Fuse 6 is no longer supported
As of February 2025, Red Hat Fuse 6 is no longer supported. If you are using Fuse 6, please upgrade to Red Hat build of Apache Camel.此内容没有您所选择的语言版本。
7.2. Set-up a Directory Server and Browser
Overview
复制链接链接已复制到粘贴板!
In this stage of the tutorial you will install an X.500 directory server and browser client from the Apache Directory project. These applications will be used throughout the rest of this tutorial.
Procedure
复制链接链接已复制到粘贴板!
To set-up the directory server and browser:
- Download Apache Directory Server from http://directory.apache.org/apacheds/1.5/downloads.html.
- Run the downloaded installer.ImportantDuring the installation process, you will be asked whether or not to install a default instance of the directory server. Choose the default instance.
- Start the directory service as described in the section called “Starting Apache Directory Server”.
- Install Apache Directory Studio as described in the section called “Install Apache Directory Studio”.
- Start Apache Directory Studio.
- If you installed the standalone version of Apache Directory Studio, double-click the relevant icon to launch the application.
- If you installed Apache Directory Studio into an existing Eclipse IDE:
- Start Eclipse.
- Select
. - In the Open Perspective dialog, select LDAP.
- Click .
- Connect the browser to the server as described in the section called “Connecting the browser to the server”.
Starting Apache Directory Server
复制链接链接已复制到粘贴板!
If you install Apache Directory Server on Windows, the default instance of the directory server is configured as a Windows service. Hence, you can stop and start the directory server using the standard Services administrative tool.
If you install on a Linux or Mac OS platform, follow the instructions in Installing and Starting the Server for starting and stopping the directory server.
Install Apache Directory Studio
复制链接链接已复制到粘贴板!
The Apache Directory Studio is an Eclipse-based suite of tools for administering an X.500 directory server. In particular, for this tutorial, you need the LDAP Browser feature, which enables you to create new entries in the Directory Information Tree (DIT).
There are two alternative ways of installing Apache Directory Studio:
- Standalone application—download the standalone distribution from the Directory Studio downloads page and follow the installation instructions from the Apache Directory Studio User Guide.
- Eclipse plug-in—if you already use Eclipse as your development environment, you can install Apache Directory Studio as a set of Eclipse plug-ins. The only piece of Apache Directory Studio that you need for this tutorial is the LDAP Browser plug-in.To install the LDAP Browser as an Eclipse plug-in, follow the install instructions from the LDAP Browser Plug-In User Guide.
Connecting the browser to the server
复制链接链接已复制到粘贴板!
To connect the LDAP browser to the LDAP server:
- Right-click inside the Connections view.
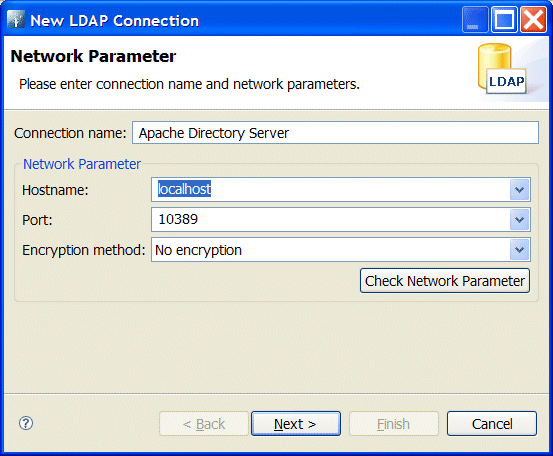
- Select .The New LDAP Connection wizard opens.
- In the Connection name field, enter
Apache Directory Server. - In the Hostname field enter
localhost. - In the Port field, enter
10389.Figure 7.1. New LDAP Connection Wizard
- Click Next.
- In the Bind DN or user field, enter
uid=admin,ou=system). - In the Bind password field, enter
secret).Figure 7.2. Authentication Step of New LDAP Connection
- Click Finish.
If the connection is successfully established, you should see an outline of the Directory Information Tree (DIT) in the LDAP Browser view.

