第 4 章 运行路由
本教程介绍了运行路由的过程,以验证路由是否正确将信息从源端点传输到 sink 端点。
目标
在本教程中,您将完成以下任务:
- 将路由作为本地 Camel 上下文运行(没有测试,因为还没有设置测试)
- 通过路由发送消息
- 检查 sink 端点收到的消息,以确保路由正确处理测试信息
先决条件
要启动此教程,您需要 ZooOrderApp 项目:
- 完成 第 2 章 设置您的环境 教程。
下面是其中之一:
完成 第 3 章 定义路由 教程。
或
-
将项目的
blueprint.xml文件替换为提供的blueprintContexts/blueprint1.xml文件,如 “关于资源文件”一节 所述。
运行路由
运行路由:
-
打开
ZooOrderApp项目。 在 Project Explorer 中,选择
ZooOrderApp/Camel Contexts/blueprint.xml: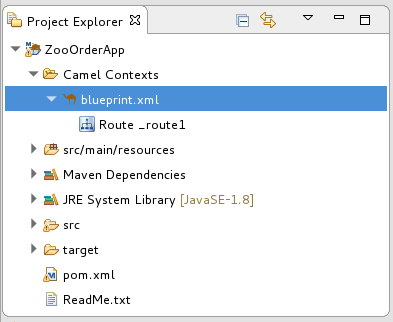
右键单击
blueprint.xml,然后选择 Run AsLocal Camel Context (不带测试)。 注意如果您选择 Local Camel Context,工具会自动尝试针对提供的 JUnit 测试运行路由上下文。由于 JUnit 测试不存在,因此工具将恢复到在没有测试的情况下运行路由上下文。在 第 9 章 使用 JUnit 测试路由 教程中,您可以创建一个 JUnit 测试案例来测试 ZooOrderApp 项目。
Console 面板将打开,以显示反映项目执行进度的日志消息。开始时,Maven 下载更新本地 Maven 存储库所需的资源。Maven 下载过程可能需要几分钟时间。
等待消息(类似于以下内容)显示在输出的末尾。这些消息表示路由成功执行:
... [Blueprint Event Dispatcher: 1] BlueprintCamelContext INFO Route: _route1 started and consuming from:Endpoint[file://src/data?noop=true] [Blueprint Event Dispatcher: 1] BlueprintCamelContext INFO Total 1 routes, of which 1 are started. [Blueprint Event Dispatcher: 1]BlueprintCamelContext INFO Apache Camel 2.21.0.redhat-3 (CamelContext: ...) started in 0.163 seconds [Blueprint Event Dispatcher: 1] BlueprintCamelContext INFO Apache Camel 2.21.0.redhat-3 (CamelContext: ...) started in 0.918 seconds-
要关闭路由,请点击位于 Console 视图顶部的
 。
。
验证路由
要验证路由是否已正确执行,请检查消息 XML 文件是否从源文件夹(src/data)复制到目标文件夹(target/messages/received)。
-
在 Project Explorer 中,选择
ZooOrderApp。 - 右键单击,然后选择 Refresh。
在 Project Explorer 中,找到
target/messages/文件夹,并将它展开,以验证target/messages/received文件夹是否包含六个消息文件,message1.xml到message6.xml: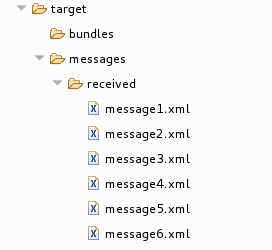
双击
message1.xml在路由编辑器的 Design 选项卡中打开它,然后选择 Source 选项卡来查看 XML 代码:<?xml version="1.0" encoding="UTF-8"?> <order> <customer> <name>Bronx Zoo</name> <city>Bronx NY</city> <country>USA</country> </customer> <orderline> <animal>wombat</animal> <quantity>12</quantity> </orderline> </order>
后续步骤
在 第 5 章 添加基于内容的路由器 教程中,您添加基于内容的路由,该路由器使用消息的内容来确定其目的地。