此内容没有您所选择的语言版本。
1.3. Creating a project
To create a project, do the following:
- Open the Project Authoring perspective: on the main menu, click
. - In the Project Explorer, select the organizational unit and the repository where you want to create the project.
- In the perspective menu, go to
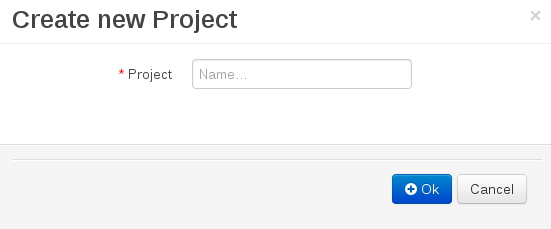
. - In the Create new Project dialog window, define the project details:
- In the Project text box, enter the project name.
- The explorer refreshes to show a New Project Wizard pop-up window.

- Define the Project General Settings and Group artifact version details for this new project. These parameters are stored inside the
pom.xmlMaven configuration file.- Project Name: The name for the project; for example
MortgageProject - Project Description: The description of the project which may be useful for the project documentation purpose.
- Group ID: group ID of the project; for example
org.mycompany.commons - Artifact ID: artifact ID unique in the group; for example
myframework. Avoid using a space or any special character that might lead to an invalid name. - Version ID: version of the project; for example
2.1.1
The Project Screen view is updated with the new project details as defined in the pom.xml file. Note, that you can switch between project descriptor files in the drop down-box with Project Settings and Knowledge Base Setting, and edit their contents.