此内容没有您所选择的语言版本。
Chapter 1. Setting Up and Managing a Repository for Your Projects
1.1. Using Git with Red Hat JBoss Developer Studio
The IDE includes the Git Perspective to allow developers to create, add, and manage their Git repositories quickly and easily with a graphical interface. This article introduces the basic workflow of a Git project and how to accomplish the most common Git-related tasks via the Git perspective. Common Git-based tasks include:
1.1.1. Setting Up the Git Perspective
Use the following instructions to locate the Git Perspective in the IDE:
-
In the menu bar at the top of the page, click
. -
From the list of available perspectives, select
Gitand clickOK.
Result: The Git Repositories view appears on the upper left side of the window.
1.1.2. Setting up a Repository in the Git Perspective
The first step to using the Git Perspective in the IDE is to set up a Git repository. There are three ways to set up a Git repository in the Git Perspective:
The most common use case for developers is to clone an existing repository, or import an existing local clone of a repository into the IDE. However, the first option is an easy way to create a full repository (bare or normal) from scratch.
1.1.3. Creating a New Git Repository
If a repository is not already created and available, use the following steps to create a new repository:
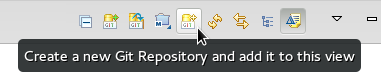
Click the
Create a new Git Repository and add it to this viewbutton.Figure 1.1. Click the Create a New Git Repository Button
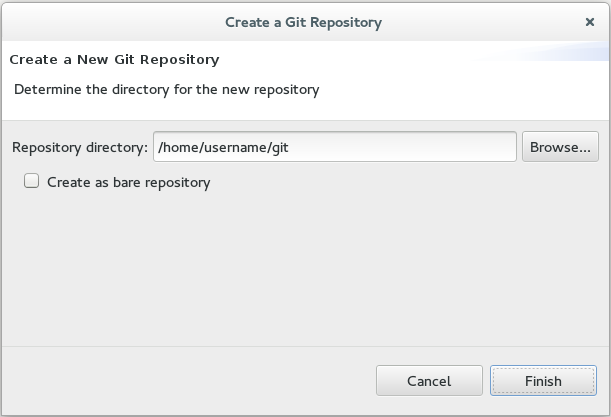
In the dialog box:
-
Ensure that the automatically populated default value for the
Repository Directoryfield is correct. Optionally, if required, check the
Create a bare repositoryto create a new bare repository. For details about bare repositories and how they differ from a normal repository, see the Did You Know? section.Figure 1.2. Create a New Git Repository
Result: A new git repository is created on your local machine and is listed in the
Git Repositoriesview.
-
Ensure that the automatically populated default value for the
1.1.4. Cloning an Existing Git Repository
If your repository already exists online (for example, in GitHub), use the following steps to create a local clone:
- Ensure that you have forked the repository online. This option is available in the repository host’s website.
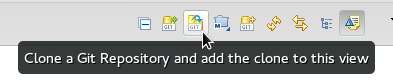
Click the
Clone a Git Repository and add the clone to this viewbutton.Figure 1.3. Click the Clone a Git Repository Button
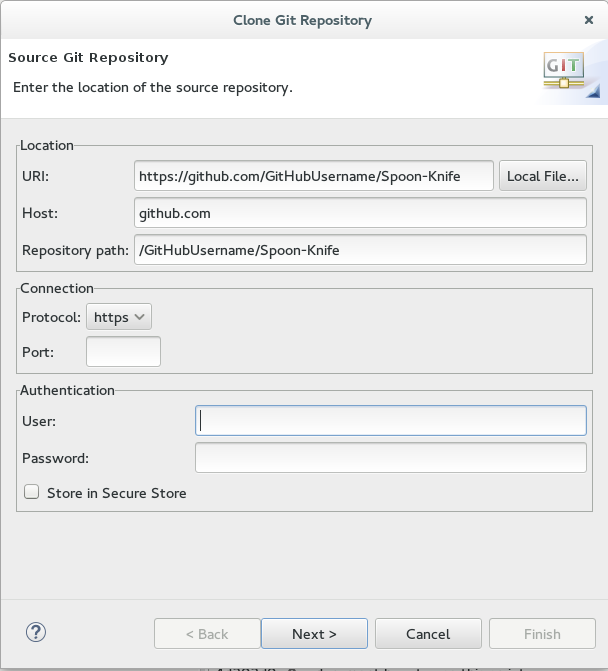
Enter the details of the source repository as follows:
-
Add the
URIfor the repository’s online source. This automatically populates theHostandRepository Pathfields. -
Add your username and password for the source repository under the
Authenticationdetails. Click
Nextto continue.Figure 1.4. Enter the Source Repository Details
-
Add the
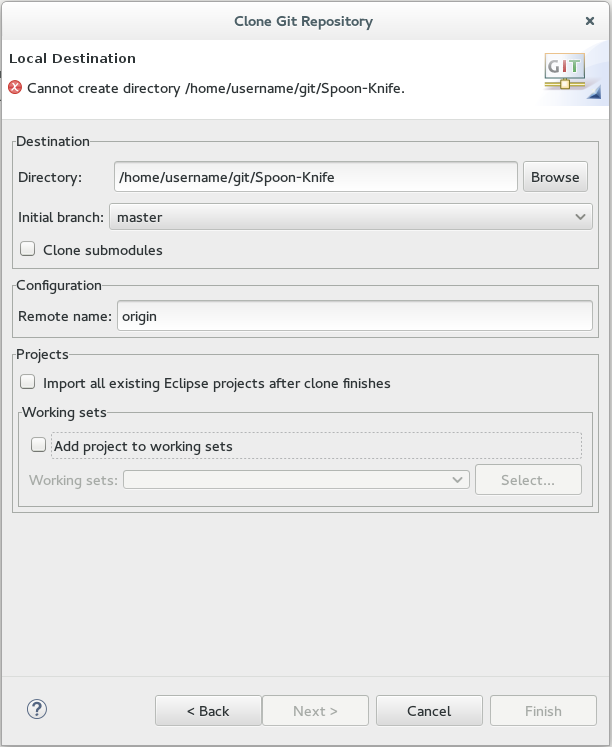
Customize the local version of your Git repository as follows:
-
Confirm that the automatically populated information for the destination
DirectoryandInitial Branchare correctly populated. -
Optionally, set a non-default name for the
Remote namefield. Optionally, select the
Add project to working setsoption and use the drop down menu and theSelectbutton to select the appropriate working sets for this repository.Figure 1.5. Customize the Local Version of the Git Repository
-
Click
Finishto conclude cloning an existing Git repository.
-
Confirm that the automatically populated information for the destination
Result: The new cloned repository is listed in the Git Repositories view.
1.1.5. Adding an Existing Local Git Repository
If you have already cloned a Git repository locally, the following instructions are necessary to add your Git repository to the IDE. If you have not yet cloned your repository, follow the instructions in the prerequisites section below:
1.1.5.1. Prerequisites
- Ensure that you have forked the repository online.
In the command line on your local system, navigate to the location where you want to store the local copy of the repository and enter the following command to clone the repository:
git clone ${repo_URL}$ git clone ${repo_URL}Copy to Clipboard Copied! Toggle word wrap Toggle overflow
1.1.6. Adding an Existing Git Repository
Use the following instructions to add your existing local Git Repository to JBoss Developer Studio’s Git Perspective:
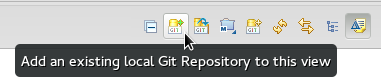
Click the
Add an existing local Git Repository to this viewbutton.Figure 1.6. Click the Add an Existing Local Git Repository Button
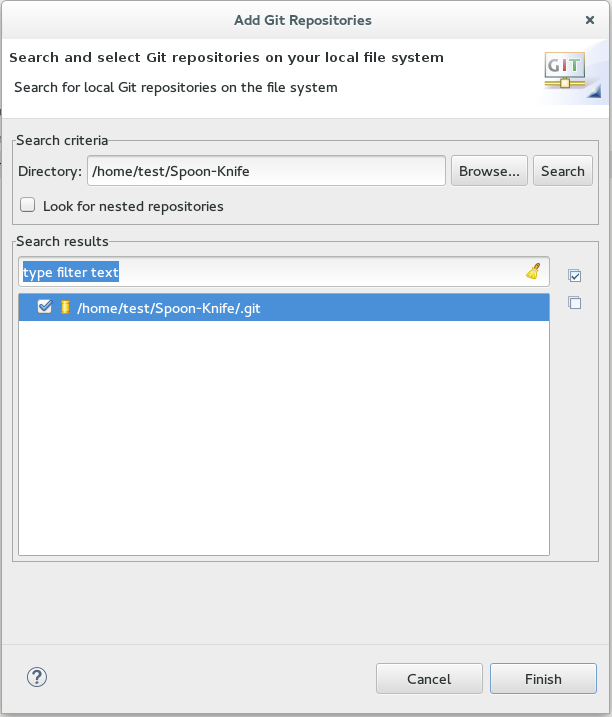
Select the local Git Repository as follows:
-
Click
Browseto navigate to the local directory that contains the Git repository. -
Optionally, select the
Look for nested repositoriescheckbox to search for nested repositories. In the
Search resultsbox, ensure that the appropriate .git file is selected.Figure 1.7. Find and Add Local Repository
-
Click
Finish.
-
Click
Result: The local repository now appears in the Git Repositories view.
1.1.7. Adding a Remote for the Repository
After setting up your repository for the first time, set up a remote for repository. This is a one-time set up step for newly created or added repository.
-
In the
Git Repositoriesview, expand the target repository. -
From the expanded options, right-click
Remotesand thenCreate Remotes. In the
New Remotedialog box:-
Add a name in the
Remote namefield. -
Ensure that the
Configure Pushradio button is selected. -
Click
OKto continue.
-
Add a name in the
In the
Configure Pushdialog box:-
Click
Changeto view theSelect a URIdialog box. -
Add the URI to your repository in the
URIfield. This automatically populates theHostandRepository pathfields. -
Add your repository username and password in the
Authenticationsection of the dialog box and clickFinishto continue.
-
Click
-
Click
Saveto save your push configuration settings.
Result: Expand the Remotes folder in the repository view to see the newly added remote.
1.1.8. Creating and Working With a New Branch
This section provides instructions for creating a new branch and common tasks with the new branch, such as:
1.1.9. Creating a New Branch
If your repository is already set up in the IDE, create a new branch to make changes to the files.
In the
Git Repositoriesview:- Expand the name of your Git Repository.
-
Click
Branchesto expand the branch view. -
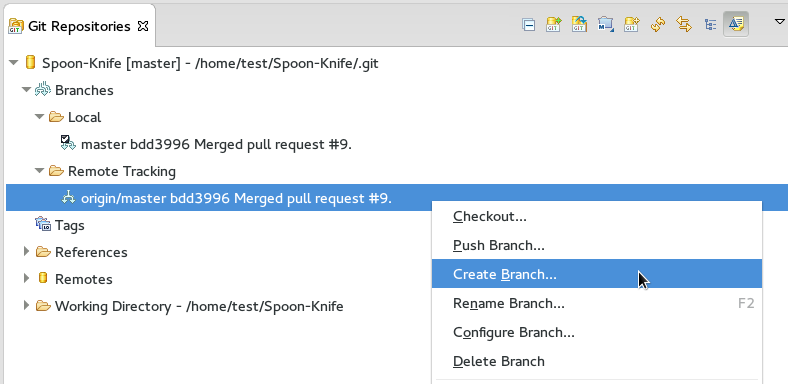
Click
Remote Trackingto view all remote branches for the repository. A branch displays with a name that begins with origin/master. Right-click this branch and select
Create Branchfrom the displayed options.Figure 1.8. Create a Branch from Origin/Master
Add the required details about the new branch:
-
Add the desired new branch name in the
Branch namefield. -
Ensure that the
Configure upstream for push and pullcheckbox is selected. -
In the
When doing a pulloptions, select the option that suits your requirement. TheMerge upstream commits into local branchoption creates commits when a merge occurs. These commits are included in the subsequent pull request. TheRebase commits of a local branch onto upstreamoption performs a rebase before adding your changes, which prevents additional commits in your pull request. Ensure that the
Checkout new branchcheck box is selected.Figure 1.9. Add Details for a New Branch
-
Click
Finishto create the new branch.
-
Add the desired new branch name in the

Result: The new branch appears under
1.1.10. Working in the New Branch
After creating a new branch, you can implement changes in the new branch as follows:
-
Expand
and find the new branch where changes are to be implemented. Confirm that the target branch is checked out. The currently checked-out branch displays a small black check mark:
Figure 1.10. An Example of a Checked-out Branch
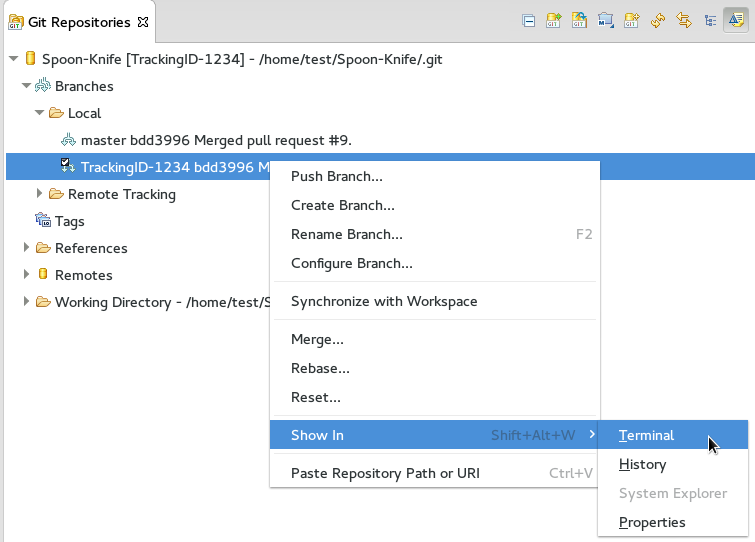
Right-click on the checked-out branch name and mouse-over the
Show Inoption in the menu and then clickTerminalin the submenu.Figure 1.11. The Show Branch in Terminal Option
On the right view, a
Terminaltab appears. In the same row, click the icon that resembles a computer monitor to view the command line prompt in this view.Figure 1.12. The Open a Terminal Button
In the
Launch Terminaldialog box:-
Ensure that Local Terminal is selected in the
Choose a Terminaldrop-down box. -
Select Default (ISO-8859-1) in the
Encodingbox. -
Click
OK. Note that as a default, the terminal window is at the /home/YourCurrentUser/ directory.
-
Ensure that Local Terminal is selected in the


Result: The Terminal tab now displays a command line terminal. Use the terminal view to make the required changes to your checked-out files.
1.1.11. Updating the Branch Before Implementing Changes
When working locally on a branch, it is better to ensure the local branch is up to date before creating a pull request (PR). As an example, if someone else has checked out the same repository and created a new branch, made changes, and merged the changes, use the following procedure to update your repository and branch before committing your own changes.
In the example below, a new branch called TrackingID-1234 is created using the IDE. Assuming that someone else is working on the same repository and has created a new branch called NEWBRANCH, made changes to it, and then merged the changes back into the repository. The local branch (TrackingID-1234) is now out of date because it does not include the changes from NEWBRANCH. Use the following instructions to update the branch:
- Right-click the name of the repository to update.
-
From the menu that displays, click
Pull. - A status menu appears that displays the progress of the pull request.
-
When the pull completes, a
Pull Result for Repository_Namemenu appears that lists the results of the fetch and update operations. -
Click
OKto conclude the operation.
Result: The repository now contains the most updated version of the contents.
1.1.12. Commiting and Merging Changes
After all required changes are complete, commit the changes and then create a Pull Request. Pull Requests are then evaluated by the repository owner and either merged into the repository or rejected.
-
Ensure that the black and white tick mark that indicates the current branch appears at the correct working branch in the
Localfolder of your repository view. -
Right-click the name of the repository. In the displayed menu, click the
Commitoption. In the
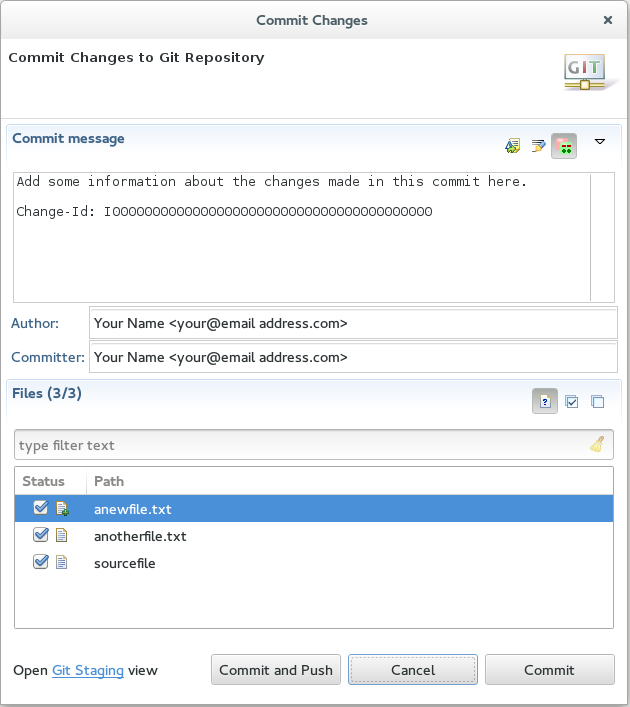
Commit Changesdialog box:-
Add a commit message describing the changes in the
Commit messagetext box. -
Confirm that the automatically populated
AuthorandCommitterfields contain the correct name and email address. In the
Filesarea, all files added using the git add command display in the box. Select the checkbox next to each file to include it in the commit. See the Did You Know? section to learn about only including some of the changed files in a commit.Figure 1.13. Add details to the Commit Changes Dialog Box
-
Click
Committo create a new commit (without creating a Pull Request) or clickCommit and Pushto commit the changes and create a Pull Request at the same time.
-
Add a commit message describing the changes in the
1.1.13. Committing Without Pushing the Changes
If you selected Commit in the previous procedure to commit changes but not push them, use the following instructions:
When the operation completes, the repository is now ahead by one commit. This is represented with an arrow and the number one:
Figure 1.14. Git Repository Status
-
When you are ready to create a Pull Request, right click the current branch name and click
Push Branch. -
An automatically populated
Push Branch Branch_Namedialog box appears. Confirm that the settings are correct. The settings selected when creating this branch are used for this step. ClickNextto continue. - A dialog box appears requesting the repository access username and password.
-
A
Push Confirmationdialog box appears. ClickFinishto create the Pull Request. If requested, supply the username and password for the repository once again. -
When the operation completes, a
Push summarydialog box appears. ClickOKto dismiss this dialog box.

Result: The included changes are now committed and a Pull Request is generated for the repository owner to review.
1.1.14. Committing and Pushing the Changes
If you selected Commit and Push in the previous procedure, use the following instructions:
- A dialog box appears requesting the repository access username and password.
When the operation completes, the repository is now ahead by one commit. This is represented with an arrow and the number one:
Figure 1.15. Git Repository Status
-
After the Pull Request is evaluated and merged, right-click the repository and click
Pullto manually update the repository.
Result: A Pull Request is generating and ready for the repository owner to review.
1.1.15. Did You Know?
-
Bare repositories are recommended for central repositories, but not for development environments. Bare repositories differ from normal repositories because they do not contain a working or checked out copy of any source files. This prevents editing files and committing changes in the repository. Additionally, they store the git revision history for your repository in the repository’s root folder instead of in a
.gitsub-folder. -
When selecting the files to commit in the
Commit Changes, you can select only the files you want included in the commit using the checkboxes next to each file name. The unchecked files are not included in the commit and no extra actions are required to reconcile the uncommitted files when committing and creating a Pull Request. -
If you need to add a change ID to each commit message, in the
Comming Changesdialog box, click the rightmost icon at the top right corner to add a change ID to the commit message.
1.2. Configuring Maven Basics
In the context of application development, Maven provides a standardized build system for projects. One of the main benefits of using Maven with your project is that it facilitates fetching dependencies from one or more repositories. This article serves as an introduction to using Maven with the IDE and contains instructions for the following tasks:
Root Maven projects can serve as aggregators for multiple Maven modules, also known as sub-projects. For each module that is part of a maven project, a <module> entry is added to the project’s pom.xml file. A pom.xml that contains <module> entries is often referred to as an aggregator pom.
When modules are included into a project it is possible to execute Maven goals across all of the modules by a single command issued from the parent project directory.
Note that the provided instructions pertain to the creation of a parent+module project structure. If you prefer to create just a simple project, simply start with an archetype or don’t use the pom packaging in step 2.a.
1.2.1. Creating a New Maven Project
Use the following instructions to create the parent project of a multi-module Maven project. The instructions provided ensure that the packaging option is set to pom, which is a requirement for multi-module Maven projects. Alternately, to create a standalone Maven project instead, set the packaging option to an option other than pom.
Create a new project:
-
In the workspace, navigate to
. -
Type
mavenin theFilterfield and selectMaven Project. -
Click
Nextto continue.
-
In the workspace, navigate to
Enter the initial project details:
-
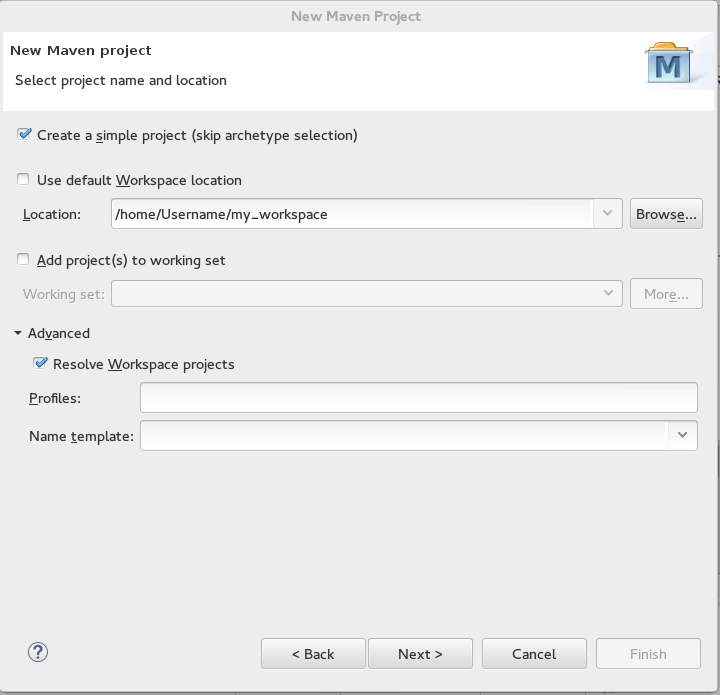
Check the
Create a simple project (skip archetype selection)check box. If this check box is selected, theSelect an Archetypestep of the wizard is skipped and the project type is set to pom, which is required to create a Maven Module based on this Maven project. Alternately, to create a standalone project, uncheck theCreate a simple project (skip archetype selection)check box and follow the instructions in the wizard. -
Ensure that the
Use default Workspace locationcheck box is not checked and specify a non-default location for your workspace files using theBrowsebutton. Using a non-default workspace location is recommended because this allows other tools to access the workspace location easily. The following optional steps are available for further configuration, if required:
-
(Optional) Check the
Add project(s) to working setcheck box to add the newly created projects to a working set. (Optional) Click
Advancedto view additional optional advanced configuration for the new Maven project, such as:-
Resolve Workspace projects: dependencies opened as workspace projects will be resolved without having to install them to your local Maven repository first. This way, any changes made to one of these dependencies will have an immediate effect on other projects consuming it (compilation, refactoring, etc.). WhenResolve Workspace projectsis disabled, dependencies existing in the workspace must be installed to your local Maven repository after any change (by runningmvn install), in order to see effects in projects consuming them. -
Profiles: select a set of Maven profiles to activate or deactivate in the workspace. Profiles are defined in the projectpom.xml, or inherited from a parentpom.xml, or defined in the relevantsettings.xml. Name templates: allows you to disambiguate projects names in the workspace by prepending or appending the group ID or SCM branch names to the default artifact ID.Figure 1.16. Create a New Maven Project
-
-
(Optional) Check the
-
When the configuration is complete, click
Nextto continue.
-
Check the
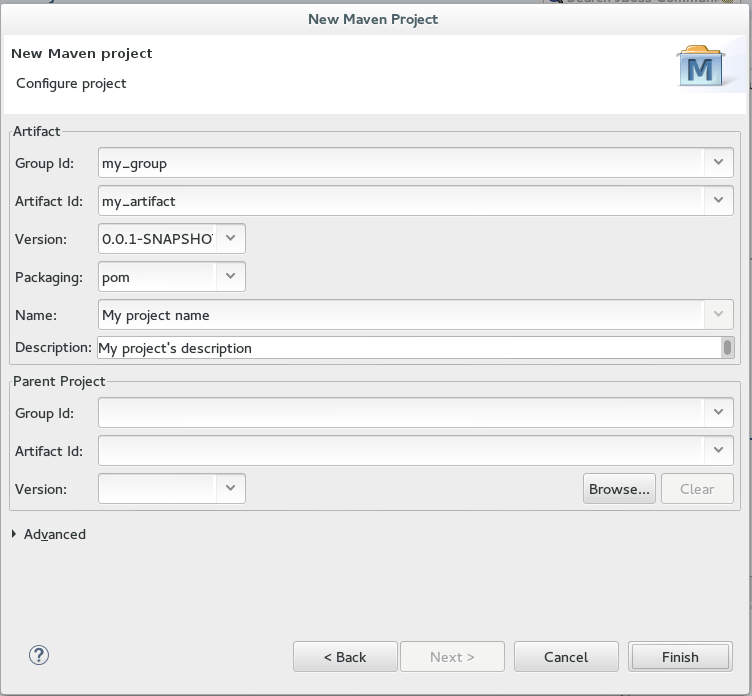
Configure the project details:
-
Enter the desired group ID, which is similar to an organization namespace (for example, com.company.businessunit.project), in the
Group Idfield. -
Enter the desired artifact ID value, which is the name for your project, in the
Artifact Idfield. This value must not include any spaces and the only special characters allowed are periods ('.'), underscores ('_'), and dashes ('-'). -
Set the
Versionfield’s value to0.0.1-SNAPSHOTor a similar value. For details about the appropriate version build numbers, see Project Versions -
Set the value of the
Packagingfield topom. -
(Optional) Add a name for your project in the
Namefield. (Optional) Add a description for your project in the
Descriptionfield.Figure 1.17. Configure Project Details
-
Click
Finishto conclude the new Maven project creation wizard.
-
Enter the desired group ID, which is similar to an organization namespace (for example, com.company.businessunit.project), in the
Result: Your new Maven project is created and appears in the Project Explorer view.
1.2.2. Creating a New Maven Module
Each Maven project with a packaging pom can include multiple Maven modules. Follow the instructions to create your first Maven module:
1.2.2.1. Prerequisites
- You must have an existing Maven project available with the packaging type pom. See Create a New Maven Project for instructions to create a new Maven project.
1.2.2.2. Creating a New Maven Module
Create a new Maven module as follows:
-
In the Project Explorer view, right-click the recently created pom project and select
. -
From the wizard selection screen, expand
Mavenand selectMaven Module. -
Click
Next >to continue.
-
In the Project Explorer view, right-click the recently created pom project and select
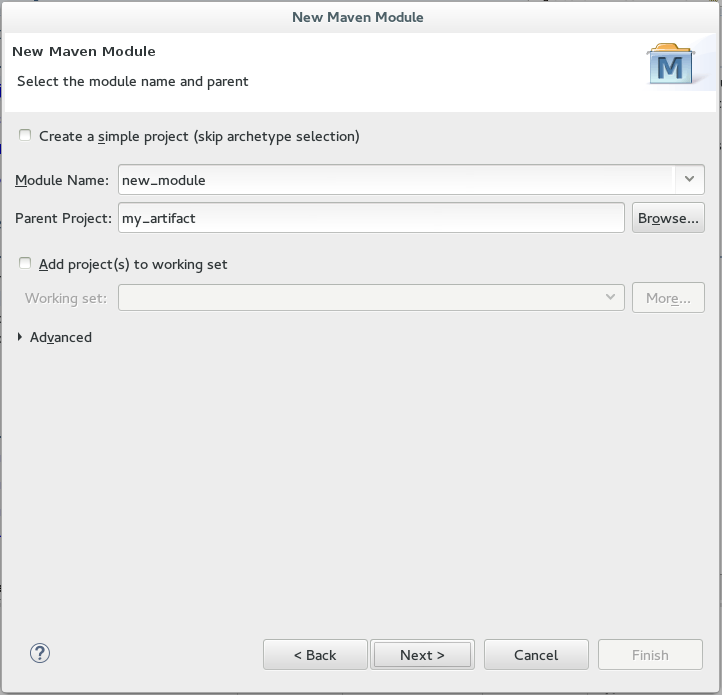
Enter the initial module details:
-
Ensure that the
Create a simple project (skip archetype selection)check box is not checked. If this check box is selected, theSelect an Archetypestep of the wizard is skipped. -
Enter the desired module name in the
Module Namefield. This value corresponds to the Maven project’s Project ID. -
Use the
Browsebutton to locate the desired parent project and select it. The following optional steps are available for further configuration, if required:
-
(Optional) Check the
Add project(s) to working setcheck box to add the newly created projects to a working set. (Optional) Click
Advancedto view additional optional advanced configuration for the new Maven project, such as:-
Resolve Workspace projects: dependencies opened as workspace projects will be resolved without having to install them to your local Maven repository first. This way, any changes made to one of these dependencies will have an immediate effect on other projects consuming it (compilation, refactoring, etc.). WhenResolve Workspace projectsis disabled, dependencies existing in the workspace must be installed to your local Maven repository after any change (by runningmvn install), in order to see effects in projects consuming them. -
Profiles: select a set of Maven profiles to activate or deactivate in the workspace. Profiles are defined in the projectpom.xml, or inherited from a parentpom.xml, or defined in the relevantsettings.xml. Name templates: allows you to disambiguate projects names in the workspace by prepending or appending the group ID or SCM branch names to the default artifact ID.Figure 1.18. Set the Module Name and Parent
-
-
(Optional) Check the
-
When the configuration is complete, click
Nextto continue.
-
Ensure that the
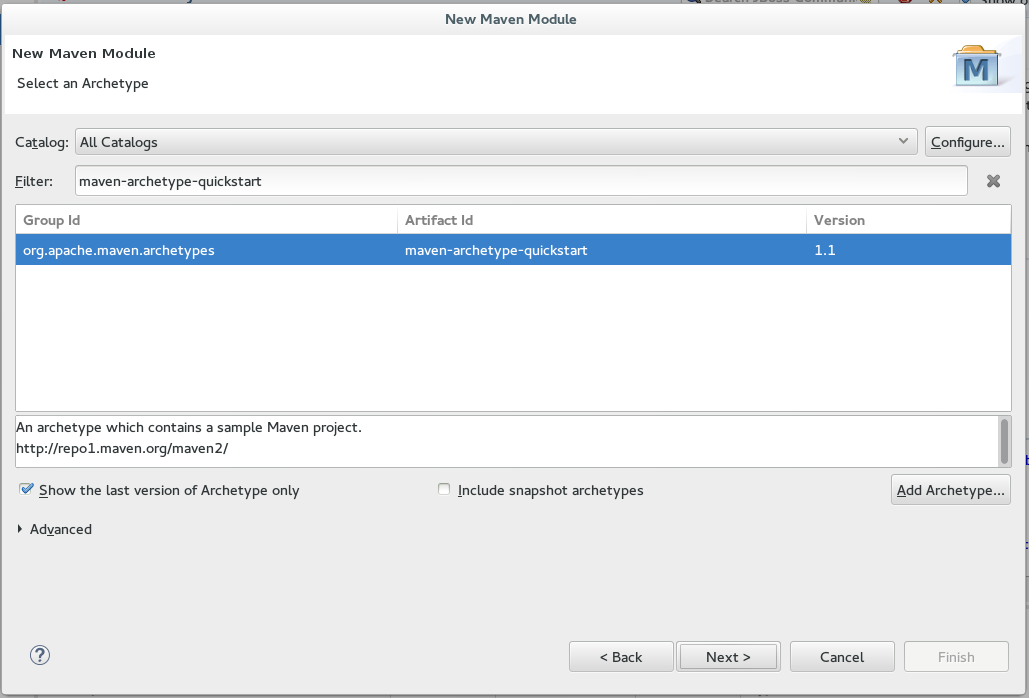
Enter the module archetype information:
-
Ensure that the
Show the last version of Archetype onlycheck box is checked. This ensures that only the latest version of each archetype displays. Select an archetype based on the purpose of the project you are creating. Use the keyword maven-archetype-quickstart in the
Filterfield to locate a sample Maven project archetype.Figure 1.19. Select a Module Archetype
- Click Next to continue.
-
Ensure that the
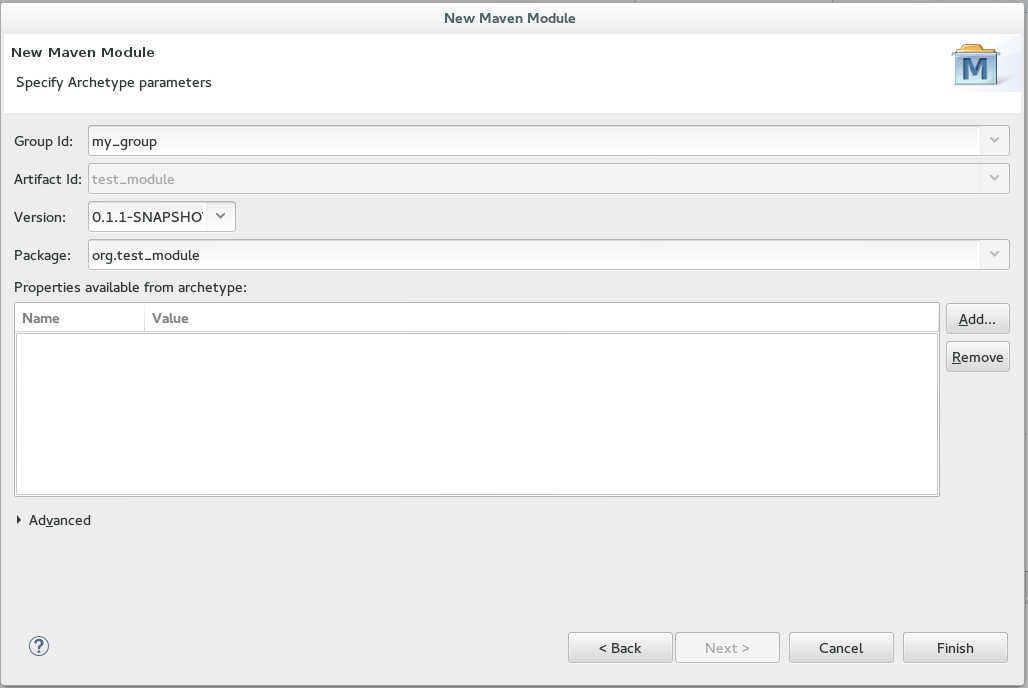
Enter the module details:
-
Add the same group ID value that was used for the Maven project to the
Group Idfield. -
Add the desired version number in the
Versionfield. For details about the appropriate version build numbers, see Project Versions The
Artefact IdandPackagefields are automatically populated based on the parent project details.Figure 1.20. Configure the Module Archetype Parameters
-
Click
Finishto conclude setting up the Maven module.
-
Add the same group ID value that was used for the Maven project to the
(Optional) To change the settings for the created Maven module, expand the module name in the
Project Explorerview and double clickpom.xmlfrom the expanded list. AnOverviewtab appears and all settings can be changed from this tab.Figure 1.21. Change the Module Settings from the Overview View
Result: Your new Maven module is created and appears in the
Project Explorerview. Additionally, a hierarchical view of the nested projects is now available in the Project Explorer view as well (see Nested/Hierarchical view of projects).

The previous tasks contain instructions to create a new Maven project and Maven module. However, for an existing application that was not created with Maven support, use the following instructions to add Maven support to the non-Maven project:
-
Right-click the project name in the
Project Explorerview. -
From the displayed options, click
Configure. -
From the displayed sub-menu, click
Convert to Maven Project. Configure details for the new pom file:
- The basic fields for the new pom file are prepopulated based on the project details. If required, edit the existing values.
-
(Optional) Add a name for the new project in the
Namefield. (Optional) Add a brief description for the project in the
Descriptionfield.Figure 1.22. Create a New Pom Descriptor
-
Click
Finishto finalize the pom information.
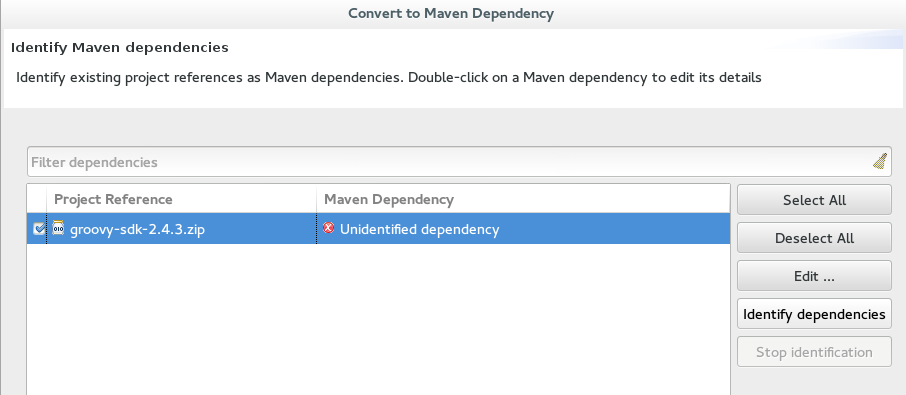
- If the project references java dependencies, a wizard appears displaying all these dependencies and a green check mark when each dependency is identified. Learn more about dependency identification in the Did You Know section.
Check the
Delete original references from projectcheck box to avoid retaining duplicate or stale dependencies in your project.Figure 1.23. Identify Maven Dependencies
-
Click
Finishwhen all dependencies are converted.


Result: The existing project is now configured for Maven support.
1.2.4. Did You Know?
The wizard used to convert a non-Maven project to a Maven project attempts to identify all the project’s classpath entries and their equivalent Maven dependencies. From the list of identified dependencies, users can select which ones will be added to the generated Maven pom.xml file. When identifying dependencies, one of several strategies may be used:
- Checking if the jar contains the relevant maven metadata.
- Identify the dependency using the Nexus indexer.
- Identify the dependency using the JBoss Nexus instance REST API (if we are online) via a SHA1 search.
-
Identify the dependency using the
search.maven.orgREST API (if we are online) via a SHA1 search.
-
All unchecked dependencies will be ignored and are not added to the generated
pom.xml. However, some of these can be added as transitive dependencies to your project. For instance, if you addjsp-apibut removeservlet-api, the latter appears in the project classpath, as it is a dependency ofjsp-api. -
You can double-click on a dependency from a list (or click the
Editbutton) to edit its Maven coordinates or scope. Selecting several dependencies (ctrl+click) and clicking theEditbutton allows batch editing of their scope.
1.2.5. Troubleshooting
Error Message:
Unidentifiable Dependencyin theMaven Dependencycolumn.Figure 1.24. Unidentifiable Dependency
Issue: Either:
- the jar file is corrupted/invalid.
- the jar file is valid but does not contain any metadata used for identification.
Resolution:
-
Make sure that jar exists as a Maven artifact. If needed, you can install it to your local repository and then Click on the
Identify dependenciesbutton. -
Double click on the dependency, or click on the
Edit…button and set the expected maven coordinates.
-
Make sure that jar exists as a Maven artifact. If needed, you can install it to your local repository and then Click on the
Error Message: Some selected dependencies can not be resolved. Click here to configure repositories in your settings.xml.
Figure 1.25. Dependencies Can Not Be Resolved Error
- Issue:: This error displays when a dependency can be identified (that is, whether it contains the pom properties or other metadata) but the dependency is not available in any repository defined in your settings.xml.
-
Resolution: Click the
herelink in the error message and compare the old and new settings for the dependency and add a new and correct repository. Users may choose to use one of the predefined repositories from Red Hat.