此内容没有您所选择的语言版本。
Chapter 11. Configure MTU Settings
11.1. MTU overview
OpenStack Networking has the ability to calculate the largest possible MTU size that can safely be applied to instances. The MTU value specifies the maximum amount of data a single network packet is able to transfer; this number is variable depending on the most appropriate size for the application. For example, NFS shares might require a different MTU size to that of a VoIP application.
OpenStack Networking is able to calculate the largest possible MTU value, which can then be viewed using the neutron net-show command. net-mtu is a neutron API extension, so it may be not present in some implementations. The required MTU value can be advertised to DHCPv4 clients for automatic configuration, if supported by the instance, as well as to IPv6 clients through Router Advertisement (RA) packets. Note that for Router Advertisements to be sent, the network should be attached to a router.
MTU settings need to be set consistently from end-to-end in order to work properly. This means that the MTU setting needs to be the same size at every point the packet passes through, including the VM itself, the virtual network infrastructure, the physical network, and the destination server itself.
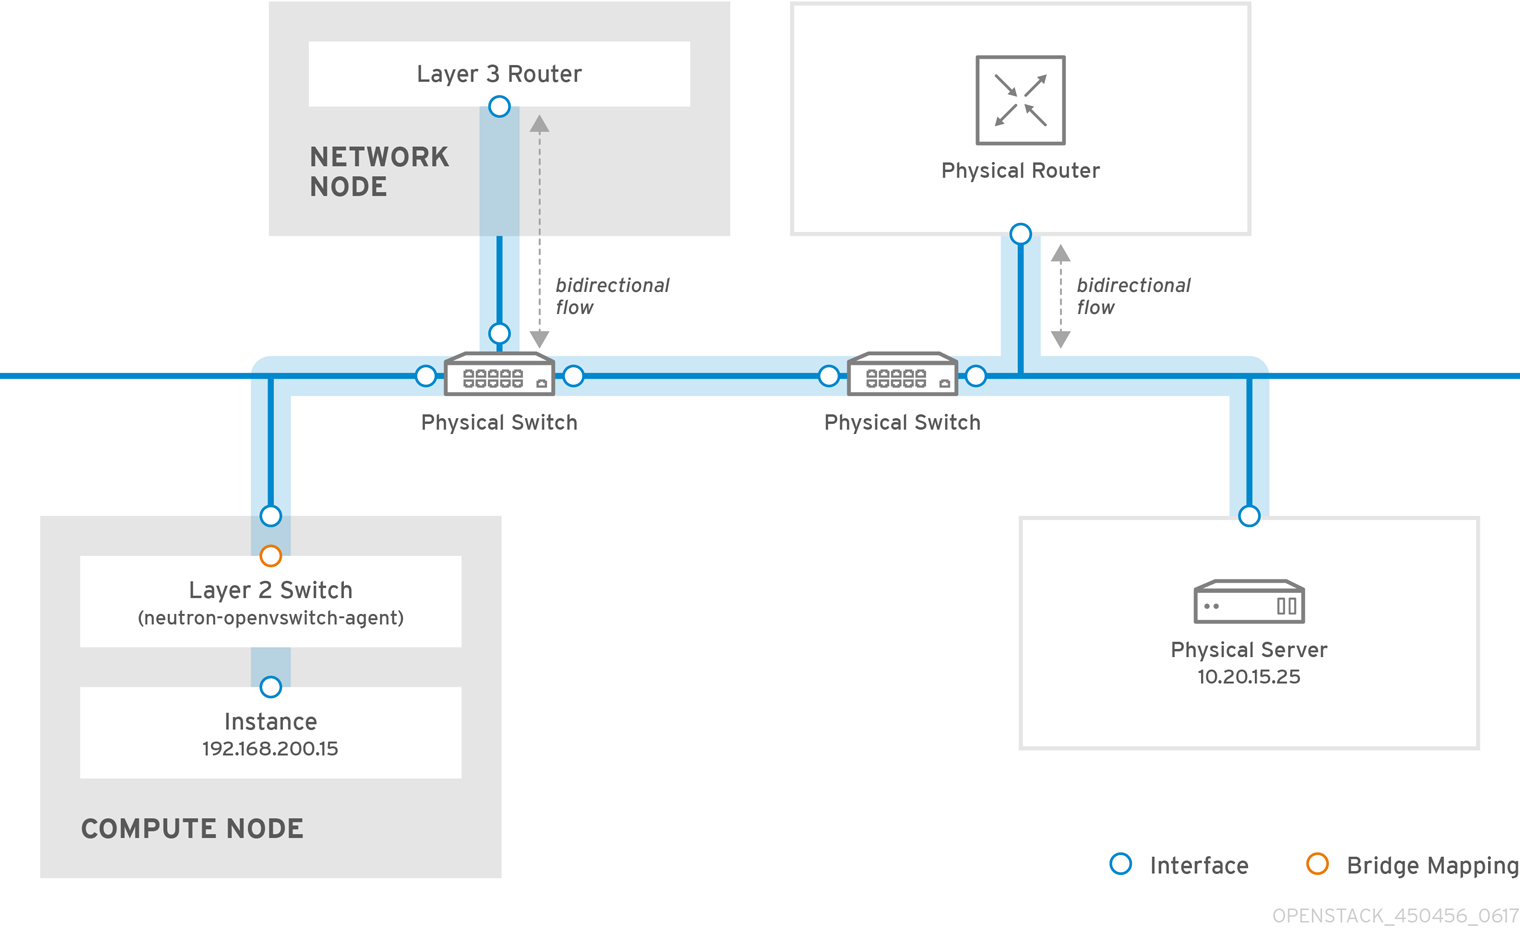
For example, the circles in the following diagram indicate the various points where an MTU value would need to be adjusted for traffic between an instance and a physical server. Every interface that handles network traffic will need to have its MTU value changed to accommodate packets of a particular MTU size. This will be required if traffic is expected to travel from the instance 192.168.200.15 through to the physical server 10.20.15.25:
Inconsistent MTU values can result in several network issues, the most common being random packet loss that results in connection drops and slow network performance. Such issues are problematic to troubleshoot, since every possible network point needs to be identified and examined to ensure it has the correct MTU value set.
11.1.1. Configure MTU advertisement
MTU advertisement eases the MTU configuration process by moving MTU settings into the realm of automated DHCP configuration and/or IPv6 RA configuration. As a result, the optimal MTU size is then advertised to instances using DHCPv4 or IPv6 RA.
MTU advertisement is enabled in /etc/neutron/neutron.conf:
advertise_mtu = True
advertise_mtu = TrueNote that this option is enabled by default in Mitaka, has been deprecated in Newton, and is likely to be removed in a future release. When set, the tenant network’s configured MTU option is advertised to instances using DHCPv4 and IPv6 RAs.
Not all DHCPv4 clients support the automatic configuration of MTU values.
11.1.2. Configure tenant networks
With Red Hat OpenStack Platform 10 director, you can use a single parameter in the network environment file to define the default MTU for all tenant networks. This will make it easier to align your configuration with the physical MTU:
-
NeutronTenantMtu- Configures the base MTU that reflects physical network capabilities. Neutron then uses this base value to calculate MTUs for networks it manages. For example, for VLAN and flat networks, the value is used as-is, but for VLXAN and GRE networks, they get lower MTUs to make room for the tunnel header overhead. If using VXLAN/GRE tunneling, then this should be equal to the MTU operating on the physical network.
11.1.3. Configure MTU Settings in Director
This example demonstrates how to set the MTU using the NIC config templates. The MTU needs to be set on the bridge, bond (if applicable), interface(s), and VLAN(s):
11.1.4. Review the resulting MTU calculation
View the calculated MTU value. This result is the calculation of the largest possible MTU value that can be used by instances. You can then proceed by configuring this value on all interfaces involved in the path of network traffic.
neutron net-show <network>
# neutron net-show <network>