此内容没有您所选择的语言版本。
Chapter 1. Image Service
This chapter discusses the steps you can follow to manage images and storage in Red Hat OpenStack Platform.
A virtual machine image is a file that contains a virtual disk which has a bootable operating system installed on it. Virtual machine images are supported in different formats. The following are the formats available on Red Hat OpenStack Platform:
-
RAW- Unstructured disk image format. -
QCOW2- Disk format supported by QEMU emulator. -
ISO- Sector-by-sector copy of the data on a disk, stored in a binary file. -
AKI- Indicates an Amazon Kernel Image. -
AMI- Indicates an Amazon Machine Image. -
ARI- Indicates an Amazon RAMDisk Image. -
VDI- Disk format supported by VirtualBox virtual machine monitor and the QEMU emulator. -
VHD- Common disk format used by virtual machine monitors from VMware, VirtualBox, and others. -
VMDK- Disk format supported by many common virtual machine monitors.
While we don’t normally think of ISO as a virtual machine image format, since ISOs contain bootable filesystems with an installed operating system, you can treat them the same as you treat other virtual machine image files.
To download the official Red Hat Enterprise Linux cloud images, you require a valid Red Hat Enterprise Linux subscription:
1.1. Image Service: New Features
With the Red Hat OpenStack Platform 8 release, the following new features are available for the Image Service:
Image conversion - Convert images by calling the task API while importing an image (only qcow/raw format conversion is available for the Kilo release).
As part of the import workflow, a plugin provides the image conversion. This plugin can be activated or deactivated based on the deployer configuration. Therefore, the deployer needs to specify the preferred format of images for the deployment.
Internally, Image service receives the bits of the image in a particular format. These bits are stored in a temporary location. The plugin is then triggered to convert the image to the target format, and moved to a final destination. When the task is finished, the temporary location is deleted. As a result, the format uploaded initially is not retained by the Image service.
NoteThe conversion can be triggered only when importing an image (the old copy-from). It does not run when uploading an image. For example:
$ glance --os-image-api-version 2 task-create --type import --input '{"import_from_format": "qcow2", "import_from": "http://127.0.0.1:8000/test.qcow2", "image_properties": {"disk_format": "qcow2", "container_format": "bare"}}'Image Introspection - Every image format comes with a set of metadata embedded inside the image itself.
For example, a stream optimized
vmdkwould contain the following parameters:$ head -20 so-disk.vmdk # Disk DescriptorFile version=1 CID=d5a0bce5 parentCID=ffffffff createType="streamOptimized" # Extent description RDONLY 209714 SPARSE "generated-stream.vmdk" # The Disk Data Base #DDB ddb.adapterType = "buslogic" ddb.geometry.cylinders = "102" ddb.geometry.heads = "64" ddb.geometry.sectors = "32" ddb.virtualHWVersion = "4"By introspecting this vmdk, you can easily know that the disk_type is streamOptimized, and the adapter_type is buslogic. By doing this metadata extraction in the Image service, the administrator does not have to care about all of these metadata unless they want to override some of them. These metadata parameters are useful for the consumer of the image. In Compute, the workflow to instantiate a streamOptimized disk is totally different than the one to instantiate a flat disk. This new feature allows metadata extraction. You can achieve image introspection by calling the task API while importing the image.
NoteFor the Kilo release, you can only introspect the virtual_size metadata parameter.
1.2. Manage Images
The OpenStack Image service (glance) provides discovery, registration, and delivery services for disk and server images. It provides the ability to copy or snapshot a server image, and immediately store it away. Stored images can be used as a template to get new servers up and running quickly and more consistently, than installing a server operating system and individually configuring additional services.
1.2.1. Harden the Image Service
The copy_from feature in the Image Service API v1 allows an attacker to perform masked network port scans. It is possible to create images with a URL such as http://localhost:22. This could allow an attacker to enumerate internal network details, because the scan appears to originate from the Image Service. This is classified as a Server-Side Request Forgery (SSRF).
1.2.1.1. Diagnose Vulnerability
All copy_from calls are logged by the Image Service. This makes it possible to link the abuser of this vulnerability to the cloud user exploiting it. For this flaw to be exploited, image creation must be enabled and non-admin users must be able to use the copy_from function.
To diagnose this vulnerability, review the /etc/glance/policy.json file. If the file has the following settings, your deployment is vulnerable:
 "add_image": "",
 "copy_from": "",
1.2.1.2. Mitigate Vulnerability
To prevent attackers from exploiting this flaw, restrict the policy for the copy_from function to the admin role.
Add the following setting to the copy_from line of the /etc/glance/policy.json file:
"copy_from": "role:admin",Limiting the copy_from function to admin users impacts Orchestration and dashboard usage. For example: Any Orchestration stacks for non-admin users that create images will break. Non-admin users will not be able to create images in the dashboard by providing an image-data URI.
1.2.1.2.1. Partial Mitigation
Optionally, instead of restricting the copy_from function, you can partially mitigate the vulnerability by:
- Rate-limiting calls to the Image Service, which makes network probing extremely slow and may deter attacks.
- Limiting connections from the control-plane node that runs the glance-api server to the ports required for the services and ports 80 and 443 towards the external network. This action would significantly limit the scope of an attack without affecting the majority of users.
1.2.2. Create an Image
This section provides you with the steps to manually create OpenStack-compatible images in .qcow2 format using Red Hat Enterprise Linux 6 and Red Hat Enterprise Linux 7 ISO files.
You can use a ready RHEL KVM guest QCOW2 image:
These images are configured with cloud-init and must take advantage of ec2-compatible metadata services for provisioning SSH keys in order to function properly.
For the KVM guest images:
-
The
rootaccount in the image is disabled, butsudoaccess is granted to a special user namedcloud-user. -
There is no
rootpassword set for this image.
The root password is locked in /etc/shadow by placing !! in the second field.
For an OpenStack instance, it is recommended that you generate an ssh keypair from the OpenStack dashboard or command line and use that key combination to perform an SSH public authentication to the instance as root.
When the instance is launched, this public key will be injected to it. You can then authenticate using the private key downloaded while creating the keypair.
If you do not want to use keypairs, you can use the admin password that has been set using the Inject an admin Password Into an Instance procedure.
If you want to create custom Red Hat Enterprise Linux images, see Create a Red Hat Enterprise Linux 7 Image or Create a Red Hat Enterprise Linux 6 Image.
1.2.2.2. Create Custom Red Hat Enterprise Linux Images
Prerequisites:
- Linux host machine to create an image. This can be any machine on which you can install and run the Linux packages.
-
libvirt, virt-manager (run command
yum groupinstall -y @virtualization). This installs all packages necessary for creating a guest operating system. -
Libguestfs tools (run command
yum install -y libguestfs-tools-c). This installs a set of tools for accessing and modifying virtual machine images. - A Red Hat Enterprise Linux 7 ISO file (see RHEL 7.0 Binary DVD or RHEL 6.6 Binary DVD).
-
Text editor, if you want to change the
kickstartfiles.
In the following procedures, all commands with the [user@host]# prompt should be run on your host machine.
1.2.2.2.1. Create a Red Hat Enterprise Linux 7 Image
This section provides you with the steps to manually create an OpenStack-compatible image in .qcow2 format using a Red Hat Enterprise Linux 7 ISO file.
Start the installation using
virt-installas shown below:[user@host]# qemu-img create -f qcow2 rhel7.qcow2 8G [user@host]# virt-install --virt-type kvm --name rhel7 --ram 2048 \ --cdrom /tmp/rhel-server-7.0-x86_64-dvd.iso \ --disk rhel7.qcow2,format=qcow2 \ --network=bridge:virbr0 --graphics vnc,listen=0.0.0.0 \ --noautoconsole --os-type=linux --os-variant=rhel7This launches an instance and starts the installation process.
NoteIf the instance does not launch automatically, run the following command to view the console:
[user@host]# virt-viewer rhel7Set up the virtual machine as follows:
-
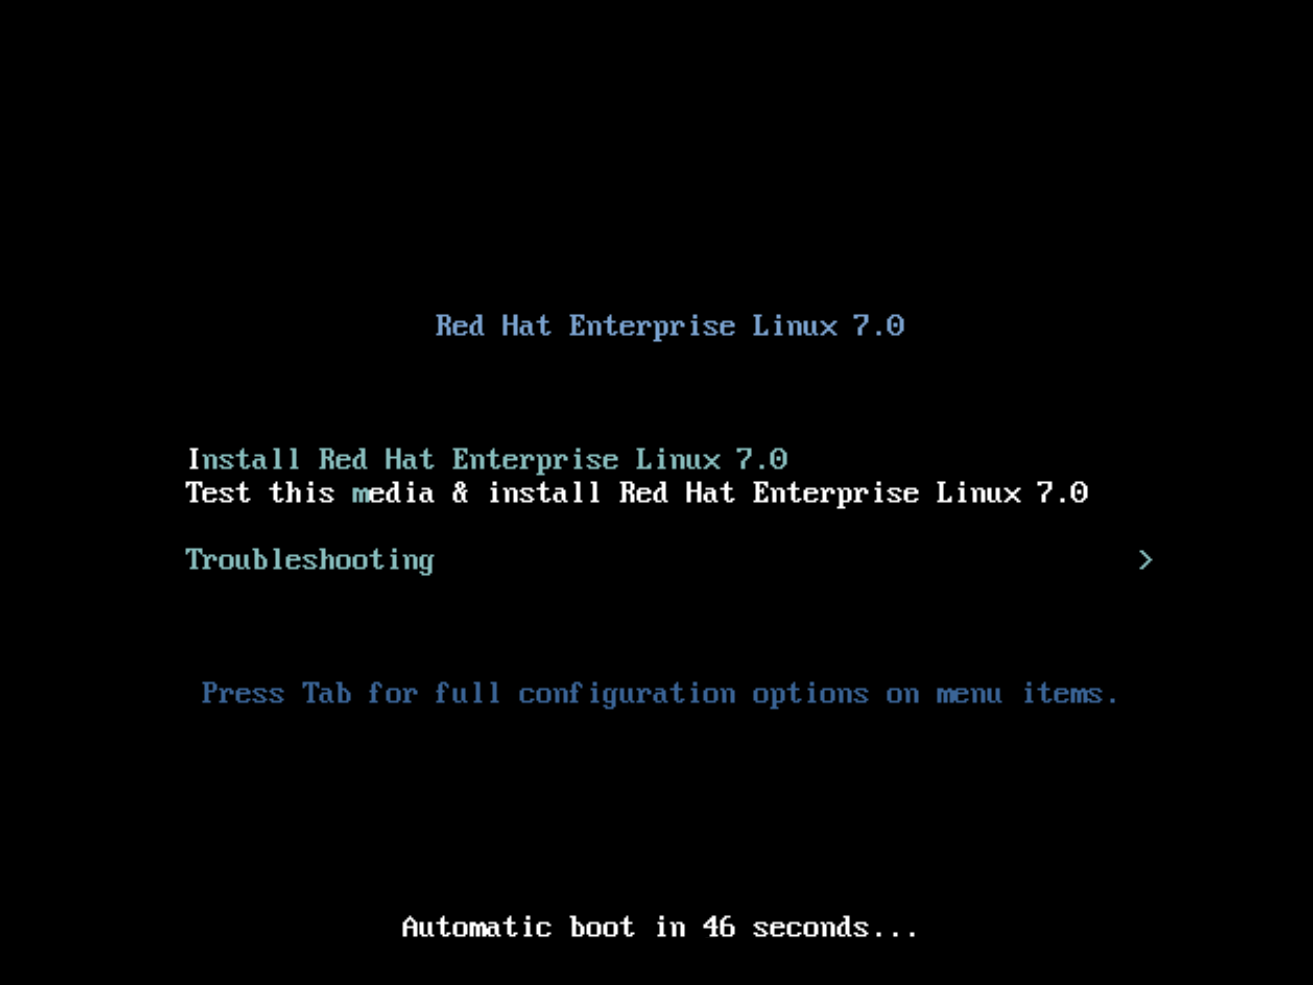
At the initial Installer boot menu, choose the Install Red Hat Enterprise Linux 7.0 option.
- Choose the appropriate Language and Keyboard options.
-
When prompted about which type of devices your installation uses, choose Auto-detected installation media.

-
When prompted about which type of installation destination, choose Local Standard Disks.
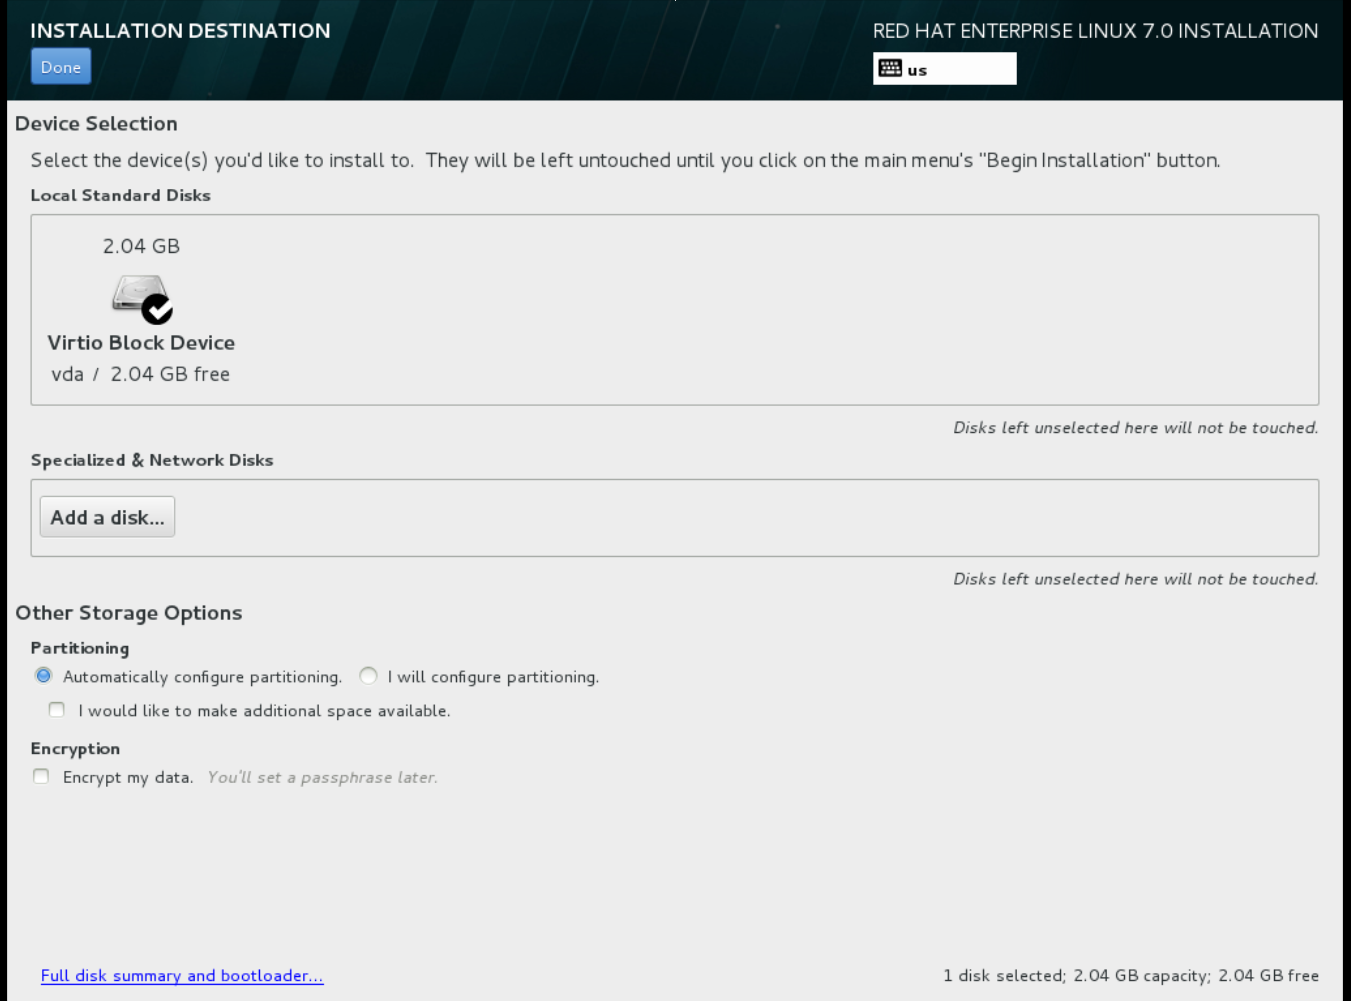 For other storage options, choose Automatically configure partitioning.
- For software selection, choose Minimal Install.
-
For network and hostname, choose
eth0for network and choose a hostname for your device. The default hostname islocalhost.localdomain. -
Choose the
rootpassword.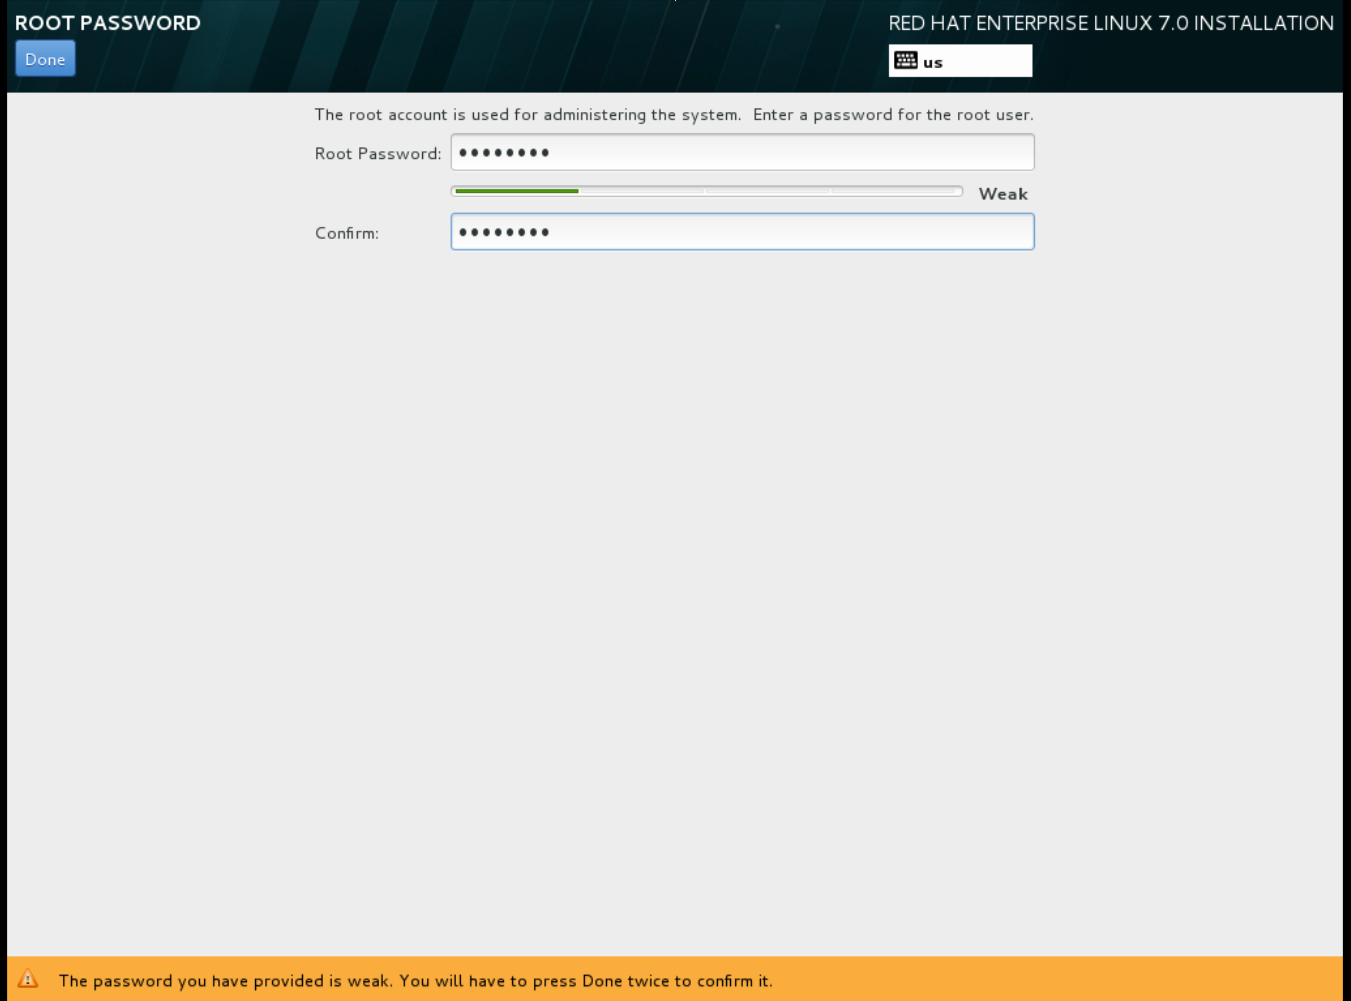 The installation process completes and the Complete! screen appears.
-
At the initial Installer boot menu, choose the Install Red Hat Enterprise Linux 7.0 option.
- After the installation is complete, reboot the instance and log in as the root user.
Update the
/etc/sysconfig/network-scripts/ifcfg-eth0file so it only contains the following values:TYPE=Ethernet DEVICE=eth0 ONBOOT=yes BOOTPROTO=dhcp NM_CONTROLLED=no- Reboot the machine.
Register the machine with the Content Delivery Network:
# subscription-manager registerEnter your Customer Portal user name and password when prompted:
Username: admin@example.com
Password:
Find entitlement pools containing the channel:
# subscription-manager list --available | grep -A8 "Red Hat Enterprise Linux Server"Use the pool identifiers located in the previous step to attach the
Red Hat Enterprise Linux Serverentitlement to the system:# subscription-manager attach --pool=pool_idEnable the required channel:
# subscription-manager repos --enable=rhel-7-server-rpmsFor Red Hat OpenStack Platform 8, the required channels are
rhel-7-server-openstack-8-rpmsandrhel-7-server-rh-common-rpms.NoteFor more information, see "Subscribe to the Required Channels" in the Installation Reference.
Update the system.
# yum -y updateInstall the
cloud-initpackages.# yum install -y cloud-utils-growpart cloud-initEdit the
/etc/cloud/cloud.cfgconfiguration file and undercloud_init_modulesadd:- resolv-confThe
resolv-confoption automatically configures theresolv.confwhen an instance boots for the first time. This file contains information related to the instance such asnameservers,domainand other options.Add the following line to
/etc/sysconfig/networkto avoid problems accessing the EC2 metadata service.NOZEROCONF=yesTo ensure the console messages appear in the
Logtab on the dashboard and thenova console-logoutput, add the following boot option to the ``/etc/default/grub` file:GRUB_CMDLINE_LINUX_DEFAULT="console=tty0 console=ttyS0,115200n8"Run the following command:
# grub2-mkconfig -o /boot/grub2/grub.cfgThe output is as follows:
Generating grub configuration file ...
Found linux image: /boot/vmlinuz-3.10.0-229.7.2.el7.x86_64
Found initrd image: /boot/initramfs-3.10.0-229.7.2.el7.x86_64.img
Found linux image: /boot/vmlinuz-3.10.0-121.el7.x86_64
Found initrd image: /boot/initramfs-3.10.0-121.el7.x86_64.img
Found linux image: /boot/vmlinuz-0-rescue-b82a3044fb384a3f9aeacf883474428b
Found initrd image: /boot/initramfs-0-rescue-b82a3044fb384a3f9aeacf883474428b.img
done
Un-register the virtual machine so that the resulting image does not contain the same subscription details for every instance cloned based on it.
# subscription-manager repos --disable=*
# subscription-manager unregister
# yum clean all
Power off the instance:
# poweroffReset and clean the image using the
virt-sysprepcommand so it can be to create instances without issues:[user@host]# virt-sysprep -d rhel7Reduce image size using the
virt-sparsifycommand. This command converts any free space within the disk image back to free space within the host:[user@host]# virt-sparsify --compress /tmp/rhel7.qcow2 rhel7-cloud.qcow2This creates a new
rhel7-cloud.qcow2file in the location from where the command is run.
The rhel7-cloud.qcow2 image file is ready to be uploaded to the Image service. For more information on uploading this image to your OpenStack deployment using the dashboard, see Upload an Image.
1.2.2.2.2. Create a Red Hat Enterprise Linux 6 Image
This section provides you with the steps to manually create an OpenStack-compatible image in .qcow2 format using a Red Hat Enterprise Linux 6 ISO file.
Start the installation using
virt-install:[user@host]# qemu-img create -f qcow2 rhel6.qcow2 4G [user@host]# virt-install --connect=qemu:///system --network=bridge:virbr0 \ --name=rhel6.6 --os-type linux --os-variant rhel6 \ --disk path=rhel6.qcow2,format=qcow2,size=10,cache=none \ --ram 4096 --vcpus=2 --check-cpu --accelerate \ --hvm --cdrom=rhel-server-6.6-x86_64-dvd.isoThis launches an instance and starts the installation process.
NoteIf the instance does not launch automatically, run the following command to view the console:
[user@host]# virt-viewer rhel6Set up the virtual machines as follows:
At the initial Installer boot menu, choose the Install or upgrade an existing system option.
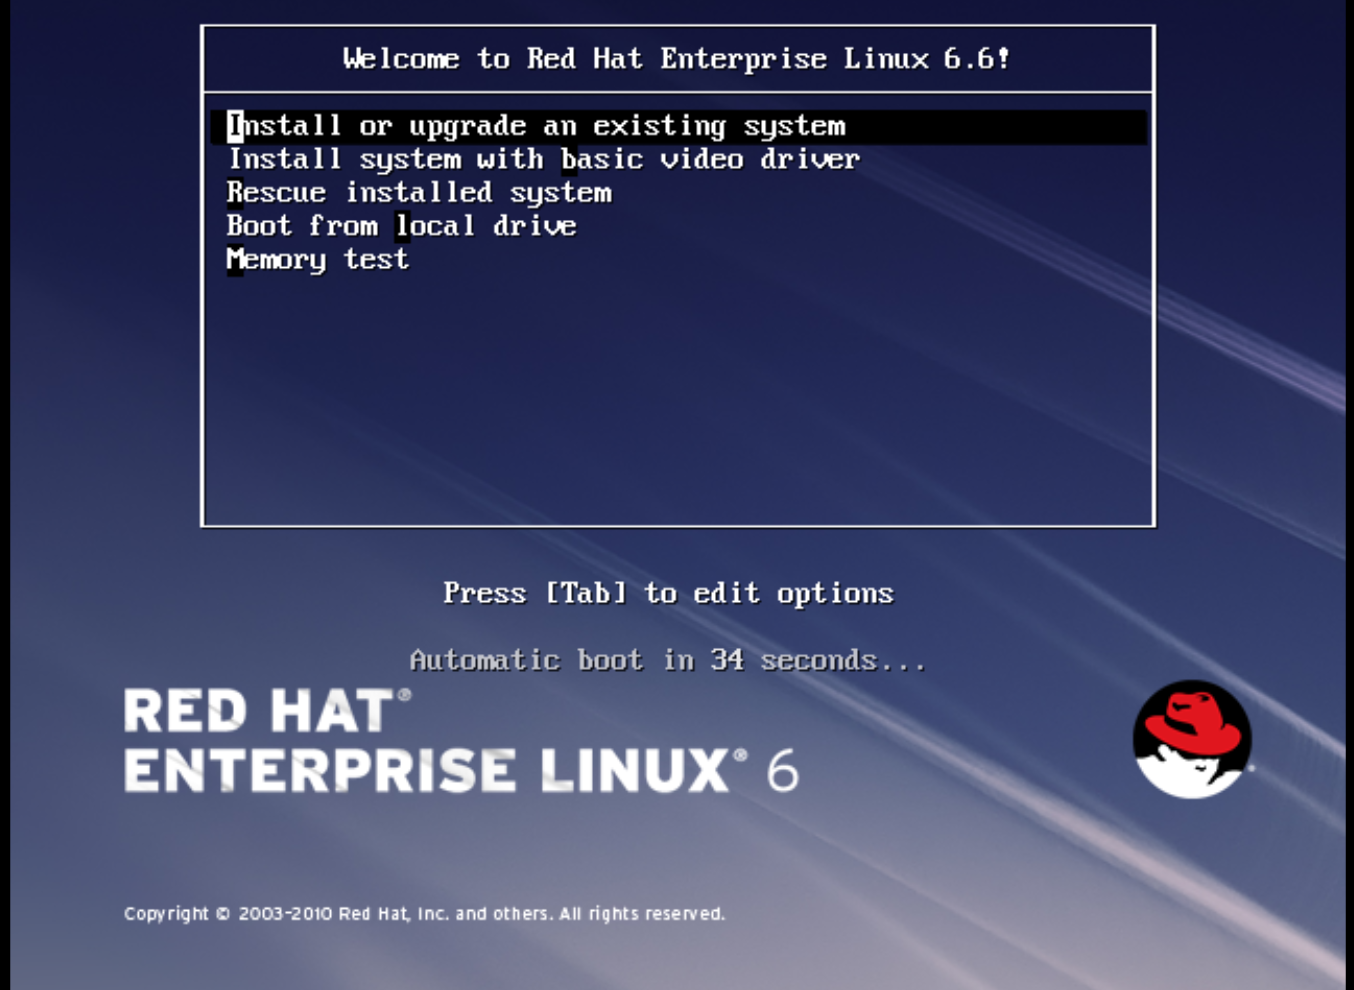 Step through the installation prompts. Accept the defaults.
The installation checks for disc and performs a Media Check. When the check is a Success, it ejects the disc.
- Choose the appropriate Language and Keyboard options.
-
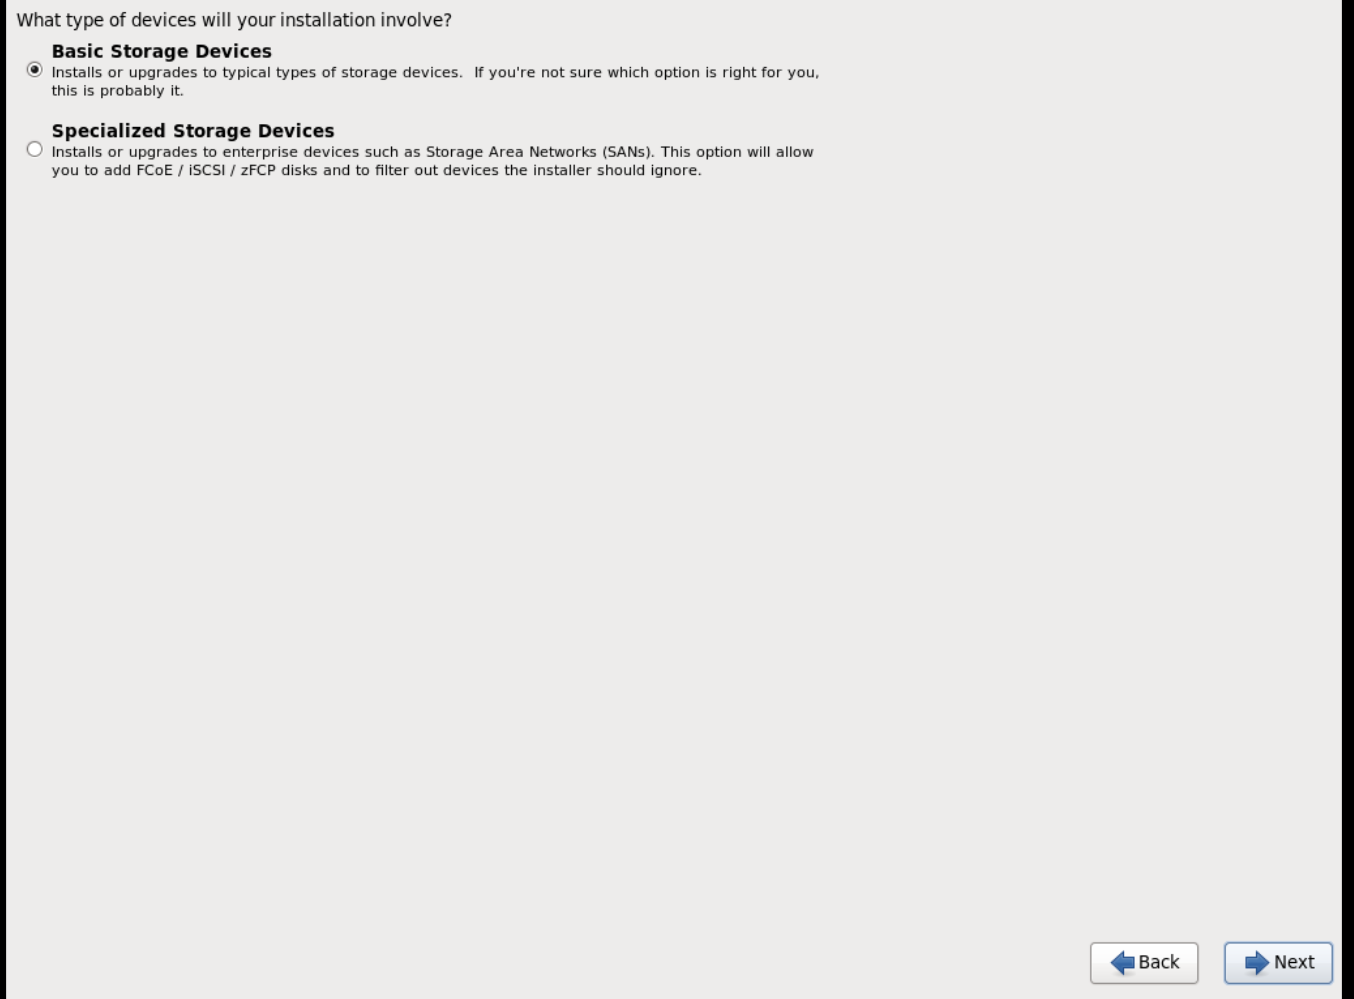
When prompted about which type of devices your installation uses, choose Basic Storage Devices.
-
Choose a hostname for your device. The default hostname is
localhost.localdomain. -
Set timezone and
rootpassword. -
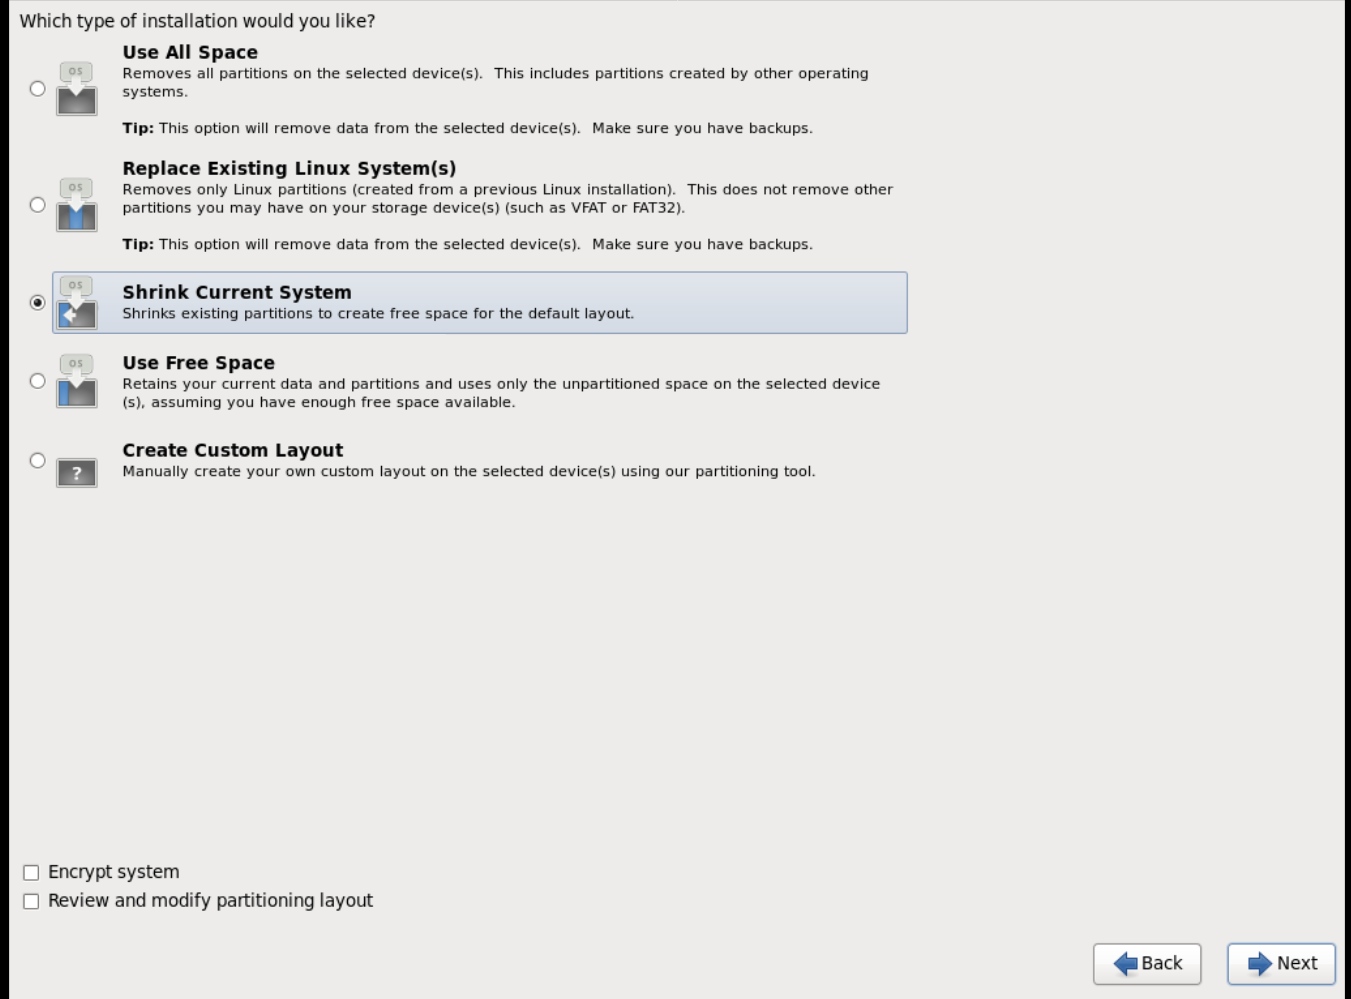
Based on the space on the disk, choose the type of installation.
-
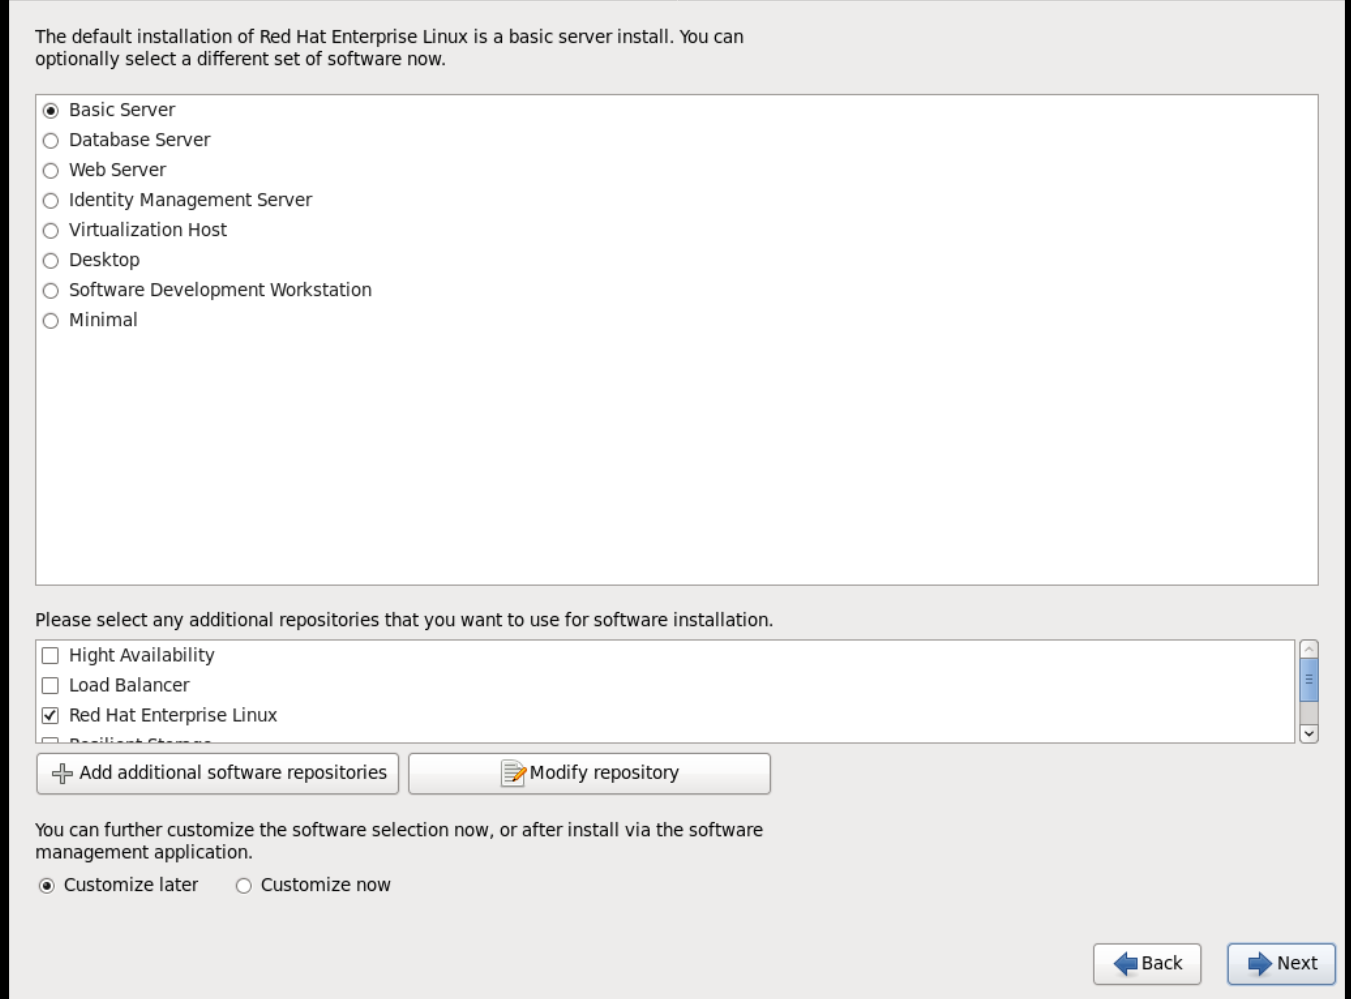
Choose the Basic Server install, which installs an SSH server.
- The installation process completes and Congratulations, your Red Hat Enterprise Linux installation is complete screen appears.
-
Reboot the instance and log in as the
rootuser. Update the
/etc/sysconfig/network-scripts/ifcfg-eth0file so it only contains the following values:TYPE=Ethernet DEVICE=eth0 ONBOOT=yes BOOTPROTO=dhcp NM_CONTROLLED=no- Reboot the machine.
Register the machine with the Content Delivery Network:
# subscription-manager registerEnter your Customer Portal user name and password when prompted:
Username: admin@example.com
Password:
Find entitlement pools containing the channel:
# subscription-manager list --available | grep -A8 "Red Hat Enterprise Linux Server"Use the pool identifiers located in the previous step to attach the
Red Hat Enterprise Linux Serverentitlement to the system:# subscription-manager attach --pool=pool_idEnable the required channel:
# subscription-manager repos --enable=rhel-6-server-rpmsFor Red Hat OpenStack Platform 8, the required channels are
rhel-7-server-openstack-8-rpmsandrhel-6-server-rh-common-rpms.NoteFor more information, see "Subscribe to the Required Channels" in the Installation Reference.
Update the system.
# yum -y updateInstall the
cloud-initpackages.# yum install -y cloud-utils-growpart cloud-initEdit the
/etc/cloud/cloud.cfgconfiguration file and undercloud_init_modulesadd:- resolv-confThe
resolv-confoption automatically configures theresolv.confconfiguration file when an instance boots for the first time. This file contains information related to the instance such asnameservers,domain, and other options.To prevent network issues, create
/etc/udev/rules.d/75-persistent-net-generator.rulesfile.# echo "#" > /etc/udev/rules.d/75-persistent-net-generator.rulesThis prevents
/etc/udev/rules.d/70-persistent-net.rulesfile from being created. If/etc/udev/rules.d/70-persistent-net.rulesis created, networking may not function properly when booting from snapshots (the network interface is created as "eth1" rather than "eth0" and IP address is not assigned).Add the following line to
/etc/sysconfig/networkto avoid problems accessing the EC2 metadata service.NOZEROCONF=yesTo ensure the console messages appear in the
Logtab on the dashboard and thenova console-logoutput, add the following boot option to the/etc/grub.conf:console=tty0 console=ttyS0,115200n8Un-register the virtual machine so that the resulting image does not contain the same subscription details for every instance cloned based on it.
# subscription-manager repos --disable=*
# subscription-manager unregister
# yum clean all
Power off the instance:
# poweroffReset and clean the image using the
virt-sysprepcommand so it can be to create instances without issues:[user@host]# virt-sysprep -d rhel6.6Reduce image size using the
virt-sparsifycommand. This command converts any free space within the disk image back to free space within the host:[user@host]# virt-sparsify - -compress rhel6.qcow2 rhel6-cloud.qcow2This creates a new
rhel6-cloud.qcow2file in the location from where the command is run.NoteYou will need to manually resize the partitions of instances based on the image in accordance with the disk space in the flavor that is applied to the instance.
The rhel6-cloud.qcow2 image file is ready to be uploaded to the Image service. For more information on uploading this image to your OpenStack deployment using the dashboard, see Upload an Image
1.2.3. Upload an Image
- In the dashboard, select Project > Compute > Images.
- Click Create Image.
- Fill out the values, and click Create Image when finished.
| Field | Notes |
|---|---|
| Name | Name for the image. The name must be unique within the project. |
| Description | Brief description to identify the image. |
| Image Source | Image source: Image Location or Image File. Based on your selection, the next field is displayed. |
| Image Location or Image File |
|
| Format | Image format (for example, qcow2). |
| Architecture | Image architecture. For example, use i686 for a 32-bit architecture or x86_64 for a 64-bit architecture. |
| Minimum Disk (GB) | Minimum disk size required to boot the image. If this field is not specified, the default value is 0 (no minimum). |
| Minimum RAM (MB) | Minimum memory size required to boot the image. If this field is not specified, the default value is 0 (no minimum). |
| Public | If selected, makes the image public to all users with access to the project. |
| Protected | If selected, ensures only users with specific permissions can delete this image. |
You can also use the glance image-create command with the property option to create an image. More values are available on the command line. For a complete listing, see Image Configuration Parameters.
1.2.4. Update an Image
- In the dashboard, select Project > Compute > Images.
Click Edit Image from the dropdown list.
NoteThe Edit Image option is available only when you log in as an
adminuser. When you log in as ademouser, you have the option to Launch an instance or Create Volume.- Update the fields and click Update Image when finished. You can update the following values - name, description, kernel ID, ramdisk ID, architecture, format, minimum disk, minimum RAM, public, protected.
- Click the drop-down menu and select Update Metadata option.
- Specify metadata by adding items from the left column to the right one. In the left column, there are metadata definitions from the Image Service Metadata Catalog. Select Other to add metadata with the key of your choice and click Save when finished.
You can also use the glance image-update command with the property option to update an image. More values are available on the command line; for a complete listing, see Image Configuration Parameters.
1.2.5. Delete an Image
- In the dashboard, select Project > Compute > Images.
- Select the image you want to delete and click Delete Images. == Configure OpenStack Compute Storage
This chapter describes the architecture for the back-end storage of images in OpenStack Compute (nova), and provides basic configuration options.
1.3. Architecture Overview
In Red Hat OpenStack Platform, the OpenStack Compute service uses the KVM hypervisor to execute compute workloads. The libvirt driver handles all interactions with KVM, and enables the creation of virtual machines.
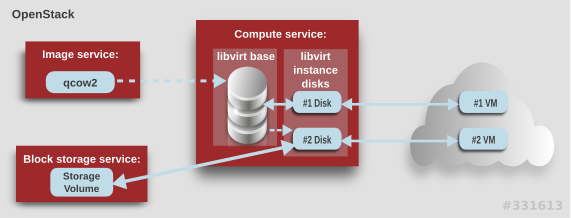
Two types of libvirt storage must be considered for Compute:
- Base image, which is a cached and formatted copy of the Image service image.
-
Instance disk, which is created using the
libvirtbase and is the back end for the virtual machine instance. Instance disk data can be stored either in Compute’s ephemeral storage (using thelibvirtbase) or in persistent storage (for example, using Block Storage).
The steps that Compute takes to create a virtual machine instance are:
-
Cache the Image service’s backing image as the
libvirtbase. - Convert the base image to the raw format (if configured).
- Resize the base image to match the VM’s flavor specifications.
- Use the base image to create the libvirt instance disk.
In the diagram above, the #1 instance disk uses ephemeral storage; the #2 disk uses a block-storage volume.
Ephemeral storage is an empty, unformatted, additional disk available to an instance. This storage value is defined by the instance flavor. The value provided by the user must be less than or equal to the ephemeral value defined for the flavor. The default value is 0, meaning no ephemeral storage is created.
The ephemeral disk appears in the same way as a plugged-in hard drive or thumb drive. It is available as a block device which you can check using the lsblk command. You can format it, mount it, and use it however you normally would a block device. There is no way to preserve or reference that disk beyond the instance it is attached to.
Block storage volume is persistant storage available to an instance regardless of the state of the running instance.
1.4. Configuration
Compute configuration for handling the libvirt base and instance disks can determine both performance and security aspects of your environment; parameters are configured in the /etc/nova/nova.conf file.
| Section | Parameter | Description | Default |
|---|---|---|---|
| [DEFAULT] |
|
Whether to convert a
Converting the base to raw uses more space for any image that could have been used directly by the hypervisor (for example, a qcow2 image). If you have a system with slower I/O or less available space, you might want to specify false, trading the higher CPU requirements of compression for that of minimized input bandwidth.
Raw base images are always used with |
|
| [DEFAULT] |
|
Whether to use CoW (Copy on Write) images for
| true |
| [DEFAULT] |
|
Preallocation mode for
Even when not using CoW instance disks, the copy each VM gets is sparse and so the VM may fail unexpectedly at run time with ENOSPC. By running | none |
| [DEFAULT] |
|
Whether to enable direct resizing of the base image by accessing the image over a block device (boolean). This is only necessary for images with older versions of Because this parameter enables the direct mounting of images which might otherwise be disabled for security reasons, it is not enabled by default. |
|
| [DEFAULT] |
|
The default format that is used for a new ephemeral volume. Value can be: |
|
| [DEFAULT] |
|
Number of seconds to wait between runs of the image cache manager, which impacts base caching on libvirt compute nodes. This period is used in the auto removal of unused cached images (see |
|
| [DEFAULT] |
|
Whether to enable the automatic removal of unused base images (checked every |
|
| [DEFAULT] |
|
How old an unused base image must be before being removed from the |
|
|
[ |
|
Image type to use for |
|