此内容没有您所选择的语言版本。
Chapter 3. Creating and running a test scenario
You can create test scenarios in Business Central to test the functionality of business rule data before deployment. A basic test scenario must have at least the following data:
- Related data objects
- GIVEN facts
- EXPECT results
With this data, the test scenario can validate the expected and actual results for that rule instance based on the defined facts. You can also add a CALL METHOD and any available globals to a test scenario, but these scenario settings are optional.
Procedure
-
Go to Menu
Design Projects and click the project name. -
Click Add Asset
Test Scenario. - Enter an informative Test Scenario name and select the appropriate Package. The package that you specify must be the same package where the required data objects and rule assets have been assigned or will be assigned.
Click Ok to create the test scenario.
The new test scenario is now listed in the Test Scenarios panel of the Project Explorer,
- Click the Data Objects tab to verify that all data objects required for the rules that you want to test are listed. If not, click New item to import the needed data objects from other packages, or create data objects within your package.
After all data objects are in place, return to the Model tab of the test scenarios designer and define the GIVEN and EXPECT data for the scenario, based on the available data objects.
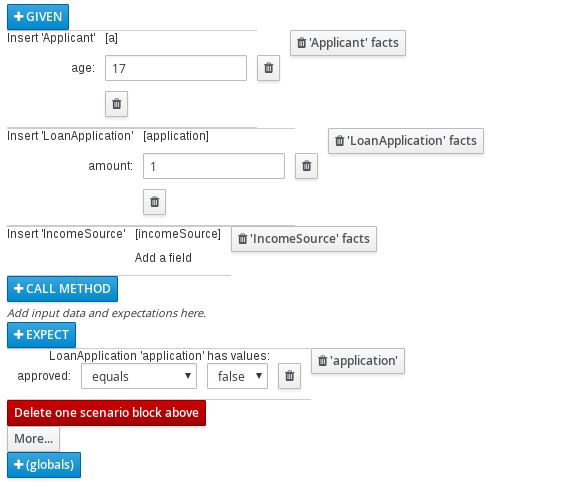
Figure 3.1. The test scenarios designer
The GIVEN section defines the input facts for the test. For example, if an
Underagerule in the project declines loan applications for applicants under the age of 21, then the GIVEN facts in the test scenario could beApplicantwithageset to some integer less than 21.The EXPECT section defines the expected results based on the GIVEN input facts. That is, GIVEN the input facts, EXPECT these other facts to be valid or entire rules to be activated. For example, with the given facts of an applicant under the age of 21 in the scenario, the EXPECT results could be
LoanApplicationwithapprovedset tofalse(as a result of the underage applicant), or could be the activation of theUnderagerule as a whole.Optionally, add a CALL METHOD and any globals to the test scenario:
-
CALL METHOD: Use this to invoke a method from another fact when the rule execution is initiated. Click CALL METHOD, select a fact, and click
 to select the method to invoke. You can invoke any Java class methods (such as methods from an ArrayList) from the Java library or from a JAR that was imported for the project (if applicable).
- globals: Use this to add any global variables in the project that you want to validate in the test scenario. Click globals to select the variable to be validated, and then in the test scenarios designer, click the global name and define field values to be applied to the global variable. If no global variables are available, then they must be created as new assets in Business Central. Global variables are named objects that are visible to the process engine but are different from the objects for facts. Changes in the object of a global do not trigger the re-evaluation of rules.
-
CALL METHOD: Use this to invoke a method from another fact when the rule execution is initiated. Click CALL METHOD, select a fact, and click
- Click More at the bottom of the test scenarios designer to add other data blocks to the same scenario file as needed.
- After you have defined all GIVEN, EXPECT, and other data for the scenario, click Save in the test scenarios designer to save your work.
Click Run scenario in the upper-right corner to run this
.scenariofile, or click Run all scenarios to run all saved.scenariofiles in the project package (if there are multiple). Although the Run scenario option does not require the individual.scenariofile to be saved, the Run all scenarios option does require all.scenariofiles to be saved.If the test fails, address any problems described in the Reporting message at the bottom of the window, review all components in the scenario, and try again to validate the scenario until the scenario passes.
- Click Save in the test scenarios designer to save your work after all changes are complete.
For more details about adding GIVEN facts to test scenarios, see Section 3.1, “Adding GIVEN facts in test scenarios”.
For more details about adding EXPECT results to test scenarios, see Section 3.2, “Adding EXPECT results in test scenarios”.
3.1. Adding GIVEN facts in test scenarios
The GIVEN section defines input facts for the test. For example, if an Underage rule in the project declines loan applications for applicants under the age of 21, then the GIVEN facts in the test scenario could be Applicant with age set to some integer less than 21.
Prerequisite
All data objects required for your test scenario have been created or imported and are listed in the Data Objects tab of the test scenarios designer.
Procedure
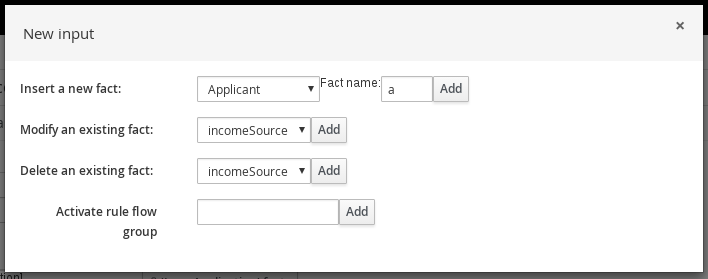
In the test scenarios designer, click GIVEN to open the New input window with the available facts.
Figure 3.2. Add GIVEN input to the test scenario
The list includes the following options, depending on the data objects available in the Data Objects tab of the test scenarios designer:
- Insert a new fact: Use this to add a fact and modify its field values. Enter a variable for the fact as the Fact name.
- Modify an existing fact: (Appears only after another fact has been added.) Use this to specify a previously inserted fact to be modified in the process engine between executions of the scenario.
- Delete an existing fact: (Appears only after another fact has been added.) Use this to specify a previously inserted fact to be deleted from the process engine between executions of the scenario.
- Activate rule flow group: Use this to specify a rule flow group to be activated so that all rules within that group can be tested.
-
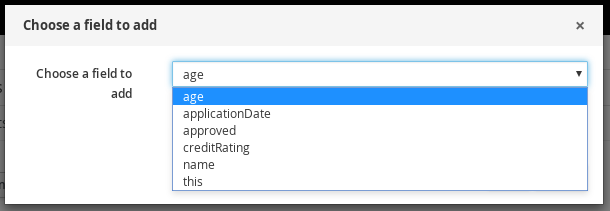
Choose a fact for the desired input option and click Add. For example, set Insert a new fact: to Applicant and enter
aorappor any other variable for the Fact name. Click the fact in the test scenarios designer and select the field to be modified.
Figure 3.3. Modify a fact field
Click the edit icon (
 ) and select from the following field values:
- Literal value: Creates an open field in which you enter a specific literal value.
- Bound variable: Sets the value of the field to the fact bound to a selected variable. The field type must match the bound variable type.
- Create new fact: Enables you to create a new fact and assign it as a field value of the parent fact. Then you can click the child fact in the test scenarios designer and likewise assign field values or nest other facts similarly.
- Continue adding any other GIVEN input data for the scenario and click Save in the test scenarios designer to save your work.
3.2. Adding EXPECT results in test scenarios
The EXPECT section defines the expected results based on the GIVEN input facts. That is, GIVEN the input facts, EXPECT other specified facts to be valid or entire rules to be activated. For example, with the given facts of an applicant under the age of 21 in the scenario, the EXPECT results could be LoanApplication with approved set to false (as a result of the underage applicant), or could be the activation of the Underage rule as a whole.
Prerequisite
All data objects required for your test scenario have been created or imported and are listed in the Data Objects tab of the test scenarios designer.
Procedure
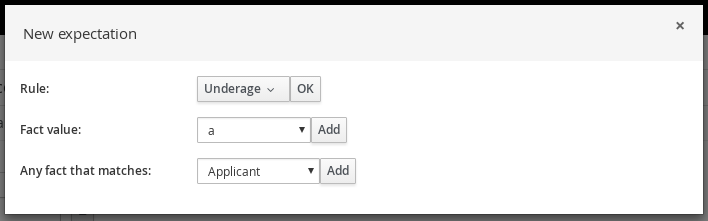
In the test scenarios designer, click EXPECT to open the New expectations window with the available facts.
Figure 3.4. Add EXPECT results to the test scenario
The list includes the following options, depending on the data in the GIVEN section and the data objects available in the Data Objects tab of the test scenarios designer:
- Rule: Use this to specify a particular rule in the project that is expected to be activated as a result of the GIVEN input. Type the name of a rule that is expected to be activated or select it from the list of rules, and then in the test scenarios designer, specify the number of times the rule should be activated.
- Fact value: Use this to select a fact and define values for it that are expected to be valid as a result of the facts defined in the GIVEN section. The facts are listed by the Fact name previously defined for the GIVEN input.
- Any fact that matches: Use this to validate that at least one fact with the specified values exists as a result of the GIVEN input.
-
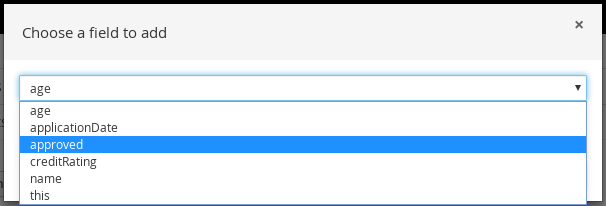
Choose a fact for the desired expectation (such as Fact value:
application) and click Add or OK. Click the fact in the test scenarios designer and select the field to be added and modified.
Figure 3.5. Modify a fact field
-
Set the field values to what is expected to be valid as a result of the GIVEN input (such as
approved|equals|false). - Continue adding any other EXPECT input data for the scenario and click Save in the test scenarios designer to save your work.
After you have defined and saved all GIVEN, EXPECT, and other data for the scenario, click Run scenario in the upper-right corner to run this
.scenariofile, or click Run all scenarios to run all saved.scenariofiles in the project package (if there are multiple). Although the Run scenario option does not require the individual.scenariofile to be saved, the Run all scenarios option does require all.scenariofiles to be saved.If the test fails, address any problems described in the Reporting message at the bottom of the window, review all components in the scenario, and try again to validate the scenario until the scenario passes.
- Click Save in the test scenarios designer to save your work after all changes are complete.