此内容没有您所选择的语言版本。
Chapter 8. Virtualization Agent (virt-who)
virt-who is an agent for reporting virtual guest IDs to Satellite. virt-who has the ability to scan for third-party hypervisors, register the hypervisors on the Satellite, and upload a list of guest UUIDs associated with the hypervisors.
8.1. Setting up the Virtualization Agent
复制链接链接已复制到粘贴板!
The Virtualization Agent can be installed on the Satellite server or on a seperate host. If using a seperate host, use the following requirements guidelines for your virt-who installation:
- Red Hat Enterprise Linux 6 or above.
- Access to both the Red Hat Satellite and the hypervisor on port 443, TCP. In addition, you must create a user in your virtualization environment so that the Virtualization Agent can read information about hypervisors and guests. This can be a user with read-only permission.
- The system must be registered to either Red Hat Content Delivert Network directly or the Red Hat Satellite and subscribed to the RHN Tools channel.
To set up virt-who on the Red Hat Satellite:
- Login as root on the Red Hat Satellite.
- Install the virt-who package:
# yum install virt-who - Edit the following entries in the
/etc/sysconfig/virt-whofile:# Start virt-who on background, perform doublefork and monitor for virtual guest # events (if possible). It is NOT recommended to turn off this option for # starting virt-who as service. VIRTWHO_BACKGROUND=1 # Enable debugging output. # optional VIRTWHO_DEBUG=1 # virt-who subscription manager backend, enable ony one option from following 2: # Report to Subscription Asset Manager (SAM) VIRTWHO_SAM=0 # Report to Satellite VIRTWHO_SATELLITE=1Edit the virtualization options for your virtualization environment type. For example, for Red Hat Enterprise Virtualization:# Register guests using RHEV-M VIRTWHO_RHEVM=1 # Options for RHEV-M mode VIRTWHO_RHEVM_ENV=not-used VIRTWHO_RHEVM_SERVER=server_hostname_or_IP VIRTWHO_RHEVM_USERNAME=server_login VIRTWHO_RHEVM_PASSWORD=server_passwordFor VMware ESX:# Register ESX machines using vCenter VIRTWHO_ESX=1 # Option for ESX mode VIRTWHO_ESX_ENV=not-used VIRTWHO_ESX_OWNER=organization_id VIRTWHO_ESX_SERVER=server_hostname_or_IP VIRTWHO_ESX_USERNAME=server_login VIRTWHO_ESX_PASSWORD=server_passwordNote
The user for accessing the virtualization environment only requires read-only permissions. For security, create a new user in your virtualization environment with read-only permissions and nothing else.Finally, edit the Satellite options and enter your server details:# Option for Satellite backend VIRTWHO_SATELLITE_SERVER=satellite_hostname VIRTWHO_SATELLITE_USERNAME=username VIRTWHO_SATELLITE_PASSWORD=password - Start the virt-who service:
service virt-who startStarting the virt-who service will gather the host/guest UUID information and send the information to the Satellite. It will also scan the/var/lib/virt-who/hypervisor-systemid-[UUID]file to check if the hypervisor has already been registered to the Red Hat Satellite. If it does, the existing hypervisor system information on the Red Hat Satellite is updated. If it does not exist on the Satellite, the new hypervisor wil be registered.
Note
If a hypervisor is deleted, its corresponding file needs to be removed from
/var/lib/virt-who/hypervisor-systemid-UUID, and the hypervisor needs to be manually removed via the satellite web UI.
If your environment contains more than one of the same virtualization environment type, add multiple configuration files to the
/etc/virt-who.d/ instead of adding details for a single configuration in the /etc/sysconfig/virt-who file. For example:
[test-esx-1]
type=esx
server=10.1.1.1
username=admin
password=password

[test-esx-2]
type=esx
server=10.1.2.1
username=admin
password=password
8.1.1. VMware Configuration Scenario
复制链接链接已复制到粘贴板!
The following scenario configures virt-who for use in a VMware environment. This includes creating the user in Active Directory with read-only permissions for virt-who to use.
Satellite requires open access to vCenter on ports 80 and 443. Before following these steps, create a firewall exception to allow connections on port 80 and 443 from the Red Hat Satellite server to the vCenter.
First, create the
virtwho-readonly-user account in Active Directory and provide access to vCenter:
- Run the Active Directory Users and Computers program on your Windows machine with a user that has rights to add users into your domain. Create a user named
virtwho-readonly-user. - Log in to vSphere Web Client using an account with administrator privileges.
- Navigate to
. 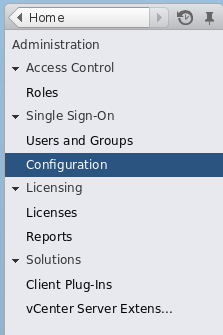
Figure 8.1. Navigate to Single Sign-On Configuration
- Navigate to the tab, press the plus icon, and select the Active Directory identity source. This adds Active Directory identity source, including the
virtwho-readonly-useruser.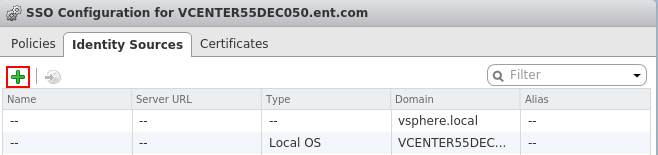
Figure 8.2. Add the Identity Source
- Navigate to
and select the vCenter to grant access to virtwho-readonly-user.
Figure 8.3. Navigate to vCenter
- Navigate to
and press the plus icon to open the Add Permission dialog. 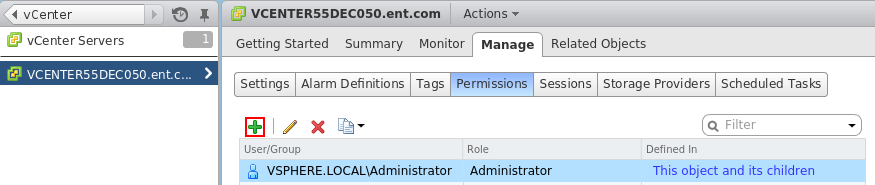
Figure 8.4. Click the plus icon
- Select the
virtwho-readonly-user. - Select the Read-only role.
- Click OK to save the permissions.
- Log out and test the
virtwho-readonly-userin vCenter. Make sure the inventory shows the resources thatvirtwho-readonly-usercan access.
Next, install and configure virt-who to communicate with vCenter:
- Log in to the Satellite server and install virt-who:
# yum install virt-who - Edit the
/etc/sysconfig/virt-whofile and use the following options:# virt-who options VIRTWHO_BACKGROUND=1 VIRTWHO_DEBUG=1 # Enable virt-who with VMware VIRTWHO_ESX=1 # Options for ESX mode VIRTWHO_ESX_ENV=not-used VIRTWHO_ESX_OWNER=[organization_id] VIRTWHO_ESX_SERVER=vcenter.example.com VIRTWHO_ESX_USERNAME=DOMAIN\\virtwho-readonly-user VIRTWHO_ESX_PASSWORD=******* # Report to Satellite VIRTWHO_SAM=0 VIRTWHO_SATELLITE=1Make sure to replace [organization_id] with the ID of your target organization on your Satellite server. - Start and enable the virt-who service:
# service virt-who start
# chkconfig virt-who on
virt-who now gathers host and guest UUIDs from vCenter for Satellite to use.