第 9 章 使用 JUnit 测试路由
本教程介绍了如何使用 New Camel Test Case 向导为您的路由创建测试案例,然后测试路由。
概述
New Camel Test Case 向导会生成一个样板 JUnit 测试案例。当您创建或修改路由(例如,向它添加更多处理器)时,您应该创建或修改生成的测试案例,以添加特定于您创建或更新的路由的预期和断言。这样可确保测试对路由有效。
目标
在本教程中,您将完成以下任务:
-
创建
/src/test/文件夹,以存储 JUnit 测试案例 -
为
ZooOrderApp项目生成 JUnit 测试案例 - 修改新生成的 JUnit 测试案例
-
修改
ZooOrderApp项目的pom.xml文件 -
使用新的 JUnit 测试案例运行
ZooOrderApp - 观察输出
先决条件
要启动此教程,您需要从以下之一生成的 ZooOrderApp 项目:
完成 第 8 章 通过路由追踪消息 教程。
或
-
完成 第 2 章 设置您的环境 教程,并将项目的
blueprint.xml文件替换为提供的blueprintContexts/blueprint3.xml文件,如 “关于资源文件”一节 所述。
从 Project Explorer 中的
ZooOrderApp项目的/src/data/目录和/target/messages/子目录中删除任何 trace 生成的消息。跟踪生成的消息以ID-前缀开头。例如,图 9.1 “跟踪生成的消息” 显示八个 trace 生成的信息:图 9.1. 跟踪生成的消息
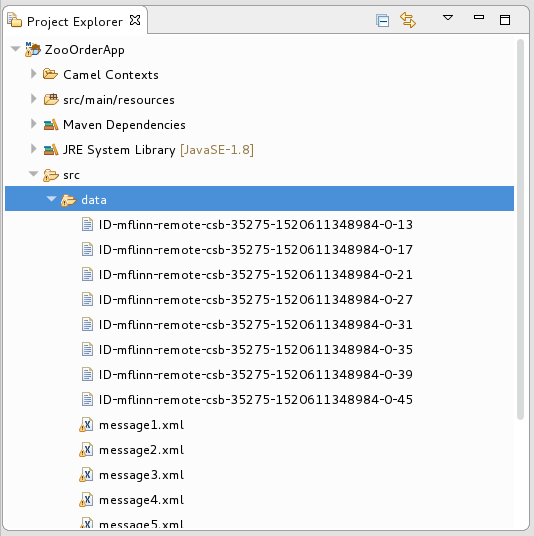
选择批处理中的所有 trace 生成的消息,右键单击并选择 Delete。
创建 src/test 文件夹
在为 ZooOrderApp 项目创建 JUnit 测试案例前,您必须为它创建一个包含在构建路径中的文件夹:
-
在 Project Explorer 中,右键单击
ZooOrderApp项目,然后选择 NewFolder。 在 New Folder 对话框中,在项目树窗格中,展开
ZooOrderApp节点并选择src文件夹。确保
ZooOrderApp/src出现在 Enter 或选择 parent folder 字段中。在 Folder name 中,输入
/test/java:
点 Finish。
在 Project Explorer 中,新的
src/test/java文件夹会出现在src/main/resources文件夹下:
验证构建路径中是否包含新的
/src/test/java文件夹。-
在 Project Explorer 中,右键单击
/src/test/java文件夹以打开上下文菜单。 选择 Build Path 以查看菜单选项:
菜单选项 Remove from Build Path 验证构建路径中当前是否包含
/src/test/java文件夹: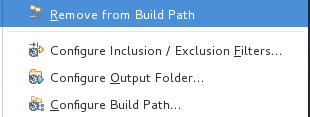
-
在 Project Explorer 中,右键单击
创建 JUnit 测试案例
为 ZooOrderApp 项目创建一个 JUnit 测试案例:
-
在 Project Explorer 中,选择
src/test/java。 右键单击,然后选择 New
Camel Test Case。 
-
在 Camel JUnit Test Case 向导中,确保
Source folder字段包含ZooOrderApp/src/test/java。要找到正确的文件夹,请点击 。
。
-
在 Package 字段中,输入
tutorial.zooapp.route。此软件包将包括新的测试案例。 在 test 字段下的 Camel XML 文件中,点
打开配置为过滤 XML 文件的文件 explorer,然后选择 ZooOrderApp项目的blueprint.xml文件: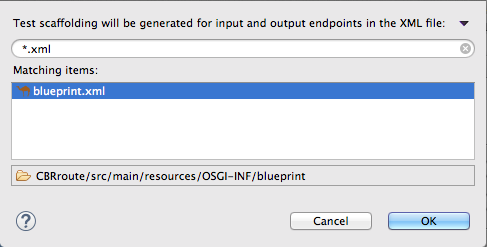
点击 确定。Name 字段默认为 BlueprintXmlTest。
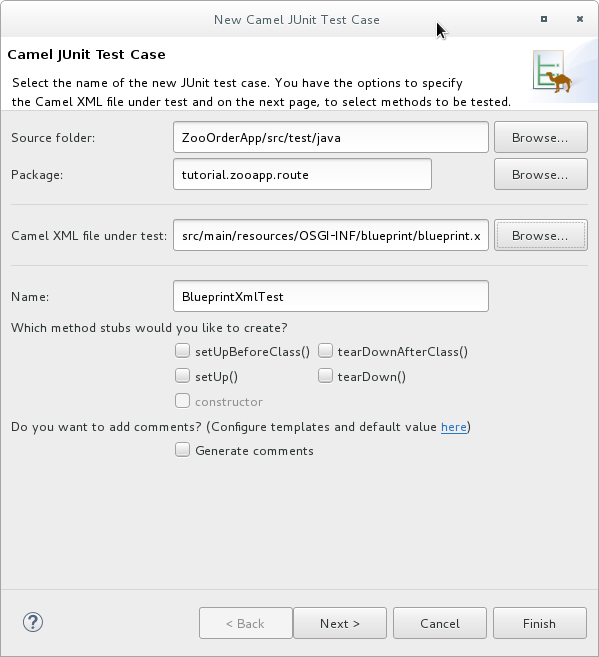
点 Next 打开 Test Endpoints 页面。
默认情况下,会选择所有端点,并将包含在测试案例中。
点 Finish。
注意如有提示,将 JUnit 添加到构建路径中。
测试的工件添加到项目中,并显示在 src/test/java 下的 Project Explorer 中。实施测试案例的类在工具的 Java 编辑器中打开:
package tutorial.zooapp.route;

import org.apache.camel.EndpointInject;
import org.apache.camel.Produce;
import org.apache.camel.ProducerTemplate;
import org.apache.camel.builder.RouteBuilder;
import org.apache.camel.component.mock.MockEndpoint;
import org.apache.camel.test.blueprint.CamelBlueprintTestSupport;
import org.junit.Test;

public class BlueprintXmlTest extends CamelBlueprintTestSupport {

	// TODO Create test message bodies that work for the route(s) being tested
	// Expected message bodies
	protected Object[] expectedBodies = { "<something id='1'>expectedBody1</something>",
			"<something id='2'>expectedBody2</something>" };
	// Templates to send to input endpoints
	@Produce(uri = "file:src/data?noop=true")
	protected ProducerTemplate inputEndpoint;
	@Produce(uri = "direct:OrderFulfillment")
	protected ProducerTemplate input2Endpoint;
	// Mock endpoints used to consume messages from the output endpoints and then perform assertions
	@EndpointInject(uri = "mock:output")
	protected MockEndpoint outputEndpoint;
	@EndpointInject(uri = "mock:output2")
	protected MockEndpoint output2Endpoint;
	@EndpointInject(uri = "mock:output3")
	protected MockEndpoint output3Endpoint;
	@EndpointInject(uri = "mock:output4")
	protected MockEndpoint output4Endpoint;

	@Test
	public void testCamelRoute() throws Exception {
		// Create routes from the output endpoints to our mock endpoints so we can assert expectations
		context.addRoutes(new RouteBuilder() {
			@Override
			public void configure() throws Exception {
				from("file:target/messages/invalidOrders").to(outputEndpoint);
				from("file:target/messages/validOrders/USA").to(output3Endpoint);
				from("file:target/messages/validOrders/Germany").to(output4Endpoint);
			}
		});

		// Define some expectations

		// TODO Ensure expectations make sense for the route(s) we're testing
		outputEndpoint.expectedBodiesReceivedInAnyOrder(expectedBodies);

		// Send some messages to input endpoints
		for (Object expectedBody : expectedBodies) {
			inputEndpoint.sendBody(expectedBody);
		}

		// Validate our expectations
		assertMockEndpointsSatisfied();
	}

	@Override
	protected String getBlueprintDescriptor() {
		return "OSGI-INF/blueprint/blueprint.xml";
	}

}
对于 ZooOrderApp 项目,生成的 JUnit 测试案例不足,它将无法成功运行。您需要修改它以及项目的 pom.xml,如 “修改 BlueprintXmlTest 文件”一节 和 “修改 pom.xml 文件”一节。
修改 BlueprintXmlTest 文件
您必须将 BlueprintXmlTest.java 文件修改为:
- 导入几个支持所需文件功能的类
-
创建用于保存各种源
.xml文件的内容的变量 -
读取源
.xml文件的内容 - 定义适当的预期
按照以下步骤修改 BlueprintXmlTest.java 文件:
在 Project Explorer 中,展开
ZooOrderApp项目,以公开BlueprintXmlTest.java文件: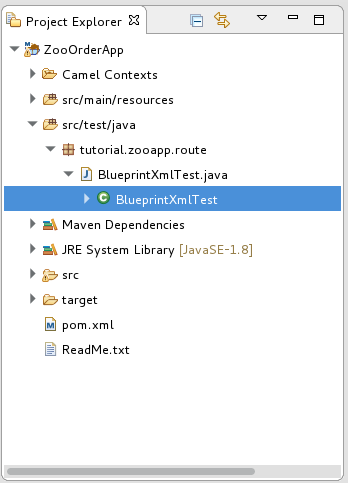
-
打开
BlueprintXmlTest.java文件。 -
在 Java 编辑器中,单击
import org.apache.camel.EndpointInject;以展开列表。 添加以粗体文本显示的两行。添加第一行会导致在更新
pom.xml文件时将解析的错误,如下一节中的指示。package tutorial.zooapp.route; import org.apache.camel.EndpointInject; import org.apache.camel.Produce; import org.apache.camel.ProducerTemplate; import org.apache.camel.builder.RouteBuilder; import org.apache.camel.component.mock.MockEndpoint; import org.apache.camel.test.blueprint.CamelBlueprintTestSupport; import org.apache.commons.io.FileUtils; import org.junit.Test; import java.io.File;
-
向下滚动到在
// Expected 消息正文后直接遵循的行。 使用这些
受保护的行:String body#; 行替换这些行来保护的 Object[] expectedBodies={ …… expectedBody2</something>"};iwl-DESTINATION to these protected String body";protected String body1; protected String body2; protected String body3; protected String body4; protected String body5; protected String body6;向下滚动到行
public void testCamelRoute ()会抛出 Exception {,并在行body# = FileUtils.readFileToString (new File ("src/data/message#.xml"), "UTF-8")后插入,如下所示。这些行将指示错误,直到您根据下一节中的指示更新pom.xml文件。// Valid orders body2 = FileUtils.readFileToString(new File("src/data/message2.xml"), "UTF-8"); body4 = FileUtils.readFileToString(new File("src/data/message4.xml"), "UTF-8"); body5 = FileUtils.readFileToString(new File("src/data/message5.xml"), "UTF-8"); body6 = FileUtils.readFileToString(new File("src/data/message6.xml"), "UTF-8"); // Invalid orders body1 = FileUtils.readFileToString(new File("src/data/message1.xml"), "UTF-8"); body3 = FileUtils.readFileToString(new File("src/data/message3.xml"), "UTF-8");-
向下滚动到
// TODO Ensure expectations 之后直接遵循的行,对我们测试的路由有意义。 将以
outputEndpoint.expectedBodiesReceivedInAnyOrder (expectedBodies)开始的代码块替换为 …inputEndpoint.sendBody (expectedBody); },显示的行:// Invalid orders outputEndpoint.expectedBodiesReceived(body1, body3); // Valid orders for USA output3Endpoint.expectedBodiesReceived(body2, body5, body6); // Valid order for Germany output4Endpoint.expectedBodiesReceived(body4);其余的代码保留原样。
- 保存该文件。
检查您更新的
BlueprintXmlTest.java文件是否有所需的修改。它应该类似如下:package tutorial.zooapp.route; import org.apache.camel.EndpointInject; import org.apache.camel.Produce; import org.apache.camel.ProducerTemplate; import org.apache.camel.builder.RouteBuilder; import org.apache.camel.component.mock.MockEndpoint; import org.apache.camel.test.blueprint.CamelBlueprintTestSupport; import org.apache.commons.io.FileUtils; import org.junit.Test; import java.io.file; public class BlueprintXmlTest extends CamelBlueprintTestSupport { // TODO Create test message bodies that work for the route(s) being tested // Expected message bodies protected String body1; protected String body2; protected String body3; protected String body4; protected String body5; protected String body6; // Templates to send to input endpoints @Produce(uri = "file:src/data?noop=true") protected ProducerTemplate inputEndpoint; @Produce(uri = "direct:OrderFulfillment") protected ProducerTemplate input2Endpoint; // Mock endpoints used to consume messages from the output endpoints and then perform assertions @EndpointInject(uri = "mock:output") protected MockEndpoint outputEndpoint; @EndpointInject(uri = "mock:output2") protected MockEndpoint output2Endpoint; @EndpointInject(uri = "mock:output3") protected MockEndpoint output3Endpoint; @EndpointInject(uri = "mock:output4") protected MockEndpoint output4Endpoint; @Test public void testCamelRoute() throws Exception { // Create routes from the output endpoints to our mock endpoints so we can assert expectations context.addRoutes(new RouteBuilder() { @Override public void configure() throws Exception { // Valid orders body2 = FileUtils.readFileToString(new File("src/data/message2.xml"), "UTF-8"); body4 = FileUtils.readFileToString(new File("src/data/message4.xml"), "UTF-8"); body5 = FileUtils.readFileToString(new File("src/data/message5.xml"), "UTF-8"); body6 = FileUtils.readFileToString(new File("src/data/message6.xml"), "UTF-8"); // Invalid orders body1 = FileUtils.readFileToString(new File("src/data/message1.xml"), "UTF-8"); body3 = FileUtils.readFileToString(new File("src/data/message3.xml"), "UTF-8"); from("file:target/messages/invalidOrders").to(outputEndpoint); from("file:target/messages/validOrders/USA").to(output3Endpoint); from("file:target/messages/validOrders/Germany").to(output4Endpoint); from("direct:OrderFulfillment").to(output2Endpoint); } }); // Define some expectations // TODO Ensure expectations make sense for the route(s) we're testing // Invalid orders outputEndpoint.expectedBodiesReceived(body1, body3); // Valid orders for USA output3Endpoint.expectedBodiesReceived(body2, body5, body6); // Valid order for Germany output4Endpoint.expectedBodiesReceived(body4); // Validate our expectations assertMockEndpointsSatisfied(); } @Override protected String getBlueprintDescriptor() { return "OSGI-INF/blueprint/blueprint.xml"; } }
修改 pom.xml 文件
您需要将对 commons-io 项目的依赖添加到 ZooOrderApp 项目的 pom.xml 文件中:
-
在 Project Explorer 中,选择位于目标文件夹下的
pom.xml,然后在工具的 XML 编辑器中打开它。 -
单击页面底部的
pom.xml选项卡,以打开文件进行编辑。 在 <
dependencies>部分的末尾添加以下行:<dependency> <groupId>commons-io</groupId> <artifactId>commons-io</artifactId> <version>2.5</version> <scope>test</scope> </dependency>- 保存该文件。
运行 JUnit 测试
要运行测试:
- 切换到 JBoss 透视图以释放更多工作区。
-
在 Project Explorer 中,右键单击
ZooOrderApp项目。 选择 Run As
JUnit Test。 默认情况下,JUnit 视图在边栏中打开。(为了提供更好的视图,请将其拖动到底部,右侧面板显示 控制台、服务器和 属性 选项卡。)
注意有时,测试在第一次在项目上运行 JUnit 时失败。重新运行测试会导致成功的结果。
如果测试成功运行,您会看到如下内容:
图 9.2. 成功运行 JUnit

当测试失败时,您会看到如下内容:
图 9.3. 失败的 JUnit 运行
 注意
注意如果您的执行环境没有设置为 Java SE 8,则 JUnit 将失败。JUnit 选项卡顶部的消息栏将显示一条错误消息,表示它无法找到正确的 SDK。
要解决这个问题,打开项目的上下文菜单,然后选择 Run As
Run Configuration JRE。点 *Execution environment 字段旁边的 Environments] 按钮,找到并选择 Java SE 8 环境。 检查输出并采取措施解决任何测试失败。
要查看 JUnit 面板中显示的更多错误,请点面板菜单栏中的
 来最大化视图。
再次运行 JUnit 测试案例前,请先从 Project Explorer 中的 ZooOrderApp 项目的
/src/data文件夹删除任何 JUnit 生成的测试消息(请参阅 图 9.1 “跟踪生成的消息”)。
进一步阅读
要了解有关 JUnit 测试的更多信息,请参阅 JUnit。
后续步骤
在 第 10 章 将项目发布到红帽 Fuse 教程中,您将了解如何将 Apache Camel 项目发布到红帽 Fuse。