Dieser Inhalt ist in der von Ihnen ausgewählten Sprache nicht verfügbar.
Chapter 3. Certificate profiles (Making Rules for Issuing Certificates)
Red Hat Certificate System provides a customizable framework to apply policies for incoming certificate requests and to control the input request types and output certificate types; these are called certificate profiles. Certificate profiles set the required information for certificate enrollment forms in the Certificate Manager end-entities page. This chapter describes how to configure certificate profiles.
3.1. About certificate profiles
A certificate profile defines everything associated with issuing a particular type of certificate, including the authentication method, the authorization method, the default certificate content, constraints for the values of the content, and the contents of the input and output for the certificate profile. Enrollment and renewal requests are submitted to a certificate profile and are then subject to the defaults and constraints set in that certificate profile. These constraints are in place whether the request is submitted through the input form associated with the certificate profile or through other means. The certificate that is issued from a certificate profile request contains the content required by the defaults with the information required by the default parameters. The constraints provide rules for what content is allowed in the certificate.
For details about using and customizing certificate profiles, see Section 3.2, “Setting up certificate profiles”.
The Certificate System contains a set of default profiles. While the default profiles are created to satisfy most deployments, every deployment can add their own new certificate profiles or modify the existing profiles.
- Authentication. In every certification profile can be specified an authentication method.
- Authorization. In every certification profile can be specified an authorization method.
- Profile inputs. Profile inputs are parameters and values that are submitted to the CA when a certificate is requested. Profile inputs include public keys for the certificate request and the certificate subject name requested by the end entity for the certificate.
- Profile outputs. Profile outputs are parameters and values that specify the format in which to provide the certificate to the end entity. Profile outputs are CMC responses which contain a PKCS#7 certificate chain, when the request was successful.
Certificate content. Each certificate defines content information, such as the name of the entity to which it is assigned (the subject name), its signing algorithm, and its validity period. What is included in a certificate is defined in the X.509 standard. With version 3 of the X509 standard, certificates can also contain extensions. For more information about certificate extensions, see Section B.3, “Standard X.509 v3 certificate extension reference”.
All of the information about a certificate profile is defined in the
setentry of the profile policy in the profile’s configuration file. When multiple certificates are expected to be requested at the same time, multiple set entries can be defined in the profile policy to satisfy needs of each certificate. Each policy set consists of a number of policy rules and each policy rule describes a field in the certificate content. A policy rule can include the following parts:- Profile defaults. These are predefined parameters and allowed values for information contained within the certificate. Profile defaults include the validity period of the certificate, and what certificate extensions appear for each type of certificate issued.
-
Profile constraints. Constraints set rules or policies for issuing certificates. Amongst other, profile constraints include rules to require the certificate subject name to have at least one CN component, to set the validity of a certificate to a maximum of 360 days, to define the allowed grace period for renewal, or to require that the
subjectaltnameextension is always set totrue.
3.1.1. The enrollment profile
The parameters for each profile defining the inputs, outputs, and policy sets are listed in more detail in Profile configuration file parameters in the Planning, Installation and Deployment Guide (Common Criteria Edition).
A profile usually contains inputs, policy sets, and outputs, as illustrated in the caUserCert profile in the following example. .Example caCMCUserCert Profile
The first part of a certificate profile is the description. This shows the name, long description, whether it is enabled, and who enabled it.
desc=This certificate profile is for enrolling user certificates by using the CMC certificate request with CMC Signature authentication.
visible=true
enable=true
enableBy=admin
name=Signed CMC-Authenticated User Certificate Enrollment
desc=This certificate profile is for enrolling user certificates by using the CMC certificate request with CMC Signature authentication.
visible=true
enable=true
enableBy=admin
name=Signed CMC-Authenticated User Certificate Enrollment
The missing auth.instance_id= entry in this profile means that with this profile, authentication is not needed to submit the enrollment request. However, manual approval by an authorized CA agent will be required to get an issuance.
Next, the profile lists all of the required inputs for the profile:
input.list=i1
input.i1.class_id=cmcCertReqInputImp
input.list=i1
input.i1.class_id=cmcCertReqInputImp
For the caCMCUserCert profile, this defines the certificate request type, which is CMC.
Next, the profile must define the output, meaning the format of the final certificate. The only one available is certOutputImpl, which results in CMC response to be returned to the requestor in case of success.
output.list=o1
output.o1.class_id=certOutputImpl
output.list=o1
output.o1.class_id=certOutputImpl
The last - largest - block of configuration is the policy set for the profile. Policy sets list all of the settings that are applied to the final certificate, like its validity period, its renewal settings, and the actions the certificate can be used for. The policyset.list parameter identifies the block name of the policies that apply to one certificate; the policyset.userCertSet.list lists the individual policies to apply.
For example, the sixth policy populates the Key Usage Extension automatically in the certificate, according to the configuration in the policy. It sets the defaults and requires the certificate to use those defaults by setting the constraints:
3.1.2. Certificate extensions: defaults and constraints
An extension configures additional information to include in a certificate or rules about how the certificate can be used. These extensions can either be specified in the certificate request or taken from the profile default definition and then enforced by the constraints.
A certificate extension is added or identified in a profile by adding the default which corresponds to the extension and sets default values, if the certificate extension is not set in the request. For example, the Basic Constraints Extension identifies whether a certificate is a CA signing certificate, the maximum number of subordinate CAs that can be configured under the CA, and whether the extension is critical (required):
policyset.caCertSet.5.default.name=Basic Constraints Extension Default
policyset.caCertSet.5.default.params.basicConstraintsCritical=true
policyset.caCertSet.5.default.params.basicConstraintsIsCA=true
policyset.caCertSet.5.default.params.basicConstraintsPathLen=-1
policyset.caCertSet.5.default.name=Basic Constraints Extension Default
policyset.caCertSet.5.default.params.basicConstraintsCritical=true
policyset.caCertSet.5.default.params.basicConstraintsIsCA=true
policyset.caCertSet.5.default.params.basicConstraintsPathLen=-1The extension can also set required values for the certificate request called constraints. If the contents of a request do not match the set constraints, then the request is rejected. The constraints generally correspond to the extension default, though not always. For example:
To allow user supplied extensions to be embedded in the certificate requests and ignore the system-defined default in the profile, the profile needs to contain the User Supplied Extension Default, which is described in Section B.1.32, “User Supplied extension default”.
3.1.3. Inputs and outputs
Inputs set information that must be submitted to receive a certificate. This can be requester information, a specific format of certificate request, or organizational information.
In a Common Criteria environment, set the input.i1.class_id parameter in all enabled profiles to cmcCertReqInputImpl:
input.i1.class_id=cmcCertReqInputImpl
input.i1.class_id=cmcCertReqInputImpl
The outputs configured in the profile define the format of the certificate that is issued. In a Common Criteria environment, set the output.o1.class_id parameter in all enabled profiles to certOutputImpl:
output.o1.class_id=CertOutputImpl
output.o1.class_id=CertOutputImpl
In a Common Criteria-compliant Certificate System environment, users access profiles through the /ca/ee/ca/profileSubmitUserSignedCMCFull servlet that is accessed through the end-entities interface.
3.2. Setting up certificate profiles
In Certificate System, you can add, delete, and modify enrollment profiles:
- Using the PKI command-line interface
- Editing the profile configuration files directly (this is recommended only at time of installation configuration; see Chapter 11 Configuring certificate profiles in the Planning, Installation and Deployment Guide (Common Criteria Edition).
This section provides information on the pki CLI method.
3.2.1. Managing certificate enrollment profiles using the pki command-line interface
This section describes how to manage certificate profiles using the pki utility. For further details, see the pki-ca-profile(1) man page.
Using the raw format is recommended. For details on each attribute and field of the profile, see Chapter 11 Configuring certificate profiles in the Planning, Installation and Deployment Guide (Common Criteria Edition).
3.2.2. Enabling and disabling a certificate profile
Before you can edit a certificate profile, you must disable it. After the modification is complete, you can re-enable the profile.
Only CA agents can enable and disable certificate profiles.
For example, to disable the
caCMCECserverCertcertificate profile:pki -c password -n caagent ca-profile-disable caCMCECserverCert
# pki -c password -n caagent ca-profile-disable caCMCECserverCertCopy to Clipboard Copied! Toggle word wrap Toggle overflow For example, to enable the
caCMCECserverCertcertificate profile:pki -c password -n caagent ca-profile-enable caCMCECserverCert
# pki -c password -n caagent ca-profile-enable caCMCECserverCertCopy to Clipboard Copied! Toggle word wrap Toggle overflow
3.2.2.1. Creating a certificate profile in raw format
To create a new profile in raw format:
pki -c password -n caadmin ca-profile-add profile_name.cfg --raw
# pki -c password -n caadmin ca-profile-add profile_name.cfg --rawIn raw format, specify the new profile ID as follows:
profileId=profile_name
profileId=profile_name3.2.2.2. Editing a certificate profile in raw format
CA administrators can edit a certificate profile in raw format without manually downloading the configuration file.
For example, to edit the caCMCECserverCert profile:
pki -c password -n caadmin ca-profile-edit caCMCECserverCert
# pki -c password -n caadmin ca-profile-edit caCMCECserverCert
This command automatically downloads the profile configuration in raw format and opens it in the VI editor. When you close the editor, the profile configuration is updated on the server.
You do not need to restart the CA after editing a profile.
Before you can edit a profile, disable the profile. For details, see Section 3.2.2, “Enabling and disabling a certificate profile”.
Example 3.1. Editing a certificate profile in raw format
For example, to edit the caCMCserverCert profile to accept multiple user-supplied extensions:
Disable the profile as a CA agent:
pki -c password -n caagemt ca-profile-disable caCMCserverCert
# pki -c password -n caagemt ca-profile-disable caCMCserverCertCopy to Clipboard Copied! Toggle word wrap Toggle overflow Edit the profile as a CA administrator:
Download and open the profile in the
VIeditor:pki -c password -n caadmin ca-profile-edit caCMCserverCert
# pki -c password -n caadmin ca-profile-edit caCMCserverCertCopy to Clipboard Copied! Toggle word wrap Toggle overflow - Update the configuration to accept the extensions. For details, see Example B.3, “Multiple user supplied extensions in CSR”.
Enable the profile as a CA agent:
pki -c password -n caagent ca-profile-enable caCMCserverCert
# pki -c password -n caagent ca-profile-enable caCMCserverCertCopy to Clipboard Copied! Toggle word wrap Toggle overflow
3.2.2.3. Deleting a certificate profile
To delete a certificate profile:
pki -c password -n caadmin ca-profile-del profile_name
# pki -c password -n caadmin ca-profile-del profile_nameBefore you can delete a profile, disable the profile. For details, see Section 3.2.2, “Enabling and disabling a certificate profile”.
3.2.3. Listing certificate enrollment profiles
The following pre-defined certificate profiles are ready to use and set up in this environment when the Certificate System CA is installed. These certificate profiles have been designed for the most common types of certificates, and they provide common defaults, constraints, authentication methods, inputs, and outputs.
For a list of supported profiles, see Section 8.3, “CMC authentication plugins”
To list the available profiles on the command line, use the pki utility. For example:
For further details, see the pki-ca-profile(1) man page. Additional information can also be found in Chapter 11 Configuring certificate profiles in the Planning, Installation and Deployment Guide (Common Criteria Edition).
3.2.4. Displaying details of a certificate enrollment profile
For example, to display a specific certificate profile, such as caECFullCMCUserSignedCert:
For example, to display a specific certificate profile, such as caECFullCMCUserSignedCert, in raw format:
For further details, see the pki-ca-profile(1) man page.
3.3. Defining key defaults in profiles
When creating certificate profiles, the Key Default must be added before the Subject Key Identifier Default. Certificate System processes the key constraints in the Key Default before creating or applying the Subject Key Identifier Default, so if the key has not been processed yet, setting the key in the subject name fails.
For example, an object-signing profile may define both defaults:
In the policyset list, then, the Key Default (p11) must be listed before the Subject Key Identifier Default (p3).
policyset.set1.list=p1,p2,p11,p3,p4,p5,p6,p7,p8,p9,p10
policyset.set1.list=p1,p2,p11,p3,p4,p5,p6,p7,p8,p9,p103.4. Configuring profiles to enable renewal
This section discusses how to set up profiles for certificate renewals.
Renewing a certificate regenerates the certificate using the same public key as the original certificate. Renewing a certificate can be preferable to simply generating new keys and installing new certificates; for example, if a new CA signing certificate is created, all of the certificates which that CA issued and signed must be reissued. If the CA signing certificate is renewed, then all of the issued certificates are still valid. A renewed certificate is identical to the original, only with an updated validity period and expiration date. This makes renewing certificates a much simpler and cleaner option for handling the expiration of many kinds of certificates, especially CA signing certificates.
For more information on how to renew certificates, see Section 5.4, “Renewing certificates”.
3.4.1. The renewal process
There are two methods of renewing a certificate:
- Regenerating the certificate takes the original key, profile, and request of the certificate and recreates a new certificate with a new validity period and expiration date using the identical key.
- Re-keying a certificate submits a certificate request through the original profile with the same information, so that a new key pair is generated.
A profile that allows renewal is often accompanied by the renewGracePeriodConstraint entry. For example:
The Renew Grace Period Constraint should be set in the original enrollment profile. This defines the amount of time before and after the certificate’s expiration date when the user is allowed to renew the certificate. There are only a few examples of these in the default profiles, and they are mostly not enabled by default. This entry is not required; however, if no grace period is set, it is only possible to renew a certificate on the date of its expiration.
3.4.2. Renewing using the same key
A profile that allows the same key to be submitted for renewal has the allowSameKeyRenewal parameter set to true in the uniqueKeyConstraint entry. For example:
policyset.cmcUserCertSet.9.constraint.class_id=uniqueKeyConstraintImpl
policyset.cmcUserCertSet.9.constraint.name=Unique Key Constraint
policyset.cmcUserCertSet.9.constraint.params.allowSameKeyRenewal=true
policyset.cmcUserCertSet.9.default.class_id=noDefaultImpl
policyset.cmcUserCertSet.9.default.name=No Default
policyset.cmcUserCertSet.9.constraint.class_id=uniqueKeyConstraintImpl
policyset.cmcUserCertSet.9.constraint.name=Unique Key Constraint
policyset.cmcUserCertSet.9.constraint.params.allowSameKeyRenewal=true
policyset.cmcUserCertSet.9.default.class_id=noDefaultImpl
policyset.cmcUserCertSet.9.default.name=No Default3.4.3. Renewing using a new key
To renew a certificate with a new key, use the same profile with a new key. Certificate System uses the subjectDN from the user signing certificate that signs the request for the new certificate.
3.5. Setting the signing algorithms for certificates
The CA’s signing certificate can sign the certificates it issues with any public key algorithm supported by the CA. Red Hat Certificate System supports ECC and RSA. Both public key algorithms support different cipher suites, algorithms used to encrypt and decrypt data.
Each certificate enrollment profile can define which cipher suite the CA should use to sign certificates processed through that profile. If no signing algorithm is set, then the profile uses the default signing algorithm set at installation (see Changing the signing algorithms).
3.6. Managing CA-related profiles
Certificate profiles and extensions must be used to set rules on how subordinate CAs can issue certificates. There are two parts to this:
- Managing the CA signing certificate
- Defining issuance rules
3.6.1. Setting restrictions on CA certificates
When a subordinate CA is created, the root CA can impose limits or restrictions on the subordinate CA. For example, the root CA can dictate the maximum depth of valid certification paths (the number of subordinate CAs allowed to be chained below the new CA) by setting the pathLenConstraint field of the Basic Constraints extension in the CA signing certificate.
A certificate chain generally consists of an entity certificate, zero or more intermediate CA certificates, and a root CA certificate. The root CA certificate is either self-signed or signed by an external trusted CA. Once issued, the root CA certificate is loaded into a certificate database as a trusted CA.
An exchange of certificates takes place when performing a TLS handshake, when sending an S/MIME message, or when sending a signed object. As part of the handshake, the sender is expected to send the subject certificate and any intermediate CA certificates needed to link the subject certificate to the trusted root. For certificate chaining to work properly the certificates should have the following properties:
- CA certificates must have the Basic Constraints extension.
- CA certificates must have the keyCertSign bit set in the Key Usage extension.
When the CAs generate new keys, they must add the Authority Key Identifier extension to all subject certificates. This extension helps distinguish the certificates from the older CA certificates. The CA certificates must contain the Subject Key Identifier extension.
For more information on certificates and their extensions, see Internet X.509 Public Key Infrastructure - Certificate and Certificate Revocation List (CRL) Profile (RFC 5280), available at RFC 5280.
These extensions can be configured through the certificate profile enrollment pages. By default, the CA contains the required and reasonable configuration settings, but it is possible to customize these settings.
This procedure describes editing the CA certificate profile used by a CA to issue CA certificates to its subordinate CAs.
The profile that is used when a CA instance is first configured is /var/lib/pki/instance_name/ca/conf/caCert.profile. This profile cannot be edited in pkiconsole (since it is only available before the instance is configured). It is possible to edit the policies for this profile in the template file before the CA is configured using a text editor.
To modify the default in the CA signing certificate profile used by a CA:
- If the profile is currently enabled, it must be disabled before it can be edited. Open the agent services page, select Manage Certificate Profiles from the left navigation menu, select the profile, and click Disable profile.
Open the CA Console.
pkiconsole -d nssdb -n 'optional client cert nickname' https://server.example.com:8443/ca
# pkiconsole -d nssdb -n 'optional client cert nickname' https://server.example.com:8443/caCopy to Clipboard Copied! Toggle word wrap Toggle overflow Notepkiconsoleis being deprecated and will be replaced by a new browser-based UI in a future major release. Althoughpkiconsolewill continue to be available until the replacement UI is released, we encourage using the command line equivalent ofpkiconsoleat this time, as the pki CLI will continue to be supported and improved upon even when the new browser-based UI becomes available in the future.- In the left navigation tree of the Configuration tab, select Certificate Manager, then Certificate Profiles.
- Select caCACert, or the appropriate CA signing certificate profile, from the right window, and click .
- In the Policies tab of the Certificate Profile Rule Editor, select and edit the Key Usage or Extended Key Usage Extension Default if it exists or add it to the profile.
- Select the Key Usage or Extended Key Usage Extension Constraint, as appropriate, for the default.
- Set the default values for the CA certificates. For more information, see Section B.1.13, “Key Usage extension default” and Section B.1.8, “Extended Key Usage extension default”.
- Set the constraint values for the CA certificates. There are no constraints to be set for a Key Usage extension; for an Extended Key Usage extension, set the appropriate OID constraints for the CA. For more information, see Section B.1.8, “Extended Key Usage extension default”.
- When the changes have been made to the profile, log into the agent services page again, and re-enable the certificate profile.
For more information on modifying certificate profiles, see Section 3.2, “Setting up certificate profiles”.
3.6.2. Changing the restrictions for CAs on issuing certificates
The restrictions on the certificates issued are set by default after the subsystem is configured. These include:
- Whether certificates can be issued with validity periods longer than the CA signing certificate. The default is to disallow this.
- The signing algorithm used to sign certificates.
- The serial number range the CA is able to use to issue certificates.
Subordinate CAs have constraints for the validity periods, types of certificates, and the types of extensions which they can issue. It is possible for a subordinate CA to issue certificates that violate these constraints, but a client authenticating a certificate that violates those constraints will not accept that certificate. Check the constraints set on the CA signing certificate before changing the issuing rules for a subordinate CA.
To change the certificate issuance rules:
Open the Certificate System Console.
pkiconsole -d nssdb -n 'optional client cert nickname' https://server.example.com:8443/ca
# pkiconsole -d nssdb -n 'optional client cert nickname' https://server.example.com:8443/caCopy to Clipboard Copied! Toggle word wrap Toggle overflow Notepkiconsoleis being deprecated and will be replaced by a new browser-based UI in a future major release. Althoughpkiconsolewill continue to be available until the replacement UI is released, we encourage using the command line equivalent ofpkiconsoleat this time, as the pki CLI will continue to be supported and improved upon even when the new browser-based UI becomes available in the future.Select the Certificate Manager item in the left navigation tree of the Configuration tab.
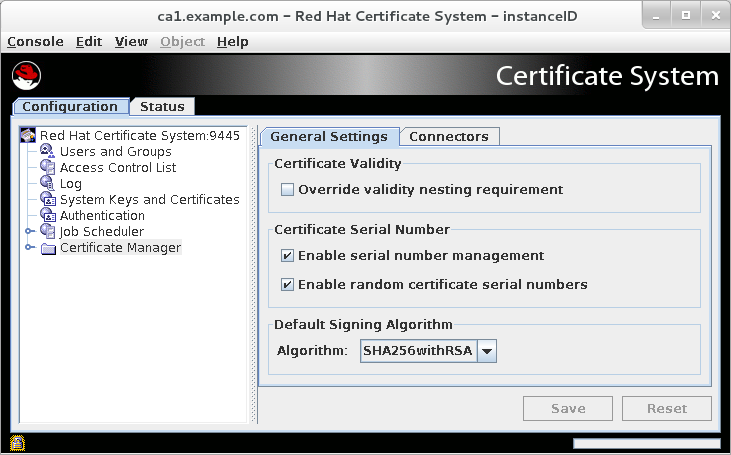
Figure 3.1. The General Settings tab in non-subordinate CAs by default
By default, in non-cloned CAs, the General Settings tab of the Certificate Manager menu item contains these options:
Override validity nesting requirement. This checkbox sets whether the Certificate Manager can issue certificates with validity periods longer than the CA signing certificate validity period.
If this checkbox is not selected and the CA receives a request with validity period longer than the CA signing certificate’s validity period, it automatically truncates the validity period to end on the day the CA signing certificate expires.
Certificate Serial Number. These fields display the serial number range for certificates issued by the Certificate Manager. The server assigns the serial number in the Next serial number field to the next certificate it issues and the number in the Ending serial number to the last certificate it issues.
The serial number range allows multiple CAs to be deployed and balances the number of certificates each CA issues. The combination of an issuer name and a serial number uniquely identifies a certificate.
NOTEThe serial number ranges with cloned CAs are fluid. All cloned CAs share a common configuration entry which defines the next available range. When one CA starts running low on available numbers, it checks this configuration entry and claims the next range. The entry is automatically updated, so that the next CA gets a new range.
The ranges are defined in
begin*Numberandend*Numberattributes, with separate ranges defined for requests and certificate serial numbers. For example:Copy to Clipboard Copied! Toggle word wrap Toggle overflow Serial number management can be enabled for CAs which are not cloned. However, by default, serial number management is disabled unless a system is cloned, when it is automatically enabled.
The serial number range cannot be updated manually through the console. The serial number ranges are read-only fields.
Default Signing Algorithm. Specifies the signing algorithm the Certificate Manager uses to sign certificates. The options are
SHA256withRSA, andSHA512withRSA, if the CA’s signing key type is RSA.The signing algorithm specified in the certificate profile configuration overrides the algorithm set here.
By default, in cloned CAs, the General Settings tab of the Certificate Manager menu item contains these options:
- Enable serial number management
Enable random certificate serial numbers
Select both check boxes.
Figure 3.2. The General Settings tab in cloned CAs by default
- Click .


3.6.3. Using random certificate serial numbers
Red Hat Certificate System contains a serial number range management for requests, certificates, and replica IDs. This allows the automation of cloning when installing Identity Management (IdM).
There are these ways to reduce the likelihood of hash-based attacks:
- making part of the certificate serial number unpredictable to the attacker
- adding a randomly chosen component to the identity
- making the validity dates unpredictable to the attacker by skewing each one forwards or backwards
The random certificate serial number assignment method adds a randomly chosen component to the identity. This method:
- works with cloning
- allows resolving conflicts
- is compatible with the current serial number management method
- is compatible with the current workflows for administrators, agents, and end entities
- fixes the existing bugs in sequential serial number management
Administrators must enable random certificate serial numbers.
Enabling random certificate serial numbers
You can enable automatic serial number range management either from the command line or from the console UI.
To enable automatic serial number management from the console UI:
Tick the Enable serial number management option in the General Settings tab.
Figure 3.3. The General Settings tab when random serial number assignment is enabled
- Tick the Enable random certificate serial numbers option.
3.7. Managing subject names and subject alternative names
The subject name of a certificate is a distinguished name (DN) that contains identifying information about the entity to which the certificate is issued. This subject name can be built from standard LDAP directory components, such as common names and organizational units. These components are defined in X.500. In addition to - or even in place of - the subject name, the certificate can have a subject alternative name, which is a kind of extension set for the certificate that includes additional information that is not defined in X.500.
The naming components for both subject names and subject alternative names can be customized.
If the subject name is empty, then the Subject Alternative Name extension must be present and marked critical.
3.7.1. Using the requester CN or UID in the subject name
The cn or uid value from a certificate request can be used to build the subject name of the issued certificate. This section demonstrates a profile that requires the naming attribute (CN or UID) being specified in the Subject Name Constraint to be present in the certificate request. If the naming attribute is missing, the request is rejected.
There are two parts to this configuration:
-
The CN or UID format is set in the
patternconfiguration in the Subject Name Constraint. - The format of the subject DN, including the CN or UID token and the specific suffix for the certificate, is set in the Subject Name Default.
For example, to use the CN in the subject DN:
In this example, if a request comes in with the CN of cn=John Smith, then the certificate will be issued with a subject DN of cn=John Smith,DC=example, DC=com. If the request comes in but it has a UID of uid=jsmith and no CN, then the request is rejected.
The same configuration is used to pull the requester UID into the subject DN:
The format for the pattern parameter is covered in Section B.2.11, “Subject Name constraint” and Section B.1.27, “Subject Name default”.
3.7.2. Inserting LDAP directory attribute values and other information into the subject alt name
Information from an LDAP directory or that was submitted by the requester can be inserted into the subject alternative name of the certificate by using matching variables in the Subject Alt Name Extension Default configuration. This default sets the type (format) of information and then the matching pattern (variable) to use to retrieve the information. For example:
This inserts the requester’s email as the first CN component in the subject alt name. To use additional components, increment the Type_, Pattern_, and Enable_ values numerically, such as Type_1.
Configuring the subject alt name is detailed in Section B.1.23, “Subject Alternative Name extension default”, as well.
To insert LDAP components into the subject alt name of the certificate:
Inserting LDAP attribute values requires enabling the user directory authentication plugin,
SharedSecret.Open the CA Console.
pkiconsole -d nssdb -n 'optional client cert nickname' https://server.example.com:8443/ca
# pkiconsole -d nssdb -n 'optional client cert nickname' https://server.example.com:8443/caCopy to Clipboard Copied! Toggle word wrap Toggle overflow Notepkiconsoleis being deprecated and will be replaced by a new browser-based UI in a future major release. Althoughpkiconsolewill continue to be available until the replacement UI is released, we encourage using the command line equivalent ofpkiconsoleat this time, as the pki CLI will continue to be supported and improved upon even when the new browser-based UI becomes available in the future.- Select Authentication in the left navigation tree.
-
In the Authentication Instance tab, click , and add an instance of the
SharedSecretauthentication plugin. Enter the following information:
Copy to Clipboard Copied! Toggle word wrap Toggle overflow - Save the new plugin instance.
For information on setting a CMC shared token, see Section 8.4.2, “Setting a CMC Shared Secret”.
The
ldapStringAttributesparameter instructs the authentication plugin to read the value of themailattribute from the user’s LDAP entry and put that value in the certificate request. When the value is in the request, the certificate profile policy can be set to insert that value for an extension value.The format for the
dnpatternparameter is covered in Section B.2.11, “Subject Name constraint” and Section B.1.27, “Subject Name default”.To enable the CA to insert the LDAP attribute value in the certificate extension, edit the profile’s configuration file, and insert a policy set parameter for an extension. For example, to insert the
mailattribute value in the Subject Alternative Name extension in thecaFullCMCSharedTokenCertprofile, change the following code:policyset.setID.8.default.params.subjAltExtPattern_0=$request.auth_token.mail[0]$
policyset.setID.8.default.params.subjAltExtPattern_0=$request.auth_token.mail[0]$Copy to Clipboard Copied! Toggle word wrap Toggle overflow For more details about editing a profile, see Section 3.2.2.2, “Editing a certificate profile in raw format”.
Restart the CA.
systemctl restart pki-tomcatd-nuxwdog@instance_name.service
# systemctl restart pki-tomcatd-nuxwdog@instance_name.serviceCopy to Clipboard Copied! Toggle word wrap Toggle overflow
For this example, certificates submitted through the caFullCMCSharedTokenCert profile enrollment form will have the Subject Alternative Name extension added with the value of the requester’s mail LDAP attribute. For example:
Identifier: Subject Alternative Name - 2.5.29.17
    Critical: no
    Value:
    RFC822Name: jsmith@example.com
Identifier: Subject Alternative Name - 2.5.29.17
    Critical: no
    Value:
    RFC822Name: jsmith@example.com
There are many attributes which can be automatically inserted into certificates by being set as a token ($X$) in any of the Pattern_ parameters in the policy set. The common tokens are listed in Table 3.1, “Variables used to populate certificates”, and the default profiles contain examples for how these tokens are used.
| Policy Set Token | Description |
|---|---|
| $request.auth_token.cn[0]$ |
The LDAP common name ( |
| $request.auth_token.mail[0]$ |
The value of the LDAP email ( |
| $request.auth_token.tokencertsubject$ | The certificate subject name. |
| $request.auth_token.uid$ |
The LDAP user ID ( |
| $request.auth_token.userdn$ | The user DN of the user who requested the certificate. |
| $request.auth_token.userid$ | The value of the user ID attribute for the user who requested the certificate. |
| $request.uid$ | The value of the user ID attribute for the user who requested the certificate. |
| $request.requestor_email$ | The email address of the person who submitted the request. |
| $request.requestor_name$ | The person who submitted the request. |
| $request.upn$ | The Microsoft UPN. This has the format (UTF8String)1.3.6.1.4.1.311.20.2.3,$request.upn$. |
| $server.source$ | Instructs the server to generate a version 4 UUID (random number) component in the subject name. This always has the format (IA5String)1.2.3.4,$server.source$. |
| $request.auth_token.user$ | Used when the request was submitted by TPS. The TPS subsystem trusted manager who requested the certificate. |
| $request.subject$ |
Used when the request was submitted by TPS. The subject name DN of the entity to which TPS has resolved and requested for. For example, |
3.7.3. Using the CN attribute in the SAN extension
Several client applications and libraries no longer support using the Common Name (CN) attribute of the Subject DN for domain name validation, which has been deprecated in RFC 2818. Instead, these applications and libraries use the dNSName Subject Alternative Name (SAN) value in the certificate request.
Certificate System copies the CN only if it matches the preferred name syntax according to RFC 1034 Section 3.5 and has more than one component. Additionally, existing SAN values are preserved. For example, the dNSName value based on the CN is appended to existing SANs.
To configure Certificate System to automatically use the CN attribute in the SAN extension, edit the certificate profile used to issue the certificates. For example:
Disable the profile:
pki -c password -d /administrator_nssdb_directory/ -p 8443 -n administrator_cert_nickname ca-profile-disable profile_name
# pki -c password -d /administrator_nssdb_directory/ -p 8443 -n administrator_cert_nickname ca-profile-disable profile_nameCopy to Clipboard Copied! Toggle word wrap Toggle overflow Edit the profile:
pki -c password -d /administrator_nssdb_directory/ -p 8443 -n administrator_cert_nickname ca-profile-edit profile_name
# pki -c password -d /administrator_nssdb_directory/ -p 8443 -n administrator_cert_nickname ca-profile-edit profile_nameCopy to Clipboard Copied! Toggle word wrap Toggle overflow Add the following configuration with a unique set number for the profile. For example:
policyset.serverCertSet.12.constraint.class_id=noConstraintImpl
policyset.serverCertSet.12.constraint.name=No Constraint
policyset.serverCertSet.12.default.class_id=commonNameToSANDefaultImpl
policyset.serverCertSet.12.default.name=Copy Common Name to Subject
policyset.serverCertSet.12.constraint.class_id=noConstraintImpl
policyset.serverCertSet.12.constraint.name=No Constraint
policyset.serverCertSet.12.default.class_id=commonNameToSANDefaultImpl
policyset.serverCertSet.12.default.name=Copy Common Name to Subject
Copy to Clipboard Copied! Toggle word wrap Toggle overflow The previous example uses
12as the set number.Append the new policy set number to the
policyset.userCertSet.listparameter. For example:policyset.userCertSet.list=1,10,2,3,4,5,6,7,8,9,12
policyset.userCertSet.list=1,10,2,3,4,5,6,7,8,9,12Copy to Clipboard Copied! Toggle word wrap Toggle overflow - Save the profile.
Enable the profile:
pki -c password -d /administrator_nssdb_directory/ -p 8443 -n administrator_nickname ca-profile-enable profile_name
# pki -c password -d /administrator_nssdb_directory/ -p 8443 -n administrator_nickname ca-profile-enable profile_nameCopy to Clipboard Copied! Toggle word wrap Toggle overflow
All default server profiles contain the commonNameToSANDefaultImpl default.
3.7.4. Accepting SAN extensions from a CSR
In certain environments, administrators want to allow specifying Subject Alternative Name (SAN) extensions in Certificate Signing Request (CSR).
3.7.4.1. Configuring a profile to retrieve SANs from a CSR
To allow retrieving SANs from a CSR, use the User Extension Default. For details, see Section B.1.32, “User Supplied extension default”.
A SAN extension can contain one or more SANs.
To accept SANs from a CSR, add the following default and constraint to a profile, such as caCMCECserverCert:
3.7.4.2. Generating a CSR with SANs
For example, to generate a CSR with two SANs using the certutil utility:
certutil -R -k ec -q nistp256 -d . -s "cn=Example Multiple SANs" --extSAN dns:www.example.com,dns:www.example.org -a -o request.csr.p10
# certutil -R -k ec -q nistp256 -d . -s "cn=Example Multiple SANs" --extSAN dns:www.example.com,dns:www.example.org -a -o request.csr.p10After generating the CSR, follow the steps described in Section 5.3.1, “The CMC enrollment process” to complete the CMC enrollment.