Dieser Inhalt ist in der von Ihnen ausgewählten Sprache nicht verfügbar.
9.4. Configure Network Bridging Using a GUI
When starting a bridge interface, NetworkManager waits for at least one port to enter the “forwarding” state before beginning any network-dependent
IP configuration such as DHCP or IPv6 autoconfiguration. Static IP addressing is allowed to proceed before any ports or ports are connected or begin forwarding packets.
9.4.1. Establishing a Bridge Connection with a GUI
Link kopierenLink in die Zwischenablage kopiert!
Procedure 9.1. Adding a New Bridge Connection Using nm-connection-editor
Follow the below instructions to create a new bridge connection:
- Enter nm-connection-editor in a terminal:
nm-connection-editor
~]$ nm-connection-editorCopy to Clipboard Copied! Toggle word wrap Toggle overflow - Click the Add button. The Choose a Connection Type window appears. Select Bridge and click Create. The Editing Bridge connection 1 window appears.
Figure 9.5. Editing Bridge Connection 1
- Add port devices by referring to Procedure 9.3, “Adding a Port Interface to a Bridge” below.

Procedure 9.2. Editing an Existing Bridge Connection
- Enter nm-connection-editor in a terminal:
nm-connection-editor
~]$ nm-connection-editorCopy to Clipboard Copied! Toggle word wrap Toggle overflow - Select the Bridge connection you want to edit.
- Click the Edit button.
Configuring the Connection Name, Auto-Connect Behavior, and Availability Settings
Five settings in the Editing dialog are common to all connection types, see the General tab:
- Connection name — Enter a descriptive name for your network connection. This name will be used to list this connection in the menu of the Network window.
- Automatically connect to this network when it is available — Select this box if you want NetworkManager to auto-connect to this connection when it is available. See the section called “Editing an Existing Connection with control-center” for more information.
- All users may connect to this network — Select this box to create a connection available to all users on the system. Changing this setting may require root privileges. See Section 3.4.5, “Managing System-wide and Private Connection Profiles with a GUI” for details.
- Automatically connect to VPN when using this connection — Select this box if you want NetworkManager to auto-connect to a VPN connection when it is available. Select the VPN from the dropdown menu.
- Firewall Zone — Select the Firewall Zone from the dropdown menu. See the Red Hat Enterprise Linux 7 Security Guide for more information on Firewall Zones.
9.4.1.1. Configuring the Bridge Tab
Link kopierenLink in die Zwischenablage kopiert!
- Interface name
- The name of the interface to the bridge.
- Bridged connections
- One or more port interfaces.
- Aging time
- The time, in seconds, a MAC address is kept in the MAC address forwarding database.
- Enable IGMP snooping
- If required, select the check box to enable IGMP snooping on the device.
- Enable STP (Spanning Tree Protocol)
- If required, select the check box to enable
STP. - Priority
- The bridge priority; the bridge with the lowest priority will be elected as the root bridge.
- Forward delay
- The time, in seconds, spent in both the Listening and Learning states before entering the Forwarding state. The default is 15 seconds.
- Hello time
- The time interval, in seconds, between sending configuration information in bridge protocol data units (BPDU).
- Max age
- The maximum time, in seconds, to store the configuration information from BPDUs. This value should be twice the Hello Time plus 1 but less than twice the Forwarding delay minus 1.
- Group forward mask
- This property is a mask of group addresses that allows group addresses to be forwarded. In most cases, group addresses in the range from
01:80:C2:00:00:00to01:80:C2:00:00:0Fare not forwarded by the bridge device. This property is a mask of 16 bits, each corresponding to a group address in the above range, that must be forwarded. Note that theGroup forward maskproperty cannot have any of the0,1,2bits set to1because those addresses are used for Spanning tree protocol (STP), Link Aggregation Control Protocol (LACP) and Ethernet MAC pause frames.
Procedure 9.3. Adding a Port Interface to a Bridge
- To add a port to a bridge, select the Bridge tab in the Editing Bridge connection 1 window. If necessary, open this window by following the procedure in Procedure 9.2, “Editing an Existing Bridge Connection”.
- Click . The Choose a Connection Type menu appears.
- Select the type of connection to be created from the list. Click Create. A window appropriate to the connection type selected appears.
Figure 9.6. The NetworkManager Graphical User Interface Add a Bridge Connection
- Select the Bridge Port tab. Configure Priority and Path cost as required. Note the STP priority for a bridge port is limited by the Linux kernel. Although the standard allows a range of
0to255, Linux only allows0to63. The default is32in this case.Figure 9.7. The NetworkManager Graphical User Interface Bridge Port tab
- If required, select the Hairpin mode check box to enable forwarding of frames for external processing. Also known as virtual Ethernet port aggregator (VEPA) mode.


Then, to configure:
- An Ethernet port, click the Ethernet tab and proceed to the section called “Basic Configuration Options ”, or;
- A Bond port, click the Bond tab and proceed to Section 7.8.1.1, “Configuring the Bond Tab”, or;
- A Team port, click the Team tab and proceed to Section 8.14.1.1, “Configuring the Team Tab”, or;
- An VLAN port, click the VLAN tab and proceed to Section 10.5.1.1, “Configuring the VLAN Tab”, or;
Saving Your New (or Modified) Connection and Making Further Configurations
Once you have finished editing your new bridge connection, click the button to save your customized configuration. If the profile was in use while being edited, power cycle the connection to make NetworkManager apply the changes. If the profile is OFF, set it to ON or select it in the network connection icon's menu. See Section 3.4.1, “Connecting to a Network Using the control-center GUI” for information on using your new or altered connection.
You can further configure an existing connection by selecting it in the Network window and clicking Options to return to the Editing dialog.
Then, to configure:
IPv4settings for the connection, click the IPv4 Settings tab and proceed to Section 5.4, “Configuring IPv4 Settings”, or;IPv6settings for the connection, click the IPv6 Settings tab and proceed to Section 5.5, “Configuring IPv6 Settings”.
Once saved the Bridge will appear in the Network settings tool with each port showing in the display.
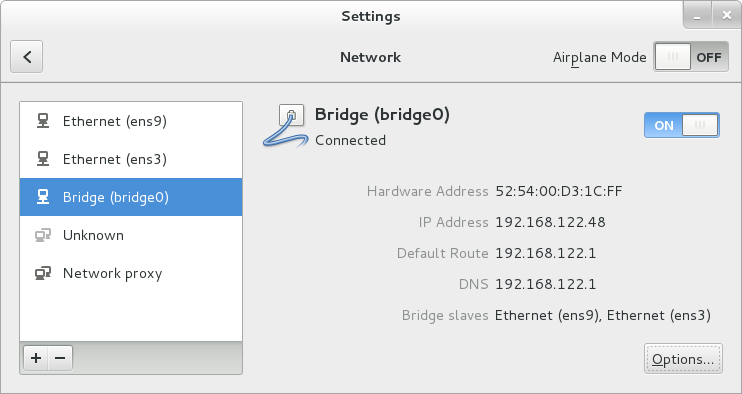
Figure 9.8. The NetworkManager Graphical User Interface with Bridge