Dieser Inhalt ist in der von Ihnen ausgewählten Sprache nicht verfügbar.
Chapter 1. Managing Clusters
Heketi allows administrators to add and remove storage capacity by managing either a single or multiple Red Hat Gluster Storage clusters.
Heketi provides a RESTful management interface which can be used to manage the lifecycle of Red Hat Gluster Storage volumes. With Heketi, cloud services like OpenStack Manila, Kubernetes, and OpenShift can dynamically provision Red Hat Gluster Storage volumes with any of the supported durability types. Heketi will automatically determine the location for bricks across the cluster, making sure to place bricks and its replicas across different failure domains. Heketi also supports any number of Red Hat Gluster Storage clusters, allowing cloud services to provide network file storage without being limited to a single Red Hat Gluster Storage cluster.
With Heketi, the administrator no longer manages or configures bricks, disks, or trusted storage pools. Heketi service will manage all hardware for the administrator, enabling it to allocate storage on demand. Any disks registered with Heketi must be provided in raw format, which will then be managed by it using LVM on the disks provided.
The replica 3 and the arbiter volumes are supported volume types that can be created using Heketi.
Heketi volume creation
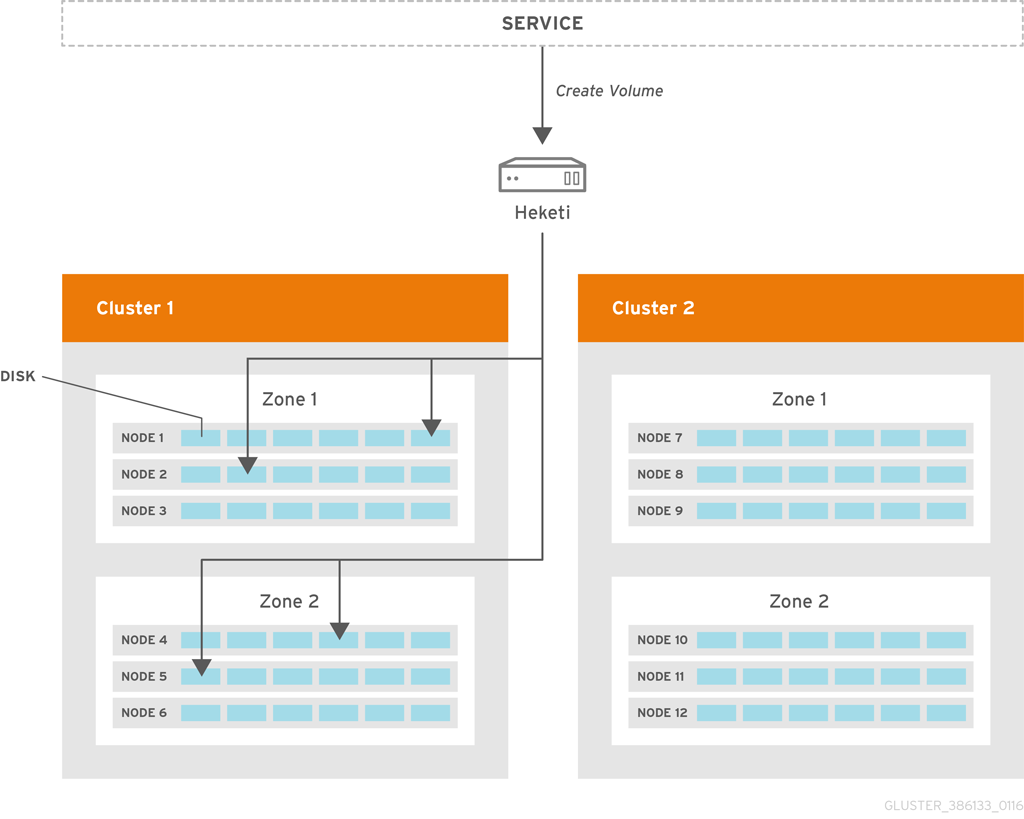
A create volume request to Heketi leads it to select bricks spread across 2 zones and 4 nodes. After the volume is created in Red hat Gluster Storage, Heketi provides the volume information to the service that initially made the request.
1.1. Increasing Storage Capacity
You can increase the storage capacity using any of the following ways:
- Adding devices
- Adding new nodes
- Adding an entirely new cluster.
1.1.1. Adding New Devices
You can add more devices to existing nodes to increase storage capacity. When adding more devices, you must ensure to add devices as a set. For example, when expanding a distributed replicated volume with a replica count of replica 2, then one device should be added to at least two nodes. If using replica 3, then at least one device should be added to at least three nodes.
You can add a device by using CLI as follows:
Register the specified device. The following example command shows how to add a device` /dev/sde` to node d6f2c22f2757bf67b1486d868dcb7794:
# heketi-cli device add --name=/dev/sde --node=d6f2c22f2757bf67b1486d868dcb7794
OUTPUT:
Device added successfully
1.1.2. Adding New Nodes
Another way to add storage to Heketi, is to add new nodes to the cluster. Like adding devices, you can add a new node to an existing cluster by using CLI. After you add a new node to the cluster, you must register new devices to that node.
For adding a node to be successful, ensure the ports are opened for glusterd communication. For more information about the ports, see https://access.redhat.com/documentation/en-us/red_hat_gluster_storage/3.5/html/installation_guide/port_information
Scaleup the OCP cluster to add the new node. For more information see, https://access.redhat.com/documentation/en-us/openshift_container_platform/3.11/html-single/configuring_clusters/#adding-cluster-hosts_adding-hosts-to-cluster
Note- If the new node is already part of OCP cluster then skip this step and proceed with Step 2.
- The OCP cluster can be scaled up to add new nodes as either compute nodes or infra nodes. For example, for infra it is node3.example.com openshift_node_group_name='node-config-infra' and for compute node it is node3.example.com openshift_node_group_name='node-config-compute'.
Configure the firewall rules:
NoteFor adding a node to be successful, ensure the ports are opened for glusterd communication. For more information about the ports, see https://access.redhat.com/documentation/en-us/red_hat_gluster_storage/3.5/html/installation_guide/port_information
Add the following rules to the
/etc/sysconfig/iptablesfile of the newly added glusterfs node:-A OS_FIREWALL_ALLOW -p tcp -m state --state NEW -m tcp --dport 24007 -j ACCEPT -A OS_FIREWALL_ALLOW -p tcp -m state --state NEW -m tcp --dport 24008 -j ACCEPT -A OS_FIREWALL_ALLOW -p tcp -m state --state NEW -m tcp --dport 2222 -j ACCEPT -A OS_FIREWALL_ALLOW -p tcp -m state --state NEW -m multiport --dports 49152:49664 -j ACCEPT -A OS_FIREWALL_ALLOW -p tcp -m state --state NEW -m tcp --dport 24010 -j ACCEPT -A OS_FIREWALL_ALLOW -p tcp -m state --state NEW -m tcp --dport 3260 -j ACCEPT -A OS_FIREWALL_ALLOW -p tcp -m state --state NEW -m tcp --dport 111 -j ACCEPTReload/restart the iptables:
# systemctl restart iptables
Execute the following steps to add labels to the node where the RHGS Container will be deployed:
Verify that Red Hat Openshift Container Storage is deployed and working as expected in the existing project by executing the following command:
# oc get dsFor example:
# oc get ds
NAME                DESIRED   CURRENT   READY     UP-TO-DATE   AVAILABLE   NODE SELECTOR            AGE
glusterfs-storage   3         3         3         3            3           glusterfs=storage-host   1d
Add the label for each node which is newly added, where the Red Hat Gluster Storage pods are to be added for the new cluster:
# oc label node <NODE_NAME> glusterfs=<node_label>where,
- NODE_NAME: is the name of the newly created node.
-
node_label: The name that is used in the existing daemonset. This is the value you get in the previous step when you execute
oc get ds.
For example:
# oc label node 192.168.90.3 glusterfs=storage-host
node "192.168.90.3" labeled
Verify if the Red Hat Gluster Storage pods are running on the newly added node by executing the following command:
Observe additional Gluster Storage pods spawned on these new nodes
# oc get podsFor example:
# oc get pods
NAME              READY     STATUS    RESTARTS   AGE
glusterfs-356cf   1/1       Running   0          30d
glusterfs-fh4gm   1/1       Running   0          30d
glusterfs-hg4tk   1/1       Running   0          30d
glusterfs-v759z   0/1       Running   0          1m
You should see additional Gluster Storage pods, in this example 4 gluster pods instead of just 3 as before. It will take 1-2 minutes for them to become healthy. (i.e. glusterfs-v759z 0/1 not healthy yet).
Verify if the Red Hat Gluster Storage pods are running
# oc get pods -o wide -l glusterfs=storage-pod
Add a new node to the cluster by using Heketi CLI. Following shows an example of how to add new node in
zone 1to `597fceb5d6c876b899e48f599b988f54 ` cluster using the CLI:# heketi-cli node add --zone=1 --cluster=597fceb5d6c876b899e48f599b988f54 --management-host-name=node4.example.com --storage-host-name=192.168.10.104 OUTPUT: Node information: Id: 095d5f26b56dc6c64564a9bc17338cbf State: online Cluster Id: 597fceb5d6c876b899e48f599b988f54 Zone: 1 Management Hostname node4.example.com Storage Hostname 192.168.10.104- Add devices to the cluster by using Heketi CLI. For more information on adding devices, refer Section 1.1.1, “Adding New Devices”.
- Manually update the endpoints as they are not updated automatically when a node is added to a gluster trusted storage pool using heketi. For more information on how to update the endpoints, see Section 1.1.2.1, “Updating the endpoints after adding a new node”.
1.1.2.1. Updating the endpoints after adding a new node
Procedure
List the endpoints across all the namespaces that have the old IP address configured:
# oc get ep --all-namespaces | grep <OLD_IP><OLD_IP>-
Specify the old IP address, for example,
10.0.0.57.
Example 1.1. Example output
NAMESPACE  NAME
      ENDPOINTS                               AGE
glusterfs  glusterfs-dynamic-3901a1fb-ee2c-11eb-9447-001a4a0005a7
      10.0.0.181:1,10.0.0.57:1,10.0.0.43:1    112d
glusterfs  glusterfs-dynamic-3bcc23bf-a5c0-11eb-b69a-001a4a0005a7
      10.0.0.181:1,10.0.0.57:1,10.0.0.43:1    205d
glusterfs  glusterfs-dynamic-a4a000f5-ee28-11eb-9447-001a4a0005a7
      10.0.0.181:1,10.0.0.57:1,10.0.0.43:1    113d
glusterfs  heketi-db-storage-endpoints
      10.0.0.57:1,10.0.0.181:1,10.74.251.23:1 217d
Optional: Confirm that the IP address (for example,
10.0.0.64) of the new node is added:# oc get ep <heketi-db-endpoint_name>Example 1.2. Example
# oc get ep heketi-db-storage-endpointsExample 1.3. Example output
NAME                          ENDPOINTS                                       AGE
heketi-db-storage-endpoints   10.0.0.181:1,10.0.0.57:1,10.0.0.43:1            217d
Select any gluster volume, navigate into the concerned heketi pod, and execute the following command:
# heketi-cli volume endpoint patch <volume_id><volume_id>Specify the ID of a gluster file based volume, for example,
253778390e76e7ab803231504dc266d4.Example 1.4. Example
# heketi-cli volume endpoint patch 253778390e76e7ab803231504dc266d4Example 1.5. Example output
{"subsets": [{"addresses":[{"ip":"10.0.0.181"}],"ports":[{"port":1}]},{"addresses":[{"ip":"10.0.0.57"}],"ports":[{"port":1}]},{"addresses":[{"ip":"10.0.0.43"}],"ports":[{"port":1}]},{"addresses":[{"ip":"10.0.0.64"}],"ports":[{"port":1}]}]}
In this example, a new node with IP address
10.0.0.64is added. By default, heketi shows the new IP address on each gluster volume.Execute the following command from the
oc bastionto add the IP address of the new node to theheketi-db-endpoint:# oc patch ep <heketi-db-endpoint_name> -p <patch_json><heketi-db-endpoint_name>-
Specify the name of the heketi-db endpoint, for example,
heketi-db-storage-endpoints. <patch_json>-
Is the JSON patch that the
heketi-clicommand generates.
Example 1.6. Example
# oc patch ep heketi-db-storage-endpoints -p '{"subsets": [{"addresses":[{"ip":"10.0.0.181"}],"ports":[{"port":1}]},{"addresses":[{"ip":"10.0.0.57"}],"ports":[{"port":1}]},{"addresses":[{"ip":"10.0.0.43"}],"ports":[{"port":1}]},{"addresses":[{"ip":"10.0.0.64"}],"ports":[{"port":1}]}]}'Replace the old IP address with the IP address of the new node on the gluster endpoints:
# oc get ep --all-namespaces | grep glusterfs-dynamic | tr -s ' ' | while read LINE; do NS=$(echo $LINE|cut -d' ' -f1); EP=$(echo $LINE|cut -d' ' -f2); echo $NS $EP; oc -n $NS get ep $EP -o yaml | sed 's/<old_ip_address>/<new_ip_address>/g' | oc -n $NS replace -f - ; done<old_ip_address>- Specify the old IP address.
<new_ip_address>-
Specify the IP address of the new node, for example,
10.0.0.64.
This command edits all the heketi endpoints (usually starting with the name
glusterfs-dynamic), and replaces the old IP address with the new IP address.- Replace the old IP address with the IP address of the new node on the gluster-block based volumes. For more information, see the Red Hat Knowledgebase solution Gluster block PVs are not updated with new IPs after gluster node replacement.
Optional: If the node is still present, you must evacuate and delete the node from OpenShift Container Storage.
Remove and delete the devices. For more information on how to remove and delete devices from an old node, see Section 1.2.3, “Deleting Device”.
Important-
You can use the
--force-forgetoption along with theheketi-cli device delete <device_ID>command to delete failed devices. However, it is recommended to use this option only when the device delete command fails. -
You must ensure that the device is removed or the system is clean outside of heketi using the system commands and only then use the
--force-forgetoption.
-
You can use the
Optional: If the disks or devices are still present, you must delete one device at a time, and wait for the self-heal operation to complete before deleting the next device.
NoteThe heal operation might take a long time to complete since it replaces all the bricks from the old node to the replacement node.
- Delete the node. For more information on how to delete a node from heketi configuration, see Section 1.2.4, “Deleting Node”.
-
If the endpoints were already updated when you replaced the old IP address with the IP address of the new node on the heketi endpoints, then you do not need to execute the
heketi-cli volume endpoint patchoroc patch epcommand. Refer to the previous steps 2 and 3. - Optional: If you have Persistent Volumes (PVs), block volume based gluster block, follow the steps 11 to 16 of Section 3.2.2, “Replacing a node on Block Storage”, as you need to update the new IP address on the PV definition and iSCSI target layer.
- Remove the storage labels from the old node. For more information on how to delete and uninstall the old node from OpenShift Container Platform, see Uninstalling nodes.
1.1.3. Adding a New Cluster to an Existing Red Hat Openshift Container Storage Installation
Storage capacity can be increased by adding new clusters of Red Hat Gluster Storage. The nodes of the new clusters must be prepared as either OCP nodes (converged mode) or RHGS nodes (independent mode). To add a new cluster to an existing Red Hat Openshift Container Storage installation, execute the following commands:
Verify that Red Hat Openshift Container Storage is deployed and working as expected in the existing project by executing the following command. :
# oc get dsFor example:
# oc get ds NAME DESIRED CURRENT READY UP-TO-DATE AVAILABLE NODE SELECTOR AGE glusterfs-storage 3 3 3 3 3 glusterfs=storage-host 1dNoteAdd new hosts by performing step 1 and step 2 in Section 1.1.2, “Adding New Nodes” section. Repeat the steps for all the nodes you want to add.
Verify if the Red Hat Gluster Storage pods are running by executing the following command:
# oc get podsAdd the label for each node which is newly added , where the Red Hat Gluster Storage pods are to be added for the new cluster to start by executing the following command:
# oc label node <NODE_NAME> glusterfs=<node_label>where,
- NODE_NAME: is the name of the newly created node
- node_label: The name that is used in the existing daemonset.
For example:
# oc label node 192.168.90.3 glusterfs=storage-host
node "192.168.90.3" labeled
Observe additional Gluster Storage pods spawned on these new nodes
# oc get podsFor example:
# oc get pods
NAME              READY     STATUS    RESTARTS   AGE
glusterfs-356cf   1/1       Running   0          30d
glusterfs-fh4gm   1/1       Running   0          30d
glusterfs-hg4tk   1/1       Running   0          30d
glusterfs-v759z   0/1       Running   0          1m
glusterfs-rgs3k   0/1       Running   0          1m
glusterfs-gtq9f   0/1       Running   0          1m
You should see additional Gluster Storage pods, in this example 6 gluster pods instead of just 3 as before. It will take 1-2 minutes for them to become healthy. (i.e. glusterfs-v759z, glusterfs-rgs3k, and glusterfs-gtq9f 0/1 not healthy yet).
Verify if the Red Hat Gluster Storage pods are running by executing the following command:
# oc get dsFor example:
# oc get ds
NAME                DESIRED   CURRENT   READY     UP-TO-DATE   AVAILABLE   NODE SELECTOR            AGE
glusterfs-storage   6         6         6         6            6           glusterfs=storage-host   2h
Create a new cluster in Heketi by using the following command:
# heketi-cli cluster create- Add nodes and devices to the newly created cluster as described in sections Adding New Devices and Adding New Nodes.
1.2. Reducing Storage Capacity
Heketi also supports the reduction of storage capacity. You can reduce storage by deleting devices, nodes, and clusters. These requests can only be performed by using the Heketi CLI or the API. For information on using command line API, see Heketi API https://github.com/heketi/heketi/wiki/API.
The IDs can be retrieved by executing the heketi-cli topology info command.
# heketi-cli topology info-
The
heketidbstoragevolume cannot be deleted as it contains the heketi database.
1.2.1. Deleting Volumes
You can delete the volume using the following Heketi CLI command:
# heketi-cli volume delete <volume_id>For example:
# heketi-cli volume delete 12b2590191f571be9e896c7a483953c3
Volume 12b2590191f571be9e896c7a483953c3 deleted
1.2.2. Deleting Bricks
You can delete a brick from a volume using the following Heketi CLI command:
# heketi-cli brick evict <brick_id>For example:
# heketi-cli brick evict 000e649d15e7d2a7615de3c2878ee270
  Brick 000e649d15e7d2a7615de3c2878ee270 evicted
The brick ID can be determined from the Heketi topology. A brick belongs to one single volume so only the brick ID is required. Heketi will automatically determine the volume that the brick is associated to and will replace it with a new brick.
1.2.3. Deleting Device
Deleting the device deletes devices from heketi’s topology. Devices that have bricks cannot be deleted. You must ensure they are free of bricks by disabling and removing devices.
1.2.3.1. Disabling and Enabling a Device
Disabling devices stops further allocation of bricks onto the device. You can disable devices using the following Heketi CLI command:
# heketi-cli device disable <device_id>For example:
# heketi-cli device disable f53b13b9de1b5125691ee77db8bb47f4
Device f53b13b9de1b5125691ee77db8bb47f4 is now offline
If you want to re-enable the device, execute the following command. Enabling the device allows allocation of bricks onto the device.
# heketi-cli device enable <device_id>For example:
# heketi-cli device enable f53b13b9de1b5125691ee77db8bb47f4
Device f53b13b9de1b5125691ee77db8bb47f4 is now online
1.2.3.2. Removing and Deleting the Device
Removing devices moves existing bricks from the device to other devices. This helps in ensuring the device is free of bricks. A device can be removed only after disabling it.
Remove device using the following command:
# heketi-cli device remove <device_id>For example:
# heketi-cli device remove e9ef1d9043ed3898227143add599e1f9
Device e9ef1d9043ed3898227143add599e1f9 is now removed
Delete the device using the following command:
# heketi-cli device delete <device_id>For example:
# heketi-cli device delete 56912a57287d07fad0651ba0003cf9aa
Device 56912a57287d07fad0651ba0003cf9aa deleted
The only way to reuse a deleted device is by adding the device to heketi’s topology again.
1.2.4. Deleting Node
Nodes that have devices added to it cannot be deleted. To delete the node, the devices that are associated with the node have to be deleted. Disabling and removing the node ensures all the underlying devices are removed too. Once the node is removed, all the devices in it can be deleted and finally the node can be deleted.
1.2.4.1. Disabling and Enabling a Node
Disabling node stops further allocation of bricks to all the devices associated to the node. You can disable nodes using the following Heketi CLI command:
# heketi-cli node disable <node_id>For example:
# heketi-cli node disable 5f0af88b968ed1f01bf959fe4fe804dc
Node 5f0af88b968ed1f01bf959fe4fe804dc is now offline
If you want to re-enable the node, execute the following command.
# heketi-cli node enable <node_id>For example:
# heketi-cli node enable 5f0af88b968ed1f01bf959fe4fe804dc
Node 5f0af88b968ed1f01bf959fe4fe804dc is now online
1.2.4.2. Removing and Deleting the Node
Removing nodes moves existing bricks from all the devices in the node to other devices in the cluster. This helps in ensuring all the device in the node is free of bricks. A device can be removed only after disabling it.
To remove the node execute the following command:
# heketi-cli node remove <node_id>For example:
# heketi-cli node remove 5f0af88b968ed1f01bf959fe4fe804dc
Node 5f0af88b968ed1f01bf959fe4fe804dc is now removed
Delete the devices associated with the node by executing the following command as the nodes that have devices associated with it cannot be deleted:
# heketi-cli device delete <device_id>For example:
# heketi-cli device delete 56912a57287d07fad0651ba0003cf9aa
Device 56912a57287d07fad0651ba0003cf9aa deleted
Execute the command for every device on the node.
Delete the node using the following command:
# heketi-cli node delete <node_id>For example:
# heketi-cli node delete 5f0af88b968ed1f01bf959fe4fe804dc
Node 5f0af88b968ed1f01bf959fe4fe804dc deleted
Deleting the node deletes the node from the heketi topology. The only way to reuse a deleted node is by adding the node to heketi’s topology again
Note-
When a node is deleted from a gluster trusted storage pool using heketi, existing endpoints are not updated automatically.
To update the endpoints execute the following commands:
# heketi-cli volume endpoint patch <volume-id># oc patch ep <heketi-db-endpoint-name> -p <changes>- Optional-When a node is deleted from a gluster trusted storage pool using heketi , the pods running on the deleted node are still present. To remove the pods execute the following commands:
# oc label nodes <node name> glusterfs-For example:
# oc label node 192.168.90.3 glusterfs-
  node "192.168.90.3" labeled
The glusterfs=storage-host label is removed from the node which ensures the deleted glusterfs pods are stopped and deleted from the removed node. For more information on required steps before maintenance, see link: https://access.redhat.com/documentation/en-us/red_hat_openshift_container_storage/3.11/html-single/operations_guide/index#necessary_steps_to_be_followed_before_maintenance
-
When a node is deleted from a gluster trusted storage pool using heketi, existing endpoints are not updated automatically.
1.2.5. Deleting Clusters
You can delete the cluster using the following Heketi CLI command:
Before a cluster is deleted, ensure that all the nodes inside the cluster are deleted.
# heketi-cli cluster delete <cluster_id>For example:
# heketi-cli cluster delete 0e949d91c608d13fd3fc4e96f798a5b1
Cluster 0e949d91c608d13fd3fc4e96f798a5b1 deleted
1.3. Replacing Cluster Resources
Heketi supports the replacement of devices and nodes. The procedure to replace devices and nodes is given in the following sections.
1.3.1. Replacing Devices
Heketi does not allow one-to-one replacement of a device with another. However, in case of a failed device, follow the example below for the sequence of operations that are required to replace a failed device.
Locate the device that has failed using the following command:
# heketi-cli topology info… … ... Nodes: Node Id: 8faade64a9c8669de204b66bc083b10d ... ... … Id:a811261864ee190941b17c72809a5001 Name:/dev/vdc State:online Size (GiB):499 Used (GiB):281 Free (GiB):218 Bricks: Id:34c14120bef5621f287951bcdfa774fc Size (GiB):280 Path: /var/lib/heketi/mounts/vg_a811261864ee190941b17c72809a5001/brick_34c14120bef5621f287951bcdfa774fc/brick … … ...The example below illustrates the sequence of operations that are required to replace a failed device. The example uses device ID
a811261864ee190941b17c72809a5001which belongs to node with id8faade64a9c8669de204b66bc083b10das.Add a new device preferably to the same node as the device being replaced.
# heketi-cli device add --name /dev/vdd --node 8faade64a9c8669de204b66bc083b10d
Device added successfully
Disable the failed device.
# heketi-cli device disable a811261864ee190941b17c72809a5001
Device a811261864ee190941b17c72809a5001 is now offline
Remove the failed device.
# heketi-cli device remove a811261864ee190941b17c72809a5001
Device a811261864ee190941b17c72809a5001 is now removed
At this stage, the bricks are migrated from the failed device. Heketi chooses a suitable device based on the brick allocation algorithm. As a result, there is a possibility that all the bricks might not be migrated to the newly added device.
Delete the failed device.
Delete the device using the following heketi-cli delete command:
# heketi-cli device delete a811261864ee190941b17c72809a5001 Device a811261864ee190941b17c72809a5001 deletedNote-
You can use the
--force-forgetoption along with theHeketi-cli device delete <device-ID>command to delete failed devices. However, it is recommended to use this option only when the device delete command fails. -
You must ensure that the device is removed or the system is clean outside of heketi using the system commands and only then use the
--force-forgetoption.
-
You can use the
performance.read-aheadoption must be disabled in order to allow the heal to complete.# gluster volume set <VOLUME> performance.read-ahead offNoteSet
performance.read-aheadoption as OFF until the task of healing the volume is accomplished, once healing is complete set it back to the default state that is ON state.- Extra shd’s must be started if more than 100,000 entries require healing. For more information on how to start additional self-heal daemon, see https://access.redhat.com/solutions/3794011
Before repeating the above sequence of steps on another device, you must wait for the self-heal operation to complete. You can verify that the self-heal operation completed when the Number of entries value returns a 0 value.
# oc rsh <any_gluster_pod_name>
for each in $(gluster volume list) ; do gluster vol heal $each info | grep "Number of entries:" ; done
Number of entries: 0
Number of entries: 0
Number of entries: 0
1.3.2. Replacing Nodes
Heketi does not allow one-to-one replacement of a node with another. However, in case of a failed node, follow the example below for the sequence of operations that are required to replace a failed node and its respective devices.
Locate the node that has failed using the following command:
# heketi-cli topology info

…
…
...
    Nodes:
Node Id: 8faade64a9c8669de204b66bc083b10d
...
...
…
          Id:a811261864ee190941b17c72809a5001   Name:/dev/vdc            State:online    Size (GiB):499     Used (GiB):281     Free (GiB):218
                  Bricks:
                          Id:34c14120bef5621f287951bcdfa774fc   Size (GiB):280     Path: /var/lib/heketi/mounts/vg_a811261864ee190941b17c72809a5001/brick_34c14120bef5621f287951bcdfa774fc/brick
…
…
...
The example below illustrates the sequence of operations that are required to replace a failed node. The example uses node ID 8faade64a9c8669de204b66bc083b10d.
Scale up the OCP cluster to add the replacement node. For more detail how to add a node, refer to the steps in section Section 1.1.2, “Adding New Nodes”.
NoteIf the replacement node is already part of OCP cluster then skip this step and proceed with step 2.
Add a new node, preferably with the same number of devices and size as the node being replaced. Refer to the steps in section, Section 1.1.2, “Adding New Nodes”.
# heketi-cli node add --zone=1 --cluster=597fceb5d6c876b899e48f599b988f54 --management-host-name=node4.example.com --storage-host-name=192.168.10.104

# heketi-cli device add --name /dev/vdd --node 8faade64a9c8669de204b66bc083b10d

Node and device added successfully
Disable the failed node.
# heketi-cli node disable 8faade64a9c8669de204b66bc083b10d
Node 8faade64a9c8669de204b66bc083b10d is now offline
Remove the failed node.
# heketi-cli node remove 8faade64a9c8669de204b66bc083b10d
Node 8faade64a9c8669de204b66bc083b10d is now removed
At this stage, the bricks are migrated from the failed node. Heketi chooses a suitable device based on the brick allocation algorithm.
Delete the devices associated with the node by executing the following command as the nodes that have devices associated with it cannot be deleted:
# heketi-cli device delete <device_id>For example:
# heketi-cli device delete 56912a57287d07fad0651ba0003cf9aa
Device 56912a57287d07fad0651ba0003cf9aa deleted
Execute the command for every device on the node.
Delete the failed node.
# heketi-cli node delete 8faade64a9c8669de204b66bc083b10d Node 8faade64a9c8669de204b66bc083b10d deletedNoteIf you want to replace a block from a node, refer to Section 3.2.2, “Replacing a node on Block Storage”