Chapter 10. Publishing certificates and CRLs
Red Hat Certificate System includes a customizable publishing framework for the Certificate Manager, enabling certificate authorities to publish certificates, certificate revocation lists (CRLs), and other certificate-related objects to any of the supported repositories: an LDAP-compliant directory, a flat file, and an online validation authority. This chapter explains how to configure a Certificate Manager to publish certificates and CRLs to a file, to a directory, and to the Online Certificate Status Manager.
The general process to configure publishing is as follows:
Configure publishing to a file, LDAP directory, or OCSP responder.
There can be a single publisher or multiple publishers, depending on how many locations will be used. The locations can be split by certificates and CRLs or narrower definitions, such as certificate type. Rules determine which type to publish and to what location by being associated with the publisher.
Set rules to determine what certificates are published to the locations. Any rule which a certificate or CRL matches is activated, so the same certificate can be published to a file and to an LDAP directory by matching a file-based rule and matching a directory-based rule.
Rules can be set for each object type: CA certificates, CRLs, user certificates, and cross-pair certificates. Disable all rules that will not be used.
- Configure CRLs. CRLs must be configured before they can be published. See Chapter 7, Revoking certificates and issuing CRLs.
- Enable publishing after setting up publishers, mappers, and rules. Once publishing is enabled, the server starts publishing immediately. If the publishers, mappers, and rules are not completely configured, publishing may not work correctly or at all.
10.1. About publishing
The Certificate System is capable of publishing certificates to a file or an LDAP directory and of publishing CRLs to a file, an LDAP directory, or to an OCSP responder.
For additional flexibility, specific types of certificates or CRLs can be published to a single format or all three. For example, CA certificates can be published only to a directory and not to a file, and user certificates can be published to both a file and a directory.
An OCSP responder only provides information about CRLs; certificates are not published to an OCSP responder.
Different publishing locations can be set for certificates files and CRL files, as well as different publishing locations for different types of certificates files or different types of CRL files.
Similarly, different types of certificates and different types of CRLs can be published to different places in a directory. For example, certificates for users from the West Coast division of a company can be published in one branch of the directory, while certificates for users in the East Coast division can be published to another branch in the directory.
When publishing is enabled, every time a certificate or a CRL is issued, updated, or revoked, the publishing system is invoked. The certificate or CRL is evaluated by the rules to see if it matches the type and predicate set in the rule. The type specifies if the object is a CRL, CA certificate, or any other certificate. The predicate sets more criteria for the type of object being evaluated. For example, it can specify user certificates, or it can specify West Coast user certificates. To use predicates, a value needs to be entered in the predicate field of the publishing rule, and a corresponding value (although formatted somewhat differently) needs to be contained in the certificate or certificate request to match. The value in the certificate or certificate request may be derived from information in the certificate, such as the type of certificate, or may be derived from a hidden value that is placed in the request form. If no predicate is set, all certificates of that type are considered to match. For example, all CRLs match the rule if CRL is set as the type.
Every rule that is matched publishes the certificate or CRL according to the method and location specified in that rule. A given certificate or CRL can match no rules, one rule, more than one rule, or all rules. The publishing system attempts to match every certificate and CRL issued against all rules.
When a rule is matched, the certificate or CRL is published according to the method and location specified in the publisher associated with that rule. For example, if a rule matches all certificates issued to users, and the rule has a publisher that publishes to a file in the location /etc/CS/certificates, the certificate is published as a file to that location. If another rule matches all certificates issued to users, and the rule has a publisher that publishes to the LDAP attribute userCertificate;binary attribute, the certificate is published to the directory specified when LDAP publishing was enabled in this attribute in the user’s entry.
For rules that specify to publish to a file, a new file is created when either a certificate or a CRL is issued in the stipulated directory.
For rules that specify to publish to an LDAP directory, the certificate or CRL is published to the entry specified in the directory, in the attribute specified. The CA overwrites the values for any published certificate or CRL attribute with any subsequent certificate or CRL. Simply put, any existing certificate or CRL that is already published is replaced by the next certificate or CRL.
For rules that specify to publish to an Online Certificate Status Manager, a CRL is published to this manager. Certificates are not published to an Online Certificate Status Manager.
For LDAP publishing, the location of the user’s entry needs to be determined. Mappers are used to determine the entry to which to publish. The mappers can contain an exact DN for the entry, some variable that associates information that can be gotten from the certificate to create the DN, or enough information to search the directory for a unique attribute or set of attributes in the entry to ascertain the correct DN for the entry.
When a certificate is revoked, the server uses the publishing rules to locate and delete the corresponding certificate from the LDAP directory or from the filesystem.
When a certificate expires, the server can remove that certificate from the configured directory. The server does not do this automatically; the server must be configured to run the appropriate job. For details, see Chapter 14, Setting automated jobs.
Setting up publishing involves configuring publishers, mappers, and rules.
10.1.1. Publishers
Publishers specify the location to which certificates and CRLs are published. When publishing to a file, publishers specify the filesystem publishing directory. When publishing to an LDAP directory, publishers specify the attribute in the directory that stores the certificate or CRL; a mapper is used to determine the DN of the entry. For every DN, a different formula is set for deriving that DN. The location of the LDAP directory is specified when LDAP publishing is enabled. When publishing a CRL to an OCSP responder, publishers specify the hostname and URI of the Online Certificate Status Manager.
10.1.2. Mappers
Mappers are only used in LDAP publishing. Mappers construct the DN for an entry based on information from the certificate or the certificate request. The server has information from the subject name of the certificate and the certificate request and needs to know how to use this information to create a DN for that entry. The mapper provides a formula for converting the information available either to a DN or to some unique information that can be searched in the directory to obtain a DN for the entry.
10.1.3. Rules
Rules for file, LDAP, and OCSP publishing tell the server whether and how a certificate or CRL is to be published. A rule first defines what is to be published, a certificate or CRL matching certain characteristics, by setting a type and predicate for the rule. A rule then specifies the publishing method and location by being associated with a publisher and, for LDAP publishing, with a mapper.
Rules can be as simple or complex as necessary for the PKI deployment and are flexible enough to accommodate different scenarios.
10.1.4. Publishing to Files
The server can publish certificates and CRLs to flat files, which can then be imported into any repository, such as a relational database. When the server is configured to publish certificates and CRLs to file, the published files are DER-encoded binary blobs, base-64 encoded text blobs, or both.
-
For each certificate the server issues, it creates a file that contains the certificate in either DER-encoded or base-64 encoded format. Each file is named either
cert-serial_number.derorcert-serial_number.b64. The serial_number is the serial number of the certificate contained in the file. For example, the filename for a DER-encoded certificate with the serial number1234iscert-1234.der. -
Every time the server generates a CRL, it creates a file that contains the new CRL in either DER-encoded or base-64 encoded format. Each file is named either
issuing_point_name-this_update.derorissuing_point_name-this_update.b64, depending on the format. The issuing_point_name identifies the CRL issuing point which published the CRL, and this_update specifies the value derived from the time-dependent update value for the CRL contained in the file. For example, the filename for a DER-encoded CRL with the valueThis Update: Friday January 28 15:36:00 PST 2022, isMasterCRL-20220128-153600.der.
10.1.5. OCSP Publishing
There are two forms of Certificate System OCSP services, an internal service for the Certificate Manager and the Online Certificate Status Manager. The internal service checks the internal database of the Certificate Manager to report on the status of a certificate. The internal service is not set for publishing; it uses the certificates stored in its internal database to determine the status of a certificate. The Online Certificate Status Manager checks CRLs sent to it by Certificate Manager. A publisher is set for each location a CRL is sent and one rule for each type of CRL sent.
For detailed information on both OCSP services, see Section 7.6, “Using the Online Certificate Status Protocol (OCSP) responder”.
10.1.6. LDAP Publishing
In LDAP publishing, the server publishes the certificates, CRLs, and other certificate-related objects to a directory using LDAP or LDAPS. The branch of the directory to which it publishes is called the publishing directory.
- For each certificate the server issues, it creates a blob that contains the certificate in its DER-encoded format in the specified attribute of the user’s entry. The certificate is published as a DER encoded binary blob.
- Every time the server generates a CRL, it creates a blob that contains the new CRL in its DER-encoded format in the specified attribute of the entry for the CA.
The server can publish certificates and CRLs to an LDAP-compliant directory using the LDAP protocol or LDAP over SSL (LDAPS) protocol, and applications can retrieve the certificates and CRLs over HTTP. Support for retrieving certificates and CRLs over HTTP enables some browsers to import the latest CRL automatically from the directory that receives regular updates from the server. The browser can then use the CRL to check all certificates automatically to ensure that they have not been revoked.
For LDAP publishing to work, the user entry must be present in the LDAP directory.
If the server and publishing directory become out of sync for some reason, privileged users (administrators and agents) can also manually initiate the publishing process. For instructions, see Section 10.11.2, “Manually updating the crl in the directory”.
10.1.7. Configuring publishing to a file
The general process to configure publishing involves setting up a publisher to publish the certificates or CRLs to the specific location. There can be a single publisher or multiple publishers, depending on how many locations will be used. The locations can be split by certificates and CRLs or finer definitions, such as certificate type. Rules determine which type to publish and to what location by being associated with the publisher.
Publishing to file simply publishes the CRLs or certificates to text files on a given host.
Publishers must be created and configured for each publishing location; publishers are not automatically created for publishing to a file. To publish all files to a single location, create one publisher. To publish to different locations, create a publisher for each location. A location can either contain an object type, like user certificates, or a subset of an object type, like West Coast user certificates.
To create publishers for publishing to files:
Log into the Certificate Manager Console.
pkiconsole https://server.example.com:8443/caNotepkiconsoleis being deprecated.In the Configuration tab, select Certificate Manager from the navigation tree on the left. Select Publishing, and then Publishers.
The Publishers Management tab, which lists configured publisher instances, opens on the right.

Click to open the Select Publisher Plug-in Implementation window, which lists registered publisher modules.

Select the
FileBasedPublishermodule, then open the editor window.This is the module that enables the Certificate Manager to publish certificates and CRLs to files.
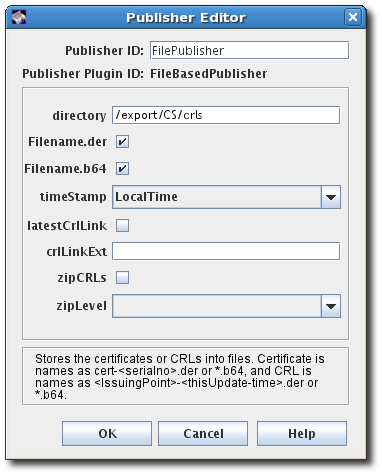
Configure the information for publishing the certificate:
-
The publisher ID, an alphanumeric string with no spaces like
PublishCertsToFile -
The path to the directory in which the Certificate Manager should publish the files. The path can be an absolute path or can be relative to the Certificate System instance directory. For example,
/export/CS/certificates. - The file type to publish, by selecting the checkboxes for DER-encoded files, base-64 encoded files, or both.
- For CRLs, the format of the timestamp. Published certificates include serial numbers in their file names, while CRLs use timestamps.
- For CRLs, whether to generate a link in the file to go to the latest CRL. If enabled, the link assumes that the name of the CRL issuing point to use with the extension will be supplied in the crlLinkExt field.
- For CRLs, whether to compress (zip) CRLs and the compression level to use.
-
The publisher ID, an alphanumeric string with no spaces like
After configuring the publisher, configure the rules for the published certificates and CRLs, as described in Section 10.4, “Creating rules”.
10.2. Configuring publishing to an OCSP
The general process to configure publishing involves setting up a publisher to publish the certificates or CRLs to the specific location. There can be a single publisher or multiple publishers, depending on how many locations will be used. The locations can be split by certificates and CRLs or finer definitions, such as certificate type. Rules determine which type to publish and to what location by being associated with the publisher.
Publishing to an OCSP Manager is a way to publish CRLs to a specific location for client verification.
A publisher must be created and configured for each publishing location; publishers are not automatically created for publishing to the OCSP responder. Create a single publisher to publish everything to s single location, or create a publisher for every location to which CRLs will be published. Each location can contain a different kind of CRL.
10.2.1. Enabling publishing to an OCSP with client authentication
Log into the Certificate Manager Console.
pkiconsole https://server.example.com:8443/caNotepkiconsoleis being deprecated.In the Configuration tab, select Certificate Manager from the navigation tree on the left. Select Publishing, and then Publishers.
Click to open the Select Publisher Plug-in Implementation window, which lists registered publisher modules.
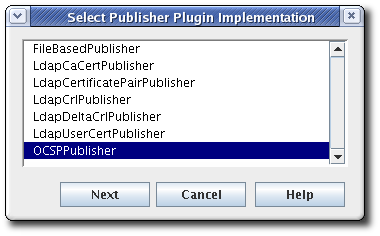
Select the
OCSPPublishermodule, then open the editor window. This is the publisher module that enables the Certificate Manager to publish CRLs to the Online Certificate Status Manager.
-
The publisher ID must be an alphanumeric string with no spaces, like
PublishCertsToOCSP. -
The host can be the fully-qualified domain name, such as
ocspResponder.example.com, or an IPv4 or IPv6 address. -
The default path is the directory to send the CRL to, like
/ocsp/agent/ocsp/addCRL. - If client authentication is used (enableClientAuth is checked), then the nickname field gives the nickname of the certificate to use for authentication. This certificate must already exist in the OCSP security database; this will usually be the CA subsystem certificate.
-
The publisher ID must be an alphanumeric string with no spaces, like
Create a user entry for the CA on the OCSP Manager. The user is used to authenticate to the OCSP when sending a new CRL. There are two things required:
-
Name the OCSP user entry after the CA server, like
CA-hostname-EEport. - Use whatever certificate was specified in the publisher configuration as the user certificate in the OCSP user account. This is usually the CA’s subsystem certificate.
Setting up subsystem users is covered in Section 16.3.2.1, “Creating users”.
-
Name the OCSP user entry after the CA server, like
After configuring the publisher, configure the rules for the published certificates and CRLs, as described in Section 10.4, “Creating rules”.
10.3. Configuring publishing to an LDAP Directory
The general process to configure publishing involves setting up a publisher to publish the certificates or CRLs to the specific location. There can be a single publisher or multiple publishers, depending on how many locations will be used. The locations can be split by certificates and CRLs or finer definitions, such as certificate type. Rules determine which type to publish and to what location by being associated with the publisher.
Configuring LDAP publishing is similar to other publishing procedures, with additional steps to configure the directory:
- Configure the Directory Server to which certificates will be published. Certain attributes have to be added to entries and bind identities and authentication methods have to be configured.
- Configure a publisher for each type of object published: CA certificates, cross-pair certificates, CRLs, and user certificates. The publisher declares in which attribute to store the object. The attributes set by default are the X.500 standard attributes for storing each object type. This attribute can be changed in the publisher, but generally, it is not necessary to change the LDAP publishers.
Set up mappers to enable an entry’s DN to be derived from the certificate’s subject name. This generally does not need set for CA certificates, CRLs, and user certificates. There can be more than one mapper set for a type of certificate. This can be useful, for example, to publish certificates for two sets of users from different divisions of a company who are located in different parts of the directory tree. A mapper is created for each of the groups to specify a different branch of the tree.
For details about setting up mappers, see Section 10.3.3, “Creating mappers”.
- Create rules to connect publishers to mappers, as described in Section 10.4, “Creating rules”.
- Enable publishing, as described in Section 10.5, “Enabling publishing”.
10.3.1. Configuring the LDAP directory
Before certificates and CRLs can be published, the Directory Server must be configured to work with the publishing system. This means that user entries must have attributes that allow them to receive certificate information, and entries must be created to represent the CRLs.
Set up the entry for the CA. For the Certificate Manager to publish its CA certificate and CRL, the directory must include an entry for the CA.
NoteWhen LDAP publishing is configured, the Certificate Manager automatically creates or converts an entry for the CA in the directory. This option is set in both the CA and CRL mapper instances and enabled by default. If the directory restricts the Certificate Manager from creating entries in the directory, turn off this option in those mapper instances, and add an entry for the CA manually in the directory.
When adding the CA’s entry to the directory, select the entry type based on the DN of the CA:
-
If the CA’s DN begins with the
cncomponent, create a newpersonentry for the CA. Selecting a different type of entry may not allow thecncomponent to be specified. If the CA’s DN begins with the
oucomponent, create a neworganizationalunitentry for the CA.The entry does not have to be in the
pkiCAorcertificationAuthorityobject class. The Certificate Manager will convert this entry to thepkiCAorcertificationAuthorityobject class automatically by publishing its CA’s signing certificate.NoteThe
pkiCAobject class is defined in RFC 4523, while thecertificationAuthorityobject class is defined in the (obsolete) RFC 2256. Either object class is acceptable, depending on the schema definitions used by the Directory Server. In some situations, both object classes can be used for the same CA entry.
For more information on creating directory entries, see the Red Hat Directory Server documentation.
-
If the CA’s DN begins with the
Add the correct schema elements to the CA and user directory entries.
For a Certificate Manager to publish certificates and CRLs to a directory, it must be configured with specific attributes and object classes.
Expand Object Type Schema Reason End-entity certificate
userCertificate;binary (attribute)
This is the attribute to which the Certificate Manager publishes the certificate.
This is a multi-valued attribute, and each value is a DER-encoded binary X.509 certificate. The LDAP object class named
inetOrgPersonallows this attribute. ThestrongAuthenticationUserobject class allows this attribute and can be combined with any other object class to allow certificates to be published to directory entries with other object classes. The Certificate Manager does not automatically add this object class to the schema table of the corresponding Directory Server.If the directory object that it finds does not allow the
userCertificate;binaryattribute, adding or removing the certificate fails.CA certificate
caCertificate;binary (attribute)
This is the attribute to which the Certificate Manager publishes the certificate.
The Certificate Manager publishes its own CA certificate to its own LDAP directory entry when the server starts. The entry corresponds to the Certificate Manager’s issuer name.
This is a required attribute of the
pkiCAorcertificationAuthorityobject class. The Certificate Manager adds this object class to the directory entry for the CA if it can find the CA’s directory entry.CRL
certificateRevocationList;binary (attribute)
This is the attribute to which the Certificate Manager publishes the CRL.
The Certificate Manager publishes the CRL to its own LDAP directory entry. The entry corresponds to the Certificate Manager’s issuer name.
This is an attribute of the
pkiCAorcertificationAuthorityobject class. The value of the attribute is the DER-encoded binary X.509 CRL. The CA’s entry must already contain thepkiCAorcertificationAuthorityobject class for the CRL to be published to the entry.Delta CRL
deltaRevocationList;binary (attribute)
This is the attribute to which the Certificate Manager publishes the delta CRL. The Certificate Manager publishes the delta CRL to its own LDAP directory entry, separate from the full CRL. The delta CRL entry corresponds to the Certificate Manager’s issuer name.
This attribute belongs to the
deltaCRLorcertificationAuthority-V2object class. The value of the attribute is the DER-encoded binary X.509 delta CRL.Set up a bind DN for the Certificate Manager to use to access the Directory Server.
The Certificate Manager user must have read-write permissions to the directory to publish certificates and CRLs to the directory so that the Certificate Manager can modify the user entries with certificate-related information and the CA entry with CA’s certificate and CRL related information.
The bind DN entry can be either of the following:
- An existing DN that has write access, such as the Directory Manager.
A new user which is granted write access. The entry can be identified by the Certificate Manager’s DN, such as
cn=testCA, ou=Research Dept, o=Example Corporation, st=California, c=US.NoteCarefully consider what privileges are given to this user. This user can be restricted in what it can write to the directory by creating ACLs for the account. For instructions on giving write access to the Certificate Manager’s entry, see the Directory Server documentation.
Set the directory authentication method for how the Certificate Manager authenticates to Directory Server. There are three options: basic authentication (simple username and password); SSL without client authentication (simple username and password); and SSL with client authentication (certificate-based).
See the Red Hat Directory Server documentation for instructions on setting up these methods of communication with the server.
10.3.2. Configuring LDAP publishers
The Certificate Manager creates, configures, and enables a set of publishers that are associated with LDAP publishing. The default publishers (for CA certificates, user certificates, CRLs, and cross-pair certificates) already conform to the X.500 standard attributes for storing certificates and CRLs and do not need to be changed.
| Publisher | Description |
|---|---|
| LdapCaCertPublisher | Publishes CA certificates to the LDAP directory. |
| LdapCrlPublisher | Publishes CRLs to the LDAP directory. |
| LdapDeltaCrlPublisher | Publishes delta CRLs to the LDAP directory. |
| LdapUserCertPublisher | Publishes all types of end-entity certificates to the LDAP directory. |
| LdapCrossCertPairPublisher | Publishes cross-signed certificates to the LDAP directory. |
10.3.3. Creating mappers
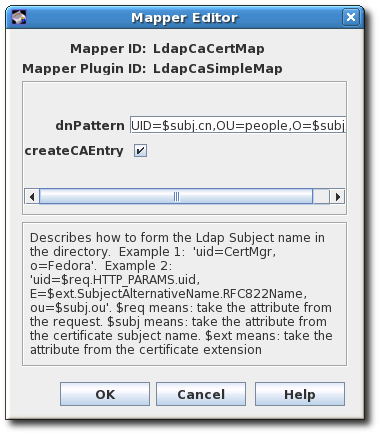
Mappers are only used with LDAP publishing. Mappers define a relationship between a certificate’s subject name and the DN of the directory entry to which the certificate is published. The Certificate Manager needs to derive the DN of the entry from the certificate or the certificate request so it can determine which entry to use. The mapper defines the relationship between the DN for the user entry and the subject name of the certificate or other input information so that the exact DN of the entry can be determined and found in the directory.
When it is configured, the Certificate Manager automatically creates a set of mappers defining the most common relationships. The default mappers are listed in Table 10.2, “Default mappers”.
| Mapper | Description |
|---|---|
| LdapUserCertMap | Locates the correct attribute of user entries in the directory in order to publish user certificates. |
| LdapCrlMap | Locates the correct attribute of the CA’s entry in the directory in order to publish the CRL. |
| LdapCaCertMap | Locates the correct attribute of the CA’s entry in the directory in order to publish the CA certificate. |
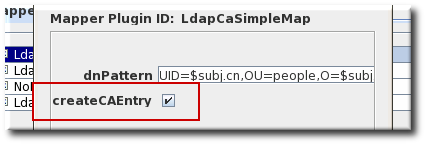
To use the default mappers, configure each of the macros by specifying the DN pattern and whether to create the CA entry in the directory. To use other mappers, create and configure an instance of the mapper. For more information, see Section C.2, “Mapper plug-in modules”.
Log into the Certificate Manager Console.
pkiconsole https://server.example.com:8443/caNotepkiconsoleis being deprecated.In the Configuration tab, select Certificate Manager from the navigation tree on the left. Select Publishing, and then Mappers.
The Mappers Management tab, which lists configured mappers, opens on the right.
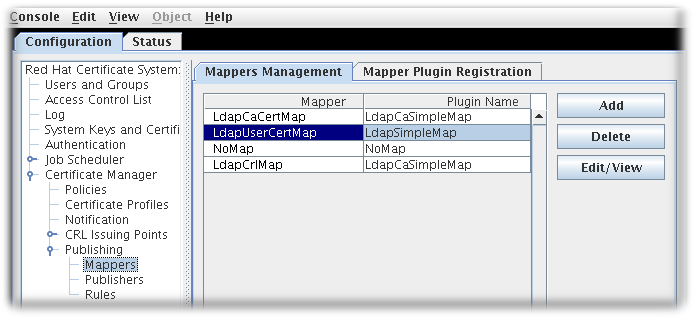
To create a new mapper instance, click . The Select Mapper Plugin Implementation window opens, which lists registered mapper modules. Select a module, and edit it. For complete information about these modules, see Section C.2, “Mapper plug-in modules”.

Edit the mapper instance, and click .
See Section C.2, “Mapper plug-in modules” for detailed information about each mapper.
10.3.4. Completing configuration: rules and enabling
After configuring the mappers for LDAP publishing, configure the rules for the published certificates and CRLs, as described in Section 10.4, “Creating rules”.
Once the configuration is complete, enable publishing, as described in Section 10.5, “Enabling publishing”.
10.4. Creating rules
Rules determine what certificate object is published in what location. Rules work independently, not in tandem. A certificate or CRL that is being published is matched against every rule. Any rule which it matches is activated. In this way, the same certificate or CRL can be published to a file, to an Online Certificate Status Manager, and to an LDAP directory by matching a file-based rule, an OCSP rule, and matching a directory-based rule.
Rules can be set for each object type: CA certificates, CRLs, user certificates, and cross-pair certificates. The rules can be more detailed for different kinds of certificates or different kinds of CRLs.
The rule first determines if the object matches by matching the type and predicate set up in the rule with the object. Where matching objects are published is determined by the publisher and mapper associated with the rule.
Rules are created for each type of certificate the Certificate Manager issues.
Modify publishing rules by doing the following:
Log into the Certificate Manager Console.
pkiconsole https://server.example.com:8443/caNotepkiconsoleis being deprecated.In the Configuration tab, select Certificate Manager from the navigation tree on the left. Select Publishing, and then Rules.
The Rules Management tab, which lists configured rules, opens on the right.
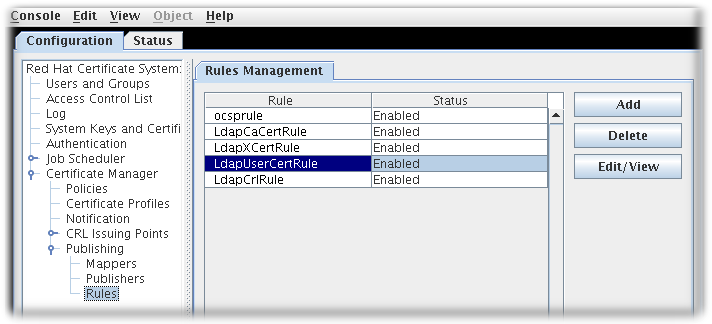
To edit an existing rule, select that rule from the list, and click . This opens the Rule Editor window.
To create a rule, click . This opens the Select Rule Plug-in Implementation window.

Select the
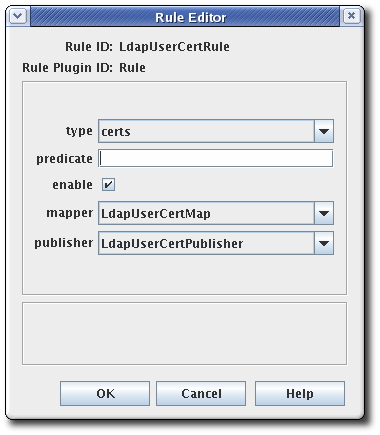
Rulemodule. This is the only default module. If any custom modules have been been registered, they are also available.Edit the rule.
-
type. This is the type of certificate for which the rule applies. For a CA signing certificate, the value is
cacert. For a cross-signed certificate, the value isxcert. For all other types of certificates, the value iscerts. For CRLs, specifycrl. - predicate. This sets the predicate value for the type of certificate or CRL issuing point to which this rule applies. The predicate values for CRL issuing points, delta CRLs, and certificates are listed in Table 10.3, “Predicate expressions”.
- enable.
- mapper. Mappers are not necessary when publishing to a file; they are only needed for LDAP publishing. If this rule is associated with a publisher that publishes to an LDAP directory, select an appropriate mapper here. Leave blank for all other forms of publishing.
- publisher. Sets the publisher to associate with the rule.
-
type. This is the type of certificate for which the rule applies. For a CA signing certificate, the value is
The following table lists the predicates that can be used to identify CRL issuing points and delta CRLs and certificate profiles.
| Predicate Type | Predicate |
|---|---|
| CRL Issuing Point |
To publish only the master CRL, set |
| Certificate Profile |
To publish certificates based on the profile used to issue them, set |
10.5. Enabling publishing
Publishing can be enabled for only files, only LDAP, or both. Publishing should be enabled after setting up publishers, rules, and mappers. Once enabled, the server attempts to begin publishing. If publishing was not configured correctly before being enabled, publishing may exhibit undesirable behavior or may fail.
Configure CRLs. CRLs must be configured before they can be published. See Chapter 7, Revoking certificates and issuing CRLs.
Log into the Certificate Manager Console.
pkiconsole https://server.example.com:8443/caNotepkiconsoleis being deprecated.In the Configuration tab, select Certificate Manager from the navigation tree on the left. Select Publishing.
The right pane shows the details for publishing to an LDAP-compliant directory.
- To enable publishing to a file only, select Enable Publishing.
To enable LDAP publishing, select both Enable Publishing and Enable Default LDAP Connection.
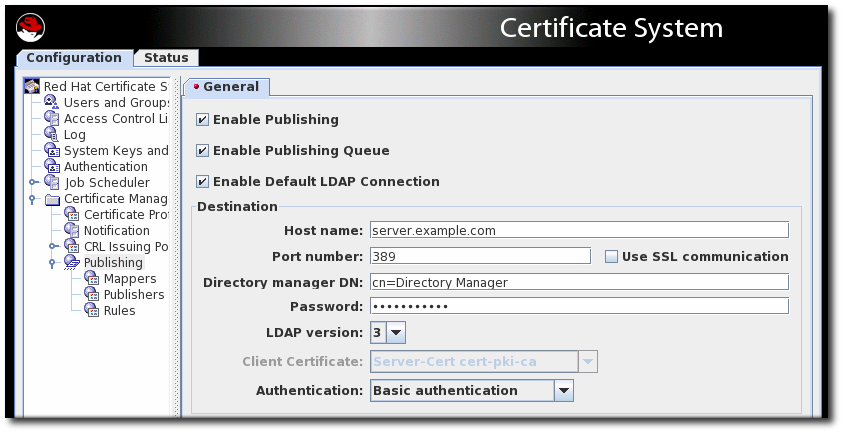
In the Destination section, set the information for the Directory Server instance.
Host name. If the Directory Server is configured for SSL client authenticated communication, the name must match the
cncomponent in the subject DN of the Directory Server’s SSL server certificate.The hostname can be the fully-qualified domain name or an IPv4 or IPv6 address.
- Port number.
- Directory Manager DN. This is the distinguished name (DN) of the directory entry that has Directory Manager privileges. The Certificate Manager uses this DN to access the directory tree and to publish to the directory. The access control set up for this DN determines whether the Certificate Manager can perform publishing. It is possible to create another DN that has limited read-write permissions for only those attributes that the publishing system actually needs to write.
Password. TThe CA uses this password to bind to the LDAP directory to which the certificate or CRL is published. The Certificate Manager saves this password in its
password.conffile. For example:CA LDAP Publishing:passwordNoteThe parameter name that identifies the publishing password (
CA LDAP Publishing) is set in the Certificate Manager’sCS.cfgfile in theca.publish.ldappublish.ldap.ldapauth.bindPWPromptparameter, and it can be edited.- Client certificate. This sets the certificate the Certificate Manager uses for SSL client authentication to the publishing directory. By default, the Certificate Manager uses its SSL server certificate.
- LDAP version. Select LDAP version 3.
Authentication. The way the Certificate Manager authenticates to the Directory Server. The choices are
Basic authenticationandSSL client authentication.If the Directory Server is configured for basic authentication or for SSL communication without client authentication, select
Basic authenticationand specify values for the Directory manager DN and password.If the Directory Server is configured for SSL communication with client authentication, select
SSL client authenticationand theUse SSL communicationoption, and identify the certificate that the Certificate Manager must use for SSL client authentication to the directory.
The server attempts to connect to the Directory Server. If the information is incorrect, the server displays an error message.
10.6. Enabling a publishing queue
Part of the enrollment process includes publishing the issued certificate to any directories or files. This, essentially, closes out the initial certificate request. However, publishing a certificate to an external network can significantly slow down the issuance process -which leaves the request open.
To avoid this situation, administrators can enable a publishing queue. The publishing queue separates the publishing operation (which may involve an external LDAP directory) from the request and enrollment operations, which uses a separate request queue. The request queue is updated immediately to show that the enrollment process is complete, while the publishing queue sends the information at the pace of the network traffic.
The publishing queue sets a defined, limited number of threads that publish generated certificates, rather than opening a new thread for each approved certificate.
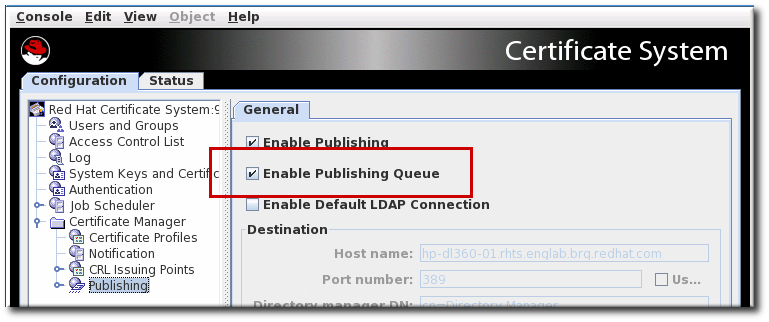
The publishing queue is disabled by default. It can be enabled in the CA Console, along with enabling publishing.
pkiconsole is being deprecated.
While the publishing queue is disabled by default, the queue is automatically enabled if LDAP publishing is enabled in the Console. Otherwise, the queue can be enabled manually.
Figure 10.1. Enabling the publishing queue
Enabling the publishing queue by editing the CS.cfg file allows administrators to set other options for publishing, like the number of threads to use for publishing operations and the queue page size.
For instruction on how to configure this feature by editing the CS.cfg file, see the Enabling and Configuring a Publishing Queue section in the Red Hat Certificate System Planning, Installation, and Deployment Guide.
10.7. Setting up resumable CRL downloads
Certificate System provides option for interrupted CRL downloads to be resumed smoothly. This is done by publishing the CRLs as a plain file over HTTP. This method of downloading CRLs gives flexibility in retrieving CRLs and lowers overall network congestion.
10.7.1. Retrieving CRLs using wget
Because CRLs can be published as a text file over HTTP, they can be manually retrieved from the CA using a tool such as wget. The wget command can be used to retrieve any published CRL. For example, to retrieve a full CRL which is newer than the previous full CRL:
[root@server ~]# wget --no-check-certificate -d https://server.example.com:8443/ca/ee/ca/crl/MasterCRL.bin
The relevant parameters for wget are summarized in the following table.
| Argument | Description |
|---|---|
| no argument | Retrieves the full CRL. |
| -N | Retrieves the CRL that is newer than the local copy (delta CRL). |
| -c | Retrieves a partially-downloaded file. |
| --no-check-certificate | Skips SSL for the connection, so it is not necessary to configure SSL between the host and client. |
| -d | Prints debug information. |
10.8. Publishing cross-pair certificates
The cross-pair certificates can be published as a crossCertificatePair entry to an LDAP directory or to a file; this is enabled by default. If this has been disabled, it can be re-enabled through the Certificate Manager Console by doing the following:
Open the CA console.
pkiconsole https://server.example.com:8443/caNotepkiconsoleis being deprecated.- In the Configuration tab, select the Certificate Manager link in the left pane, then the Publishing link.
- Click the Rules link under Publishing. This opens the Rules Management pane on the right.
If the rule exists and has been disabled, select the enable checkbox. If the rule has been deleted, then click and create a new rule.
- Select xcerts from the type drop-down menu.
- Make sure the enable checkbox is selected.
- Select LdapCaCertMap from the mapper drop-down menu.
- Select LdapCrossCertPairPublisher from the publisher drop-down menu.
The mapper and publisher specified in the publishing rule are both listed under Mapper and Publisher under the Publishing link in the left navigation window of the CA Console. The mapper, LdapCaCertMap, by default designates that the crossCertificatePair be stored to the LdapCaSimpleMap LDAP entry. The publisher, LDAPCrossPairPublisher, by default sets the attribute to store the cross-pair certificate in the CA entry to crossCertificatePair;binary.
- For more information on using cross-pair certificates, see Section 18.5, “Using cross-pair certificates”.
- For more information on creating cross-pair certificate profiles, see the Configuring Cross-Pair profiles section in the Red Hat Certificate System Planning, Installation, and Deployment Guide.
10.9. Testing publishing to files
To verify that the Certificate Manager is publishing certificates and CRLs correctly to file:
- Open the CA’s end-entities page, and request a certificate.
- Approve the request through the agent services page, if required.
- Retrieve the certificate from the end-entities page, and download the certificate into the browser.
Check whether the server generated the DER-encoded file containing the certificate.
Open the directory to which the binary blob of the certificate is supposed to be published. The certificate file should be named
cert-serial_number.der.Convert the DER-encoded certificate to its base 64-encoded format using the Binary to ASCII tool. For more information on this tool, refer to the
BtoA(1)man page.BtoA input_file output_fileinput_file sets the path to the file that contains the DER-encoded certificate, and output_file sets the path to the file to write the base-64 encoded certificate.
Open the ASCII file; the base-64 encoded certificate is similar to the one shown:
-----BEGIN CERTIFICATE-----
MMIIBtgYJYIZIAYb4QgIFoIIBpzCCAZ8wggGbMIIBRaADAgEAAgEBMA0GCSqGSIb3DQEBBAUAMFcxC
AJBgNVBAYTAlVTMSwwKgYDVQQKEyNOZXRzY2FwZSBDb21tdW5pY2F0aWhfyyuougjgjjgmkgjkgmjg
fjfgjjjgfyjfyj9ucyBDb3Jwb3JhdGlvbjpMEaMBgGA1UECxMRSXNzdWluZyhgdfhbfdpffjphotoo
gdhkBBdXRob3JpdHkwHhcNOTYxMTA4MDkwNzM0WhcNOTgxMTA4MDkwNzMM0WjBXMQswCQYDVQQGEwJ
VUzEsMCoGA1UEChMjTmV0c2NhcGUgQ29tbXVuaWNhdGlvbnMgQ29ycG9yY2F0aW9ucyBDb3Jwb3Jhd
GlvbjpMEaMBgGA1UECxMRSXNzdWluZyBBdXRob3JpdHkwHh
-----END CERTIFICATE-----
Convert the base 64-encoded certificate to a readable form using the Pretty Print Certificate tool. For more information on this tool, refer to the
PrettyPrintCert(1)man page.PrettyPrintCert input_file [output_file]input_file sets the path to the ASCII file that contains the base-64 encoded certificate, and output_file, optionally, sets the path to the file to write the certificate. If an output file is not set, the certificate information is written to the standard output.
Compare the output with the certificate issued; check the serial number in the certificate with the one used in the filename.
If everything matches, the Certificate Manager is configured correctly to publish certificates to file.
- Revoke the certificate.
Check whether the server generated the DER-encoded file containing the CRL.
Open the directory to which the server is to publish the CRL as a binary blob. The CRL file should have a name in the form
crl-this_update.der. this_update specifies the value derived from the time-dependentThis Updatevariable of the CRL.Convert the DER-encoded CRL to its base 64-encoded format using the Binary to ASCII tool.
BtoA input_file output_fileConvert the base 64-encoded CRL to readable form using the Pretty Print CRL tool.
PrettyPrintCrl input_file [output_file]- Compare the output.
10.10. Viewing certificates and CRLs published to file
Certificates and CRLs can be published to two types of files: base-64 encoded or DER-encoded. The content of these files can be viewed by converting the files to pretty-print format using the dumpasn1 tool or the PrettyPrintCert or PrettyPrintCrl tool.
To view the content in a base-64 encoded file:
Convert the base-64 file to binary. For example:
AtoB /tmp/example.b64 /tmp/example.binUse the
PrettyPrintCertorPrettyPrintCrltool to convert the binary file to pretty-print format. For example:PrettyPrintCert example.bin example.cert
To view the content of a DER-encoded file, simply run the
dumpasn1,PrettyPrintCert, orPrettyPrintCrltool with the DER-encoded file. For example:PrettyPrintCrl example.der example.crl
10.11. Updating certificates and CRLs in a directory
The Certificate Manager and the publishing directory can become out of sync if certificates are issued or revoked while the Directory Server is down. Certificates that were issued or revoked need to be published or unpublished manually when the Directory Server comes back up.
To find certificates that are out of sync with the directory - valid certificates that are not in the directory and revoked or expired certificates that are still in the directory - the Certificate Manager keeps a record of whether a certificate in its internal database has been published to the directory. If the Certificate Manager and the publishing directory become out of sync, use the Update Directory option in the Certificate Manager agent services page to synchronize the publishing directory with the internal database.
The following choices are available for synchronizing the directory with the internal database:
- Search the internal database for certificates that are out of sync and publish or unpublish.
- Publish certificates that were issued while the Directory Server was down. Similarly, unpublish certificates that were revoked or that expired while Directory Server was down.
- Publish or unpublish a range of certificates based on serial numbers, from serial number xx to serial number yy.
A Certificate Manager’s publishing directory can be manually updated by a Certificate Manager agent only.
10.11.1. Manually updating certificates in the directory
The Update Directory Server form in the Certificate Manager agent services page can be used to update the directory manually with certificate-related information. This form initiates a combination of the following operations:
- Update the directory with certificates.
Remove expired certificates from the directory.
Removing expired certificates from the publishing directory can be automated by scheduling an automated job. For details, see Chapter 14, Setting automated jobs.
- Remove revoked certificates from the directory.
Manually update the directory with changes by doing the following:
- Open the Certificate Manager agent services page.
- Select the Update Directory Server link.
Select the appropriate options, and click .
The Certificate Manager starts updating the directory with the certificate information in its internal database. If the changes are substantial, updating the directory can take considerable time. During this period, any changes made through the Certificate Manager, including any certificates issued or any certificates revoked, may not be included in the update. If any certificates are issued or revoked while the directory is updated, update the directory again to reflect those changes.
When the directory update is complete, the Certificate Manager displays a status report. If the process is interrupted, the server logs an error message.
If the Certificate Manager is installed as a root CA, the CA signing certificate may get published using the publishing rule set up for user certificates when using the agent interface to update the directory with valid certificates. This may return an object class violation error or other errors in the mapper. Selecting the appropriate serial number range to exclude the CA signing certificate can avoid this problem. The CA signing certificate is the first certificate a root CA issues.
-
Modify the default publishing rule for user certificates by changing the value of the
predicateparameter toprofileId!=caCACert. -
Use the
LdapCaCertPublisherpublisher plug-in module to add another rule, with the predicate parameter set toprofileId=caCACert, for publishing subordinate CA certificates.
10.11.2. Manually updating the crl in the directory
The Certificate Revocation List form in the Certificate Manager agent services page manually updates the directory with CRL-related information.
Manually update the CRL information by doing the following:
- Open the Certificate Manager agent services page.
- Select Update Revocation List.
- Click .
The Certificate Manager starts updating the directory with the CRL in its internal database. If the CRL is large, updating the directory takes considerable time. During this period, any changes made to the CRL may not be included in the update.
When the directory is updated, the Certificate Manager displays a status report. If the process is interrupted, the server logs an error message.
10.12. Registering custom mappers and publisher plug-in modules
New mapper or publisher plug-in modules can be registered in a Certificate Manager’s publishing framework. Unwanted mapper or publisher plug-in modules can be deleted. Before deleting a module, delete all the rules that are based on this module.
-
Create the custom job class. For this example, the custom publisher plug-in is called
MyPublisher.java. Compile the new class.
javac -d . -classpath $CLASSPATH MyPublisher.javaCreate a directory in the CA’s
WEB-INFweb directory to hold the custom classes, so that the CA can access them.mkdir /var/lib/pki/ instance_name/ca/webapps/ca/WEB-INF/classesCopy the new plug-in files into the new
classesdirectory, and set the owner to the Certificate System system user (pkiuser).cp -pr com /var/lib/pki/ instance_name/ca/webapps/ca/WEB-INF/classes chown -R pkiuser:pkiuser /var/lib/pki/ instance_name/ca/webapps/ca/WEB-INF/classesRegister the plug-in.
Log into the Certificate Manager Console.
pkiconsole https://server.example.com:8443/caNotepkiconsoleis being deprecated.- In the Configuration tab, select Certificate Manager from the navigation tree on the left. Select Publishing.
To register a mapper module, select Mappers, and then select the Mapper Plugin Registration tab.
To register a publisher module, select Publishers, and then select the Publisher Plug-in Registration tab.
- To register a plug-in, click .
-
Set the plug-in name and plug-in class name. The class name is, the path to the implementing Java class. If this class is part of a package, include the package name. For example, to register a class named
customMapperin a package namedcom.customplugins, the name iscom.customplugins.customMapper.