7.3. Issuing CRLs
- The Certificate Manager uses its CA signing certificate key to sign CRLs. To use a separate signing key pair for CRLs, set up a CRL signing key and change the Certificate Manager configuration to use this key to sign CRLs. See Section 7.3.4, “Setting a CA to Use a Different Certificate to Sign CRLs” for more information.
- Set up CRL issuing points. An issuing point is already set up and enabled for a master CRL.
Figure 7.1. Default CRL Issuing Point
Additional issuing points for the CRLs can be created. See Section 7.3.1, “Configuring Issuing Points” for details.There are five types of CRLs the issuing points can create, depending on the options set when configuring the issuing point to define what the CRL will list:- Master CRL contains the list of revoked certificates from the entire CA.
- ARL is an Authority Revocation List containing only revoked CA certificates.
- CRL with expired certificates includes revoked certificates that have expired in the CRL.
- CRL from certificate profiles determines the revoked certificates to include based on the profiles used to create the certificates originally.
- CRLs by reason code determines the revoked certificates to include based on the revocation reason code.
- Configure the CRLs for each issuing point. See Section 7.3.2, “Configuring CRLs for Each Issuing Point” for details.
- Set up the CRL extensions which are configured for the issuing point. See Section 7.3.3, “Setting CRL Extensions” for details.
- Set up the delta CRL for an issuing point by enabling extensions for that issuing point,
DeltaCRLIndicatororCRLNumber. - Set up the
CRLDistributionPointextension to include information about the issuing point. - Set up publishing CRLs to files, an LDAP directory, or an OCSP responder. See Chapter 8, Publishing Certificates and CRLs for details about setting up publishing.
7.3.1. Configuring Issuing Points
Copy linkLink copied to clipboard!
Issuing points define which certificates are included in a new CRL. A master CRL issuing point is created by default for a master CRL containing a list of all revoked certificates for the Certificate Manager.
To create a new issuing point, do the following:
- Open the Certificate System Console.
pkiconsole https://server.example.com:8443/ca
pkiconsole https://server.example.com:8443/caCopy to Clipboard Copied! Toggle word wrap Toggle overflow - In the Configuration tab, expand Certificate Manager from the left navigation menu. Then select CRL Issuing Points.
- To edit an issuing point, select the issuing point, and click . The only parameters which can be edited are the name of the issuing point and whether the issuing point is enabled or disabled.To add an issuing point, click . The CRL Issuing Point Editor window opens.
Figure 7.2. CRL Issuing Point Editor
Note
If some fields do not appear large enough to read the content, expand the window by dragging one of the corners.Fill in the following fields:- Enable. Enables the issuing point if selected; deselect to disable.
- CRL Issuing Point name. Gives the name for the issuing point; spaces are not allowed.
- Description. Describes the issuing point.
- Click .
To view and configure a new issuing point, close the CA Console, then open the Console again. The new issuing point is listed below the CRL Issuing Points entry in the navigation tree.
Configure CRLs for the new issuing point, and set up any CRL extensions that will be used with the CRL. See Section 7.3.2, “Configuring CRLs for Each Issuing Point” for details on configuring an issuing point. See Section 7.3.3, “Setting CRL Extensions” for details on setting up the CRL extensions. All the CRLs created appear on the Update Revocation List page of the agent services pages.
7.3.2. Configuring CRLs for Each Issuing Point
Copy linkLink copied to clipboard!
Information, such as the generation interval, the CRL version, CRL extensions, and the signing algorithm, can all be configured for the CRLs for the issuing point. The CRLs must be configured for each issuing point.
- Open the CA console.
pkiconsole https://server.example.com:8443/ca
pkiconsole https://server.example.com:8443/caCopy to Clipboard Copied! Toggle word wrap Toggle overflow - In the navigation tree, select Certificate Manager, and then select CRL Issuing Points.
- Select the issuing point name below the Issuing Points entry.
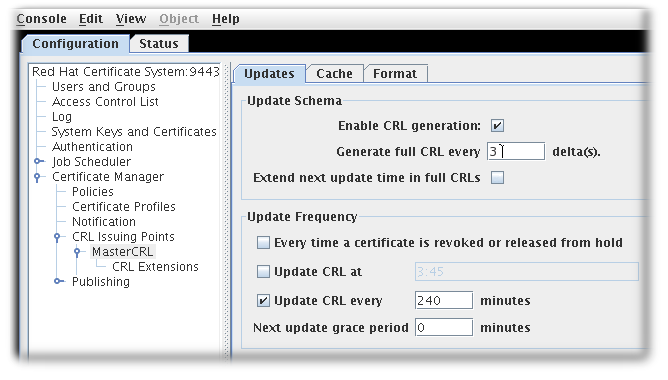
- Configure how and how often the CRLs are updated by supplying information in the Update tab for the issuing point. This tab has two sections, Update Schema and Update Frequency.
- The Update Schema section has the following options:
- Enable CRL generation. This checkbox sets whether CRLs are generated for that issuing point.
- Generate full CRL every # delta(s). This field sets how frequently CRLs are created in relation to the number of changes.
- Extend next update time in full CRLs. This provides an option to set the
nextUpdatefield in the generated CRLs. ThenextUpdateparameter shows the date when the next CRL is issued, regardless of whether it is a full or delta CRL. When using a combination of full and delta CRLs, enablingExtend next update time in full CRLswill make thenextUpdateparameter in a full CRL show when the next full CRL will be issued. Otherwise, thenextUpdateparameter in the full CRL will show when the next delta CRL will be issued, since the delta will be the next CRL to be issued.
- The Update Frequency section sets the different intervals when the CRLs are generated and issued to the directory.
- Every time a certificate is revoked or released from hold. This sets the Certificate Manager to generate the CRL every time it revokes a certificate. The Certificate Manager attempts to issue the CRL to the configured directory whenever it is generated. Generating a CRL can be time consuming if the CRL is large. Configuring the Certificate Manager to generate CRLs every time a certificate is revoked may engage the server for a considerable amount of time; during this time, the server will not be able to update the directory with any changes it receives.This setting is not recommended for a standard installation. This option should be selected to test revocation immediately, such as testing whether the server issues the CRL to a flat file.
- Update the CRL at. This field sets a daily time when the CRL should be updated. To specify multiple times, enter a comma-separate list of times, such as
01:50,04:55,06:55. To enter a schedule for multiple days, enter a comma-separated list to set the times within the same day, and then a semicolon separated list to identify times for different days. For example, this sets revocation on Day 1 of the cycle at 1:50am, 4:55am, and 6:55am and then Day 2 at 2am, 5am, and 5pm:01:50,04:55,06:55;02:00,05:00,17:00
01:50,04:55,06:55;02:00,05:00,17:00Copy to Clipboard Copied! Toggle word wrap Toggle overflow - Next update grace period. If the Certificate Manager updates the CRL at a specific frequency, the server can be configured to have a grace period to the next update time to allow time to create the CRL and issue it. For example, if the server is configured to update the CRL every 20 minutes with a grace period of 2 minutes, and if the CRL is updated at 16:00, the CRL is updated again at 16:18.
Important
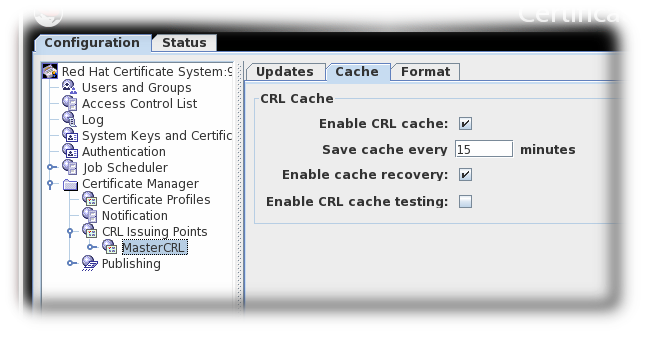
Due to a known issue, when currently setting full and delta Certificate Revocation List schedules, theUpdate CRL every time a certificate is revoked or released from holdoption also requires you to fill out the twograce periodsettings. Thus, in order to select this option you need to first select theUpdate CRL everyoption and enter a number for theNext update grace period # minutesbox. - The Cache tab sets whether caching is enabled and the cache frequency.
Figure 7.3. CRL Cache Tab
- Enable CRL cache. This checkbox enables the cache, which is used to create delta CRLs. If the cache is disabled, delta CRLs will not be created. For more information about the cache, see Section 7.1, “About Revoking Certificates”.
- Update cache every. This field sets how frequently the cache is written to the internal database. Set to
0to have the cache written to the database every time a certificate is revoked. - Enable cache recovery. This checkbox allows the cache to be restored.
- Enable CRL cache testing. This checkbox enables CRL performance testing for specific CRL issuing points. CRLs generated with this option should not be used in deployed CAs, as CRLs issued for testing purposed contain data generated solely for the purpose of performance testing.
- The Format tab sets the formatting and contents of the CRLs that are created. There are two sections, CRL Format and CRL Contents.
Figure 7.4. CRL Format Tab
- The CRL Format section has two options:
- Revocation list signing algorithm is a drop down list of allowed ciphers to encrypt the CRL.
- Allow extensions for CRL v2 is a checkbox which enabled CRL v2 extensions for the issuing point. If this is enabled, set the required CRL extensions described in Section 7.3.3, “Setting CRL Extensions”.
Note
Extensions must be turned on to create delta CRLs. - The CRL Contents section has three checkboxes which set what types of certificates to include in the CRL:
- Include expired certificates. This includes revoked certificates that have expired. If this is enabled, information about revoked certificates remains in the CRL after the certificate expires. If this is not enabled, information about revoked certificates is removed when the certificate expires.
- CA certificates only. This includes only CA certificates in the CRL. Selecting this option creates an Authority Revocation List (ARL), which lists only revoked CA certificates.
- Certificates issued according to profiles. This only includes certificates that were issued according to the listed profiles; to specify multiple profiles, enter a comma-separated list.
- Click .
- Extensions are allowed for this issuing point and can be configured. See Section 7.3.3, “Setting CRL Extensions” for details.
7.3.3. Setting CRL Extensions
Copy linkLink copied to clipboard!
Note
Extensions only need configured for an issuing point if the Allow extensions for CRLs v2 checkbox is selected for that issuing point.
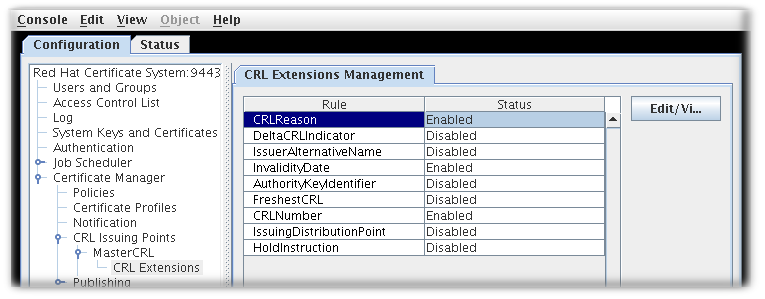
When the issuing point is created, three extensions are automatically enabled:
CRLReason, InvalidityDate, and CRLNumber. Other extensions are available but are disabled by default. These can be enabled and modified. For more information about the available CRL extensions, see Section B.4.2, “Standard X.509 v3 CRL Extensions Reference”.
To configure CRL extensions, do the following:
- Open the CA console.
pkiconsole https://server.example.com:8443/ca
pkiconsole https://server.example.com:8443/caCopy to Clipboard Copied! Toggle word wrap Toggle overflow - In the navigation tree, select Certificate Manager, and then select CRL Issuing Points.
- Select the issuing point name below the Issuing Points entry, and select the CRL Extension entry below the issuing point.The right pane shows the CRL Extensions Management tab, which lists configured extensions.
Figure 7.5. CRL Extensions
- To modify a rule, select it, and click .
- Most extensions have two options, enabling them and setting whether they are critical. Some require more information. Supply all required values. See Section B.4.2, “Standard X.509 v3 CRL Extensions Reference” for complete information about each extension and the parameters for those extensions.
- Click .
- Click to see the updated status of all the rules.
7.3.4. Setting a CA to Use a Different Certificate to Sign CRLs
Copy linkLink copied to clipboard!
For instruction on how to configure this feature by editing the
CS.cfg file, see Setting a CA to Use a Different Certificate to Sign CRLs.
7.3.5. Generating CRLs from Cache
Copy linkLink copied to clipboard!
By default, CRLs are generated from the CA's internal database. However, revocation information can be collected as the certificates are revoked and kept in memory. This revocation information can then be used to update CRLs from memory. Bypassing the database searches that are required to generate the CRL from the internal database significantly improves performance.
Note
Because of the performance enhancement from generating CRLs from cache, enable the
enableCRLCache parameter in most environments. However, the Enable CRL cache testing parameter should not be enabled in a production environment.
7.3.5.1. Configuring CRL Generation from Cache in the Console
Copy linkLink copied to clipboard!
- Open the console.
pkiconsole https://server.example.com:8443/ca
pkiconsole https://server.example.com:8443/caCopy to Clipboard Copied! Toggle word wrap Toggle overflow - In the Configuration tab, expand the Certificate Manager folder and the CRL Issuing Points subfolder.
- Select the MasterCRL node.
- Select Enable CRL cache.
- Save the changes.
7.3.5.2. Configuring CRL Generation from Cache in CS.cfg
Copy linkLink copied to clipboard!
For instruction on how to configure this feature by editing the
CS.cfg file, see Configuring CRL Generation from Cache in CS.cfg.


