7.8. Creating a Bond Connection Using a GUI
You can use the GNOME control-center utility to direct NetworkManager to create a Bond from two or more Wired or InfiniBand connections. It is not necessary to create the connections to be bonded first. They can be configured as part of the process to configure the bond. You must have the MAC addresses of the interfaces available in order to complete the configuration process.
7.8.1. Establishing a Bond Connection
Procedure 7.1. Adding a New Bond Connection_Using nm-connection-editor
Follow the below steps to create a new bond connection.
- Enter nm-connection-editor in a terminal:
~]$ nm-connection-editor - Click the Add button. The Choose a Connection Type window appears. Select Bond and click Create. The Editing Bond connection 1 window appears.
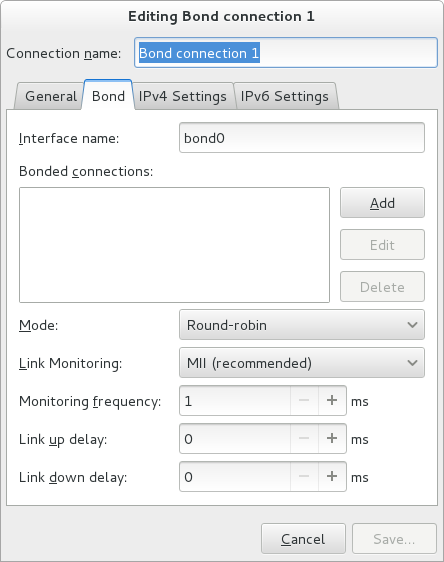
Figure 7.6. The NetworkManager Graphical User Interface Add a Bond menu
- On the Bond tab, click and select the type of interface you want to use with the bond connection. Click the button. Note that the dialog to select the port type only comes up when you create the first port; after that, it will automatically use that same type for all further ports.
- The Editing bond0 slave 1 window appears. Use the Device MAC address drop-down menu to select the MAC address of the interface to be bonded. The first port's MAC address will be used as the MAC address for the bond interface. If required, enter a clone MAC address to be used as the bond's MAC address. Click the button.
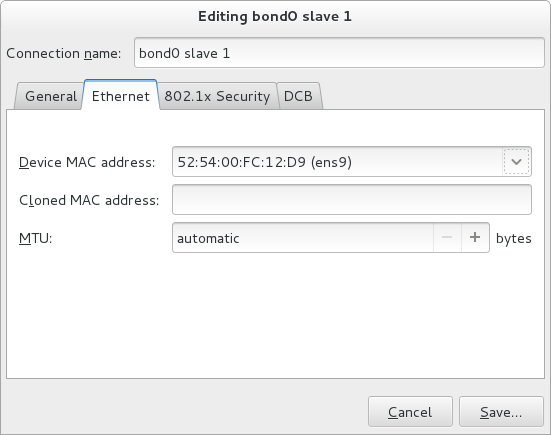
Figure 7.7. The NetworkManager Graphical User Interface Add a Bond Connection menu
- The name of the bonded port appears in the Bonded connections window. Click the button to add further port connections.
- Review and confirm the settings and then click the Save button.
- Edit the bond-specific settings by referring to Section 7.8.1.1, “Configuring the Bond Tab” below.
Procedure 7.2. Editing an Existing Bond Connection
Follow these steps to edit an existing bond connection.
- Enter nm-connection-editor in a terminal:
~]$ nm-connection-editor - Select the connection you want to edit and click the Edit button.
- Select the General tab.
- Configure the connection name, auto-connect behavior, and availability settings.Five settings in the Editing dialog are common to all connection types, see the General tab:
- Connection name — Enter a descriptive name for your network connection. This name will be used to list this connection in the menu of the Network window.
- Automatically connect to this network when it is available — Select this box if you want NetworkManager to auto-connect to this connection when it is available. See the section called “Editing an Existing Connection with control-center” for more information.
- All users may connect to this network — Select this box to create a connection available to all users on the system. Changing this setting may require root privileges. See Section 3.4.5, “Managing System-wide and Private Connection Profiles with a GUI” for details.
- Automatically connect to VPN when using this connection — Select this box if you want NetworkManager to auto-connect to a VPN connection when it is available. Select the VPN from the drop-down menu.
- Firewall Zone — Select the firewall zone from the drop-down menu. See the Red Hat Enterprise Linux 7 Security Guide for more information on firewall zones.
- Edit the bond-specific settings by referring to Section 7.8.1.1, “Configuring the Bond Tab” below.
Saving Your New (or Modified) Connection and Making Further Configurations
Once you have finished editing your bond connection, click the button to save your customized configuration.
Then, to configure:
IPv4settings for the connection, click the IPv4 Settings tab and proceed to Section 5.4, “Configuring IPv4 Settings”orIPv6settings for the connection, click the IPv6 Settings tab and proceed to Section 5.5, “Configuring IPv6 Settings”.
7.8.1.1. Configuring the Bond Tab
If you have already added a new bond connection (see Procedure 7.1, “Adding a New Bond Connection_Using nm-connection-editor” for instructions), you can edit the Bond tab to set the load sharing mode and the type of link monitoring to use to detect failures of a port connection.
- Mode
- The mode that is used to share traffic over the port connections which make up the bond. The default is Round-robin. Other load sharing modes, such as
802.3ad, can be selected by means of the drop-down list. - Link Monitoring
- The method of monitoring the ports ability to carry network traffic.
The following modes of load sharing are selectable from the Mode drop-down list:
- Round-robin
- Sets a round-robin policy for fault tolerance and load balancing. Transmissions are received and sent out sequentially on each bonded port interface beginning with the first one available. This mode might not work behind a bridge with virtual machines without additional switch configuration.
- Active backup
- Sets an active-backup policy for fault tolerance. Transmissions are received and sent out through the first available bonded port interface. Another bonded port interface is only used if the active bonded port interface fails. Note that this is the only mode available for bonds of InfiniBand devices.
- XOR
- Sets an XOR (exclusive-or) policy. Transmissions are based on the selected hash policy. The default is to derive a hash by XOR of the source and destination MAC addresses multiplied by the modulo of the number of port interfaces. In this mode traffic destined for specific peers will always be sent over the same interface. As the destination is determined by the MAC addresses this method works best for traffic to peers on the same link or local network. If traffic has to pass through a single router then this mode of traffic balancing will be suboptimal.
- Broadcast
- Sets a broadcast policy for fault tolerance. All transmissions are sent on all port interfaces. This mode might not work behind a bridge with virtual machines without additional switch configuration.
- 802.3ad
- Sets an IEEE
802.3addynamic link aggregation policy. Creates aggregation groups that share the same speed and duplex settings. Transmits and receives on all ports in the active aggregator. Requires a network switch that is802.3adcompliant. - Adaptive transmit load balancing
- Sets an adaptive Transmit Load Balancing (TLB) policy for fault tolerance and load balancing. The outgoing traffic is distributed according to the current load on each port interface. Incoming traffic is received by the current port. If the receiving port fails, another port takes over the MAC address of the failed port. This mode is only suitable for local addresses known to the kernel bonding module and therefore cannot be used behind a bridge with virtual machines.
- Adaptive load balancing
- Sets an Adaptive Load Balancing (ALB) policy for fault tolerance and load balancing. Includes transmit and receive load balancing for
IPv4traffic. Receive load balancing is achieved throughARPnegotiation. This mode is only suitable for local addresses known to the kernel bonding module and therefore cannot be used behind a bridge with virtual machines.
The following types of link monitoring can be selected from the Link Monitoring drop-down list. It is a good idea to test which channel bonding module parameters work best for your bonded interfaces.
- MII (Media Independent Interface)
- The state of the carrier wave of the interface is monitored. This can be done by querying the driver, by querying MII registers directly, or by using ethtool to query the device. Three options are available:
- Monitoring Frequency
- The time interval, in milliseconds, between querying the driver or MII registers.
- Link up delay
- The time in milliseconds to wait before attempting to use a link that has been reported as up. This delay can be used if some gratuitous
ARPrequests are lost in the period immediately following the link being reported as “up”. This can happen during switch initialization for example. - Link down delay
- The time in milliseconds to wait before changing to another link when a previously active link has been reported as “down”. This delay can be used if an attached switch takes a relatively long time to change to backup mode.
- ARP
- The address resolution protocol (
ARP) is used to probe one or more peers to determine how well the link-layer connections are working. It is dependent on the device driver providing the transmit start time and the last receive time.Two options are available:- Monitoring Frequency
- The time interval, in milliseconds, between sending
ARPrequests. - ARP targets
- A comma separated list of
IPaddresses to sendARPrequests to.