Hosted control planes
Using hosted control planes with OpenShift Container Platform
Abstract
Chapter 1. Hosted control planes overview
You can deploy OpenShift Container Platform clusters by using two different control plane configurations: standalone or hosted control planes. The standalone configuration uses dedicated virtual machines or physical machines to host the control plane. With hosted control planes for OpenShift Container Platform, you create control planes as pods on a hosting cluster without the need for dedicated virtual or physical machines for each control plane.
1.1. Glossary of common concepts and personas for hosted control planes
When you use hosted control planes for OpenShift Container Platform, it is important to understand its key concepts and the personas that are involved.
1.1.1. Concepts
- hosted cluster
- An OpenShift Container Platform cluster with its control plane and API endpoint hosted on a management cluster. The hosted cluster includes the control plane and its corresponding data plane.
- hosted cluster infrastructure
- Network, compute, and storage resources that exist in the tenant or end-user cloud account.
- hosted control plane
- An OpenShift Container Platform control plane that runs on the management cluster, which is exposed by the API endpoint of a hosted cluster. The components of a control plane include etcd, the Kubernetes API server, the Kubernetes controller manager, and a VPN.
- hosting cluster
- See management cluster.
- managed cluster
- A cluster that the hub cluster manages. This term is specific to the cluster lifecycle that the multicluster engine for Kubernetes Operator manages in Red Hat Advanced Cluster Management. A managed cluster is not the same thing as a management cluster. For more information, see Managed cluster.
- management cluster
- An OpenShift Container Platform cluster where the HyperShift Operator is deployed and where the control planes for hosted clusters are hosted. The management cluster is synonymous with the hosting cluster.
- management cluster infrastructure
- Network, compute, and storage resources of the management cluster.
- node pool
- A resource that contains the compute nodes. The control plane contains node pools. The compute nodes run applications and workloads.
1.1.2. Personas
- cluster instance administrator
-
Users who assume this role are the equivalent of administrators in standalone OpenShift Container Platform. This user has the
cluster-adminrole in the provisioned cluster, but might not have power over when or how the cluster is updated or configured. This user might have read-only access to see some configuration projected into the cluster. - cluster instance user
- Users who assume this role are the equivalent of developers in standalone OpenShift Container Platform. This user does not have a view into OperatorHub or machines.
- cluster service consumer
- Users who assume this role can request control planes and worker nodes, drive updates, or modify externalized configurations. Typically, this user does not manage or access cloud credentials or infrastructure encryption keys. The cluster service consumer persona can request hosted clusters and interact with node pools. Users who assume this role have RBAC to create, read, update, or delete hosted clusters and node pools within a logical boundary.
- cluster service provider
Users who assume this role typically have the
cluster-adminrole on the management cluster and have RBAC to monitor and own the availability of the HyperShift Operator as well as the control planes for the tenant’s hosted clusters. The cluster service provider persona is responsible for several activities, including the following examples:- Owning service-level objects for control plane availability, uptime, and stability
- Configuring the cloud account for the management cluster to host control planes
- Configuring the user-provisioned infrastructure, which includes the host awareness of available compute resources
1.2. Introduction to hosted control planes
You can use hosted control planes for Red Hat OpenShift Container Platform to reduce management costs, optimize cluster deployment time, and separate management and workload concerns so that you can focus on your applications.
Hosted control planes is available by using the multicluster engine for Kubernetes Operator version 2.0 or later on the following platforms:
- Bare metal by using the Agent provider
- OpenShift Virtualization, as a Generally Available feature in connected environments and a Technology Preview feature in disconnected environments
- Amazon Web Services (AWS), as a Technology Preview feature
- IBM Z, as a Technology Preview feature
- IBM Power, as a Technology Preview feature
1.2.1. Architecture of hosted control planes
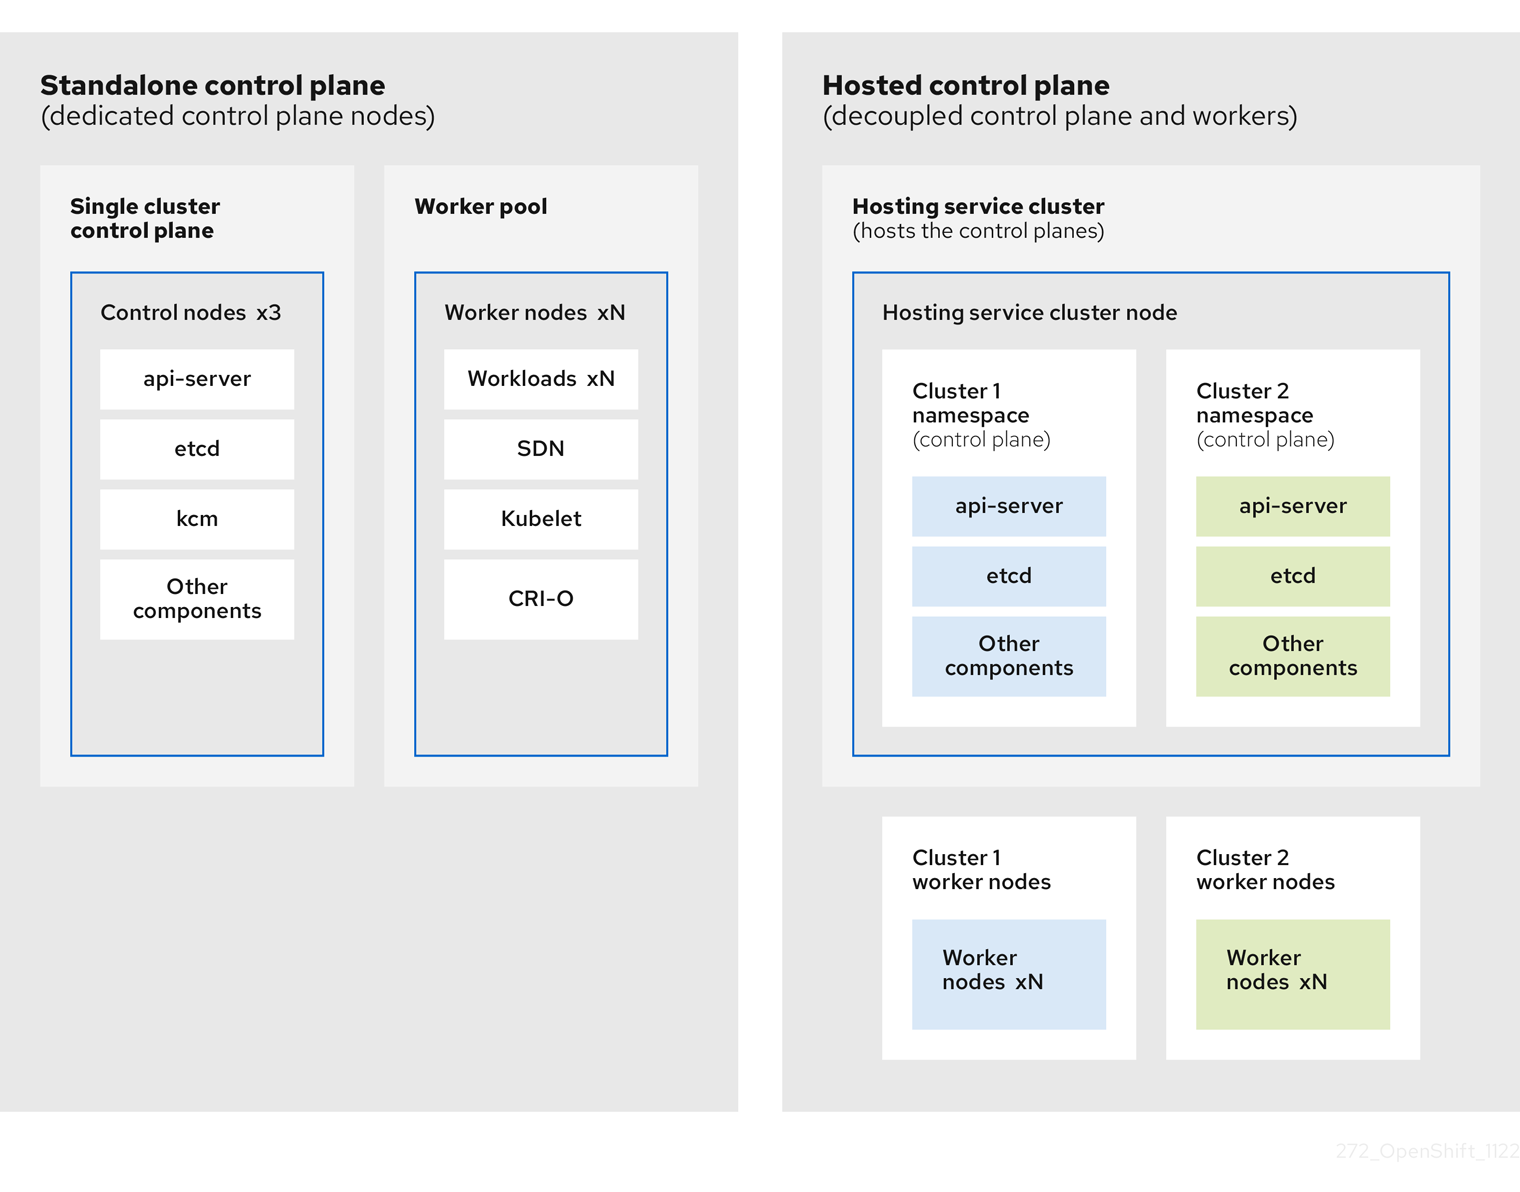
OpenShift Container Platform is often deployed in a coupled, or standalone, model, where a cluster consists of a control plane and a data plane. The control plane includes an API endpoint, a storage endpoint, a workload scheduler, and an actuator that ensures state. The data plane includes compute, storage, and networking where workloads and applications run.
The standalone control plane is hosted by a dedicated group of nodes, which can be physical or virtual, with a minimum number to ensure quorum. The network stack is shared. Administrator access to a cluster offers visibility into the cluster’s control plane, machine management APIs, and other components that contribute to the state of a cluster.
Although the standalone model works well, some situations require an architecture where the control plane and data plane are decoupled. In those cases, the data plane is on a separate network domain with a dedicated physical hosting environment. The control plane is hosted by using high-level primitives such as deployments and stateful sets that are native to Kubernetes. The control plane is treated as any other workload.
1.2.2. Benefits of hosted control planes
With hosted control planes for OpenShift Container Platform, you can pave the way for a true hybrid-cloud approach and enjoy several other benefits.
- The security boundaries between management and workloads are stronger because the control plane is decoupled and hosted on a dedicated hosting service cluster. As a result, you are less likely to leak credentials for clusters to other users. Because infrastructure secret account management is also decoupled, cluster infrastructure administrators cannot accidentally delete control plane infrastructure.
- With hosted control planes, you can run many control planes on fewer nodes. As a result, clusters are more affordable.
- Because the control planes consist of pods that are launched on OpenShift Container Platform, control planes start quickly. The same principles apply to control planes and workloads, such as monitoring, logging, and auto-scaling.
- From an infrastructure perspective, you can push registries, HAProxy, cluster monitoring, storage nodes, and other infrastructure components to the tenant’s cloud provider account, isolating usage to the tenant.
- From an operational perspective, multicluster management is more centralized, which results in fewer external factors that affect the cluster status and consistency. Site reliability engineers have a central place to debug issues and navigate to the cluster data plane, which can lead to shorter Time to Resolution (TTR) and greater productivity.
1.3. Differences between hosted control planes and OpenShift Container Platform
Hosted control planes is a form factor of OpenShift Container Platform. Hosted clusters and the stand-alone OpenShift Container Platform clusters are configured and managed differently. See the following tables to understand the differences between OpenShift Container Platform and hosted control planes:
1.3.1. Cluster creation and lifecycle
| OpenShift Container Platform | Hosted control planes |
|---|---|
|
You install a standalone OpenShift Container Platform cluster by using the |
You install a hosted cluster by using the |
1.3.2. Cluster configuration
| OpenShift Container Platform | Hosted control planes |
|---|---|
|
You configure cluster-scoped resources such as authentication, API server, and proxy by using the |
You configure resources that impact the control plane in the |
1.3.3. etcd encryption
| OpenShift Container Platform | Hosted control planes |
|---|---|
|
You configure etcd encryption by using the |
You configure etcd encryption by using the |
1.3.4. Operators and control plane
| OpenShift Container Platform | Hosted control planes |
|---|---|
| A standalone OpenShift Container Platform cluster contains separate Operators for each control plane component. | A hosted cluster contains a single Operator named Control Plane Operator that runs in the hosted control plane namespace on the management cluster. |
| etcd uses storage that is mounted on the control plane nodes. The etcd cluster Operator manages etcd. | etcd uses a persistent volume claim for storage and is managed by the Control Plane Operator. |
| The Ingress Operator, network related Operators, and {olm-first} run on the cluster. | The Ingress Operator, network related Operators, and {olm-first} run in the hosted control plane namespace on the management cluster. |
| The OAuth server runs inside the cluster and is exposed through a route in the cluster. | The OAuth server runs inside the control plane and is exposed through a route, node port, or load balancer on the management cluster. |
1.3.5. Updates
| OpenShift Container Platform | Hosted control planes |
|---|---|
|
The Cluster Version Operator (CVO) orchestrates the update process and monitors the |
The hosted control planes update results in a change to the |
| After you update an OpenShift Container Platform cluster, both the control plane and compute machines are updated. | After you update the hosted cluster, only the control plane is updated. You perform node pool updates separately. |
1.3.6. Machine configuration and management
| OpenShift Container Platform | Hosted control planes |
|---|---|
|
The |
The |
| A set of control plane machines are available. | A set of control plane machines do not exist. |
|
You enable a machine health check by using the |
You enable a machine health check through the |
|
You enable autoscaling by using the |
You enable autoscaling through the |
| Machines and machine sets are exposed in the cluster. | Machines, machine sets, and machine deployments from upstream Cluster CAPI Operator are used to manage machines but are not exposed to the user. |
| All machine sets are upgraded automatically when you update the cluster. | You update your node pools independently from the hosted cluster updates. |
| Only an in-place upgrade is supported in the cluster. | Both replace and in-place upgrades are supported in the hosted cluster. |
| The Machine Config Operator manages configurations for machines. | The Machine Config Operator does not exist in hosted control planes. |
|
You configure machine Ignition by using the |
You configure the |
| The Machine Config Daemon (MCD) manages configuration changes and updates on each of the nodes. | For an in-place upgrade, the node pool controller creates a run-once pod that updates a machine based on your configuration. |
| You can modify the machine configuration resources such as the SR-IOV Operator. | You cannot modify the machine configuration resources. |
1.3.7. Networking
| OpenShift Container Platform | Hosted control planes |
|---|---|
| The Kube API server communicates with nodes directly, because the Kube API server and nodes exist in the same Virtual Private Cloud (VPC). | The Kube API server communicates with nodes through Konnectivity. The Kube API server and nodes exist in a different Virtual Private Cloud (VPC). |
| Nodes communicate with the Kube API server through the internal load balancer. | Nodes communicate with the Kube API server through an external load balancer or a node port. |
1.3.8. Web console
| OpenShift Container Platform | Hosted control planes |
|---|---|
| The web console shows the status of a control plane. | The web console does not show the status of a control plane. |
| You can update your cluster by using the web console. | You cannot update the hosted cluster by using the web console. |
| The web console displays the infrastructure resources such as machines. | The web console does not display the infrastructure resources. |
|
You can configure machines through the | You cannot configure machines by using the web console. |
1.4. Relationship between hosted control planes, multicluster engine Operator, and RHACM
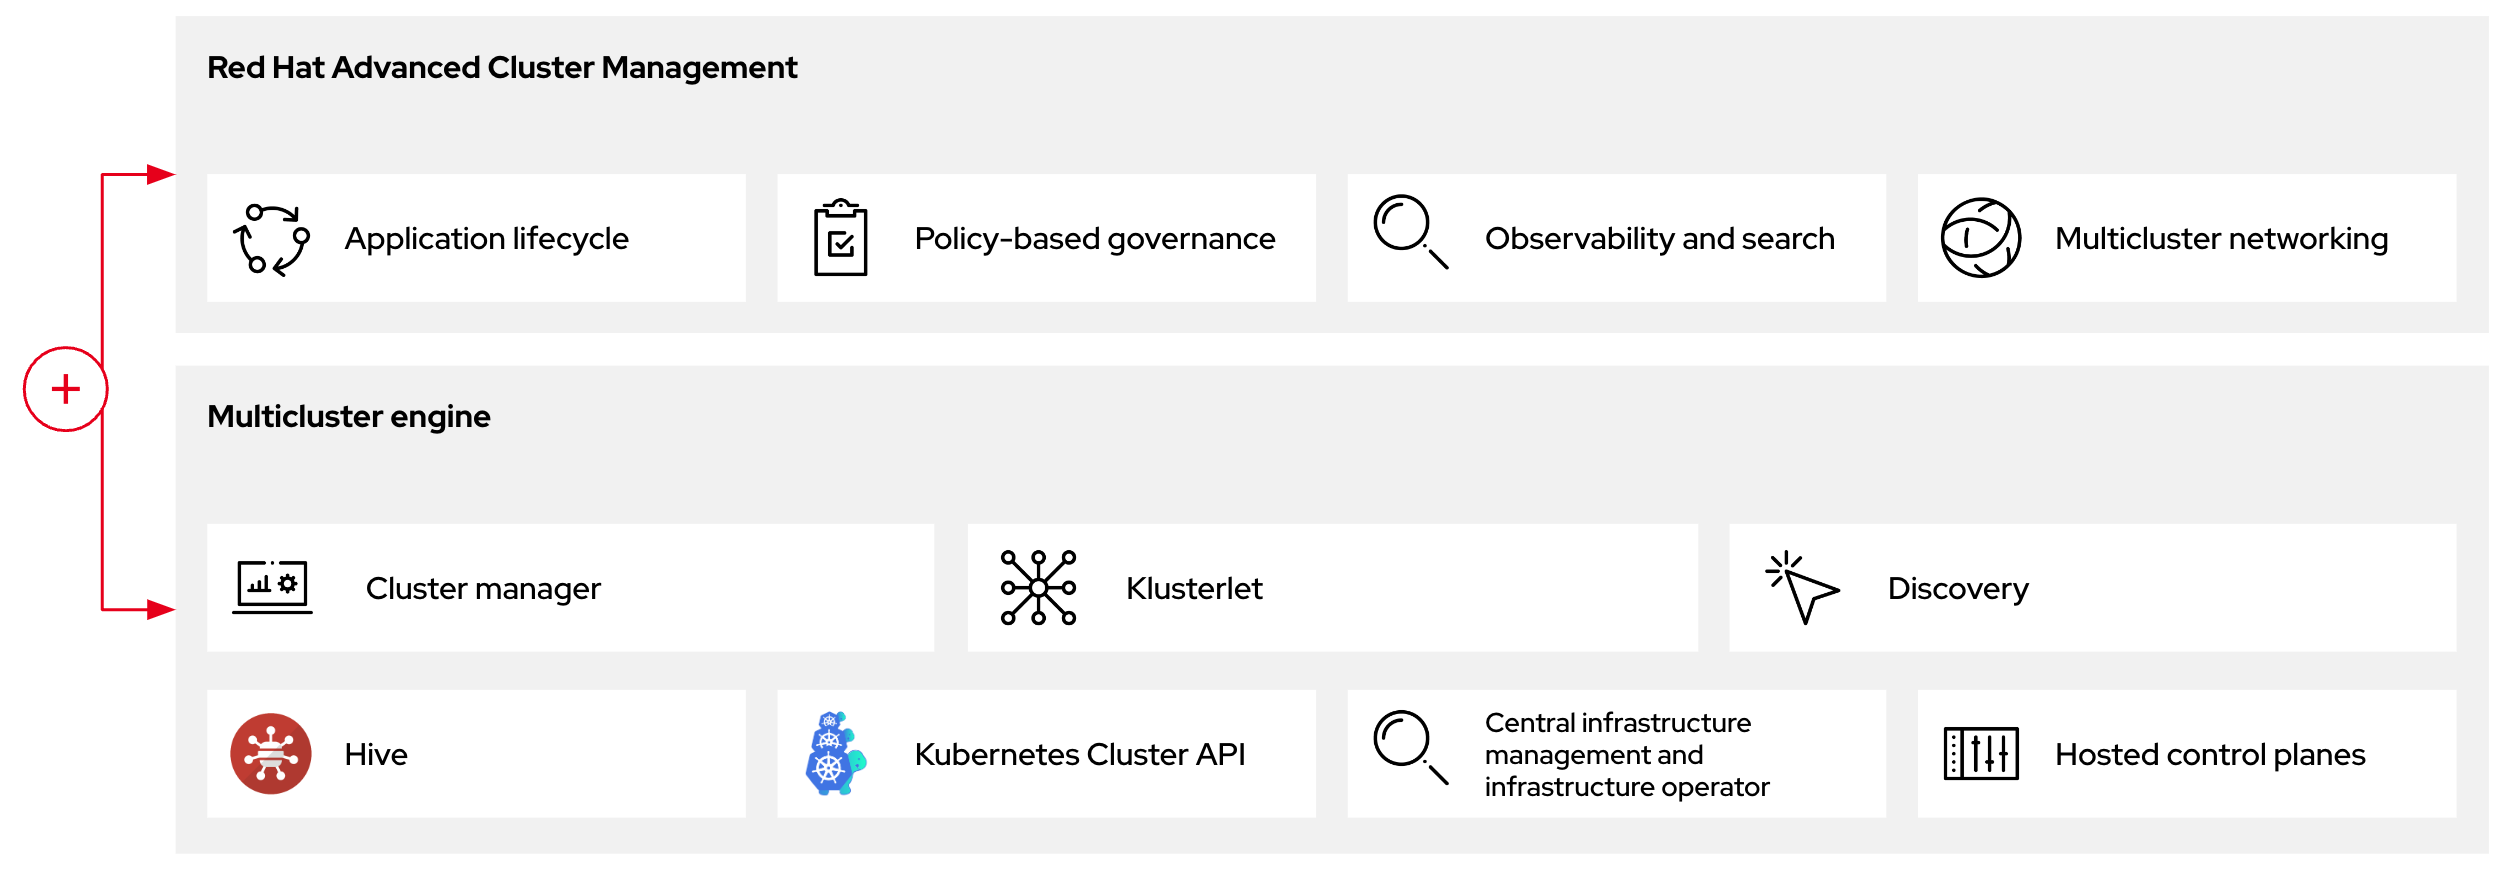
You can configure hosted control planes by using the multicluster engine for Kubernetes Operator. The multicluster engine is an integral part of Red Hat Advanced Cluster Management (RHACM) and is enabled by default with RHACM. The multicluster engine Operator cluster lifecycle defines the process of creating, importing, managing, and destroying Kubernetes clusters across various infrastructure cloud providers, private clouds, and on-premises data centers.
The multicluster engine Operator is the cluster lifecycle Operator that provides cluster management capabilities for OpenShift Container Platform and RHACM hub clusters. The multicluster engine Operator enhances cluster fleet management and supports OpenShift Container Platform cluster lifecycle management across clouds and data centers.
Figure 1.1. Cluster life cycle and foundation

You can use the multicluster engine Operator with OpenShift Container Platform as a standalone cluster manager or as part of a RHACM hub cluster.
A management cluster is also known as the hosting cluster.
You can deploy OpenShift Container Platform clusters by using two different control plane configurations: standalone or hosted control planes. The standalone configuration uses dedicated virtual machines or physical machines to host the control plane. With hosted control planes for OpenShift Container Platform, you create control planes as pods on a management cluster without the need for dedicated virtual or physical machines for each control plane.
Figure 1.2. RHACM and the multicluster engine Operator introduction diagram
1.5. Versioning for hosted control planes
With each major, minor, or patch version release of OpenShift Container Platform, two components of hosted control planes are released:
- The HyperShift Operator
-
The
hcpcommand-line interface (CLI)
The HyperShift Operator manages the lifecycle of hosted clusters that are represented by the HostedCluster API resources. The HyperShift Operator is released with each OpenShift Container Platform release. The HyperShift Operator creates the supported-versions config map in the hypershift namespace. The config map contains the supported hosted cluster versions.
You can host different versions of control planes on the same management cluster.
Example supported-versions config map object
    apiVersion: v1
    data:
      supported-versions: '{"versions":["4.15"]}'
    kind: ConfigMap
    metadata:
      labels:
        hypershift.openshift.io/supported-versions: "true"
      name: supported-versions
      namespace: hypershift
You can use the hcp CLI to create hosted clusters.
You can use the hypershift.openshift.io API resources, such as, HostedCluster and NodePool, to create and manage OpenShift Container Platform clusters at scale. A HostedCluster resource contains the control plane and common data plane configuration. When you create a HostedCluster resource, you have a fully functional control plane with no attached nodes. A NodePool resource is a scalable set of worker nodes that is attached to a HostedCluster resource.
The API version policy generally aligns with the policy for Kubernetes API versioning.
Chapter 2. Getting started with hosted control planes
To get started with hosted control planes for OpenShift Container Platform, you first configure your hosted cluster on the provider that you want to use. Then, you complete a few management tasks.
You can view the procedures by selecting from one of the following providers:
2.1. Bare metal
- Hosted control plane sizing guidance
- Installing the hosted control plane command line interface
- Distributing hosted cluster workloads
- Bare metal firewall and port requirements
- Bare metal infrastructure requirements: Review the infrastructure requirements to create a hosted cluster on bare metal.
Configuring hosted control plane clusters on bare metal:
- Configure DNS
- Create a hosted cluster and verify cluster creation
-
Scale the
NodePoolobject for the hosted cluster - Handle ingress traffic for the hosted cluster
- Enable node auto-scaling for the hosted cluster
- Configuring hosted control planes in a disconnected environment
- To destroy a hosted cluster on bare metal, follow the instructions in Destroying a hosted cluster on bare metal.
- If you want to disable the hosted control plane feature, see Disabling the hosted control plane feature.
2.2. OpenShift Virtualization
- Hosted control plane sizing guidance
- Installing the hosted control plane command line interface
- Distributing hosted cluster workloads
- Managing hosted control plane clusters on OpenShift Virtualization: Create OpenShift Container Platform clusters with worker nodes that are hosted by KubeVirt virtual machines.
- Configuring hosted control planes in a disconnected environment
- To destroy a hosted cluster is on OpenShift Virtualization, follow the instructions in Destroying a hosted cluster on OpenShift Virtualization.
- If you want to disable the hosted control plane feature, see Disabling the hosted control plane feature.
2.3. Amazon Web Services (AWS)
Hosted control planes on the AWS platform is a Technology Preview feature only. Technology Preview features are not supported with Red Hat production service level agreements (SLAs) and might not be functionally complete. Red Hat does not recommend using them in production. These features provide early access to upcoming product features, enabling customers to test functionality and provide feedback during the development process.
For more information about the support scope of Red Hat Technology Preview features, see Technology Preview Features Support Scope.
- AWS infrastructure requirements: Review the infrastructure requirements to create a hosted cluster on AWS.
- Configuring hosted control plane clusters on AWS (Technology Preview): The tasks to configure hosted control plane clusters on AWS include creating the AWS S3 OIDC secret, creating a routable public zone, enabling external DNS, enabling AWS PrivateLink, and deploying a hosted cluster.
- Deploying the SR-IOV Operator for hosted control planes: After you configure and deploy your hosting service cluster, you can create a subscription to the Single Root I/O Virtualization (SR-IOV) Operator on a hosted cluster. The SR-IOV pod runs on worker machines rather than the control plane.
- To destroy a hosted cluster on AWS, follow the instructions in Destroying a hosted cluster on AWS.
- If you want to disable the hosted control plane feature, see Disabling the hosted control plane feature.
2.4. IBM Z
Hosted control planes on the IBM Z platform is a Technology Preview feature only. Technology Preview features are not supported with Red Hat production service level agreements (SLAs) and might not be functionally complete. Red Hat does not recommend using them in production. These features provide early access to upcoming product features, enabling customers to test functionality and provide feedback during the development process.
For more information about the support scope of Red Hat Technology Preview features, see Technology Preview Features Support Scope.
2.5. IBM Power
Hosted control planes on the IBM Power platform is a Technology Preview feature only. Technology Preview features are not supported with Red Hat production service level agreements (SLAs) and might not be functionally complete. Red Hat does not recommend using them in production. These features provide early access to upcoming product features, enabling customers to test functionality and provide feedback during the development process.
For more information about the support scope of Red Hat Technology Preview features, see Technology Preview Features Support Scope.
2.6. Non bare metal agent machines
Hosted control planes clusters using non bare metal agent machines is a Technology Preview feature only. Technology Preview features are not supported with Red Hat production service level agreements (SLAs) and might not be functionally complete. Red Hat does not recommend using them in production. These features provide early access to upcoming product features, enabling customers to test functionality and provide feedback during the development process.
For more information about the support scope of Red Hat Technology Preview features, see Technology Preview Features Support Scope.
- Installing the hosted control plane command line interface
- Configuring hosted control plane clusters using non bare metal agent machines (Technology Preview)
- To destroy a hosted cluster on non bare metal agent machines, follow the instructions in Destroying a hosted cluster on non bare metal agent machines
- If you want to disable the hosted control plane feature, see Disabling the hosted control plane feature.
Chapter 3. Authentication and authorization for hosted control planes
The OpenShift Container Platform control plane includes a built-in OAuth server. You can obtain OAuth access tokens to authenticate to the OpenShift Container Platform API. After you create your hosted cluster, you can configure OAuth by specifying an identity provider.
3.1. Configuring the OAuth server for a hosted cluster by using the CLI
You can configure the internal OAuth server for your hosted cluster by using an OpenID Connect identity provider (oidc).
You can configure OAuth for the following supported identity providers:
-
oidc -
htpasswd -
keystone -
ldap -
basic-authentication -
request-header -
github -
gitlab -
google
Adding any identity provider in the OAuth configuration removes the default kubeadmin user provider.
When you configure identity providers, you must configure at least one NodePool replica in your hosted cluster in advance. Traffic for DNS resolution is sent through the worker nodes. You do not need to configure the NodePool replicas in advance for the htpasswd and request-header identity providers.
Prerequisites
- You created your hosted cluster.
Procedure
Edit the
HostedClustercustom resource (CR) on the hosting cluster by running the following command:$ oc edit hostedcluster <hosted_cluster_name> -n <hosted_cluster_namespace>Add the OAuth configuration in the
HostedClusterCR by using the following example:apiVersion: hypershift.openshift.io/v1alpha1 kind: HostedCluster metadata: name: <hosted_cluster_name>1 namespace: <hosted_cluster_namespace>2 spec: configuration: oauth: identityProviders: - openID:3 claims: email:4 - <email_address> name:5 - <display_name> preferredUsername:6 - <preferred_username> clientID: <client_id>7 clientSecret: name: <client_id_secret_name>8 issuer: https://example.com/identity9 mappingMethod: lookup10 name: IAM type: OpenID- 1
- Specifies your hosted cluster name.
- 2
- Specifies your hosted cluster namespace.
- 3
- This provider name is prefixed to the value of the identity claim to form an identity name. The provider name is also used to build the redirect URL.
- 4
- Defines a list of attributes to use as the email address.
- 5
- Defines a list of attributes to use as a display name.
- 6
- Defines a list of attributes to use as a preferred user name.
- 7
- Defines the ID of a client registered with the OpenID provider. You must allow the client to redirect to the
https://oauth-openshift.apps.<cluster_name>.<cluster_domain>/oauth2callback/<idp_provider_name>URL. - 8
- Defines a secret of a client registered with the OpenID provider.
- 9
- The Issuer Identifier described in the OpenID spec. You must use
httpswithout query or fragment component. - 10
- Defines a mapping method that controls how mappings are established between identities of this provider and
Userobjects.
- Save the file to apply the changes.
3.2. Configuring the OAuth server for a hosted cluster by using the web console
You can configure the internal OAuth server for your hosted cluster by using the OpenShift Container Platform web console.
You can configure OAuth for the following supported identity providers:
-
oidc -
htpasswd -
keystone -
ldap -
basic-authentication -
request-header -
github -
gitlab -
google
Adding any identity provider in the OAuth configuration removes the default kubeadmin user provider.
When you configure identity providers, you must configure at least one NodePool replica in your hosted cluster in advance. Traffic for DNS resolution is sent through the worker nodes. You do not need to configure the NodePool replicas in advance for the htpasswd and request-header identity providers.
Prerequisites
-
You logged in as a user with
cluster-adminprivileges. - You created your hosted cluster.
Procedure
- Navigate to Home → API Explorer.
-
Use the Filter by kind box to search for your
HostedClusterresource. -
Click the
HostedClusterresource that you want to edit. - Click the Instances tab.
-
Click the Options menu
 next to your hosted cluster name entry and click Edit HostedCluster.
Add the OAuth configuration in the YAML file:
spec: configuration: oauth: identityProviders: - openID:1 claims: email:2 - <email_address> name:3 - <display_name> preferredUsername:4 - <preferred_username> clientID: <client_id>5 clientSecret: name: <client_id_secret_name>6 issuer: https://example.com/identity7 mappingMethod: lookup8 name: IAM type: OpenID- 1
- This provider name is prefixed to the value of the identity claim to form an identity name. The provider name is also used to build the redirect URL.
- 2
- Defines a list of attributes to use as the email address.
- 3
- Defines a list of attributes to use as a display name.
- 4
- Defines a list of attributes to use as a preferred user name.
- 5
- Defines the ID of a client registered with the OpenID provider. You must allow the client to redirect to the
https://oauth-openshift.apps.<cluster_name>.<cluster_domain>/oauth2callback/<idp_provider_name>URL. - 6
- Defines a secret of a client registered with the OpenID provider.
- 7
- The Issuer Identifier described in the OpenID spec. You must use
httpswithout query or fragment component. - 8
- Defines a mapping method that controls how mappings are established between identities of this provider and
Userobjects.
- Click Save.
3.3. Assigning components IAM roles by using the CCO in a hosted cluster on AWS
You can assign components IAM roles that provide short-term, limited-privilege security credentials by using the Cloud Credential Operator (CCO) in hosted clusters on Amazon Web Services (AWS). By default, the CCO runs in a hosted control plane.
The CCO supports a manual mode only for hosted clusters on AWS. By default, hosted clusters are configured in a manual mode. The management cluster might use modes other than manual.
3.4. Verifying the CCO installation in a hosted cluster on AWS
You can verify that the Cloud Credential Operator (CCO) is running correctly in your hosted control plane.
Prerequisites
- You configured the hosted cluster on Amazon Web Services (AWS).
Procedure
Verify that the CCO is configured in a manual mode in your hosted cluster by running the following command:
$ oc get cloudcredentials <hosted_cluster_name> -n <hosted_cluster_namespace> -o=jsonpath={.spec.credentialsMode}Expected output
ManualVerify that the value for the
serviceAccountIssuerresource is not empty by running the following command:$ oc get authentication cluster --kubeconfig <hosted_cluster_name>.kubeconfig -o jsonpath --template '{.spec.serviceAccountIssuer }'Example output
https://aos-hypershift-ci-oidc-29999.s3.us-east-2.amazonaws.com/hypershift-ci-29999
3.5. Enabling Operators to support CCO-based workflows with AWS STS
As an Operator author designing your project to run on Operator Lifecycle Manager (OLM), you can enable your Operator to authenticate against AWS on STS-enabled OpenShift Container Platform clusters by customizing your project to support the Cloud Credential Operator (CCO).
With this method, the Operator is responsible for creating the CredentialsRequest object, which means the Operator requires RBAC permission to create these objects. Then, the Operator must be able to read the resulting Secret object.
By default, pods related to the Operator deployment mount a serviceAccountToken volume so that the service account token can be referenced in the resulting Secret object.
Prerequisites
- OpenShift Container Platform 4.14 or later
- Cluster in STS mode
- OLM-based Operator project
Procedure
Update your Operator project’s
ClusterServiceVersion(CSV) object:Ensure your Operator has RBAC permission to create
CredentialsRequestsobjects:Example 3.1. Example
clusterPermissionslist# ... install: spec: clusterPermissions: - rules: - apiGroups: - "cloudcredential.openshift.io" resources: - credentialsrequests verbs: - create - delete - get - list - patch - update - watchAdd the following annotation to claim support for this method of CCO-based workflow with AWS STS:
# ...
metadata:
 annotations:
   features.operators.openshift.io/token-auth-aws: "true"
Update your Operator project code:
Get the role ARN from the environment variable set on the pod by the
Subscriptionobject. For example:// Get ENV var roleARN := os.Getenv("ROLEARN") setupLog.Info("getting role ARN", "role ARN = ", roleARN) webIdentityTokenPath := "/var/run/secrets/openshift/serviceaccount/token"Ensure you have a
CredentialsRequestobject ready to be patched and applied. For example:Example 3.2. Example
CredentialsRequestobject creationimport ( minterv1 "github.com/openshift/cloud-credential-operator/pkg/apis/cloudcredential/v1" corev1 "k8s.io/api/core/v1" metav1 "k8s.io/apimachinery/pkg/apis/meta/v1" ) var in = minterv1.AWSProviderSpec{ StatementEntries: []minterv1.StatementEntry{ { Action: []string{ "s3:*", }, Effect: "Allow", Resource: "arn:aws:s3:*:*:*", }, }, STSIAMRoleARN: "<role_arn>", } var codec = minterv1.Codec var ProviderSpec, _ = codec.EncodeProviderSpec(in.DeepCopyObject()) const ( name = "<credential_request_name>" namespace = "<namespace_name>" ) var CredentialsRequestTemplate = &minterv1.CredentialsRequest{ ObjectMeta: metav1.ObjectMeta{ Name: name, Namespace: "openshift-cloud-credential-operator", }, Spec: minterv1.CredentialsRequestSpec{ ProviderSpec: ProviderSpec, SecretRef: corev1.ObjectReference{ Name: "<secret_name>", Namespace: namespace, }, ServiceAccountNames: []string{ "<service_account_name>", }, CloudTokenPath: "", }, }Alternatively, if you are starting from a
CredentialsRequestobject in YAML form (for example, as part of your Operator project code), you can handle it differently:Example 3.3. Example
CredentialsRequestobject creation in YAML form// CredentialsRequest is a struct that represents a request for credentials type CredentialsRequest struct { APIVersion string `yaml:"apiVersion"` Kind string `yaml:"kind"` Metadata struct { Name string `yaml:"name"` Namespace string `yaml:"namespace"` } `yaml:"metadata"` Spec struct { SecretRef struct { Name string `yaml:"name"` Namespace string `yaml:"namespace"` } `yaml:"secretRef"` ProviderSpec struct { APIVersion string `yaml:"apiVersion"` Kind string `yaml:"kind"` StatementEntries []struct { Effect string `yaml:"effect"` Action []string `yaml:"action"` Resource string `yaml:"resource"` } `yaml:"statementEntries"` STSIAMRoleARN string `yaml:"stsIAMRoleARN"` } `yaml:"providerSpec"` // added new field CloudTokenPath string `yaml:"cloudTokenPath"` } `yaml:"spec"` } // ConsumeCredsRequestAddingTokenInfo is a function that takes a YAML filename and two strings as arguments // It unmarshals the YAML file to a CredentialsRequest object and adds the token information. func ConsumeCredsRequestAddingTokenInfo(fileName, tokenString, tokenPath string) (*CredentialsRequest, error) { // open a file containing YAML form of a CredentialsRequest file, err := os.Open(fileName) if err != nil { return nil, err } defer file.Close() // create a new CredentialsRequest object cr := &CredentialsRequest{} // decode the yaml file to the object decoder := yaml.NewDecoder(file) err = decoder.Decode(cr) if err != nil { return nil, err } // assign the string to the existing field in the object cr.Spec.CloudTokenPath = tokenPath // return the modified object return cr, nil }NoteAdding a
CredentialsRequestobject to the Operator bundle is not currently supported.Add the role ARN and web identity token path to the credentials request and apply it during Operator initialization:
Example 3.4. Example applying
CredentialsRequestobject during Operator initialization// apply credentialsRequest on install credReq := credreq.CredentialsRequestTemplate credReq.Spec.CloudTokenPath = webIdentityTokenPath c := mgr.GetClient() if err := c.Create(context.TODO(), credReq); err != nil { if !errors.IsAlreadyExists(err) { setupLog.Error(err, "unable to create CredRequest") os.Exit(1) } }Ensure your Operator can wait for a
Secretobject to show up from the CCO, as shown in the following example, which is called along with the other items you are reconciling in your Operator:Example 3.5. Example wait for
Secretobject// WaitForSecret is a function that takes a Kubernetes client, a namespace, and a v1 "k8s.io/api/core/v1" name as arguments // It waits until the secret object with the given name exists in the given namespace // It returns the secret object or an error if the timeout is exceeded func WaitForSecret(client kubernetes.Interface, namespace, name string) (*v1.Secret, error) { // set a timeout of 10 minutes timeout := time.After(10 * time.Minute)1 // set a polling interval of 10 seconds ticker := time.NewTicker(10 * time.Second) // loop until the timeout or the secret is found for { select { case <-timeout: // timeout is exceeded, return an error return nil, fmt.Errorf("timed out waiting for secret %s in namespace %s", name, namespace) // add to this error with a pointer to instructions for following a manual path to a Secret that will work on STS case <-ticker.C: // polling interval is reached, try to get the secret secret, err := client.CoreV1().Secrets(namespace).Get(context.Background(), name, metav1.GetOptions{}) if err != nil { if errors.IsNotFound(err) { // secret does not exist yet, continue waiting continue } else { // some other error occurred, return it return nil, err } } else { // secret is found, return it return secret, nil } } } }- 1
- The
timeoutvalue is based on an estimate of how fast the CCO might detect an addedCredentialsRequestobject and generate aSecretobject. You might consider lowering the time or creating custom feedback for cluster administrators that could be wondering why the Operator is not yet accessing the cloud resources.
Set up the AWS configuration by reading the secret created by the CCO from the credentials request and creating the AWS config file containing the data from that secret:
Example 3.6. Example AWS configuration creation
func SharedCredentialsFileFromSecret(secret *corev1.Secret) (string, error) { var data []byte switch { case len(secret.Data["credentials"]) > 0: data = secret.Data["credentials"] default: return "", errors.New("invalid secret for aws credentials") } f, err := ioutil.TempFile("", "aws-shared-credentials") if err != nil { return "", errors.Wrap(err, "failed to create file for shared credentials") } defer f.Close() if _, err := f.Write(data); err != nil { return "", errors.Wrapf(err, "failed to write credentials to %s", f.Name()) } return f.Name(), nil }ImportantThe secret is assumed to exist, but your Operator code should wait and retry when using this secret to give time to the CCO to create the secret.
Additionally, the wait period should eventually time out and warn users that the OpenShift Container Platform cluster version, and therefore the CCO, might be an earlier version that does not support the
CredentialsRequestobject workflow with STS detection. In such cases, instruct users that they must add a secret by using another method.Configure the AWS SDK session, for example:
Example 3.7. Example AWS SDK session configuration
sharedCredentialsFile, err := SharedCredentialsFileFromSecret(secret)
if err != nil {
   // handle error
}
options := session.Options{
   SharedConfigState: session.SharedConfigEnable,
   SharedConfigFiles: []string{sharedCredentialsFile},
}
Chapter 4. Handling a machine configuration for hosted control planes
In a standalone OpenShift Container Platform cluster, a machine config pool manages a set of nodes. You can handle a machine configuration by using the MachineConfigPool custom resource (CR).
You can reference any machineconfiguration.openshift.io resources in the nodepool.spec.config field of the NodePool CR.
In hosted control planes, the MachineConfigPool CR does not exist. A node pool contains a set of compute nodes. You can handle a machine configuration by using node pools.
4.1. Configuring node pools for hosted control planes
On hosted control planes, you can configure node pools by creating a MachineConfig object inside of a config map in the management cluster.
Procedure
To create a
MachineConfigobject inside of a config map in the management cluster, enter the following information:apiVersion: v1 kind: ConfigMap metadata: name: <configmap_name> namespace: clusters data: config: | apiVersion: machineconfiguration.openshift.io/v1 kind: MachineConfig metadata: labels: machineconfiguration.openshift.io/role: worker name: <machineconfig_name> spec: config: ignition: version: 3.2.0 storage: files: - contents: source: data:... mode: 420 overwrite: true path: ${PATH}1 - 1
- Sets the path on the node where the
MachineConfigobject is stored.
After you add the object to the config map, you can apply the config map to the node pool as follows:
$ oc edit nodepool <nodepool_name> --namespace <hosted_cluster_namespace>apiVersion: hypershift.openshift.io/v1alpha1 kind: NodePool metadata: # ... name: nodepool-1 namespace: clusters # ... spec: config: - name: <configmap_name>1 # ...- 1
- Replace
<configmap_name>with the name of your config map.
4.2. Referencing the kubelet configuration in node pools
To reference your kubelet configuration in node pools, you add the kubelet configuration in a config map and then apply the config map in the NodePool resource.
Procedure
Add the kubelet configuration inside of a config map in the management cluster by entering the following information:
Example
ConfigMapobject with the kubelet configurationapiVersion: v1 kind: ConfigMap metadata: name: <configmap_name>1 namespace: clusters data: config: | apiVersion: machineconfiguration.openshift.io/v1 kind: KubeletConfig metadata: name: <kubeletconfig_name>2 spec: kubeletConfig: registerWithTaints: - key: "example.sh/unregistered" value: "true" effect: "NoExecute"Apply the config map to the node pool by entering the following command:
$ oc edit nodepool <nodepool_name> --namespace clusters1 - 1
- Replace
<nodepool_name>with the name of your node pool.
Example
NodePoolresource configurationapiVersion: hypershift.openshift.io/v1alpha1 kind: NodePool metadata: # ... name: nodepool-1 namespace: clusters # ... spec: config: - name: <configmap_name>1 # ...- 1
- Replace
<configmap_name>with the name of your config map.
4.3. Configuring node tuning in a hosted cluster
To set node-level tuning on the nodes in your hosted cluster, you can use the Node Tuning Operator. In hosted control planes, you can configure node tuning by creating config maps that contain Tuned objects and referencing those config maps in your node pools.
Procedure
Create a config map that contains a valid tuned manifest, and reference the manifest in a node pool. In the following example, a
Tunedmanifest defines a profile that setsvm.dirty_ratioto 55 on nodes that contain thetuned-1-node-labelnode label with any value. Save the followingConfigMapmanifest in a file namedtuned-1.yaml:apiVersion: v1 kind: ConfigMap metadata: name: tuned-1 namespace: clusters data: tuning: | apiVersion: tuned.openshift.io/v1 kind: Tuned metadata: name: tuned-1 namespace: openshift-cluster-node-tuning-operator spec: profile: - data: | [main] summary=Custom OpenShift profile include=openshift-node [sysctl] vm.dirty_ratio="55" name: tuned-1-profile recommend: - priority: 20 profile: tuned-1-profileNoteIf you do not add any labels to an entry in the
spec.recommendsection of the Tuned spec, node-pool-based matching is assumed, so the highest priority profile in thespec.recommendsection is applied to nodes in the pool. Although you can achieve more fine-grained node-label-based matching by setting a label value in the Tuned.spec.recommend.matchsection, node labels will not persist during an upgrade unless you set the.spec.management.upgradeTypevalue of the node pool toInPlace.Create the
ConfigMapobject in the management cluster:$ oc --kubeconfig="$MGMT_KUBECONFIG" create -f tuned-1.yamlReference the
ConfigMapobject in thespec.tuningConfigfield of the node pool, either by editing a node pool or creating one. In this example, assume that you have only oneNodePool, namednodepool-1, which contains 2 nodes.apiVersion: hypershift.openshift.io/v1alpha1 kind: NodePool metadata: ... name: nodepool-1 namespace: clusters ... spec: ... tuningConfig: - name: tuned-1 status: ...NoteYou can reference the same config map in multiple node pools. In hosted control planes, the Node Tuning Operator appends a hash of the node pool name and namespace to the name of the Tuned CRs to distinguish them. Outside of this case, do not create multiple TuneD profiles of the same name in different Tuned CRs for the same hosted cluster.
Verification
Now that you have created the ConfigMap object that contains a Tuned manifest and referenced it in a NodePool, the Node Tuning Operator syncs the Tuned objects into the hosted cluster. You can verify which Tuned objects are defined and which TuneD profiles are applied to each node.
List the
Tunedobjects in the hosted cluster:$ oc --kubeconfig="$HC_KUBECONFIG" get tuned.tuned.openshift.io -n openshift-cluster-node-tuning-operatorExample output
NAME AGE default 7m36s rendered 7m36s tuned-1 65sList the
Profileobjects in the hosted cluster:$ oc --kubeconfig="$HC_KUBECONFIG" get profile.tuned.openshift.io -n openshift-cluster-node-tuning-operatorExample output
NAME TUNED APPLIED DEGRADED AGE nodepool-1-worker-1 tuned-1-profile True False 7m43s nodepool-1-worker-2 tuned-1-profile True False 7m14sNoteIf no custom profiles are created, the
openshift-nodeprofile is applied by default.To confirm that the tuning was applied correctly, start a debug shell on a node and check the sysctl values:
$ oc --kubeconfig="$HC_KUBECONFIG" debug node/nodepool-1-worker-1 -- chroot /host sysctl vm.dirty_ratioExample output
vm.dirty_ratio = 55
4.4. Deploying the SR-IOV Operator for hosted control planes
Hosted control planes on the AWS platform is a Technology Preview feature only. Technology Preview features are not supported with Red Hat production service level agreements (SLAs) and might not be functionally complete. Red Hat does not recommend using them in production. These features provide early access to upcoming product features, enabling customers to test functionality and provide feedback during the development process.
For more information about the support scope of Red Hat Technology Preview features, see Technology Preview Features Support Scope.
After you configure and deploy your hosting service cluster, you can create a subscription to the SR-IOV Operator on a hosted cluster. The SR-IOV pod runs on worker machines rather than the control plane.
Prerequisites
You must configure and deploy the hosted cluster on AWS. For more information, see Configuring the hosting cluster on AWS (Technology Preview).
Procedure
Create a namespace and an Operator group:
apiVersion: v1 kind: Namespace metadata: name: openshift-sriov-network-operator --- apiVersion: operators.coreos.com/v1 kind: OperatorGroup metadata: name: sriov-network-operators namespace: openshift-sriov-network-operator spec: targetNamespaces: - openshift-sriov-network-operatorCreate a subscription to the SR-IOV Operator:
apiVersion: operators.coreos.com/v1alpha1 kind: Subscription metadata: name: sriov-network-operator-subsription namespace: openshift-sriov-network-operator spec: channel: stable name: sriov-network-operator config: nodeSelector: node-role.kubernetes.io/worker: "" source: s/qe-app-registry/redhat-operators sourceNamespace: openshift-marketplace
Verification
To verify that the SR-IOV Operator is ready, run the following command and view the resulting output:
$ oc get csv -n openshift-sriov-network-operatorExample output
NAME DISPLAY VERSION REPLACES PHASE sriov-network-operator.4.15.0-202211021237 SR-IOV Network Operator 4.15.0-202211021237 sriov-network-operator.4.15.0-202210290517 SucceededTo verify that the SR-IOV pods are deployed, run the following command:
$ oc get pods -n openshift-sriov-network-operator
4.5. Configuring the NTP server for hosted clusters
You can configure the Network Time Protocol (NTP) server for your hosted clusters by using Butane.
Procedure
Create a Butane config file,
99-worker-chrony.bu, that includes the contents of thechrony.conffile. For more information about Butane, see "Creating machine configs with Butane".Example
99-worker-chrony.buconfiguration# ... variant: openshift version: 4.15.0 metadata: name: 99-worker-chrony labels: machineconfiguration.openshift.io/role: worker storage: files: - path: /etc/chrony.conf mode: 06441 overwrite: true contents: inline: | pool 0.rhel.pool.ntp.org iburst2 driftfile /var/lib/chrony/drift makestep 1.0 3 rtcsync logdir /var/log/chrony # ...- 1
- Specify an octal value mode for the
modefield in the machine config file. After creating the file and applying the changes, themodefield is converted to a decimal value. - 2
- Specify any valid, reachable time source, such as the one provided by your Dynamic Host Configuration Protocol (DHCP) server.
NoteFor machine-to-machine communication, the NTP on the User Datagram Protocol (UDP) port is
123. If you configured an external NTP time server, you must open UDP port123.Use Butane to generate a
MachineConfigobject file,99-worker-chrony.yaml, that contains a configuration that Butane sends to the nodes. Run the following command:$ butane 99-worker-chrony.bu -o 99-worker-chrony.yamlExample
99-worker-chrony.yamlconfiguration# Generated by Butane; do not edit apiVersion: machineconfiguration.openshift.io/v1 kind: MachineConfig metadata: labels: machineconfiguration.openshift.io/role: worker name: <machineconfig_name> spec: config: ignition: version: 3.2.0 storage: files: - contents: source: data:... mode: 420 overwrite: true path: /example/pathAdd the contents of the
99-worker-chrony.yamlfile inside of a config map in the management cluster:Example config map
apiVersion: v1 kind: ConfigMap metadata: name: <configmap_name> namespace: <namespace>1 data: config: | apiVersion: machineconfiguration.openshift.io/v1 kind: MachineConfig metadata: labels: machineconfiguration.openshift.io/role: worker name: <machineconfig_name> spec: config: ignition: version: 3.2.0 storage: files: - contents: source: data:... mode: 420 overwrite: true path: /example/path # ...- 1
- Replace
<namespace>with the name of your namespace where you created the node pool, such asclusters.
Apply the config map to your node pool by running the following command:
$ oc edit nodepool <nodepool_name> --namespace <hosted_cluster_namespace>Example
NodePoolconfigurationapiVersion: hypershift.openshift.io/v1alpha1 kind: NodePool metadata: # ... name: nodepool-1 namespace: clusters # ... spec: config: - name: <configmap_name>1 # ...- 1
- Replace
<configmap_name>with the name of your config map.
Add the list of your NTP servers in the
infra-env.yamlfile, which defines theInfraEnvcustom resource (CR):Example
infra-env.yamlfileapiVersion: agent-install.openshift.io/v1beta1 kind: InfraEnv # ... spec: additionalNTPSources: - <ntp_server>1 - <ntp_server1> - <ntp_server2> # ...- 1
- Replace
<ntp_server>with the name of your NTP server. For more details about creating a host inventory and theInfraEnvCR, see "Creating a host inventory".
Apply the
InfraEnvCR by running the following command:$ oc apply -f infra-env.yaml
Verification
Check the following fields to know the status of your host inventory:
-
conditions: The standard Kubernetes conditions indicating if the image was created successfully. -
isoDownloadURL: The URL to download the Discovery Image. createdTime: The time at which the image was last created. If you modify theInfraEnvCR, ensure that you have updated the timestamp before downloading a new image.Verify that your host inventory is created by running the following command:
$ oc describe infraenv <infraenv_resource_name> -n <infraenv_namespace>NoteIf you modify the
InfraEnvCR, confirm that theInfraEnvCR has created a new Discovery Image by looking at thecreatedTimefield. If you already booted hosts, boot them again with the latest Discovery Image.
-
Chapter 5. Using feature gates in a hosted cluster
You can use feature gates in a hosted cluster to enable features that are not part of the default set of features. You can enable the TechPreviewNoUpgrade feature set by using feature gates in your hosted cluster.
5.1. Enabling feature sets by using feature gates
You can enable the TechPreviewNoUpgrade feature set in a hosted cluster by editing the HostedCluster custom resource (CR) with the OpenShift CLI.
Prerequisites
-
You installed the OpenShift CLI (
oc).
Procedure
Open the
HostedClusterCR for editing on the hosting cluster by running the following command:$ oc edit hostedcluster <hosted_cluster_name> -n <hosted_cluster_namespace>Define the feature set by entering a value in the
featureSetfield. For example:apiVersion: hypershift.openshift.io/v1beta1 kind: HostedCluster metadata: name: <hosted_cluster_name>1 namespace: <hosted_cluster_namespace>2 spec: configuration: featureGate: featureSet: TechPreviewNoUpgrade3 WarningEnabling the
TechPreviewNoUpgradefeature set on your cluster cannot be undone and prevents minor version updates. This feature set allows you to enable these Technology Preview features on test clusters, where you can fully test them. Do not enable this feature set on production clusters.- Save the file to apply the changes.
Verification
Verify that the
TechPreviewNoUpgradefeature gate is enabled in your hosted cluster by running the following command:$ oc get featuregate cluster -o yaml
Chapter 6. Configuring certificates for hosted control planes
With hosted control planes, the steps to configure certificates differ from those of standalone OpenShift Container Platform.
6.1. Configuring a custom API server certificate in a hosted cluster
To configure a custom certificate for the API server, specify the certificate details in the spec.configuration.apiServer section of your HostedCluster configuration.
You can configure a custom certificate during either day-1 or day-2 operations. However, because the service publishing strategy is immutable after you set it during hosted cluster creation, you must know what the hostname is for the Kubernetes API server that you plan to configure.
Prerequisites
You created a Kubernetes secret that contains your custom certificate in the management cluster. The secret contains the following keys:
-
tls.crt: The certificate -
tls.key: The private key
-
-
If your
HostedClusterconfiguration includes a service publishing strategy that uses a load balancer, ensure that the Subject Alternative Names (SANs) of the certificate do not conflict with the internal API endpoint (api-int). The internal API endpoint is automatically created and managed by your platform. If you use the same hostname in both the custom certificate and the internal API endpoint, routing conflicts can occur. The only exception to this rule is when you use AWS as the provider with eitherPrivateorPublicAndPrivateconfigurations. In those cases, the SAN conflict is managed by the platform. - The certificate must be valid for the external API endpoint.
- The validity period of the certificate aligns with your cluster’s expected life cycle.
Procedure
Create a secret with your custom certificate by entering the following command:
$ oc create secret tls sample-hosted-kas-custom-cert \
  --cert=path/to/cert.crt \
  --key=path/to/key.key \
  -n <hosted_cluster_namespace>
Update your
HostedClusterconfiguration with the custom certificate details, as shown in the following example:spec: configuration: apiServer: servingCerts: namedCertificates: - names:1 - api-custom-cert-sample-hosted.sample-hosted.example.com servingCertificate:2 name: sample-hosted-kas-custom-certApply the changes to your
HostedClusterconfiguration by entering the following command:$ oc apply -f <hosted_cluster_config>.yaml
Verification
- Check the API server pods to ensure that the new certificate is mounted.
- Test the connection to the API server by using the custom domain name.
-
Verify the certificate details in your browser or by using tools such as
openssl.
6.2. Configuring the Kubernetes API server for a hosted cluster
If you want to customize the Kubernetes API server for your hosted cluster, complete the following steps.
Prerequisites
- You have a running hosted cluster.
-
You have access to modify the
HostedClusterresource. You have a custom DNS domain to use for the Kubernetes API server.
- The custom DNS domain must be properly configured and resolvable.
- The DNS domain must have valid TLS certificates configured.
- Network access to the domain must be properly configured in your environment.
- The custom DNS domain must be unique across your hosted clusters.
- You have a configured custom certificate. For more information, see "Configuring a custom API server certificate in a hosted cluster".
Procedure
In your provider platform, configure the DNS record so that the
kubeAPIServerDNSNameURL points to the IP address that the Kubernetes API server is being exposed to. The DNS record must be properly configured and resolvable from your cluster.Example command to configure the DNS record
$ dig + short kubeAPIServerDNSNameIn your
HostedClusterspecification, modify thekubeAPIServerDNSNamefield, as shown in the following example:apiVersion: hypershift.openshift.io/v1beta1 kind: HostedCluster metadata: name: <hosted_cluster_name> namespace: <hosted_cluster_namespace> spec: configuration: apiServer: servingCerts: namedCertificates: - names:1 - api-custom-cert-sample-hosted.sample-hosted.example.com servingCertificate:2 name: sample-hosted-kas-custom-cert kubeAPIServerDNSName: api-custom-cert-sample-hosted.sample-hosted.example.com3 # ...- 1
- The list of DNS names that the certificate is valid for. The names listed in this field cannot be the same as the names specified in the
spec.servicePublishingStrategy.*hostnamefield. - 2
- The name of the secret that contains the custom certificate.
- 3
- This field accepts a URI that will be used as the API server endpoint.
Apply the configuration by entering the following command:
$ oc -f <hosted_cluster_spec>.yamlAfter the configuration is applied, the HyperShift Operator generates a new
kubeconfigsecret that points to your custom DNS domain.Retrieve the
kubeconfigsecret by using the CLI or the console.To retrieve the secret by using the CLI, enter the following command:
$ kubectl get secret <hosted_cluster_name>-custom-admin-kubeconfig \
  -n <cluster_namespace> \
  -o jsonpath='{.data.kubeconfig}' | base64 -d
To retrieve the secret by using the console, go to your hosted cluster and click Download Kubeconfig.
NoteYou cannot consume the new
kubeconfigsecret by using the show login command option in the console.
6.3. Troubleshooting accessing a hosted cluster by using a custom DNS
If you encounter issues when you access a hosted cluster by using a custom DNS, complete the following steps.
Procedure
- Verify that the DNS record is properly configured and resolved.
Check that the TLS certificates for the custom domain are valid, verifying that the SAN is correct for your domain, by entering the following command:
$ oc get secret \ -n clusters <serving_certificate_name> \ -o jsonpath='{.data.tls\.crt}' | base64 \ -d |openssl x509 -text -noout -- Ensure that network connectivity to the custom domain is working.
In the
HostedClusterresource, verify that the status shows the correct customkubeconfiginformation, as shown in the following example:Example
HostedClusterstatusstatus: customKubeconfig: name: sample-hosted-custom-admin-kubeconfigCheck the
kube-apiserverlogs in theHostedControlPlanenamespace by entering the following command:$ oc logs -n <hosted_control_plane_namespace> \ -l app=kube-apiserver -f -c kube-apiserver
Chapter 7. Updating hosted control planes
Updates for hosted control planes involve updating the hosted cluster and the node pools. For a cluster to remain fully operational during an update process, you must meet the requirements of the Kubernetes version skew policy while completing the control plane and node updates.
7.1. Requirements to upgrade hosted control planes
The multicluster engine for Kubernetes Operator can manage one or more OpenShift Container Platform clusters. After you create a hosted cluster on OpenShift Container Platform, you must import your hosted cluster in the multicluster engine Operator as a managed cluster. Then, you can use the OpenShift Container Platform cluster as a management cluster.
Consider the following requirements before you start updating hosted control planes:
- You must use the bare metal platform for an OpenShift Container Platform cluster when using OpenShift Virtualization as a provider.
-
You must use bare metal or OpenShift Virtualization as the cloud platform for the hosted cluster. You can find the platform type of your hosted cluster in the
spec.Platform.typespecification of theHostedClustercustom resource (CR).
You must upgrade the OpenShift Container Platform cluster, multicluster engine Operator, hosted cluster, and node pools by completing the following tasks:
- Upgrade an OpenShift Container Platform cluster to the latest version. For more information, see "Updating a cluster using the web console" or "Updating a cluster using the CLI".
- Upgrade the multicluster engine Operator to the latest version. For more information, see "Updating installed Operators".
- Upgrade the hosted cluster and node pools from the previous OpenShift Container Platform version to the latest version. For more information, see "Updating a control plane in a hosted cluster" and "Updating node pools in a hosted cluster".
7.2. Setting channels in a hosted cluster
You can see available updates in the HostedCluster.Status field of the HostedCluster custom resource (CR).
The available updates are not fetched from the Cluster Version Operator (CVO) of a hosted cluster. The list of the available updates can be different from the available updates from the following fields of the HostedCluster custom resource (CR):
-
status.version.availableUpdates -
status.version.conditionalUpdates
The initial HostedCluster CR does not have any information in the status.version.availableUpdates and status.version.conditionalUpdates fields. After you set the spec.channel field to the stable OpenShift Container Platform release version, the HyperShift Operator reconciles the HostedCluster CR and updates the status.version field with the available and conditional updates.
See the following example of the HostedCluster CR that contains the channel configuration:
spec:
  autoscaling: {}
  channel: stable-4.y
  clusterID: d6d42268-7dff-4d37-92cf-691bd2d42f41
  configuration: {}
  controllerAvailabilityPolicy: SingleReplica
  dns:
    baseDomain: dev11.red-chesterfield.com
    privateZoneID: Z0180092I0DQRKL55LN0
publicZoneID: Z00206462VG6ZP0H2QLWK- 1
- Replace
<4.y>with the OpenShift Container Platform release version you specified inspec.release. For example, if you set thespec.releasetoocp-release:4.16.4-multi, you must setspec.channeltostable-4.16.
After you configure the channel in the HostedCluster CR, to view the output of the status.version.availableUpdates and status.version.conditionalUpdates fields, run the following command:
$ oc get -n <hosted_cluster_namespace> hostedcluster <hosted_cluster_name> -o yamlExample output
version:
  availableUpdates:
  - channels:
    - candidate-4.16
    - candidate-4.17
    - eus-4.16
    - fast-4.16
    - stable-4.16
    image: quay.io/openshift-release-dev/ocp-release@sha256:b7517d13514c6308ae16c5fd8108133754eb922cd37403ed27c846c129e67a9a
    url: https://access.redhat.com/errata/RHBA-2024:6401
    version: 4.16.11
  - channels:
    - candidate-4.16
    - candidate-4.17
    - eus-4.16
    - fast-4.16
    - stable-4.16
    image: quay.io/openshift-release-dev/ocp-release@sha256:d08e7c8374142c239a07d7b27d1170eae2b0d9f00ccf074c3f13228a1761c162
    url: https://access.redhat.com/errata/RHSA-2024:6004
    version: 4.16.10
  - channels:
    - candidate-4.16
    - candidate-4.17
    - eus-4.16
    - fast-4.16
    - stable-4.16
    image: quay.io/openshift-release-dev/ocp-release@sha256:6a80ac72a60635a313ae511f0959cc267a21a89c7654f1c15ee16657aafa41a0
    url: https://access.redhat.com/errata/RHBA-2024:5757
    version: 4.16.9
  - channels:
    - candidate-4.16
    - candidate-4.17
    - eus-4.16
    - fast-4.16
    - stable-4.16
    image: quay.io/openshift-release-dev/ocp-release@sha256:ea624ae7d91d3f15094e9e15037244679678bdc89e5a29834b2ddb7e1d9b57e6
    url: https://access.redhat.com/errata/RHSA-2024:5422
    version: 4.16.8
  - channels:
    - candidate-4.16
    - candidate-4.17
    - eus-4.16
    - fast-4.16
    - stable-4.16
    image: quay.io/openshift-release-dev/ocp-release@sha256:e4102eb226130117a0775a83769fe8edb029f0a17b6cbca98a682e3f1225d6b7
    url: https://access.redhat.com/errata/RHSA-2024:4965
    version: 4.16.6
  - channels:
    - candidate-4.16
    - candidate-4.17
    - eus-4.16
    - fast-4.16
    - stable-4.16
    image: quay.io/openshift-release-dev/ocp-release@sha256:f828eda3eaac179e9463ec7b1ed6baeba2cd5bd3f1dd56655796c86260db819b
    url: https://access.redhat.com/errata/RHBA-2024:4855
    version: 4.16.5
  conditionalUpdates:
  - conditions:
    - lastTransitionTime: "2024-09-23T22:33:38Z"
      message: |-
        Could not evaluate exposure to update risk SRIOVFailedToConfigureVF (creating PromQL round-tripper: unable to load specified CA cert /etc/tls/service-ca/service-ca.crt: open /etc/tls/service-ca/service-ca.crt: no such file or directory)
          SRIOVFailedToConfigureVF description: OCP Versions 4.14.34, 4.15.25, 4.16.7 and ALL subsequent versions include kernel datastructure changes which are not compatible with older versions of the SR-IOV operator. Please update SR-IOV operator to versions dated 20240826 or newer before updating OCP.
          SRIOVFailedToConfigureVF URL: https://issues.redhat.com/browse/NHE-1171
      reason: EvaluationFailed
      status: Unknown
      type: Recommended
    release:
      channels:
      - candidate-4.16
      - candidate-4.17
      - eus-4.16
      - fast-4.16
      - stable-4.16
      image: quay.io/openshift-release-dev/ocp-release@sha256:fb321a3f50596b43704dbbed2e51fdefd7a7fd488ee99655d03784d0cd02283f
      url: https://access.redhat.com/errata/RHSA-2024:5107
      version: 4.16.7
    risks:
    - matchingRules:
      - promql:
          promql: |
            group(csv_succeeded{_id="d6d42268-7dff-4d37-92cf-691bd2d42f41", name=~"sriov-network-operator[.].*"})
            or
            0 * group(csv_count{_id="d6d42268-7dff-4d37-92cf-691bd2d42f41"})
        type: PromQL
      message: OCP Versions 4.14.34, 4.15.25, 4.16.7 and ALL subsequent versions
        include kernel datastructure changes which are not compatible with older
        versions of the SR-IOV operator. Please update SR-IOV operator to versions
        dated 20240826 or newer before updating OCP.
      name: SRIOVFailedToConfigureVF
      url: https://issues.redhat.com/browse/NHE-1171
7.3. Updating the OpenShift Container Platform version in a hosted cluster
Hosted control planes enables the decoupling of updates between the control plane and the data plane.
As a cluster service provider or cluster administrator, you can manage the control plane and the data separately.
You can update a control plane by modifying the HostedCluster custom resource (CR) and a node by modifying its NodePool CR. Both the HostedCluster and NodePool CRs specify an OpenShift Container Platform release image in a .release field.
To keep your hosted cluster fully operational during an update process, the control plane and the node updates must follow the Kubernetes version skew policy.
7.3.1. The multicluster engine Operator hub management cluster
The multicluster engine for Kubernetes Operator requires a specific OpenShift Container Platform version for the management cluster to remain in a supported state. You can install the multicluster engine Operator from OperatorHub in the OpenShift Container Platform web console.
See the following support matrices for the multicluster engine Operator versions:
The multicluster engine Operator supports the following OpenShift Container Platform versions:
- The latest unreleased version
- The latest released version
- Two versions before the latest released version
You can also get the multicluster engine Operator version as a part of Red Hat Advanced Cluster Management (RHACM).
7.3.2. Supported OpenShift Container Platform versions in a hosted cluster
When deploying a hosted cluster, the OpenShift Container Platform version of the management cluster does not affect the OpenShift Container Platform version of a hosted cluster.
The HyperShift Operator creates the supported-versions ConfigMap in the hypershift namespace. The supported-versions ConfigMap describes the range of supported OpenShift Container Platform versions that you can deploy.
See the following example of the supported-versions ConfigMap:
apiVersion: v1
data:
    server-version: 2f6cfe21a0861dea3130f3bed0d3ae5553b8c28b
    supported-versions: '{"versions":["4.17","4.16","4.15","4.14"]}'
kind: ConfigMap
metadata:
    creationTimestamp: "2024-06-20T07:12:31Z"
    labels:
        hypershift.openshift.io/supported-versions: "true"
    name: supported-versions
    namespace: hypershift
    resourceVersion: "927029"
    uid: f6336f91-33d3-472d-b747-94abae725f70
To create a hosted cluster, you must use the OpenShift Container Platform version from the support version range. However, the multicluster engine Operator can manage only between n+1 and n-2 OpenShift Container Platform versions, where n defines the current minor version. You can check the multicluster engine Operator support matrix to ensure the hosted clusters managed by the multicluster engine Operator are within the supported OpenShift Container Platform range.
To deploy a higher version of a hosted cluster on OpenShift Container Platform, you must update the multicluster engine Operator to a new minor version release to deploy a new version of the Hypershift Operator. Upgrading the multicluster engine Operator to a new patch, or z-stream, release does not update the HyperShift Operator to the next version.
See the following example output of the hcp version command that shows the supported OpenShift Container Platform versions for OpenShift Container Platform 4.16 in the management cluster:
Client Version: openshift/hypershift: fe67b47fb60e483fe60e4755a02b3be393256343. Latest supported OCP: 4.17.0
Server Version: 05864f61f24a8517731664f8091cedcfc5f9b60d
Server Supports OCP Versions: 4.17, 4.16, 4.15, 4.14
7.4. Updates for the hosted cluster
The spec.release value dictates the version of the control plane. The HostedCluster object transmits the intended spec.release value to the HostedControlPlane.spec.release value and runs the appropriate Control Plane Operator version.
The hosted control plane manages the rollout of the new version of the control plane components along with any OpenShift Container Platform components through the new version of the Cluster Version Operator (CVO).
In hosted control planes, the NodeHealthCheck resource cannot detect the status of the CVO. A cluster administrator must manually pause the remediation triggered by NodeHealthCheck, before performing critical operations, such as updating the cluster, to prevent new remediation actions from interfering with cluster updates.
To pause the remediation, enter the array of strings, for example, pause-test-cluster, as a value of the pauseRequests field in the NodeHealthCheck resource. For more information, see About the Node Health Check Operator.
After the cluster update is complete, you can edit or delete the remediation. Navigate to the Compute → NodeHealthCheck page, click your node health check, and then click Actions, which shows a drop-down list.
7.5. Updates for node pools
With node pools, you can configure the software that is running in the nodes by exposing the spec.release and spec.config values. You can start a rolling node pool update in the following ways:
-
Changing the
spec.releaseorspec.configvalues. - Changing any platform-specific field, such as the AWS instance type. The result is a set of new instances with the new type.
- Changing the cluster configuration, if the change propagates to the node.
Node pools support replace updates and in-place updates. The nodepool.spec.release value dictates the version of any particular node pool. A NodePool object completes a replace or an in-place rolling update according to the .spec.management.upgradeType value.
After you create a node pool, you cannot change the update type. If you want to change the update type, you must create a node pool and delete the other one.
7.5.1. Replace updates for node pools
A replace update creates instances in the new version while it removes old instances from the previous version. This update type is effective in cloud environments where this level of immutability is cost effective.
Replace updates do not preserve any manual changes because the node is entirely re-provisioned.
7.5.2. In place updates for node pools
An in-place update directly updates the operating systems of the instances. This type is suitable for environments where the infrastructure constraints are higher, such as bare metal.
In-place updates can preserve manual changes, but will report errors if you make manual changes to any file system or operating system configuration that the cluster directly manages, such as kubelet certificates.
7.6. Updating node pools in a hosted cluster
You can update your version of OpenShift Container Platform by updating the node pools in your hosted cluster. The node pool version must not surpass the hosted control plane version.
The .spec.release field in the NodePool custom resource (CR) shows the version of a node pool.
Procedure
Change the
spec.release.imagevalue in the node pool by entering the following command:$ oc patch nodepool <node_pool_name> -n <hosted_cluster_namespace> --type=merge -p '{"spec":{"nodeDrainTimeout":"60s","release":{"image":"<openshift_release_image>"}}}'1 2 - 1
- Replace
<node_pool_name>and<hosted_cluster_namespace>with your node pool name and hosted cluster namespace, respectively. - 2
- The
<openshift_release_image>variable specifies the new OpenShift Container Platform release image that you want to upgrade to, for example,quay.io/openshift-release-dev/ocp-release:4.y.z-x86_64. Replace<4.y.z>with the supported OpenShift Container Platform version.
Verification
To verify that the new version was rolled out, check the
.status.conditionsvalue in the node pool by running the following command:$ oc get -n <hosted_cluster_namespace> nodepool <node_pool_name> -o yamlExample output
status:
 conditions:
 - lastTransitionTime: "2024-05-20T15:00:40Z"
       message: 'Using release image: quay.io/openshift-release-dev/ocp-release:4.y.z-x86_64'
1 reason: AsExpected status: "True" type: ValidReleaseImage- 1
- Replace
<4.y.z>with the supported OpenShift Container Platform version.
7.7. Updating a control plane in a hosted cluster
On hosted control planes, you can upgrade your version of OpenShift Container Platform by updating the hosted cluster. The .spec.release in the HostedCluster custom resource (CR) shows the version of the control plane. The HostedCluster updates the .spec.release field to the HostedControlPlane.spec.release and runs the appropriate Control Plane Operator version.
The HostedControlPlane resource orchestrates the rollout of the new version of the control plane components along with the OpenShift Container Platform component in the data plane through the new version of the Cluster Version Operator (CVO). The HostedControlPlane includes the following artifacts:
- CVO
- Cluster Network Operator (CNO)
- Cluster Ingress Operator
- Manifests for the Kube API server, scheduler, and manager
- Machine approver
- Autoscaler
- Infrastructure resources to enable ingress for control plane endpoints such as the Kube API server, ignition, and konnectivity
You can set the .spec.release field in the HostedCluster CR to update the control plane by using the information from the status.version.availableUpdates and status.version.conditionalUpdates fields.
Procedure
Add the
hypershift.openshift.io/force-upgrade-to=<openshift_release_image>annotation to the hosted cluster by entering the following command:$ oc annotate hostedcluster -n <hosted_cluster_namespace> <hosted_cluster_name> "hypershift.openshift.io/force-upgrade-to=<openshift_release_image>" --overwrite1 2 - 1
- Replace
<hosted_cluster_name>and<hosted_cluster_namespace>with your hosted cluster name and hosted cluster namespace, respectively. - 2
- The
<openshift_release_image>variable specifies the new OpenShift Container Platform release image that you want to upgrade to, for example,quay.io/openshift-release-dev/ocp-release:4.y.z-x86_64. Replace<4.y.z>with the supported OpenShift Container Platform version.
Change the
spec.release.imagevalue in the hosted cluster by entering the following command:$ oc patch hostedcluster <hosted_cluster_name> -n <hosted_cluster_namespace> --type=merge -p '{"spec":{"release":{"image":"<openshift_release_image>"}}}'
Verification
To verify that the new version was rolled out, check the
.status.conditionsand.status.versionvalues in the hosted cluster by running the following command:$ oc get -n <hosted_cluster_namespace> hostedcluster <hosted_cluster_name> -o yamlExample output
status:
 conditions:
 - lastTransitionTime: "2024-05-20T15:01:01Z"
        message: Payload loaded version="4.y.z" image="quay.io/openshift-release-dev/ocp-release:4.y.z-x86_64"
1 status: "True" type: ClusterVersionReleaseAccepted #... version: availableUpdates: null desired: image: quay.io/openshift-release-dev/ocp-release:4.y.z-x86_642 version: 4.y.z
7.8. Updating a hosted cluster by using the multicluster engine Operator console
You can update your hosted cluster by using the multicluster engine Operator console.
Before updating a hosted cluster, you must refer to the available and conditional updates of a hosted cluster. Choosing a wrong release version might break the hosted cluster.
Procedure
- Select All clusters.
- Navigate to Infrastructure → Clusters to view managed hosted clusters.
- Click the Upgrade available link to update the control plane and node pools.
7.9. Limitations of managing imported hosted clusters
Hosted clusters are automatically imported into the local multicluster engine for Kubernetes Operator, unlike a standalone OpenShift Container Platform or third party clusters. Hosted clusters run some of their agents in the hosted mode so that the agents do not use the resources of your cluster.
If you choose to automatically import hosted clusters, you can update node pools and the control plane in hosted clusters by using the HostedCluster resource on the management cluster. To update node pools and a control plane, see "Updating node pools in a hosted cluster" and "Updating a control plane in a hosted cluster".
You can import hosted clusters into a location other than the local multicluster engine Operator by using the Red Hat Advanced Cluster Management (RHACM). For more information, see "Discovering multicluster engine for Kubernetes Operator hosted clusters in Red Hat Advanced Cluster Management".
In this topology, you must update your hosted clusters by using the command-line interface or the console of the local multicluster engine for Kubernetes Operator where the cluster is hosted. You cannot update the hosted clusters through the RHACM hub cluster.
Chapter 8. Hosted control planes Observability
You can gather metrics for hosted control planes by configuring metrics sets. The HyperShift Operator can create or delete monitoring dashboards in the management cluster for each hosted cluster that it manages.
8.1. Configuring metrics sets for hosted control planes
Hosted control planes for Red Hat OpenShift Container Platform creates ServiceMonitor resources in each control plane namespace that allow a Prometheus stack to gather metrics from the control planes. The ServiceMonitor resources use metrics relabelings to define which metrics are included or excluded from a particular component, such as etcd or the Kubernetes API server. The number of metrics that are produced by control planes directly impacts the resource requirements of the monitoring stack that gathers them.
Instead of producing a fixed number of metrics that apply to all situations, you can configure a metrics set that identifies a set of metrics to produce for each control plane. The following metrics sets are supported:
-
Telemetry: These metrics are needed for telemetry. This set is the default set and is the smallest set of metrics. -
SRE: This set includes the necessary metrics to produce alerts and allow the troubleshooting of control plane components. -
All: This set includes all of the metrics that are produced by standalone OpenShift Container Platform control plane components.
To configure a metrics set, set the METRICS_SET environment variable in the HyperShift Operator deployment by entering the following command:
$ oc set env -n hypershift deployment/operator METRICS_SET=All8.1.1. Configuring the SRE metrics set
When you specify the SRE metrics set, the HyperShift Operator looks for a config map named sre-metric-set with a single key: config. The value of the config key must contain a set of RelabelConfigs that are organized by control plane component.
You can specify the following components:
-
etcd -
kubeAPIServer -
kubeControllerManager -
openshiftAPIServer -
openshiftControllerManager -
openshiftRouteControllerManager -
cvo -
olm -
catalogOperator -
registryOperator -
nodeTuningOperator -
controlPlaneOperator -
hostedClusterConfigOperator
A configuration of the SRE metrics set is illustrated in the following example:
kubeAPIServer:
  - action:       "drop"
    regex:        "etcd_(debugging|disk|server).*"
    sourceLabels: ["__name__"]
  - action:       "drop"
    regex:        "apiserver_admission_controller_admission_latencies_seconds_.*"
    sourceLabels: ["__name__"]
  - action:       "drop"
    regex:        "apiserver_admission_step_admission_latencies_seconds_.*"
    sourceLabels: ["__name__"]
  - action:       "drop"
    regex:        "scheduler_(e2e_scheduling_latency_microseconds|scheduling_algorithm_predicate_evaluation|scheduling_algorithm_priority_evaluation|scheduling_algorithm_preemption_evaluation|scheduling_algorithm_latency_microseconds|binding_latency_microseconds|scheduling_latency_seconds)"
    sourceLabels: ["__name__"]
  - action:       "drop"
    regex:        "apiserver_(request_count|request_latencies|request_latencies_summary|dropped_requests|storage_data_key_generation_latencies_microseconds|storage_transformation_failures_total|storage_transformation_latencies_microseconds|proxy_tunnel_sync_latency_secs)"
    sourceLabels: ["__name__"]
  - action:       "drop"
    regex:        "docker_(operations|operations_latency_microseconds|operations_errors|operations_timeout)"
    sourceLabels: ["__name__"]
  - action:       "drop"
    regex:        "reflector_(items_per_list|items_per_watch|list_duration_seconds|lists_total|short_watches_total|watch_duration_seconds|watches_total)"
    sourceLabels: ["__name__"]
  - action:       "drop"
    regex:        "etcd_(helper_cache_hit_count|helper_cache_miss_count|helper_cache_entry_count|request_cache_get_latencies_summary|request_cache_add_latencies_summary|request_latencies_summary)"
    sourceLabels: ["__name__"]
  - action:       "drop"
    regex:        "transformation_(transformation_latencies_microseconds|failures_total)"
    sourceLabels: ["__name__"]
  - action:       "drop"
    regex:        "network_plugin_operations_latency_microseconds|sync_proxy_rules_latency_microseconds|rest_client_request_latency_seconds"
    sourceLabels: ["__name__"]
  - action:       "drop"
    regex:        "apiserver_request_duration_seconds_bucket;(0.15|0.25|0.3|0.35|0.4|0.45|0.6|0.7|0.8|0.9|1.25|1.5|1.75|2.5|3|3.5|4.5|6|7|8|9|15|25|30|50)"
    sourceLabels: ["__name__", "le"]
kubeControllerManager:
  - action:       "drop"
    regex:        "etcd_(debugging|disk|request|server).*"
    sourceLabels: ["__name__"]
  - action:       "drop"
    regex:        "rest_client_request_latency_seconds_(bucket|count|sum)"
    sourceLabels: ["__name__"]
  - action:       "drop"
    regex:        "root_ca_cert_publisher_sync_duration_seconds_(bucket|count|sum)"
    sourceLabels: ["__name__"]
openshiftAPIServer:
  - action:       "drop"
    regex:        "etcd_(debugging|disk|server).*"
    sourceLabels: ["__name__"]
  - action:       "drop"
    regex:        "apiserver_admission_controller_admission_latencies_seconds_.*"
    sourceLabels: ["__name__"]
  - action:       "drop"
    regex:        "apiserver_admission_step_admission_latencies_seconds_.*"
    sourceLabels: ["__name__"]
  - action:       "drop"
    regex:        "apiserver_request_duration_seconds_bucket;(0.15|0.25|0.3|0.35|0.4|0.45|0.6|0.7|0.8|0.9|1.25|1.5|1.75|2.5|3|3.5|4.5|6|7|8|9|15|25|30|50)"
    sourceLabels: ["__name__", "le"]
openshiftControllerManager:
  - action:       "drop"
    regex:        "etcd_(debugging|disk|request|server).*"
    sourceLabels: ["__name__"]
openshiftRouteControllerManager:
  - action:       "drop"
    regex:        "etcd_(debugging|disk|request|server).*"
    sourceLabels: ["__name__"]
olm:
  - action:       "drop"
    regex:        "etcd_(debugging|disk|server).*"
    sourceLabels: ["__name__"]
catalogOperator:
  - action:       "drop"
    regex:        "etcd_(debugging|disk|server).*"
    sourceLabels: ["__name__"]
cvo:
  - action: drop
    regex: "etcd_(debugging|disk|server).*"
    sourceLabels: ["__name__"]
8.2. Enabling monitoring dashboards in a hosted cluster
You can enable monitoring dashboards in a hosted cluster by creating a config map.
Procedure
Create the
hypershift-operator-install-flagsconfig map in thelocal-clusternamespace. See the following example configuration:kind: ConfigMap apiVersion: v1 metadata: name: hypershift-operator-install-flags namespace: local-cluster data: installFlagsToAdd: "--monitoring-dashboards --metrics-set=All"1 installFlagsToRemove: ""- 1
- The
--monitoring-dashboards --metrics-set=Allflag adds the monitoring dashboard for all metrics.
Wait a couple of minutes for the HyperShift Operator deployment in the
hypershiftnamespace to be updated to include the following environment variable:- name: MONITORING_DASHBOARDS value: "1"When monitoring dashboards are enabled, for each hosted cluster that the HyperShift Operator manages, the Operator creates a config map named
cp-<hosted_cluster_namespace>-<hosted_cluster_name>in theopenshift-config-managednamespace, where<hosted_cluster_namespace>is the namespace of the hosted cluster and<hosted_cluster_name>is the name of the hosted cluster. As a result, a new dashboard is added in the administrative console of the management cluster.- To view the dashboard, log in to the management cluster’s console and go to the dashboard for the hosted cluster by clicking Observe → Dashboards.
-
Optional: To disable monitoring dashboards in a hosted cluster, remove the
--monitoring-dashboards --metrics-set=Allflag from thehypershift-operator-install-flagsconfig map. When you delete a hosted cluster, its corresponding dashboard is also deleted.
8.2.1. Dashboard customization
To generate dashboards for each hosted cluster, the HyperShift Operator uses a template that is stored in the monitoring-dashboard-template config map in the Operator namespace (hypershift). This template contains a set of Grafana panels that contain the metrics for the dashboard. You can edit the content of the config map to customize the dashboards.
When a dashboard is generated, the following strings are replaced with values that correspond to a specific hosted cluster:
| Name | Description |
|---|---|
|
| The name of the hosted cluster |
|
| The namespace of the hosted cluster |
|
| The namespace where the control plane pods of the hosted cluster are placed |
|
|
The UUID of the hosted cluster, which matches the |
Chapter 9. High availability for hosted control planes
9.1. Recovering an unhealthy etcd cluster
In a highly available control plane, three etcd pods run as a part of a stateful set in an etcd cluster. To recover an etcd cluster, identify unhealthy etcd pods by checking the etcd cluster health.
9.1.1. Checking the status of an etcd cluster
You can check the status of the etcd cluster health by logging into any etcd pod.
Procedure
Log in to an etcd pod by entering the following command:
$ oc rsh -n openshift-etcd -c etcd <etcd_pod_name>Print the health status of an etcd cluster by entering the following command:
sh-4.4# etcdctl endpoint status -w tableExample output
+------------------------------+-----------------+---------+---------+-----------+------------+-----------+------------+--------------------+--------+
|          ENDPOINT            |       ID        | VERSION | DB SIZE | IS LEADER | IS LEARNER | RAFT TERM | RAFT INDEX | RAFT APPLIED INDEX | ERRORS |
+------------------------------+-----------------+---------+---------+-----------+------------+-----------+------------+--------------------+--------+
| https://192.168.1xxx.20:2379 | 8fxxxxxxxxxx    |  3.5.12 |  123 MB |     false |      false |        10 |     180156 |             180156 |        |
| https://192.168.1xxx.21:2379 | a5xxxxxxxxxx    |  3.5.12 |  122 MB |     false |      false |        10 |     180156 |             180156 |        |
| https://192.168.1xxx.22:2379 | 7cxxxxxxxxxx    |  3.5.12 |  124 MB |      true |      false |        10 |     180156 |             180156 |        |
+-----------------------------+------------------+---------+---------+-----------+------------+-----------+------------+--------------------+--------+
9.1.2. Recovering a failing etcd pod
Each etcd pod of a 3-node cluster has its own persistent volume claim (PVC) to store its data. An etcd pod might fail because of corrupted or missing data. You can recover a failing etcd pod and its PVC.
Procedure
To confirm that the etcd pod is failing, enter the following command:
$ oc get pods -l app=etcd -n openshift-etcdExample output
NAME     READY   STATUS             RESTARTS     AGE
etcd-0   2/2     Running            0            64m
etcd-1   2/2     Running            0            45m
etcd-2   1/2     CrashLoopBackOff   1 (5s ago)   64m
The failing etcd pod might have the
CrashLoopBackOfforErrorstatus.Delete the failing pod and its PVC by entering the following command:
$ oc delete pods etcd-2 -n openshift-etcd
Verification
Verify that a new etcd pod is up and running by entering the following command:
$ oc get pods -l app=etcd -n openshift-etcdExample output
NAME     READY   STATUS    RESTARTS   AGE
etcd-0   2/2     Running   0          67m
etcd-1   2/2     Running   0          48m
etcd-2   2/2     Running   0          2m2s
9.2. Backing up and restoring etcd in an on-premise environment
You can back up and restore etcd on a hosted cluster in an on-premise environment to fix failures.
9.2.1. Backing up and restoring etcd on a hosted cluster in an on-premise environment
By backing up and restoring etcd on a hosted cluster, you can fix failures, such as corrupted or missing data in an etcd member of a three node cluster. If multiple members of the etcd cluster encounter data loss or have a CrashLoopBackOff status, this approach helps prevent an etcd quorum loss.
This procedure requires API downtime.
Prerequisites
-
The
ocandjqbinaries have been installed.
Procedure
First, set up your environment variables and scale down the API servers:
Set up environment variables for your hosted cluster by entering the following commands, replacing values as necessary:
$ CLUSTER_NAME=my-cluster$ HOSTED_CLUSTER_NAMESPACE=clusters$ CONTROL_PLANE_NAMESPACE="${HOSTED_CLUSTER_NAMESPACE}-${CLUSTER_NAME}"Pause reconciliation of the hosted cluster by entering the following command, replacing values as necessary:
$ oc patch -n ${HOSTED_CLUSTER_NAMESPACE} hostedclusters/${CLUSTER_NAME} -p '{"spec":{"pausedUntil":"true"}}' --type=mergeScale down the API servers by entering the following commands:
Scale down the
kube-apiserver:$ oc scale -n ${CONTROL_PLANE_NAMESPACE} deployment/kube-apiserver --replicas=0Scale down the
openshift-apiserver:$ oc scale -n ${CONTROL_PLANE_NAMESPACE} deployment/openshift-apiserver --replicas=0Scale down the
openshift-oauth-apiserver:$ oc scale -n ${CONTROL_PLANE_NAMESPACE} deployment/openshift-oauth-apiserver --replicas=0
Next, take a snapshot of etcd by using one of the following methods:
- Use a previously backed-up snapshot of etcd.
If you have an available etcd pod, take a snapshot from the active etcd pod by completing the following steps:
List etcd pods by entering the following command:
$ oc get -n ${CONTROL_PLANE_NAMESPACE} pods -l app=etcdTake a snapshot of the pod database and save it locally to your machine by entering the following commands:
$ ETCD_POD=etcd-0$ oc exec -n ${CONTROL_PLANE_NAMESPACE} -c etcd -t ${ETCD_POD} -- env ETCDCTL_API=3 /usr/bin/etcdctl \ --cacert /etc/etcd/tls/etcd-ca/ca.crt \ --cert /etc/etcd/tls/client/etcd-client.crt \ --key /etc/etcd/tls/client/etcd-client.key \ --endpoints=https://localhost:2379 \ snapshot save /var/lib/snapshot.dbVerify that the snapshot is successful by entering the following command:
$ oc exec -n ${CONTROL_PLANE_NAMESPACE} -c etcd -t ${ETCD_POD} -- env ETCDCTL_API=3 /usr/bin/etcdctl -w table snapshot status /var/lib/snapshot.db
Make a local copy of the snapshot by entering the following command:
$ oc cp -c etcd ${CONTROL_PLANE_NAMESPACE}/${ETCD_POD}:/var/lib/snapshot.db /tmp/etcd.snapshot.dbMake a copy of the snapshot database from etcd persistent storage:
List etcd pods by entering the following command:
$ oc get -n ${CONTROL_PLANE_NAMESPACE} pods -l app=etcdFind a pod that is running and set its name as the value of
ETCD_POD: ETCD_POD=etcd-0, and then copy its snapshot database by entering the following command:$ oc cp -c etcd ${CONTROL_PLANE_NAMESPACE}/${ETCD_POD}:/var/lib/data/member/snap/db /tmp/etcd.snapshot.db
Next, scale down the etcd statefulset by entering the following command:
$ oc scale -n ${CONTROL_PLANE_NAMESPACE} statefulset/etcd --replicas=0Delete volumes for second and third members by entering the following command:
$ oc delete -n ${CONTROL_PLANE_NAMESPACE} pvc/data-etcd-1 pvc/data-etcd-2Create a pod to access the first etcd member’s data:
Get the etcd image by entering the following command:
$ ETCD_IMAGE=$(oc get -n ${CONTROL_PLANE_NAMESPACE} statefulset/etcd -o jsonpath='{ .spec.template.spec.containers[0].image }')Create a pod that allows access to etcd data:
$ cat << EOF | oc apply -n ${CONTROL_PLANE_NAMESPACE} -f -
apiVersion: apps/v1
kind: Deployment
metadata:
  name: etcd-data
spec:
  replicas: 1
  selector:
    matchLabels:
      app: etcd-data
  template:
    metadata:
      labels:
        app: etcd-data
    spec:
      containers:
      - name: access
        image: $ETCD_IMAGE
        volumeMounts:
        - name: data
          mountPath: /var/lib
        command:
        - /usr/bin/bash
        args:
        - -c
        - |-
          while true; do
            sleep 1000
          done
      volumes:
      - name: data
        persistentVolumeClaim:
          claimName: data-etcd-0
    EOF
Check the status of the
etcd-datapod and wait for it to be running by entering the following command:$ oc get -n ${CONTROL_PLANE_NAMESPACE} pods -l app=etcd-dataGet the name of the
etcd-datapod by entering the following command:$ DATA_POD=$(oc get -n ${CONTROL_PLANE_NAMESPACE} pods --no-headers -l app=etcd-data -o name | cut -d/ -f2)
Copy an etcd snapshot into the pod by entering the following command:
$ oc cp /tmp/etcd.snapshot.db ${CONTROL_PLANE_NAMESPACE}/${DATA_POD}:/var/lib/restored.snap.dbRemove old data from the
etcd-datapod by entering the following commands:$ oc exec -n ${CONTROL_PLANE_NAMESPACE} ${DATA_POD} -- rm -rf /var/lib/data$ oc exec -n ${CONTROL_PLANE_NAMESPACE} ${DATA_POD} -- mkdir -p /var/lib/dataRestore the etcd snapshot by entering the following command:
$ oc exec -n ${CONTROL_PLANE_NAMESPACE} ${DATA_POD} -- etcdutl snapshot restore /var/lib/restored.snap.db \
     --data-dir=/var/lib/data --skip-hash-check \
     --name etcd-0 \
     --initial-cluster-token=etcd-cluster \
     --initial-cluster etcd-0=https://etcd-0.etcd-discovery.${CONTROL_PLANE_NAMESPACE}.svc:2380,etcd-1=https://etcd-1.etcd-discovery.${CONTROL_PLANE_NAMESPACE}.svc:2380,etcd-2=https://etcd-2.etcd-discovery.${CONTROL_PLANE_NAMESPACE}.svc:2380 \
     --initial-advertise-peer-urls https://etcd-0.etcd-discovery.${CONTROL_PLANE_NAMESPACE}.svc:2380
Remove the temporary etcd snapshot from the pod by entering the following command:
$ oc exec -n ${CONTROL_PLANE_NAMESPACE} ${DATA_POD} -- rm /var/lib/restored.snap.dbDelete data access deployment by entering the following command:
$ oc delete -n ${CONTROL_PLANE_NAMESPACE} deployment/etcd-dataScale up the etcd cluster by entering the following command:
$ oc scale -n ${CONTROL_PLANE_NAMESPACE} statefulset/etcd --replicas=3Wait for the etcd member pods to return and report as available by entering the following command:
$ oc get -n ${CONTROL_PLANE_NAMESPACE} pods -l app=etcd -wScale up all etcd-writer deployments by entering the following command:
$ oc scale deployment -n ${CONTROL_PLANE_NAMESPACE} --replicas=3 kube-apiserver openshift-apiserver openshift-oauth-apiserver
Restore reconciliation of the hosted cluster by entering the following command:
$ oc patch -n ${HOSTED_CLUSTER_NAMESPACE} hostedclusters/${CLUSTER_NAME} -p '{"spec":{"pausedUntil":""}}' --type=merge
9.3. Backing up and restoring etcd on AWS
You can back up and restore etcd on a hosted cluster on Amazon Web Services (AWS) to fix failures.
Hosted control planes on the AWS platform is a Technology Preview feature only. Technology Preview features are not supported with Red Hat production service level agreements (SLAs) and might not be functionally complete. Red Hat does not recommend using them in production. These features provide early access to upcoming product features, enabling customers to test functionality and provide feedback during the development process.
For more information about the support scope of Red Hat Technology Preview features, see Technology Preview Features Support Scope.
9.3.1. Taking a snapshot of etcd for a hosted cluster
To back up etcd for a hosted cluster, you must take a snapshot of etcd. Later, you can restore etcd by using the snapshot.
This procedure requires API downtime.
Procedure
Pause reconciliation of the hosted cluster by entering the following command:
$ oc patch -n clusters hostedclusters/<hosted_cluster_name> -p '{"spec":{"pausedUntil":"true"}}' --type=mergeStop all etcd-writer deployments by entering the following command:
$ oc scale deployment -n <hosted_cluster_namespace> --replicas=0 kube-apiserver openshift-apiserver openshift-oauth-apiserverTo take an etcd snapshot, use the
execcommand in each etcd container by entering the following command:$ oc exec -it <etcd_pod_name> -n <hosted_cluster_namespace> -- env ETCDCTL_API=3 /usr/bin/etcdctl --cacert /etc/etcd/tls/etcd-ca/ca.crt --cert /etc/etcd/tls/client/etcd-client.crt --key /etc/etcd/tls/client/etcd-client.key --endpoints=localhost:2379 snapshot save /var/lib/data/snapshot.dbTo check the snapshot status, use the
execcommand in each etcd container by running the following command:$ oc exec -it <etcd_pod_name> -n <hosted_cluster_namespace> -- env ETCDCTL_API=3 /usr/bin/etcdctl -w table snapshot status /var/lib/data/snapshot.dbCopy the snapshot data to a location where you can retrieve it later, such as an S3 bucket. See the following example.
NoteThe following example uses signature version 2. If you are in a region that supports signature version 4, such as the
us-east-2region, use signature version 4. Otherwise, when copying the snapshot to an S3 bucket, the upload fails.Example
BUCKET_NAME=somebucket
FILEPATH="/${BUCKET_NAME}/${CLUSTER_NAME}-snapshot.db"
CONTENT_TYPE="application/x-compressed-tar"
DATE_VALUE=`date -R`
SIGNATURE_STRING="PUT\n\n${CONTENT_TYPE}\n${DATE_VALUE}\n${FILEPATH}"
ACCESS_KEY=accesskey
SECRET_KEY=secret
SIGNATURE_HASH=`echo -en ${SIGNATURE_STRING} | openssl sha1 -hmac ${SECRET_KEY} -binary | base64`

oc exec -it etcd-0 -n ${HOSTED_CLUSTER_NAMESPACE} -- curl -X PUT -T "/var/lib/data/snapshot.db" \
  -H "Host: ${BUCKET_NAME}.s3.amazonaws.com" \
  -H "Date: ${DATE_VALUE}" \
  -H "Content-Type: ${CONTENT_TYPE}" \
  -H "Authorization: AWS ${ACCESS_KEY}:${SIGNATURE_HASH}" \
  https://${BUCKET_NAME}.s3.amazonaws.com/${CLUSTER_NAME}-snapshot.db
To restore the snapshot on a new cluster later, save the encryption secret that the hosted cluster references.
Get the secret encryption key by entering the following command:
$ oc get hostedcluster <hosted_cluster_name> -o=jsonpath='{.spec.secretEncryption.aescbc}'
{"activeKey":{"name":"<hosted_cluster_name>-etcd-encryption-key"}}
Save the secret encryption key by entering the following command:
$ oc get secret <hosted_cluster_name>-etcd-encryption-key -o=jsonpath='{.data.key}'You can decrypt this key when restoring a snapshot on a new cluster.
Next steps
Restore the etcd snapshot.
9.3.2. Restoring an etcd snapshot on a hosted cluster
If you have a snapshot of etcd from your hosted cluster, you can restore it. Currently, you can restore an etcd snapshot only during cluster creation.
To restore an etcd snapshot, you modify the output from the create cluster --render command and define a restoreSnapshotURL value in the etcd section of the HostedCluster specification.
The --render flag in the hcp create command does not render the secrets. To render the secrets, you must use both the --render and the --render-sensitive flags in the hcp create command.
Prerequisites
You took an etcd snapshot on a hosted cluster.
Procedure
On the
awscommand-line interface (CLI), create a pre-signed URL so that you can download your etcd snapshot from S3 without passing credentials to the etcd deployment:ETCD_SNAPSHOT=${ETCD_SNAPSHOT:-"s3://${BUCKET_NAME}/${CLUSTER_NAME}-snapshot.db"} ETCD_SNAPSHOT_URL=$(aws s3 presign ${ETCD_SNAPSHOT})Modify the
HostedClusterspecification to refer to the URL:spec: etcd: managed: storage: persistentVolume: size: 4Gi type: PersistentVolume restoreSnapshotURL: - "${ETCD_SNAPSHOT_URL}" managementType: Managed-
Ensure that the secret that you referenced from the
spec.secretEncryption.aescbcvalue contains the same AES key that you saved in the previous steps.
9.4. Disaster recovery for a hosted cluster in AWS
You can recover a hosted cluster to the same region within Amazon Web Services (AWS). For example, you need disaster recovery when the upgrade of a management cluster fails and the hosted cluster is in a read-only state.
Hosted control planes is a Technology Preview feature only. Technology Preview features are not supported with Red Hat production service level agreements (SLAs) and might not be functionally complete. Red Hat does not recommend using them in production. These features provide early access to upcoming product features, enabling customers to test functionality and provide feedback during the development process.
For more information about the support scope of Red Hat Technology Preview features, see Technology Preview Features Support Scope.
The disaster recovery process involves the following steps:
- Backing up the hosted cluster on the source management cluster
- Restoring the hosted cluster on a destination management cluster
- Deleting the hosted cluster from the source management cluster
Your workloads remain running during the process. The Cluster API might be unavailable for a period, but that does not affect the services that are running on the worker nodes.
Both the source management cluster and the destination management cluster must have the --external-dns flags to maintain the API server URL. That way, the server URL ends with https://api-sample-hosted.sample-hosted.aws.openshift.com. See the following example:
Example: External DNS flags
--external-dns-provider=aws \
--external-dns-credentials=<path_to_aws_credentials_file> \
--external-dns-domain-filter=<basedomain>
If you do not include the --external-dns flags to maintain the API server URL, you cannot migrate the hosted cluster.
9.4.1. Overview of the backup and restore process
The backup and restore process works as follows:
On management cluster 1, which you can think of as the source management cluster, the control plane and workers interact by using the external DNS API. The external DNS API is accessible, and a load balancer sits between the management clusters.
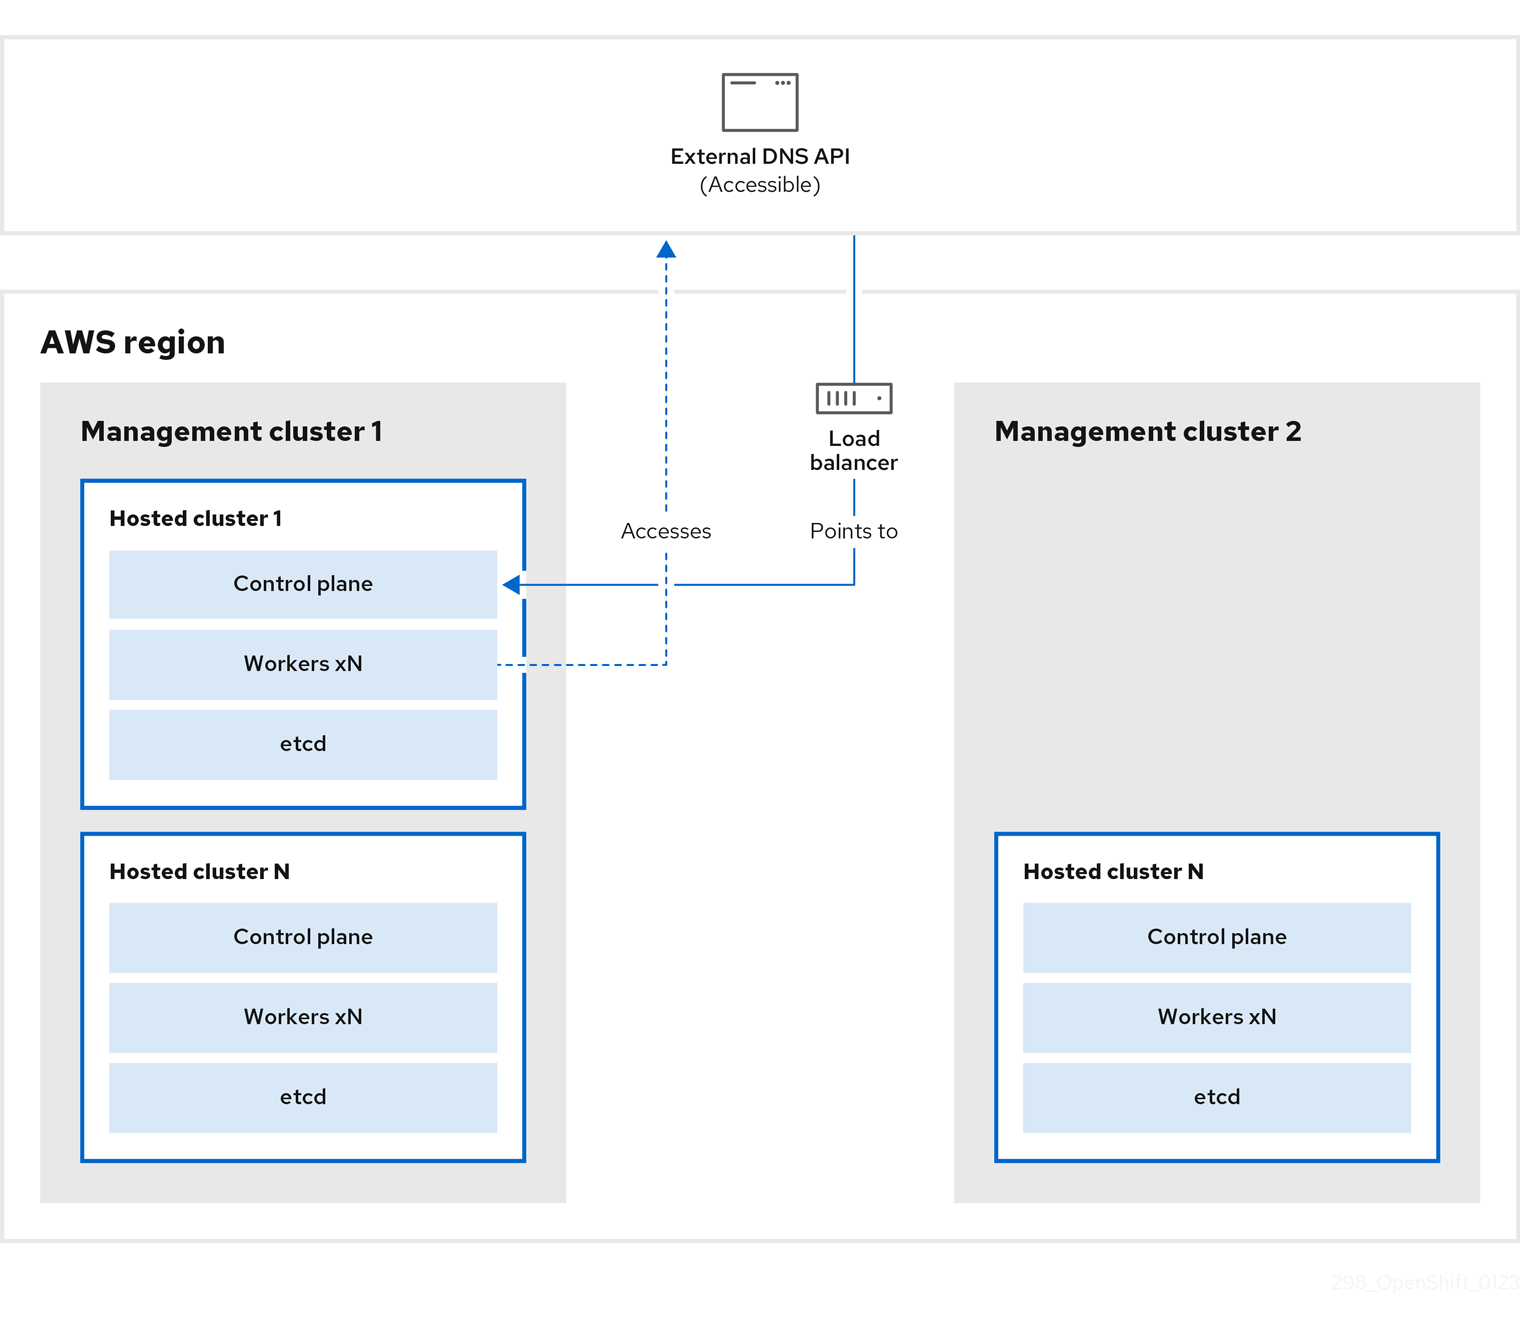
You take a snapshot of the hosted cluster, which includes etcd, the control plane, and the worker nodes. During this process, the worker nodes continue to try to access the external DNS API even if it is not accessible, the workloads are running, the control plane is saved in a local manifest file, and etcd is backed up to an S3 bucket. The data plane is active and the control plane is paused.
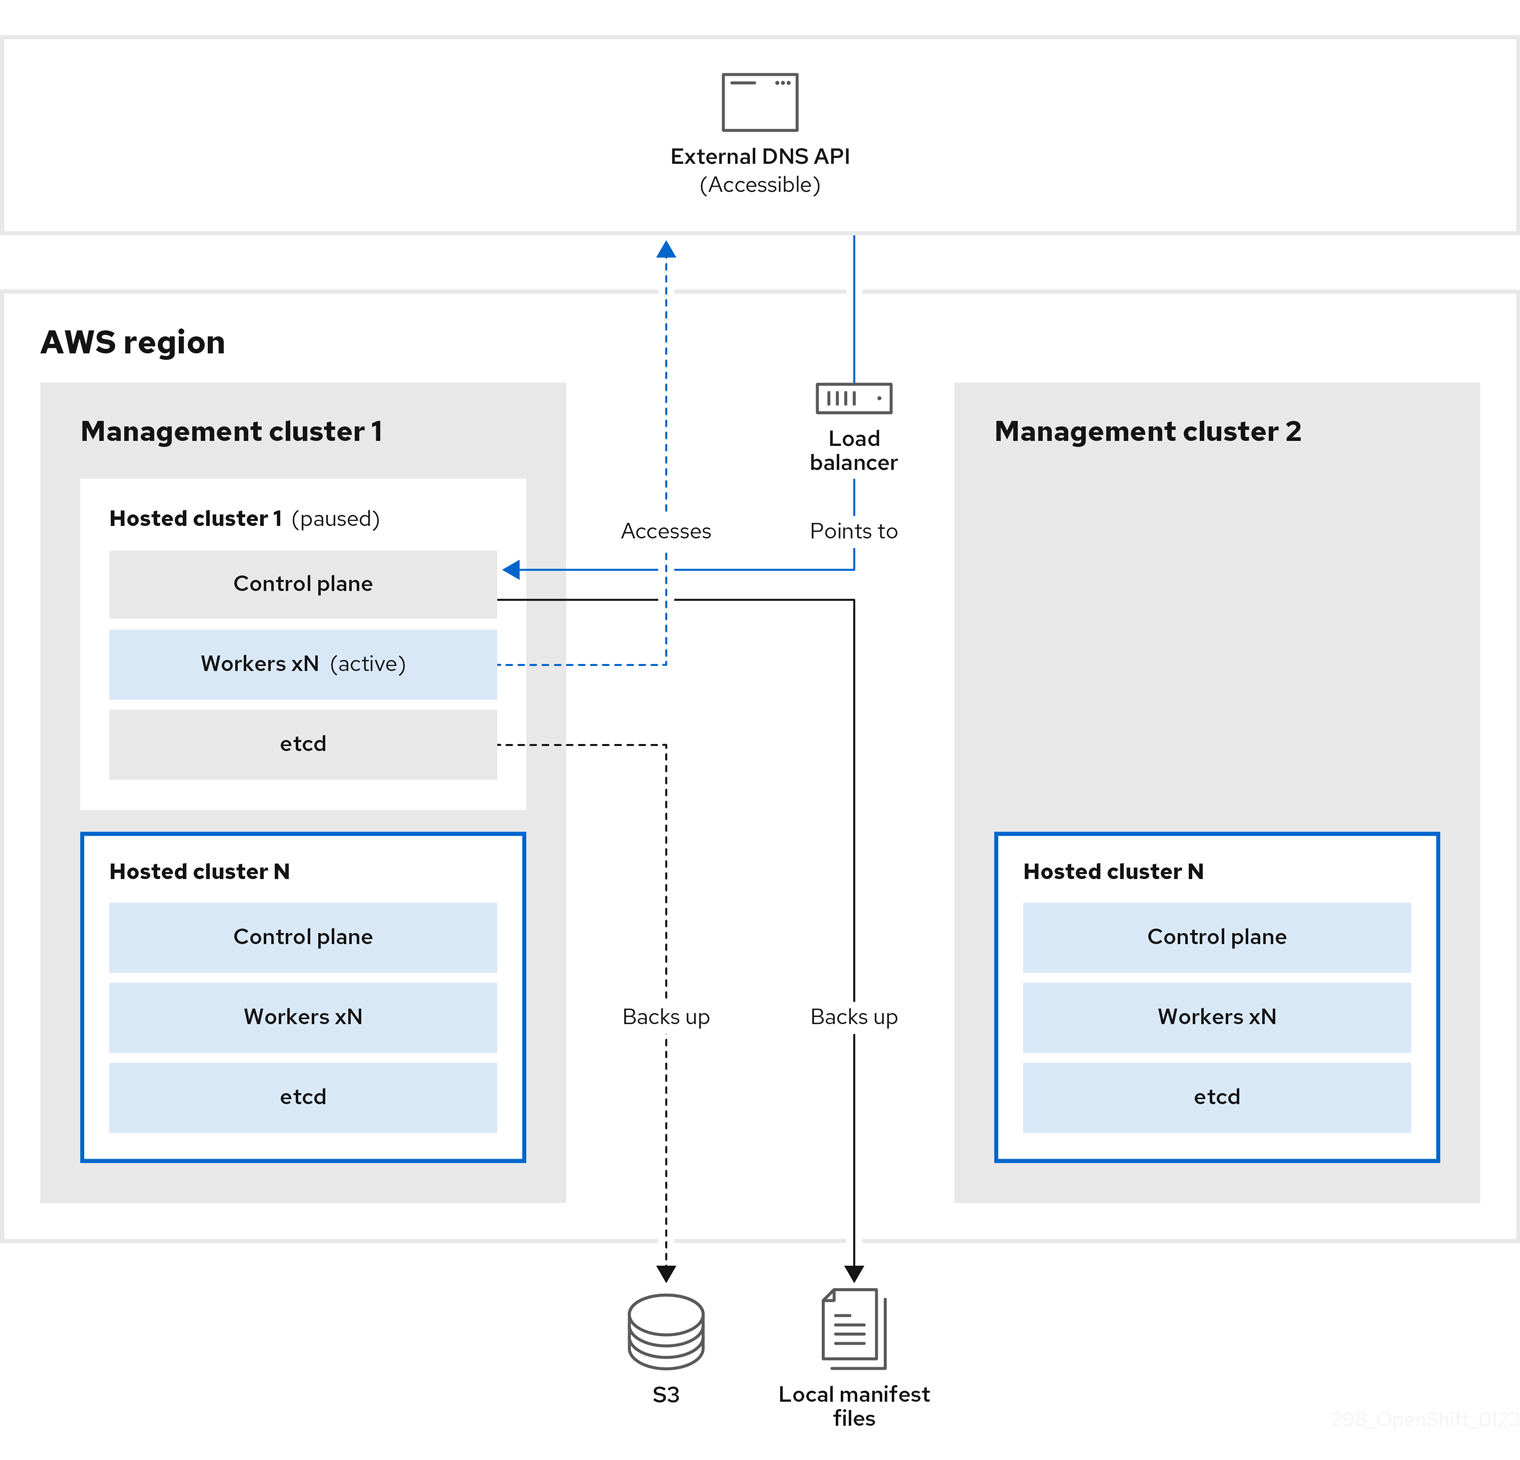
On management cluster 2, which you can think of as the destination management cluster, you restore etcd from the S3 bucket and restore the control plane from the local manifest file. During this process, the external DNS API is stopped, the hosted cluster API becomes inaccessible, and any workers that use the API are unable to update their manifest files, but the workloads are still running.
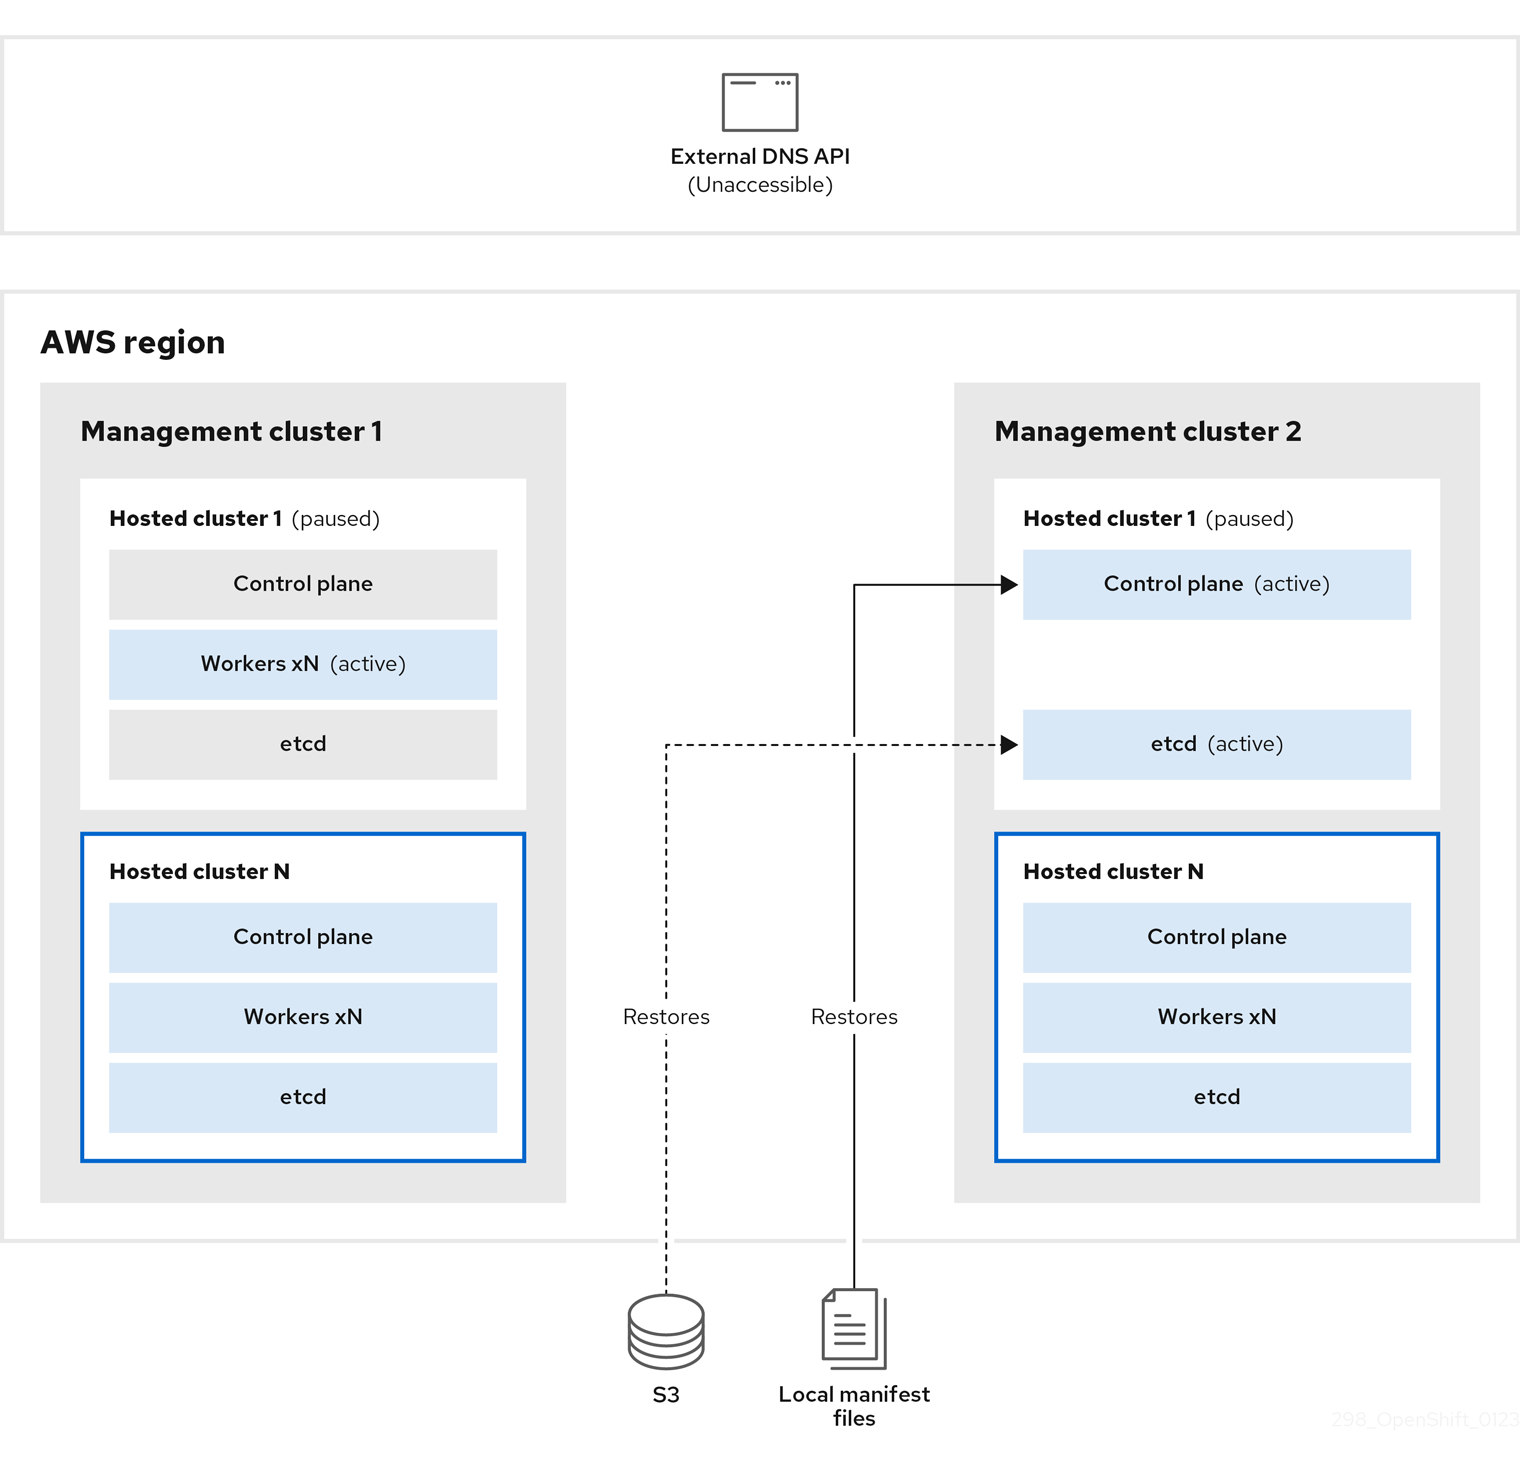
The external DNS API is accessible again, and the worker nodes use it to move to management cluster 2. The external DNS API can access the load balancer that points to the control plane.
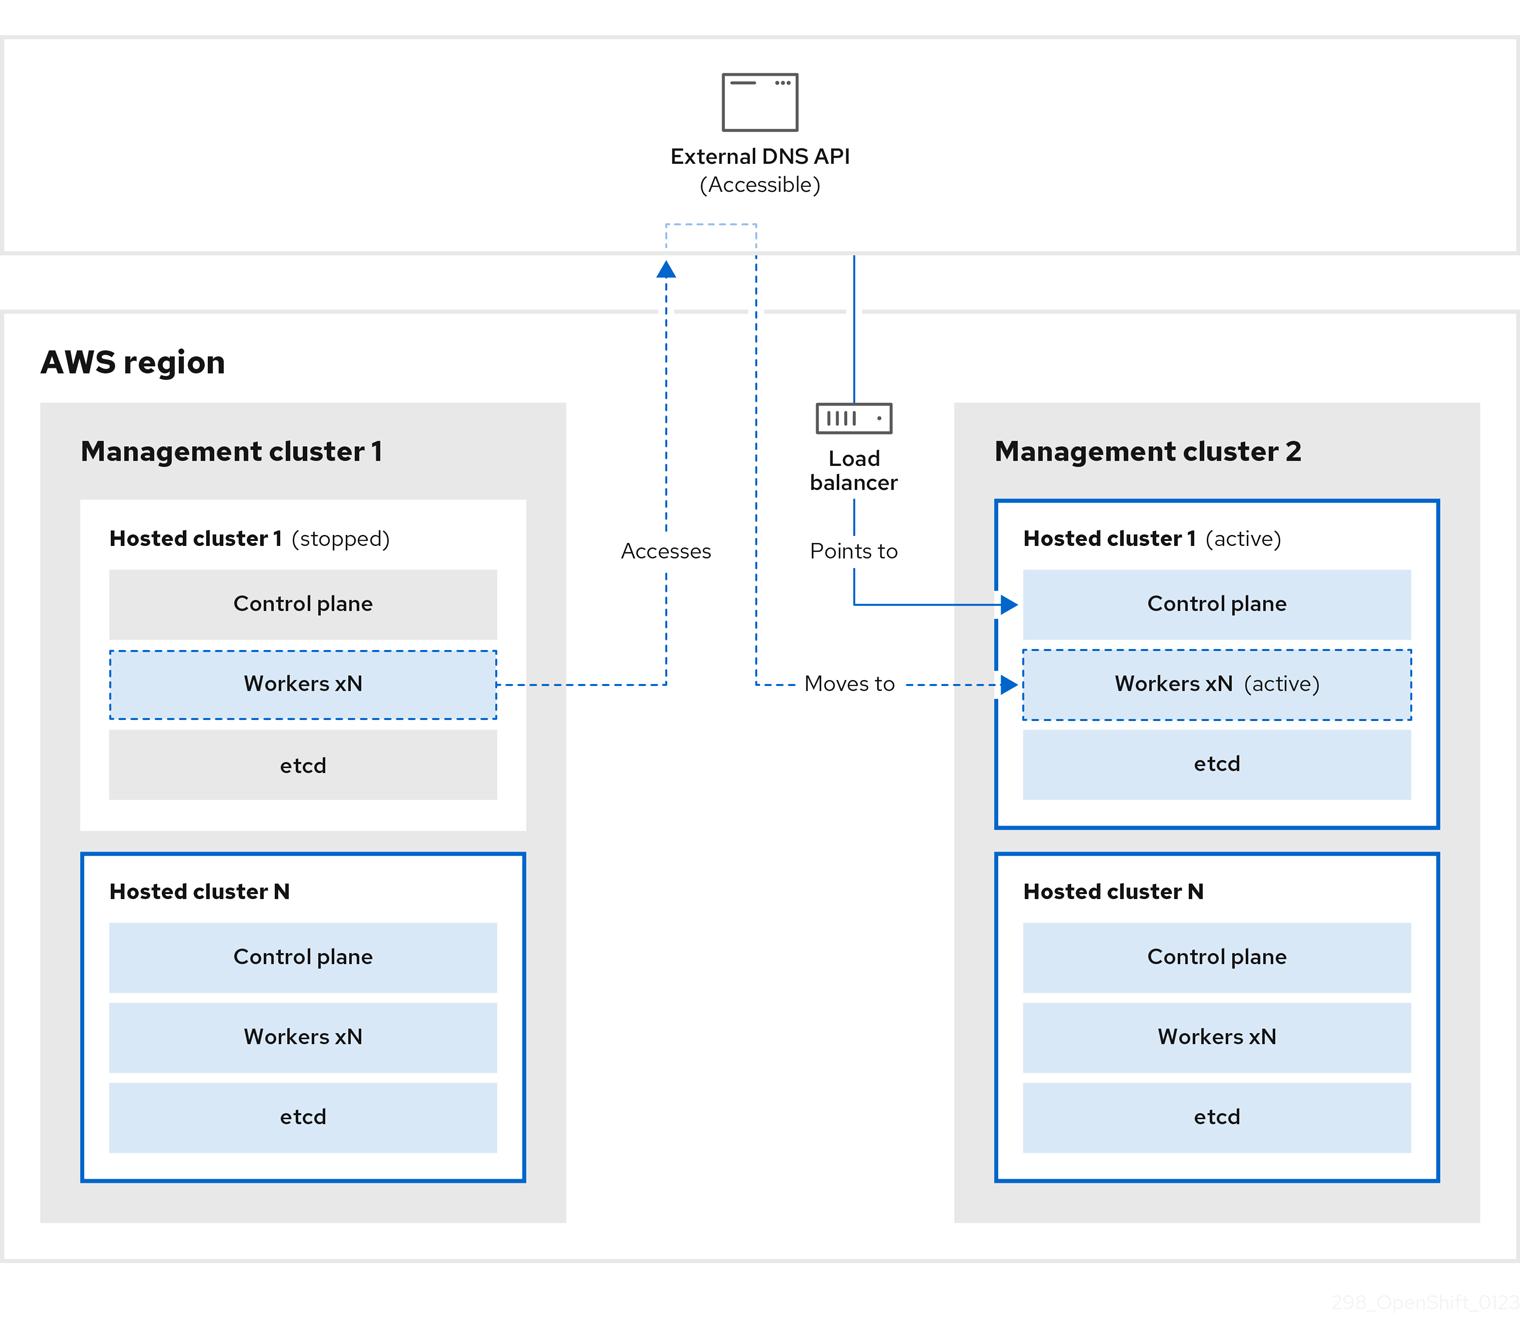
On management cluster 2, the control plane and worker nodes interact by using the external DNS API. The resources are deleted from management cluster 1, except for the S3 backup of etcd. If you try to set up the hosted cluster again on mangagement cluster 1, it will not work.
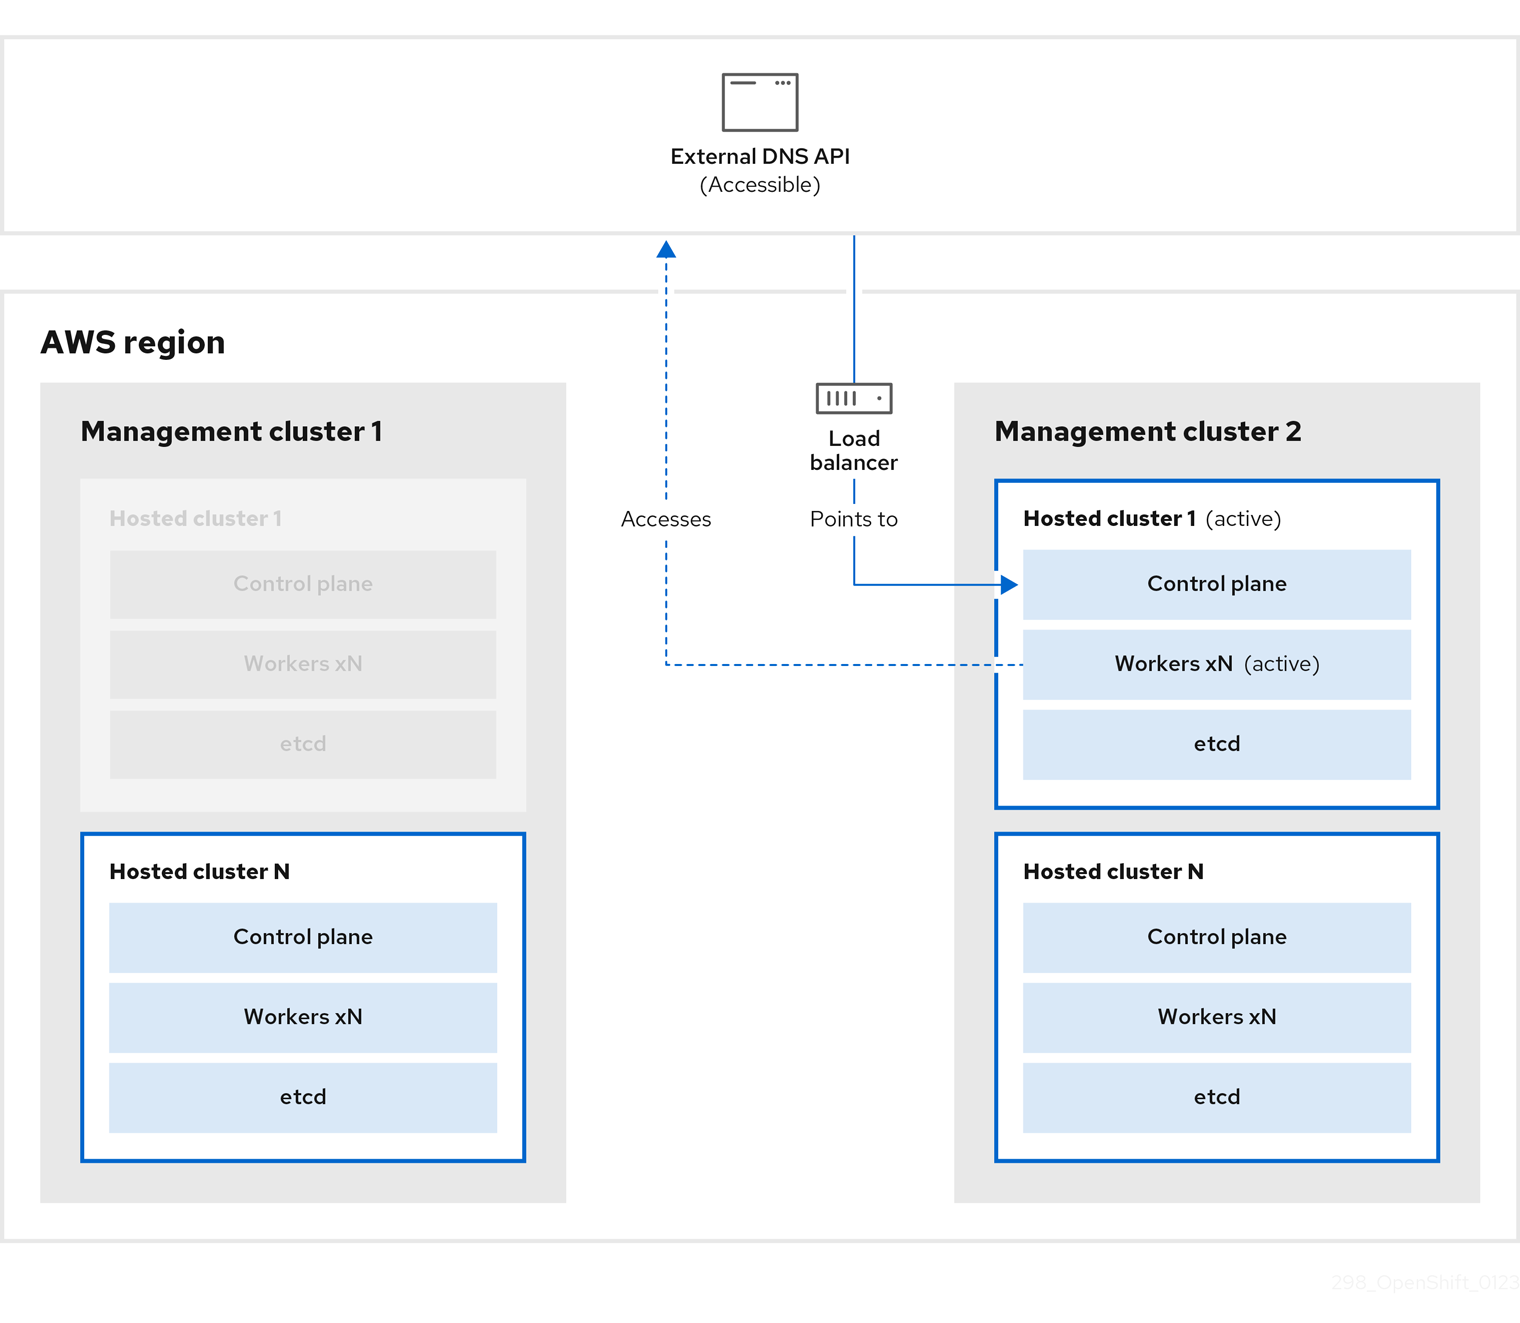
9.4.2. Backing up a hosted cluster
To recover your hosted cluster in your target management cluster, you first need to back up all of the relevant data.
Procedure
Create a configmap file to declare the source management cluster by entering this command:
$ oc create configmap mgmt-parent-cluster -n default --from-literal=from=${MGMT_CLUSTER_NAME}Shut down the reconciliation in the hosted cluster and in the node pools by entering these commands:
$ PAUSED_UNTIL="true"
$ oc patch -n ${HC_CLUSTER_NS} hostedclusters/${HC_CLUSTER_NAME} -p '{"spec":{"pausedUntil":"'${PAUSED_UNTIL}'"}}' --type=merge
$ oc scale deployment -n ${HC_CLUSTER_NS}-${HC_CLUSTER_NAME} --replicas=0 kube-apiserver openshift-apiserver openshift-oauth-apiserver control-plane-operator
$ PAUSED_UNTIL="true" $ oc patch -n ${HC_CLUSTER_NS} hostedclusters/${HC_CLUSTER_NAME} -p '{"spec":{"pausedUntil":"'${PAUSED_UNTIL}'"}}' --type=merge $ oc patch -n ${HC_CLUSTER_NS} nodepools/${NODEPOOLS} -p '{"spec":{"pausedUntil":"'${PAUSED_UNTIL}'"}}' --type=merge $ oc scale deployment -n ${HC_CLUSTER_NS}-${HC_CLUSTER_NAME} --replicas=0 kube-apiserver openshift-apiserver openshift-oauth-apiserver control-plane-operatorBack up etcd and upload the data to an S3 bucket by running this bash script:
TipWrap this script in a function and call it from the main function.
# ETCD Backup
ETCD_PODS="etcd-0"
if [ "${CONTROL_PLANE_AVAILABILITY_POLICY}" = "HighlyAvailable" ]; then
  ETCD_PODS="etcd-0 etcd-1 etcd-2"
fi

for POD in ${ETCD_PODS}; do
  # Create an etcd snapshot
  oc exec -it ${POD} -n ${HC_CLUSTER_NS}-${HC_CLUSTER_NAME} -- env ETCDCTL_API=3 /usr/bin/etcdctl --cacert /etc/etcd/tls/client/etcd-client-ca.crt --cert /etc/etcd/tls/client/etcd-client.crt --key /etc/etcd/tls/client/etcd-client.key --endpoints=localhost:2379 snapshot save /var/lib/data/snapshot.db
  oc exec -it ${POD} -n ${HC_CLUSTER_NS}-${HC_CLUSTER_NAME} -- env ETCDCTL_API=3 /usr/bin/etcdctl -w table snapshot status /var/lib/data/snapshot.db

  FILEPATH="/${BUCKET_NAME}/${HC_CLUSTER_NAME}-${POD}-snapshot.db"
  CONTENT_TYPE="application/x-compressed-tar"
  DATE_VALUE=`date -R`
  SIGNATURE_STRING="PUT\n\n${CONTENT_TYPE}\n${DATE_VALUE}\n${FILEPATH}"

  set +x
  ACCESS_KEY=$(grep aws_access_key_id ${AWS_CREDS} | head -n1 | cut -d= -f2 | sed "s/ //g")
  SECRET_KEY=$(grep aws_secret_access_key ${AWS_CREDS} | head -n1 | cut -d= -f2 | sed "s/ //g")
  SIGNATURE_HASH=$(echo -en ${SIGNATURE_STRING} | openssl sha1 -hmac "${SECRET_KEY}" -binary | base64)
  set -x

  # FIXME: this is pushing to the OIDC bucket
  oc exec -it etcd-0 -n ${HC_CLUSTER_NS}-${HC_CLUSTER_NAME} -- curl -X PUT -T "/var/lib/data/snapshot.db" \
    -H "Host: ${BUCKET_NAME}.s3.amazonaws.com" \
    -H "Date: ${DATE_VALUE}" \
    -H "Content-Type: ${CONTENT_TYPE}" \
    -H "Authorization: AWS ${ACCESS_KEY}:${SIGNATURE_HASH}" \
    https://${BUCKET_NAME}.s3.amazonaws.com/${HC_CLUSTER_NAME}-${POD}-snapshot.db
done
For more information about backing up etcd, see "Backing up and restoring etcd on a hosted cluster".
Back up Kubernetes and OpenShift Container Platform objects by entering the following commands. You need to back up the following objects:
-
HostedClusterandNodePoolobjects from the HostedCluster namespace -
HostedClustersecrets from the HostedCluster namespace -
HostedControlPlanefrom the Hosted Control Plane namespace -
Clusterfrom the Hosted Control Plane namespace -
AWSCluster,AWSMachineTemplate, andAWSMachinefrom the Hosted Control Plane namespace -
MachineDeployments,MachineSets, andMachinesfrom the Hosted Control Plane namespace ControlPlanesecrets from the Hosted Control Plane namespace$ mkdir -p ${BACKUP_DIR}/namespaces/${HC_CLUSTER_NS} ${BACKUP_DIR}/namespaces/${HC_CLUSTER_NS}-${HC_CLUSTER_NAME} $ chmod 700 ${BACKUP_DIR}/namespaces/ # HostedCluster $ echo "Backing Up HostedCluster Objects:" $ oc get hc ${HC_CLUSTER_NAME} -n ${HC_CLUSTER_NS} -o yaml > ${BACKUP_DIR}/namespaces/${HC_CLUSTER_NS}/hc-${HC_CLUSTER_NAME}.yaml $ echo "--> HostedCluster" $ sed -i '' -e '/^status:$/,$d' ${BACKUP_DIR}/namespaces/${HC_CLUSTER_NS}/hc-${HC_CLUSTER_NAME}.yaml # NodePool $ oc get np ${NODEPOOLS} -n ${HC_CLUSTER_NS} -o yaml > ${BACKUP_DIR}/namespaces/${HC_CLUSTER_NS}/np-${NODEPOOLS}.yaml $ echo "--> NodePool" $ sed -i '' -e '/^status:$/,$ d' ${BACKUP_DIR}/namespaces/${HC_CLUSTER_NS}/np-${NODEPOOLS}.yaml # Secrets in the HC Namespace $ echo "--> HostedCluster Secrets:" for s in $(oc get secret -n ${HC_CLUSTER_NS} | grep "^${HC_CLUSTER_NAME}" | awk '{print $1}'); do oc get secret -n ${HC_CLUSTER_NS} $s -o yaml > ${BACKUP_DIR}/namespaces/${HC_CLUSTER_NS}/secret-${s}.yaml done # Secrets in the HC Control Plane Namespace $ echo "--> HostedCluster ControlPlane Secrets:" for s in $(oc get secret -n ${HC_CLUSTER_NS}-${HC_CLUSTER_NAME} | egrep -v "docker|service-account-token|oauth-openshift|NAME|token-${HC_CLUSTER_NAME}" | awk '{print $1}'); do oc get secret -n ${HC_CLUSTER_NS}-${HC_CLUSTER_NAME} $s -o yaml > ${BACKUP_DIR}/namespaces/${HC_CLUSTER_NS}-${HC_CLUSTER_NAME}/secret-${s}.yaml done # Hosted Control Plane $ echo "--> HostedControlPlane:" $ oc get hcp ${HC_CLUSTER_NAME} -n ${HC_CLUSTER_NS}-${HC_CLUSTER_NAME} -o yaml > ${BACKUP_DIR}/namespaces/${HC_CLUSTER_NS}-${HC_CLUSTER_NAME}/hcp-${HC_CLUSTER_NAME}.yaml # Cluster $ echo "--> Cluster:" $ CL_NAME=$(oc get hcp ${HC_CLUSTER_NAME} -n ${HC_CLUSTER_NS}-${HC_CLUSTER_NAME} -o jsonpath={.metadata.labels.\*} | grep ${HC_CLUSTER_NAME}) $ oc get cluster ${CL_NAME} -n ${HC_CLUSTER_NS}-${HC_CLUSTER_NAME} -o yaml > ${BACKUP_DIR}/namespaces/${HC_CLUSTER_NS}-${HC_CLUSTER_NAME}/cl-${HC_CLUSTER_NAME}.yaml # AWS Cluster $ echo "--> AWS Cluster:" $ oc get awscluster ${HC_CLUSTER_NAME} -n ${HC_CLUSTER_NS}-${HC_CLUSTER_NAME} -o yaml > ${BACKUP_DIR}/namespaces/${HC_CLUSTER_NS}-${HC_CLUSTER_NAME}/awscl-${HC_CLUSTER_NAME}.yaml # AWS MachineTemplate $ echo "--> AWS Machine Template:" $ oc get awsmachinetemplate ${NODEPOOLS} -n ${HC_CLUSTER_NS}-${HC_CLUSTER_NAME} -o yaml > ${BACKUP_DIR}/namespaces/${HC_CLUSTER_NS}-${HC_CLUSTER_NAME}/awsmt-${HC_CLUSTER_NAME}.yaml # AWS Machines $ echo "--> AWS Machine:" $ CL_NAME=$(oc get hcp ${HC_CLUSTER_NAME} -n ${HC_CLUSTER_NS}-${HC_CLUSTER_NAME} -o jsonpath={.metadata.labels.\*} | grep ${HC_CLUSTER_NAME}) for s in $(oc get awsmachines -n ${HC_CLUSTER_NS}-${HC_CLUSTER_NAME} --no-headers | grep ${CL_NAME} | cut -f1 -d\ ); do oc get -n ${HC_CLUSTER_NS}-${HC_CLUSTER_NAME} awsmachines $s -o yaml > ${BACKUP_DIR}/namespaces/${HC_CLUSTER_NS}-${HC_CLUSTER_NAME}/awsm-${s}.yaml done # MachineDeployments $ echo "--> HostedCluster MachineDeployments:" for s in $(oc get machinedeployment -n ${HC_CLUSTER_NS}-${HC_CLUSTER_NAME} -o name); do mdp_name=$(echo ${s} | cut -f 2 -d /) oc get -n ${HC_CLUSTER_NS}-${HC_CLUSTER_NAME} $s -o yaml > ${BACKUP_DIR}/namespaces/${HC_CLUSTER_NS}-${HC_CLUSTER_NAME}/machinedeployment-${mdp_name}.yaml done # MachineSets $ echo "--> HostedCluster MachineSets:" for s in $(oc get machineset -n ${HC_CLUSTER_NS}-${HC_CLUSTER_NAME} -o name); do ms_name=$(echo ${s} | cut -f 2 -d /) oc get -n ${HC_CLUSTER_NS}-${HC_CLUSTER_NAME} $s -o yaml > ${BACKUP_DIR}/namespaces/${HC_CLUSTER_NS}-${HC_CLUSTER_NAME}/machineset-${ms_name}.yaml done # Machines $ echo "--> HostedCluster Machine:" for s in $(oc get machine -n ${HC_CLUSTER_NS}-${HC_CLUSTER_NAME} -o name); do m_name=$(echo ${s} | cut -f 2 -d /) oc get -n ${HC_CLUSTER_NS}-${HC_CLUSTER_NAME} $s -o yaml > ${BACKUP_DIR}/namespaces/${HC_CLUSTER_NS}-${HC_CLUSTER_NAME}/machine-${m_name}.yaml done
-
Clean up the
ControlPlaneroutes by entering this command:$ oc delete routes -n ${HC_CLUSTER_NS}-${HC_CLUSTER_NAME} --allBy entering that command, you enable the ExternalDNS Operator to delete the Route53 entries.
Verify that the Route53 entries are clean by running this script:
function clean_routes() {

    if [[ -z "${1}" ]];then
        echo "Give me the NS where to clean the routes"
        exit 1
    fi

    # Constants
    if [[ -z "${2}" ]];then
        echo "Give me the Route53 zone ID"
        exit 1
    fi

    ZONE_ID=${2}
    ROUTES=10
    timeout=40
    count=0

    # This allows us to remove the ownership in the AWS for the API route
    oc delete route -n ${1} --all

    while [ ${ROUTES} -gt 2 ]
    do
        echo "Waiting for ExternalDNS Operator to clean the DNS Records in AWS Route53 where the zone id is: ${ZONE_ID}..."
        echo "Try: (${count}/${timeout})"
        sleep 10
        if [[ $count -eq timeout ]];then
            echo "Timeout waiting for cleaning the Route53 DNS records"
            exit 1
        fi
        count=$((count+1))
        ROUTES=$(aws route53 list-resource-record-sets --hosted-zone-id ${ZONE_ID} --max-items 10000 --output json | grep -c ${EXTERNAL_DNS_DOMAIN})
    done
}

# SAMPLE: clean_routes "<HC ControlPlane Namespace>" "<AWS_ZONE_ID>"
clean_routes "${HC_CLUSTER_NS}-${HC_CLUSTER_NAME}" "${AWS_ZONE_ID}"
Verification
Check all of the OpenShift Container Platform objects and the S3 bucket to verify that everything looks as expected.
Next steps
Restore your hosted cluster.
9.4.3. Restoring a hosted cluster
Gather all of the objects that you backed up and restore them in your destination management cluster.
Prerequisites
You backed up the data from your source management cluster.
Ensure that the kubeconfig file of the destination management cluster is placed as it is set in the KUBECONFIG variable or, if you use the script, in the MGMT2_KUBECONFIG variable. Use export KUBECONFIG=<Kubeconfig FilePath> or, if you use the script, use export KUBECONFIG=${MGMT2_KUBECONFIG}.
Procedure
Verify that the new management cluster does not contain any namespaces from the cluster that you are restoring by entering these commands:
$ export KUBECONFIG=${MGMT2_KUBECONFIG}$ BACKUP_DIR=${HC_CLUSTER_DIR}/backupNamespace deletion in the destination Management cluster
$ oc delete ns ${HC_CLUSTER_NS} || true$ oc delete ns ${HC_CLUSTER_NS}-{HC_CLUSTER_NAME} || trueRe-create the deleted namespaces by entering these commands:
Namespace creation commands
$ oc new-project ${HC_CLUSTER_NS}$ oc new-project ${HC_CLUSTER_NS}-${HC_CLUSTER_NAME}Restore the secrets in the HC namespace by entering this command:
$ oc apply -f ${BACKUP_DIR}/namespaces/${HC_CLUSTER_NS}/secret-*Restore the objects in the
HostedClustercontrol plane namespace by entering these commands:Restore secret command
$ oc apply -f ${BACKUP_DIR}/namespaces/${HC_CLUSTER_NS}-${HC_CLUSTER_NAME}/secret-*Cluster restore commands
$ oc apply -f ${BACKUP_DIR}/namespaces/${HC_CLUSTER_NS}-${HC_CLUSTER_NAME}/hcp-*$ oc apply -f ${BACKUP_DIR}/namespaces/${HC_CLUSTER_NS}-${HC_CLUSTER_NAME}/cl-*If you are recovering the nodes and the node pool to reuse AWS instances, restore the objects in the HC control plane namespace by entering these commands:
Commands for AWS
$ oc apply -f ${BACKUP_DIR}/namespaces/${HC_CLUSTER_NS}-${HC_CLUSTER_NAME}/awscl-*$ oc apply -f ${BACKUP_DIR}/namespaces/${HC_CLUSTER_NS}-${HC_CLUSTER_NAME}/awsmt-*$ oc apply -f ${BACKUP_DIR}/namespaces/${HC_CLUSTER_NS}-${HC_CLUSTER_NAME}/awsm-*Commands for machines
$ oc apply -f ${BACKUP_DIR}/namespaces/${HC_CLUSTER_NS}-${HC_CLUSTER_NAME}/machinedeployment-*$ oc apply -f ${BACKUP_DIR}/namespaces/${HC_CLUSTER_NS}-${HC_CLUSTER_NAME}/machineset-*$ oc apply -f ${BACKUP_DIR}/namespaces/${HC_CLUSTER_NS}-${HC_CLUSTER_NAME}/machine-*Restore the etcd data and the hosted cluster by running this bash script:
ETCD_PODS="etcd-0"
if [ "${CONTROL_PLANE_AVAILABILITY_POLICY}" = "HighlyAvailable" ]; then
  ETCD_PODS="etcd-0 etcd-1 etcd-2"
fi

HC_RESTORE_FILE=${BACKUP_DIR}/namespaces/${HC_CLUSTER_NS}/hc-${HC_CLUSTER_NAME}-restore.yaml
HC_BACKUP_FILE=${BACKUP_DIR}/namespaces/${HC_CLUSTER_NS}/hc-${HC_CLUSTER_NAME}.yaml
HC_NEW_FILE=${BACKUP_DIR}/namespaces/${HC_CLUSTER_NS}/hc-${HC_CLUSTER_NAME}-new.yaml
cat ${HC_BACKUP_FILE} > ${HC_NEW_FILE}
cat > ${HC_RESTORE_FILE} <<EOF
    restoreSnapshotURL:
EOF

for POD in ${ETCD_PODS}; do
  # Create a pre-signed URL for the etcd snapshot
  ETCD_SNAPSHOT="s3://${BUCKET_NAME}/${HC_CLUSTER_NAME}-${POD}-snapshot.db"
  ETCD_SNAPSHOT_URL=$(AWS_DEFAULT_REGION=${MGMT2_REGION} aws s3 presign ${ETCD_SNAPSHOT})

  # FIXME no CLI support for restoreSnapshotURL yet
  cat >> ${HC_RESTORE_FILE} <<EOF
    - "${ETCD_SNAPSHOT_URL}"
EOF
done

cat ${HC_RESTORE_FILE}

if ! grep ${HC_CLUSTER_NAME}-snapshot.db ${HC_NEW_FILE}; then
  sed -i '' -e "/type: PersistentVolume/r ${HC_RESTORE_FILE}" ${HC_NEW_FILE}
  sed -i '' -e '/pausedUntil:/d' ${HC_NEW_FILE}
fi

HC=$(oc get hc -n ${HC_CLUSTER_NS} ${HC_CLUSTER_NAME} -o name || true)
if [[ ${HC} == "" ]];then
    echo "Deploying HC Cluster: ${HC_CLUSTER_NAME} in ${HC_CLUSTER_NS} namespace"
    oc apply -f ${HC_NEW_FILE}
else
    echo "HC Cluster ${HC_CLUSTER_NAME} already exists, avoiding step"
fi
If you are recovering the nodes and the node pool to reuse AWS instances, restore the node pool by entering this command:
$ oc apply -f ${BACKUP_DIR}/namespaces/${HC_CLUSTER_NS}/np-*
Verification
To verify that the nodes are fully restored, use this function:
timeout=40
count=0
NODE_STATUS=$(oc get nodes --kubeconfig=${HC_KUBECONFIG} | grep -v NotReady | grep -c "worker") || NODE_STATUS=0

while [ ${NODE_POOL_REPLICAS} != ${NODE_STATUS} ]
do
    echo "Waiting for Nodes to be Ready in the destination MGMT Cluster: ${MGMT2_CLUSTER_NAME}"
    echo "Try: (${count}/${timeout})"
    sleep 30
    if [[ $count -eq timeout ]];then
        echo "Timeout waiting for Nodes in the destination MGMT Cluster"
        exit 1
    fi
    count=$((count+1))
    NODE_STATUS=$(oc get nodes --kubeconfig=${HC_KUBECONFIG} | grep -v NotReady | grep -c "worker") || NODE_STATUS=0
done
Next steps
Shut down and delete your cluster.
9.4.4. Deleting a hosted cluster from your source management cluster
After you back up your hosted cluster and restore it to your destination management cluster, you shut down and delete the hosted cluster on your source management cluster.
Prerequisites
You backed up your data and restored it to your source management cluster.
Ensure that the kubeconfig file of the destination management cluster is placed as it is set in the KUBECONFIG variable or, if you use the script, in the MGMT_KUBECONFIG variable. Use export KUBECONFIG=<Kubeconfig FilePath> or, if you use the script, use export KUBECONFIG=${MGMT_KUBECONFIG}.
Procedure
Scale the
deploymentandstatefulsetobjects by entering these commands:ImportantDo not scale the stateful set if the value of its
spec.persistentVolumeClaimRetentionPolicy.whenScaledfield is set toDelete, because this could lead to a loss of data.As a workaround, update the value of the
spec.persistentVolumeClaimRetentionPolicy.whenScaledfield toRetain. Ensure that no controllers exist that reconcile the stateful set and would return the value back toDelete, which could lead to a loss of data.$ export KUBECONFIG=${MGMT_KUBECONFIG}Scale down deployment commands
$ oc scale deployment -n ${HC_CLUSTER_NS}-${HC_CLUSTER_NAME} --replicas=0 --all$ oc scale statefulset.apps -n ${HC_CLUSTER_NS}-${HC_CLUSTER_NAME} --replicas=0 --all$ sleep 15Delete the
NodePoolobjects by entering these commands:NODEPOOLS=$(oc get nodepools -n ${HC_CLUSTER_NS} -o=jsonpath='{.items[?(@.spec.clusterName=="'${HC_CLUSTER_NAME}'")].metadata.name}') if [[ ! -z "${NODEPOOLS}" ]];then oc patch -n "${HC_CLUSTER_NS}" nodepool ${NODEPOOLS} --type=json --patch='[ { "op":"remove", "path": "/metadata/finalizers" }]' oc delete np -n ${HC_CLUSTER_NS} ${NODEPOOLS} fiDelete the
machineandmachinesetobjects by entering these commands:# Machines for m in $(oc get machines -n ${HC_CLUSTER_NS}-${HC_CLUSTER_NAME} -o name); do oc patch -n ${HC_CLUSTER_NS}-${HC_CLUSTER_NAME} ${m} --type=json --patch='[ { "op":"remove", "path": "/metadata/finalizers" }]' || true oc delete -n ${HC_CLUSTER_NS}-${HC_CLUSTER_NAME} ${m} || true done$ oc delete machineset -n ${HC_CLUSTER_NS}-${HC_CLUSTER_NAME} --all || trueDelete the cluster object by entering these commands:
$ C_NAME=$(oc get cluster -n ${HC_CLUSTER_NS}-${HC_CLUSTER_NAME} -o name)$ oc patch -n ${HC_CLUSTER_NS}-${HC_CLUSTER_NAME} ${C_NAME} --type=json --patch='[ { "op":"remove", "path": "/metadata/finalizers" }]'$ oc delete cluster.cluster.x-k8s.io -n ${HC_CLUSTER_NS}-${HC_CLUSTER_NAME} --allDelete the AWS machines (Kubernetes objects) by entering these commands. Do not worry about deleting the real AWS machines. The cloud instances will not be affected.
for m in $(oc get awsmachine.infrastructure.cluster.x-k8s.io -n ${HC_CLUSTER_NS}-${HC_CLUSTER_NAME} -o name)
do
    oc patch -n ${HC_CLUSTER_NS}-${HC_CLUSTER_NAME} ${m} --type=json --patch='[ { "op":"remove", "path": "/metadata/finalizers" }]' || true
    oc delete -n ${HC_CLUSTER_NS}-${HC_CLUSTER_NAME} ${m} || true
done
Delete the
HostedControlPlaneandControlPlaneHC namespace objects by entering these commands:Delete HCP and ControlPlane HC NS commands
$ oc patch -n ${HC_CLUSTER_NS}-${HC_CLUSTER_NAME} hostedcontrolplane.hypershift.openshift.io ${HC_CLUSTER_NAME} --type=json --patch='[ { "op":"remove", "path": "/metadata/finalizers" }]'$ oc delete hostedcontrolplane.hypershift.openshift.io -n ${HC_CLUSTER_NS}-${HC_CLUSTER_NAME} --all$ oc delete ns ${HC_CLUSTER_NS}-${HC_CLUSTER_NAME} || trueDelete the
HostedClusterand HC namespace objects by entering these commands:Delete HC and HC Namespace commands
$ oc -n ${HC_CLUSTER_NS} patch hostedclusters ${HC_CLUSTER_NAME} -p '{"metadata":{"finalizers":null}}' --type merge || true$ oc delete hc -n ${HC_CLUSTER_NS} ${HC_CLUSTER_NAME} || true$ oc delete ns ${HC_CLUSTER_NS} || true
Verification
To verify that everything works, enter these commands:
Validations commands
$ export KUBECONFIG=${MGMT2_KUBECONFIG}$ oc get hc -n ${HC_CLUSTER_NS}$ oc get np -n ${HC_CLUSTER_NS}$ oc get pod -n ${HC_CLUSTER_NS}-${HC_CLUSTER_NAME}$ oc get machines -n ${HC_CLUSTER_NS}-${HC_CLUSTER_NAME}Commands for inside the HostedCluster
$ export KUBECONFIG=${HC_KUBECONFIG}$ oc get clusterversion$ oc get nodes
Next steps
Delete the OVN pods in the hosted cluster so that you can connect to the new OVN control plane that runs in the new management cluster:
-
Load the
KUBECONFIGenvironment variable with the hosted cluster’s kubeconfig path. Enter this command:
$ oc delete pod -n openshift-ovn-kubernetes --all
Chapter 10. Troubleshooting hosted control planes
If you encounter issues with hosted control planes, see the following information to guide you through troubleshooting.
10.1. Gathering information to troubleshoot hosted control planes
When you need to troubleshoot an issue with hosted control plane clusters, you can gather information by running the must-gather command. The command generates output for the management cluster and the hosted cluster.
The output for the management cluster contains the following content:
- Cluster-scoped resources: These resources are node definitions of the management cluster.
-
The
hypershift-dumpcompressed file: This file is useful if you need to share the content with other people. - Namespaced resources: These resources include all of the objects from the relevant namespaces, such as config maps, services, events, and logs.
- Network logs: These logs include the OVN northbound and southbound databases and the status for each one.
- Hosted clusters: This level of output involves all of the resources inside of the hosted cluster.
The output for the hosted cluster contains the following content:
- Cluster-scoped resources: These resources include all of the cluster-wide objects, such as nodes and CRDs.
- Namespaced resources: These resources include all of the objects from the relevant namespaces, such as config maps, services, events, and logs.
Although the output does not contain any secret objects from the cluster, it can contain references to the names of secrets.
Prerequisites
-
You must have
cluster-adminaccess to the management cluster. -
You need the
namevalue for theHostedClusterresource and the namespace where the CR is deployed. -
You must have the
hcpcommand line interface installed. For more information, see Installing the hosted control planes command line interface. -
You must have the OpenShift CLI (
oc) installed. -
You must ensure that the
kubeconfigfile is loaded and is pointing to the management cluster.
Procedure
To gather the output for troubleshooting, enter the following command:
$ oc adm must-gather --image=registry.redhat.io/multicluster-engine/must-gather-rhel9:v<mce_version> \
  /usr/bin/gather hosted-cluster-namespace=HOSTEDCLUSTERNAMESPACE hosted-cluster-name=HOSTEDCLUSTERNAME \
  --dest-dir=NAME ; tar -cvzf NAME.tgz NAME
where:
-
You replace
<mce_version>with the version of multicluster engine Operator that you are using; for example,2.4. -
The
hosted-cluster-namespace=HOSTEDCLUSTERNAMESPACEparameter is optional. If you do not include it, the command runs as though the hosted cluster is in the default namespace, which isclusters. -
The
--dest-dir=NAMEparameter is optional. Specify that parameter if you want to save the results of the command to a compressed file, replacingNAMEwith the name of the directory where you want to save the results.
-
You replace
10.2. Pausing the reconciliation of a hosted cluster and hosted control plane
If you are a cluster instance administrator, you can pause the reconciliation of a hosted cluster and hosted control plane. You might want to pause reconciliation when you back up and restore an etcd database or when you need to debug problems with a hosted cluster or hosted control plane.
Procedure
To pause reconciliation for a hosted cluster and hosted control plane, populate the
pausedUntilfield of theHostedClusterresource.To pause the reconciliation until a specific time, enter the following command:
$ oc patch -n <hosted_cluster_namespace> hostedclusters/<hosted_cluster_name> -p '{"spec":{"pausedUntil":"<timestamp>"}}' --type=merge1 - 1
- Specify a timestamp in the RFC339 format, for example,
2024-03-03T03:28:48Z. The reconciliation is paused until the specified time is passed.
To pause the reconciliation indefinitely, enter the following command:
$ oc patch -n <hosted_cluster_namespace> hostedclusters/<hosted_cluster_name> -p '{"spec":{"pausedUntil":"true"}}' --type=mergeThe reconciliation is paused until you remove the field from the
HostedClusterresource.When the pause reconciliation field is populated for the
HostedClusterresource, the field is automatically added to the associatedHostedControlPlaneresource.
To remove the
pausedUntilfield, enter the following patch command:$ oc patch -n <hosted_cluster_namespace> hostedclusters/<hosted_cluster_name> -p '{"spec":{"pausedUntil":null}}' --type=merge
10.3. Scaling down the data plane to zero
If you are not using the hosted control plane, to save the resources and cost you can scale down a data plane to zero.
Ensure you are prepared to scale down the data plane to zero. Because the workload from the worker nodes disappears after scaling down.
Procedure
Set the
kubeconfigfile to access the hosted cluster by running the following command:$ export KUBECONFIG=<install_directory>/auth/kubeconfigGet the name of the
NodePoolresource associated to your hosted cluster by running the following command:$ oc get nodepool --namespace <HOSTED_CLUSTER_NAMESPACE>Optional: To prevent the pods from draining, add the
nodeDrainTimeoutfield in theNodePoolresource by running the following command:$ oc edit nodepool <nodepool_name> --namespace <hosted_cluster_namespace>Example output
apiVersion: hypershift.openshift.io/v1alpha1
kind: NodePool
metadata:
# ...
  name: nodepool-1
  namespace: clusters
# ...
spec:
  arch: amd64
  clusterName: clustername
1 management: autoRepair: false replace: rollingUpdate: maxSurge: 1 maxUnavailable: 0 strategy: RollingUpdate upgradeType: Replace nodeDrainTimeout: 0s2 # ...NoteTo allow the node draining process to continue for a certain period of time, you can set the value of the
nodeDrainTimeoutfield accordingly, for example,nodeDrainTimeout: 1m.Scale down the
NodePoolresource associated to your hosted cluster by running the following command:$ oc scale nodepool/<NODEPOOL_NAME> --namespace <HOSTED_CLUSTER_NAMESPACE> --replicas=0NoteAfter scaling down the data plan to zero, some pods in the control plane stay in the
Pendingstatus and the hosted control plane stays up and running. If necessary, you can scale up theNodePoolresource.Optional: Scale up the
NodePoolresource associated to your hosted cluster by running the following command:$ oc scale nodepool/<NODEPOOL_NAME> --namespace <HOSTED_CLUSTER_NAMESPACE> --replicas=1After rescaling the
NodePoolresource, wait for couple of minutes for theNodePoolresource to become available in aReadystate.
Verification
Verify that the value for the
nodeDrainTimeoutfield is greater than0sby running the following command:$ oc get nodepool -n <hosted_cluster_namespace> <nodepool_name> -ojsonpath='{.spec.nodeDrainTimeout}'
Legal Notice
Copyright © Red Hat
OpenShift documentation is licensed under the Apache License 2.0 (https://www.apache.org/licenses/LICENSE-2.0).
Modified versions must remove all Red Hat trademarks.
Portions adapted from https://github.com/kubernetes-incubator/service-catalog/ with modifications by Red Hat.
Red Hat, Red Hat Enterprise Linux, the Red Hat logo, the Shadowman logo, JBoss, OpenShift, Fedora, the Infinity logo, and RHCE are trademarks of Red Hat, Inc., registered in the United States and other countries.
Linux® is the registered trademark of Linus Torvalds in the United States and other countries.
Java® is a registered trademark of Oracle and/or its affiliates.
XFS® is a trademark of Silicon Graphics International Corp. or its subsidiaries in the United States and/or other countries.
MySQL® is a registered trademark of MySQL AB in the United States, the European Union and other countries.
Node.js® is an official trademark of the OpenJS Foundation.
The OpenStack® Word Mark and OpenStack logo are either registered trademarks/service marks or trademarks/service marks of the OpenStack Foundation, in the United States and other countries and are used with the OpenStack Foundation’s permission. We are not affiliated with, endorsed or sponsored by the OpenStack Foundation, or the OpenStack community.
All other trademarks are the property of their respective owners.