Configuring network settings
General networking configuration processes in OpenShift Container Platform
Abstract
Chapter 1. Configuring system controls and interface attributes using the tuning plugin
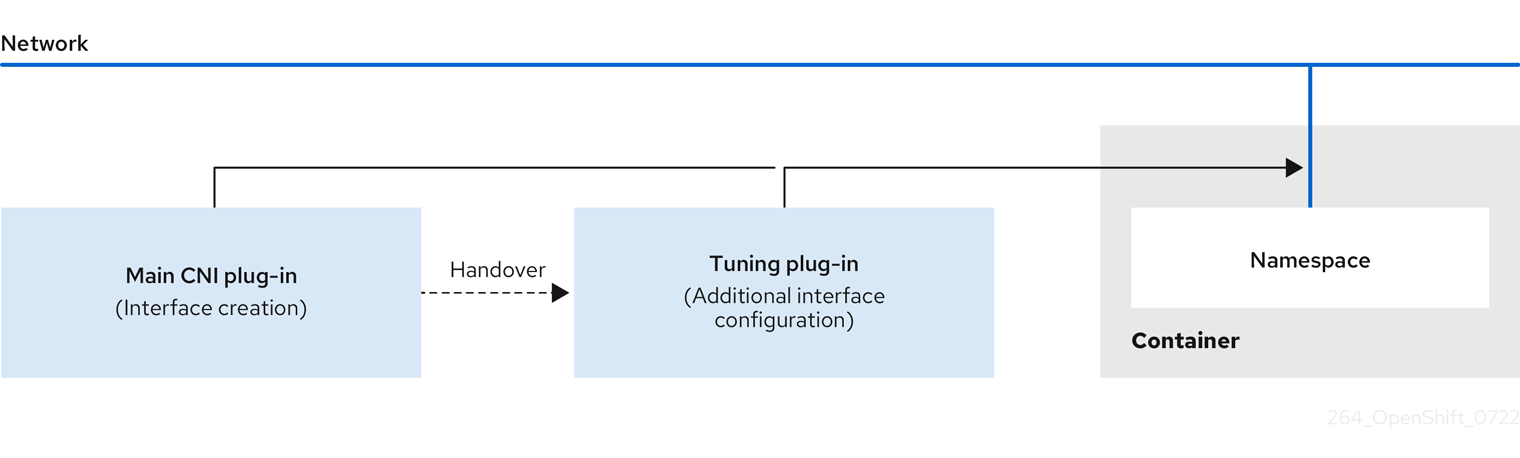
To modify kernel parameters and interface attributes at runtime in OpenShift Container Platform, you can use the tuning Container Network Interface (CNI) meta plugin. The plugin operates in a chain with a main CNI plugin and allows you to change sysctls and interface attributes such as promiscuous mode, all-multicast mode, MTU, and MAC address.
1.1. Configuring system controls by using the tuning CNI
To configure interface-level network sysctls in OpenShift Container Platform, you can use the tuning CNI meta plugin in a network attachment definition. Configure the net.ipv4.conf.IFNAME.accept_redirects sysctl to enable accepting and sending ICMP-redirected packets.
Procedure
Create a network attachment definition, such as
tuning-example.yaml, with the following content:apiVersion: "k8s.cni.cncf.io/v1" kind: NetworkAttachmentDefinition metadata: name: <name> namespace: default spec: config: '{ "cniVersion": "0.4.0", "name": "<name>", "plugins": [{ "type": "<main_CNI_plugin>" }, { "type": "tuning", "sysctl": { "net.ipv4.conf.IFNAME.accept_redirects": "1" } } ] }where:
metadata.name- Specifies the name for the additional network attachment to create. The name must be unique within the specified namespace.
metadata.namespace- Specifies the namespace that the object is associated with.
spec.config.cniVersion- Specifies the CNI specification version.
spec.config.name- Specifies the name for the configuration. It is recommended to match the configuration name to the name value of the network attachment definition.
spec.config.plugins.type- Specifies the name of the main CNI plugin to configure.
spec.config.plugins.tuning.sysctl-
Specifies the sysctl to set. The interface name is represented by the
IFNAMEtoken and is replaced with the actual name of the interface at runtime.
Example network attachment definition
apiVersion: "k8s.cni.cncf.io/v1"
kind: NetworkAttachmentDefinition
metadata:
  name: tuningnad
  namespace: default
spec:
  config: '{
    "cniVersion": "0.4.0",
    "name": "tuningnad",
    "plugins": [{
      "type": "bridge"
      },
      {
      "type": "tuning",
      "sysctl": {
         "net.ipv4.conf.IFNAME.accept_redirects": "1"
        }
    }
  ]
}'
Apply the YAML by running the following command:
$ oc apply -f tuning-example.yamlExample output
networkattachmentdefinition.k8.cni.cncf.io/tuningnad createdCreate a pod such as
examplepod.yamlwith the network attachment definition similar to the following:apiVersion: v1 kind: Pod metadata: name: tunepod namespace: default annotations: k8s.v1.cni.cncf.io/networks: tuningnad spec: containers: - name: podexample image: centos command: ["/bin/bash", "-c", "sleep INF"] securityContext: runAsUser: 2000 runAsGroup: 3000 allowPrivilegeEscalation: false capabilities: drop: ["ALL"] securityContext: runAsNonRoot: true seccompProfile: type: RuntimeDefaultwhere:
metadata.annotations.k8s.v1.cni.cncf.io/networks-
Specifies the name of the configured
NetworkAttachmentDefinition. spec.containers.securityContext.runAsUser- Specifies which user ID the container is run with.
spec.containers.securityContext.runAsGroup- Specifies which primary group ID the containers is run with.
spec.containers.securityContext.allowPrivilegeEscalation-
Specifies if a pod can request to allow privilege escalation. If unspecified, it defaults to true. This boolean directly controls whether the
no_new_privsflag gets set on the container process. spec.containers.securityContext.capabilities- Specifies privileged actions without giving full root access. This policy ensures all capabilities are dropped from the pod.
spec.securityContext.runAsNonRoot: true- Specifies that the container will run with a user with any UID other than 0.
spec.securityContext.seccompProfile- Specifies the default seccomp profile for a pod or container workload.
Apply the yaml by running the following command:
$ oc apply -f examplepod.yamlVerify that the pod is created by running the following command:
$ oc get podExample output
NAME      READY   STATUS    RESTARTS   AGE
tunepod   1/1     Running   0          47s
Log in to the pod by running the following command:
$ oc rsh tunepodVerify the values of the configured sysctl flags. For example, find the value
net.ipv4.conf.net1.accept_redirectsby running the following command:sh-4.4# sysctl net.ipv4.conf.net1.accept_redirectsExpected output
net.ipv4.conf.net1.accept_redirects = 1
1.2. Enabling all-multicast mode by using the tuning CNI
To enable all-multicast mode on network interfaces in OpenShift Container Platform, you can use the tuning Container Network Interface (CNI) meta plugin in a network attachment definition. When enabled, the interface receives all multicast packets on the network.
Procedure
Create a network attachment definition, such as
tuning-example.yaml, with the following content:apiVersion: "k8s.cni.cncf.io/v1" kind: NetworkAttachmentDefinition metadata: name: <name> namespace: default spec: config: '{ "cniVersion": "0.4.0", "name": "<name>", "plugins": [{ "type": "<main_CNI_plugin>" }, { "type": "tuning", "allmulti": true } } ] }where:
<name>- Specifies the name for the additional network attachment to create. The name must be unique within the specified namespace.
default- Specifies the namespace that the object is associated with.
"0.4.0"- Specifies the CNI specification version.
"<name>"- Specifies the name for the configuration. Match the configuration name to the name value of the network attachment definition.
"<main_CNI_plugin>"- Specifies the name of the main CNI plugin to configure.
"tuning"- Specifies the name of the CNI meta plugin.
"true"- Specifies the all-multicast mode of interface. If enabled, all multicast packets on the network will be received by the interface.
Example network attachment definition
apiVersion: "k8s.cni.cncf.io/v1"
kind: NetworkAttachmentDefinition
metadata:
  name: setallmulti
  namespace: default
spec:
  config: '{
    "cniVersion": "0.4.0",
    "name": "setallmulti",
    "plugins": [
      {
        "type": "bridge"
      },
      {
        "type": "tuning",
        "allmulti": true
      }
    ]
  }'
Apply the settings specified in the YAML file by running the following command:
$ oc apply -f tuning-allmulti.yamlExample output
networkattachmentdefinition.k8s.cni.cncf.io/setallmulti createdCreate a pod with a network attachment definition similar to that specified in the following
examplepod.yamlsample file:apiVersion: v1 kind: Pod metadata: name: allmultipod namespace: default annotations: k8s.v1.cni.cncf.io/networks: setallmulti spec: containers: - name: podexample image: centos command: ["/bin/bash", "-c", "sleep INF"] securityContext: runAsUser: 2000 runAsGroup: 3000 allowPrivilegeEscalation: false capabilities: drop: ["ALL"] securityContext: runAsNonRoot: true seccompProfile: type: RuntimeDefaultwhere:
metadata.annotations.k8s.v1.cni.cncf.io/networks-
Specifies the name of the configured
NetworkAttachmentDefinition. spec.containers.securityContext.runAsUser- Specifies which user ID the container is run with.
spec.containers.securityContext.runAsGroup- Specifies which primary group ID the containers is run with.
spec.containers.securityContext.allowPrivilegeEscalation-
Specifies if a pod can request to allow privilege escalation. If unspecified, it defaults to true. This boolean directly controls whether the
no_new_privsflag gets set on the container process. spec.containers.securityContext.capabilities- Specifies privileged actions without giving full root access. This policy ensures all capabilities are dropped from the pod.
spec.containers.securityContext.runAsNonRoot: true- Specifies that the container will run with a user with any UID other than 0.
spec.containers.securityContext.seccompProfile- Specifies the default seccomp profile for a pod or container workload.
Apply the settings specified in the YAML file by running the following command:
$ oc apply -f examplepod.yamlVerify that the pod is created by running the following command:
$ oc get podExample output
NAME          READY   STATUS    RESTARTS   AGE
allmultipod   1/1     Running   0          23s
Log in to the pod by running the following command:
$ oc rsh allmultipodList all the interfaces associated with the pod by running the following command:
sh-4.4# ip linkExample output
1: lo: <LOOPBACK,UP,LOWER_UP> mtu 65536 qdisc noqueue state UNKNOWN mode DEFAULT group default qlen 1000
    link/loopback 00:00:00:00:00:00 brd 00:00:00:00:00:00
2: eth0@if22: <BROADCAST,MULTICAST,UP,LOWER_UP> mtu 8901 qdisc noqueue state UP mode DEFAULT group default
    link/ether 0a:58:0a:83:00:10 brd ff:ff:ff:ff:ff:ff link-netnsid 0
3: net1@if24: <BROADCAST,MULTICAST,ALLMULTI,UP,LOWER_UP> mtu 1500 qdisc noqueue state UP mode DEFAULT group default
    link/ether ee:9b:66:a4:ec:1d brd ff:ff:ff:ff:ff:ff link-netnsid 0
where:
eth0@if22- Specifies the primary interface.
net1@if24- Specifies the secondary interface configured with the network-attachment-definition that supports the all-multicast mode (ALLMULTI flag).
Chapter 2. Configuring the node port service range
To meet your cluster node port requirements in OpenShift Container Platform, you can configure the node port service range during installation or expand it after installation. You can expand the default range of 30000-32768 on either side while preserving this default range within your new configuration.
Red Hat has not performed testing outside the default port range of 30000-32768. For ranges outside the default port range, ensure that you test to verify the expanding node port range does not impact your cluster. In particular, ensure that there is:
- No overlap with any ports already in use by host processes
- No overlap with any ports already in use by pods that are configured with host networking
If you expanded the range and a port allocation issue occurs, create a new cluster and set the required range for it.
If you expand the node port range and OpenShift CLI (oc) stops working because of a port conflict with the OpenShift Container Platform API server, you must create a new cluster.
2.1. Expanding the node port range
To expand the node port range for your OpenShift Container Platform cluster after installation, you can use the oc patch command to update the serviceNodePortRange parameter. You can expand the range on either side, but you cannot shrink it after installation.
Red Hat has not performed testing outside the default port range of 30000-32768. For ranges outside the default port range, ensure that you test to verify that expanding your node port range does not impact your cluster. If you expanded the range and a port allocation issue occurs, create a new cluster and set the required range for it.
When expanding the serviceNodePortRange parameter, ensure the value you set for the parameter does not overlap with the ephemeral port range, net.ipv4.ip_local_port_range, of the kernel.
OVN-Kubernetes uses this ephemeral range for source network address translation (SNAT) source port selection on outbound pod traffic. When a SNAT source port coincides with a node port number, return traffic can be misrouted, causing intermittent outbound TCP connection timeouts.
For more information, see "Safe and unsafe sysctls" in the Additional resources section.
Prerequisites
-
Installed the OpenShift CLI (
oc). -
Logged in to the cluster as a user with
cluster-adminprivileges. -
You ensured that your cluster infrastructure allows access to the ports that exist in the extended range. For example, if you expand the node port range to
30000-32900, your firewall or packet filtering configuration must allow the inclusive port range of30000-32900.
Procedure
To expand the range for the
serviceNodePortRangeparameter in thenetwork.config.openshift.ioobject that your cluster uses to manage traffic for pods, enter the following command:$ oc patch network.config.openshift.io cluster --type=merge -p \ '{ "spec": { "serviceNodePortRange": "<port_range>" } }'where:
<port_range>-
Specifies the expanded range, such as
30000-32900.
TipYou can also apply the following YAML to update the node port range:
apiVersion: config.openshift.io/v1
kind: Network
metadata:
  name: cluster
spec:
  serviceNodePortRange: "<port_range>"
# ...
Example output
network.config.openshift.io/cluster patched
Verification
To confirm that the updated configuration is active, enter the following command. The update can take several minutes to apply.
$ oc get configmaps -n openshift-kube-apiserver config \
  -o jsonpath="{.data['config\.yaml']}" | \
  grep -Eo '"service-node-port-range":["[[:digit:]]+-[[:digit:]]+"]'
Example output
"service-node-port-range":["30000-32900"]
Chapter 3. Configuring the cluster network range
To expand the cluster network range in OpenShift Container Platform to support more nodes and IP addresses, you can modify the cluster network CIDR mask after cluster installation. This procedure requires the OVN-Kubernetes network plugin and provides more IP space for additional nodes.
For example, if you deployed a cluster and specified 10.128.0.0/19 as the cluster network range and a host prefix of 23, you are limited to 16 nodes. You can expand that to 510 nodes by changing the CIDR mask on a cluster to /14.
The following limitations apply when modifying the cluster network IP address range:
- The CIDR mask size specified must always be smaller than the currently configured CIDR mask size, because you can only increase IP space by adding more nodes to an installed cluster
- The host prefix cannot be modified
- Pods that are configured with an overridden default gateway must be recreated after the cluster network expands
You cannot expand the service network CIDR range after installing the cluster, either directly or through the ServiceCIDR API. You must configure the service network CIDR during installation using the install-config.yaml file. To avoid service IP address exhaustion, ensure that your initial service network range is large enough to accommodate future growth.
3.1. Expanding the cluster network IP address range
To expand the cluster network IP address range in OpenShift Container Platform to support more nodes, you can modify the cluster network CIDR mask using the oc patch command.
This change requires rolling out a new Operator configuration across the cluster, and can take up to 30 minutes to take effect.
Prerequisites
-
You have installed the OpenShift CLI (
oc). -
You have logged in to the cluster with a user with
cluster-adminprivileges. - You have ensured that the cluster uses the OVN-Kubernetes network plugin.
Procedure
To obtain the cluster network range and host prefix for your cluster, enter the following command:
$ oc get network.operator.openshift.io \
  -o jsonpath="{.items[0].spec.clusterNetwork}"
Example output
[{"cidr":"10.217.0.0/22","hostPrefix":23}]To expand the cluster network IP address range, enter the following command. Use the CIDR IP address range and host prefix returned from the output of the previous command.
$ oc patch Network.config.openshift.io cluster --type='merge' --patch \
  '{
    "spec":{
      "clusterNetwork": [ {"cidr":"<network>/<cidr>","hostPrefix":<prefix>} ],
      "networkType": "OVNKubernetes"
    }
  }'
where:
<network>-
Specifies the network part of the
cidrfield that you obtained from the previous step. You cannot change this value. <cidr>-
Specifies the network prefix length. For example,
14. Change this value to a smaller number than the value from the output in the previous step to expand the cluster network range. <prefix>-
Specifies the current host prefix for your cluster. This value must be the same value for the
hostPrefixfield that you obtained from the previous step.
Example command
$ oc patch Network.config.openshift.io cluster --type='merge' --patch \
  '{
    "spec":{
      "clusterNetwork": [ {"cidr":"10.217.0.0/14","hostPrefix": 23} ],
      "networkType": "OVNKubernetes"
    }
  }'
Example output
network.config.openshift.io/cluster patchedTo confirm that the configuration is active, enter the following command. It can take up to 30 minutes for this change to take effect.
$ oc get network.operator.openshift.io \
  -o jsonpath="{.items[0].spec.clusterNetwork}"
Example output
[{"cidr":"10.217.0.0/14","hostPrefix":23}]
Chapter 4. Configuring IP failover
To provide high availability for Virtual IP addresses and ensure services remain accessible when nodes fail in OpenShift Container Platform, you can configure IP failover using Keepalived.
IP failover uses Keepalived to host a set of externally accessible Virtual IP (VIP) addresses on a set of hosts. Each VIP address is only serviced by a single host at a time. Keepalived uses the Virtual Router Redundancy Protocol (VRRP) to determine which host, from the set of hosts, services which VIP. If a host becomes unavailable, or if the service that Keepalived is watching does not respond, the VIP is switched to another host from the set. This means a VIP is always serviced as long as a host is available.
Every VIP in the set is serviced by a node selected from the set. If a single node is available, the VIPs are served. There is no way to explicitly distribute the VIPs over the nodes, so there can be nodes with no VIPs and other nodes with many VIPs. If there is only one node, all VIPs are on it.
The administrator must ensure that all of the VIP addresses meet the following requirements:
- Accessible on the configured hosts from outside the cluster.
- Not used for any other purpose within the cluster.
Keepalived on each node determines whether the needed service is running. If it is, VIPs are supported and Keepalived participates in the negotiation to determine which node serves the VIP. For a node to participate, the service must be listening on the watch port on a VIP or the check must be disabled.
Each VIP in the set might be served by a different node.
IP failover monitors a port on each VIP to determine whether the port is reachable on the node. If the port is not reachable, the VIP is not assigned to the node. If the port is set to 0, this check is suppressed. The check script does the needed testing.
When a node running Keepalived passes the check script, the VIP on that node can enter the master state based on its priority and the priority of the current master and as determined by the preemption strategy.
A cluster administrator can provide a script through the OPENSHIFT_HA_NOTIFY_SCRIPT variable, and this script is called whenever the state of the VIP on the node changes. Keepalived uses the master state when it is servicing the VIP, the backup state when another node is servicing the VIP, or in the fault state when the check script fails. The notify script is called with the new state whenever the state changes.
You can create an IP failover deployment configuration on OpenShift Container Platform. The IP failover deployment configuration specifies the set of VIP addresses, and the set of nodes on which to service them. A cluster can have multiple IP failover deployment configurations, with each managing its own set of unique VIP addresses. Each node in the IP failover configuration runs an IP failover pod, and this pod runs Keepalived.
When using VIPs to access a pod with host networking, the application pod runs on all nodes that are running the IP failover pods. This enables any of the IP failover nodes to become the master and service the VIPs when needed. If application pods are not running on all nodes with IP failover, either some IP failover nodes never service the VIPs or some application pods never receive any traffic. Use the same selector and replication count, for both IP failover and the application pods, to avoid this mismatch.
While using VIPs to access a service, any of the nodes can be in the IP failover set of nodes, since the service is reachable on all nodes, no matter where the application pod is running. Any of the IP failover nodes can become master at any time. The service can either use external IPs and a service port or it can use a NodePort. Setting up a NodePort is a privileged operation.
When using external IPs in the service definition, the VIPs are set to the external IPs, and the IP failover monitoring port is set to the service port. When using a node port, the port is open on every node in the cluster, and the service load-balances traffic from whatever node currently services the VIP. In this case, the IP failover monitoring port is set to the NodePort in the service definition.
Even though a service VIP is highly available, performance can still be affected. Keepalived makes sure that each of the VIPs is serviced by some node in the configuration, and several VIPs can end up on the same node even when other nodes have none. Strategies that externally load-balance across a set of VIPs can be thwarted when IP failover puts multiple VIPs on the same node.
When you use ExternalIP, you can set up IP failover to have the same VIP range as the ExternalIP range. You can also disable the monitoring port. In this case, all of the VIPs appear on same node in the cluster. Any user can set up a service with an ExternalIP and make it highly available.
There are a maximum of 254 VIPs in the cluster.
4.1. IP failover environment variables
The IP failover environment variables reference lists all variables you can use to configure IP failover in OpenShift Container Platform, including VIP addresses, monitoring ports, and network interfaces.
| Variable Name | Default | Description |
|---|---|---|
|
|
|
The IP failover pod tries to open a TCP connection to this port on each Virtual IP (VIP). If connection is established, the service is considered to be running. If this port is set to |
|
|
The interface name that IP failover uses to send Virtual Router Redundancy Protocol (VRRP) traffic. The default value is
If your cluster uses the OVN-Kubernetes network plugin, set this value to | |
|
|
|
The number of replicas to create. This must match |
|
|
The list of IP address ranges to replicate. This must be provided. For example, | |
|
|
|
The offset value used to set the virtual router IDs. Using different offset values allows multiple IP failover configurations to exist within the same cluster. The default offset is |
|
|
The number of groups to create for VRRP. If not set, a group is created for each virtual IP range specified with the | |
|
| INPUT |
The name of the iptables chain, to automatically add an |
|
| The full path name in the pod file system of a script that is periodically run to verify the application is operating. | |
|
|
| The period, in seconds, that the check script is run. |
|
| The full path name in the pod file system of a script that is run whenever the state changes. | |
|
|
|
The strategy for handling a new higher priority host. The |
4.2. Configuring IP failover in your cluster
To configure IP failover in your OpenShift Container Platform cluster and provide high availability for Virtual IP addresses, you can create a deployment that runs Keepalived on selected nodes to monitor services and fail over VIPs when nodes become unavailable.
The IP failover deployment ensures that a failover pod runs on each of the nodes matching the constraints or the label used. The pod, which runs Keepalived, can monitor an endpoint and use Virtual Router Redundancy Protocol (VRRP) to fail over the virtual IP (VIP) from one node to another if the first node cannot reach the service or endpoint.
For production use, set a selector that selects at least two nodes, and set replicas equal to the number of selected nodes.
Prerequisites
-
You have logged in to the cluster as a user with
cluster-adminprivileges. - You have created a pull secret.
Red Hat OpenStack Platform (RHOSP) only:
- You have installed an RHOSP client (RHCOS documentation) on the target environment.
-
You have downloaded the RHOSP
openrc.shrc file (RHCOS documentation).
Procedure
Create an IP failover service account:
$ oc create sa ipfailoverUpdate security context constraints (SCC) for
hostNetwork:$ oc adm policy add-scc-to-user privileged -z ipfailover$ oc adm policy add-scc-to-user hostnetwork -z ipfailoverRed Hat OpenStack Platform (RHOSP) only: Complete the following steps to make a failover VIP address reachable on RHOSP ports.
Use the RHOSP CLI to show the default RHOSP API and VIP addresses in the
allowed_address_pairsparameter of your RHOSP cluster:$ openstack port show <cluster_name> -c allowed_address_pairsOutput example
*Field*                  *Value*
allowed_address_pairs    ip_address='192.168.0.5', mac_address='fa:16:3e:31:f9:cb'
                         ip_address='192.168.0.7', mac_address='fa:16:3e:31:f9:cb'
Set a different VIP address for the IP failover deployment and make the address reachable on RHOSP ports by entering the following command in the RHOSP CLI. Do not set any default RHOSP API and VIP addresses as the failover VIP address for the IP failover deployment.
Example of adding the
1.1.1.1failover IP address as an allowed address on RHOSP ports.$ openstack port set <cluster_name> --allowed-address ip-address=1.1.1.1,mac-address=fa:fa:16:3e:31:f9:cb- Create a deployment YAML file to configure IP failover for your deployment. See "Example deployment YAML for IP failover configuration" in a later step.
Specify the following specification in the IP failover deployment so that you pass the failover VIP address to the
OPENSHIFT_HA_VIRTUAL_IPSenvironment variable:Example of adding the
1.1.1.1VIP address toOPENSHIFT_HA_VIRTUAL_IPSapiVersion: apps/v1 kind: Deployment metadata: name: ipfailover-keepalived # ... spec: env: - name: OPENSHIFT_HA_VIRTUAL_IPS value: "1.1.1.1" # ...
Create a deployment YAML file to configure IP failover.
NoteFor Red Hat OpenStack Platform (RHOSP), you do not need to re-create the deployment YAML file. You already created this file as part of the earlier instructions.
Example deployment YAML for IP failover configuration
apiVersion: apps/v1
kind: Deployment
metadata:
  name: ipfailover-keepalived
  labels:
    ipfailover: hello-openshift
spec:
  strategy:
    type: Recreate
  replicas: 2
  selector:
    matchLabels:
      ipfailover: hello-openshift
  template:
    metadata:
      labels:
        ipfailover: hello-openshift
    spec:
      serviceAccountName: ipfailover
      privileged: true
      hostNetwork: true
      nodeSelector:
        node-role.kubernetes.io/worker: ""
      containers:
      - name: openshift-ipfailover
        image: registry.redhat.io/openshift4/ose-keepalived-ipfailover-rhel9:v4.20
        ports:
        - containerPort: 63000
          hostPort: 63000
        imagePullPolicy: IfNotPresent
        securityContext:
          privileged: true
        volumeMounts:
        - name: lib-modules
          mountPath: /lib/modules
          readOnly: true
        - name: host-slash
          mountPath: /host
          readOnly: true
          mountPropagation: HostToContainer
        - name: etc-sysconfig
          mountPath: /etc/sysconfig
          readOnly: true
        - name: config-volume
          mountPath: /etc/keepalive
        env:
        - name: OPENSHIFT_HA_CONFIG_NAME
          value: "ipfailover"
        - name: OPENSHIFT_HA_VIRTUAL_IPS
          value: "1.1.1.1-2"
        - name: OPENSHIFT_HA_VIP_GROUPS
          value: "10"
        - name: OPENSHIFT_HA_NETWORK_INTERFACE
          value: "ens3" #The host interface to assign the VIPs
        - name: OPENSHIFT_HA_MONITOR_PORT
          value: "30060"
        - name: OPENSHIFT_HA_VRRP_ID_OFFSET
          value: "10"
        - name: OPENSHIFT_HA_REPLICA_COUNT
          value: "2" #Must match the number of replicas in the deployment
        - name: OPENSHIFT_HA_USE_UNICAST
          value: "false"
        #- name: OPENSHIFT_HA_UNICAST_PEERS
          #value: "10.0.148.40,10.0.160.234,10.0.199.110"
        - name: OPENSHIFT_HA_IPTABLES_CHAIN
          value: "INPUT"
        #- name: OPENSHIFT_HA_NOTIFY_SCRIPT
        #  value: /etc/keepalive/mynotifyscript.sh
        - name: OPENSHIFT_HA_CHECK_SCRIPT
          value: "/etc/keepalive/mycheckscript.sh"
        - name: OPENSHIFT_HA_PREEMPTION
          value: "preempt_delay 300"
        - name: OPENSHIFT_HA_CHECK_INTERVAL
          value: "2"
        livenessProbe:
          initialDelaySeconds: 10
          exec:
            command:
            - pgrep
            - keepalived
      volumes:
      - name: lib-modules
        hostPath:
          path: /lib/modules
      - name: host-slash
        hostPath:
          path: /
      - name: etc-sysconfig
        hostPath:
          path: /etc/sysconfig
      # config-volume contains the check script
      # created with `oc create configmap keepalived-checkscript --from-file=mycheckscript.sh`
      - configMap:
          defaultMode: 0755
          name: keepalived-checkscript
        name: config-volume
      imagePullSecrets:
        - name: openshift-pull-secret
where:
ipfailover-keepalived- Specifies the name of the IP failover deployment.
OPENSHIFT_HA_VIRTUAL_IPS-
Specifies the lis t of IP address ranges to replicate. This must be provided. For example,
1.2.3.4-6,1.2.3.9. OPENSHIFT_HA_VIP_GROUPS-
Specifies the number of groups to create for VRRP. If not set, a group is created for each virtual IP range specified with the
OPENSHIFT_HA_VIP_GROUPSvariable. OPENSHIFT_HA_NETWORK_INTERFACE-
Specifies the interface name that IP failover uses to send VRRP traffic. By default,
eth0is used. OPENSHIFT_HA_MONITOR_PORT-
Specifies the IP failover pod tries to open a TCP connection to this port on each VIP. If connection is established, the service is considered to be running. If this port is set to
0, the test always passes. The default value is80. OPENSHIFT_HA_VRRP_ID_OFFSET-
Specifies the offset value used to set the virtual router IDs. Using different offset values allows multiple IP failover configurations to exist within the same cluster. The default offset is
10, and the allowed range is0through255. OPENSHIFT_HA_REPLICA_COUNT-
Specifies the number of replicas to create. This must match
spec.replicasvalue in IP failover configuration. The default value is2. OPENSHIFT_HA_USE_UNICAST-
Specifies whether to use unicast mode for VRRP. The default value is
false. OPENSHIFT_HA_UNICAST_PEERS-
Specifies the list of IP addresses of the unicast peers. This must be provided if
OPENSHIFT_HA_USE_UNICASTis set totrue. OPENSHIFT_HA_IPTABLES_CHAIN-
Specifies the name of the
iptableschain to automatically add aniptablesrule to allow the VRRP traffic on. If the value is not set, aniptablesrule is not added. If the chain does not exist, it is not created, and Keepalived operates in unicast mode. The default isINPUT. OPENSHIFT_HA_NOTIFY_SCRIPT- Specifies the full path name in the pod file system of a script that is run whenever the state changes.
OPENSHIFT_HA_CHECK_SCRIPT- Specifies the full path name in the pod file system of a script that is periodically run to verify the application is operating.
OPENSHIFT_HA_PREEMPTION-
Specifies the strategy for handling a new higher priority host. The default value is
preempt_delay 300, which causes a Keepalived instance to take over a VIP after 5 minutes if a lower-priority master is holding the VIP. OPENSHIFT_HA_CHECK_INTERVAL-
Specifies the period, in seconds, that the check script is run. The default value is
2. openshift-pull-secret- Specifies the name of the pull secret to use for the IP failover deployment. Create the pull secret before creating the deployment, otherwise you will get an error when creating the deployment.
4.3. Configuring check and notify scripts
To customize health monitoring for IP failover and receive notifications when VIP state changes in OpenShift Container Platform, you can configure check and notify scripts by using ConfigMap objects.
The check and notify scripts run inside the IP failover pod and use the pod file system rather than the host file system. The host file system is available to the pod under the /hosts mount path. When configuring a check or notify script, you must provide the full path to the script.
Each IP failover pod manages a Keepalived daemon that controls one or more virtual IP (VIP) addresses on the node where the pod is running. Keepalived tracks the state of each VIP on the node, which can be master, backup, or fault.
The full path names of the check and notify scripts are added to the Keepalived configuration file, /etc/keepalived/keepalived.conf, which is loaded each time Keepalived starts. You add the scripts to the pod by using a ConfigMap object, as described in the following sections.
- Check script
Keepalived monitors application health by periodically running an optional, user-supplied check script. For example, the script can test a web server by issuing a request and verifying the response. If you do not provide a check script, Keepalived runs a default script that tests the TCP connection. This default test is suppressed when the monitor port is set to
0.If the check script returns a non-zero value, the node enters the
backupstate and any VIPs that it holds are reassigned.- Notify script
As a cluster administrator, you can provide an optional notify script that Keepalived calls whenever the VIP state changes. Keepalived passes the following parameters to the notify script:
-
$1—grouporinstance -
$2— Name of thegrouporinstance -
$3— New state:master,backup, orfault
-
Prerequisites
-
You installed the OpenShift CLI (
oc). -
You are logged in to the cluster with a user with
cluster-adminprivileges.
Procedure
Create the desired script and create a
ConfigMapobject to hold it. The script has no input arguments and must return0forOKand1forfail.The check script,
mycheckscript.sh:#!/bin/bash # Whatever tests are needed # E.g., send request and verify response exit 0Create the
ConfigMapobject by running the following command:$ oc create configmap mycustomcheck --from-file=mycheckscript.shAdd the script to the pod. The
defaultModefor the mountedConfigMapobject files must able to run by usingoccommands or by editing the IP failover configuration.Add the script to the pod by running the following command. A value of
0755,493decimal, is typical. For example:$ oc set env deploy/ipfailover-keepalived \ OPENSHIFT_HA_CHECK_SCRIPT=/etc/keepalive/mycheckscript.sh$ oc set volume deploy/ipfailover-keepalived --add --overwrite \ --name=config-volume \ --mount-path=/etc/keepalive \ --source='{"configMap": { "name": "mycustomcheck", "defaultMode": 493}}'NoteThe
oc set envcommand is whitespace sensitive. There must be no whitespace on either side of the=sign.Alternatively, edit the
ipfailover-keepalivedconfiguration by running the following command:$ oc edit deploy ipfailover-keepalivedExample
ipfailover-keepalivedconfigurationspec: containers: - env: - name: OPENSHIFT_HA_CHECK_SCRIPT value: /etc/keepalive/mycheckscript.sh ... volumeMounts: - mountPath: /etc/keepalive name: config-volume dnsPolicy: ClusterFirst ... volumes: - configMap: defaultMode: 0755 name: customrouter name: config-volume ...where:
spec.container.env.name-
Specifies the
OPENSHIFT_HA_CHECK_SCRIPTenvironment variable to point to the mounted script file. spec.container.volumeMounts-
Specifies the
spec.container.volumeMountsfield to create the mount point. spec.volumes-
Specifies a new
spec.volumesfield to mention the config map. spec.volumes.configMap.defaultMode-
Specifies run permission on the files. When read back, it is displayed in decimal,
493.
-
Save the changes and exit the editor. This restarts the
ipfailover-keepalivedconfiguration.
4.4. Configuring VRRP preemption
To control VIP preemption behavior when nodes recover in OpenShift Container Platform, you can configure the OPENSHIFT_HA_PREEMPTION variable to set a delay before higher priority VIPs take over or disable preemption entirely.
When a virtual IP (VIP) on a node recovers from the fault state, it enters the backup state if it has a lower priority than the VIP currently in the master state.
There are two options for the OPENSHIFT_HA_PREEMPTION variable:
-
nopreempt: When set, themasterrole does not move from a lower-priority VIP to a higher-priority VIP. -
preempt_delay 300: When set, Keepalived waits 300 seconds before moving themasterrole to the higher-priority VIP.
In the following example, the OPENSHIFT_HA_PREEMPTION value is set to preempt_delay 300.
Procedure
To specify preemption enter
oc edit deploy ipfailover-keepalivedto edit the router deployment configuration:$ oc edit deploy ipfailover-keepalived# ... spec: containers: - env: - name: OPENSHIFT_HA_PREEMPTION value: preempt_delay 300 #...
4.5. Deploying multiple IP failover instances
When deploying multiple IP failover instances in OpenShift Container Platform, each Keepalived daemon assigns unique VRRP IDs to virtual IP addresses. Configure the OPENSHIFT_HA_VRRP_ID_OFFSET variable to prevent VRRP ID range overlaps between different IP failover configurations.
Each IP failover pod created by an IP failover configuration (one pod per node or replica) runs a Keepalived daemon. When multiple IP failover configurations are present, additional pods are created, and their Keepalived daemons participate together in Virtual Router Redundancy Protocol (VRRP) negotiation. This negotiation determines which node services each virtual IP (VIP).
For each VIP, Keepalived assigns a unique internal vrrp-id. During VRRP negotiation, these vrrp-id values are used to select the node that services the corresponding VIP.
The IP failover pod assigns vrrp-id values sequentially to the VIPs defined in the IP failover configuration, starting from the value specified by OPENSHIFT_HA_VRRP_ID_OFFSET. Valid vrrp-id values are in the range 1..255.
When you deploy multiple IP failover configurations, ensure that the configured offset leaves sufficient space for additional VIPs and prevents vrrp-id ranges from overlapping across configurations.
4.6. Configuring IP failover for more than 254 addresses
To configure IP failover for more than 254 Virtual IP addresses in OpenShift Container Platform, you can use the OPENSHIFT_HA_VIP_GROUPS variable to group multiple addresses together. By using the OPENSHIFT_HA_VIP_GROUPS variable, you can change the number of VIPs per VRRP instance and define the number of VIP groups available for each VRRP instance when configuring IP failover.
Grouping VIPs creates a wider range of allocation of VIPs per VRRP in the case of VRRP failover events, and is useful when all hosts in the cluster have access to a service locally. For example, when a service is being exposed with an ExternalIP.
As a rule for failover, do not limit services, such as the router, to one specific host. Instead, services should be replicated to each host so that in the case of IP failover, the services do not have to be recreated on the new host.
If you are using OpenShift Container Platform health checks, the nature of IP failover and groups means that all instances in the group are not checked. For that reason, the Kubernetes health checks must be used to ensure that services are live.
Prerequisites
-
You are logged in to the cluster with a user with
cluster-adminprivileges.
Procedure
To change the number of IP addresses assigned to each group, change the value for the
OPENSHIFT_HA_VIP_GROUPSvariable, for example:Example
DeploymentYAML for IP failover configuration... spec: env: - name: OPENSHIFT_HA_VIP_GROUPS value: "3" ...In this example, the
OPENSHIFT_HA_VIP_GROUPSvariable is set to3. In an environment with seven VIPs, it creates three groups, assigning three VIPs to the first group, and two VIPs to the two remaining groups.NoteIf the number of groups set by
OPENSHIFT_HA_VIP_GROUPSis fewer than the number of IP addresses set to fail over, the group contains more than one IP address, and all of the addresses move as a single unit.
4.7. High availability For ExternalIP
High availability for ExternalIP in non-cloud clusters of OpenShift Container Platform combines IP failover with ExternalIP auto-assignment to ensure services remain accessible when nodes fail. You can configure this by using the same CIDR range for both ExternalIP auto-assignment and IP failover.
To configure high availability for ExternalIP, you can specify a spec.ExternalIP.autoAssignCIDRs range of the cluster network configuration, and then use the same range in creating the IP failover configuration.
Because IP failover can support up to a maximum of 255 VIPs for the entire cluster, the spec.ExternalIP.autoAssignCIDRs must be /24 or smaller.
4.8. Removing IP failover
To remove IP failover from your OpenShift Container Platform cluster and clean up iptables rules and virtual IP addresses, you can delete the deployment and service account, then run a cleanup job on each configured node.
When IP failover is initially configured, the worker nodes in the cluster are modified with an iptables rule that explicitly allows multicast packets on 224.0.0.18 for Keepalived. Because of the change to the nodes, removing IP failover requires running a job to remove the iptables rule and removing the virtual IP addresses used by Keepalived.
Procedure
Optional: Identify and delete any check and notify scripts that are stored as config maps:
Identify whether any pods for IP failover use a config map as a volume:
$ oc get pod -l ipfailover \
  -o jsonpath="\
{range .items[?(@.spec.volumes[*].configMap)]}
{'Namespace: '}{.metadata.namespace}
{'Pod:       '}{.metadata.name}
{'Volumes that use config maps:'}
{range .spec.volumes[?(@.configMap)]}  {'volume:    '}{.name}
  {'configMap: '}{.configMap.name}{'\n'}{end}
{end}"
Example output
Namespace: default
Pod:       keepalived-worker-59df45db9c-2x9mn
Volumes that use config maps:
  volume:    config-volume
  configMap: mycustomcheck
If the preceding step provided the names of config maps that are used as volumes, delete the config maps:
$ oc delete configmap <configmap_name>
Identify an existing deployment for IP failover:
$ oc get deployment -l ipfailoverExample output
NAMESPACE   NAME         READY   UP-TO-DATE   AVAILABLE   AGE
default     ipfailover   2/2     2            2           105d
Delete the deployment:
$ oc delete deployment <ipfailover_deployment_name>Remove the
ipfailoverservice account:$ oc delete sa ipfailoverRun a job that removes the IP tables rule that was added when IP failover was initially configured:
Create a file such as
remove-ipfailover-job.yamlwith contents that are similar to the following example:apiVersion: batch/v1 kind: Job metadata: generateName: remove-ipfailover- labels: app: remove-ipfailover spec: template: metadata: name: remove-ipfailover spec: containers: - name: remove-ipfailover image: registry.redhat.io/openshift4/ose-keepalived-ipfailover-rhel9:v4.20 command: ["/var/lib/ipfailover/keepalived/remove-failover.sh"] nodeSelector: kubernetes.io/hostname: <host_name> restartPolicy: Never-
The
nodeSelectoris likely the same as the selector used in the old IP failover deployment. - Run the job for each node in your cluster that was configured for IP failover and replace the hostname each time.
-
The
Run the job:
$ oc create -f remove-ipfailover-job.yamlExample output
job.batch/remove-ipfailover-2h8dm created
Verification
Confirm that the job removed the initial configuration for IP failover.
$ oc logs job/remove-ipfailover-2h8dmExample output
remove-failover.sh: OpenShift IP Failover service terminating.
  - Removing ip_vs module ...
  - Cleaning up ...
  - Releasing VIPs  (interface eth0) ...
Chapter 5. Configuring the cluster-wide proxy
To enable your OpenShift Container Platform cluster to use an HTTP or HTTPS proxy when direct internet access is denied, you can configure cluster-wide proxy settings by modifying the Proxy object for existing clusters or by configuring proxy settings in the install-config.yaml file for new clusters.
After you enable a cluster-wide egress proxy for your cluster on a supported platform, Red Hat Enterprise Linux CoreOS (RHCOS) populates the status.noProxy parameter with the values of the networking.machineNetwork[].cidr, networking.clusterNetwork[].cidr, and networking.serviceNetwork[] fields from your install-config.yaml file that exists on the supported platform.
As a postinstallation task, you can change the networking.clusterNetwork[].cidr value, but not the networking.machineNetwork[].cidr and the networking.serviceNetwork[] values. For more information, see "Configuring the cluster network range".
For installations on Amazon Web Services (AWS), Google Cloud, Microsoft Azure, and Red Hat OpenStack Platform (RHOSP), the status.noProxy parameter is also populated with the instance metadata endpoint, 169.254.169.254.
Example of values added to the status: segment of a Proxy object by RHCOS
apiVersion: config.openshift.io/v1
kind: Proxy
metadata:
  name: cluster
# ...
networking:
  clusterNetwork:
  - cidr: <ip_address_from_cidr>
    hostPrefix: 23
  network type: OVNKubernetes
  machineNetwork:
  - cidr: <ip_address_from_cidr>
  serviceNetwork:
  - 172.30.0.0/16
# ...
status:
  noProxy:
  - localhost
  - .cluster.local
  - .svc
  - 127.0.0.1
  - <api_server_internal_url>
# ...
where:
<ip_address_from_cidr>-
Specifies IP address blocks from which pod IP addresses are allocated. The default value is
10.128.0.0/14with a host prefix of/23. <ip_address_from_cidr>-
Specifies IP address blocks for machines. The default value is
10.0.0.0/16. <ip_address_from_cidr>-
Specifies IP address block for services. The default value is
172.30.0.0/16. <api_server_internal_url>-
You can find the URL of the internal API server by running the
oc get infrastructures.config.openshift.io cluster -o jsonpath='{.status.etcdDiscoveryDomain}'command.
If your installation type does not include setting the networking.machineNetwork[].cidr field, you must include the machine IP addresses manually in the .status.noProxy field to make sure that the traffic between nodes can bypass the proxy.
5.1. Prerequisites
Review the sites that your cluster requires access to and determine whether any of them must bypass the proxy. By default, all cluster system egress traffic is proxied, including calls to the cloud provider API for the cloud that hosts your cluster. The system-wide proxy affects system components only, not user workloads. If necessary, add sites to the spec.noProxy parameter of the Proxy object to bypass the proxy.
5.2. Enabling the cluster-wide proxy
To enable the cluster-wide egress proxy for your OpenShift Container Platform cluster, you can modify the Proxy object to configure HTTP and HTTPS proxy settings and specify domains that bypass the proxy.
When a cluster is installed or upgraded without the proxy configured, a Proxy object is still generated but it has a nil spec. For example:
apiVersion: config.openshift.io/v1
kind: Proxy
metadata:
  name: cluster
spec:
  trustedCA:
    name: ""
status:
Only the Proxy object named cluster is supported, and no additional proxies can be created.
A cluster administrator can configure the proxy for OpenShift Container Platform by modifying the cluster Proxy object.
After you enable the cluster-wide proxy capability for your cluster and you save the Proxy object file, the Machine Config Operator (MCO) reboots all nodes in your cluster so that each node can access connections that exist outside of the cluster. You do not need to manually reboot these nodes.
Prerequisites
- You have cluster administrator permissions.
-
You installed the OpenShift Container Platform
ocCLI tool.
Procedure
Create a config map that contains any additional CA certificates required for proxying HTTPS connections.
NoteYou can skip this step if the identity certificate of the proxy is signed by an authority from the Red Hat Enterprise Linux CoreOS (RHCOS) trust bundle.
Create a file called
user-ca-bundle.yaml, and provide the values of your PEM-encoded certificates:apiVersion: v1 data: ca-bundle.crt: |1 <MY_PEM_ENCODED_CERTS>2 kind: ConfigMap metadata: name: user-ca-bundle3 namespace: openshift-config4 where:
data.ca-bundle.crt-
Specifies the data key that must be named
ca-bundle.crt. <MY_PEM_ENCODED_CERTS>- Specifies one or more PEM-encoded X.509 certificates used to sign the proxy’s identity certificate.
user-ca-bundle-
Specifies the config map name that is referenced from the
Proxyobject. openshift-config- Specifies the namespace that the config map must exist in.
Create the config map from the
user-ca-bundle.yamlfile by entering the following command:$ oc create -f user-ca-bundle.yaml
Use the
oc editcommand to modify theProxyobject:$ oc edit proxy/clusterConfigure the necessary fields for the proxy:
apiVersion: config.openshift.io/v1
kind: Proxy
metadata:
  name: cluster
spec:
  httpProxy: http://<username>:<pswd>@<ip>:<port>
1 httpsProxy: https://<username>:<pswd>@<ip>:<port>2 noProxy: example.com3 readinessEndpoints: - http://www.google.com4 - https://www.google.com trustedCA: name: user-ca-bundle5 where:
httpProxy-
Specifies the proxy URL to use for creating HTTP connections outside the cluster. The URL scheme must be
http. httpsProxy-
Specifies the proxy URL to use for creating HTTPS connections outside the cluster. The URL scheme must be either
httporhttps. Specify a URL for the proxy that supports the URL scheme. For example, most proxies report an error if they are configured to usehttpsbut they only supporthttp. This failure message may not propagate to the logs and can appear to be a network connection failure instead. If using a proxy that listens forhttpsconnections from the cluster, you might need to configure the cluster to accept the CAs and certificates that the proxy uses. noProxySpecifies a comma-separated list of destination domain names, domains, IP addresses (or other network CIDRs), and port numbers to exclude proxying. Note that Port numbers are only supported when configuring IPv6 addresses. Port numbers are not supported when configuring IPv4 addresses.
Preface a domain with
.to match subdomains only. For example,.y.commatchesx.y.com, but noty.com. Use*to bypass proxy for all destinations.If your
noproxyfield needs to include a domain address, you must explicitly specify that FQDN, or prefix-matched subdomain, in thenoproxyfield. You cannot use the IP address or CIDR range that encapsulates the domain. This is because the cluster does not wait for DNS to return the IP address before assigning the route connection, and checks explicitly against the request being made. For example, if you have a CIDR block value, such as10.0.0.0/24, for thenoproxyfield and the field attempts to accesshttps://10.0.0.11, the addresses successfully match. However, attempting to accesshttps://exampleserver.externaldomain.com, whose A record entry is10.0.0.11, fails. An additional value of.externaldomain.comfor yournoproxyfield is necessary.If you scale up compute nodes that are not included in the network defined by the
networking.machineNetwork[].cidrfield from the installation configuration, you must add them to this list to prevent connection issues.This field is ignored if neither the
httpProxyorhttpsProxyfields are set.readinessEndpoints-
Specifies one or more URLs external to the cluster to use to perform a readiness check before writing the
httpProxyandhttpsProxyvalues to status. trustedCA-
Specifies a reference to the config map in the
openshift-confignamespace that contains additional CA certificates required for proxying HTTPS connections. Note that the config map must already exist before referencing it here. This field is required unless the proxy’s identity certificate is signed by an authority from the RHCOS trust bundle.
- Save the file to apply the changes.
5.3. Removing the cluster-wide proxy
The cluster Proxy object cannot be deleted. To remove the cluster-wide proxy configuration from your OpenShift Container Platform cluster, you can remove all spec fields from the Proxy object by using the oc edit command.
Prerequisites
- Cluster administrator permissions
-
OpenShift Container Platform
ocCLI tool installed
Procedure
Use the
oc editcommand to modify the proxy:$ oc edit proxy/clusterRemove all
specfields from the Proxy object. For example:apiVersion: config.openshift.io/v1 kind: Proxy metadata: name: cluster spec: {}- Save the file to apply the changes.
5.4. Verifying the cluster-wide proxy configuration
To verify that your cluster-wide proxy configuration is working correctly in OpenShift Container Platform, you can check the Proxy object status, review Machine Config Operator logs, and confirm that system components are routing external requests through the proxy.
Prerequisites
- You have cluster administrator permissions.
-
You have the OpenShift Container Platform
ocCLI tool installed.
Procedure
Check the proxy configuration status using the
occommand:$ oc get proxy/cluster -o yaml-
Verify the proxy fields in the output to ensure they match your configuration. Specifically, check the
spec.httpProxy,spec.httpsProxy,spec.noProxy, andspec.trustedCAfields. Inspect the status of the
Proxyobject:$ oc get proxy/cluster -o jsonpath='{.status}'Example output
{
status:
    httpProxy: http://user:xxx@xxxx:3128
    httpsProxy: http://user:xxx@xxxx:3128
    noProxy: .cluster.local,.svc,10.0.0.0/16,10.128.0.0/14,127.0.0.1,169.254.169.254,172.30.0.0/16,localhost,test.no-proxy.com
}
Check the logs of the Machine Config Operator (MCO) to ensure that the configuration changes were applied successfully:
$ oc logs -n openshift-machine-config-operator $(oc get pods -n openshift-machine-config-operator -l k8s-app=machine-config-operator -o name)- Look for messages that indicate the proxy settings were applied and the nodes were rebooted if necessary.
Verify that system components are using the proxy by checking the logs of a component that makes external requests, such as the Cluster Version Operator (CVO):
$ oc logs -n openshift-cluster-version $(oc get pods -n openshift-cluster-version -l k8s-app=machine-config-operator -o name)- Look for log entries that show that external requests have been routed through the proxy.
Chapter 6. Configuring a custom PKI
To ensure secure communication between internal components in your OpenShift Container Platform cluster, you can add your organization’s custom Certificate Authority (CA) certificates to the cluster-wide truststore.
You can add your custom CA certificates to the cluster-wide truststore in one of two ways:
-
During cluster installation, by adding your CA certificate to the
install-config.yamlfile. -
On a running cluster, by creating a
ConfigMapobject that contains your CA certificate and referencing it in the clusterProxyobject.
The cluster Proxy object is the mechanism for managing the cluster-wide truststore. This guide focuses only on the task of adding a CA. If you also need to configure an egress proxy, refer to the "Configuring the cluster-wide proxy" chapter for detailed instructions.
6.1. Adding a custom CA during cluster installation
To add a custom Certificate Authority (CA) to your OpenShift Container Platform cluster during initial cluster installation, you can add the CA certificate to your install-config.yaml file. Adding the CA certificate during installation ensures that your cluster trusts the CA after installation.
The following procedure uses the additionalTrustBundle parameter. If you are also configuring an egress proxy, you can add this parameter to your install-config.yaml file along with your proxy configuration. For more information on the available proxy settings, see the "Configuring the cluster-wide proxy" chapter.
Prerequisites
-
You have access to the
install-config.yamlfile for your cluster installation. - You have your custom CA certificate avalable in PEM-encoded format.
Procedure
-
Open your
install-config.yamlfile. Add the
additionalTrustBundleparameter with your PEM-encoded CA certificate:apiVersion: v1 baseDomain: my.domain.com metadata: name: my-cluster additionalTrustBundle: | -----BEGIN CERTIFICATE----- <MY_PEM_ENCODED_CA_CERT> -----END CERTIFICATE-----where:
additionalTrustBundle-
Specifies the custom CA certificate that you want the cluster to trust. The installation program uses the certificate to generate a
user-ca-bundleConfigMapobject in theopenshift-confignamespace.
-
Save the
install-config.yamlfile and continue with your cluster installation.
6.2. Adding a custom CA to a running cluster
To add a custom CA certificate to your running OpenShift Container Platform cluster, you can create a ConfigMap object with your certificate and reference it in the cluster Proxy object.
When you modify the cluster Proxy object, the Machine Config Operator (MCO) initiates a rolling reboot of all nodes to apply the change. This is expected behavior and does not require manual intervention.
This procedure uses the trustedCA field in the Proxy object. If you also need to configure or modify egress proxy settings at the same time, see the "Configuring the cluster-wide proxy" chapter for detailed instructions.
Prerequisites
- You have cluster-admin privileges.
-
You have the OpenShift CLI (
oc) installed. - You have your custom CA certificate available in PEM-encoded format.
Procedure
Create a
ConfigMapobject with your CA certificate.-
Create a YAML file named
custom-ca.yamlto define theConfigMapobject. Add the following content to the file:
apiVersion: v1
kind: ConfigMap
metadata:
  name: custom-ca-bundle
  namespace: openshift-config
data:
  ca-bundle.crt: |
    -----BEGIN CERTIFICATE-----
    <MY_PEM_ENCODED_CA_CERT>
    -----END CERTIFICATE-----
where:
metadata.name-
Specifies the name of the
ConfigMapobject that you will reference from theProxyobject. metadata.namespace-
Specifies the namespace of the
ConfigMapobject. data.ca-bundle.crt- Specifies the data key for the certificate bundle.
-
Create a YAML file named
Apply the manifest to create the
ConfigMapobject in the cluster by running the following command:$ oc apply -f custom-ca.yamlReference the
ConfigMapobject in the clusterProxyobject.Update the cluster
Proxyobject to reference theConfigMapobject you just created by running the following command:$ oc patch proxy/cluster --type=merge --patch='{"spec":{"trustedCA":{"name":"custom-ca-bundle"}}}'After you run this command, the Machine Config Operator (MCO) detects the change and begins distributing the new trusted CA to all nodes in the cluster.
6.3. Verifying the custom CA configuration
To verify that your custom CA certificate has been successfully added to the OpenShift Container Platform cluster-wide trust bundle, you can view the contents of the trusted-ca-bundle ConfigMap object and check that your certificate is included.
Prerequisites
-
You have permissions to view
ConfigMapobjects in the openshift-config namespace. -
You have the OpenShift CLI (
oc) installed.
Procedure
Run the following command to view the contents of the cluster-wide CA trust bundle:
$ oc get configmap trusted-ca-bundle -n openshift-config -o yaml-
In the YAML output, inspect the
data.ca-bundle.crtfield. This field contains all the trusted certificates for the cluster. Verify that the PEM-encoded certificate you added is included in the list of certificates. The output will resemble the following structure:
kind: ConfigMap
metadata:
  name: trusted-ca-bundle
  namespace: openshift-config
data:
  ca-bundle.crt: |
    -----BEGIN CERTIFICATE-----
    <A_SYSTEM_CA_CERTIFICATE>
    -----END CERTIFICATE-----
    -----BEGIN CERTIFICATE-----
    <ANOTHER_SYSTEM_CA_CERTIFICATE>
    -----END CERTIFICATE-----
    -----BEGIN CERTIFICATE-----
    <YOUR_CUSTOM_CA_CERTIFICATE_SHOULD_BE_HERE>
    -----END CERTIFICATE-----
If your certificate is present in the output, the cluster now trusts your custom PKI.
6.4. Certificate injection using Operators
In OpenShift Container Platform, certificate injection using Operators merges your custom Certificate Authorities (CAs) with system certificates and injects the merged bundle into Operators that request it. You can use this feature so your Operators trust custom certificates without requiring manual certificate bundle management.
After adding a config.openshift.io/inject-trusted-cabundle="true" label to the config map, existing data in it is deleted. The Cluster Network Operator takes ownership of a config map and only accepts ca-bundle as data. You must use a separate config map to store service-ca.crt by using the service.beta.openshift.io/inject-cabundle=true annotation or a similar configuration. Adding a config.openshift.io/inject-trusted-cabundle="true" label and service.beta.openshift.io/inject-cabundle=true annotation on the same config map can cause issues.
Operators request this injection by creating an empty ConfigMap with the following label:
config.openshift.io/inject-trusted-cabundle="true"An example of the empty ConfigMap:
apiVersion: v1
data: {}
kind: ConfigMap
metadata:
  labels:
    config.openshift.io/inject-trusted-cabundle: "true"
  name: ca-inject
  namespace: apache
where:
metadata.name- Specifies the empty ConfigMap name.
The Operator mounts this ConfigMap into the container’s local trust store.
Adding a trusted CA certificate is only needed if the certificate is not included in the Red Hat Enterprise Linux CoreOS (RHCOS) trust bundle.
Certificate injection is not limited to Operators. The Cluster Network Operator injects certificates across any namespace when an empty ConfigMap is created with the config.openshift.io/inject-trusted-cabundle=true label.
The ConfigMap can reside in any namespace, but the ConfigMap must be mounted as a volume to each container within a pod that requires a custom CA. For example:
apiVersion: apps/v1
kind: Deployment
metadata:
  name: my-example-custom-ca-deployment
  namespace: my-example-custom-ca-ns
spec:
  ...
    spec:
      ...
      containers:
        - name: my-container-that-needs-custom-ca
          volumeMounts:
          - name: trusted-ca
            mountPath: /etc/pki/ca-trust/extracted/pem
            readOnly: true
      volumes:
      - name: trusted-ca
        configMap:
          name: ca-inject
          items:
            - key: ca-bundle.crt
              path: tls-ca-bundle.pem
where:
volumes.items.key- Specifies the ConfigMap key.
volumes.items.path- Specifies the ConfigMap path.
Legal Notice
Copyright © Red Hat
OpenShift documentation is licensed under the Apache License 2.0 (https://www.apache.org/licenses/LICENSE-2.0).
Modified versions must remove all Red Hat trademarks.
Portions adapted from https://github.com/kubernetes-incubator/service-catalog/ with modifications by Red Hat.
Red Hat, Red Hat Enterprise Linux, the Red Hat logo, the Shadowman logo, JBoss, OpenShift, Fedora, the Infinity logo, and RHCE are trademarks of Red Hat, Inc., registered in the United States and other countries.
Linux® is the registered trademark of Linus Torvalds in the United States and other countries.
Java® is a registered trademark of Oracle and/or its affiliates.
XFS® is a trademark of Silicon Graphics International Corp. or its subsidiaries in the United States and/or other countries.
MySQL® is a registered trademark of MySQL AB in the United States, the European Union and other countries.
Node.js® is an official trademark of the OpenJS Foundation.
The OpenStack® Word Mark and OpenStack logo are either registered trademarks/service marks or trademarks/service marks of the OpenStack Foundation, in the United States and other countries and are used with the OpenStack Foundation’s permission. We are not affiliated with, endorsed or sponsored by the OpenStack Foundation, or the OpenStack community.
All other trademarks are the property of their respective owners.