Security and compliance
Learning about and managing security for OpenShift Container Platform
Abstract
Chapter 1. OpenShift Container Platform security and compliance
1.1. Security overview
It is important to understand how to properly secure various aspects of your OpenShift Container Platform cluster.
Container security
A good starting point to understanding OpenShift Container Platform security is to review the concepts in Understanding container security. This and subsequent sections provide a high-level walkthrough of the container security measures available in OpenShift Container Platform, including solutions for the host layer, the container and orchestration layer, and the build and application layer. These sections also include information on the following topics:
- Why container security is important and how it compares with existing security standards.
- Which container security measures are provided by the host (RHCOS and RHEL) layer and which are provided by OpenShift Container Platform.
- How to evaluate your container content and sources for vulnerabilities.
- How to design your build and deployment process to proactively check container content.
- How to control access to containers through authentication and authorization.
- How networking and attached storage are secured in OpenShift Container Platform.
- Containerized solutions for API management and SSO.
Auditing
OpenShift Container Platform auditing provides a security-relevant chronological set of records documenting the sequence of activities that have affected the system by individual users, administrators, or other components of the system. Administrators can configure the audit log policy and view audit logs.
Certificates
Certificates are used by various components to validate access to the cluster. Administrators can replace the default ingress certificate, add API server certificates, or add a service certificate.
You can also review more details about the types of certificates used by the cluster:
- User-provided certificates for the API server
- Proxy certificates
- Service CA certificates
- Node certificates
- Bootstrap certificates
- etcd certificates
- OLM certificates
- Aggregated API client certificates
- Machine Config Operator certificates
- User-provided certificates for default ingress
- Ingress certificates
- Monitoring and cluster logging Operator component certificates
- Control plane certificates
Encrypting data
You can enable etcd encryption for your cluster to provide an additional layer of data security. For example, it can help protect the loss of sensitive data if an etcd backup is exposed to the incorrect parties.
Vulnerability scanning
Administrators can use the Red Hat Quay Container Security Operator to run vulnerability scans and review information about detected vulnerabilities.
1.2. Compliance overview
For many OpenShift Container Platform customers, regulatory readiness, or compliance, on some level is required before any systems can be put into production. That regulatory readiness can be imposed by national standards, industry standards, or the organization’s corporate governance framework.
Compliance checking
Administrators can use the Compliance Operator to run compliance scans and recommend remediations for any issues found. The oc-compliance plugin is an OpenShift CLI (oc) plugin that provides a set of utilities to easily interact with the Compliance Operator.
File integrity checking
Administrators can use the File Integrity Operator to continually run file integrity checks on cluster nodes and provide a log of files that have been modified.
Chapter 2. Container security
2.1. Understanding container security
Securing a containerized application relies on multiple levels of security:
Container security begins with a trusted base container image and continues through the container build process as it moves through your CI/CD pipeline.
ImportantImage streams by default do not automatically update. This default behavior might create a security issue because security updates to images referenced by an image stream do not automatically occur. For information about how to override this default behavior, see Configuring periodic importing of imagestreamtags.
- When a container is deployed, its security depends on it running on secure operating systems and networks, and establishing firm boundaries between the container itself and the users and hosts that interact with it.
- Continued security relies on being able to scan container images for vulnerabilities and having an efficient way to correct and replace vulnerable images.
Beyond what a platform such as OpenShift Container Platform offers out of the box, your organization will likely have its own security demands. Some level of compliance verification might be needed before you can even bring OpenShift Container Platform into your data center.
Likewise, you may need to add your own agents, specialized hardware drivers, or encryption features to OpenShift Container Platform, before it can meet your organization’s security standards.
This guide provides a high-level walkthrough of the container security measures available in OpenShift Container Platform, including solutions for the host layer, the container and orchestration layer, and the build and application layer. It then points you to specific OpenShift Container Platform documentation to help you achieve those security measures.
This guide contains the following information:
- Why container security is important and how it compares with existing security standards.
- Which container security measures are provided by the host (RHCOS and RHEL) layer and which are provided by OpenShift Container Platform.
- How to evaluate your container content and sources for vulnerabilities.
- How to design your build and deployment process to proactively check container content.
- How to control access to containers through authentication and authorization.
- How networking and attached storage are secured in OpenShift Container Platform.
- Containerized solutions for API management and SSO.
The goal of this guide is to understand the incredible security benefits of using OpenShift Container Platform for your containerized workloads and how the entire Red Hat ecosystem plays a part in making and keeping containers secure. It will also help you understand how you can engage with the OpenShift Container Platform to achieve your organization’s security goals.
2.1.1. What are containers?
Containers package an application and all its dependencies into a single image that can be promoted from development, to test, to production, without change. A container might be part of a larger application that works closely with other containers.
Containers provide consistency across environments and multiple deployment targets: physical servers, virtual machines (VMs), and private or public cloud.
Some of the benefits of using containers include:
| Infrastructure | Applications |
|---|---|
| Sandboxed application processes on a shared Linux operating system kernel | Package my application and all of its dependencies |
| Simpler, lighter, and denser than virtual machines | Deploy to any environment in seconds and enable CI/CD |
| Portable across different environments | Easily access and share containerized components |
See Understanding Linux containers from the Red Hat Customer Portal to find out more about Linux containers. To learn about RHEL container tools, see Building, running, and managing containers in the RHEL product documentation.
2.1.2. What is OpenShift Container Platform?
Automating how containerized applications are deployed, run, and managed is the job of a platform such as OpenShift Container Platform. At its core, OpenShift Container Platform relies on the Kubernetes project to provide the engine for orchestrating containers across many nodes in scalable data centers.
Kubernetes is a project, which can run using different operating systems and add-on components that offer no guarantees of supportability from the project. As a result, the security of different Kubernetes platforms can vary.
OpenShift Container Platform is designed to lock down Kubernetes security and integrate the platform with a variety of extended components. To do this, OpenShift Container Platform draws on the extensive Red Hat ecosystem of open source technologies that include the operating systems, authentication, storage, networking, development tools, base container images, and many other components.
OpenShift Container Platform can leverage Red Hat’s experience in uncovering and rapidly deploying fixes for vulnerabilities in the platform itself as well as the containerized applications running on the platform. Red Hat’s experience also extends to efficiently integrating new components with OpenShift Container Platform as they become available and adapting technologies to individual customer needs.
2.2. Understanding host and VM security
Both containers and virtual machines provide ways of separating applications running on a host from the operating system itself. Understanding RHCOS, which is the operating system used by OpenShift Container Platform, will help you see how the host systems protect containers and hosts from each other.
2.2.1. Securing containers on Red Hat Enterprise Linux CoreOS (RHCOS)
Containers simplify the act of deploying many applications to run on the same host, using the same kernel and container runtime to spin up each container. The applications can be owned by many users and, because they are kept separate, can run different, and even incompatible, versions of those applications at the same time without issue.
In Linux, containers are just a special type of process, so securing containers is similar in many ways to securing any other running process. An environment for running containers starts with an operating system that can secure the host kernel from containers and other processes running on the host, as well as secure containers from each other.
Because OpenShift Container Platform 4.8 runs on RHCOS hosts, with the option of using Red Hat Enterprise Linux (RHEL) as worker nodes, the following concepts apply by default to any deployed OpenShift Container Platform cluster. These RHEL security features are at the core of what makes running containers in OpenShift Container Platform more secure:
- Linux namespaces enable creating an abstraction of a particular global system resource to make it appear as a separate instance to processes within a namespace. Consequently, several containers can use the same computing resource simultaneously without creating a conflict. Container namespaces that are separate from the host by default include mount table, process table, network interface, user, control group, UTS, and IPC namespaces. Those containers that need direct access to host namespaces need to have elevated permissions to request that access. See Overview of Containers in Red Hat Systems from the RHEL 7 container documentation for details on the types of namespaces.
- SELinux provides an additional layer of security to keep containers isolated from each other and from the host. SELinux allows administrators to enforce mandatory access controls (MAC) for every user, application, process, and file.
Disabling SELinux on RHCOS nodes is not supported.
- CGroups (control groups) limit, account for, and isolate the resource usage (CPU, memory, disk I/O, network, etc.) of a collection of processes. CGroups are used to ensure that containers on the same host are not impacted by each other.
- Secure computing mode (seccomp) profiles can be associated with a container to restrict available system calls. See page 94 of the OpenShift Security Guide for details about seccomp.
- Deploying containers using RHCOS reduces the attack surface by minimizing the host environment and tuning it for containers. The CRI-O container engine further reduces that attack surface by implementing only those features required by Kubernetes and OpenShift Container Platform to run and manage containers, as opposed to other container engines that implement desktop-oriented standalone features.
RHCOS is a version of Red Hat Enterprise Linux (RHEL) that is specially configured to work as control plane (master) and worker nodes on OpenShift Container Platform clusters. So RHCOS is tuned to efficiently run container workloads, along with Kubernetes and OpenShift Container Platform services.
To further protect RHCOS systems in OpenShift Container Platform clusters, most containers, except those managing or monitoring the host system itself, should run as a non-root user. Dropping the privilege level or creating containers with the least amount of privileges possible is recommended best practice for protecting your own OpenShift Container Platform clusters.
2.2.2. Comparing virtualization and containers
Traditional virtualization provides another way to keep application environments separate on the same physical host. However, virtual machines work in a different way than containers. Virtualization relies on a hypervisor spinning up guest virtual machines (VMs), each of which has its own operating system (OS), represented by a running kernel, as well as the running application and its dependencies.
With VMs, the hypervisor isolates the guests from each other and from the host kernel. Fewer individuals and processes have access to the hypervisor, reducing the attack surface on the physical server. That said, security must still be monitored: one guest VM might be able to use hypervisor bugs to gain access to another VM or the host kernel. And, when the OS needs to be patched, it must be patched on all guest VMs using that OS.
Containers can be run inside guest VMs, and there might be use cases where this is desirable. For example, you might be deploying a traditional application in a container, perhaps to lift-and-shift an application to the cloud.
Container separation on a single host, however, provides a more lightweight, flexible, and easier-to-scale deployment solution. This deployment model is particularly appropriate for cloud-native applications. Containers are generally much smaller than VMs and consume less memory and CPU.
See Linux Containers Compared to KVM Virtualization in the RHEL 7 container documentation to learn about the differences between container and VMs.
2.2.3. Securing OpenShift Container Platform
When you deploy OpenShift Container Platform, you have the choice of an installer-provisioned infrastructure (there are several available platforms) or your own user-provisioned infrastructure. Some low-level security-related configuration, such as enabling FIPS compliance or adding kernel modules required at first boot, might benefit from a user-provisioned infrastructure. Likewise, user-provisioned infrastructure is appropriate for disconnected OpenShift Container Platform deployments.
Keep in mind that, when it comes to making security enhancements and other configuration changes to OpenShift Container Platform, the goals should include:
- Keeping the underlying nodes as generic as possible. You want to be able to easily throw away and spin up similar nodes quickly and in prescriptive ways.
- Managing modifications to nodes through OpenShift Container Platform as much as possible, rather than making direct, one-off changes to the nodes.
In pursuit of those goals, most node changes should be done during installation through Ignition or later using MachineConfigs that are applied to sets of nodes by the Machine Config Operator. Examples of security-related configuration changes you can do in this way include:
- Adding kernel arguments
- Adding kernel modules
- Enabling support for FIPS cryptography
- Configuring disk encryption
- Configuring the chrony time service
Besides the Machine Config Operator, there are several other Operators available to configure OpenShift Container Platform infrastructure that are managed by the Cluster Version Operator (CVO). The CVO is able to automate many aspects of OpenShift Container Platform cluster updates.
2.3. Hardening RHCOS
RHCOS was created and tuned to be deployed in OpenShift Container Platform with few if any changes needed to RHCOS nodes. Every organization adopting OpenShift Container Platform has its own requirements for system hardening. As a RHEL system with OpenShift-specific modifications and features added (such as Ignition, ostree, and a read-only /usr to provide limited immutability), RHCOS can be hardened just as you would any RHEL system. Differences lie in the ways you manage the hardening.
A key feature of OpenShift Container Platform and its Kubernetes engine is to be able to quickly scale applications and infrastructure up and down as needed. Unless it is unavoidable, you do not want to make direct changes to RHCOS by logging into a host and adding software or changing settings. You want to have the OpenShift Container Platform installer and control plane manage changes to RHCOS so new nodes can be spun up without manual intervention.
So, if you are setting out to harden RHCOS nodes in OpenShift Container Platform to meet your security needs, you should consider both what to harden and how to go about doing that hardening.
2.3.1. Choosing what to harden in RHCOS
The RHEL 8 Security Hardening guide describes how you should approach security for any RHEL system.
Use this guide to learn how to approach cryptography, evaluate vulnerabilities, and assess threats to various services. Likewise, you can learn how to scan for compliance standards, check file integrity, perform auditing, and encrypt storage devices.
With the knowledge of what features you want to harden, you can then decide how to harden them in RHCOS.
2.3.2. Choosing how to harden RHCOS
Direct modification of RHCOS systems in OpenShift Container Platform is discouraged. Instead, you should think of modifying systems in pools of nodes, such as worker nodes and control plane nodes (also known as the master nodes). When a new node is needed, in non-bare metal installs, you can request a new node of the type you want and it will be created from an RHCOS image plus the modifications you created earlier.
There are opportunities for modifying RHCOS before installation, during installation, and after the cluster is up and running.
2.3.2.1. Hardening before installation
For bare metal installations, you can add hardening features to RHCOS before beginning the OpenShift Container Platform installation. For example, you can add kernel options when you boot the RHCOS installer to turn security features on or off, such as SELinux booleans or various low-level settings, such as symmetric multithreading.
Although bare metal RHCOS installations are more difficult, they offer the opportunity of getting operating system changes in place before starting the OpenShift Container Platform installation. This can be important when you need to ensure that certain features, such as disk encryption or special networking settings, be set up at the earliest possible moment.
Disabling SELinux on RHCOS nodes is not supported.
2.3.2.2. Hardening during installation
You can interrupt the OpenShift Container Platform installation process and change Ignition configs. Through Ignition configs, you can add your own files and systemd services to the RHCOS nodes. You can also make some basic security-related changes to the install-config.yaml file used for installation. Contents added in this way are available at each node’s first boot.
2.3.2.3. Hardening after the cluster is running
After the OpenShift Container Platform cluster is up and running, there are several ways to apply hardening features to RHCOS:
-
Daemon set: If you need a service to run on every node, you can add that service with a Kubernetes
DaemonSetobject. -
Machine config:
MachineConfigobjects contain a subset of Ignition configs in the same format. By applying machine configs to all worker or control plane nodes, you can ensure that the next node of the same type that is added to the cluster has the same changes applied.
All of the features noted here are described in the OpenShift Container Platform product documentation.
2.4. Container image signatures
Red Hat delivers signatures for the images in the Red Hat Container Registries. Those signatures can be automatically verified when being pulled to OpenShift Container Platform 4 clusters by using the Machine Config Operator (MCO).
Quay.io serves most of the images that make up OpenShift Container Platform, and only the release image is signed. Release images refer to the approved OpenShift Container Platform images, offering a degree of protection against supply chain attacks. However, some extensions to OpenShift Container Platform, such as logging, monitoring, and service mesh, are shipped as Operators from the Operator Lifecycle Manager (OLM). Those images ship from the Red Hat Ecosystem Catalog Container images registry.
To verify the integrity of those images between Red Hat registries and your infrastructure, enable signature verification.
2.4.1. Enabling signature verification for Red Hat Container Registries
Enabling container signature validation for Red Hat Container Registries requires writing a signature verification policy file specifying the keys to verify images from these registries. For RHEL8 nodes, the registries are already defined in /etc/containers/registries.d by default.
Procedure
Create a Butane config file,
51-worker-rh-registry-trust.bu, containing the necessary configuration for the worker nodes.NoteSee "Creating machine configs with Butane" for information about Butane.
variant: openshift
version: 4.8.0
metadata:
  name: 51-worker-rh-registry-trust
  labels:
    machineconfiguration.openshift.io/role: worker
storage:
  files:
  - path: /etc/containers/policy.json
    mode: 0644
    overwrite: true
    contents:
      inline: |
        {
          "default": [
            {
              "type": "insecureAcceptAnything"
            }
          ],
          "transports": {
            "docker": {
              "registry.access.redhat.com": [
                {
                  "type": "signedBy",
                  "keyType": "GPGKeys",
                  "keyPath": "/etc/pki/rpm-gpg/RPM-GPG-KEY-redhat-release"
                }
              ],
              "registry.redhat.io": [
                {
                  "type": "signedBy",
                  "keyType": "GPGKeys",
                  "keyPath": "/etc/pki/rpm-gpg/RPM-GPG-KEY-redhat-release"
                }
              ]
            },
            "docker-daemon": {
              "": [
                {
                  "type": "insecureAcceptAnything"
                }
              ]
            }
          }
        }
Use Butane to generate a machine config YAML file,
51-worker-rh-registry-trust.yaml, containing the file to be written to disk on the worker nodes:$ butane 51-worker-rh-registry-trust.bu -o 51-worker-rh-registry-trust.yamlApply the created machine config:
$ oc apply -f 51-worker-rh-registry-trust.yamlCheck that the worker machine config pool has rolled out with the new machine config:
Check that the new machine config was created:
$ oc get mcSample output
NAME                                               GENERATEDBYCONTROLLER                      IGNITIONVERSION   AGE
00-master                                          a2178ad522c49ee330b0033bb5cb5ea132060b0a   3.2.0             25m
00-worker                                          a2178ad522c49ee330b0033bb5cb5ea132060b0a   3.2.0             25m
01-master-container-runtime                        a2178ad522c49ee330b0033bb5cb5ea132060b0a   3.2.0             25m
01-master-kubelet                                  a2178ad522c49ee330b0033bb5cb5ea132060b0a   3.2.0             25m
01-worker-container-runtime                        a2178ad522c49ee330b0033bb5cb5ea132060b0a   3.2.0             25m
01-worker-kubelet                                  a2178ad522c49ee330b0033bb5cb5ea132060b0a   3.2.0             25m
51-master-rh-registry-trust                                                                   3.2.0             13s
51-worker-rh-registry-trust                                                                   3.2.0             53s
1 99-master-generated-crio-seccomp-use-default 3.2.0 25m 99-master-generated-registries a2178ad522c49ee330b0033bb5cb5ea132060b0a 3.2.0 25m 99-master-ssh 3.2.0 28m 99-worker-generated-crio-seccomp-use-default 3.2.0 25m 99-worker-generated-registries a2178ad522c49ee330b0033bb5cb5ea132060b0a 3.2.0 25m 99-worker-ssh 3.2.0 28m rendered-master-af1e7ff78da0a9c851bab4be2777773b a2178ad522c49ee330b0033bb5cb5ea132060b0a 3.2.0 8s rendered-master-cd51fd0c47e91812bfef2765c52ec7e6 a2178ad522c49ee330b0033bb5cb5ea132060b0a 3.2.0 24m rendered-worker-2b52f75684fbc711bd1652dd86fd0b82 a2178ad522c49ee330b0033bb5cb5ea132060b0a 3.2.0 24m rendered-worker-be3b3bce4f4aa52a62902304bac9da3c a2178ad522c49ee330b0033bb5cb5ea132060b0a 3.2.0 48s2 Check that the worker machine config pool is updating with the new machine config:
$ oc get mcpSample output
NAME     CONFIG                                             UPDATED   UPDATING   DEGRADED   MACHINECOUNT   READYMACHINECOUNT   UPDATEDMACHINECOUNT   DEGRADEDMACHINECOUNT   AGE
master   rendered-master-af1e7ff78da0a9c851bab4be2777773b   True      False      False      3              3                   3                     0                      30m
worker   rendered-worker-be3b3bce4f4aa52a62902304bac9da3c   False     True       False      3              0                   0                     0                      30m
1 - 1
- When the
UPDATINGfield isTrue, the machine config pool is updating with the new machine config. When the field becomesFalse, the worker machine config pool has rolled out to the new machine config.
If your cluster uses any RHEL7 worker nodes, when the worker machine config pool is updated, create YAML files on those nodes in the
/etc/containers/registries.ddirectory, which specify the location of the detached signatures for a given registry server. The following example works only for images hosted inregistry.access.redhat.comandregistry.redhat.io.Start a debug session to each RHEL7 worker node:
$ oc debug node/<node_name>Change your root directory to
/host:sh-4.2# chroot /hostCreate a
/etc/containers/registries.d/registry.redhat.io.yamlfile that contains the following:docker: registry.redhat.io: sigstore: https://registry.redhat.io/containers/sigstoreCreate a
/etc/containers/registries.d/registry.access.redhat.com.yamlfile that contains the following:docker: registry.access.redhat.com: sigstore: https://access.redhat.com/webassets/docker/content/sigstore- Exit the debug session.
2.4.2. Verifying the signature verification configuration
After you apply the machine configs to the cluster, the Machine Config Controller detects the new MachineConfig object and generates a new rendered-worker-<hash> version.
Prerequisites
- You enabled signature verification by using a machine config file.
Procedure
On the command line, run the following command to display information about a desired worker:
$ oc describe machineconfigpool/workerExample output of initial worker monitoring
Name:         worker
Namespace:
Labels:       machineconfiguration.openshift.io/mco-built-in=
Annotations:  <none>
API Version:  machineconfiguration.openshift.io/v1
Kind:         MachineConfigPool
Metadata:
  Creation Timestamp:  2019-12-19T02:02:12Z
  Generation:          3
  Resource Version:    16229
  Self Link:           /apis/machineconfiguration.openshift.io/v1/machineconfigpools/worker
  UID:                 92697796-2203-11ea-b48c-fa163e3940e5
Spec:
  Configuration:
    Name:  rendered-worker-f6819366eb455a401c42f8d96ab25c02
    Source:
      API Version:  machineconfiguration.openshift.io/v1
      Kind:         MachineConfig
      Name:         00-worker
      API Version:  machineconfiguration.openshift.io/v1
      Kind:         MachineConfig
      Name:         01-worker-container-runtime
      API Version:  machineconfiguration.openshift.io/v1
      Kind:         MachineConfig
      Name:         01-worker-kubelet
      API Version:  machineconfiguration.openshift.io/v1
      Kind:         MachineConfig
      Name:         51-worker-rh-registry-trust
      API Version:  machineconfiguration.openshift.io/v1
      Kind:         MachineConfig
      Name:         99-worker-92697796-2203-11ea-b48c-fa163e3940e5-registries
      API Version:  machineconfiguration.openshift.io/v1
      Kind:         MachineConfig
      Name:         99-worker-ssh
  Machine Config Selector:
    Match Labels:
      machineconfiguration.openshift.io/role:  worker
  Node Selector:
    Match Labels:
      node-role.kubernetes.io/worker:
  Paused:                              false
Status:
  Conditions:
    Last Transition Time:  2019-12-19T02:03:27Z
    Message:
    Reason:
    Status:                False
    Type:                  RenderDegraded
    Last Transition Time:  2019-12-19T02:03:43Z
    Message:
    Reason:
    Status:                False
    Type:                  NodeDegraded
    Last Transition Time:  2019-12-19T02:03:43Z
    Message:
    Reason:
    Status:                False
    Type:                  Degraded
    Last Transition Time:  2019-12-19T02:28:23Z
    Message:
    Reason:
    Status:                False
    Type:                  Updated
    Last Transition Time:  2019-12-19T02:28:23Z
    Message:               All nodes are updating to rendered-worker-f6819366eb455a401c42f8d96ab25c02
    Reason:
    Status:                True
    Type:                  Updating
  Configuration:
    Name:  rendered-worker-d9b3f4ffcfd65c30dcf591a0e8cf9b2e
    Source:
      API Version:            machineconfiguration.openshift.io/v1
      Kind:                   MachineConfig
      Name:                   00-worker
      API Version:            machineconfiguration.openshift.io/v1
      Kind:                   MachineConfig
      Name:                   01-worker-container-runtime
      API Version:            machineconfiguration.openshift.io/v1
      Kind:                   MachineConfig
      Name:                   01-worker-kubelet
      API Version:            machineconfiguration.openshift.io/v1
      Kind:                   MachineConfig
      Name:                   99-worker-92697796-2203-11ea-b48c-fa163e3940e5-registries
      API Version:            machineconfiguration.openshift.io/v1
      Kind:                   MachineConfig
      Name:                   99-worker-ssh
  Degraded Machine Count:     0
  Machine Count:              1
  Observed Generation:        3
  Ready Machine Count:        0
  Unavailable Machine Count:  1
  Updated Machine Count:      0
Events:                       <none>
Run the
oc describecommand again:$ oc describe machineconfigpool/workerExample output after the worker is updated
... Last Transition Time: 2019-12-19T04:53:09Z Message: All nodes are updated with rendered-worker-f6819366eb455a401c42f8d96ab25c02 Reason: Status: True Type: Updated Last Transition Time: 2019-12-19T04:53:09Z Message: Reason: Status: False Type: Updating Configuration: Name: rendered-worker-f6819366eb455a401c42f8d96ab25c02 Source: API Version: machineconfiguration.openshift.io/v1 Kind: MachineConfig Name: 00-worker API Version: machineconfiguration.openshift.io/v1 Kind: MachineConfig Name: 01-worker-container-runtime API Version: machineconfiguration.openshift.io/v1 Kind: MachineConfig Name: 01-worker-kubelet API Version: machineconfiguration.openshift.io/v1 Kind: MachineConfig Name: 51-worker-rh-registry-trust API Version: machineconfiguration.openshift.io/v1 Kind: MachineConfig Name: 99-worker-92697796-2203-11ea-b48c-fa163e3940e5-registries API Version: machineconfiguration.openshift.io/v1 Kind: MachineConfig Name: 99-worker-ssh Degraded Machine Count: 0 Machine Count: 3 Observed Generation: 4 Ready Machine Count: 3 Unavailable Machine Count: 0 Updated Machine Count: 3 ...NoteThe
Observed Generationparameter shows an increased count based on the generation of the controller-produced configuration. This controller updates this value even if it fails to process the specification and generate a revision. TheConfiguration Sourcevalue points to the51-worker-rh-registry-trustconfiguration.Confirm that the
policy.jsonfile exists with the following command:$ oc debug node/<node> -- chroot /host cat /etc/containers/policy.jsonExample output
Starting pod/<node>-debug ...
To use host binaries, run `chroot /host`
{
  "default": [
    {
      "type": "insecureAcceptAnything"
    }
  ],
  "transports": {
    "docker": {
      "registry.access.redhat.com": [
        {
          "type": "signedBy",
          "keyType": "GPGKeys",
          "keyPath": "/etc/pki/rpm-gpg/RPM-GPG-KEY-redhat-release"
        }
      ],
      "registry.redhat.io": [
        {
          "type": "signedBy",
          "keyType": "GPGKeys",
          "keyPath": "/etc/pki/rpm-gpg/RPM-GPG-KEY-redhat-release"
        }
      ]
    },
    "docker-daemon": {
      "": [
        {
          "type": "insecureAcceptAnything"
        }
      ]
    }
  }
}
Confirm that the
registry.redhat.io.yamlfile exists with the following command:$ oc debug node/<node> -- chroot /host cat /etc/containers/registries.d/registry.redhat.io.yamlExample output
Starting pod/<node>-debug ...
To use host binaries, run `chroot /host`
docker:
     registry.redhat.io:
         sigstore: https://registry.redhat.io/containers/sigstore
Confirm that the
registry.access.redhat.com.yamlfile exists with the following command:$ oc debug node/<node> -- chroot /host cat /etc/containers/registries.d/registry.access.redhat.com.yamlExample output
Starting pod/<node>-debug ...
To use host binaries, run `chroot /host`
docker:
     registry.access.redhat.com:
         sigstore: https://access.redhat.com/webassets/docker/content/sigstore
2.5. Understanding compliance
For many OpenShift Container Platform customers, regulatory readiness, or compliance, on some level is required before any systems can be put into production. That regulatory readiness can be imposed by national standards, industry standards or the organization’s corporate governance framework.
2.5.1. Understanding compliance and risk management
FIPS compliance is one of the most critical components required in highly secure environments, to ensure that only supported cryptographic technologies are allowed on nodes.
The use of FIPS Validated / Modules in Process cryptographic libraries is only supported on OpenShift Container Platform deployments on the x86_64 architecture.
To understand Red Hat’s view of OpenShift Container Platform compliance frameworks, refer to the Risk Management and Regulatory Readiness chapter of the OpenShift Security Guide Book.
2.6. Securing container content
To ensure the security of the content inside your containers you need to start with trusted base images, such as Red Hat Universal Base Images, and add trusted software. To check the ongoing security of your container images, there are both Red Hat and third-party tools for scanning images.
2.6.1. Securing inside the container
Applications and infrastructures are composed of readily available components, many of which are open source packages such as, the Linux operating system, JBoss Web Server, PostgreSQL, and Node.js.
Containerized versions of these packages are also available. However, you need to know where the packages originally came from, what versions are used, who built them, and whether there is any malicious code inside them.
Some questions to answer include:
- Will what is inside the containers compromise your infrastructure?
- Are there known vulnerabilities in the application layer?
- Are the runtime and operating system layers current?
By building your containers from Red Hat Universal Base Images (UBI) you are assured of a foundation for your container images that consists of the same RPM-packaged software that is included in Red Hat Enterprise Linux. No subscriptions are required to either use or redistribute UBI images.
To assure ongoing security of the containers themselves, security scanning features, used directly from RHEL or added to OpenShift Container Platform, can alert you when an image you are using has vulnerabilities. OpenSCAP image scanning is available in RHEL and the Red Hat Quay Container Security Operator can be added to check container images used in OpenShift Container Platform.
2.6.2. Creating redistributable images with UBI
To create containerized applications, you typically start with a trusted base image that offers the components that are usually provided by the operating system. These include the libraries, utilities, and other features the application expects to see in the operating system’s file system.
Red Hat Universal Base Images (UBI) were created to encourage anyone building their own containers to start with one that is made entirely from Red Hat Enterprise Linux rpm packages and other content. These UBI images are updated regularly to keep up with security patches and free to use and redistribute with container images built to include your own software.
Search the Red Hat Ecosystem Catalog to both find and check the health of different UBI images. As someone creating secure container images, you might be interested in these two general types of UBI images:
-
UBI: There are standard UBI images for RHEL 7 and 8 (
ubi7/ubiandubi8/ubi), as well as minimal images based on those systems (ubi7/ubi-minimalandubi8/ubi-mimimal). All of these images are preconfigured to point to free repositories of RHEL software that you can add to the container images you build, using standardyumanddnfcommands. Red Hat encourages people to use these images on other distributions, such as Fedora and Ubuntu. -
Red Hat Software Collections: Search the Red Hat Ecosystem Catalog for
rhscl/to find images created to use as base images for specific types of applications. For example, there are Apache httpd (rhscl/httpd-*), Python (rhscl/python-*), Ruby (rhscl/ruby-*), Node.js (rhscl/nodejs-*) and Perl (rhscl/perl-*) rhscl images.
Keep in mind that while UBI images are freely available and redistributable, Red Hat support for these images is only available through Red Hat product subscriptions.
See Using Red Hat Universal Base Images in the Red Hat Enterprise Linux documentation for information on how to use and build on standard, minimal and init UBI images.
2.6.3. Security scanning in RHEL
For Red Hat Enterprise Linux (RHEL) systems, OpenSCAP scanning is available from the openscap-utils package. In RHEL, you can use the openscap-podman command to scan images for vulnerabilities. See Scanning containers and container images for vulnerabilities in the Red Hat Enterprise Linux documentation.
OpenShift Container Platform enables you to leverage RHEL scanners with your CI/CD process. For example, you can integrate static code analysis tools that test for security flaws in your source code and software composition analysis tools that identify open source libraries to provide metadata on those libraries such as known vulnerabilities.
2.6.3.1. Scanning OpenShift images
For the container images that are running in OpenShift Container Platform and are pulled from Red Hat Quay registries, you can use an Operator to list the vulnerabilities of those images. The Red Hat Quay Container Security Operator can be added to OpenShift Container Platform to provide vulnerability reporting for images added to selected namespaces.
Container image scanning for Red Hat Quay is performed by the Clair security scanner. In Red Hat Quay, Clair can search for and report vulnerabilities in images built from RHEL, CentOS, Oracle, Alpine, Debian, and Ubuntu operating system software.
2.6.4. Integrating external scanning
OpenShift Container Platform makes use of object annotations to extend functionality. External tools, such as vulnerability scanners, can annotate image objects with metadata to summarize results and control pod execution. This section describes the recognized format of this annotation so it can be reliably used in consoles to display useful data to users.
2.6.4.1. Image metadata
There are different types of image quality data, including package vulnerabilities and open source software (OSS) license compliance. Additionally, there may be more than one provider of this metadata. To that end, the following annotation format has been reserved:
quality.images.openshift.io/<qualityType>.<providerId>: {}| Component | Description | Acceptable values |
|---|---|---|
|
| Metadata type |
|
|
| Provider ID string |
|
2.6.4.1.1. Example annotation keys
quality.images.openshift.io/vulnerability.blackduck: {}
quality.images.openshift.io/vulnerability.jfrog: {}
quality.images.openshift.io/license.blackduck: {}
quality.images.openshift.io/vulnerability.openscap: {}
The value of the image quality annotation is structured data that must adhere to the following format:
| Field | Required? | Description | Type |
|---|---|---|---|
|
| Yes | Provider display name | String |
|
| Yes | Scan timestamp | String |
|
| No | Short description | String |
|
| Yes | URL of information source or more details. Required so user may validate the data. | String |
|
| No | Scanner version | String |
|
| No | Compliance pass or fail | Boolean |
|
| No | Summary of issues found | List (see table below) |
The summary field must adhere to the following format:
| Field | Description | Type |
|---|---|---|
|
| Display label for component (for example, "critical," "important," "moderate," "low," or "health") | String |
|
| Data for this component (for example, count of vulnerabilities found or score) | String |
|
|
Component index allowing for ordering and assigning graphical representation. The value is range | Integer |
|
| URL of information source or more details. Optional. | String |
2.6.4.1.2. Example annotation values
This example shows an OpenSCAP annotation for an image with vulnerability summary data and a compliance boolean:
OpenSCAP annotation
{
  "name": "OpenSCAP",
  "description": "OpenSCAP vulnerability score",
  "timestamp": "2016-09-08T05:04:46Z",
  "reference": "https://www.open-scap.org/930492",
  "compliant": true,
  "scannerVersion": "1.2",
  "summary": [
    { "label": "critical", "data": "4", "severityIndex": 3, "reference": null },
    { "label": "important", "data": "12", "severityIndex": 2, "reference": null },
    { "label": "moderate", "data": "8", "severityIndex": 1, "reference": null },
    { "label": "low", "data": "26", "severityIndex": 0, "reference": null }
  ]
}
This example shows the Container images section of the Red Hat Ecosystem Catalog annotation for an image with health index data with an external URL for additional details:
Red Hat Ecosystem Catalog annotation
{
  "name": "Red Hat Ecosystem Catalog",
  "description": "Container health index",
  "timestamp": "2016-09-08T05:04:46Z",
  "reference": "https://access.redhat.com/errata/RHBA-2016:1566",
  "compliant": null,
  "scannerVersion": "1.2",
  "summary": [
    { "label": "Health index", "data": "B", "severityIndex": 1, "reference": null }
  ]
}
2.6.4.2. Annotating image objects
While image stream objects are what an end user of OpenShift Container Platform operates against, image objects are annotated with security metadata. Image objects are cluster-scoped, pointing to a single image that may be referenced by many image streams and tags.
2.6.4.2.1. Example annotate CLI command
Replace <image> with an image digest, for example sha256:401e359e0f45bfdcf004e258b72e253fd07fba8cc5c6f2ed4f4608fb119ecc2:
$ oc annotate image <image> \
    quality.images.openshift.io/vulnerability.redhatcatalog='{ \
    "name": "Red Hat Ecosystem Catalog", \
    "description": "Container health index", \
    "timestamp": "2020-06-01T05:04:46Z", \
    "compliant": null, \
    "scannerVersion": "1.2", \
    "reference": "https://access.redhat.com/errata/RHBA-2020:2347", \
    "summary": "[ \
      { "label": "Health index", "data": "B", "severityIndex": 1, "reference": null } ]" }'
2.6.4.3. Controlling pod execution
Use the images.openshift.io/deny-execution image policy to programmatically control if an image can be run.
2.6.4.3.1. Example annotation
annotations:
  images.openshift.io/deny-execution: true
2.6.4.4. Integration reference
In most cases, external tools such as vulnerability scanners develop a script or plugin that watches for image updates, performs scanning, and annotates the associated image object with the results. Typically this automation calls the OpenShift Container Platform 4.8 REST APIs to write the annotation. See OpenShift Container Platform REST APIs for general information on the REST APIs.
2.6.4.4.1. Example REST API call
The following example call using curl overrides the value of the annotation. Be sure to replace the values for <token>, <openshift_server>, <image_id>, and <image_annotation>.
Patch API call
$ curl -X PATCH \
  -H "Authorization: Bearer <token>" \
  -H "Content-Type: application/merge-patch+json" \
  https://<openshift_server>:6443/apis/image.openshift.io/v1/images/<image_id> \
  --data '{ <image_annotation> }'
The following is an example of PATCH payload data:
Patch call data
{
"metadata": {
  "annotations": {
    "quality.images.openshift.io/vulnerability.redhatcatalog":
       "{ 'name': 'Red Hat Ecosystem Catalog', 'description': 'Container health index', 'timestamp': '2020-06-01T05:04:46Z', 'compliant': null, 'reference': 'https://access.redhat.com/errata/RHBA-2020:2347', 'summary': [{'label': 'Health index', 'data': '4', 'severityIndex': 1, 'reference': null}] }"
    }
  }
}2.7. Using container registries securely
Container registries store container images to:
- Make images accessible to others
- Organize images into repositories that can include multiple versions of an image
- Optionally limit access to images, based on different authentication methods, or make them publicly available
There are public container registries, such as Quay.io and Docker Hub where many people and organizations share their images. The Red Hat Registry offers supported Red Hat and partner images, while the Red Hat Ecosystem Catalog offers detailed descriptions and health checks for those images. To manage your own registry, you could purchase a container registry such as Red Hat Quay.
From a security standpoint, some registries provide special features to check and improve the health of your containers. For example, Red Hat Quay offers container vulnerability scanning with Clair security scanner, build triggers to automatically rebuild images when source code changes in GitHub and other locations, and the ability to use role-based access control (RBAC) to secure access to images.
2.7.1. Knowing where containers come from?
There are tools you can use to scan and track the contents of your downloaded and deployed container images. However, there are many public sources of container images. When using public container registries, you can add a layer of protection by using trusted sources.
2.7.2. Immutable and certified containers
Consuming security updates is particularly important when managing immutable containers. Immutable containers are containers that will never be changed while running. When you deploy immutable containers, you do not step into the running container to replace one or more binaries. From an operational standpoint, you rebuild and redeploy an updated container image to replace a container instead of changing it.
Red Hat certified images are:
- Free of known vulnerabilities in the platform components or layers
- Compatible across the RHEL platforms, from bare metal to cloud
- Supported by Red Hat
The list of known vulnerabilities is constantly evolving, so you must track the contents of your deployed container images, as well as newly downloaded images, over time. You can use Red Hat Security Advisories (RHSAs) to alert you to any newly discovered issues in Red Hat certified container images, and direct you to the updated image. Alternatively, you can go to the Red Hat Ecosystem Catalog to look up that and other security-related issues for each Red Hat image.
2.7.3. Getting containers from Red Hat Registry and Ecosystem Catalog
Red Hat lists certified container images for Red Hat products and partner offerings from the Container Images section of the Red Hat Ecosystem Catalog. From that catalog, you can see details of each image, including CVE, software packages listings, and health scores.
Red Hat images are actually stored in what is referred to as the Red Hat Registry, which is represented by a public container registry (registry.access.redhat.com) and an authenticated registry (registry.redhat.io). Both include basically the same set of container images, with registry.redhat.io including some additional images that require authentication with Red Hat subscription credentials.
Container content is monitored for vulnerabilities by Red Hat and updated regularly. When Red Hat releases security updates, such as fixes to glibc, DROWN, or Dirty Cow, any affected container images are also rebuilt and pushed to the Red Hat Registry.
Red Hat uses a health index to reflect the security risk for each container provided through the Red Hat Ecosystem Catalog. Because containers consume software provided by Red Hat and the errata process, old, stale containers are insecure whereas new, fresh containers are more secure.
To illustrate the age of containers, the Red Hat Ecosystem Catalog uses a grading system. A freshness grade is a measure of the oldest and most severe security errata available for an image. "A" is more up to date than "F". See Container Health Index grades as used inside the Red Hat Ecosystem Catalog for more details on this grading system.
See the Red Hat Product Security Center for details on security updates and vulnerabilities related to Red Hat software. Check out Red Hat Security Advisories to search for specific advisories and CVEs.
2.7.4. OpenShift Container Registry
OpenShift Container Platform includes the OpenShift Container Registry, a private registry running as an integrated component of the platform that you can use to manage your container images. The OpenShift Container Registry provides role-based access controls that allow you to manage who can pull and push which container images.
OpenShift Container Platform also supports integration with other private registries that you might already be using, such as Red Hat Quay.
2.7.5. Storing containers using Red Hat Quay
Red Hat Quay is an enterprise-quality container registry product from Red Hat. Development for Red Hat Quay is done through the upstream Project Quay. Red Hat Quay is available to deploy on-premise or through the hosted version of Red Hat Quay at Quay.io.
Security-related features of Red Hat Quay include:
- Time machine: Allows images with older tags to expire after a set period of time or based on a user-selected expiration time.
- Repository mirroring: Lets you mirror other registries for security reasons, such hosting a public repository on Red Hat Quay behind a company firewall, or for performance reasons, to keep registries closer to where they are used.
- Action log storage: Save Red Hat Quay logging output to Elasticsearch storage to allow for later search and analysis.
- Clair security scanning: Scan images against a variety of Linux vulnerability databases, based on the origins of each container image.
- Internal authentication: Use the default local database to handle RBAC authentication to Red Hat Quay or choose from LDAP, Keystone (OpenStack), JWT Custom Authentication, or External Application Token authentication.
- External authorization (OAuth): Allow authorization to Red Hat Quay from GitHub, GitHub Enterprise, or Google Authentication.
- Access settings: Generate tokens to allow access to Red Hat Quay from docker, rkt, anonymous access, user-created accounts, encrypted client passwords, or prefix username autocompletion.
Ongoing integration of Red Hat Quay with OpenShift Container Platform continues, with several OpenShift Container Platform Operators of particular interest. The Quay Bridge Operator lets you replace the internal OpenShift Container Platform registry with Red Hat Quay. The Quay Red Hat Quay Container Security Operator lets you check vulnerabilities of images running in OpenShift Container Platform that were pulled from Red Hat Quay registries.
2.8. Securing the build process
In a container environment, the software build process is the stage in the life cycle where application code is integrated with the required runtime libraries. Managing this build process is key to securing the software stack.
2.8.1. Building once, deploying everywhere
Using OpenShift Container Platform as the standard platform for container builds enables you to guarantee the security of the build environment. Adhering to a "build once, deploy everywhere" philosophy ensures that the product of the build process is exactly what is deployed in production.
It is also important to maintain the immutability of your containers. You should not patch running containers, but rebuild and redeploy them.
As your software moves through the stages of building, testing, and production, it is important that the tools making up your software supply chain be trusted. The following figure illustrates the process and tools that could be incorporated into a trusted software supply chain for containerized software:
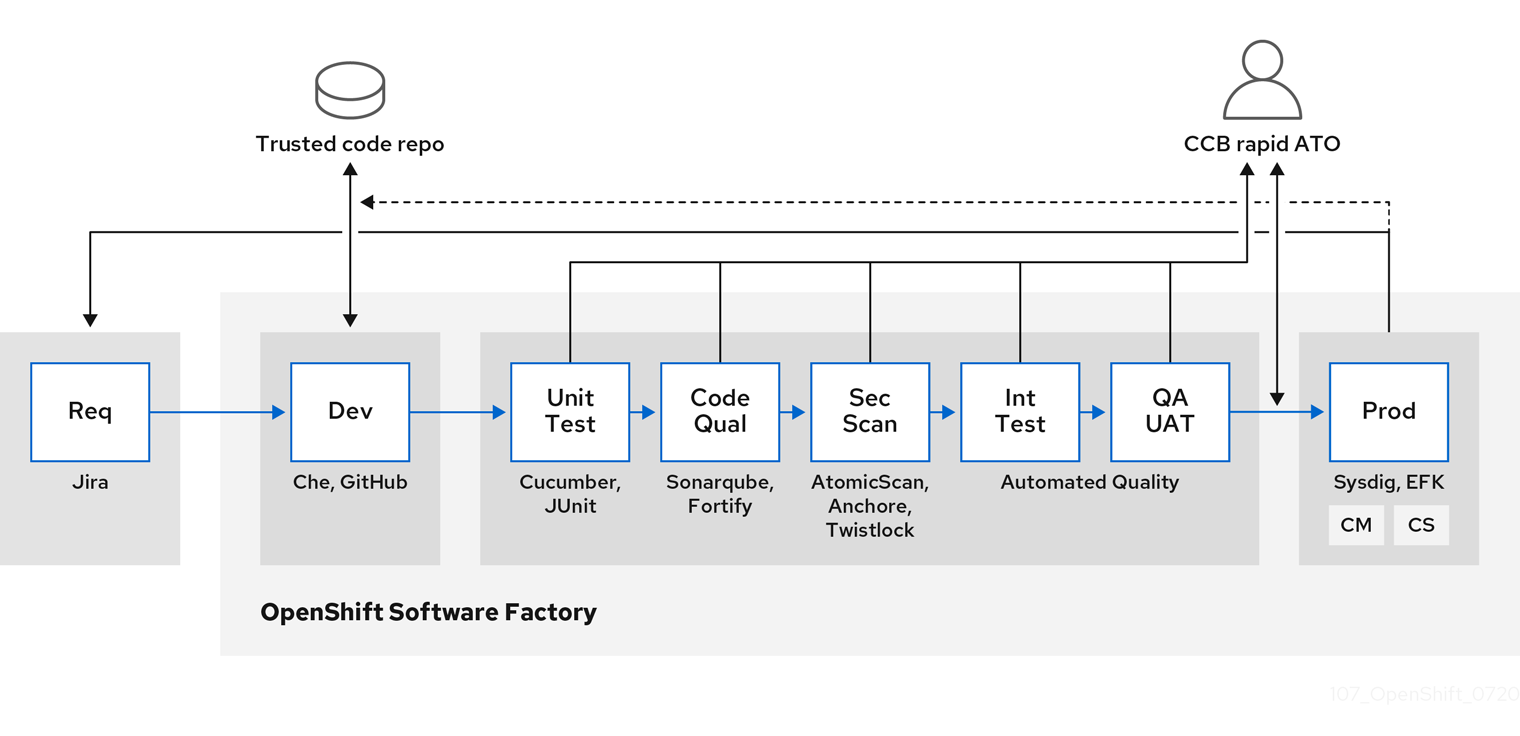
OpenShift Container Platform can be integrated with trusted code repositories (such as GitHub) and development platforms (such as Che) for creating and managing secure code. Unit testing could rely on Cucumber and JUnit. You could inspect your containers for vulnerabilities and compliance issues with Anchore or Twistlock, and use image scanning tools such as AtomicScan or Clair. Tools such as Sysdig could provide ongoing monitoring of your containerized applications.
2.8.2. Managing builds
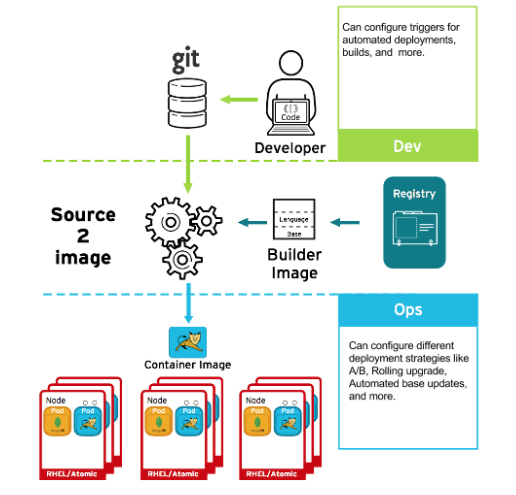
You can use Source-to-Image (S2I) to combine source code and base images. Builder images make use of S2I to enable your development and operations teams to collaborate on a reproducible build environment. With Red Hat S2I images available as Universal Base Image (UBI) images, you can now freely redistribute your software with base images built from real RHEL RPM packages. Red Hat has removed subscription restrictions to allow this.
When developers commit code with Git for an application using build images, OpenShift Container Platform can perform the following functions:
- Trigger, either by using webhooks on the code repository or other automated continuous integration (CI) process, to automatically assemble a new image from available artifacts, the S2I builder image, and the newly committed code.
- Automatically deploy the newly built image for testing.
- Promote the tested image to production where it can be automatically deployed using a CI process.
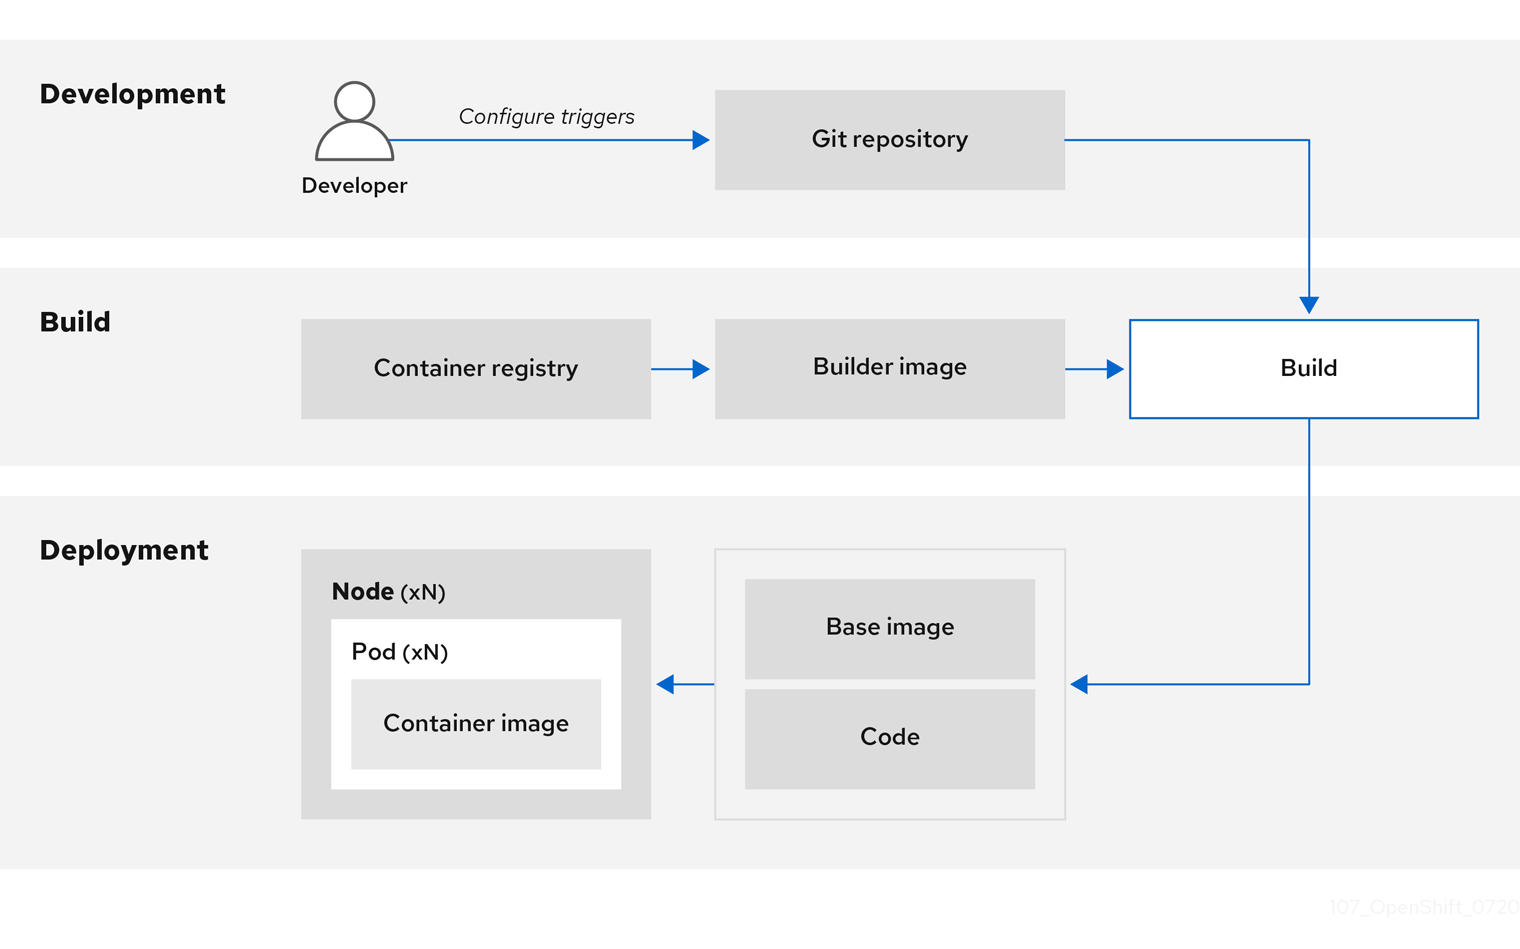
You can use the integrated OpenShift Container Registry to manage access to final images. Both S2I and native build images are automatically pushed to your OpenShift Container Registry.
In addition to the included Jenkins for CI, you can also integrate your own build and CI environment with OpenShift Container Platform using RESTful APIs, as well as use any API-compliant image registry.
2.8.3. Securing inputs during builds
In some scenarios, build operations require credentials to access dependent resources, but it is undesirable for those credentials to be available in the final application image produced by the build. You can define input secrets for this purpose.
For example, when building a Node.js application, you can set up your private mirror for Node.js modules. To download modules from that private mirror, you must supply a custom .npmrc file for the build that contains a URL, user name, and password. For security reasons, you do not want to expose your credentials in the application image.
Using this example scenario, you can add an input secret to a new BuildConfig object:
Create the secret, if it does not exist:
$ oc create secret generic secret-npmrc --from-file=.npmrc=~/.npmrcThis creates a new secret named
secret-npmrc, which contains the base64 encoded content of the~/.npmrcfile.Add the secret to the
sourcesection in the existingBuildConfigobject:source: git: uri: https://github.com/sclorg/nodejs-ex.git secrets: - destinationDir: . secret: name: secret-npmrcTo include the secret in a new
BuildConfigobject, run the following command:$ oc new-build \ openshift/nodejs-010-centos7~https://github.com/sclorg/nodejs-ex.git \ --build-secret secret-npmrc
2.8.4. Designing your build process
You can design your container image management and build process to use container layers so that you can separate control.
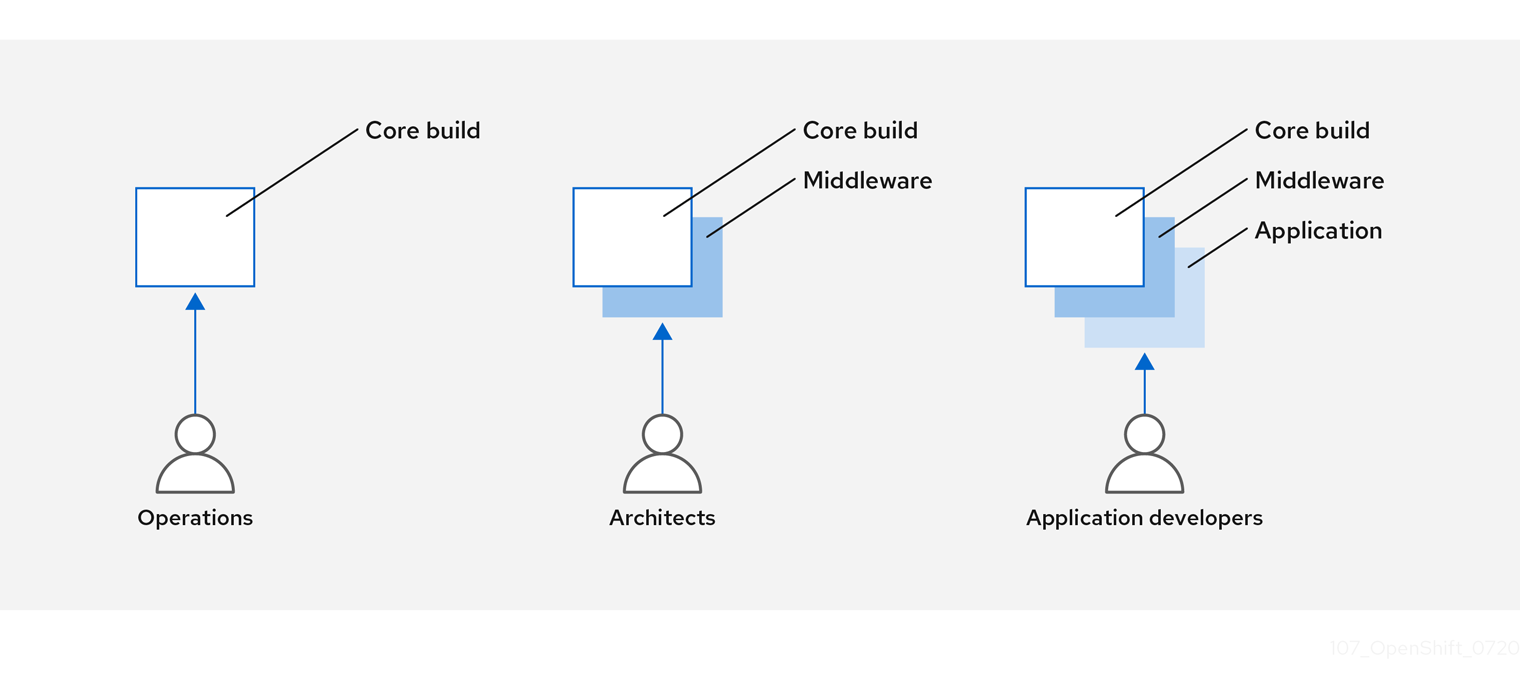
For example, an operations team manages base images, while architects manage middleware, runtimes, databases, and other solutions. Developers can then focus on application layers and focus on writing code.
Because new vulnerabilities are identified daily, you need to proactively check container content over time. To do this, you should integrate automated security testing into your build or CI process. For example:
- SAST / DAST – Static and Dynamic security testing tools.
- Scanners for real-time checking against known vulnerabilities. Tools like these catalog the open source packages in your container, notify you of any known vulnerabilities, and update you when new vulnerabilities are discovered in previously scanned packages.
Your CI process should include policies that flag builds with issues discovered by security scans so that your team can take appropriate action to address those issues. You should sign your custom built containers to ensure that nothing is tampered with between build and deployment.
Using GitOps methodology, you can use the same CI/CD mechanisms to manage not only your application configurations, but also your OpenShift Container Platform infrastructure.
2.8.5. Building Knative serverless applications
Relying on Kubernetes and Kourier, you can build, deploy, and manage serverless applications by using OpenShift Serverless in OpenShift Container Platform.
As with other builds, you can use S2I images to build your containers, then serve them using Knative services. View Knative application builds through the Topology view of the OpenShift Container Platform web console.
2.9. Deploying containers
You can use a variety of techniques to make sure that the containers you deploy hold the latest production-quality content and that they have not been tampered with. These techniques include setting up build triggers to incorporate the latest code and using signatures to ensure that the container comes from a trusted source and has not been modified.
2.9.1. Controlling container deployments with triggers
If something happens during the build process, or if a vulnerability is discovered after an image has been deployed, you can use tooling for automated, policy-based deployment to remediate. You can use triggers to rebuild and replace images, ensuring the immutable containers process, instead of patching running containers, which is not recommended.
For example, you build an application using three container image layers: core, middleware, and applications. An issue is discovered in the core image and that image is rebuilt. After the build is complete, the image is pushed to your OpenShift Container Registry. OpenShift Container Platform detects that the image has changed and automatically rebuilds and deploys the application image, based on the defined triggers. This change incorporates the fixed libraries and ensures that the production code is identical to the most current image.
You can use the oc set triggers command to set a deployment trigger. For example, to set a trigger for a deployment called deployment-example:
$ oc set triggers deploy/deployment-example \
    --from-image=example:latest \
    --containers=web
2.9.2. Controlling what image sources can be deployed
It is important that the intended images are actually being deployed, that the images including the contained content are from trusted sources, and they have not been altered. Cryptographic signing provides this assurance. OpenShift Container Platform enables cluster administrators to apply security policy that is broad or narrow, reflecting deployment environment and security requirements. Two parameters define this policy:
- one or more registries, with optional project namespace
- trust type, such as accept, reject, or require public key(s)
You can use these policy parameters to allow, deny, or require a trust relationship for entire registries, parts of registries, or individual images. Using trusted public keys, you can ensure that the source is cryptographically verified. The policy rules apply to nodes. Policy may be applied uniformly across all nodes or targeted for different node workloads (for example, build, zone, or environment).
Example image signature policy file
{
    "default": [{"type": "reject"}],
    "transports": {
        "docker": {
            "access.redhat.com": [
                {
                    "type": "signedBy",
                    "keyType": "GPGKeys",
                    "keyPath": "/etc/pki/rpm-gpg/RPM-GPG-KEY-redhat-release"
                }
            ]
        },
        "atomic": {
            "172.30.1.1:5000/openshift": [
                {
                    "type": "signedBy",
                    "keyType": "GPGKeys",
                    "keyPath": "/etc/pki/rpm-gpg/RPM-GPG-KEY-redhat-release"
                }
            ],
            "172.30.1.1:5000/production": [
                {
                    "type": "signedBy",
                    "keyType": "GPGKeys",
                    "keyPath": "/etc/pki/example.com/pubkey"
                }
            ],
            "172.30.1.1:5000": [{"type": "reject"}]
        }
    }
}
The policy can be saved onto a node as /etc/containers/policy.json. Saving this file to a node is best accomplished using a new MachineConfig object. This example enforces the following rules:
-
Require images from the Red Hat Registry (
registry.access.redhat.com) to be signed by the Red Hat public key. -
Require images from your OpenShift Container Registry in the
openshiftnamespace to be signed by the Red Hat public key. -
Require images from your OpenShift Container Registry in the
productionnamespace to be signed by the public key forexample.com. -
Reject all other registries not specified by the global
defaultdefinition.
2.9.3. Using signature transports
A signature transport is a way to store and retrieve the binary signature blob. There are two types of signature transports.
-
atomic: Managed by the OpenShift Container Platform API. -
docker: Served as a local file or by a web server.
The OpenShift Container Platform API manages signatures that use the atomic transport type. You must store the images that use this signature type in your OpenShift Container Registry. Because the docker/distribution extensions API auto-discovers the image signature endpoint, no additional configuration is required.
Signatures that use the docker transport type are served by local file or web server. These signatures are more flexible; you can serve images from any container image registry and use an independent server to deliver binary signatures.
However, the docker transport type requires additional configuration. You must configure the nodes with the URI of the signature server by placing arbitrarily-named YAML files into a directory on the host system, /etc/containers/registries.d by default. The YAML configuration files contain a registry URI and a signature server URI, or sigstore:
Example registries.d file
docker:
    access.redhat.com:
        sigstore: https://access.redhat.com/webassets/docker/content/sigstore
In this example, the Red Hat Registry, access.redhat.com, is the signature server that provides signatures for the docker transport type. Its URI is defined in the sigstore parameter. You might name this file /etc/containers/registries.d/redhat.com.yaml and use the Machine Config Operator to automatically place the file on each node in your cluster. No service restart is required since policy and registries.d files are dynamically loaded by the container runtime.
2.9.4. Creating secrets and config maps
The Secret object type provides a mechanism to hold sensitive information such as passwords, OpenShift Container Platform client configuration files, dockercfg files, and private source repository credentials. Secrets decouple sensitive content from pods. You can mount secrets into containers using a volume plugin or the system can use secrets to perform actions on behalf of a pod.
For example, to add a secret to your deployment configuration so that it can access a private image repository, do the following:
Procedure
- Log in to the OpenShift Container Platform web console.
- Create a new project.
-
Navigate to Resources → Secrets and create a new secret. Set
Secret TypetoImage SecretandAuthentication TypetoImage Registry Credentialsto enter credentials for accessing a private image repository. -
When creating a deployment configuration (for example, from the Add to Project → Deploy Image page), set the
Pull Secretto your new secret.
Config maps are similar to secrets, but are designed to support working with strings that do not contain sensitive information. The ConfigMap object holds key-value pairs of configuration data that can be consumed in pods or used to store configuration data for system components such as controllers.
2.9.5. Automating continuous deployment
You can integrate your own continuous deployment (CD) tooling with OpenShift Container Platform.
By leveraging CI/CD and OpenShift Container Platform, you can automate the process of rebuilding the application to incorporate the latest fixes, testing, and ensuring that it is deployed everywhere within the environment.
2.10. Securing the container platform
OpenShift Container Platform and Kubernetes APIs are key to automating container management at scale. APIs are used to:
- Validate and configure the data for pods, services, and replication controllers.
- Perform project validation on incoming requests and invoke triggers on other major system components.
Security-related features in OpenShift Container Platform that are based on Kubernetes include:
- Multitenancy, which combines Role-Based Access Controls and network policies to isolate containers at multiple levels.
- Admission plugins, which form boundaries between an API and those making requests to the API.
OpenShift Container Platform uses Operators to automate and simplify the management of Kubernetes-level security features.
2.10.1. Isolating containers with multitenancy
Multitenancy allows applications on an OpenShift Container Platform cluster that are owned by multiple users, and run across multiple hosts and namespaces, to remain isolated from each other and from outside attacks. You obtain multitenancy by applying role-based access control (RBAC) to Kubernetes namespaces.
In Kubernetes, namespaces are areas where applications can run in ways that are separate from other applications. OpenShift Container Platform uses and extends namespaces by adding extra annotations, including MCS labeling in SELinux, and identifying these extended namespaces as projects. Within the scope of a project, users can maintain their own cluster resources, including service accounts, policies, constraints, and various other objects.
RBAC objects are assigned to projects to authorize selected users to have access to those projects. That authorization takes the form of rules, roles, and bindings:
- Rules define what a user can create or access in a project.
- Roles are collections of rules that you can bind to selected users or groups.
- Bindings define the association between users or groups and roles.
Local RBAC roles and bindings attach a user or group to a particular project. Cluster RBAC can attach cluster-wide roles and bindings to all projects in a cluster. There are default cluster roles that can be assigned to provide admin, basic-user, cluster-admin, and cluster-status access.
2.10.2. Protecting control plane with admission plugins
While RBAC controls access rules between users and groups and available projects, admission plugins define access to the OpenShift Container Platform master API. Admission plugins form a chain of rules that consist of:
- Default admissions plugins: These implement a default set of policies and resources limits that are applied to components of the OpenShift Container Platform control plane.
- Mutating admission plugins: These plugins dynamically extend the admission chain. They call out to a webhook server and can both authenticate a request and modify the selected resource.
- Validating admission plugins: These validate requests for a selected resource and can both validate the request and ensure that the resource does not change again.
API requests go through admissions plugins in a chain, with any failure along the way causing the request to be rejected. Each admission plugin is associated with particular resources and only responds to requests for those resources.
2.10.2.1. Security context constraints (SCCs)
You can use security context constraints (SCCs) to define a set of conditions that a pod must run with to be accepted into the system.
Some aspects that can be managed by SCCs include:
- Running of privileged containers
- Capabilities a container can request to be added
- Use of host directories as volumes
- SELinux context of the container
- Container user ID
If you have the required permissions, you can adjust the default SCC policies to be more permissive, if required.
2.10.2.2. Granting roles to service accounts
You can assign roles to service accounts, in the same way that users are assigned role-based access. There are three default service accounts created for each project. A service account:
- is limited in scope to a particular project
- derives its name from its project
- is automatically assigned an API token and credentials to access the OpenShift Container Registry
Service accounts associated with platform components automatically have their keys rotated.
2.10.3. Authentication and authorization
2.10.3.1. Controlling access using OAuth
You can use API access control via authentication and authorization for securing your container platform. The OpenShift Container Platform master includes a built-in OAuth server. Users can obtain OAuth access tokens to authenticate themselves to the API.
As an administrator, you can configure OAuth to authenticate using an identity provider, such as LDAP, GitHub, or Google. The identity provider is used by default for new OpenShift Container Platform deployments, but you can configure this at initial installation time or post-installation.
2.10.3.2. API access control and management
Applications can have multiple, independent API services which have different endpoints that require management. OpenShift Container Platform includes a containerized version of the 3scale API gateway so that you can manage your APIs and control access.
3scale gives you a variety of standard options for API authentication and security, which can be used alone or in combination to issue credentials and control access: standard API keys, application ID and key pair, and OAuth 2.0.
You can restrict access to specific endpoints, methods, and services and apply access policy for groups of users. Application plans allow you to set rate limits for API usage and control traffic flow for groups of developers.
For a tutorial on using APIcast v2, the containerized 3scale API Gateway, see Running APIcast on Red Hat OpenShift in the 3scale documentation.
2.10.3.3. Red Hat Single Sign-On
The Red Hat Single Sign-On server enables you to secure your applications by providing web single sign-on capabilities based on standards, including SAML 2.0, OpenID Connect, and OAuth 2.0. The server can act as a SAML or OpenID Connect–based identity provider (IdP), mediating with your enterprise user directory or third-party identity provider for identity information and your applications using standards-based tokens. You can integrate Red Hat Single Sign-On with LDAP-based directory services including Microsoft Active Directory and Red Hat Enterprise Linux Identity Management.
2.10.3.4. Secure self-service web console
OpenShift Container Platform provides a self-service web console to ensure that teams do not access other environments without authorization. OpenShift Container Platform ensures a secure multitenant master by providing the following:
- Access to the master uses Transport Layer Security (TLS)
- Access to the API Server uses X.509 certificates or OAuth access tokens
- Project quota limits the damage that a rogue token could do
- The etcd service is not exposed directly to the cluster
2.10.4. Managing certificates for the platform
OpenShift Container Platform has multiple components within its framework that use REST-based HTTPS communication leveraging encryption via TLS certificates. OpenShift Container Platform’s installer configures these certificates during installation. There are some primary components that generate this traffic:
- masters (API server and controllers)
- etcd
- nodes
- registry
- router
2.10.4.1. Configuring custom certificates
You can configure custom serving certificates for the public hostnames of the API server and web console during initial installation or when redeploying certificates. You can also use a custom CA.
2.11. Securing networks
Network security can be managed at several levels. At the pod level, network namespaces can prevent containers from seeing other pods or the host system by restricting network access. Network policies give you control over allowing and rejecting connections. You can manage ingress and egress traffic to and from your containerized applications.
2.11.1. Using network namespaces
OpenShift Container Platform uses software-defined networking (SDN) to provide a unified cluster network that enables communication between containers across the cluster.
Network policy mode, by default, makes all pods in a project accessible from other pods and network endpoints. To isolate one or more pods in a project, you can create NetworkPolicy objects in that project to indicate the allowed incoming connections. Using multitenant mode, you can provide project-level isolation for pods and services.
2.11.2. Isolating pods with network policies
Using network policies, you can isolate pods from each other in the same project. Network policies can deny all network access to a pod, only allow connections for the ingress controller, reject connections from pods in other projects, or set similar rules for how networks behave.
2.11.3. Using multiple pod networks
Each running container has only one network interface by default. The Multus CNI plugin lets you create multiple CNI networks, and then attach any of those networks to your pods. In that way, you can do things like separate private data onto a more restricted network and have multiple network interfaces on each node.
2.11.4. Isolating applications
OpenShift Container Platform enables you to segment network traffic on a single cluster to make multitenant clusters that isolate users, teams, applications, and environments from non-global resources.
2.11.5. Securing ingress traffic
There are many security implications related to how you configure access to your Kubernetes services from outside of your OpenShift Container Platform cluster. Besides exposing HTTP and HTTPS routes, ingress routing allows you to set up NodePort or LoadBalancer ingress types. NodePort exposes an application’s service API object from each cluster worker. LoadBalancer lets you assign an external load balancer to an associated service API object in your OpenShift Container Platform cluster.
2.11.6. Securing egress traffic
OpenShift Container Platform provides the ability to control egress traffic using either a router or firewall method. For example, you can use IP whitelisting to control database access. A cluster administrator can assign one or more egress IP addresses to a project in an OpenShift Container Platform SDN network provider. Likewise, a cluster administrator can prevent egress traffic from going outside of an OpenShift Container Platform cluster using an egress firewall.
By assigning a fixed egress IP address, you can have all outgoing traffic assigned to that IP address for a particular project. With the egress firewall, you can prevent a pod from connecting to an external network, prevent a pod from connecting to an internal network, or limit a pod’s access to specific internal subnets.
2.12. Securing attached storage
OpenShift Container Platform supports multiple types of storage, both for on-premise and cloud providers. In particular, OpenShift Container Platform can use storage types that support the Container Storage Interface.
2.12.1. Persistent volume plugins
Containers are useful for both stateless and stateful applications. Protecting attached storage is a key element of securing stateful services. Using the Container Storage Interface (CSI), OpenShift Container Platform can incorporate storage from any storage back end that supports the CSI interface.
OpenShift Container Platform provides plugins for multiple types of storage, including:
- Red Hat OpenShift Container Storage *
- AWS Elastic Block Stores (EBS) *
- AWS Elastic File System (EFS) *
- Azure Disk *
- Azure File *
- OpenStack Cinder *
- GCE Persistent Disks *
- VMware vSphere *
- Network File System (NFS)
- FlexVolume
- Fibre Channel
- iSCSI
Plugins for those storage types with dynamic provisioning are marked with an asterisk (*). Data in transit is encrypted via HTTPS for all OpenShift Container Platform components communicating with each other.
You can mount a persistent volume (PV) on a host in any way supported by your storage type. Different types of storage have different capabilities and each PV’s access modes are set to the specific modes supported by that particular volume.
For example, NFS can support multiple read/write clients, but a specific NFS PV might be exported on the server as read-only. Each PV has its own set of access modes describing that specific PV’s capabilities, such as ReadWriteOnce, ReadOnlyMany, and ReadWriteMany.
2.12.3. Block storage
For block storage providers like AWS Elastic Block Store (EBS), GCE Persistent Disks, and iSCSI, OpenShift Container Platform uses SELinux capabilities to secure the root of the mounted volume for non-privileged pods, making the mounted volume owned by and only visible to the container with which it is associated.
2.13. Monitoring cluster events and logs
The ability to monitor and audit an OpenShift Container Platform cluster is an important part of safeguarding the cluster and its users against inappropriate usage.
There are two main sources of cluster-level information that are useful for this purpose: events and logging.
2.13.1. Watching cluster events
Cluster administrators are encouraged to familiarize themselves with the Event resource type and review the list of system events to determine which events are of interest. Events are associated with a namespace, either the namespace of the resource they are related to or, for cluster events, the default namespace. The default namespace holds relevant events for monitoring or auditing a cluster, such as node events and resource events related to infrastructure components.
The master API and oc command do not provide parameters to scope a listing of events to only those related to nodes. A simple approach would be to use grep:
$ oc get event -n default | grep NodeExample output
1h 20h 3 origin-node-1.example.local Node Normal NodeHasDiskPressure ...
A more flexible approach is to output the events in a form that other tools can process. For example, the following example uses the jq tool against JSON output to extract only NodeHasDiskPressure events:
$ oc get events -n default -o json \
  | jq '.items[] | select(.involvedObject.kind == "Node" and .reason == "NodeHasDiskPressure")'
Example output
{
  "apiVersion": "v1",
  "count": 3,
  "involvedObject": {
    "kind": "Node",
    "name": "origin-node-1.example.local",
    "uid": "origin-node-1.example.local"
  },
  "kind": "Event",
  "reason": "NodeHasDiskPressure",
  ...
}
Events related to resource creation, modification, or deletion can also be good candidates for detecting misuse of the cluster. The following query, for example, can be used to look for excessive pulling of images:
$ oc get events --all-namespaces -o json \
  | jq '[.items[] | select(.involvedObject.kind == "Pod" and .reason == "Pulling")] | length'
Example output
4When a namespace is deleted, its events are deleted as well. Events can also expire and are deleted to prevent filling up etcd storage. Events are not stored as a permanent record and frequent polling is necessary to capture statistics over time.
2.13.2. Logging
Using the oc log command, you can view container logs, build configs and deployments in real time. Different can users have access different access to logs:
- Users who have access to a project are able to see the logs for that project by default.
- Users with admin roles can access all container logs.
To save your logs for further audit and analysis, you can enable the cluster-logging add-on feature to collect, manage, and view system, container, and audit logs. You can deploy, manage, and upgrade OpenShift Logging through the OpenShift Elasticsearch Operator and Red Hat OpenShift Logging Operator.
2.13.3. Audit logs
With audit logs, you can follow a sequence of activities associated with how a user, administrator, or other OpenShift Container Platform component is behaving. API audit logging is done on each server.
Chapter 3. Configuring certificates
3.1. Replacing the default ingress certificate
3.1.1. Understanding the default ingress certificate
By default, OpenShift Container Platform uses the Ingress Operator to create an internal CA and issue a wildcard certificate that is valid for applications under the .apps sub-domain. Both the web console and CLI use this certificate as well.
The internal infrastructure CA certificates are self-signed. While this process might be perceived as bad practice by some security or PKI teams, any risk here is minimal. The only clients that implicitly trust these certificates are other components within the cluster. Replacing the default wildcard certificate with one that is issued by a public CA already included in the CA bundle as provided by the container userspace allows external clients to connect securely to applications running under the .apps sub-domain.
3.1.2. Replacing the default ingress certificate
You can replace the default ingress certificate for all applications under the .apps subdomain. After you replace the certificate, all applications, including the web console and CLI, will have encryption provided by specified certificate.
Prerequisites
-
You must have a wildcard certificate for the fully qualified
.appssubdomain and its corresponding private key. Each should be in a separate PEM format file. - The private key must be unencrypted. If your key is encrypted, decrypt it before importing it into OpenShift Container Platform.
-
The certificate must include the
subjectAltNameextension showing*.apps.<clustername>.<domain>. - The certificate file can contain one or more certificates in a chain. The wildcard certificate must be the first certificate in the file. It can then be followed with any intermediate certificates, and the file should end with the root CA certificate.
- Copy the root CA certificate into an additional PEM format file.
Procedure
Create a config map that includes only the root CA certificate used to sign the wildcard certificate:
$ oc create configmap custom-ca \
     --from-file=ca-bundle.crt=</path/to/example-ca.crt> \
1 -n openshift-config- 1
</path/to/example-ca.crt>is the path to the root CA certificate file on your local file system.
Update the cluster-wide proxy configuration with the newly created config map:
$ oc patch proxy/cluster \
     --type=merge \
     --patch='{"spec":{"trustedCA":{"name":"custom-ca"}}}'
Create a secret that contains the wildcard certificate chain and key:
$ oc create secret tls <secret> \1 --cert=</path/to/cert.crt> \2 --key=</path/to/cert.key> \3 -n openshift-ingressUpdate the Ingress Controller configuration with the newly created secret:
$ oc patch ingresscontroller.operator default \
     --type=merge -p \
     '{"spec":{"defaultCertificate": {"name": "<secret>"}}}' \
1 -n openshift-ingress-operator- 1
- Replace
<secret>with the name used for the secret in the previous step.
Additional resources
3.2. Adding API server certificates
The default API server certificate is issued by an internal OpenShift Container Platform cluster CA. Clients outside of the cluster will not be able to verify the API server’s certificate by default. This certificate can be replaced by one that is issued by a CA that clients trust.
3.2.1. Add an API server named certificate
The default API server certificate is issued by an internal OpenShift Container Platform cluster CA. You can add one or more alternative certificates that the API server will return based on the fully qualified domain name (FQDN) requested by the client, for example when a reverse proxy or load balancer is used.
Prerequisites
- You must have a certificate for the FQDN and its corresponding private key. Each should be in a separate PEM format file.
- The private key must be unencrypted. If your key is encrypted, decrypt it before importing it into OpenShift Container Platform.
-
The certificate must include the
subjectAltNameextension showing the FQDN. - The certificate file can contain one or more certificates in a chain. The certificate for the API server FQDN must be the first certificate in the file. It can then be followed with any intermediate certificates, and the file should end with the root CA certificate.
Do not provide a named certificate for the internal load balancer (host name api-int.<cluster_name>.<base_domain>). Doing so will leave your cluster in a degraded state.
Procedure
Login to the new API as the
kubeadminuser.$ oc login -u kubeadmin -p <password> https://FQDN:6443Get the
kubeconfigfile.$ oc config view --flatten > kubeconfig-newapiCreate a secret that contains the certificate chain and private key in the
openshift-confignamespace.$ oc create secret tls <secret> \1 --cert=</path/to/cert.crt> \2 --key=</path/to/cert.key> \3 -n openshift-configUpdate the API server to reference the created secret.
$ oc patch apiserver cluster \
     --type=merge -p \
     '{"spec":{"servingCerts": {"namedCertificates":
     [{"names": ["<FQDN>"],
1 "servingCertificate": {"name": "<secret>"}}]}}}'2 Examine the
apiserver/clusterobject and confirm the secret is now referenced.$ oc get apiserver cluster -o yamlExample output
...
spec:
  servingCerts:
    namedCertificates:
    - names:
      - <FQDN>
      servingCertificate:
        name: <secret>
...
Check the
kube-apiserveroperator, and verify that a new revision of the Kubernetes API server rolls out. It may take a minute for the operator to detect the configuration change and trigger a new deployment. While the new revision is rolling out,PROGRESSINGwill reportTrue.$ oc get clusteroperators kube-apiserverDo not continue to the next step until
PROGRESSINGis listed asFalse, as shown in the following output:Example output
NAME             VERSION   AVAILABLE   PROGRESSING   DEGRADED   SINCE
kube-apiserver   4.8.0     True        False         False      145m
If
PROGRESSINGis showingTrue, wait a few minutes and try again.
3.3. Securing service traffic using service serving certificate secrets
3.3.1. Understanding service serving certificates
Service serving certificates are intended to support complex middleware applications that require encryption. These certificates are issued as TLS web server certificates.
The service-ca controller uses the x509.SHA256WithRSA signature algorithm to generate service certificates.
The generated certificate and key are in PEM format, stored in tls.crt and tls.key respectively, within a created secret. The certificate and key are automatically replaced when they get close to expiration.
The service CA certificate, which issues the service certificates, is valid for 26 months and is automatically rotated when there is less than 13 months validity left. After rotation, the previous service CA configuration is still trusted until its expiration. This allows a grace period for all affected services to refresh their key material before the expiration. If you do not upgrade your cluster during this grace period, which restarts services and refreshes their key material, you might need to manually restart services to avoid failures after the previous service CA expires.
You can use the following command to manually restart all pods in the cluster. Be aware that running this command causes a service interruption, because it deletes every running pod in every namespace. These pods will automatically restart after they are deleted.
$ for I in $(oc get ns -o jsonpath='{range .items[*]} {.metadata.name}{"\n"} {end}'); \
      do oc delete pods --all -n $I; \
      sleep 1; \
      done
3.3.2. Add a service certificate
To secure communication to your service, generate a signed serving certificate and key pair into a secret in the same namespace as the service.
The generated certificate is only valid for the internal service DNS name <service.name>.<service.namespace>.svc, and is only valid for internal communications. If your service is a headless service (no clusterIP value set), the generated certificate also contains a wildcard subject in the format of *.<service.name>.<service.namespace>.svc.
Because the generated certificates contain wildcard subjects for headless services, you must not use the service CA if your client must differentiate between individual pods. In this case:
- Generate individual TLS certificates by using a different CA.
- Do not accept the service CA as a trusted CA for connections that are directed to individual pods and must not be impersonated by other pods. These connections must be configured to trust the CA that was used to generate the individual TLS certificates.
Prerequisites:
- You must have a service defined.
Procedure
Annotate the service with
service.beta.openshift.io/serving-cert-secret-name:$ oc annotate service <service_name> \1 service.beta.openshift.io/serving-cert-secret-name=<secret_name>2 For example, use the following command to annotate the service
test1:$ oc annotate service test1 service.beta.openshift.io/serving-cert-secret-name=test1Examine the service to confirm that the annotations are present:
$ oc describe service <service_name>Example output
... Annotations: service.beta.openshift.io/serving-cert-secret-name: <service_name> service.beta.openshift.io/serving-cert-signed-by: openshift-service-serving-signer@1556850837 ...-
After the cluster generates a secret for your service, your
Podspec can mount it, and the pod will run after it becomes available.
3.3.3. Add the service CA bundle to a config map
A pod can access the service CA certificate by mounting a ConfigMap object that is annotated with service.beta.openshift.io/inject-cabundle=true. Once annotated, the cluster automatically injects the service CA certificate into the service-ca.crt key on the config map. Access to this CA certificate allows TLS clients to verify connections to services using service serving certificates.
After adding this annotation to a config map all existing data in it is deleted. It is recommended to use a separate config map to contain the service-ca.crt, instead of using the same config map that stores your pod configuration.
Procedure
Annotate the config map with
service.beta.openshift.io/inject-cabundle=true:$ oc annotate configmap <config_map_name> \1 service.beta.openshift.io/inject-cabundle=true- 1
- Replace
<config_map_name>with the name of the config map to annotate.
NoteExplicitly referencing the
service-ca.crtkey in a volume mount will prevent a pod from starting until the config map has been injected with the CA bundle. This behavior can be overridden by setting theoptionalfield totruefor the volume’s serving certificate configuration.For example, use the following command to annotate the config map
test1:$ oc annotate configmap test1 service.beta.openshift.io/inject-cabundle=trueView the config map to ensure that the service CA bundle has been injected:
$ oc get configmap <config_map_name> -o yamlThe CA bundle is displayed as the value of the
service-ca.crtkey in the YAML output:apiVersion: v1 data: service-ca.crt: | -----BEGIN CERTIFICATE----- ...
3.3.4. Add the service CA bundle to an API service
You can annotate an APIService object with service.beta.openshift.io/inject-cabundle=true to have its spec.caBundle field populated with the service CA bundle. This allows the Kubernetes API server to validate the service CA certificate used to secure the targeted endpoint.
Procedure
Annotate the API service with
service.beta.openshift.io/inject-cabundle=true:$ oc annotate apiservice <api_service_name> \1 service.beta.openshift.io/inject-cabundle=true- 1
- Replace
<api_service_name>with the name of the API service to annotate.
For example, use the following command to annotate the API service
test1:$ oc annotate apiservice test1 service.beta.openshift.io/inject-cabundle=trueView the API service to ensure that the service CA bundle has been injected:
$ oc get apiservice <api_service_name> -o yamlThe CA bundle is displayed in the
spec.caBundlefield in the YAML output:apiVersion: apiregistration.k8s.io/v1 kind: APIService metadata: annotations: service.beta.openshift.io/inject-cabundle: "true" ... spec: caBundle: <CA_BUNDLE> ...
3.3.5. Add the service CA bundle to a custom resource definition
You can annotate a CustomResourceDefinition (CRD) object with service.beta.openshift.io/inject-cabundle=true to have its spec.conversion.webhook.clientConfig.caBundle field populated with the service CA bundle. This allows the Kubernetes API server to validate the service CA certificate used to secure the targeted endpoint.
The service CA bundle will only be injected into the CRD if the CRD is configured to use a webhook for conversion. It is only useful to inject the service CA bundle if a CRD’s webhook is secured with a service CA certificate.
Procedure
Annotate the CRD with
service.beta.openshift.io/inject-cabundle=true:$ oc annotate crd <crd_name> \1 service.beta.openshift.io/inject-cabundle=true- 1
- Replace
<crd_name>with the name of the CRD to annotate.
For example, use the following command to annotate the CRD
test1:$ oc annotate crd test1 service.beta.openshift.io/inject-cabundle=trueView the CRD to ensure that the service CA bundle has been injected:
$ oc get crd <crd_name> -o yamlThe CA bundle is displayed in the
spec.conversion.webhook.clientConfig.caBundlefield in the YAML output:apiVersion: apiextensions.k8s.io/v1 kind: CustomResourceDefinition metadata: annotations: service.beta.openshift.io/inject-cabundle: "true" ... spec: conversion: strategy: Webhook webhook: clientConfig: caBundle: <CA_BUNDLE> ...
3.3.6. Add the service CA bundle to a mutating webhook configuration
You can annotate a MutatingWebhookConfiguration object with service.beta.openshift.io/inject-cabundle=true to have the clientConfig.caBundle field of each webhook populated with the service CA bundle. This allows the Kubernetes API server to validate the service CA certificate used to secure the targeted endpoint.
Do not set this annotation for admission webhook configurations that need to specify different CA bundles for different webhooks. If you do, then the service CA bundle will be injected for all webhooks.
Procedure
Annotate the mutating webhook configuration with
service.beta.openshift.io/inject-cabundle=true:$ oc annotate mutatingwebhookconfigurations <mutating_webhook_name> \1 service.beta.openshift.io/inject-cabundle=true- 1
- Replace
<mutating_webhook_name>with the name of the mutating webhook configuration to annotate.
For example, use the following command to annotate the mutating webhook configuration
test1:$ oc annotate mutatingwebhookconfigurations test1 service.beta.openshift.io/inject-cabundle=trueView the mutating webhook configuration to ensure that the service CA bundle has been injected:
$ oc get mutatingwebhookconfigurations <mutating_webhook_name> -o yamlThe CA bundle is displayed in the
clientConfig.caBundlefield of all webhooks in the YAML output:apiVersion: admissionregistration.k8s.io/v1 kind: MutatingWebhookConfiguration metadata: annotations: service.beta.openshift.io/inject-cabundle: "true" ... webhooks: - myWebhook: - v1beta1 clientConfig: caBundle: <CA_BUNDLE> ...
3.3.7. Add the service CA bundle to a validating webhook configuration
You can annotate a ValidatingWebhookConfiguration object with service.beta.openshift.io/inject-cabundle=true to have the clientConfig.caBundle field of each webhook populated with the service CA bundle. This allows the Kubernetes API server to validate the service CA certificate used to secure the targeted endpoint.
Do not set this annotation for admission webhook configurations that need to specify different CA bundles for different webhooks. If you do, then the service CA bundle will be injected for all webhooks.
Procedure
Annotate the validating webhook configuration with
service.beta.openshift.io/inject-cabundle=true:$ oc annotate validatingwebhookconfigurations <validating_webhook_name> \1 service.beta.openshift.io/inject-cabundle=true- 1
- Replace
<validating_webhook_name>with the name of the validating webhook configuration to annotate.
For example, use the following command to annotate the validating webhook configuration
test1:$ oc annotate validatingwebhookconfigurations test1 service.beta.openshift.io/inject-cabundle=trueView the validating webhook configuration to ensure that the service CA bundle has been injected:
$ oc get validatingwebhookconfigurations <validating_webhook_name> -o yamlThe CA bundle is displayed in the
clientConfig.caBundlefield of all webhooks in the YAML output:apiVersion: admissionregistration.k8s.io/v1 kind: ValidatingWebhookConfiguration metadata: annotations: service.beta.openshift.io/inject-cabundle: "true" ... webhooks: - myWebhook: - v1beta1 clientConfig: caBundle: <CA_BUNDLE> ...
3.3.8. Manually rotate the generated service certificate
You can rotate the service certificate by deleting the associated secret. Deleting the secret results in a new one being automatically created, resulting in a new certificate.
Prerequisites
- A secret containing the certificate and key pair must have been generated for the service.
Procedure
Examine the service to determine the secret containing the certificate. This is found in the
serving-cert-secret-nameannotation, as seen below.$ oc describe service <service_name>Example output
...
service.beta.openshift.io/serving-cert-secret-name: <secret>
...
Delete the generated secret for the service. This process will automatically recreate the secret.
$ oc delete secret <secret>1 - 1
- Replace
<secret>with the name of the secret from the previous step.
Confirm that the certificate has been recreated by obtaining the new secret and examining the
AGE.$ oc get secret <service_name>Example output
NAME              TYPE                DATA   AGE
<service.name>    kubernetes.io/tls   2      1s
3.3.9. Manually rotate the service CA certificate
The service CA is valid for 26 months and is automatically refreshed when there is less than 13 months validity left.
If necessary, you can manually refresh the service CA by using the following procedure.
A manually-rotated service CA does not maintain trust with the previous service CA. You might experience a temporary service disruption until the pods in the cluster are restarted, which ensures that pods are using service serving certificates issued by the new service CA.
Prerequisites
- You must be logged in as a cluster admin.
Procedure
View the expiration date of the current service CA certificate by using the following command.
$ oc get secrets/signing-key -n openshift-service-ca \
     -o template='{{index .data "tls.crt"}}' \
     | base64 --decode \
     | openssl x509 -noout -enddate
Manually rotate the service CA. This process generates a new service CA which will be used to sign the new service certificates.
$ oc delete secret/signing-key -n openshift-service-caTo apply the new certificates to all services, restart all the pods in your cluster. This command ensures that all services use the updated certificates.
$ for I in $(oc get ns -o jsonpath='{range .items[*]} {.metadata.name}{"\n"} {end}'); \ do oc delete pods --all -n $I; \ sleep 1; \ doneWarningThis command will cause a service interruption, as it goes through and deletes every running pod in every namespace. These pods will automatically restart after they are deleted.
3.4. Updating the CA bundle
3.4.1. Understanding the CA Bundle certificate
Proxy certificates allow users to specify one or more custom certificate authority (CA) used by platform components when making egress connections.
The trustedCA field of the Proxy object is a reference to a config map that contains a user-provided trusted certificate authority (CA) bundle. This bundle is merged with the Red Hat Enterprise Linux CoreOS (RHCOS) trust bundle and injected into the trust store of platform components that make egress HTTPS calls. For example, image-registry-operator calls an external image registry to download images. If trustedCA is not specified, only the RHCOS trust bundle is used for proxied HTTPS connections. Provide custom CA certificates to the RHCOS trust bundle if you want to use your own certificate infrastructure.
The trustedCA field should only be consumed by a proxy validator. The validator is responsible for reading the certificate bundle from required key ca-bundle.crt and copying it to a config map named trusted-ca-bundle in the openshift-config-managed namespace. The namespace for the config map referenced by trustedCA is openshift-config:
apiVersion: v1
kind: ConfigMap
metadata:
  name: user-ca-bundle
  namespace: openshift-config
data:
  ca-bundle.crt: |
    -----BEGIN CERTIFICATE-----
    Custom CA certificate bundle.
    -----END CERTIFICATE-----
3.4.2. Replacing the CA Bundle certificate
Procedure
Create a config map that includes the root CA certificate used to sign the wildcard certificate:
$ oc create configmap custom-ca \
     --from-file=ca-bundle.crt=</path/to/example-ca.crt> \
1 -n openshift-config- 1
</path/to/example-ca.crt>is the path to the CA certificate bundle on your local file system.
Update the cluster-wide proxy configuration with the newly created config map:
$ oc patch proxy/cluster \
     --type=merge \
     --patch='{"spec":{"trustedCA":{"name":"custom-ca"}}}'
Additional resources
Chapter 4. Certificate types and descriptions
4.1. User-provided certificates for the API server
4.1.1. Purpose
The API server is accessible by clients external to the cluster at api.<cluster_name>.<base_domain>. You might want clients to access the API server at a different hostname or without the need to distribute the cluster-managed certificate authority (CA) certificates to the clients. The administrator must set a custom default certificate to be used by the API server when serving content.
4.1.2. Location
The user-provided certificates must be provided in a kubernetes.io/tls type Secret in the openshift-config namespace. Update the API server cluster configuration, the apiserver/cluster resource, to enable the use of the user-provided certificate.
4.1.3. Management
User-provided certificates are managed by the user.
4.1.4. Expiration
API server client certificate expiration is less than five minutes.
User-provided certificates are managed by the user.
4.1.5. Customization
Update the secret containing the user-managed certificate as needed.
Additional resources
4.2. Proxy certificates
4.2.1. Purpose
Proxy certificates allow users to specify one or more custom certificate authority (CA) certificates used by platform components when making egress connections.
The trustedCA field of the Proxy object is a reference to a config map that contains a user-provided trusted certificate authority (CA) bundle. This bundle is merged with the Red Hat Enterprise Linux CoreOS (RHCOS) trust bundle and injected into the trust store of platform components that make egress HTTPS calls. For example, image-registry-operator calls an external image registry to download images. If trustedCA is not specified, only the RHCOS trust bundle is used for proxied HTTPS connections. Provide custom CA certificates to the RHCOS trust bundle if you want to use your own certificate infrastructure.
The trustedCA field should only be consumed by a proxy validator. The validator is responsible for reading the certificate bundle from required key ca-bundle.crt and copying it to a config map named trusted-ca-bundle in the openshift-config-managed namespace. The namespace for the config map referenced by trustedCA is openshift-config:
apiVersion: v1
kind: ConfigMap
metadata:
  name: user-ca-bundle
  namespace: openshift-config
data:
  ca-bundle.crt: |
    -----BEGIN CERTIFICATE-----
    Custom CA certificate bundle.
    -----END CERTIFICATE-----
Additional resources
4.2.2. Managing proxy certificates during installation
The additionalTrustBundle value of the installer configuration is used to specify any proxy-trusted CA certificates during installation. For example:
$ cat install-config.yamlExample output
...
proxy:
  httpProxy: http://<https://username:password@proxy.example.com:123/>
  httpsProxy: https://<https://username:password@proxy.example.com:123/>
	noProxy: <123.example.com,10.88.0.0/16>
additionalTrustBundle: |
    -----BEGIN CERTIFICATE-----
   <MY_HTTPS_PROXY_TRUSTED_CA_CERT>
    -----END CERTIFICATE-----
...
4.2.3. Location
The user-provided trust bundle is represented as a config map. The config map is mounted into the file system of platform components that make egress HTTPS calls. Typically, Operators mount the config map to /etc/pki/ca-trust/extracted/pem/tls-ca-bundle.pem, but this is not required by the proxy. A proxy can modify or inspect the HTTPS connection. In either case, the proxy must generate and sign a new certificate for the connection.
Complete proxy support means connecting to the specified proxy and trusting any signatures it has generated. Therefore, it is necessary to let the user specify a trusted root, such that any certificate chain connected to that trusted root is also trusted.
If using the RHCOS trust bundle, place CA certificates in /etc/pki/ca-trust/source/anchors.
See Using shared system certificates in the Red Hat Enterprise Linux documentation for more information.
4.2.4. Expiration
The user sets the expiration term of the user-provided trust bundle.
The default expiration term is defined by the CA certificate itself. It is up to the CA administrator to configure this for the certificate before it can be used by OpenShift Container Platform or RHCOS.
Red Hat does not monitor for when CAs expire. However, due to the long life of CAs, this is generally not an issue. However, you might need to periodically update the trust bundle.
4.2.5. Services
By default, all platform components that make egress HTTPS calls will use the RHCOS trust bundle. If trustedCA is defined, it will also be used.
Any service that is running on the RHCOS node is able to use the trust bundle of the node.
4.2.6. Management
These certificates are managed by the system and not the user.
4.2.7. Customization
Updating the user-provided trust bundle consists of either:
-
updating the PEM-encoded certificates in the config map referenced by
trustedCA,or -
creating a config map in the namespace
openshift-configthat contains the new trust bundle and updatingtrustedCAto reference the name of the new config map.
The mechanism for writing CA certificates to the RHCOS trust bundle is exactly the same as writing any other file to RHCOS, which is done through the use of machine configs. When the Machine Config Operator (MCO) applies the new machine config that contains the new CA certificates, the node is rebooted. During the next boot, the service coreos-update-ca-trust.service runs on the RHCOS nodes, which automatically update the trust bundle with the new CA certificates. For example:
apiVersion: machineconfiguration.openshift.io/v1
kind: MachineConfig
metadata:
  labels:
    machineconfiguration.openshift.io/role: worker
  name: 50-examplecorp-ca-cert
spec:
  config:
    ignition:
      version: 3.1.0
    storage:
      files:
      - contents:
          source: data:text/plain;charset=utf-8;base64,LS0tLS1CRUdJTiBDRVJUSUZJQ0FURS0tLS0tCk1JSUVORENDQXh5Z0F3SUJBZ0lKQU51bkkwRDY2MmNuTUEwR0NTcUdTSWIzRFFFQkN3VUFNSUdsTVFzd0NRWUQKV1FRR0V3SlZVekVYTUJVR0ExVUVDQXdPVG05eWRHZ2dRMkZ5YjJ4cGJtRXhFREFPQmdOVkJBY01CMUpoYkdWcApBMmd4RmpBVUJnTlZCQW9NRFZKbFpDQklZWFFzSUVsdVl5NHhFekFSQmdOVkJBc01DbEpsWkNCSVlYUWdTVlF4Ckh6QVpCZ05WQkFNTUVsSmxaQ0JJWVhRZ1NWUWdVbTl2ZENCRFFURWhNQjhHQ1NxR1NJYjNEUUVKQVJZU2FXNW0KWGpDQnBURUxNQWtHQTFVRUJoTUNWVk14RnpBVkJnTlZCQWdNRGs1dmNuUm9JRU5oY205c2FXNWhNUkF3RGdZRApXUVFIREFkU1lXeGxhV2RvTVJZd0ZBWURWUVFLREExU1pXUWdTR0YwTENCSmJtTXVNUk13RVFZRFZRUUxEQXBTCkFXUWdTR0YwSUVsVU1Sc3dHUVlEVlFRRERCSlNaV1FnU0dGMElFbFVJRkp2YjNRZ1EwRXhJVEFmQmdrcWhraUcKMHcwQkNRRVdFbWx1Wm05elpXTkFjbVZrYUdGMExtTnZiVENDQVNJd0RRWUpLb1pJaHZjTkFRRUJCUUFEZ2dFUApCRENDQVFvQ2dnRUJBTFF0OU9KUWg2R0M1TFQxZzgwcU5oMHU1MEJRNHNaL3laOGFFVHh0KzVsblBWWDZNSEt6CmQvaTdsRHFUZlRjZkxMMm55VUJkMmZRRGsxQjBmeHJza2hHSUlaM2lmUDFQczRsdFRrdjhoUlNvYjNWdE5xU28KSHhrS2Z2RDJQS2pUUHhEUFdZeXJ1eTlpckxaaW9NZmZpM2kvZ0N1dDBaV3RBeU8zTVZINXFXRi9lbkt3Z1BFUwpZOXBvK1RkQ3ZSQi9SVU9iQmFNNzYxRWNyTFNNMUdxSE51ZVNmcW5obzNBakxRNmRCblBXbG82MzhabTFWZWJLCkNFTHloa0xXTVNGa0t3RG1uZTBqUTAyWTRnMDc1dkNLdkNzQ0F3RUFBYU5qTUdFd0hRWURWUjBPQkJZRUZIN1IKNXlDK1VlaElJUGV1TDhacXczUHpiZ2NaTUI4R0ExVWRJd1FZTUJhQUZIN1I0eUMrVWVoSUlQZXVMOFpxdzNQegpjZ2NaTUE4R0ExVWRFd0VCL3dRRk1BTUJBZjh3RGdZRFZSMFBBUUgvQkFRREFnR0dNQTBHQ1NxR1NJYjNEUUVCCkR3VUFBNElCQVFCRE52RDJWbTlzQTVBOUFsT0pSOCtlbjVYejloWGN4SkI1cGh4Y1pROGpGb0cwNFZzaHZkMGUKTUVuVXJNY2ZGZ0laNG5qTUtUUUNNNFpGVVBBaWV5THg0ZjUySHVEb3BwM2U1SnlJTWZXK0tGY05JcEt3Q3NhawpwU29LdElVT3NVSks3cUJWWnhjckl5ZVFWMnFjWU9lWmh0UzV3QnFJd09BaEZ3bENFVDdaZTU4UUhtUzQ4c2xqCjVlVGtSaml2QWxFeHJGektjbGpDNGF4S1Fsbk92VkF6eitHbTMyVTB4UEJGNEJ5ZVBWeENKVUh3MVRzeVRtZWwKU3hORXA3eUhvWGN3bitmWG5hK3Q1SldoMWd4VVp0eTMKLS0tLS1FTkQgQ0VSVElGSUNBVEUtLS0tLQo=
        mode: 0644
        overwrite: true
        path: /etc/pki/ca-trust/source/anchors/examplecorp-ca.crt
The trust store of machines must also support updating the trust store of nodes.
4.2.8. Renewal
There are no Operators that can auto-renew certificates on the RHCOS nodes.
Red Hat does not monitor for when CAs expire. However, due to the long life of CAs, this is generally not an issue. However, you might need to periodically update the trust bundle.
4.3. Service CA certificates
4.3.1. Purpose
service-ca is an Operator that creates a self-signed CA when an OpenShift Container Platform cluster is deployed.
4.3.2. Expiration
A custom expiration term is not supported. The self-signed CA is stored in a secret with qualified name service-ca/signing-key in fields tls.crt (certificate(s)), tls.key (private key), and ca-bundle.crt (CA bundle).
Other services can request a service serving certificate by annotating a service resource with service.beta.openshift.io/serving-cert-secret-name: <secret name>. In response, the Operator generates a new certificate, as tls.crt, and private key, as tls.key to the named secret. The certificate is valid for two years.
Other services can request that the CA bundle for the service CA be injected into API service or config map resources by annotating with service.beta.openshift.io/inject-cabundle: true to support validating certificates generated from the service CA. In response, the Operator writes its current CA bundle to the CABundle field of an API service or as service-ca.crt to a config map.
As of OpenShift Container Platform 4.3.5, automated rotation is supported and is backported to some 4.2.z and 4.3.z releases. For any release supporting automated rotation, the service CA is valid for 26 months and is automatically refreshed when there is less than 13 months validity left. If necessary, you can manually refresh the service CA.
The service CA expiration of 26 months is longer than the expected upgrade interval for a supported OpenShift Container Platform cluster, such that non-control plane consumers of service CA certificates will be refreshed after CA rotation and prior to the expiration of the pre-rotation CA.
A manually-rotated service CA does not maintain trust with the previous service CA. You might experience a temporary service disruption until the pods in the cluster are restarted, which ensures that pods are using service serving certificates issued by the new service CA.
4.3.3. Management
These certificates are managed by the system and not the user.
4.3.4. Services
Services that use service CA certificates include:
- cluster-autoscaler-operator
- cluster-monitoring-operator
- cluster-authentication-operator
- cluster-image-registry-operator
- cluster-ingress-operator
- cluster-kube-apiserver-operator
- cluster-kube-controller-manager-operator
- cluster-kube-scheduler-operator
- cluster-networking-operator
- cluster-openshift-apiserver-operator
- cluster-openshift-controller-manager-operator
- cluster-samples-operator
- machine-config-operator
- console-operator
- insights-operator
- machine-api-operator
- operator-lifecycle-manager
This is not a comprehensive list.
Additional resources
4.4. Node certificates
4.4.1. Purpose
Node certificates are signed by the cluster; they come from a certificate authority (CA) that is generated by the bootstrap process. After the cluster is installed, the node certificates are auto-rotated.
4.4.2. Management
These certificates are managed by the system and not the user.
Additional resources
4.5. Bootstrap certificates
4.5.1. Purpose
The kubelet, in OpenShift Container Platform 4 and later, uses the bootstrap certificate located in /etc/kubernetes/kubeconfig to initially bootstrap. This is followed by the bootstrap initialization process and authorization of the kubelet to create a CSR.
In that process, the kubelet generates a CSR while communicating over the bootstrap channel. The controller manager signs the CSR, resulting in a certificate that the kubelet manages.
4.5.2. Management
These certificates are managed by the system and not the user.
4.5.3. Expiration
This bootstrap CA is valid for 10 years.
The kubelet-managed certificate is valid for one year and rotates automatically at around the 80 percent mark of that one year.
4.5.4. Customization
You cannot customize the bootstrap certificates.
4.6. etcd certificates
4.6.1. Purpose
etcd certificates are signed by the etcd-signer; they come from a certificate authority (CA) that is generated by the bootstrap process.
4.6.2. Expiration
The CA certificates are valid for 10 years. The peer, client, and server certificates are valid for three years.
4.6.3. Management
These certificates are managed by the system and not the user.
4.6.4. Services
etcd certificates are used for encrypted communication between etcd member peers, as well as encrypted client traffic. The following certificates are generated and used by etcd and other processes that communicate with etcd:
- Peer certificates: Used for communication between etcd members.
-
Client certificates: Used for encrypted server-client communication. Client certificates are currently used by the API server only, and no other service should connect to etcd directly except for the proxy. Client secrets (
etcd-client,etcd-metric-client,etcd-metric-signer, andetcd-signer) are added to theopenshift-config,openshift-monitoring, andopenshift-kube-apiservernamespaces. - Server certificates: Used by the etcd server for authenticating client requests.
- Metric certificates: All metric consumers connect to proxy with metric-client certificates.
Additional resources
4.7. OLM certificates
4.7.1. Management
All certificates for OpenShift Lifecycle Manager (OLM) components (olm-operator, catalog-operator, packageserver, and marketplace-operator) are managed by the system.
When installing Operators that include webhooks or API services in their ClusterServiceVersion (CSV) object, OLM creates and rotates the certificates for these resources. Certificates for resources in the openshift-operator-lifecycle-manager namespace are managed by OLM.
OLM will not update the certificates of Operators that it manages in proxy environments. These certificates must be managed by the user using the subscription config.
4.8. Aggregated API client certificates
4.8.1. Purpose
Aggregated API client certificates are used to authenticate the KubeAPIServer when connecting to the Aggregated API Servers.
4.8.2. Management
These certificates are managed by the system and not the user.
4.8.3. Expiration
This CA is valid for 30 days.
The managed client certificates are valid for 30 days.
CA and client certificates are rotated automatically through the use of controllers.
4.8.4. Customization
You cannot customize the aggregated API server certificates.
4.9. Machine Config Operator certificates
4.9.1. Purpose
Machine Config Operator certificates are used to secure connections between the Red Hat Enterprise Linux CoreOS (RHCOS) nodes and the Machine Config Server.
4.9.2. Management
These certificates are managed by the system and not the user.
4.9.3. Expiration
This CA is valid for 10 years.
The issued serving certificates are valid for 10 years.
4.9.4. Customization
You cannot customize the Machine Config Operator certificates.
4.10. User-provided certificates for default ingress
4.10.1. Purpose
Applications are usually exposed at <route_name>.apps.<cluster_name>.<base_domain>. The <cluster_name> and <base_domain> come from the installation config file. <route_name> is the host field of the route, if specified, or the route name. For example, hello-openshift-default.apps.username.devcluster.openshift.com. hello-openshift is the name of the route and the route is in the default namespace. You might want clients to access the applications without the need to distribute the cluster-managed CA certificates to the clients. The administrator must set a custom default certificate when serving application content.
The Ingress Operator generates a default certificate for an Ingress Controller to serve as a placeholder until you configure a custom default certificate. Do not use operator-generated default certificates in production clusters.
4.10.2. Location
The user-provided certificates must be provided in a tls type Secret resource in the openshift-ingress namespace. Update the IngressController CR in the openshift-ingress-operator namespace to enable the use of the user-provided certificate. For more information on this process, see Setting a custom default certificate.
4.10.3. Management
User-provided certificates are managed by the user.
4.10.4. Expiration
User-provided certificates are managed by the user.
4.10.5. Services
Applications deployed on the cluster use user-provided certificates for default ingress.
4.10.6. Customization
Update the secret containing the user-managed certificate as needed.
Additional resources
4.11. Ingress certificates
4.11.1. Purpose
The Ingress Operator uses certificates for:
- Securing access to metrics for Prometheus.
- Securing access to routes.
4.11.2. Location
To secure access to Ingress Operator and Ingress Controller metrics, the Ingress Operator uses service serving certificates. The Operator requests a certificate from the service-ca controller for its own metrics, and the service-ca controller puts the certificate in a secret named metrics-tls in the openshift-ingress-operator namespace. Additionally, the Ingress Operator requests a certificate for each Ingress Controller, and the service-ca controller puts the certificate in a secret named router-metrics-certs-<name>, where <name> is the name of the Ingress Controller, in the openshift-ingress namespace.
Each Ingress Controller has a default certificate that it uses for secured routes that do not specify their own certificates. Unless you specify a custom certificate, the Operator uses a self-signed certificate by default. The Operator uses its own self-signed signing certificate to sign any default certificate that it generates. The Operator generates this signing certificate and puts it in a secret named router-ca in the openshift-ingress-operator namespace. When the Operator generates a default certificate, it puts the default certificate in a secret named router-certs-<name> (where <name> is the name of the Ingress Controller) in the openshift-ingress namespace.
The Ingress Operator generates a default certificate for an Ingress Controller to serve as a placeholder until you configure a custom default certificate. Do not use Operator-generated default certificates in production clusters.
4.11.3. Workflow
Figure 4.1. Custom certificate workflow
Figure 4.2. Default certificate workflow
![]() An empty
An empty defaultCertificate field causes the Ingress Operator to use its self-signed CA to generate a serving certificate for the specified domain.
![]() The default CA certificate and key generated by the Ingress Operator. Used to sign Operator-generated default serving certificates.
The default CA certificate and key generated by the Ingress Operator. Used to sign Operator-generated default serving certificates.
![]() In the default workflow, the wildcard default serving certificate, created by the Ingress Operator and signed using the generated default CA certificate. In the custom workflow, this is the user-provided certificate.
In the default workflow, the wildcard default serving certificate, created by the Ingress Operator and signed using the generated default CA certificate. In the custom workflow, this is the user-provided certificate.
![]() The router deployment. Uses the certificate in
The router deployment. Uses the certificate in secrets/router-certs-default as its default front-end server certificate.
![]() In the default workflow, the contents of the wildcard default serving certificate (public and private parts) are copied here to enable OAuth integration. In the custom workflow, this is the user-provided certificate.
In the default workflow, the contents of the wildcard default serving certificate (public and private parts) are copied here to enable OAuth integration. In the custom workflow, this is the user-provided certificate.
![]() The public (certificate) part of the default serving certificate. Replaces the
The public (certificate) part of the default serving certificate. Replaces the configmaps/router-ca resource.
![]() The user updates the cluster proxy configuration with the CA certificate that signed the
The user updates the cluster proxy configuration with the CA certificate that signed the ingresscontroller serving certificate. This enables components like auth, console, and the registry to trust the serving certificate.
![]() The cluster-wide trusted CA bundle containing the combined Red Hat Enterprise Linux CoreOS (RHCOS) and user-provided CA bundles or an RHCOS-only bundle if a user bundle is not provided.
The cluster-wide trusted CA bundle containing the combined Red Hat Enterprise Linux CoreOS (RHCOS) and user-provided CA bundles or an RHCOS-only bundle if a user bundle is not provided.
![]() The custom CA certificate bundle, which instructs other components (for example,
The custom CA certificate bundle, which instructs other components (for example, auth and console) to trust an ingresscontroller configured with a custom certificate.
![]() The
The trustedCA field is used to reference the user-provided CA bundle.
![]() The Cluster Network Operator injects the trusted CA bundle into the
The Cluster Network Operator injects the trusted CA bundle into the proxy-ca config map.
![]() OpenShift Container Platform 4.8 and newer use
OpenShift Container Platform 4.8 and newer use default-ingress-cert.
4.11.4. Expiration
The expiration terms for the Ingress Operator’s certificates are as follows:
-
The expiration date for metrics certificates that the
service-cacontroller creates is two years after the date of creation. - The expiration date for the Operator’s signing certificate is two years after the date of creation.
- The expiration date for default certificates that the Operator generates is two years after the date of creation.
You cannot specify custom expiration terms on certificates that the Ingress Operator or service-ca controller creates.
You cannot specify expiration terms when installing OpenShift Container Platform for certificates that the Ingress Operator or service-ca controller creates.
4.11.5. Services
Prometheus uses the certificates that secure metrics.
The Ingress Operator uses its signing certificate to sign default certificates that it generates for Ingress Controllers for which you do not set custom default certificates.
Cluster components that use secured routes may use the default Ingress Controller’s default certificate.
Ingress to the cluster via a secured route uses the default certificate of the Ingress Controller by which the route is accessed unless the route specifies its own certificate.
4.11.6. Management
Ingress certificates are managed by the user. See Replacing the default ingress certificate for more information.
4.11.7. Renewal
The service-ca controller automatically rotates the certificates that it issues. However, it is possible to use oc delete secret <secret> to manually rotate service serving certificates.
The Ingress Operator does not rotate its own signing certificate or the default certificates that it generates. Operator-generated default certificates are intended as placeholders for custom default certificates that you configure.
4.12. Monitoring and OpenShift Logging Operator component certificates
4.12.1. Expiration
Monitoring components secure their traffic with service CA certificates. These certificates are valid for 2 years and are replaced automatically on rotation of the service CA, which is every 13 months.
If the certificate lives in the openshift-monitoring or openshift-logging namespace, it is system managed and rotated automatically.
4.12.2. Management
These certificates are managed by the system and not the user.
4.13. Control plane certificates
4.13.1. Location
Control plane certificates are included in these namespaces:
- openshift-config-managed
- openshift-kube-apiserver
- openshift-kube-apiserver-operator
- openshift-kube-controller-manager
- openshift-kube-controller-manager-operator
- openshift-kube-scheduler
4.13.2. Management
Control plane certificates are managed by the system and rotated automatically.
In the rare case that your control plane certificates have expired, see Recovering from expired control plane certificates.
Chapter 5. Compliance Operator
5.1. Compliance Operator release notes
The Compliance Operator lets OpenShift Container Platform administrators describe the required compliance state of a cluster and provides them with an overview of gaps and ways to remediate them.
These release notes track the development of the Compliance Operator in the OpenShift Container Platform.
For an overview of the Compliance Operator, see Understanding the Compliance Operator.
To access the latest release, see Updating the Compliance Operator.
5.1.1. OpenShift Compliance Operator 0.1.59
The following advisory is available for the OpenShift Compliance Operator 0.1.59:
5.1.1.1. New features and enhancements
-
The Compliance Operator now supports Payment Card Industry Data Security Standard (PCI-DSS)
ocp4-pci-dssandocp4-pci-dss-nodeprofiles on theppc64learchitecture.
5.1.1.2. Bug fixes
-
Previously, the Compliance Operator did not support the Payment Card Industry Data Security Standard (PCI DSS)
ocp4-pci-dssandocp4-pci-dss-nodeprofiles on different architectures such asppc64le. Now, the Compliance Operator supportsocp4-pci-dssandocp4-pci-dss-nodeprofiles on theppc64learchitecture. (OCPBUGS-3252) -
Previously, after the recent update to version 0.1.57, the
rerunnerservice account (SA) was no longer owned by the cluster service version (CSV), which caused the SA to be removed during the Operator upgrade. Now, the CSV owns thererunnerSA in 0.1.59, and upgrades from any previous version will not result in a missing SA. (OCPBUGS-3452) -
In 0.1.57, the Operator started the controller metrics endpoint listening on port
8080. This resulted inTargetDownalerts since cluster monitoring expected port is8383. With 0.1.59, the Operator starts the endpoint listening on port8383as expected. (OCPBUGS-3097)
5.1.2. OpenShift Compliance Operator 0.1.57
The following advisory is available for the OpenShift Compliance Operator 0.1.57:
5.1.2.1. New features and enhancements
-
KubeletConfigchecks changed fromNodetoPlatformtype.KubeletConfigchecks the default configuration of theKubeletConfig. The configuration files are aggregated from all nodes into a single location per node pool. See EvaluatingKubeletConfigrules against default configuration values. -
The
ScanSettingCustom Resource now allows users to override the default CPU and memory limits of scanner pods through thescanLimitsattribute. For more information, see Increasing Compliance Operator resource limits. -
A
PriorityClassobject can now be set throughScanSetting. This ensures the Compliance Operator is prioritized and minimizes the chance that the cluster falls out of compliance. For more information, see SettingPriorityClassforScanSettingscans.
5.1.2.2. Bug fixes
-
Previously, the Compliance Operator hard-coded notifications to the default
openshift-compliancenamespace. If the Operator were installed in a non-default namespace, the notifications would not work as expected. Now, notifications work in non-defaultopenshift-compliancenamespaces. (BZ#2060726) - Previously, the Compliance Operator was unable to evaluate default configurations used by kubelet objects, resulting in inaccurate results and false positives. This new feature evaluates the kubelet configuration and now reports accurately. (BZ#2075041)
-
Previously, the Compliance Operator reported the
ocp4-kubelet-configure-event-creationrule in aFAILstate after applying an automatic remediation because theeventRecordQPSvalue was set higher than the default value. Now, theocp4-kubelet-configure-event-creationrule remediation sets the default value, and the rule applies correctly. (BZ#2082416) -
The
ocp4-configure-network-policiesrule requires manual intervention to perform effectively. New descriptive instructions and rule updates increase applicability of theocp4-configure-network-policiesrule for clusters using Calico CNIs. (BZ#2091794) -
Previously, the Compliance Operator would not clean up pods used to scan infrastructure when using the
debug=trueoption in the scan settings. This caused pods to be left on the cluster even after deleting theScanSettingBinding. Now, pods are always deleted when aScanSettingBindingis deleted.(BZ#2092913) -
Previously, the Compliance Operator used an older version of the
operator-sdkcommand that caused alerts about deprecated functionality. Now, an updated version of theoperator-sdkcommand is included and there are no more alerts for deprecated functionality. (BZ#2098581) - Previously, the Compliance Operator would fail to apply remediations if it could not determine the relationship between kubelet and machine configurations. Now, the Compliance Operator has improved handling of the machine configurations and is able to determine if a kubelet configuration is a subset of a machine configuration. (BZ#2102511)
-
Previously, the rule for
ocp4-cis-node-master-kubelet-enable-cert-rotationdid not properly describe success criteria. As a result, the requirements forRotateKubeletClientCertificatewere unclear. Now, the rule forocp4-cis-node-master-kubelet-enable-cert-rotationreports accurately regardless of the configuration present in the kubelet configuration file. (BZ#2105153) - Previously, the rule for checking idle streaming timeouts did not consider default values, resulting in inaccurate rule reporting. Now, more robust checks ensure increased accuracy in results based on default configuration values. (BZ#2105878)
-
Previously, the Compliance Operator would fail to fetch API resources when parsing machine configurations without Ignition specifications, which caused the
api-check-podsprocesses to crash loop. Now, the Compliance Operator handles Machine Config Pools that do not have Ignition specifications correctly. (BZ#2117268) -
Previously, rules evaluating the
modprobeconfiguration would fail even after applying remediations due to a mismatch in values for themodprobeconfiguration. Now, the same values are used for themodprobeconfiguration in checks and remediations, ensuring consistent results. (BZ#2117747)
5.1.2.3. Deprecations
-
Specifying Install into all namespaces in the cluster or setting the
WATCH_NAMESPACESenvironment variable to""no longer affects all namespaces. Any API resources installed in namespaces not specified at the time of Compliance Operator installation is no longer be operational. API resources might require creation in the selected namespace, or theopenshift-compliancenamespace by default. This change improves the Compliance Operator’s memory usage.
5.1.3. OpenShift Compliance Operator 0.1.53
The following advisory is available for the OpenShift Compliance Operator 0.1.53:
5.1.3.1. Bug fixes
-
Previously, the
ocp4-kubelet-enable-streaming-connectionsrule contained an incorrect variable comparison, resulting in false positive scan results. Now, the Compliance Operator provides accurate scan results when settingstreamingConnectionIdleTimeout. (BZ#2069891) -
Previously, group ownership for
/etc/openvswitch/conf.dbwas incorrect on IBM Z architectures, resulting inocp4-cis-node-worker-file-groupowner-ovs-conf-dbcheck failures. Now, the check is markedNOT-APPLICABLEon IBM Z architecture systems. (BZ#2072597) -
Previously, the
ocp4-cis-scc-limit-container-allowed-capabilitiesrule reported in aFAILstate due to incomplete data regarding the security context constraints (SCC) rules in the deployment. Now, the result isMANUAL, which is consistent with other checks that require human intervention. (BZ#2077916) Previously, the following rules failed to account for additional configuration paths for API servers and TLS certificates and keys, resulting in reported failures even if the certificates and keys were set properly:
-
ocp4-cis-api-server-kubelet-client-cert -
ocp4-cis-api-server-kubelet-client-key -
ocp4-cis-kubelet-configure-tls-cert -
ocp4-cis-kubelet-configure-tls-key
Now, the rules report accurately and observe legacy file paths specified in the kubelet configuration file. (BZ#2079813)
-
-
Previously, the
content_rule_oauth_or_oauthclient_inactivity_timeoutrule did not account for a configurable timeout set by the deployment when assessing compliance for timeouts. This resulted in the rule failing even if the timeout was valid. Now, the Compliance Operator uses thevar_oauth_inactivity_timeoutvariable to set valid timeout length. (BZ#2081952) - Previously, the Compliance Operator used administrative permissions on namespaces not labeled appropriately for privileged use, resulting in warning messages regarding pod security-level violations. Now, the Compliance Operator has appropriate namespace labels and permission adjustments to access results without violating permissions. (BZ#2088202)
-
Previously, applying auto remediations for
rhcos4-high-master-sysctl-kernel-yama-ptrace-scopeandrhcos4-sysctl-kernel-core-patternresulted in subsequent failures of those rules in scan results, even though they were remediated. Now, the rules reportPASSaccurately, even after remediations are applied.(BZ#2094382) -
Previously, the Compliance Operator would fail in a
CrashLoopBackoffstate because of out-of-memory exceptions. Now, the Compliance Operator is improved to handle large machine configuration data sets in memory and function correctly. (BZ#2094854)
5.1.3.2. Known issue
When
"debug":trueis set within theScanSettingBindingobject, the pods generated by theScanSettingBindingobject are not removed when that binding is deleted. As a workaround, run the following command to delete the remaining pods:$ oc delete pods -l compliance.openshift.io/scan-name=ocp4-cis
5.1.4. OpenShift Compliance Operator 0.1.52
The following advisory is available for the OpenShift Compliance Operator 0.1.52:
5.1.4.1. New features and enhancements
- The FedRAMP high SCAP profile is now available for use in OpenShift Container Platform environments. For more information, See Supported compliance profiles.
5.1.4.2. Bug fixes
-
Previously, the
OpenScapcontainer would crash due to a mount permission issue in a security environment whereDAC_OVERRIDEcapability is dropped. Now, executable mount permissions are applied to all users. (BZ#2082151) -
Previously, the compliance rule
ocp4-configure-network-policiescould be configured asMANUAL. Now, compliance ruleocp4-configure-network-policiesis set toAUTOMATIC. (BZ#2072431) - Previously, the Cluster Autoscaler would fail to scale down because the Compliance Operator scan pods were never removed after a scan. Now, the pods are removed from each node by default unless explicitly saved for debugging purposes. (BZ#2075029)
-
Previously, applying the Compliance Operator to the
KubeletConfigwould result in the node going into aNotReadystate due to unpausing the Machine Config Pools too early. Now, the Machine Config Pools are unpaused appropriately and the node operates correctly. (BZ#2071854) -
Previously, the Machine Config Operator used
base64instead ofurl-encodedcode in the latest release, causing Compliance Operator remediation to fail. Now, the Compliance Operator checks encoding to handle bothbase64andurl-encodedMachine Config code and the remediation applies correctly. (BZ#2082431)
5.1.4.3. Known issue
When
"debug":trueis set within theScanSettingBindingobject, the pods generated by theScanSettingBindingobject are not removed when that binding is deleted. As a workaround, run the following command to delete the remaining pods:$ oc delete pods -l compliance.openshift.io/scan-name=ocp4-cis
5.1.5. OpenShift Compliance Operator 0.1.49
The following advisory is available for the OpenShift Compliance Operator 0.1.49:
5.1.5.1. Bug fixes
-
Previously, the
openshift-compliancecontent did not include platform-specific checks for network types. As a result, OVN- and SDN-specific checks would show asfailedinstead ofnot-applicablebased on the network configuration. Now, new rules contain platform checks for networking rules, resulting in a more accurate assessment of network-specific checks. (BZ#1994609) -
Previously, the
ocp4-moderate-routes-protected-by-tlsrule incorrectly checked TLS settings that results in the rule failing the check, even if the connection secure SSL TLS protocol. Now, the check properly evaluates TLS settings that are consistent with the networking guidance and profile recommendations. (BZ#2002695) -
Previously,
ocp-cis-configure-network-policies-namespaceused pagination when requesting namespaces. This caused the rule to fail because the deployments truncated lists of more than 500 namespaces. Now, the entire namespace list is requested, and the rule for checking configured network policies works for deployments with more than 500 namespaces. (BZ#2038909) -
Previously, remediations using the
sshd jinjamacros were hard-coded to specific sshd configurations. As a result, the configurations were inconsistent with the content the rules were checking for and the check would fail. Now, the sshd configuration is parameterized and the rules apply successfully. (BZ#2049141) -
Previously, the
ocp4-cluster-version-operator-verify-integrityalways checked the first entry in the Cluter Version Operator (CVO) history. As a result, the upgrade would fail in situations where subsequent versions of {product-name} would be verified. Now, the compliance check result forocp4-cluster-version-operator-verify-integrityis able to detect verified versions and is accurate with the CVO history. (BZ#2053602) -
Previously, the
ocp4-api-server-no-adm-ctrl-plugins-disabledrule did not check for a list of empty admission controller plugins. As a result, the rule would always fail, even if all admission plugins were enabled. Now, more robust checking of theocp4-api-server-no-adm-ctrl-plugins-disabledrule accurately passes with all admission controller plugins enabled. (BZ#2058631) - Previously, scans did not contain platform checks for running against Linux worker nodes. As a result, running scans against worker nodes that were not Linux-based resulted in a never ending scan loop. Now, the scan schedules appropriately based on platform type and labels complete successfully. (BZ#2056911)
5.1.6. OpenShift Compliance Operator 0.1.48
The following advisory is available for the OpenShift Compliance Operator 0.1.48:
5.1.6.1. Bug fixes
-
Previously, some rules associated with extended Open Vulnerability and Assessment Language (OVAL) definitions had a
checkTypeofNone. This was because the Compliance Operator was not processing extended OVAL definitions when parsing rules. With this update, content from extended OVAL definitions is parsed so that these rules now have acheckTypeof eitherNodeorPlatform. (BZ#2040282) -
Previously, a manually created
MachineConfigobject forKubeletConfigprevented aKubeletConfigobject from being generated for remediation, leaving the remediation in thePendingstate. With this release, aKubeletConfigobject is created by the remediation, regardless if there is a manually createdMachineConfigobject forKubeletConfig. As a result,KubeletConfigremediations now work as expected. (BZ#2040401)
5.1.7. OpenShift Compliance Operator 0.1.47
The following advisory is available for the OpenShift Compliance Operator 0.1.47:
5.1.7.1. New features and enhancements
The Compliance Operator now supports the following compliance benchmarks for the Payment Card Industry Data Security Standard (PCI DSS):
- ocp4-pci-dss
- ocp4-pci-dss-node
- Additional rules and remediations for FedRAMP moderate impact level are added to the OCP4-moderate, OCP4-moderate-node, and rhcos4-moderate profiles.
- Remediations for KubeletConfig are now available in node-level profiles.
5.1.7.2. Bug fixes
Previously, if your cluster was running OpenShift Container Platform 4.6 or earlier, remediations for USBGuard-related rules would fail for the moderate profile. This is because the remediations created by the Compliance Operator were based on an older version of USBGuard that did not support drop-in directories. Now, invalid remediations for USBGuard-related rules are not created for clusters running OpenShift Container Platform 4.6. If your cluster is using OpenShift Container Platform 4.6, you must manually create remediations for USBGuard-related rules.
Additionally, remediations are created only for rules that satisfy minimum version requirements. (BZ#1965511)
-
Previously, when rendering remediations, the compliance operator would check that the remediation was well-formed by using a regular expression that was too strict. As a result, some remediations, such as those that render
sshd_config, would not pass the regular expression check and therefore, were not created. The regular expression was found to be unnecessary and removed. Remediations now render correctly. (BZ#2033009)
5.1.8. OpenShift Compliance Operator 0.1.44
The following advisory is available for the OpenShift Compliance Operator 0.1.44:
5.1.8.1. New features and enhancements
-
In this release, the
strictNodeScanoption is now added to theComplianceScan,ComplianceSuiteandScanSettingCRs. This option defaults totruewhich matches the previous behavior, where an error occurred if a scan was not able to be scheduled on a node. Setting the option tofalseallows the Compliance Operator to be more permissive about scheduling scans. Environments with ephemeral nodes can set thestrictNodeScanvalue to false, which allows a compliance scan to proceed, even if some of the nodes in the cluster are not available for scheduling. -
You can now customize the node that is used to schedule the result server workload by configuring the
nodeSelectorandtolerationsattributes of theScanSettingobject. These attributes are used to place theResultServerpod, the pod that is used to mount a PV storage volume and store the raw Asset Reporting Format (ARF) results. Previously, thenodeSelectorand thetolerationsparameters defaulted to selecting one of the control plane nodes and tolerating thenode-role.kubernetes.io/master taint. This did not work in environments where control plane nodes are not permitted to mount PVs. This feature provides a way for you to select the node and tolerate a different taint in those environments. -
The Compliance Operator can now remediate
KubeletConfigobjects. - A comment containing an error message is now added to help content developers differentiate between objects that do not exist in the cluster versus objects that cannot be fetched.
-
Rule objects now contain two new attributes,
checkTypeanddescription. These attributes allow you to determine if the rule pertains to a node check or platform check, and also allow you to review what the rule does. -
This enhancement removes the requirement that you have to extend an existing profile in order to create a tailored profile. This means the
extendsfield in theTailoredProfileCRD is no longer mandatory. You can now select a list of rule objects to create a tailored profile. Note that you must select whether your profile applies to nodes or the platform by setting thecompliance.openshift.io/product-type:annotation or by setting the-nodesuffix for theTailoredProfileCR. -
In this release, the Compliance Operator is now able to schedule scans on all nodes irrespective of their taints. Previously, the scan pods would only tolerated the
node-role.kubernetes.io/master taint, meaning that they would either ran on nodes with no taints or only on nodes with thenode-role.kubernetes.io/mastertaint. In deployments that use custom taints for their nodes, this resulted in the scans not being scheduled on those nodes. Now, the scan pods tolerate all node taints. In this release, the Compliance Operator supports the following North American Electric Reliability Corporation (NERC) security profiles:
- ocp4-nerc-cip
- ocp4-nerc-cip-node
- rhcos4-nerc-cip
- In this release, the Compliance Operator supports the NIST 800-53 Moderate-Impact Baseline for the Red Hat OpenShift - Node level, ocp4-moderate-node, security profile.
5.1.8.2. Templating and variable use
- In this release, the remediation template now allows multi-value variables.
-
With this update, the Compliance Operator can change remediations based on variables that are set in the compliance profile. This is useful for remediations that include deployment-specific values such as time outs, NTP server host names, or similar. Additionally, the
ComplianceCheckResultobjects now use the labelcompliance.openshift.io/check-has-valuethat lists the variables a check has used.
5.1.8.3. Bug fixes
- Previously, while performing a scan, an unexpected termination occurred in one of the scanner containers of the pods. In this release, the Compliance Operator uses the latest OpenSCAP version 1.3.5 to avoid a crash.
-
Previously, using
autoReplyRemediationsto apply remediations triggered an update of the cluster nodes. This was disruptive if some of the remediations did not include all of the required input variables. Now, if a remediation is missing one or more required input variables, it is assigned a state ofNeedsReview. If one or more remediations are in aNeedsReviewstate, the machine config pool remains paused, and the remediations are not applied until all of the required variables are set. This helps minimize disruption to the nodes. - The RBAC Role and Role Binding used for Prometheus metrics are changed to 'ClusterRole' and 'ClusterRoleBinding' to ensure that monitoring works without customization.
-
Previously, if an error occurred while parsing a profile, rules or variables objects were removed and deleted from the profile. Now, if an error occurs during parsing, the
profileparserannotates the object with a temporary annotation that prevents the object from being deleted until after parsing completes. (BZ#1988259) -
Previously, an error occurred if titles or descriptions were missing from a tailored profile. Because the XCCDF standard requires titles and descriptions for tailored profiles, titles and descriptions are now required to be set in
TailoredProfileCRs. -
Previously, when using tailored profiles,
TailoredProfilevariable values were allowed to be set using only a specific selection set. This restriction is now removed, andTailoredProfilevariables can be set to any value.
5.1.9. Release Notes for Compliance Operator 0.1.39
The following advisory is available for the OpenShift Compliance Operator 0.1.39:
5.1.9.1. New features and enhancements
- Previously, the Compliance Operator was unable to parse Payment Card Industry Data Security Standard (PCI DSS) references. Now, the Operator can parse compliance content that ships with PCI DSS profiles.
- Previously, the Compliance Operator was unable to execute rules for AU-5 control in the moderate profile. Now, permission is added to the Operator so that it can read Prometheusrules.monitoring.coreos.com objects and run the rules that cover AU-5 control in the moderate profile.
5.2. Supported compliance profiles
There are several profiles available as part of the Compliance Operator (CO) installation.
The Compliance Operator might report incorrect results on managed platforms, such as OpenShift Dedicated, Red Hat OpenShift Service on AWS, and Azure Red Hat OpenShift. For more information, see the Red Hat Knowledgebase Solution #6983418.
5.2.1. Compliance profiles
The Compliance Operator provides the following compliance profiles:
| Profile | Profile title | Compliance Operator version | Industry compliance benchmark | Supported architectures |
|---|---|---|---|---|
| ocp4-cis | CIS Red Hat OpenShift Container Platform 4 Benchmark | 0.1.39+ |
CIS Benchmarks ™ footnote:cisbenchmark[To locate the CIS RedHat OpenShift Container Platform v4 Benchmark, go to CIS Benchmarks and type |
|
| ocp4-cis-node | CIS Red Hat OpenShift Container Platform 4 Benchmark | 0.1.39+ | CIS Benchmarks ™ footnote:cisbenchmark[] |
|
| ocp4-e8 | Australian Cyber Security Centre (ACSC) Essential Eight | 0.1.39+ |
| |
| ocp4-moderate | NIST 800-53 Moderate-Impact Baseline for Red Hat OpenShift - Platform level | 0.1.39+ |
| |
| rhcos4-e8 | Australian Cyber Security Centre (ACSC) Essential Eight | 0.1.39+ |
| |
| rhcos4-moderate | NIST 800-53 Moderate-Impact Baseline for Red Hat Enterprise Linux CoreOS | 0.1.39+ |
| |
| ocp4-moderate-node | NIST 800-53 Moderate-Impact Baseline for Red Hat OpenShift - Node level | 0.1.44+ |
| |
| ocp4-nerc-cip | North American Electric Reliability Corporation (NERC) Critical Infrastructure Protection (CIP) cybersecurity standards profile for the Red Hat OpenShift Container Platform - Platform level | 0.1.44+ |
| |
| ocp4-nerc-cip-node | North American Electric Reliability Corporation (NERC) Critical Infrastructure Protection (CIP) cybersecurity standards profile for the Red Hat OpenShift Container Platform - Node level | 0.1.44+ |
| |
| rhcos4-nerc-cip | North American Electric Reliability Corporation (NERC) Critical Infrastructure Protection (CIP) cybersecurity standards profile for Red Hat Enterprise Linux CoreOS | 0.1.44+ |
| |
| ocp4-pci-dss | PCI-DSS v3.2.1 Control Baseline for Red Hat OpenShift Container Platform 4 | 0.1.47+ |
| |
| ocp4-pci-dss-node | PCI-DSS v3.2.1 Control Baseline for Red Hat OpenShift Container Platform 4 | 0.1.47+ |
| |
| ocp4-high | NIST 800-53 High-Impact Baseline for Red Hat OpenShift - Platform level | 0.1.52+ |
| |
| ocp4-high-node | NIST 800-53 High-Impact Baseline for Red Hat OpenShift - Node level | 0.1.52+ |
| |
| rhcos4-high | NIST 800-53 High-Impact Baseline for Red Hat Enterprise Linux CoreOS | 0.1.52+ |
|
5.3. Installing the Compliance Operator
Before you can use the Compliance Operator, you must ensure it is deployed in the cluster.
5.3.1. Installing the Compliance Operator through the web console
Prerequisites
-
You must have
adminprivileges.
Procedure
- In the OpenShift Container Platform web console, navigate to Operators → OperatorHub.
- Search for the Compliance Operator, then click Install.
-
Keep the default selection of Installation mode and namespace to ensure that the Operator will be installed to the
openshift-compliancenamespace. - Click Install.
Verification
To confirm that the installation is successful:
- Navigate to the Operators → Installed Operators page.
-
Check that the Compliance Operator is installed in the
openshift-compliancenamespace and its status isSucceeded.
If the Operator is not installed successfully:
-
Navigate to the Operators → Installed Operators page and inspect the
Statuscolumn for any errors or failures. -
Navigate to the Workloads → Pods page and check the logs in any pods in the
openshift-complianceproject that are reporting issues.
If the restricted Security Context Constraints (SCC) have been modified to contain the system:authenticated group or has added requiredDropCapabilities, the Compliance Operator may not function properly due to permissions issues.
You can create a custom SCC for the Compliance Operator scanner pod service account. For more information, see Creating a custom SCC for the Compliance Operator.
5.3.2. Installing the Compliance Operator using the CLI
Prerequisites
-
You must have
adminprivileges.
Procedure
Define a
Namespaceobject:Example
namespace-object.yamlapiVersion: v1 kind: Namespace metadata: labels: openshift.io/cluster-monitoring: "true" name: openshift-complianceCreate the
Namespaceobject:$ oc create -f namespace-object.yamlDefine an
OperatorGroupobject:Example
operator-group-object.yamlapiVersion: operators.coreos.com/v1 kind: OperatorGroup metadata: name: compliance-operator namespace: openshift-compliance spec: targetNamespaces: - openshift-complianceCreate the
OperatorGroupobject:$ oc create -f operator-group-object.yamlDefine a
Subscriptionobject:Example
subscription-object.yamlapiVersion: operators.coreos.com/v1alpha1 kind: Subscription metadata: name: compliance-operator-sub namespace: openshift-compliance spec: channel: "release-0.1" installPlanApproval: Automatic name: compliance-operator source: redhat-operators sourceNamespace: openshift-marketplaceCreate the
Subscriptionobject:$ oc create -f subscription-object.yaml
If you are setting the global scheduler feature and enable defaultNodeSelector, you must create the namespace manually and update the annotations of the openshift-compliance namespace, or the namespace where the Compliance Operator was installed, with openshift.io/node-selector: “”. This removes the default node selector and prevents deployment failures.
Verification
Verify the installation succeeded by inspecting the CSV file:
$ oc get csv -n openshift-complianceVerify that the Compliance Operator is up and running:
$ oc get deploy -n openshift-compliance
If the restricted Security Context Constraints (SCC) have been modified to contain the system:authenticated group or has added requiredDropCapabilities, the Compliance Operator may not function properly due to permissions issues.
You can create a custom SCC for the Compliance Operator scanner pod service account. For more information, see Creating a custom SCC for the Compliance Operator.
5.4. Updating the Compliance Operator
As a cluster administrator, you can update the Compliance Operator on your OpenShift Container Platform cluster.
5.4.1. Preparing for an Operator update
The subscription of an installed Operator specifies an update channel that tracks and receives updates for the Operator. You can change the update channel to start tracking and receiving updates from a newer channel.
The names of update channels in a subscription can differ between Operators, but the naming scheme typically follows a common convention within a given Operator. For example, channel names might follow a minor release update stream for the application provided by the Operator (1.2, 1.3) or a release frequency (stable, fast).
You cannot change installed Operators to a channel that is older than the current channel.
Red Hat Customer Portal Labs include the following application that helps administrators prepare to update their Operators:
You can use the application to search for Operator Lifecycle Manager-based Operators and verify the available Operator version per update channel across different versions of OpenShift Container Platform. Cluster Version Operator-based Operators are not included.
5.4.2. Changing the update channel for an Operator
You can change the update channel for an Operator by using the OpenShift Container Platform web console.
If the approval strategy in the subscription is set to Automatic, the update process initiates as soon as a new Operator version is available in the selected channel. If the approval strategy is set to Manual, you must manually approve pending updates.
Prerequisites
- An Operator previously installed using Operator Lifecycle Manager (OLM).
Procedure
- In the Administrator perspective of the web console, navigate to Operators → Installed Operators.
- Click the name of the Operator you want to change the update channel for.
- Click the Subscription tab.
- Click the name of the update channel under Channel.
- Click the newer update channel that you want to change to, then click Save.
For subscriptions with an Automatic approval strategy, the update begins automatically. Navigate back to the Operators → Installed Operators page to monitor the progress of the update. When complete, the status changes to Succeeded and Up to date.
For subscriptions with a Manual approval strategy, you can manually approve the update from the Subscription tab.
5.4.3. Manually approving a pending Operator update
If an installed Operator has the approval strategy in its subscription set to Manual, when new updates are released in its current update channel, the update must be manually approved before installation can begin.
Prerequisites
- An Operator previously installed using Operator Lifecycle Manager (OLM).
Procedure
- In the Administrator perspective of the OpenShift Container Platform web console, navigate to Operators → Installed Operators.
- Operators that have a pending update display a status with Upgrade available. Click the name of the Operator you want to update.
- Click the Subscription tab. Any update requiring approval are displayed next to Upgrade Status. For example, it might display 1 requires approval.
- Click 1 requires approval, then click Preview Install Plan.
- Review the resources that are listed as available for update. When satisfied, click Approve.
- Navigate back to the Operators → Installed Operators page to monitor the progress of the update. When complete, the status changes to Succeeded and Up to date.
5.5. Compliance Operator scans
The ScanSetting and ScanSettingBinding APIs are recommended to run compliance scans with the Compliance Operator. For more information on these API objects, run:
$ oc explain scansettingsor
$ oc explain scansettingbindings5.5.1. Running compliance scans
You can run a scan using the Center for Internet Security (CIS) profiles. For convenience, the Compliance Operator creates a ScanSetting object with reasonable defaults on startup. This ScanSetting object is named default.
For all-in-one control plane and worker nodes, the compliance scan runs twice on the worker and control plane nodes. The compliance scan might generate inconsistent scan results. You can avoid inconsistent results by defining only a single role in the ScanSetting object.
Procedure
Inspect the
ScanSettingobject by running:$ oc describe scansettings default -n openshift-complianceExample output
Name:         default
Namespace:    openshift-compliance
Labels:       <none>
Annotations:  <none>
API Version:  compliance.openshift.io/v1alpha1
Kind:         ScanSetting
Metadata:
  Creation Timestamp:  2022-10-10T14:07:29Z
  Generation:          1
  Managed Fields:
    API Version:  compliance.openshift.io/v1alpha1
    Fields Type:  FieldsV1
    fieldsV1:
      f:rawResultStorage:
        .:
        f:nodeSelector:
          .:
          f:node-role.kubernetes.io/master:
        f:pvAccessModes:
        f:rotation:
        f:size:
        f:tolerations:
      f:roles:
      f:scanTolerations:
      f:schedule:
      f:showNotApplicable:
      f:strictNodeScan:
    Manager:         compliance-operator
    Operation:       Update
    Time:            2022-10-10T14:07:29Z
  Resource Version:  56111
  UID:               c21d1d14-3472-47d7-a450-b924287aec90
Raw Result Storage:
  Node Selector:
    node-role.kubernetes.io/master:
  Pv Access Modes:
    ReadWriteOnce
1 Rotation: 32 Size: 1Gi3 Tolerations: Effect: NoSchedule Key: node-role.kubernetes.io/master Operator: Exists Effect: NoExecute Key: node.kubernetes.io/not-ready Operator: Exists Toleration Seconds: 300 Effect: NoExecute Key: node.kubernetes.io/unreachable Operator: Exists Toleration Seconds: 300 Effect: NoSchedule Key: node.kubernetes.io/memory-pressure Operator: Exists Roles: master4 worker5 Scan Tolerations:6 Operator: Exists Schedule: 0 1 * * *7 Show Not Applicable: false Strict Node Scan: true Events: <none>- 1
- The Compliance Operator creates a persistent volume (PV) that contains the results of the scans. By default, the PV will use access mode
ReadWriteOncebecause the Compliance Operator cannot make any assumptions about the storage classes configured on the cluster. Additionally,ReadWriteOnceaccess mode is available on most clusters. If you need to fetch the scan results, you can do so by using a helper pod, which also binds the volume. Volumes that use theReadWriteOnceaccess mode can be mounted by only one pod at time, so it is important to remember to delete the helper pods. Otherwise, the Compliance Operator will not be able to reuse the volume for subsequent scans. - 2
- The Compliance Operator keeps results of three subsequent scans in the volume; older scans are rotated.
- 3
- The Compliance Operator will allocate one GB of storage for the scan results.
- 4 5
- If the scan setting uses any profiles that scan cluster nodes, scan these node roles.
- 6
- The default scan setting object also scans all the nodes.
- 7
- The default scan setting object runs scans at 01:00 each day.
As an alternative to the default scan setting, you can use
default-auto-apply, which has the following settings:Name: default-auto-apply Namespace: openshift-compliance Labels: <none> Annotations: <none> API Version: compliance.openshift.io/v1alpha1 Auto Apply Remediations: true Auto Update Remediations: true Kind: ScanSetting Metadata: Creation Timestamp: 2022-10-18T20:21:00Z Generation: 1 Managed Fields: API Version: compliance.openshift.io/v1alpha1 Fields Type: FieldsV1 fieldsV1: f:autoApplyRemediations:1 f:autoUpdateRemediations:2 f:rawResultStorage: .: f:nodeSelector: .: f:node-role.kubernetes.io/master: f:pvAccessModes: f:rotation: f:size: f:tolerations: f:roles: f:scanTolerations: f:schedule: f:showNotApplicable: f:strictNodeScan: Manager: compliance-operator Operation: Update Time: 2022-10-18T20:21:00Z Resource Version: 38840 UID: 8cb0967d-05e0-4d7a-ac1c-08a7f7e89e84 Raw Result Storage: Node Selector: node-role.kubernetes.io/master: Pv Access Modes: ReadWriteOnce Rotation: 3 Size: 1Gi Tolerations: Effect: NoSchedule Key: node-role.kubernetes.io/master Operator: Exists Effect: NoExecute Key: node.kubernetes.io/not-ready Operator: Exists Toleration Seconds: 300 Effect: NoExecute Key: node.kubernetes.io/unreachable Operator: Exists Toleration Seconds: 300 Effect: NoSchedule Key: node.kubernetes.io/memory-pressure Operator: Exists Roles: master worker Scan Tolerations: Operator: Exists Schedule: 0 1 * * * Show Not Applicable: false Strict Node Scan: true Events: <none>Create a
ScanSettingBindingobject that binds to the defaultScanSettingobject and scans the cluster using thecisandcis-nodeprofiles. For example:apiVersion: compliance.openshift.io/v1alpha1 kind: ScanSettingBinding metadata: name: cis-compliance namespace: openshift-compliance profiles: - name: ocp4-cis-node kind: Profile apiGroup: compliance.openshift.io/v1alpha1 - name: ocp4-cis kind: Profile apiGroup: compliance.openshift.io/v1alpha1 settingsRef: name: default kind: ScanSetting apiGroup: compliance.openshift.io/v1alpha1Create the
ScanSettingBindingobject by running:$ oc create -f <file-name>.yaml -n openshift-complianceAt this point in the process, the
ScanSettingBindingobject is reconciled and based on theBindingand theBoundsettings. The Compliance Operator creates aComplianceSuiteobject and the associatedComplianceScanobjects.Follow the compliance scan progress by running:
$ oc get compliancescan -w -n openshift-complianceThe scans progress through the scanning phases and eventually reach the
DONEphase when complete. In most cases, the result of the scan isNON-COMPLIANT. You can review the scan results and start applying remediations to make the cluster compliant. See Managing Compliance Operator remediation for more information.
5.5.2. Scheduling the result server pod on a worker node
The result server pod mounts the persistent volume (PV) that stores the raw Asset Reporting Format (ARF) scan results. The nodeSelector and tolerations attributes enable you to configure the location of the result server pod.
This is helpful for those environments where control plane nodes are not permitted to mount persistent volumes.
Procedure
Create a
ScanSettingcustom resource (CR) for the Compliance Operator:Define the
ScanSettingCR, and save the YAML file, for example,rs-workers.yaml:apiVersion: compliance.openshift.io/v1alpha1 kind: ScanSetting metadata: name: rs-on-workers namespace: openshift-compliance rawResultStorage: nodeSelector: node-role.kubernetes.io/worker: ""1 pvAccessModes: - ReadWriteOnce rotation: 3 size: 1Gi tolerations: - operator: Exists2 roles: - worker - master scanTolerations: - operator: Exists schedule: 0 1 * * *To create the
ScanSettingCR, run the following command:$ oc create -f rs-workers.yaml
Verification
To verify that the
ScanSettingobject is created, run the following command:$ oc get scansettings rs-on-workers -n openshift-compliance -o yamlExample output
apiVersion: compliance.openshift.io/v1alpha1 kind: ScanSetting metadata: creationTimestamp: "2021-11-19T19:36:36Z" generation: 1 name: rs-on-workers namespace: openshift-compliance resourceVersion: "48305" uid: 43fdfc5f-15a7-445a-8bbc-0e4a160cd46e rawResultStorage: nodeSelector: node-role.kubernetes.io/worker: "" pvAccessModes: - ReadWriteOnce rotation: 3 size: 1Gi tolerations: - operator: Exists roles: - worker - master scanTolerations: - operator: Exists schedule: 0 1 * * * strictNodeScan: true
5.5.3. ScanSetting Custom Resource
The ScanSetting Custom Resource now allows you to override the default CPU and memory limits of scanner pods through the scan limits attribute. The Compliance Operator will use defaults of 500Mi memory, 100m CPU for the scanner container, and 200Mi memory with 100m CPU for the api-resource-collector container. To set the memory limits of the Operator, modify the Subscription object if installed through OLM or the Operator deployment itself.
To increase the default CPU and memory limits of the Compliance Operator, see Increasing Compliance Operator resource limits.
Increasing the memory limit for the Compliance Operator or the scanner pods is needed if the default limits are not sufficient and the Operator or scanner pods are ended by the Out Of Memory (OOM) process.
5.5.4. Applying resource requests and limits
When the kubelet starts a container as part of a Pod, the kubelet passes that container’s requests and limits for memory and CPU to the container runtime. In Linux, the container runtime configures the kernel cgroups that apply and enforce the limits you defined.
The CPU limit defines how much CPU time the container can use. During each scheduling interval, the Linux kernel checks to see if this limit is exceeded. If so, the kernel waits before allowing the cgroup to resume execution.
If several different containers (cgroups) want to run on a contended system, workloads with larger CPU requests are allocated more CPU time than workloads with small requests. The memory request is used during Pod scheduling. On a node that uses cgroups v2, the container runtime might use the memory request as a hint to set memory.min and memory.low values.
If a container attempts to allocate more memory than this limit, the Linux kernel out-of-memory subsystem activates and intervenes by stopping one of the processes in the container that tried to allocate memory. The memory limit for the Pod or container can also apply to pages in memory-backed volumes, such as an emptyDir.
The kubelet tracks tmpfs emptyDir volumes as container memory is used, rather than as local ephemeral storage. If a container exceeds its memory request and the node that it runs on becomes short of memory overall, the Pod’s container might be evicted.
A container may not exceed its CPU limit for extended periods. Container run times do not stop Pods or containers for excessive CPU usage. To determine whether a container cannot be scheduled or is being killed due to resource limits, see Troubleshooting the Compliance Operator.
5.5.5. Scheduling Pods with resource requests
When a Pod is created, the scheduler selects a Node for the Pod to run on. Each node has a maximum capacity for each resource type in the amount of CPU and memory it can provide for the Pods. The scheduler ensures that the sum of the resource requests of the scheduled containers is less than the capacity nodes for each resource type.
Although memory or CPU resource usage on nodes is very low, the scheduler might still refuse to place a Pod on a node if the capacity check fails to protect against a resource shortage on a node.
For each container, you can specify the following resource limits and request:
spec.containers[].resources.limits.cpu
spec.containers[].resources.limits.memory
spec.containers[].resources.limits.hugepages-<size>
spec.containers[].resources.requests.cpu
spec.containers[].resources.requests.memory
spec.containers[].resources.requests.hugepages-<size>Although you can specify requests and limits for only individual containers, it is also useful to consider the overall resource requests and limits for a pod. For a particular resource, a pod resource request or limit is the sum of the resource requests or limits of that type for each container in the pod.
Example Pod resource requests and limits
apiVersion: v1
kind: Pod
metadata:
name: frontend
spec:
containers:
- name: app
image: images.my-company.example/app:v4
resources:
requests:
memory: "64Mi"
cpu: "250m"
limits:
memory: "128Mi"
cpu: "500m"
- name: log-aggregator
image: images.my-company.example/log-aggregator:v6
resources:
requests:
memory: "64Mi"
cpu: "250m"
limits:
memory: "128Mi"
cpu: "500m"5.6. Understanding the Compliance Operator
The Compliance Operator lets OpenShift Container Platform administrators describe the required compliance state of a cluster and provides them with an overview of gaps and ways to remediate them. The Compliance Operator assesses compliance of both the Kubernetes API resources of OpenShift Container Platform, as well as the nodes running the cluster. The Compliance Operator uses OpenSCAP, a NIST-certified tool, to scan and enforce security policies provided by the content.
The Compliance Operator is available for Red Hat Enterprise Linux CoreOS (RHCOS) deployments only.
5.6.1. Compliance Operator profiles
There are several profiles available as part of the Compliance Operator installation. You can use the oc get command to view available profiles, profile details, and specific rules.
View the available profiles:
$ oc get -n openshift-compliance profiles.complianceExample output
NAME AGE ocp4-cis 94m ocp4-cis-node 94m ocp4-e8 94m ocp4-high 94m ocp4-high-node 94m ocp4-moderate 94m ocp4-moderate-node 94m ocp4-nerc-cip 94m ocp4-nerc-cip-node 94m ocp4-pci-dss 94m ocp4-pci-dss-node 94m rhcos4-e8 94m rhcos4-high 94m rhcos4-moderate 94m rhcos4-nerc-cip 94mThese profiles represent different compliance benchmarks. Each profile has the product name that it applies to added as a prefix to the profile’s name.
ocp4-e8applies the Essential 8 benchmark to the OpenShift Container Platform product, whilerhcos4-e8applies the Essential 8 benchmark to the Red Hat Enterprise Linux CoreOS (RHCOS) product.Run the following command to view the details of the
rhcos4-e8profile:$ oc get -n openshift-compliance -oyaml profiles.compliance rhcos4-e8Example output
apiVersion: compliance.openshift.io/v1alpha1 description: 'This profile contains configuration checks for Red Hat Enterprise Linux CoreOS that align to the Australian Cyber Security Centre (ACSC) Essential Eight. A copy of the Essential Eight in Linux Environments guide can be found at the ACSC website: https://www.cyber.gov.au/acsc/view-all-content/publications/hardening-linux-workstations-and-servers' id: xccdf_org.ssgproject.content_profile_e8 kind: Profile metadata: annotations: compliance.openshift.io/image-digest: pb-rhcos4hrdkm compliance.openshift.io/product: redhat_enterprise_linux_coreos_4 compliance.openshift.io/product-type: Node creationTimestamp: "2022-10-19T12:06:49Z" generation: 1 labels: compliance.openshift.io/profile-bundle: rhcos4 name: rhcos4-e8 namespace: openshift-compliance ownerReferences: - apiVersion: compliance.openshift.io/v1alpha1 blockOwnerDeletion: true controller: true kind: ProfileBundle name: rhcos4 uid: 22350850-af4a-4f5c-9a42-5e7b68b82d7d resourceVersion: "43699" uid: 86353f70-28f7-40b4-bf0e-6289ec33675b rules: - rhcos4-accounts-no-uid-except-zero - rhcos4-audit-rules-dac-modification-chmod - rhcos4-audit-rules-dac-modification-chown - rhcos4-audit-rules-execution-chcon - rhcos4-audit-rules-execution-restorecon - rhcos4-audit-rules-execution-semanage - rhcos4-audit-rules-execution-setfiles - rhcos4-audit-rules-execution-setsebool - rhcos4-audit-rules-execution-seunshare - rhcos4-audit-rules-kernel-module-loading-delete - rhcos4-audit-rules-kernel-module-loading-finit - rhcos4-audit-rules-kernel-module-loading-init - rhcos4-audit-rules-login-events - rhcos4-audit-rules-login-events-faillock - rhcos4-audit-rules-login-events-lastlog - rhcos4-audit-rules-login-events-tallylog - rhcos4-audit-rules-networkconfig-modification - rhcos4-audit-rules-sysadmin-actions - rhcos4-audit-rules-time-adjtimex - rhcos4-audit-rules-time-clock-settime - rhcos4-audit-rules-time-settimeofday - rhcos4-audit-rules-time-stime - rhcos4-audit-rules-time-watch-localtime - rhcos4-audit-rules-usergroup-modification - rhcos4-auditd-data-retention-flush - rhcos4-auditd-freq - rhcos4-auditd-local-events - rhcos4-auditd-log-format - rhcos4-auditd-name-format - rhcos4-auditd-write-logs - rhcos4-configure-crypto-policy - rhcos4-configure-ssh-crypto-policy - rhcos4-no-empty-passwords - rhcos4-selinux-policytype - rhcos4-selinux-state - rhcos4-service-auditd-enabled - rhcos4-sshd-disable-empty-passwords - rhcos4-sshd-disable-gssapi-auth - rhcos4-sshd-disable-rhosts - rhcos4-sshd-disable-root-login - rhcos4-sshd-disable-user-known-hosts - rhcos4-sshd-do-not-permit-user-env - rhcos4-sshd-enable-strictmodes - rhcos4-sshd-print-last-log - rhcos4-sshd-set-loglevel-info - rhcos4-sysctl-kernel-dmesg-restrict - rhcos4-sysctl-kernel-kptr-restrict - rhcos4-sysctl-kernel-randomize-va-space - rhcos4-sysctl-kernel-unprivileged-bpf-disabled - rhcos4-sysctl-kernel-yama-ptrace-scope - rhcos4-sysctl-net-core-bpf-jit-harden title: Australian Cyber Security Centre (ACSC) Essential EightRun the following command to view the details of the
rhcos4-audit-rules-login-eventsrule:$ oc get -n openshift-compliance -oyaml rules rhcos4-audit-rules-login-eventsExample output
apiVersion: compliance.openshift.io/v1alpha1 checkType: Node description: |- The audit system already collects login information for all users and root. If the auditd daemon is configured to use the augenrules program to read audit rules during daemon startup (the default), add the following lines to a file with suffix.rules in the directory /etc/audit/rules.d in order to watch for attempted manual edits of files involved in storing logon events: -w /var/log/tallylog -p wa -k logins -w /var/run/faillock -p wa -k logins -w /var/log/lastlog -p wa -k logins If the auditd daemon is configured to use the auditctl utility to read audit rules during daemon startup, add the following lines to /etc/audit/audit.rules file in order to watch for unattempted manual edits of files involved in storing logon events: -w /var/log/tallylog -p wa -k logins -w /var/run/faillock -p wa -k logins -w /var/log/lastlog -p wa -k logins id: xccdf_org.ssgproject.content_rule_audit_rules_login_events kind: Rule metadata: annotations: compliance.openshift.io/image-digest: pb-rhcos4hrdkm compliance.openshift.io/rule: audit-rules-login-events control.compliance.openshift.io/NIST-800-53: AU-2(d);AU-12(c);AC-6(9);CM-6(a) control.compliance.openshift.io/PCI-DSS: Req-10.2.3 policies.open-cluster-management.io/controls: AU-2(d),AU-12(c),AC-6(9),CM-6(a),Req-10.2.3 policies.open-cluster-management.io/standards: NIST-800-53,PCI-DSS creationTimestamp: "2022-10-19T12:07:08Z" generation: 1 labels: compliance.openshift.io/profile-bundle: rhcos4 name: rhcos4-audit-rules-login-events namespace: openshift-compliance ownerReferences: - apiVersion: compliance.openshift.io/v1alpha1 blockOwnerDeletion: true controller: true kind: ProfileBundle name: rhcos4 uid: 22350850-af4a-4f5c-9a42-5e7b68b82d7d resourceVersion: "44819" uid: 75872f1f-3c93-40ca-a69d-44e5438824a4 rationale: Manual editing of these files may indicate nefarious activity, such as an attacker attempting to remove evidence of an intrusion. severity: medium title: Record Attempts to Alter Logon and Logout Events warning: Manual editing of these files may indicate nefarious activity, such as an attacker attempting to remove evidence of an intrusion.
5.7. Managing the Compliance Operator
This section describes the lifecycle of security content, including how to use an updated version of compliance content and how to create a custom ProfileBundle object.
5.7.1. ProfileBundle CR example
The ProfileBundle object requires two pieces of information: the URL of a container image that contains the contentImage and the file that contains the compliance content. The contentFile parameter is relative to the root of the file system. You can define the built-in rhcos4 ProfileBundle object as shown in the following example:
apiVersion: compliance.openshift.io/v1alpha1
kind: ProfileBundle
metadata:
creationTimestamp: "2022-10-19T12:06:30Z"
finalizers:
- profilebundle.finalizers.compliance.openshift.io
generation: 1
name: rhcos4
namespace: openshift-compliance
resourceVersion: "46741"
uid: 22350850-af4a-4f5c-9a42-5e7b68b82d7d
spec:
contentFile: ssg-rhcos4-ds.xml
contentImage: registry.redhat.io/compliance/openshift-compliance-content-rhel8@sha256:900e...
status:
conditions:
- lastTransitionTime: "2022-10-19T12:07:51Z"
message: Profile bundle successfully parsed
reason: Valid
status: "True"
type: Ready
dataStreamStatus: VALID5.7.2. Updating security content
Security content is included as container images that the ProfileBundle objects refer to. To accurately track updates to ProfileBundles and the custom resources parsed from the bundles such as rules or profiles, identify the container image with the compliance content using a digest instead of a tag:
$ oc -n openshift-compliance get profilebundles rhcos4 -oyamlExample output
apiVersion: compliance.openshift.io/v1alpha1
kind: ProfileBundle
metadata:
creationTimestamp: "2022-10-19T12:06:30Z"
finalizers:
- profilebundle.finalizers.compliance.openshift.io
generation: 1
name: rhcos4
namespace: openshift-compliance
resourceVersion: "46741"
uid: 22350850-af4a-4f5c-9a42-5e7b68b82d7d
spec:
contentFile: ssg-rhcos4-ds.xml
contentImage: registry.redhat.io/compliance/openshift-compliance-content-rhel8@sha256:900e...
status:
conditions:
- lastTransitionTime: "2022-10-19T12:07:51Z"
message: Profile bundle successfully parsed
reason: Valid
status: "True"
type: Ready
dataStreamStatus: VALID- 1
- Security container image.
Each ProfileBundle is backed by a deployment. When the Compliance Operator detects that the container image digest has changed, the deployment is updated to reflect the change and parse the content again. Using the digest instead of a tag ensures that you use a stable and predictable set of profiles.
5.8. Tailoring the Compliance Operator
While the Compliance Operator comes with ready-to-use profiles, they must be modified to fit the organizations’ needs and requirements. The process of modifying a profile is called tailoring.
The Compliance Operator provides the TailoredProfile object to help tailor profiles.
5.8.1. Creating a new tailored profile
You can write a tailored profile from scratch using the TailoredProfile object. Set an appropriate title and description and leave the extends field empty. Indicate to the Compliance Operator what type of scan will this custom profile generate:
- Node scan: Scans the Operating System.
- Platform scan: Scans the OpenShift configuration.
Procedure
Set the following annotation on the TailoredProfile object:
+ .Example new-profile.yaml
apiVersion: compliance.openshift.io/v1alpha1
kind: TailoredProfile
metadata:
name: new-profile
annotations:
compliance.openshift.io/product-type: Node
spec:
extends:
description: My custom profile
title: Custom profile - 1
- Set
NodeorPlatformaccordingly. - 2
- Use the
descriptionfield to describe the function of the newTailoredProfileobject. - 3
- Give your
TailoredProfileobject a title with thetitlefield.NoteAdding the
-nodesuffix to thenamefield of theTailoredProfileobject is similar to adding theNodeproduct type annotation and generates an Operating System scan.
5.8.2. Using tailored profiles to extend existing ProfileBundles
While the TailoredProfile CR enables the most common tailoring operations, the XCCDF standard allows even more flexibility in tailoring OpenSCAP profiles. In addition, if your organization has been using OpenScap previously, you may have an existing XCCDF tailoring file and can reuse it.
The ComplianceSuite object contains an optional TailoringConfigMap attribute that you can point to a custom tailoring file. The value of the TailoringConfigMap attribute is a name of a config map, which must contain a key called tailoring.xml and the value of this key is the tailoring contents.
Procedure
Browse the available rules for the Red Hat Enterprise Linux CoreOS (RHCOS)
ProfileBundle:$ oc get rules.compliance -n openshift-compliance -l compliance.openshift.io/profile-bundle=rhcos4Browse the available variables in the same
ProfileBundle:$ oc get variables.compliance -n openshift-compliance -l compliance.openshift.io/profile-bundle=rhcos4Create a tailored profile named
nist-moderate-modified:Choose which rules you want to add to the
nist-moderate-modifiedtailored profile. This example extends therhcos4-moderateprofile by disabling two rules and changing one value. Use therationalevalue to describe why these changes were made:Example
new-profile-node.yamlapiVersion: compliance.openshift.io/v1alpha1 kind: TailoredProfile metadata: name: nist-moderate-modified spec: extends: rhcos4-moderate description: NIST moderate profile title: My modified NIST moderate profile disableRules: - name: rhcos4-file-permissions-var-log-messages rationale: The file contains logs of error messages in the system - name: rhcos4-account-disable-post-pw-expiration rationale: No need to check this as it comes from the IdP setValues: - name: rhcos4-var-selinux-state rationale: Organizational requirements value: permissiveExpand Table 5.2. Attributes for spec variables Attribute Description extendsName of the
Profileobject upon which thisTailoredProfileis built.titleHuman-readable title of the
TailoredProfile.disableRulesA list of name and rationale pairs. Each name refers to a name of a rule object that is to be disabled. The rationale value is human-readable text describing why the rule is disabled.
manualRulesA list of name and rationale pairs. When a manual rule is added, the check result status will always be
manualand remediation will not be generated. This attribute is automatic and by default has no values when set as a manual rule.enableRulesA list of name and rationale pairs. Each name refers to a name of a rule object that is to be enabled. The rationale value is human-readable text describing why the rule is enabled.
descriptionHuman-readable text describing the
TailoredProfile.setValuesA list of name, rationale, and value groupings. Each name refers to a name of the value set. The rationale is human-readable text describing the set. The value is the actual setting.
Add the
tailoredProfile.spec.manualRulesattribute:Example
tailoredProfile.spec.manualRules.yamlapiVersion: compliance.openshift.io/v1alpha1 kind: TailoredProfile metadata: name: ocp4-manual-scc-check spec: extends: ocp4-cis description: This profile extends ocp4-cis by forcing the SCC check to always return MANUAL title: OCP4 CIS profile with manual SCC check manualRules: - name: ocp4-scc-limit-container-allowed-capabilities rationale: We use third party software that installs its own SCC with extra privilegesCreate the
TailoredProfileobject:$ oc create -n openshift-compliance -f new-profile-node.yaml1 - 1
- The
TailoredProfileobject is created in the defaultopenshift-compliancenamespace.
Example output
tailoredprofile.compliance.openshift.io/nist-moderate-modified created
Define the
ScanSettingBindingobject to bind the newnist-moderate-modifiedtailored profile to the defaultScanSettingobject.Example
new-scansettingbinding.yamlapiVersion: compliance.openshift.io/v1alpha1 kind: ScanSettingBinding metadata: name: nist-moderate-modified profiles: - apiGroup: compliance.openshift.io/v1alpha1 kind: Profile name: ocp4-moderate - apiGroup: compliance.openshift.io/v1alpha1 kind: TailoredProfile name: nist-moderate-modified settingsRef: apiGroup: compliance.openshift.io/v1alpha1 kind: ScanSetting name: defaultCreate the
ScanSettingBindingobject:$ oc create -n openshift-compliance -f new-scansettingbinding.yamlExample output
scansettingbinding.compliance.openshift.io/nist-moderate-modified created
5.9. Retrieving Compliance Operator raw results
When proving compliance for your OpenShift Container Platform cluster, you might need to provide the scan results for auditing purposes.
5.9.1. Obtaining Compliance Operator raw results from a persistent volume
Procedure
The Compliance Operator generates and stores the raw results in a persistent volume. These results are in Asset Reporting Format (ARF).
Explore the
ComplianceSuiteobject:$ oc get compliancesuites nist-moderate-modified \ -o json -n openshift-compliance | jq '.status.scanStatuses[].resultsStorage'Example output
{ "name": "ocp4-moderate", "namespace": "openshift-compliance" } { "name": "nist-moderate-modified-master", "namespace": "openshift-compliance" } { "name": "nist-moderate-modified-worker", "namespace": "openshift-compliance" }This shows the persistent volume claims where the raw results are accessible.
Verify the raw data location by using the name and namespace of one of the results:
$ oc get pvc -n openshift-compliance rhcos4-moderate-workerExample output
NAME STATUS VOLUME CAPACITY ACCESS MODES STORAGECLASS AGE rhcos4-moderate-worker Bound pvc-548f6cfe-164b-42fe-ba13-a07cfbc77f3a 1Gi RWO gp2 92mFetch the raw results by spawning a pod that mounts the volume and copying the results:
$ oc create -n openshift-compliance -f pod.yamlExample pod.yaml
apiVersion: "v1" kind: Pod metadata: name: pv-extract spec: containers: - name: pv-extract-pod image: registry.access.redhat.com/ubi8/ubi command: ["sleep", "3000"] volumeMounts: - mountPath: "/workers-scan-results" name: workers-scan-vol volumes: - name: workers-scan-vol persistentVolumeClaim: claimName: rhcos4-moderate-workerAfter the pod is running, download the results:
$ oc cp pv-extract:/workers-scan-results -n openshift-compliance .ImportantSpawning a pod that mounts the persistent volume will keep the claim as
Bound. If the volume’s storage class in use has permissions set toReadWriteOnce, the volume is only mountable by one pod at a time. You must delete the pod upon completion, or it will not be possible for the Operator to schedule a pod and continue storing results in this location.After the extraction is complete, the pod can be deleted:
$ oc delete pod pv-extract -n openshift-compliance
5.10. Managing Compliance Operator result and remediation
Each ComplianceCheckResult represents a result of one compliance rule check. If the rule can be remediated automatically, a ComplianceRemediation object with the same name, owned by the ComplianceCheckResult is created. Unless requested, the remediations are not applied automatically, which gives an OpenShift Container Platform administrator the opportunity to review what the remediation does and only apply a remediation once it has been verified.
5.10.1. Filters for compliance check results
By default, the ComplianceCheckResult objects are labeled with several useful labels that allow you to query the checks and decide on the next steps after the results are generated.
List checks that belong to a specific suite:
$ oc get -n openshift-compliance compliancecheckresults \
-l compliance.openshift.io/suite=workers-compliancesuiteList checks that belong to a specific scan:
$ oc get -n openshift-compliance compliancecheckresults \
-l compliance.openshift.io/scan=workers-scan
Not all ComplianceCheckResult objects create ComplianceRemediation objects. Only ComplianceCheckResult objects that can be remediated automatically do. A ComplianceCheckResult object has a related remediation if it is labeled with the compliance.openshift.io/automated-remediation label. The name of the remediation is the same as the name of the check.
List all failing checks that can be remediated automatically:
$ oc get -n openshift-compliance compliancecheckresults \
-l 'compliance.openshift.io/check-status=FAIL,compliance.openshift.io/automated-remediation'List all failing checks sorted by severity:
$ oc get compliancecheckresults -n openshift-compliance \
-l 'compliance.openshift.io/check-status=FAIL,compliance.openshift.io/check-severity=high'Example output
NAME STATUS SEVERITY
nist-moderate-modified-master-configure-crypto-policy FAIL high
nist-moderate-modified-master-coreos-pti-kernel-argument FAIL high
nist-moderate-modified-master-disable-ctrlaltdel-burstaction FAIL high
nist-moderate-modified-master-disable-ctrlaltdel-reboot FAIL high
nist-moderate-modified-master-enable-fips-mode FAIL high
nist-moderate-modified-master-no-empty-passwords FAIL high
nist-moderate-modified-master-selinux-state FAIL high
nist-moderate-modified-worker-configure-crypto-policy FAIL high
nist-moderate-modified-worker-coreos-pti-kernel-argument FAIL high
nist-moderate-modified-worker-disable-ctrlaltdel-burstaction FAIL high
nist-moderate-modified-worker-disable-ctrlaltdel-reboot FAIL high
nist-moderate-modified-worker-enable-fips-mode FAIL high
nist-moderate-modified-worker-no-empty-passwords FAIL high
nist-moderate-modified-worker-selinux-state FAIL high
ocp4-moderate-configure-network-policies-namespaces FAIL high
ocp4-moderate-fips-mode-enabled-on-all-nodes FAIL highList all failing checks that must be remediated manually:
$ oc get -n openshift-compliance compliancecheckresults \
-l 'compliance.openshift.io/check-status=FAIL,!compliance.openshift.io/automated-remediation'
The manual remediation steps are typically stored in the description attribute in the ComplianceCheckResult object.
| ComplianceCheckResult Status | Description |
|---|---|
| PASS | Compliance check ran to completion and passed. |
| FAIL | Compliance check ran to completion and failed. |
| INFO | Compliance check ran to completion and found something not severe enough to be considered an error. |
| MANUAL | Compliance check does not have a way to automatically assess the success or failure and must be checked manually. |
| INCONSISTENT | Compliance check reports different results from different sources, typically cluster nodes. |
| ERROR | Compliance check ran, but could not complete properly. |
| NOT-APPLICABLE | Compliance check did not run because it is not applicable or not selected. |
5.10.2. Reviewing a remediation
Review both the ComplianceRemediation object and the ComplianceCheckResult object that owns the remediation. The ComplianceCheckResult object contains human-readable descriptions of what the check does and the hardening trying to prevent, as well as other metadata like the severity and the associated security controls. The ComplianceRemediation object represents a way to fix the problem described in the ComplianceCheckResult. After first scan, check for remediations with the state MissingDependencies.
Below is an example of a check and a remediation called sysctl-net-ipv4-conf-all-accept-redirects. This example is redacted to only show spec and status and omits metadata:
spec:
apply: false
current:
object:
apiVersion: machineconfiguration.openshift.io/v1
kind: MachineConfig
spec:
config:
ignition:
version: 3.2.0
storage:
files:
- path: /etc/sysctl.d/75-sysctl_net_ipv4_conf_all_accept_redirects.conf
mode: 0644
contents:
source: data:,net.ipv4.conf.all.accept_redirects%3D0
outdated: {}
status:
applicationState: NotApplied
The remediation payload is stored in the spec.current attribute. The payload can be any Kubernetes object, but because this remediation was produced by a node scan, the remediation payload in the above example is a MachineConfig object. For Platform scans, the remediation payload is often a different kind of an object (for example, a ConfigMap or Secret object), but typically applying that remediation is up to the administrator, because otherwise the Compliance Operator would have required a very broad set of permissions to manipulate any generic Kubernetes object. An example of remediating a Platform check is provided later in the text.
To see exactly what the remediation does when applied, the MachineConfig object contents use the Ignition objects for the configuration. See the Ignition specification for further information about the format. In our example, the spec.config.storage.files[0].path attribute specifies the file that is being create by this remediation (/etc/sysctl.d/75-sysctl_net_ipv4_conf_all_accept_redirects.conf) and the spec.config.storage.files[0].contents.source attribute specifies the contents of that file.
The contents of the files are URL-encoded.
Use the following Python script to view the contents:
$ echo "net.ipv4.conf.all.accept_redirects%3D0" | python3 -c "import sys, urllib.parse; print(urllib.parse.unquote(''.join(sys.stdin.readlines())))"Example output
net.ipv4.conf.all.accept_redirects=05.10.3. Applying remediation when using customized machine config pools
When you create a custom MachineConfigPool, add a label to the MachineConfigPool so that machineConfigPoolSelector present in the KubeletConfig can match the label with MachineConfigPool.
Do not set protectKernelDefaults: false in the KubeletConfig file, because the MachineConfigPool object might fail to unpause unexpectedly after the Compliance Operator finishes applying remediation.
Procedure
List the nodes.
$ oc get nodes -n openshift-complianceExample output
NAME STATUS ROLES AGE VERSION ip-10-0-128-92.us-east-2.compute.internal Ready master 5h21m v1.23.3+d99c04f ip-10-0-158-32.us-east-2.compute.internal Ready worker 5h17m v1.23.3+d99c04f ip-10-0-166-81.us-east-2.compute.internal Ready worker 5h17m v1.23.3+d99c04f ip-10-0-171-170.us-east-2.compute.internal Ready master 5h21m v1.23.3+d99c04f ip-10-0-197-35.us-east-2.compute.internal Ready master 5h22m v1.23.3+d99c04fAdd a label to nodes.
$ oc -n openshift-compliance \ label node ip-10-0-166-81.us-east-2.compute.internal \ node-role.kubernetes.io/<machine_config_pool_name>=Example output
node/ip-10-0-166-81.us-east-2.compute.internal labeledCreate custom
MachineConfigPoolCR.apiVersion: machineconfiguration.openshift.io/v1 kind: MachineConfigPool metadata: name: <machine_config_pool_name> labels: pools.operator.machineconfiguration.openshift.io/<machine_config_pool_name>: ''1 spec: machineConfigSelector: matchExpressions: - {key: machineconfiguration.openshift.io/role, operator: In, values: [worker,<machine_config_pool_name>]} nodeSelector: matchLabels: node-role.kubernetes.io/<machine_config_pool_name>: ""- 1
- The
labelsfield defines label name to add for Machine config pool(MCP).
Verify MCP created successfully.
$ oc get mcp -w
5.10.4. Evaluating KubeletConfig rules against default configuration values
OpenShift Container Platform infrastructure might contain incomplete configuration files at run time, and nodes assume default configuration values for missing configuration options. Some configuration options can be passed as command line arguments. As a result, the Compliance Operator cannot verify if the configuration file on the node is complete because it might be missing options used in the rule checks.
To prevent false negative results where the default configuration value passes a check, the Compliance Operator uses the Node/Proxy API to fetch the configuration for each node in a node pool, then all configuration options that are consistent across nodes in the node pool are stored in a file that represents the configuration for all nodes within that node pool. This increases the accuracy of the scan results.
No additional configuration changes are required to use this feature with default master and worker node pools configurations.
5.10.5. Scanning custom node pools
The Compliance Operator does not maintain a copy of each node pool configuration. The Compliance Operator aggregates consistent configuration options for all nodes within a single node pool into one copy of the configuration file. The Compliance Operator then uses the configuration file for a particular node pool to evaluate rules against nodes within that pool.
If your cluster uses custom node pools outside the default worker and master node pools, you must supply additional variables to ensure the Compliance Operator aggregates a configuration file for that node pool.
Procedure
To check the configuration against all pools in an example cluster containing
master,worker, and customexamplenode pools, set the value of theocp-var-role-masterandopc-var-role-workerfields toexamplein theTailoredProfileobject:apiVersion: compliance.openshift.io/v1alpha1 kind: TailoredProfile metadata: name: cis-example-tp spec: extends: ocp4-cis title: My modified NIST profile to scan example nodes setValues: - name: ocp4-var-role-master value: example rationale: test for example nodes - name: ocp4-var-role-worker value: example rationale: test for example nodes description: cis-example-scanAdd the
examplerole to theScanSettingobject that will be stored in theScanSettingBindingCR:apiVersion: compliance.openshift.io/v1alpha1 kind: ScanSetting metadata: name: default namespace: openshift-compliance rawResultStorage: rotation: 3 size: 1Gi roles: - worker - master - example scanTolerations: - effect: NoSchedule key: node-role.kubernetes.io/master operator: Exists schedule: '0 1 * * *'Create a scan that uses the
ScanSettingBindingCR:apiVersion: compliance.openshift.io/v1alpha1 kind: ScanSettingBinding metadata: name: cis namespace: openshift-compliance profiles: - apiGroup: compliance.openshift.io/v1alpha1 kind: Profile name: ocp4-cis - apiGroup: compliance.openshift.io/v1alpha1 kind: Profile name: ocp4-cis-node - apiGroup: compliance.openshift.io/v1alpha1 kind: TailoredProfile name: cis-example-tp settingsRef: apiGroup: compliance.openshift.io/v1alpha1 kind: ScanSetting name: default
The Compliance Operator checks the runtime KubeletConfig through the Node/Proxy API object and then uses variables such as ocp-var-role-master and ocp-var-role-worker to determine the nodes it performs the check against. In the ComplianceCheckResult, the KubeletConfig rules are shown as ocp4-cis-kubelet-*. The scan passes only if all selected nodes pass this check.
Verification
The Platform KubeletConfig rules are checked through the
Node/Proxyobject. You can find those rules by running the following command:$ oc get rules -o json | jq '.items[] | select(.checkType == "Platform") | select(.metadata.name | contains("ocp4-kubelet-")) | .metadata.name'
5.10.6. Remediating KubeletConfig sub pools
KubeletConfig remediation labels can be applied to MachineConfigPool sub-pools.
Procedure
Add a label to the sub-pool
MachineConfigPoolCR:$ oc label mcp <sub-pool-name> pools.operator.machineconfiguration.openshift.io/<sub-pool-name>=
5.10.7. Applying a remediation
The boolean attribute spec.apply controls whether the remediation should be applied by the Compliance Operator. You can apply the remediation by setting the attribute to true:
$ oc -n openshift-compliance \
patch complianceremediations/<scan-name>-sysctl-net-ipv4-conf-all-accept-redirects \
--patch '{"spec":{"apply":true}}' --type=merge
After the Compliance Operator processes the applied remediation, the status.ApplicationState attribute would change to Applied or to Error if incorrect. When a machine config remediation is applied, that remediation along with all other applied remediations are rendered into a MachineConfig object named 75-$scan-name-$suite-name. That MachineConfig object is subsequently rendered by the Machine Config Operator and finally applied to all the nodes in a machine config pool by an instance of the machine control daemon running on each node.
Note that when the Machine Config Operator applies a new MachineConfig object to nodes in a pool, all the nodes belonging to the pool are rebooted. This might be inconvenient when applying multiple remediations, each of which re-renders the composite 75-$scan-name-$suite-name MachineConfig object. To prevent applying the remediation immediately, you can pause the machine config pool by setting the .spec.paused attribute of a MachineConfigPool object to true.
The Compliance Operator can apply remediations automatically. Set autoApplyRemediations: true in the ScanSetting top-level object.
Applying remediations automatically should only be done with careful consideration.
5.10.8. Remediating a platform check manually
Checks for Platform scans typically have to be remediated manually by the administrator for two reasons:
- It is not always possible to automatically determine the value that must be set. One of the checks requires that a list of allowed registries is provided, but the scanner has no way of knowing which registries the organization wants to allow.
-
Different checks modify different API objects, requiring automated remediation to possess
rootor superuser access to modify objects in the cluster, which is not advised.
Procedure
The example below uses the
ocp4-ocp-allowed-registries-for-importrule, which would fail on a default OpenShift Container Platform installation. Inspect the ruleoc get rule.compliance/ocp4-ocp-allowed-registries-for-import -oyaml, the rule is to limit the registries the users are allowed to import images from by setting theallowedRegistriesForImportattribute, The warning attribute of the rule also shows the API object checked, so it can be modified and remediate the issue:$ oc edit image.config.openshift.io/clusterExample output
apiVersion: config.openshift.io/v1 kind: Image metadata: annotations: release.openshift.io/create-only: "true" creationTimestamp: "2020-09-10T10:12:54Z" generation: 2 name: cluster resourceVersion: "363096" selfLink: /apis/config.openshift.io/v1/images/cluster uid: 2dcb614e-2f8a-4a23-ba9a-8e33cd0ff77e spec: allowedRegistriesForImport: - domainName: registry.redhat.io status: externalRegistryHostnames: - default-route-openshift-image-registry.apps.user-cluster-09-10-12-07.devcluster.openshift.com internalRegistryHostname: image-registry.openshift-image-registry.svc:5000Re-run the scan:
$ oc -n openshift-compliance \ annotate compliancescans/rhcos4-e8-worker compliance.openshift.io/rescan=
5.10.9. Updating remediations
When a new version of compliance content is used, it might deliver a new and different version of a remediation than the previous version. The Compliance Operator will keep the old version of the remediation applied. The OpenShift Container Platform administrator is also notified of the new version to review and apply. A ComplianceRemediation object that had been applied earlier, but was updated changes its status to Outdated. The outdated objects are labeled so that they can be searched for easily.
The previously applied remediation contents would then be stored in the spec.outdated attribute of a ComplianceRemediation object and the new updated contents would be stored in the spec.current attribute. After updating the content to a newer version, the administrator then needs to review the remediation. As long as the spec.outdated attribute exists, it would be used to render the resulting MachineConfig object. After the spec.outdated attribute is removed, the Compliance Operator re-renders the resulting MachineConfig object, which causes the Operator to push the configuration to the nodes.
Procedure
Search for any outdated remediations:
$ oc -n openshift-compliance get complianceremediations \ -l complianceoperator.openshift.io/outdated-remediation=Example output
NAME STATE workers-scan-no-empty-passwords OutdatedThe currently applied remediation is stored in the
Outdatedattribute and the new, unapplied remediation is stored in theCurrentattribute. If you are satisfied with the new version, remove theOutdatedfield. If you want to keep the updated content, remove theCurrentandOutdatedattributes.Apply the newer version of the remediation:
$ oc -n openshift-compliance patch complianceremediations workers-scan-no-empty-passwords \ --type json -p '[{"op":"remove", "path":/spec/outdated}]'The remediation state will switch from
OutdatedtoApplied:$ oc get -n openshift-compliance complianceremediations workers-scan-no-empty-passwordsExample output
NAME STATE workers-scan-no-empty-passwords Applied- The nodes will apply the newer remediation version and reboot.
5.10.10. Unapplying a remediation
It might be required to unapply a remediation that was previously applied.
Procedure
Set the
applyflag tofalse:$ oc -n openshift-compliance \ patch complianceremediations/rhcos4-moderate-worker-sysctl-net-ipv4-conf-all-accept-redirects \ --patch '{"spec":{"apply":false}}' --type=mergeThe remediation status will change to
NotAppliedand the compositeMachineConfigobject would be re-rendered to not include the remediation.ImportantAll affected nodes with the remediation will be rebooted.
5.10.11. Removing a KubeletConfig remediation
KubeletConfig remediations are included in node-level profiles. In order to remove a KubeletConfig remediation, you must manually remove it from the KubeletConfig objects. This example demonstrates how to remove the compliance check for the one-rule-tp-node-master-kubelet-eviction-thresholds-set-hard-imagefs-available remediation.
Procedure
Locate the
scan-nameand compliance check for theone-rule-tp-node-master-kubelet-eviction-thresholds-set-hard-imagefs-availableremediation:$ oc -n openshift-compliance get remediation \ one-rule-tp-node-master-kubelet-eviction-thresholds-set-hard-imagefs-available -o yamlExample output
apiVersion: compliance.openshift.io/v1alpha1 kind: ComplianceRemediation metadata: annotations: compliance.openshift.io/xccdf-value-used: var-kubelet-evictionhard-imagefs-available creationTimestamp: "2022-01-05T19:52:27Z" generation: 1 labels: compliance.openshift.io/scan-name: one-rule-tp-node-master1 compliance.openshift.io/suite: one-rule-ssb-node name: one-rule-tp-node-master-kubelet-eviction-thresholds-set-hard-imagefs-available namespace: openshift-compliance ownerReferences: - apiVersion: compliance.openshift.io/v1alpha1 blockOwnerDeletion: true controller: true kind: ComplianceCheckResult name: one-rule-tp-node-master-kubelet-eviction-thresholds-set-hard-imagefs-available uid: fe8e1577-9060-4c59-95b2-3e2c51709adc resourceVersion: "84820" uid: 5339d21a-24d7-40cb-84d2-7a2ebb015355 spec: apply: true current: object: apiVersion: machineconfiguration.openshift.io/v1 kind: KubeletConfig spec: kubeletConfig: evictionHard: imagefs.available: 10%2 outdated: {} type: Configuration status: applicationState: AppliedNoteIf the remediation invokes an
evictionHardkubelet configuration, you must specify all of theevictionHardparameters:memory.available,nodefs.available,nodefs.inodesFree,imagefs.available, andimagefs.inodesFree. If you do not specify all parameters, only the specified parameters are applied and the remediation will not function properly.Remove the remediation:
Set
applyto false for the remediation object:$ oc -n openshift-compliance patch \ complianceremediations/one-rule-tp-node-master-kubelet-eviction-thresholds-set-hard-imagefs-available \ -p '{"spec":{"apply":false}}' --type=mergeUsing the
scan-name, find theKubeletConfigobject that the remediation was applied to:$ oc -n openshift-compliance get kubeletconfig \ --selector compliance.openshift.io/scan-name=one-rule-tp-node-masterExample output
NAME AGE compliance-operator-kubelet-master 2m34sManually remove the remediation,
imagefs.available: 10%, from theKubeletConfigobject:$ oc edit -n openshift-compliance KubeletConfig compliance-operator-kubelet-masterImportantAll affected nodes with the remediation will be rebooted.
You must also exclude the rule from any scheduled scans in your tailored profiles that auto-applies the remediation, otherwise, the remediation will be re-applied during the next scheduled scan.
5.10.12. Inconsistent ComplianceScan
The ScanSetting object lists the node roles that the compliance scans generated from the ScanSetting or ScanSettingBinding objects would scan. Each node role usually maps to a machine config pool.
It is expected that all machines in a machine config pool are identical and all scan results from the nodes in a pool should be identical.
If some of the results are different from others, the Compliance Operator flags a ComplianceCheckResult object where some of the nodes will report as INCONSISTENT. All ComplianceCheckResult objects are also labeled with compliance.openshift.io/inconsistent-check.
Because the number of machines in a pool might be quite large, the Compliance Operator attempts to find the most common state and list the nodes that differ from the common state. The most common state is stored in the compliance.openshift.io/most-common-status annotation and the annotation compliance.openshift.io/inconsistent-source contains pairs of hostname:status of check statuses that differ from the most common status. If no common state can be found, all the hostname:status pairs are listed in the compliance.openshift.io/inconsistent-source annotation.
If possible, a remediation is still created so that the cluster can converge to a compliant status. However, this might not always be possible and correcting the difference between nodes must be done manually. The compliance scan must be re-run to get a consistent result by annotating the scan with the compliance.openshift.io/rescan= option:
$ oc -n openshift-compliance \
annotate compliancescans/rhcos4-e8-worker compliance.openshift.io/rescan=5.11. Performing advanced Compliance Operator tasks
The Compliance Operator includes options for advanced users for the purpose of debugging or integration with existing tooling.
5.11.1. Using the ComplianceSuite and ComplianceScan objects directly
While it is recommended that users take advantage of the ScanSetting and ScanSettingBinding objects to define the suites and scans, there are valid use cases to define the ComplianceSuite objects directly:
-
Specifying only a single rule to scan. This can be useful for debugging together with the
debug: trueattribute which increases the OpenSCAP scanner verbosity, as the debug mode tends to get quite verbose otherwise. Limiting the test to one rule helps to lower the amount of debug information. - Providing a custom nodeSelector. In order for a remediation to be applicable, the nodeSelector must match a pool.
- Pointing the Scan to a bespoke config map with a tailoring file.
- For testing or development when the overhead of parsing profiles from bundles is not required.
The following example shows a ComplianceSuite that scans the worker machines with only a single rule:
apiVersion: compliance.openshift.io/v1alpha1
kind: ComplianceSuite
metadata:
name: workers-compliancesuite
spec:
scans:
- name: workers-scan
profile: xccdf_org.ssgproject.content_profile_moderate
content: ssg-rhcos4-ds.xml
contentImage: quay.io/complianceascode/ocp4:latest
debug: true
rule: xccdf_org.ssgproject.content_rule_no_direct_root_logins
nodeSelector:
node-role.kubernetes.io/worker: ""
The ComplianceSuite object and the ComplianceScan objects referred to above specify several attributes in a format that OpenSCAP expects.
To find out the profile, content, or rule values, you can start by creating a similar Suite from ScanSetting and ScanSettingBinding or inspect the objects parsed from the ProfileBundle objects like rules or profiles. Those objects contain the xccdf_org identifiers you can use to refer to them from a ComplianceSuite.
5.11.2. Setting PriorityClass for ScanSetting scans
In large scale environments, the default PriorityClass object can be too low to guarantee Pods execute scans on time. For clusters that must maintain compliance or guarantee automated scanning, it is recommended to set the PriorityClass variable to ensure the Compliance Operator is always given priority in resource constrained situations.
Procedure
Set the
PriorityClassvariable:apiVersion: compliance.openshift.io/v1alpha1 strictNodeScan: true metadata: name: default namespace: openshift-compliance priorityClass: compliance-high-priority1 kind: ScanSetting showNotApplicable: false rawResultStorage: nodeSelector: node-role.kubernetes.io/master: '' pvAccessModes: - ReadWriteOnce rotation: 3 size: 1Gi tolerations: - effect: NoSchedule key: node-role.kubernetes.io/master operator: Exists - effect: NoExecute key: node.kubernetes.io/not-ready operator: Exists tolerationSeconds: 300 - effect: NoExecute key: node.kubernetes.io/unreachable operator: Exists tolerationSeconds: 300 - effect: NoSchedule key: node.kubernetes.io/memory-pressure operator: Exists schedule: 0 1 * * * roles: - master - worker scanTolerations: - operator: Exists- 1
- If the
PriorityClassreferenced in theScanSettingcannot be found, the Operator will leave thePriorityClassempty, issue a warning, and continue scheduling scans without aPriorityClass.
5.11.3. Using raw tailored profiles
While the TailoredProfile CR enables the most common tailoring operations, the XCCDF standard allows even more flexibility in tailoring OpenSCAP profiles. In addition, if your organization has been using OpenScap previously, you may have an existing XCCDF tailoring file and can reuse it.
The ComplianceSuite object contains an optional TailoringConfigMap attribute that you can point to a custom tailoring file. The value of the TailoringConfigMap attribute is a name of a config map which must contain a key called tailoring.xml and the value of this key is the tailoring contents.
Procedure
Create the
ConfigMapobject from a file:$ oc -n openshift-compliance \ create configmap nist-moderate-modified \ --from-file=tailoring.xml=/path/to/the/tailoringFile.xmlReference the tailoring file in a scan that belongs to a suite:
apiVersion: compliance.openshift.io/v1alpha1 kind: ComplianceSuite metadata: name: workers-compliancesuite spec: debug: true scans: - name: workers-scan profile: xccdf_org.ssgproject.content_profile_moderate content: ssg-rhcos4-ds.xml contentImage: quay.io/complianceascode/ocp4:latest debug: true tailoringConfigMap: name: nist-moderate-modified nodeSelector: node-role.kubernetes.io/worker: ""
5.11.4. Performing a rescan
Typically you will want to re-run a scan on a defined schedule, like every Monday or daily. It can also be useful to re-run a scan once after fixing a problem on a node. To perform a single scan, annotate the scan with the compliance.openshift.io/rescan= option:
$ oc -n openshift-compliance \
annotate compliancescans/rhcos4-e8-worker compliance.openshift.io/rescan=
A rescan generates four additional mc for rhcos-moderate profile:
$ oc get mcExample output
75-worker-scan-chronyd-or-ntpd-specify-remote-server
75-worker-scan-configure-usbguard-auditbackend
75-worker-scan-service-usbguard-enabled
75-worker-scan-usbguard-allow-hid-and-hub
When the scan setting default-auto-apply label is applied, remediations are applied automatically and outdated remediations automatically update. If there are remediations that were not applied due to dependencies, or remediations that had been outdated, rescanning applies the remediations and might trigger a reboot. Only remediations that use MachineConfig objects trigger reboots. If there are no updates or dependencies to be applied, no reboot occurs.
5.11.5. Setting custom storage size for results
While the custom resources such as ComplianceCheckResult represent an aggregated result of one check across all scanned nodes, it can be useful to review the raw results as produced by the scanner. The raw results are produced in the ARF format and can be large (tens of megabytes per node), it is impractical to store them in a Kubernetes resource backed by the etcd key-value store. Instead, every scan creates a persistent volume (PV) which defaults to 1GB size. Depending on your environment, you may want to increase the PV size accordingly. This is done using the rawResultStorage.size attribute that is exposed in both the ScanSetting and ComplianceScan resources.
A related parameter is rawResultStorage.rotation which controls how many scans are retained in the PV before the older scans are rotated. The default value is 3, setting the rotation policy to 0 disables the rotation. Given the default rotation policy and an estimate of 100MB per a raw ARF scan report, you can calculate the right PV size for your environment.
5.11.5.1. Using custom result storage values
Because OpenShift Container Platform can be deployed in a variety of public clouds or bare metal, the Compliance Operator cannot determine available storage configurations. By default, the Compliance Operator will try to create the PV for storing results using the default storage class of the cluster, but a custom storage class can be configured using the rawResultStorage.StorageClassName attribute.
If your cluster does not specify a default storage class, this attribute must be set.
Configure the ScanSetting custom resource to use a standard storage class and create persistent volumes that are 10GB in size and keep the last 10 results:
Example ScanSetting CR
apiVersion: compliance.openshift.io/v1alpha1
kind: ScanSetting
metadata:
name: default
namespace: openshift-compliance
rawResultStorage:
storageClassName: standard
rotation: 10
size: 10Gi
roles:
- worker
- master
scanTolerations:
- effect: NoSchedule
key: node-role.kubernetes.io/master
operator: Exists
schedule: '0 1 * * *'5.11.6. Applying remediations generated by suite scans
Although you can use the autoApplyRemediations boolean parameter in a ComplianceSuite object, you can alternatively annotate the object with compliance.openshift.io/apply-remediations. This allows the Operator to apply all of the created remediations.
Procedure
-
Apply the
compliance.openshift.io/apply-remediationsannotation by running:
$ oc -n openshift-compliance \
annotate compliancesuites/workers-compliancesuite compliance.openshift.io/apply-remediations=5.11.7. Automatically update remediations
In some cases, a scan with newer content might mark remediations as OUTDATED. As an administrator, you can apply the compliance.openshift.io/remove-outdated annotation to apply new remediations and remove the outdated ones.
Procedure
-
Apply the
compliance.openshift.io/remove-outdatedannotation:
$ oc -n openshift-compliance \
annotate compliancesuites/workers-compliancesuite compliance.openshift.io/remove-outdated=
Alternatively, set the autoUpdateRemediations flag in a ScanSetting or ComplianceSuite object to update the remediations automatically.
5.11.8. Creating a custom SCC for the Compliance Operator
In some environments, you must create a custom Security Context Constraints (SCC) file to ensure the correct permissions are available to the Compliance Operator api-resource-collector.
Prerequisites
-
You must have
adminprivileges.
Procedure
Define the SCC in a YAML file named
restricted-adjusted-compliance.yaml:SecurityContextConstraintsobject definitionallowHostDirVolumePlugin: false allowHostIPC: false allowHostNetwork: false allowHostPID: false allowHostPorts: false allowPrivilegeEscalation: true allowPrivilegedContainer: false allowedCapabilities: null apiVersion: security.openshift.io/v1 defaultAddCapabilities: null fsGroup: type: MustRunAs kind: SecurityContextConstraints metadata: name: restricted-adjusted-compliance priority: 301 readOnlyRootFilesystem: false requiredDropCapabilities: - KILL - SETUID - SETGID - MKNOD runAsUser: type: MustRunAsRange seLinuxContext: type: MustRunAs supplementalGroups: type: RunAsAny users: - system:serviceaccount:openshift-compliance:api-resource-collector2 volumes: - configMap - downwardAPI - emptyDir - persistentVolumeClaim - projected - secretCreate the SCC:
$ oc create -n openshift-compliance -f restricted-adjusted-compliance.yamlExample output
securitycontextconstraints.security.openshift.io/restricted-adjusted-compliance created
Verification
Verify the SCC was created:
$ oc get -n openshift-compliance scc restricted-adjusted-complianceExample output
NAME PRIV CAPS SELINUX RUNASUSER FSGROUP SUPGROUP PRIORITY READONLYROOTFS VOLUMES restricted-adjusted-compliance false <no value> MustRunAs MustRunAsRange MustRunAs RunAsAny 30 false ["configMap","downwardAPI","emptyDir","persistentVolumeClaim","projected","secret"]
5.12. Troubleshooting the Compliance Operator
This section describes how to troubleshoot the Compliance Operator. The information can be useful either to diagnose a problem or provide information in a bug report. Some general tips:
The Compliance Operator emits Kubernetes events when something important happens. You can either view all events in the cluster using the command:
$ oc get events -n openshift-complianceOr view events for an object like a scan using the command:
$ oc describe -n openshift-compliance compliancescan/cis-complianceThe Compliance Operator consists of several controllers, approximately one per API object. It could be useful to filter only those controllers that correspond to the API object having issues. If a
ComplianceRemediationcannot be applied, view the messages from theremediationctrlcontroller. You can filter the messages from a single controller by parsing withjq:$ oc -n openshift-compliance logs compliance-operator-775d7bddbd-gj58f \ | jq -c 'select(.logger == "profilebundlectrl")'The timestamps are logged as seconds since UNIX epoch in UTC. To convert them to a human-readable date, use
date -d @timestamp --utc, for example:$ date -d @1596184628.955853 --utc-
Many custom resources, most importantly
ComplianceSuiteandScanSetting, allow thedebugoption to be set. Enabling this option increases verbosity of the OpenSCAP scanner pods, as well as some other helper pods. -
If a single rule is passing or failing unexpectedly, it could be helpful to run a single scan or a suite with only that rule to find the rule ID from the corresponding
ComplianceCheckResultobject and use it as theruleattribute value in aScanCR. Then, together with thedebugoption enabled, thescannercontainer logs in the scanner pod would show the raw OpenSCAP logs.
5.12.1. Anatomy of a scan
The following sections outline the components and stages of Compliance Operator scans.
5.12.1.1. Compliance sources
The compliance content is stored in Profile objects that are generated from a ProfileBundle object. The Compliance Operator creates a ProfileBundle object for the cluster and another for the cluster nodes.
$ oc get -n openshift-compliance profilebundle.compliance$ oc get -n openshift-compliance profile.compliance
The ProfileBundle objects are processed by deployments labeled with the Bundle name. To troubleshoot an issue with the Bundle, you can find the deployment and view logs of the pods in a deployment:
$ oc logs -n openshift-compliance -lprofile-bundle=ocp4 -c profileparser$ oc get -n openshift-compliance deployments,pods -lprofile-bundle=ocp4$ oc logs -n openshift-compliance pods/<pod-name>$ oc describe -n openshift-compliance pod/<pod-name> -c profileparser5.12.1.2. The ScanSetting and ScanSettingBinding objects lifecycle and debugging
With valid compliance content sources, the high-level ScanSetting and ScanSettingBinding objects can be used to generate ComplianceSuite and ComplianceScan objects:
apiVersion: compliance.openshift.io/v1alpha1
kind: ScanSetting
metadata:
name: my-companys-constraints
debug: true
# For each role, a separate scan will be created pointing
# to a node-role specified in roles
roles:
- worker
---
apiVersion: compliance.openshift.io/v1alpha1
kind: ScanSettingBinding
metadata:
name: my-companys-compliance-requirements
profiles:
# Node checks
- name: rhcos4-e8
kind: Profile
apiGroup: compliance.openshift.io/v1alpha1
# Cluster checks
- name: ocp4-e8
kind: Profile
apiGroup: compliance.openshift.io/v1alpha1
settingsRef:
name: my-companys-constraints
kind: ScanSetting
apiGroup: compliance.openshift.io/v1alpha1
Both ScanSetting and ScanSettingBinding objects are handled by the same controller tagged with logger=scansettingbindingctrl. These objects have no status. Any issues are communicated in form of events:
Events:
Type Reason Age From Message
---- ------ ---- ---- -------
Normal SuiteCreated 9m52s scansettingbindingctrl ComplianceSuite openshift-compliance/my-companys-compliance-requirements created
Now a ComplianceSuite object is created. The flow continues to reconcile the newly created ComplianceSuite.
5.12.1.3. ComplianceSuite custom resource lifecycle and debugging
The ComplianceSuite CR is a wrapper around ComplianceScan CRs. The ComplianceSuite CR is handled by controller tagged with logger=suitectrl. This controller handles creating scans from a suite, reconciling and aggregating individual Scan statuses into a single Suite status. If a suite is set to execute periodically, the suitectrl also handles creating a CronJob CR that re-runs the scans in the suite after the initial run is done:
$ oc get cronjobsExample output
NAME SCHEDULE SUSPEND ACTIVE LAST SCHEDULE AGE
<cron_name> 0 1 * * * False 0 <none> 151m
For the most important issues, events are emitted. View them with oc describe compliancesuites/<name>. The Suite objects also have a Status subresource that is updated when any of Scan objects that belong to this suite update their Status subresource. After all expected scans are created, control is passed to the scan controller.
5.12.1.4. ComplianceScan custom resource lifecycle and debugging
The ComplianceScan CRs are handled by the scanctrl controller. This is also where the actual scans happen and the scan results are created. Each scan goes through several phases:
5.12.1.4.1. Pending phase
The scan is validated for correctness in this phase. If some parameters like storage size are invalid, the scan transitions to DONE with ERROR result, otherwise proceeds to the Launching phase.
5.12.1.4.2. Launching phase
In this phase, several config maps that contain either environment for the scanner pods or directly the script that the scanner pods will be evaluating. List the config maps:
$ oc -n openshift-compliance get cm \
-l compliance.openshift.io/scan-name=rhcos4-e8-worker,complianceoperator.openshift.io/scan-script=These config maps will be used by the scanner pods. If you ever needed to modify the scanner behavior, change the scanner debug level or print the raw results, modifying the config maps is the way to go. Afterwards, a persistent volume claim is created per scan to store the raw ARF results:
$ oc get pvc -n openshift-compliance -lcompliance.openshift.io/scan-name=rhcos4-e8-worker
The PVCs are mounted by a per-scan ResultServer deployment. A ResultServer is a simple HTTP server where the individual scanner pods upload the full ARF results to. Each server can run on a different node. The full ARF results might be very large and you cannot presume that it would be possible to create a volume that could be mounted from multiple nodes at the same time. After the scan is finished, the ResultServer deployment is scaled down. The PVC with the raw results can be mounted from another custom pod and the results can be fetched or inspected. The traffic between the scanner pods and the ResultServer is protected by mutual TLS protocols.
Finally, the scanner pods are launched in this phase; one scanner pod for a Platform scan instance and one scanner pod per matching node for a node scan instance. The per-node pods are labeled with the node name. Each pod is always labeled with the ComplianceScan name:
$ oc get pods -lcompliance.openshift.io/scan-name=rhcos4-e8-worker,workload=scanner --show-labelsExample output
NAME READY STATUS RESTARTS AGE LABELS
rhcos4-e8-worker-ip-10-0-169-90.eu-north-1.compute.internal-pod 0/2 Completed 0 39m compliance.openshift.io/scan-name=rhcos4-e8-worker,targetNode=ip-10-0-169-90.eu-north-1.compute.internal,workload=scanner+ The scan then proceeds to the Running phase.
5.12.1.4.3. Running phase
The running phase waits until the scanner pods finish. The following terms and processes are in use in the running phase:
-
init container: There is one init container called
content-container. It runs the contentImage container and executes a single command that copies the contentFile to the/contentdirectory shared with the other containers in this pod. -
scanner: This container runs the scan. For node scans, the container mounts the node filesystem as
/hostand mounts the content delivered by the init container. The container also mounts theentrypointConfigMapcreated in the Launching phase and executes it. The default script in the entrypointConfigMapexecutes OpenSCAP and stores the result files in the/resultsdirectory shared between the pod’s containers. Logs from this pod can be viewed to determine what the OpenSCAP scanner checked. More verbose output can be viewed with thedebugflag. logcollector: The logcollector container waits until the scanner container finishes. Then, it uploads the full ARF results to the
ResultServerand separately uploads the XCCDF results along with scan result and OpenSCAP result code as aConfigMap.These result config maps are labeled with the scan name (compliance.openshift.io/scan-name=rhcos4-e8-worker):$ oc describe cm/rhcos4-e8-worker-ip-10-0-169-90.eu-north-1.compute.internal-podExample output
Name: rhcos4-e8-worker-ip-10-0-169-90.eu-north-1.compute.internal-pod Namespace: openshift-compliance Labels: compliance.openshift.io/scan-name-scan=rhcos4-e8-worker complianceoperator.openshift.io/scan-result= Annotations: compliance-remediations/processed: compliance.openshift.io/scan-error-msg: compliance.openshift.io/scan-result: NON-COMPLIANT OpenSCAP-scan-result/node: ip-10-0-169-90.eu-north-1.compute.internal Data ==== exit-code: ---- 2 results: ---- <?xml version="1.0" encoding="UTF-8"?> ...
Scanner pods for Platform scans are similar, except:
-
There is one extra init container called
api-resource-collectorthat reads the OpenSCAP content provided by the content-container init, container, figures out which API resources the content needs to examine and stores those API resources to a shared directory where thescannercontainer would read them from. -
The
scannercontainer does not need to mount the host file system.
When the scanner pods are done, the scans move on to the Aggregating phase.
5.12.1.4.4. Aggregating phase
In the aggregating phase, the scan controller spawns yet another pod called the aggregator pod. Its purpose it to take the result ConfigMap objects, read the results and for each check result create the corresponding Kubernetes object. If the check failure can be automatically remediated, a ComplianceRemediation object is created. To provide human-readable metadata for the checks and remediations, the aggregator pod also mounts the OpenSCAP content using an init container.
When a config map is processed by an aggregator pod, it is labeled the compliance-remediations/processed label. The result of this phase are ComplianceCheckResult objects:
$ oc get compliancecheckresults -lcompliance.openshift.io/scan-name=rhcos4-e8-workerExample output
NAME STATUS SEVERITY
rhcos4-e8-worker-accounts-no-uid-except-zero PASS high
rhcos4-e8-worker-audit-rules-dac-modification-chmod FAIL medium
and ComplianceRemediation objects:
$ oc get complianceremediations -lcompliance.openshift.io/scan-name=rhcos4-e8-workerExample output
NAME STATE
rhcos4-e8-worker-audit-rules-dac-modification-chmod NotApplied
rhcos4-e8-worker-audit-rules-dac-modification-chown NotApplied
rhcos4-e8-worker-audit-rules-execution-chcon NotApplied
rhcos4-e8-worker-audit-rules-execution-restorecon NotApplied
rhcos4-e8-worker-audit-rules-execution-semanage NotApplied
rhcos4-e8-worker-audit-rules-execution-setfiles NotAppliedAfter these CRs are created, the aggregator pod exits and the scan moves on to the Done phase.
5.12.1.4.5. Done phase
In the final scan phase, the scan resources are cleaned up if needed and the ResultServer deployment is either scaled down (if the scan was one-time) or deleted if the scan is continuous; the next scan instance would then recreate the deployment again.
It is also possible to trigger a re-run of a scan in the Done phase by annotating it:
$ oc -n openshift-compliance \
annotate compliancescans/rhcos4-e8-worker compliance.openshift.io/rescan=
After the scan reaches the Done phase, nothing else happens on its own unless the remediations are set to be applied automatically with autoApplyRemediations: true. The OpenShift Container Platform administrator would now review the remediations and apply them as needed. If the remediations are set to be applied automatically, the ComplianceSuite controller takes over in the Done phase, pauses the machine config pool to which the scan maps to and applies all the remediations in one go. If a remediation is applied, the ComplianceRemediation controller takes over.
5.12.1.5. ComplianceRemediation controller lifecycle and debugging
The example scan has reported some findings. One of the remediations can be enabled by toggling its apply attribute to true:
$ oc patch complianceremediations/rhcos4-e8-worker-audit-rules-dac-modification-chmod --patch '{"spec":{"apply":true}}' --type=merge
The ComplianceRemediation controller (logger=remediationctrl) reconciles the modified object. The result of the reconciliation is change of status of the remediation object that is reconciled, but also a change of the rendered per-suite MachineConfig object that contains all the applied remediations.
The MachineConfig object always begins with 75- and is named after the scan and the suite:
$ oc get mc | grep 75-Example output
75-rhcos4-e8-worker-my-companys-compliance-requirements 3.2.0 2m46s
The remediations the mc currently consists of are listed in the machine config’s annotations:
$ oc describe mc/75-rhcos4-e8-worker-my-companys-compliance-requirementsExample output
Name: 75-rhcos4-e8-worker-my-companys-compliance-requirements
Labels: machineconfiguration.openshift.io/role=worker
Annotations: remediation/rhcos4-e8-worker-audit-rules-dac-modification-chmod:
The ComplianceRemediation controller’s algorithm works like this:
- All currently applied remediations are read into an initial remediation set.
- If the reconciled remediation is supposed to be applied, it is added to the set.
-
A
MachineConfigobject is rendered from the set and annotated with names of remediations in the set. If the set is empty (the last remediation was unapplied), the renderedMachineConfigobject is removed. - If and only if the rendered machine config is different from the one already applied in the cluster, the applied MC is updated (or created, or deleted).
-
Creating or modifying a
MachineConfigobject triggers a reboot of nodes that match themachineconfiguration.openshift.io/rolelabel - see the Machine Config Operator documentation for more details.
The remediation loop ends once the rendered machine config is updated, if needed, and the reconciled remediation object status is updated. In our case, applying the remediation would trigger a reboot. After the reboot, annotate the scan to re-run it:
$ oc -n openshift-compliance \
annotate compliancescans/rhcos4-e8-worker compliance.openshift.io/rescan=The scan will run and finish. Check for the remediation to pass:
$ oc -n openshift-compliance \
get compliancecheckresults/rhcos4-e8-worker-audit-rules-dac-modification-chmodExample output
NAME STATUS SEVERITY
rhcos4-e8-worker-audit-rules-dac-modification-chmod PASS medium5.12.1.6. Useful labels
Each pod that is spawned by the Compliance Operator is labeled specifically with the scan it belongs to and the work it does. The scan identifier is labeled with the compliance.openshift.io/scan-name label. The workload identifier is labeled with the workload label.
The Compliance Operator schedules the following workloads:
- scanner: Performs the compliance scan.
- resultserver: Stores the raw results for the compliance scan.
- aggregator: Aggregates the results, detects inconsistencies and outputs result objects (checkresults and remediations).
- suitererunner: Will tag a suite to be re-run (when a schedule is set).
- profileparser: Parses a datastream and creates the appropriate profiles, rules and variables.
When debugging and logs are required for a certain workload, run:
$ oc logs -l workload=<workload_name> -c <container_name>5.12.2. Increasing Compliance Operator resource limits
In some cases, the Compliance Operator might require more memory than the default limits allow. The best way to mitigate this issue is to set custom resource limits.
To increase the default memory and CPU limits of scanner pods, see `ScanSetting` Custom resource.
Procedure
To increase the Operator’s memory limits to 500 Mi, create the following patch file named
co-memlimit-patch.yaml:spec: config: resources: limits: memory: 500MiApply the patch file:
$ oc patch sub compliance-operator -nopenshift-compliance --patch-file co-memlimit-patch.yaml --type=merge
5.12.3. Configuring Operator resource constraints
The resources field defines Resource Constraints for all the containers in the Pod created by the Operator Lifecycle Manager (OLM).
Resource Constraints applied in this process overwrites the existing resource constraints.
Procedure
Inject a request of 0.25 cpu and 64 Mi of memory, and a limit of 0.5 cpu and 128 Mi of memory in each container by editing the
Subscriptionobject:kind: Subscription metadata: name: custom-operator spec: package: etcd channel: alpha config: resources: requests: memory: "64Mi" cpu: "250m" limits: memory: "128Mi" cpu: "500m"
5.12.4. Getting support
If you experience difficulty with a procedure described in this documentation, or with OpenShift Container Platform in general, visit the Red Hat Customer Portal. From the Customer Portal, you can:
- Search or browse through the Red Hat Knowledgebase of articles and solutions relating to Red Hat products.
- Submit a support case to Red Hat Support.
- Access other product documentation.
To identify issues with your cluster, you can use Insights in OpenShift Cluster Manager. Insights provides details about issues and, if available, information on how to solve a problem.
If you have a suggestion for improving this documentation or have found an error, submit a Jira issue for the most relevant documentation component. Please provide specific details, such as the section name and OpenShift Container Platform version.
5.13. Uninstalling the Compliance Operator
You can remove the OpenShift Compliance Operator from your cluster by using the OpenShift Container Platform web console.
5.13.1. Uninstalling the OpenShift Compliance Operator from OpenShift Container Platform
To remove the Compliance Operator, you must first delete the Compliance Operator custom resource definitions (CRDs). After the CRDs are removed, you can then remove the Operator and its namespace by deleting the openshift-compliance project.
Prerequisites
-
Access to an OpenShift Container Platform cluster using an account with
cluster-adminpermissions. - The OpenShift Compliance Operator must be installed.
Procedure
To remove the Compliance Operator by using the OpenShift Container Platform web console:
- Navigate to the Operators → Installed Operators page.
- Delete all ScanSettingBinding, ComplainceSuite, ComplianceScan, and ProfileBundle objects.
- Switch to the Administration → Operators → Installed Operators page.
-
Click the Options menu
 on the Compliance Operator entry and select Uninstall Operator.
- Switch to the Home → Projects page.
- Search for 'compliance'.
Click the Options menu
next to the openshift-compliance project, and select Delete Project.
-
Confirm the deletion by typing
openshift-compliancein the dialog box, and click Delete.
-
Confirm the deletion by typing
5.14. Using the oc-compliance plugin
Although the Compliance Operator automates many of the checks and remediations for the cluster, the full process of bringing a cluster into compliance often requires administrator interaction with the Compliance Operator API and other components. The oc-compliance plugin makes the process easier.
5.14.1. Installing the oc-compliance plugin
Procedure
Extract the
oc-complianceimage to get theoc-compliancebinary:$ podman run --rm -v ~/.local/bin:/mnt/out:Z registry.redhat.io/compliance/oc-compliance-rhel8:stable /bin/cp /usr/bin/oc-compliance /mnt/out/Example output
W0611 20:35:46.486903 11354 manifest.go:440] Chose linux/amd64 manifest from the manifest list.You can now run
oc-compliance.
5.14.2. Fetching raw results
When a compliance scan finishes, the results of the individual checks are listed in the resulting ComplianceCheckResult custom resource (CR). However, an administrator or auditor might require the complete details of the scan. The OpenSCAP tool creates an Advanced Recording Format (ARF) formatted file with the detailed results. This ARF file is too large to store in a config map or other standard Kubernetes resource, so a persistent volume (PV) is created to contain it.
Procedure
Fetching the results from the PV with the Compliance Operator is a four-step process. However, with the
oc-complianceplugin, you can use a single command:$ oc compliance fetch-raw <object-type> <object-name> -o <output-path>-
<object-type>can be eitherscansettingbinding,compliancescanorcompliancesuite, depending on which of these objects the scans were launched with. <object-name>is the name of the binding, suite, or scan object to gather the ARF file for, and<output-path>is the local directory to place the results.For example:
$ oc compliance fetch-raw scansettingbindings my-binding -o /tmp/Example output
Fetching results for my-binding scans: ocp4-cis, ocp4-cis-node-worker, ocp4-cis-node-master Fetching raw compliance results for scan 'ocp4-cis'....... The raw compliance results are available in the following directory: /tmp/ocp4-cis Fetching raw compliance results for scan 'ocp4-cis-node-worker'........... The raw compliance results are available in the following directory: /tmp/ocp4-cis-node-worker Fetching raw compliance results for scan 'ocp4-cis-node-master'...... The raw compliance results are available in the following directory: /tmp/ocp4-cis-node-master
View the list of files in the directory:
$ ls /tmp/ocp4-cis-node-master/Example output
ocp4-cis-node-master-ip-10-0-128-89.ec2.internal-pod.xml.bzip2 ocp4-cis-node-master-ip-10-0-150-5.ec2.internal-pod.xml.bzip2 ocp4-cis-node-master-ip-10-0-163-32.ec2.internal-pod.xml.bzip2Extract the results:
$ bunzip2 -c resultsdir/worker-scan/worker-scan-stage-459-tqkg7-compute-0-pod.xml.bzip2 > resultsdir/worker-scan/worker-scan-ip-10-0-170-231.us-east-2.compute.internal-pod.xmlView the results:
$ ls resultsdir/worker-scan/Example output
worker-scan-ip-10-0-170-231.us-east-2.compute.internal-pod.xml
worker-scan-stage-459-tqkg7-compute-0-pod.xml.bzip2
worker-scan-stage-459-tqkg7-compute-1-pod.xml.bzip25.14.3. Re-running scans
Although it is possible to run scans as scheduled jobs, you must often re-run a scan on demand, particularly after remediations are applied or when other changes to the cluster are made.
Procedure
Rerunning a scan with the Compliance Operator requires use of an annotation on the scan object. However, with the
oc-complianceplugin you can rerun a scan with a single command. Enter the following command to rerun the scans for theScanSettingBindingobject namedmy-binding:$ oc compliance rerun-now scansettingbindings my-bindingExample output
Rerunning scans from 'my-binding': ocp4-cis Re-running scan 'openshift-compliance/ocp4-cis'
5.14.4. Using ScanSettingBinding custom resources
When using the ScanSetting and ScanSettingBinding custom resources (CRs) that the Compliance Operator provides, it is possible to run scans for multiple profiles while using a common set of scan options, such as schedule, machine roles, tolerations, and so on. While that is easier than working with multiple ComplianceSuite or ComplianceScan objects, it can confuse new users.
The oc compliance bind subcommand helps you create a ScanSettingBinding CR.
Procedure
Run:
$ oc compliance bind [--dry-run] -N <binding name> [-S <scansetting name>] <objtype/objname> [..<objtype/objname>]-
If you omit the
-Sflag, thedefaultscan setting provided by the Compliance Operator is used. -
The object type is the Kubernetes object type, which can be
profileortailoredprofile. More than one object can be provided. -
The object name is the name of the Kubernetes resource, such as
.metadata.name. Add the
--dry-runoption to display the YAML file of the objects that are created.For example, given the following profiles and scan settings:
$ oc get profile.compliance -n openshift-complianceExample output
NAME AGE ocp4-cis 9m54s ocp4-cis-node 9m54s ocp4-e8 9m54s ocp4-moderate 9m54s ocp4-ncp 9m54s rhcos4-e8 9m54s rhcos4-moderate 9m54s rhcos4-ncp 9m54s rhcos4-ospp 9m54s rhcos4-stig 9m54s$ oc get scansettings -n openshift-complianceExample output
NAME AGE default 10m default-auto-apply 10m
-
If you omit the
To apply the
defaultsettings to theocp4-cisandocp4-cis-nodeprofiles, run:$ oc compliance bind -N my-binding profile/ocp4-cis profile/ocp4-cis-nodeExample output
Creating ScanSettingBinding my-bindingOnce the
ScanSettingBindingCR is created, the bound profile begins scanning for both profiles with the related settings. Overall, this is the fastest way to begin scanning with the Compliance Operator.
5.14.5. Printing controls
Compliance standards are generally organized into a hierarchy as follows:
- A benchmark is the top-level definition of a set of controls for a particular standard. For example, FedRAMP Moderate or Center for Internet Security (CIS) v.1.6.0.
- A control describes a family of requirements that must be met in order to be in compliance with the benchmark. For example, FedRAMP AC-01 (access control policy and procedures).
- A rule is a single check that is specific for the system being brought into compliance, and one or more of these rules map to a control.
- The Compliance Operator handles the grouping of rules into a profile for a single benchmark. It can be difficult to determine which controls that the set of rules in a profile satisfy.
Procedure
The
oc compliancecontrolssubcommand provides a report of the standards and controls that a given profile satisfies:$ oc compliance controls profile ocp4-cis-nodeExample output
+-----------+----------+ | FRAMEWORK | CONTROLS | +-----------+----------+ | CIS-OCP | 1.1.1 | + +----------+ | | 1.1.10 | + +----------+ | | 1.1.11 | + +----------+ ...
5.14.6. Fetching compliance remediation details
The Compliance Operator provides remediation objects that are used to automate the changes required to make the cluster compliant. The fetch-fixes subcommand can help you understand exactly which configuration remediations are used. Use the fetch-fixes subcommand to extract the remediation objects from a profile, rule, or ComplianceRemediation object into a directory to inspect.
Procedure
View the remediations for a profile:
$ oc compliance fetch-fixes profile ocp4-cis -o /tmpExample output
No fixes to persist for rule 'ocp4-api-server-api-priority-flowschema-catch-all'1 No fixes to persist for rule 'ocp4-api-server-api-priority-gate-enabled' No fixes to persist for rule 'ocp4-api-server-audit-log-maxbackup' Persisted rule fix to /tmp/ocp4-api-server-audit-log-maxsize.yaml No fixes to persist for rule 'ocp4-api-server-audit-log-path' No fixes to persist for rule 'ocp4-api-server-auth-mode-no-aa' No fixes to persist for rule 'ocp4-api-server-auth-mode-node' No fixes to persist for rule 'ocp4-api-server-auth-mode-rbac' No fixes to persist for rule 'ocp4-api-server-basic-auth' No fixes to persist for rule 'ocp4-api-server-bind-address' No fixes to persist for rule 'ocp4-api-server-client-ca' Persisted rule fix to /tmp/ocp4-api-server-encryption-provider-cipher.yaml Persisted rule fix to /tmp/ocp4-api-server-encryption-provider-config.yaml- 1
- The
No fixes to persistwarning is expected whenever there are rules in a profile that do not have a corresponding remediation, because either the rule cannot be remediated automatically or a remediation was not provided.
You can view a sample of the YAML file. The
headcommand will show you the first 10 lines:$ head /tmp/ocp4-api-server-audit-log-maxsize.yamlExample output
apiVersion: config.openshift.io/v1 kind: APIServer metadata: name: cluster spec: maximumFileSizeMegabytes: 100View the remediation from a
ComplianceRemediationobject created after a scan:$ oc get complianceremediations -n openshift-complianceExample output
NAME STATE ocp4-cis-api-server-encryption-provider-cipher NotApplied ocp4-cis-api-server-encryption-provider-config NotApplied$ oc compliance fetch-fixes complianceremediations ocp4-cis-api-server-encryption-provider-cipher -o /tmpExample output
Persisted compliance remediation fix to /tmp/ocp4-cis-api-server-encryption-provider-cipher.yamlYou can view a sample of the YAML file. The
headcommand will show you the first 10 lines:$ head /tmp/ocp4-cis-api-server-encryption-provider-cipher.yamlExample output
apiVersion: config.openshift.io/v1 kind: APIServer metadata: name: cluster spec: encryption: type: aescbc
Use caution before applying remediations directly. Some remediations might not be applicable in bulk, such as the usbguard rules in the moderate profile. In these cases, allow the Compliance Operator to apply the rules because it addresses the dependencies and ensures that the cluster remains in a good state.
5.14.7. Viewing ComplianceCheckResult object details
When scans are finished running, ComplianceCheckResult objects are created for the individual scan rules. The view-result subcommand provides a human-readable output of the ComplianceCheckResult object details.
Procedure
Run:
$ oc compliance view-result ocp4-cis-scheduler-no-bind-address
5.15. Understanding the Custom Resource Definitions
The Compliance Operator in the OpenShift Container Platform provides you with several Custom Resource Definitions (CRDs) to accomplish the compliance scans. To run a compliance scan, it leverages the predefined security policies, which are derived from the ComplianceAsCode community project. The Compliance Operator converts these security policies into CRDs, which you can use to run compliance scans and get remediations for the issues found.
5.15.1. CRDs workflow
The CRD provides you the following workflow to complete the compliance scans:
- Define your compliance scan requirements
- Configure the compliance scan settings
- Process compliance requirements with compliance scans settings
- Monitor the compliance scans
- Check the compliance scan results
5.15.2. Defining the compliance scan requirements
By default, the Compliance Operator CRDs include ProfileBundle and Profile objects, in which you can define and set the rules for your compliance scan requirements. You can also customize the default profiles by using a TailoredProfile object.
5.15.2.1. ProfileBundle object
When you install the Compliance Operator, it includes ready-to-run ProfileBundle objects. The Compliance Operator parses the ProfileBundle object and creates a Profile object for each profile in the bundle. It also parses Rule and Variable objects, which are used by the Profile object.
Example ProfileBundle object
apiVersion: compliance.openshift.io/v1alpha1
kind: ProfileBundle
name: <profile bundle name>
namespace: openshift-compliance
status:
dataStreamStatus: VALID - 1
- Indicates whether the Compliance Operator was able to parse the content files.
When the contentFile fails, an errorMessage attribute appears, which provides details of the error that occurred.
Troubleshooting
When you roll back to a known content image from an invalid image, the ProfileBundle object stops responding and displays PENDING state. As a workaround, you can move to a different image than the previous one. Alternatively, you can delete and re-create the ProfileBundle object to return to the working state.
5.15.2.2. Profile object
The Profile object defines the rules and variables that can be evaluated for a certain compliance standard. It contains parsed out details about an OpenSCAP profile, such as its XCCDF identifier and profile checks for a Node or Platform type. You can either directly use the Profile object or further customize it using a TailorProfile object.
You cannot create or modify the Profile object manually because it is derived from a single ProfileBundle object. Typically, a single ProfileBundle object can include several Profile objects.
Example Profile object
apiVersion: compliance.openshift.io/v1alpha1
description: <description of the profile>
id: xccdf_org.ssgproject.content_profile_moderate
kind: Profile
metadata:
annotations:
compliance.openshift.io/product: <product name>
compliance.openshift.io/product-type: Node
creationTimestamp: "YYYY-MM-DDTMM:HH:SSZ"
generation: 1
labels:
compliance.openshift.io/profile-bundle: <profile bundle name>
name: rhcos4-moderate
namespace: openshift-compliance
ownerReferences:
- apiVersion: compliance.openshift.io/v1alpha1
blockOwnerDeletion: true
controller: true
kind: ProfileBundle
name: <profile bundle name>
uid: <uid string>
resourceVersion: "<version number>"
selfLink: /apis/compliance.openshift.io/v1alpha1/namespaces/openshift-compliance/profiles/rhcos4-moderate
uid: <uid string>
rules:
- rhcos4-account-disable-post-pw-expiration
- rhcos4-accounts-no-uid-except-zero
- rhcos4-audit-rules-dac-modification-chmod
- rhcos4-audit-rules-dac-modification-chown
title: <title of the profile>- 1
- Specify the XCCDF name of the profile. Use this identifier when you define a
ComplianceScanobject as the value of the profile attribute of the scan. - 2
- Specify either a
NodeorPlatform. Node profiles scan the cluster nodes and platform profiles scan the Kubernetes platform. - 3
- Specify the list of rules for the profile. Each rule corresponds to a single check.
5.15.2.3. Rule object
The Rule object, which forms the profiles, are also exposed as objects. Use the Rule object to define your compliance check requirements and specify how it could be fixed.
Example Rule object
apiVersion: compliance.openshift.io/v1alpha1
checkType: Platform
description: <description of the rule>
id: xccdf_org.ssgproject.content_rule_configure_network_policies_namespaces
instructions: <manual instructions for the scan>
kind: Rule
metadata:
annotations:
compliance.openshift.io/rule: configure-network-policies-namespaces
control.compliance.openshift.io/CIS-OCP: 5.3.2
control.compliance.openshift.io/NERC-CIP: CIP-003-3 R4;CIP-003-3 R4.2;CIP-003-3
R5;CIP-003-3 R6;CIP-004-3 R2.2.4;CIP-004-3 R3;CIP-007-3 R2;CIP-007-3 R2.1;CIP-007-3
R2.2;CIP-007-3 R2.3;CIP-007-3 R5.1;CIP-007-3 R6.1
control.compliance.openshift.io/NIST-800-53: AC-4;AC-4(21);CA-3(5);CM-6;CM-6(1);CM-7;CM-7(1);SC-7;SC-7(3);SC-7(5);SC-7(8);SC-7(12);SC-7(13);SC-7(18)
labels:
compliance.openshift.io/profile-bundle: ocp4
name: ocp4-configure-network-policies-namespaces
namespace: openshift-compliance
rationale: <description of why this rule is checked>
severity: high
title: <summary of the rule>- 1
- Specify the type of check this rule executes.
Nodeprofiles scan the cluster nodes andPlatformprofiles scan the Kubernetes platform. An empty value indicates there is no automated check. - 2
- Specify the XCCDF name of the rule, which is parsed directly from the datastream.
- 3
- Specify the severity of the rule when it fails.
The Rule object gets an appropriate label for an easy identification of the associated ProfileBundle object. The ProfileBundle also gets specified in the OwnerReferences of this object.
5.15.2.4. TailoredProfile object
Use the TailoredProfile object to modify the default Profile object based on your organization requirements. You can enable or disable rules, set variable values, and provide justification for the customization. After validation, the TailoredProfile object creates a ConfigMap, which can be referenced by a ComplianceScan object.
You can use the TailoredProfile object by referencing it in a ScanSettingBinding object. For more information about ScanSettingBinding, see ScanSettingBinding object.
Example TailoredProfile object
apiVersion: compliance.openshift.io/v1alpha1
kind: TailoredProfile
metadata:
name: rhcos4-with-usb
spec:
extends: rhcos4-moderate
title: <title of the tailored profile>
disableRules:
- name: <name of a rule object to be disabled>
rationale: <description of why this rule is checked>
status:
id: xccdf_compliance.openshift.io_profile_rhcos4-with-usb
outputRef:
name: rhcos4-with-usb-tp
namespace: openshift-compliance
state: READY - 1
- This is optional. Name of the
Profileobject upon which theTailoredProfileis built. If no value is set, a new profile is created from theenableRuleslist. - 2
- Specifies the XCCDF name of the tailored profile.
- 3
- Specifies the
ConfigMapname, which can be used as the value of thetailoringConfigMap.nameattribute of aComplianceScan. - 4
- Shows the state of the object such as
READY,PENDING, andFAILURE. If the state of the object isERROR, then the attributestatus.errorMessageprovides the reason for the failure.
With the TailoredProfile object, it is possible to create a new Profile object using the TailoredProfile construct. To create a new Profile, set the following configuration parameters :
- an appropriate title
-
extendsvalue must be empty scan type annotation on the
TailoredProfileobject:compliance.openshift.io/product-type: Platform/NodeNoteIf you have not set the
product-typeannotation, the Compliance Operator defaults toPlatformscan type. Adding the-nodesuffix to the name of theTailoredProfileobject results innodescan type.
5.15.3. Configuring the compliance scan settings
After you have defined the requirements of the compliance scan, you can configure it by specifying the type of the scan, occurrence of the scan, and location of the scan. To do so, Compliance Operator provides you with a ScanSetting object.
5.15.3.1. ScanSetting object
Use the ScanSetting object to define and reuse the operational policies to run your scans. By default, the Compliance Operator creates the following ScanSetting objects:
- default - it runs a scan every day at 1 AM on both master and worker nodes using a 1Gi Persistent Volume (PV) and keeps the last three results. Remediation is neither applied nor updated automatically.
-
default-auto-apply - it runs a scan every day at 1AM on both control plane and worker nodes using a 1Gi Persistent Volume (PV) and keeps the last three results. Both
autoApplyRemediationsandautoUpdateRemediationsare set to true.
Example ScanSetting object
Name: default-auto-apply
Namespace: openshift-compliance
Labels: <none>
Annotations: <none>
API Version: compliance.openshift.io/v1alpha1
Auto Apply Remediations: true
Auto Update Remediations: true
Kind: ScanSetting
Metadata:
Creation Timestamp: 2022-10-18T20:21:00Z
Generation: 1
Managed Fields:
API Version: compliance.openshift.io/v1alpha1
Fields Type: FieldsV1
fieldsV1:
f:autoApplyRemediations:
f:autoUpdateRemediations:
f:rawResultStorage:
.:
f:nodeSelector:
.:
f:node-role.kubernetes.io/master:
f:pvAccessModes:
f:rotation:
f:size:
f:tolerations:
f:roles:
f:scanTolerations:
f:schedule:
f:showNotApplicable:
f:strictNodeScan:
Manager: compliance-operator
Operation: Update
Time: 2022-10-18T20:21:00Z
Resource Version: 38840
UID: 8cb0967d-05e0-4d7a-ac1c-08a7f7e89e84
Raw Result Storage:
Node Selector:
node-role.kubernetes.io/master:
Pv Access Modes:
ReadWriteOnce
Rotation: 3
Size: 1Gi
  Tolerations:
    Effect:              NoSchedule
    Key:                 node-role.kubernetes.io/master
    Operator:            Exists
    Effect:              NoExecute
    Key:                 node.kubernetes.io/not-ready
    Operator:            Exists
    Toleration Seconds:  300
    Effect:              NoExecute
    Key:                 node.kubernetes.io/unreachable
    Operator:            Exists
    Toleration Seconds:  300
    Effect:              NoSchedule
    Key:                 node.kubernetes.io/memory-pressure
    Operator:            Exists
Roles:
  master
worker
Scan Tolerations:
Operator: Exists
Schedule: "0 1 * * *"
Show Not Applicable:  false
Strict Node Scan:     true
Events: <none>- 1
- Set to
trueto enable auto remediations. Set tofalseto disable auto remediations. - 2
- Set to
trueto enable auto remediations for content updates. Set tofalseto disable auto remediations for content updates. - 3
- Specify the number of stored scans in the raw result format. The default value is
3. As the older results get rotated, the administrator must store the results elsewhere before the rotation happens. - 4
- Specify the storage size that should be created for the scan to store the raw results. The default value is
1Gi - 6
- Specify how often the scan should be run in cron format.Note
To disable the rotation policy, set the value to
0. - 5
- Specify the
node-role.kubernetes.iolabel value to schedule the scan forNodetype. This value has to match the name of aMachineConfigPool.
5.15.4. Processing the compliance scan requirements with compliance scans settings
When you have defined the compliance scan requirements and configured the settings to run the scans, then the Compliance Operator processes it using the ScanSettingBinding object.
5.15.4.1. ScanSettingBinding object
Use the ScanSettingBinding object to specify your compliance requirements with reference to the Profile or TailoredProfile object. It is then linked to a ScanSetting object, which provides the operational constraints for the scan. Then the Compliance Operator generates the ComplianceSuite object based on the ScanSetting and ScanSettingBinding objects.
Example ScanSettingBinding object
apiVersion: compliance.openshift.io/v1alpha1
kind: ScanSettingBinding
metadata:
  name: <name of the scan>
profiles:
  # Node checks
  - name: rhcos4-with-usb
    kind: TailoredProfile
    apiGroup: compliance.openshift.io/v1alpha1
  # Cluster checks
  - name: ocp4-moderate
    kind: Profile
    apiGroup: compliance.openshift.io/v1alpha1
settingsRef:
  name: my-companys-constraints
  kind: ScanSetting
  apiGroup: compliance.openshift.io/v1alpha1
The creation of ScanSetting and ScanSettingBinding objects results in the compliance suite. To get the list of compliance suite, run the following command:
$ oc get compliancesuites
If you delete ScanSettingBinding, then compliance suite also is deleted.
5.15.5. Tracking the compliance scans
After the creation of compliance suite, you can monitor the status of the deployed scans using the ComplianceSuite object.
5.15.5.1. ComplianceSuite object
The ComplianceSuite object helps you keep track of the state of the scans. It contains the raw settings to create scans and the overall result.
For Node type scans, you should map the scan to the MachineConfigPool, since it contains the remediations for any issues. If you specify a label, ensure it directly applies to a pool.
Example ComplianceSuite object
apiVersion: compliance.openshift.io/v1alpha1
kind: ComplianceSuite
metadata:
  name: <name of the scan>
spec:
  autoApplyRemediations: false
schedule: "0 1 * * *"
scans:
    - name: workers-scan
      scanType: Node
      profile: xccdf_org.ssgproject.content_profile_moderate
      content: ssg-rhcos4-ds.xml
      contentImage: quay.io/complianceascode/ocp4:latest
      rule: "xccdf_org.ssgproject.content_rule_no_netrc_files"
      nodeSelector:
        node-role.kubernetes.io/worker: ""
status:
  Phase: DONE
Result: NON-COMPLIANT
  scanStatuses:
  - name: workers-scan
    phase: DONE
    result: NON-COMPLIANT
The suite in the background creates the ComplianceScan object based on the scans parameter. You can programmatically fetch the ComplianceSuites events. To get the events for the suite, run the following command:
$ oc get events --field-selector involvedObject.kind=ComplianceSuite,involvedObject.name=<name of the suite>
You might create errors when you manually define the ComplianceSuite, since it contains the XCCDF attributes.
5.15.5.2. Advanced ComplianceScan Object
The Compliance Operator includes options for advanced users for debugging or integrating with existing tooling. While it is recommended that you not create a ComplianceScan object directly, you can instead manage it using a ComplianceSuite object.
Example Advanced ComplianceScan object
apiVersion: compliance.openshift.io/v1alpha1
kind: ComplianceScan
metadata:
  name: <name of the scan>
spec:
  scanType: Node
profile: xccdf_org.ssgproject.content_profile_moderate
  content: ssg-ocp4-ds.xml
  contentImage: quay.io/complianceascode/ocp4:latest
rule: "xccdf_org.ssgproject.content_rule_no_netrc_files"
nodeSelector:
    node-role.kubernetes.io/worker: ""
status:
  phase: DONE
result: NON-COMPLIANT - 1
- Specify either
NodeorPlatform. Node profiles scan the cluster nodes and platform profiles scan the Kubernetes platform. - 2
- Specify the XCCDF identifier of the profile that you want to run.
- 3
- Specify the container image that encapsulates the profile files.
- 4
- It is optional. Specify the scan to run a single rule. This rule has to be identified with the XCCDF ID, and has to belong to the specified profile.Note
If you skip the
ruleparameter, then scan runs for all the available rules of the specified profile. - 5
- If you are on the OpenShift Container Platform and wants to generate a remediation, then nodeSelector label has to match the
MachineConfigPoollabel.NoteIf you do not specify
nodeSelectorparameter or match theMachineConfiglabel, scan will still run, but it will not create remediation. - 6
- Indicates the current phase of the scan.
- 7
- Indicates the verdict of the scan.
If you delete a ComplianceSuite object, then all the associated scans get deleted.
When the scan is complete, it generates the result as Custom Resources of the ComplianceCheckResult object. However, the raw results are available in ARF format. These results are stored in a Persistent Volume (PV), which has a Persistent Volume Claim (PVC) associated with the name of the scan. You can programmatically fetch the ComplianceScans events. To generate events for the suite, run the following command:
oc get events --field-selector involvedObject.kind=ComplianceScan,involvedObject.name=<name of the suite>5.15.6. Viewing the compliance results
When the compliance suite reaches the DONE phase, you can view the scan results and possible remediations.
5.15.6.1. ComplianceCheckResult object
When you run a scan with a specific profile, several rules in the profiles are verified. For each of these rules, a ComplianceCheckResult object is created, which provides the state of the cluster for a specific rule.
Example ComplianceCheckResult object
apiVersion: compliance.openshift.io/v1alpha1
kind: ComplianceCheckResult
metadata:
  labels:
    compliance.openshift.io/check-severity: medium
    compliance.openshift.io/check-status: FAIL
    compliance.openshift.io/suite: example-compliancesuite
    compliance.openshift.io/scan-name: workers-scan
  name: workers-scan-no-direct-root-logins
  namespace: openshift-compliance
  ownerReferences:
  - apiVersion: compliance.openshift.io/v1alpha1
    blockOwnerDeletion: true
    controller: true
    kind: ComplianceScan
    name: workers-scan
description: <description of scan check>
instructions: <manual instructions for the scan>
id: xccdf_org.ssgproject.content_rule_no_direct_root_logins
severity: medium
status: FAIL - 1
- Describes the severity of the scan check.
- 2
- Describes the result of the check. The possible values are:
- PASS: check was successful.
- FAIL: check was unsuccessful.
- INFO: check was successful and found something not severe enough to be considered an error.
- MANUAL: check cannot automatically assess the status and manual check is required.
- INCONSISTENT: different nodes report different results.
- ERROR: check run successfully, but could not complete.
- NOTAPPLICABLE: check did not run as it is not applicable.
To get all the check results from a suite, run the following command:
oc get compliancecheckresults \
-l compliance.openshift.io/suite=workers-compliancesuite
5.15.6.2. ComplianceRemediation object
For a specific check you can have a datastream specified fix. However, if a Kubernetes fix is available, then the Compliance Operator creates a ComplianceRemediation object.
Example ComplianceRemediation object
apiVersion: compliance.openshift.io/v1alpha1
kind: ComplianceRemediation
metadata:
  labels:
    compliance.openshift.io/suite: example-compliancesuite
    compliance.openshift.io/scan-name: workers-scan
    machineconfiguration.openshift.io/role: worker
  name: workers-scan-disable-users-coredumps
  namespace: openshift-compliance
  ownerReferences:
  - apiVersion: compliance.openshift.io/v1alpha1
    blockOwnerDeletion: true
    controller: true
    kind: ComplianceCheckResult
    name: workers-scan-disable-users-coredumps
    uid: <UID>
spec:
  apply: false
  object:
    current:
       apiVersion: machineconfiguration.openshift.io/v1
       kind: MachineConfig
       spec:
         config:
           ignition:
             version: 2.2.0
           storage:
             files:
             - contents:
                 source: data:,%2A%20%20%20%20%20hard%20%20%20core%20%20%20%200
               filesystem: root
               mode: 420
               path: /etc/security/limits.d/75-disable_users_coredumps.conf
outdated: {} - 1
trueindicates the remediation was applied.falseindicates the remediation was not applied.- 2
- Includes the definition of the remediation.
- 3
- Indicates remediation that was previously parsed from an earlier version of the content. The Compliance Operator still retains the outdated objects to give the administrator a chance to review the new remediations before applying them.
To get all the remediations from a suite, run the following command:
oc get complianceremediations \
-l compliance.openshift.io/suite=workers-compliancesuite
To list all failing checks that can be remediated automatically, run the following command:
oc get compliancecheckresults \
-l 'compliance.openshift.io/check-status in (FAIL),compliance.openshift.io/automated-remediation'
To list all failing checks that can be remediated manually, run the following command:
oc get compliancecheckresults \
-l 'compliance.openshift.io/check-status in (FAIL),!compliance.openshift.io/automated-remediation'
Chapter 6. File Integrity Operator
6.1. File Integrity Operator release notes
The File Integrity Operator for OpenShift Container Platform continually runs file integrity checks on RHCOS nodes.
These release notes track the development of the File Integrity Operator in the OpenShift Container Platform.
For an overview of the File Integrity Operator, see Understanding the File Integrity Operator.
To access the latest release, see Updating the File Integrity Operator.
6.1.1. OpenShift File Integrity Operator 1.0.0
The following advisory is available for the OpenShift File Integrity Operator 1.0.0:
The File Integrity Operator is now stable and the release channel is upgraded to v1. Future releases will follow Semantic Versioning. To access the latest release, see Updating the File Integrity Operator.
6.1.2. OpenShift File Integrity Operator 0.1.32
The following advisory is available for the OpenShift File Integrity Operator 0.1.32:
6.1.2.1. Bug fixes
- Previously, alerts issued by the File Integrity Operator did not set a namespace, making it difficult to understand from which namespace the alert originated. Now, the Operator sets the appropriate namespace, providing more information about the alert. (BZ#2112394)
- Previously, The File Integrity Operator did not update the metrics service on Operator startup, causing the metrics targets to be unreachable. With this release, the File Integrity Operator now ensures the metrics service is updated on Operator startup. (BZ#2115821)
6.1.3. OpenShift File Integrity Operator 0.1.30
The following advisory is available for the OpenShift File Integrity Operator 0.1.30:
6.1.3.1. Bug fixes
- Previously, alerts issued by the File Integrity Operator did not set a namespace, making it difficult to understand where the alert originated. Now, the Operator sets the appropriate namespace, increasing understanding of the alert. (BZ#2101393)
6.1.4. OpenShift File Integrity Operator 0.1.24
The following advisory is available for the OpenShift File Integrity Operator 0.1.24:
6.1.4.1. New features and enhancements
-
You can now configure the maximum number of backups stored in the
FileIntegrityCustom Resource (CR) with theconfig.maxBackupsattribute. This attribute specifies the number of AIDE database and log backups left over from there-initprocess to keep on the node. Older backups beyond the configured number are automatically pruned. The default is set to five backups.
6.1.4.2. Bug fixes
-
Previously, upgrading the Operator from versions older than 0.1.21 to 0.1.22 could cause the
re-initfeature to fail. This was a result of the Operator failing to updateconfigMapresource labels. Now, upgrading to the latest version fixes the resource labels. (BZ#2049206) -
Previously, when enforcing the default
configMapscript contents, the wrong data keys were compared. This resulted in theaide-reinitscript not being updated properly after an Operator upgrade, and caused there-initprocess to fail. Now,daemonSetsrun to completion and the AIDE databasere-initprocess executes successfully. (BZ#2072058)
6.1.5. OpenShift File Integrity Operator 0.1.22
The following advisory is available for the OpenShift File Integrity Operator 0.1.22:
6.1.5.1. Bug fixes
-
Previously, a system with a File Integrity Operator installed might interrupt the OpenShift Container Platform update, due to the
/etc/kubernetes/aide.reinitfile. This occurred if the/etc/kubernetes/aide.reinitfile was present, but later removed prior to theostreevalidation. With this update,/etc/kubernetes/aide.reinitis moved to the/rundirectory so that it does not conflict with the OpenShift Container Platform update. (BZ#2033311)
6.1.6. OpenShift File Integrity Operator 0.1.21
The following advisory is available for the OpenShift File Integrity Operator 0.1.21:
6.1.6.1. New features and enhancements
-
The metrics related to
FileIntegrityscan results and processing metrics are displayed on the monitoring dashboard on the web console. The results are labeled with the prefix offile_integrity_operator_. -
If a node has an integrity failure for more than 1 second, the default
PrometheusRuleprovided in the operator namespace alerts with a warning. The following dynamic Machine Config Operator and Cluster Version Operator related filepaths are excluded from the default AIDE policy to help prevent false positives during node updates:
- /etc/machine-config-daemon/currentconfig
- /etc/pki/ca-trust/extracted/java/cacerts
- /etc/cvo/updatepayloads
- /root/.kube
- The AIDE daemon process has stability improvements over v0.1.16, and is more resilient to errors that might occur when the AIDE database is initialized.
6.1.6.2. Bug fixes
- Previously, when the Operator automatically upgraded, outdated daemon sets were not removed. With this release, outdated daemon sets are removed during the automatic upgrade.
6.2. Installing the File Integrity Operator
6.2.1. Installing the File Integrity Operator using the web console
Prerequisites
-
You must have
adminprivileges.
Procedure
- In the OpenShift Container Platform web console, navigate to Operators → OperatorHub.
- Search for the File Integrity Operator, then click Install.
-
Keep the default selection of Installation mode and namespace to ensure that the Operator will be installed to the
openshift-file-integritynamespace. - Click Install.
Verification
To confirm that the installation is successful:
- Navigate to the Operators → Installed Operators page.
-
Check that the Operator is installed in the
openshift-file-integritynamespace and its status isSucceeded.
If the Operator is not installed successfully:
-
Navigate to the Operators → Installed Operators page and inspect the
Statuscolumn for any errors or failures. -
Navigate to the Workloads → Pods page and check the logs in any pods in the
openshift-file-integrityproject that are reporting issues.
6.2.2. Installing the File Integrity Operator using the CLI
Prerequisites
-
You must have
adminprivileges.
Procedure
Create a
Namespaceobject YAML file by running:$ oc create -f <file-name>.yamlExample output
apiVersion: v1
kind: Namespace
metadata:
  labels:
    openshift.io/cluster-monitoring: "true"
  name: openshift-file-integrity
Create the
OperatorGroupobject YAML file:$ oc create -f <file-name>.yamlExample output
apiVersion: operators.coreos.com/v1
kind: OperatorGroup
metadata:
  name: file-integrity-operator
  namespace: openshift-file-integrity
spec:
  targetNamespaces:
  - openshift-file-integrity
Create the
Subscriptionobject YAML file:$ oc create -f <file-name>.yamlExample output
apiVersion: operators.coreos.com/v1alpha1
kind: Subscription
metadata:
  name: file-integrity-operator
  namespace: openshift-file-integrity
spec:
  channel: "v1"
  installPlanApproval: Automatic
  name: file-integrity-operator
  source: redhat-operators
  sourceNamespace: openshift-marketplace
Verification
Verify the installation succeeded by inspecting the CSV file:
$ oc get csv -n openshift-file-integrityVerify that the File Integrity Operator is up and running:
$ oc get deploy -n openshift-file-integrity
6.3. Updating the File Integrity Operator
As a cluster administrator, you can update the File Integrity Operator on your OpenShift Container Platform cluster.
6.3.1. Preparing for an Operator update
The subscription of an installed Operator specifies an update channel that tracks and receives updates for the Operator. You can change the update channel to start tracking and receiving updates from a newer channel.
The names of update channels in a subscription can differ between Operators, but the naming scheme typically follows a common convention within a given Operator. For example, channel names might follow a minor release update stream for the application provided by the Operator (1.2, 1.3) or a release frequency (stable, fast).
You cannot change installed Operators to a channel that is older than the current channel.
Red Hat Customer Portal Labs include the following application that helps administrators prepare to update their Operators:
You can use the application to search for Operator Lifecycle Manager-based Operators and verify the available Operator version per update channel across different versions of OpenShift Container Platform. Cluster Version Operator-based Operators are not included.
6.3.2. Changing the update channel for an Operator
You can change the update channel for an Operator by using the OpenShift Container Platform web console.
If the approval strategy in the subscription is set to Automatic, the update process initiates as soon as a new Operator version is available in the selected channel. If the approval strategy is set to Manual, you must manually approve pending updates.
Prerequisites
- An Operator previously installed using Operator Lifecycle Manager (OLM).
Procedure
- In the Administrator perspective of the web console, navigate to Operators → Installed Operators.
- Click the name of the Operator you want to change the update channel for.
- Click the Subscription tab.
- Click the name of the update channel under Channel.
- Click the newer update channel that you want to change to, then click Save.
For subscriptions with an Automatic approval strategy, the update begins automatically. Navigate back to the Operators → Installed Operators page to monitor the progress of the update. When complete, the status changes to Succeeded and Up to date.
For subscriptions with a Manual approval strategy, you can manually approve the update from the Subscription tab.
6.3.3. Manually approving a pending Operator update
If an installed Operator has the approval strategy in its subscription set to Manual, when new updates are released in its current update channel, the update must be manually approved before installation can begin.
Prerequisites
- An Operator previously installed using Operator Lifecycle Manager (OLM).
Procedure
- In the Administrator perspective of the OpenShift Container Platform web console, navigate to Operators → Installed Operators.
- Operators that have a pending update display a status with Upgrade available. Click the name of the Operator you want to update.
- Click the Subscription tab. Any update requiring approval are displayed next to Upgrade Status. For example, it might display 1 requires approval.
- Click 1 requires approval, then click Preview Install Plan.
- Review the resources that are listed as available for update. When satisfied, click Approve.
- Navigate back to the Operators → Installed Operators page to monitor the progress of the update. When complete, the status changes to Succeeded and Up to date.
6.4. Understanding the File Integrity Operator
The File Integrity Operator is an OpenShift Container Platform Operator that continually runs file integrity checks on the cluster nodes. It deploys a daemon set that initializes and runs privileged advanced intrusion detection environment (AIDE) containers on each node, providing a status object with a log of files that are modified during the initial run of the daemon set pods.
Currently, only Red Hat Enterprise Linux CoreOS (RHCOS) nodes are supported.
6.4.1. Creating the FileIntegrity custom resource
An instance of a FileIntegrity custom resource (CR) represents a set of continuous file integrity scans for one or more nodes.
Each FileIntegrity CR is backed by a daemon set running AIDE on the nodes matching the FileIntegrity CR specification.
Procedure
Create the following example
FileIntegrityCR namedworker-fileintegrity.yamlto enable scans on worker nodes:Example FileIntegrity CR
apiVersion: fileintegrity.openshift.io/v1alpha1
kind: FileIntegrity
metadata:
  name: worker-fileintegrity
  namespace: openshift-file-integrity
spec:
  nodeSelector:
      node-role.kubernetes.io/worker: ""
  config: {}
Apply the YAML file to the
openshift-file-integritynamespace:$ oc apply -f worker-fileintegrity.yaml -n openshift-file-integrity
Verification
Confirm the
FileIntegrityobject was created successfully by running the following command:$ oc get fileintegrities -n openshift-file-integrityExample output
NAME                   AGE
worker-fileintegrity   14s
6.4.2. Checking the FileIntegrity custom resource status
The FileIntegrity custom resource (CR) reports its status through the .status.phase subresource.
Procedure
To query the
FileIntegrityCR status, run:$ oc get fileintegrities/worker-fileintegrity -o jsonpath="{ .status.phase }"Example output
Active
6.4.3. FileIntegrity custom resource phases
-
Pending- The phase after the custom resource (CR) is created. -
Active- The phase when the backing daemon set is up and running. -
Initializing- The phase when the AIDE database is being reinitialized.
6.4.4. Understanding the FileIntegrityNodeStatuses object
The scan results of the FileIntegrity CR are reported in another object called FileIntegrityNodeStatuses.
$ oc get fileintegritynodestatusesExample output
NAME                                                AGE
worker-fileintegrity-ip-10-0-130-192.ec2.internal   101s
worker-fileintegrity-ip-10-0-147-133.ec2.internal   109s
worker-fileintegrity-ip-10-0-165-160.ec2.internal   102s
It might take some time for the FileIntegrityNodeStatus object results to be available.
There is one result object per node. The nodeName attribute of each FileIntegrityNodeStatus object corresponds to the node being scanned. The status of the file integrity scan is represented in the results array, which holds scan conditions.
$ oc get fileintegritynodestatuses.fileintegrity.openshift.io -ojsonpath='{.items[*].results}' | jq
The fileintegritynodestatus object reports the latest status of an AIDE run and exposes the status as Failed, Succeeded, or Errored in a status field.
$ oc get fileintegritynodestatuses -wExample output
NAME                                                               NODE                                         STATUS
example-fileintegrity-ip-10-0-134-186.us-east-2.compute.internal   ip-10-0-134-186.us-east-2.compute.internal   Succeeded
example-fileintegrity-ip-10-0-150-230.us-east-2.compute.internal   ip-10-0-150-230.us-east-2.compute.internal   Succeeded
example-fileintegrity-ip-10-0-169-137.us-east-2.compute.internal   ip-10-0-169-137.us-east-2.compute.internal   Succeeded
example-fileintegrity-ip-10-0-180-200.us-east-2.compute.internal   ip-10-0-180-200.us-east-2.compute.internal   Succeeded
example-fileintegrity-ip-10-0-194-66.us-east-2.compute.internal    ip-10-0-194-66.us-east-2.compute.internal    Failed
example-fileintegrity-ip-10-0-222-188.us-east-2.compute.internal   ip-10-0-222-188.us-east-2.compute.internal   Succeeded
example-fileintegrity-ip-10-0-134-186.us-east-2.compute.internal   ip-10-0-134-186.us-east-2.compute.internal   Succeeded
example-fileintegrity-ip-10-0-222-188.us-east-2.compute.internal   ip-10-0-222-188.us-east-2.compute.internal   Succeeded
example-fileintegrity-ip-10-0-194-66.us-east-2.compute.internal    ip-10-0-194-66.us-east-2.compute.internal    Failed
example-fileintegrity-ip-10-0-150-230.us-east-2.compute.internal   ip-10-0-150-230.us-east-2.compute.internal   Succeeded
example-fileintegrity-ip-10-0-180-200.us-east-2.compute.internal   ip-10-0-180-200.us-east-2.compute.internal   Succeeded
6.4.5. FileIntegrityNodeStatus CR status types
These conditions are reported in the results array of the corresponding FileIntegrityNodeStatus CR status:
-
Succeeded- The integrity check passed; the files and directories covered by the AIDE check have not been modified since the database was last initialized. -
Failed- The integrity check failed; some files or directories covered by the AIDE check have been modified since the database was last initialized. -
Errored- The AIDE scanner encountered an internal error.
6.4.5.1. FileIntegrityNodeStatus CR success example
Example output of a condition with a success status
[
  {
    "condition": "Succeeded",
    "lastProbeTime": "2020-09-15T12:45:57Z"
  }
]
[
  {
    "condition": "Succeeded",
    "lastProbeTime": "2020-09-15T12:46:03Z"
  }
]
[
  {
    "condition": "Succeeded",
    "lastProbeTime": "2020-09-15T12:45:48Z"
  }
]
In this case, all three scans succeeded and so far there are no other conditions.
6.4.5.2. FileIntegrityNodeStatus CR failure status example
To simulate a failure condition, modify one of the files AIDE tracks. For example, modify /etc/resolv.conf on one of the worker nodes:
$ oc debug node/ip-10-0-130-192.ec2.internalExample output
Creating debug namespace/openshift-debug-node-ldfbj ...
Starting pod/ip-10-0-130-192ec2internal-debug ...
To use host binaries, run `chroot /host`
Pod IP: 10.0.130.192
If you don't see a command prompt, try pressing enter.
sh-4.2# echo "# integrity test" >> /host/etc/resolv.conf
sh-4.2# exit

Removing debug pod ...
Removing debug namespace/openshift-debug-node-ldfbj ...
After some time, the Failed condition is reported in the results array of the corresponding FileIntegrityNodeStatus object. The previous Succeeded condition is retained, which allows you to pinpoint the time the check failed.
$ oc get fileintegritynodestatuses.fileintegrity.openshift.io/worker-fileintegrity-ip-10-0-130-192.ec2.internal -ojsonpath='{.results}' | jq -rAlternatively, if you are not mentioning the object name, run:
$ oc get fileintegritynodestatuses.fileintegrity.openshift.io -ojsonpath='{.items[*].results}' | jqExample output
[
  {
    "condition": "Succeeded",
    "lastProbeTime": "2020-09-15T12:54:14Z"
  },
  {
    "condition": "Failed",
    "filesChanged": 1,
    "lastProbeTime": "2020-09-15T12:57:20Z",
    "resultConfigMapName": "aide-ds-worker-fileintegrity-ip-10-0-130-192.ec2.internal-failed",
    "resultConfigMapNamespace": "openshift-file-integrity"
  }
]
The Failed condition points to a config map that gives more details about what exactly failed and why:
$ oc describe cm aide-ds-worker-fileintegrity-ip-10-0-130-192.ec2.internal-failedExample output
Name:         aide-ds-worker-fileintegrity-ip-10-0-130-192.ec2.internal-failed
Namespace:    openshift-file-integrity
Labels:       file-integrity.openshift.io/node=ip-10-0-130-192.ec2.internal
              file-integrity.openshift.io/owner=worker-fileintegrity
              file-integrity.openshift.io/result-log=
Annotations:  file-integrity.openshift.io/files-added: 0
              file-integrity.openshift.io/files-changed: 1
              file-integrity.openshift.io/files-removed: 0

Data

integritylog:
------
AIDE 0.15.1 found differences between database and filesystem!!
Start timestamp: 2020-09-15 12:58:15

Summary:
  Total number of files:  31553
  Added files:                0
  Removed files:            0
  Changed files:            1


---------------------------------------------------
Changed files:
---------------------------------------------------

changed: /hostroot/etc/resolv.conf

---------------------------------------------------
Detailed information about changes:
---------------------------------------------------


File: /hostroot/etc/resolv.conf
 SHA512   : sTQYpB/AL7FeoGtu/1g7opv6C+KT1CBJ , qAeM+a8yTgHPnIHMaRlS+so61EN8VOpg

Events:  <none>
Due to the config map data size limit, AIDE logs over 1 MB are added to the failure config map as a base64-encoded gzip archive. In this case, you want to pipe the output of the above command to base64 --decode | gunzip. Compressed logs are indicated by the presence of a file-integrity.openshift.io/compressed annotation key in the config map.
6.4.6. Understanding events
Transitions in the status of the FileIntegrity and FileIntegrityNodeStatus objects are logged by events. The creation time of the event reflects the latest transition, such as Initializing to Active, and not necessarily the latest scan result. However, the newest event always reflects the most recent status.
$ oc get events --field-selector reason=FileIntegrityStatusExample output
LAST SEEN   TYPE     REASON                OBJECT                                MESSAGE
97s         Normal   FileIntegrityStatus   fileintegrity/example-fileintegrity   Pending
67s         Normal   FileIntegrityStatus   fileintegrity/example-fileintegrity   Initializing
37s         Normal   FileIntegrityStatus   fileintegrity/example-fileintegrity   Active
When a node scan fails, an event is created with the add/changed/removed and config map information.
$ oc get events --field-selector reason=NodeIntegrityStatusExample output
LAST SEEN   TYPE      REASON                OBJECT                                MESSAGE
114m        Normal    NodeIntegrityStatus   fileintegrity/example-fileintegrity   no changes to node ip-10-0-134-173.ec2.internal
114m        Normal    NodeIntegrityStatus   fileintegrity/example-fileintegrity   no changes to node ip-10-0-168-238.ec2.internal
114m        Normal    NodeIntegrityStatus   fileintegrity/example-fileintegrity   no changes to node ip-10-0-169-175.ec2.internal
114m        Normal    NodeIntegrityStatus   fileintegrity/example-fileintegrity   no changes to node ip-10-0-152-92.ec2.internal
114m        Normal    NodeIntegrityStatus   fileintegrity/example-fileintegrity   no changes to node ip-10-0-158-144.ec2.internal
114m        Normal    NodeIntegrityStatus   fileintegrity/example-fileintegrity   no changes to node ip-10-0-131-30.ec2.internal
87m         Warning   NodeIntegrityStatus   fileintegrity/example-fileintegrity   node ip-10-0-152-92.ec2.internal has changed! a:1,c:1,r:0 \ log:openshift-file-integrity/aide-ds-example-fileintegrity-ip-10-0-152-92.ec2.internal-failed
Changes to the number of added, changed, or removed files results in a new event, even if the status of the node has not transitioned.
$ oc get events --field-selector reason=NodeIntegrityStatusExample output
LAST SEEN   TYPE      REASON                OBJECT                                MESSAGE
114m        Normal    NodeIntegrityStatus   fileintegrity/example-fileintegrity   no changes to node ip-10-0-134-173.ec2.internal
114m        Normal    NodeIntegrityStatus   fileintegrity/example-fileintegrity   no changes to node ip-10-0-168-238.ec2.internal
114m        Normal    NodeIntegrityStatus   fileintegrity/example-fileintegrity   no changes to node ip-10-0-169-175.ec2.internal
114m        Normal    NodeIntegrityStatus   fileintegrity/example-fileintegrity   no changes to node ip-10-0-152-92.ec2.internal
114m        Normal    NodeIntegrityStatus   fileintegrity/example-fileintegrity   no changes to node ip-10-0-158-144.ec2.internal
114m        Normal    NodeIntegrityStatus   fileintegrity/example-fileintegrity   no changes to node ip-10-0-131-30.ec2.internal
87m         Warning   NodeIntegrityStatus   fileintegrity/example-fileintegrity   node ip-10-0-152-92.ec2.internal has changed! a:1,c:1,r:0 \ log:openshift-file-integrity/aide-ds-example-fileintegrity-ip-10-0-152-92.ec2.internal-failed
40m         Warning   NodeIntegrityStatus   fileintegrity/example-fileintegrity   node ip-10-0-152-92.ec2.internal has changed! a:3,c:1,r:0 \ log:openshift-file-integrity/aide-ds-example-fileintegrity-ip-10-0-152-92.ec2.internal-failed
6.5. Configuring the Custom File Integrity Operator
6.5.1. Viewing FileIntegrity object attributes
As with any Kubernetes custom resources (CRs), you can run oc explain fileintegrity, and then look at the individual attributes using:
$ oc explain fileintegrity.spec$ oc explain fileintegrity.spec.config6.5.2. Important attributes
| Attribute | Description |
|---|---|
|
|
A map of key-values pairs that must match with node’s labels in order for the AIDE pods to be schedulable on that node. The typical use is to set only a single key-value pair where |
|
|
A boolean attribute. If set to |
|
| Specify tolerations to schedule on nodes with custom taints. When not specified, a default toleration is applied, which allows tolerations to run on control plane nodes (also known as the master nodes). |
|
|
The number of seconds to pause in between AIDE integrity checks. Frequent AIDE checks on a node can be resource intensive, so it can be useful to specify a longer interval. Defaults to |
|
|
The maximum number of AIDE database and log backups leftover from the |
|
| Name of a configMap that contains custom AIDE configuration. If omitted, a default configuration is created. |
|
| Namespace of a configMap that contains custom AIDE configuration. If unset, the FIO generates a default configuration suitable for RHCOS systems. |
|
|
Key that contains actual AIDE configuration in a config map specified by |
6.5.3. Examine the default configuration
The default File Integrity Operator configuration is stored in a config map with the same name as the FileIntegrity CR.
Procedure
To examine the default config, run:
$ oc describe cm/worker-fileintegrity
6.5.4. Understanding the default File Integrity Operator configuration
Below is an excerpt from the aide.conf key of the config map:
@@define DBDIR /hostroot/etc/kubernetes
@@define LOGDIR /hostroot/etc/kubernetes
database=file:@@{DBDIR}/aide.db.gz
database_out=file:@@{DBDIR}/aide.db.gz
gzip_dbout=yes
verbose=5
report_url=file:@@{LOGDIR}/aide.log
report_url=stdout
PERMS = p+u+g+acl+selinux+xattrs
CONTENT_EX = sha512+ftype+p+u+g+n+acl+selinux+xattrs
/hostroot/boot/ CONTENT_EX
/hostroot/root/\..* PERMS
/hostroot/root/ CONTENT_EX
The default configuration for a FileIntegrity instance provides coverage for files under the following directories:
-
/root -
/boot -
/usr -
/etc
The following directories are not covered:
-
/var -
/opt -
Some OpenShift Container Platform-specific excludes under
/etc/
6.5.5. Supplying a custom AIDE configuration
Any entries that configure AIDE internal behavior such as DBDIR, LOGDIR, database, and database_out are overwritten by the Operator. The Operator would add a prefix to /hostroot/ before all paths to be watched for integrity changes. This makes reusing existing AIDE configs that might often not be tailored for a containerized environment and start from the root directory easier.
/hostroot is the directory where the pods running AIDE mount the host’s file system. Changing the configuration triggers a reinitializing of the database.
6.5.6. Defining a custom File Integrity Operator configuration
This example focuses on defining a custom configuration for a scanner that runs on the control plane nodes (also known as the master nodes) based on the default configuration provided for the worker-fileintegrity CR. This workflow might be useful if you are planning to deploy a custom software running as a daemon set and storing its data under /opt/mydaemon on the control plane nodes.
Procedure
- Make a copy of the default configuration.
- Edit the default configuration with the files that must be watched or excluded.
- Store the edited contents in a new config map.
-
Point the
FileIntegrityobject to the new config map through the attributes inspec.config. Extract the default configuration:
$ oc extract cm/worker-fileintegrity --keys=aide.confThis creates a file named
aide.confthat you can edit. To illustrate how the Operator post-processes the paths, this example adds an exclude directory without the prefix:$ vim aide.confExample output
/hostroot/etc/kubernetes/static-pod-resources !/hostroot/etc/kubernetes/aide.* !/hostroot/etc/kubernetes/manifests !/hostroot/etc/docker/certs.d !/hostroot/etc/selinux/targeted !/hostroot/etc/openvswitch/conf.dbExclude a path specific to control plane nodes:
!/opt/mydaemon/Store the other content in
/etc:/hostroot/etc/ CONTENT_EXCreate a config map based on this file:
$ oc create cm master-aide-conf --from-file=aide.confDefine a
FileIntegrityCR manifest that references the config map:apiVersion: fileintegrity.openshift.io/v1alpha1 kind: FileIntegrity metadata: name: master-fileintegrity namespace: openshift-file-integrity spec: nodeSelector: node-role.kubernetes.io/master: "" config: name: master-aide-conf namespace: openshift-file-integrityThe Operator processes the provided config map file and stores the result in a config map with the same name as the
FileIntegrityobject:$ oc describe cm/master-fileintegrity | grep /opt/mydaemonExample output
!/hostroot/opt/mydaemon
6.5.7. Changing the custom File Integrity configuration
To change the File Integrity configuration, never change the generated config map. Instead, change the config map that is linked to the FileIntegrity object through the spec.name, namespace, and key attributes.
6.6. Performing advanced Custom File Integrity Operator tasks
6.6.1. Reinitializing the database
If the File Integrity Operator detects a change that was planned, it might be required to reinitialize the database.
Procedure
Annotate the
FileIntegritycustom resource (CR) withfile-integrity.openshift.io/re-init:$ oc annotate fileintegrities/worker-fileintegrity file-integrity.openshift.io/re-init=The old database and log files are backed up and a new database is initialized. The old database and logs are retained on the nodes under
/etc/kubernetes, as seen in the following output from a pod spawned usingoc debug:Example output
ls -lR /host/etc/kubernetes/aide.* -rw-------. 1 root root 1839782 Sep 17 15:08 /host/etc/kubernetes/aide.db.gz -rw-------. 1 root root 1839783 Sep 17 14:30 /host/etc/kubernetes/aide.db.gz.backup-20200917T15_07_38 -rw-------. 1 root root 73728 Sep 17 15:07 /host/etc/kubernetes/aide.db.gz.backup-20200917T15_07_55 -rw-r--r--. 1 root root 0 Sep 17 15:08 /host/etc/kubernetes/aide.log -rw-------. 1 root root 613 Sep 17 15:07 /host/etc/kubernetes/aide.log.backup-20200917T15_07_38 -rw-r--r--. 1 root root 0 Sep 17 15:07 /host/etc/kubernetes/aide.log.backup-20200917T15_07_55To provide some permanence of record, the resulting config maps are not owned by the
FileIntegrityobject, so manual cleanup is necessary. As a result, any previous integrity failures would still be visible in theFileIntegrityNodeStatusobject.
6.6.2. Machine config integration
In OpenShift Container Platform 4, the cluster node configuration is delivered through MachineConfig objects. You can assume that the changes to files that are caused by a MachineConfig object are expected and should not cause the file integrity scan to fail. To suppress changes to files caused by MachineConfig object updates, the File Integrity Operator watches the node objects; when a node is being updated, the AIDE scans are suspended for the duration of the update. When the update finishes, the database is reinitialized and the scans resume.
This pause and resume logic only applies to updates through the MachineConfig API, as they are reflected in the node object annotations.
6.6.3. Exploring the daemon sets
Each FileIntegrity object represents a scan on a number of nodes. The scan itself is performed by pods managed by a daemon set.
To find the daemon set that represents a FileIntegrity object, run:
$ oc -n openshift-file-integrity get ds/aide-worker-fileintegrityTo list the pods in that daemon set, run:
$ oc -n openshift-file-integrity get pods -lapp=aide-worker-fileintegrity
To view logs of a single AIDE pod, call oc logs on one of the pods.
$ oc -n openshift-file-integrity logs pod/aide-worker-fileintegrity-mr8x6Example output
Starting the AIDE runner daemon
initializing AIDE db
initialization finished
running aide check
...
The config maps created by the AIDE daemon are not retained and are deleted after the File Integrity Operator processes them. However, on failure and error, the contents of these config maps are copied to the config map that the FileIntegrityNodeStatus object points to.
6.7. Troubleshooting the File Integrity Operator
6.7.1. General troubleshooting
- Issue
- You want to generally troubleshoot issues with the File Integrity Operator.
- Resolution
-
Enable the debug flag in the
FileIntegrityobject. Thedebugflag increases the verbosity of the daemons that run in theDaemonSetpods and run the AIDE checks.
6.7.2. Checking the AIDE configuration
- Issue
- You want to check the AIDE configuration.
- Resolution
-
The AIDE configuration is stored in a config map with the same name as the
FileIntegrityobject. All AIDE configuration config maps are labeled withfile-integrity.openshift.io/aide-conf.
6.7.3. Determining the FileIntegrity object’s phase
- Issue
-
You want to determine if the
FileIntegrityobject exists and see its current status. - Resolution
To see the
FileIntegrityobject’s current status, run:$ oc get fileintegrities/worker-fileintegrity -o jsonpath="{ .status }"Once the
FileIntegrityobject and the backing daemon set are created, the status should switch toActive. If it does not, check the Operator pod logs.
6.7.4. Determining that the daemon set’s pods are running on the expected nodes
- Issue
- You want to confirm that the daemon set exists and that its pods are running on the nodes you expect them to run on.
- Resolution
Run:
$ oc -n openshift-file-integrity get pods -lapp=aide-worker-fileintegrityNoteAdding
-owideincludes the IP address of the node that the pod is running on.To check the logs of the daemon pods, run
oc logs.Check the return value of the AIDE command to see if the check passed or failed.
Chapter 7. Viewing audit logs
OpenShift Container Platform auditing provides a security-relevant chronological set of records documenting the sequence of activities that have affected the system by individual users, administrators, or other components of the system.
7.1. About the API audit log
Audit works at the API server level, logging all requests coming to the server. Each audit log contains the following information:
| Field | Description |
|---|---|
|
| The audit level at which the event was generated. |
|
| A unique audit ID, generated for each request. |
|
| The stage of the request handling when this event instance was generated. |
|
| The request URI as sent by the client to a server. |
|
| The Kubernetes verb associated with the request. For non-resource requests, this is the lowercase HTTP method. |
|
| The authenticated user information. |
|
| Optional. The impersonated user information, if the request is impersonating another user. |
|
| Optional. The source IPs, from where the request originated and any intermediate proxies. |
|
| Optional. The user agent string reported by the client. Note that the user agent is provided by the client, and must not be trusted. |
|
|
Optional. The object reference this request is targeted at. This does not apply for |
|
|
Optional. The response status, populated even when the |
|
|
Optional. The API object from the request, in JSON format. The |
|
|
Optional. The API object returned in the response, in JSON format. The |
|
| The time that the request reached the API server. |
|
| The time that the request reached the current audit stage. |
|
|
Optional. An unstructured key value map stored with an audit event that may be set by plugins invoked in the request serving chain, including authentication, authorization and admission plugins. Note that these annotations are for the audit event, and do not correspond to the |
Example output for the Kubernetes API server:
{"kind":"Event","apiVersion":"audit.k8s.io/v1","level":"Metadata","auditID":"ad209ce1-fec7-4130-8192-c4cc63f1d8cd","stage":"ResponseComplete","requestURI":"/api/v1/namespaces/openshift-kube-controller-manager/configmaps/cert-recovery-controller-lock?timeout=35s","verb":"update","user":{"username":"system:serviceaccount:openshift-kube-controller-manager:localhost-recovery-client","uid":"dd4997e3-d565-4e37-80f8-7fc122ccd785","groups":["system:serviceaccounts","system:serviceaccounts:openshift-kube-controller-manager","system:authenticated"]},"sourceIPs":["::1"],"userAgent":"cluster-kube-controller-manager-operator/v0.0.0 (linux/amd64) kubernetes/$Format","objectRef":{"resource":"configmaps","namespace":"openshift-kube-controller-manager","name":"cert-recovery-controller-lock","uid":"5c57190b-6993-425d-8101-8337e48c7548","apiVersion":"v1","resourceVersion":"574307"},"responseStatus":{"metadata":{},"code":200},"requestReceivedTimestamp":"2020-04-02T08:27:20.200962Z","stageTimestamp":"2020-04-02T08:27:20.206710Z","annotations":{"authorization.k8s.io/decision":"allow","authorization.k8s.io/reason":"RBAC: allowed by ClusterRoleBinding \"system:openshift:operator:kube-controller-manager-recovery\" of ClusterRole \"cluster-admin\" to ServiceAccount \"localhost-recovery-client/openshift-kube-controller-manager\""}}7.2. Viewing the audit logs
You can view the logs for the OpenShift API server, Kubernetes API server, and OpenShift OAuth API server for each control plane node (also known as the master node).
Procedure
To view the audit logs:
View the OpenShift API server logs:
List the OpenShift API server logs that are available for each control plane node:
$ oc adm node-logs --role=master --path=openshift-apiserver/Example output
ci-ln-m0wpfjb-f76d1-vnb5x-master-0 audit-2021-03-09T00-12-19.834.log ci-ln-m0wpfjb-f76d1-vnb5x-master-0 audit.log ci-ln-m0wpfjb-f76d1-vnb5x-master-1 audit-2021-03-09T00-11-49.835.log ci-ln-m0wpfjb-f76d1-vnb5x-master-1 audit.log ci-ln-m0wpfjb-f76d1-vnb5x-master-2 audit-2021-03-09T00-13-00.128.log ci-ln-m0wpfjb-f76d1-vnb5x-master-2 audit.logView a specific OpenShift API server log by providing the node name and the log name:
$ oc adm node-logs <node_name> --path=openshift-apiserver/<log_name>For example:
$ oc adm node-logs ci-ln-m0wpfjb-f76d1-vnb5x-master-0 --path=openshift-apiserver/audit-2021-03-09T00-12-19.834.logExample output
{"kind":"Event","apiVersion":"audit.k8s.io/v1","level":"Metadata","auditID":"381acf6d-5f30-4c7d-8175-c9c317ae5893","stage":"ResponseComplete","requestURI":"/metrics","verb":"get","user":{"username":"system:serviceaccount:openshift-monitoring:prometheus-k8s","uid":"825b60a0-3976-4861-a342-3b2b561e8f82","groups":["system:serviceaccounts","system:serviceaccounts:openshift-monitoring","system:authenticated"]},"sourceIPs":["10.129.2.6"],"userAgent":"Prometheus/2.23.0","responseStatus":{"metadata":{},"code":200},"requestReceivedTimestamp":"2021-03-08T18:02:04.086545Z","stageTimestamp":"2021-03-08T18:02:04.107102Z","annotations":{"authorization.k8s.io/decision":"allow","authorization.k8s.io/reason":"RBAC: allowed by ClusterRoleBinding \"prometheus-k8s\" of ClusterRole \"prometheus-k8s\" to ServiceAccount \"prometheus-k8s/openshift-monitoring\""}}
View the Kubernetes API server logs:
List the Kubernetes API server logs that are available for each control plane node:
$ oc adm node-logs --role=master --path=kube-apiserver/Example output
ci-ln-m0wpfjb-f76d1-vnb5x-master-0 audit-2021-03-09T14-07-27.129.log ci-ln-m0wpfjb-f76d1-vnb5x-master-0 audit.log ci-ln-m0wpfjb-f76d1-vnb5x-master-1 audit-2021-03-09T19-24-22.620.log ci-ln-m0wpfjb-f76d1-vnb5x-master-1 audit.log ci-ln-m0wpfjb-f76d1-vnb5x-master-2 audit-2021-03-09T18-37-07.511.log ci-ln-m0wpfjb-f76d1-vnb5x-master-2 audit.logView a specific Kubernetes API server log by providing the node name and the log name:
$ oc adm node-logs <node_name> --path=kube-apiserver/<log_name>For example:
$ oc adm node-logs ci-ln-m0wpfjb-f76d1-vnb5x-master-0 --path=kube-apiserver/audit-2021-03-09T14-07-27.129.logExample output
{"kind":"Event","apiVersion":"audit.k8s.io/v1","level":"Metadata","auditID":"cfce8a0b-b5f5-4365-8c9f-79c1227d10f9","stage":"ResponseComplete","requestURI":"/api/v1/namespaces/openshift-kube-scheduler/serviceaccounts/openshift-kube-scheduler-sa","verb":"get","user":{"username":"system:serviceaccount:openshift-kube-scheduler-operator:openshift-kube-scheduler-operator","uid":"2574b041-f3c8-44e6-a057-baef7aa81516","groups":["system:serviceaccounts","system:serviceaccounts:openshift-kube-scheduler-operator","system:authenticated"]},"sourceIPs":["10.128.0.8"],"userAgent":"cluster-kube-scheduler-operator/v0.0.0 (linux/amd64) kubernetes/$Format","objectRef":{"resource":"serviceaccounts","namespace":"openshift-kube-scheduler","name":"openshift-kube-scheduler-sa","apiVersion":"v1"},"responseStatus":{"metadata":{},"code":200},"requestReceivedTimestamp":"2021-03-08T18:06:42.512619Z","stageTimestamp":"2021-03-08T18:06:42.516145Z","annotations":{"authentication.k8s.io/legacy-token":"system:serviceaccount:openshift-kube-scheduler-operator:openshift-kube-scheduler-operator","authorization.k8s.io/decision":"allow","authorization.k8s.io/reason":"RBAC: allowed by ClusterRoleBinding \"system:openshift:operator:cluster-kube-scheduler-operator\" of ClusterRole \"cluster-admin\" to ServiceAccount \"openshift-kube-scheduler-operator/openshift-kube-scheduler-operator\""}}
View the OpenShift OAuth API server logs:
List the OpenShift OAuth API server logs that are available for each control plane node:
$ oc adm node-logs --role=master --path=oauth-apiserver/Example output
ci-ln-m0wpfjb-f76d1-vnb5x-master-0 audit-2021-03-09T13-06-26.128.log ci-ln-m0wpfjb-f76d1-vnb5x-master-0 audit.log ci-ln-m0wpfjb-f76d1-vnb5x-master-1 audit-2021-03-09T18-23-21.619.log ci-ln-m0wpfjb-f76d1-vnb5x-master-1 audit.log ci-ln-m0wpfjb-f76d1-vnb5x-master-2 audit-2021-03-09T17-36-06.510.log ci-ln-m0wpfjb-f76d1-vnb5x-master-2 audit.logView a specific OpenShift OAuth API server log by providing the node name and the log name:
$ oc adm node-logs <node_name> --path=oauth-apiserver/<log_name>For example:
$ oc adm node-logs ci-ln-m0wpfjb-f76d1-vnb5x-master-0 --path=oauth-apiserver/audit-2021-03-09T13-06-26.128.logExample output
{"kind":"Event","apiVersion":"audit.k8s.io/v1","level":"Metadata","auditID":"dd4c44e2-3ea1-4830-9ab7-c91a5f1388d6","stage":"ResponseComplete","requestURI":"/apis/user.openshift.io/v1/users/~","verb":"get","user":{"username":"system:serviceaccount:openshift-monitoring:prometheus-k8s","groups":["system:serviceaccounts","system:serviceaccounts:openshift-monitoring","system:authenticated"]},"sourceIPs":["10.0.32.4","10.128.0.1"],"userAgent":"dockerregistry/v0.0.0 (linux/amd64) kubernetes/$Format","objectRef":{"resource":"users","name":"~","apiGroup":"user.openshift.io","apiVersion":"v1"},"responseStatus":{"metadata":{},"code":200},"requestReceivedTimestamp":"2021-03-08T17:47:43.653187Z","stageTimestamp":"2021-03-08T17:47:43.660187Z","annotations":{"authorization.k8s.io/decision":"allow","authorization.k8s.io/reason":"RBAC: allowed by ClusterRoleBinding \"basic-users\" of ClusterRole \"basic-user\" to Group \"system:authenticated\""}}
7.3. Filtering audit logs
You can use jq or another JSON parsing tool to filter the API server audit logs.
The amount of information logged to the API server audit logs is controlled by the audit log policy that is set.
The following procedure provides examples of using jq to filter audit logs on control plane node node-1.example.com. See the jq Manual for detailed information on using jq.
Prerequisites
-
You have access to the cluster as a user with the
cluster-adminrole. -
You have installed
jq.
Procedure
Filter OpenShift API server audit logs by user:
$ oc adm node-logs node-1.example.com \ --path=openshift-apiserver/audit.log \ | jq 'select(.user.username == "myusername")'Filter OpenShift API server audit logs by user agent:
$ oc adm node-logs node-1.example.com \ --path=openshift-apiserver/audit.log \ | jq 'select(.userAgent == "cluster-version-operator/v0.0.0 (linux/amd64) kubernetes/$Format")'Filter Kubernetes API server audit logs by a certain API version and only output the user agent:
$ oc adm node-logs node-1.example.com \ --path=kube-apiserver/audit.log \ | jq 'select(.requestURI | startswith("/apis/apiextensions.k8s.io/v1beta1")) | .userAgent'Filter OpenShift OAuth API server audit logs by excluding a verb:
$ oc adm node-logs node-1.example.com \ --path=oauth-apiserver/audit.log \ | jq 'select(.verb != "get")'
7.4. Gathering audit logs
You can use the must-gather tool to collect the audit logs for debugging your cluster, which you can review or send to Red Hat Support.
Procedure
Run the
oc adm must-gathercommand with the-- /usr/bin/gather_audit_logsflag:$ oc adm must-gather -- /usr/bin/gather_audit_logsCreate a compressed file from the
must-gatherdirectory that was just created in your working directory. For example, on a computer that uses a Linux operating system, run the following command:$ tar cvaf must-gather.tar.gz must-gather.local.4722904036990062481 - 1
- Replace
must-gather-local.472290403699006248with the actual directory name.
- Attach the compressed file to your support case on the Red Hat Customer Portal.
Chapter 8. Configuring the audit log policy
You can control the amount of information that is logged to the API server audit logs by choosing the audit log policy profile to use.
8.1. About audit log policy profiles
Audit log profiles define how to log requests that come to the OpenShift API server, the Kubernetes API server, and the OAuth API server.
OpenShift Container Platform provides the following predefined audit policy profiles:
| Profile | Description |
|---|---|
|
| Logs only metadata for read and write requests; does not log request bodies except for OAuth access token requests. This is the default policy. |
|
|
In addition to logging metadata for all requests, logs request bodies for every write request to the API servers ( |
|
|
In addition to logging metadata for all requests, logs request bodies for every read and write request to the API servers ( |
-
Sensitive resources, such as
Secret,Route, andOAuthClientobjects, are never logged past the metadata level.
By default, OpenShift Container Platform uses the Default audit log profile. You can use another audit policy profile that also logs request bodies, but be aware of the increased resource usage (CPU, memory, and I/O).
8.2. Configuring the audit log policy
You can configure the audit log policy to use when logging requests that come to the API servers.
Prerequisites
-
You have access to the cluster as a user with the
cluster-adminrole.
Procedure
Edit the
APIServerresource:$ oc edit apiserver clusterUpdate the
spec.audit.profilefield:apiVersion: config.openshift.io/v1 kind: APIServer metadata: ... spec: audit: profile: WriteRequestBodies1 - 1
- Set to
Default,WriteRequestBodies, orAllRequestBodies. The default profile isDefault.
- Save the file to apply the changes.
Verify that a new revision of the Kubernetes API server pods has rolled out. This will take several minutes.
$ oc get kubeapiserver -o=jsonpath='{range .items[0].status.conditions[?(@.type=="NodeInstallerProgressing")]}{.reason}{"\n"}{.message}{"\n"}'Review the
NodeInstallerProgressingstatus condition for the Kubernetes API server to verify that all nodes are at the latest revision. The output showsAllNodesAtLatestRevisionupon successful update:AllNodesAtLatestRevision 3 nodes are at revision 121 - 1
- In this example, the latest revision number is
12.
If the output shows a message similar to one of the following, this means that the update is still in progress. Wait a few minutes and try again.
-
3 nodes are at revision 11; 0 nodes have achieved new revision 12 -
2 nodes are at revision 11; 1 nodes are at revision 12
Chapter 9. Configuring TLS security profiles
TLS security profiles provide a way for servers to regulate which ciphers a client can use when connecting to the server. This ensures that OpenShift Container Platform components use cryptographic libraries that do not allow known insecure protocols, ciphers, or algorithms.
Cluster administrators can choose which TLS security profile to use for each of the following components:
- the Ingress Controller
the control plane
This includes the Kubernetes API server, Kubernetes controller manager, Kubernetes scheduler, OpenShift API server, OpenShift OAuth API server, and OpenShift OAuth server.
- the kubelet, when it acts as an HTTP server for the Kubernetes API server
9.1. Understanding TLS security profiles
You can use a TLS (Transport Layer Security) security profile to define which TLS ciphers are required by various OpenShift Container Platform components. The OpenShift Container Platform TLS security profiles are based on Mozilla recommended configurations.
You can specify one of the following TLS security profiles for each component:
| Profile | Description |
|---|---|
|
| This profile is intended for use with legacy clients or libraries. The profile is based on the Old backward compatibility recommended configuration.
The Note For the Ingress Controller, the minimum TLS version is converted from 1.0 to 1.1. |
|
| This profile is the recommended configuration for the majority of clients. It is the default TLS security profile for the Ingress Controller, kubelet, and control plane. The profile is based on the Intermediate compatibility recommended configuration.
The |
|
| This profile is intended for use with modern clients that have no need for backwards compatibility. This profile is based on the Modern compatibility recommended configuration.
The Note
In OpenShift Container Platform 4.6, 4.7, and 4.8, the Important
The |
|
| This profile allows you to define the TLS version and ciphers to use. Warning
Use caution when using a Note
OpenShift Container Platform router enables Red Hat-distributed OpenSSL default set of TLS |
When using one of the predefined profile types, the effective profile configuration is subject to change between releases. For example, given a specification to use the Intermediate profile deployed on release X.Y.Z, an upgrade to release X.Y.Z+1 might cause a new profile configuration to be applied, resulting in a rollout.
9.2. Viewing TLS security profile details
You can view the minimum TLS version and ciphers for the predefined TLS security profiles for each of the following components: Ingress Controller, control plane, and kubelet.
The effective configuration of minimum TLS version and list of ciphers for a profile might differ between components.
Procedure
View details for a specific TLS security profile:
$ oc explain <component>.spec.tlsSecurityProfile.<profile>1 - 1
- For
<component>, specifyingresscontroller,apiserver, orkubeletconfig. For<profile>, specifyold,intermediate, orcustom.
For example, to check the ciphers included for the
intermediateprofile for the control plane:$ oc explain apiserver.spec.tlsSecurityProfile.intermediateExample output
KIND: APIServer VERSION: config.openshift.io/v1 DESCRIPTION: intermediate is a TLS security profile based on: https://wiki.mozilla.org/Security/Server_Side_TLS#Intermediate_compatibility_.28recommended.29 and looks like this (yaml): ciphers: - TLS_AES_128_GCM_SHA256 - TLS_AES_256_GCM_SHA384 - TLS_CHACHA20_POLY1305_SHA256 - ECDHE-ECDSA-AES128-GCM-SHA256 - ECDHE-RSA-AES128-GCM-SHA256 - ECDHE-ECDSA-AES256-GCM-SHA384 - ECDHE-RSA-AES256-GCM-SHA384 - ECDHE-ECDSA-CHACHA20-POLY1305 - ECDHE-RSA-CHACHA20-POLY1305 - DHE-RSA-AES128-GCM-SHA256 - DHE-RSA-AES256-GCM-SHA384 minTLSVersion: TLSv1.2View all details for the
tlsSecurityProfilefield of a component:$ oc explain <component>.spec.tlsSecurityProfile1 - 1
- For
<component>, specifyingresscontroller,apiserver, orkubeletconfig.
For example, to check all details for the
tlsSecurityProfilefield for the Ingress Controller:$ oc explain ingresscontroller.spec.tlsSecurityProfileExample output
KIND: IngressController VERSION: operator.openshift.io/v1 RESOURCE: tlsSecurityProfile <Object> DESCRIPTION: ... FIELDS: custom <> custom is a user-defined TLS security profile. Be extremely careful using a custom profile as invalid configurations can be catastrophic. An example custom profile looks like this: ciphers: - ECDHE-ECDSA-CHACHA20-POLY1305 - ECDHE-RSA-CHACHA20-POLY1305 - ECDHE-RSA-AES128-GCM-SHA256 - ECDHE-ECDSA-AES128-GCM-SHA256 minTLSVersion: TLSv1.1 intermediate <> intermediate is a TLS security profile based on: https://wiki.mozilla.org/Security/Server_Side_TLS#Intermediate_compatibility_.28recommended.29 and looks like this (yaml): ...1 modern <> modern is a TLS security profile based on: https://wiki.mozilla.org/Security/Server_Side_TLS#Modern_compatibility and looks like this (yaml): ...2 NOTE: Currently unsupported. old <> old is a TLS security profile based on: https://wiki.mozilla.org/Security/Server_Side_TLS#Old_backward_compatibility and looks like this (yaml): ...3 type <string> ...
9.3. Configuring the TLS security profile for the Ingress Controller
To configure a TLS security profile for an Ingress Controller, edit the IngressController custom resource (CR) to specify a predefined or custom TLS security profile. If a TLS security profile is not configured, the default value is based on the TLS security profile set for the API server.
Sample IngressController CR that configures the Old TLS security profile
apiVersion: operator.openshift.io/v1
kind: IngressController
...
spec:
tlsSecurityProfile:
old: {}
type: Old
...The TLS security profile defines the minimum TLS version and the TLS ciphers for TLS connections for Ingress Controllers.
You can see the ciphers and the minimum TLS version of the configured TLS security profile in the IngressController custom resource (CR) under Status.Tls Profile and the configured TLS security profile under Spec.Tls Security Profile. For the Custom TLS security profile, the specific ciphers and minimum TLS version are listed under both parameters.
The HAProxy Ingress Controller image does not support TLS 1.3 and because the Modern profile requires TLS 1.3, it is not supported. The Ingress Operator converts the Modern profile to Intermediate.
The Ingress Operator also converts the TLS 1.0 of an Old or Custom profile to 1.1, and TLS 1.3 of a Custom profile to 1.2.
Prerequisites
-
You have access to the cluster as a user with the
cluster-adminrole.
Procedure
Edit the
IngressControllerCR in theopenshift-ingress-operatorproject to configure the TLS security profile:$ oc edit IngressController default -n openshift-ingress-operatorAdd the
spec.tlsSecurityProfilefield:Sample
IngressControllerCR for aCustomprofileapiVersion: operator.openshift.io/v1 kind: IngressController ... spec: tlsSecurityProfile: type: Custom1 custom:2 ciphers:3 - ECDHE-ECDSA-CHACHA20-POLY1305 - ECDHE-RSA-CHACHA20-POLY1305 - ECDHE-RSA-AES128-GCM-SHA256 - ECDHE-ECDSA-AES128-GCM-SHA256 minTLSVersion: VersionTLS11 ...- Save the file to apply the changes.
Verification
Verify that the profile is set in the
IngressControllerCR:$ oc describe IngressController default -n openshift-ingress-operatorExample output
Name: default Namespace: openshift-ingress-operator Labels: <none> Annotations: <none> API Version: operator.openshift.io/v1 Kind: IngressController ... Spec: ... Tls Security Profile: Custom: Ciphers: ECDHE-ECDSA-CHACHA20-POLY1305 ECDHE-RSA-CHACHA20-POLY1305 ECDHE-RSA-AES128-GCM-SHA256 ECDHE-ECDSA-AES128-GCM-SHA256 Min TLS Version: VersionTLS11 Type: Custom ...
9.4. Configuring the TLS security profile for the control plane
To configure a TLS security profile for the control plane, edit the APIServer custom resource (CR) to specify a predefined or custom TLS security profile. Setting the TLS security profile in the APIServer CR propagates the setting to the following control plane components:
- Kubernetes API server
- Kubernetes controller manager
- Kubernetes scheduler
- OpenShift API server
- OpenShift OAuth API server
- OpenShift OAuth server
If a TLS security profile is not configured, the default TLS security profile is Intermediate.
The default TLS security profile for the Ingress Controller is based on the TLS security profile set for the API server.
Sample APIServer CR that configures the Old TLS security profile
apiVersion: config.openshift.io/v1
kind: APIServer
...
spec:
tlsSecurityProfile:
old: {}
type: Old
...The TLS security profile defines the minimum TLS version and the TLS ciphers required to communicate with the control plane components.
You can see the configured TLS security profile in the APIServer custom resource (CR) under Spec.Tls Security Profile. For the Custom TLS security profile, the specific ciphers and minimum TLS version are listed.
The control plane does not support TLS 1.3 as the minimum TLS version; the Modern profile is not supported because it requires TLS 1.3.
Prerequisites
-
You have access to the cluster as a user with the
cluster-adminrole.
Procedure
Edit the default
APIServerCR to configure the TLS security profile:$ oc edit APIServer clusterAdd the
spec.tlsSecurityProfilefield:Sample
APIServerCR for aCustomprofileapiVersion: config.openshift.io/v1 kind: APIServer metadata: name: cluster spec: tlsSecurityProfile: type: Custom1 custom:2 ciphers:3 - ECDHE-ECDSA-CHACHA20-POLY1305 - ECDHE-RSA-CHACHA20-POLY1305 - ECDHE-RSA-AES128-GCM-SHA256 - ECDHE-ECDSA-AES128-GCM-SHA256 minTLSVersion: VersionTLS11- Save the file to apply the changes.
Verification
Verify that the TLS security profile is set in the
APIServerCR:$ oc describe apiserver clusterExample output
Name: cluster Namespace: ... API Version: config.openshift.io/v1 Kind: APIServer ... Spec: Audit: Profile: Default Tls Security Profile: Custom: Ciphers: ECDHE-ECDSA-CHACHA20-POLY1305 ECDHE-RSA-CHACHA20-POLY1305 ECDHE-RSA-AES128-GCM-SHA256 ECDHE-ECDSA-AES128-GCM-SHA256 Min TLS Version: VersionTLS11 Type: Custom ...
9.5. Configuring the TLS security profile for the kubelet
To configure a TLS security profile for the kubelet when it is acting as an HTTP server, create a KubeletConfig custom resource (CR) to specify a predefined or custom TLS security profile for specific nodes. If a TLS security profile is not configured, the default TLS security profile is Intermediate.
The kubelet uses its HTTP/GRPC server to communicate with the Kubernetes API server, which sends commands to pods, gathers logs, and run exec commands on pods through the kubelet.
Sample KubeletConfig CR that configures the Old TLS security profile on worker nodes
apiVersion: config.openshift.io/v1
kind: KubeletConfig
...
spec:
tlsSecurityProfile:
old: {}
type: Old
machineConfigPoolSelector:
matchLabels:
pools.operator.machineconfiguration.openshift.io/worker: ""
You can see the ciphers and the minimum TLS version of the configured TLS security profile in the kubelet.conf file on a configured node.
Prerequisites
-
You have access to the cluster as a user with the
cluster-adminrole.
Procedure
Create a
KubeletConfigCR to configure the TLS security profile:Sample
KubeletConfigCR for aCustomprofileapiVersion: machineconfiguration.openshift.io/v1 kind: KubeletConfig metadata: name: set-kubelet-tls-security-profile spec: tlsSecurityProfile: type: Custom1 custom:2 ciphers:3 - ECDHE-ECDSA-CHACHA20-POLY1305 - ECDHE-RSA-CHACHA20-POLY1305 - ECDHE-RSA-AES128-GCM-SHA256 - ECDHE-ECDSA-AES128-GCM-SHA256 minTLSVersion: VersionTLS11 machineConfigPoolSelector: matchLabels: pools.operator.machineconfiguration.openshift.io/worker: ""4 - 1
- Specify the TLS security profile type (
Old,Intermediate, orCustom). The default isIntermediate. - 2
- Specify the appropriate field for the selected type:
-
old: {} -
intermediate: {} -
custom:
-
- 3
- For the
customtype, specify a list of TLS ciphers and minimum accepted TLS version. - 4
- Optional: Specify the machine config pool label for the nodes you want to apply the TLS security profile.
Create the
KubeletConfigobject:$ oc create -f <filename>Depending on the number of worker nodes in the cluster, wait for the configured nodes to be rebooted one by one.
Verification
To verify that the profile is set, perform the following steps after the nodes are in the Ready state:
Start a debug session for a configured node:
$ oc debug node/<node_name>Set
/hostas the root directory within the debug shell:sh-4.4# chroot /hostView the
kubelet.conffile:sh-4.4# cat /etc/kubernetes/kubelet.confExample output
kind: KubeletConfiguration apiVersion: kubelet.config.k8s.io/v1beta1 ... "tlsCipherSuites": [ "TLS_ECDHE_ECDSA_WITH_AES_128_GCM_SHA256", "TLS_ECDHE_RSA_WITH_AES_128_GCM_SHA256", "TLS_ECDHE_ECDSA_WITH_AES_256_GCM_SHA384", "TLS_ECDHE_RSA_WITH_AES_256_GCM_SHA384", "TLS_ECDHE_ECDSA_WITH_CHACHA20_POLY1305_SHA256", "TLS_ECDHE_RSA_WITH_CHACHA20_POLY1305_SHA256" ], "tlsMinVersion": "VersionTLS12",
Chapter 10. Configuring seccomp profiles
An OpenShift Container Platform container or a pod runs a single application that performs one or more well-defined tasks. The application usually requires only a small subset of the underlying operating system kernel APIs. Seccomp, secure computing mode, is a Linux kernel feature that can be used to limit the process running in a container to only call a subset of the available system calls. These system calls can be configured by creating a profile that is applied to a container or pod. Seccomp profiles are stored as JSON files on the disk.
OpenShift workloads run unconfined by default, without any seccomp profile applied.
Seccomp profiles cannot be applied to privileged containers.
10.1. Enabling the default seccomp profile for all pods
OpenShift Container Platform ships with a default seccomp profile that is referenced as runtime/default. You can enable the default seccomp profile for a pod or container workload by creating a custom Security Context Constraint (SCC).
There is a requirement to create a custom SCC. Do not edit the default SCCs. Editing the default SCCs can lead to issues when some of the platform pods deploy or OpenShift Container Platform is upgraded. For more information, see the section entitled "Default security context constraints".
Follow these steps to enable the default seccomp profile for all pods:
Export the available
restrictedSCC to a yaml file:$ oc get scc restricted -o yaml > restricted-seccomp.yamlEdit the created
restrictedSCC yaml file:$ vi restricted-seccomp.yamlUpdate as shown in this example:
kind: SecurityContextConstraints metadata: name: restricted1 <..snip..> seccompProfiles:2 - runtime/default3 Create the custom SCC:
$ oc create -f restricted-seccomp.yamlExpected output
securitycontextconstraints.security.openshift.io/restricted-seccomp createdAdd the custom SCC to the ServiceAccount:
$ oc adm policy add-scc-to-user restricted-seccomp -z defaultNoteThe default service account is the ServiceAccount that is applied unless the user configures a different one. OpenShift Container Platform configures the seccomp profile of the pod based on the information in the SCC.
Expected output
clusterrole.rbac.authorization.k8s.io/system:openshift:scc:restricted-seccomp added: "default"
In OpenShift Container Platform 4.8 the ability to add the pod annotations seccomp.security.alpha.kubernetes.io/pod: runtime/default and container.seccomp.security.alpha.kubernetes.io/<container_name>: runtime/default is deprecated.
10.2. Configuring a custom seccomp profile
You can configure a custom seccomp profile, which allows you to update the filters based on the application requirements. This allows cluster administrators to have greater control over the security of workloads running in OpenShift Container Platform.
10.2.1. Setting up the custom seccomp profile
Prerequisite
- You have cluster administrator permissions.
- You have created a custom security context constraints (SCC). For more information, see "Additional resources".
- You have created a custom seccomp profile.
Procedure
-
Upload your custom seccomp profile to
/var/lib/kubelet/seccomp/<custom-name>.jsonby using the Machine Config. See "Additional resources" for detailed steps. Update the custom SCC by providing reference to the created custom seccomp profile:
seccompProfiles: - localhost/<custom-name>.json1 - 1
- Provide the name of your custom seccomp profile.
10.2.2. Applying the custom seccomp profile to the workload
Prerequisite
- The cluster administrator has set up the custom seccomp profile. For more details, see "Setting up the custom seccomp profile".
Procedure
Apply the seccomp profile to the workload by setting the
securityContext.seccompProfile.typefield as following:Example
spec: securityContext: seccompProfile: type: Localhost localhostProfile: <custom-name>.json1 - 1
- Provide the name of your custom seccomp profile.
Alternatively, you can use the pod annotations
seccomp.security.alpha.kubernetes.io/pod: localhost/<custom-name>.json. However, this method is deprecated in OpenShift Container Platform 4.8.
During deployment, the admission controller validates the following:
- The annotations against the current SCCs allowed by the user role.
- The SCC, which includes the seccomp profile, is allowed for the pod.
If the SCC is allowed for the pod, the kubelet runs the pod with the specified seccomp profile.
Ensure that the seccomp profile is deployed to all worker nodes.
The custom SCC must have the appropriate priority to be automatically assigned to the pod or meet other conditions required by the pod, such as allowing CAP_NET_ADMIN.
Chapter 11. Allowing JavaScript-based access to the API server from additional hosts
11.1. Allowing JavaScript-based access to the API server from additional hosts
The default OpenShift Container Platform configuration only allows the web console to send requests to the API server.
If you need to access the API server or OAuth server from a JavaScript application using a different hostname, you can configure additional hostnames to allow.
Prerequisites
-
Access to the cluster as a user with the
cluster-adminrole.
Procedure
Edit the
APIServerresource:$ oc edit apiserver.config.openshift.io clusterAdd the
additionalCORSAllowedOriginsfield under thespecsection and specify one or more additional hostnames:apiVersion: config.openshift.io/v1 kind: APIServer metadata: annotations: release.openshift.io/create-only: "true" creationTimestamp: "2019-07-11T17:35:37Z" generation: 1 name: cluster resourceVersion: "907" selfLink: /apis/config.openshift.io/v1/apiservers/cluster uid: 4b45a8dd-a402-11e9-91ec-0219944e0696 spec: additionalCORSAllowedOrigins: - (?i)//my\.subdomain\.domain\.com(:|\z)1 - 1
- The hostname is specified as a Golang regular expression that matches against CORS headers from HTTP requests against the API server and OAuth server.
NoteThis example uses the following syntax:
-
The
(?i)makes it case-insensitive. -
The
//pins to the beginning of the domain and matches the double slash followinghttp:orhttps:. -
The
\.escapes dots in the domain name. -
The
(:|\z)matches the end of the domain name(\z)or a port separator(:).
- Save the file to apply the changes.
Chapter 12. Encrypting etcd data
12.1. About etcd encryption
By default, etcd data is not encrypted in OpenShift Container Platform. You can enable etcd encryption for your cluster to provide an additional layer of data security. For example, it can help protect the loss of sensitive data if an etcd backup is exposed to the incorrect parties.
When you enable etcd encryption, the following OpenShift API server and Kubernetes API server resources are encrypted:
- Secrets
- Config maps
- Routes
- OAuth access tokens
- OAuth authorize tokens
When you enable etcd encryption, encryption keys are created. These keys are rotated on a weekly basis. You must have these keys to restore from an etcd backup.
Etcd encryption only encrypts values, not keys. Resource types, namespaces, and object names are unencrypted.
If etcd encryption is enabled during a backup, the static_kuberesources_<datetimestamp>.tar.gz file contains the encryption keys for the etcd snapshot. For security reasons, store this file separately from the etcd snapshot. However, this file is required to restore a previous state of etcd from the respective etcd snapshot.
12.2. Enabling etcd encryption
You can enable etcd encryption to encrypt sensitive resources in your cluster.
Do not back up etcd resources until the initial encryption process is completed. If the encryption process is not completed, the backup might be only partially encrypted.
After you enable etcd encryption, several changes can occur:
- The etcd encryption might affect the memory consumption of a few resources.
- You might notice a transient affect on backup performance because the leader must serve the backup.
- A disk I/O can affect the node that receives the backup state.
Prerequisites
-
Access to the cluster as a user with the
cluster-adminrole.
Procedure
Modify the
APIServerobject:$ oc edit apiserverSet the
encryptionfield type toaescbc:spec: encryption: type: aescbc1 - 1
- The
aescbctype means that AES-CBC with PKCS#7 padding and a 32 byte key is used to perform the encryption.
Save the file to apply the changes.
The encryption process starts. It can take 20 minutes or longer for this process to complete, depending on the size of your cluster.
Verify that etcd encryption was successful.
Review the
Encryptedstatus condition for the OpenShift API server to verify that its resources were successfully encrypted:$ oc get openshiftapiserver -o=jsonpath='{range .items[0].status.conditions[?(@.type=="Encrypted")]}{.reason}{"\n"}{.message}{"\n"}'The output shows
EncryptionCompletedupon successful encryption:EncryptionCompleted All resources encrypted: routes.route.openshift.ioIf the output shows
EncryptionInProgress, encryption is still in progress. Wait a few minutes and try again.Review the
Encryptedstatus condition for the Kubernetes API server to verify that its resources were successfully encrypted:$ oc get kubeapiserver -o=jsonpath='{range .items[0].status.conditions[?(@.type=="Encrypted")]}{.reason}{"\n"}{.message}{"\n"}'The output shows
EncryptionCompletedupon successful encryption:EncryptionCompleted All resources encrypted: secrets, configmapsIf the output shows
EncryptionInProgress, encryption is still in progress. Wait a few minutes and try again.Review the
Encryptedstatus condition for the OpenShift OAuth API server to verify that its resources were successfully encrypted:$ oc get authentication.operator.openshift.io -o=jsonpath='{range .items[0].status.conditions[?(@.type=="Encrypted")]}{.reason}{"\n"}{.message}{"\n"}'The output shows
EncryptionCompletedupon successful encryption:EncryptionCompleted All resources encrypted: oauthaccesstokens.oauth.openshift.io, oauthauthorizetokens.oauth.openshift.ioIf the output shows
EncryptionInProgress, encryption is still in progress. Wait a few minutes and try again.
12.3. Disabling etcd encryption
You can disable encryption of etcd data in your cluster.
Prerequisites
-
Access to the cluster as a user with the
cluster-adminrole.
Procedure
Modify the
APIServerobject:$ oc edit apiserverSet the
encryptionfield type toidentity:spec: encryption: type: identity1 - 1
- The
identitytype is the default value and means that no encryption is performed.
Save the file to apply the changes.
The decryption process starts. It can take 20 minutes or longer for this process to complete, depending on the size of your cluster.
Verify that etcd decryption was successful.
Review the
Encryptedstatus condition for the OpenShift API server to verify that its resources were successfully decrypted:$ oc get openshiftapiserver -o=jsonpath='{range .items[0].status.conditions[?(@.type=="Encrypted")]}{.reason}{"\n"}{.message}{"\n"}'The output shows
DecryptionCompletedupon successful decryption:DecryptionCompleted Encryption mode set to identity and everything is decryptedIf the output shows
DecryptionInProgress, decryption is still in progress. Wait a few minutes and try again.Review the
Encryptedstatus condition for the Kubernetes API server to verify that its resources were successfully decrypted:$ oc get kubeapiserver -o=jsonpath='{range .items[0].status.conditions[?(@.type=="Encrypted")]}{.reason}{"\n"}{.message}{"\n"}'The output shows
DecryptionCompletedupon successful decryption:DecryptionCompleted Encryption mode set to identity and everything is decryptedIf the output shows
DecryptionInProgress, decryption is still in progress. Wait a few minutes and try again.Review the
Encryptedstatus condition for the OpenShift OAuth API server to verify that its resources were successfully decrypted:$ oc get authentication.operator.openshift.io -o=jsonpath='{range .items[0].status.conditions[?(@.type=="Encrypted")]}{.reason}{"\n"}{.message}{"\n"}'The output shows
DecryptionCompletedupon successful decryption:DecryptionCompleted Encryption mode set to identity and everything is decryptedIf the output shows
DecryptionInProgress, decryption is still in progress. Wait a few minutes and try again.
Chapter 13. Scanning pods for vulnerabilities
Using the Red Hat Quay Container Security Operator, you can access vulnerability scan results from the OpenShift Container Platform web console for container images used in active pods on the cluster. The Red Hat Quay Container Security Operator:
- Watches containers associated with pods on all or specified namespaces
- Queries the container registry where the containers came from for vulnerability information, provided an image’s registry is running image scanning (such as Quay.io or a Red Hat Quay registry with Clair scanning)
-
Exposes vulnerabilities via the
ImageManifestVulnobject in the Kubernetes API
Using the instructions here, the Red Hat Quay Container Security Operator is installed in the openshift-operators namespace, so it is available to all namespaces on your OpenShift Container Platform cluster.
13.1. Running the Red Hat Quay Container Security Operator
You can start the Red Hat Quay Container Security Operator from the OpenShift Container Platform web console by selecting and installing that Operator from the Operator Hub, as described here.
Prerequisites
- Have administrator privileges to the OpenShift Container Platform cluster
- Have containers that come from a Red Hat Quay or Quay.io registry running on your cluster
Procedure
- Navigate to Operators → OperatorHub and select Security.
- Select the Container Security Operator, then select Install to go to the Create Operator Subscription page.
- Check the settings. All namespaces and automatic approval strategy are selected, by default.
- Select Install. The Container Security Operator appears after a few moments on the Installed Operators screen.
Optional: You can add custom certificates to the Red Hat Quay Container Security Operator. In this example, create a certificate named
quay.crtin the current directory. Then run the following command to add the cert to the Red Hat Quay Container Security Operator:$ oc create secret generic container-security-operator-extra-certs --from-file=quay.crt -n openshift-operators- If you added a custom certificate, restart the Operator pod for the new certs to take effect.
Open the OpenShift Dashboard (
Home→Overview). A link to Quay Image Security appears under the status section, with a listing of the number of vulnerabilities found so far. Select the link to see a Quay Image Security breakdown, as shown in the following figure:
You can do one of two things at this point to follow up on any detected vulnerabilities:
Select the link to the vulnerability. You are taken to the container registry that the container came from, where you can see information about the vulnerability. The following figure shows an example of detected vulnerabilities from a Quay.io registry:
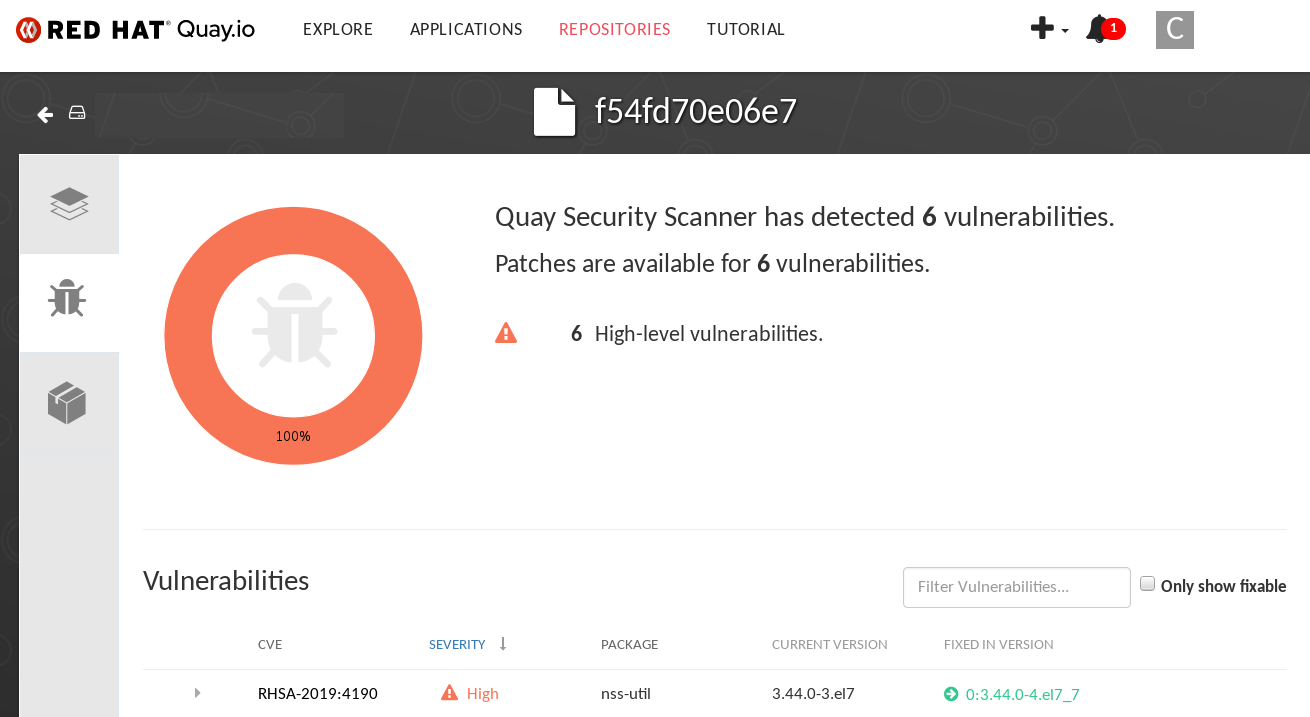
Select the namespaces link to go to the ImageManifestVuln screen, where you can see the name of the selected image and all namespaces where that image is running. The following figure indicates that a particular vulnerable image is running in the
quay-enterprisenamespace: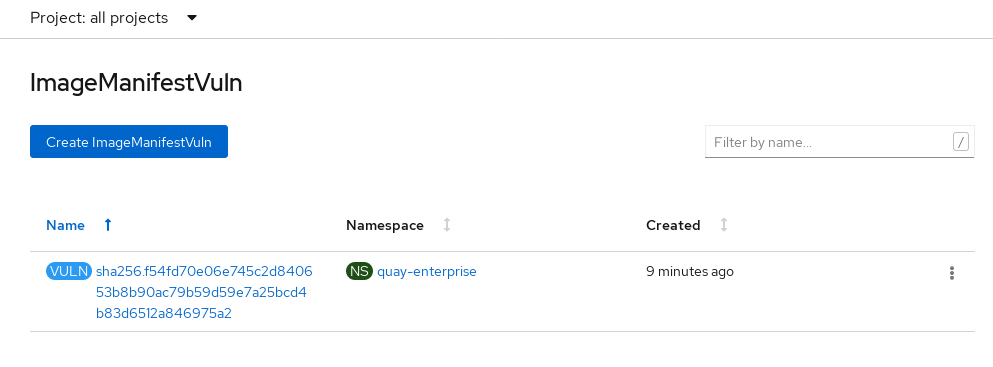
At this point, you know what images are vulnerable, what you need to do to fix those vulnerabilities, and every namespace that the image was run in. So you can:
- Alert anyone running the image that they need to correct the vulnerability
- Stop the images from running by deleting the deployment or other object that started the pod that the image is in
Note that if you do delete the pod, it may take several minutes for the vulnerability to reset on the dashboard.
13.2. Querying image vulnerabilities from the CLI
Using the oc command, you can display information about vulnerabilities detected by the Red Hat Quay Container Security Operator.
Prerequisites
- Be running the Red Hat Quay Container Security Operator on your OpenShift Container Platform instance
Procedure
To query for detected container image vulnerabilities, type:
$ oc get vuln --all-namespacesExample output
NAMESPACE NAME AGE default sha256.ca90... 6m56s skynet sha256.ca90... 9m37sTo display details for a particular vulnerability, provide the vulnerability name and its namespace to the
oc describecommand. This example shows an active container whose image includes an RPM package with a vulnerability:$ oc describe vuln --namespace mynamespace sha256.ac50e3752...Example output
Name: sha256.ac50e3752... Namespace: quay-enterprise ... Spec: Features: Name: nss-util Namespace Name: centos:7 Version: 3.44.0-3.el7 Versionformat: rpm Vulnerabilities: Description: Network Security Services (NSS) is a set of libraries...
Legal Notice
Copyright © Red Hat
OpenShift documentation is licensed under the Apache License 2.0 (https://www.apache.org/licenses/LICENSE-2.0).
Modified versions must remove all Red Hat trademarks.
Portions adapted from https://github.com/kubernetes-incubator/service-catalog/ with modifications by Red Hat.
Red Hat, Red Hat Enterprise Linux, the Red Hat logo, the Shadowman logo, JBoss, OpenShift, Fedora, the Infinity logo, and RHCE are trademarks of Red Hat, Inc., registered in the United States and other countries.
Linux® is the registered trademark of Linus Torvalds in the United States and other countries.
Java® is a registered trademark of Oracle and/or its affiliates.
XFS® is a trademark of Silicon Graphics International Corp. or its subsidiaries in the United States and/or other countries.
MySQL® is a registered trademark of MySQL AB in the United States, the European Union and other countries.
Node.js® is an official trademark of the OpenJS Foundation.
The OpenStack® Word Mark and OpenStack logo are either registered trademarks/service marks or trademarks/service marks of the OpenStack Foundation, in the United States and other countries and are used with the OpenStack Foundation’s permission. We are not affiliated with, endorsed or sponsored by the OpenStack Foundation, or the OpenStack community.
All other trademarks are the property of their respective owners.