Chapter 14. Managing vulnerabilities
14.1. Vulnerability management
Security vulnerabilities in your environment might be exploited by an attacker to perform unauthorized actions such as denial of service, remote code execution, or unauthorized access to sensitive data. Therefore, the management of vulnerabilities is a foundational step towards a successful Kubernetes security program.
14.1.1. Vulnerability management process
Vulnerability management is a continuous process to identify and remediate vulnerabilities. Red Hat Advanced Cluster Security for Kubernetes helps you to facilitate a vulnerability management process.
A successful vulnerability management program often includes the following critical tasks:
- Performing asset assessment
- Prioritizing the vulnerabilities
- Assessing the exposure
- Taking action
- Continuously reassessing assets
Red Hat Advanced Cluster Security for Kubernetes helps organizations to perform continuous assessments on their OpenShift Container Platform and Kubernetes clusters. It provides organizations with the contextual information they need to prioritize and act on vulnerabilities in their environment more effectively.
14.1.1.1. Performing asset assessment
Performing an assessment of an organization’s assets involve the following actions:
- Identifying the assets in your environment
- Scanning these assets to identify known vulnerabilities
- Reporting on the vulnerabilities in your environment to impacted stakeholders
When you install Red Hat Advanced Cluster Security for Kubernetes on your Kubernetes or OpenShift Container Platform cluster, it first aggregates the assets running inside of your cluster to help you identify those assets. RHACS allows organizations to perform continuous assessments on their OpenShift Container Platform and Kubernetes clusters. RHACS provides organizations with the contextual information to prioritize and act on vulnerabilities in their environment more effectively.
Important assets that should be monitored by the organization’s vulnerability management process using RHACS include:
- Components: Components are software packages that may be used as part of an image or run on a node. Components are the lowest level where vulnerabilities are present. Therefore, organizations must upgrade, modify or remove software components in some way to remediate vulnerabilities.
- Image: A collection of software components and code that create an environment to run an executable portion of code. Images are where you upgrade components to fix vulnerabilities.
- Nodes: A server used to manage and run applications using OpenShift or Kubernetes and the components that make up the OpenShift Container Platform or Kubernetes service.
Red Hat Advanced Cluster Security for Kubernetes groups these assets into the following structures:
- Deployment: A definition of an application in Kubernetes that may run pods with containers based on one or many images.
- Namespace: A grouping of resources such as Deployments that support and isolate an application.
- Cluster: A group of nodes used to run applications using OpenShift or Kubernetes.
Red Hat Advanced Cluster Security for Kubernetes scans the assets for known vulnerabilities and uses the Common Vulnerabilities and Exposures (CVE) data to assess the impact of a known vulnerability.
14.1.2. Viewing vulnerabilities
RHACS provides the following methods to view vulnerabilities discovered in your system:
-
To view application vulnerabilities by namespace or deployment, or to view vulnerabilities in an image, in the RHACS web portal, navigate to Vulnerability Management (1.0)
Dashboard. -
To view vulnerabilities in applications running on clusters in your system, navigate to Vulnerability Management (2.0)
Workload CVEs. You can filter vulnerabilities by image, deployment, namespace, and cluster.
14.1.2.1. Viewing application vulnerabilities
You can view application vulnerabilities in Red Hat Advanced Cluster Security for Kubernetes.
Procedure
-
On the RHACS portal, navigate to Vulnerability Management 1.0
Dashboard. -
On the Dashboard view header, select Application & Infrastructure
Namespaces or Deployments. - From the list, search for and select the Namespace or Deployment you want to review.
- To get more information about the application, select an entity from Related entities on the right.
14.1.2.2. Viewing image vulnerabilities
You can view image vulnerabilities in Red Hat Advanced Cluster Security for Kubernetes.
Procedure
-
On the RHACS portal, navigate to Vulnerability Management 1.0
Dashboard. - On the Dashboard view header, select Images.
From the list of images, select the image you want to investigate. You can also filter the list by performing one of the following steps:
- Enter Image in the search bar and then select the Image attribute.
- Enter the image name in the search bar.
- In the image details view, review the listed CVEs and prioritize taking action to address the impacted components.
- Select Components from Related entities on the right to get more information about all the components that are impacted by the selected image. Or select Components from the Affected components column under the Image findings section for a list of components affected by specific CVEs.
Additional resources
14.1.2.3. Viewing workload CVEs in Vulnerability Management (2.0)
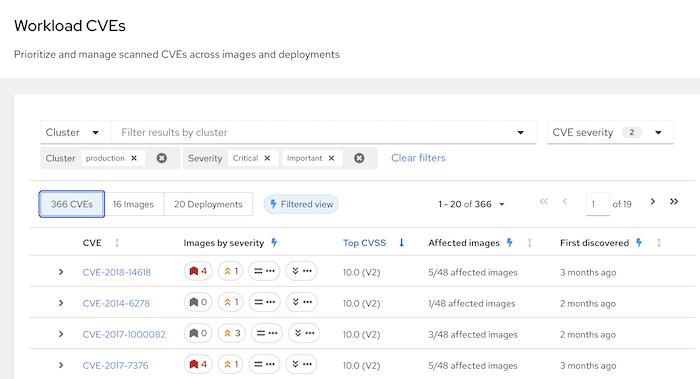
You can view a comprehensive list of vulnerabilities, or CVEs, in RHACS across images and deployments. You can use the search filter bar to select specific CVEs, images, deployments, namespaces, or clusters.
Procedure
-
In the RHACS portal, navigate to Vulnerability Management (2.0)
Workload CVEs. From the drop-down list, select the search criteria you want to use. You can select an item type, such as a cluster, from the list, and then select the specific name of the item. You can add additional items to the filter by selecting another item from the list and selecting the specific name of the new item. For example, you can select a specific image and a specific cluster to limit results to those selections. You can filter on the following items:
- CVE
- Image
- Deployment
- Namespace
- Cluster
- Optional: Use the CVE severity list to select the severities of the CVEs that you want to display.
Click the relevant button to view a list of vulnerabilities, images, or deployments in the system.
NoteThe Filtered view icon indicates that the displayed results were filtered based on the criteria that you selected. You can click Clear filters to remove all filters, or remove individual filters by clicking on them.
In the list of results, click a CVE, image name, or deployment name to view more information about the item. For example, depending on the item type, you can view the following information:
- Whether a CVE is fixable
- Whether an image is active
- The Dockerfile line in the image that contains the CVE
- External links to information about the CVE in Red Hat and other CVE databases
Search example
The following graphic shows an example of search criteria for a cluster called "production" to view CVEs of critical and important severity in that cluster.
14.1.2.3.1. Viewing infrastructure vulnerabilities
You can view vulnerabilities in nodes by using Red Hat Advanced Cluster Security for Kubernetes.
Procedure
-
On the RHACS portal, navigate to Vulnerability Management 1.0
Dashboard. -
On the Dashboard view header, select Application & Infrastructure
Cluster. - From the list of clusters, select the cluster you want to investigate.
- Review the clusters vulnerabilities and prioritize taking action on the impacted nodes on the cluster.
14.1.2.3.2. Viewing node vulnerabilities
You can view vulnerabilities in specific nodes by using Red Hat Advanced Cluster Security for Kubernetes.
Procedure
-
On the RHACS portal, navigate to Vulnerability Management 1.0
Dashboard. - On the Dashboard view header, select Nodes.
- From the list of nodes, select the node you want to investigate.
- Review vulnerabilities for the selected node and prioritize taking action.
- To get more information about the affected components in a node, select Components from Related entities on the right.
14.1.2.4. Prioritizing the vulnerabilities
Answer the following questions to prioritize the vulnerabilities in your environment for action and investigation:
- How important is an affected asset for your organization?
- How severe does a vulnerability need to be for investigation?
- Can the vulnerability be fixed by a patch for the affected software component?
- Does the existence of the vulnerability violate any of your organization’s security policies?
The answers to these questions help security and development teams decide if they want to gauge the exposure of a vulnerability.
Red Hat Advanced Cluster Security for Kubernetes provides you the means to facilitate the prioritization of the vulnerabilities in your applications and components.
14.1.2.5. Assessing the exposure
To assess your exposure to a vulnerability, answer the following questions:
- Is your application impacted by a vulnerability?
- Is the vulnerability mitigated by some other factor?
- Are there any known threats that could lead to the exploitation of this vulnerability?
- Are you using the software package which has the vulnerability?
- Is spending time on a specific vulnerability and the software package worth it?
Take some of the following actions based on your assessment:
- Consider marking the vulnerability as a false positive if you determine that there is no exposure or that the vulnerability does not apply in your environment.
- Consider if you would prefer to remediate, mitigate or accept the risk if you are exposed.
- Consider if you want to remove or change the software package to reduce your attack surface.
14.1.2.6. Taking action
Once you have decided to take action on a vulnerability, you can take one of the following actions:
- Remediate the vulnerability
- Mitigate and accept the risk
- Accept the risk
- Mark the vulnerability as a false positive
You can remediate vulnerabilities by performing one of the following actions:
- Remove a software package
- Update a software package to a non-vulnerable version.
Additional resources
14.1.2.6.1. Finding a new component version
The following procedure finds a new component version to upgrade to.
Procedure
-
On the RHACS portal, navigate to Vulnerability Management 1.0
Dashboard. - On the Dashboard view header, select Images.
- From the list of images, select the image you already assessed.
- Under the Image findings section, select the CVE.
- Select the affected components of the CVE you want to take action on.
- Review the version of the component that the CVE is fixed in and update your image.
14.1.2.7. Accepting risks
Follow the instructions in this section to accept the risks in Red Hat Advanced Cluster Security for Kubernetes.
Prerequisites
-
You must have
writepermission for theVulnerabilityManagementRequestsresource.
To accept risk with or without mitigation:
Procedure
-
On the RHACS portal, navigate to Vulnerability Management 1.0
Dashboard. - On the Dashboard view header, select Images.
- From the list of images, select the image you already assessed.
- Find the row which lists the CVE you would like to take action on.
-
Click
 on the right for the CVE you identified and click Defer CVE.
- Select the date and time till you want to defer the CVE.
- Select if you want to defer the CVE for the selected image tag or all tags for this image.
- Enter the reason for the deferral.
- Click Request approval. Select the blue information icon on the right of the CVE and copy the approval link to share with your organization’s deferral approver.
14.1.2.7.1. Marking vulnerabilities as false positive
The following procedure marks a vulnerability as a false positive.
Prerequisites
-
You must have the
writepermission for theVulnerabilityManagementRequestsresource.
Procedure
-
On the RHACS portal, navigate to Vulnerability Management 1.0
Dashboard. - On the Dashboard view header, select Images.
- From the list of images, select the image you already assessed.
- Find the row which lists the CVE you would like to take action on.
-
Click the
on the right for the CVE you identified and click Defer CVE.
- Select the date and time you want to defer the CVE.
- Select if you want to defer the CVE for the selected image tag or all tags for this image.
- Enter the reason for the deferral.
- Click Request approval.
- Select the blue information icon on the right of the CVE and copy the approval link to share with your organization’s deferral approver.
14.1.2.7.2. Reviewing a false positive or deferred CVE
Use the following procedure to review a false positive or deferred CVE.
Prerequisites
-
You must have the
writepermission for theVulnerabilityManagementApprovalsresource.
You can review a false positive or deferred CVE:
Procedure
- Open the approval link in your browser or in the RHACS portal.
-
Navigate to Vulnerability Management
Risk Acceptance and search for the CVE. - Review the vulnerabilities scope and action to decide if you would like to approve it.
-
Click on the
at the far right of the CVE and approve or deny the request for approval.
14.1.2.8. Reporting vulnerabilities to teams
As organizations must constantly reassess and report on their vulnerabilities, some organizations find it helpful to have scheduled communications to key stakeholders to help in the vulnerability management process.
You can use Red Hat Advanced Cluster Security for Kubernetes to schedule these reoccurring communications through e-mail. These communications should be scoped to the most relevant information that the key stakeholders need.
For sending these communications, you must consider the following questions:
- What schedule would have the most impact when communicating with the stakeholders?
- Who is the audience?
- Should you only send specific severity vulnerabilities in your report?
- Should you only send fixable vulnerabilities in your report?
14.1.3. Vulnerability reporting
You can create and download an on-demand image vulnerability report from the Vulnerability Management (2.0) menu in the RHACS web portal. This report includes a comprehensive list of common vulnerabilities and exposures across images and deployments, called workload CVEs in RHACS. You can share this report with auditors or internal stakeholders by scheduling emails in RHACS or by downloading the report and sharing it by using other methods.
14.1.3.1. Creating vulnerability management report configurations
RHACS guides you through the process of creating a vulnerability management report configuration. This configuration determines the information that will be included in a report job that runs at a scheduled time or that you run on demand.
Procedure
-
On the RHACS portal, navigate to Vulnerability Management (2.0)
Vulnerability Reporting. - Click Create report.
- Enter a name for your report configuration in the Report name field.
- Optional: Enter text describing the report configuration in the Description field.
- In the CVE severity field, select the severity of common vulnerabilities and exposures (CVEs) that you want to include in the report configuration.
- Select the CVE status. You can select Fixable, Unfixable, or both.
- In the Image type field, select whether you want to include CVEs from deployed images, watched images, or both.
- In the CVEs discovered since field, select the time period for which you want CVEs to be included in the report configuration.
In the Configure report scope field, you can perform the following actions:
- Select an existing collection and click View to view the collection information, edit the collection, and get a preview of collection results. When viewing the collection, entering text in the field searches for collections matching that text string.
Click Create collection to create a new collection.
NoteFor more information about collections, see "Creating and using deployment collections" in the "Additional resources" section.
- Click Next to configure the delivery destinations and optionally set up a schedule for delivery.
14.1.3.1.1. Configuring delivery destinations and scheduling
Configuring destinations and delivery schedules for vulnerability reports is optional, unless on the previous page, you selected the option to include CVEs that were discovered since the last scheduled report. If you selected that option, configuring destinations and delivery schedules for vulnerability reports is required.
Procedure
- To configure destinations for delivery, in the Configure delivery destinations section, you can add a delivery destination and set up a schedule for reporting.
To email reports, you must configure at least one email notifier. Select an existing notifier or create a new email notifier to send your report by email. For more information about creating an email notifier, see "Configuring the email plugin" in the "Additional resources" section.
When you select a notifier, the email addresses configured in the notifier as Default recipients appear in the Distribution list field. You can add additional email addresses that are separated by a comma.
A default email template is automatically applied. To edit this default template, perform the following steps:
- Click the edit icon and enter a customized subject and email body in the Edit tab.
- Click the Preview tab to see your proposed template.
Click Apply to save your changes to the template.
NoteWhen reviewing the report jobs for a specific report, you can see whether the default template or a customized template was used when creating the report.
- In the Configure schedule section, select the frequency and day of the week for the report.
- Click Next to review your vulnerability report configuration and finish creating it.
14.1.3.1.2. Reviewing and creating the report configuration
You can review the details of your vulnerability report configuration before creating it.
Procedure
- In the Review and create section, you can review the report configuration parameters, delivery destination, email template that is used if you selected email delivery, delivery schedule, and report format. To make any changes, click Back to go to the previous section and edit the fields that you want to change.
- Click Create to create the report configuration and save it.
14.1.3.2. Vulnerability report permissions
The ability to create, view, and download reports depends on the access control settings, or roles and permission sets, for your user account.
For example, you can only view, create, and download reports for data that your user account has permission to access. In addition, the following restrictions apply:
- You can only download reports that you have generated; you cannot download reports generated by other users.
- Report permissions are restricted depending on the access settings for user accounts. If the access settings for your account change, old reports do not reflect the change. For example, if you are given new permissions and want to view vulnerability data that is now allowed by those permissions, you must create a new vulnerability report.
14.1.3.3. Editing vulnerability report configurations
You can edit existing vulnerability report configurations from the list of report configurations, or by selecting an individual report configuration first.
Procedure
To edit an existing vulnerability report configuration, in the RHACS web portal, navigate to Vulnerability Management (2.0)
Vulnerability Reporting and choose one of the following methods: -
Locate the report configuration that you want to edit in the list of report configurations and click
. Then, select Edit report.
- Click on the report configuration name in the list of report configurations. Then, click Actions and select Edit report.
-
Locate the report configuration that you want to edit in the list of report configurations and click
- Make changes to the report configuration and save.
14.1.3.4. Downloading vulnerability reports
You can generate an on-demand vulnerability report and then download it.
You can only download reports that you have generated; you cannot download reports generated by other users.
Procedure
-
In the RHACS web portal, navigate to Vulnerability Management (2.0)
Vulnerability Reporting and, in the list of report configurations, locate the report configuration that you want to use to create the downloadable report. Generate the vulnerability report by using one of the following methods:
To generate the report from the list:
-
Click
.
- Select Generate download. The My active job status column displays the status of your report creation. After the Processing status goes away, you can download the report.
-
Click
To generate the report from the report window:
- Click the report configuration name to open the configuration detail window.
- Click Actions and select Generate download.
- To download the report, if you are viewing the list of report configurations, click the report configuration name to open it.
- Click All report jobs.
-
If the report is completed, click the Ready for download link in the Status column. The report is in
.csvformat and is compressed into a.zipfile for download.
14.1.3.5. Sending vulnerability reports on-demand
You can send vulnerability reports immediately, rather than waiting for the scheduled send time.
Procedure
-
In the RHACS web portal, navigate to Vulnerability Management (2.0)
Vulnerability Reporting and, in the list of report configurations, locate the report configuration for the report that you want to send. -
Click
. Then, select Send report now.
14.1.3.6. Cloning vulnerability report configurations
You can make copies of vulnerability report configurations by cloning them. This is useful when you want to reuse report configurations with minor changes, such as reporting vulnerabilities in different deployments or namespaces.
Procedure
-
In the RHACS web portal, navigate to Vulnerability Management (2.0)
Vulnerability Reporting and locate the report configuration that you want to clone in the list of report configurations. - Click Clone report.
- Make any changes that you want to the report parameters and delivery destinations.
- Click Create.
14.1.3.7. Deleting vulnerability report configurations
Deleting a report configuration deletes the configuration and any reports that were previously run using this configuration.
Procedure
-
In the RHACS web portal, navigate to Vulnerability Management (2.0)
Vulnerability Reporting and locate the report configuration that you want to delete in the list of reports. -
Click
. Then, select Delete report.
14.1.3.8. Configuring vulnerability management report job retention settings
You can configure settings that determine when vulnerability report job requests expire and other retention settings for report jobs.
These settings do not affect the following vulnerability report jobs:
-
Jobs in the
WAITINGorPREPARINGstate (unfinished jobs) - The last successful scheduled report job
- The last successful on-demand emailed report job
- The last successful downloadable report job
- Downloadable report jobs for which the report file has not been deleted by either manual deletion or by configuring the downloadable report pruning settings
Procedure
In the RHACS web portal, navigate to Platform Configuration
System Configuration. You can configure the following settings for vulnerability report jobs: Vulnerability report run history retention: The number of days that a record is kept of vulnerability report jobs that have been run. This setting controls how many days that report jobs are listed in the All report jobs tab under Vulnerability Management (2.0)
Vulnerability Reporting when a report configuration is selected. All report history beyond the cutoff date is pruned except for the following jobs: - Unfinished jobs.
- Jobs for which prepared downloadable reports still exist in the system.
- The last successful report job for each job type (scheduled email, on-demand email, or download). This ensures users have information about the last run job for each type.
-
Prepared downloadable vulnerability reports retention days: The number of days that created on-demand downloadable vulnerability report jobs are available for download in the All report jobs tab under Vulnerability Management (2.0)
Vulnerability Reporting when a report configuration is selected. - Prepared downloadable vulnerability reports limit: The limit, in MB, of space allocated to prepared downloadable vulnerability report jobs. After the limit is reached, the oldest report job in the download queue is removed.
- To change these values, click Edit, make your changes, and then click Save.
14.1.3.9. Migration of vulnerability reports when upgrading to RHACS version 4.3 and later
Red Hat Advanced Cluster Security for Kubernetes (RHACS) version 4.3 includes an automatic migration of vulnerability report configurations that were created in previous versions of RHACS in the Vulnerability Management 1.0
RHACS performs the following actions during the migration:
-
Report configurations are copied to create a new version of the report that you can access by clicking Vulnerability Management (2.0)
Vulnerability Reporting. - The original name for the report is used when migrating reports to the new location.
-
Report configurations created in the Vulnerability Management 2.0 (Tech preview)
Reporting page are not affected by upgrading to RHACS version 4.3 or later. The menu item to access these report configurations was renamed Vulnerability Management (2.0) and the page was renamed Vulnerability Reporting. -
If a report configuration previously created by using the Vulnerability Management 1.0 page is not migrated because the notifier attached to it no longer exists, then the details of that configuration are added to the logs generated by the Central pod. You can use details from the log to re-create the report configuration by clicking Vulnerability Management (2.0)
Vulnerability Reporting and adding a new report. -
For each report configuration that was previously created by using the Vulnerability Management 1.0 page, the most recent successful scheduled report job is migrated to the All Report jobs section of the report configuration. To view the report configuration, click Vulnerability Management (2.0)
Vulnerability Reporting, and then click the report configuration.
If you need to roll back to RHACS 4.2 from a later version, the following actions occur:
-
The report configurations that became defunct with migration now become functional again and are available by clicking Vulnerability Management 1.0
Reporting. - The report configurations created by the migration remain functional and are available by clicking Vulnerability Reporting 2.0 (Tech Preview). You can manually delete unwanted report configurations created in either the 1.0 or 2.0 reporting version.
-
If a report configuration in the Vulnerability Management 1.0
Reporting page is updated after rolling back to RHACS 4.2 or earlier, those updates might not be applied to the migrated report configuration when the system is upgraded again. If this happens, the details of the report configuration are added to the logs generated by the Central pod. You can manually update the report configuration by clicking Vulnerability Management (2.0) Vulnerability Reporting and using the details from the log. -
Any new report configurations created in the Vulnerability Management 1.0
Reporting page are migrated when you upgrade again to RHACS version 4.3 or later.
14.2. Common vulnerability management tasks
Common vulnerability management tasks involve identifying and prioritizing vulnerabilities, remedying them, and monitoring for new threats. Following are some common tasks you can perform from the Vulnerability Management
14.2.1. Finding critical CVEs impacting your infrastructure
Use the Vulnerability Management view for identifying CVEs that are impacting your platform the most.
Procedure
- Navigate to the RHACS portal and click Vulnerability Management from the navigation menu.
- Select CVEs on the Vulnerability Management view header.
- In the CVEs view, select the Env Impact column header to arrange the CVEs in descending order (highest first) based on the environment impact.
14.2.2. Finding the most vulnerable image components
Use the Vulnerability Management view for identifying highly vulnerable image components.
Procedure
- Navigate to the RHACS portal and click Vulnerability Management from the navigation menu.
-
From the Vulnerability Management view header, select Application & Infrastructure
Components. - In the Components view, select the CVEs column header to arrange the components in descending order (highest first) based on the CVEs count.
14.2.3. Identifying the container image layer that introduces vulnerabilities
Use the Vulnerability Management view to identify vulnerable components and the image layer they appear in.
Procedure
- Navigate to the RHACS portal and click Vulnerability Management from the navigation menu.
- Select an image from either the Top Riskiest Images widget or click the Images button at the top of the Dashboard and select an image.
- In the Image details view, next to Dockerfile, select the expand icon to see a summary of image components.
- Select the expand icon for specific components to get more details about the CVEs affecting the selected component.
You can also view this information by navigating to Vulnerability Management (2.0)
14.2.4. Viewing details only for fixable CVEs
Use the Vulnerability Management view to filter and show only the fixable CVEs.
Procedure
- Navigate to the RHACS portal and click Vulnerability Management from the navigation menu.
-
From the Vulnerability Management view header, select Filter CVEs
Fixable.
14.2.5. Identifying the operating system of the base image
Use the Vulnerability Management view to identify the operating system of the base image.
Procedure
- Navigate to the RHACS portal and click Vulnerability Management from the navigation menu.
- From the Vulnerability Management view header, select Images.
- View the base operating system (OS) and OS version for all images under the Image OS column.
-
Select an image to view its details. The base operating system is also available under the Image Summary
Details and Metadata section.
Red Hat Advanced Cluster Security for Kubernetes lists the Image OS as unknown when either:
- The operating system information is not available, or
- If the image scanner in use does not provide this information.
Docker Trusted Registry, Google Container Registry, and Anchore do not provide this information.
You can also view this information by navigating to Vulnerability Management (2.0)
14.2.6. Identifying top risky objects
Use the Vulnerability Management view for identifying the top risky objects in your environment. The Top Risky widget displays information about the top risky images, deployments, clusters, and namespaces in your environment. The risk is determined based on the number of vulnerabilities and their CVSS scores.
Procedure
- Navigate to the RHACS portal and click Vulnerability Management from the navigation menu.
Select the Top Risky widget header to choose between riskiest images, deployments, clusters, and namespaces.
The small circles on the chart represent the chosen object (image, deployment, cluster, namespace). Hover over the circles to see an overview of the object they represent. And select a circle to view detailed information about the selected object, its related entities, and the connections between them.
For example, if you are viewing Top Risky Deployments by CVE Count and CVSS score, each circle on the chart represents a deployment.
- When you hover over a deployment, you see an overview of the deployment, which includes deployment name, name of the cluster and namespace, severity, risk priority, CVSS, and CVE count (including fixable).
- When you select a deployment, the Deployment view opens for the selected deployment. The Deployment view shows in-depth details of the deployment and includes information about policy violations, common vulnerabilities, CVEs, and riskiest images for that deployment.
- Select View All on the widget header to view all objects of the chosen type. For example, if you chose Top Risky Deployments by CVE Count and CVSS score, you can select View All to view detailed information about all deployments in your infrastructure.
14.2.7. Identifying top riskiest images and components
Similar to the Top Risky, the Top Riskiest widget lists the names of the top riskiest images and components. This widget also includes the total number of CVEs and the number of fixable CVEs in the listed images.
Procedure
- Navigate to the RHACS portal and click Vulnerability Management from the navigation menu.
Select the Top Riskiest Images widget header to choose between the riskiest images and components. If you are viewing Top Riskiest Images:
- When you hover over an image in the list, you see an overview of the image, which includes image name, scan time, and the number of CVEs along with severity (critical, high, medium, and low).
- When you select an image, the Image view opens for the selected image. The Image view shows in-depth details of the image and includes information about CVEs by CVSS score, top riskiest components, fixable CVEs, and Dockerfile for the image.
- Select View All on the widget header to view all objects of the chosen type. For example, if you chose Top Riskiest Components, you can select View All to view detailed information about all components in your infrastructure.
14.2.8. Viewing the Dockerfile for an image
Use the Vulnerability Management view to find the root cause of vulnerabilities in an image. You can view the Dockerfile and find exactly which command in the Dockerfile introduced the vulnerabilities and all components that are associated with that single command.
The Dockerfile section shows information about:
- All the layers in the Dockerfile
- The instructions and their value for each layer
- The components included in each layer
- The number of CVEs in components for each layer
When there are components introduced by a specific layer, you can select the expand icon to see a summary of its components. If there are any CVEs in those components, you can select the expand icon for an individual component to get more details about the CVEs affecting that component.
Procedure
- Navigate to the RHACS portal and click Vulnerability Management from the navigation menu.
- Select an image from either the Top Riskiest Images widget or click the Images button at the top of the Dashboard and select an image.
- In the Image details view, next to Dockerfile, select the expand icon to see a summary of instructions, values, creation date, and components.
- Select the expand icon for an individual component to view more information.
You can also view this information by navigating to Vulnerability Management (2.0)
14.2.9. Disabling identifying vulnerabilities in nodes
Identifying vulnerabilities in nodes is enabled by default. You can disable it from the RHACS portal.
Procedure
-
On the RHACS portal, navigate to Platform Configuration
Integrations. - Under Image Integrations, select StackRox Scanner.
- From the list of scanners, select StackRox Scanner to view its details.
- Remove the Node Scanner option from Types.
- Select Save.
14.2.10. Scanning inactive images
Red Hat Advanced Cluster Security for Kubernetes (RHACS) scans all active (deployed) images every 4 hours and updates the image scan results to reflect the latest vulnerability definitions.
You can also configure RHACS to scan inactive (not deployed) images automatically.
Procedure
-
On the RHACS portal, navigate to Vulnerability Management (2.0)
Workload CVEs (Tech preview). - Click <number> Images to display a list of images and locate the image you want to watch.
-
Click
, and then select Watch image. RHACS then scans the image and shows an error or success message.
-
(Optional) To remove a watched image, click
, and then select Unwatch image.
(Optional) You can view the list of all watched images and add additional images to watch by clicking Manage watched images in the page header.
ImportantOn the RHACS portal, click Platform Configuration
System Configuration to view the data retention configuration. All the data related to the image removed from the watched image list continues to appear in the RHACS portal for the number of days mentioned on the System Configuration page and is only removed after that period is over.
- Click Close to return to the Workload CVEs page.
14.2.11. Creating policies to block specific CVEs
You can create new policies or add specific CVEs to an existing policy from the Vulnerability Management view.
Procedure
- Click CVEs from the Vulnerability Management view header.
-
Select the checkboxes (leftmost column) for one or more CVEs and then click Add selected CVEs to Policy (
addicon). Or, move the mouse over a CVE in the list, and select the Add icon on the right side. For Policy Name:
- To add the CVE to an existing policy, select an existing policy from the drop-down list box.
- To create a new policy, enter the name for the new policy, and select Create <policy_name>.
- Select a value for Severity, either Critical, High, Medium, or Low.
- Choose the Lifecycle Stage to which your policy is applicable, from Build, or Deploy. You can also select both life-cycle stages.
- Enter details about the policy in the Description box.
- Turn off the Enable Policy toggle if you want to create the policy but enable it later. The Enable Policy toggle is on by default.
- Verify the listed CVEs which are included in this policy.
- Click Save Policy.
14.2.12. Viewing recently detected vulnerabilities
The Recently Detected Vulnerabilities widget on the Vulnerability Management view shows a list of recently discovered vulnerabilities in your scanned images, based on the scan time and CVSS score. It also includes information about the number of images affected by the CVE and its impact (percentage) on your environment.
- When you hover over a CVE in the list, you see an overview of the CVE, which includes scan time, CVSS score, description, impact, and whether it’s scored by using CVSS v2 or v3.
- When you select a CVE, the CVE details view opens for the selected CVE. The CVE details view shows in-depth details of the CVE and the components, images, and deployments and deployments in which it appears.
- Select View All on the Recently Detected Vulnerabilities widget header to view a list of all the CVEs in your infrastructure. You can also filter the list of CVEs.
14.2.13. Viewing the most common vulnerabilities
The Most Common Vulnerabilities widget on the Vulnerability Management view shows a list of vulnerabilities that affect the largest number of deployments and images arranged by their CVSS score.
- When you hover over a CVE in the list, you see an overview of the CVE which includes, scan time, CVSS score, description, impact, and whether it is scored by using CVSS v2 or v3.
- When you select a CVE, the CVE details view opens for the selected CVE. The CVE details view shows in-depth details of the CVE and the components, images, and deployments and deployments in which it appears.
-
Select View All on the Most Common Vulnerabilities widget header to view a list of all the CVEs in your infrastructure. You can also filter the list of CVEs. To export the CVEs as a CSV file, select Export
Download CVES as CSV.
14.2.14. Identifying deployments with most severe policy violations
The Deployments with most severe policy violations widget on the Vulnerability Management view shows a list of deployments and severity of vulnerabilities affecting that deployment.
- When you hover over a deployment in the list, you see an overview of the deployment, which includes the deployment name, the name of the cluster and the namespace in which the deployment exists, and the number of failing policies and their severity.
- When you select a deployment, the Deployment view opens for the selected deployment. The Deployment view shows in-depth details of the deployment and includes information about policy violations, common vulnerabilities, CVEs, and riskiest images for that deployment.
-
Select View All on the Most Common Vulnerabilities widget header to view a list of all the CVEs in your infrastructure. You can also filter the list of CVEs. To export the CVEs as a CSV file, select Export
Download CVES as CSV.
14.2.15. Finding clusters with most Kubernetes and Istio vulnerabilities
Use the Vulnerability Management view for identifying the clusters with most Kubernetes and Istio vulnerabilities in your environment.
The Clusters with most K8S & Istio Vulnerabilities widget shows a list of clusters, ranked by the number of Kubernetes and Istio vulnerabilities in each cluster. The cluster on top of the list is the cluster with the highest number of vulnerabilities.
Procedure
Click on one of the clusters from the list to view details about the cluster. The Cluster view includes:
- Cluster Details section, which shows cluster details and metadata, top risky objects (deployments, namespaces, and images), recently detected vulnerabilities, riskiest images, and deployments with the most severe policy violations.
- Cluster Findings section, which includes a list of failing policies and list of fixable CVEs.
- Related Entities section, which shows the number of namespaces, deployments, policies, images, components, and CVEs the cluster contains. You can select these entities to view more details.
- Click View All on the widget header to view the list of all clusters.
14.2.16. Identifying vulnerabilities in nodes
You can use the Vulnerability Management view to identify vulnerabilities in your nodes. The identified vulnerabilities include vulnerabilities in:
- Core Kubernetes components.
Container runtimes (Docker, CRI-O, runC, and containerd).
NoteRed Hat Advanced Cluster Security for Kubernetes can identify vulnerabilities in the following operating systems:
- Amazon Linux 2
- CentOS
- Debian
- Garden Linux (Debian 11)
- Red Hat Enterprise Linux CoreOS (RHCOS)
- Red Hat Enterprise Linux (RHEL)
- Ubuntu (AWS, Microsoft Azure, GCP, and GKE specific versions)
Procedure
-
On the RHACS portal, navigate to Vulnerability Management
Dashboard. - Select Nodes on the Dashboard view header to view a list of all the CVEs affecting your nodes.
Select a node from the list to view details of all CVEs affecting that node.
- When you select a node, the Node details panel opens for the selected node. The Node view shows in-depth details of the node and includes information about CVEs by CVSS score and fixable CVEs for that node.
- Select View All on the CVEs by CVSS score widget header to view a list of all the CVEs in the selected node. You can also filter the list of CVEs.
- To export the fixable CVEs as a CSV file, select Export as CSV under the Node Findings section.
14.3. Scanning RHCOS node hosts
For OpenShift Container Platform, Red Hat Enterprise Linux CoreOS (RHCOS) is the only supported operating system for control plane. Whereas, for node hosts, OpenShift Container Platform supports both RHCOS and Red Hat Enterprise Linux (RHEL). With Red Hat Advanced Cluster Security for Kubernetes (RHACS), you can scan RHCOS nodes for vulnerabilities and detect potential security threats.
RHACS scans RHCOS RPMs installed on the node host, as part of the RHCOS installation, for any known vulnerabilities.
First, RHACS analyzes and detects RHCOS components. Then it matches vulnerabilities for identified components by using RHEL and OpenShift 4.X Open Vulnerability and Assessment Language (OVAL) v2 security data streams.
-
If you installed RHACS by using the
roxctlCLI, you must manually enable the RHCOS node scanning features. When you use Helm or Operator installation methods on OpenShift Container Platform, this feature is enabled by default.
14.3.1. Enabling RHCOS node scanning
If you use OpenShift Container Platform, you can enable scanning of Red Hat Enterprise Linux CoreOS (RHCOS) nodes for vulnerabilities by using Red Hat Advanced Cluster Security for Kubernetes (RHACS).
Prerequisites
- For scanning RHCOS node hosts of the Secured cluster, you must have installed Secured cluster on OpenShift Container Platform 4.11 or later. For more information on supported managed and self-managed OpenShift Container Platform versions, see Red Hat Advanced Cluster Security for Kubernetes Support Policy.
Procedure
Run one of the following commands to update the compliance container.
For a default compliance container with metrics disabled, run the following command:
$ oc -n stackrox patch daemonset/collector -p '{"spec":{"template":{"spec":{"containers":[{"name":"compliance","env":[{"name":"ROX_METRICS_PORT","value":"disabled"},{"name":"ROX_NODE_SCANNING_ENDPOINT","value":"127.0.0.1:8444"},{"name":"ROX_NODE_SCANNING_INTERVAL","value":"4h"},{"name":"ROX_NODE_SCANNING_INTERVAL_DEVIATION","value":"24m"},{"name":"ROX_NODE_SCANNING_MAX_INITIAL_WAIT","value":"5m"},{"name":"ROX_RHCOS_NODE_SCANNING","value":"true"},{"name":"ROX_CALL_NODE_INVENTORY_ENABLED","value":"true"}]}]}}}}'For a compliance container with Prometheus metrics enabled, run the following command:
$ oc -n stackrox patch daemonset/collector -p '{"spec":{"template":{"spec":{"containers":[{"name":"compliance","env":[{"name":"ROX_METRICS_PORT","value":":9091"},{"name":"ROX_NODE_SCANNING_ENDPOINT","value":"127.0.0.1:8444"},{"name":"ROX_NODE_SCANNING_INTERVAL","value":"4h"},{"name":"ROX_NODE_SCANNING_INTERVAL_DEVIATION","value":"24m"},{"name":"ROX_NODE_SCANNING_MAX_INITIAL_WAIT","value":"5m"},{"name":"ROX_RHCOS_NODE_SCANNING","value":"true"},{"name":"ROX_CALL_NODE_INVENTORY_ENABLED","value":"true"}]}]}}}}'
Update the Collector DaemonSet (DS) by taking the following steps:
Add new volume mounts to Collector DS by running the following command:
$ oc -n stackrox patch daemonset/collector -p '{"spec":{"template":{"spec":{"volumes":[{"name":"tmp-volume","emptyDir":{}},{"name":"cache-volume","emptyDir":{"sizeLimit":"200Mi"}}]}}}}'Add the new
NodeScannercontainer by running the following command:$ oc -n stackrox patch daemonset/collector -p '{"spec":{"template":{"spec":{"containers":[{"command":["/scanner","--nodeinventory","--config=",""],"env":[{"name":"ROX_NODE_NAME","valueFrom":{"fieldRef":{"apiVersion":"v1","fieldPath":"spec.nodeName"}}},{"name":"ROX_CLAIR_V4_SCANNING","value":"true"},{"name":"ROX_COMPLIANCE_OPERATOR_INTEGRATION","value":"true"},{"name":"ROX_CSV_EXPORT","value":"false"},{"name":"ROX_DECLARATIVE_CONFIGURATION","value":"false"},{"name":"ROX_INTEGRATIONS_AS_CONFIG","value":"false"},{"name":"ROX_NETPOL_FIELDS","value":"true"},{"name":"ROX_NETWORK_DETECTION_BASELINE_SIMULATION","value":"true"},{"name":"ROX_NETWORK_GRAPH_PATTERNFLY","value":"true"},{"name":"ROX_NODE_SCANNING_CACHE_TIME","value":"3h36m"},{"name":"ROX_NODE_SCANNING_INITIAL_BACKOFF","value":"30s"},{"name":"ROX_NODE_SCANNING_MAX_BACKOFF","value":"5m"},{"name":"ROX_PROCESSES_LISTENING_ON_PORT","value":"false"},{"name":"ROX_QUAY_ROBOT_ACCOUNTS","value":"true"},{"name":"ROX_ROXCTL_NETPOL_GENERATE","value":"true"},{"name":"ROX_SOURCED_AUTOGENERATED_INTEGRATIONS","value":"false"},{"name":"ROX_SYSLOG_EXTRA_FIELDS","value":"true"},{"name":"ROX_SYSTEM_HEALTH_PF","value":"false"},{"name":"ROX_VULN_MGMT_WORKLOAD_CVES","value":"false"}],"image":"registry.redhat.io/advanced-cluster-security/rhacs-scanner-slim-rhel8:4.3.8","imagePullPolicy":"IfNotPresent","name":"node-inventory","ports":[{"containerPort":8444,"name":"grpc","protocol":"TCP"}],"volumeMounts":[{"mountPath":"/host","name":"host-root-ro","readOnly":true},{"mountPath":"/tmp/","name":"tmp-volume"},{"mountPath":"/cache","name":"cache-volume"}]}]}}}}'
14.3.2. Analysis and detection
When you use RHACS with OpenShift Container Platform, RHACS creates two coordinating containers for analysis and detection, the Compliance container and the Node-inventory container. The Compliance container was already a part of earlier RHACS versions. However, the Node-inventory container is new with RHACS 4.0 and works only with OpenShift Container Platform cluster nodes.
Upon start-up, the Compliance and Node-inventory containers begin the first inventory scan of Red Hat Enterprise Linux CoreOS (RHCOS) software components within five minutes. Next, the Node-inventory container scans the node’s file system to identify installed RPM packages and report on RHCOS software components. Afterward, inventory scanning occurs at periodic intervals, typically every four hours. You can customize the default interval by configuring the ROX_NODE_SCANNING_INTERVAL environment variable for the Compliance container.
14.3.3. Vulnerability matching
Central services, which include Central and Scanner, perform vulnerability matching. Scanner uses Red Hat’s Open Vulnerability and Assessment Language (OVAL) v2 security data streams to match vulnerabilities on Red Hat Enterprise Linux CoreOS (RHCOS) software components.
Unlike the earlier versions, RHACS 4.0 no longer uses the Kubernetes node metadata to find the kernel and container runtime versions. Instead, it uses the installed RHCOS RPMs to assess that information.
14.3.4. Related environment variables
You can use the following environment variables to configure RHCOS node scanning on RHACS.
| Environment Variable | Description |
|---|---|
|
|
The time after which a cached inventory is considered outdated. Defaults to 90% of |
|
|
The initial time in seconds a node scan will be delayed if a backoff file is found. The default value is |
|
| The upper limit of backoff. The default value is 5m, being 50% of Kubernetes restart policy stability timer. |
| Environment Variable | Description |
|---|---|
|
|
The base value of the interval duration between node scans. The deafult value is |
|
|
The duration of node scans may differ from the base interval time. However, the maximum value is limited by the |
|
|
The maximum wait time before the first node scan, which is randomly generated. You can set this value to |
14.3.5. Identifying vulnerabilities in nodes
You can use the Vulnerability Management view to identify vulnerabilities in your nodes. The identified vulnerabilities include vulnerabilities in:
- Core Kubernetes components.
Container runtimes (Docker, CRI-O, runC, and containerd).
NoteRed Hat Advanced Cluster Security for Kubernetes can identify vulnerabilities in the following operating systems:
- Amazon Linux 2
- CentOS
- Debian
- Garden Linux (Debian 11)
- Red Hat Enterprise Linux CoreOS (RHCOS)
- Red Hat Enterprise Linux (RHEL)
- Ubuntu (AWS, Microsoft Azure, GCP, and GKE specific versions)
Procedure
-
On the RHACS portal, navigate to Vulnerability Management
Dashboard. - Select Nodes on the Dashboard view header to view a list of all the CVEs affecting your nodes.
Select a node from the list to view details of all CVEs affecting that node.
- When you select a node, the Node details panel opens for the selected node. The Node view shows in-depth details of the node and includes information about CVEs by CVSS score and fixable CVEs for that node.
- Select View All on the CVEs by CVSS score widget header to view a list of all the CVEs in the selected node. You can also filter the list of CVEs.
- To export the fixable CVEs as a CSV file, select Export as CSV under the Node Findings section.