Chapter 17. Configuring a multi-site, fault-tolerant messaging system
Large-scale enterprise messaging systems commonly have discrete broker clusters located in geographically distributed data centers. In the event of a data center outage, system administrators might need to preserve existing messaging data and ensure that client applications can continue to produce and consume messages. You can use specific broker topologies and the Red Hat Ceph Storage software-defined storage platform to ensure continuity of your messaging system during a data center outage. This type of solution is called a multi-site, fault-tolerant architecture.
The following sections explain how to protect your messaging system from data center outages. These sections provide information about:
- How Red Hat Ceph Storage clusters work
- Installing and configuring a Red Hat Ceph Storage cluster
- Adding backup brokers to take over from live brokers in the event of a data center outage
- Configuring your broker servers with the Ceph client role
- Configuring each broker to use the shared store high-availability (HA) policy, specifying where in the Ceph File System each broker stores its messaging data
- Configuring client applications to connect to new brokers in the event of a data center outage
- Restarting a data center after an outage
Multi-site fault tolerance is not a replacement for high-availability (HA) broker redundancy within data centers. Broker redundancy based on live-backup groups provides automatic protection against single broker failures within single clusters. By contrast, multi-site fault tolerance protects against large-scale data center outages.
To use Red Hat Ceph Storage to ensure continuity of your messaging system, you must configure your brokers to use the shared store high-availability (HA) policy. You cannot configure your brokers to use the replication HA policy. For more information about these policies, see Implementing High Availability.
17.1. How Red Hat Ceph Storage clusters work
Red Hat Ceph Storage is a clustered object storage system. Red Hat Ceph Storage uses data sharding of objects and policy-based replication to guarantee data integrity and system availability.
Red Hat Ceph Storage uses an algorithm called CRUSH (Controlled Replication Under Scalable Hashing) to determine how to store and retrieve data by automatically computing data storage locations. You configure Ceph items called CRUSH maps, which detail cluster topography and specify how data is replicated across storage clusters.
CRUSH maps contain lists of Object Storage Devices (OSDs), a list of ‘buckets’ for aggregating the devices into a failure domain hierarchy, and rules that tell CRUSH how it should replicate data in a Ceph cluster’s pools.
By reflecting the underlying physical organization of the installation, CRUSH maps can model — and thereby address — potential sources of correlated device failures, such as physical proximity, shared power sources, and shared networks. By encoding this information into the cluster map, CRUSH can separate object replicas across different failure domains (for example, data centers) while still maintaining a pseudo-random distribution of data across the storage cluster. This helps to prevent data loss and enables the cluster to operate in a degraded state.
Red Hat Ceph Storage clusters require a number of nodes (physical or virtual) to operate. Clusters must include the following types of nodes:
Monitor nodes
Each Monitor (MON) node runs the monitor daemon (ceph-mon), which maintains a master copy of the cluster map. The cluster map includes the cluster topology. A client connecting to the Ceph cluster retrieves the current copy of the cluster map from the Monitor, which enables the client to read from and write data to the cluster.
A Red Hat Ceph Storage cluster can run with one Monitor node; however, to ensure high availability in a production cluster, Red Hat supports only deployments with at least three Monitor nodes. A minimum of three Monitor nodes means that in the event of the failure or unavailability of one Monitor, a quorum exists for the remaining Monitor nodes in the cluster to elect a new leader.
Manager nodes
Each Manager (MGR) node runs the Ceph Manager daemon (ceph-mgr), which is responsible for keeping track of runtime metrics and the current state of the Ceph cluster, including storage utilization, current performance metrics, and system load. Usually, Manager nodes are colocated (that is, on the same host machine) with Monitor nodes.
Object Storage Device nodes
Each Object Storage Device (OSD) node runs the Ceph OSD daemon (ceph-osd), which interacts with logical disks attached to the node. Ceph stores data on OSD nodes. Ceph can run with very few OSD nodes (the default is three), but production clusters realize better performance at modest scales, for example, with 50 OSDs in a storage cluster. Having multiple OSDs in a storage cluster enables system administrators to define isolated failure domains within a CRUSH map.
Metadata Server nodes
Each Metadata Server (MDS) node runs the MDS daemon (ceph-mds), which manages metadata related to files stored on the Ceph File System (CephFS). The MDS daemon also coordinates access to the shared cluster.
Additional resources
For more information about Red Hat Ceph Storage, see What is Red Hat Ceph Storage?
17.2. Installing Red Hat Ceph Storage
AMQ Broker multi-site, fault-tolerant architectures use Red Hat Ceph Storage 3. By replicating data across data centers, a Red Hat Ceph Storage cluster effectively creates a shared store available to brokers in separate data centers. You configure your brokers to use the shared store high-availability (HA) policy and store messaging data in the Red Hat Ceph Storage cluster.
Red Hat Ceph Storage clusters intended for production use should have a minimum of:
- Three Monitor (MON) nodes
- Three Manager (MGR) nodes
- Three Object Storage Device (OSD) nodes containing multiple OSD daemons
- Three Metadata Server (MDS) nodes
You can run the OSD, MON, MGR, and MDS nodes on either the same or separate physical or virtual machines. However, to ensure fault tolerance within your Red Hat Ceph Storage cluster, it is good practice to distribute each of these types of nodes across distinct data centers. In particular, you must ensure that in the event of a single data center outage, your storage cluster still has a minimum of two available MON nodes. Therefore, if you have three MON nodes in you cluster, each of these nodes must run on separate host machines in separate data centers. Do not run two MON nodes in a single data center, because failure of this data center will leave your storage cluster with only one remaining MON node. In this situation, the storage cluster can no longer operate.
The procedures linked-to from this section show you how to install a Red Hat Ceph Storage 3 cluster that includes MON, MGR, OSD, and MDS nodes.
Prerequisites
For information about preparing a Red Hat Ceph Storage installation, see:
Procedure
For procedures that show how to install a Red Hat Ceph 3 storage cluster that includes MON, MGR, OSD, and MDS nodes, see:
17.3. Configuring a Red Hat Ceph Storage cluster
This example procedure shows how to configure your Red Hat Ceph storage cluster for fault tolerance. You create CRUSH buckets to aggregate your Object Storage Device (OSD) nodes into data centers that reflect your real-life, physical installation. In addition, you create a rule that tells CRUSH how to replicate data in your storage pools. These steps update the default CRUSH map that was created by your Ceph installation.
Prerequisites
- You have already installed a Red Hat Ceph Storage cluster. For more information, see Installing Red Hat Ceph Storage.
- You should understand how Red Hat Ceph Storage uses Placement Groups (PGs) to organize large numbers of data objects in a pool, and how to calculate the number of PGs to use in your pool. For more information, see Placement Groups (PGs).
- You should understand how to set the number of object replicas in a pool. For more information, Set the Number of Object Replicas.
Procedure
Create CRUSH buckets to organize your OSD nodes. Buckets are lists of OSDs, based on physical locations such as data centers. In Ceph, these physical locations are known as failure domains.
ceph osd crush add-bucket dc1 datacenter
ceph osd crush add-bucket dc2 datacenter
ceph osd crush add-bucket dc1 datacenter
ceph osd crush add-bucket dc2 datacenter
Copy to Clipboard Copied! Toggle word wrap Toggle overflow Move the host machines for your OSD nodes to the data center CRUSH buckets that you created. Replace host names
host1-host4with the names of your host machines.ceph osd crush move host1 datacenter=dc1 ceph osd crush move host2 datacenter=dc1 ceph osd crush move host3 datacenter=dc2 ceph osd crush move host4 datacenter=dc2
ceph osd crush move host1 datacenter=dc1 ceph osd crush move host2 datacenter=dc1 ceph osd crush move host3 datacenter=dc2 ceph osd crush move host4 datacenter=dc2Copy to Clipboard Copied! Toggle word wrap Toggle overflow Ensure that the CRUSH buckets you created are part of the
defaultCRUSH tree.ceph osd crush move dc1 root=default ceph osd crush move dc2 root=default
ceph osd crush move dc1 root=default ceph osd crush move dc2 root=defaultCopy to Clipboard Copied! Toggle word wrap Toggle overflow Create a rule to map storage object replicas across your data centers. This helps to prevent data loss and enables your cluster to stay running in the event of a single data center outage.
The command to create a rule uses the following syntax:
ceph osd crush rule create-replicated <rule-name> <root> <failure-domain> <class>. An example is shown below.ceph osd crush rule create-replicated multi-dc default datacenter hdd
ceph osd crush rule create-replicated multi-dc default datacenter hddCopy to Clipboard Copied! Toggle word wrap Toggle overflow NoteIn the preceding command, if your storage cluster uses solid-state drives (SSD), specify
ssdinstead ofhdd(hard disk drives).Configure your Ceph data and metadata pools to use the rule that you created. Initially, this might cause data to be backfilled to the storage destinations determined by the CRUSH algorithm.
ceph osd pool set cephfs_data crush_rule multi-dc
ceph osd pool set cephfs_metadata crush_rule multi-dc
ceph osd pool set cephfs_data crush_rule multi-dc
ceph osd pool set cephfs_metadata crush_rule multi-dc
Copy to Clipboard Copied! Toggle word wrap Toggle overflow Specify the numbers of Placement Groups (PGs) and Placement Groups for Placement (PGPs) for your metadata and data pools. The PGP value should be equal to the PG value.
ceph osd pool set cephfs_metadata pg_num 128
ceph osd pool set cephfs_metadata pgp_num 128

ceph osd pool set cephfs_data pg_num 128
ceph osd pool set cephfs_data pgp_num 128
ceph osd pool set cephfs_metadata pg_num 128
ceph osd pool set cephfs_metadata pgp_num 128

ceph osd pool set cephfs_data pg_num 128
ceph osd pool set cephfs_data pgp_num 128
Copy to Clipboard Copied! Toggle word wrap Toggle overflow Specify the numbers of replicas to be used by your data and metadata pools.
ceph osd pool set cephfs_data min_size 1
ceph osd pool set cephfs_metadata min_size 1

ceph osd pool set cephfs_data size 2
ceph osd pool set cephfs_metadata size 2
ceph osd pool set cephfs_data min_size 1
ceph osd pool set cephfs_metadata min_size 1

ceph osd pool set cephfs_data size 2
ceph osd pool set cephfs_metadata size 2
Copy to Clipboard Copied! Toggle word wrap Toggle overflow
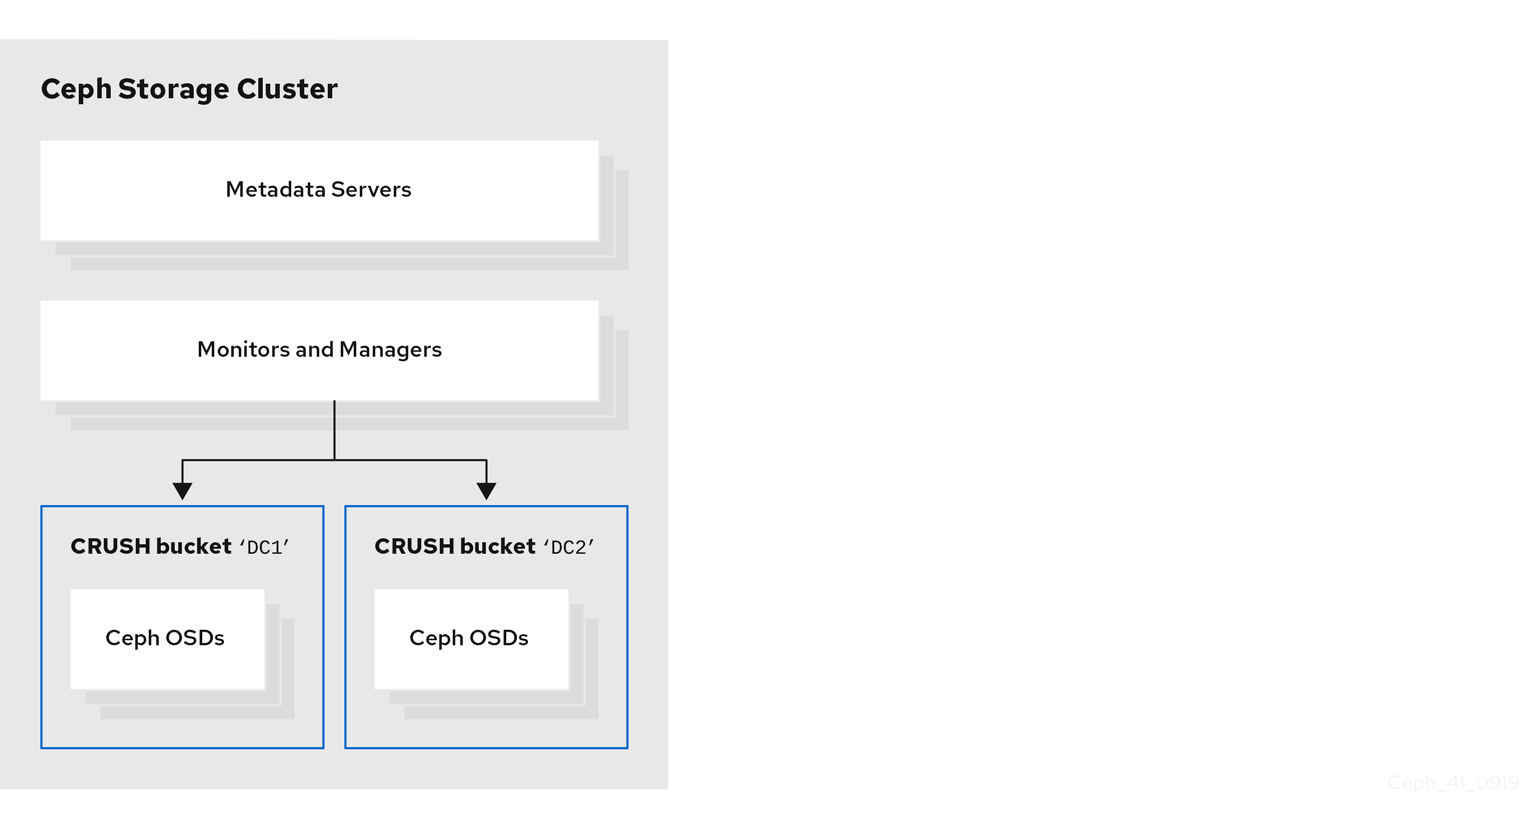
The following figure shows the Red Hat Ceph Storage cluster created by the preceding example procedure. The storage cluster has OSDs organized into CRUSH buckets corresponding to data centers.
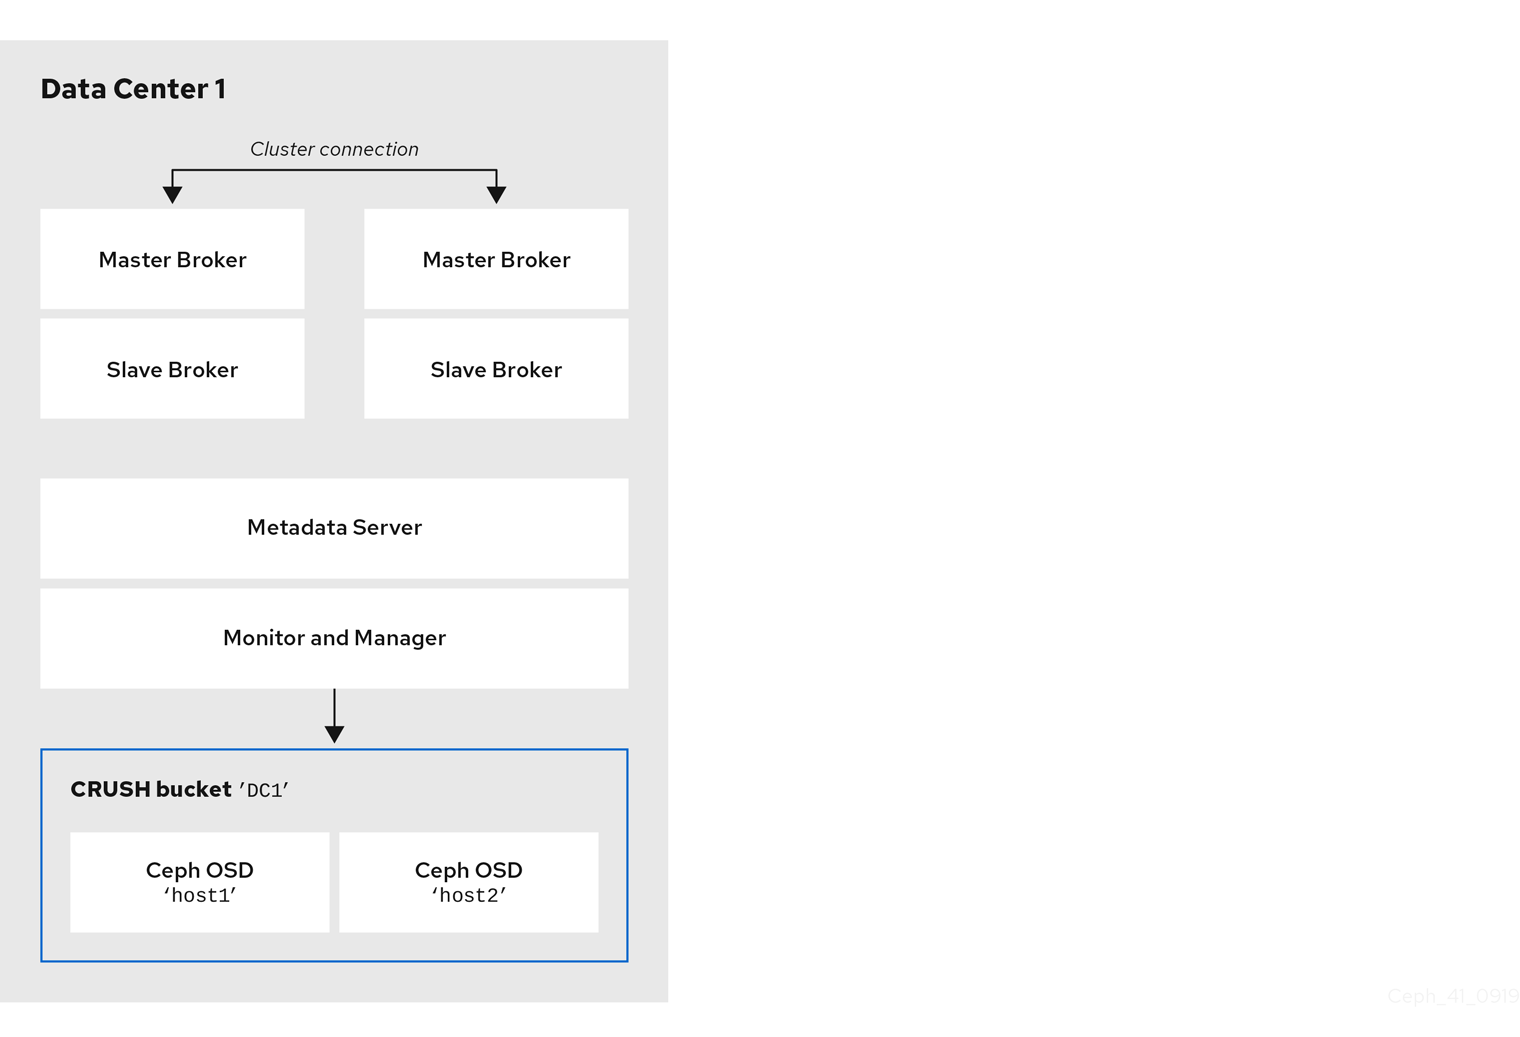
The following figure shows a possible layout of the first data center, including your broker servers. Specifically, the data center hosts:
- The servers for two live-backup broker pairs
- The OSD nodes that you assigned to the first data center in the preceding procedure
- Single Metadata Server, Monitor and Manager nodes. The Monitor and Manager nodes are usually co-located on the same machine.
You can run the OSD, MON, MGR, and MDS nodes on either the same or separate physical or virtual machines. However, to ensure fault tolerance within your Red Hat Ceph Storage cluster, it is good practice to distribute each of these types of nodes across distinct data centers. In particular, you must ensure that in the event of a single data center outage, you storage cluster still has a minimum of two available MON nodes. Therefore, if you have three MON nodes in you cluster, each of these nodes must run on separate host machines in separate data centers.
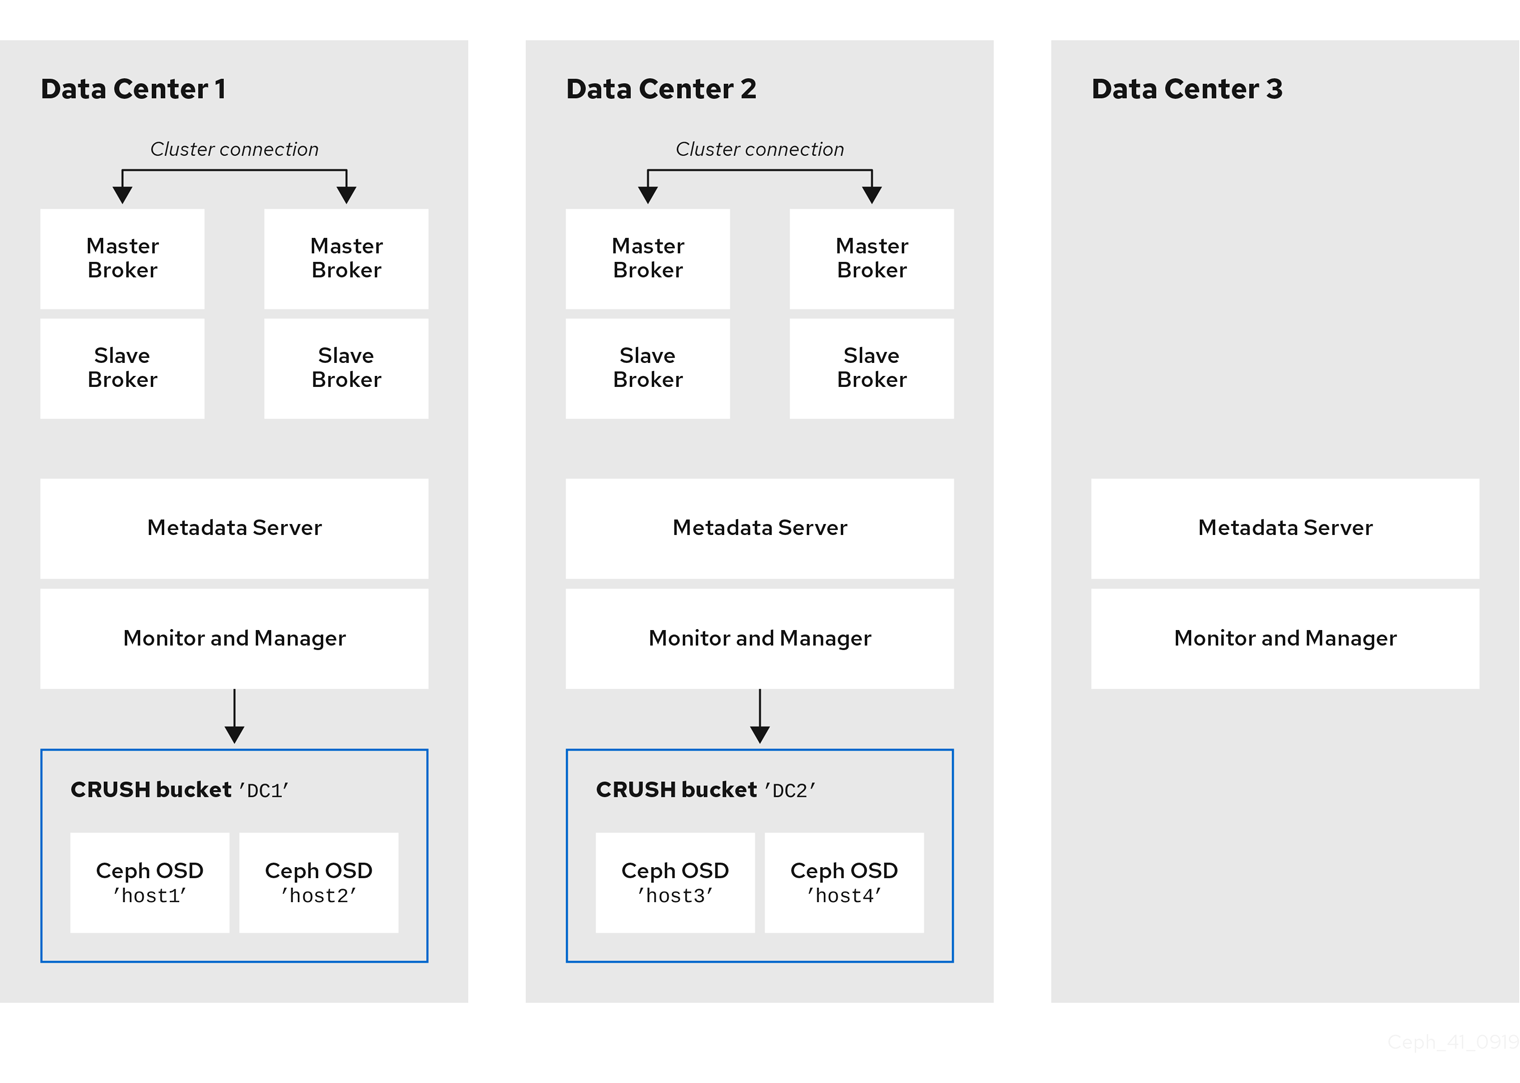
The following figure shows a complete example topology. To ensure fault tolerance in your storage cluster, the MON, MGR, and MDS nodes are distributed across three separate data centers.
Locating the host machines for certain OSD nodes in the same data center as your broker servers does not mean that you store messaging data on those specific OSD nodes. You configure the brokers to store messaging data in a specified directory in the Ceph File System. The Metadata Server nodes in your cluster then determine how to distribute the stored data across all available OSDs in your data centers and handle replication of this data across data centers. the sections that follow show how to configure brokers to store messaging data on the Ceph File System.
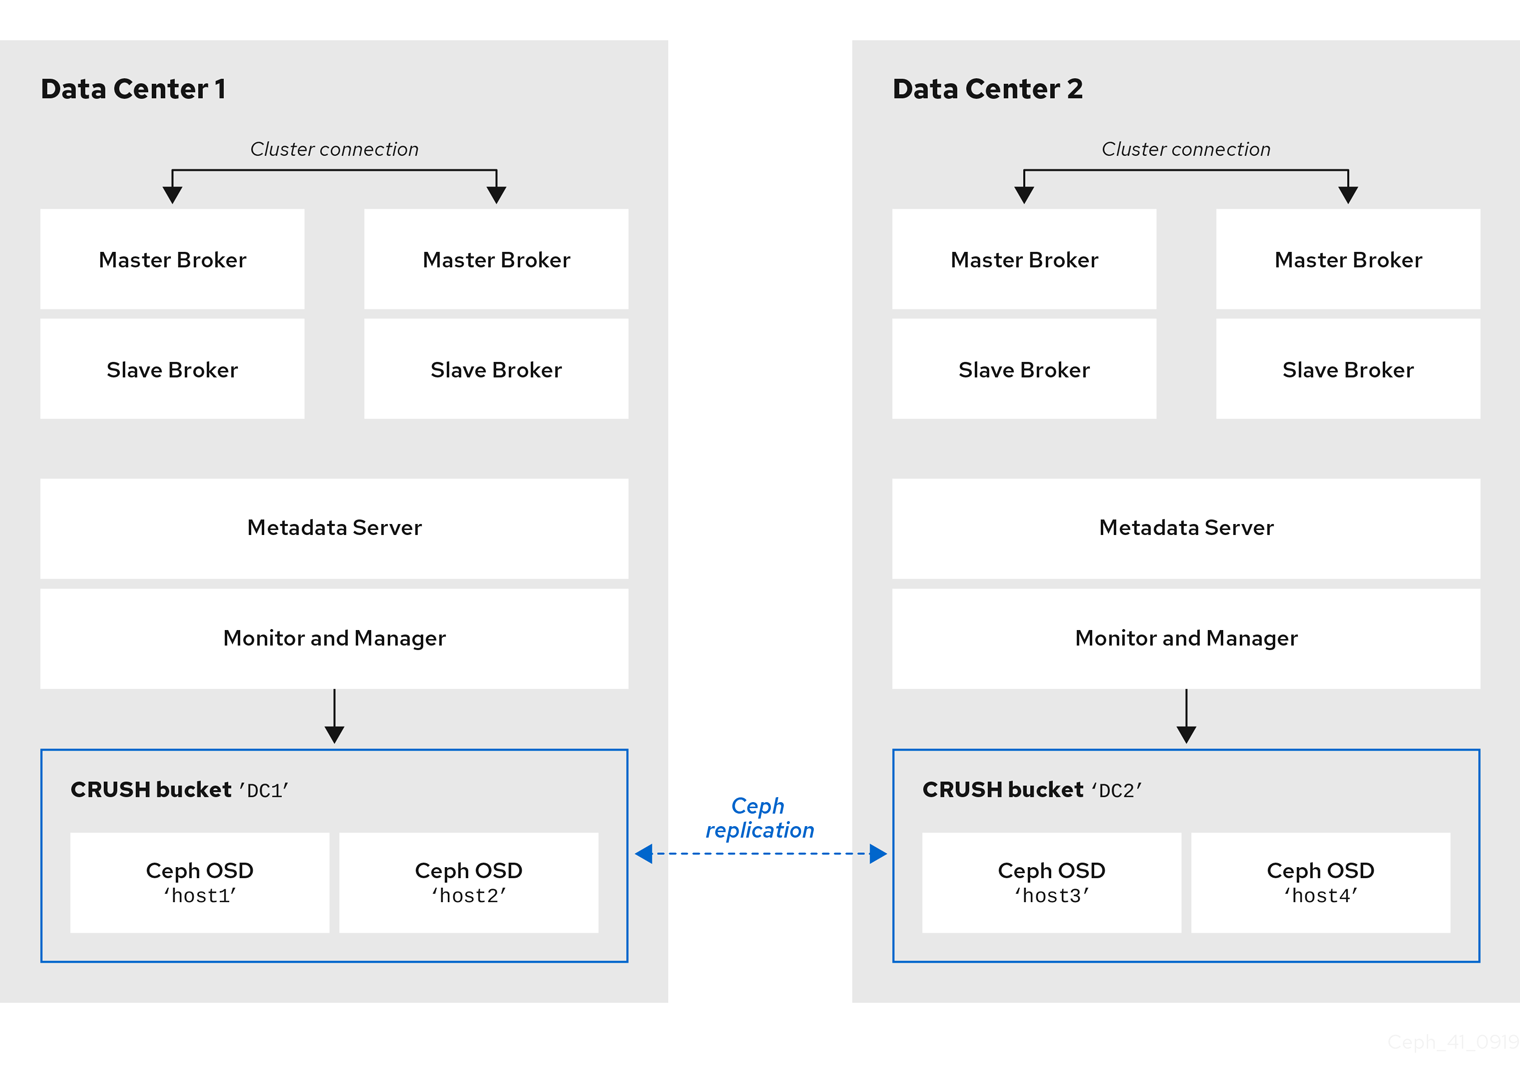
The figure below illustrates replication of data between the two data centers that have broker servers.
Additional resources
For more information about:
- Administrating CRUSH for your Red Hat Ceph Storage cluster, see CRUSH Administration.
- The full set of attributes that you can set on a storage pool, see Pool Values.
17.4. Mounting the Ceph File System on your broker servers
Before you can configure brokers in your messaging system to store messaging data in your Red Hat Ceph Storage cluster, you first need to mount a Ceph File System (CephFS).
The procedure linked-to from this section shows you how to mount the CephFS on your broker servers.
Prerequisites
You have:
- Installed and configured a Red Hat Ceph Storage cluster. For more information, see Installing Red Hat Ceph Storage and Configuring a Red Hat Ceph Storage cluster.
-
Installed and configured three or more Ceph Metadata Server daemons (
ceph-mds). For more information, see Installing Metadata Servers and Configuring Metadata Server Daemons. - Created the Ceph File System from a Monitor node. For more information, see Creating the Ceph File System.
- Created a Ceph File System client user with a key that your broker servers can use for authorized access. For more information, see Creating Ceph File System Client Users.
Procedure
For instructions on mounting the Ceph File System on your broker servers, see Mounting the Ceph File System as a kernel client.
17.5. Configuring brokers in a multi-site, fault-tolerant messaging system
To configure your brokers as part of a multi-site, fault-tolerant messaging system, you need to:
- Add idle backup brokers to take over from live brokers in the event of a data center failure
- Configure all broker servers with the Ceph client role
- Configure each broker to use the shared store high-availability (HA) policy, specifying where in the Ceph File System the broker stores its messaging data
17.5.1. Adding backup brokers
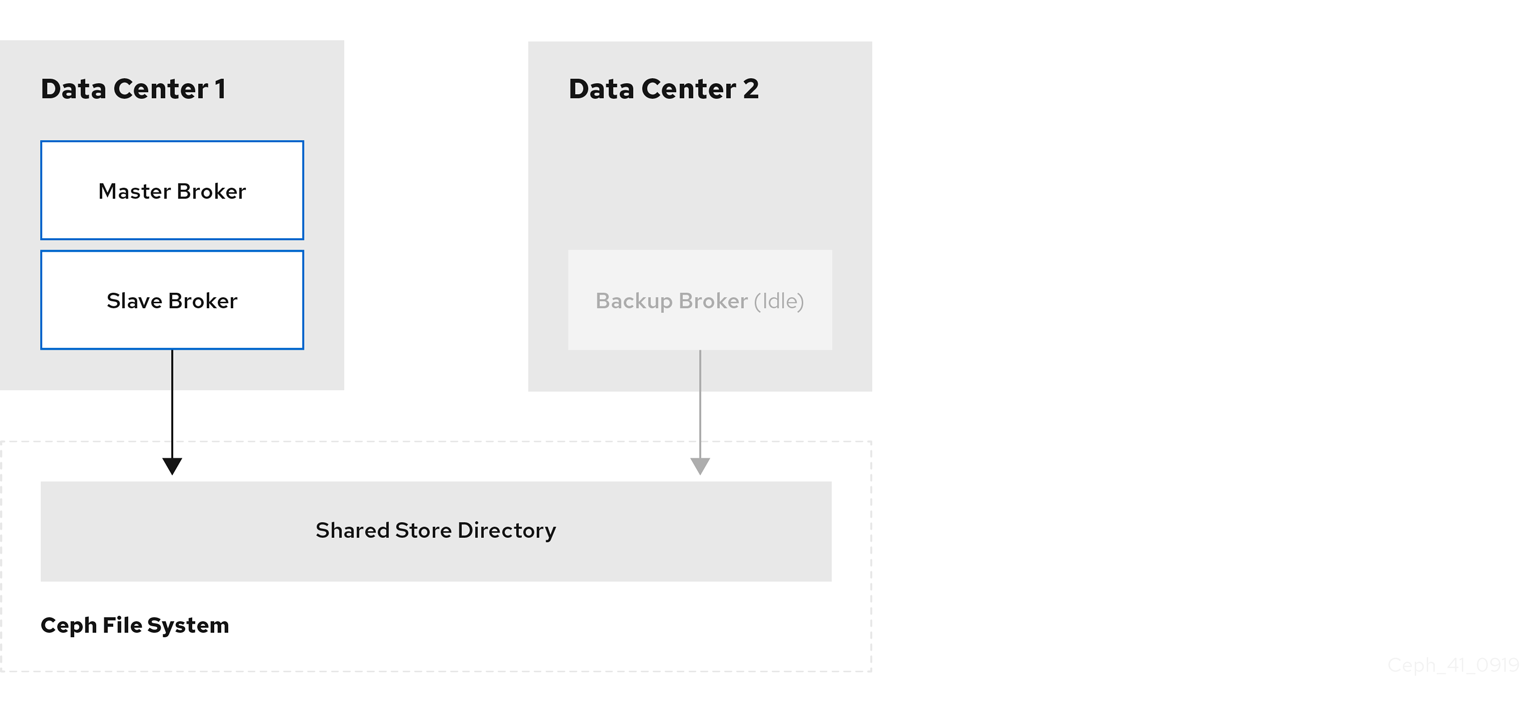
Within each of your data centers, you need to add idle backup brokers that can take over from live master-slave broker groups that shut down in the event of a data center outage. You should replicate the configuration of live master brokers in your idle backup brokers. You also need to configure your backup brokers to accept client connections in the same way as your existing brokers.
In a later procedure, you see how to configure an idle backup broker to join an existing master-slave broker group. You must locate the idle backup broker in a separate data center to that of the live master-slave broker group. It is also recommended that you manually start the idle backup broker only in the event of a data center failure.
The following figure shows an example topology.
Additional resources
- To learn how to create additional broker instances, see Creating a standalone broker.
- For information about configuring broker network connections, see Network Connections: Acceptors and Connectors.
17.5.2. Configuring brokers as Ceph clients
When you have added the backup brokers that you need for a fault-tolerant system, you must configure all of the broker servers with the Ceph client role. The client role enable brokers to store data in your Red Hat Ceph Storage cluster.
To learn how to configure Ceph clients, see Installing the Ceph Client Role.
17.6. Configuring clients in a multi-site, fault-tolerant messaging system
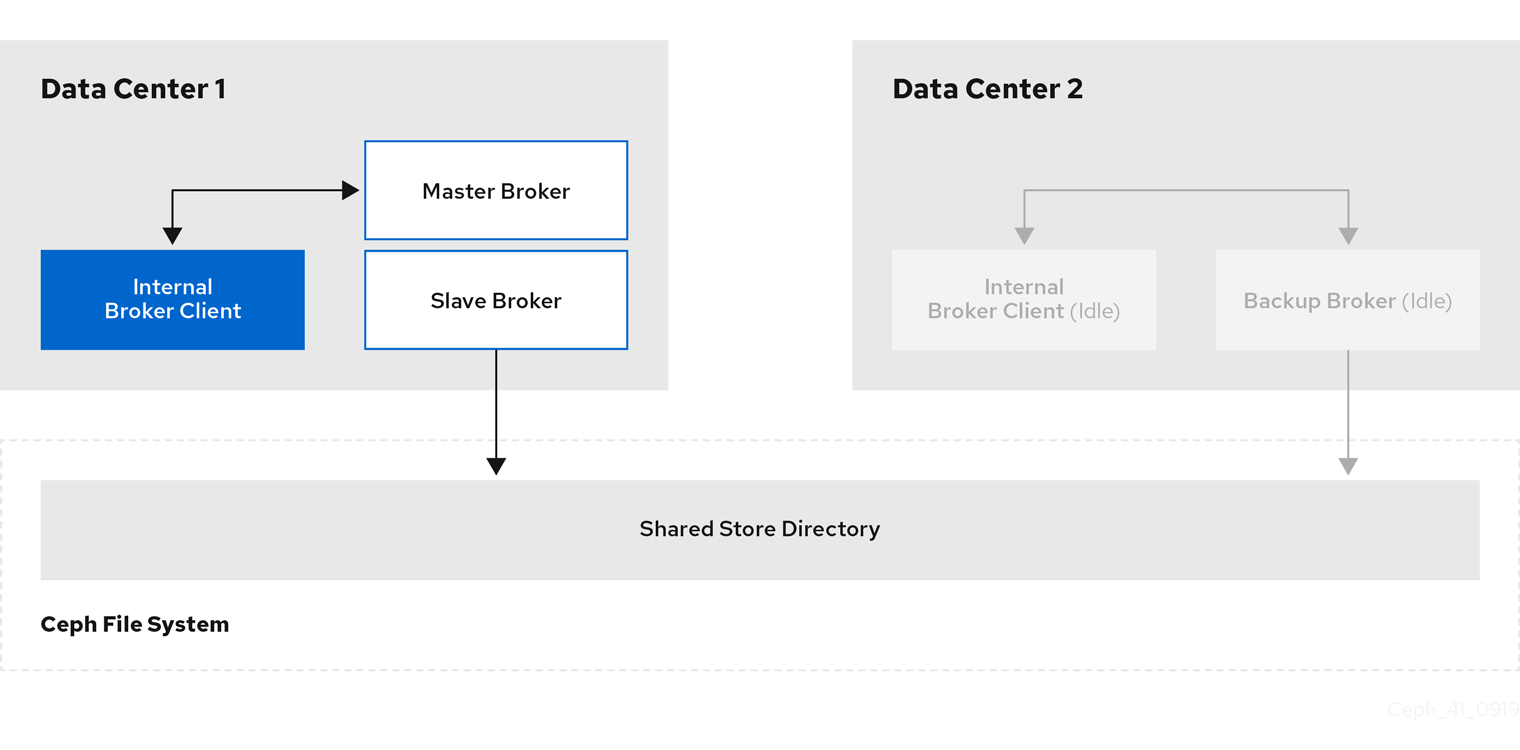
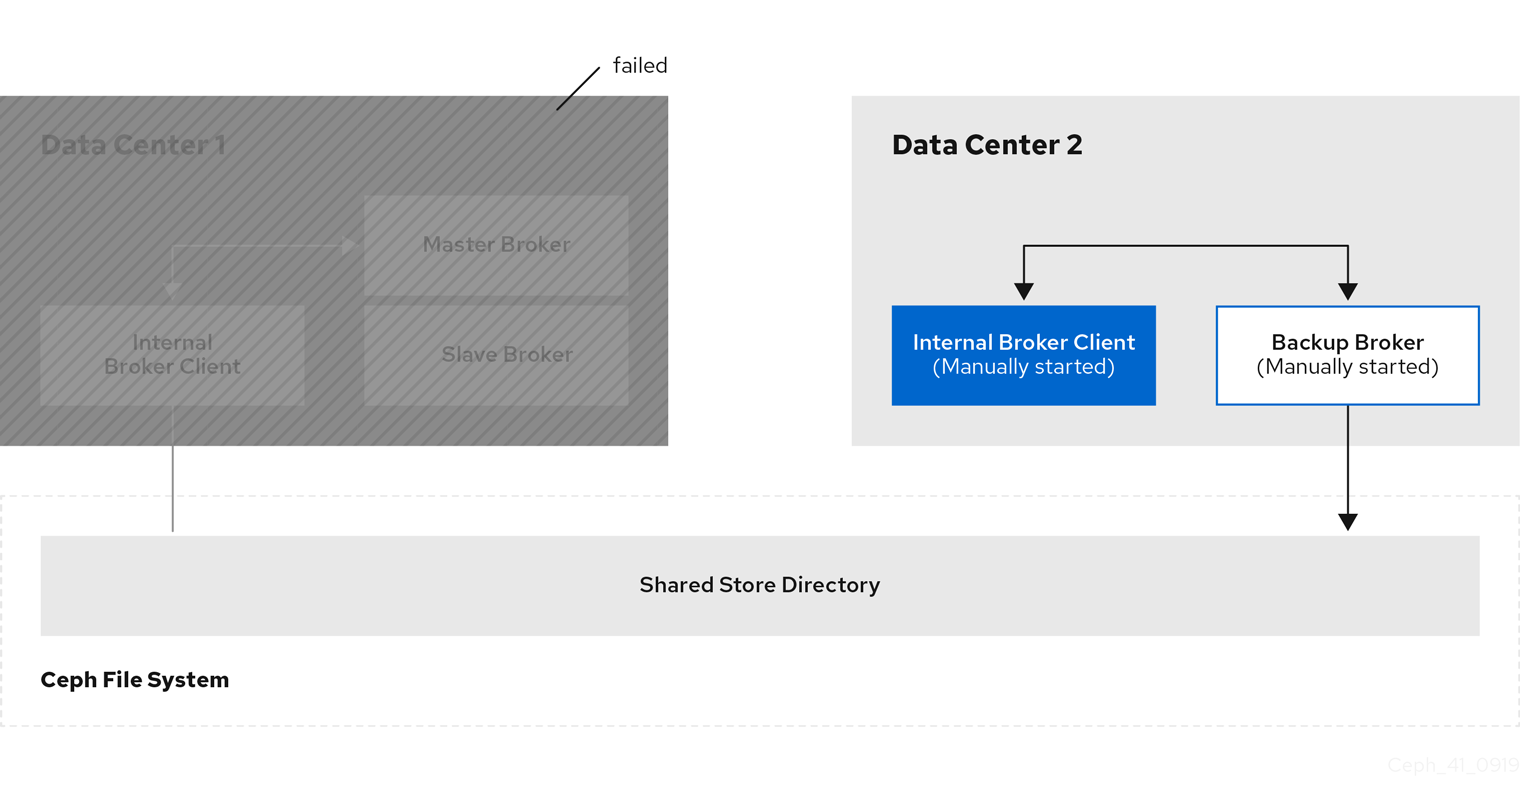
An internal client application is one that is running on a machine located in the same data center as the broker server. The following figure shows this topology.
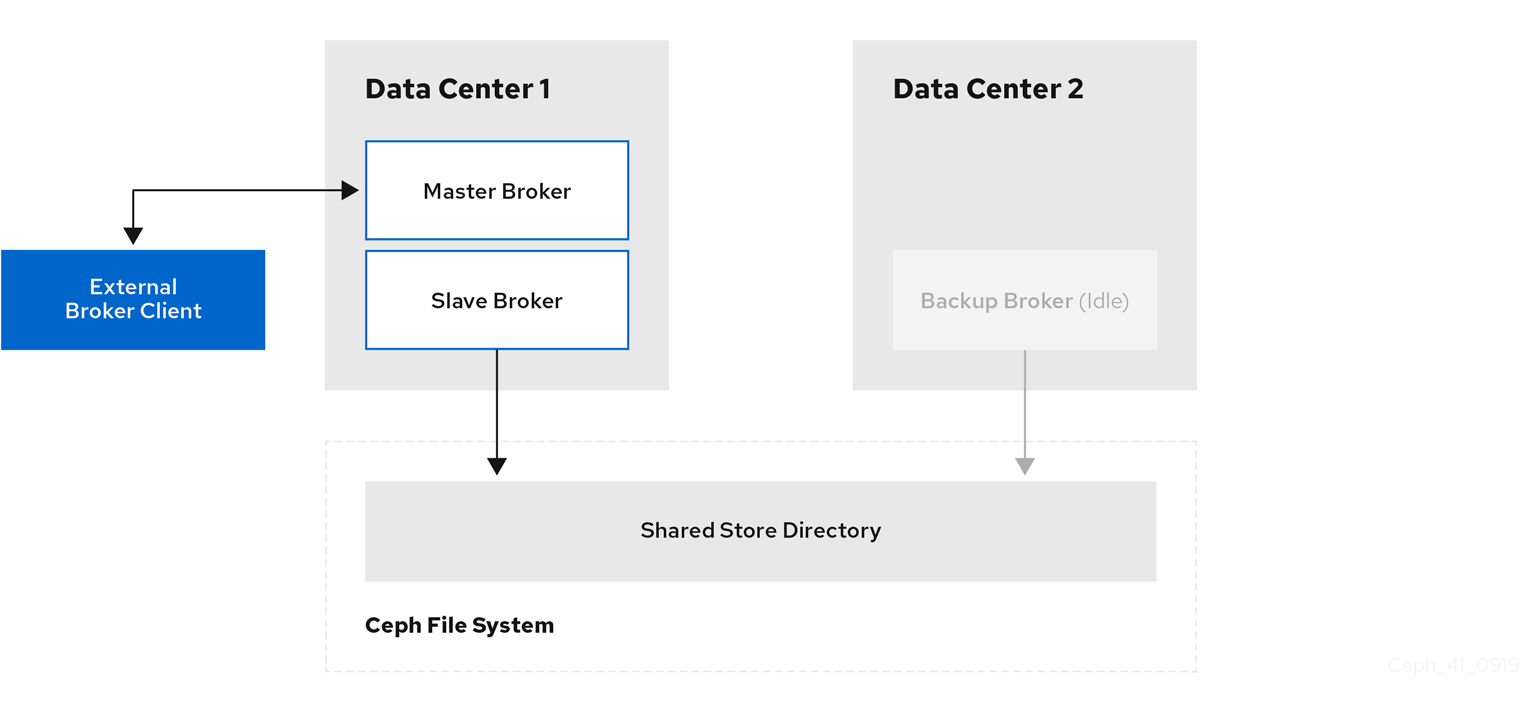
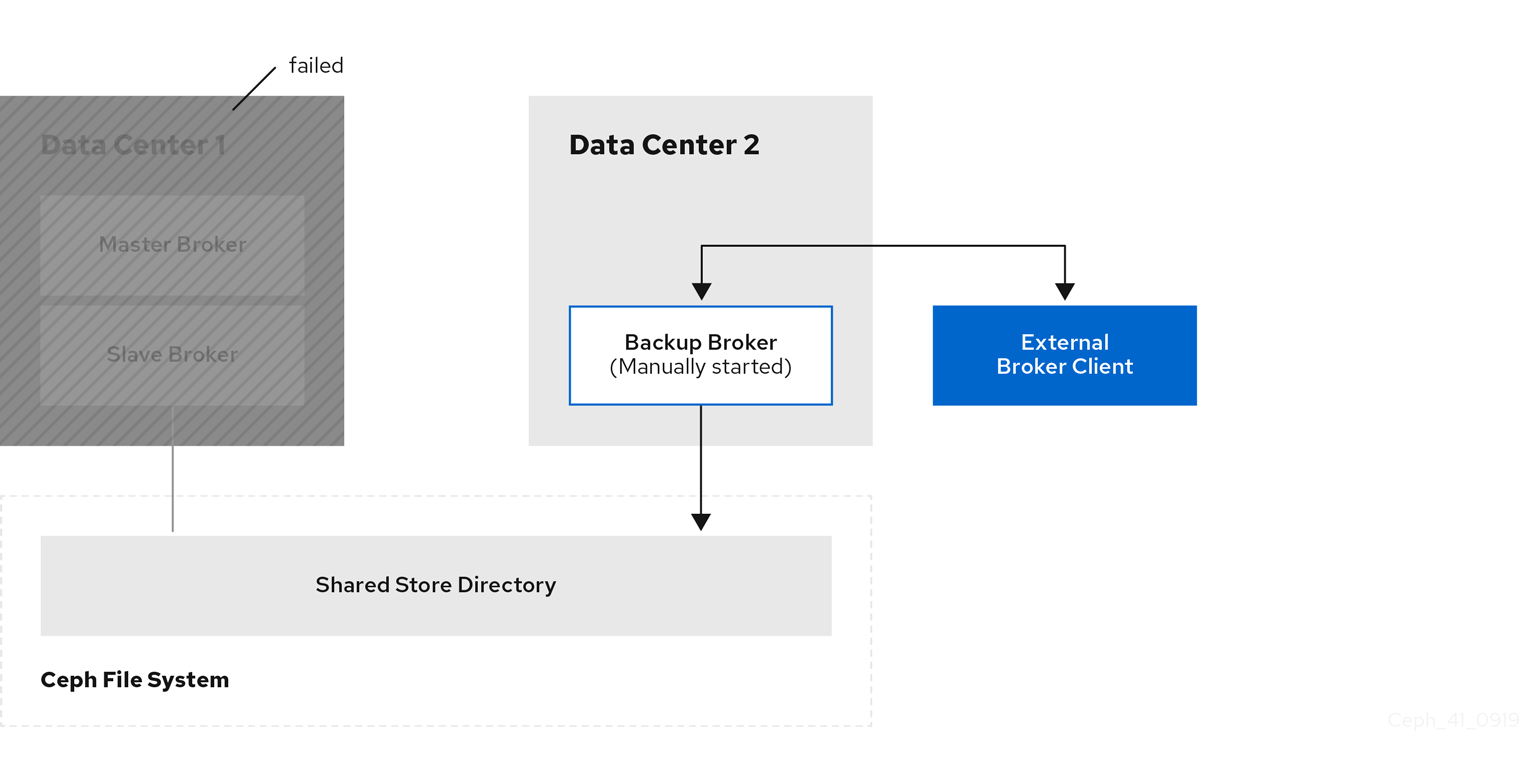
An external client application is one running on a machine located outside the broker data center. The following figure shows this topology.
The following sub-sections describe show examples of configuring your internal and external client applications to connect to a backup broker in another data center in the event of a data center outage.
17.6.1. Configuring internal clients
If you experience a data center outage, internal client applications will shut down along with your brokers. To mitigate this situation, you must have another instance of the client application available in a separate data center. In the event of a data center outage, you manually start your backup client to connect to a backup broker that you have also manually started.
To enable the backup client to connect to a backup broker, you need to configure the client connection similarly to that of the client in your primary data center.
Example
A basic connection configuration for an AMQ Core Protocol JMS client to a master-slave broker group is shown below. In this example, host1 and host2 are the host servers for the master and slave brokers.
<ConnectionFactory connectionFactory = new ActiveMQConnectionFactory(“(tcp://host1:port,tcp://host2:port)?ha=true&retryInterval=100&retryIntervalMultiplier=1.0&reconnectAttempts=-1”);
<ConnectionFactory connectionFactory = new ActiveMQConnectionFactory(“(tcp://host1:port,tcp://host2:port)?ha=true&retryInterval=100&retryIntervalMultiplier=1.0&reconnectAttempts=-1”);
To configure a backup client to connect to a backup broker in the event of a data center outage, use a similar connection configuration, but specify only the host name of your backup broker server. In this example, the backup broker server is host3.
<ConnectionFactory connectionFactory = new ActiveMQConnectionFactory(“(tcp://host3:port)?ha=true&retryInterval=100&retryIntervalMultiplier=1.0&reconnectAttempts=-1”);
<ConnectionFactory connectionFactory = new ActiveMQConnectionFactory(“(tcp://host3:port)?ha=true&retryInterval=100&retryIntervalMultiplier=1.0&reconnectAttempts=-1”);Additional resources
For more information about configuring broker and client network connections, see:
17.6.2. Configuring external clients
To enable an external broker client to continue producing or consuming messaging data in the event of a data center outage, you must configure the client to fail over to a broker in another data center. In the case of a multi-site, fault-tolerant system, you configure the client to fail over to the backup broker that you manually start in the event of an outage.
Examples
Shown below are examples of configuring the AMQ Core Protocol JMS and AMQP JMS clients to fail over to a backup broker in the event that the primary master-slave group is unavailable. In these examples, host1 and host2 are the host servers for the primary master and slave brokers, while host3 is the host server for the backup broker that you manually start in the event of a data center outage.
To configure an AMQ Core Protocol JMS client, include the backup broker on the ordered list of brokers that the client attempts to connect to.
<ConnectionFactory connectionFactory = new ActiveMQConnectionFactory(“(tcp://host1:port,tcp://host2:port,tcp://host3:port)?ha=true&retryInterval=100&retryIntervalMultiplier=1.0&reconnectAttempts=-1”);
<ConnectionFactory connectionFactory = new ActiveMQConnectionFactory(“(tcp://host1:port,tcp://host2:port,tcp://host3:port)?ha=true&retryInterval=100&retryIntervalMultiplier=1.0&reconnectAttempts=-1”);Copy to Clipboard Copied! Toggle word wrap Toggle overflow To configure an AMQP JMS client, include the backup broker in the failover URI that you configure on the client.
failover:(amqp://host1:port,amqp://host2:port,amqp://host3:port)?jms.clientID=foo&failover.maxReconnectAttempts=20
failover:(amqp://host1:port,amqp://host2:port,amqp://host3:port)?jms.clientID=foo&failover.maxReconnectAttempts=20Copy to Clipboard Copied! Toggle word wrap Toggle overflow
Additional resources
For more information about configuring failover on:
- The AMQ Core Protocol JMS client, see Reconnect and failover.
- The AMQP JMS client, see Failover options.
- Other supported clients, consult the client-specific documentation in the AMQ Clients section of Product Documentation for Red Hat AMQ 7.8.
17.7. Verifying storage cluster health during a data center outage
When you have configured your Red Hat Ceph Storage cluster for fault tolerance, the cluster continues to run in a degraded state without losing data, even when one of your data centers fails.
This procedure shows how to verify the status of your cluster while it runs in a degraded state.
Procedure
To verify the status of your Ceph storage cluster, use the
healthorstatuscommands:ceph health ceph status
# ceph health
# ceph status
Copy to Clipboard Copied! Toggle word wrap Toggle overflow To watch the ongoing events of the cluster on the command line, open a new terminal. Then, enter:
ceph -w
# ceph -wCopy to Clipboard Copied! Toggle word wrap Toggle overflow
When you run any of the preceding commands, you see output indicating that the storage cluster is still running, but in a degraded state. Specifically, you should see a warning that resembles the following:
health: HEALTH_WARN
        2 osds down
        Degraded data redundancy: 42/84 objects degraded (50.0%), 16 pgs unclean, 16 pgs degraded
health: HEALTH_WARN
        2 osds down
Degraded data redundancy: 42/84 objects degraded (50.0%), 16 pgs unclean, 16 pgs degradedAdditional resources
- For more information about monitoring the health of your Red Hat Ceph Storage cluster, see Monitoring.
17.8. Maintaining messaging continuity during a data center outage
The following procedure shows you how to keep brokers and associated messaging data available to clients during a data center outage. Specifically, when a data center fails, you need to:
- Manually start any idle backup brokers that you created to take over from brokers in your failed data center.
- Connect internal or external clients to the new active brokers.
Prerequisites
You must have:
- Installed and configured a Red Hat Ceph Storage cluster. For more information, see Installing Red Hat Ceph Storage and Configuring a Red Hat Ceph Storage cluster.
- Mounted the Ceph File System. For more information, see Mounting the Ceph File System on your broker servers.
- Added idle backup brokers to take over from live brokers in the event of a data center failure. For more information, see Adding backup brokers.
- Configured your broker servers with the Ceph client role. For more information, see Configuring brokers as Ceph clients.
- Configured each broker to use the shared store high availability (HA) policy, specifying where in the Ceph File System each broker stores its messaging data . For more information, see Configuring shared store high availability.
- Configured your clients to connect to backup brokers in the event of a data center outage. For more information, see Configuring clients in a multi-site, fault-tolerant messaging system.
Procedure
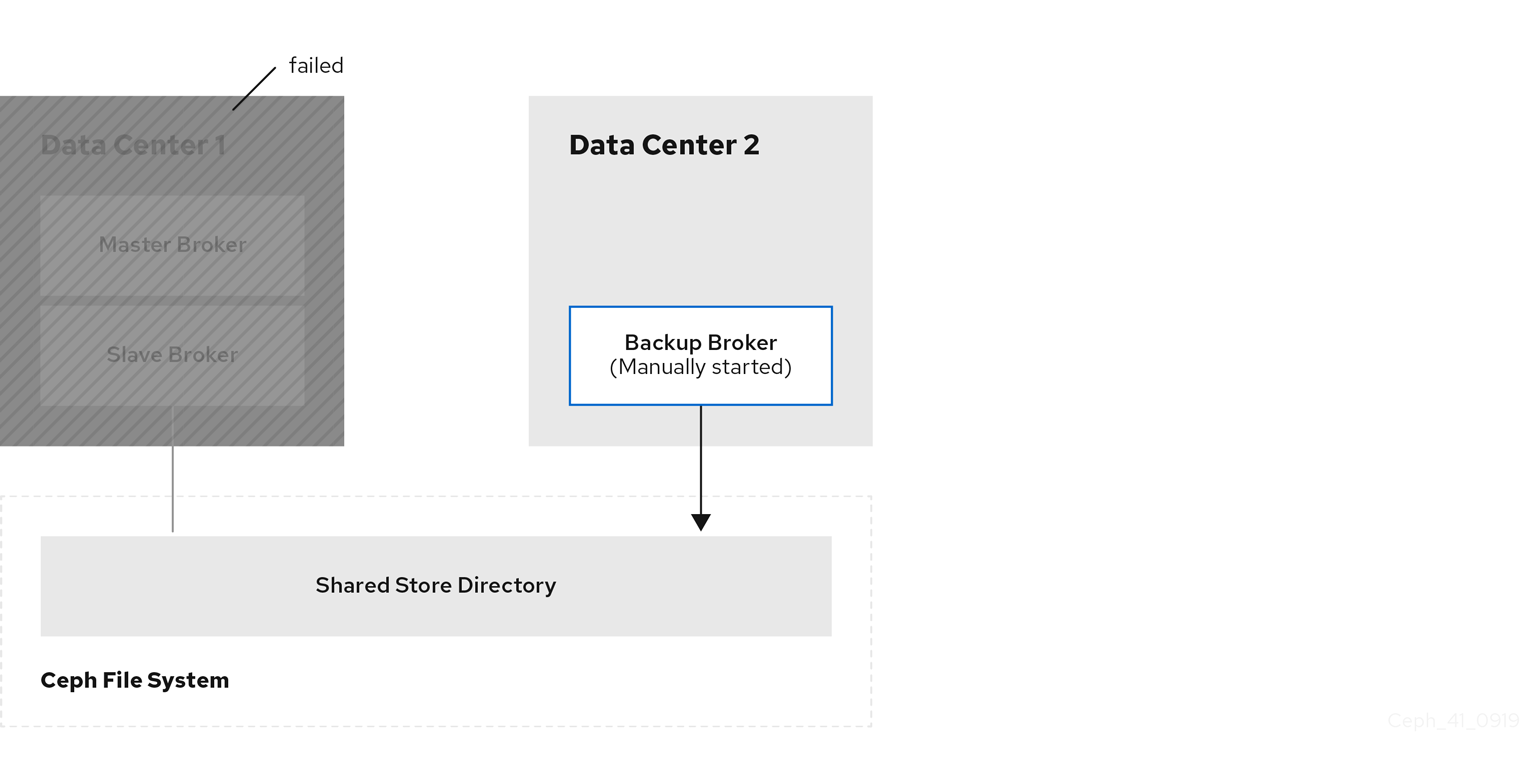
For each master-slave broker pair in the failed data center, manually start the idle backup broker that you added.
Reestablish client connections.
If you were using an internal client in the failed data center, manually start the backup client that you created. As described in Configuring clients in a multi-site, fault-tolerant messaging system, you must configure the client to connect to the backup broker that you manually started.
The following figure shows the new topology.
If you have an external client, manually connect the external client to the new active broker or observe that the clients automatically fails over to the new active broker, based on its configuration. For more information, see Configuring external clients.
The following figure shows the new topology.
17.9. Restarting a previously failed data center
When a previously failed data center is back online, follow these steps to restore the original state of your messaging system:
- Restart the servers that host the nodes of your Red Hat Ceph Storage cluster
- Restart the brokers in your messaging system
- Re-establish connections from your client applications to your restored brokers
The following sub-sections show to perform these steps.
17.9.1. Restarting storage cluster servers
When you restart Monitor, Metadata Server, Manager, and Object Storage Device (OSD) nodes in a previously failed data center, your Red Hat Ceph Storage cluster self-heals to restore full data redundancy. During this process, Red Hat Ceph Storage automatically backfills data to the restored OSD nodes, as needed.
To verify that your storage cluster is automatically self-healing and restoring full data redundancy, use the commands previously shown in Verifying storage cluster health during a data center outage. When you re-execute these commands, you see that the percentage degradation indicated by the previous HEALTH_WARN message starts to improve until it returns to 100%.
17.9.2. Restarting broker servers
The following procedure shows how to restart your broker servers when your storage cluster is no longer operating in a degraded state.
Procedure
- Stop any client applications connected to backup brokers that you manually started when the data center outage occurred.
Stop the backup brokers that you manually started.
On Linux:
BROKER_INSTANCE_DIR/bin/artemis stop
BROKER_INSTANCE_DIR/bin/artemis stopCopy to Clipboard Copied! Toggle word wrap Toggle overflow On Windows:
BROKER_INSTANCE_DIR\bin\artemis-service.exe stop
BROKER_INSTANCE_DIR\bin\artemis-service.exe stopCopy to Clipboard Copied! Toggle word wrap Toggle overflow
In your previously failed data center, restart the original master and slave brokers.
On Linux:
BROKER_INSTANCE_DIR/bin/artemis run
BROKER_INSTANCE_DIR/bin/artemis runCopy to Clipboard Copied! Toggle word wrap Toggle overflow On Windows:
BROKER_INSTANCE_DIR\bin\artemis-service.exe start
BROKER_INSTANCE_DIR\bin\artemis-service.exe startCopy to Clipboard Copied! Toggle word wrap Toggle overflow
The original master broker automatically resumes its role as master when you restart it.
17.9.3. Reestablishing client connections
When you have restarted your broker servers, reconnect your client applications to those brokers. The following subsections describe how to reconnect both internal and external client applications.
17.9.3.1. Reconnecting internal clients
Internal clients are those running in the same, previously failed data center as the restored brokers. To reconnect internal clients, restart them. Each client application reconnects to the restored master broker that is specified in its connection configuration.
For more information about configuring broker and client network connections, see:
17.9.3.2. Reconnecting external clients
External clients are those running outside the data center that previously failed. Based on your client type, and the information in Configuring external broker clients, you either configured the client to automatically fail over to a backup broker, or you manually established this connection. When you restore your previously failed data center, you reestablish a connection from your client to the restored master broker in a similar way, as described below.
- If you configured your external client to automatically fail over to a backup broker, the client automatically fails back to the original master broker when you shut down the backup broker and restart the original master broker.
- If you manually connected the external client to a backup broker when a data center outage occurred, you must manually reconnect the client to the original master broker that you restart.
