Chapter 6. Rulebook activations
A rulebook activation is a process running in the background defined by a decision environment executing a specific rulebook.
6.1. Setting up a rulebook activation
Prerequisites
- You are logged in to the Event-Driven Ansible controller Dashboard as a Content Consumer.
- You have set up a project.
- You have set up a decision environment.
- You have set up an automation controller token.
Procedure
- Navigate to the Event-Driven Ansible controller Dashboard.
- From the navigation panel, select .
Insert the following:
- Name
- Insert the name.
- Description
- This field is optional.
- Project
- Projects are a logical collection of rulebooks.
- Rulebook
- Rulebooks are shown according to the project selected.
- Decision environment
Decision environments are a container image to run Ansible rulebooks.
NoteIn Event-Driven Ansible controller, you cannot customize the pull policy of the decision environment. By default, it follows the behavior of the always policy. Every time an activation is started, the system tries to pull the most recent version of the image.
- Restart policy
This is a policy to decide when to restart a rulebook.
Policies:
- Always: Restarts when a rulebook finishes
- Never: Never restarts a rulebook when it finishes
- On failure: Only restarts when it fails
- Rulebook activation enabled?
- This automatically enables the rulebook activation to run.
- Variables
-
The variables for the rulebook are in a JSON/YAML format. The content would be equivalent to the file passed through the
--varsflag of ansible-rulebook command.
- Click .
Your rulebook activation is now created and can be managed in the Rulebook Activations screen.
After saving the new rulebook activation, the rulebook activation’s details page is displayed. From there or the Rulebook Activations list view you can edit or delete it.
6.2. Rulebook activation list view
On the Rulebook Activations page, you can view the rulebook activations that you have created along with the Activation status, Number of rules associated with the rulebook, the Fire count, and Restart count.
If the Activation Status is Running, it means that the rulebook activation is running in the background and executing the required actions according to the rules declared in the rulebook.
You can view more details by selecting the activation from the Rulebook Activations list view.
![Rulebook activation][width=25px](https://access.redhat.com/webassets/avalon/d/Red_Hat_Ansible_Automation_Platform-2.4-Event-Driven_Ansible_controller_user_guide-en-US/images/2b2fdf25e67d6f64b92e05f42a6918c4/eda-rulebook-activations-list-view.png)
For all activations that have run, you can view the Details and History tabs to get more information about what happened.
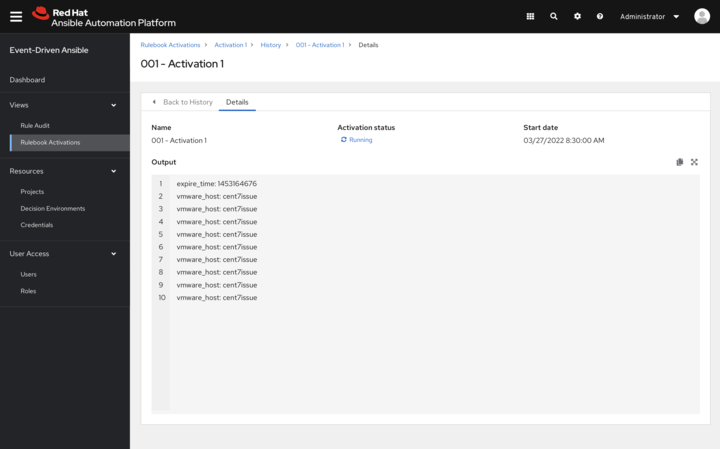
6.2.1. Viewing activation output
You can view the output of the activations in the History tab.
Procedure
- Select the tab to access the list of all the activation instances. An activation instance represents a single execution of the activation.
- Then select the activation instance in question, this will show you the Output produced by that specific execution.
To view events that came in and triggered an action, you can use the Rule Audit section in the Event-Driven Ansible controller Dashboard.
6.3. Enabling and disabling rulebook activations
- Select the switch on the row level to enable or disable your chosen rulebook.
- In the popup window, select .
- Select .
6.4. Restarting rulebook activations
You can only restart a rulebook activation if it is currently enabled and the restart policy was set to Always when it was created.
- Select the icon ⋮ next to Rulebook Activation enabled/disabled toggle.
- Select .
- In the popup window, select .
- Select .
6.5. Deleting rulebook activations
- Select the icon ⋮ next to the Rulebook Activation enabled/disabled toggle.
- Select .
- In the popup window, select .
- Select .
6.6. Activating webhook rulebooks
In Openshift environments, you can allow webhooks to reach an activation-job-pod over a given port by creating a Route that exposes that rulebook activation’s Kubernetes service.
Prerequisites
- You have created a rulebook activation in the Event-Driven Ansible controller Dashboard.
The following is an example of rulebook with a given webhook:
- name: Listen for storage-monitor events
  hosts: all
  sources:
    - ansible.eda.webhook:
        host: 0.0.0.0
        port: 5000
  rules:
    - name: Rule - Print event information
    condition: event.meta.headers is defined
    action:
      run_job_template:
        name: StorageRemediation
        organization: Default
        job_args:
          extra_vars:
             message: from eda
             sleep: 1
Procedure
Create a Route (on OpenShift Container Platform) to expose the service. The following is an example Route for an ansible-rulebook source that expects POST’s on port 5000 on the decision environment pod:
kind: Route
apiVersion: route.openshift.io/v1
metadata:
  name: test-sync-bug
  namespace: dynatrace
  labels:
    app: eda
    job-name: activation-job-1-5000
spec:
  host: test-sync-bug-dynatrace.apps.aap-dt.ocp4.testing.ansible.com
  to:
    kind: Service
    name: activation-job-1-5000
    weight: 100
  port:
    targetPort: 5000
  tls:
    termination: edge
    insecureEdgeTerminationPolicy: Redirect
  wildcardPolicy: None
When you create the Route, test it with a Post to the Route URL:
curl -H "Content-Type: application/json" -X POST test-sync-bug-dynatrace.apps.aap-dt.ocp4.testing.ansible.com -d '{}'NoteYou do not need the port as it is specified on the Route (targetPort).
6.7. Testing with Kubernetes
With Kubernetes you can create an Ingress, or expose the port, but not for production.
Procedure
Run the following command to expose the port on the cluster for a given service:
kubectl port-forward svc/<ACTIVATION_SVC_NAME> 5000:5000
Make the HTTP requests against the
localhost:5000to trigger the rulebook:curl -H "Content-Type: application/json" -X POST test-sync-bug-dynatrace.apps.aap-dt.ocp4.testing.ansible.com -d '{}'