Chapter 1. Introduction
An Ansible Playbook is a blueprint for automation tasks, which are actions executed with limited manual effort across an inventory of solutions. Playbooks tell Ansible what to do on which devices. Instead of manually applying the same action to hundreds or thousands of similar technologies across IT environments, executing a playbook automatically completes the same action for the specified type of inventory—such as a set of routers.
Playbooks are regularly used to automate IT infrastructure—such as operating systems and Kubernetes platforms—networks, security systems, and code repositories like GitHub. You can use playbooks to program applications, services, server nodes, and other devices, without the manual overhead of creating everything from scratch. Playbooks, and the conditions, variables, and tasks within them, can be saved, shared, or reused indefinitely. This makes it easier for you to codify operational knowledge and ensure that the same actions are performed consistently.
1.1. How do Ansible Playbooks work?
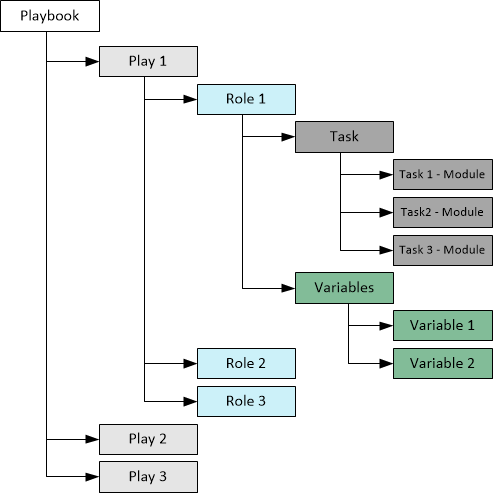
Ansible Playbooks are lists of tasks that automatically execute for your specified inventory or groups of hosts. One or more Ansible tasks can be combined to make a play, that is, an ordered grouping of tasks mapped to specific hosts.
Tasks are executed in the order in which they are written.
A playbook can include one or more plays.
A playbook is composed of one or more plays in an ordered list.
The terms playbook and play are sports analogies.
Each play executes part of the overall goal of the playbook, running one or more tasks.
Each task calls an Ansible module.
- Playbook
- A list of plays that define the order in which Ansible performs operations, from top to bottom, to achieve an overall goal.
- Play
- An ordered list of tasks that maps to managed nodes in an inventory.
- Task
- A reference to a single module that defines the operations that Ansible performs.
- Roles
- Roles are a way to make code in playbooks reusable by putting the functionality into "libraries" that can then be used in any playbook as needed.
- Module
- A unit of code or binary that Ansible runs on managed nodes.
Ansible modules are grouped in collections with a Fully Qualified Collection Name (FQCN) for each module. Tasks are executed by modules, each of which performs a specific task in a playbook. A module contains metadata that determines when and where a task is executed, as well as which user executes it. There are thousands of Ansible modules that perform all kinds of IT tasks, such as:
- Cloud management
- User management
- Networking
- Security
- Configuration management
- Communication
1.2. How do I use Ansible Playbooks?
Ansible uses the YAML syntax. YAML is a human-readable language that enables you to create playbooks without having to learn a complicated coding language.
For more information on YAML, see YAML Syntax and consider installing an add-on for your text editor, see Other Tools and Programs to help you write clean YAML syntax in your playbooks.
There are two ways of using Ansible Playbooks:
- From the command line interface (CLI)
- Using Red Hat Ansible Automation Platform’s push-button deployments.
1.2.1. From the CLI
After installing the open source Ansible project or Red Hat Ansible Automation Platform by using
$ sudo dnf install ansible
in the Red Hat Enterprise Linux CLI, you can use the ansible-playbook command to run Ansible Playbooks.
1.2.2. From within the platform
The Red Hat Ansible Automation Platform user interface offers push-button Ansible Playbook deployments that can be used as part of larger jobs or job templates. These deployments come with additional safeguards that are particularly helpful to users who are newer to IT automation, or those without as much experience working in the CLI.
1.3. Starting automation with Ansible
Get started with Ansible by creating an automation project, building an inventory, and creating a Hello World playbook.
Prerequisites
- The Ansible package must be installed.
Procedure
- Create a project folder on your filesystem.
mkdir ansible_quickstart
cd ansible_quickstart
Using a single directory structure makes it easier to add to source control, and reuse and share automation content.
1.4. Building an inventory
Inventories organize managed nodes in centralized files that provide Ansible with system information and network locations. Using an inventory file, Ansible can manage a large number of hosts with a single command. To complete the following steps, you need the IP address or fully qualified domain name (FQDN) of at least one host system. For demonstration purposes, the host could be running locally in a container or a virtual machine.
You must also ensure that your public SSH key is added to the authorized_keys file on each host. Use the following procedure to build an inventory.
Procedure
Create a file named inventory.ini in the ansible_quickstart directory that you created. Add a new [myhosts] group to the inventory.ini file and specify the IP address or fully qualified domain name (FQDN) of each host system.
[myhosts]
192.0.2.50
192.0.2.51
192.0.2.52
Verify your inventory, using:
ansible-inventory -i inventory.ini --list
Ping the myhosts group in your inventory, using:
ansible myhosts -m ping -i inventory.ini
Pass the -u option with the Ansible command if the username is different on the control node and the managed node(s).
192.0.2.50 | SUCCESS => {
    "ansible_facts": {
        "discovered_interpreter_python": "/usr/bin/python3"
    },
    "changed": false,
    "ping": "pong"
}
192.0.2.51 | SUCCESS => {
    "ansible_facts": {
        "discovered_interpreter_python": "/usr/bin/python3"
    },
    "changed": false,
    "ping": "pong"
}
192.0.2.52 | SUCCESS => {
    "ansible_facts": {
        "discovered_interpreter_python": "/usr/bin/python3"
    },
    "changed": false,
    "ping": "pong"
}
You have successfully built an inventory.
1.4.1. Inventories in INI or YAML format
You can create inventories in either INI files or in YAML. In most cases, such as the preceding example, INI files are straightforward and easy to read for a small number of managed nodes. Creating an inventory in YAML format becomes a sensible option as the number of managed nodes increases.
For example, the following is an equivalent of the inventory.ini that declares unique names for managed nodes and uses the ansible_host field:
myhosts:
  hosts:
    my_host_01:
      ansible_host: 192.0.2.50
    my_host_02:
      ansible_host: 192.0.2.51
    my_host_03:
      ansible_host: 192.0.2.52
1.4.2. Tips for building inventories
- Ensure that group names are meaningful and unique.
- Group names are also case sensitive.
- Do not use spaces, hyphens, or preceding numbers (use floor_19, not 19th_floor) in group names.
Group hosts in your inventory logically according to their What, Where, and When:
- What: Group hosts according to the topology, for example: db, web, leaf, spine.
- Where: Group hosts by geographic location, for example: datacenter, region, floor, building.
- When: Group hosts by stage, for example: development, test, staging, production.
1.4.3. Use metagroups
Create a metagroup that organizes multiple groups in your inventory with the following syntax:
metagroupname:
  children:
The following inventory illustrates a basic structure for a data center. This example inventory contains a network metagroup that includes all network devices and a datacenter metagroup that includes the network group and all webservers.
leafs:
  hosts:
    leaf01:
      ansible_host: 192.0.2.100
    leaf02:
      ansible_host: 192.0.2.110

spines:
  hosts:
    spine01:
      ansible_host: 192.0.2.120
    spine02:
      ansible_host: 192.0.2.130

network:
  children:
    leafs:
    spines:

webservers:
  hosts:
    webserver01:
      ansible_host: 192.0.2.140
    webserver02:
      ansible_host: 192.0.2.150

datacenter:
  children:
    network:
    webservers:
1.5. Create variables
Variables set values for managed nodes, such as the IP address, FQDN, operating system, and SSH user, so you do not need to pass them when running Ansible commands.
Variables can apply to specific hosts.
webservers:
  hosts:
    webserver01:
      ansible_host: 192.0.2.140
      http_port: 80
    webserver02:
      ansible_host: 192.0.2.150
      http_port: 443
Variables can also apply to all hosts in a group.
webservers:
  hosts:
    webserver01:
      ansible_host: 192.0.2.140
      http_port: 80
    webserver02:
      ansible_host: 192.0.2.150
      http_port: 443
  vars:
    ansible_user: my_server_user
For more information about inventories and Ansible inventory variables, see About the Installer Inventory file and Inventory file variables.
1.6. Creating your first playbook
Use the following procedure to create a playbook that pings your hosts and prints a “Hello world” message.
Procedure
Create a file named
playbook.yamlin youransible_quickstartdirectory, with the following content:- name: My first play hosts: myhosts tasks: - name: Ping my hosts ansible.builtin.ping: - name: Print message ansible.builtin.debug: msg: Hello worldRun your playbook, using the following command:
ansible-playbook -i inventory.ini playbook.yaml- Ansible returns the following output:
PLAY [My first play] ****************************************************************************

TASK [Gathering Facts] **************************************************************************
ok: [192.0.2.50]
ok: [192.0.2.51]
ok: [192.0.2.52]

TASK [Ping my hosts] ****************************************************************************
ok: [192.0.2.50]
ok: [192.0.2.51]
ok: [192.0.2.52]

TASK [Print message] ****************************************************************************
ok: [192.0.2.50] => {
    "msg": "Hello world"
}
ok: [192.0.2.51] => {
    "msg": "Hello world"
}
ok: [192.0.2.52] => {
    "msg": "Hello world"
}

PLAY RECAP **************************************************************************************
192.0.2.50: ok=3    changed=0    unreachable=0    failed=0    skipped=0    rescued=0    ignored=0
192.0.2.51: ok=3    changed=0    unreachable=0    failed=0    skipped=0    rescued=0    ignored=0
192.0.2.52: ok=3    changed=0    unreachable=0    failed=0    skipped=0    rescued=0    ignored=0
In this output you can see:
- The names that you give the play and each task. Always use descriptive names that make it easy to verify and troubleshoot playbooks.
- The Gather Facts task runs implicitly. By default Ansible gathers information about your inventory that it can use in the playbook.
-
The status of each task. Each task has a status of
okwhich means it ran successfully. -
The play recap that summarizes results of all tasks in the playbook per host. In this example, there are three tasks so
ok=3indicates that each task ran successfully.