Chapter 2. Configuring authentication in the Ansible Automation Platform
Using the authentication settings in Ansible Automation Platform, you can set up a simplified login through several authentication methods, such as LDAP and SAML. Depending on the authentication method you select, you will be required to enter different information to complete the configuration. Be sure to include all the information required for your configuration needs.
2.1. Prerequisites
- A running installation of Ansible Automation Platform 2.5
- A running instance of your authentication source
- Administrator rights to the Ansible Automation Platform
- Any connection information needed to connect Ansible Automation Platform 2.5 to your source (see individual authentication types for details).
2.2. Pluggable authentication
Authentication is the process of verifying a user’s identity to the Ansible Automation Platform (that is, to establish that a user is who they say they are). You can do this in several ways but would traditionally be associated with a username and password.
When you log out of Ansible Automation Platform, only your session with the platform ends. Your session with the external Single Sign-On (SSO) provider stays active. To switch to a different account with the same provider, you must log out of the SSO provider’s website directly. This ensures that you can successfully sign in with a new account.
Ansible Automation Platform 2.5 uses a pluggable authentication system with a configuration wizard that provides a common, simplified method of configuring different types of authenticators such as LDAP and SAML. With the pluggable system you can configure many authenticators of the same type.
In the pluggable system we have a couple of concepts:
- Authenticator Plugin
- A plugin allows Ansible Automation Platform to connect to a source system, such as, LDAP or SAML. Ansible Automation Platform includes a variety of authenticator plugins. Authenticator plugins are similar to Ansible collections, in that all of the required code is in a package and can be versioned independently if needed.
- Authenticator
- An authenticator is an instantiation of an authenticator plugin and allows users from the specified source to log in. For example, the LDAP authenticator plugin defines a required LDAP server setting. When you instantiate an authenticator from the LDAP authentication plugin, you must give the authenticator the LDAP server URL it needs to connect to.
- Authenticator Map
- Authenticator maps are applied to authenticators and tell Ansible Automation Platform what permissions to give a user logging into the system.
2.2.1. User creation with several authenticators in Ansible Automation Platform 2.5
In Ansible Automation Platform 2.5, user account management is unique to each configured authenticator. When a user authenticates through several external sources, such as LDAP and SAML, the platform creates a separate user record for each authenticator.
This behavior results in the following:
- Distinct records: Each external authenticator creates its own user record.
- Unique names: The system requires a unique username for every user entry.
- Username collision: If a user’s login causes a username collision (the name already exists from a different authenticator), the system appends a hash or other identifying characters to the subsequent user account’s username to keep uniqueness.
Then the
2.3. Creating an authentication method
Creating an authenticator involves the following procedures:
- Selecting an authentication type, where you select the type of authenticator plugin you want to configure, including the authentication details for the authentication type selected.
Mapping, where you define mapping rule types and triggers to control access to the system, and Mapping order, where you can define the mapping precedence.
NoteMapping order is only available if you have defined one or more authenticator maps.
2.3.1. Selecting an authentication type
On the Authentication Methods page you can select the type of authenticator plugin you want to configure.
Procedure
-
From the navigation panel, select
. - Click .
Enter a unique Name for the authenticator. The name is required, must be unique across all authenticators, and must not be longer than 512 characters. This becomes the unique identifier generated for the authenticator.
NoteChanging the name does not update the unique identifier of the authenticator. For example, if you create an authenticator with the name
My Authenticatorand later change it toMy LDAP Authenticatoryou will not be able to create another authenticator with the nameMy Authenticatorbecause the unique identifier is still in use.- Select the authenticator type from the Authentication type list. See Configuring an authentication type for the complete list of authentication plugins available.
The Authentication details section automatically updates to show the fields relevant to the selected authentication type. See the respective sections in Configuring an authentication type for the required details.
For all authentication types you can enter a Name, Additional Authenticator Fields and Create Objects.
- Enable or disable Enabled to specify if the authenticator should be enabled or disabled. If enabled, users are able to login from the authenticator. If disabled, users will not be allowed to login from the authenticator.
Enable or disable Create Object to specify whether the authenticator should create teams and organizations in the system when a user logs in.
- Enabled
- Teams and organizations defined in the authenticator maps are created and the users added to them.
- Disabled
- Organizations and teams defined in the authenticator maps will not be created automatically in the system. However, if they already exist (i.e. created by a superuser), users who trigger the maps are granted access to them.
Enable or disable Remove Users. If enabled, any access previously granted to a user is removed when they authenticate from this source. If disabled, permissions are only added or removed from the user based on the results of this authenticator’s authenticator mappings.
For example, assume a user has been granted the
is_superuserpermission in the system. And that user will log in to an authenticator whose maps will not formulate an opinion as to whether or not the user should be a superuser. If Remove Users is enabled, theis_superuserpermission will be removed from the user, the authenticator maps will not have an opinion as to whether it should be there or not so, after login the user will not have theis_superuserpermission.If Remove Users is disabled, the
is_superuserpermission will not be removed from the user. The authenticator maps will not have an opinion as to whether it should be there or not so after login the user will have theis_superuserpermission.- Click and proceed to Define authentication mapping rules and triggers.
2.3.2. Defining authentication mapping rules and triggers
Authentication map types can be used with any type of authenticator. Each map has a trigger that defines when the map should be evaluated as true.
Procedure
-
From the navigation panel, select
. - In the list view, select the authenticator name displayed in the Name column.
- Select the Mapping tab from the Details page of your authenticator.
- Click .
Select a map type from the Authentication mapping list. See Authenticator map types for detailed descriptions of the different map types. Choices include:
- Enter a unique rule Name to identify the rule.
Select a Trigger from the list. See Authenticator map triggers for more details. Choices include:
- Always
- Never
- Group
- Attribute
- Click .
- Repeat this procedure to create additional mapping rules and triggers for the authenticator.
Proceed to Adjust the Mapping order to optionally reorder the mappings for your authenticator.
NoteThe mapping order setting is only available if there is more than one authenticator map defined.
2.3.3. Adjusting the Mapping order
If you have one or more authenticator maps defined, you can manage the order of the maps. Authenticator maps are run in order when logging in lowest order to highest. If one authenticator map determines a user should be a member of a team but a subsequent map determines the user should not be a member of the same team the ruling form the second map will take precedence over the result of the first map. Authenticator maps with the same order are executed in an undefined order.
For example, if the first authenticator map is of type is_superuser and the trigger is set to never, any user logging into the system would never be granted the is_superuser flag.
And, if the second map is of type is_superuser and the trigger is based on the user having a specific group, any user logging in would initially be denied the is_superuser permission. However, any user with the specified group would subsequently be granted the is_superuser permission by the second rule.
The order of rules is important beyond whether you want to process organizations, teams or roles first. They can also be used to refine access and careful consideration is needed to avoid login issues.
For example:
- Authenticator map A denies all users access to the system
-
Authenticator map B allows the user
johnaccess to the system
When the mapping order is set to A, B; the first map denies access for all users, including john. The second map subsequently allows john access to the system and the result is that john is granted access and is able to log in to the platform.
However, when the mapping order is changed to B, A; the first map allows john access to the system. The second map subsequently denies all users access to the system (including john) and the result is that john is denied access and is unable to log in to the platform.
Procedure
-
From the navigation panel, select
. - In the list view, select the authenticator name displayed in the Name column.
- Select the Mapping tab from the Details page of your authenticator.
- Click .
Adjust the mapping order by dragging and dropping the mappings up or down in the list using the draggable icon.
NoteThe mapping precedence is determined by the order in which the mappings are listed.
- After your authenticator maps are in the correct order, click .
2.4. Enabling and disabling the local authenticator
As a platform administrator, you can enable or disable authenticators. However, disabling your local authenticator can have significant impacts and should only be done under specific circumstances. Before you disable your local authenticator, you must consider the following:
- Local account inaccessibility
-
Disabling the local authenticator prevents all local accounts, including the default
adminaccount from logging in. - Potential inaccessibility
- Disabling the local authenticator without having at least one other configured authenticator can render the Ansible Automation Platform environment completely inaccessible.
- Dependency on enterprise authentication provider
- If the local authenticator is disabled and an issue occurs with the configured enterprise authentication provider, the platform will become inaccessible until the enterprise authentication provider issue is resolved.
Prerequisites
- You have at least one other authenticator method configured.
- You have at least one administrator account that can authenticate using your alternate authenticator.
Disabling the local authenticator without an alternative authentication in place can result in a locked environment.
Procedure
-
From the navigation panel, select
. - Ensure that at least one other authenticator type is configured and enabled.
- Select your Local Authenticator.
- Toggle the Enabled switch to the off position to disable the local authenticator.
Troubleshooting
If the local authenticator is disabled without another authentication method configured, or if an issue arises with your configured enterprise authentication provider, making the Ansible Automation Platform inaccessible, you can re-enable the local authenticator from the command line as follows:
List the available authenticators and retrieve the ID of your local authenticator by running the following command:
aap-gateway-api authenticators --listEnable the local authenticator using its ID:
aap-gateway-manage authenticators --enable :idwhere:
:idis the ID of the local authenticator obtained from the previous step.
2.5. Configuring an authentication type
Ansible Automation Platform provides multiple authenticator plugins that you can configure to simplify the login experience for your organization. These are the authenticator plugins that are provided:
The Controller admin authentication method is for a specific installation and deployment scenario and should only be used if explicitly instructed to do so. This method provides no beneficial functionality for the normal operation of Ansible Automation Platform.
2.5.1. Configuring local authentication
As a platform administrator, you can configure local system authentication. With local authentication, users and their passwords are checked against local system accounts.
A local authenticator is automatically created by the Ansible Automation Platform installation process, and is configured with the specified admin credentials in the inventory file before installation. After successful installation, you can log in to the Ansible Automation Platform using those credentials.
Procedure
-
From the navigation panel, select
. - Click .
- Enter a Name for this Local configuration. The configuration name is required, must be unique across all authenticators, and must not be longer than 512 characters.
- Select Local from the Authentication type list.
- Select a legacy authenticator method from the Auto migrate users from list. After upgrading from 2.4 to 2.5, this is the legacy authenticator from which to automatically migrate users to this new authentication configuration. Refer to Ansible Automation Platform post-upgrade steps in the RPM upgrade and migration guide for important information about migrating users.
Optional: Enter any Additional Authenticator Fields that this authenticator can take. These fields are not validated and are passed directly back to the authenticator.
NoteValues defined in this field override the dedicated fields provided in the UI. Any values not defined here are not provided to the authenticator.
- To automatically create organizations, users, and teams upon successful login, select Create objects.
- To enable this authentication method upon creation, select Enabled.
- To remove a user for any groups they were previously added to when they authenticate from this source, select Remove users.
- Click .
2.5.2. Configuring LDAP authentication
As a platform administrator, you can configure LDAP as the source for account authentication information for Ansible Automation Platform users.
If the LDAP server you want to connect to has a certificate that is self-signed or signed by an internal certificate authority (CA), the CA certificate must be added to the system’s trusted CAs. Otherwise, connection to the LDAP server will result in an error that the certificate issuer is not recognized.
When LDAP is configured, an account is created for any user who logs in with an LDAP username and password and they can be automatically placed into organizations as either regular users or organization administrators.
Ansible Automation Platform treats usernames as case-insensitive in LDAP. It sends the username that was entered without modification to the LDAP provider for authentication. After successful authentication, the platform converts the username to lowercase and stores it in the database. For example, if a user logs in as JDOE, their platform username will be jdoe. If the user logs in again as JDoe, their username will still be jdoe.
However, if Ansible Automation Platform is configured with multiple LDAP authenticators, and the same user IDs exist across them, their usernames might differ. For instance, JDOE might have the username jdoe, while jDOE could be assigned jdoe-<some hash>.
If a user previously logged in using different case variations of their username, Ansible Automation Platform maps all case variations to the lowercase username. Existing users with other case variations are not valid for interactive log in. However, any existing OAuth tokens for the mixed case username still allow authentication. A system administrator can delete those case variation users if needed.
Users created through an LDAP login should not change their username, first name, last name, or set a local password for themselves. Any changes made to this information is overwritten the next time the user logs in to the platform.
Migration of LDAP authentication settings are not supported for 2.4 to 2.5 in the platform UI. If you are upgrading from Ansible Automation Platform 2.4 to 2.5, be sure to save your authentication provider data before upgrading.
Procedure
-
From the navigation panel, select
. - Click .
- Enter a Name for this authentication configuration.
- Select LDAP from the Authentication type list. The Authentication details section automatically updates to show the fields relevant to the selected authentication type.
- Select a legacy authenticator method from the Auto migrate users from list. After upgrading from 2.4 to 2.5, this is the legacy authenticator from which to automatically migrate users to this new authentication configuration. Refer to Ansible Automation Platform post-upgrade steps in the RPM upgrade and migration guide for important information about migrating users.
- In the LDAP Server URI field, enter or modify the list of LDAP servers to which you want to connect. This field supports multiple addresses.
In the LDAP Bind DN text field, enter the Distinguished Name (DN) to specify the user that the Ansible Automation Platform uses to connect to the LDAP server as shown in the following example:
cn=josie,cn=users,dc=website,dc=com- In the LDAP Bind Password text field, enter the password to use for the binding user.
Select a group type from the LDAP Group Type list.
The group type defines the class name of the group, which manages the groups associated with users in your LDAP directory and is returned by the search specified in Step 14 of this procedure. The group type, along with group parameters and the group search, is used to find and assign groups to users during log in, and can also be evaluated during the mapping process. The following table lists the available group types, along with their descriptions and the necessary parameters for each. By default, LDAP groups will be mapped to Django groups by taking the first value of the cn attribute. You can specify a different attribute with
name_attr. For example,name_attr='cn'.Expand Table 2.1. Available LDAP group types LDAP Group Type Description Initializer method (init) PosixGroupTypeHandles the
posixGroupobject class. This checks for both primary group and group membership.name_attr='cn'MemberDNGroupTypeHandles the grouping mechanisms wherein the group object contains a list of its member DNs.
member_attr, name_attr='cn'GroupOfNamesTypeHandles the
groupOfNamesobject class. Equivalent toMemberDNGroupType('member').name_attr='cn'GroupOfUniqueNamesTypeHandles the
groupOfUniqueNamesobject class. Equivalent toMemberDNGroupType('uniqueMember').name_attr='cn'ActiveDirectoryGroupTypeHandles the Active Directory groups. Equivalent to
MemberDNGroupType('member').name_attr='cn'OrganizationalRoleGroupTypeHandles the
organizationalRoleobject class. Equivalent toMemberDNGroupType('roleOccupant').name_attr='cn'NestedGroupOfNamesTypeHandles the
groupOfNamesobject class. Equivalent toNestedMemberDNGroupType('member').member_attr, name_attr='cn'NestedGroupOfUniqueNamesTypeHandles the
groupOfUniqueNamesobject class. Equivalent toNestedMemberDNGroupType('uniqueMember').name_attr='cn'NestedActiveDirectoryGroupTypeHandles the Active Directory groups. Equivalent to
NestedMemberDNGroupType('member').name_attr='cn'NestedOrganizationalRoleGroupTypeHandles the
organizationalRoleobject class. Equivalent toNestedMemberDNGroupType('roleOccupant').name_attr='cn'NoteThe group types that are supported by Ansible Automation Platform use the underlying django-auth-ldap library. To specify the parameters for the selected group type, see Step 14 of this procedure.
You can use LDAP User DN Template as an alternative to user search. This approach is more efficient for user lookups than searching if it is usable in your organizational environment. Enter the name of the template as shown in the following example:
uid=%(user)s,cn=users,cn=accounts,dc=example,dc=comwhere:
uidis the user identifier,cnis the common name anddcis the domain component.NoteIf this setting has a value it will be used instead of the LDAP User Search setting.
- LDAP Start TLS is disabled by default. StartTLS allows your LDAP connection to be upgraded from an unencrypted connection to a secure connection using Transport Layer Security (TLS). To enable StartTLS when the LDAP connection is not using SSL, set the switch to On.
Optional: Enter any Additional Authenticator Fields that this authenticator can take. These fields are not validated and are passed directly back to the authenticator.
NoteValues defined in this field override the dedicated fields provided in the UI. Any values not defined here are not provided to the authenticator.
Enter any LDAP Connection Options to set for the LDAP connection. By default, LDAP referrals are disabled to prevent certain LDAP queries from hanging with Active Directory. Option names should be strings as shown in the following example:
OPT_REFERRALS: 0
OPT_NETWORK_TIMEOUT: 30
See the python-LDAP Reference for possible options and values that can be set.
Depending on the selected LDAP Group Type, different parameters are available in the LDAP Group Type Parameters field to account for this.
LDAP_GROUP_TYPE_PARAMSis a dictionary, which is converted tokwargsand passed to the LDAP Group Type class selected. There are two common parameters used by group types:name_attrandmember_attr. Wherename_attrdefaults tocnandmember_attrdefaults tomember:{"name_attr": "cn", "member_attr": "member"}To determine the parameters that a specific LDAP Group Type requires, refer to the django_auth_ldap documentation on the classes
initparameters.In the LDAP Group Search field, specify which groups should be searched and how to search them as shown in the following example:
[
"dc=example,dc=com",
"SCOPE_SUBTREE",
"(objectClass=group)"
 ]
In the LDAP User Attribute Map field, enter user attributes to map LDAP fields to your Ansible Automation Platform users, for example,
emailorfirst_nameas shown in the following example:{ "first_name": "givenname", "last_name": "sn", "email": "mail" }In the LDAP User Search field, enter where to search for users during authentication as shown in the following example:
[
"ou=users,dc=website,dc=com",
"SCOPE_SUBTREE",
"(cn=%(user)s)"
]
If the LDAP User DN Template is not set, the Ansible Automation Platform authenticates to LDAP using the Bind DN Template and LDAP Bind Password. After authentication, an LDAP search is performed to locate the user specified by this field. If the user is found, Ansible Automation Platform validates the provided password against the user found by the LDAP search. Multiple search queries are supported for users with
LDAPUnionby entering multiple search terms as shown in the following example:[ [ "ou=users,dc=example,dc=com", "SCOPE_SUBTREE", "uid=%(user)s" ], [ "ou=employees,dc=subdivision,dc=com", "SCOPE_SUBTREE", "uid=%(user)s" ] ]If non-unique users are found during multiple searches, those users will not be able to log in to Ansible Automation Platform. Based on the example provided, if a user with
uid=jdoewas found in both theou=users,dc=example,dc=comandou=employees,dc=subdivision,dc=com, neitherjdoeuser would be able to log in. All other unique users that are found in either branch would still be able to log in.NoteIf the field LDAP User DN Template is populated, it takes precedence over the LDAP User Search field and only the template will be used to authenticate users.
- To automatically create organizations, users, and teams upon successful login, select Create objects.
- To enable this authentication method upon creation, select Enabled.
- To remove a user for any groups they were previously added to when they authenticate from this source, select Remove users.
- Click .
2.5.2.1. Importing a certificate authority in automation controller for LDAPS integration
You can authenticate to the automation controller server by using LDAP. However, if you change to using LDAPS (LDAP over SSL/TLS) to authenticate and the TLS certificate is not trusted by platform gateway, it fails with an error such as:
2025-08-26 16:40:56,141 WARNING django_auth_ldap Caught LDAPError while authenticating: SERVER_DOWN({'result': -1, 'desc': "Can't contact LDAP server", 'ctrls': [], 'info': 'error:0A000086:SSL routines::certificate verify failed (self-signed certificate)'})To get Ansible Automation Platform to trust the certificate coming from LDAP, perform the following procedure on all platform gateway instances.
Procedure
-
Place a copy of the LDAP servers certificate in the directory,
/etc/pki/ca-trust/source/anchors/. Run the command:
update-ca-trust
2.5.3. Configuring SAML authentication
SAML allows the exchange of authentication and authorization data between an Identity Provider (IdP) and a Service Provider (SP). Ansible Automation Platform is a SAML SP that you can configure to talk with one or more SAML IdPs to authenticate users.
Based on groups and attributes optionally provided by the SAML IdP, users can be placed into teams and organizations in Ansible Automation Platform based on the authenticator maps tied to this authenticator. This mapping ensures that when a user logs in through SAML, Ansible Automation Platform can correctly identify the user and assign the proper attributes like first name, last name, email, and group membership.
Prerequisites
Before you configure SAML authentication in Ansible Automation Platform, be sure you do the following:
- Configure a SAML Identity Provider (IdP).
Pre-configure the SAML IdP with the settings required for integration with Ansible Automation Platform. For example, in Microsoft Entra ID you can configure the following:
- Identifier (Entity ID): This can be any value that you want, but it needs to match the one configured in your Ansible Automation Platform.
- Reply URL (Assertion Consumer Service (ACS) URL): This URL is auto generated when the SAML method is configured in Ansible Automation Platform. That value must be copied from Ansible Automation Platform and pasted in your IdP settings.
- Gather the user attributes for your SAML IdP application. Different IdPs might use different attribute names and formats. Refer to documentation for your specific IdP for the exact attribute names and the expected values.
Generate a private key and public certificate using the following command:
$ openssl req -x509 -newkey rsa:4096 -keyout key.pem -out cert.pem -sha256 -days 3650 -nodes
Procedure
-
From the navigation panel, select
. - Click .
- Enter a Name for this SAML configuration.
- Select SAML from the Authentication type list. The Authentication details section automatically updates to show the fields relevant to the selected authentication type.
- Select a legacy authenticator method from the Auto migrate users from list. After upgrading from 2.4 to 2.5, this is the legacy authenticator from which to automatically migrate users to this new authentication configuration. Refer to Ansible Automation Platform post-upgrade steps in the RPM upgrade and migration guide for important information about migrating users.
- Enter the application-defined unique identifier used as the audience of the SAML service provider configuration in the SAML Service Provider Entity ID field. This is usually the base URL of your service provider, but the actual value depends on the Entity ID expected by your IdP.
-
Include the certificate content in the SAML Service Provider Public Certificate field. This information is contained in the cert.pem you created as a prerequisite and must include the
—–BEGIN CERTIFICATE—–and—–END CERTIFICATE—–. -
Include the private key content in the SAML Service Provider Private Key field. This information is contained in the key.pem you created as a prerequisite and must include the
—–BEGIN PRIVATE KEY—–and—–END PRIVATE KEY—–. - Enter the URL to redirect the user to for login initiation in the IdP Login URL field. This is the login URL from your SAML IdP application.
Enter the public cert used for secrets coming from the IdP in the IdP Public Cert field. This is the SAML certificate available for download from IdP.
NoteThe IdP in the IdP Public Cert field should contain the entire certificate, including the
—–BEGIN CERTIFICATE—–and—–END CERTIFICATE—–. You must manually enter the prefix and suffix if the IdP does not include it.- Enter the entity ID returned in the assertion in the Entity ID. This is the identifier from your IdP SAML application. You can find this value in the SAML metadata provided by your IdP.
- Enter user details in the Groups, User Email, Username, User Last Name and User First Name.
Enter a permanent ID for the user in the User Permanent ID field. This field is required.
NoteAdditional attributes might be available through your SAML IdP. Those values must be included in either the Additional Authenticators Fields or the SAML IDP to extra_data attribute mapping field. Refer to those steps for details.
- The SAML Assertion Consumer Service (ACS) URL field registers the service as a service provider (SP) with each identity provider (IdP) you have configured. Leave this field blank. After you save this authentication method, it is auto generated. This field must match the Reply URL setting in your IdP.
Optional: Enter any Additional Authenticator Fields that this authenticator can take. These fields are not validated and are passed directly back to the authenticator. For example, to ensure all SAML IdP attributes other than Email, Username, Last Name, First Name are included for mapping, enter the following:
GET_ALL_EXTRA_DATA: trueAlternatively, you can include a list of SAML IdP attributes in the SAML IDP to extra_data attribute mapping field.
NoteValues defined in this field override the dedicated fields provided in the UI. Any values not defined here are not provided to the authenticator.
In the SAML Service Provider Organization Info field, provide the URL, display name, and the name of your app.
{
  "en-US": {
    "url": "http://www.example.com",
    "displayname": "Example",
    "name": "example"
  }
}
In the SAML Service Provider Technical Contact field, give the name and email address of the technical contact for your service provider.
{
"givenName": "Some User",
"emailAddress": "suser@example.com"
}
In the SAML Service Provider Support Contact field, give the name and email address of the support contact for your service provider.
{
"givenName": "Some User",
"emailAddress": "suser@example.com"
}
Optional: Provide extra configuration data in the SAML Service Provider extra configuration data field. For example, you can choose to enable signing requests for added security:
{
"sign_request": True,
}
This field is the equivalent to the
SOCIAL_AUTH_SAML_SP_EXTRAin the API. For more information, see OneLogin’s SAML Python Toolkit to learn about the valid service provider extra (SP_EXTRA) parameters.Optional: Provide security settings in the SAML Security Config field. This field is the equivalent to the
SOCIAL_AUTH_SAML_SECURITY_CONFIGfield in the API.// Indicates whether the <samlp:AuthnRequest> messages sent by this SP // will be signed. [Metadata of the SP will offer this info] "authnRequestsSigned": false, // Indicates a requirement for the <samlp:Response>, <samlp:LogoutRequest> // and <samlp:LogoutResponse> elements received by this SP to be signed. "wantMessagesSigned": false, // Indicates a requirement for the <saml:Assertion> elements received by // this SP to be signed. [Metadata of the SP will offer this info] "wantAssertionsSigned": false, // Authentication context. // Set to false and no AuthContext will be sent in the AuthNRequest, // Set true or don't present this parameter and you will get an AuthContext 'exact' 'urn:oasis:names:tc:SAML:2.0:ac:classes:PasswordProtectedTransport' // Set an array with the possible auth context values: array ('urn:oasis:names:tc:SAML:2.0:ac:classes:Password', 'urn:oasis:names:tc:SAML:2.0:ac:classes:X509'), "requestedAuthnContext": true,For more information and additional options, see OneLogin’s SAML Python Toolkit.
Optional: In the SAML IDP to extra_data attribute mapping field, enter values to map IDP attributes to extra_data attributes. These values will include additional user information beyond standard attributes like Email or Username to be mapped. For example:
- Department
- UserType
- Organization
For more information on the values you can include, see advanced SAML settings.
ImportantMake sure you include all relevant values so that everything gets mapped correctly for your configuration. Alternatively, you can include the
GET_ALL_EXTRA_DATA: truein the Additional Authenticator Fields to allow mapping of all available SAML IdP attributes.- To automatically create organizations, users, and teams upon successful login, select Create objects.
- To enable this authentication method upon creation, select Enabled.
- To remove a user for any groups they were previously added to when they authenticate from this source, select Remove users.
- Click .
You can configure an HTTPS redirect for SAML in operator-based deployments to simplify login for your users. For the steps to configure this setting, see Enabling single sign-on (SSO) for platform gateway on OpenShift Container Platform.
2.5.3.1. Configuring transparent SAML logins
For transparent logins to work, you must first get IdP-initiated logins to work.
Procedure
-
Set the
RelayStateon the IdP to "IdP".
2.5.4. Configuring TACACS+ authentication
Terminal Access Controller Access-Control System Plus (TACACS+) is a protocol that handles remote authentication and related services for networked access control through a centralized server. TACACS+ provides authentication, authorization and accounting (AAA) services, in which you can configure Ansible Automation Platform to use as a source for authentication.
This feature is deprecated and will be removed in a future release.
Procedure
-
From the navigation panel, select
. - Click .
- Enter a Name for this authentication configuration.
- Select TACACS+ from the Authentication type list. The Authentication details section automatically updates to show the fields relevant to the selected authentication type.
- Select a legacy authenticator method from the Auto migrate users from list. After upgrading from 2.4 to 2.5, this is the legacy authenticator from which to automatically migrate users to this new authentication configuration. Refer to Ansible Automation Platform post-upgrade steps in the RPM upgrade and migration guide for important information about migrating users.
Enter the following information:
- Hostname of TACACS+ Server: Provide the hostname or IP address of the TACACS+ server with which to authenticate. If you leave this field blank, TACACS+ authentication is disabled.
- TACACS+ Authentication Protocol: The protocol used by the TACACS+ client. The options are ascii or pap.
- Shared secret for authenticating to TACACS+ server: The secret key for TACACS+ authentication server.
- The TACACS+ client address sending enabled is disabled by default. To enable client address sending, select the checkbox.
Optional: Enter any Additional Authenticator Fields that this authenticator can take. These fields are not validated and are passed directly back to the authenticator.
NoteValues defined in this field override the dedicated fields provided in the UI. Any values not defined here are not provided to the authenticator.
- To automatically create organizations, users, and teams upon successful login, select Create objects.
- To enable this authentication method upon creation, select Enabled.
To remove a user for any groups they were previously added to when they authenticate from this source, select Remove users.
Click .
2.5.5. Configuring Microsoft Entra ID authentication
To set up enterprise authentication for Microsoft Entra ID, formerly known as Microsoft Azure Active Directory (AD), follow these steps:
- Configure your Ansible Automation Platform to use Microsoft Entra ID authentication using the steps in this procedure.
- Register Ansible Automation Platform in Microsoft Entra ID by following the Quickstart: Register an application with the Microsoft identity platform. This process provides you with an Application (client) ID and Application secret.
- Add the redirect URL in Microsoft Entra ID. After completing the configuration wizard for Microsoft Entra ID authentication in your platform, copy the URL displayed in the Azure AD OAuth2 Callback URL field. Then, go to your registered enterprise application in Azure and add this URL as a Redirect URL (also referred to as a Callback URL in Ansible Automation Platform) as described in How to add a redirect URI to your application. This step is required for the login flow to work correctly.
The attributes provided by Microsoft Entra ID are not set in the Ansible Automation Platform configuration for this authentication type. Instead, the social_core azuread backend provides the translation of claims provided by Microsoft Entra ID. The user attributes that allow Ansible Automation Platform to correctly identify the user and assign the proper attributes like first name, last name, email, and username include the following:
| Ansible Automation Platform attribute | Microsoft Entra ID parameter |
|---|---|
| authenticator_uid | upn |
| Username | name |
| First Name | given_name |
| Last Name | family_name |
| | email (falling back to upn) |
Each key and secret must belong to a unique application and cannot be shared or reused between different authentication backends. To register the application, you must supply it with your webpage URL, which is the Callback URL shown in the Authenticator details for your authenticator configuration. See Displaying authenticator details for instructions on accessing this information.
Procedure
-
From the navigation panel, select
. - Click .
- Enter a Name for this authentication configuration.
- Select Azuread from the Authentication type list. The Authentication details section automatically updates to show the fields relevant to the selected authentication type.
- Select a legacy authenticator method from the Auto migrate users from list. After upgrading from 2.4 to 2.5, this is the legacy authenticator from which to automatically migrate users to this new authentication configuration. Refer to Ansible Automation Platform post-upgrade steps in the RPM upgrade and migration guide for important information about migrating users.
- Click , copy and paste Microsoft’s Application (Client) ID to the OIDC Key field.
If your Microsoft Entra ID is configured to provide user group information within a groups claim, ensure that the platform is configured with a Groups Claim name that matches your Microsoft Entra ID configuration. This allows the platform to correctly identify and associate groups for users logging in through Microsoft Entra ID.
NoteGroups coming from Microsoft Entra ID can be identified using either unique IDs or group names. When creating group mappings for a Microsoft Entra ID authenticator, you can use either the unique ID or the group name.
By default, Microsoft Entra ID uses groups as the default group claim name. So, be sure to either set the value to the default or to any custom override you have set in your IdP. The current default is set to preserve the existing behavior unless explicitly changed.
- Following instructions for registering your application with the Microsoft identity platform, supply the key (shown at one time only) to the client for authentication.
- Copy and paste the secret key created for your Microsoft Entra ID/Microsoft Azure AD application to the OIDC Secret field.
Optional: Enter any Additional Authenticator Fields that this authenticator can take. These fields are not validated and are passed directly back to the authenticator.
NoteValues defined in this field override the dedicated fields provided in the UI. Any values not defined here are not provided to the authenticator.
- To automatically create organizations, users, and teams upon successful login, select Create objects.
- To enable this authentication method upon creation, select Enabled.
- To remove a user for any groups they were previously added to when they authenticate from this source, select Remove users.
- Click .
Verification
To verify that the authentication is configured correctly, log out of Ansible Automation Platform and check that the login screen displays the logo of your authentication chosen method to enable logging in with those credentials.
2.5.6. Configuring Google OAuth2 authentication
To set up social authentication for Google, you must obtain an OAuth2 key and secret for a web application. To do this, you must first create a project and set it up with Google.
For instructions, see Setting up OAuth 2.0 in the Google API Console Help documentation.
If you have already completed the setup process, you can access those credentials by going to the Credentials section of the Google API Manager Console. The OAuth2 key (Client ID) and secret (Client secret) are used to supply the required fields in the UI.
Procedure
-
From the navigation panel, select
. - Click .
- Enter a Name for this authentication configuration.
- Select Google OAuth from the Authentication type list. The Authentication details section automatically updates to show the fields relevant to the selected authentication type.
- Select a legacy authenticator method from the Auto migrate users from list. After upgrading from 2.4 to 2.5, this is the legacy authenticator from which to automatically migrate users to this new authentication configuration. Refer to Ansible Automation Platform post-upgrade steps in the RPM upgrade and migration guide for important information about migrating users.
The Google OAuth2 Key and Google OAuth2 Secret fields are pre-populated.
If not, use the credentials Google supplied during the web application setup process. Save these settings for use in the following steps.
- Copy and paste Google’s Client ID into the Google OAuth2 Key field.
- Copy and paste Google’s Client secret into the Google OAuth2 Secret field.
Optional: Enter information for the following fields using the tooltips provided for instructions and required format:
- Access Token URL
- Access Token Method
- Authorization URL
- Revoke Token Method
- Revoke Token URL
- OIDC JWT Algorithm(s)
- OIDC JWT
Optional: Enter any Additional Authenticator Fields that this authenticator can take. These fields are not validated and are passed directly back to the authenticator.
NoteValues defined in this field override the dedicated fields provided in the UI. Any values not defined here are not provided to the authenticator.
- To automatically create organizations, users, and teams upon successful login, select Create objects.
- To enable this authentication method upon creation, select Enabled.
To remove a user for any groups they were previously added to when they authenticate from this source, select Remove users.
Click .
Verification
To verify that the authentication is configured correctly, log out of Ansible Automation Platform and check that the login screen displays the logo of your authentication chosen method to enable logging in with those credentials.
2.5.7. Configuring generic OIDC authentication
OpenID Connect (OIDC) uses the OAuth 2.0 framework. It enables third-party applications to verify the identity and obtain basic end-user information. The main difference between OIDC and SAML is that SAML has a service provider (SP)-to-IdP trust relationship, whereas OIDC establishes the trust with the channel (HTTPS) that is used to obtain the security token. To obtain the credentials needed to set up OIDC with Ansible Automation Platform, see the documentation from the IdP of your choice that has OIDC support.
Procedure
-
From the navigation panel, select
. - Click .
- Enter a Name for this authentication configuration.
- Select Generic OIDC from the Authentication type list. The Authentication details section automatically updates to show the fields relevant to the selected authentication type.
- Select a legacy authenticator method from the Auto migrate users from list. After upgrading from 2.4 to 2.5, this is the legacy authenticator from which to automatically migrate users to this new authentication configuration. Refer to Ansible Automation Platform post-upgrade steps in the RPM upgrade and migration guide for important information about migrating users.
Enter the following information:
- OIDC Provider URL: The URL for your OIDC provider.
- OIDC Key: The client ID from your third-party IdP.
- OIDC Secret: The client secret from your IdP.
- Optional: Select the HTTP method to be used when requesting an access token from the Access Token Method list. The default method is POST.
Optionally enter information for the following fields using the tooltips provided for instructions and required format:
- Access Token Method - The default method is POST.
- Access Token URL
- Access Token Method
- Authorization URL
- Callback URL - The OIDC Callback URL field registers the service as a service provider (SP) with each OIDC provider you have configured. Leave this field blank. After you save this authentication method, it is auto generated. Configure your IdP to allow redirects to this URL as part of the authentication flow.
- ID Key
- ID Token Issuer
- JWKS URI
- OIDC Public Key
- Revoke Token Method - The default method is GET.
- Revoke Token URL
- Response Type
- Token Endpoint Auth Method
- Userinfo URL
- Username Key
- Use the Verify OIDC Provider Certificate to enable or disable the OIDC provider SSL certificate verification.
- Use the Redirect State to enable or disable the state parameter in the redirect URI. It is recommended that this is enabled to prevent Cross Site Request Forgery (CSRF) attacks.
Optional: Enter any Additional Authenticator Fields that this authenticator can take. These fields are not validated and are passed directly back to the authenticator.
NoteValues defined in this field override the dedicated fields provided in the UI. Any values not defined here are not provided to the authenticator.
- To automatically create organizations, users, and teams upon successful login, select Create objects.
- To enable this authentication method upon creation, select Enabled.
- To remove a user for any groups they were previously added to when they authenticate from this source, select Remove users.
- Click .
2.5.7.1. Troubleshoot Generic OIDC Single Sign-On authentication failures
Authentication fails if the OIDC JWT Algorithm setting is not explicitly defined. The authentication code requires a list of acceptable algorithms, which it does not retrieve automatically from the OpenID Connect (OIDC) configuration endpoint.
2.5.7.1.1. Configuring JWT_Algorithms manually
To resolve the authentication failure, manually provide the list of supported algorithms in the platform gateway configuration.
Procedure
-
From the navigation panel, select
. - Select your OIDC authenticator from the list.
- Click and locate the OIDC JWT Algorithm(s) field.
Enter the list of supported algorithms as a YAML list or a JSON array. These algorithms are typically available from your IdP’s OpenID Connect (OIDC) discovery endpoint.
Example
[ "PS384", "ES384", "RS384", "HS256", "HS512", "ES256", "RS256", "HS384", "ES512", "PS256", "PS512", "RS512" ]- Save your changes. The system uses these specified algorithms for token verification, resolving any authentication failures related to their absence.
2.5.7.1.2. Enabling debugging for enterprise authentication
To further diagnose authentication issues, enable debug logging in platform gateway.
Procedure
-
Change the logging configuration in the platform gateway’s
settings.pyfile. Set the logging level for the
ansible_baselogger toDEBUG:LOGGING['loggers']['ansible_base']['level'] = 'DEBUG'After this change, detailed
AuthTokenErrormessages are displayed in the logs, providing specific information about the cause of the failure.
2.5.7.1.3. Troubleshooting Generic OIDC scope mismatches
Authentication fails when the Identity Provider (IdP) does not support the default scopes automatically appended by the system.
To prevent the system from appending this default scope, you must add a setting to your authenticator configuration.
Procedure
-
From the navigation panel, select
. - Select your OIDC authenticator from the list.
- Click .
In the Additional Authenticator Fields section, add the following attribute and value. This input box supports either YAML or JSON. Ensure you add this key-value pair on a new line if there are other fields present:
IGNORE_DEFAULT_SCOPE: True- Save your changes. The authenticator now only uses the scopes you explicitly defined, resolving any authentication failures related to unsupported scopes.
2.5.8. Configuring keycloak authentication
You can configure Ansible Automation Platform to integrate Keycloak to manage user authentication.
When using this authenticator some specific setup in your Keycloak instance is required. Refer to the Python Keycloak reference for more details.
Procedure
-
From the navigation panel, select
. - Click .
- Enter a Name for this authentication configuration.
- Select Keycloak from the Authentication type list. The Authentication details section automatically updates to show the fields relevant to the selected authentication type.
- Select a legacy authenticator method from the Auto migrate users from list. After upgrading from 2.4 to 2.5, this is the legacy authenticator from which to automatically migrate users to this new authentication configuration. Refer to Ansible Automation Platform post-upgrade steps in the RPM upgrade and migration guide for important information about migrating users.
- Enter the location where the user’s token can be retrieved in the Keycloak Access Token URL field.
- Optional: Enter the redirect location the user is taken to during the login flow in the Keycloak Provider URL field.
- Enter the Client ID from your Keycloak installation in the Keycloak OIDC Key field.
- Enter the RS256 public key provided by your Keycloak realm in the Keycloak Public Key field.
- Enter the OIDC secret (Client Secret) from your Keycloak installation in the Keycloak OIDC Secret field.
Optional: Enter any Additional Authenticator Fields that this authenticator can take. These fields are not validated and are passed directly back to the authenticator.
NoteValues defined in this field override the dedicated fields provided in the UI. Any values not defined here are not provided to the authenticator.
- To automatically create organizations, users, and teams upon successful login, select Create objects.
- To enable this authentication method upon creation, select Enabled.
- To remove a user for any groups they were previously added to when they authenticate from this source, select Remove users.
- Click .
Troubleshooting
If you receive an jwt.exceptions.InvalidAudienceError: Audience doesn’t match error, you must re-enable the audience by doing the following:
-
From the navigation for your Keycloak configuration, select
. - Pick a name for the mapper.
-
Select the Client ID corresponding to your client in
Included Client Audience.
2.5.9. Configuring GitHub authentication
You can connect GitHub identities to Ansible Automation Platform using OAuth. To set up GitHub authentication, you need to obtain an OAuth2 key and secret by registering your organization-owned application from GitHub using the registering the new application with GitHub.
The OAuth2 key (Client ID) and secret (Client Secret) are used to supply the required fields in the UI. To register the application, you must supply it with your webpage URL, which is the Callback URL shown in the Authenticator details for your authenticator configuration. See Displaying authenticator details for instructions on accessing this information.
Procedure
-
From the navigation panel, select
. - Click .
- Enter a Name for this authentication configuration.
- Select GitHub from the Authentication type list. The Authentication details section automatically updates to show the fields relevant to the selected authentication type.
- Select a legacy authenticator method from the Auto migrate users from list. After upgrading from 2.4 to 2.5, this is the legacy authenticator from which to automatically migrate users to this new authentication configuration. Refer to Ansible Automation Platform post-upgrade steps in the RPM upgrade and migration guide for important information about migrating users.
When the application is registered, GitHub displays the Client ID and Client Secret:
- Copy and paste the GitHub Client ID into the GitHub OAuth2 Key field.
- Copy and paste the GitHub Client Secret into the GitHub OAuth2 Secret field.
Optional: Enter any Additional Authenticator Fields that this authenticator can take. These fields are not validated and are passed directly back to the authenticator.
NoteValues defined in this field override the dedicated fields provided in the UI. Any values not defined here are not provided to the authenticator.
- To automatically create organizations, users, and teams upon successful login, select Create objects.
- To enable this authentication method upon creation, select Enabled.
- To remove a user for any groups they were previously added to when they authenticate from this source, select Remove users.
- Click .
Verification
To verify that the authentication is configured correctly, log out of Ansible Automation Platform and check that the login screen displays the logo of your authentication chosen method to enable logging in with those credentials.
2.5.10. Configuring GitHub organization authentication
When defining account authentication with either an organization or a team within an organization, you should use the specific organization and team settings. Account authentication can be limited by an organization and by a team within an organization. You can also choose to permit all by specifying non-organization or non-team based settings. You can limit users who can log in to the platform by limiting only those in an organization or on a team within an organization.
To set up social authentication for a GitHub organization, you must obtain an OAuth2 key and secret for a web application using the registering the new application with GitHub.
The OAuth2 key (Client ID) and secret (Client Secret) are used to supply the required fields in the UI. To register the application, you must supply it with your webpage URL, which is the Callback URL shown in the Authenticator details for your authenticator configuration. See Displaying authenticator details for instructions on accessing this information.
Procedure
-
From the navigation panel, select
. - Click .
- Enter a Name for this authentication configuration.
- Select GitHub organization from the Authentication type list. The Authentication details section automatically updates to show the fields relevant to the selected authentication type.
- Select a legacy authenticator method from the Auto migrate users from list. After upgrading from 2.4 to 2.5, this is the legacy authenticator from which to automatically migrate users to this new authentication configuration. Refer to Ansible Automation Platform post-upgrade steps in the RPM upgrade and migration guide for important information about migrating users.
When the application is registered, GitHub displays the Client ID and Client Secret:
- Copy and paste the GitHub Client ID into the GitHub OAuth2 Key field.
- Copy and paste the GitHub Client Secret into the GitHub OAuth2 Secret field.
-
Enter the name of your GitHub organization, as used in your organization’s URL, for example,
https://github.com/<yourorg>/in the GitHub OAuth Organization Name field. Optional: Enter any Additional Authenticator Fields that this authenticator can take. These fields are not validated and are passed directly back to the authenticator.
NoteValues defined in this field override the dedicated fields provided in the UI. Any values not defined here are not provided to the authenticator.
-
Enter the authorization scope for users in the GitHub OAuth2 Scope field. The default is
read:org. - To automatically create organizations, users, and teams upon successful login, select Create objects.
- To enable this authentication method upon creation, select Enabled.
- To remove a user for any groups they were previously added to when they authenticate from this source, select Remove users.
- Click .
Verification
To verify that the authentication is configured correctly, log out of Ansible Automation Platform and check that the login screen displays the logo of your authentication chosen method to enable logging in with those credentials.
2.5.11. Configuring GitHub team authentication
To set up social authentication for a GitHub team, you must obtain an OAuth2 key and secret for a web application using the instructions provided in registering the new application with GitHub.
The OAuth2 key (Client ID) and secret (Client Secret) are used to supply the required fields in the UI. To register the application, you must supply it with your webpage URL, which is the Callback URL shown in the Authenticator details for your authenticator configuration. See Displaying authenticator details for instructions on accessing this information.
Each key and secret must belong to a unique application and cannot be shared or reused between different authentication backends. The OAuth2 key (Client ID) and secret (Client Secret) are used to supply the required fields in the UI.
Procedure
-
From the navigation panel, select
. - Click .
- Enter a Name for this authentication configuration.
- Select GitHub team from the Authentication type list. The Authentication details section automatically updates to show the fields relevant to the selected authentication type.
- Select a legacy authenticator method from the Auto migrate users from list. After upgrading from 2.4 to 2.5, this is the legacy authenticator from which to automatically migrate users to this new authentication configuration. Refer to Ansible Automation Platform post-upgrade steps in the RPM upgrade and migration guide for important information about migrating users.
When the application is registered, GitHub displays the Client ID and Client Secret:
- Copy and paste the GitHub Client ID into the GitHub OAuth2 Key field.
- Copy and paste the GitHub Client Secret into the GitHub OAuth2 Secret field.
- Copy and paste GitHub’s team ID in the GitHub OAuth2 Team ID field.
-
Enter the authorization scope for users in the GitHub OAuth2 Scope field. The default is
read:org. Optional: Enter any Additional Authenticator Fields that this authenticator can take. These fields are not validated and are passed directly back to the authenticator.
NoteValues defined in this field override the dedicated fields provided in the UI. Any values not defined here are not provided to the authenticator.
- To automatically create organizations, users, and teams upon successful login, select Create objects.
- To enable this authentication method upon creation, select Enabled.
- To remove a user for any groups they were previously added to when they authenticate from this source, select Remove users.
- Click .
Verification
To verify that the authentication is configured correctly, log out of Ansible Automation Platform and check that the login screen displays the logo of your authentication chosen method to enable logging in with those credentials.
2.5.12. Configuring GitHub enterprise authentication
To set up social authentication for a GitHub enterprise, you must obtain a GitHub Enterprise URL, an API URL, OAuth2 key and secret for a web application.
To obtain the URLs, refer to the GitHub Enterprise administration documentation.
The OAuth2 key (Client ID) and secret (Client Secret) are used to supply the required fields in the UI. To register the application, you must supply it with your webpage URL, which is the Callback URL shown in the Authenticator details for your authenticator configuration. See Displaying authenticator details for instructions on accessing this information.
Each key and secret must belong to a unique application and cannot be shared or reused between different authentication backends. The OAuth2 key (Client ID) and secret (Client Secret) are used to supply the required fields in the UI.
Procedure
-
From the navigation panel, select
. - Click .
- Enter a Name for this authentication configuration.
- Select GitHub enterprise from the Authentication type list. The Authentication details section automatically updates to show the fields relevant to the selected authentication type.
- Select a legacy authenticator method from the Auto migrate users from list. After upgrading from 2.4 to 2.5, this is the legacy authenticator from which to automatically migrate users to this new authentication configuration. Refer to Ansible Automation Platform post-upgrade steps in the RPM upgrade and migration guide for important information about migrating users.
When the application is registered, GitHub displays the Client ID and Client Secret:
- Copy and paste the GitHub Client ID into the GitHub OAuth2 Key field.
- Copy and paste the GitHub Client Secret into the GitHub OAuth2 Secret field.
-
In the Base URL field, enter the hostname of the GitHub Enterprise instance, for example,
https://github.example.com. -
In the Github OAuth2 Enterprise API URL field, enter the API URL of the GitHub Enterprise instance, for example,
https://github.example.com/api/v3. Optional: Enter any Additional Authenticator Fields that this authenticator can take. These fields are not validated and are passed directly back to the authenticator.
NoteValues defined in this field override the dedicated fields provided in the UI. Any values not defined here are not provided to the authenticator.
- To automatically create organizations, users, and teams upon successful login, select Create objects.
- To enable this authentication method upon creation, select Enabled.
- To remove a user for any groups they were previously added to when they authenticate from this source, select Remove users.
- Click .
Verification
To verify that the authentication is configured correctly, log out of Ansible Automation Platform and check that the login screen displays the logo of your authentication chosen method to enable logging in with those credentials.
2.5.13. Configuring GitHub enterprise organization authentication
To set up social authentication for a GitHub enterprise organization, you must obtain a GitHub enterprise organization URL, an Organization API URL, an Organization OAuth2 key and secret for a web application.
To obtain the URLs, refer to the GitHub Enterprise administration documentation.
The OAuth2 key (Client ID) and secret (Client Secret) are used to supply the required fields in the UI. To register the application, you must supply it with your webpage URL, which is the Callback URL shown in the Authenticator details for your authenticator configuration. See Displaying authenticator details for instructions on accessing this information.
Each key and secret must belong to a unique application and cannot be shared or reused between different authentication backends. The OAuth2 key (Client ID) and secret (Client Secret) are used to supply the required fields in the UI.
Procedure
-
From the navigation panel, select
. - Click .
- Enter a Name for this authentication configuration.
- Select GitHub enterprise organization from the Authentication type list. The Authentication details section automatically updates to show the fields relevant to the selected authentication type.
- Select a legacy authenticator method from the Auto migrate users from list. After upgrading from 2.4 to 2.5, this is the legacy authenticator from which to automatically migrate users to this new authentication configuration. Refer to Ansible Automation Platform post-upgrade steps in the RPM upgrade and migration guide for important information about migrating users.
When the application is registered, GitHub displays the Client ID and Client Secret:
- Copy and paste the GitHub Client ID into the GitHub OAuth2 Key field.
- Copy and paste the GitHub Client Secret into the GitHub OAuth2 Secret field.
-
In the Base URL field, enter the hostname of the GitHub Enterprise instance, for example,
https://github.example.com. -
In the Github OAuth2 Enterprise API URL field, enter the API URL of the GitHub Enterprise instance, for example,
https://github.example.com/api/v3. -
Enter the name of your GitHub enterprise organization, as used in your organization’s URL, for example,
https://github.com/<yourorg>/in the GitHub OAuth2 Enterprise Org Name field. Optional: Enter any Additional Authenticator Fields that this authenticator can take. These fields are not validated and are passed directly back to the authenticator.
NoteValues defined in this field override the dedicated fields provided in the UI. Any values not defined here are not provided to the authenticator.
- To automatically create organizations, users, and teams upon successful login, select Create objects.
- To enable this authentication method upon creation, select Enabled.
- To remove a user for any groups they were previously added to when they authenticate from this source, select Remove users.
- Click .
Verification
To verify that the authentication is configured correctly, log out of Ansible Automation Platform and check that the login screen displays the logo of your authentication chosen method to enable logging in with those credentials.
2.5.14. Configuring GitHub enterprise team authentication
To set up social authentication for a GitHub enterprise team, you must obtain a GitHub Enterprise Organization URL, an Organization API URL, an Organization OAuth2 key and secret for a web application.
To obtain the URLs, refer to the GitHub Enterprise administration documentation.
To obtain the key and secret, you must first register your enterprise organization-owned application at https://github.com/organizations/<yourorg>/settings/applications.
The OAuth2 key (Client ID) and secret (Client Secret) are used to supply the required fields in the UI. To register the application, you must supply it with your webpage URL, which is the Callback URL shown in the Authenticator details for your authenticator configuration. See Displaying authenticator details for instructions on accessing this information.
Each key and secret must belong to a unique application and cannot be shared or reused between different authentication backends. The OAuth2key (Client ID) and secret (Client Secret) are used to supply the required fields in the UI.
Procedure
-
From the navigation panel, select
. - Click .
- Enter a Name for this authentication configuration.
- Select GitHub enterprise team from the Authentication type list. The Authentication details section automatically updates to show the fields relevant to the selected authentication type.
- Select a legacy authenticator method from the Auto migrate users from list. After upgrading from 2.4 to 2.5, this is the legacy authenticator from which to automatically migrate users to this new authentication configuration. Refer to Ansible Automation Platform post-upgrade steps in the RPM upgrade and migration guide for important information about migrating users.
When the application is registered, GitHub displays the Client ID and Client Secret:
- Copy and paste the GitHub Client ID into the GitHub OAuth2 Key field.
- Copy and paste the GitHub Client Secret into the GitHub OAuth2 Secret field.
-
In the Base URL field, enter the hostname of the GitHub Enterprise instance, for example,
https://github.orgexample.com. -
In the Github OAuth2 Enterprise API URL field, enter the API URL of the GitHub Enterprise instance, for example,
https://github.example.com/api/v3. - Enter the OAuth2 key (Client ID) from your GitHub developer application in the GitHub OAuth2 team ID field.
Optional: Enter any Additional Authenticator Fields that this authenticator can take. These fields are not validated and are passed directly back to the authenticator.
NoteValues defined in this field override the dedicated fields provided in the UI. Any values not defined here are not provided to the authenticator.
- To automatically create organizations, users, and teams upon successful login, select Create objects.
- To enable this authentication method upon creation, select Enabled.
- To remove a user for any groups they were previously added to when they authenticate from this source, select Remove users.
- Click .
Verification
To verify that the authentication is configured correctly, log out of Ansible Automation Platform and check that the login screen displays the logo of your authentication chosen method to enable logging in with those credentials.
2.5.15. Configuring RADIUS authentication
You can configure Ansible Automation Platform to centrally use RADIUS as a source for authentication information.
Procedure
-
From the navigation panel, select
. - Click .
- Enter a Name for this authentication configuration.
- Select Radius from the Authentication type list. The Authentication details section automatically updates to show the fields relevant to the selected authentication type.
- Select a legacy authenticator method from the Auto migrate users from list. After upgrading from 2.4 to 2.5, this is the legacy authenticator from which to automatically migrate users to this new authentication configuration. Refer to Ansible Automation Platform post-upgrade steps in the RPM upgrade and migration guide for important information about migrating users.
- Enter the host or IP of the RADIUS server in the RADIUS Server field. If you leave this field blank, RADIUS authentication is disabled.
- Enter the Shared secret for authenticating to RADIUS server.
Optional: Enter any Additional Authenticator Fields that this authenticator can take. These fields are not validated and are passed directly back to the authenticator.
NoteValues defined in this field override the dedicated fields provided in the UI. Any values not defined here are not provided to the authenticator.
- To automatically create organizations, users, and teams upon successful login, select Create objects.
- To enable this authentication method upon creation, select Enabled.
- To remove a user for any groups they were previously added to when they authenticate from this source, select Remove users.
- Click .
2.6. Mapping
To control which users are allowed into the Ansible Automation Platform server, and placed into Ansible Automation Platform organizations or teams based on their attributes (such as username and email address) or what groups they belong to, you can configure authenticator maps.
Use authenticator maps to add conditions that must be met before a user is given or denied access to a resource type. Authenticator maps are associated with an authenticator and are given an order. The maps are processed in order when the user logs in. This is similar to firewall rules or mail filters.
2.6.1. Understanding authenticator mapping
- Authentication
- Validates a user’s identity, typically through a username and password or a trust system.
- Authorization
- Determines what an authenticated user can do once they are authenticated.
In Ansible Automation Platform, authenticators manage authentication, validating users and returning details such as their username, first name, email, and group memberships (for example, LDAP groups). Authorization comes from the authenticator’s associated maps.
During the authentication process, after a user has authenticated, the authorization system starts with a default set of permissions in memory. Then sequentially, the authenticator maps are processed and adjust permissions based on their trigger conditions. When all the authenticator’s maps are processed, the in-memory representation of the user’s permissions are reconciled with their existing permissions.
For example, here is a simplified in-memory representation of the default permissions as follows:
Access allowed = True
Superuser permission = Undefined
Admin of teams = None
And, you might have maps that need to be processed are processed in the following order:
- Allow rule set to never
- Allow rule based on group
- Superuser rule based on user attributes
- Team admin rule based on user group
The first Allow map, set to never, denies access to the system and the in-memory representation looks like:
Access allowed = False
Superuser permission = Undefined
Admin of teams = None
However, if the user matches the second Allow map (the group-based allow), the permissions change to the following:
Access allowed = True
Superuser permission = Undefined
Admin of teams = None
Where the user is subsequently granted access to Ansible Automation Platform because they have the required groups.
Next, the Superuser map checks user attributes. If no match is found, it does not revoke existing permissions by default. Therefore, the permissions remain the same as the results from the previous map:
Access allowed = True
Superuser permission = Skipped
Admin of teams = None
To revoke superuser access, you can select the Revoke option on the Superuser map. That way, when the user does not meet the attribute criteria, the permissions update to False like in the following:
Access allowed = True
Superuser permission = False
Admin of teams = None
The final Team map checks the user’s groups coming from the authenticator for admin access on the team “My Team”. If the user has the required group, the permissions update to the following:
Access allowed = True
Superuser permission = False
Admin of teams = “My Team”
If the user lacks the required group, permissions remain unchanged unless the Revoke option has been selected on the map, in which case permissions update to the following:
Access allowed = True
Superuser permission = False
Admin of teams = Revoke admin of “My Team”
After processing all maps in the order defined, the final permissions reconcile, updating the user’s access based on the map rules.
In summary, authenticators validate users and delegate system authorization to the authenticator maps. Authenticator maps are executed in order creating an in-memory representation of the users' permissions which get reconciled with the actual permissions after all maps are executed.
By default, authenticator maps return either ALLOW or SKIPPED.
- ALLOW
- Means that a match is detected and the platform should grant the user access to the corresponding role or permission (such as, superuser, or team member).
- SKIPPED
- Means that the user did not match the trigger in the map and, the platform skips processing this map and continues to check the remaining maps. This is useful if you want to grant users additional permissions in the system without having to change the authenticator maps.
However, when the Revoke option is selected, SKIPPED becomes DENY and users who do not meet the required trigger criteria are denied access to the corresponding role or permission. This ensures that only users with matching trigger conditions are granted access.
2.6.2. Authenticator map types
Ansible Automation Platform supports the following rule types:
- Allow
- Determine if the user is allowed to log in to the system.
- Organization
- Determine if a user should be put into an organization.
- Team
- Determine if the user should be a member of a team.
- Role
- Determine if the user is a member of a role (for example, System Auditor).
- Is Superuser
- Determine if the user is a superuser in the system.
These authentication map types can be used with any type of authenticator.
2.6.3. Authenticator map triggers
Each map has a trigger that defines when the map should be evaluated as true. Trigger types include the following:
- Always
- The trigger should always be fired.
- Never
- The trigger should never be fired.
- Group
The map is true or false based on a user having, not having, or having multiple groups in the source system. See Authenticator map examples for information on using Group triggers.
When defining a group trigger, the authentication mapping expands to include the following selections:
Operation: This field includes conditional settings that trigger the handling of the rule based on the specified Groups criteria. The choices include and and or. For example, if you select and the user logging in must be a member of all of the groups specified in the Groups field for this trigger to be true. Alternatively, if you select or the user logging in must be a member of any of the specified Groups in order for the trigger to fire.
NoteIf you are only keying off one group it does not matter if you select "and" or "or".
Groups: This is a list of one or more groups coming from the authentication system that the user must be a member of. The first time you create a Groups entry, you must manually enter the values. Once entered, that selection will be available from the Groups list.
See the Operation field to determine the behavior of the trigger if more than one group is specified in the trigger.
NoteYou must enter group identifiers in lowercase. For example,
cn=johnsmith,dc=example,dc=cominstead ofCN=JohnSmith,DC=Example,DC=COM.
- Attribute
The map is true or false based on a users attributes coming from the source system. See Authenticator map examples for information about using Attribute triggers.
When defining an attribute trigger, the authentication mapping expands to include the following selections:
Operation: This field includes conditional settings that trigger the handling of the rule based on the specified Attribute criteria. In version 2.5 this field indicates what will happen if the source system returns a list of attributes instead of a single value. For example, if the source system returns multiple emails for a user and Operation was set to and, all of the given emails must match the Comparison for the trigger to be True. If Operation was set to or, any of the returned emails will set the trigger to True if they match the Comparison in the trigger.
NoteIf you want to experiment with multiple attribute maps you can do that through the API but the UI form will remove multi-attribute maps if the authenticator is saved through the UI. When adding multiple attributes to a map, the Operation will also apply to the attributes.
-
Attribute: The name of the attribute coming from the source system this trigger will be evaluated against. For example, if you wanted the trigger to fire based on the user’s last name and the last name field in the source system was called
users_last_nameyou would enter the value ‘users_last_name’ in this field. Comparison: Tells the trigger how to evaluate the value of the users. Attribute in the source system compared to the Value specified on the trigger. Available options are: contains, matches, ends with, in, or equals. Below is a breakdown of each Comparison type:
- contains: The specified character sequence in Value is contained within the attributes value returned from the source. For example, given an attribute value of ‘John’ from the source the contains Comparison would set the trigger to True if the trigger Value was set to ‘Jo’ and False if the trigger Value was ‘Joy’.
- matches: The Value on the trigger is treated as a python regular expression and does an Regular expression match (re.match) (with case ignore on) between the specified Value and the value returned from the source system. For example, if the trigger’s Value was ‘Jo’ the trigger would return True if the value from the source was ‘John‘ or ‘Joanne‘ or any other value which matched the regular expression ‘Jo’. The trigger would return False if the sources value for the attribute was ‘Dan’ because ‘Dan’ does not match the regular expression ‘Jo’.
- ends with: The trigger will see if the value provided by the source ends with the specified Value of the trigger. For example, if the source provided a value of ‘John’ the trigger would be True if its Value was set to ‘n’ or ‘on’. The trigger would be False if its Value was set to ‘z’ because the value ‘John’ coming from the source does not end with the value ’z’ specified by the trigger.
- equal: The trigger will see if the value provided by the source is equal to (in its entirety) the specified Value of the trigger. For example, if the source returned the value ‘John’, the trigger would be True if its Value was set to ‘John’. Any value other than ‘John’ returned from the source would set this trigger to False.
- in: The in condition checks if the value matches one of several values. When in is specified as the Comparison, the Value field can be a comma-separated list. For example, if a trigger had a Value of ‘John,Donna’ the trigger would be True if the attribute coming from the source had either the value ‘John’ or ‘Donna’. Otherwise, the trigger would be False.
Value: The value that a users attribute will be matched against based on the Comparison field. See examples in the Comparison definition in this section.
NoteIf the Comparison type is in, this field can be a comma-separated list (without spaces).
2.6.4. Authenticator map examples
Use the following examples to explore the different conditions, like groups and attribute values you can implement to control user access to the platform.
Add users to an organization based on an attribute
In this example, you will add a user to the Networking organization if they have an Organization attribute with the value of Networking:
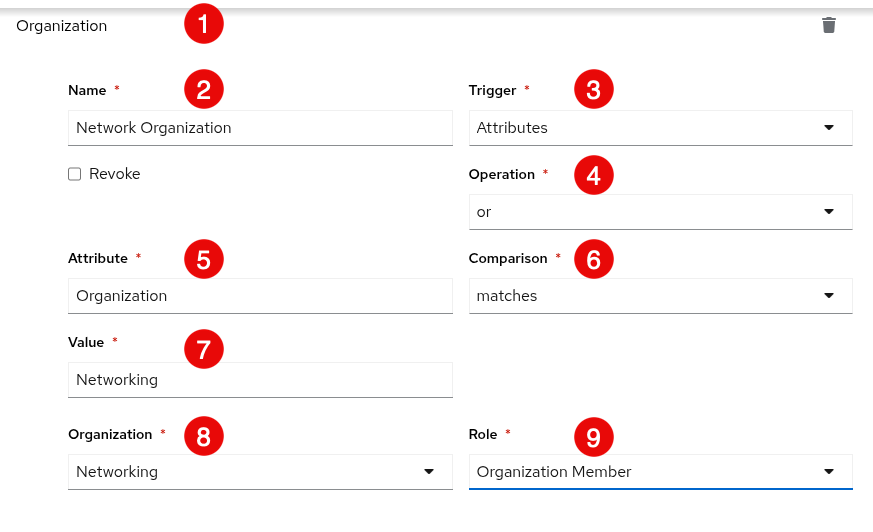
- The Organization title of the page indicates that you are configuring settings permissions on an organization.
-
Network Organizationis entered in this field and is the unique, descriptive name for this map configuration. -
Attributes is selected from the Trigger list to configure authentication based on an attribute from the source system, which in this example is
Organization. -
The operation is defined as
ormeaning that at least one condition must be true for authentication to succeed. - The Attribute coming from the source system is Organization.
-
The Comparison value is set to
matcheswhich means that when a user has the attribute Value ofNetworking, they are added to the Networking organization. -
The attribute Value coming from the source system is
Networking. -
The name of the Organization to which you are adding members is
Networking. -
Users are added to the Networking organization with the
Organization Memberrole.
Add users to a team based on the users group
In this example, you will add user to the Apple team if they have either of the following groups:
cn=administrators,ou=aap,ou=example,o=comor
cn=operators,ou=aap,ou=example,co=com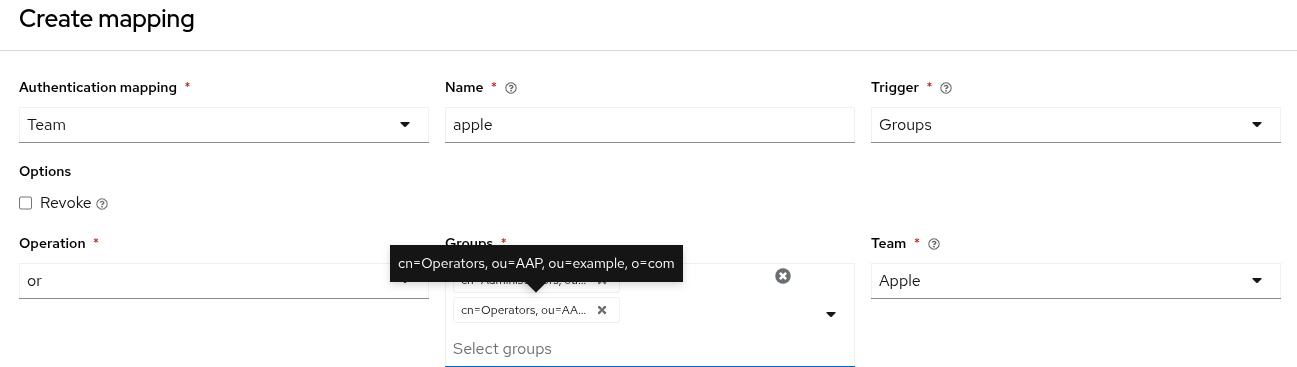
Do not escalate privileges
In this example, you never escalate users to a superuser. But note, this rule does not revoke a user’s superuser permission because the revoke option is not set.
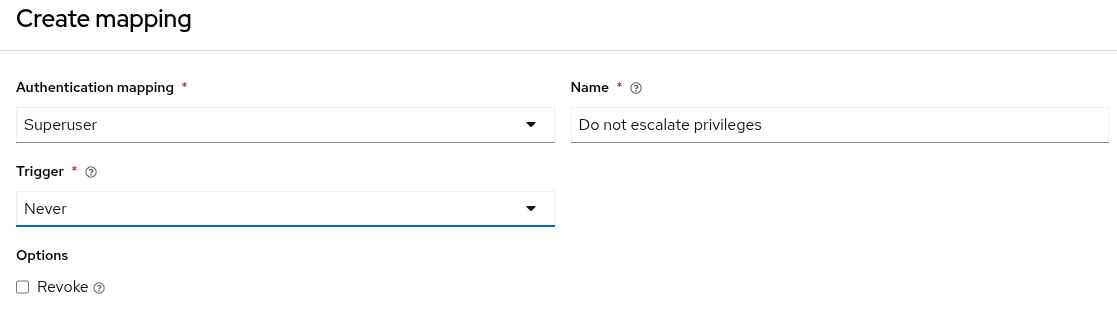
Escalate privileges based on a user having a group
In this example, you escalate user privileges to superuser if they belong to the following group:
cn=administrators,ou=aap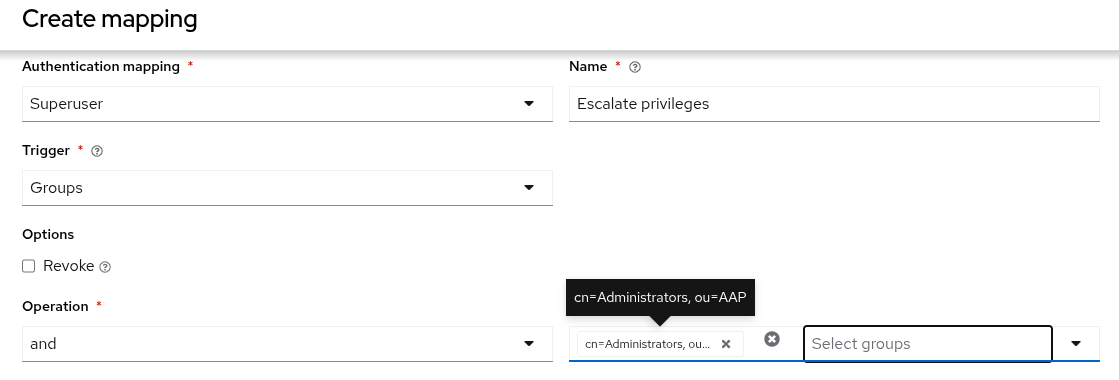
Using mapping order to create exceptions
Since maps are executed in order, it is possible to create exceptions. Expanding on the previous example for Do not escalate privileges, you can add another rule with a higher order, such as, Escalate privileges.
The first rule (Do not escalate privileges) prevents any user from being escalated to a superuser, but the second rule (Escalate privileges) alters that decision to grant superuser privileges to a user if they are in the Administrators group.
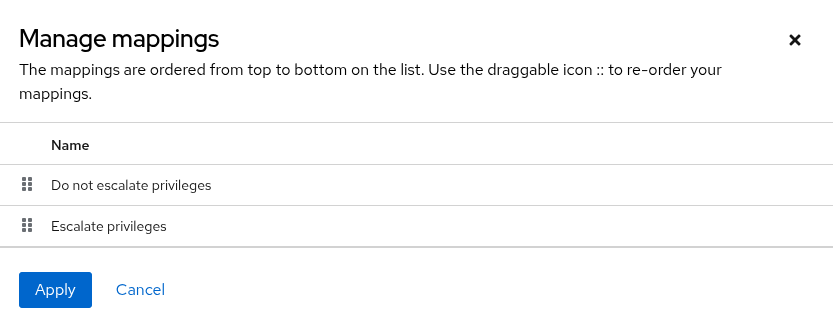
2.6.5. Allow mapping
With allow mapping, you can control which users have access to the system by defining the conditions that must be met.
Procedure
- After configuring the authentication details for your authentication method, select the Mapping tab.
- Select Allow from the Add authentication mapping list.
- Enter a unique rule Name to identify the rule.
- Select a Trigger from the list. See Authenticator map triggers for more information about map triggers.
- Select Revoke to deny user access to the system when the trigger conditions are not matched.
- Click .
2.6.6. Organization mapping
You can control which users are placed into which Ansible Automation Platform organizations based on attributes like their username and email address or based on groups provided from an authenticator.
When organization mapping is positively evaluated, a specified organization is created, if it does not exist if the authenticator tied to the map is allowed to create objects.
Procedure
- After configuring the authentication details for your authentication method, select the Mapping tab.
- Select Organization from the Add authentication mapping list.
- Enter a unique rule Name to identify the rule.
- Select a Trigger from the list. See Authenticator map triggers for more information about map triggers.
- Select Revoke to remove the user’s access to the selected organization role when the trigger conditions are not matched.
- Select the Organization to which matching users are added or blocked.
- Select a Role to be applied or removed for matching users (for example, Organization Admin or Organization Member).
- Click .
2.6.7. Team mapping
Team mapping is the mapping of team members (users) from authenticators.
You can define the options for each team’s membership. For each team, you can specify which users are automatically added as members of the team and also which users can administer the team.
Team mappings can be specified separately for each account authentication.
When Team mapping is positively evaluated, a specified team and its organization are created, if they don’t exist if the related authenticator is allowed to create objects.
When configuring team mappings with an Attribute trigger, use the or operation. The and operation requires every single value in a list to match the comparison criteria for the trigger to be successful. This is rarely the intended behavior, as you typically want a match on at least one value in the list.
Procedure
- After configuring the authentication details for your authentication method, select the Mapping tab.
- Select Team from the Add authentication mapping list.
- Enter a unique rule Name to identify the rule.
- Select a Trigger from the list. See Authenticator map triggers for more information about map triggers.
- Select Revoke to remove the user’s access to the selected organization role and deny user access to the system when the trigger conditions are not matched.
- Select the Team and Organization to which matching users are added or blocked.
- Select a Role to be applied or removed for matching users (for example, Team Admin or Team Member).
- Click .
2.6.8. Role mapping
Role mapping is the mapping of a user either to a global role, such as Platform Auditor, or team or organization role.
When a Team or Organization is specified together with the appropriate Role, the behavior is identical with Organization mapping or Team mapping.
Role mapping can be specified separately for each account authentication.
Procedure
- After configuring the authentication details for your authentication method, select the Mapping tab.
- Select Role from the Add authentication mapping list.
- Enter a unique rule Name to identify the rule.
- Select a Trigger from the list. See Authenticator map triggers for more information about map triggers.
- Select Revoke to remove the role for the user when none of the trigger conditions are matched.
- Select a Role to be applied or removed for matching users.
- Click .
2.6.9. Superuser mapping
Superuser mapping is the mapping of a user to the superuser role, such as System Administrator.
Procedure
- After configuring the authentication details for your authentication method, select the Mapping tab.
- Select Superuser from the Add authentication mapping list.
- Enter a unique rule Name to identify the rule.
- Select a Trigger from the list. See Authenticator map triggers for more information about map triggers.
- Select Revoke to remove the superuser role from the user when none of the trigger conditions are matched.
- Click .
2.6.10. Revoking partial administrator role in Ansible Automation Platform 2.5
When the System Administrator (is_superuser) role is revoked through authentication mappings for any authentication method in Ansible Automation Platform 2.5, the revocation does not fully cascade.
The user loses the platform gateway System Administrator role but keeps the following component administrator roles:
- Automation Execution Administrator (Automation controller)
- Automation Decision Administrator (Event-Driven Ansible)
- Automation Content Administrator (automation hub)
This issue occurs only when external authentication providers trigger the token revocation. Manual revocation initiated by a user within the platform gateway UI works correctly. This behavior is updated in Ansible Automation Platform 2.6 to ensure the System Administrator value is honored across all components regardless of how it is revoked.
To fully remove all administrative privileges after a mapped authentication revocation, a local administrator must perform the following manual steps:
Procedure
- Log in to platform gateway with a System Administrator account.
-
From the navigation panel, select
and click the required user. - In the Roles tab, remove the following retained roles: Automation Execution Administrator, Automation Decision Administrator, and Automation Content Administrator.
2.6.11. Reviewing authenticator map results
As a platform administrator, you can review the authenticator map results through the users page in the API, api/gateway/v1/users/X, to see how the maps were evaluated when the user logged in to the platform.
2.7. Managing authentication in Ansible Automation Platform
After you have configured your authentication settings, you can view a list of authenticators, search, sort and view the details for each authenticator configured on the system.
2.7.1. Authentication list view
On the Authentication Methods page, you can view and manage the configured authentication methods for your organization.
Procedure
From the navigation panel, select
. The Authentication Methods page is displayed.
- Click and follow the steps for creating an authentication method in Configuring an authentication type. Otherwise, proceed to step 3.
- From the menu bar, you can sort the list of authentication methods by using the arrows in the menu bar for Order, Name and Authentication type.
- Click the toggles to Enable or Disable authenticators.
2.7.2. Searching for an authenticator
You can search for a previously configured authenticator from the Authentication list view.
Procedure
-
From the navigation panel, select
. - In the search bar, enter an appropriate keyword for the authentication method you want to search for and click the arrow icon.
- If you don’t find what you’re looking for, you can narrow your search. From the filter list, select Name or Authentication type depending on the search term you want to use.
- Scroll through the list of search results and select the authenticator you want to review.
2.7.3. Displaying authenticator details
After you locate the authenticator you want to review, you can display the configuration details:
Procedure
-
From the navigation panel, select
. In the list view, select the authenticator name displayed in the Name column.
The authenticator Details page is displayed.
- From the Details page, you can review the configuration settings applied to the authenticator.
2.7.4. Editing an authenticator
You can modify the settings of previously configured authenticators from the Authentication list view.
Procedure
-
From the navigation panel, select
. In the list view, you can either:
-
Select the
 icon next to authenticator you want to modify, or
- Select the authenticator name displayed in the Name column and click from the Details page.
-
Select the
- Modify the authentication details or mapping configurations as required.
- Click .
2.7.5. Deleting an authenticator
You can modify the settings of previously configured authenticators from the Authentication list view.
Procedure
-
From the navigation panel, select
. - In the list view, select the checkbox next to the authenticator you want to delete.
Select Delete authentication from the ⋮ list.
NoteYou can delete multiple authenticators by selecting the checkbox next to each authenticator you want to remove, and clicking Delete selected authentication from the ⋮ list on the menu bar.
2.7.6. Google Cloud Platform network configuration for increased authentication performance
In a Google Cloud Platform (GCP) environment, a high volume of traffic can lead to authentication and performance issues because of the low default port limit set on the GCP Cloud NAT gateway. While this configuration affects all GCP deployments, the highest risk for hitting this limit occurs when Ansible Automation Platform is deployed on OpenShift (version 4.17 and above).
The default setting for the Cloud NAT gateway’s Minimum ports per VM instance in OpenShift installations on GCP (version 4.17 and above) is 64. This low port limit can be quickly exhausted when platform gateway handles concurrent external network connections, such as Single Sign-On (SSO) requests. When the limit is reached, it prevents new outgoing connections, causing authentication failures or severe performance degradation.
2.7.6.1. Increasing the minimum ports
To address this limitation, manually increase the Minimum ports per VM instance setting for the Cloud NAT gateway associated with the worker nodes.
Use the Google Cloud Console to apply this workaround.
Procedure
- Go to the Cloud NAT service.
- Locate and select the NAT gateway configured for your OpenShift cluster’s worker nodes.
Increase the default value of 64 for the Minimum ports per VM instance setting to a higher value to accommodate your anticipated traffic volume.
Increasing this limit ensures enough available ports for external communication, reducing the likelihood of performance issues during high-volume authentication and external communication tasks.