Chapter 3. Requirements for Installing Red Hat Ceph Storage
Figure 3.1. Prerequisite Workflow
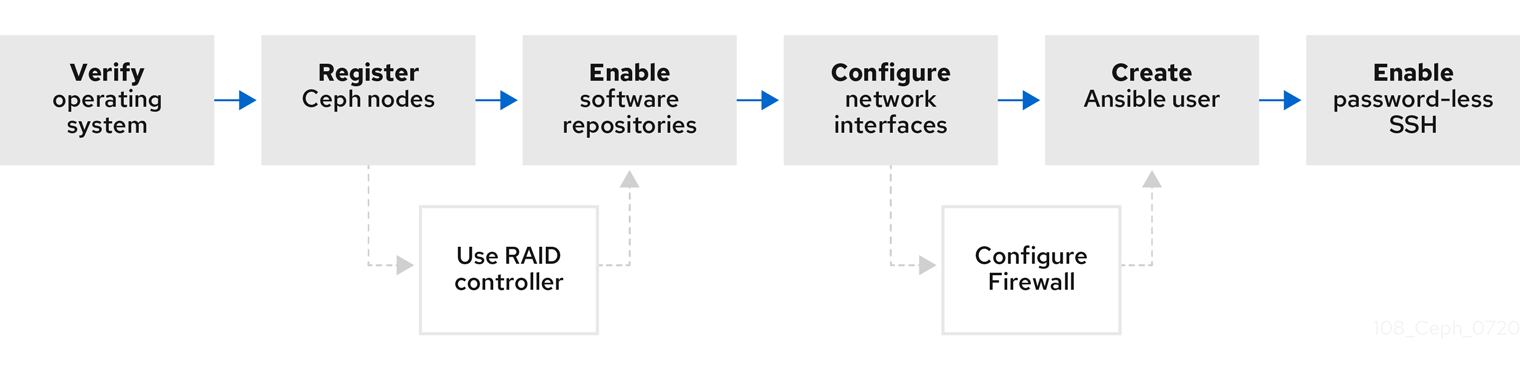
Before installing Red Hat Ceph Storage, review the following requirements and prepare each Monitor, OSD, Metadata Server, and client nodes accordingly.
To know about Red Hat Ceph Storage releases and corresponding Red Hat Ceph Storage package versions, see What are the Red Hat Ceph Storage releases and corresponding Ceph package versions article on the Red Hat Customer Portal.
3.1. Prerequisites
- Verify the hardware meets the minimum requirements for Red Hat Ceph Storage 4.
3.2. Requirements checklist for installing Red Hat Ceph Storage
| Task | Required | Section | Recommendation |
|---|---|---|---|
| Verifying the operating system version | Yes | Section 3.3, “Operating system requirements for Red Hat Ceph Storage” | |
| Registering Ceph nodes | Yes | Section 3.4, “Registering Red Hat Ceph Storage nodes to the CDN and attaching subscriptions” | |
| Enabling Ceph software repositories | Yes | Section 3.5, “Enabling the Red Hat Ceph Storage repositories” | |
| Using a RAID controller with OSD nodes | No | Section 2.6, “Considerations for using a RAID controller with OSD nodes” | Enabling write-back caches on a RAID controller might result in increased small I/O write throughput for OSD nodes. |
| Configuring the network | Yes | Section 3.6, “Verifying the network configuration for Red Hat Ceph Storage” | At minimum, a public network is required. However, a private network for cluster communication is recommended. |
| Configuring a firewall | No | Section 3.7, “Configuring a firewall for Red Hat Ceph Storage” | A firewall can increase the level of trust for a network. |
| Creating an Ansible user | Yes | Creating the Ansible user is required on all Ceph nodes. | |
| Enabling password-less SSH | Yes | Required for Ansible. |
By default, ceph-ansible installs NTP/chronyd as a requirement. If NTP/chronyd is customized, refer to Configuring the Network Time Protocol for Red Hat Ceph Storage in Manually Installing Red Hat Ceph Storage section to understand how NTP/chronyd must be configured to function properly with Ceph.
3.3. Operating system requirements for Red Hat Ceph Storage
Red Hat Enterprise Linux entitlements are included in the Red Hat Ceph Storage subscription.
The initial release of Red Hat Ceph Storage 4 is supported on Red Hat Enterprise Linux 7.7 or Red Hat Enterprise Linux 8.1. The current version of Red Hat Ceph Storage 4.3 is supported on Red Hat Enterprise Linux 7.9, 8.2 EUS, 8.4 EUS, 8.5, 8.6, 8.7, 8.8.
Red Hat Ceph Storage 4 is supported on RPM-based deployments or container-based deployments.
Deploying Red Hat Ceph Storage 4 in containers running on Red Hat Enterprise Linux 7, deploys Red Hat Ceph Storage 4 running on Red Hat Enterprise Linux 8 container image.
Use the same operating system version, architecture, and deployment type across all nodes. For example, do not use a mixture of nodes with both AMD64 and Intel 64 architectures, a mixture of nodes with both Red Hat Enterprise Linux 7 and Red Hat Enterprise Linux 8 operating systems, or a mixture of nodes with both RPM-based deployments and container-based deployments.
Red Hat does not support clusters with heterogeneous architectures, operating system versions, or deployment types.
SELinux
By default, SELinux is set to Enforcing mode and the ceph-selinux packages are installed. For additional information on SELinux please see the Data Security and Hardening Guide, Red Hat Enterprise Linux 7 SELinux User’s and Administrator’s Guide, and Red Hat Enterprise Linux 8 Using SELinux Guide.
Additional Resources
- The documentation set for Red Hat Enterprise Linux 8 is available at https://access.redhat.com/documentation/en-us/red_hat_enterprise_linux/8/
- The documentation set for Red Hat Enterprise Linux 7 is available at https://access.redhat.com/documentation/en-us/red_hat_enterprise_linux/7/.
3.4. Registering Red Hat Ceph Storage nodes to the CDN and attaching subscriptions
Register each Red Hat Ceph Storage node to the Content Delivery Network (CDN) and attach the appropriate subscription so that the node has access to software repositories. Each Red Hat Ceph Storage node must be able to access the full Red Hat Enterprise Linux 8 base content and the extras repository content. Perform the following steps on all bare-metal and container nodes in the storage cluster, unless otherwise noted.
For bare-metal Red Hat Ceph Storage nodes that cannot access the Internet during the installation, provide the software content by using the Red Hat Satellite server. Alternatively, mount a local Red Hat Enterprise Linux 8 Server ISO image and point the Red Hat Ceph Storage nodes to the ISO image. For additional details, contact Red Hat Support.
For more information on registering Ceph nodes with the Red Hat Satellite server, see the How to Register Ceph with Satellite 6 and How to Register Ceph with Satellite 5 articles on the Red Hat Customer Portal.
Prerequisites
- A valid Red Hat subscription.
- Red Hat Ceph Storage nodes must be able to connect to the Internet.
- Root-level access to the Red Hat Ceph Storage nodes.
Procedure
For container deployments only, when the Red Hat Ceph Storage nodes do NOT have access to the Internet during deployment. You must follow these steps first on a node with Internet access:
Start a local container registry:
Red Hat Enterprise Linux 7
# docker run -d -p 5000:5000 --restart=always --name registry registry:2Red Hat Enterprise Linux 8
# podman run -d -p 5000:5000 --restart=always --name registry registry:2Verify
registry.redhat.iois in the container registry search path.Open for editing the
/etc/containers/registries.conffile:[registries.search] registries = [ 'registry.access.redhat.com', 'registry.fedoraproject.org', 'registry.centos.org', 'docker.io']If
registry.redhat.iois not included in the file, add it:[registries.search] registries = ['registry.redhat.io', 'registry.access.redhat.com', 'registry.fedoraproject.org', 'registry.centos.org', 'docker.io']Pull the Red Hat Ceph Storage 4 image, Prometheus image, and Dashboard image from the Red Hat Customer Portal:
Red Hat Enterprise Linux 7
# docker pull registry.redhat.io/rhceph/rhceph-4-rhel8:latest
# docker pull registry.redhat.io/openshift4/ose-prometheus-node-exporter:v4.6
# docker pull registry.redhat.io/rhceph/rhceph-4-dashboard-rhel8:latest
# docker pull registry.redhat.io/openshift4/ose-prometheus:v4.6
# docker pull registry.redhat.io/openshift4/ose-prometheus-alertmanager:v4.6
Red Hat Enterprise Linux 8
# podman pull registry.redhat.io/rhceph/rhceph-4-rhel8:latest # podman pull registry.redhat.io/openshift4/ose-prometheus-node-exporter:v4.6 # podman pull registry.redhat.io/rhceph/rhceph-4-dashboard-rhel8:latest # podman pull registry.redhat.io/openshift4/ose-prometheus:v4.6 # podman pull registry.redhat.io/openshift4/ose-prometheus-alertmanager:v4.6NoteRed Hat Enterprise Linux 7 and 8 both use the same container image, based on Red Hat Enterprise Linux 8.
Tag the image:
The Prometheus image tag version is v4.6 for Red Hat Ceph Storage 4.2.
Red Hat Enterprise Linux 7
# docker tag registry.redhat.io/rhceph/rhceph-4-rhel8:latest LOCAL_NODE_FQDN:5000/rhceph/rhceph-4-rhel8:latest # docker tag registry.redhat.io/openshift4/ose-prometheus-node-exporter:v4.6 LOCAL_NODE_FQDN:5000/openshift4/ose-prometheus-node-exporter:v4.6 # docker tag registry.redhat.io/rhceph/rhceph-4-dashboard-rhel8:latest LOCAL_NODE_FQDN:5000/rhceph/rhceph-4-dashboard-rhel8:latest # docker tag registry.redhat.io/openshift4/ose-prometheus-alertmanager:v4.6 LOCAL_NODE_FQDN:5000/openshift4/ose-prometheus-alertmanager:v4.6 # docker tag registry.redhat.io/openshift4/ose-prometheus:v4.6 LOCAL_NODE_FQDN:5000/openshift4/ose-prometheus:v4.6- Replace
- LOCAL_NODE_FQDN with your local host FQDN.
Red Hat Enterprise Linux 8
# podman tag registry.redhat.io/rhceph/rhceph-4-rhel8:latest LOCAL_NODE_FQDN:5000/rhceph/rhceph-4-rhel8:latest # podman tag registry.redhat.io/openshift4/ose-prometheus-node-exporter:v4.6 LOCAL_NODE_FQDN:5000/openshift4/ose-prometheus-node-exporter:v4.6 # podman tag registry.redhat.io/rhceph/rhceph-4-dashboard-rhel8:latest LOCAL_NODE_FQDN:5000/rhceph/rhceph-4-dashboard-rhel8:latest # podman tag registry.redhat.io/openshift4/ose-prometheus-alertmanager:v4.6 LOCAL_NODE_FQDN:5000/openshift4/ose-prometheus-alertmanager:v4.6 # podman tag registry.redhat.io/openshift4/ose-prometheus:v4.6 LOCAL_NODE_FQDN:5000/openshift4/ose-prometheus:v4.6- Replace
- LOCAL_NODE_FQDN with your local host FQDN.
Edit the
/etc/containers/registries.conffile and add the node’s FQDN with the port in the file, and save:[registries.insecure] registries = ['LOCAL_NODE_FQDN:5000']NoteThis step must be done on all storage cluster nodes that access the local Docker registry.
Push the image to the local Docker registry you started:
Red Hat Enterprise Linux 7
# docker push --remove-signatures LOCAL_NODE_FQDN:5000/rhceph/rhceph-4-rhel8 # docker push --remove-signatures LOCAL_NODE_FQDN:5000/openshift4/ose-prometheus-node-exporter:v4.6 # docker push --remove-signatures LOCAL_NODE_FQDN:5000/rhceph/rhceph-4-dashboard-rhel8 # docker push --remove-signatures LOCAL_NODE_FQDN:5000/openshift4/ose-prometheus-alertmanager:v4.6 # docker push --remove-signatures LOCAL_NODE_FQDN:5000/openshift4/ose-prometheus:v4.6- Replace
- LOCAL_NODE_FQDN with your local host FQDN.
Red Hat Enterprise Linux 8
# podman push --remove-signatures LOCAL_NODE_FQDN:5000/rhceph/rhceph-4-rhel8 # podman push --remove-signatures LOCAL_NODE_FQDN:5000/openshift4/ose-prometheus-node-exporter:v4.6 # podman push --remove-signatures LOCAL_NODE_FQDN:5000/rhceph/rhceph-4-dashboard-rhel8 # podman push --remove-signatures LOCAL_NODE_FQDN:5000/openshift4/ose-prometheus-alertmanager:v4.6 # podman push --remove-signatures LOCAL_NODE_FQDN:5000/openshift4/ose-prometheus:v4.6- Replace
- LOCAL_NODE_FQDN with your local host FQDN.
For Red Hat Enterprise Linux 7, restart the
dockerservice:# systemctl restart dockerNoteSee the Installing a Red Hat Ceph Storage cluster for an example of the
all.ymlfile when the Red Hat Ceph Storage nodes do NOT have access to the Internet during deployment.
For all deployments, bare-metal or in containers:
Register the node, and when prompted, enter the appropriate Red Hat Customer Portal credentials:
# subscription-manager registerPull the latest subscription data from the CDN:
# subscription-manager refreshList all available subscriptions for Red Hat Ceph Storage:
# subscription-manager list --available --all --matches="*Ceph*"Copy the Pool ID from the list of available subscriptions for Red Hat Ceph Storage.
Attach the subscription:
# subscription-manager attach --pool=POOL_ID- Replace
- POOL_ID with the Pool ID identified in the previous step.
Disable the default software repositories, and enable the server and the extras repositories on the respective version of Red Hat Enterprise Linux:
Red Hat Enterprise Linux 7
# subscription-manager repos --disable=*
# subscription-manager repos --enable=rhel-7-server-rpms
# subscription-manager repos --enable=rhel-7-server-extras-rpms
Red Hat Enterprise Linux 8
# subscription-manager repos --disable=*
# subscription-manager repos --enable=rhel-8-for-x86_64-baseos-rpms
# subscription-manager repos --enable=rhel-8-for-x86_64-appstream-rpms
Update the system to receive the latest packages.
For Red Hat Enterprise Linux 7:
# yum updateFor Red Hat Enterprise Linux 8:
# dnf update
Additional Resources
- See the Using and Configuring Red Hat Subscription Manager guide for Red Hat Subscription Management.
- See the Enabling the Red Hat Ceph Storage repositories.
3.5. Enabling the Red Hat Ceph Storage repositories
Before you can install Red Hat Ceph Storage, you must choose an installation method. Red Hat Ceph Storage supports two installation methods:
Content Delivery Network (CDN)
For Ceph Storage clusters with Ceph nodes that can connect directly to the internet, use Red Hat Subscription Manager to enable the required Ceph repository.
Local Repository
For Ceph Storage clusters where security measures preclude nodes from accessing the internet, install Red Hat Ceph Storage 4 from a single software build delivered as an ISO image, which will allow you to install local repositories.
Prerequisites
- Valid customer subscription.
For CDN installations:
- Red Hat Ceph Storage nodes must be able to connect to the internet.
- Register the cluster nodes with CDN.
If enabled, then disable the Extra Packages for Enterprise Linux (EPEL) software repository:
[root@monitor ~]# yum install yum-utils vim -y
[root@monitor ~]# yum-config-manager --disable epel
Procedure
For CDN installations:
On the Ansible administration node, enable the Red Hat Ceph Storage 4 Tools repository and Ansible repository:
Red Hat Enterprise Linux 7
[root@admin ~]# subscription-manager repos --enable=rhel-7-server-rhceph-4-tools-rpms --enable=rhel-7-server-ansible-2.9-rpmsRed Hat Enterprise Linux 8
[root@admin ~]# subscription-manager repos --enable=rhceph-4-tools-for-rhel-8-x86_64-rpms --enable=ansible-2.9-for-rhel-8-x86_64-rpmsBy default, Red Hat Ceph Storage repositories are enabled by
ceph-ansibleon the respective nodes. To manually enable the repositories:NoteDo not enable these repositories on containerized deployments as they are not needed.
On the Ceph Monitor nodes, enable the Red Hat Ceph Storage 4 Monitor repository:
Red Hat Enterprise Linux 7
[root@monitor ~]# subscription-manager repos --enable=rhel-7-server-rhceph-4-mon-rpmsRed Hat Enterprise Linux 8
[root@monitor ~]# subscription-manager repos --enable=rhceph-4-mon-for-rhel-8-x86_64-rpmsOn the Ceph OSD nodes, enable the Red Hat Ceph Storage 4 OSD repository:
Red Hat Enterprise Linux 7
[root@osd ~]# subscription-manager repos --enable=rhel-7-server-rhceph-4-osd-rpmsRed Hat Enterprise Linux 8
[root@osd ~]# subscription-manager repos --enable=rhceph-4-osd-for-rhel-8-x86_64-rpmsEnable the Red Hat Ceph Storage 4 Tools repository on the following node types: RBD mirroring, Ceph clients, Ceph Object Gateways, Metadata Servers, NFS, iSCSI gateways, and Dashboard servers.
Red Hat Enterprise Linux 7
[root@client ~]# subscription-manager repos --enable=rhel-7-server-rhceph-4-tools-rpmsRed Hat Enterprise Linux 8
[root@client ~]# subscription-manager repos --enable=rhceph-4-tools-for-rhel-8-x86_64-rpmsFor ISO installations:
- Log in to the Red Hat Customer Portal.
- Click Downloads to visit the Software & Download center.
- In the Red Hat Ceph Storage area, click Download Software to download the latest version of the software.
Additional Resources
- The Using and Configuring Red Hat Subscription Manager guide for Red Hat Subscription Management 1
3.6. Verifying the network configuration for Red Hat Ceph Storage
All Red Hat Ceph Storage nodes require a public network. You must have a network interface card configured to a public network where Ceph clients can reach Ceph monitors and Ceph OSD nodes.
You might have a network interface card for a cluster network so that Ceph can conduct heart-beating, peering, replication, and recovery on a network separate from the public network.
Configure the network interface settings and ensure to make the changes persistent.
Red Hat does not recommend using a single network interface card for both a public and private network.
Prerequisites
- Network interface card connected to the network.
Procedure
Do the following steps on all Red Hat Ceph Storage nodes in the storage cluster, as the root user.
Verify the following settings are in the
/etc/sysconfig/network-scripts/ifcfg-*file corresponding the public-facing network interface card:-
The
BOOTPROTOparameter is set tononefor static IP addresses. The
ONBOOTparameter must be set toyes.If it is set to
no, the Ceph storage cluster might fail to peer on reboot.If you intend to use IPv6 addressing, you must set the IPv6 parameters such as
IPV6INITtoyes, except theIPV6_FAILURE_FATALparameter.Also, edit the Ceph configuration file,
/etc/ceph/ceph.conf, to instruct Ceph to use IPv6, otherwise, Ceph uses IPv4.
-
The
Additional Resources
- For details on configuring network interface scripts for Red Hat Enterprise Linux 8, see the Configuring ip networking with ifcfg files chapter in the Configuring and managing networking guide for Red Hat Enterprise Linux 8.
- For more information on network configuration see the Ceph network configuration section in the Configuration Guide for Red Hat Ceph Storage 4.
3.7. Configuring a firewall for Red Hat Ceph Storage
Red Hat Ceph Storage uses the firewalld service. The firewalld service contains the list of ports for each daemon.
The Ceph Monitor daemons use ports 3300 and 6789 for communication within the Ceph storage cluster.
On each Ceph OSD node, the OSD daemons use several ports in the range 6800-7300:
- One for communicating with clients and monitors over the public network
- One for sending data to other OSDs over a cluster network, if available; otherwise, over the public network
- One for exchanging heartbeat packets over a cluster network, if available; otherwise, over the public network
The Ceph Manager (ceph-mgr) daemons use ports in range 6800-7300. Consider colocating the ceph-mgr daemons with Ceph Monitors on same nodes.
The Ceph Metadata Server nodes (ceph-mds) use port range 6800-7300.
The Ceph Object Gateway nodes are configured by Ansible to use port 8080 by default. However, you can change the default port, for example to port 80.
To use the SSL/TLS service, open port 443.
The following steps are optional if firewalld is enabled. By default, ceph-ansible includes the below setting in group_vars/all.yml, which automatically opens the appropriate ports:
configure_firewall: TruePrerequisite
- Network hardware is connected.
-
Having
rootorsudoaccess to all nodes in the storage cluster.
Procedure
On all nodes in the storage cluster, start the
firewalldservice. Enable it to run on boot, and ensure that it is running:# systemctl enable firewalld # systemctl start firewalld # systemctl status firewalldOn all monitor nodes, open port
3300and6789on the public network:[root@monitor ~]# firewall-cmd --zone=public --add-port=3300/tcp [root@monitor ~]# firewall-cmd --zone=public --add-port=3300/tcp --permanent [root@monitor ~]# firewall-cmd --zone=public --add-port=6789/tcp [root@monitor ~]# firewall-cmd --zone=public --add-port=6789/tcp --permanent [root@monitor ~]# firewall-cmd --permanent --add-service=ceph-mon [root@monitor ~]# firewall-cmd --add-service=ceph-monTo limit access based on the source address:
firewall-cmd --zone=public --add-rich-rule='rule family=ipv4 \ source address=IP_ADDRESS/NETMASK_PREFIX port protocol=tcp \ port=6789 accept' --permanent- Replace
- IP_ADDRESS with the network address of the Monitor node.
NETMASK_PREFIX with the netmask in CIDR notation.
Example
[root@monitor ~]# firewall-cmd --zone=public --add-rich-rule='rule family=ipv4 \
source address=192.168.0.11/24 port protocol=tcp \
port=6789 accept' --permanent
On all OSD nodes, open ports
6800-7300on the public network:[root@osd ~]# firewall-cmd --zone=public --add-port=6800-7300/tcp [root@osd ~]# firewall-cmd --zone=public --add-port=6800-7300/tcp --permanent [root@osd ~]# firewall-cmd --permanent --add-service=ceph [root@osd ~]# firewall-cmd --add-service=cephIf you have a separate cluster network, repeat the commands with the appropriate zone.
On all Ceph Manager (
ceph-mgr) nodes, open ports6800-7300on the public network:[root@monitor ~]# firewall-cmd --zone=public --add-port=6800-7300/tcp [root@monitor ~]# firewall-cmd --zone=public --add-port=6800-7300/tcp --permanentIf you have a separate cluster network, repeat the commands with the appropriate zone.
On all Ceph Metadata Server (
ceph-mds) nodes, open ports6800-7300on the public network:[root@monitor ~]# firewall-cmd --zone=public --add-port=6800-7300/tcp [root@monitor ~]# firewall-cmd --zone=public --add-port=6800-7300/tcp --permanentIf you have a separate cluster network, repeat the commands with the appropriate zone.
On all Ceph Object Gateway nodes, open the relevant port or ports on the public network.
To open the default Ansible configured port of
8080:[root@gateway ~]# firewall-cmd --zone=public --add-port=8080/tcp [root@gateway ~]# firewall-cmd --zone=public --add-port=8080/tcp --permanentTo limit access based on the source address:
firewall-cmd --zone=public --add-rich-rule="rule family="ipv4" \
source address="IP_ADDRESS/NETMASK_PREFIX" port protocol="tcp" \
port="8080" accept"
firewall-cmd --zone=public --add-rich-rule="rule family="ipv4" \ source address="IP_ADDRESS/NETMASK_PREFIX" port protocol="tcp" \ port="8080" accept" --permanent- Replace
- IP_ADDRESS with the network address of the Monitor node.
NETMASK_PREFIX with the netmask in CIDR notation.
Example
[root@gateway ~]# firewall-cmd --zone=public --add-rich-rule="rule family="ipv4" \
source address="192.168.0.31/24" port protocol="tcp" \
port="8080" accept"
[root@gateway ~]# firewall-cmd --zone=public --add-rich-rule="rule family="ipv4" \ source address="192.168.0.31/24" port protocol="tcp" \ port="8080" accept" --permanent
Optionally, if you installed Ceph Object Gateway using Ansible and changed the default port that Ansible configures the Ceph Object Gateway to use from
8080, for example, to port80, then open this port:[root@gateway ~]# firewall-cmd --zone=public --add-port=80/tcp [root@gateway ~]# firewall-cmd --zone=public --add-port=80/tcp --permanentTo limit access based on the source address, run the following commands:
firewall-cmd --zone=public --add-rich-rule="rule family="ipv4" \
source address="IP_ADDRESS/NETMASK_PREFIX" port protocol="tcp" \
port="80" accept"
firewall-cmd --zone=public --add-rich-rule="rule family="ipv4" \ source address="IP_ADDRESS/NETMASK_PREFIX" port protocol="tcp" \ port="80" accept" --permanent- Replace
- IP_ADDRESS with the network address of the Monitor node.
- NETMASK_PREFIX with the netmask in CIDR notation.
Example
[root@gateway ~]# firewall-cmd --zone=public --add-rich-rule="rule family="ipv4" \
source address="192.168.0.31/24" port protocol="tcp" \
port="80" accept"
[root@gateway ~]# firewall-cmd --zone=public --add-rich-rule="rule family="ipv4" \ source address="192.168.0.31/24" port protocol="tcp" \ port="80" accept" --permanentOptional. To use SSL/TLS, open port
443:[root@gateway ~]# firewall-cmd --zone=public --add-port=443/tcp [root@gateway ~]# firewall-cmd --zone=public --add-port=443/tcp --permanentTo limit access based on the source address, run the following commands:
firewall-cmd --zone=public --add-rich-rule="rule family="ipv4" \
source address="IP_ADDRESS/NETMASK_PREFIX" port protocol="tcp" \
port="443" accept"
firewall-cmd --zone=public --add-rich-rule="rule family="ipv4" \ source address="IP_ADDRESS/NETMASK_PREFIX" port protocol="tcp" \ port="443" accept" --permanent- Replace
- IP_ADDRESS with the network address of the Monitor node.
- NETMASK_PREFIX with the netmask in CIDR notation.
Example
[root@gateway ~]# firewall-cmd --zone=public --add-rich-rule="rule family="ipv4" \
source address="192.168.0.31/24" port protocol="tcp" \
port="443" accept"
[root@gateway ~]# firewall-cmd --zone=public --add-rich-rule="rule family="ipv4" \
source address="192.168.0.31/24" port protocol="tcp" \
port="443" accept" --permanent
Additional Resources
- For more information about public and cluster network, see Verifying the Network Configuration for Red Hat Ceph Storage.
-
For additional details on
firewalld, see the Using and configuring firewalls chapter in the Securing networks guide for Red Hat Enterprise Linux 8.
3.8. Creating an Ansible user with sudo access
Ansible must be able to log into all the Red Hat Ceph Storage (RHCS) nodes as a user that has root privileges to install software and create configuration files without prompting for a password. You must create an Ansible user with password-less root access on all nodes in the storage cluster when deploying and configuring a Red Hat Ceph Storage cluster with Ansible.
Prerequisite
-
Having
rootorsudoaccess to all nodes in the storage cluster.
Procedure
Log into the node as the
rootuser:ssh root@HOST_NAME- Replace
HOST_NAME with the host name of the Ceph node.
Example
# ssh root@mon01Enter the
rootpassword when prompted.
Create a new Ansible user:
adduser USER_NAME- Replace
USER_NAME with the new user name for the Ansible user.
Example
# adduser adminImportantDo not use
cephas the user name. Thecephuser name is reserved for the Ceph daemons. A uniform user name across the cluster can improve ease of use, but avoid using obvious user names, because intruders typically use them for brute-force attacks.
Set a new password for this user:
# passwd USER_NAME- Replace
USER_NAME with the new user name for the Ansible user.
Example
# passwd adminEnter the new password twice when prompted.
Configure
sudoaccess for the newly created user:cat << EOF >/etc/sudoers.d/USER_NAME $USER_NAME ALL = (root) NOPASSWD:ALL EOF- Replace
USER_NAME with the new user name for the Ansible user.
Example
# cat << EOF >/etc/sudoers.d/admin
admin ALL = (root) NOPASSWD:ALL
EOF
Assign the correct file permissions to the new file:
chmod 0440 /etc/sudoers.d/USER_NAME- Replace
USER_NAME with the new user name for the Ansible user.
Example
# chmod 0440 /etc/sudoers.d/admin
Additional Resources
- The Managing user accounts section in the Configuring basic system settings guide Red Hat Enterprise Linux 8
3.9. Enabling password-less SSH for Ansible
Generate an SSH key pair on the Ansible administration node and distribute the public key to each node in the storage cluster so that Ansible can access the nodes without being prompted for a password.
This procedure is not required if installing Red Hat Ceph Storage using the Cockpit web-based interface. This is because the Cockpit Ceph Installer generates its own SSH key. Instructions for copying the Cockpit SSH key to all nodes in the cluster are in the chapter Installing Red Hat Ceph Storage using the Cockpit web interface.
Prerequisites
- Access to the Ansible administration node.
-
Creating an Ansible user with
sudoaccess.
Procedure
Generate the SSH key pair, accept the default file name and leave the passphrase empty:
[ansible@admin ~]$ ssh-keygenCopy the public key to all nodes in the storage cluster:
ssh-copy-id USER_NAME@HOST_NAME- Replace
- USER_NAME with the new user name for the Ansible user.
HOST_NAME with the host name of the Ceph node.
Example
[ansible@admin ~]$ ssh-copy-id ceph-admin@ceph-mon01
Create the user’s SSH
configfile:[ansible@admin ~]$ touch ~/.ssh/configOpen for editing the
configfile. Set values for theHostnameandUseroptions for each node in the storage cluster:Host node1 Hostname HOST_NAME User USER_NAME Host node2 Hostname HOST_NAME User USER_NAME ...- Replace
- HOST_NAME with the host name of the Ceph node.
USER_NAME with the new user name for the Ansible user.
Example
Host node1 Hostname monitor User admin Host node2 Hostname osd User admin Host node3 Hostname gateway User adminImportantBy configuring the
~/.ssh/configfile you do not have to specify the-u USER_NAMEoption each time you execute theansible-playbookcommand.
Set the correct file permissions for the
~/.ssh/configfile:[admin@admin ~]$ chmod 600 ~/.ssh/config
Additional Resources
-
The
ssh_config(5)manual page. - See the Using secure communications between two systems with OpenSSH chapter in the Securing networks for Red Hat Enterprise Linux 8.