Chapter 5. OpenShift basics in CodeReady Studio
CodeReady Studio includes OpenShift Application Explorer view, which provides a simplified user experience allowing easy and rapid feedback through the inner loop as well as debugging.
5.1. Setting up OpenShift Application Explorer view
The following section describes how to open OpenShift Application Explorer in CodeReady Studio.
Procedure
- Start CodeReady Studio.
Click
. 
The Show View window appears.

- Enter OpenShift in the search field.
- Select OpenShift Application Explorer.
Click .
The OpenShift Application Explorer view appears.

5.2. Connecting to the OpenShift cluster using OpenShift Application Explorer
The following section describes how to login to the OpenShift cluster in CodeReady Studio using OpenShift Application Explorer.
Procedure
- Start CodeReady Studio.
- Open OpenShift Application Explorer.
Click Can’t connect to cluster. Click to login.

The Login window appears.

- Enter your login credentials.
- Click the button.
Your projects now appear in the OpenShift Application Explorer view.
5.3. Creating a new launcher project
The following section describes how to create a new launcher project in CodeReady Studio.
Procedure
- Start CodeReady Studio.
Press Ctrl+N.
The Select a wizard window appears.

- Enter Launcher in the search field.
- Select Launcher project.
Click .
The New Launcher project window appears.

- Set your preferred Mission.
- Set your preferred Runtime.
- Name your project.
- Select the location for your project.
Click the button.
Note that the process of resolving dependencies might take some time to complete.
Your newly created launcher project is now listed in the Project Explorer view.
5.4. Creating a new project using OpenShift Application Explorer
The following section describes how to create a new project using OpenShift Application Explorer in CodeReady Studio.
Procedure
- Start CodeReady Studio.
- Start OpenShift Application Explorer.
Right-click any place in
. 
The New project window appears.

- Name your project.
- Click .
Your newly created project is now listed in the OpenShift Application Explorer view.
5.5. Creating a new component using OpenShift Application Explorer
The following section describes how to create a new component using OpenShift Application Explorer in CodeReady Studio.
Procedure
- Start CodeReady Studio.
- Start OpenShift Application Explorer.
Right-click the target
. 
The Create component window appears.

- Name your project.
- Click to select the Eclipse Project.
- Set your preferred Component type.
- Set your preferred Component version.
- Name your application.
- Clear the Push after create check box.
Click .
The Console view appears, displaying the validation process.
Your newly created component is now listed in the OpenShift Application Explorer view under your project.
5.6. Deploying a component on cluster using OpenShift Application Explorer
The following section describes how to deploy a component on cluster using OpenShift Application Explorer in CodeReady Studio.
Procedure
- Start CodeReady Studio.
- Start OpenShift Application Explorer.
- Expand your project.
- Expand your application.
Right-click your
. 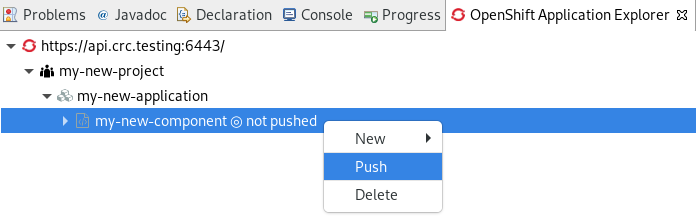
The Console view appears, displaying the process of file synchronization.
5.7. Defining an external access URL using OpenShift Application Explorer
The following section describes how to define an external access URL using OpenShift Application Explorer in CodeReady Studio.
Procedure
- Start CodeReady Studio.
- Start OpenShift Application Explorer.
- Expand your project.
- Expand your application.
Right-click your
. 
The Create URL window appears.

- Name your URL.
- Set Port value to 8080.
Click .
The Console view appears, displaying the process of URL creation.
In OpenShift Application Explorer, right-click your
.
The Console view appears, displaying the process of file synchronization.
Your newly created URL is now listed in the OpenShift Application Explorer view under your component.
5.8. Debugging an application on the cluster using OpenShift Application Explorer
The following section describes how to debug a component using OpenShift Application Explorer in CodeReady Studio.
Procedure
- Start CodeReady Studio.
- Start OpenShift Application Explorer.
- Expand your project.
- Expand your application.
Right-click your
. 
The Console view appears.
- In OpenShift Application Explorer, expand your component.
Right-click your
. 
The Confirm Perspective Switch window appears.
Click .
The Debug Perspective window appears displaying the debugging process.