Chapter 8. Customizing the desktop environment
Customize the GNOME desktop environment in Red Hat Enterprise Linux 10 to personalize your individual workflow and visual preferences with an adaptable user interface.
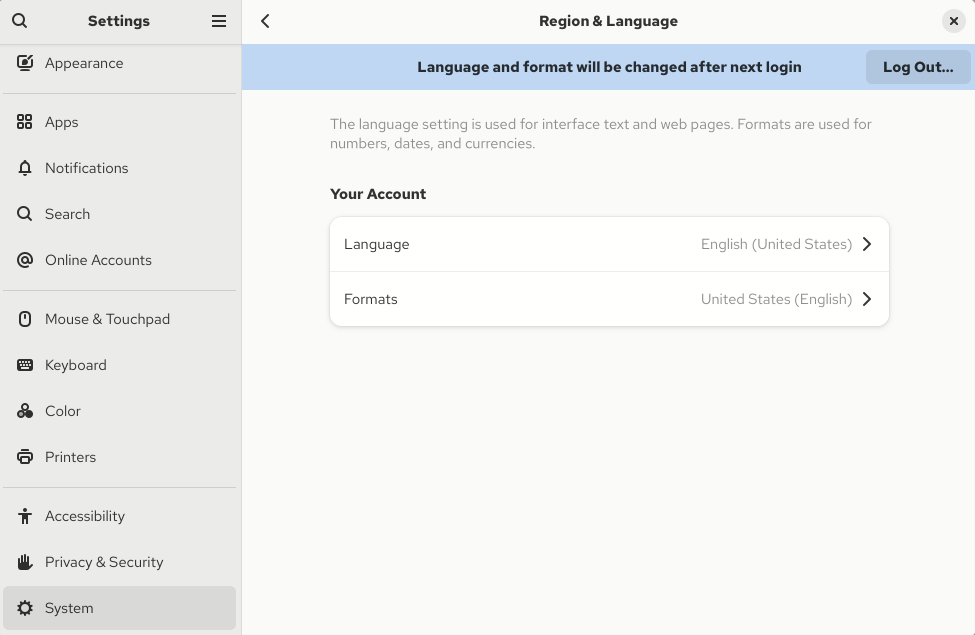
8.1. Change the language by using the desktop GUI
Use the Settings application to change the system language.
Prerequisites
- Required language packages are installed on your system.
Procedure
Open the Settings application from the system menu by clicking on its icon.

- In Settings, click Region & Language from the left vertical bar.
Click Language.

Select the required region and language from the menu.

- Click Select.
Click Log Out… for changes to take effect.
 Note
NoteSome applications do not support certain languages. The text of an application that cannot be translated into the selected language remains in US English.
8.2. Enabling Chinese, Japanese, or Korean text input
If you write with Chinese, Japanese, or Korean characters, you can configure RHEL to input text in your language.
8.2.1. Input methods
Certain scripts, such as Chinese, Japanese, or Korean, require keyboard input to go through an Input Method Engine (IME) to enter native text.
An input method is a set of conversion rules between the text input and the selected script. An IME is a software that performs the input conversion specified by the input method.
To input text in these scripts, you must set up an IME. If you installed the system in your native language and selected your language at the GNOME Initial Setup screen, the input method for your language is enabled by default.
The following input method engines (IMEs) are available on RHEL from the listed packages:
| Languages | Scripts | IME name | Package |
|---|---|---|---|
| Chinese | Simplified Chinese | Intelligent Pinyin |
|
| Chinese | Traditional Chinese | New Zhuyin |
|
| Japanese | Kanji, Hiragana, Katakana | Anthy |
|
| Korean | Hangul | Hangul |
|
| Other | Various | M17N |
|
8.2.2. Switching the input method in GNOME
Before you can switch to a different script, for example, Chinese, Japanese, or Korean scripts, you must configure the input method.
Prerequisites
-
The input method packages are installed. You can install all available input packages by entering the
dnf install @input-methodscommand.
Procedure
Click the settings (⚙️) button on the right to display a settings menu.
- Select the Keyboard section.
In the Input Sources list, review the currently enabled input methods.

If your input method is missing, click the Add Input Source button under the Input Sources list and select your language.
NoteIf you cannot find your language in the menu, expand the selection by clicking More () at the end of the list.
Select the input method that you want to use. A gear icon marks all input methods to distinguish them from simple keyboard layouts.

- Confirm your selection by clicking .
Switch the active input method in one of the following ways:
Click the input method indicator on the right side of the top panel and select your input method.
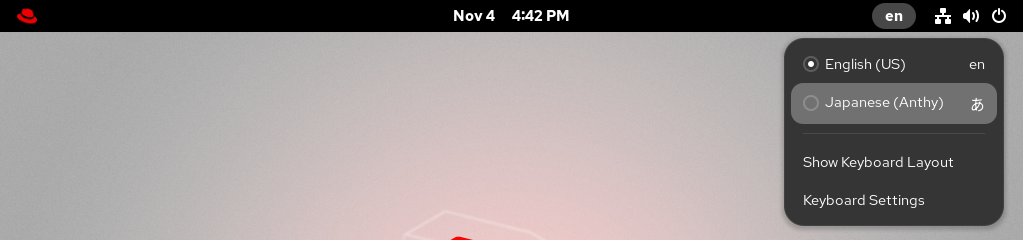
- Switch between the enabled input methods by using the Super+Space keyboard shortcut.
Verification
- Open a text editor.
- Type text in your language.
- Verify that the text appears in your native script.
8.3. Enabling desktop icons
You can enable the desktop icons functionality and move files to the desktop.
8.3.1. Desktop icons
Desktop icons are provided by the Desktop icons GNOME Shell extension, which is available from the gnome-shell-extension-desktop-icons package.
-
Desktop icons in GNOME Classic: The GNOME Classic environment includes the
gnome-shell-extension-desktop-iconspackage by default. Desktop icons are always on, and you cannot turn them off. Desktop icons in GNOME Standard: In GNOME Standard, desktop icons are disabled by default.
To enable desktop icons in the GNOME Standard environment, you must install the
gnome-shell-extension-desktop-iconspackage.
8.3.2. Enabling desktop icons in GNOME Standard
Enable the desktop icons functionality directly in the GNOME Standard environment.
Prerequisites
The Extensions application is installed on the system:
# dnf install gnome-shell-extension-desktop-icons
Procedure
- Open the Extensions application.
Enable the Desktop Icons extension.

8.3.3. Creating a desktop icon for a file
Creating a desktop icon for a file provides a quick and convenient shortcut to access that file directly from your desktop. Instead of navigating through folders, you can open the file directly, saving you time and streamlining your workflow.
Prerequisites
- The Desktop icons extension is enabled.
Procedure
Move the selected file into the
~/Desktop/directory.
Verification
- Verify the icon for the file is displayed on the desktop.
8.4. Using special characters in GNOME
In GNOME, you can use the compose key to type special characters from different languages and symbol sets, including those not available on your keyboard. You can enter and view special characters from different languages and symbol sets, making it easy to work with diverse character sets in GNOME.
To input these special characters, you can define one of the existing keys on your keyboard as a compose key. Once enabled, the compose key allows you to type special characters and symbols by pressing multiple keys in a specific sequence.
8.4.1. Enabling the compose key for an individual user
You can enable the compose key from the Settings menu while logged in as the user.
Procedure
- Click on the Activities button in the upper-left corner of the screen.
- Type Settings and click on the Settings icon to open the Settings application.
- In the Settings window, click on Keyboard in the left sidebar.
- Scroll down and select the Compose Key option.
- Toggle the slider to enable the Compose Key.
- Select the key you want to use as the compose key.
Once you have selected the compose key, close the Settings window.
The compose key is now enabled, and you can use it to input special characters and symbols by pressing the compose key, followed by the corresponding sequence of keys.
To see available multi-key sequences for composing special characters, use:
$ grep "<Multi_key>" /usr/share/X11/locale/en_US.UTF-8/Compose
Verification
-
Press the compose key, then type the sequence of keys for the special character you want to input. For example, to type
©, press the compose key, then press o and c.
8.4.2. Enabling the compose key for another user
Enable the compose key for another user with the gsettings utility.
Prerequisites
- Administrative access.
Procedure
Allow all clients to connect to the X server:
# xhost +Run the following command to set the compose key:
# su - <username> -c "gsettings set org.gnome.desktop.input-sources xkb-options \"['compose:<compose_key>']\""Replace
<username>with the username of the user for whom you want to enable the compose key. Replace<compose_key>with the key you want to use as the compose key. You can use theraltoption to select the right Alt key as the compose key.To see other compose key options that you can use to set up a compose key on your keyboard, use:
$ grep compose /usr/share/X11/xkb/rules/evdev.lstResets the access control:
# xhost -
Verification
To check the compose key settings for another user, use:
# su - <username> -c "gsettings get org.gnome.desktop.input-sources xkb-options"Replace
<username>with the username of the user for whom you want to check the compose key setting.
8.4.3. Enabling the compose key for all users
You can enable the compose key for all users by creating a dconf configuration file.
Prerequisites
- Administrative access.
Procedure
Create the
/etc/dconf/db/local.d/00-compose-keyconfiguration file with the following content:[org/gnome/desktop/input-sources] xkb-options=['compose:<compose_key>']Replace
<compose_key>with the key you want to use as the compose key. You can use theraltoption to select the right Alt key as the compose key.To see other compose key options that you can use to set up a compose key on your keyboard, use:
$ grep compose /usr/share/X11/xkb/rules/evdev.lstUpdate the
dconfdatabase with the new configuration:# dconf updateRestart your system or log out and log back in to your GNOME session for the changes to take effect.
The compose key is now enabled for all users on the system and they can use it to input special characters and symbols by pressing the compose key, followed by the corresponding sequence of keys.
Verification
-
Press the compose key, then type the sequence of keys for the special character you want to input. For example, to type
©, press the compose key, then press o and c.
8.4.4. Compose key sequences for special characters
The table showcases compose key sequences used to input special characters with diacritics or accents in GNOME. Each row displays a compose key sequence alongside its corresponding result
| Compose key sequence | Result |
|---|---|
| Compose+'+letter | Letter with acute accent (é, á, ñ) |
| Compose+`+letter | Letter with grave accent (è, ù, ò) |
| Compose+"+letter | Letter with umlaut or diaeresis (ë, ö, ü) |
| Compose+-+letter | Letter with macron (ā, ē, ō) |
| Compose+/+letter | Letter with stroke or diacritic (ø, ł, ǿ) |
| Compose+=+letter | Letter with double acute accent (ő, ű, ȁ) |
| Compose+.+letter | Letter with dot above (ȧ, ċ, ḋ) |
| Compose+,+letter | Letter with cedilla (ç, ş, ņ) |
| Compose+^+letter | Letter with circumflex accent (â, ê, î) |
| Compose+~+letter | Letter with tilde accent (ã, ñ, õ) |