Chapter 2. Managing LVM physical volumes
A physical volume (PV) is a physical storage device or a partition on a storage device that LVM uses.
During the initialization process, an LVM disk label and metadata are written to the device, which allows LVM to track and manage it as part of the logical volume management scheme.
You cannot increase the size of the metadata after the initialization. If you need larger metadata, you must set the appropriate size during the initialization process.
When initialization process is complete, you can allocate the PV to a volume group (VG). You can divide this VG into logical volumes (LVs), which are the virtual block devices that operating systems and applications can use for storage.
To ensure optimal performance, partition the whole disk as a single PV for LVM use.
2.1. Creating an LVM physical volume
You can use the pvcreate command to initialize a physical volume LVM usage.
Prerequisites
- Administrative access.
-
The
lvm2package is installed.
Procedure
Identify the storage device you want to use as a physical volume. To list all available storage devices, use:
$ lsblkCreate an LVM physical volume:
# pvcreate /dev/sdbReplace /dev/sdb with the name of the device you want to initialize as a physical volume.
Verification steps
Display the created physical volume:
# pvs

  PV         VG  Fmt  Attr PSize  PFree
  /dev/sdb       lvm2 a--  28.87g 13.87g
2.2. Removing LVM physical volumes
You can use the pvremove command to remove a physical volume for LVM usage.
Prerequisites
- Administrative access.
Procedure
List the physical volumes to identify the device you want to remove:
# pvs

  PV           VG Fmt  Attr PSize  PFree
  /dev/sdb1       lvm2 ---  28.87g 28.87g
Remove the physical volume:
# pvremove /dev/sdb1Replace /dev/sdb1 with the name of the device associated with the physical volume.
If your physical volume is part of the volume group, you need to remove it from the volume group first.
If you volume group contains more that one physical volume, use the
vgreducecommand:# vgreduce VolumeGroupName /dev/sdb1Replace VolumeGroupName with the name of the volume group. Replace /dev/sdb1 with the name of the device.
If your volume group contains only one physical volume, use
vgremovecommand:# vgremove VolumeGroupNameReplace VolumeGroupName with the name of the volume group.
Verification
Verify the physical volume is removed:
# pvs
2.3. Creating logical volumes in the web console
Logical volumes act as physical drives. You can use the RHEL 8 web console to create LVM logical volumes in a volume group.
Prerequisites
- You have installed the RHEL 8 web console.
- You have enabled the cockpit service.
Your user account is allowed to log in to the web console.
For instructions, see Installing and enabling the web console.
-
The
cockpit-storagedpackage is installed on your system. - The volume group is created.
Procedure
Log in to the RHEL 8 web console.
For details, see Logging in to the web console.
- Click Storage.
- In the Storage table, click the volume group in which you want to create logical volumes.
- On the Logical volume group page, scroll to the LVM2 logical volumes section and click .
- In the Name field, enter a name for the new logical volume. Do not include spaces in the name.
In the drop-down menu, select Block device for filesystems.
This configuration enables you to create a logical volume with the maximum volume size which is equal to the sum of the capacities of all drives included in the volume group.

Define the size of the logical volume. Consider:
- How much space the system using this logical volume will need.
- How many logical volumes you want to create.
You do not have to use the whole space. If necessary, you can grow the logical volume later.

Click .
The logical volume is created. To use the logical volume you must format and mount the volume.
Verification
On the Logical volume page, scroll to the LVM2 logical volumes section and verify whether the new logical volume is listed.
2.4. Formatting logical volumes in the web console
Logical volumes act as physical drives. To use them, you must format them with a file system.
Formatting logical volumes erases all data on the volume.
The file system you select determines the configuration parameters you can use for logical volumes. For example, the XFS file system does not support shrinking volumes.
Prerequisites
- You have installed the RHEL 8 web console.
- You have enabled the cockpit service.
Your user account is allowed to log in to the web console.
For instructions, see Installing and enabling the web console.
-
The
cockpit-storagedpackage is installed on your system. - The logical volume created.
- You have root access privileges to the system.
Procedure
Log in to the RHEL 8 web console.
For details, see Logging in to the web console.
- Click .
- In the Storage table, click the volume group in the logical volumes is created.
- On the Logical volume group page, scroll to the LVM2 logical volumes section.
- Click the menu button, , next to the volume group you want to format.
From the drop-down menu, select .
- In the Name field, enter a name for the file system.
In the Mount Point field, add the mount path.

In the drop-down menu, select a file system:
XFS file system supports large logical volumes, switching physical drives online without outage, and growing an existing file system. Leave this file system selected if you do not have a different strong preference.
XFS does not support reducing the size of a volume formatted with an XFS file system
ext4 file system supports:
- Logical volumes
- Switching physical drives online without an outage
- Growing a file system
- Shrinking a file system
Select the Overwrite existing data with zeros checkbox if you want the RHEL web console to rewrite the whole disk with zeros. This option is slower because the program has to go through the whole disk, but it is more secure. Use this option if the disk includes any data and you need to overwrite it.
If you do not select the Overwrite existing data with zeros checkbox, the RHEL web console rewrites only the disk header. This increases the speed of formatting.
From the drop-down menu, select the type of encryption if you want to enable it on the logical volume.
You can select a version with either the LUKS1 (Linux Unified Key Setup) or LUKS2 encryption, which allows you to encrypt the volume with a passphrase.
- In the drop-down menu, select when you want the logical volume to mount after the system boots.
- Select the required Mount options.
Format the logical volume:
- If you want to format the volume and immediately mount it, click .
If you want to format the volume without mounting it, click .
Formatting can take several minutes depending on the volume size and which formatting options are selected.
Verification
On the Logical volume group page, scroll to the LVM2 logical volumes section and click the logical volume to check the details and additional options.

- If you selected the option, click the menu button at the end of the line of the logical volume, and select to use the logical volume.
2.5. Resizing logical volumes in the web console
You can extend or reduce logical volumes in the RHEL 8 web console. The example procedure demonstrates how to grow and shrink the size of a logical volume without taking the volume offline.
You cannot reduce volumes that contains GFS2 or XFS filesystem.
Prerequisites
- You have installed the RHEL 8 web console.
- You have enabled the cockpit service.
Your user account is allowed to log in to the web console.
For instructions, see Installing and enabling the web console.
-
The
cockpit-storagedpackage is installed on your system. - An existing logical volume containing a file system that supports resizing logical volumes.
Procedure
- Log in to the RHEL web console.
- Click .
- In the Storage table, click the volume group in the logical volumes is created.
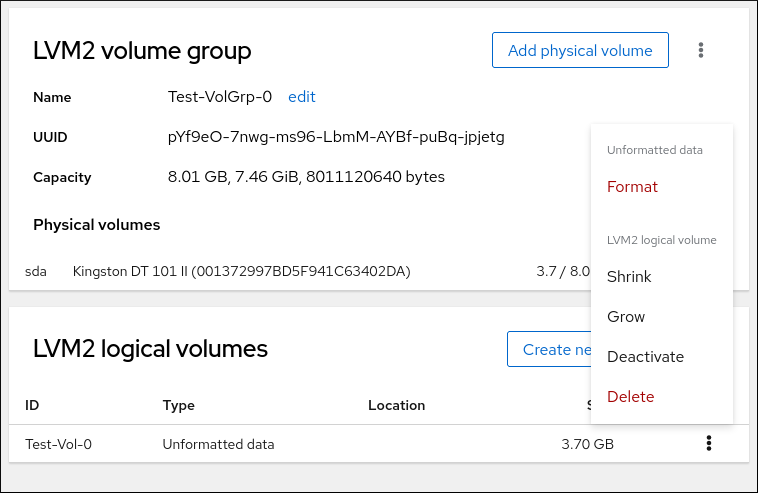
On the Logical volume group page, scroll to the LVM2 logical volumes section and click the menu button, , next to volume group you want to resize.
From the menu, select Grow or Shrink to resize the volume:
Growing the Volume:
- Select to increase the size of the volume.
In the Grow logical volume dialog box, adjust the size of the logical volume.
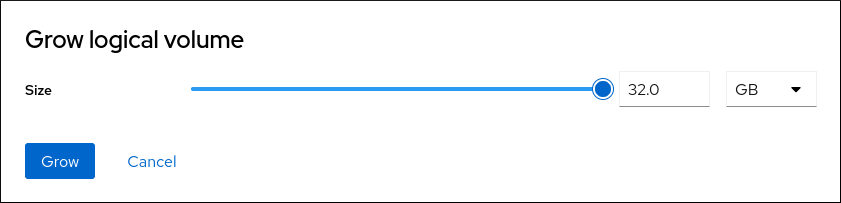
Click .
LVM grows the logical volume without causing a system outage.
Shrinking the Volume:
- Select to reduce the size of the volume.
In the Shrink logical volume dialog box, adjust the size of the logical volume.
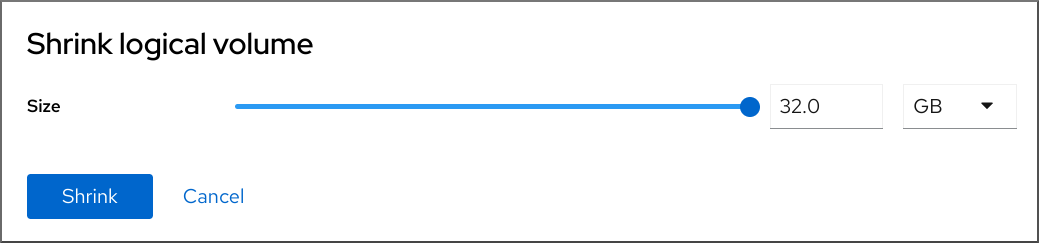
Click .
LVM shrinks the logical volume without causing a system outage.