Chapter 4. Managing LVM volume groups
A volume group (VG) is a collection of physical volumes (PVs), which creates a pool of disk space out of which logical volumes (LVs) can be allocated.
Within a volume group, the disk space available for allocation is divided into units of a fixed-size called extents. An extent is the smallest unit of space that can be allocated. Within a physical volume, extents are referred to as physical extents.
A logical volume is allocated into logical extents of the same size as the physical extents. The extent size is therefore the same for all logical volumes in the volume group. The volume group maps the logical extents to physical extents.
4.1. Creating LVM volume group
You can create an LVM volume group (VG) myvg using the /dev/vdb1 and /dev/vdb2 physical volumes (PVs). By default, when physical volumes are used to create a volume group, its disk space is divided into 4MB extents. This extent size is the minimum amount by which the logical volume can be increased or decreased in size. The extent size can be modified using the -s argument of the vgcreate command and large numbers of extents have no impact on I/O performance of the logical volume. You can put limits on the number of physical or logical volumes the volume group can have using the -p and -l arguments of the vgcreate command.
Prerequisites
-
The
lvm2package is installed. - One or more physical volumes are created. For more information about creating physical volumes, see Creating LVM physical volume.
Procedure
Create a myvg VG using any of the following methods:
Without specifying any options:
# vgcreate myvg /dev/vdb1 /dev/vdb2
 Volume group "myvg" successfully created.
By specifying the volume group extent size using the
-sargument:# vgcreate -s 2 /dev/myvg /dev/vdb1 /dev/vdb2 Volume group "myvg" successfully created.
By limiting the number of physical or logical volumes the VG can have using the
-pand-larguments:# vgcreate -l 1 /dev/myvg /dev/vdb1 /dev/vdb2 Volume group "myvg" successfully created.
View the created volume groups by using any one of the following commands according to your requirement:
The
vgscommand provides volume group information in a configurable form, displaying one line per volume group:# vgs VG #PV #LV #SN Attr VSize VFree myvg 2 0 0 wz-n 159.99g 159.99g
The
vgdisplaycommand displays volume group properties such as size, extents, number of physical volumes, and other options in a fixed form. The following example shows the output of thevgdisplaycommand for the volume group myvg. To display all existing volume groups, do not specify a volume group:# vgdisplay myvg --- Volume group --- VG Name myvg System ID Format lvm2 Metadata Areas 4 Metadata Sequence No 6 VG Access read/write [..]
The
vgscancommand scans all supported LVM block devices in the system for volume group:# vgscan Found volume group "myvg" using metadata type lvm2
Optional: Increase a volume group’s capacity by adding one or more free physical volumes:
# vgextend myvg /dev/vdb3
Physical volume "/dev/vdb3" successfully created.
Volume group "myvg" successfully extended
Optional: Rename an existing volume group:
# vgrename myvg myvg1
Volume group "myvg" successfully renamed to "myvg1"
Additional resources
-
vgcreate(8),vgextend(8),vgdisplay(8),vgs(8),vgscan(8),vgrename(8), andlvm(8)man pages
4.2. Creating volume groups in the web console
Create volume groups from one or more physical drives or other storage devices.
Logical volumes are created from volume groups. Each volume group can include multiple logical volumes.
Prerequisites
You have installed the RHEL 8 web console.
For instructions, see Installing and enabling the web console.
-
The
cockpit-storagedpackage is installed on your system. - Physical drives or other types of storage devices from which you want to create volume groups.
Procedure
Log in to the RHEL 8 web console.
For details, see Logging in to the web console.
- Click .
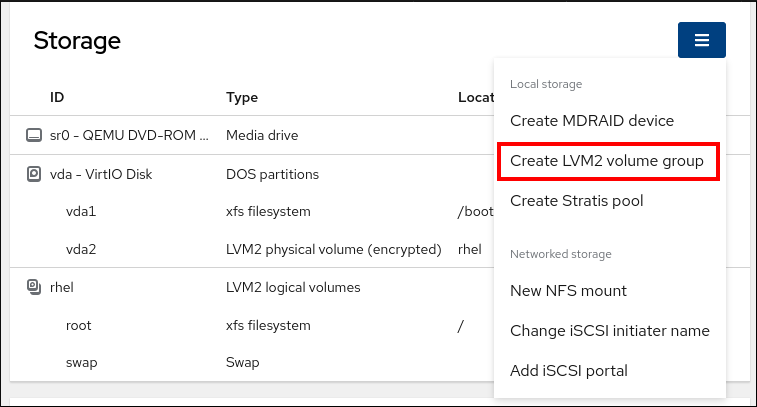
- In the Storage table, click the menu button.
From the drop-down menu, select Create LVM2 volume group.

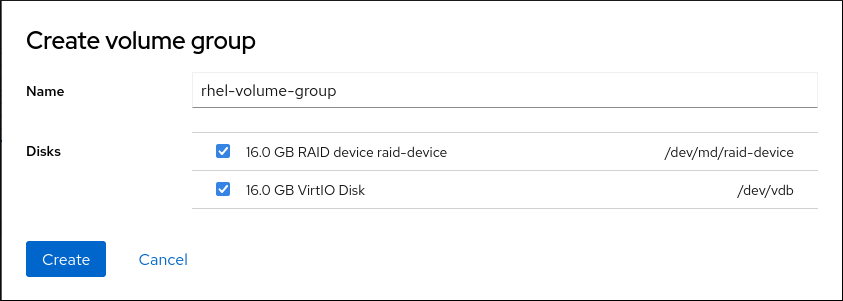
- In the Name field, enter a name for the volume group. The name must not include spaces.
Select the drives you want to combine to create the volume group.

The RHEL web console displays only unused block devices. If you do not see your device in the list, make sure that it is not being used by your system, or format it to be empty and unused. Used devices include, for example:
- Devices formatted with a file system
- Physical volumes in another volume group
- Physical volumes being a member of another software RAID device
Click .
The volume group is created.
Verification
- On the Storage page, check whether the new volume group is listed in the Storage table.
4.3. Combining LVM volume groups
To combine two volume groups into a single volume group, use the vgmerge command. You can merge an inactive "source" volume with an active or an inactive "destination" volume if the physical extent sizes of the volume are equal and the physical and logical volume summaries of both volume groups fit into the destination volume groups limits.
Procedure
Merge the inactive volume group databases into the active or inactive volume group myvg giving verbose runtime information:
# vgmerge -v myvg databases
Additional resources
-
vgmerge(8)man page
4.4. Removing physical volumes from a volume group
To remove unused physical volumes (PVs) from a volume group (VG), use the vgreduce command. The vgreduce command shrinks a volume group’s capacity by removing one or more empty physical volumes. This frees those physical volumes to be used in different volume groups or to be removed from the system.
Procedure
If the physical volume is still being used, migrate the data to another physical volume from the same volume group :
# pvmove /dev/vdb3
  /dev/vdb3: Moved: 2.0%
 ...
  /dev/vdb3: Moved: 79.2%
 ...
  /dev/vdb3: Moved: 100.0%
If there are not enough free extents on the other physical volumes in the existing volume group:
Create a new physical volume from /dev/vdb4:
# pvcreate /dev/vdb4
  Physical volume "/dev/vdb4" successfully created
Add the newly created physical volume to the myvg volume group:
# vgextend myvg /dev/vdb4
  Volume group "myvg" successfully extended
Move the data from /dev/vdb3 to /dev/vdb4:
# pvmove /dev/vdb3 /dev/vdb4
  /dev/vdb3: Moved: 33.33%
  /dev/vdb3: Moved: 100.00%
Remove the physical volume /dev/vdb3 from the volume group:
# vgreduce myvg /dev/vdb3
Removed "/dev/vdb3" from volume group "myvg"
Verification
Verify that the /dev/vdb3 physical volume is removed from the myvg volume group:
# pvs
  PV           VG    Fmt   Attr   PSize        PFree      Used
  /dev/vdb1 myvg  lvm2   a--    1020.00m    0          1020.00m
  /dev/vdb2 myvg  lvm2   a--    1020.00m    0          1020.00m
  /dev/vdb3   	    lvm2   a--    1020.00m   1008.00m    12.00m
Additional resources
-
vgreduce(8),pvmove(8), andpvs(8)man pages
4.5. Splitting a LVM volume group
If there is enough unused space on the physical volumes, a new volume group can be created without adding new disks.
In the initial setup, the volume group myvg consists of /dev/vdb1, /dev/vdb2, and /dev/vdb3. After completing this procedure, the volume group myvg will consist of /dev/vdb1 and /dev/vdb2, and the second volume group, yourvg, will consist of /dev/vdb3.
Prerequisites
-
You have sufficient space in the volume group. Use the
vgscancommand to determine how much free space is currently available in the volume group. -
Depending on the free capacity in the existing physical volume, move all the used physical extents to other physical volume using the
pvmovecommand. For more information, see Removing physical volumes from a volume group.
Procedure
Split the existing volume group myvg to the new volume group yourvg:
# vgsplit myvg yourvg /dev/vdb3
  Volume group "yourvg" successfully split from "myvg"
NoteIf you have created a logical volume using the existing volume group, use the following command to deactivate the logical volume:
# lvchange -a n /dev/myvg/mylvFor more information about creating logical volumes, see Managing LVM logical volumes.
View the attributes of the two volume groups:
# vgs
  VG     #PV #LV #SN Attr   VSize  VFree
  myvg     2   1   0 wz--n- 34.30G 10.80G
  yourvg   1   0   0 wz--n- 17.15G 17.15G
Verification
Verify that the newly created volume group yourvg consists of /dev/vdb3 physical volume:
# pvs
  PV           VG      Fmt   Attr   PSize        PFree      Used
  /dev/vdb1 myvg   lvm2   a--    1020.00m    0          1020.00m
  /dev/vdb2 myvg   lvm2   a--    1020.00m    0          1020.00m
  /dev/vdb3 yourvg lvm2   a--    1020.00m   1008.00m    12.00m
Additional resources
-
vgsplit(8),vgs(8), andpvs(8)man pages
4.6. Moving a volume group to another system
You can move an entire LVM volume group (VG) to another system using the following commands:
vgexport- Use this command on an existing system to make an inactive VG inaccessible to the system. Once the VG is inaccessible, you can detach its physical volumes (PV).
vgimport- Use this command on the other system to make the VG, which was inactive in the old system, accessible in the new system.
Prerequisites
- No users are accessing files on the active volumes in the volume group that you are moving.
Procedure
Unmount the mylv logical volume:
# umount /dev/mnt/mylvDeactivate all logical volumes in the volume group, which prevents any further activity on the volume group:
# vgchange -an myvg
vgchange -- volume group "myvg" successfully deactivated
Export the volume group to prevent it from being accessed by the system from which you are removing it.
# vgexport myvg
vgexport -- volume group "myvg" successfully exported
View the exported volume group:
# pvscan PV /dev/sda1 is in exported VG myvg [17.15 GB / 7.15 GB free] PV /dev/sdc1 is in exported VG myvg [17.15 GB / 15.15 GB free] PV /dev/sdd1 is in exported VG myvg [17.15 GB / 15.15 GB free] ...- Shut down your system and unplug the disks that make up the volume group and connect them to the new system.
Plug the disks into the new system and import the volume group to make it accessible to the new system:
# vgimport myvgNoteYou can use the
--forceargument of thevgimportcommand to import volume groups that are missing physical volumes and subsequently run thevgreduce --removemissingcommand.Activate the volume group:
# vgchange -ay myvgMount the file system to make it available for use:
# mkdir -p /mnt/myvg/users
# mount /dev/myvg/users /mnt/myvg/users
Additional resources
-
vgimport(8),vgexport(8), andvgchange(8)man pages
4.7. Removing LVM volume groups
You can remove an existing volume group using the vgremove command.
Prerequisites
- The volume group contains no logical volumes. To remove logical volumes from a volume group, see Removing LVM logical volumes.
Procedure
If the volume group exists in a clustered environment, stop the lockspace of the volume group on all other nodes. Use the following command on all nodes except the node where you are performing the removal:
# vgchange --lockstop vg-nameWait for the lock to stop.
Remove the volume group:
# vgremove vg-name
  Volume group "vg-name" successfully removed
Additional resources
-
vgremove(8)man page