Using image mode for RHEL to build, deploy, and manage operating systems
Using RHEL bootc images on Red Hat Enterprise Linux 9
Abstract
Providing feedback on Red Hat documentation
We are committed to providing high-quality documentation and value your feedback. To help us improve, you can submit suggestions or report errors through the Red Hat Jira tracking system.
Procedure
Log in to the Jira website.
If you do not have an account, select the option to create one.
- Click Create in the top navigation bar.
- Enter a descriptive title in the Summary field.
- Enter your suggestion for improvement in the Description field. Include links to the relevant parts of the documentation.
- Click Create at the bottom of the dialogue.
Chapter 1. Introducing image mode for RHEL
Use image mode for RHEL to build, test, and deploy operating systems by using the same tools and techniques as application containers. Image mode for RHEL is available by using the registry.redhat.io/rhel9/rhel-bootc bootc image. The RHEL bootc images differ from the existing application Universal Base Images (UBI) in that they contain additional components necessary to boot that were traditionally excluded, such as, kernel, initrd, boot loader, firmware, among others.
The rhel-bootc and user-created containers based on rhel-bootc container image are subject to the Red Hat Enterprise Linux end user license agreement (EULA). You are not allowed to publicly redistribute these images.
Red Hat provides bootc image for the following computer architectures:
- AMD and Intel 64-bit architectures (x86-64-v2)
- The 64-bit ARM architecture (ARMv8.0-A)
- IBM Power Systems 64-bit Little Endian architecture (ppc64le)
- IBM Z 64-bit architecture (s390x)
Bootc supports the following container image formats and disk image formats:
| Image type | Target environment |
|---|---|
|
| Physical, virtualized, cloud, and edge environments. |
|
| Amazon Machine Image. |
|
| QEMU (targeted for environments such as Red Hat OpenStack, Red Hat OpenStack services for OpenShift, and OpenShift Virtualization), Libvirt (RHEL). |
|
| VMDK for vSphere. |
|
| An unattended Anaconda installer that installs to the first disk found. |
|
| Unformatted raw disk. Also supported in QEMU and Libvirt |
|
| VHD for Virtual PC, among others. |
|
| Google Compute Engine (GCE) environment. |
Containers help streamline the lifecycle of a RHEL system by offering the following possibilities:
- Building container images
-
You can configure your operating system at a build time by modifying the Containerfile. Image mode for RHEL is available by using the
registry.redhat.io/rhel9/rhel-bootccontainer image. You can use Podman, OpenShift Container Platform, or other standard container build tools to manage your containers and container images. You can automate the build process by using CI/CD pipelines. - Versioning, mirroring, and testing container images
- You can version, mirror, introspect, and sign your derived bootc image by using any container tools such as Podman or OpenShift Container Platform.
- Deploying container images to the target environment
You have several options on how to deploy your image:
- Anaconda: is the installation program used by RHEL. You can deploy all image types to the target environment by using Anaconda and Kickstart to automate the installation process.
-
bootc-image-builder: is a containerized tool that converts the container image to different types of disk images, and optionally uploads them to an image registry or object storage. -
bootc: is a tool responsible for fetching container images from a container registry and installing them to a system, updating the operating system, or switching from an existing ostree-based system. The RHEL bootc image contains thebootcutility by default and works with all image types. However, remember that therpm-ostreeis not supported and must not be used to make changes.
- Updating your operating system
-
The system supports in-place transactional updates with rollback after deployment. Automatic updates are on by default. A systemd service unit and systemd timer unit files check the container registry for updates and apply them to the system. As the updates are transactional, a reboot is required. For environments that require more sophisticated or scheduled rollouts, disable auto updates and use the
bootcutility to update your operating system.
RHEL has two deployment modes. Both provide the same stability, reliability, and performance during deployment. See their differences:
-
Package mode: You can build package-based images and OSTree images by using RHEL image builder, and you can manage the package mode images by using
composer-clior web console. The operating system uses RPM packages and is updated by using thednfpackage manager. The root filesystem is mutable. However, the operating system cannot be managed as a containerized application. See Composing a customized RHEL system image product documentation. -
Image mode: a container-native approach to build, deploy, and manage RHEL. The same RPM packages are delivered as a base image and updates are deployed as a container image. The root filesystem is immutable by default, except for
/etcand/var, with most content coming from the container image.
You can choose to use either the Image mode or the Package mode deployment to build, test, and share your operating system. Image mode additionally enables you to manage your operating system in the same way as any other containerized application.
1.1. Benefits of image mode for RHEL
The benefits of image mode for RHEL occur across the lifecycle of a system. The following list contains some of the most important advantages:
- Container images are easier to understand and use than other image formats and are fast to build
- Containerfiles, also known as Dockerfiles, provide a straightforward approach to defining the content and build instructions for an image. Container images are often significantly faster to build and iterate on compared to other image creation tools.
- Consolidate process, infrastructure, and release artifacts
- As you distribute applications as containers, you can use the same infrastructure and processes to manage the underlying operating system.
- Immutable updates
-
Just as containerized applications are updated in an immutable way, with image mode for RHEL, the operating system is also. You can boot into updates and roll back when needed in the same way that you use
rpm-ostreesystems.
The use of rpm-ostree to make changes, or install content, is not supported.
- Portability across hybrid cloud environments
- You can use bootc images across physical, virtualized, cloud, and edge environments.
Although containers provide the foundation to build, transport, and run images, it is important to understand that after you deploy these bootc images, either by using an installation mechanism, or you convert them to a disk image, the system does not run as a container.
1.2. Prerequisites
- You have a subscribed RHEL 9 system. For more information, see Getting Started with RHEL System Registration documentation.
- You have a container registry. You can create your registry locally or create a free account on the Quay.io service. To create the Quay.io account, see Red Hat Quay.io page.
- You have a Red Hat account with either production or developer subscriptions. No cost developer subscriptions are available on the Red Hat Enterprise Linux Overview page.
- You have authenticated to registry.redhat.io. For more information, see Red Hat Container Registry Authentication article.
Chapter 2. Building and testing RHEL bootc images
You can build and test RHEL container images by using Podman and Containerfiles to create, customize, and share bootable RHEL system images across environments efficiently. You can also use other tools, for example, OpenShift Container Platform. For more examples of configuring RHEL systems by using containers, see the rhel-bootc-examples repository.
2.1. Building and configuring bootc-based images from a Containerfile
You can use a Containerfile to build and customize your own bootc-based image with the tools, configurations, and applications you need. While most standard instructions work, some are ignored when the image is installed on a system.
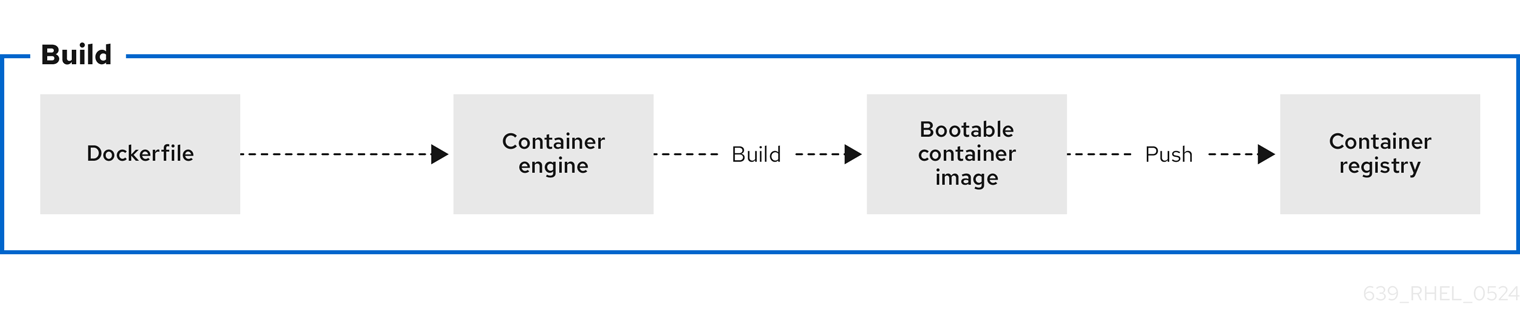
Figure 2.1. Building an image by using instructions from a Containerfile, testing the container, pushing an image to a registry, and sharing it with others
A general Containerfile structure is the following:
FROM registry.redhat.io/rhel9/rhel-bootc:latest

RUN dnf -y install [software] [dependencies] && dnf clean all

ADD [application]
ADD [configuration files]

RUN [config scripts]
The available commands that are usable inside a Containerfile and a Dockerfile are equivalent.
However, the following commands in a Containerfile are ignored when the rhel-9-bootc image is installed to a system:
-
ENTRYPOINTandCMD(OCI:Entrypoint/Cmd): you can setCMD /sbin/initinstead. -
ENV(OCI:Env): change thesystemdconfiguration to configure the global system environment. -
EXPOSE(OCI:exposedPorts): it is independent of how the system firewall and network function at runtime. -
USER(OCI:User): configure individual services inside the RHEL bootc to run as unprivileged users instead.
The rhel-9-bootc container image reuses the OCI image format.
-
The
rhel-9-bootccontainer image ignores the container config section (Config) when it is installed to a system. -
The
rhel-9-bootccontainer image does not ignore the container config section (Config) when you run this image by using container runtimes such aspodmanordocker.
2.2. Building reproducible container images with container tools
Red Hat Enterprise Linux (RHEL) now supports reproducible container builds using Podman and Buildah, reducing image changes with consistent inputs over time. This new feature decreases data pulled from registries when updating images, which is crucial for supply chain security, reliable software deployment, and effective debugging. Reproducible builds for RHEL containers reduce registry storage, create smaller update payloads, and enable faster downloads by ensuring image layers remain consistent. Previously, challenges with tarball creation and escalating container image sizes led to increased storage burdens and unnecessary layer pulls, even when underlying data remained unchanged, hindering faster updates in environments like rhel-bootc and RHEL AI.
2.3. Building a container image
To build an image by using instructions from a Containerfile, use the podman build command.
Prerequisites
-
The
container-toolsmeta-package is installed.
Procedure
Create a
Containerfile:$ cat Containerfile FROM registry.redhat.io/rhel9/rhel-bootc:latest RUN dnf -y install cloud-init && \ ln -s ../cloud-init.target /usr/lib/systemd/system/default.target.wants && \ dnf clean allThis
Containerfileexample adds thecloud-inittool, so it automatically fetches SSH keys and can run scripts from the infrastructure and also gather configuration and secrets from the instance metadata. For example, you can use this container image for pre-generated AWS or KVM guest systems.Build the
<image>image by usingContainerfilein the current directory:$ podman build -t quay.io/<namespace>/<image>:<tag> .
Verification
List all images:
$ podman images
REPOSITORY                                  TAG      IMAGE ID       CREATED              SIZE
localhost/<image>                           latest   b28cd00741b3   About a minute ago   2.1 GB
2.4. Benefits of custom bootable images with multi-stage builds
The deployment image must include only the application and its required runtime, without adding any build tools or unnecessary libraries. To achieve this, use a two-stage Containerfile: one stage for building the artifacts and another for hosting the application.
With multi-stage builds, you use multiple FROM instructions in your Containerfile. Each FROM instruction can use a different base, and each of them begins a new stage of the build. You can selectively copy artifacts from one stage to another and exclude everything you do not need in the final image.
Multi-stage builds offer several advantages:
- Smaller image size
- By separating the build environment from the runtime environment, only the necessary files and dependencies are included in the final image, significantly reducing its size.
- Improved security
- Since build tools and unnecessary libraries are excluded from the final image, the attack surface is reduced, leading to a more secure container.
- Optimized performance
- A smaller image size means faster download, deployment, and startup times, improving the overall efficiency of the containerized application.
- Simplified maintenance
- With the build and runtime environments separated, the final image is cleaner and easier to maintain, containing only what is needed to run the application.
- Cleaner builds
- Multi-stage builds help avoid clutter from intermediate files, which could accumulate during the build process, ensuring that only essential artifacts make it into the final image.
- Resource efficiency
- The ability to build in one stage and discard unnecessary parts minimizes the use of storage and bandwidth during deployment.
- Better layer caching
- With clearly defined stages, Podman can efficiently cache the results of previous stages, by accelerating up future builds.
The following Containerfile consists of two stages. The first stage is typically named builder and it compiles a golang binary. The second stage copies the binary from the first stage. The default working directory for the go-toolset builder is opt/ap-root/src.
FROM registry.access.redhat.com/ubi9/go-toolset:latest as builder
RUN echo 'package main; import "fmt"; func main() { fmt.Println("hello world") }' > helloworld.go
RUN go build helloworld.go

FROM registry.redhat.io/rhel9/rhel-bootc:latest
COPY --from=builder /opt/app-root/src/helloworld /
CMD ["/helloworld"]
As a result, the final container image includes the helloworld binary but no data from the previous stage.
You can also use multi-stage builds to perform the following scenarios:
- Stopping at a specific build stage
- When you build your image, you can stop at a specified build stage. For example:
$ podman build --target build -t hello .For example, you can use this approach to debugging a specific build stage.
- Using an external image as a stage
-
You can use the
COPY --frominstruction to copy from a separate image either using the local image name, a tag available locally or on a container registry, or a tag ID. For example:
COPY --from=<image> <source_path> <destination_path>- Using a previous stage as a new stage
-
You can continue where a previous stage ended by using the
FROMinstruction. For example:
FROM ubi9 AS stage1
[...]

FROM stage1 AS stage2
[...]

FROM ubi9 AS final-stage
[...]2.5. Running a container image
To run and test your container, use the podman run command.
Prerequisites
-
The
container-toolsmeta-package is installed.
Procedure
Run the container by using the
podman runcommand with the appropriate options. For example, to run the container namedmybootcbased on thequay.io/<namespace>/<image>:<tag>container image:$ podman run -it --rm --name mybootc quay.io/<namespace>/<image>:<tag> /bin/bash-
The
-ioption creates an interactive session. Without the-ioption, the shell open, and then exits. -
The
-toption opens a terminal session. Without the-ioption, stays open, but you cannot type anything to the shell. -
The
--rmoption removes thequay.io/<namespace>/<image>:<tag>container image after the container exits.
-
The
Verification
List all running containers:
$ podman ps
CONTAINER ID  IMAGE                                    COMMAND          CREATED        STATUS            PORTS   NAMES
7ccd6001166e  quay.io/<namespace>/<image>:<tag>  /sbin/init  6 seconds ago  Up 5 seconds ago          mybootc
2.6. Overriding the version of bootc images
Red Hat Enterprise Linux (RHEL) base images, Universal Base Images (UBI), and rhel-bootc use version numbers that track only the major operating system version. To define a specific version number for a derived image, you can override this value by adding the version label to your Containerfile.
Prerequisites
-
The
container-toolsmeta-package is installed.
Procedure
Create a Containerfile:
FROM registry.redhat.io/rhel9/rhel-bootc:latest
# In this example, the custom operating system has its own
# version scheme.
# The operating system major version is copied
# and a sub-version of it is added, which represents a point-in-time
# snapshot of the base OS content.
# This just changes the output of bootc status. A deeper level
# of customization is available by also changing the contents of /usr/lib/os-release.
# Define the custom version and release metadata
LABEL org.opencontainers.image.version=”10.1.1”
Build the
<image>image by usingContainerfilefrom the current directory:$ podman build -t quay.io/<namespace>/<image>:<tag> .
Verification
Verify that the override was applied:
$ podman inspect <image-name> --format '{{index .Labels "org.opencontainers.image.version"}}'
2.7. Pushing a container image to the registry
To push an image to your own registry, or a third-party registry, and share it with others, use the podman push command. The following procedure uses the Red Hat Quay registry as an example.
Prerequisites
-
The
container-toolsmeta-package is installed. - An image is built and available on the local system.
- You have created the Red Hat Quay registry. For more information, see Proof of Concept - Deploying Red Hat Quay.
Procedure
Push the
quay.io/<namespace>/<image>:<tag>container image from your local storage to the registry:$ podman push quay.io/<namespace>/<image>:<tag>
Chapter 3. Building and managing logically bound images
Logically bound images give you support for container images that are bound to the lifecycle of the base bootc image. This helps combine different operational processes for applications and operating systems, and the container application images are referenced from the base image as image files or an equivalent. Consequently, you can manage multiple container images for system installations.
You can use containers for lifecycle-bound workloads, such as security agents and monitoring tools. You can also upgrade such workloads by using the bootc upgrade command.
3.1. Introduction to logically bound images
By using logically bound images, you can associate container application images to a base bootc system image. By default, application containers as executed by, for example, podman have a lifecycle independent of host upgrades; they can be added or removed at any time, and are typically fetched on demand after booting if the container image is not present.
Logically bound images offer a key benefit that the application containers bound in this way have a lifecycle tied to the host upgrade and are available before the host reboots into the new operating system. The container images bound in this way will be present as long as a bootc container references them.
The following are examples for lifecycle bound workloads which are usually not updated outside of the host:
- Logging, for example, journald→remote log forwarder container
- Monitoring, for example, Prometheus node_exporter
- Configuration management agents
- Security agents
For these types of workloads it is often important that the container start from a very early stage in the boot process before e.g. networking might be available. Logically bound images enable you to start containers (often via systemd) with the the same reliability of using ExecStart= of a binary in the base bootc image.
The term logically bound can also be contrasted with another model of physically bound images, where application container content is physically stored in the bootc container image. A key advantage for logically bound over physically bound is that tou can update the bootc system without re-downloading application container images which are not changed.
When using logically bound images, you must manage multiple container images for the system to install the logically bound images. This is an advantage and also a disadvantage. For example, for a disconnected or offline installation, you must mirror all the containers, not just one. The application images are only referenced from the base image as .image files or an equivalent.
- Logically bound images installation
-
When you run
bootc install, logically bound images must be present in the default/var/lib/containerscontainer store. The images will be copied into the target system and present directly at boot, alongside the bootc base image. - Logically bound images lifecycle
-
Logically bound images are referenced by the bootable container and have guaranteed availability when the bootc based server starts. The image is always upgraded by using
bootc upgradeand is available asread-onlyto other processes, such as Podman. - Logically bound images management on upgrades, rollbacks, and garbage collection
- During upgrades, the logically bound images are managed exclusively by bootc.
- During rollbacks, the logically bound images corresponding to rollback deployments are retained.
- bootc performs garbage collection of unused bound images.
3.2. Creating logically bound images
You can create logically bound images by using a Podman Quadlet .image or .container files.
Prerequisites
-
The
container-toolsmeta-package is installed.
Procedure
- Select the image that you want to logically bound.
Create a
Containerfile:$ cat Containerfile FROM quay.io/<namespace>/<image>:latest COPY ./<app_1>.image /usr/share/containers/systemd/<app_1>.image COPY ./<app_2>.container /usr/share/containers/systemd/<app_2>.container RUN ln -s /usr/share/containers/systemd/<app_1>.image \ /usr/lib/bootc/bound-images.d/<app_1>.image && \ ln -s /usr/share/containers/systemd/<app_2>.container \ /usr/lib/bootc/bound-images.d/<app_2>.containerIn the
.containerdefinition, use:GlobalArgs=--storage-opt=additionalimagestore=/usr/lib/bootc/storageIn the
Containerfileexample, the image is selected to be logically bound by creating a symlink in the/usr/lib/bootc/bound-images.ddirectory pointing to either an.imageor a.containerfile.Run the
bootc upgradecommand.$ bootc upgradeThe bootc upgrade performs the following overall steps:
- Fetches the new base image from the image repository. See linkhttps://docs.redhat.com/en/documentation/red_hat_enterprise_linux/9/html/using_image_mode_for_rhel_to_build_deploy_and_manage_operating_systems/managing-users-groups-ssh-key-and-secrets-in-image-mode-for-rhel#configuring-container-pull-secrets_managing-users-groups-ssh-key-and-secrets-in-image-mode-for-rhel[Configuring container pull secrets].
- Reads the new base image root file system to discover logically bound images.
-
Automatically pulls any discovered logically bound images defined in the new bootc image into the bootc-owned
/usr/lib/bootc/storageimage storage.
Make the bound images become available to container runtimes such as Podman. For that, you must explicitly configure bound images to point to the bootc storage as an "additional image store". For example:
podman --storage-opt=additionalimagestore=/usr/lib/bootc/storage run <image>ImportantDo not attempt to globally enable the
/usr/lib/bootc/storageimage storage in/etc/containers/storage.conf. Only use the bootc storage for logically bound images.
The bootc image store is owned by bootc. The logically bound images will be garbage collected when they are no longer referenced by a file in the /usr/lib/bootc/bound-images.d directory.
Chapter 4. Building and managing physically bound images
Physically bound images embed all necessary application containers, configurations, and Quadlet files directly into the root filesystem during the bootc build process. This ensures the entire system is all integrated, enabling disconnected and offline deployment, and applications are immediately available on boot.
4.1. Introduction to physically bound images
RHEL bootc physically binds images to the base operating system image, directly embedding containerized applications. This creates a fully self-contained, and immutable system. The underlying mechanism resembles that of logically-bound images because physically-bound images can be pre-pulled during image build time and made available at runtime.
Physically bound images contain the data in the final tar of the image, while logically bound images only reference the image and pull it during a bootc upgrade. Physically bound images offer strict offline reliability, while logically bound images accelerate development by avoiding an update to the entire base image for a small application change.
The key benefits of physically bound images include:
- Because the base operating system and all required application containers ship as one artifact, you have pre-installed application availability right at boot.
- You gain resilience against registry downtime, simplify your offline deployments, and secure atomic updates for both the operating system and applications.
4.2. Creating physically bound images by using system roles
You can use system roles to create physically bound images to detect the non-booted environment and adjust their behaviour. The images must not, for example, try to start systemd units or talk to network services; instead, they must defer all of that to the first boot.
Prerequisites
- You have prepared the control node and the managed nodes.
-
The account you use to connect to the managed nodes has
sudopermissions for these nodes. - You are logged in to the control node as a user who can run playbooks on the managed nodes.
Procedure
Create a playbook file, for example
./setup.yml, with the following content:--- - name: Configure physically bound images with RHEL system roles hosts: all vars: podman_registries_conf: unqualified-search-registries: - "registry.access.redhat.com" - "docker.io" - "my-company-registry.com" registry: - location: "my-company-registry.com" - location: "my-local-registry:5000" insecure: true podman_quadlet_specs: - file_src: my-quadlet.container state: started tasks: - name: Run the podman role include_role: name: redhat.rhel_system_roles.podmanThe Podman system role in the Ansible Playbook configures the system with registries and a quadlet application.
Validate the playbook syntax:
$ ansible-playbook --syntax-check ./setup.ymlThis command only validates the syntax and does not protect against a wrong but valid configuration.
Create a
quadlet.containerfile to configures the container application, for example:[Install] WantedBy=default.target [Container] Image=quay.io/my_org/my_image:20260326 ContainerName=my-quadletCreate a
Containerfilefile with the following content:FROM quay.io/centos-bootc/centos-bootc:stream10 RUN dnf -y install ansible-core rhel-system-roles COPY ./setup.yml . COPY ./quadlet.container . RUN ansible-playbook -c local setup.ymlYou perform every action inside the image build, running the playbooks against localhost. You can use a multi-stage build to keep Ansible and the roles out of your final image. Because this process is entirely self-contained, it works well in your automatic container build pipelines.
NoteThe images must be copied over before any container or service (e.g., Quadlet) depending on such an image is started.
Build the
bootcimage, for example:$ podman build -t quay.io/<namespace>/<image>:<tag> .
Chapter 5. Creating bootc-compatible base disk images by using bootc-image-builder
The bootc-image-builder is a containerized tool to create disk images from bootc images. You can use the images that you build to deploy disk images in different environments, such as the edge, server, and clouds.
5.1. Introducing image mode for RHEL for bootc-image-builder
By using the bootc-image-builder tool, you can convert bootc images into disk images for a variety of different platforms and formats. Converting bootc images into disk images is equivalent to installing a bootc image. After you deploy these disk images to the target environment, you can update them directly from the container registry.
You can build your base images by using one of the following methods:
- Use a local RHEL system, instal the Podman tool, and build your image locally. Then, you can push the images to your private registry.
- Use a CI/CD pipeline: Create a CI/CD pipeline that uses a RHEL-based system to build images and push them to your private registry.
The bootc-image-builder tool supports generating the following image types:
- Disk image formats, such as ISO, are suitable for disconnected installations.
Virtual disk image formats, such as:
- QEMU copy-on-write (QCOW2)
- Amazon Machine Image (AMI)
- Unformatted raw disk (Raw)
- Virtual Machine Image (VMI)
bootc-image-builder uses the local container storage by default. The tool cannot pull container images from remote registries itself. To build disk images, you must make the base bootc container image available in the system’s local container registry to mount the system’s container storage into the bootc-image-builder container so it can use containers from the system storage.
Deploying from a container image is beneficial when you run VMs or servers because you can achieve the same installation result. That consistency extends across multiple different image types and platforms when you build them from the same container image. Consequently, you can minimize the effort in maintaining operating system images across platforms. You can also update systems that you deploy from these disk images by using the bootc tool, instead of re-creating and uploading new disk images with bootc-image-builder.
Although you can deploy a rhel-9-bootc image directly, you can also create your own customized images that are derived from this bootc image. The bootc-image-builder tool takes the rhel-9-bootc OCI container image as an input.
Generic base container images do not include any default passwords or SSH keys. Also, the disk images that you create by using the bootc-image-builder tool do not contain the tools that are available in common disk images, such as cloud-init. These disk images are transformed container images only.
5.2. Installing bootc-image-builder
The bootc-image-builder is intended to be used as a container and it is not available as an RPM package in RHEL. To install the bootc-image-builder, use the Red Hat Container Registry.
Prerequisites
-
The
container-toolsmeta-package is installed. The meta-package contains all container tools, such as Podman, Buildah, and Skopeo. -
You are authenticated to
registry.redhat.io. For details, see Red Hat Container Registry Authentication.
Procedure
Log in to authenticate to
registry.redhat.io:$ sudo podman login registry.redhat.ioInstall the
bootc-image-buildertool:$ sudo podman pull registry.redhat.io/rhel9/bootc-image-builder
Verification
List all images pulled to your local system:
$ sudo podman images
REPOSITORY                                    TAG         IMAGE ID      CREATED       SIZE
registry.redhat.io/rhel9/bootc-image-builder  latest      b361f3e845ea  24 hours ago  676 MB
5.3. Supported image customizations for a configuration file
You can use a build configuration file in the TOML or JSON format to add customizations for your resulting disk image.
The container directory maps the config file to /config.toml. The customizations object defines the image modifications. Additionally, you can embed a build configuration file, either as config.json or config.toml in the /usr/lib/bootc-image-builder directory. The system automatically uses any file system or disk customizations found in this directory by default. This behavior can be overridden if you explicitly specify a different customization.
For the JSON format, you can also pass the configuration by using stdin when you use the --config argument.
- User customization
Add a user to your disk image, and optionally set an SSH key. All fields for this section are optional except for the
name.Expand TOML JSON [[customizations.user]] name = "user" password = "password" key = "ssh-rsa AAA ... user@email.com" groups = ["wheel"]{ "customizations": { "user": [ { "name": "user", "password": "password", "key": "ssh-rsa AAA ... user@email.com", "groups": [ "wheel", "admins" ] } ] } }- Kernel configuration
You can customize the kernel boot parameters in the configuration file.
Expand TOML JSON [customizations.kernel] name = "kernel-debug" append = "nosmt=force"{ "customizations": { "kernel": { "append": "mitigations=auto,nosmt" } } }- File systems configuration
You can use the file system section of the customizations to set the minimum size of the base partitions, such as
/and/boot, and to create extra partitions with mount points under/var.Expand TOML JSON [[customizations.filesystem]] mountpoint = "/" minsize = "10 GiB" [[customizations.filesystem]] mountpoint = "/var/data" minsize = "20 GiB"{ "customizations": { "filesystem": [ { "mountpoint": "/", "minsize": "10 GiB" }, { "mountpoint": "/var/data", "minsize": "20 GiB" } ] } }- File system type interaction with rootfs
The root file system type (
--rootfs) argument overrides the default value from the source container. It also sets the file system types for all additional mount points for theext4,xfs, andbtrfstypes.For supported mount points and sizes, the following restrictions and rules apply, unless the
rootfsisbtrfs:-
You can specify
/to set the minimum size of the root file system. The final size of the file system, mounted at/sysrooton a booted system, equals the value you specify in this configuration or 2x the size of the base container, whichever is larger. -
You can specify
/bootto set the minimum size of the boot partition. You can also specify subdirectories of/var, but you cannot specify symlinks in/var. For example,/var/homeand/var/runare symlinks and cannot be file systems on their own. -
/varitself cannot be a mount point. Therootfsoption defines the file system type for the root file system. -
Currently, there is no support for creating
btrfssubvolumes during build time. Therefore, if therootfsisbtrfs, no custom mount points are supported under/var. You can only configure/and/boot.
-
You can specify
- Anaconda ISO (installer) configuration options
Create a Kickstart file that contains the installation commands of your choice. Then, add a Kickstart file to your ISO build to create a fully customized and automated installation medium.
NoteThe following combined customizations are not supported:
[customizations.user]and[customizations.installer.kickstart]. When you add a Kickstart, use a configuration file in theTOMLformat, because multi-line strings are prone to error.Expand TOML JSON [customizations.installer.kickstart] contents = """ text --non-interactive zerombr clearpart --all --initlabel --disklabel=gpt autopart --noswap --type=lvm network --bootproto=dhcp --device=link --activate --onboot=on """{ "customizations": { "installer": { "kickstart": { "contents": "text --non-interactive\nzerombr\nclearpart --all --initlabel --disklabel=gpt\nautopart --noswap --type=lvm\nnetwork --bootproto=dhcp --device=link --activate --onboot=on" } } } }Warningbootc-image-builderdoes not add additional Kickstart commands besides the container image, which the system adds automatically to the container image. See Creating Kickstart files for more information.
5.4. Creating QCOW2 images by using bootc-image-builder
Build a RHEL bootc image into a QEMU (QCOW2) image for the architecture that you are running the commands on.
The RHEL base image does not include a default user. Optionally, you can inject a user configuration by using the --config option to run the bootc-image-builder container. Alternatively, you can configure the base image with cloud-init to inject users and SSH keys on first boot. See Users and groups configuration - Injecting users and SSH keys by using cloud-init.
Prerequisites
- You have Podman installed on your host machine.
-
You have root access to run the
bootc-image-buildertool, and run the containers in--privilegedmode, to build the images.
Procedure
Optional: Create a
config.tomlto configure user access, for example:[[customizations.user]] name = "user" password = "pass" key = "ssh-rsa AAA ... user@email.com" groups = ["wheel"]Before running the container, initialize the
outputfolder. Use the-pargument to ensure that the command does not fail if the directory already exists:$ mkdir -p ./outputRun
bootc-image-builder. Optionally, if you want to use user access configuration, pass theconfig.tomlas an argument.NoteIf you do not have the container storage mount, your image must be public.
The following example creates a public QCOW2 image. The image must be accessible from a registry, such as
registry.redhat.io/rhel9/bootc-image-builder:latest.$ podman run \ --rm \ --privileged \ --pull=newer \ --security-opt label=type:unconfined_t \ -v ./config.toml:/config.toml:ro \ -v ./output:/output \ -v /var/lib/containers/storage:/var/lib/containers/storage \ registry.redhat.io/rhel9/bootc-image-builder:latest \ --type qcow2 \ --config /config.toml \ quay.io/<namespace>/<image>:<tag>This example creates a private QCOW2 image from a local container.
$ sudo podman run \
    --rm \
    -it \
    --privileged \
    --pull=newer \
    --security-opt label=type:unconfined_t \
    -v ./config.toml:/config.toml:ro \
    -v ./output:/output \
    -v /var/lib/containers/storage:/var/lib/containers/storage \
    registry.redhat.io/rhel9/bootc-image-builder:latest \
    --type qcow2 \
    --config /config.toml \
    quay.io/<namespace>/<image>:<tag>
You can find the
.qcow2image in the output folder.
5.5. Creating VMDK images by using bootc-image-builder
Create a Virtual Machine Disk (VMDK) from a bootc image and use it within VMware’s virtualization platforms, such as vSphere, or use it in Oracle VirtualBox.
Prerequisites
- You have Podman installed on your host machine.
-
You have authenticated to the Red Hat Registry by using the
podman login registry.redhat.io. -
You have pulled the
rhel9/bootc-image-buildercontainer image.
Procedure
Create a
Containerfilewith the following content:FROM registry.redhat.io/rhel9/rhel-bootc:latest RUN dnf -y install cloud-init open-vm-tools && \ ln -s ../cloud-init.target /usr/lib/systemd/system/default.target.wants && \ rm -rf /var/{cache,log} /var/lib/{dnf,rhsm} && \ systemctl enable vmtoolsd.serviceBefore running the container, initialize the
outputfolder. Use the-pargument to ensure that the command does not fail if the directory already exists:$ mkdir -p ./outputBuild the bootc image:
# podman build . -t localhost/rhel-bootc-vmdkCreate a VMDK file from the previously created bootc image. The image must be accessible from a registry, such as
registry.redhat.io/rhel9/bootc-image-builder:latest.# podman run \ --rm \ -it \ --privileged \ -v /var/lib/containers/storage:/var/lib/containers/storage \ -v ./output:/output \ --security-opt label=type:unconfined_t \ --pull newer \ registry.redhat.io/rhel9/bootc-image-builder:latest \ --type vmdk \ --config /config.toml \ localhost/rhel-bootc-vmdk:latestA VMDK disk file for the bootc image is stored in the
output/vmdkdirectory.
5.6. Creating GCE images by using bootc-image-builder
Build a RHEL bootc image into a GCE image for the architecture that you are running the commands on. The RHEL base image does not include a default user. Optionally, you can inject a user configuration by using the --config option to run the bootc-image-builder container. Alternatively, you can configure the base image with cloud-init to inject users and SSH keys on first boot. See Users and groups configuration - Injecting users and SSH keys by using cloud-init.
Prerequisites
- You have Podman installed on your host machine.
-
You have root access to run the
bootc-image-buildertool, and run the containers in--privilegedmode, to build the images.
Procedure
Optional: Create a
config.tomlto configure user access, for example:[[customizations.user]] name = "user" password = "pass" key = "ssh-rsa AAA ... user@email.com" groups = ["wheel"]Before running the container, initialize the
outputfolder. Use the-pargument to ensure that the command does not fail if the directory already exists:$ mkdir -p ./outputRun
bootc-image-builder. Optionally, if you want to use user access configuration, pass theconfig.tomlas an argument.NoteIf you do not have the container storage mount, your image must be public.
Run
bootc-image-builder. Optionally, if you want to use user access configuration, pass theconfig.tomlas an argument. The image must be accessible from a registry, such asregistry.redhat.io/rhel9/bootc-image-builder:latest.The following is an example of creating a
gceimage:$ podman run \ --rm \ -it \ --privileged \ --pull=newer \ --security-opt label=type:unconfined_t \ -v ./config.toml:/config.toml \ -v ./output:/output \ -v /var/lib/containers/storage:/var/lib/containers/storage \ registry.redhat.io/rhel9/bootc-image-builder:latest \ --type gce \ --config /config.toml \ quay.io/<namespace>/<image>:<tag>You can find the
gceimage in the output folder.
5.7. Creating AMI images by using bootc-image-builder and uploading it to AWS
Create an Amazon Machine Image (AMI) from a bootc image and use it to launch an Amazon Web Services (AWS) Amazon Elastic Compute Cloud (EC2) instance.
Prerequisites
- You have Podman installed on your host machine.
-
You have an existing
AWS S3bucket within your AWS account. -
You have root access to run the
bootc-image-buildertool, and run the containers in--privilegedmode, to build the images. -
You have the
vmimportservice role configured on your account to import an AMI into your AWS account.
Procedure
Create a disk image from the bootc image.
- Configure the user details in the Containerfile. Make sure that you assign it with sudo access.
- Build a customized operating system image with the configured user from the Containerfile. It creates a default user with passwordless sudo access.
Optional: Configure the machine image with
cloud-init. See Users and groups configuration - Injecting users and SSH keys by using cloud-init. The following is an example:FROM registry.redhat.io/rhel9/rhel-bootc:latest RUN dnf -y install cloud-init && \ ln -s ../cloud-init.target /usr/lib/systemd/system/default.target.wants && \ rm -rf /var/{cache,log} /var/lib/{dnf,rhsm}NoteYou can also use
cloud-initto add users and additional configuration by using instance metadata.Build the bootc image. For example, to deploy the image to an
x86_64AWS machine, use the following commands:$ podman build -t quay.io/<namespace>/<image>:<tag> . $ podman push quay.io/<namespace>/<image>:<tag> .Before running the container, initialize the
outputfolder. Use the-pargument to ensure that the command does not fail if the directory already exists:$ mkdir -p ./output-
Use the
bootc-image-buildertool to create an AMI from the bootc container image. Use the
bootc-image-buildertool to create a public AMI image from the bootc container image. The image must be accessible from a registry, such asregistry.redhat.io/rhel9/bootc-image-builder:latest.$ podman run \ --rm \ -it \ --privileged \ --pull=newer \ -v $HOME/.aws:/root/.aws:ro \ -v /var/lib/containers/storage:/var/lib/containers/storage \ --env AWS_PROFILE=default \ registry.redhat.io/rhel9/bootc-image-builder:latest \ --type ami \ --config /config.toml \ --aws-ami-name rhel-bootc-x86 \ --aws-bucket rhel-bootc-bucket \ --aws-region us-east-1 \ quay.io/<namespace>/<image>:<tag>NoteThe following flags must be specified all together. If you do not specify any flag, the AMI is exported to your output directory.
-
--aws-ami-name- The name of the AMI image in AWS -
--aws-bucket- The target S3 bucket name for intermediate storage when you are creating the AMI --aws-region- The target region for AWS uploadsThe
bootc-image-buildertool builds an AMI image and uploads it to your AWS s3 bucket by using your AWS credentials to push and register an AMI image after building it. Thebootc-image-buildertool builds an AMI image and uploads it to yourAWS S3 bucketby using your AWS credentials to push and register an AMI image after building it.
-
Next steps
- You can deploy your image. See Deploying a container image to AWS with an AMI disk image.
You can make updates to the image and push the changes to a registry. See Managing RHEL bootc images.
- If you have any issues configuring the requirements for your AWS image, see the following documentation
- AWS IAM account manager
- Using high-level (s3) commands with the AWS CLI.
- S3 buckets.
- Regions and Zones.
- Launching a customized RHEL image on AWS.
- Launching a customized RHEL image on AWS.
For more details on users, groups, SSH keys, and secrets, see Users and groups configuration - Injecting users and SSH keys by using cloud-init
Additional resources
5.8. Creating raw disk images by using bootc-image-builder
You can convert a bootc image to a raw image with an MBR or GPT partition table by using bootc-image-builder.
The RHEL base image does not include a default user, so optionally, you can inject a user configuration by using the --config option to run the bootc-image-builder container. Alternatively, you can configure the base image with cloud-init to inject users and SSH keys on first boot. See Users and groups configuration - Injecting users and SSH keys by using cloud-init.
Prerequisites
- You have Podman installed on your host machine.
-
You have root access to run the
bootc-image-buildertool, and run the containers in--privilegedmode, to build the images. - You have pulled your target container image in the container storage.
Procedure
Optional: Create a
config.tomlto configure user access, for example:[[customizations.user]] name = "user" password = "pass" key = "ssh-rsa AAA ... user@email.com" groups = ["wheel"]Before running the container, initialize the
outputfolder. Use the-pargument to ensure that the command does not fail if the directory already exists:$ mkdir -p ./outputRun
bootc-image-builder. If you want to use user access configuration, pass theconfig.tomlas an argument. The image must be accessible from a registry, such asregistry.redhat.io/rhel9/bootc-image-builder:latest.$ podman run \ --rm \ --privileged \ --pull=newer \ --security-opt label=type:unconfined_t \ -v /var/lib/containers/storage:/var/lib/containers/storage \ -v ./config.toml:/config.toml \ -v ./output:/output \ registry.redhat.io/rhel9/bootc-image-builder:latest \ --type raw \ --config /config.toml \ quay.io/<namespace>/<image>:<tag>You can find the
.rawimage in the output folder.
5.9. Creating ISO images by using bootc-image-builder
You can use bootc-image-builder to create an ISO image from which you can perform an offline deployment of a bootable container.
Prerequisites
- You have Podman installed on your host machine.
- Your host system is subscribed or you have injected repository configuration by using bind mounts to ensure the image build process can fetch RPMs.
-
You have root access to run the
bootc-image-buildertool, and run the containers in--privilegedmode, to build the images.
Procedure
Optional: Create a
config.tomlto which overrides the default embedded Kickstart which performs an automatic installation.[customizations.installer.kickstart] contents = """ text --non-interactive zerombr clearpart --all --initlabel --disklabel=gpt autopart --noswap --type=lvm network --bootproto=dhcp --device=link --activate --onboot=on """Before running the container, initialize the
outputfolder. Use the-pargument to ensure that the command does not fail if the directory already exists:$ mkdir -p ./outputRun
bootc-image-builderto create a public ISO image. If you do not want to add any configuration, omit the-v $(pwd)/config.toml:/config.tomlargument. The image must be accessible from a registry, such asregistry.redhat.io/rhel9/bootc-image-builder:latest.$ podman run \ --rm \ --privileged \ --pull=newer \ --security-opt label=type:unconfined_t \ -v /var/lib/containers/storage:/var/lib/containers/storage \ -v $(pwd)/config.toml:/config.toml \ -v $(pwd)/output:/output \ registry.redhat.io/rhel9/bootc-image-builder:latest \ --type iso \ --config /config.toml \ quay.io/<namespace>/<image>:<tag>You can find the
.isoimage in the output folder.
Next steps
You can use the ISO image on unattended installation methods, such as USB sticks or Install-on-boot. The installable boot ISO contains a configured Kickstart file. See Deploying a container image by using Anaconda and Kickstart.
WarningBooting the ISO on a machine with an existing operating system or data can be destructive, because the Kickstart is configured to automatically reformat the first disk on the system.
- You can make updates to the image and push the changes to a registry. See Managing RHEL bootable images.
5.10. Using bootc-image-builder to build ISO images with a Kickstart file
You can use a Kickstart file to configure various parts of the RHEL installation process, such as setting up users, customizing partitioning, and adding an SSH key. You can include the Kickstart file in an ISO build to configure any part of the installation process, except the deployment of the base image. For ISOs with bootc container base images, you can use a Kickstart file to configure all installation settings except the ostreecontainer command.
For example, you can use a Kickstart to perform either a partial installation, a full installation, or even omit the user creation. Use bootc-image-builder to build an ISO image that contains the custom Kickstart to configure your installation process.
Prerequisites
- You have Podman installed on your host machine.
-
You have root access to run the
bootc-image-buildertool, and run the containers in--privilegedmode, to build the images.
Procedure
Create your Kickstart file. The following Kickstart file is an example of a fully unattended Kickstart file configuration that contains user creation, and partition instructions.
[customizations.installer.kickstart] contents = """ lang en_GB.UTF-8 keyboard uk timezone CET user --name <user> --password <password> --plaintext --groups <groups> sshkey --username <user> ssh-<type> <public key> rootpw --lock zerombr clearpart --all --initlabel autopart --type=plain reboot --eject """-
Save the Kickstart configuration in the
tomlformat to inject the Kickstart content. For example,config.toml. Run
bootc-image-builder, and include the Kickstart file configuration that you want to add to the ISO build. Thebootc-image-builderautomatically adds theostreecontainercommand that installs the container image.$ sudo podman run \ --rm \ -it \ --privileged \ --pull=newer \ --security-opt label=type:unconfined_t \ -v /var/lib/containers/storage:/var/lib/containers/storage \ -v ./config.toml:/config.toml \ -v ./output:/output \ registry.redhat.io/rhel9/bootc-image-builder:latest \ --type iso \ --config /config.toml \ quay.io/<namespace>/<image>:<tag>You can find the
.isoimage in the output folder.
5.11. Verification and troubleshooting
- If you have any issues configuring the requirements for your AWS image, see the following documentation
- For more details on users, groups, SSH keys, and secrets, see
Chapter 6. Customizing disk images of RHEL image mode with advanced partitioning
You can use the following methods to customize advanced partitions to allows for granular control over disk and filesystem layouts when building and deploying RHEL systems as container images:
- Disk customizations
- Filesystem customizations
However, the two customizations are incompatible with each other. You cannot use both customizations in the same blueprint, which is a text file in TOML format that defines the specifications and configurations for a custom RHEL system image.
6.1. Understanding partitions
The following are the general principles about partitions:
- The full disk image size is always larger than the size of the sum of the partitions, due to requirements for headers and metadata. Consequently, all sizes are treated as minimum requirements, whether for specific filesystems, partitions, logical volumes, or the image itself.
- When the partition is automatically added, the partition that contains the root filesystem is always the last in the partition table layout. This is valid for a plain formatted partition, an LVM Volume Group, or a Btrfs partition. For disk customizations, the order that you defined is respected.
-
For the raw partitioning, that is, with no LVM, the partition containing the root filesystem is grown to fill any leftover space on the partition table. Logical Volumes are not grown to fill the space in the Volume Group because they are simple to grow on a live system. Some directories have hard-coded minimum sizes which cannot be overridden. These are 1 GiB for
/and 2 GiB for/usr. As a result, if/usris not on a separate partition, the root filesystem size is at least 3 GiB.
6.2. Benefits of disk customizations in RHEL image mode
Disk customizations provide a more powerful interface to control the entire partitioning layout of the image.
- Allowed mountpoints
When using
bootc-image-builder, only the following directories allow customization:-
The
/(root) directory. -
Custom directories under
/var, but not/varitself.
-
The
- Not allowed mountpoints
Under
/var, the following mount points do not allow customization:-
/var/home -
/var/lock -
/var/mail -
/var/mnt -
/var/roothome -
/var/run -
/var/srv -
/var/usrlocal
-
6.3. Disk customizations in blueprints
You can define the partition table almost entirely in a blueprint by using disk customizations. Disk customizations have the following structure:
Partitions: The top level is a list of partitions.
type: Each partition has a type, which can be eitherplainorlvm. If the type is not set, it defaults toplain. The remaining required and optional properties of the partition depend on the type.plain: A plain partition is a partition with a filesystem. It supports the following properties:-
fs_type: The filesystem type, which should be one ofxfs,ext4,vfat, orswap. Setting it toswapwill create a swap partition. The mount point for a swap partition must be empty. -
minsize: The minimum size of the partition, as an integer (in bytes) or a string with a data unit (for example 3 GiB). The final size of the partition in the image might be larger for specific mount points. See Understanding partitions section. -
mountpointThe mount point for the filesystem. For swap partitions, this must be empty. -
label: The label for the filesystem (optional).
-
lvm: An lvm partition is a partition with an LVM volume group. Only single persistent volumes (PV) volume groups are supported. It supports the following properties:-
name: The name of the volume group (optional; if unset, the system generates a name automatically). -
minsize: The minimum size of the volume group, as an integer (in bytes) or a string with a data unit (for example 3 GiB). The final size of the partition and volume group in the image might be larger if the value is smaller than the sum of logical volumes it contains. logical_volumes: One or more logical volumes for the volume group. Each volume group supports the following properties:-
name: The name of the logical volume (optional; if unset, a name will be generated automatically based on the mount point). -
minsize: The minimum size of the logical volume, as an integer (in bytes) or a string with a data unit (for example 3 GiB). The final size of the logical volume in the image might be larger for specific mount points. -
label: The label for the filesystem (optional). -
fs_type: The filesystem type, which should be one ofxfs,ext4,vfat, orswap. Setting it to swap will create a swap logical volume. The mount point for a swap logical volume must be empty. -
mount point: The mount point for the logical volume’s filesystem. For swap logical volumes, this must be empty.
-
-
- Order:
The order of each element in a list is respected when creating the partition table. The partitions are created in the order they are defined, regardless of their type.
- Incomplete partition tables:
Incomplete partitioning descriptions are valid. Partitions, LVM logical volumes, are added automatically to create a valid partition table. The following rules are applied:
-
A root filesystem is added if one is not defined. This is identified by the mount point
/. If an LVM volume group is defined, the root filesystem is created as a logical volume, otherwise it will be created as a plain partition with a filesystem. The type of the filesystem, for plain and LVM, depends on the distribution (xfs for RHEL and CentOS, ext4 for Fedora). See Understanding partitions section for information about the sizing and order of the root partition. -
A boot partition is created if needed and if one is not defined. This is identified by the mountpoint
/boot. A boot partition is needed when the root partition (mount point/) is on an LVM logical volume. It is created as the first partition after the ESP (see next item). -
An EFI system partition (ESP) is created if needed. This is identified by the mount point
/boot/efi. An ESP is needed when the image is configured to boot with UEFI. This is defined by the image definition and depends on the image type, the distribution, and the architecture. The type of the filesystem is alwaysvfat. By default, the ESP is 200 MiB and is the first partition after the BIOS boot (see next item). - A 1 MiB unformatted BIOS boot partition is created at the start of the partition table if the image is configured to boot with BIOS. This is defined by the image definition and depends on the image type, the distribution, and the architecture. Both a BIOS boot partition and an ESP are created for images that are configured for hybrid boot.
- Combining partition types:
You can define multiple partitions. The following combination of partition types are valid:
-
plainandlvm: Plain partitions can be created alongside an LVM volume group. However, only one LVM volume group can be defined. - Examples: Blueprint to define two partitions
The following blueprint defines two partitions. The first is a 50 GiB partition with an ext4 filesystem that will be mounted at /data. The second is an LVM volume group with three logical volumes, one for root /, one for /var/home directories, and a swap space in that order. The LVM volume group will have 15 GiB of non-allocated space.
[[customizations.disk.partitions]]
type = "plain"
label = "data"
mountpoint = "/data"
fs_type = "ext4"
minsize = "50 GiB"

[[customizations.disk.partitions]]
type = "lvm"
name = "mainvg"
minsize = "20 GiB"

[[customizations.disk.partitions.logical_volumes]]
name = "rootlv"
mountpoint = "/"
label = "root"
fs_type = "ext4"
minsize = "2 GiB"

[[customizations.disk.partitions.logical_volumes]]
name = "homelv"
mountpoint = "/var/home"
label = "home"
fs_type = "ext4"
minsize = "2 GiB"

[[customizations.disk.partitions.logical_volumes]]
name = "swaplv"
fs_type = "swap"
minsize = "1 GiB"
6.4. Benefits of the filesystem customization in RHEL image mode
Filesystem customization provides the final partition table of an image that you built with image builder, and it is determined by a combination of the following factors:
- The base partition table for a given image type.
The relevant blueprint customizations:
- Partitioning mode.
- Filesystem customizations.
The image size parameter of the build request:
-
On the command line, this is the
--sizeoption of thecomposer-cli compose startcommand.
-
On the command line, this is the
The following describes how these factors affect the final layout of the partition table.
- Modifying partition tables
You can modify the partition table by taking the following aspects in consideration:
- Partitioning modes
The partitioning mode controls how the partition table is modified from the image type’s default layout.
-
The
rawpartition type does not convert any partition to LVM. -
The
lvmpartition type always converts the partition that contains the/root mountpoint to an LVM Volume Group and creates a root Logical Volume. Except from/boot, any extra mountpoint is added to the Volume Group as new Logical Volumes. The
auto-lvmmode is the default mode and converts a raw partition table to an LVM-based one if and only if new mountpoints are defined in the filesystems customization. See the Mountpoints entry for more details.- Mountpoints
You can define new filesystems and minimum partition sizes by using the filesystems customization in the blueprint. By default, if new mountpoints are created, a partition table is automatically converted to LVM. See the Partitioning modes entry for more details.
- Image size The minimum size of the partition table is the size of the disk image. The final size of the image will either be the value of the size parameter or the sum of all partitions and their associated metadata, depending on which one is the larger.
6.5. Creating images with specific sizes in filesystem customization
When you create images with specific sizes in RHEL Image Mode, especially when using bootc and bootc-image-builder, you define the desired disk size within your image build process. While exact sizes can be challenging due to overheads, you can specify minimum requirements.
Prerequisites
-
You must specify the exact
[Image size]in the build request. - You must specify mountpoints as customizations with sizes smaller than the total size in sum. This is required because the partition table, partitions, and other entities often require extra space for metadata and headers. Thus, the space to fit all mountpoints is always larger than the sum of the partition sizes. However, the exact size of the extra space varies based on many factors, such as image type.
Procedure
The following are steps to create a disk image of a very specific size in the TOML file:
Define the
image_sizeparameter within the [disk] section of yourconfig.tomlfile:[disk] image_size = 10737418240 # Example: 10GB in bytes
Add any extra mountpoints with their required minimum sizes. Ensure that the sum of the sizes is smaller than the image size by at least 3.01 GiB if no /usr mountpoint exists, or at least 1.01 GiB if one does. The extra 0.01 MiB is more than enough for the headers and metadata, for which extra space might be reserved. Do not specify a size for the / mountpoint.
With this, you create a disk with a partition table of the desired size with each partition sized to fit the desired mountpoints. The root partition, root LVM Logical Volume, will be at least 3 GiB, or 1 GiB if /usr is specified. See Understanding partitions for more details.
- If the partition table does not have any LVM Volume Groups (VG), the root partition will be grown to fill the remaining space.
- If the partition table contains an LVM Volume Group (VG), the VG will have unallocated extents that can be used to grow any of the Logical Volumes.
6.6. Using bootc-image-builder to add with advanced partitioning to disk images of image mode
You can customize your bootc-image-builder blueprint to implement advanced partitioning for osbuild-composer. The following are possible custom mountpoints:
-
You can create LVM-based images under all partitions on LVs except,
/bootand/boot/efi. - You can create an LV-based swap.
- You can give VGs and LVs custom names.
Include partitioning configurations in the base image that bootc-image-builder will read to create the partitioning layout, making the container itself the source of truth for the partition table. Mountpoints for partitions and logical volumes should be created in the base container image used to build the disk. This is particularly important for top-level mountpoints, such as the /app mountpoint. The bootc-image-builder will validate the configuration against the bootc container before building, in order to avoid creating unbootable images.
Prerequisites
- You have Podman installed on your host machine.
-
You have root access to run the
bootc-image-buildertool, and run the containers in--privilegedmode, to build the images. - QEMU is installed.
Procedure
Create a
config.tomfile with the following content:Add a user to the image.
[[customizations.user]]
name = "user1"
password = "user2"
key = "ssh-rsa AAA ... user@email.com"
groups = ["wheel"]

# Set a size for the root partition:

[[customizations.partitioning.plain.filesystems]]
mountpoint = "/"
type = "ext4"
minsize = "3 GiB"

# Add an extra data partition
[[customizations.partitioning.plain.filesystems]]
mountpoint = "/var/data"
type = "xfs"
minsize = "2 GiB"
label = "data"


# Add an app partition with a top-level mountpoint.
# Requires derived container.
[[customizations.partitioning.plain.filesystems]]
mountpoint = "/app"
type = "xfs"
minsize = "1 GiB"
label = "app"

# Add the LVM configuration:
# Define the LVM Volume Group name and size
[[customizations.partitioning.lvm.volume_groups]]
name = "rhelvg"
minsize = 10737418240  # 10 GiB


# Add a data Logical Volume to the group
[[customizations.partitioning.lvm.volume_groups.logical_volumes]]
name = "datalv"
mountpoint = "/var/data"
label = "data"
minsize = "1 GiB"
type = "xfs"


# The root Logical Volume is created automatically if not defined, but setting
# it lets us set the name, label, and size explicitly
[[customizations.partitioning.lvm.volume_groups.logical_volumes]]
name = "rootlv"
mountpoint = "/"
label = "system"
minsize = "2 GiB"
type = "ext4"


# Add an app Logical Volume with a top-level mountpoint.
# Requires derived container.
[[customizations.partitioning.lvm.volume_groups.logical_volumes]]
mountpoint = "/app"
type = "xfs"
minsize = "1 GiB"
label = "app"
name = "applv"
Run the
bootc-image-builder. Optionally, if you want to use user access configuration, pass theconfig.tomlas an argument. The following is an example of creating a public QCOW2 image:sudo podman run \ --rm \ -it \ --privileged \ --pull=newer \ --security-opt label=type:unconfined_t \ -v ./config.toml:/config.toml:ro \ -v ./output:/output \ registry.redhat.io/rhel9/bootc-image-builder:latest \ --type qcow2 \ --config /config.toml \ quay.io/<namespace>/<image>:<tag>
You can find the .qcow2 image in the output folder.
Verification
Run the resulting QCOW2 file on a virtual machine.
qemu-system-x86_64 \
     -enable-kvm \
     -cpu host \
     -m 8G \
     -bios /usr/share/edk2/ovmf/OVMF_CODE.fd \
     -snapshot \
     -drive file="${path}/output/qcow2/disk.qcow2"
Access the system in the virtual machine launched with SSH.
# ssh -i /<path_to_private_ssh-key> <user1>@<ip-address>
Next steps
- You can deploy your image. See Deploying a container image using KVM with a QCOW2 disk image.
- You can make updates to the image and push the changes to a registry. See Managing RHEL bootc images.
6.7. Building disk images of image-mode RHEL with advanced partitioning
You can create image-mode disk images with advanced partitioning by bootc-image-builder. The image-mode disk images you create for RHEL image mode include custom mount points, custom mount options, LVM-based partitions, and LVM-based swap volumes.
With that, you can, for example, change the size of the / and the /boot directories by using a config.toml file. When installing the RHEL image mode on bare metal, you can benefit from all partitioning features available in the Anaconda installer.
Prerequisites
- You have Podman installed on your host machine.
-
You have
virt-installinstalled on your host machine. -
You have root access to run the
bootc-image-buildertool, and run the containers in--privilegedmode, to build the images.
Procedure
Create a
config.tomlfile to configure custom mount options, for example:[[customizations.filesystem]] mountpoint = "/" minsize = "10 GiB" [[customizations.filesystem]] mountpoint = "/var/data" minsize = "20 GiB"Run
bootc-image-builder, passing theconfig.tomlas an argument.NoteIf you do not have the container storage mount and
--localimage options, your image must be public.The following is an example of creating a public image:
$ sudo podman run \
    --rm \
    -it \
    --privileged \
    --pull=newer \
    --security-opt label=type:unconfined_t \
    -v ./config.toml:/config.toml \
    -v ./output:/output \
    registry.redhat.io/rhel9/bootc-image-builder:latest \
    --type <image_type> \
    --config config.toml \
  quay.io/<namespace>/<image>:<tag>
Chapter 7. Best practices for running containers by using local sources
You can access content hosted in an internal registry that requires a custom Transport Layer Security (TLS) root certificate, when running RHEL bootc images.
To install content to a container by using only local resources, you can use one of the following options:
- Bind mounts: Override the container’s store with the host’s.
-
Derived image: Create a new container image with your custom certificates by building it using a
Containerfile.
You can use these techniques to run a bootc-image-builder container or a bootc container when appropriate.
7.1. Importing custom certificate to a container by using bind mounts
Use bound mounts to override the container’s store with the host’s.
Procedure
Run RHEL bootc image and use bind mount, for example
-v /etc/pki:/etc/pki, to override the container’s store with the host’s:# podman run \ --rm \ -it \ --privileged \ --pull=newer \ --security-opt label=type:unconfined_t \ -v $(pwd)/output:/output \ -v /etc/pki:/etc/pki \ localhost/<image> \ --type iso \ --config /config.toml \ quay.io/<namespace>/<image>:<tag>
Verification
- The disk image build process should now be able to access internal certificates.
7.2. Importing custom certificates to a container by a using Containerfile
Create a new container image with your custom certificates by building it using a Containerfile.
Procedure
Create a
Containerfile:FROM <internal_repository>/<image> RUN mkdir -p /etc/pki/ca-trust/extracted/pem/ COPY tls-ca-bundle.pem /etc/pki/ca-trust/extracted/pem/ RUN rm -rf /etc/yum.repos.d/* COPY echo-rhel9_4.repo /etc/yum.repos.d/Build the custom image:
# podman build -t <your_image> .Run the
<your_image>:# podman run -it --rm <your_image>
Verification
List the certificates inside the container:
# ls -l /etc/pki/ca-trust/extracted/pem/
tls-ca-bundle.pem
Chapter 8. Deploying RHEL bootc images
You can deploy RHEL bootc images by various methods, depending on your target environment, installation method, and automation requirements.
8.1. Available methods for deploying RHEL bootc images
You can deploy the rhel-bootc container image by using the following mechanisms: * Anaconda * bootc-image-builder * bootc install
The following bootc image types are available:
Disk images that you generated by using the
bootc image-buildersuch as:- QCOW2 (QEMU copy-on-write, virtual disk)
- Raw (Mac Format)
- AMI (Amazon Cloud)
- ISO: Unattended installation method, by using an USB Sticks or Install-on-boot.
After you have created a layered image that you can deploy, there are several ways that the image can be installed to a host:
You can use RHEL installer and Kickstart to install the layered image to a bare metal system, by using the following mechanisms:
- Deploy by using USB
- PXE
-
You can also use
bootc-image-builderto convert the container image to a bootc image and deploy it to a bare metal or to a cloud environment.
The installation method happens only one time. After you deploy your image, any future updates will apply directly from the container registry as the updates are published.
Figure 8.1. Deploying a bootc image by using a basic build installer bootc install, or deploying a container image by using Anaconda and Kickstart
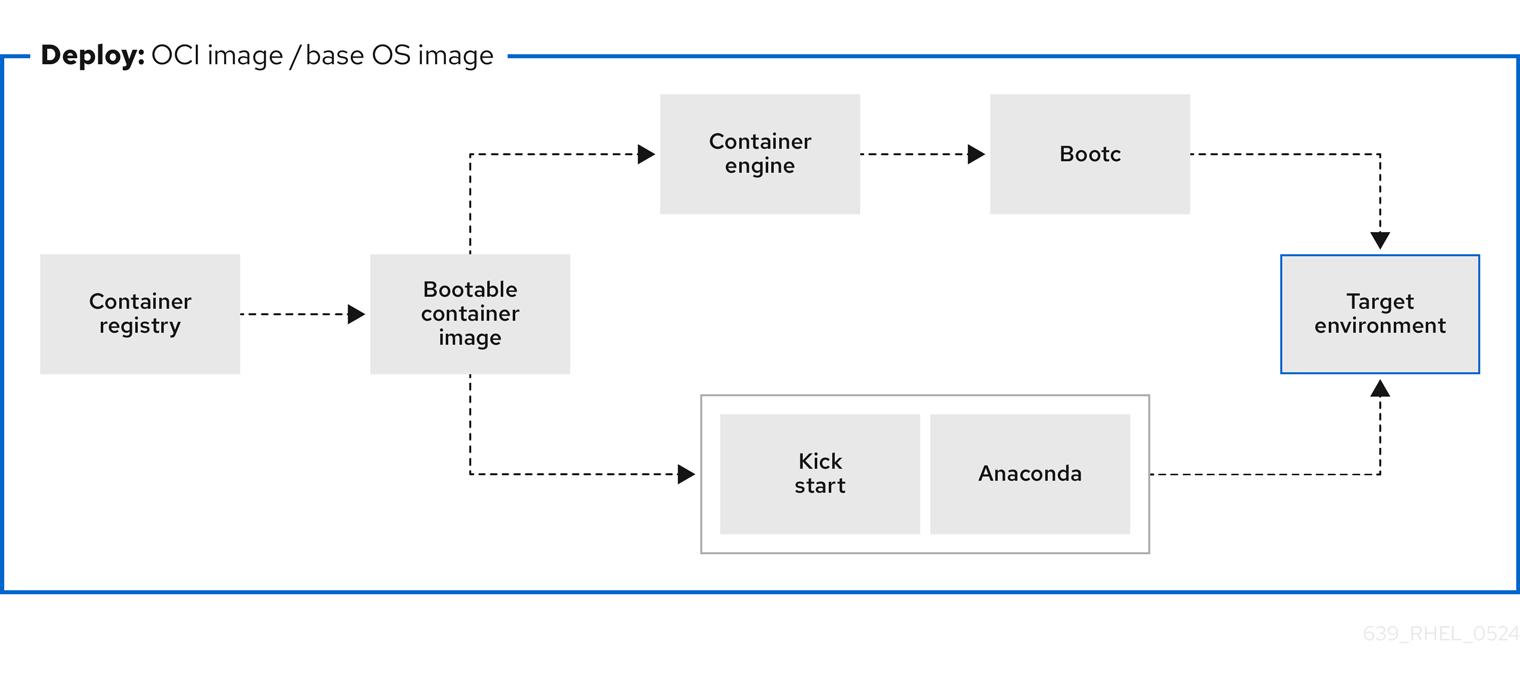
Figure 8.2. Using bootc-image-builder to create disk images from bootc images and deploying disk images in different environments, such as the edge, servers, and clouds by using Anaconda, bootc-image-builder or bootc install

8.2. Deploying a container image by using KVM with a QCOW2 disk image
After creating a QCOW2 image from a RHEL bootc image by using the bootc-image-builder tool, you can use a virtualization software to boot it.
Prerequisites
- You created a container image.
- You pushed the container image to an accessible repository.
-
You created a QCOW2 image by using
bootc-image-builder. For instructions, see Creating QCOW2 images by using bootc-image-builder.
Procedure
By using
libvirt, create a virtual machine (VM) with the disk image that you previously created from the container image. For more details, see Creating virtual machines by using the command line.The following example uses
virt-installto create a VM. Replace<qcow2/disk.qcow2>with the path to your QCOW2 file:$ sudo virt-install \ --name bootc \ --memory 4096 \ --vcpus 2 \ --disk <qcow2/disk.qcow2> \ --import
Verification
- Connect to the VM in which you are running the container image. See Configuring bridges on a network bond to connect virtual machines with the network for more details.
Next steps
- You can make updates to the image and push the changes to a registry. See Managing RHEL bootc images.
8.3. Deploying a container image by using AWS with an AMI disk image
After using the bootc-image-builder tool to create an AMI from a bootc image, and uploading it to a AWS s3 bucket, you can deploy a container image to AWS by using the AMI disk image.
Prerequisites
- You created an Amazon Machine Image (AMI) from a bootc image. See Creating AMI images by using bootc-image-builder and uploading it to AWS.
-
cloud-initis available in the Containerfile that you previously created so that you can create a layered image for your use case.
Procedure
- In a browser, access Service→EC2 and log in.
- On the AWS console dashboard menu, choose the correct region. The image must have the Available status, to indicate that it was correctly uploaded.
- On the AWS dashboard, select your image and click .
- In the new window that opens, choose an instance type according to the resources you need to start your image. Click .
- Review your instance details. You can edit each section if you need to make any changes. Click .
- Before you start the instance, select a public key to access it. You can either use the key pair you already have or you can create a new key pair.
Click to start your instance. You can check the status of the instance, which displays as Initializing.
After the instance status is Running, the button becomes available.
- Click . A window appears with instructions on how to connect by using SSH.
Run the following command to set the permissions of your private key file so that only you can read it. See Connect to your Linux instance.
$ chmod 400 <your-instance-name.pem>Connect to your instance by using its Public DNS:
$ ssh -i <your-instance-name.pem>ec2-user@<your-instance-IP-address>
Your instance continues to run unless you stop it.
Verification
After launching your image, you can:
- Try to connect to http://<your_instance_ip_address> in a browser.
- Check if you are able to perform any action while connected to your instance by using SSH.
Next steps
- After you deploy your image, you can make updates to the image and push the changes to a registry. See Managing RHEL bootc images.
8.4. Deploying a container image from the network by using Anaconda and Kickstart
You can deploy an ISO image by using Anaconda and Kickstart to install your container image. The installable boot ISO already contains the ostreecontainer Kickstart file configured that you can use to provision your custom container image.
Prerequisites
- You have downloaded the 9.4 Boot ISO for your architecture from Red Hat. See Downloading RH boot images.
Procedure
Create an
ostreecontainerKickstart file to fetch the image from the network. For example:# Basic setup text network --bootproto=dhcp --device=link --activate # Basic partitioning clearpart --all --initlabel --disklabel=gpt reqpart --add-boot part / --grow --fstype xfs # Reference the container image to install - The kickstart # has no %packages section. A container image is being installed. ostreecontainer --url quay.io/<namespace>/<image>:<tag> . bootc-image-builder:latest firewall --disabled services --enabled=sshd # Only inject a SSH key for root rootpw --iscrypted locked sshkey --username root "<your-key>" rebootBoot a system by using the 9.4 Boot ISO installation media.
Append the Kickstart file with the following to the kernel argument:
inst.ks=http://<path_to_your_kickstart>
- Press CTRL+X to boot the system.
Next steps
- After you deploy your container image, you can make updates to the image and push the changes to a registry. See Managing RHEL bootc images.
8.5. Deploying a custom ISO container image in disconnected environments
By using using bootc-image-builder to convert a bootc image to an ISO image, you create a system similar to the RHEL ISOs, except that your container image content is embedded in the ISO disk image. You do not need to have access to the network during installation. You can install the ISO disk image that you created from bootc-image-builder to a bare metal system.
Prerequisites
- You have created an ISO image with your bootc image embedded.
Procedure
- Copy your ISO disk image to a USB flash drive.
- Perform a bare-metal installation by using the content in the USB stick into a disconnected environment.
Next steps
- You can push an updated version of this container image to the registry to deliver OS updates to your running systems. See Managing RHEL bootc images.
8.6. Deploying an ISO bootc image over PXE boot
To run your ISO bootc image, you can use a network installation to deploy the RHEL ISO image over PXE.
Prerequisites
- You have downloaded the latest Boot ISO for your architecture from Red Hat. See Downloading RH boot images.
You have configured the server for the PXE boot. Choose one of the following options:
- For HTTP clients, see Configuring the DHCPv4 server for HTTP and PXE boot.
- For UEFI-based clients, see Configuring a TFTP server for UEFI-based clients.
- For BIOS-based clients, see Configuring a TFTP server for BIOS-based clients.
- You have a client, also known as the system to which you are installing your ISO image.
Procedure
- Export the RHEL installation ISO image to the HTTP server. The PXE boot server is now ready to serve PXE clients.
- Boot the client and start the installation.
- Select PXE Boot when prompted to specify a boot source. If the boot options are not displayed, press the Enter key on your keyboard or wait until the boot window opens.
- From the Red Hat Enterprise Linux boot window, select the boot option that you want, and press Enter.
- Start the network installation.
Next steps
- You can make updates to the image and push the changes to a registry. See Managing RHEL bootc images.
8.7. Injecting configuration in the resulting disk images with bootc-image-builder
You can inject configuration into a custom image by using a build config, that is, a .toml or a .json file with customizations for the resulting image. The `build config file is mapped into the container directory to /config.toml. The following example shows how to add a user to the resulting disk image:
Procedure
Create a
./config.toml. The following example shows how to add a user to the disk image.[[customizations.user]] name = "user" password = "pass" key = "ssh-rsa AAA ... user@email.com" groups = ["wheel"]-
name- Mandatory. Name of the user. -
password- Not mandatory. Nonencrypted password. -
key- Not mandatory. Public SSH key contents. -
groups- Not mandatory. An array of groups to add the user into.
-
Run
bootc-image-builderand pass the following arguments, including theconfig.toml:$ sudo podman run \ --rm \ -it \ --privileged \ --pull=newer \ --security-opt label=type:unconfined_t \ -v $(pwd)/config.toml:/config.toml \ -v $(pwd)/output:/output \ registry.redhat.io/rhel9/bootc-image-builder:latest \ --type qcow2 \ --config config.toml \ quay.io/<namespace>/<image>:<tag>Launch a VM, for example, by using
virt-install:$ sudo virt-install \ --name bootc \ --memory 4096 \ --vcpus 2 \ --disk qcow2/disk.qcow2 \ --import \ --os-variant rhel9
Verification
Access the system with SSH:
# ssh -i /<path_to_private_ssh-key> <user1>_@_<ip-address>
Next steps
- After you deploy your container image, you can make updates to the image and push the changes to a registry. See Managing RHEL bootable images.
8.8. Deploying a container image to bare metal by using bootc install
You can perform a bare-metal installation to a device by using a RHEL ISO image. Bootc contains a basic build installer and it is available as the following methods: bootc install to-disk or bootc install to-filesystem.
-
bootc install to-disk: By using this method, you do not need to perform any additional steps to deploy the container image, because the container images include a basic installer. -
bootc install to-filesystem: By using this method, you can configure a target device and root filesystem by using a tool of your choice, for example, LVM.
Prerequisites
- You have downloaded a RHEL 10 Boot ISO from Red Hat for your architecture. See Downloading RHEL boot images.
- You have created a configuration file.
Procedure
Inject a configuration into the running ISO image.
By using
bootc install to-disk:$ podman run \ --rm --privileged \ --pid=host -v /dev:/dev \ -v /var/lib/containers:/var/lib/containers \ --security-opt label=type:unconfined_t <image> bootc install to-disk <path-to-disk>By using
bootc install to-filesystem:$ podman run \ --rm --privileged \ --pid=host -v /:/target \ -v /dev:/dev \ -v /var/lib/containers:/var/lib/containers \ --security-opt label=type:unconfined_t <image> bootc install to-filesystem <path-to-disk>
Next steps
- After you deploy your container image to a bare-metal environment, you can make updates to the image and push the changes to a registry. See Managing RHEL bootable images.
8.9. Deploying a container image by using a single command
The system-reinstall-bootc command provides an interactive CLI that wraps the bootc install to-existing root command. You can deploy a container image into a RHEL cloud instance by using a signal command. The system-reinstall-bootc command performs the following actions:
- Pull the supplied image to set up SSH keys or access the system.
-
Run the
bootc install to-existing-rootcommand with all the bind mounts and SSH keys configured.
The following procedure deploys a bootc image to a new RHEL 10 instance on AWS. When launching the instance, make sure to select your SSH key, or create a new one. Otherwise, the default instance configuration settings can be used.
Prerequisites
- Red Hat Account or Access to Red Hat RPMS
- A package-based RHEL (9.6 / 10.0 or greater) virtual system running in an AWS environment.
- Ability and permissions to SSH into the package system and make "destructive changes."
Procedure
After the instance starts, connect to it by using SSH using the key you selected when creating the instance:
$ ssh -i <ssh-key-file> <cloud-user@ip>Make sure that the
system-reinstall-bootcsubpackage is installed:# rpm -q system-reinstall-bootcIf not, install the
system-reinstall-bootcsubpackage:# dnf -y install system-reinstall-bootcConvert the system to use a bootc image:
# system-reinstall-bootc <image>- You can use the container image from the Red Hat Ecosystem Catalog or the customized bootc image built from a Containerfile.
- Select users to import to the bootc image by pressing the "a" key.
- Confirm your selection twice and wait until the image is downloaded.
Reboot the system:
# rebootRemove the stored SSH host key for the given
<ip>from your/.ssh/known_hostsfile:# ssh-keygen -R <ip>The bootc system is now using a new public SSH host key. When attempting to connect to the same IP address with a different key than what is stored locally, SSH will raise a warning or refuse the connection due to a host key mismatch. Since this change is expected, the existing host key entry can be safely removed from the
~/.ssh/known_hostsfile using the following command.Connect to the bootc system:
# ssh -i <ssh-key-file> root@<ip>
Verification
Confirm that the system OS has changed:
# bootc status
8.10. Deploying an image mode update in offline and air-gapped environments
With image mode for Red Hat Enterprise Linux, you can deploy updates to RHEL systems in offline and air-gapped environments by using external storage to transfer container images.
To deploy an image mode update onto a host machine, you need a network connection to access a registry and get updates. However, when your operational environment requires specific architectural factors, such as hardware specifications, stringent security mandates, location-based network limitations, or scheduled updates when remote access is unavailable, you can perform system updates fully offline and air-gapped.
Offline updates can be time-consuming when you use them on many devices and might require on-site capability to deploy the updates.
Prerequisites
- A running RHEL system containing the updates that you want to make to the system.
- A running RHEL system with Red Hat Enterprise Linux 9 deployed on the target hardware.
-
The
container-toolsmeta-package is installed. Themeta-packagecontains all container tools, such as Podman, Buildah, and Skopeo. - Access to a registry or a locally stored container.
- An external storage device for the container requires an update.
Procedure
Verify which storage devices are already connected to your system.
$ lsblk
NAME          MAJ:MIN     SIZE   RO TYPE  MOUNTPOINTS
zram0           251:0       8G    0 disk  [SWAP]
nvme0n1         259:0   476.9G    0 disk
├─nvme0n1p1    259:1     600M    0 part  /boot/efi
├─nvme0n1p2    259:2       1G    0 part  /boot
└─nvme0n1p3    259:3   475.4G    0 part
Connect your external storage and run the same command. Compare the two outputs to find the name of your external storage device on your system.
$ lsblk
NAME        MAJ:MIN   SIZE   RO TYPE  MOUNTPOINTS
sda             8:0   28.9G    0 disk
└─sda1         8:1   28.9G    0 part
zram0         251:0      8G    0 disk  [SWAP]
nvme0n1       259:0  476.9G    0 disk
├─nvme0n1p1  259:1    600M    0 part  /boot/efi
├─nvme0n1p2  259:2      1G    0 part  /boot
└─nvme0n1p3  259:3  475.4G    0 part
In this case, the USB drive whose name is
sdahas ansda1partition.The
MOUNTPOINTScolumn lists the mount points of the partitions on your external storage. If your system automatically mounts external storage, then valid mount points already exist. However, if there are no mount points, you must mount it yourself before you can store anything on the device.Create an empty directory, or use an existing one, to mount your partition:
$ sudo mkdir /mnt/usb/Mount your device partition.
$ sudo mount /dev/sda1 /mnt/usbOptional: Verify if the partition was correctly created:
$ lsblk
NAME         MAJ:MIN    SIZE   RO TYPE  MOUNTPOINTS
sda              8:0   28.9G    0 disk
└─sda1          8:1   28.9G    0 part  /mnt/usb
[...]
Your external storage device is ready for copying files onto it.
Copy the container stored locally to your mounted device by using the
skopeocommand, and adapting the paths and names of the container for your own environment:For local storage:
$ sudo skopeo copy --preserve-digests --all \
  containers-storage:localhost/rhel-container:latest \
  oci://mnt/usb/
For a container stored on a remote registry:
$ sudo skopeo copy --preserve-digests --all \ docker://quay.io/example:latest \ oci://mnt/usb/NoteDepending on the size of the container, these commands might take a few minutes to complete.
Unmount and eject the external storage:
$ sudo umount /dev/sda1 $ sudo eject /dev/sda1- Apply the update to the container on the offline system.
-
Plug the external storage device into your offline system. If the storage device does not mount automatically, use the
mkdirandmountcommands to locate the external storage and mount it. Copy the container from the external device over to the offline system’s local container registry. Copy the container to the offline machine’s local container storage:
$ skopeo copy --preserve-digests --all \
  oci://mnt/usb \
  containers-storage:rhel-update:latest
In this case, the mount point of the external storage is the path to the
OCIsection, while thecontainers-storagesection varies depending on the name and tag you want the container to have.Use Podman to verify that your container is now local:
$ podman images
REPOSITORY			        TAG     IMAGE ID  CREATED  SIZE
example.io/library/rhel-update   latest  cdb6d...  1 min    1.48 GB
Deploy the update to the container on the offline system by using
bootc:$ bootc switch --transport containers-storage \ example.io/library/rhel-update:latestIf you cannot copy your container to local storage, use the
oci transportflag and the path to your storage device instead:$ bootc switch --transport oci /mnt/usbWith the
--transportflag in thebootc switchcommand, you can specify an alternative source for the container.By default,
bootcattempts to pull from a registry because thebootc-image-builderuses a registry to build the original image. There is no way to specify where an update is located when using bootc upgrade. By using thebootc switchand specifying that you are using local container storage, you cannot only remove the requirement of a remote registry, but also deploy updates by using this local container in the future.You can now successfully use the
bootc upgrade, provided that your local container and the update share the same location. If you want to switch to updates on a remote repository in the future, you must usebootc switchagain.
Verification
Ensure that the update was properly deployed:
$ bootc status
Staged image: containers-storage:example.io/library/rhel-update:latest
  Digest: sha256: 05b1dfa791...
  Version: 9.0 (2025-07-07 18:33:19.380715153 UTC)
Booted Image: localhost/rhel-intel:base
  Digest: sha256: 7d6f312e09...
  Version: 9.0 (2025-06-23 15:58:12.228704562 UTC)
The output shows your current booted image, along with any changes staged to happen. The container you used earlier is visible, but the staged changes do not happen until the next reboot. The output also confirms that updates will be pulled from your container storage.
Reboot the system:
$ bootc status
Booted image: containers-storage:example.io/library/rhel-update:latest
	Digest: sha256: 05b1dfa791...
	Version: 9.0 (2025-07-07 18:33:19.380715153 UTC)
Rollback image: localhost/rhel-intel:base
	Digest: sha256: 7d6f312e09...
	Version: 9.0 (2025-06-23 15:58:12.228704562 UTC)
You can verify that you have booted into the correct image:
- The booted image is your updated image.
- The rollback image is your previous image. You have successfully performed an offline image mode update.
8.11. Advanced installation with to-filesystem
The bootc install command contains two subcommands: bootc install to-disk and bootc install to-filesystem.
-
The
bootc-install-to-filesystemperforms installation to the target filesystem. The
bootc install to-disksubcommand consists of a set of opinionated lower level tools that you can also call independently. The command consist of the following tools:-
mkfs.$fs /dev/disk -
mount /dev/disk /mnt -
bootc install to-filesystem --karg=root=UUID=<uuid of /mnt> --imgref $self /mnt
-
The bootc install to-existing-root is a variant of install to-filesystem. You can use it to convert an existing system into the target container image.
This conversion eliminates the /boot and /boot/efi partitions and can delete the existing Linux installation. The conversion process reuses the filesystem, and even though the user data is preserved, the system no longer boots in package mode.
Prerequisites
- You must have root permissions to complete the procedure.
-
You must match the host environment and the target container version, for example, if your host is a RHEL 9 host, then you must have a RHEL 9 container. Installing a RHEL container on a Fedora host by using
btrfsas the RHEL kernel will not support that filesystem.
Procedure
Run the following command to convert an existing system into the target container image. Pass the target
rootfsby using the-v /:/targetoption.# podman run --rm --privileged -v /dev:/dev -v /var/lib/containers:/var/lib/containers -v /:/target \ --pid=host --security-opt label=type:unconfined_t \ <image> \ bootc install to-existing-rootThis command deletes the data in
/boot, but everything else in the existing operating system is not automatically deleted. This can be useful because the new image can automatically import data from the previous host system. Consequently, container images, database, the user home directory data, configuration files in/etcare all available after the subsequent reboot in/sysroot.You can also use the
--root-ssh-authorized-keysflag to inherit the root user SSH keys, by adding--root-ssh-authorized-keys /target/root/.ssh/authorized_keys. For example:# podman run --rm --privileged -v /dev:/dev -v /var/lib/containers:/var/lib/containers -v /:/target \ --pid=host --security-opt label=type:unconfined_t \ <image> \ bootc install to-existing-root --root-ssh-authorized-keys /target/root/.ssh/authorized_keys
Chapter 9. Creating bootc images from scratch
With bootc images from scratch, you can have control over the underlying image content and tailor your system environment to your requirements.
You can use the bootc-base-imagectl command to create a bootc image from scratch by using an existing bootc base image as a build environment, which provides greater control over the content included in the build process. This process takes the user RPM packages as input, so you need to rebuild the image if the RPMs change.
The custom base derives from the base container and does not automatically incorporate changes to the default base image unless you make them part of a container pipeline.
You can use the bootc-base-imagectl rechunk subcommand on any bootc container image.
If you want to perform kernel management, you do not need to create a bootc image from scratch. See Managing kernel arguments in bootc systems.
9.1. Using pinned content to build images
To maintain reproducible builds, you can use repository snapshot tools to pin a base image to specific package versions. This ensures that rpm-md or yum repositories remain consistent with the lockfiles of your project.
With the bootc image from scratch feature, you can configure and override package information in source RPM repositories, while referencing mirrored, pinned, or snapshotted repository content. Consequently, you gain control over package versions and their dependencies.
For example, you might want to gain control over package versions and their dependencies in the following situations:
- You need to use a specific package version because of strict certification and compliance requirements.
- You need to use specific software versions to support critical dependencies.
Prerequisites
- A standard bootc base image.
Procedure
The following example creates a bootc image from scratch with pinned content:
# Begin with a standard bootc base image that serves as a "builder" for our custom image.
FROM registry.redhat.io/rhel9/rhel-bootc:latest as builder
# Configure and override source RPM repositories, if necessary. The following step is required when referencing specific content views or target mirrored/snapshotted/pinned versions of content.
RUN rm -rvf /etc/yum.repos.d; mkdir -p /etc/yum.repos.d/
COPY mypinnedcontent.repo /etc/yum.repos.d/
# The file must be copied to the /etc/yum.repos.d/ directory.
# The mypinnedcontent.repo is your standard repository that ensures that your container will always be built with the exact same versions of software, preventing unexpected bugs or security issues from new updates.
# Build the root file system using the specified repositories and non-RPM content from the "builder" base image.
# If no repositories are defined, the default build will be used. You can modify the scope of packages in the base image by changing the manifest between the "standard" and "minimal" sets.
# Add additional repositories to apply customizations to the image. However, referencing a custom manifest in this step is not currently supported without forking the code.
RUN /usr/libexec/bootc-base-imagectl build-rootfs --manifest=standard /target-rootfs
# Create a new, empty image from scratch.
FROM scratch
# Copy the root file system built in the previous step into this image.
COPY --from=builder /target-rootfs/ /
# Apply customizations to the image. This syntax uses "heredocs" https://www.docker.com/blog/introduction-to-heredocs-in-dockerfiles/ to pass multi-line arguments in a more readable format.
RUN <<EORUN
# Set pipefail to display failures within the heredoc and avoid false-positive successful builds.
set -xeuo pipefail
# Install necessary packages, run scripts, etc.
dnf -y install NetworkManager emacs
# Remove leftover build artifacts from installing packages in the final built image.
dnf clean all
rm /var/{log,cache,lib}/* -rf
EORUN
# Define required labels for this bootc image to be recognized as such.
LABEL containers.bootc 1
LABEL ostree.bootable 1
# Optional labels that only apply when running this image as a container. These keep the default entry point running under systemd.
STOPSIGNAL SIGRTMIN+3
CMD ["/sbin/init"]
# Run the bootc linter to avoid encountering certain bugs and maintain content quality. Place this command last in your Containerfile.
RUN bootc container lint
Verification steps
Save and build your image.
$ podman build -t quay.io/<namespace>/<image>:<tag> . --cap-add=all --security-opt=label=type:container_runtime_t --device /dev/fuseBuild <_image_> image by using the
Containerfilein the current directory:$ podman build -t quay.io/<namespace>/<image>:<tag> .
9.2. Building a base image up from minimal
Previously, you could build just a standard image by using image mode for RHEL. The standard image is roughly a headless server-oriented installation, although you can use it for desktops as well, and includes many opinionated packages for networking, CLI tool, among others.
You now have the option to generate from the standard image a new minimal image which only starts from bootc, kernel, and dnf. This image can then be extended further in a multi-stage build. At the current time the minimal image is not shipped pre-built in the registry.
The base images include the /usr/libexec/bootc-base-imagectl tool that enables you to generate a custom base image. By using the tool, you can build a root file system that is based on the RPM packages that you selected in the base image.
Prerequisites
- A standard bootc base image.
Procedure
The following example creates a custom minimal base image:
# Begin with a standard bootc base image that is reused as a "builder" for the custom image.
FROM registry.redhat.io/rhel9/rhel-bootc:latest as builder
# Configure and override source RPM repositories, if necessary. This step is not required when building up from minimal unless referencing specific content views or target mirrored/snapshotted/pinned versions of content.
# Add additional repositories to apply customizations to the image. However, referencing a custom manifest in this step is not currently supported without forking the code.
# Build the root file system by using the specified repositories and non-RPM content from the "builder" base image.
# If no repositories are defined, the default build will be used. You can modify the scope of packages in the base image by changing the manifest between the "standard" and "minimal" sets.
RUN dnf repolist && /usr/libexec/bootc-base-imagectl build-rootfs --manifest=minimal /target-rootfs
# Create a new, empty image from scratch.
FROM scratch
# Copy the root file system built in the previous step into this image.
COPY --from=builder /target-rootfs/ /
# Apply customizations to the image. This syntax uses "heredocs" https://www.docker.com/blog/introduction-to-heredocs-in-dockerfiles/ to pass multi-line arguments in a more readable format.
RUN <<EORUN
# Set pipefail to display failures within the heredoc and avoid false-positive successful builds.
set -xeuo pipefail
# Install required packages for our custom bootc image. Note that using a minimal manifest means we need to add critical components specific to our use case and environment.
dnf -y install NetworkManager cowsay
# Remove leftover build artifacts from installing packages from the final built image.
dnf clean all
rm /var/{log,cache,lib}/* -rf
# Close the shell command.
EORUN
# Define required labels for this bootc image to be recognized as such.
LABEL containers.bootc 1
LABEL ostree.bootable 1
# Optional labels that only apply when running this image as a container. These keep the default entry point running under systemd.
STOPSIGNAL SIGRTMIN+3
CMD ["/sbin/init"]
# Run the bootc linter to avoid encountering certain bugs and maintain content quality. Place this command last in your Containerfile.
RUN bootc container lint
9.3. Building required privileges
If you want to generate a new root file system, and do not modify the existing container, you can use container features, such as the mount namespacing, that are not enabled by default in many container build environments, to be able to gain building required privileges.
Prerequisites
-
The
container-toolsmeta-package is installed.
Procedure
Generate a new root file system, providing these arguments at a minimum to
podman build:--cap-add=all --security-opt=label=type:container_runtime_t --device /dev/fuse
9.4. Generating your bootc images from scratch
Create bootc images from scratch from a custom RHEL bootc default base container image to get a small root content set.
Prerequisites
-
The
container-toolsmetapackage is installed.
Procedure
Create a
Containerfile. The following is an example:# The following example reuses the default base image as a "builder" image. Optionally, you can use the commented instructions to configure or override the RPM repositories in /etc/yum.repos.d to, for example, refer to pinned versions FROM registry.redhat.io/rhel9/rhel-bootc:latest as builder # RUN rm -rf /etc/yum.repos.d/* # COPY mycustom.repo /etc/yum.repos.d RUN /usr/libexec/bootc-base-imagectl build-rootfs --manifest=minimal /target-rootfs # Create a new, empty image from scratch. FROM scratch # Copy the root file system built in the previous step into this image. COPY --from=builder /target-rootfs/ / # You can make arbitrary changes such as copying the systemd units and other tweaks from the baseconfig container image. This example uses the heredocs syntax, to improve and make it easy to add complex instructions, and install critical components RUN <<EORUN set -xeuo pipefail # Install networking support and SSH which are not in minimal dnf -y install NetworkManager openssh-server dnf clean all rm /var/{log,cache,lib}/* -rf bootc container lint EORUN # This label is required LABEL containers.bootc 1 LABEL ostree.bootable 1 # These labels are optional but useful if you want to keep the default of running under systemd when run as a container image. STOPSIGNAL SIGRTMIN+3 CMD ["/sbin/init"]
Next steps
-
After creating your
Containerfile, you get an image with a single tar file large layer. Every change, such as pushing to the registry, pulling for clients, results in copying the single large tar file, and increases the container image size. You can optimize the container image that you created for a smaller version.
Optionally, in RHEL 9.6 systems, you can use rpm-ostree to take a large image and resize it to a smaller version.
9.5. Optimizing container images to a smaller version
You can use the bootc-base-imagectl rechunk subcommand to interact with rpm-ostree and perform the image rechunking.
rpm-ostree can take a large image and "rechunk" it. This process optimizes the ordering and grouping of installed packages into many layers in the final image, which provides better network efficiency since several layers can be reused without causing a transfer.
The output of a scratch build is an image with a single large layer (tar). Every change that you do to the input, for example, a kernel update, results in a new layer including the entire contents of the bootc image. This new layer must then be pushed, stored by registries, and pulled by clients.
The bootc-base-imagectl is shipped as part of the bootc images. You can use pre-existing images to rechunk custom base images by mapping the host containers-storage into the container, and running bootc-base-imagectl within to do the rechunking operation.
Prerequisites
- You have a previously-built base image.
Procedure
Run the following command to rechunk your base image.
$ sudo podman run --rm --privileged -v /var/lib/containers:/var/lib/containers \
      registry.redhat.io/rhel9/rhel-bootc:latest \
      /usr/libexec/bootc-base-imagectl rechunk \
          quay.io/exampleos/rhel-bootc:single \
          quay.io/exampleos/rhel-bootc:chunked
Chapter 10. Enabling the FIPS mode while building a bootc image
Federal Information Processing Standards (FIPS) include standards for cryptographic operations. You can enable FIPS mode when building a bootc image, to configure the system to use only FIPS-approved modules. You can use the following options to enable FIPS mode:
-
By using the
bootc-image-buildertool: You must enable the FIPS system-wide cryptographic policy in the Containerfile. -
When performing an Anaconda installation: You must enable the FIPS system-wide cryptographic policy in the Containerfile, and also add the
fips=1kernel argument during the boot time.
A FIPS dracut module is built-in to the base image. It defaults to a boot=UUID= karg in bootc install-to-filesystem.
10.1. Enabling FIPS mode by using bootc-image-builder
Create a disk image by using bootc-image-builder or bootc install to-disk, and enable FIPS mode by passing the custom Containerfile as an argument when building the image.
Prerequisites
- Podman is installed on your host machine.
-
virt-installis installed on your host machine. -
You have root access to run the
bootc-image-buildertool, and run the containers in--privilegedmode, to build the images.
Procedure
Create a
01-fips.tomlto configure FIPS enablement, for example:# Enable FIPS kargs = ["fips=1"]Create a Containerfile with the following instructions to enable the
fips=1kernel argument:FROM registry.redhat.io/rhel9/rhel-bootc:latest # Enable fips=1 kernel argument: https://bootc-dev.github.io/bootc/building/kernel-arguments.html COPY 01-fips.toml /usr/lib/bootc/kargs.d/ # Enable the FIPS system-wide cryptographic policy # crypto-policies-scripts is not installed by default in RHEL-10 RUN dnf install -y crypto-policies-scripts && update-crypto-policies --no-reload --set FIPSCreate your bootc
<image>compatible base disk image by usingContainerfilein the current directory:$ podman build -t quay.io/<namespace>/<image>:<tag> .
Verification
After login in to the system, check that FIPS mode is enabled:
$ cat /proc/sys/crypto/fips_enabled
1
$ update-crypto-policies --show
FIPS
10.2. Enabling FIPS mode to perform an Anaconda installation
To create a disk image and enable FIPS mode when performing an Anaconda installation, use the following procedure:
Prerequisites
- Podman is installed on your host machine.
-
virt-installis installed on your host machine. -
You have root access to run the
bootc-image-buildertool, and run the containers in--privilegedmode, to build the images.
Procedure
Create a
01-fips.tomlto configure FIPS enablement, for example:# Enable FIPS kargs = ["fips=1"]Create a Containerfile with the following instructions to enable the
fips=1kernel argument:FROM registry.redhat.io/rhel9/rhel-bootc:latest # Enable fips=1 kernel argument: https://bootc-dev.github.io/bootc/building/kernel-arguments.html COPY 01-fips.toml /usr/lib/bootc/kargs.d/ # Install and enable the FIPS system-wide cryptographic policy RUN dnf install -y crypto-policies-scripts && update-crypto-policies --no-reload --set FIPSCreate your bootc
<image>compatible base disk image by usingContainerfilein the current directory:$ sudo podman run \ --rm \ -it \ --privileged \ --pull=newer \ --security-opt label=type:unconfined_t \ -v $(pwd)/config.toml:/config.toml:ro \ -v $(pwd)/output:/output \ -v /var/lib/containers/storage:/var/lib/containers/storage \ registry.redhat.io/rhel9/bootc-image-builder:latest \ --local --type iso \ quay.io/<namespace>/<image>:<tag>Enable FIPS mode during the system installation:
When booting the RHEL Anaconda installer, on the installation screen, press the TAB key and add the
fips=1kernel argument.After the installation, the system starts in FIPS mode automatically.
Verification
After login in to the system, check that FIPS mode is enabled:
$ cat /proc/sys/crypto/fips_enabled
1
$ update-crypto-policies --show
FIPS
Chapter 11. Security hardening and compliance of bootable images
Image mode for RHEL provides security compliance features and supports workloads that require compliant configuration. However, the process of hardening systems and verifying compliance status is different than in package mode.
The key part of using Image mode for RHEL is creating a bootable container image. The deployed system mirrors the image. Therefore, the built image must contain all packages and configuration settings that are required by the security policy.
When a bootable image is run as a container, some of the hardening configuration is not in effect. To get a system that is fully configured in accordance with the security profile, you must boot the image in a bare metal or virtual machine instead of running as a container. Main differences of a container deployment include the following:
- Systemd services that are required by security profiles do not run on containers because systemd is not running in the container. Therefore, the container cannot comply with the related policy requirements.
-
Other services cannot run in containers, although they are configured correctly. This means that
oscapreports them as correctly configured, even if they are not running. - Configurations defined by the compliance profile are not enforcing. Requests from other packages or installation prescripts can change the compliance state. Always check the compliance of the installed product and alter your Containerfile to fit your requirements.
11.1. Building hardened bootable images
You can build hardened bootable images more easily by including the oscap-im tool in the Containerfile that you use to build your bootable container image.
Although oscap-im can consume any SCAP content, the SCAP source data streams shipped in scap-security-guide are specifically adjusted and tested to be compatible with bootable containers.
Prerequisites
-
The
container-toolsmeta-package is installed. - You know the ID of the profile within the baseline with which the system should comply. To find the ID, see the Viewing profiles for configuration compliance section.
Procedure
Create a
Containerfile:FROM registry.redhat.io/rhel9/rhel-bootc:latest # Install OpenSCAP scanner and security content to the image RUN dnf install -y openscap-utils scap-security-guide && dnf clean all # Add sudo user 'admin' with password 'admin123'. # The user can be used with profiles that prevent # ssh root logins. RUN useradd -G wheel -p "\$6\$Ga6Zn IlytrWpuCzO\$q0LqT1USHpahzUafQM9jyHCY9BiE5/ahXLNWUMiVQnFGblu0WWGZ1e6icTaCGO4GNgZNtspp1Let/qpM7FMVB0" admin # Run scan and hardening RUN oscap-im --profile <profileID> /usr/share/xml/scap/ssg/content/ssg-rhel9-ds.xmlThis
Containerfileperforms the following tasks:-
Installs the
openscap-utilspackage that provides theoscap-imtool and thescap-security-guidepackage that provides the data streams with the Security Content Automation Protocol (SCAP) content. -
Adds a user with
sudoerprivileges for profiles that prevent SSH root logins. - Scans and remediates the image for compliance with the selected profile.
-
Installs the
Build the image by using the
Containerfilein the current directory:$ podman build -t quay.io/<namespace>/<image>:<tag> .
Verification
List all images:
$ podman images
REPOSITORY                                  TAG      IMAGE ID       CREATED              SIZE
quay.io/<namespace>/<image>                 <tag>   b28cd00741b3   About a minute ago   2.1 GB
Next steps
You can deploy hardened bootable images by using any of the normal bootable image deployment methods. For more information, see Deploying the RHEL bootc images.
The deployment method, however, can affect the compliance state of the target system.
-
You can verify the compliance of a running system in Image Mode RHEL by using the
oscaptool with the same syntax and usage as in package mode RHEL. For more information, see Configuration compliance scanning.
11.2. Customizing hardened bootable images
You can apply a customized profile to a bootable image by using the oscap-im tool. You can customize a security profile by changing parameters in certain rules, for example, minimum password length, removing rules that you cover in a different way, and selecting additional rules, to implement internal policies. You cannot define new rules by customizing a profile.
Prerequisites
-
The
container-toolsmeta-package is installed. - You have a customization file for your profile. For more information, see Customizing a security profile with SCAP Workbench.
Procedure
Create a
Containerfile:FROM registry.redhat.io/rhel9/rhel-bootc:latest # Copy a tailoring file into the Containerfile COPY tailoring.xml /usr/share/ # Install OpenSCAP scanner and security content to the image RUN dnf install -y openscap-utils scap-security-guide && dnf clean all # Add sudo user 'admin' with password 'admin123'. # The user can be used with profiles that prevent # ssh root logins. RUN useradd -G wheel -p "\$6\$Ga6Zn IlytrWpuCzO\$q0LqT1USHpahzUafQM9jyHCY9BiE5/ahXLNWUMiVQnFGblu0WWGZ1e6icTaCGO4GNgZNtspp1Let/qpM7FMVB0" admin # Run scan and hardening including the tailoring file RUN oscap-im --tailoring-file /usr/share/tailoring.xml --profile stig_customized /usr/share/xml/scap/ssg/content/ssg-rhel9-ds.xml
This Containerfile performs the following tasks:
- Injects the tailoring file to your image.
-
Installs the
openscap-utilspackage that provides theoscap-imtool and thescap-security-guidepackage that provides the data streams with the Security Content Automation Protocol (SCAP) content. -
Adds a user with
sudoerprivileges for profiles that prevent SSH root logins. Scans and remediates the image for compliance with the selected profile.
Build the image by using the
Containerfilein the current directory:$ podman build -t quay.io/<namespace>/<image>:<tag> .
Verification
List all images:
$ podman images
REPOSITORY                                  TAG      IMAGE ID       CREATED              SIZE
quay.io/<namespace>/<image>                 <tag>   b28cd00741b3   About a minute ago   2.1 GB
Next steps
You can deploy hardened bootable images by using any of the normal bootable image deployment methods. For more information, see Deploying the RHEL bootc images.
The deployment method, however, can affect the compliance state of the target system.
NoteSome customizations performed during the deployment, in blueprint for
bootc-image-builderor in Kickstart for Anaconda, can interfere with the configuration present in the container image. Do not use customizations that conflict with the security policy requirements.-
You can verify the compliance of a running system in Image Mode RHEL by using the
oscaptool with the same syntax and usage as in package mode RHEL. For more information, see Configuration compliance scanning.
Chapter 12. Creating root-level directories and symlinks at runtime with image mode for RHEL
As a privileged user, you can create dynamic, top-level mountpoints at runtime while the filesystem remains read-only by default by using the transient-ro option. This is useful for applications that require bind-mount host paths that might be platform-specific or dynamic.
This feature addresses the following use cases:
- Applications that require specific, absolute host paths for bind-mounts.
-
Platforms that require specific mountpoints, for example,
/users. - Requirement to create dynamic mountpoints after deployment, but before an application starts.
- A security requirement to keep the root filesystem read-only for all regular processes.
12.1. How the transient-ro=true option works
When you enable the transient-ro=true option in the image, it changes the boot process of the system.
The following workflow describes the boot process changes:
transient-ro=truemounts theoverlayfsupper directory inread-onlymode by default.-
With this, a privileged process, such as
rootor asystemdservice, can remount the root filesystem asread-write, but only within a new, private mount namespace.
-
With this, a privileged process, such as
- Within the private namespace, the process can perform changes, such as creating new top-level directories to serve as mountpoints.
- The mountpoints persist for the current boot, but do not persist through reboots or upgrades.
-
All other regular processes on the system continue to see the original, unmodified,
read-onlyroot filesystem.
For security reasons, only privileged users (root) can create these mountpoints:
- The mountpoints are transient and do not persist across reboots.
-
The filesystem remains
read-onlyfor non-privileged processes.
Due to a limitation in util-linux, you must set the LIBMOUNT_FORCE_MOUNT2=always environment variable when performing mount operations with the transient-ro option, because this variable affects the mount namespace functionality required by transient-ro.
12.2. Creating dynamic mountpoints with transient-ro
As a root user, you can use the bootc root.transient-ro feature to build a transient overlay on top of the root file system that is read-only by default, create dynamic top-level mountpoints, and remount the filesystem as read-write when needed.
When using the root.transient-ro feature, to ensure applications can properly access host directories and create necessary mountpoints on read-only filesystems, several considerations apply, such as the following:
- Applications need to bind-mount host directories that match the host’s absolute paths.
-
Platform-specific mountpoints are required, such as
/Userson macOS. - Creation of dynamic mount points after deployment but before application startup.
-
The filesystem remains
read-onlyfor regular processes.
Prerequisites
-
The
container-toolsmeta-package is installed. The meta-package contains all container tools, such as Podman, Buildah, and Skopeo.
Procedure
Create a
transient-root-example.serviceservice to create the directory withreadanwritepermissions. In the following example,/etc/afsexists.[Unit] Description=Transient Root Example - Dynamic Mount Point Creation After=local-fs.target ConditionPathExists=/etc/afs DefaultDependencies=no [Service] Type=oneshot RemainAfterExit=yes MountFlags=slave # LIBMOUNT_FORCE_MOUNT2=always is required for mount command compatibility # See: https://github.com/util-linux/util-linux/issues/3171 Environment=LIBMOUNT_FORCE_MOUNT2=always ExecStart=/usr/bin/bash -c "echo 'Transient root example: Detected /etc/afs, remounting root as read-write'; mount -o remount,rw /; mkdir -p /afs; echo 'Created /afs directory for AFS mount point'" [Install] WantedBy=multi-user.targetAdd the following configuration to the ContainerFile:
# Copy the systemd service unit that demonstrates dynamic mount point creation
# The service will:
# 1. Check for existence of /etc/afs (ConditionPathExists)
# 2. Use MountFlags=slave for proper mount propagation
# 3. Set LIBMOUNT_FORCE_MOUNT2=always for mount command compatibility
# 4. Remount root as read-write and create /afs directory when triggered
COPY transient-root-example.service /usr/lib/systemd/system/

# Enable the service to start automatically on boot
RUN systemctl enable transient-root-example.service
Enable the
transient-rooption. During the container build process, create the following configuration to the/usr/lib/ostree/prepare-root.conffile inside the image to enable the feature:RUN echo -e '[root]\ntransient=true' >> /usr/lib/ostree/prepare-root.conf && \ set -x; kver=$(cd /usr/lib/modules && echo *); dracut -vf /usr/lib/modules/$kver/initramfs.img $kverNoteWhen making changes to the file system configuration, you must regenerate the initramfs image.
Build the bootc image with the transient root file system:
$ podman build --cap-add SYS_ADMIN -t transient-root-ro:test .This adds the
SYS_ADMINcapability thatbootcmight require forostreeoperations during the build.
Verification
Verify that
transient-ro = trueconfiguration file was correctly set in the built image:$ podman run --rm transient-root-ro:test cat /usr/lib/ostree/prepare-root.confYou should see an output similar to the following:
[root]
transient-ro = true
On the running system, verify the runtime functionality:
- Boot the image.
Create the
/etc/afstest directory.$ sudo mkdir -p /etc/afsRestart the service to trigger dynamic mount point creation:
$ systemctl restart transient-root-example.serviceThe service remounts root as
read-writeand creates the/afsdirectory.
To test the functionality without a
systemdservice, create a test directory as root on the running system:$ sudo export LIBMOUNT_FORCE_MOUNT2=always $ sudo unshare -m -- /bin/sh -c 'mount -o remount,rw / && mkdir /transient-test'Verify if the directory was created:
$ sudo ls -d /transient-test /transient-testVerify the
read-onlystatus for other processes by attempting to write to the root filesystem:$ touch /another-test-file touch: cannot touch '/another-test-file': Read-only file system
Chapter 13. Managing RHEL bootc images
After installing and deploying RHEL bootc images, you can perform management operations on your container images, such as changing or updating the systems. The system supports in-place transactional updates with rollback after deployment.
This kind of management, also known as Day 2 management baseline, consists of transactionally fetching new operating system updates from a container registry and booting the system into them, while supporting manual, or automated rollbacks in case of failures.
See Day 2 operations support for more details.
The rhel-bootc images are rebuilt whenever their underlying inputs, such as RPM packages, are updated. These rebuilds occur at least monthly, or more frequently if critical updates are released. As a user, you maintain full control over when to push the update images. A newly published base image does not trigger automatic rebuilds or redeployments of your custom images. You configure the update cadence and only push changes as required.
Figure 13.1. Manually updating an installed operating system, changing the container image reference or rolling back changes if needed

13.1. Switching the container image reference
You can change the container image reference used for upgrades by using the bootc switch command. For example, you can switch from the stage to the production tag. To manually switch an existing ostree-based container image reference, use the bootc switch command.
Prerequisites
-
A booted system using
bootc.
Procedure
Run the following command:
$ sudo bootc switch [--apply] quay.io/<namespace>/<image>:<tag>Optionally, you can use the
--applyoption when you want to automatically take actions, such as rebooting if the system has changed.
The bootc switch command has the same effect as bootc upgrade. The only difference is the container image reference is changed. This allows preserving the existing states in /etc and /var, for example, host SSH keys and home directories.
13.2. Adding modules to the bootc image initramfs
The rhel9/rhel-bootc image uses the dracut infrastructure to build an initial RAM disk, the initrd during the image build time. The initrd is built and included in the /usr/lib/modules/<kernel-version>/initramfs.img location inside the container.
You can use a drop-in configuration file to override the dracut configuration, and place it in a file in the /usr/lib/dracut/dracut.conf.d/<custom-added-modules.conf> directory. This re-creates initrd with the modules you want to add.
Prerequisites
- A booted system using bootc.
Procedure
Re-create the
initrdas part of a container build:FROM <baseimage> COPY <custom-added-modules>.conf /usr/lib/dracut/dracut.conf.d RUN set -x; kver=$(cd /usr/lib/modules && echo *); dracut -vf /usr/lib/modules/<kernel-version>/initramfs.img $kverNoteBy default the command attempts to pull the running kernel version, which causes an error. Explicitly pass to
dracutthe kernel version of the target to avoid errors.
13.3. Modifying and regenerating initrd
The default container image includes a pre-generated initial RAM disk (initrd) in /usr/lib/modules/<kernel-version>/initramfs.img. To regenerate the initrd, for example, to add a dracut module, follow the steps:
Prerequisites
-
A booted system using
bootc.
Procedure
Create your drop-in configuration file. For example:
dracutmodules = "module"Place your drop-in configuration file in the location that
dracutnormally uses:/usr. For example:/usr/lib/dracut/dracut.conf.d/50-custom-added-modules.confRegenerate the
initrdas part of the container build. You must explicitly pass the kernel version to target todracut, because it tries to pull the running kernel version, which can cause an error. The following is an example:FROM <baseimage> COPY 50-custom-added-modules.conf /usr/lib/dracut/dracut.conf.d RUN set -x; kver=$(cd /usr/lib/modules && echo *); dracut -vf /usr/lib/modules/$kver/initramfs.img $kver
13.4. Performing manual updates from an installed operating system
With image mode for RHEL, you can perform any other management task, such as changing or updating the system, by pushing the changes to the container registry.
When using image mode for RHEL, you can choose to perform manual updates for your systems. If you have automatic updates enabled, you must turn them off to perform a manual update. To do so, use one of the following options:
-
Running the
bootc upgradecommand -
Modifying the
systemdtimer file
13.4.1. Turning off automatic updates
To perform manual updates you must turn off automatic updates. You can do this by disabling the timer of the container build, by using one of the following options described in the procedure.
Prerequisites
- A booted system using bootc.
Procedure
Disable the timer of a container build.
By running the
systemctl maskcommand:$ systemctl mask bootc-fetch-apply-updates.timerBy modifying the
systemdtimer file. Usesystemd"drop-ins" to override the timer. In the following example, updates are scheduled for once a week.Create an
updates.conffile with the following content:[Timer] # Clear previous timers OnBootSec= OnBootSec=1w OnUnitInactiveSec=1wAdd you file to the directory that you created:
$ mkdir -p /usr/lib/systemd/system/bootc-fetch-apply-updates.timer.d
$ cp updates.conf /usr/lib/systemd/system/bootc-fetch-apply-updates.timer.d
13.4.2. Manually updating an installed operating system
To manually fetch updates from a registry and boot the system into the new updates, use bootc upgrade. This command fetches the transactional in-place updates from the installed operating system to the container image registry. The command queries the registry and queues an updated container image for the next boot. It stages the changes to the base image, but does not change the running system by default.
Prerequisites
- A booted system using bootc.
Procedure
Run the following command:
$ bootc upgrade [--apply]The
applyargument is optional and you can use it when you want to automatically take actions, such as rebooting if the system has changed.
The bootc upgrade command is an alias for bootc update. Both commands have the same effect.
13.5. Performing rollbacks from a updated operating system
You can roll back to a previous boot entry to revert changes in the system by using the bootc rollback command. This command changes the boot loader entry ordering by making the deployment under rollback queued for the next boot. The current deployment then becomes the rollback. Any staged changes, such as a queued upgrade that was not applied, are discarded.
After a rollback completes, the system reboots and the update timer run within 1 to 3 hours which automatically update and reboot your system to the image you just rolled back from.
If you perform a rollback, the system will automatically update again unless you turn off auto-updates. See Turning off automatic updates.
When performing a rollback, for example, by using the bootc rollback command, changes made to files in the /etc directory do not carry over to the rolled-back deployment. Instead, the files in the /etc directory revert to the state they were in during the previous deployment.
The bootc rollback command reorders existing deployments but does not create new ones. The /etc directory is merged when new deployments are created.
To preserve a modified /etc file for use after a rollback, copy it to a directory under /var, such as /var/home/<user> for a specific <user>, or under /var/root/, for the root user. These directories are unaffected by rollbacks, as they store user content.
When returning to the original state, either through a temporary rollback or another bootc rollback, the /etc directory reverts to its state from the original deployment.
Alternatively, if the issue you are rolling back does not involve configuration files in the /etc directory and you want to revert to an older deployment, use the bootc switch command. This command performs the necessary /etc merge and deploy the previous version of the software.
Prerequisites
- You performed an update to the system.
Procedure
Run the following command:
$ bootc rollback [-h|--help] [-V|--version]NoteThe
bootc rollbackcommand has the same effect asbootc upgrade. The only difference is the container image being tracked. This enables preserving the existing states in /etc and /var, for example, host SSH keys and home directories.
Verification
Use
systemd journalto check the logged message for the detected rollback invocation.$ journalctl -bYou can see a log similar to:
MESSAGE_ID=26f3b1eb24464d12aa5e7b544a6b5468
13.6. Deploying updates to system groups
You can change the configuration of your operating system by modifying the Containerfile. The update will be applied after you build and push your container image to the registry, and reboot the operating system.
You can also change the container image source by using the bootc switch command. The content in the container registry determines the specific configuration of the RHEL Image Mode operating systemSee Switching the container image reference.
Usually, when deploying updates to system groups, you can use a central management service to provide a client to be installed on each system which connects to the central service. Often, the management service requires the client to perform a one time registration. The following is an example on how to deploy updates to system groups. You can modify, by injecting the credentials for the management service into the image, to create a persistent systemd service, if required.
For clarity reasons, the Containerfile in the example is not optimized. For example, a better optimization to avoid creating multiple layers in the image is by invoking RUN a single time.
You can install a client into a image mode for RHEL image and run it at startup to register the system.
Prerequisites
-
The management-client handles future connections to the server, by using a
cronjob or a separatesystemdservice.
Procedure
Create a management service with the following characteristics. It determines when to upgrade the system.
FROM registry.redhat.io/rhel9/rhel-bootc:latest # Management services determine when to upgrade the system. # Disable bootc-fetch-apply-updates.timer if it is included in the base image. RUN systemctl disable bootc-fetch-apply-updates.timer # Install the client from dnf, or some other method that applies for your client RUN dnf install management-client -y && dnf clean all # Inject the credentials for the management service into the image ARG activation_key= # The existence of .run_next_boot acts as a flag to determine if the # registration is required to run when booting RUN touch /etc/management-client/.run_next_boot COPY <<"EOT" /usr/lib/systemd/system/management-client.service [Unit] Description=Run management client at boot After=network-online.target ConditionPathExists=/etc/management-client/.run_client_next_boot [Service] Type=oneshot EnvironmentFile=/etc/management-client/.credentials ExecStart=/usr/bin/management-client register --activation-key ${CLIENT_ACTIVATION_KEY} ExecStartPre=/bin/rm -f /etc/management-client/.run_next_boot ExecStop=/bin/rm -f /etc/management-client/.credentials [Install] WantedBy=multi-user.target EOT # Link the service to run at startup RUN ln -s /usr/lib/systemd/system/management-client.service /usr/lib/systemd/system/multi-user.target.wants/management-client.service # Store the credentials in a file to be used by the systemd service RUN echo -e "CLIENT_ACTIVATION_KEY=${activation_key}" > /etc/management-client/.credentials # Set the flag to enable the service to run one time # The systemd service will remove this file after the registration completes the first time RUN touch /etc/management-client/.run_next_boot-
Disable
bootc-fetch-apply-updates.timerif it is included in the base image. -
Install the client by using
dnf, or some other method that applies for your client. - Inject the credentials for the management service into the image.
-
Disable
13.7. Checking inventory health
You can manually check the system health of the container images and events that are running inside the container.
Prerequisites
- You pushed the container image to an accessible repository.
-
The
container-toolsmeta-package is installed.
Procedure
Display the health check status of a container.
By using the
podman inspect: orpodman pscommands.$ podman inspect --format='{{json .State.Health.Status}}' <container> healthyBy using the
podman pscommands.$ podman healthcheck run <container> healthy
Monitor and print events that occur in Podman by using the
podman eventscommand. Each event includes a timestamp, a type, a status, a name, if applicable, and an image, if applicable.$ now=$(date --iso-8601=seconds) $ podman events --since=now --stream=false healthy
13.8. Automation and GitOps
You can use CI/CD (Continuous Integration and Continuous Delivery) pipelines to automate the building process of your RHEL bootc images. By using a CI/CD , an event can trigger an update, such as updating an application.
You can use automation tools that track these updates and trigger the CI/CD pipelines, such as GitHub Actions, and GitLab CI. The pipeline keeps the systems up to date by using the transactional background operating system updates.
For more details on resources to create image mode for RHEL instances, check the specific implementations available to create image mode for RHEL instances: RHEL Image Mode CI/CD.
13.9. Inspecting bootc containers by using Toolbx
Installing software on a system presents certain risks: it can change a system’s behavior, and can leave unwanted files and directories behind after they are no longer needed. You can prevent these risks by installing your preferred development and debugging tools, editors, and software development kits (SDKs) into the Toolbx utility included in the RHEL bootc, a container image that can be completely modified without affecting the base operating system. You can perform changes on the host system with commands such as less, lsof, rsync, ssh, sudo, and unzip.
The Toolbx utility performs the following actions:
-
Pulling the
registry.access.redhat.com/ubi9/toolbox:latestimage to your local system - Starting up a container from the image
- Running a shell inside the container from which you can access the host system
Toolbx can run a root container or a rootless container, depending on the rights of the user who creates the Toolbx container. Utilities that would require root rights on the host system also should be run in root containers.
The default container name is rhel-toolbox. To inspect bootc containers, follow the steps:
Procedure
Start a Toolbx container by using the
toolbox createcommand and enter the container with thetoolbox entercommand.As a rootless user:
$ toolbox create <mytoolbox>As a root user:
$ sudo toolbox create <mytoolbox>
Created container: <mytoolbox>
Enter with: toolbox enter
Verify that you pulled the correct image:
[user@toolbox ~]$ toolbox list
IMAGE ID      IMAGE NAME    CREATED
fe0ae375f149   registry.access.redhat.com/ubi{ProductVersion}/toolbox 5 weeks ago

CONTAINER ID  CONTAINER NAME  CREATED         STATUS   IMAGE NAME
5245b924c2cb  <mytoolbox>       7 minutes ago   created  registry.access.redhat.com/ubi{ProductVersion}/toolbox:8.9-6
Enter the Toolbx container:
[user@toolbox ~]$ toolbox enter <mytoolbox>- Optional: Check if you pulled the correct image
Enter a command inside the
<mytoolbox>container and display the name of the container and the image:⬢ [user@toolbox ~]$ cat /run/.containerenv engine="podman-4.8.2" name="<mytoolbox>" id="5245b924c2cb..." image="registry.access.redhat.com/ubi{ProductVersion}/toolbox" imageid="fe0ae375f14919cbc0596142e3aff22a70973a36e5a165c75a86ea7ec5d8d65c"
Use the Toolbx to install the development tools:
Install the tools of your choice, for example, the Emacs text editor, GCC compiler and GNU Debugger (GDB):
⬢[user@toolbox ~]$ sudo dnf install emacs gcc gdbOptional: Verify that the tools are installed:
⬢[user@toolbox ~]$ dnf repoquery --info --installed <package_name>After installation, you can continue using those tools as a rootless user.
Use Toolbx to troubleshoot the host system without installing them on the host system.
Install the
systemdsuite to be able to run thejournalctlcommand:⬢[root@toolbox ~]# dnf install systemdDisplay log messages for all processes running on the host:
⬢[root@toolbox ~]# j journalctl --boot -0
Jan 02 09:06:48 user-thinkpadp1gen4i.brq.csb kernel: microcode: updated ear>
Jan 02 09:06:48 user-thinkpadp1gen4i.brq.csb kernel: Linux version 6.6.8-10>
Jan 02 09:06:48 user-thinkpadp1gen4i.brq.csb kernel: Command line: BOOT_IMA>
Jan 02 09:06:48 user-thinkpadp1gen4i.brq.csb kernel: x86/split lock detecti>
Jan 02 09:06:48 user-thinkpadp1gen4i.brq.csb kernel: BIOS-provided physical>
Display log messages for the kernel:
⬢[root@toolbox ~]# journalctl --boot -0 --dmesg
Jan 02 09:06:48 user-thinkpadp1gen4i.brq.csb kernel: microcode: updated ear>
Jan 02 09:06:48 user-thinkpadp1gen4i.brq.csb kernel: Linux version 6.6.8-10>
Jan 02 09:06:48 user-thinkpadp1gen4i.brq.csb kernel: Command line: BOOT_IMA>
Jan 02 09:06:48 user-thinkpadp1gen4i.brq.csb kernel: x86/split lock detecti>
Jan 02 09:06:48 user-thinkpadp1gen4i.brq.csb kernel: BIOS-provided physical>
Jan 02 09:06:48 user-thinkpadp1gen4i.brq.csb kernel: BIOS-e820: [mem 0x0000>
Install the
nmapnetwork scanning tool:⬢[root@toolbox ~]# dnf install nmapScan IP addresses and ports in a network:
⬢[root@toolbox ~]# nmap -sS scanme.nmap.org Starting Nmap 7.93 ( https://nmap.org ) at 2024-01-02 10:39 CET Stats: 0:01:01 elapsed; 0 hosts completed (0 up), 256 undergoing Ping Scan Ping Scan Timing: About 29.79% done; ETC: 10:43 (0:02:24 remaining) Nmap done: 256 IP addresses (0 hosts up) scanned in 206.45 seconds-
The
-sSoption performs a TCP SYN scan. Most of Nmap’s scan types are only available to privileged users, because they send and receive raw packets, which requires root access on UNIX systems.
-
The
Stop the Toolbx bootc container.
Leave the container and return to the host:
⬢ [user@toolbox ~]$ exitStop the toolbox container:
⬢ [user@toolbox ~]$ podman stop <mytoolbox>Optional: Remove the toolbox container:
⬢ [user@toolbox ~]$ toolbox rm <mytoolbox>Alternatively, you can also use the
podman rmcommand to remove the bootc container.
13.10. Performing a factory reset of an image mode system
Restore system integrity and eliminate configuration drift by performing a non-destructive factory reset. This reverts the /etc and /var directories to the original container image state, undoing all modifications and clearing user data to ensure a clean, reproducible environment.
Performing a factory reset of an image mode system is provided as a Technology Preview. Technology Preview features are not supported with Red Hat production Service Level Agreements (SLAs), might not be functionally complete, and Red Hat does not recommend using them for production. These previews provide early access to upcoming product features, enabling customers to test functionality and provide feedback during the development process.
For more information about the support scope of Red Hat Technology Preview features, see Technology Preview Features Support Scope on the Red Hat Customer Portal for information about the support scope for Technology Preview features.
Prerequisites
- You have a bootable container system.
- You have access to the container image you want to reset to in a container registry.
You might lose users that Anaconda, or other tools like cloud-init, added. Any installer, such as the bootc-image-builder tool and Anaconda, adds state on top of the image that the bootc install reset command removes.
Procedure
Perform a factory reset. Depending on your goal, run one of the following commands:
To reset to the same image currently running:
$ sudo bootc install reset --experimentalTo reset and switch to a different image:
$ sudo bootc install reset --experimental --target-imgref quay.io/example/myimage:latestTo reset and immediately reboot:
$ sudo bootc install reset --experimental --applyTo add custom kernel arguments:
$ sudo bootc install reset --experimental --karg=console=ttyS0,115200n8To skip inheriting root filesystem kernel arguments:
$ sudo bootc install reset --experimental --no-root-kargsAfter you reboot into the new deployment, you can still access your old system’s data by examining the files in
/sysroot/ostree/deploy/<old-stateroot>/.NoteAfter you perform a factory reset and reboot into the new stateroot, you still keep the old stateroot on disk at
/sysroot/ostree/deploy/<old-stateroot>/. You can access files from your previous system if you need them. For more details, see Cleaning up the old stateroot.
Chapter 14. Managing kernel arguments in bootc systems
You can use bootc to configure kernel arguments. By default, bootc uses the boot loader configuration files that are stored in /boot/loader/entries. This directory defines arguments provided to the Linux kernel. While kernel arguments are machine-specific, you can manage them through container updates. The boot loader menu entries are shared between multiple operating systems and boot loaders are installed on one device.
Currently, the boot loader entries are written by an OSTree backend.
14.1. Adding support to inject kernel arguments with bootc
The bootc tool uses generic operating system kernels. You can add support to inject kernel arguments by adding a custom configuration, in the TOML format, in /usr/lib/bootc/kargs.d.
Prerequisite
You created a container image.
- Procedure
Add a custom configuration in the
/usr/lib/bootc/kargs.dfile. For example:# /usr/lib/bootc/kargs.d/10-example.toml kargs = ["mitigations=auto,nosmt"]-
Optional: Make the kernel arguments architecture-specific by using the
match-architectureskey. For example:
# /usr/lib/bootc/kargs.d/00-console.toml
kargs = ["console=ttyS0,114800n8"]
match-architectures = ["x86_64"]
14.2. Modifying kernel arguments by using bootc install configurations
You can use the bootc install command with the --karg option to inject kernel arguments during installation time in the following ways:
- Adding kernel arguments into the container image.
-
Adding kernel arguments by using the
bootc install --kargcommand.
Use the kernel arguments on Day 2 operations, by adding the arguments and applying them on a switch, upgrade, or edit.
Prerequisites
- You created a container image.
Procedure
Create files within
/usr/lib/bootc/kargs.dwith kernel arguments.$ sudo tee /usr/lib/bootc/kargs.d/console.kargs << EOF console=tty0 console=ttyS0,115200n8 EOFFetch the container image to get the OSTree commit.
$ podman pull quay.io/<your_org>/<your_bootc_image>:latestUse the OSTree commit to return the file tree.
# bootc install to-filesystem --karg=root=<UUID>=<uuid of /mnt> --imgref $self /mntNavigate to the
/usr/lib/bootc/kargs.dkernel arguments directory.cd /usr/lib/bootc/kargs.dRead each file within the kernel arguments directory.
$ find /usr/lib/bootc/kargs.d -name ".kargs" -exec cat {} \;*Push the contents of each
kargsfile into a file containing all the neededkargs.$ CONSOLIDATED_KARGS="/tmp/all-kargs.txt"Pass the
kargsto thestage()function.$ bootc kargs --append="$KARGS_STRING"Apply the kernel arguments to switch, upgrade, or edit during operations.
$ bootc switch --transport=registry quay.io/<your_org>/<your_bootc_image>:latest
14.3. How to inject kernel arguments in the Containerfile
To add kernel arguments into a container image, use a Containerfile. The following is an example:
FROM registry.redhat.io/rhel9/rhel-bootc:latest

RUN mkdir -p /usr/lib/bootc/kargs.d
RUN cat <<EOF >> /usr/lib/bootc/kargs.d/console.toml
kargs = ["console=ttyS0,114800n8"]
match-architectures = ["x86_64"]
EOF

RUN cat <<EOF >> /usr/lib/bootc/kargs.d/01-mitigations.toml
kargs = ["mitigations=on", "systemd.unified_cgroup_hierarchy=0"]
match-architectures = ["x86_64", "aarch64"]
EOF
14.4. Injecting kernel arguments in the Containerfile at installation time
You can use boot install with the --karg to inject kernel arguments during installation time. As a result, the kernel arguments become the machine-local state, that is, they became the persistent configuration unique to that specific machine.
Prerequisites
- You created a container image.
Procedure
Inject kernel arguments:
# bootc install to-filesystem --karg=root=<UUID>=<uuid of /mnt> --imgref $self /mnt
14.5. Adding install-time kernel arguments by using bootc-image-builder
The bootc-image-builder tool supports the customizations.kernel.append during the installation time.
Prerequisites
- You created a container image.
Procedure
Add kernel arguments with
bootc-image-builderby using the following customization:{ "customizations": { "kernel": { "append": "mitigations=auto,nosmt" } } }
14.6. About changing kernel arguments after the installation by using kargs.d
The changes that you make to kargs.d files and include in a container build are applied after the installation, and the difference between the set of kernel arguments is applied to the current boot loader configuration. This preserves any machine-local kernel arguments.
You can use any tool to edit the /boot/loader/entries files, which are in a standardized format. The /boot file has read-only access to limit the set of tools that can write to this filesystem.
14.7. Editing kernel arguments in bootc systems
To perform machine local changes, you also can edit kernel arguments on a bootc system or an rpm-ostree system, by using the rpm-ostree kargs command. The changes are made through the user/lib/bootc/kargs.d path, which also handles Day 2 changes, besides the first boot changes.
The following are the options that you can use to add, modify or remove kernel arguments.
rpm-ostree kargs
- --append=KEY=VALUE
-
Appends a kernel argument. It is useful with, for example,
console=that can be used multiple times. You can use an empty value for an argument. - --replace=KEY=VALUE=NEWVALUE
-
Replaces an existing kernel argument. You can replace an argument with
KEY=VALUEonly if one value already exists for that argument. - --delete=KEY=VALUE
- Deletes a specific kernel key-value pair argument or an entire argument with a single key-value pair.
- --append-if-missing=KEY=VALUE
- Appends a kernel argument. Does nothing if the key is already present.
- --delete-if-present=KEY=VALUE
- Deletes a specific kernel key-value pair argument. Does nothing if the key is missing.
- --editor
- Uses an editor to modify the kernel arguments.
Prerequisites
- You created a container image.
Procedure
Append a kernel argument, for example:
# rpm-ostree kargs --append debug
Staging deployment... done
Freed: 40.1 MB (pkgcache branches: 0)
Changes queued for next boot. Run "systemctl reboot" to start a reboot
Check the help for more information:
# rpm-ostree kargs --help
Chapter 15. Managing file systems in image mode for RHEL
Currently, image mode uses OSTree as a back end, and enables composefs for storage by default. As a result, you can install third-party content in derived container images that write into /opt for example, because the /opt and /usr local paths are plain directories, and not symbolic links into /var.
When you install third-party content to /opt, the third-party components might also attempt to write to subdirectories within /opt during runtime, what can create potential conflicts.
15.1. Overview of physical and logical root with /sysroot
When a bootc system is fully booted, it is similar to an environment created by chroot, that is, the operating system changes the apparent root directory for the current running process and its children. The physical host root filesystem is mounted at /sysroot. The chroot filesystem is called a deployment root.
The remaining filesystem paths are part of a deployment root which is used as a final target for the system boot. The system uses the ostree=kernel argument to find the deployment root.
/usr-
It is preferred to keep all operating system content in
/usr, but not strictly required. Directories such as/binwill work as symbolic links to/usr/bin. This layout creates a separation of operating system and host specific resources.
When composefs is enabled, /usr is not different from /. Both directories are part of the same immutable image, so you do not need to perform a full UsrMove with a bootc system.
/usr/local-
With bootc systems, you can create custom container images as the default entrypoint. Because of that, the base images configure
/usr/localto be a regular directory, that is, the default directory.
The default filesystem layout has both /opt and /usr/local as regular directories, that is, they are writable at build time and immutable at runtime. This differs from RHEL CoreOS, for example, which makes these symlinks into /var.
/etcThe
/etcdirectory contains mutable persistent state by default, but it supports enabling theetc.transient configoption. When the directory is in mutable persistent state, it performs a 3-way merge across upgrades:-
Uses the new default
/etcas a base -
Applies the diff between current and previous
/etcto the new/etcdirectory -
Retains locally modified files that are different from the default
/usr/etcof the same deployment in/etc.
-
Uses the new default
The ostree-finalize-staged.service executes these tasks during shutdown time, before creating the new boot loader entry.
This happens because many components of a Linux system ship default configuration files in the /etc directory. Even if the default package does not ship it, by default the software only checks for config files in /etc. package-based update systems with no distinct versions of /etc are populated only during the installation time, and will not be changed at any point after installation. This causes the /etc system state to be influenced by the initial image version and can lead to problems to apply a change, for example, to /etc/sudoers.conf, and requires external intervention. For more details about file configuration, see Building and testing RHEL bootc images.
/var-
For example, there is only one
/vardirectory. By default, the files and data placed in the/vardirectory are persistent until explicitly deleted, and available across different sessions and system restarts. You can turn the/varpartition or its subdirectories into a mount point, such as a temporary file system (TMPFS) or a network mount point. If you do not make a distinct partition for/var, the system performs a bind mount, and creates a single, shared and persistent/ostree/deploy/$stateroot/varin the/vardirectory, so that both directories share the same data across deployments.
By default, the content in /var acts as a volume, that is, the content from the container image is copied during the initial installation time, and is not updated thereafter.
The /var and the /etc directories are different. You can use /etc for relatively small configuration files, and the expected configuration files are often bound to the operating system binaries in /usr. The /var directory has arbitrarily large data, for example, system logs, databases, and by default, do not roll back if the operating system state is rolled back.
For example, making an update such as dnf downgrade postgresql should not affect the physical database in /var/lib/postgres. Similarly, making a bootc update or bootc rollback do not affect this application data.
Having /var separate also makes it work cleanly to stage new operating system updates before applying them, that is, updates are downloaded and ready, but only take effect on reboot. The same applies for Docker volume, as it decouples the application code from its data.
You can use this case if you want applications to have a pre-created directory structure, for example, /var/lib/postgresql. Use systemd tmpfiles.d for this. You can also use StateDirectory=<directory> in units.
- Other directories
-
There is no support to ship content in
/run,/procor other API Filesystems in container images. Apart from that, other top level directories such as/usr, and/opt, are lifecycled with the container image. /opt-
Because
bootcusescomposefs, the/optdirectory is read-only, alongside other top level directories such as/usr.
When a software needs to write to its own directory in /opt/exampleapp, a common pattern is to use a symbolic link to redirect to, for example, /var for operations such as log files:
RUN rmdir /opt/exampleapp/logs && ln -sr /var/log/exampleapp /opt/exampleapp/logsOptionally, you can configure the systemd unit to launch the service to do these mounts dynamically. For example:
BindPaths=/var/log/exampleapp:/opt/exampleapp/logs- Enabling transient root
-
To enable a software to transiently (until the next reboot) write to all top-level directories, including
/usrand/opt, with symlinks to/varfor content that should persist, you can enable transient root. To enable a fully transient writablerootfsby default, set the following option in/usr/lib/ostree/prepare-root.conf.
[root]
transient = true
This enables a software to transiently write to /opt, with symlinks to /var for content that must persist.
15.2. Version selection and bootup
Image mode for RHEL uses GRUB by default, with exception to IBM Z® architectures. Each version of image mode for RHEL currently available on a system has a menu entry.
The menu entry references an OSTree deployment, which consists of a Linux kernel, an initramfs and a hash linking to an OSTree commit, which you can pass by using the ostree=kernel argument.
During bootup, OSTree reads the kernel argument to determine which deployment to use as the root filesystem. Each update or change to the system, such as package installation, addition of kernel arguments, creates a new deployment.
This enables rolling back to a previous deployment if the update causes problems.
Chapter 16. Managing users, groups, SSH keys, and secrets in image mode for RHEL
Learn more about users, groups, SSH keys, and secrets management in image mode for RHEL.
16.1. Users and groups configuration
Image mode for RHEL is an update and configuration mechanism for generic operating systems. For best practices in selected use cases, see the following list:
- Users and groups configuration for generic base images
- Usually, the distribution base images do not have any configuration. Do not encrypt passwords and SSH keys with publicly-available private keys in generic images because of security risks.
- Injecting SSH keys through
systemdcredentials -
You can use
systemdto inject a root password or SSHauthorized_keysfile in some environments. For example, use System Management BIOS (SMBIOS) to inject SSH keys system firmware. You can configure this in local virtualization environments, such asqemu. - Injecting users and SSH keys by using
cloud-init -
Many Infrastructure as a service (IaaS) and virtualization systems use metadata servers that are commonly processed by software such as
cloud-initorignition. See AWS instance metadata. The base image you are using might includecloud-initor Ignition, or you can install it in your own derived images. In this model, the SSH configuration is managed outside of the bootc image. - Adding users and credentials by using container or unit custom logic
-
Systems such as
cloud-initare not privileged. You can inject any logic you want to manage credentials in the way you want to launch a container image, for example, by using asystemdunit. To manage the credentials, you can use a custom network-hosted source, for example, FreeIPA. - Adding users and credentials statically in the container build
In package-oriented systems, you can use the derived build to inject users and credentials by using the following command:
RUN useradd someuserYou can find issues in the default
shadow-utilsimplementation ofuseradd: Users and groups IDs are allocated dynamically, and this can cause drift.- User and group home directories and
/vardirectory For systems configured with persistent
/home → /var/home, any changes to/varmade in the container image after initial installation will not be applied on subsequent updates.For example, if you inject
/var/home/someuser/.ssh/authorized_keysinto a container build, existing systems do not get the updatedauthorized_keysfile.- Using
nss-altfiles The
nss-altfilessplits system users into/usr/lib/passwdand/usr/lib/group, aligning with the way the OSTree project handles the 3 way merge for/etcas it relates to/etc/passwd. Currently, if the/etc/passwdfile is modified in any way on the local system, then subsequent changes to/etc/passwdin the container image are not applied.Base images built by
rpm-ostreehavenss-altfilesenabled by default.Also, base images have a system users pre-allocated and managed by the NSS file to avoid UID or GID drift.
In a derived container build, you can also append users to
/usr/lib/passwd, for example. Usesysusers.dorDynamicUser=yes.- Using DynamicUser=yes for
systemdunits Use the
systemdDynamicUser=yesoption where possible for system users.This is significantly better than the pattern of allocating users or groups at package install time, because it avoids potential UID or GID drift.
- Using
systemd-sysusers Use
systemd-sysusers, for example, in your derived build. For more information, see thesystemd-sysusers documentation.COPY mycustom-user.conf /usr/lib/sysusers.dThe
sysuserstool makes changes to the traditional/etc/passwdfile as necessary during boot time. If/etcis persistent, this can avoidUIDorGIDdrift. It means that theUIDorGIDallocation depends on how a specific machine was upgraded over time.- Machine-local state for users
The filesystem layout depends on the base image.
By default, the user data is stored in both
/etc,/etc/passwd,/etc/shadowandgroups, and/home, depending on the base image. However, the generic base images have to both be machine-local persistent state. In this model/homeis a symlink to/var/home/user.- Injecting users and SSH keys at system provisioning time
For base images where
/etcand/varare configured to persist by default, you can inject users by using installers such as Anaconda or Kickstart.Typically, generic installers are designed for one time bootstrap. Then, the configuration becomes a mutable machine-local state that you can change in Day 2 operations, by using some other mechanism.
You can use the Anaconda installer to set the initial password. However, changing this initial password requires a different in-system tool, such as
passwd.These flows work equivalently in a
bootc-compatiblesystem, to support users directly installing generic base images, without requiring changes to the different in-system tool.- Transient home directories
Many operating system deployments minimize persistent, mutable, and executable state. This can damage user home directories.
The
/homedirectory can be set astmpfs, to ensure that user data is cleared across reboots. This approach works especially well when combined with a transient/etcdirectory.To set up the user’s home directory to, for example, inject SSH
authorized_keysor other files, use thesystemdtmpfiles.dsnippets:f~ /home/user/.ssh/authorized_keys 600 user user - <base64 encoded data>SSH is embedded in the image as:
/usr/lib/tmpfiles.d/<username-keys.conf. Another example is a service embedded in the image that can fetch keys from the network and write them. This is the pattern used bycloud-init.- UID and GID drift
-
The
/etc/passwdand similar files are a mapping between names and numeric identifiers. When the mapping is dynamic and mixed with "stateless" container image builds, it can cause issues. Each container image build might result in the UID changing due to RPM installation ordering or other reasons. This can be a problem if that user maintains a persistent state. To handle such cases, convert it to usesysusers.dor useDynamicUser=yes.
16.2. Injecting secrets in image mode for RHEL
Image mode for RHEL does not have an opinionated mechanism for secrets. You can inject container pull secrets in your system for some cases, for example:
For
bootcto fetch updates from a registry that requires authentication, you must include a pull secret in a file. In the following example, thecredssecret contains the registry pull secret.FROM registry.redhat.io/rhel9/bootc-image-builder:latest COPY containers-auth.conf /usr/lib/tmpfiles.d/link-podman-credentials.conf RUN --mount=type=secret,id=creds,required=true cp /run/secrets/creds /usr/lib/container-auth.json && \ chmod 0600 /usr/lib/container-auth.json && \ ln -sr /usr/lib/container-auth.json /etc/ostree/auth.jsonTo build it, run
podman build --secret id=creds,src=$HOME/.docker/config.json. Use a single pull secret forbootcand Podman by using a symlink to both locations to a common persistent file embedded in the container image, for example/usr/lib/container-auth.json.For Podman to fetch container images, include a pull secret to
/etc/containers/auth.json. With this configuration, the two stacks share the/usr/lib/container-auth.jsonfile.- Injecting secrets by embedding them in a container build
- You can include secrets in the container image if the registry server is suitably protected. In some cases, embedding only bootstrap secrets into the container image is a viable pattern, especially alongside a mechanism for having a machine authenticate to a cluster. In this pattern, a provisioning tool, whether run as part of the host system or a container image, uses the bootstrap secret to inject or update other secrets, such as SSH keys, certificates, among others.
- Injecting secrets by using cloud metadata
-
Most production Infrastructure as a Service (IaaS) systems support a metadata server or equivalent which can securely host secrets, particularly bootstrap secrets. Your container image can include tools such as
cloud-initorignitionto fetch these secrets. - Injecting secrets by embedding them in disk images
-
You can embed
bootstrap secretsonly in disk images. For example, when you generate a cloud disk image from an input container image, such as AMI or OpenStack, the disk image can contain secrets that are effectively machine-local state. Rotating them requires an additional management tool or refreshing the disk images. - Injecting secrets by using bare metal installers
- Installer tools usually support injecting configuration through secrets.
- Injecting secrets through
systemdcredentials -
The
systemdproject has a credential concept for securely acquiring and passing credential data to systems and services, which applies in some deployment methodologies. See the systemd credentials documentation for more details.
16.3. Configuring container pull secrets
To fetch container images, you must configure a host system with a "pull secret", which includes the host updates. See the appendix about Injecting secrets in image mode for RHEL for more details.
You can configure the container pull secrets to an image that is already built. If you use an external installer such as Anaconda for bare metal, or bootc-image-builder, you must configure the systems with any applicable pull secrets.
The host bootc updates write the configuration to the /etc/ostree/auth.json file, which is shared with rpm-ostree.
Podman does not have system wide credentials. Podman accepts the containers-auth locations that are underneath the following directories:
-
/run: The content of this directory vanishes on reboot, which is not desired. -
/root: Part of root home directory, which is local mutable state by default.
To unify bootc and Podman credentials, use a single default global pull secret for both bootc and Podman. The following container build is an example to unify the bootc and the Podman credentials. The example expects a secret named creds to contain the registry pull secret to build.
Procedure
-
Create a symbolic link between
bootcand Podman to use a single pull secret. By creating the symbolic link, you ensure that both locations are present to a common persistent file embedded in the container image. Create the
/usr/lib/container-auth.jsonfile.FROM quay.io/<namespace>/<image>:<tag> COPY containers-auth.conf /usr/lib/tmpfiles.d/link-podman-credentials.conf RUN --mount=type=secret,id=creds,required=true cp /run/secrets/creds /usr/lib/container-auth.json && \ chmod 0600 /usr/lib/container-auth.json && \ ln -sr /usr/lib/container-auth.json /etc/ostree/auth.jsonWhen you run the Containerfile, the following actions happen:
-
The Containerfile makes
/run/containers/0/auth.jsona transient runtime file. -
It creates a symbolic link to the
/usr/lib/container-auth.json. -
It also creates a persistent file, which is also symbolic linked from
/etc/ostree/auth.json.
-
The Containerfile makes
16.4. Injecting pull secrets for registries and disabling TLS
To make it possible for containerized environments to pull images from private or insecure registries, you can configure container images, pull secrets, and disable TLS for a registry within a system.
You can include container pull secrets and other configuration to access a registry inside the base image. However, when installing by using Anaconda, the installation environment might need a duplicate copy of "bootstrap" configuration to access the targeted registry when fetching over the network.
To perform arbitrary changes to the installation environment before the target bootc container image is fetched, you can use the Anaconda %pre command.
See the containers-auth.json(5) for more detailed information about format and configurations of the auth.json file.
Procedure
Configure a pull secret:
%pre
mkdir -p /etc/ostree
cat > /etc/ostree/auth.json << 'EOF'
{
        "auths": {
                "quay.io": {
                        "auth": "<your secret here>"
                }
        }
}
EOF
%end
With this configuration, the system pulls images from
quay.iousing the provided authentication credentials, which are stored in/etc/ostree/auth.json.Disable TLS for an insecure registry:
%pre
mkdir -p /etc/containers/registries.conf.d/
cat > /etc/containers/registries.conf.d/local-registry.conf << 'EOF'

[[registry]]
location="[IP_Address]:5000"
insecure=true
EOF
%end
With this configuration, the system pulls container images from a registry that is not secured with TLS. You can use it in development or internal networks.
You can also use %pre to:
-
Fetch data from the network by using binaries included in the installation environment, such as
curl. -
Inject trusted certificate authorities into the installation environment
/etc/pki/ca-trust/source/anchorsby using theupdate-ca-trustcommand.
You can configure insecure registries similarly by modifying the /etc/containers directory.
Chapter 17. System configuration
System configuration in RHEL image mode involves a container-native approach to building, deploying, and managing the operating system. This method utilizes container images, specifically those based on the registry.redhat.io/rhel9/rhel-bootc image, to encapsulate the OS and its configurations.
17.1. Transient runtime reconfiguration
You can perform a dynamic reconfiguration of the base image configuration. For example, you can run the firewall-cmd --permanent command to achieve persistent changes across a reboot.
The /etc directory is persistent by default. If you perform changes made by using tools, for example firewall-cmd --permanent, the contents of the /etc on the system can differ from the one described in the container image.
In the default configuration, first make the changes in the base image, then queue the changes without restarting running systems, and then simultaneously write to apply the changes to existing systems only in memory.
You can configure the /etc directory to be transient by using bind mounts. In this case, the etc directory is a part of the machine’s local root filesystem. For example, if you inject static IP addresses by using Anaconda kickstarts, they persist across upgrades.
A 3-way merge is applied across upgrades and each "deployment" has its own copy of /etc.
- The
/rundirectory -
The
/rundirectory is an API filesystem that is defined to be deleted when the system is restarted. Use the/rundirectory for transient files. - Dynamic reconfiguration models
- In the Pull model, you can include code directly embedded in your base image or a privileged container that contacts the remote network server for configuration, and subsequently launch additional container images, by using the Podman API.
In the Push model, some workloads are implemented by tooling such as Ansible.
- systemd
-
You can use systemd units for dynamic transient reconfiguration by writing to
/run/systemddirectory. For example, thesystemctl edit --runtime myservice.servicedynamically changes the configuration of themyservice.serviceunit, without persisting the changes. - NetworkManager
-
Use a
/run/NetworkManager/conf.ddirectory for applying temporary network configuration. Use thenmcli connection modify --temporarycommand to write changes only in memory. Without the--temporaryoption, the command writes persistent changes. - podman
-
Use the
podman run --rmcommand to automatically remove the container when it exits. Without the--rmoption, thepodman runcommand creates a container that persists across system reboots.
17.2. Using dnf with image mode for RHEL
The rhel9/rhel-bootc container image includes the dnf package manager. You can use dnf for several use cases:
- Using
dnfas a part of a container build -
You can use the
RUN dnf installdirective in the Containerfile. - Using
dnfat runtime
The functionality depends on the dnf version. You might get an error: error: can’t create transaction lock on /usr/share/rpm/.rpm.lock (Read-only file system).
You can use the bootc-usr-overlay command to create a writable overlay filesystem for /usr directory. The dnf install writes to this overlay. You can use this feature for installing debugging tools. Note that changes will be lost on reboot.
- Configuring storage
The supported storage technologies are the following:
-
xfs/ext4 - Logical volume management (LVM)
- Linux Unified Key Setup (LUKS)
-
You can add other storage packages to the host system.
-
Storage with
bootc-image-builderYou can use the bootc-image-builder tool to create a disk image. The available configuration for partitioning and layout is relatively fixed. The default filesystem type is derived from the container image’s bootc install configuration.
Storage with bootc install You can use the bootc install to-disk command for flat storage configurations and bootc install to-filesytem command for more advanced installations. For more information see Advanced installation with to-filesystem.
17.3. Network configuration
The default images include the NetworkManager dynamic network control and configuration system, and bootc attempts to connect by using DHCP on every interface with a cable plugged in. You can apply a temporary network configuration, by setting up the /run/NetworkManager/conf.d directory.
However, if you need to use static addressing or more complex networking such as VLANs, bonds, bridges, teams, among others, you can use different ways. Regardless of the way you choose to configure networking, it results as a configuration for NetworkManager, which takes the form of NetworkManager keyfiles.
- Host Network Configuration options
- Complex networking configuration often also requires per-machine state. You can generate machine-specific container images that have, for example, static IP addressing included. You can also include code to generate network configuration from inside the image by inspecting the MAC address of the host.
- Network configuration options available
The following are the available options for configuring static IP, and how the configuration should be done:
By using a Containerfile: Create a container image with static IP or include code to generate network configuration from inside the image based on MAC address.
- Use the configuration specified in Device List Format to match the MAC address or other addresses.
-
To configure a network, you can use the
nmcli connection addsimilarly to what you do to a booted system. However, during build time, you must use the command combined with an explicit--offlineargument. See Configuring an Ethernet connection by using nmcli for more details. Ensure to add the following command before the
nmclicommand in the ContainerFile:RUN nmcli --offline connection add
-
By using Anaconda: You can use an Anaconda Kickstart to configure networking, including Wi-Fi, for bare-metal installations. The configuration is stored by default in the
/etc/NetworkManager/system-connections/file, and is inherently per-machine state. -
By using kernel arguments: Add kernel parameters on first boot to define networking configuration. On the first boot of a machine, enter kernel arguments that define networking configuration. The kernel arguments are mostly defined in the
dracut.cmdlineman page. You can apply these kernel arguments on first boot by using different methods. When usingbootc install, you can also set per-machine kernel arguments by using--karg. -
By using NetworkManager key files:
nmcliornm-initrd-generator
Generating a NetworkManager keyfiles by using nmcli
The nmcli NetworkManager command line tool provides an offline mode that does not communicate with the NetworkManager daemon and just writes the keyfile content to standard output.
Run the
nmclitool for each connection profile you want to create:$ nmcli --offline connection add \ type ethernet ifname enp1s0 \ ipv4.method manual ipv4.addresses 192.0.0.1/24 \ ipv6.method disabled [connection] id=ethernet-enp1s0 uuid=ff242096-f803-425f-9a77-4c3ec92686bd type=ethernet interface-name=enp1s0 [ethernet] [ipv4] address1=192.0.0.1/24 method=manual [ipv6] addr-gen-mode=default method=disabled [proxy]
See the settings man page for a list of the properties that can be specified by using nmcli. Bash autocompletion is available.
Generating NetworkManager Keyfiles by using nm-initrd-generator
NetworkManager contains the nm-initrd-generator tool, that can generate keyfiles from dracut kernel argument syntax. You can use the tool to either convert from kernel arguments to keyfiles or to just quickly generate some keyfiles giving a small amount of input and then modify some more detailed settings.
Generate keyfiles for a bond by using
nm-initrd-generator:$ podman run --rm -ti quay.io/<namespace>/<image>:<tag> /usr/libexec/nm-initrd-generator -s -- "ip=bond0:dhcp" "bond=bond0:ens2,ens3:mode=active-backup,miimon=100" "nameserver=8.8.8.8" * Connection 'bond0' * [connection] id=bond0 uuid=643c17b5-b364-4137-b273-33f450a45476 type=bond interface-name=bond0 multi-connect=1 permissions= [ethernet] mac-address-blacklist= [bond] miimon=100 mode=active-backup [ipv4] dns=8.8.8.8; dns-search= may-fail=false method=auto [ipv6] addr-gen-mode=eui64 dns-search= method=auto [proxy] * Connection 'ens3' * [connection] id=ens3 uuid=b42cc917-fd87-47df-9ac2-34622ecddd8c type=ethernet interface-name=ens3 master=643c17b5-b364-4137-b273-33f450a45476 multi-connect=1 permissions= slave-type=bond [ethernet] mac-address-blacklist= * Connection 'ens2' * [connection] id=ens2 uuid=e111bb4e-3ee3-4612-afc2-1d2dfff97671 type=ethernet interface-name=ens2 master=643c17b5-b364-4137-b273-33f450a45476 multi-connect=1 permissions= slave-type=bond [ethernet] mac-address-blacklist=
The command generates three keyfiles for each interface: bond0, ens3, and ens2. You can use the generated output, add more settings or modify existing settings, and then commit the files into a container image.
Configuring a Static IP
You can use the following
dracutkernel arguments:Template:
ip=${ip}::${gateway}:${netmask}:${hostname}:${interface}:none:${nameserver}Example:
ip=10.10.10.10::10.10.10.1:255.255.255.0:myhostname:ens2:none:8.8.8.8Writing configuration embedded in container images
Store the NetworkManager configuration embedded in container images in /usr/lib/NetworkManager/system-connections/ because this form is part of the immutable image state. You can also write configuration to /etc/NetworkManager/system-connections/ as part of the container image. The default OSTree 3-way merge, that is, using the old default configuration, the active /etc system, and the new default configuration, applies with any machine-specific configuration.
The keyfiles must have the 600 root-only access permissions, otherwise NetworkManager ignores them.
Disabling automatic configuration of Ethernet devices
By default, NetworkManager attempts to autoconfigure by using the DHCP or SLAAC addresses on every interface with a cable plugged in. In some network environments this might not be desirable. For that, it is possible to change the NetworkManager behavior by adding a configuration file, such as /usr/lib/NetworkManager/conf.d/noauto.conf.
Disable the
NetworkManagerautoconfiguration of Ethernet devices[main] # Do not do automatic (DHCP or SLAAC) configuration on ethernet devices # with no other matching connections. no-auto-default=*For more information, see the
bootc-switchman page on your system.
17.4. Setting a hostname in image mode for RHEL
To set a custom hostname for your system, modify the /etc/hostname file. You can set the hostname by using Anaconda, or with a privileged container.
Once you boot a system, you can verify the hostname by using the hostnamectl command.
17.5. Setting up proxied internet access in image mode for RHEL
If you are deploying to an environment that requires internet access by using a proxy, you need to configure services so that they can access resources as intended.
To do this, define a single file with required environment variables in your configuration, and to reference this by using systemd drop-in unit files for all such services.
Procedure
- Defining common proxy environment variables This common file has to be subsequently referenced explicitly by each service that requires internet access.
# /etc/example-proxy.env
https_proxy="http://example.com:8080"
all_proxy="http://example.com:8080"
http_proxy="http://example.com:8080"
HTTP_PROXY="http://example.com:8080"
HTTPS_PROXY="http://example.com:8080"
no_proxy="*.example.com,127.0.0.1,0.0.0.0,localhost"-
Defining drop-in units for core services The
bootcandpodmantools commonly need proxy configuration. At the current time,bootcdoes not always run as asystemdunit.
# /usr/lib/systemd/system/bootc-fetch-apply-updates.service.d/99-proxy.conf
[Service]
EnvironmentFile=/etc/example-proxy.env-
Defining proxy use for podman
systemdunits
Using the Podman systemd configuration, similarly add EnvironmentFile=/etc/example-proxy.env. You can set the configuration for proxy and environment settings of podman and containers in the /etc/containers/containers.conf configuration file as a root user or in the $HOME/.config/containers/containers.conf configuration file as a non-root user.
Chapter 18. Getting the source code of bootc container images
You can find the source code for bootc images in the Red Hat Ecosystem Catalog.
Procedure
-
Access the Red Hat Ecosystem Catalog and search for
rhel-bootc. - In the Get this image tab, click Get the source and follow the instructions.
After you extract the content, the input RPM package list and other content resources are available in the
extra_src_dirdirectory.The
.tarfiles are snapshots of the input git repository, and contain YAML files with the package lists.
Chapter 19. Contributing to the bootc upstream projects
You can contribute to the following upstream bootc projects:
- The upstream git repository is in CentOS Stream.
- The CentOS Stream sources primarily track the Fedora upstream project.