Chapter 7. Creating an integration that is triggered by an HTTP request (Webhook)
You can trigger execution of a simple integration by sending an HTTP GET or POST request to an HTTP endpoint that Fuse Online exposes. The following topics provide details:
- Section 7.1, “General procedure for using the Fuse Online webhook”
- Section 7.2, “Creating an integration that an HTTP request can trigger”
- Section 7.3, “How Fuse Online handles HTTP requests”
- Section 7.4, “Guidelines for an HTTP client that invokes a Fuse Online Webhook”
- Section 7.5, “About the JSON schema for specifying request parameters”
- Section 7.6, “How to specify HTTP requests”
7.1. General procedure for using the Fuse Online webhook
To trigger execution of an integration with an HTTP GET or POST request, you must do the following:
-
Decide whether you want to send a
GETorPOSTrequest to Fuse Online. - Plan your integration to handle this request.
Create the connection that finishes the integration.
Fuse Online provides a Webhook connection that you use as the start connection.
- Create any other connections that you want to add to the integration.
Create the integration:
- Add the Webhook connection as the start connection.
Add the finish connection and then any other connections that are required in the integration. The finish connection and any middle connections handle the HTTP request that triggers execution of the integration. It is up to you to choose and specify the most appropriate HTTP request for accomplishing your goals. Keep the following in mind:
- Add a connection to the application that contains the data that you want to obtain or that contains the data that you want to update.
-
A
GETrequest is limited to specification of key/value parameters. -
A
POSTrequest can provide an arbitrary body, such as an XML or JSON instance. -
Fuse Online returns only an HTTP status header and does not return any data. Consequently, you can define an integration that is triggered by a
GETrequest and that updates data rather than obtaining data. Likewise, you can define an integration that is triggered by aPOSTrequest and that obtains data rather than updating data.
Add a data mapper step after the Webhook connection.
For a
GETrequest, map the parameter fields in the HTTP request to the data fields in the next connection.For a
POSTrequest, you might have specified the output data shape in the request by passing a JSON instance, JSON schema, XML instance, or XML schema. If you did not, then when you add a Webhook connection as the start connection of an integration, Fuse Online prompts you to specify the output data type. If you do not, then the default Webhook connection output data type is in JSON format.- Add any other steps that the integration needs.
- Publish the integration and wait for it to be Running.
- Go to the integration summary page and copy the external URL that Fuse Online provides.
-
Modify this external URL to construct your
GETorPOSTrequest. -
Implement the application that sends the HTTP
GETorPOSTrequest to Fuse Online.
7.2. Creating an integration that an HTTP request can trigger
To trigger execution of an integration with an HTTP GET or POST request, add a Webhook connection as the integration’s start connection.
Procedure
- In the Fuse Online panel on the left, click Integrations.
- Click Create Integration.
- On the Choose a connection page, click the Webhook connection.
On the Choose an action page, select the Incoming Webhook action.
In the Webhook Configuration page, Fuse Online displays the webhook token that Fuse Online generates for this integration.
When you construct the HTTP request, this token is the last part of the URL. After you publish this integration and it is running, Fuse Online displays the Fuse Online external URL, which has this token at the end.
The Webhook Configuration page also includes Default Response and Error Handling sections. The webhook step sends a response to the HTTP client that invoked it. The response contains one of the return codes and, by default, the error message in the body of the returned message.
- Under Default Response, in the Return Code field, accept the default response that Fuse Online displays, or use the drop-down list to select the default response that you want. The flow sends this response when execution of the operation flow does not return any of the configured error responses. Typically, the default response return code indicates a successful operation.
Under Error Handling, indicate whether you want to include the error message in the body of the returned message.
During development, you typically want to return the error message. In production, however, you might want to hide the error message if it contains sensitive or proprietary information. The error message is a JSON-formatted string that contains
responseCode,category,message, anderrorelements, for example:Copy to Clipboard Copied! Toggle word wrap Toggle overflow Note that during development, the most reliable way to know that an error happened is to check the
HTTP_RESPONSE STATUSheader in the response to the caller. You can also check the integration pod’s log forINFOmessages. The integration’s Activity log shows a successful exchange and errors are not always visible in the Activity log.- For each error that the webhook step might return, accept the default return code or use the drop-down list to select another HTTP status return code.
- Click Next.
In the Specify Output Data Type page:
- Click in the Select Type field, and select JSON schema.
- In the Definition field, paste the JSON schema that defines the data types of the parameters in the HTTP request. See About the JSON schema for specifying request parameters.
- In the Data Type Name field, specify a name for this data type. Although this is optional, if you specify a name, it appears in the data mapper Sources list, which can make it easier to correctly map fields.
- Optionally, in the Data Type Description field, provide some information that helps you distinguish this data type.
- Click Next.
- Add the finish connection to the integration.
- Add any other needed connections.
- Add any other needed steps.
- Immediately after the start connection, add a data mapper step.
- Click Publish, give the integration a name and optionally, a description, and click Save and publish.
7.3. How Fuse Online handles HTTP requests
You can specify an HTTP GET or POST request to trigger execution of a simple integration. Although a GET request usually obtains data and a POST request usually updates data, you can use either request to trigger an integration that does either operation. Any parameters in the request are available for mapping to data fields in the next connection that is in the integration. For details, see About the JSON schema for specifying request parameters.
A Webhook connection only passes the data it receives to the next connection in the integration. When Fuse Online receives an HTTP request, it:
-
Returns an HTTP status header to the requester. When a request successfully triggers execution of an integration, the Fuse Online return code is
201. When a request fails to trigger execution of an integration, the Fuse Online return code is5xx. - Does not return any other data to the requester. In other words, there is no data in the HTTP body of the response that contains the status header.
- Passes the data in the request to the next connection in the integration.
This means that you can define a simple integration that is triggered by a GET request and that updates data rather than obtaining data. Likewise, you can define a simple integration that is triggered by a POST request and that obtains data rather than updating data.
In the integration’s Activity tab, the status of a webhook step is Success every time. This Success status indicates the status of the communication between the Fuse Online} Webhook and the HTTP client that invokes it. This Success status is not an indication that the integration passed successfully nor that any steps are without error. Errors generated by HTTP requests are not visible in the integration’s Activity log.
When you configure a webhook, the Include error message in the return body option is checked by default. When this option is checked, to verify whether the errors generated by HTTP requests are included in the webhook response, send a test request that will generate an error and then check the response header. You can also check the integration pod’s log for INFO messages. Use the following command to view the integration’s pod log, where example-integration-pod is the name of the pod.
oc logs -f pod/example-integration-pod
oc logs -f pod/example-integration-pod7.4. Guidelines for an HTTP client that invokes a Fuse Online Webhook
When you implement a client that sends an HTTP request to Fuse Online, your implementation should:
-
Add to the Fuse Online-provided external URL to construct a URL that makes a
GETorPOSTrequest. -
In the URL request, specify HTTP header and query parameter values whose data types adhere to the
io:syndesis:webhookJSON schema. See About the JSON schema for specifying request parameters. When header and query parameters adhere to this data type specification, then you can map parameter fields to fields that the next connection in the integration can process. -
If the request succeeds, handle a returned success code of
201. -
If the request fails, handle an HTTP
5xxerror code. - Not expect any other response from Fuse Online. In other words, sending the request does not directly return data to the requesting client other than the return code.
7.5. About the JSON schema for specifying request parameters
In an integration, you typically map header and query parameters in the HTTP request to data fields that the next connection in the integration can process. To make this possible, when you add the Webhook connection to the integration, specify the output data type in a JSON schema that has the following structure:
To add the data structures that you need, in the JSON instance for your HTTP request:
While all data that an HTTP client sends is available in the integration, when a Webhook connection’s data shape conforms to this JSON schema, then query parameters and body content are available for mapping.
For examples, see How to specify HTTP requests.
7.6. How to specify HTTP requests
The following examples show how to specify HTTP requests for the Fuse Online Webhook.
Webhook example of POST request with only HTTP body
Consider an integration that starts with a Webhook connection and then creates a row in the Todo table of the Fuse Online-provided database:
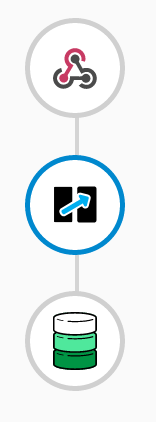
During creation of this integration, when you add the Webhook start connection, you specify its output data type with a JSON instance that has this content: {"todo":"text"}:
When you add the PostgresDB connection as the finish connection, you select the Invoke SQL action and specify this SQL statement:
INSERT INTO TODO (TASK) VALUES (:#TASK)
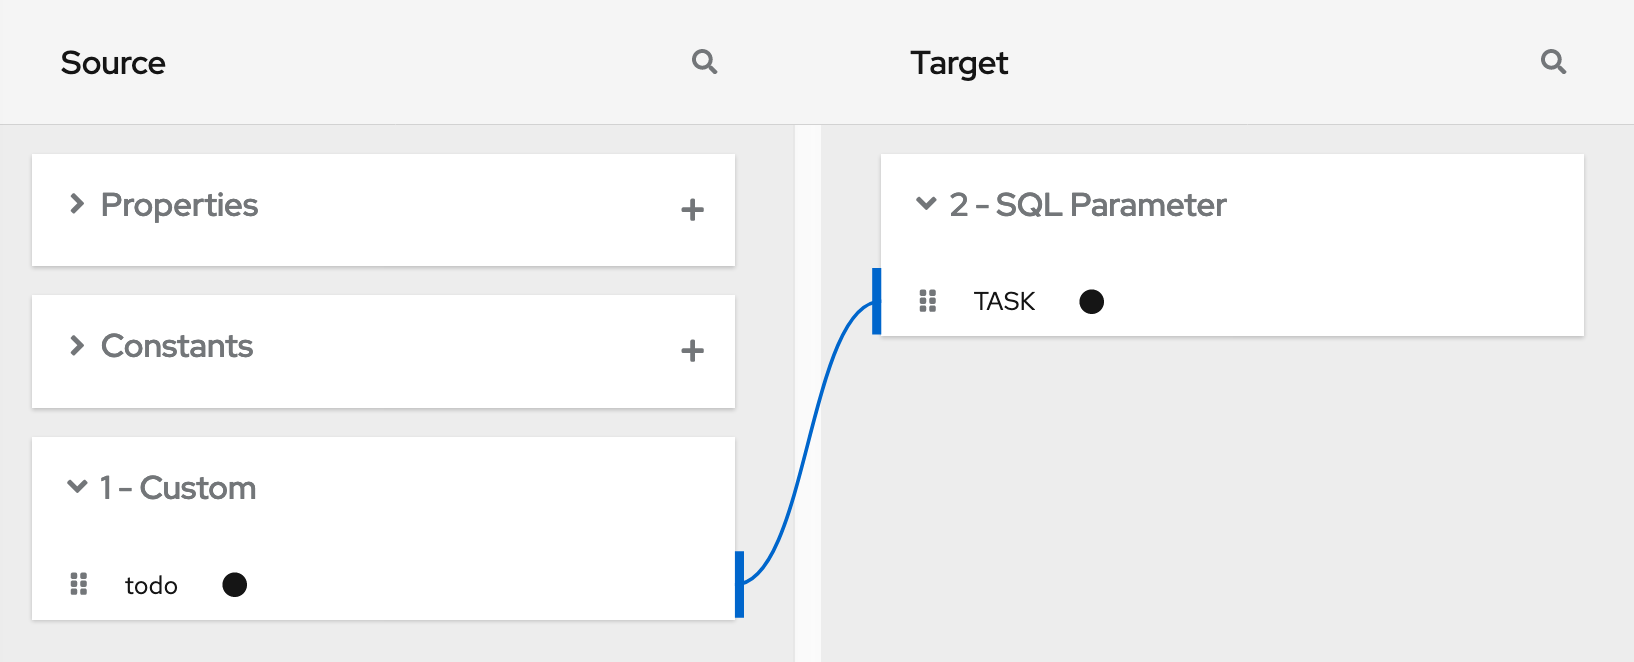
After you add the database connection, you add a mapping step:
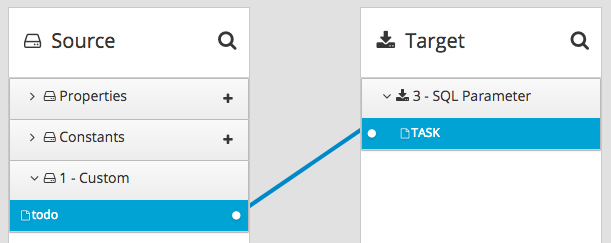
You save and publish the integration. When it is running, you can copy the external URL that Fuse Online provides:
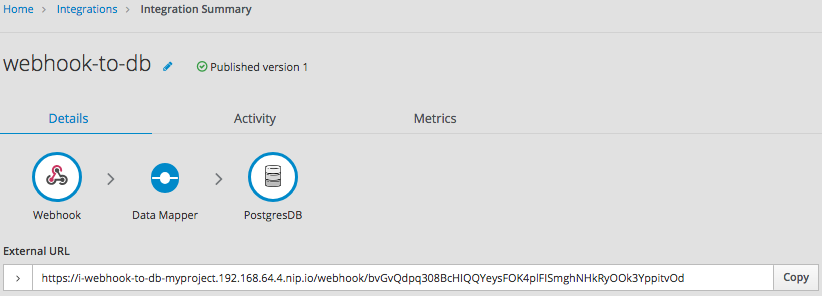
To understand the parts of the external URL, consider this sample URL:
https://i-webhook-to-db-myproject.192.168.64.4.nip.io/webhook/bvGvQdpq308BcHIQQYeysFOK4plFISmghNHkRyOOk3YppitvOd
| Value | Description |
|---|---|
|
| Fuse Online always inserts this value at the beginning of the URL. |
|
| The name of the integration. |
|
| The OpenShift namespace that contains the pod that is running the integration. |
|
| The DNS domain that is configured for OpenShift. This indicates the Fuse Online environment that is providing the webhook. |
|
| Appears in each Webhook connection URL. |
|
| Webhook connection token that Fuse Online provides when you add a Webhook connection to an integration. The token is a random string that provides security in that it makes the URL hard to discern, which prevents anyone else from sending a request. In a request, you can specify the token that Fuse Online provides or you can define your own. If you define your own, ensure that it is hard to guess. |
As you can see in the external URL, Fuse Online constructs the host name from the name of the integration, the name of the OpenShift namespace, and the OpenShift DNS domain. Fuse Online removes illegal characters and converts spaces to hyphens. In the sample external URL, this is the host name:
https://i-webhook-to-db-myproject.192.168.64.4.nip.io
To use curl to invoke the webhook, you would specify the command as follows:
curl -H 'Content-Type: application/json' -d '{"todo":"from webhook"}' https://i-webhook-to-db-myproject.192.168.64.4.nip.io/webhook/bvGvQdpq308BcHIQQYeysFOK4plFISmghNHkRyOOk3YppitvOd
-
The
-Hoption specifies the HTTPContent-Typeheader. -
The
-doption sets the HTTP method toPOSTby default.
Execution of this command triggers the integration. The database finish connection inserts a new task into the tasks table. To see this, display the Todo app at, for example, https://todo-myproject.192.168.64.4.nip.io, Click Update and you should see from webhook as a new task.
Webhook example of POST request with query parameters
For this example, consider the same integration as in the previous example:

But in this example, you define the Webhook connection output data type by specifying a JSON schema with this content:
In this JSON schema:
-
The
idmust be set toio.syndesis.webhook. -
The
parameterssection must specify the HTTP query parameters. -
The
bodysection must specify the body content and it can be as complex as you need it to be. For example, it can define nested properties as well as arrays.
This provides the information that the Webhook connector needs to prepare the content for the next step in the integration.
To use curl to send an HTTP request, invoke a command such as the following:
curl -H 'Content-Type: application/json' -d '{"company":"Gadgets","email":"sales@gadgets.com","phone":"+1-202-555-0152"}'https://i-webhook-params-to-db-myproject.192.168.42.235.nip.io/webhook/ZYWrhaW7dVk097vNsLX3YJ1GyxUFMFRteLpw0z4O69MW7d2Kjg?source=web&status=new
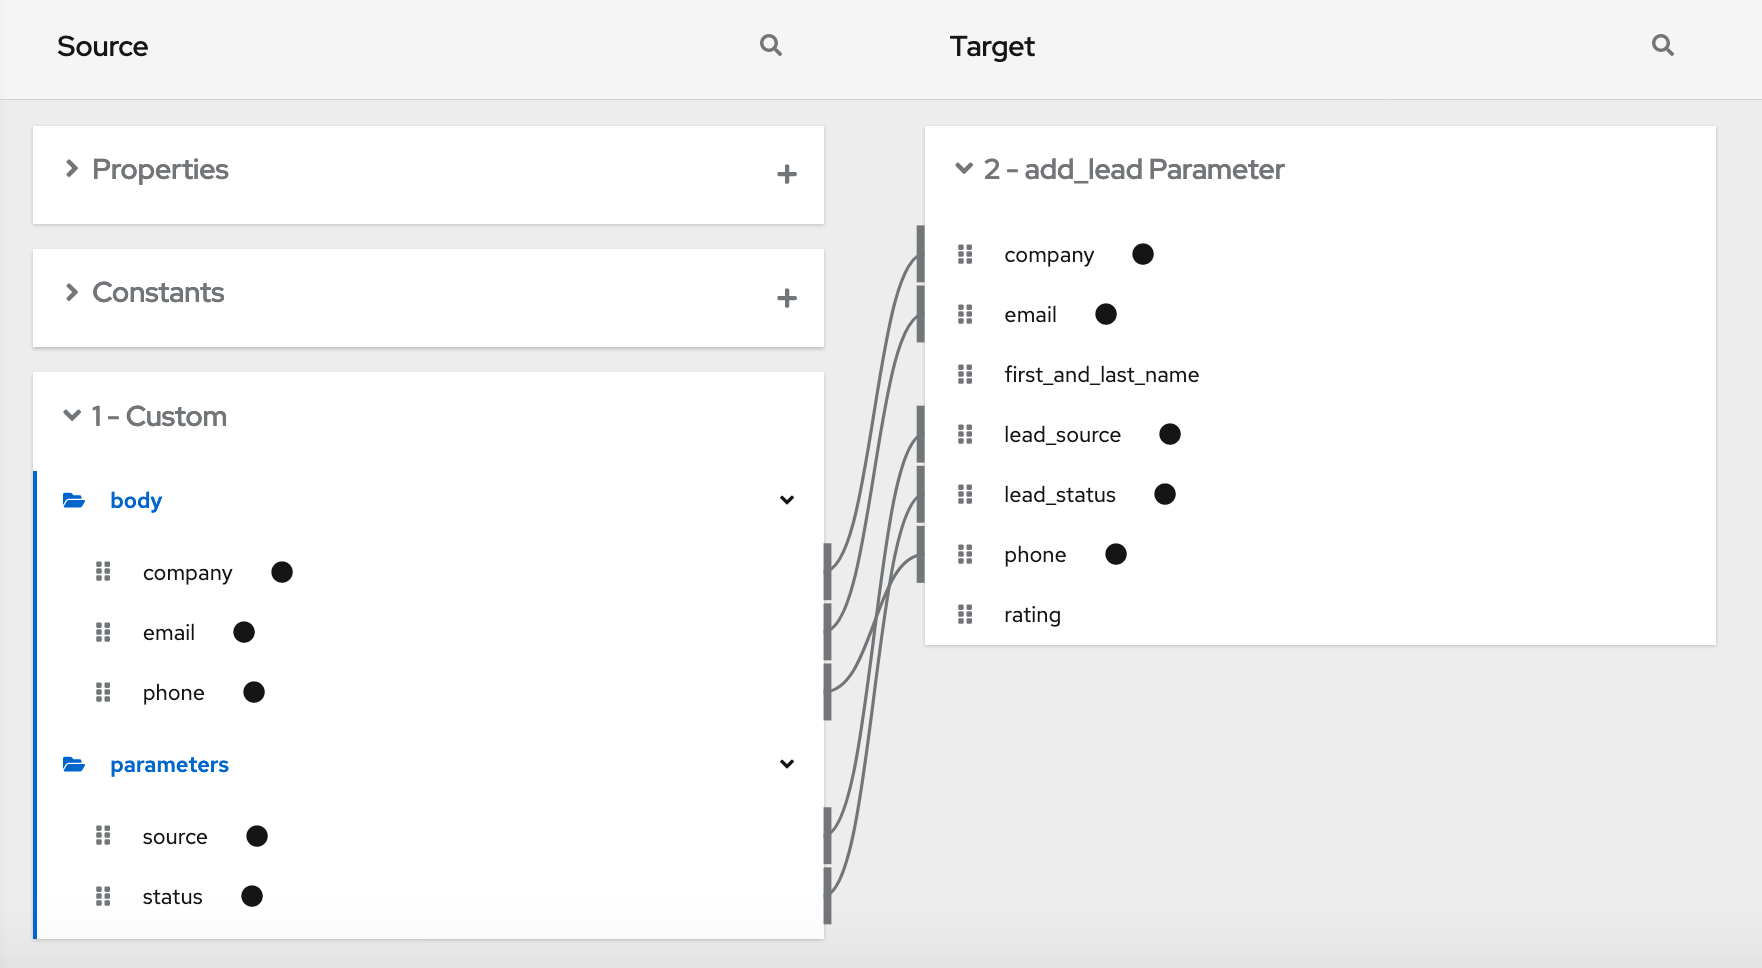
When the Webhook connection receives this request it creates a JSON instance that looks like this:
It is this internal JSON instance that enables the following mapping:
Webhook examples with GET
To trigger an integration with a GET request that does not provide input data, specify the Webhook connection output data shape as a JSON instance with the definition '{}'. You can then invoke the following curl command, which does not specify query parameters:
curl 'https://i-webhook-params-to-db-myproject.192.168.42.235.nip.io/webhook/ZYWrhaW7dVk097vNsLX3YJ1GyxUFMFRteLpw0z4O69MW7d2Kjg'
You can change the previous POST example to send a GET request with query parameters but no body. You would specify the Webhook connection output data shape as a JSON schema with the definition as shown below.
Here is the curl command that sends the GET request:
curl 'https://i-webhook-params-to-db-myproject.192.168.42.235.nip.io/webhook/ZYWrhaW7dVk097vNsLX3YJ1GyxUFMFRteLpw0z4O69MW7d2Kjg?source=web&status=new'`