5.6. Creating Replicated Volumes
Important
gluster volume create to create different types of volumes, and gluster volume info to verify successful volume creation.
- A trusted storage pool has been created, as described in Section 4.1, “Adding Servers to the Trusted Storage Pool”.
- Understand how to start and stop volumes, as described in Section 5.11, “Starting Volumes”.
5.6.1. Creating Two-way Replicated Volumes
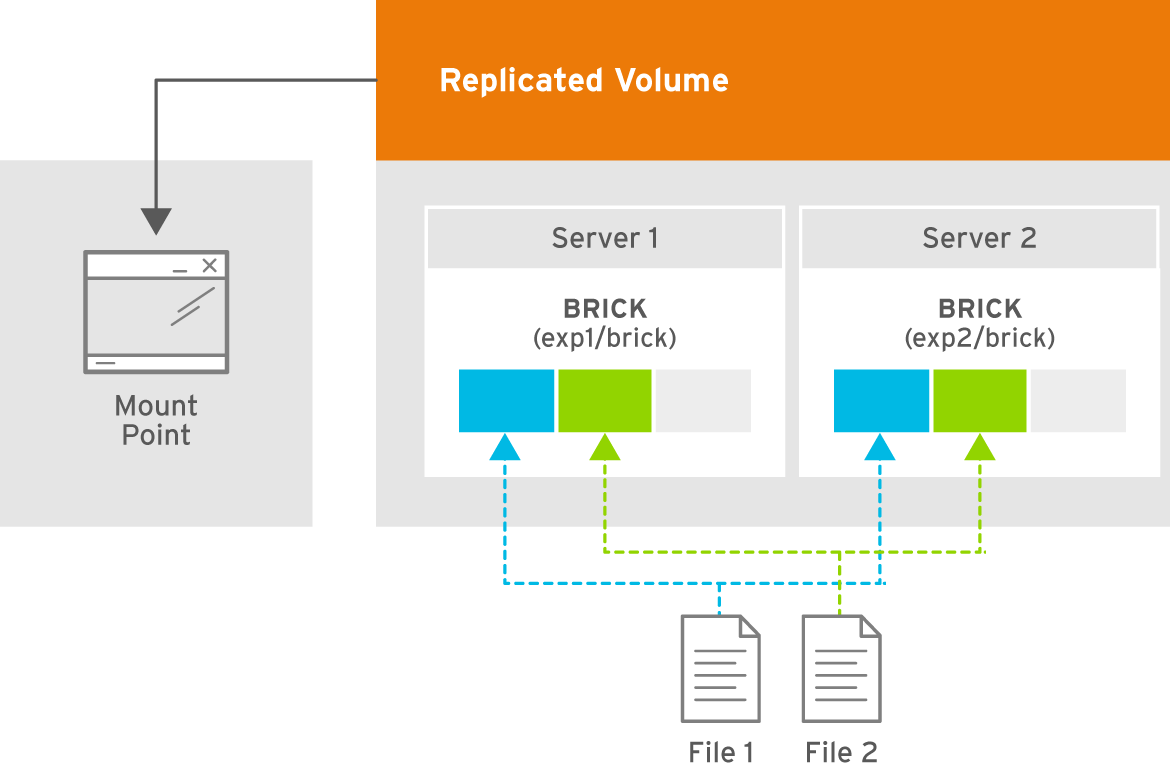
Figure 5.3. Illustration of a Two-way Replicated Volume
- Run the
gluster volume createcommand to create the replicated volume.The syntax is# gluster volume create NEW-VOLNAME [replica COUNT] [transport tcp | rdma | tcp,rdma] NEW-BRICK...The default value for transport istcp. Other options can be passed such asauth.alloworauth.reject. See Section 11.1, “Configuring Volume Options” for a full list of parameters.Example 5.3. Replicated Volume with Two Storage Servers
The order in which bricks are specified determines how they are replicated with each other. For example, every2bricks, where2is the replica count, forms a replica set. This is illustrated in Figure 5.3, “Illustration of a Two-way Replicated Volume” .gluster volume create test-volume replica 2 transport tcp server1:/rhgs/brick1 server2:/rhgs/brick2 Creation of test-volume has been successful Please start the volume to access data.
# gluster volume create test-volume replica 2 transport tcp server1:/rhgs/brick1 server2:/rhgs/brick2
Creation of test-volume has been successful
Please start the volume to access data.
Copy to Clipboard Copied! Toggle word wrap Toggle overflow - Run
# gluster volume start VOLNAMEto start the volume.gluster volume start test-volume Starting test-volume has been successful
# gluster volume start test-volume
Starting test-volume has been successful
Copy to Clipboard Copied! Toggle word wrap Toggle overflow - Run
gluster volume infocommand to optionally display the volume information.
Important
5.6.2. Creating Three-way Replicated Volumes
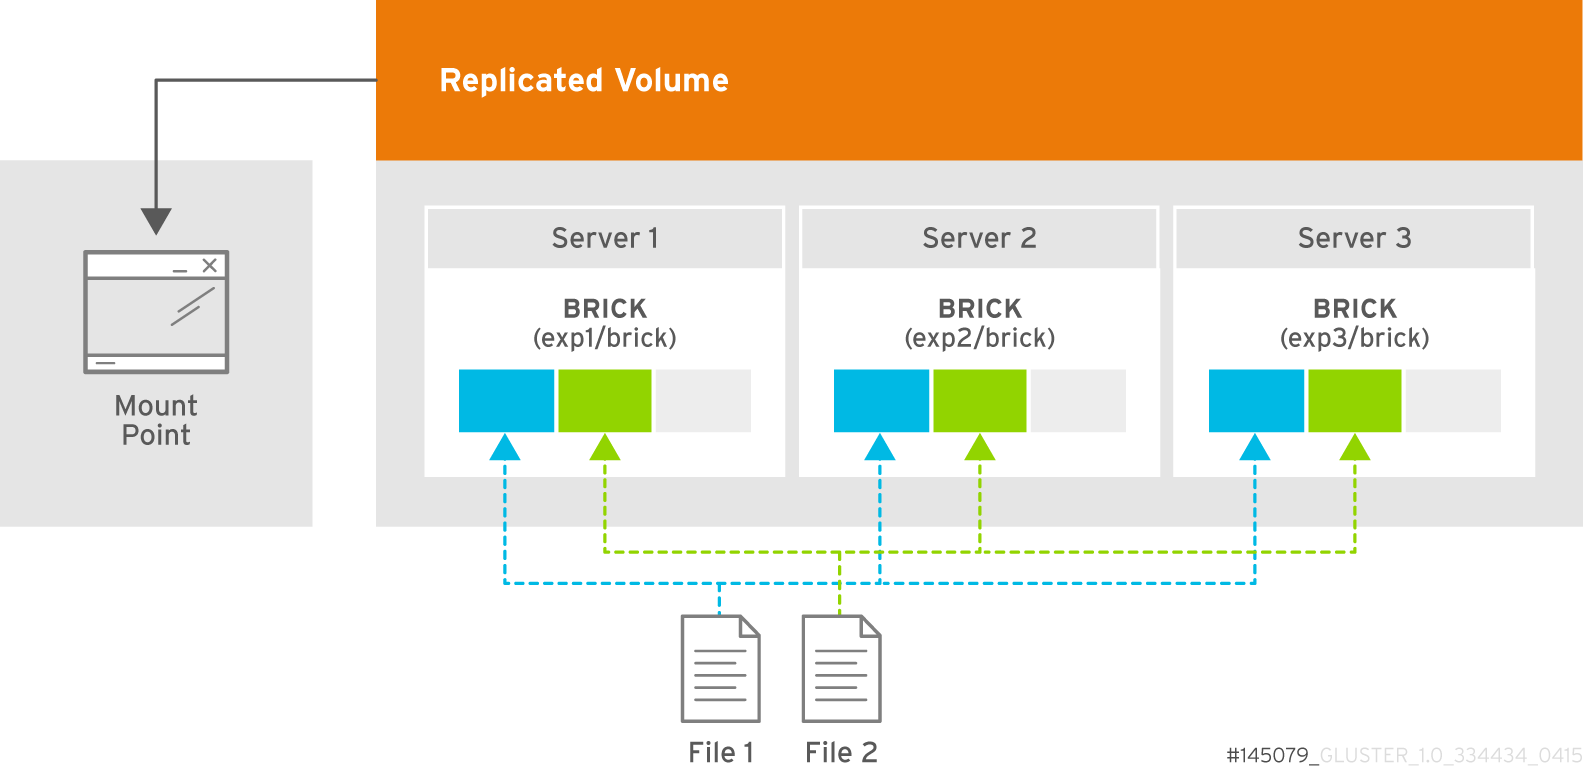
Figure 5.4. Illustration of a Three-way Replicated Volume
- Run the
gluster volume createcommand to create the replicated volume.The syntax is# gluster volume create NEW-VOLNAME [replica COUNT] [transport tcp | rdma | tcp,rdma] NEW-BRICK...The default value for transport istcp. Other options can be passed such asauth.alloworauth.reject. See Section 11.1, “Configuring Volume Options” for a full list of parameters.Example 5.4. Replicated Volume with Three Storage Servers
The order in which bricks are specified determines how bricks are replicated with each other. For example, everynbricks, where3is the replica count forms a replica set. This is illustrated in Figure 5.4, “Illustration of a Three-way Replicated Volume”.gluster volume create test-volume replica 3 transport tcp server1:/rhgs/brick1 server2:/rhgs/brick2 server3:/rhgs/brick3 Creation of test-volume has been successful Please start the volume to access data.
# gluster volume create test-volume replica 3 transport tcp server1:/rhgs/brick1 server2:/rhgs/brick2 server3:/rhgs/brick3
Creation of test-volume has been successful
Please start the volume to access data.
Copy to Clipboard Copied! Toggle word wrap Toggle overflow - Run
# gluster volume start VOLNAMEto start the volume.gluster volume start test-volume Starting test-volume has been successful
# gluster volume start test-volume
Starting test-volume has been successful
Copy to Clipboard Copied! Toggle word wrap Toggle overflow - Run
gluster volume infocommand to optionally display the volume information.
Important
5.6.3. Creating Sharded Replicated Volumes
.shard directory, and are named with the GFID and a number indicating the order of the pieces. For example, if a file is split into four pieces, the first piece is named GFID and stored normally. The other three pieces are named GFID.1, GFID.2, and GFID.3 respectively. They are placed in the .shard directory and distributed evenly between the various bricks in the volume.
5.6.3.1. Supported use cases
Important
Important
Example 5.5. Example: Three-way replicated sharded volume
- Set up a three-way replicated volume, as described in the Red Hat Gluster Storage Administration Guide: https://access.redhat.com/documentation/en-US/Red_Hat_Storage/3.2/html/Administration_Guide/sect-Creating_Replicated_Volumes.html#Creating_Three-way_Replicated_Volumes.
- Before you start your volume, enable sharding on the volume.
gluster volume set test-volume features.shard enable
# gluster volume set test-volume features.shard enableCopy to Clipboard Copied! Toggle word wrap Toggle overflow - Start the volume and ensure it is working as expected.
gluster volume test-volume start
gluster volume info test-volume
# gluster volume test-volume start
# gluster volume info test-volume
Copy to Clipboard Copied! Toggle word wrap Toggle overflow
5.6.3.2. Configuration Options
-
features.shard - Enables or disables sharding on a specified volume. Valid values are
enableanddisable. The default value isdisable.gluster volume set volname features.shard enable
# gluster volume set volname features.shard enableCopy to Clipboard Copied! Toggle word wrap Toggle overflow Note that this only affects files created after this command is run; files created before this command is run retain their old behaviour. -
features.shard-block-size - Specifies the maximum size of the file pieces when sharding is enabled. The supported value for this parameter is 512MB.
gluster volume set volname features.shard-block-size 32MB
# gluster volume set volname features.shard-block-size 32MBCopy to Clipboard Copied! Toggle word wrap Toggle overflow Note that this only affects files created after this command is run; files created before this command is run retain their old behaviour.
5.6.3.3. Finding the pieces of a sharded file
getfattr -d -m. -e hex path_to_file
# getfattr -d -m. -e hex path_to_filels /rhgs/*/.shard -lh | grep GFID
# ls /rhgs/*/.shard -lh | grep GFID
