Chapter 2. Business Central
Business Central is the web based user interface used for both Red Hat JBoss BRMS 6 and Red Hat JBoss BPM Suite 6.
It is the user interface for the business rules manager and has been combined with the core drools engine and other tools. It allows a business user to manage rules in a multi user environment and implement changes in a controlled fashion.
The Business Central is used when:
- Users need to manage versions/deployment of rules.
- Multiple users of different skill levels need to access and edit rules.
- You need an infrastructure to manage rules.
Business Central is managed by the Business Analysts, Rule experts, Developers and Administrators (rule administrators).
The main features of the Business Central are:
Multiple types of rule editors (GUI, text) including:-
- Guided Rule Editor
- Rule Templates
- Decision Tables
- Store multiple rule "assets" together as a package
- Domain Specific Language support
- Complex Event Processing support
- Version control (historical assets)
- Testing of rules
- Validation and verification of rules
- Categorization
Build and deploy including:-
- Assembly of assets into a binary package for use with a ChangeSet or KnowledgeBuilder.
- REST API to manipulate assets.
2.1. Logging on to Business Central
Log into Business Central after the server has successfully started.
-
Navigate to http://localhost:8080/business-central in a web browser. If the user interface has been configured to run from a domain name, substitute
localhostfor the domain name. For example http://www.example.com:8080/business-central. -
Log in with the user credentials that were created during installation. For example: User =
helloworlduserand password =Helloworld@123.
2.2. The Home Screen
The Home view or the "landing page" is the default view for the application. There are two menu items available in this view: Authoring and Deployment, besides the Home menu option.
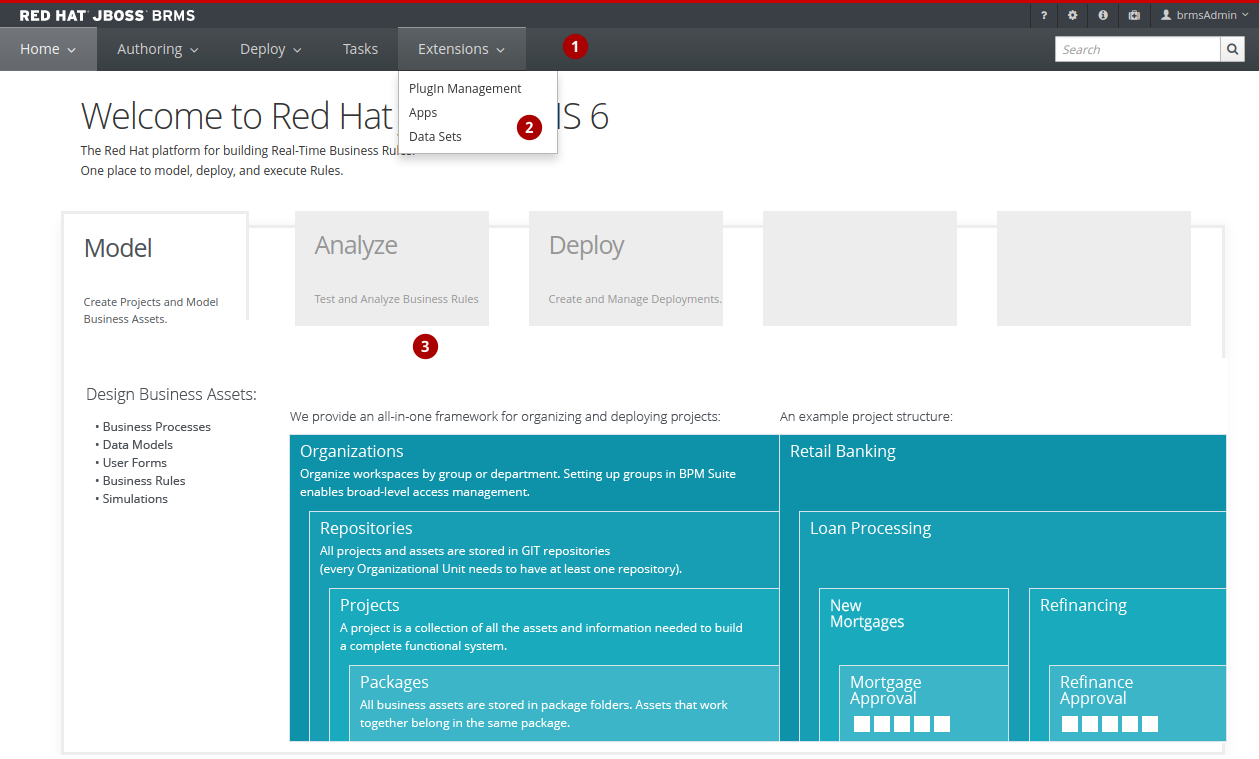
The following screen shows what the Home view looks like:
Figure 2.1. Business central home screen
- The main menu contains the links to the
Homepage and all available perspectives. - The perspective menu contains menus for the selected perspective.
- The perspective area contains the perspective tools (here the home page with links to individual perspectives and their views), such as views and editors.
2.2.1. Perspectives
Business Central provides the following groups of perspectives accessible from the main menu:
Authoring group:
Project Authoring perspective contains:
- The Project Explorer view with the overview of available repository structure, and information on available resources, such as, business process definitions, form definitions, and others.
- The editor area on the right of the Project Explorer view, where the respective editor appears when a resource is opened.
- The Messages view with validation messages.
- Contributors perspective enables you to view the number of commits sorted by the organizational unit, repository, author, and other criteria.
Artifact Repository perspective contains a list of jars which can be added as dependencies. The available operations in this perspective are upload/download artifact and open (view) the
pom.xmlfile.The view is available for users with the
adminrole only.Administration perspective contains:
- The File Explorer view with available asset repositories
The editor area on the right of the File Explorer view, where the respective editor appears when a resource is opened.
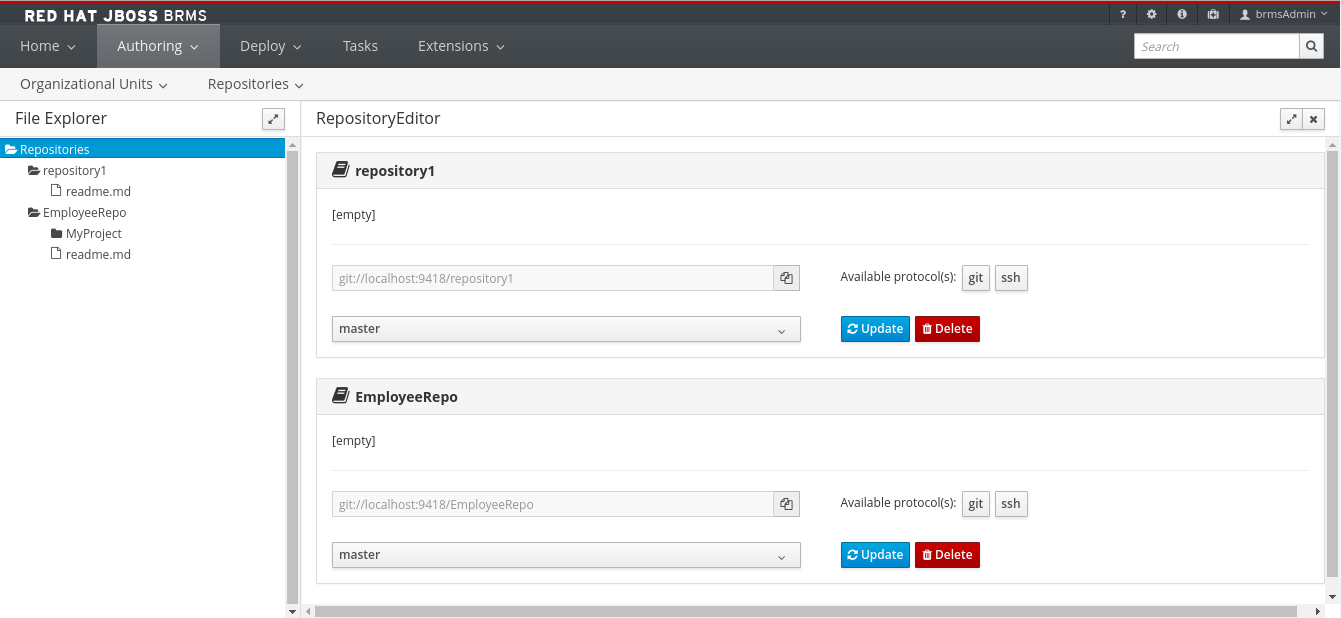
The Administration perspective allows an administrator to connect a Knowledge Store to a repository with assets and to create a new repository. For more information, see the Red Hat JBoss BRMS Administration and Configuration Guide.
The view is available for users with the
adminrole only.
Deploy group:
- Execution Servers perspective contains a list of the deployed Realtime Decision Server templates and containers associated with the templates.
Tasks group:
- Task List perspective contains a list of Tasks produced by Human Task of the Process instances or produced manually. Only Tasks assigned to the logged-in user are visible. It allows you to claim Tasks assigned to a group you are a member of.
Extensions
- PlugIn Management perspective enables you to customize and create new Business Central perspectives and plugins.
- Apps perspective enables you to browse, categorize and open custom perspective plugins.
- Data Sets perspective enables you to define and connect to external data sets.
2.3. Embedding Business Central
Business Central provides a set of editors to author assets in different formats. A specialized editor is used according to the asset format.
Business Central provides the ability to embed it in your own (Web) Applications using standalone mode. This allows you to edit rules, processes, decision tables, and other assets in your own applications without switching to Business Central.
In order to embed Business Central in your application, you will need the Business Central application deployed and running in a web/application server and, from within your own web applications, an iframe with proper HTTP query parameters as described in the following table.
| Parameter Name | Explanation | Allow Multiple Values | Example |
|---|---|---|---|
| standalone | This parameter switches Business Central to standalone mode. | no | (none) |
| path | Path to the asset to be edited. Note that asset should already exists. | no | git://master@uf-playground/todo.md |
| perspective | Reference to an existing perspective name. | no | org.guvnor.m2repo.client.perspectives.GuvnorM2RepoPerspective |
| header | Defines the name of the header that should be displayed (useful for context menu headers). | yes | ComplementNavArea |
The following example demonstrates how to set up an embedded Author Perspective for Business Central.
X-frame options can be set in web.xml of business-central. The default value for x-frame-options is as follows:
<param-name>x-frame-options</param-name>
  <param-value>SAMEORIGIN</param-value>
<param-name>x-frame-options</param-name>
<param-value>SAMEORIGIN</param-value>2.4. Project Authoring
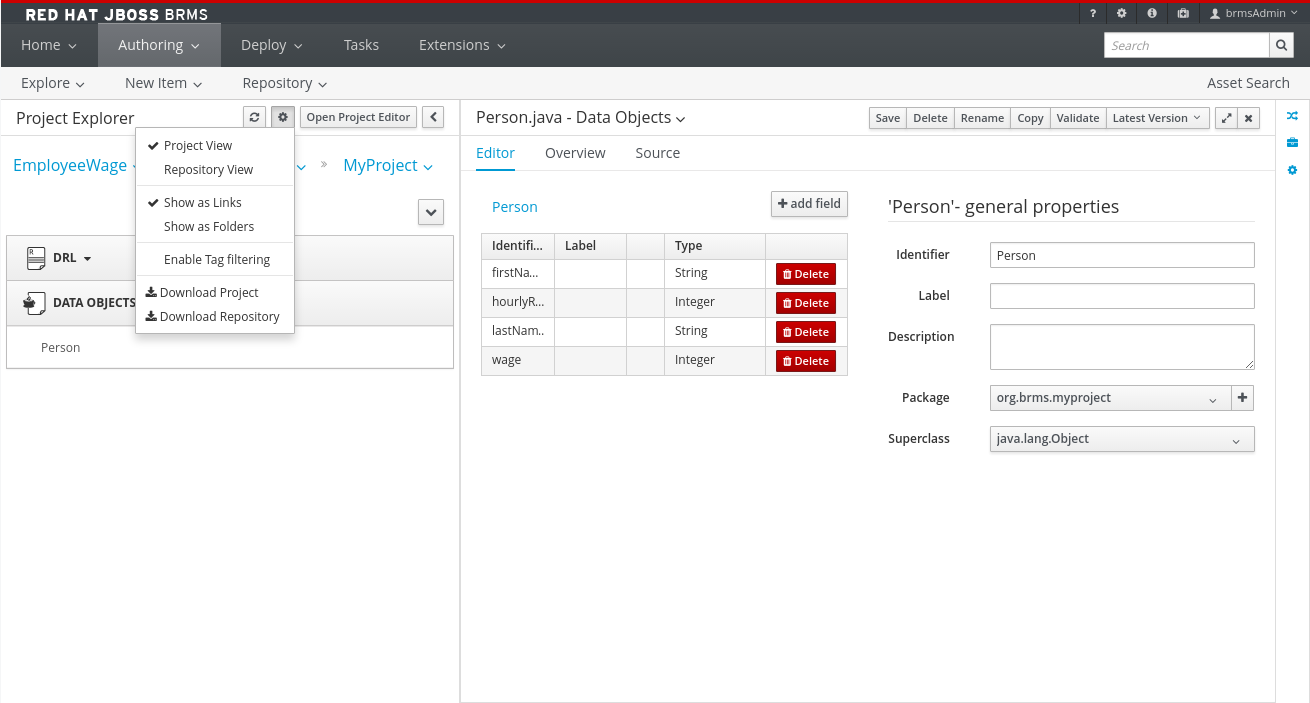
Projects and the associated assets can be authored from the Project Explorer. The Project Explorer can be accessed from the Home screen by clicking on Authoring
Figure 2.2. The Project Explorer screen
The project authoring screen is divided into 3 sections:
-
Project Explorer: The left pane of the project authoring screen is the project explorer that allows you to navigate through projects and create the required packages and assets. Clicking on the (
 ) button allows you to set the view to Project view or Repository view. The contents of the project can be navigated in a tree view by clicking on the Show as Folders or in a single-line path by clicking on the Show as Links.
- Content area: The content area shows the assets which are opened for editing. It has a toolbar with buttons like Save, Delete, Rename, Copy, and Validate that can be used to perform the required actions on the assets that are being worked upon.
- Problems: The problems area shows the validation errors of the project that occur while saving or validating a particular asset.
2.4.1. Changing the Layout
The layout of any panel can be changed by the user. Each panel can be resized and repositioned, except for the Project Explorer panel, which can only be resized and not repositioned.
Resizing the layout
The layout can be resized in the following ways:
To resize the width of the screen:
-
Move the mouse pointer over the vertical panel splitter. The pointer changes to
 .
.
- Adjust the width of the screen by dragging the splitter and setting it at the required position.
-
Move the mouse pointer over the vertical panel splitter. The pointer changes to
To resize the height of the screen:
-
Hover the cursor over the horizontal panel splitter. The pointer changes to
 .
.
- Adjust the height of the screen by dragging the splitter and setting the required position.
-
Hover the cursor over the horizontal panel splitter. The pointer changes to
Repositioning the layout
To reposition the layout, do the following:
-
Move the mouse pointer on the title of the panel. The pointer changes to
 .
.
-
Press and hold the left click of the mouse and drag the screen to the required location. A
 symbol indicating the target position is displayed to set the position of the screen.
2.4.2. Creating new assets
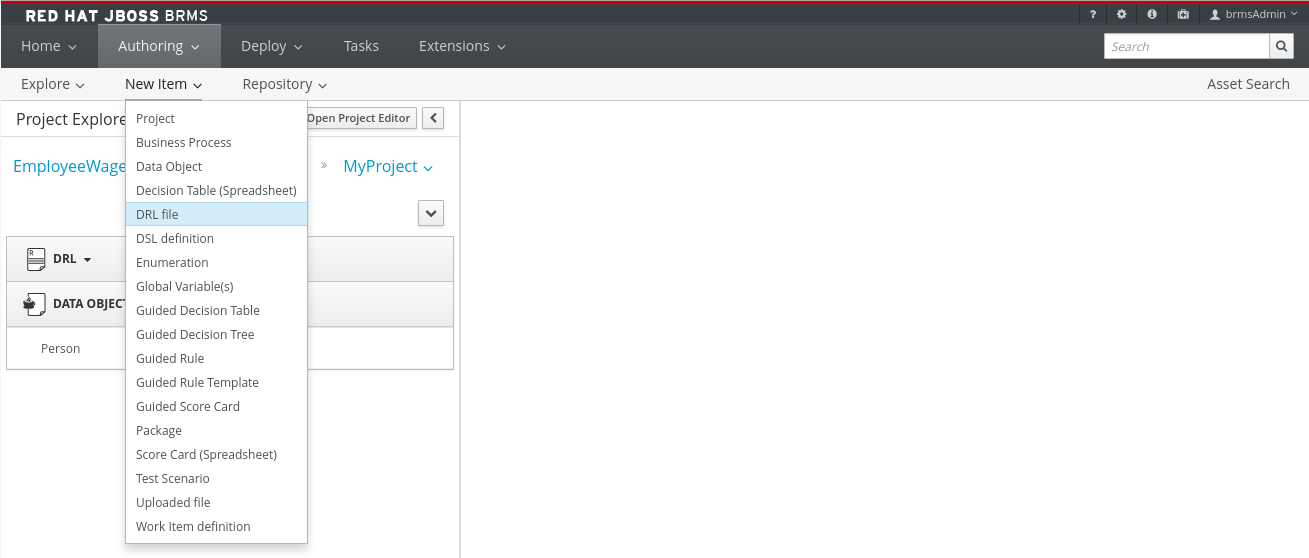
Assets can be created using the New Item perspective menu option.
Figure 2.3. Creating new Asset screen
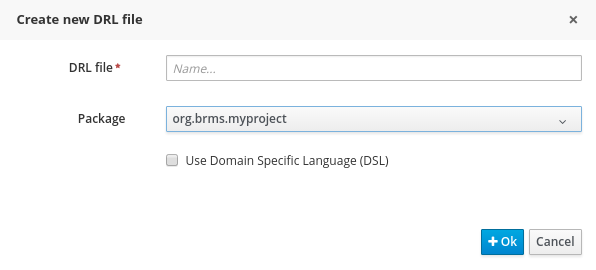
Clicking on an Asset from the New Item menu will open a Create new (Asset-type) pop-up dialog where a user can enter the name of the Asset.
Figure 2.4. Create new pop-up dialog
2.4.3. Asset Metadata and Versioning
Most assets within Business Central have some metadata and versioning information associated with them. In this section, we will go through the metadata screens and version management for one such asset (a DRL asset). Similar steps can be used to view and edit metadata and versions for other assets.
Metadata Management
To open up the metadata screen for a DRL asset, click on the Overview tab. If an asset doesn’t have an Overview tab, it means that there is no metadata associated with that asset.
The Overview section opens up in the Version history tab, and you can switch to the actual metadata by clicking on the Metadata tab.
The metadata section allows you to view or edit the Tags, Subject, Type, External Link and Source metadata for that asset. However, the most interesting metadata is the description of the asset that you can view/edit in the description field and the comments that you and other people with access to this asset can enter and view.
Comments can be entered in the text box provided in the comments section. Once you have finished entering a comment, press enter for it to appear in the comments section.
You must hit the Save button for all metadata changes to be persisted, including the comments.
Version Management
Every time you make a change in an asset and save it, a new version of the asset is created. You can switch between different versions of an asset in one of two ways:
Click the Latest Version button in the asset toolbar and select the version that you are interested in. Business Central will load this version of the asset.
- Alternatively, open up the Overview section. The Version history section shows you all the available versions. Select the version that you want to restore.
In both cases, the Save button will change to Restore. Click this button to persist changes.
2.5. Asset Locking Support
The default locking mechanism for locking a BPM and BRMS asset while updating it in Business Central is pessimistic. Whenever you open and modify an asset in Business Central, it automatically locks the asset for your exclusive use, in order to avoid conflicts in a multi-user setup. The pessimistic lock is automatically released when your session ends or when you save or close the asset.
The pessimistic lock feature is provided in order to help prevent users from overwriting each other’s changes. However, there may be cases when you may want to edit a file locked by another user. Business Central allows you to force unlock a locked asset. To do this:
Procedure: Unlocking assets
- Open the asset.
Click on the Overview tab and open up the Metadata screen.
If the asset is already being edited by another user, the following will be displayed in the Lock status field:
Locked by <user_name>To edit the asset locked by another user, click Force unclock asset button.
The following confirmation popup message is displayed:
Are you sure you want to release the lock of this asset? This might cause <user_name> to lose unsaved changes!Click Yes to confirm.
The asset goes back to unlocked state.
2.6. Project Editor
2.6.1. The Project Editor
The Project Editor helps a user to build and deploy projects. This view provides access to the various properties of a Red Hat JBoss BRMS Project that can be edited through the Web interface. Properties like Group artifact version, Dependencies, Metadata, Knowledge Base Settings and Imports can be managed from this view. The editor shows the configuration options for the current active project and the content changes when you move around in your code repository.
To access the Project Editor:
-
Click Authoring
Project Authoring. - Select your project.
- Click Open Project Editor.
2.6.2. Project Settings
Project General Settings
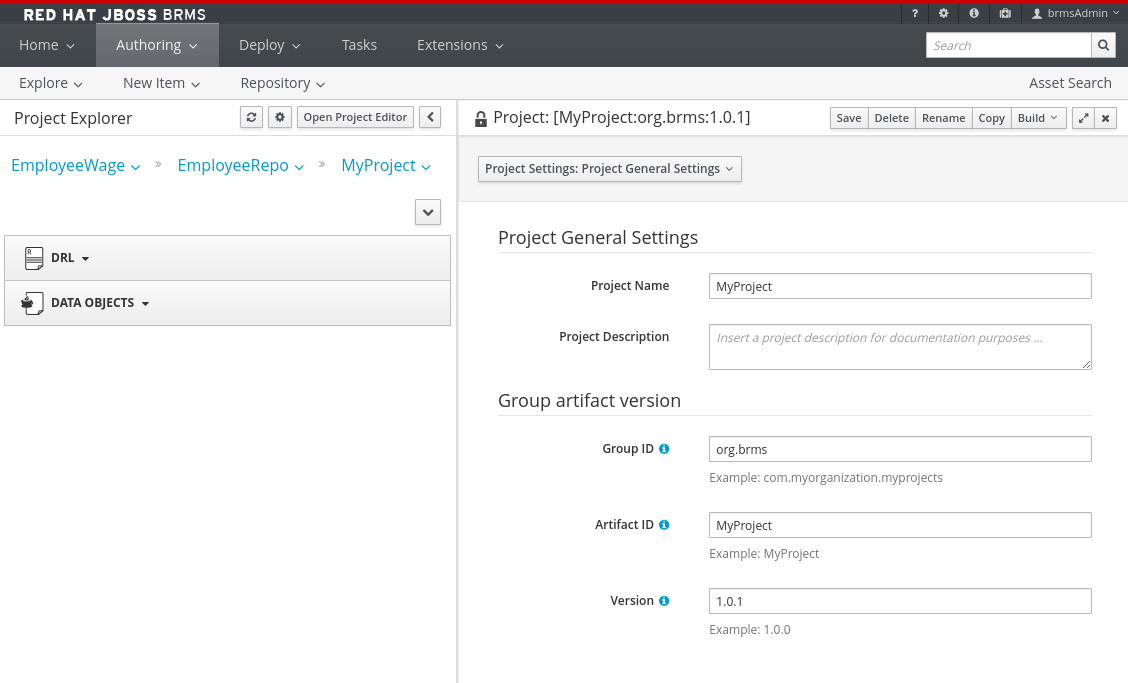
The Project settings screen allows a user to set the Group, Artifact, and Version ID’s for a project. It edits the pom.xml setting file since we use Maven to build our projects.
Figure 2.5. Project Editor - Project Settings
Dependencies
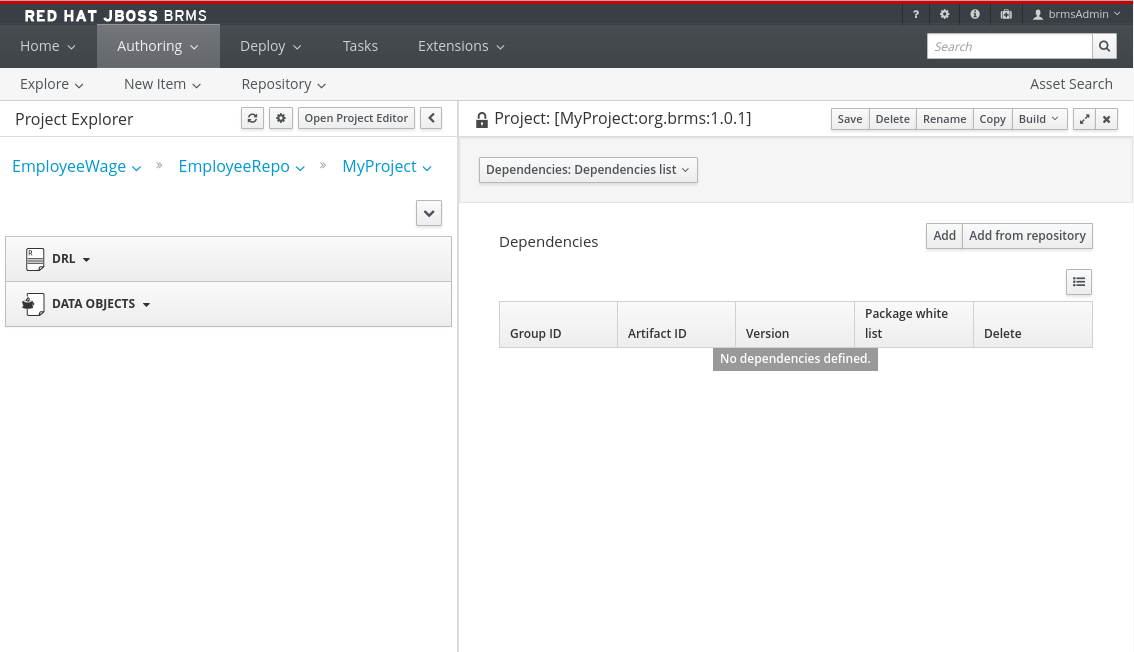
The Dependencies option allows you to set the dependencies for the current project.You access the dependencies by using Project Settings
Figure 2.6. Project Editor - Project Dependencies
Metadata
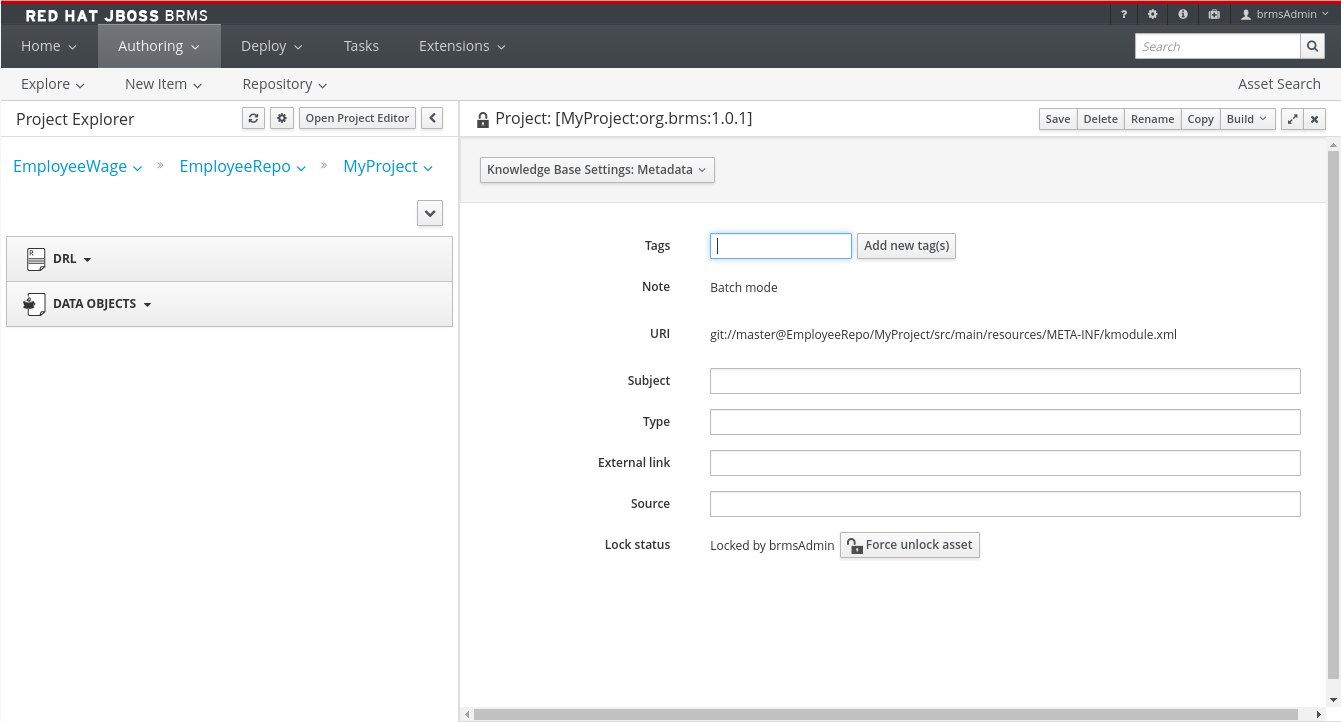
The Metadata screen displays various data and version history of a project. It enables you to edit metadata details, add descriptions, and participate in discussions which are specific to a selected asset. You can add metadata to a project, a knowledge base (kmodule) and project imports. Each metadata tab provides the following fields:
-
Tags: A tagging system for grouping the assets. -
Note: A comment from the last asset update. -
URI: A unique identifier of the asset inside of the Git repository. -
Subject,Type,External link,Source: Miscellaneous asset meta data. -
Lock status- Lock status of an asset.
Figure 2.7. Knowledge Base Settings - Metadata
2.6.3. Knowledge Base Settings
Knowledge Bases and Sessions
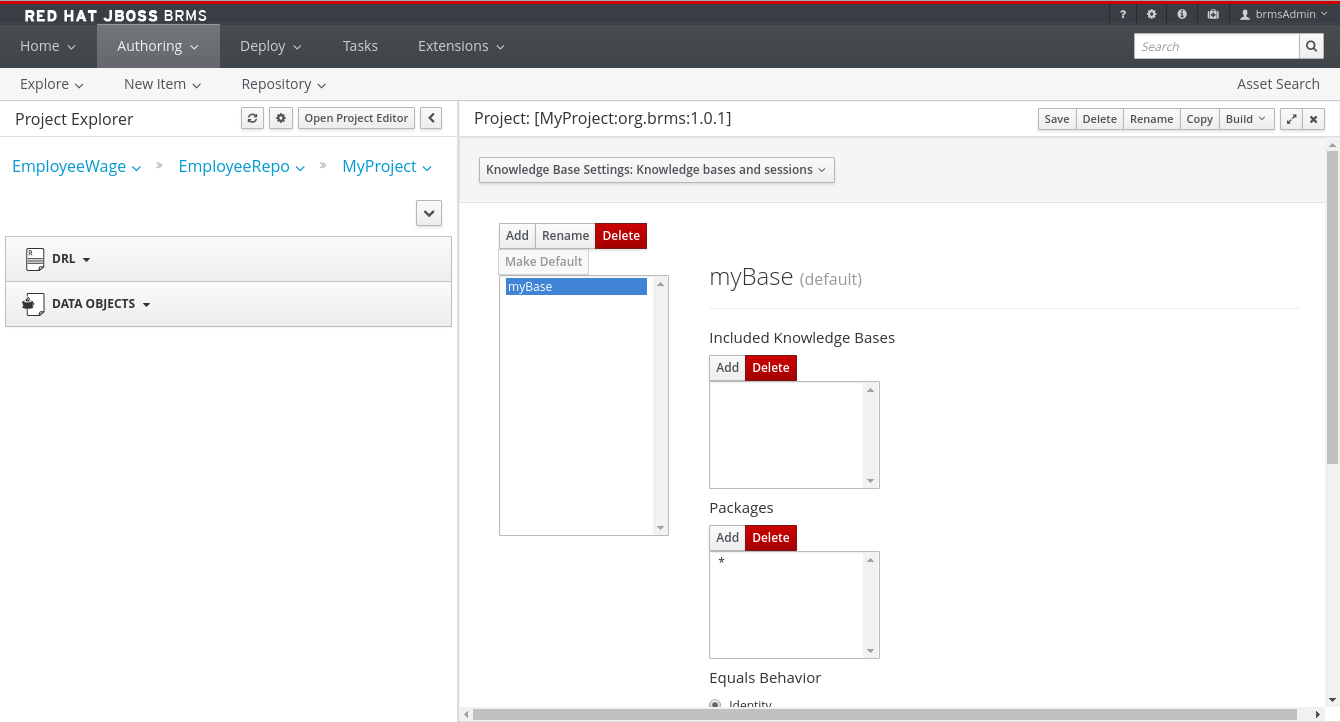
The Knowledge Base Settings allows the user to create the KIE bases and sessions using the kmodule.xml project descriptor file of your project. Accordingly, it edits the kmodule.xml project setting file.
The Knowledge bases and sessions page lists all the knowledge bases by name. It contains the Add, Rename, Delete, and Make Default options above the list. Only one knowledge base can be set as default at a time.
Figure 2.8. Project Editor - Knowledge Base Settings
The Included Knowledge Bases section displays the models, rules, and any other content in the included knowledge base. It will only be visible and usable by selecting the knowledge base from the Knowledge Base list to the left. You can Add and Delete content from this list.
The Packages section allows users to Add and Delete packages which are specified to the knowledge base.
The Equals Behavior section allows the user to choose between Identity or Equality assertion modes.
-
Identityuses anIdentityHashMapto store all asserted objects. -
Equalityuses aHashMapto store all asserted objects.
See the kbase attributes section of the Red Hat JBoss BRMS Development Guide for further details about Identity and Equality assertion modes.
The Event Processing Mode section allows the user to choose between Cloud and Stream processing modes.
-
Cloudprocessing mode is the default processing mode. It behaves in the same manner as any pure forward-chaining rules engine. -
Streamprocessing mode is ideal when the application needs to process streams of events.
See the kbase attributes section of the Red Hat JBoss BRMS Development Guide for further details about Cloud and Stream processing modes.
The Knowledge Sessions table lists all the knowledge sessions in the selected knowledge base. By clicking the
 button, you are able to add a new knowledge session to the table.
-
The
Namefield displays the name of the session. -
The
Defaultoption can only be allocated to one of each type of session. -
The
Statedrop-down allows either Stateless or Stateful types. -
The
Clockdrop-down allows either Realtime or Pseudo choices. -
Clicking the
 opens a pop-up that displays more properties for the knowledge session.
Metadata
See Section 2.6.2, “Project Settings” for more information about metadata.
2.6.4. Imports
External Data Objects
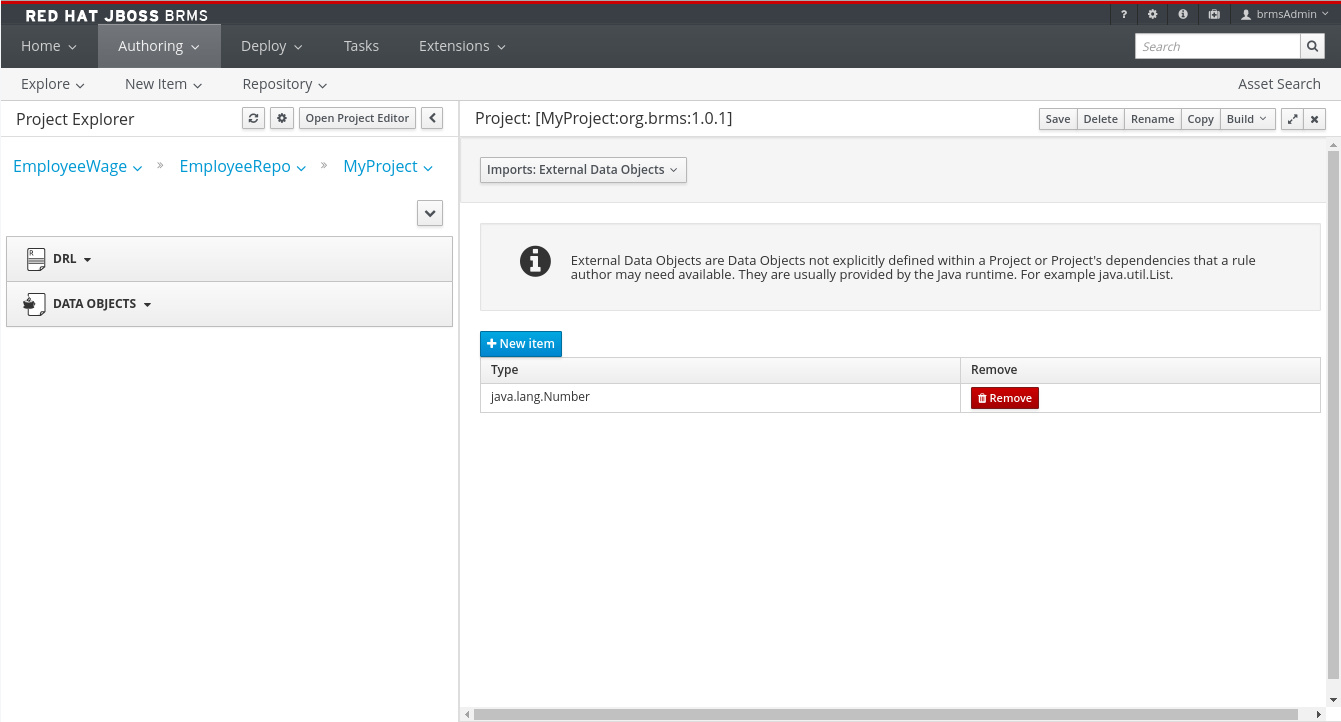
The External Data Objects specify a set of imports, or external data objects, used in the project. Each asset in a project has its own imports. The imports are used as suggestions when using the guided editors the workbench offers; accordingly, this makes it easier to work with the workbench as there is no need to type each import in every file that uses it. By changing the Import settings, the project.imports setting files are edited. Data Objects are usually provided by the Java runtime. For example java.util.List.
Figure 2.9. Project Editor - Imports
To add a fact model to the imports section, click New Item. This displays a pop-up dialog to Add Import information.Once the Import Type has been entered, click OK.
To remove a fact model from the imports section, click Remove.
The imports listed in the import suggestions are not automatically added into the knowledge base or into the packages of the workbench. Each import needs to be added into each file.
Metadata
See Section 2.6.2, “Project Settings” for more information about Metadata.
2.6.5. Repositories
Validation
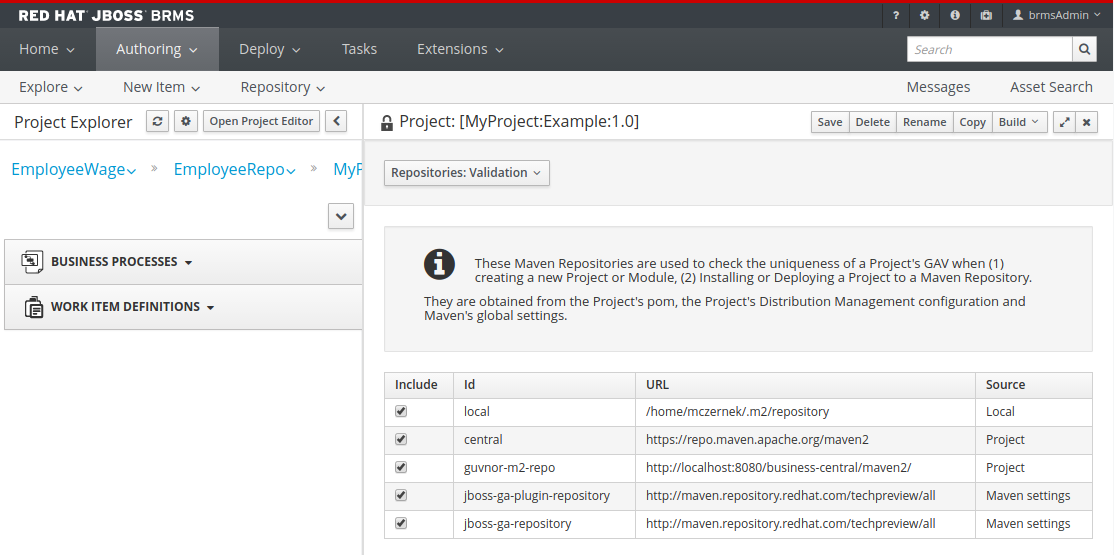
The Validation section enables you to select which maven repositories are used to check the uniqueness of your project’s GAV (group ID, artifact ID, and version).
Figure 2.10. Project Editor - Validation
2.6.6. Persistence
Persistence descriptor
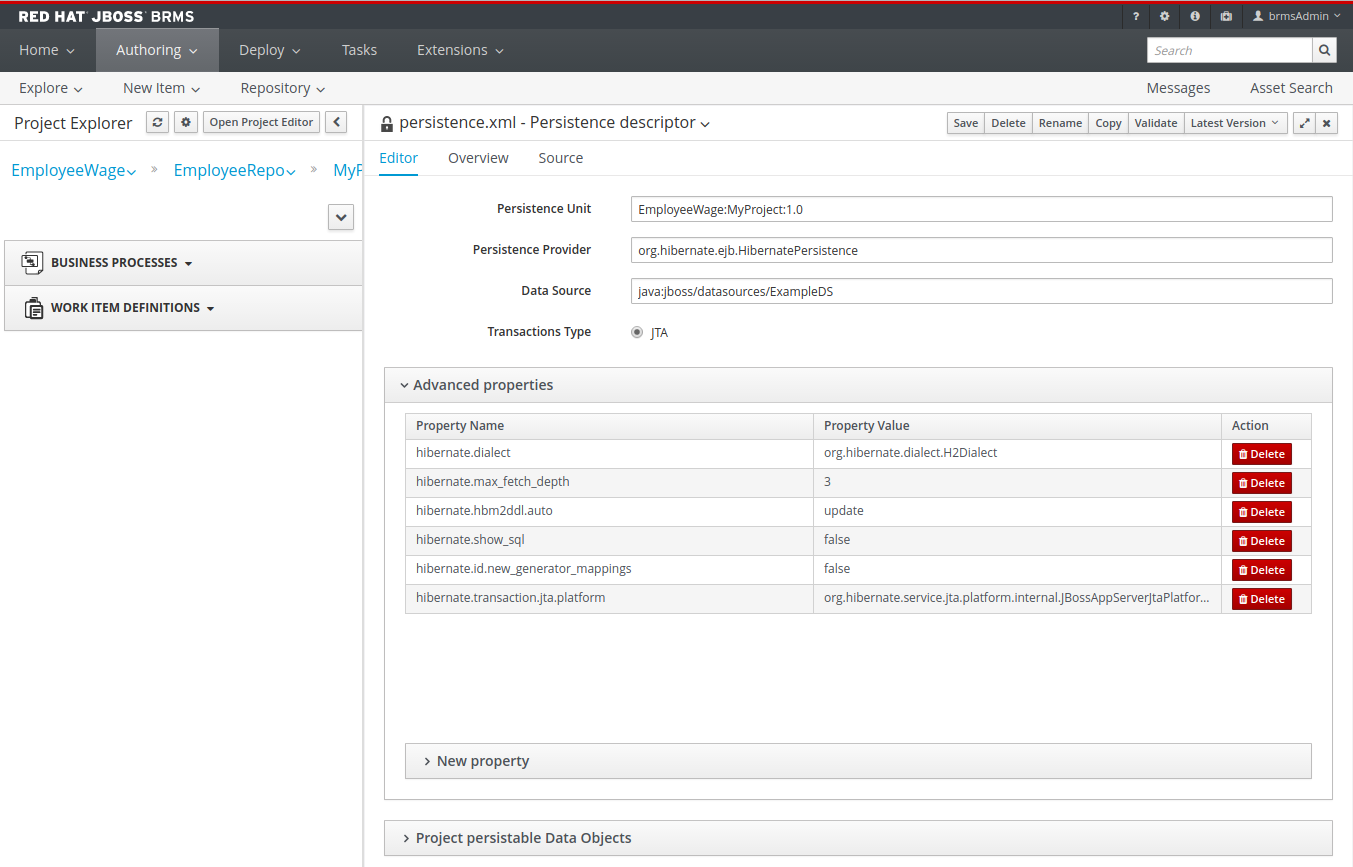
The Persistence descriptor section enables you to modify persistence.xml through GUI. You can:
- Define a persistence unit provider.
- Define a data source.
- Change predefined properties for your persistence unit.
- Add new properties to your persistence unit.
Manage persistable data objects.
The persistable data objects are based on the JPA specification and all the underlying metadata are automatically generated.
Alternatively, click Source tab to edit the persistence.xml directly.
Figure 2.11. Persistence descriptor
2.8. Rename, Copy, Delete assets
2.8.1. Renaming a file or folder
Users can rename a file or a folder directly in Project Explorer.
-
To rename a file or a folder, open Project Explorer by selecting Authoring
Project Authoring. -
Click the Gear
 icon in the upper right hand corner of the Project Explorer view and in the menu that opens, select Repository View. Click the gear icon again to select the option Show as Links (if not already selected).
-
Click the Rename
 icon to the right of the file or folder you want to rename. In the displayed Rename this item dialog box, enter the new name and click the Rename item button.
2.8.2. Deleting a file or folder
Users can delete a file or a folder directly in Project Explorer.
-
To delete a file or a folder, open Project Explorer by selecting Authoring
Project Authoring. -
Click the Gear icon (
 ) in the upper right hand corner of the Project Explorer view and in the menu that opens, select Repository View. Click the gear icon again to select the option Show as Links (if not already selected).
-
Click the Delete icon (
 ) to the right of the file or folder you want to rename. In the displayed Delete this item dialog box, click the Delete item button.
2.8.3. Copying a file or folder
Users can copy a file or a folder directly in Project Explorer.
-
To copy a file or a folder, open Project Explorer by selecting Authoring
Project Authoring. -
Click the Gear
 icon in the upper right hand corner of the Project Explorer view and in the menu that opens, select Repository View. Click the gear icon again to select the option Show as Links (if not already selected).
-
Click the Copy
 icon to the right of the file or folder you want to copy. In the displayed Copy this item dialog box, enter the new name and click the Create copy button.
2.9. Deployment Menu: The Artifact Repository
The Artifact Repository explores the Guvnor M2 repository. It shows the list of available kjar files used by the existing projects and allows a user to upload, download and manage the kjar files. It can be accessed by clicking on the Authoring
Figure 2.13. The Artifact Repository Screen
