Chapter 7. Writing rules
7.1. Creating a rule
Procedure: Creating a new rule
In the Project Explorer view, do the following:
- If in the Project view of Project Explorer, select the organizational unit, repository and the project where you want to create the rule.
-
If in the Repository view of Project Explorer, navigate to
src/main/resources/and theSUBFOLDER/PACKAGEwhere you want to create the project folder for the rule template.
-
In the perspective menu, go to New Item
Guided Rule. In the Create new Guided Rule dialog window, define the package details:
- In the Guided Rule text box, enter the name of the rule, and click OK. You can check Use Domain Specific Language (DSL) to use DSL. For more information, see Section 7.6, “The Domain Specific Language Editor”.
- The new Guided Rule is now created under the selected project.
7.2. Editing Rules
7.2.1. Editing Rules Using the Asset Editor
The asset editor provides access to information about assets and gives users the ability to edit assets.
The editor contains Editor, Overview, Source, and Data Objects tabs.
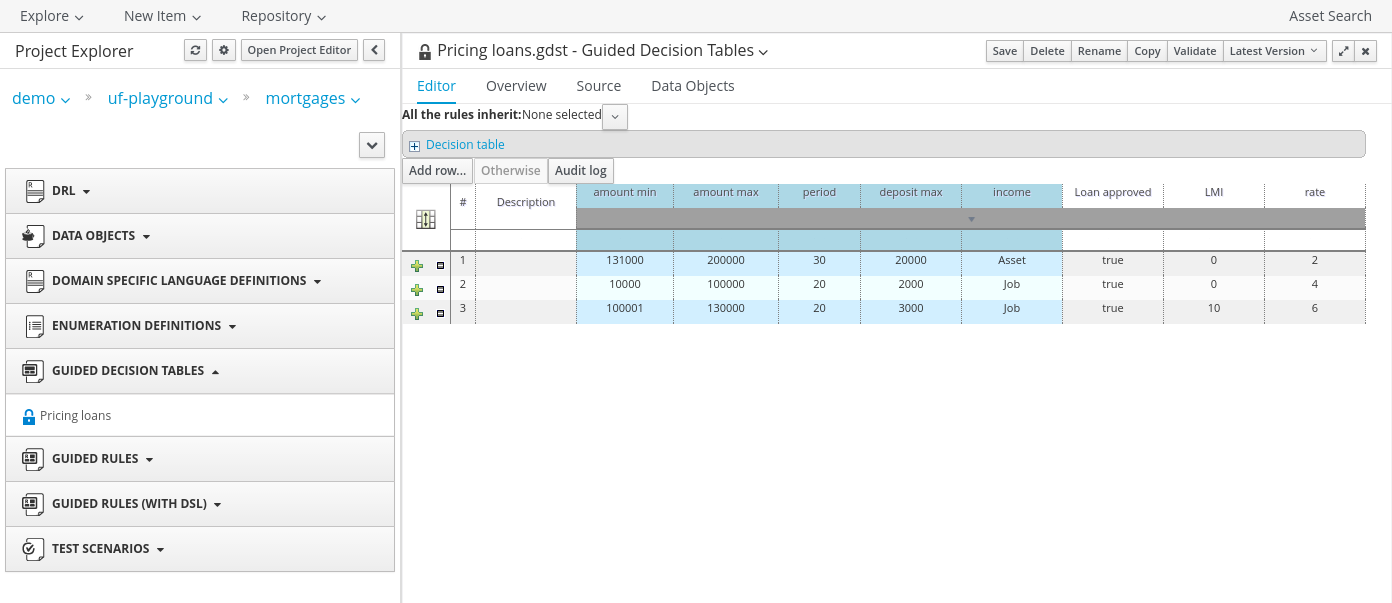
Editor Tab
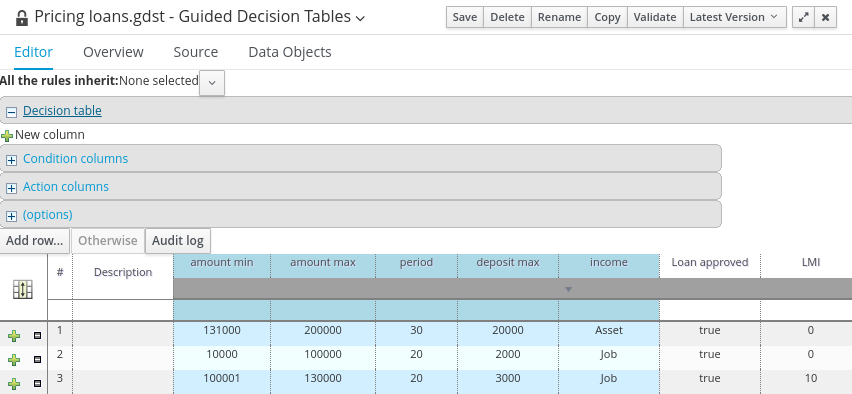
The Editor tab is where assets can be edited. The available options in the edit tab will depend on the type of asset being edited.
Figure 7.1. The Guided Decision Table - Editor Tab
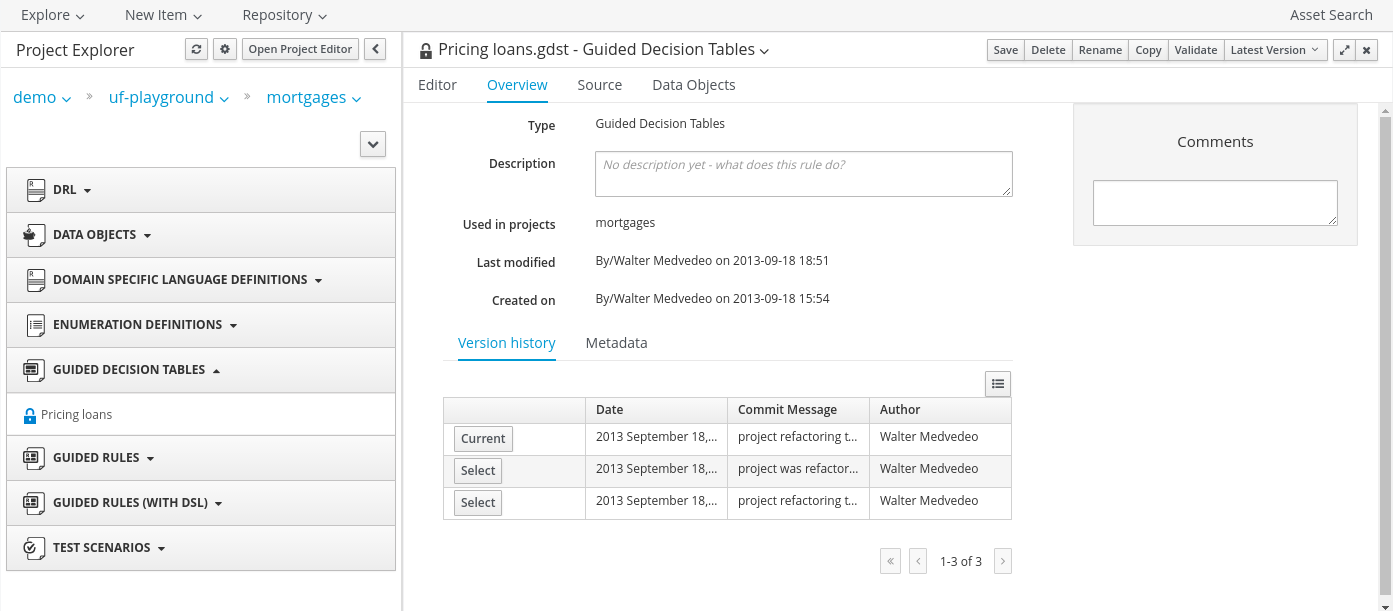
Overview Tab
The Overview screen displays the generic data and version history of an asset. It allows a user to edit other metadata details, add descriptions and discussions which are specific to a selected asset.
Figure 7.2. The Guided Decision Table - Overview Tab
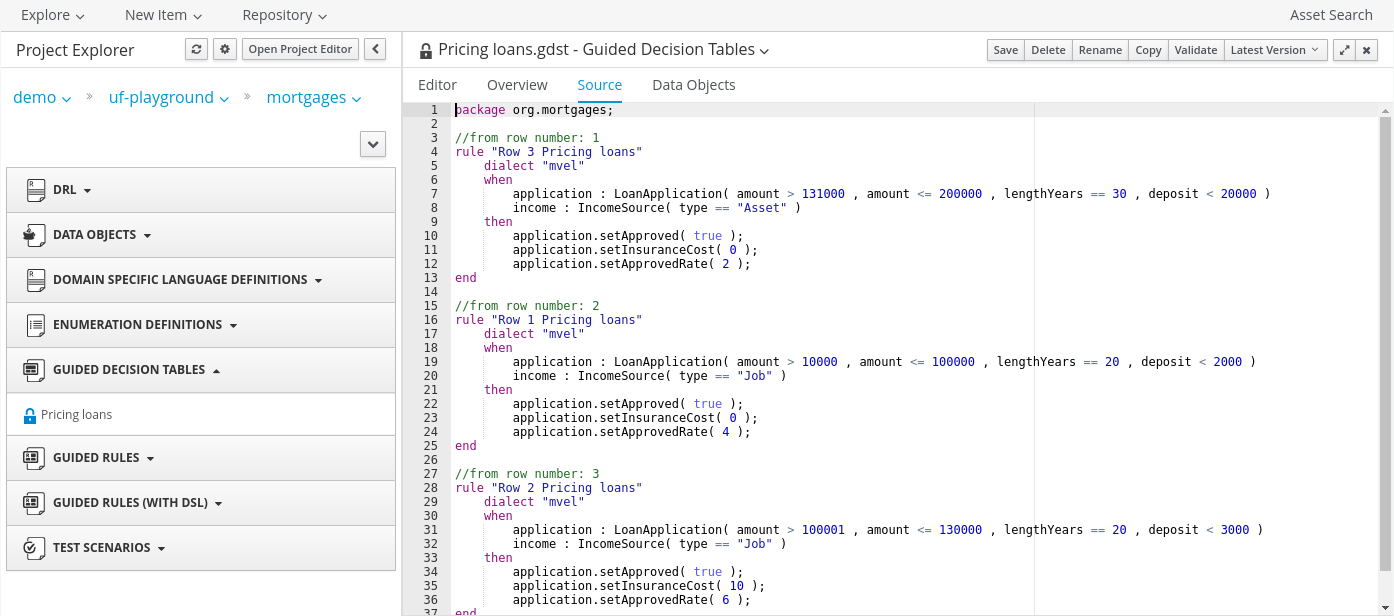
Source Tab
Source tab shows the DRL source for a selected asset.
Figure 7.3. The Guided Decision Table - Source Tab
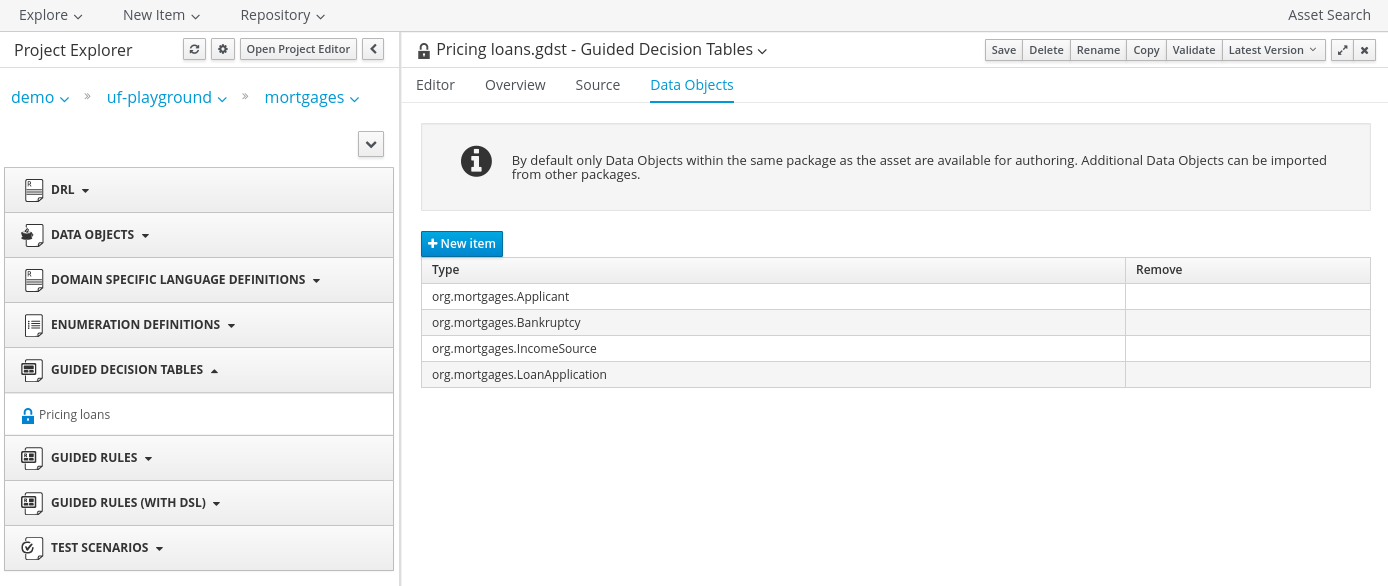
Data Objects Tab
The Data Objects tab suggests the set of imports used in the project. Each asset has its own imports and suggested fact types (that means data objects) that the user might want to use. See Section 6.4, “Creating a Data Object” for more information about data objects.
Figure 7.4. The Guided Decision Table - Data Objects Tab
7.2.2. Business Rules with the Guided Rule Editor
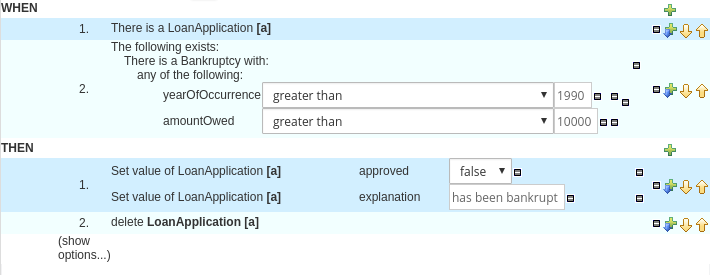
Business rules are edited in the Guided Rule Editor. The Guided Rule Editor prompts users for input based on the object model of the rule being edited.
Assets used in a rule that belong to a different package must be imported into the rule. Assets in the same package are imported by default. Define your imports in the Data Objects tab.
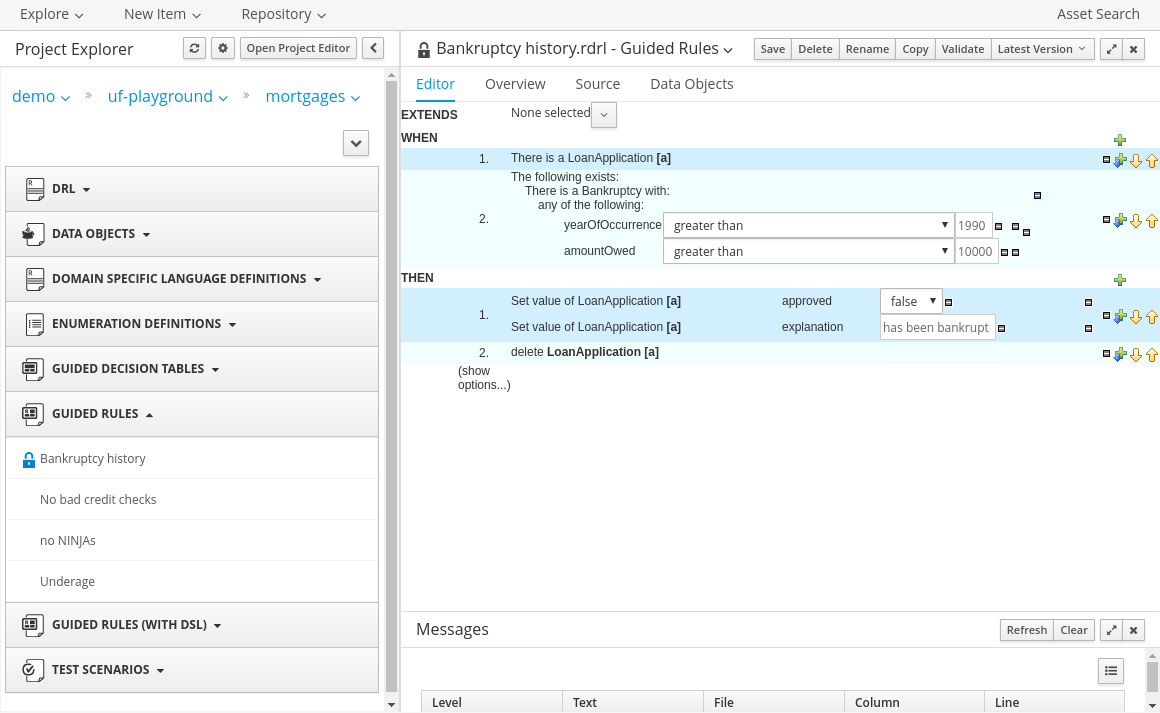
Example 7.1. The Guided Rule Editor
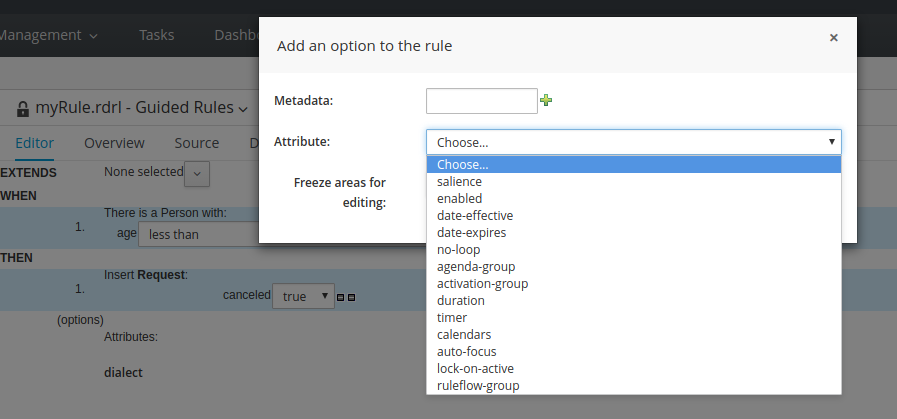
The Guided Rule Editor consists of the When and Then parts. Under the Then part is a (show options…) link that enables you to set additional rule attributes, such as ruleflow-group, salience, and similar. For more information about the Guided Rule Editor, see Section 7.5.1, “The Guided Rule Template”.
Figure 7.5. Rule Attributes
7.2.3. Narrowing Facts Using Package White List
You can narrow down the facts available during rule creation and modification by using a file called package-names-white-list. Use this file to narrow down a group of facts that are loaded and are visible. This helps to speed up the loading of these facts while creating new rules.
When you create a new project in the root directory, an empty package-names-white-list file is automatically created along with the pom.xml and project.imports project files. For existing projects, create the package-names-white-list file manually. In Business Central, you can view the file through the repository view of a project in the Project Explorer.
By default (when the file is empty), all the facts within the project itself are visible while those from the project’s dependencies are restricted.
Rules for Defining Packages
The package-names-white-list file is a text file that accepts single package names on each line. Packages can contain wildcards, for example:
-
com.redhat.finance: allows facts from only the com.redhat.finance package. Thus,
com.redhat.finance.Personandcom.redhat.finance.Salaryare allowed, butcom.redhat.finance.senior.Managementare not allowed. -
com.redhat.finance.*: allows facts from the sub-packages of the com.redhat.finance package only. Thus,
com.redhat.finance.senior.Managementandcom.redhat.finance.junior.Managementare allowed, but notcom.redhat.finance.Person. -
com.redhat.finance.**: this is a combination of the above two rules. Allows
com.redhat.finance.Personandcom.redhat.finance.senior.Managementand even,com.redhat.finance.really.senior.Managementclasses.
You can include specific packages from a dependency by adding appropriate entries into the package-names-white-list file. You can also include or remove all packages from specific dependencies. For more information, see Adding Dependencies.
7.2.4. The Anatomy of a Rule
A rule consists of multiple parts:
- When
- The when part of the rule is the condition that must be met. For instance, a bank providing credit in the form of a loan may specify that customers must be over twenty-one years of age. This would be represented by using when to determine if the customer is over twenty-one years of age.
- Then
- The then part of the rule is the action to be performed when the conditional part of the rule has been met. For instance, when the customer is under twenty-one years of age, then decline the loan because the applicant is under age.
- Optional
- Optional attributes such as salience can be defined on rules.
With the Guided Rule Editor, it is possible to add more conditions to the when (conditional) part of the rule and more actions to the then (action) part of the rule. For instance, if an applicant under the age of 21 had a guarantor for a loan application, the bank may decide to approve the loan application.
7.2.5. Salience
Each rule has a salience value which is an integer value that defaults to zero. The salience value represents the priority of the rule with higher salience values representing higher priority. Salience values can be positive or negative.
7.2.6. Adding Conditions or Actions to Rules
Procedure: Adding Conditions or Actions to Rules
- Click the plus icon in the When section of the Guided Rule Editor to add a condition, or click the plus icon in the Then section of the Guided Rule Editor to add an action.
- Select the condition or action from the menu and click Ok. If the package the rule belongs to has been configured to include DSL (Domain Specific Language) sentences, DSL sentences can be chosen from the menu.
- If the condition or action requires input, i.e., a date, true or false, am integer, or other input type, enter the required value.
7.2.7. Adding a Field to a Fact Type
With the Guided Rule Editor, it is possible to add more conditions to the when (conditional) part of the rule and more actions to the then (action) part of the rule. For instance, if a loan applicant under the age of 21 had a guarantor for a loan application, the bank may decide to approve the loan application.
To add the guarantor to the condition, first add the guarantor field to the application fact type (Data Object in Business Central) of the mortgage model. For further information about how to add a field to a fact type, see Section 6.1, “Data Modeler”.
With the guarantor field now added to the applicant fact type, you can modify the rule to include a guarantor as a condition.
7.2.8. Technical Rules (DRL)
Technical (DRL) rules are stored as text and can be managed in the Red Hat JBoss BRMS user interface. A DRL file can contain one or more rules. The condition and the action of the rule are the when and then parts of the rule respectively.
Red Hat JBoss Developer Studio provides tools for creating, editing, and debugging DRL files, and it should be used for these purposes. However, DRL rules can be managed within the Red Hat JBoss BRMS user interface. The DRL editor provides syntax highlighting for Java, DRL, and XML.
An Example Technical Rule (DRL)
7.3. Decision Tables
7.3.1. Spreadsheet Decision Tables
Rules can be stored in spreadsheet decision tables. Each row in the spreadsheet is a rule, and each column is either a condition, an action, or an option. The Red Hat JBoss BPM Suite Development Guide provides details for using decision tables.
7.3.2. Uploading Spreadsheet Decision Tables
Procedure: Uploading a Spreadsheet Decision Table
-
To upload an existing spreadsheet, select New Item
Decision Table (Spreadsheet). -
Enter a name for the spreadsheet, click Choose file…, and select the spreadsheet. You can select
.xlsor.xlsxfiles. Click Ok when done.
To convert the uploaded spreadsheet to a Guided Decision table:
- Validate the uploaded spreadsheet by clicking on the Validate button located on the project screen menu bar.
- Click Convert.
7.3.3. Spreadsheet Decision Table Examples
We are here considering a simple example for an online shopping site which lists out the shipping charges for the ordered items. The site agrees for a FREE shipping with the following conditions:
- If the number of items ordered is 4 or more and totaling $300 or over and
- If delivered at the standard shipping day from the day they were purchased which would be 4 to 5 working days.
The listed shipping rates are as follows:
| Number of items | Delivery Day | Shipping Charge, N = Number of Items |
|---|---|---|
| 3 or fewer | Next Day
2nd Day
Standard | $35 $15 $10 |
| 4 or more | Next Day
2nd Day
Standard | N*7.50 N*3.50 N*2.50 |
| Number of items | Delivery Day | Shipping Charge, N = Number of Items |
|---|---|---|
| 3 or fewer | Next Day 2nd Day Standard | $25 $10 N*1.50 |
| 4 or more | Next Day 2nd Day Standard | N*5 N*2 FREE |
The above conditions can be presented in a spreadsheet as:
7.4. Web Based Guided Decision Tables
7.4.1. Web Based Guided Decision Tables
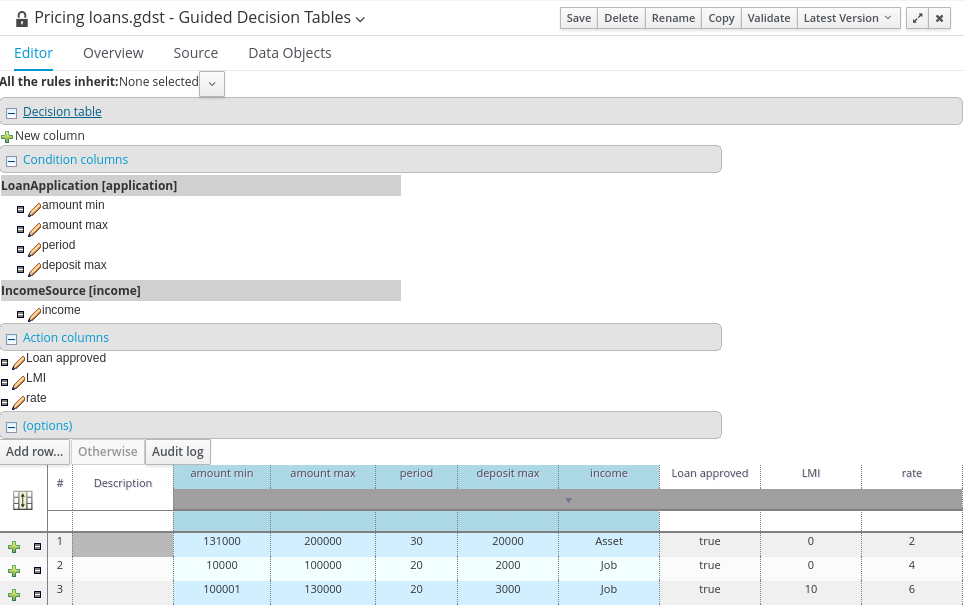
The (web based) Guided Decision Table feature works similar to the Guided Editor by introspecting what facts and fields are available to guide the creation of a decision table.
Rule attributes, meta-data, conditions and actions can be defined in a tabular format thus facilitating rapid entry of large sets of related rules. Web based decision table rules are compiled into DRL like all other rule assets.
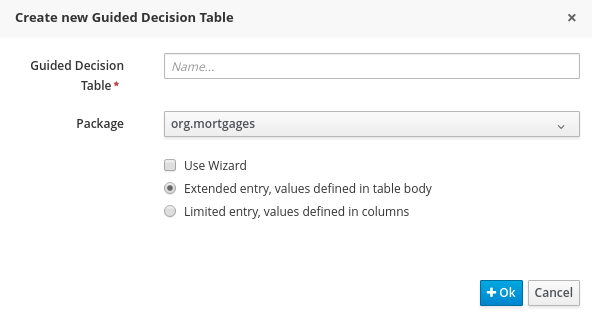
To create a new decision table, click on New Item
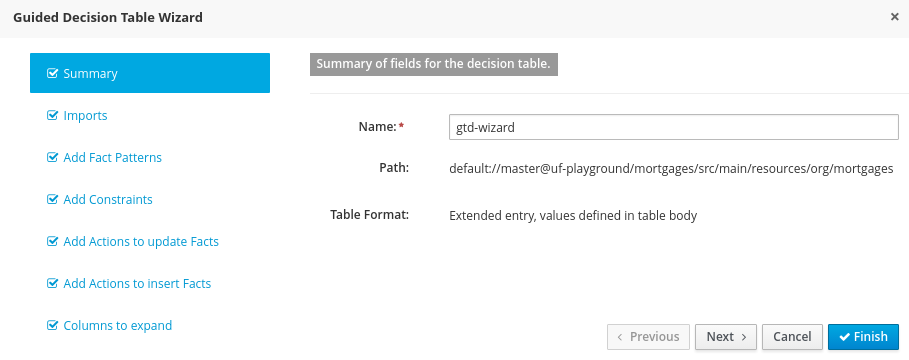
Click OK when done. If you didn’t select the wizard, you will be presented with the editor for Guided Decision Tables. If you selected the wizard, you will be presented with the first screen of the wizard.
The wizard helps you define your imports, facts, patterns and columns, but not the rows. Rows are added in the Guided Decision Table Editor, which is what you are presented with at the end of the wizard (or directly if you didn’t use the wizard).
When you build your own application comprising guided decision tables, ensure that you have the necessary dependencies added to your class path. For more information about dependencies for guided decision tables, see the Dependency Management for Guided Decision Tables, Scorecards, and Rule Templates section of the Red Hat JBoss BPM Suite Development Guide.
7.4.2. Types of decision tables
There are broadly two types of decision tables, both of which are supported:
- Extended Entry
- Limited Entry
Extended entry
An Extended Entry decision table is one for which the column definitions specify Pattern, Field and operator but not value. The values, or states, are themselves held in the body of the decision table. It is normal, but not essential, for the range of possible values to be restricted by limiting entry to values from a list. Business central supports use of Java enumerations or decision table "optional value lists" to restrict value entry.
Limited entry
A Limited Entry decision table is one for which the column definitions specify value in addition to Pattern, Field and operator. The decision table states, held in the body of the table, are boolean where a positive value (a checked tick-box) has the effect of meaning the column should apply, or be matched. A negative value (a cleared tick-box) means the column does not apply.
7.4.3. Column Configuration
For a description of column constraint types, see Section 7.4.5.3, “Condition Columns”.
You can set a default value, but normally if there is no value in the cell, that constraint will not apply.
Figure 7.6. Column Configuration
7.4.4. Adding Columns
To add a column within the Guided Decision Table Editor, click on the
 icon.
icon.
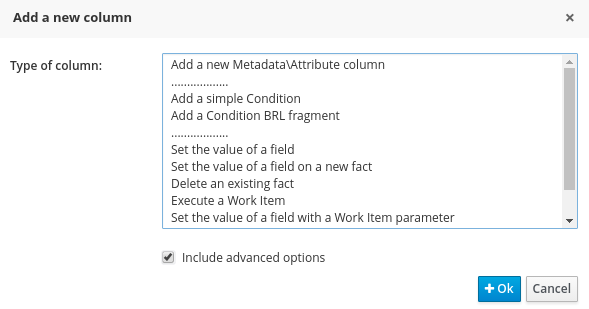
The following column type selection dialog appears:
Figure 7.7. Advanced Column Options
By default, the column type dialog shows the following types:
- Add a new Metadata\Attribute column
- Add a simple Condition
- Set the value of a field
- Set the value of a field on a new fact
- Delete an existing fact
Clicking on "Include advanced options" adds the following options:
- Add a Condition BRL fragment
- Execute a Work Item
- Set the value of a field with a Work Item parameter
- Set the value of a field on a new Fact with a Work Item parameter
- Add an action BRL fragment
7.4.5. Column Types
7.4.5.1. Attribute Columns
You can have zero or more attribute columns representing any of the DRL rule attributes. For example:
For a list of attributes, see the Rule Set Entries chapter of the Red Hat JBoss BPM Suite Development Guide.
7.4.5.2. Metadata Columns
Zero or more meta-data columns can be defined, each represents the normal meta-data annotation on DRL rules. To add meta-data:
- Click New column, then select Add a new Metadata\Attribute column.
-
Fill the Metadata field, then click the plus button (
 ) to add the meta-data.
Figure 7.8. Attribute and Meta-Data Option
7.4.5.3. Condition Columns
Conditions represent fact patterns defined in the left-hand side, or when portion, of a rule. To define a condition column, you must define a binding to a model class or select one that has previously been defined. You can also choose to negate the pattern:
when
  $c : Cheese( name == "Cheddar" ) //Binds the Cheese object to the $c variable
then
  ...
end
when
  $c : Cheese( name == "Cheddar" ) //Binds the Cheese object to the $c variable
then
  ...
endwhen not Cheese( name == "Cheddar" ) //Negates matching pattern then ... end
when
  not Cheese( name == "Cheddar" ) //Negates matching pattern
then
  ...
endOnce this has been completed, you can define field constraints. If two or more columns are defined using the same fact pattern binding, the field constraints become composite field constraints on the same pattern. If you define multiple bindings for a single model class, each binding becomes a separate model class in the left-hand side of the rule.
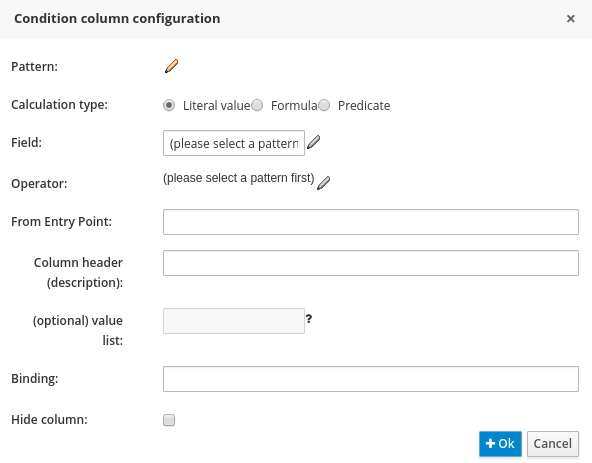
When you edit or create a new column, you will be given a choice of the type of constraint:
- Literal: The value in the cell will be compared with the field using the operator.
- Formula: The expression in the cell will be evaluated and then compared with the field.
- Predicate: No field is needed, the expression will be evaluated to true or false.
Figure 7.9. Simple Condition Column
7.4.5.4. Field Value Columns
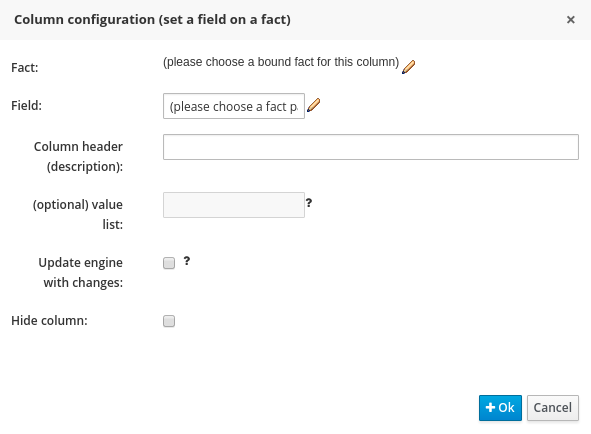
This column creates an action to set the value of a field on a previously bound fact. You have the option to notify the rule engine of the modified values which could lead to other rules being re-activated.
Figure 7.10. Set the value of a field
7.4.5.5. New Fact Field Value Columns
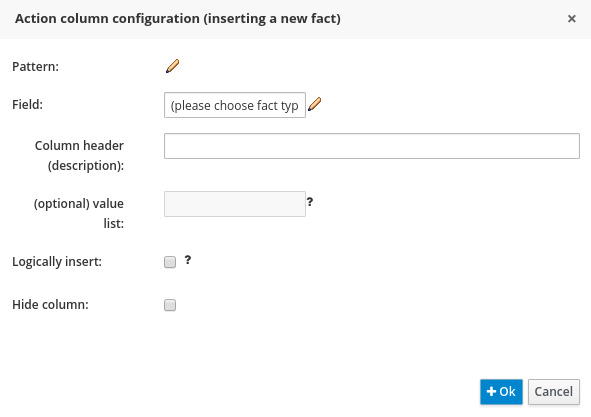
This column enables an action to insert a new fact (object) into the working memory of the rule engine. You can also define the value of one or more of the fields of the new fact. You can logically insert the new fact. When you logically insert a fact, the inserted fact will be retracted as soon as the condition of rule that inserted the fact is no longer true. See the Red Hat JBoss Development Guide for information about truth maintenance and logical insertions.
Figure 7.11. Set the Value of a Field on a New Fact
7.4.5.6. Delete Existing Fact Columns
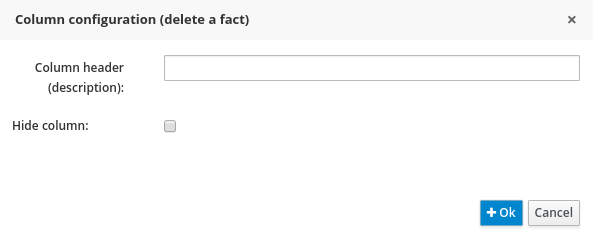
The implementation of an action to delete a bound fact.
Figure 7.12. Delete an existing fact
7.4.6. Advanced Column Types
7.4.6.1. Condition BRL Fragment Columns
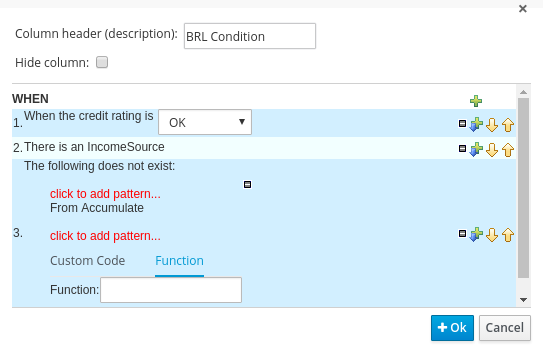
A construct that allows a BRL fragment to be used in the left-hand side of a rule. A BRL fragment is authored using the Guided Rule Editor and hence all features available in that editor can be used to define a decision table column such as the following: "from", "collect", and "accumulate". When using the embedded Guided Rule Editor, field values defined as "Template Keys" will form columns in the decision table. Facts and Fact’s fields bound in the BRL fragment can be referenced by the simpler column types and vice-versa.
The following example displays a BRL Condition for a shopping tier.
Figure 7.13. Add a Condition BRL fragment
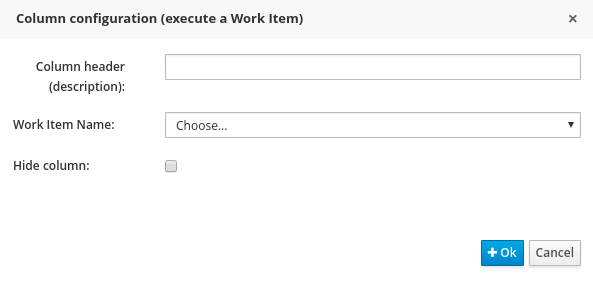
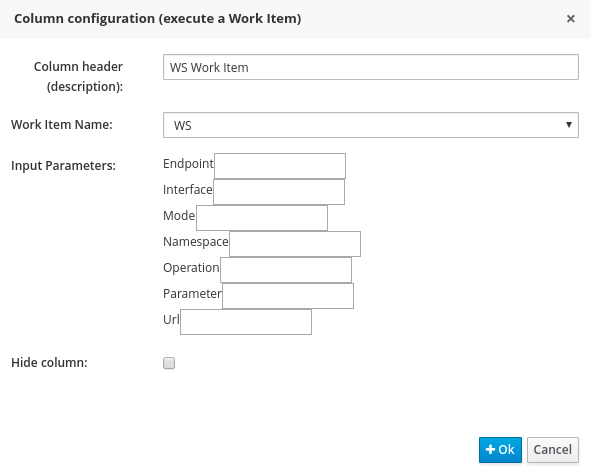
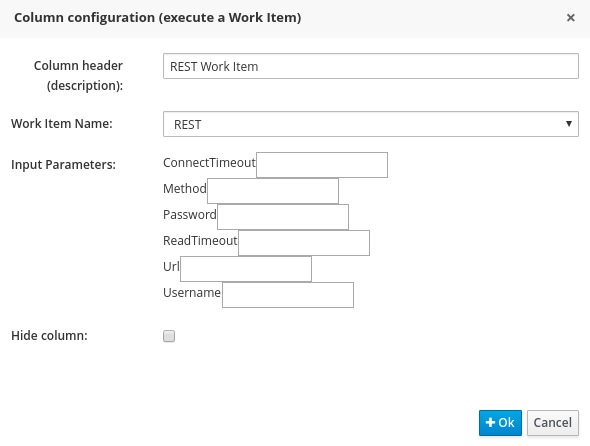
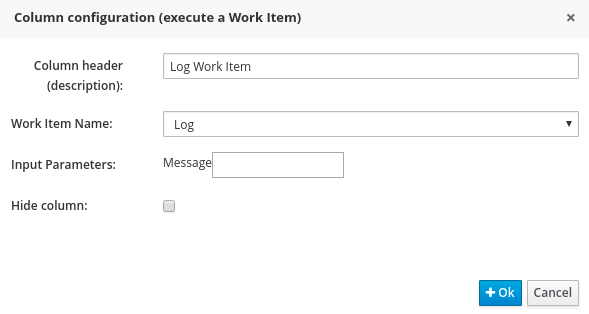
7.4.6.2. Execute Work Item Columns
This implements an action to invoke a Red Hat JBoss Business Process Management Suite work item handler. It sets its input parameters to bound Facts/Facts' fields values. This works for any work item definition.
Figure 7.14. Execute a Work Item
Figure 7.15. WS Work Item
Figure 7.16. REST Work Item
Figure 7.17. Log Work Item
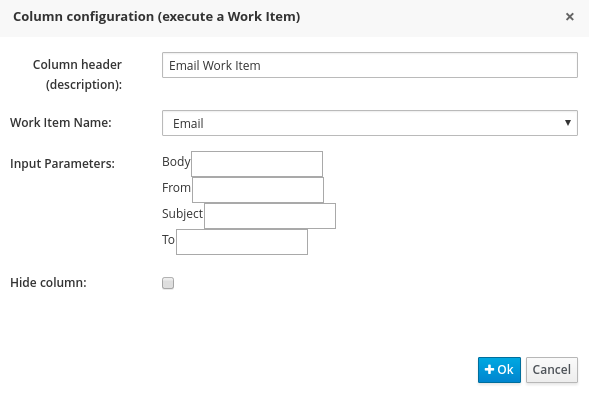
Figure 7.18. Email Work Item
7.4.6.3. Field Value with Work Item Parameter Columns
This implements an action that sets the value of a fact field to the value of a result parameter of a Red Hat JBoss BPM Suite work item handler. The work item must define a result parameter of the same data type as a field on a bound fact; this will allow you to set the field to the return parameter.
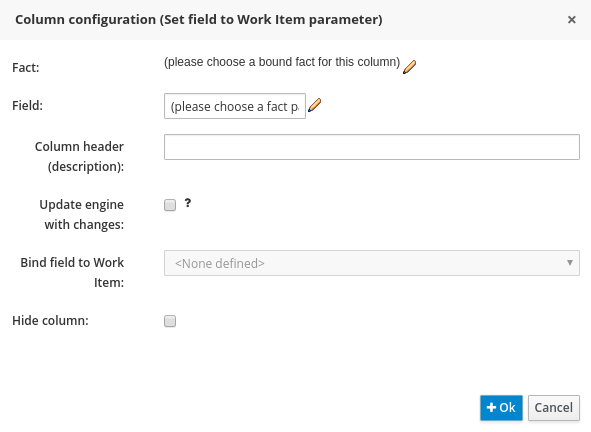
Figure 7.19. Set the Value of a Field with a Work Item Parameter
To set the Bind field to Work Item option, you first must have an action that executes a work item. This will allow you to set the field of an existing Fact based on a work item’s results.
7.4.6.4. New Fact Field Value with Work Item Parameter Columns
This implements an action that sets the value of a fact field to the value of a result parameter of a Red Hat JBoss BPM Suite work item handler. The work item must define a result parameter of the same data type as a field on a bound fact type. In such case, you can set the field to the return parameter.
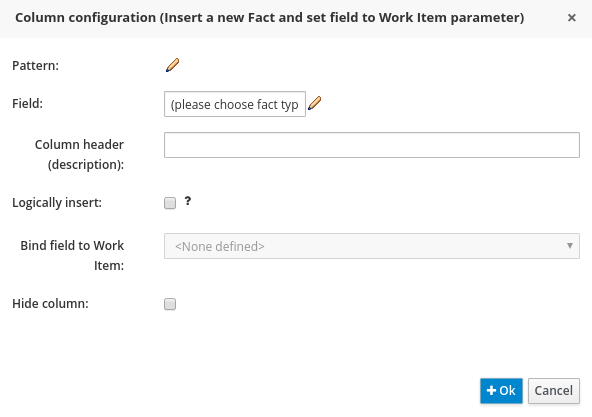
Figure 7.20. Set the value of a field on a new Fact with a Work Item parameter.
To set the Bind field to Work Item option, you first need to have an action executing a work item. This will allow you to insert a new Fact with a field value from a work item’s Results.
7.4.6.5. Action BRL Fragment Columns
A construct that allows a BRL fragment to be used in the right-hand side of a rule. A BRL fragment is authored using the Guided Rule Editor and hence all features available in that editor can be used to define a decision table column. When using the embedded Guided Rule Editor, field values defined as "Template Keys" will form columns in the decision table. Facts bound in the BRL fragment can be referenced by the simpler column types and vice-versa.
Figure 7.21. Simple layout for Adding an Action BRL fragment
7.4.7. Rule Definition
Rules are created in the main body of the decision table using the columns that have already been defined.
Rows of rules can be added or deleted by clicking the plus or minus symbols respectively.
Figure 7.22. Rule Definition
7.4.8. Cell Merging
The icon in the top left of the decision table toggles cell merging on and off. When cells are merged, those in the same column with identical values are merged into a single cell. This simplifies changing the value of multiple cells that shared the same original value. When cells are merged, they also gain an icon in the top-left of the cell that allows rows spanning the merged cell to be grouped.
Figure 7.23. Cell Merging
7.4.9. Cell Grouping
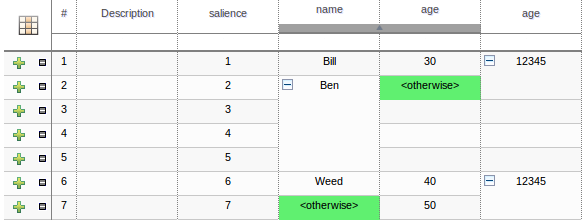
Cells that have been merged can be further collapsed into a single row. Clicking the [+\-] icon in the top left of a merged cell collapses the corresponding rows into a single entry. Cells in other columns spanning the collapsed rows that have identical values are shown unchanged. Cells in other columns spanning the collapsed rows that have different values are highlighted and the first value displayed.
Figure 7.24. Cell Grouping
When the value of a grouped cell is altered, all cells that have been collapsed also have their values updated.
7.4.10. Otherwise Operations
Condition columns defined with literal values that use either the equality == or inequality != operators can take advantage of a special decision table cell value of otherwise. This special value allows a rule to be defined that matches on all values not explicitly defined in all other rules defined in the table. This is best illustrated with an example:
To use the otherwise keyword:
-
Select a cell of a condition column that uses the
==or!=operator. - Click Otherwise.
7.5. Rule Templates
7.5.1. The Guided Rule Template
Rule Templates enable you to define a rule structure. They provide a place-holder for values and data, and they populate templates to generate many rules. From the user’s perspective, Guided Rule Templates are parametrized guided rules that contain a data table which provides parameter values. The templates enable more flexible decision tables and can enhance the flexibility of rules in existing databases. For information about managing dependencies of Rule Templates, see the Dependency Management for Guided Decision Tables, Scorecards, and Rule Templates section of the Red Hat JBoss BPM Suite Development Guide.
Procedure: Creating a new Guided Rule Template
In the Project Explorer view, do one of the following:
- If you are in the Project view, select the organizational unit, repository, and the project where you want to create the template.
-
If you are in the Repository view, navigate to
src/main/resources/and theSUBFOLDER/PACKAGEwhere you want to create the project folder for the rule template.
-
In the perspective menu, go to New Item
Guided Rule Template. In the Create new Guided Rule Template dialog window, specify the rule template name:
- In the Guided Rule Template text box, enter a name of the asset, select the package from the Package selector, then click OK.
- The new Guided Rule Template is now created and from the selected project.
Figure 7.25. Guided Template Editor
Using a plain rule template and manipulating rules and spreadsheets directly from Business Central is not supported by Red Hat. It is recommended that you create and use Guided Rule Template using Business Central.
7.5.2. WHEN Conditions in Guided Rule Templates
The Guided Rule Template Editor in Business Central allows you to set rule templates where the data is kept separate from the rules.
Make sure you have already set a data model for your project as described in Section 6.4, “Creating a Data Object”.
Procedure: Creating Simple Condition with Restriction and Multiple Field Constraint
In the Guided Rule Template Editor, click the plus icon (
 ) on the right side of the
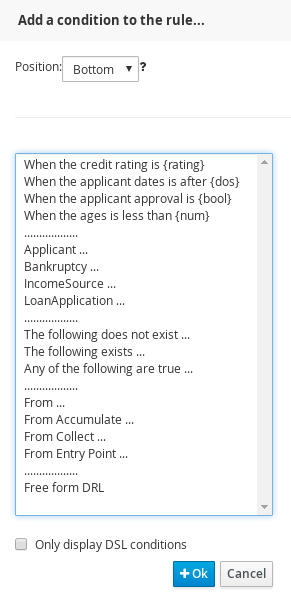
 WHENsection.The Add a condition to the rule… dialog window with the available condition templates opens.
Figure 7.26. Add a Condition to the Rule Dialog Window
Choose a condition (for example LoanApplication …) and click Ok.
A new condition is displayed in the Guided Rule Template Editor.
Click on the condition.
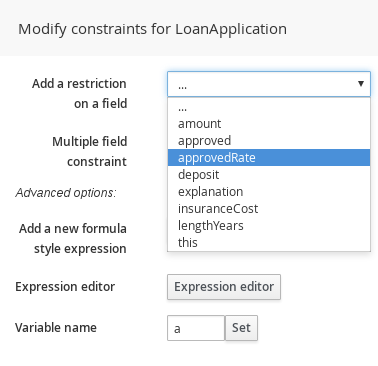
The Modify constraints for LoanApplication dialog window opens. From here you can add a restriction on a field, apply multiple field constraints, add a new formula style expression, apply an expression editor, or set a variable name.
Modify the condition to suit your needs. For example, set a variable name that can help define the condition, or add a restriction.
Once you select a restriction, the dialog window closes automatically.
Figure 7.27. Modifying a Condition
-
Choose an operator for the restriction (for example
greater than) from the drop-down menu next to the added restriction. -
Click Edit (
 ) to define the field value. The field value can be a literal value, a template key, a formula, or an expression editor.
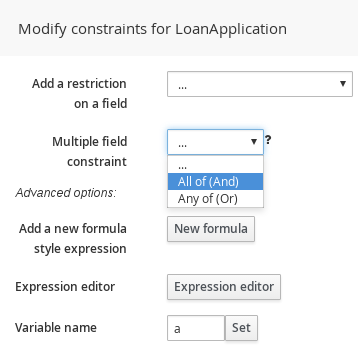
To apply multiple field constraint, click on the condition and in the Modify constraints for LoanApplication dialog window, select All of(And) or Any of(Or) from the Multiple field constraint drop-down menu.
Figure 7.28. Adding Multiple Field Constraint
The constraint is displayed in the Guided Rule Template Editor.
Click on the constraint.
The Add fields to this constraint dialog window opens.
Specify the fields and their values. For example, by clicking New Formula, you can add a new formula expression that is later evaluated to be true or false.
Figure 7.29. Multiple Field Constraint on Formula Expression
7.5.3. THEN Actions in Guided Rule Templates
The THEN section of a rule holds the actions to be executed when it matches the WHEN section.
Procedure: Using the Guided Template Editor with THEN Actions
-
Select the plus icon
 to the right of the
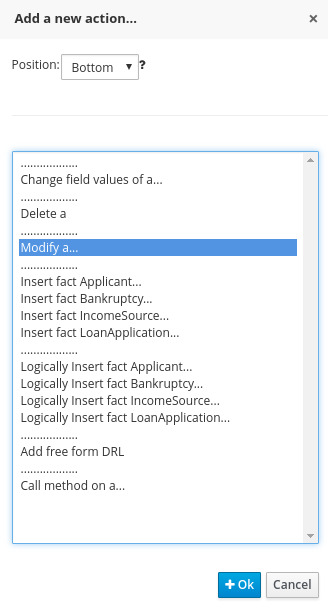
 THENsection of the Guided Template Editor to inputTHENactions. A dialog window will appear with available action templates to choose from. In the example below, we select the Modify a… action from the list.
Figure 7.30. Nurse Roster THEN Dialog Window
-
Click OK and the Guided Template Editor will display your
THENaction. Click the newly added
THENaction. An Add a field dialog appears. In the following example, it is the "Modify value of LoanApplication [a]" action.
Figure 7.31. Add a Field Dialog
- Within this dialog, you can choose a field from the Add field drop-down menu.
- Once selected, the dialog window closes automatically.
-
Select the Edit icon (
 ) within the item field to define the field value with a literal value, template key, or a formula.
7.5.4. Data Tables in the Guided Rule Template
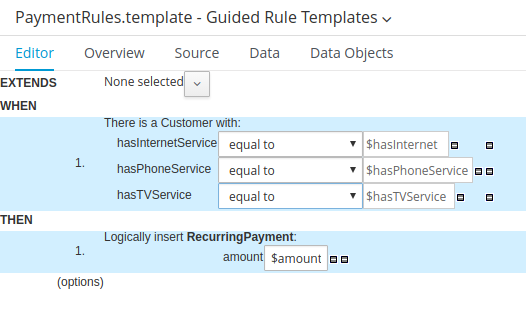
Data tables provide variables for guided rule templates that you define. This generates a number of rules, based on your settings. Data tables can be altered within the Guided Template Editor by clicking on the Data tab. Consider the following example:
A company offers phone service, internet service, and TV service. The monthly payment differs based on the active services that a customer has. The template for our example looks as follows:
To populate the rules:
Procedure: Using the Guided Template Editor with Data Tables
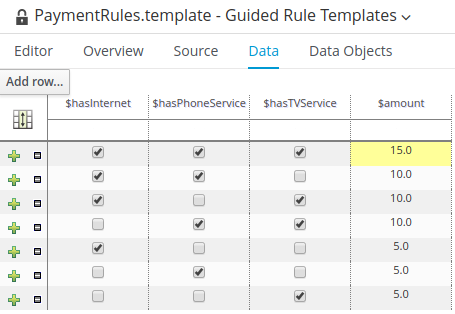
Click the Data tab to access the newly created data table. The table is empty at first, containing only a header with variables defined in the template:
- Click Add row…. Each new row results in one new rule.
Input additional data into the table. For example:
Figure 7.32. Data Table for Guided Template Editor
To view the DRL code, click the Source tab.
Copy to Clipboard Copied! Toggle word wrap Toggle overflow - Click Save to save the template when you are finished working in the Guided Template Editor.
7.6. The Domain Specific Language Editor
The domain specific language feature enables you to define language that is specific to your problem domain. You, or business analyst users, can then create rules using only the predefined language. This simplifies the process of rule creation for users without deep knowledge of rules and the rule language. Sentence constructed from domain specific languages (or DSL sentences) can be edited in the DSL editor. See the Red Hat JBoss BPM Suite Development Guide for more information about domain specific languages. The DSL syntax is extended to provide hints to control how the DSL variables are rendered. The following hints are supported:
{<varName>:<regular expression>}
This will render a text field in place of the DSL variable when the DSL sentence is used in the guided editor. The content of the text field will be validated against the regular expression.
{<varName>:ENUM:<factType.fieldName>}
This will render an enumeration in place of the DSL variable when the DSL sentence is used in the guided editor. <factType.fieldName> binds the enumeration to the model fact and field enumeration definition. This could be either a Knowledge Base enumeration or a Java enumeration, i.e., defined in a model POJO JAR file.
{<varName>:DATE:<dateFormat>}
This will render a date selector in place of the DSL variable when the DSL sentence is used in the guided editor.
{<varName>:BOOLEAN:<[checked | unchecked]>}
This will render a dropdown selector in place of the DSL variable, providing boolean choices, when the DSL sentence is used in the guided editor.
Figure 7.33. DSL Editor
7.7. Data Enumerations
7.7.1. Data Enumerations Drop-Down List Configuration
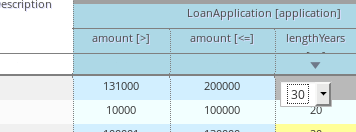
Data enumerations are an optional type of asset that can be configured to provide drop-down lists for the Guided Decision Table Editor. Double-click on a cell to view the enumeration drop-down list if the cell condition is based the same fact and field as the enumeration.
They are stored and edited just like any other asset and only apply to the package they are created in.
The contents of an enumeration configuration are the mapping of a fact.field to a list of values. These values are used to populate the drop-down menu. The list can either be literal or use a utility class (which must be added to the classpath) to load the strings. The strings contain either a value to be shown in the drop-down menu or a mapping from the code value (which is what is used in the rule) and a display value, e.g., M=Mini.
Example 7.2. An Example Enumeration Configuration
'Board.type' : [ 'Short', 'Long', 'M=Mini', 'Boogie']
'Person.age' : [ '20', '25', '30', '35' ]
'Board.type' : [ 'Short', 'Long', 'M=Mini', 'Boogie']
'Person.age' : [ '20', '25', '30', '35' ]This can be also be configured in Business Central as follows:
7.7.2. Advanced Enumeration Concepts
Drop-down lists are dependent on field values. With enumerations it is possible to define multiple options based on other field values.
A fact model for insurance policies could have a class called Insurance, consisting of the fields, policyType and coverage. The choices for policyType could be Home or Car. The type of insurance policy will determine the type of coverage that will be available. A home insurance policy could include property or liability. A car insurance policy could include collision or fullCoverage.
The field value policyType determines which options will be presented for coverage, and it is expressed as follows:
 'Insurance.policyType' : ['Home', 'Car']
 'Insurance.coverage[policyType=Home]' : ['property', 'liability']
 'Insurance.coverage[policyType=Car]' : ['collision', 'fullCoverage']
 'Insurance.policyType' : ['Home', 'Car']
 'Insurance.coverage[policyType=Home]' : ['property', 'liability']
'Insurance.coverage[policyType=Car]' : ['collision', 'fullCoverage']7.7.3. Obtaining Data Lists from External Sources
A list of Strings from an external source can be retrieved and used in an enumeration menu. This is achieved by adding code to the classpath that returns a java.util.List (of strings). Instead of specifying a list of values in the user interface, the code can return the list of strings. (As normal, you can use the "=" sign inside the strings if you want to use a different display value to the rule value.) For example, you could use the following:
'Person.age' : ['20','25', '30', '35']
'Person.age' : ['20','25', '30', '35']To:
'Person.age' : (new com.yourco.DataHelper()).getListOfAges()
'Person.age' : (new com.yourco.DataHelper()).getListOfAges()
This assumes you have a class called DataHelper which has a method getListOfAges() which returns a list of strings. The data enumerations are loaded the first time the guided editor is used in a session. To check the enumeration has loaded, go to the package configuration screen. You can "save and validate" the package; this will check it and provide feedback about any errors.
7.8. Scorecards
7.8.1. Scorecards
Scorecard is a Risk Management tool which is a graphical representation of a formula used to calculate an overall score. It is mostly used by financial institutions or banks to calculate the risk they can take to sell a product in market. Thus it can predict the likelihood or probability of a certain outcome. Red Hat JBoss BRMS now supports additive scorecards that calculates an overall score by adding all partial scores assigned to individual rule conditions.
Additionally, Drools Scorecards allows for reason codes to be set, which help in identifying the specific rules (buckets) that have contributed to the overall score. Drools Scorecards will be based on the PMML 4.1 Standard.
In general, a scorecard can be created more or less in this way:
- A statistical analysis is performed on the historical data which is usually collected from the existing customer database.
- A predictive or probable characteristics (attributes or pieces of information) are identified based on this analysis.
- Each characteristics are then broken down into ranges of possible values which are then given a score.
To explain it in detail, following is an example:
Figure 7.34. Scorecard Example
7.8.2. Creating a Scorecard
Procedure: Creating a new Score Card (Spreadsheet)
-
Open the Project Authoring perspective: on the main menu, click Authoring
Project Authoring. In the Project Explorer view, do the following:
- If in the Project view of Project Explorer, select the organizational unit, repository and the project where you want to create the score card.
- If in the Repository view of Project Explorer, navigate to the project root, where you want to create the score card.
-
In the perspective menu, go to New Item
Score Card (Spreadsheet). In the Create new Score Card (Spreadsheet) dialog window, define the package details:
- In the Resource Name text box, enter the score card name.
- Click on Choose File and browse to the location to select the spreadsheet in which the score card is initially created.
- Click OK.
- The new score card spreadsheet is created under the selected project.
When you build your own application comprising guided scorecards, ensure that you have the necessary dependencies added to your classpath. For more information about dependencies for guided decision tables, see the Dependency Management for Guided Decision Tables, Scorecards, and Rule Templates section of the Red Hat JBoss BPM Suite Development Guide.
Scorecard is a Technology Preview feature, and therefore not currently supported in Red Hat JBoss BRMS.
7.9. Guided Decision Trees
A decision tree is a graphical representation of a decision model in a tree-like manner. You can create simple decision trees in Business Central with flat data object models. The editor does not support nested data objects.
The editor offers a palette on the left-hand side (with available data objects, fields and corresponding actions) and a working area on the right-hand side where you can drag and drop the data objects to build a decision tree. You can use connectors and applicable child objects prompted by the editor, to complete your tree. You can manipulate each node using its Delete, Edit, and Collapse icons.
While creating a decision tree, you must remember the following points:
- A tree must have a data object at the root.
- A tree can only have one root.
- Data objects can have other data objects, field constraints, or actions as children.
- The field constraints must be on fields of the same data object as the parent node.
- Field constraints can have either other field constraints or actions as children.
- The field constraints must be on fields of the same data object as the parent node.
- Actions can only have other actions as children.
Guided Decision Tree is a Technology Preview feature, and therefore not currently supported in Red Hat JBoss BRMS.
7.10. Verification and Validation of Guided Decision Tables
In Business Central, the guided decision tables are a way of representing conditional logic (rule) in a precise manner, and they are well suited to business level rules.
7.10.1. Introduction
Business Central provides verification and validation feature to help ensure that a guided decision table is complete and error free. The feature looks for gaps in the logic of a guided decision table and validates the relationship between different cells. Most of the issues that the Business Central verification and validation feature reports are gaps in the author’s logic. The verification and validation feature does not prevent you from saving your work if you choose to ignore the verification and validation notifications.
When you edit a guided decision table, the verification and validation feature notifies you if you do something wrong. For example, if you forget to set an action for a row of the guided decision table or if you have a duplicate row, a new panel, Analysis, will open in the Business Central with a notification about the issue. The Analysis panel presents a list of issues found in the guided decision table, each item also pointing out the affected guided decision table rows. If you select an item in the list of issues, you will see a more in-depth description of the problem.
The validation and verification feature helps you resolve issues around:
Redundancy
Redundancy happens when two rows in a decision table execute the same consequences for the same set of facts. For example, two rows checking a client’s birthday and providing a birthday discount may result in double discount.
Subsumption
Subsumption is similar to redundancy and exists when two rules execute the same consequences, but one executes on a subset of facts of the other. For example, these two rules:
- when Person age > 10 then Increase Counter
- when Person age > 20 then Increase Counter
In this case, if a person is 15 years old, only one rule fires and if a person is 20 years old, both rules fire. Such cases cause similar trouble during runtime as redundancy.
Conflicts
A conflicting situation occurs when two similar conditions have different consequences. Sometimes, there may be conflicts between two rows (rules) or two cells in a decision table.
The example below illustrates conflict between two rows in a decision table:
- when Deposit > 20000 then Approve Loan
when Deposit > 20000 then Refuse Loan
In this case, there is no way to know if the loan will be approved or not.
The example below illustrates conflict between two cells in a decision table:
- When Age > 25
- When Age < 25
A row with conflicting cells never execute.
Defiency
Defiency is similar to a conflict and occurs due to incompleteness in the logic of a rule in a decision table. For example, consider the following two deficient rules:
- when Age > 20 then Approve Loan
- when Deposit < 20000 then Refuse Loan
These two rules may lead to confusion for a person who is over 20 years old and have deposited less than 20000. You may add more constraints to avoid the conflict after noticing the warning to make your rule logic complete.
Missing Columns
In some cases, usually by accident, the user can delete all the condition or action columns. When the conditions are removed all the actions are executed and when the actions columns are missing the rows do nothing. Both may or may not be by design, usually though this is a mistake.
7.10.2. Reporting
The verification and validation feature of Business Central reports different issue levels in the Analysis panel while you are updating a guided decision table.
-
 Error: This means a serious fault, which may lead to the guided decision table failing to work as designed at run time. Conflicts, for example, are reported as errors.
-
 Warning: This is most likely a serious fault, however they may not prevent the guided decision table from working but need to be double checked. Warnings are used e.g. for subsumption.
-
 Information: This kind of issues might be a design decision of the author of the guided decision table as well as a simple accident. This is used e.g. for a row missing any condition.
Business Central verification and validation does not prevent you from saving an incorrect change. The feature only reports issues while editing and you can still continue to overlook those and save your changes.
7.10.3. Disabling Verification and Validation of Guided Decision Tables
The decision table verification and validation feature of Business Central is enabled by default. You can disable it by setting the org.kie.verification.disable-dtable-realtime-verification system property value to true.
For example, if you are using JBoss EAP as your application server, navigate to $EAP_HOME directory and run the following command:
./standalone.sh -Dorg.kie.verification.disable-dtable-realtime-verification=true
./standalone.sh -Dorg.kie.verification.disable-dtable-realtime-verification=true
Alternatively, set this property in the standalone.xml file:
<property name="org.kie.verification.disable-dtable-realtime-verification" value="true"/>
<property name="org.kie.verification.disable-dtable-realtime-verification" value="true"/>