4.4. Configuring Console Options
4.4.1. Console Options
Simple Protocol for Independent Computing Environments (SPICE) is the recommended connection protocol for both Linux virtual machines and Windows virtual machines. To open a console to a virtual machine using SPICE, use Remote Viewer.
Virtual Network Computing (VNC) can be used to open consoles to both Linux virtual machines and Windows virtual machines. To open a console to a virtual machine using VNC, use Remote Viewer or a VNC client.
Remote Desktop Protocol (RDP) can only be used to open consoles to Windows virtual machines, and is only available when you access a virtual machines from a Windows machine on which Remote Desktop has been installed. Before you can connect to a Windows virtual machine using RDP, you must set up remote sharing on the virtual machine and configure the firewall to allow remote desktop connections.
Note
4.4.1.1. Accessing Console Options
Procedure 4.7. Accessing Console Options
- Select a running virtual machine.
- Open the Console Options window.
- In the Administration Portal, right-click the virtual machine and click Console Options.
- In the User Portal, click the Edit Console Options button.
Figure 4.1. The User Portal Edit Console Options Button
Note
4.4.1.2. SPICE Console Options
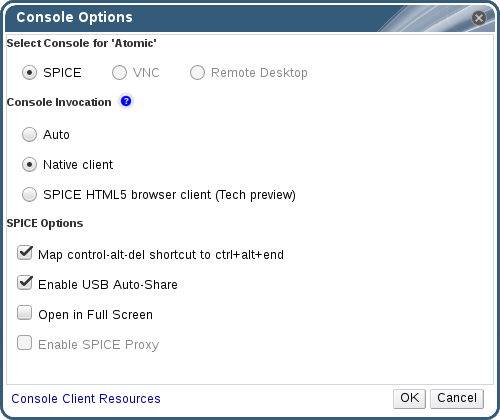
Figure 4.2. The Console Options window
Console Invocation
- Auto: The Manager automatically selects the method for invoking the console.
- Native client: When you connect to the console of the virtual machine, a file download dialog provides you with a file that opens a console to the virtual machine via Remote Viewer.
- SPICE HTML5 browser client (Tech preview): When you connect to the console of the virtual machine, a browser tab is opened that acts as the console.
SPICE Options
- Map control-alt-del shortcut to ctrl+alt+end: Select this check box to map the Ctrl+Alt+Del key combination to Ctrl+Alt+End inside the virtual machine.
- Enable USB Auto-Share: Select this check box to automatically redirect USB devices to the virtual machine. If this option is not selected, USB devices will connect to the client machine instead of the guest virtual machine. To use the USB device on the guest machine, manually enable it in the SPICE client menu.
- Open in Full Screen: Select this check box for the virtual machine console to automatically open in full screen when you connect to the virtual machine. Press SHIFT+F11 to toggle full screen mode on or off.
- Enable SPICE Proxy: Select this check box to enable the SPICE proxy.
- Enable WAN options: Select this check box to set the parameters
WANDisableEffectsandWANColorDepthtoanimationand16bits respectively on Windows virtual machines. Bandwidth in WAN environments is limited and this option prevents certain Windows settings from consuming too much bandwidth.
4.4.1.3. VNC Console Options
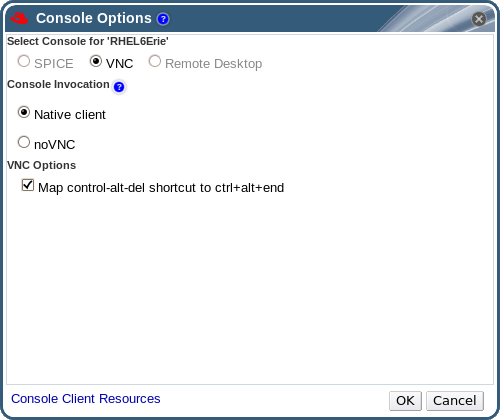
Figure 4.3. The Console Options window
Console Invocation
- Native Client: When you connect to the console of the virtual machine, a file download dialog provides you with a file that opens a console to the virtual machine via Remote Viewer.
- noVNC: When you connect to the console of the virtual machine, a browser tab is opened that acts as the console.
VNC Options
- Map control-alt-delete shortcut to ctrl+alt+end: Select this check box to map the Ctrl+Alt+Del key combination to Ctrl+Alt+End inside the virtual machine.
4.4.1.4. RDP Console Options
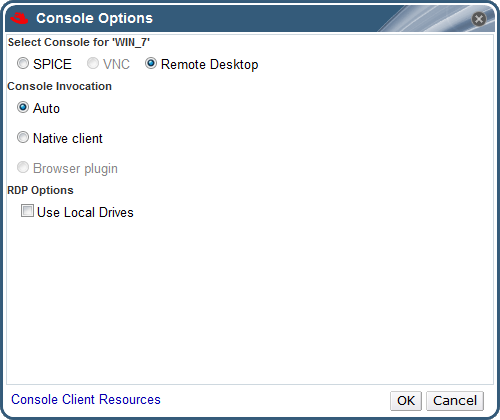
Figure 4.4. The Console Options window
Console Invocation
- Auto: The Manager automatically selects the method for invoking the console.
- Native client: When you connect to the console of the virtual machine, a file download dialog provides you with a file that opens a console to the virtual machine via Remote Desktop.
RDP Options
- Use Local Drives: Select this check box to make the drives on the client machine accessible on the guest virtual machine.
4.4.2. Remote Viewer Options
4.4.2.1. Remote Viewer Options
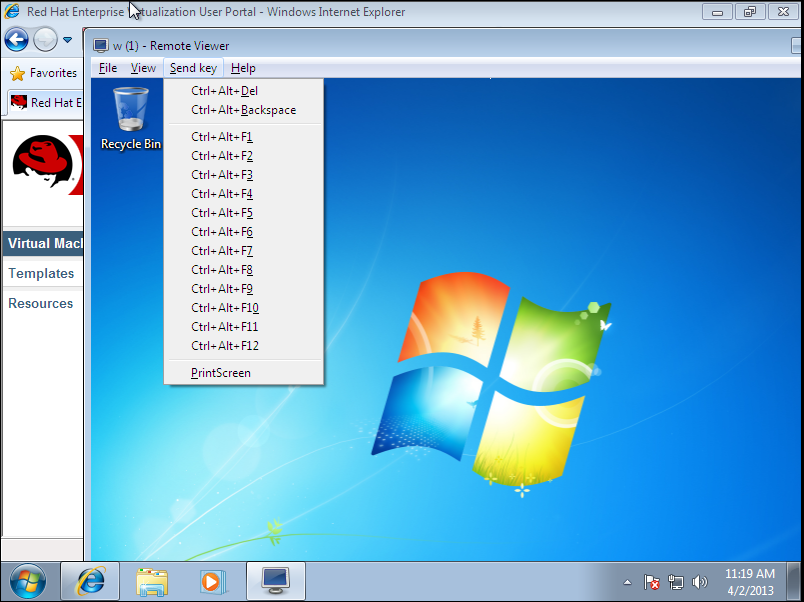
Figure 4.5. The Remote Viewer connection menu
| Option | Hotkey |
|---|---|
| File |
|
| View |
|
| Send key |
|
| Help | The About entry displays the version details of Virtual Machine Viewer that you are using. |
| Release Cursor from Virtual Machine | SHIFT+F12 |
4.4.2.2. Remote Viewer Hotkeys
Note
4.4.2.3. Manually Associating console.vv Files with Remote Viewer
console.vv file when attempting to open a console to a virtual machine using the native client console option, and Remote Viewer is already installed, then you can manually associate console.vv files with Remote Viewer so that Remote Viewer can automatically use those files to open consoles.
Procedure 4.8. Manually Associating console.vv Files with Remote Viewer
- Start the virtual machine.
- Open the Console Options window.
- In the Administration Portal, right-click the virtual machine and click Console Options.
- In the User Portal, click the Edit Console Options button.
Figure 4.6. The User Portal Edit Console Options Button
- Change the console invocation method to Native client and click .
- Attempt to open a console to the virtual machine, then click when prompted to open or save the
console.vvfile. - Navigate to the location on your local machine where you saved the file.
- Double-click the
console.vvfile and select when prompted. - In the Open with window, select and click the button.
- Navigate to the
C:\Users\[user name]\AppData\Local\virt-viewer\bindirectory and selectremote-viewer.exe. - Click and then click .
console.vv file that the Red Hat Virtualization Manager provides to open a console to that virtual machine without prompting you to select the application to use.


