Este contenido no está disponible en el idioma seleccionado.
Machine management
Adding and maintaining cluster machines
Abstract
Chapter 1. Overview of machine management
You can use machine management to flexibly work with underlying infrastructure such as Amazon Web Services (AWS), Microsoft Azure, Google Cloud, Red Hat OpenStack Platform (RHOSP), Red Hat Virtualization (RHV), and VMware vSphere to manage the OpenShift Container Platform cluster. You can control the cluster and perform auto-scaling, such as scaling up and down the cluster based on specific workload policies.
It is important to have a cluster that adapts to changing workloads. The OpenShift Container Platform cluster can horizontally scale up and down when the load increases or decreases.
Machine management is implemented as a custom resource definition (CRD). A CRD object defines a new unique object Kind in the cluster and enables the Kubernetes API server to handle the object’s entire lifecycle.
The Machine API Operator provisions the following resources:
-
MachineSet -
Machine -
ClusterAutoscaler -
MachineAutoscaler -
MachineHealthCheck
1.1. Machine API overview
The Machine API is a combination of primary resources that are based on the upstream Cluster API project and custom OpenShift Container Platform resources.
For OpenShift Container Platform 4.12 clusters, the Machine API performs all node host provisioning management actions after the cluster installation finishes. Because of this system, OpenShift Container Platform 4.12 offers an elastic, dynamic provisioning method on top of public or private cloud infrastructure.
The two primary resources are:
- Machines
-
A fundamental unit that describes the host for a node. A machine has a
providerSpecspecification, which describes the types of compute nodes that are offered for different cloud platforms. For example, a machine type for a compute node might define a specific machine type and required metadata. - Machine sets
MachineSetresources are groups of compute machines. Compute machine sets are to compute machines as replica sets are to pods. If you need more compute machines or must scale them down, you change thereplicasfield on theMachineSetresource to meet your compute need.WarningControl plane machines cannot be managed by compute machine sets.
Control plane machine sets provide management capabilities for supported control plane machines that are similar to what compute machine sets provide for compute machines.
For more information, see “Managing control plane machines".
The following custom resources add more capabilities to your cluster:
- Machine autoscaler
The
MachineAutoscalerresource automatically scales compute machines in a cloud. You can set the minimum and maximum scaling boundaries for nodes in a specified compute machine set, and the machine autoscaler maintains that range of nodes.The
MachineAutoscalerobject takes effect after aClusterAutoscalerobject exists. BothClusterAutoscalerandMachineAutoscalerresources are made available by theClusterAutoscalerOperatorobject.- Cluster autoscaler
This resource is based on the upstream cluster autoscaler project. In the OpenShift Container Platform implementation, it is integrated with the Machine API by extending the compute machine set API. You can use the cluster autoscaler to manage your cluster in the following ways:
- Set cluster-wide scaling limits for resources such as cores, nodes, memory, and GPU
- Set the priority so that the cluster prioritizes pods and new nodes are not brought online for less important pods
- Set the scaling policy so that you can scale up nodes but not scale them down
- Machine health check
-
The
MachineHealthCheckresource detects when a machine is unhealthy, deletes it, and, on supported platforms, makes a new machine.
In OpenShift Container Platform version 3.11, you could not roll out a multi-zone architecture easily because the cluster did not manage machine provisioning. Beginning with OpenShift Container Platform version 4.1, this process is easier. Each compute machine set is scoped to a single zone, so the installation program sends out compute machine sets across availability zones on your behalf. And then because your compute is dynamic, and in the face of a zone failure, you always have a zone for when you must rebalance your machines. In global Azure regions that do not have multiple availability zones, you can use availability sets to ensure high availability. The autoscaler provides best-effort balancing over the life of a cluster.
1.2. Managing compute machines
As a cluster administrator, you can perform the following actions:
Create a compute machine set for the following cloud providers:
- Create a machine set for a bare metal deployment: Creating a compute machine set on bare metal
- Manually scale a compute machine set by adding or removing a machine from the compute machine set.
-
Modify a compute machine set through the
MachineSetYAML configuration file. - Delete a machine.
- Create infrastructure compute machine sets.
- Configure and deploy a machine health check to automatically fix damaged machines in a machine pool.
1.3. Managing control plane machines
As a cluster administrator, you can perform the following actions:
Update your control plane configuration with a control plane machine set for the following cloud providers:
- Configure and deploy a machine health check to automatically recover unhealthy control plane machines.
1.4. Applying autoscaling to an OpenShift Container Platform cluster
You can automatically scale your OpenShift Container Platform cluster to ensure flexibility for changing workloads. To autoscale your cluster, you must first deploy a cluster autoscaler, and then deploy a machine autoscaler for each compute machine set.
- The cluster autoscaler increases and decreases the size of the cluster based on deployment needs.
- The machine autoscaler adjusts the number of machines in the compute machine sets that you deploy in your OpenShift Container Platform cluster.
1.5. Adding compute machines on user-provisioned infrastructure
User-provisioned infrastructure is an environment where you can deploy infrastructure such as compute, network, and storage resources that host the OpenShift Container Platform. You can add compute machines to a cluster on user-provisioned infrastructure during or after the installation process.
1.6. Adding RHEL compute machines to your cluster
As a cluster administrator, you can perform the following actions:
- Add Red Hat Enterprise Linux (RHEL) compute machines, also known as worker machines, to a user-provisioned infrastructure cluster or an installation-provisioned infrastructure cluster.
- Add more Red Hat Enterprise Linux (RHEL) compute machines to an existing cluster.
Chapter 2. Managing compute machines with the Machine API
2.1. Creating a compute machine set on Alibaba Cloud
You can create a different compute machine set to serve a specific purpose in your OpenShift Container Platform cluster on Alibaba Cloud. For example, you might create infrastructure machine sets and related machines so that you can move supporting workloads to the new machines.
You can use the advanced machine management and scaling capabilities only in clusters where the Machine API is operational. Clusters with user-provisioned infrastructure require additional validation and configuration to use the Machine API.
Clusters with the infrastructure platform type none cannot use the Machine API. This limitation applies even if the compute machines that are attached to the cluster are installed on a platform that supports the feature. This parameter cannot be changed after installation.
To view the platform type for your cluster, run the following command:
$ oc get infrastructure cluster -o jsonpath='{.status.platform}'2.1.1. Sample YAML for a compute machine set custom resource on Alibaba Cloud
This sample YAML defines a compute machine set that runs in a specified Alibaba Cloud zone in a region and creates nodes that are labeled with node-role.kubernetes.io/<role>: "".
In this sample, <infrastructure_id> is the infrastructure ID label that is based on the cluster ID that you set when you provisioned the cluster, and <role> is the node label to add.
apiVersion: machine.openshift.io/v1beta1
kind: MachineSet
metadata:
labels:
machine.openshift.io/cluster-api-cluster: <infrastructure_id>
machine.openshift.io/cluster-api-machine-role: <role>
machine.openshift.io/cluster-api-machine-type: <role>
name: <infrastructure_id>-<role>-<zone>
namespace: openshift-machine-api
spec:
replicas: 1
selector:
matchLabels:
machine.openshift.io/cluster-api-cluster: <infrastructure_id>
machine.openshift.io/cluster-api-machineset: <infrastructure_id>-<role>-<zone>
template:
metadata:
labels:
machine.openshift.io/cluster-api-cluster: <infrastructure_id>
machine.openshift.io/cluster-api-machine-role: <role>
machine.openshift.io/cluster-api-machine-type: <role>
machine.openshift.io/cluster-api-machineset: <infrastructure_id>-<role>-<zone>
spec:
metadata:
labels:
node-role.kubernetes.io/<role>: ""
providerSpec:
value:
apiVersion: machine.openshift.io/v1
credentialsSecret:
name: alibabacloud-credentials
imageId: <image_id>
instanceType: <instance_type>
kind: AlibabaCloudMachineProviderConfig
ramRoleName: <infrastructure_id>-role-worker
regionId: <region>
resourceGroup:
id: <resource_group_id>
type: ID
securityGroups:
- tags:
- Key: Name
Value: <infrastructure_id>-sg-<role>
type: Tags
systemDisk:
category: cloud_essd
size: <disk_size>
tag:
- Key: kubernetes.io/cluster/<infrastructure_id>
Value: owned
userDataSecret:
name: <user_data_secret>
vSwitch:
tags:
- Key: Name
Value: <infrastructure_id>-vswitch-<zone>
type: Tags
vpcId: ""
zoneId: <zone> - 1 5 7
- Specify the infrastructure ID that is based on the cluster ID that you set when you provisioned the cluster. If you have the OpenShift CLI (
oc) installed, you can obtain the infrastructure ID by running the following command:$ oc get -o jsonpath='{.status.infrastructureName}{"\n"}' infrastructure cluster - 2 3 8 9
- Specify the node label to add.
- 4 6 10
- Specify the infrastructure ID, node label, and zone.
- 11
- Specify the image to use. Use an image from an existing default compute machine set for the cluster.
- 12
- Specify the instance type you want to use for the compute machine set.
- 13
- Specify the name of the RAM role to use for the compute machine set. Use the value that the installer populates in the default compute machine set.
- 14
- Specify the region to place machines on.
- 15
- Specify the resource group and type for the cluster. You can use the value that the installer populates in the default compute machine set, or specify a different one.
- 16 18 20
- Specify the tags to use for the compute machine set. Minimally, you must include the tags shown in this example, with appropriate values for your cluster. You can include additional tags, including the tags that the installer populates in the default compute machine set it creates, as needed.
- 17
- Specify the type and size of the root disk. Use the
categoryvalue that the installer populates in the default compute machine set it creates. If required, specify a different value in gigabytes forsize. - 19
- Specify the name of the secret in the user data YAML file that is in the
openshift-machine-apinamespace. Use the value that the installer populates in the default compute machine set. - 21
- Specify the zone within your region to place machines on. Be sure that your region supports the zone that you specify.
2.1.1.1. Machine set parameters for Alibaba Cloud usage statistics
The default compute machine sets that the installer creates for Alibaba Cloud clusters include nonessential tag values that Alibaba Cloud uses internally to track usage statistics. These tags are populated in the securityGroups, tag, and vSwitch parameters of the spec.template.spec.providerSpec.value list.
When creating compute machine sets to deploy additional machines, you must include the required Kubernetes tags. The usage statistics tags are applied by default, even if they are not specified in the compute machine sets you create. You can also include additional tags as needed.
The following YAML snippets indicate which tags in the default compute machine sets are optional and which are required.
Tags in spec.template.spec.providerSpec.value.securityGroups
spec:
template:
spec:
providerSpec:
value:
securityGroups:
- tags:
- Key: kubernetes.io/cluster/<infrastructure_id>
Value: owned
- Key: GISV
Value: ocp
- Key: sigs.k8s.io/cloud-provider-alibaba/origin
Value: ocp
- Key: Name
Value: <infrastructure_id>-sg-<role>
type: TagsTags in spec.template.spec.providerSpec.value.tag
spec:
template:
spec:
providerSpec:
value:
tag:
- Key: kubernetes.io/cluster/<infrastructure_id>
Value: owned
- Key: GISV
Value: ocp
- Key: sigs.k8s.io/cloud-provider-alibaba/origin
Value: ocpTags in spec.template.spec.providerSpec.value.vSwitch
spec:
template:
spec:
providerSpec:
value:
vSwitch:
tags:
- Key: kubernetes.io/cluster/<infrastructure_id>
Value: owned
- Key: GISV
Value: ocp
- Key: sigs.k8s.io/cloud-provider-alibaba/origin
Value: ocp
- Key: Name
Value: <infrastructure_id>-vswitch-<zone>
type: Tags2.1.2. Creating a compute machine set
In addition to the compute machine sets created by the installation program, you can create your own to dynamically manage the machine compute resources for specific workloads of your choice.
Prerequisites
- Deploy an OpenShift Container Platform cluster.
-
Install the OpenShift CLI (
oc). -
Log in to
ocas a user withcluster-adminpermission.
Procedure
Create a new YAML file that contains the compute machine set custom resource (CR) sample and is named
<file_name>.yaml.Ensure that you set the
<clusterID>and<role>parameter values.Optional: If you are not sure which value to set for a specific field, you can check an existing compute machine set from your cluster.
To list the compute machine sets in your cluster, run the following command:
$ oc get machinesets -n openshift-machine-apiExample output
NAME DESIRED CURRENT READY AVAILABLE AGE agl030519-vplxk-worker-us-east-1a 1 1 1 1 55m agl030519-vplxk-worker-us-east-1b 1 1 1 1 55m agl030519-vplxk-worker-us-east-1c 1 1 1 1 55m agl030519-vplxk-worker-us-east-1d 0 0 55m agl030519-vplxk-worker-us-east-1e 0 0 55m agl030519-vplxk-worker-us-east-1f 0 0 55mTo view values of a specific compute machine set custom resource (CR), run the following command:
$ oc get machineset <machineset_name> \ -n openshift-machine-api -o yamlExample output
apiVersion: machine.openshift.io/v1beta1 kind: MachineSet metadata: labels: machine.openshift.io/cluster-api-cluster: <infrastructure_id>1 name: <infrastructure_id>-<role>2 namespace: openshift-machine-api spec: replicas: 1 selector: matchLabels: machine.openshift.io/cluster-api-cluster: <infrastructure_id> machine.openshift.io/cluster-api-machineset: <infrastructure_id>-<role> template: metadata: labels: machine.openshift.io/cluster-api-cluster: <infrastructure_id> machine.openshift.io/cluster-api-machine-role: <role> machine.openshift.io/cluster-api-machine-type: <role> machine.openshift.io/cluster-api-machineset: <infrastructure_id>-<role> spec: providerSpec:3 ...- 1
- The cluster infrastructure ID.
- 2
- A default node label.Note
For clusters that have user-provisioned infrastructure, a compute machine set can only create
workerandinfratype machines. - 3
- The values in the
<providerSpec>section of the compute machine set CR are platform-specific. For more information about<providerSpec>parameters in the CR, see the sample compute machine set CR configuration for your provider.
Create a
MachineSetCR by running the following command:$ oc create -f <file_name>.yaml
Verification
View the list of compute machine sets by running the following command:
$ oc get machineset -n openshift-machine-apiExample output
NAME DESIRED CURRENT READY AVAILABLE AGE agl030519-vplxk-infra-us-east-1a 1 1 1 1 11m agl030519-vplxk-worker-us-east-1a 1 1 1 1 55m agl030519-vplxk-worker-us-east-1b 1 1 1 1 55m agl030519-vplxk-worker-us-east-1c 1 1 1 1 55m agl030519-vplxk-worker-us-east-1d 0 0 55m agl030519-vplxk-worker-us-east-1e 0 0 55m agl030519-vplxk-worker-us-east-1f 0 0 55mWhen the new compute machine set is available, the
DESIREDandCURRENTvalues match. If the compute machine set is not available, wait a few minutes and run the command again.
2.2. Creating a compute machine set on AWS
You can create a different compute machine set to serve a specific purpose in your OpenShift Container Platform cluster on Amazon Web Services (AWS). For example, you might create infrastructure machine sets and related machines so that you can move supporting workloads to the new machines.
You can use the advanced machine management and scaling capabilities only in clusters where the Machine API is operational. Clusters with user-provisioned infrastructure require additional validation and configuration to use the Machine API.
Clusters with the infrastructure platform type none cannot use the Machine API. This limitation applies even if the compute machines that are attached to the cluster are installed on a platform that supports the feature. This parameter cannot be changed after installation.
To view the platform type for your cluster, run the following command:
$ oc get infrastructure cluster -o jsonpath='{.status.platform}'2.2.1. Sample YAML for a compute machine set custom resource on AWS
This sample YAML defines a compute machine set that runs in the us-east-1a Amazon Web Services (AWS) zone and creates nodes that are labeled with node-role.kubernetes.io/<role>: "".
In this sample, <infrastructure_id> is the infrastructure ID label that is based on the cluster ID that you set when you provisioned the cluster, and <role> is the node label to add.
apiVersion: machine.openshift.io/v1beta1
kind: MachineSet
metadata:
labels:
machine.openshift.io/cluster-api-cluster: <infrastructure_id>
name: <infrastructure_id>-<role>-<zone>
namespace: openshift-machine-api
spec:
replicas: 1
selector:
matchLabels:
machine.openshift.io/cluster-api-cluster: <infrastructure_id>
machine.openshift.io/cluster-api-machineset: <infrastructure_id>-<role>-<zone>
template:
metadata:
labels:
machine.openshift.io/cluster-api-cluster: <infrastructure_id>
machine.openshift.io/cluster-api-machine-role: <role>
machine.openshift.io/cluster-api-machine-type: <role>
machine.openshift.io/cluster-api-machineset: <infrastructure_id>-<role>-<zone>
spec:
metadata:
labels:
node-role.kubernetes.io/<role>: ""
providerSpec:
value:
ami:
id: ami-046fe691f52a953f9
apiVersion: awsproviderconfig.openshift.io/v1beta1
blockDevices:
- ebs:
iops: 0
volumeSize: 120
volumeType: gp2
credentialsSecret:
name: aws-cloud-credentials
deviceIndex: 0
iamInstanceProfile:
id: <infrastructure_id>-worker-profile
instanceType: m6i.large
kind: AWSMachineProviderConfig
placement:
availabilityZone: <zone>
region: <region>
securityGroups:
- filters:
- name: tag:Name
values:
- <infrastructure_id>-worker-sg
subnet:
filters:
- name: tag:Name
values:
- <infrastructure_id>-private-<zone>
tags:
- name: kubernetes.io/cluster/<infrastructure_id>
value: owned
- name: <custom_tag_name>
value: <custom_tag_value>
userDataSecret:
name: worker-user-data- 1 3 5 11 14 16
- Specify the infrastructure ID that is based on the cluster ID that you set when you provisioned the cluster. If you have the OpenShift CLI installed, you can obtain the infrastructure ID by running the following command:
$ oc get -o jsonpath='{.status.infrastructureName}{"\n"}' infrastructure cluster - 2 4 8
- Specify the infrastructure ID, role node label, and zone.
- 6 7 9
- Specify the role node label to add.
- 10
- Specify a valid Red Hat Enterprise Linux CoreOS (RHCOS) Amazon Machine Image (AMI) for your AWS zone for your OpenShift Container Platform nodes. If you want to use an AWS Marketplace image, you must complete the OpenShift Container Platform subscription from the AWS Marketplace to obtain an AMI ID for your region.
$ oc -n openshift-machine-api \ -o jsonpath='{.spec.template.spec.providerSpec.value.ami.id}{"\n"}' \ get machineset/<infrastructure_id>-<role>-<zone> - 17 18
- Optional: Specify custom tag data for your cluster. For example, you might add an admin contact email address by specifying a
name:valuepair ofEmail:admin-email@example.com.NoteCustom tags can also be specified during installation in the
install-config.ymlfile. If theinstall-config.ymlfile and the machine set include a tag with the samenamedata, the value for the tag from the machine set takes priority over the value for the tag in theinstall-config.ymlfile. - 12
- Specify the zone, for example,
us-east-1a. - 13
- Specify the region, for example,
us-east-1. - 15
- Specify the infrastructure ID and zone.
2.2.2. Creating a compute machine set
In addition to the compute machine sets created by the installation program, you can create your own to dynamically manage the machine compute resources for specific workloads of your choice.
Prerequisites
- Deploy an OpenShift Container Platform cluster.
-
Install the OpenShift CLI (
oc). -
Log in to
ocas a user withcluster-adminpermission.
Procedure
Create a new YAML file that contains the compute machine set custom resource (CR) sample and is named
<file_name>.yaml.Ensure that you set the
<clusterID>and<role>parameter values.Optional: If you are not sure which value to set for a specific field, you can check an existing compute machine set from your cluster.
To list the compute machine sets in your cluster, run the following command:
$ oc get machinesets -n openshift-machine-apiExample output
NAME DESIRED CURRENT READY AVAILABLE AGE agl030519-vplxk-worker-us-east-1a 1 1 1 1 55m agl030519-vplxk-worker-us-east-1b 1 1 1 1 55m agl030519-vplxk-worker-us-east-1c 1 1 1 1 55m agl030519-vplxk-worker-us-east-1d 0 0 55m agl030519-vplxk-worker-us-east-1e 0 0 55m agl030519-vplxk-worker-us-east-1f 0 0 55mTo view values of a specific compute machine set custom resource (CR), run the following command:
$ oc get machineset <machineset_name> \ -n openshift-machine-api -o yamlExample output
apiVersion: machine.openshift.io/v1beta1 kind: MachineSet metadata: labels: machine.openshift.io/cluster-api-cluster: <infrastructure_id>1 name: <infrastructure_id>-<role>2 namespace: openshift-machine-api spec: replicas: 1 selector: matchLabels: machine.openshift.io/cluster-api-cluster: <infrastructure_id> machine.openshift.io/cluster-api-machineset: <infrastructure_id>-<role> template: metadata: labels: machine.openshift.io/cluster-api-cluster: <infrastructure_id> machine.openshift.io/cluster-api-machine-role: <role> machine.openshift.io/cluster-api-machine-type: <role> machine.openshift.io/cluster-api-machineset: <infrastructure_id>-<role> spec: providerSpec:3 ...- 1
- The cluster infrastructure ID.
- 2
- A default node label.Note
For clusters that have user-provisioned infrastructure, a compute machine set can only create
workerandinfratype machines. - 3
- The values in the
<providerSpec>section of the compute machine set CR are platform-specific. For more information about<providerSpec>parameters in the CR, see the sample compute machine set CR configuration for your provider.
Create a
MachineSetCR by running the following command:$ oc create -f <file_name>.yaml- If you need compute machine sets in other availability zones, repeat this process to create more compute machine sets.
Verification
View the list of compute machine sets by running the following command:
$ oc get machineset -n openshift-machine-apiExample output
NAME DESIRED CURRENT READY AVAILABLE AGE agl030519-vplxk-infra-us-east-1a 1 1 1 1 11m agl030519-vplxk-worker-us-east-1a 1 1 1 1 55m agl030519-vplxk-worker-us-east-1b 1 1 1 1 55m agl030519-vplxk-worker-us-east-1c 1 1 1 1 55m agl030519-vplxk-worker-us-east-1d 0 0 55m agl030519-vplxk-worker-us-east-1e 0 0 55m agl030519-vplxk-worker-us-east-1f 0 0 55mWhen the new compute machine set is available, the
DESIREDandCURRENTvalues match. If the compute machine set is not available, wait a few minutes and run the command again.
2.2.3. Labeling GPU machine sets for the cluster autoscaler
You can use a machine set label to indicate which machines the cluster autoscaler can use to deploy GPU-enabled nodes.
Prerequisites
- Your cluster uses a cluster autoscaler.
Procedure
On the machine set that you want to create machines for the cluster autoscaler to use to deploy GPU-enabled nodes, add a
cluster-api/acceleratorlabel:apiVersion: machine.openshift.io/v1beta1 kind: MachineSet metadata: name: machine-set-name spec: template: spec: metadata: labels: cluster-api/accelerator: nvidia-t41 - 1
- Specify a label of your choice that consists of alphanumeric characters,
-,_, or.and starts and ends with an alphanumeric character. For example, you might usenvidia-t4to represent Nvidia T4 GPUs, ornvidia-a10gfor A10G GPUs.NoteYou must specify the value of this label for the
spec.resourceLimits.gpus.typeparameter in yourClusterAutoscalerCR. For more information, see "Cluster autoscaler resource definition".
2.2.4. Machine set options for the Amazon EC2 Instance Metadata Service
You can use machine sets to create machines that use a specific version of the Amazon EC2 Instance Metadata Service (IMDS). Machine sets can create machines that allow the use of both IMDSv1 and IMDSv2 or machines that require the use of IMDSv2.
Using IMDSv2 is only supported on AWS clusters that were created with OpenShift Container Platform version 4.7 or later.
To deploy new compute machines with your preferred IMDS configuration, create a compute machine set YAML file with the appropriate values. You can also edit an existing machine set to create new machines with your preferred IMDS configuration when the machine set is scaled up.
Before configuring a machine set to create machines that require IMDSv2, ensure that any workloads that interact with the AWS metadata service support IMDSv2.
2.2.4.1. Configuring IMDS by using machine sets
You can specify whether to require the use of IMDSv2 by adding or editing the value of metadataServiceOptions.authentication in the machine set YAML file for your machines.
Prerequisites
- To use IMDSv2, your AWS cluster must have been created with OpenShift Container Platform version 4.7 or later.
Procedure
Add or edit the following lines under the
providerSpecfield:providerSpec: value: metadataServiceOptions: authentication: Required1 - 1
- To require IMDSv2, set the parameter value to
Required. To allow the use of both IMDSv1 and IMDSv2, set the parameter value toOptional. If no value is specified, both IMDSv1 and IMDSv2 are allowed.
2.2.5. Machine sets that deploy machines as Dedicated Instances
You can create a machine set running on AWS that deploys machines as Dedicated Instances. Dedicated Instances run in a virtual private cloud (VPC) on hardware that is dedicated to a single customer. These Amazon EC2 instances are physically isolated at the host hardware level. The isolation of Dedicated Instances occurs even if the instances belong to different AWS accounts that are linked to a single payer account. However, other instances that are not dedicated can share hardware with Dedicated Instances if they belong to the same AWS account.
Instances with either public or dedicated tenancy are supported by the Machine API. Instances with public tenancy run on shared hardware. Public tenancy is the default tenancy. Instances with dedicated tenancy run on single-tenant hardware.
2.2.5.1. Creating Dedicated Instances by using machine sets
You can run a machine that is backed by a Dedicated Instance by using Machine API integration. Set the tenancy field in your machine set YAML file to launch a Dedicated Instance on AWS.
Procedure
Specify a dedicated tenancy under the
providerSpecfield:providerSpec: placement: tenancy: dedicated
2.2.6. Machine sets that deploy machines as Spot Instances
You can save on costs by creating a compute machine set running on AWS that deploys machines as non-guaranteed Spot Instances. Spot Instances utilize unused AWS EC2 capacity and are less expensive than On-Demand Instances. You can use Spot Instances for workloads that can tolerate interruptions, such as batch or stateless, horizontally scalable workloads.
AWS EC2 can terminate a Spot Instance at any time. AWS gives a two-minute warning to the user when an interruption occurs. OpenShift Container Platform begins to remove the workloads from the affected instances when AWS issues the termination warning.
Interruptions can occur when using Spot Instances for the following reasons:
- The instance price exceeds your maximum price
- The demand for Spot Instances increases
- The supply of Spot Instances decreases
When AWS terminates an instance, a termination handler running on the Spot Instance node deletes the machine resource. To satisfy the compute machine set replicas quantity, the compute machine set creates a machine that requests a Spot Instance.
2.2.6.1. Creating Spot Instances by using compute machine sets
You can launch a Spot Instance on AWS by adding spotMarketOptions to your compute machine set YAML file.
Procedure
Add the following line under the
providerSpecfield:providerSpec: value: spotMarketOptions: {}You can optionally set the
spotMarketOptions.maxPricefield to limit the cost of the Spot Instance. For example you can setmaxPrice: '2.50'.If the
maxPriceis set, this value is used as the hourly maximum spot price. If it is not set, the maximum price defaults to charge up to the On-Demand Instance price.NoteIt is strongly recommended to use the default On-Demand price as the
maxPricevalue and to not set the maximum price for Spot Instances.
2.2.7. Adding a GPU node to an existing OpenShift Container Platform cluster
You can copy and modify a default compute machine set configuration to create a GPU-enabled machine set and machines for the AWS EC2 cloud provider.
For more information about the supported instance types, see the following NVIDIA documentation:
Procedure
View the existing nodes, machines, and machine sets by running the following command. Note that each node is an instance of a machine definition with a specific AWS region and OpenShift Container Platform role.
$ oc get nodesExample output
NAME STATUS ROLES AGE VERSION ip-10-0-52-50.us-east-2.compute.internal Ready worker 3d17h v1.25.4+86bd4ff ip-10-0-58-24.us-east-2.compute.internal Ready control-plane,master 3d17h v1.25.4+86bd4ff ip-10-0-68-148.us-east-2.compute.internal Ready worker 3d17h v1.25.4+86bd4ff ip-10-0-68-68.us-east-2.compute.internal Ready control-plane,master 3d17h v1.25.4+86bd4ff ip-10-0-72-170.us-east-2.compute.internal Ready control-plane,master 3d17h v1.25.4+86bd4ff ip-10-0-74-50.us-east-2.compute.internal Ready worker 3d17h v1.25.4+86bd4ffView the machines and machine sets that exist in the
openshift-machine-apinamespace by running the following command. Each compute machine set is associated with a different availability zone within the AWS region. The installer automatically load balances compute machines across availability zones.$ oc get machinesets -n openshift-machine-apiExample output
NAME DESIRED CURRENT READY AVAILABLE AGE preserve-dsoc12r4-ktjfc-worker-us-east-2a 1 1 1 1 3d11h preserve-dsoc12r4-ktjfc-worker-us-east-2b 2 2 2 2 3d11hView the machines that exist in the
openshift-machine-apinamespace by running the following command. At this time, there is only one compute machine per machine set, though a compute machine set could be scaled to add a node in a particular region and zone.$ oc get machines -n openshift-machine-api | grep workerExample output
preserve-dsoc12r4-ktjfc-worker-us-east-2a-dts8r Running m5.xlarge us-east-2 us-east-2a 3d11h preserve-dsoc12r4-ktjfc-worker-us-east-2b-dkv7w Running m5.xlarge us-east-2 us-east-2b 3d11h preserve-dsoc12r4-ktjfc-worker-us-east-2b-k58cw Running m5.xlarge us-east-2 us-east-2b 3d11hMake a copy of one of the existing compute
MachineSetdefinitions and output the result to a JSON file by running the following command. This will be the basis for the GPU-enabled compute machine set definition.$ oc get machineset preserve-dsoc12r4-ktjfc-worker-us-east-2a -n openshift-machine-api -o json > <output_file.json>Edit the JSON file and make the following changes to the new
MachineSetdefinition:-
Replace
workerwithgpu. This will be the name of the new machine set. Change the instance type of the new
MachineSetdefinition tog4dn, which includes an NVIDIA Tesla T4 GPU. To learn more about AWSg4dninstance types, see Accelerated Computing.$ jq .spec.template.spec.providerSpec.value.instanceType preserve-dsoc12r4-ktjfc-worker-gpu-us-east-2a.json "g4dn.xlarge"The
<output_file.json>file is saved aspreserve-dsoc12r4-ktjfc-worker-gpu-us-east-2a.json.
-
Replace
Update the following fields in
preserve-dsoc12r4-ktjfc-worker-gpu-us-east-2a.json:-
.metadata.nameto a name containinggpu. -
.spec.selector.matchLabels["machine.openshift.io/cluster-api-machineset"]to match the new.metadata.name. -
.spec.template.metadata.labels["machine.openshift.io/cluster-api-machineset"]to match the new.metadata.name. -
.spec.template.spec.providerSpec.value.instanceTypetog4dn.xlarge.
-
To verify your changes, perform a
diffof the original compute definition and the new GPU-enabled node definition by running the following command:$ oc -n openshift-machine-api get preserve-dsoc12r4-ktjfc-worker-us-east-2a -o json | diff preserve-dsoc12r4-ktjfc-worker-gpu-us-east-2a.json -Example output
10c10 < "name": "preserve-dsoc12r4-ktjfc-worker-gpu-us-east-2a", --- > "name": "preserve-dsoc12r4-ktjfc-worker-us-east-2a", 21c21 < "machine.openshift.io/cluster-api-machineset": "preserve-dsoc12r4-ktjfc-worker-gpu-us-east-2a" --- > "machine.openshift.io/cluster-api-machineset": "preserve-dsoc12r4-ktjfc-worker-us-east-2a" 31c31 < "machine.openshift.io/cluster-api-machineset": "preserve-dsoc12r4-ktjfc-worker-gpu-us-east-2a" --- > "machine.openshift.io/cluster-api-machineset": "preserve-dsoc12r4-ktjfc-worker-us-east-2a" 60c60 < "instanceType": "g4dn.xlarge", --- > "instanceType": "m5.xlarge",Create the GPU-enabled compute machine set from the definition by running the following command:
$ oc create -f preserve-dsoc12r4-ktjfc-worker-gpu-us-east-2a.jsonExample output
machineset.machine.openshift.io/preserve-dsoc12r4-ktjfc-worker-gpu-us-east-2a created
Verification
View the machine set you created by running the following command:
$ oc -n openshift-machine-api get machinesets | grep gpuThe MachineSet replica count is set to
1so a newMachineobject is created automatically.Example output
preserve-dsoc12r4-ktjfc-worker-gpu-us-east-2a 1 1 1 1 4m21sView the
Machineobject that the machine set created by running the following command:$ oc -n openshift-machine-api get machines | grep gpuExample output
preserve-dsoc12r4-ktjfc-worker-gpu-us-east-2a running g4dn.xlarge us-east-2 us-east-2a 4m36s
Note that there is no need to specify a namespace for the node. The node definition is cluster scoped.
2.2.8. Deploying the Node Feature Discovery Operator
After the GPU-enabled node is created, you need to discover the GPU-enabled node so it can be scheduled. To do this, install the Node Feature Discovery (NFD) Operator. The NFD Operator identifies hardware device features in nodes. It solves the general problem of identifying and cataloging hardware resources in the infrastructure nodes so they can be made available to OpenShift Container Platform.
Procedure
- Install the Node Feature Discovery Operator from OperatorHub in the OpenShift Container Platform console.
-
After installing the NFD Operator into OperatorHub, select Node Feature Discovery from the installed Operators list and select Create instance. This installs the
nfd-masterandnfd-workerpods, onenfd-workerpod for each compute node, in theopenshift-nfdnamespace. Verify that the Operator is installed and running by running the following command:
$ oc get pods -n openshift-nfdExample output
NAME READY STATUS RESTARTS AGE nfd-controller-manager-8646fcbb65-x5qgk 2/2 Running 7 (8h ago) 1d- Browse to the installed Oerator in the console and select Create Node Feature Discovery.
-
Select Create to build a NFD custom resource. This creates NFD pods in the
openshift-nfdnamespace that poll the OpenShift Container Platform nodes for hardware resources and catalogue them.
Verification
After a successful build, verify that a NFD pod is running on each nodes by running the following command:
$ oc get pods -n openshift-nfdExample output
NAME READY STATUS RESTARTS AGE nfd-controller-manager-8646fcbb65-x5qgk 2/2 Running 7 (8h ago) 12d nfd-master-769656c4cb-w9vrv 1/1 Running 0 12d nfd-worker-qjxb2 1/1 Running 3 (3d14h ago) 12d nfd-worker-xtz9b 1/1 Running 5 (3d14h ago) 12dThe NFD Operator uses vendor PCI IDs to identify hardware in a node. NVIDIA uses the PCI ID
10de.View the NVIDIA GPU discovered by the NFD Operator by running the following command:
$ oc describe node ip-10-0-132-138.us-east-2.compute.internal | egrep 'Roles|pci'Example output
Roles: worker feature.node.kubernetes.io/pci-1013.present=true feature.node.kubernetes.io/pci-10de.present=true feature.node.kubernetes.io/pci-1d0f.present=true10deappears in the node feature list for the GPU-enabled node. This mean the NFD Operator correctly identified the node from the GPU-enabled MachineSet.
2.3. Creating a compute machine set on Azure
You can create a different compute machine set to serve a specific purpose in your OpenShift Container Platform cluster on Microsoft Azure. For example, you might create infrastructure machine sets and related machines so that you can move supporting workloads to the new machines.
You can use the advanced machine management and scaling capabilities only in clusters where the Machine API is operational. Clusters with user-provisioned infrastructure require additional validation and configuration to use the Machine API.
Clusters with the infrastructure platform type none cannot use the Machine API. This limitation applies even if the compute machines that are attached to the cluster are installed on a platform that supports the feature. This parameter cannot be changed after installation.
To view the platform type for your cluster, run the following command:
$ oc get infrastructure cluster -o jsonpath='{.status.platform}'2.3.1. Sample YAML for a compute machine set custom resource on Azure
This sample YAML defines a compute machine set that runs in the 1 Microsoft Azure zone in a region and creates nodes that are labeled with node-role.kubernetes.io/<role>: "".
In this sample, <infrastructure_id> is the infrastructure ID label that is based on the cluster ID that you set when you provisioned the cluster, and <role> is the node label to add.
apiVersion: machine.openshift.io/v1beta1
kind: MachineSet
metadata:
labels:
machine.openshift.io/cluster-api-cluster: <infrastructure_id>
machine.openshift.io/cluster-api-machine-role: <role>
machine.openshift.io/cluster-api-machine-type: <role>
name: <infrastructure_id>-<role>-<region>
namespace: openshift-machine-api
spec:
replicas: 1
selector:
matchLabels:
machine.openshift.io/cluster-api-cluster: <infrastructure_id>
machine.openshift.io/cluster-api-machineset: <infrastructure_id>-<role>-<region>
template:
metadata:
creationTimestamp: null
labels:
machine.openshift.io/cluster-api-cluster: <infrastructure_id>
machine.openshift.io/cluster-api-machine-role: <role>
machine.openshift.io/cluster-api-machine-type: <role>
machine.openshift.io/cluster-api-machineset: <infrastructure_id>-<role>-<region>
spec:
metadata:
creationTimestamp: null
labels:
machine.openshift.io/cluster-api-machineset: <machineset_name>
node-role.kubernetes.io/<role>: ""
providerSpec:
value:
apiVersion: azureproviderconfig.openshift.io/v1beta1
credentialsSecret:
name: azure-cloud-credentials
namespace: openshift-machine-api
image:
offer: ""
publisher: ""
resourceID: /resourceGroups/<infrastructure_id>-rg/providers/Microsoft.Compute/galleries/gallery_<infrastructure_id>/images/<infrastructure_id>-gen2/versions/latest
sku: ""
version: ""
internalLoadBalancer: ""
kind: AzureMachineProviderSpec
location: <region>
managedIdentity: <infrastructure_id>-identity
metadata:
creationTimestamp: null
natRule: null
networkResourceGroup: ""
osDisk:
diskSizeGB: 128
managedDisk:
storageAccountType: Premium_LRS
osType: Linux
publicIP: false
publicLoadBalancer: ""
resourceGroup: <infrastructure_id>-rg
sshPrivateKey: ""
sshPublicKey: ""
tags:
<custom_tag_name_1>: <custom_tag_value_1>
<custom_tag_name_2>: <custom_tag_value_2>
subnet: <infrastructure_id>-<role>-subnet
userDataSecret:
name: worker-user-data
vmSize: Standard_D4s_v3
vnet: <infrastructure_id>-vnet
zone: "1" - 1
- Specify the infrastructure ID that is based on the cluster ID that you set when you provisioned the cluster. If you have the OpenShift CLI installed, you can obtain the infrastructure ID by running the following command:
$ oc get -o jsonpath='{.status.infrastructureName}{"\n"}' infrastructure clusterYou can obtain the subnet by running the following command:
$ oc -n openshift-machine-api \ -o jsonpath='{.spec.template.spec.providerSpec.value.subnet}{"\n"}' \ get machineset/<infrastructure_id>-worker-centralus1You can obtain the vnet by running the following command:
$ oc -n openshift-machine-api \ -o jsonpath='{.spec.template.spec.providerSpec.value.vnet}{"\n"}' \ get machineset/<infrastructure_id>-worker-centralus1 - 2
- Specify the node label to add.
- 3
- Specify the infrastructure ID, node label, and region.
- 4
- Specify the image details for your compute machine set. If you want to use an Azure Marketplace image, see "Selecting an Azure Marketplace image".
- 5
- Specify an image that is compatible with your instance type. The Hyper-V generation V2 images created by the installation program have a
-gen2suffix, while V1 images have the same name without the suffix. - 6
- Specify the region to place machines on.
- 7
- Optional: Specify custom tags in your machine set. Provide the tag name in
<custom_tag_name>field and the corresponding tag value in<custom_tag_value>field. - 8
- Specify the zone within your region to place machines on. Ensure that your region supports the zone that you specify.Important
If your region supports availability zones, you must specify the zone. Specifying the zone avoids volume node affinity failure when a pod requires a persistent volume attachment. To do this, you can create a compute machine set for each zone in the same region.
2.3.2. Creating a compute machine set
In addition to the compute machine sets created by the installation program, you can create your own to dynamically manage the machine compute resources for specific workloads of your choice.
Prerequisites
- Deploy an OpenShift Container Platform cluster.
-
Install the OpenShift CLI (
oc). -
Log in to
ocas a user withcluster-adminpermission.
Procedure
Create a new YAML file that contains the compute machine set custom resource (CR) sample and is named
<file_name>.yaml.Ensure that you set the
<clusterID>and<role>parameter values.Optional: If you are not sure which value to set for a specific field, you can check an existing compute machine set from your cluster.
To list the compute machine sets in your cluster, run the following command:
$ oc get machinesets -n openshift-machine-apiExample output
NAME DESIRED CURRENT READY AVAILABLE AGE agl030519-vplxk-worker-us-east-1a 1 1 1 1 55m agl030519-vplxk-worker-us-east-1b 1 1 1 1 55m agl030519-vplxk-worker-us-east-1c 1 1 1 1 55m agl030519-vplxk-worker-us-east-1d 0 0 55m agl030519-vplxk-worker-us-east-1e 0 0 55m agl030519-vplxk-worker-us-east-1f 0 0 55mTo view values of a specific compute machine set custom resource (CR), run the following command:
$ oc get machineset <machineset_name> \ -n openshift-machine-api -o yamlExample output
apiVersion: machine.openshift.io/v1beta1 kind: MachineSet metadata: labels: machine.openshift.io/cluster-api-cluster: <infrastructure_id>1 name: <infrastructure_id>-<role>2 namespace: openshift-machine-api spec: replicas: 1 selector: matchLabels: machine.openshift.io/cluster-api-cluster: <infrastructure_id> machine.openshift.io/cluster-api-machineset: <infrastructure_id>-<role> template: metadata: labels: machine.openshift.io/cluster-api-cluster: <infrastructure_id> machine.openshift.io/cluster-api-machine-role: <role> machine.openshift.io/cluster-api-machine-type: <role> machine.openshift.io/cluster-api-machineset: <infrastructure_id>-<role> spec: providerSpec:3 ...- 1
- The cluster infrastructure ID.
- 2
- A default node label.Note
For clusters that have user-provisioned infrastructure, a compute machine set can only create
workerandinfratype machines. - 3
- The values in the
<providerSpec>section of the compute machine set CR are platform-specific. For more information about<providerSpec>parameters in the CR, see the sample compute machine set CR configuration for your provider.
Create a
MachineSetCR by running the following command:$ oc create -f <file_name>.yaml
Verification
View the list of compute machine sets by running the following command:
$ oc get machineset -n openshift-machine-apiExample output
NAME DESIRED CURRENT READY AVAILABLE AGE agl030519-vplxk-infra-us-east-1a 1 1 1 1 11m agl030519-vplxk-worker-us-east-1a 1 1 1 1 55m agl030519-vplxk-worker-us-east-1b 1 1 1 1 55m agl030519-vplxk-worker-us-east-1c 1 1 1 1 55m agl030519-vplxk-worker-us-east-1d 0 0 55m agl030519-vplxk-worker-us-east-1e 0 0 55m agl030519-vplxk-worker-us-east-1f 0 0 55mWhen the new compute machine set is available, the
DESIREDandCURRENTvalues match. If the compute machine set is not available, wait a few minutes and run the command again.
2.3.3. Labeling GPU machine sets for the cluster autoscaler
You can use a machine set label to indicate which machines the cluster autoscaler can use to deploy GPU-enabled nodes.
Prerequisites
- Your cluster uses a cluster autoscaler.
Procedure
On the machine set that you want to create machines for the cluster autoscaler to use to deploy GPU-enabled nodes, add a
cluster-api/acceleratorlabel:apiVersion: machine.openshift.io/v1beta1 kind: MachineSet metadata: name: machine-set-name spec: template: spec: metadata: labels: cluster-api/accelerator: nvidia-t41 - 1
- Specify a label of your choice that consists of alphanumeric characters,
-,_, or.and starts and ends with an alphanumeric character. For example, you might usenvidia-t4to represent Nvidia T4 GPUs, ornvidia-a10gfor A10G GPUs.NoteYou must specify the value of this label for the
spec.resourceLimits.gpus.typeparameter in yourClusterAutoscalerCR. For more information, see "Cluster autoscaler resource definition".
2.3.4. Selecting an Azure Marketplace image
You can create a machine set running on Azure that deploys machines that use the Azure Marketplace offering. To use this offering, you must first obtain the Azure Marketplace image. When obtaining your image, consider the following:
-
While the images are the same, the Azure Marketplace publisher is different depending on your region. If you are located in North America, specify
redhatas the publisher. If you are located in EMEA, specifyredhat-limitedas the publisher. -
The offer includes a
rh-ocp-workerSKU and arh-ocp-worker-gen1SKU. Therh-ocp-workerSKU represents a Hyper-V generation version 2 VM image. The default instance types used in OpenShift Container Platform are version 2 compatible. If you plan to use an instance type that is only version 1 compatible, use the image associated with therh-ocp-worker-gen1SKU. Therh-ocp-worker-gen1SKU represents a Hyper-V version 1 VM image.
Installing images with the Azure marketplace is not supported on clusters with 64-bit ARM instances.
You should only modify the RHCOS image for compute machines to use an Azure Marketplace image. Control plane machines and infrastructure nodes do not require an OpenShift Container Platform subscription and use the public RHCOS default image by default, which does not incur subscription costs on your Azure bill. Therefore, you should not modify the cluster default boot image or the control plane boot images. Applying the Azure Marketplace image to them will incur additional licensing costs that cannot be recovered.
Prerequisites
-
You have installed the Azure CLI client
(az). - Your Azure account is entitled for the offer and you have logged into this account with the Azure CLI client.
Procedure
Display all of the available OpenShift Container Platform images by running one of the following commands:
North America:
$ az vm image list --all --offer rh-ocp-worker --publisher redhat -o tableExample output
Offer Publisher Sku Urn Version ------------- -------------- ------------------ -------------------------------------------------------------- -------------- rh-ocp-worker RedHat rh-ocp-worker RedHat:rh-ocp-worker:rh-ocpworker:4.8.2021122100 4.8.2021122100 rh-ocp-worker RedHat rh-ocp-worker-gen1 RedHat:rh-ocp-worker:rh-ocp-worker-gen1:4.8.2021122100 4.8.2021122100EMEA:
$ az vm image list --all --offer rh-ocp-worker --publisher redhat-limited -o tableExample output
Offer Publisher Sku Urn Version ------------- -------------- ------------------ -------------------------------------------------------------- -------------- rh-ocp-worker redhat-limited rh-ocp-worker redhat-limited:rh-ocp-worker:rh-ocp-worker:4.8.2021122100 4.8.2021122100 rh-ocp-worker redhat-limited rh-ocp-worker-gen1 redhat-limited:rh-ocp-worker:rh-ocp-worker-gen1:4.8.2021122100 4.8.2021122100
NoteRegardless of the version of OpenShift Container Platform that you install, the correct version of the Azure Marketplace image to use is 4.8. If required, your VMs are automatically upgraded as part of the installation process.
Inspect the image for your offer by running one of the following commands:
North America:
$ az vm image show --urn redhat:rh-ocp-worker:rh-ocp-worker:<version>EMEA:
$ az vm image show --urn redhat-limited:rh-ocp-worker:rh-ocp-worker:<version>
Review the terms of the offer by running one of the following commands:
North America:
$ az vm image terms show --urn redhat:rh-ocp-worker:rh-ocp-worker:<version>EMEA:
$ az vm image terms show --urn redhat-limited:rh-ocp-worker:rh-ocp-worker:<version>
Accept the terms of the offering by running one of the following commands:
North America:
$ az vm image terms accept --urn redhat:rh-ocp-worker:rh-ocp-worker:<version>EMEA:
$ az vm image terms accept --urn redhat-limited:rh-ocp-worker:rh-ocp-worker:<version>
-
Record the image details of your offer, specifically the values for
publisher,offer,sku, andversion. Add the following parameters to the
providerSpecsection of your machine set YAML file using the image details for your offer:Sample
providerSpecimage values for Azure Marketplace machinesproviderSpec: value: image: offer: rh-ocp-worker publisher: redhat resourceID: "" sku: rh-ocp-worker type: MarketplaceWithPlan version: 4.8.2021122100
2.3.5. Enabling Azure boot diagnostics
You can enable boot diagnostics on Azure machines that your machine set creates.
Prerequisites
- Have an existing Microsoft Azure cluster.
Procedure
Add the
diagnosticsconfiguration that is applicable to your storage type to theproviderSpecfield in your machine set YAML file:For an Azure Managed storage account:
providerSpec: diagnostics: boot: storageAccountType: AzureManaged1 - 1
- Specifies an Azure Managed storage account.
For an Azure Unmanaged storage account:
providerSpec: diagnostics: boot: storageAccountType: CustomerManaged1 customerManaged: storageAccountURI: https://<storage-account>.blob.core.windows.net2 NoteOnly the Azure Blob Storage data service is supported.
Verification
- On the Microsoft Azure portal, review the Boot diagnostics page for a machine deployed by the machine set, and verify that you can see the serial logs for the machine.
2.3.6. Machine sets that deploy machines as Spot VMs
You can save on costs by creating a compute machine set running on Azure that deploys machines as non-guaranteed Spot VMs. Spot VMs utilize unused Azure capacity and are less expensive than standard VMs. You can use Spot VMs for workloads that can tolerate interruptions, such as batch or stateless, horizontally scalable workloads.
Azure can terminate a Spot VM at any time. Azure gives a 30-second warning to the user when an interruption occurs. OpenShift Container Platform begins to remove the workloads from the affected instances when Azure issues the termination warning.
Interruptions can occur when using Spot VMs for the following reasons:
- The instance price exceeds your maximum price
- The supply of Spot VMs decreases
- Azure needs capacity back
When Azure terminates an instance, a termination handler running on the Spot VM node deletes the machine resource. To satisfy the compute machine set replicas quantity, the compute machine set creates a machine that requests a Spot VM.
2.3.6.1. Creating Spot VMs by using compute machine sets
You can launch a Spot VM on Azure by adding spotVMOptions to your compute machine set YAML file.
Procedure
Add the following line under the
providerSpecfield:providerSpec: value: spotVMOptions: {}You can optionally set the
spotVMOptions.maxPricefield to limit the cost of the Spot VM. For example you can setmaxPrice: '0.98765'. If themaxPriceis set, this value is used as the hourly maximum spot price. If it is not set, the maximum price defaults to-1and charges up to the standard VM price.Azure caps Spot VM prices at the standard price. Azure will not evict an instance due to pricing if the instance is set with the default
maxPrice. However, an instance can still be evicted due to capacity restrictions.
It is strongly recommended to use the default standard VM price as the maxPrice value and to not set the maximum price for Spot VMs.
2.3.7. Machine sets that deploy machines on Ephemeral OS disks
You can create a compute machine set running on Azure that deploys machines on Ephemeral OS disks. Ephemeral OS disks use local VM capacity rather than remote Azure Storage. This configuration therefore incurs no additional cost and provides lower latency for reading, writing, and reimaging.
2.3.7.1. Creating machines on Ephemeral OS disks by using compute machine sets
You can launch machines on Ephemeral OS disks on Azure by editing your compute machine set YAML file.
Prerequisites
- Have an existing Microsoft Azure cluster.
Procedure
Edit the custom resource (CR) by running the following command:
$ oc edit machineset <machine-set-name>where
<machine-set-name>is the compute machine set that you want to provision machines on Ephemeral OS disks.Add the following to the
providerSpecfield:providerSpec: value: ... osDisk: ... diskSettings:1 ephemeralStorageLocation: Local2 cachingType: ReadOnly3 managedDisk: storageAccountType: Standard_LRS4 ...ImportantThe implementation of Ephemeral OS disk support in OpenShift Container Platform only supports the
CacheDiskplacement type. Do not change theplacementconfiguration setting.Create a compute machine set using the updated configuration:
$ oc create -f <machine-set-config>.yaml
Verification
-
On the Microsoft Azure portal, review the Overview page for a machine deployed by the compute machine set, and verify that the
Ephemeral OS diskfield is set toOS cache placement.
2.3.8. Machine sets that deploy machines with ultra disks as data disks
You can create a machine set running on Azure that deploys machines with ultra disks. Ultra disks are high-performance storage that are intended for use with the most demanding data workloads.
You can also create a persistent volume claim (PVC) that dynamically binds to a storage class backed by Azure ultra disks and mounts them to pods.
Data disks do not support the ability to specify disk throughput or disk IOPS. You can configure these properties by using PVCs.
2.3.8.1. Creating machines with ultra disks by using machine sets
You can deploy machines with ultra disks on Azure by editing your machine set YAML file.
Prerequisites
- Have an existing Microsoft Azure cluster.
Procedure
Create a custom secret in the
openshift-machine-apinamespace using theworkerdata secret by running the following command:$ oc -n openshift-machine-api \ get secret <role>-user-data \1 --template='{{index .data.userData | base64decode}}' | jq > userData.txt2 In a text editor, open the
userData.txtfile and locate the final}character in the file.-
On the immediately preceding line, add a
,. Create a new line after the
,and add the following configuration details:"storage": { "disks": [1 { "device": "/dev/disk/azure/scsi1/lun0",2 "partitions": [3 { "label": "lun0p1",4 "sizeMiB": 1024,5 "startMiB": 0 } ] } ], "filesystems": [6 { "device": "/dev/disk/by-partlabel/lun0p1", "format": "xfs", "path": "/var/lib/lun0p1" } ] }, "systemd": { "units": [7 { "contents": "[Unit]\nBefore=local-fs.target\n[Mount]\nWhere=/var/lib/lun0p1\nWhat=/dev/disk/by-partlabel/lun0p1\nOptions=defaults,pquota\n[Install]\nWantedBy=local-fs.target\n",8 "enabled": true, "name": "var-lib-lun0p1.mount" } ] }- 1
- The configuration details for the disk that you want to attach to a node as an ultra disk.
- 2
- Specify the
lunvalue that is defined in thedataDisksstanza of the machine set you are using. For example, if the machine set containslun: 0, specifylun0. You can initialize multiple data disks by specifying multiple"disks"entries in this configuration file. If you specify multiple"disks"entries, ensure that thelunvalue for each matches the value in the machine set. - 3
- The configuration details for a new partition on the disk.
- 4
- Specify a label for the partition. You might find it helpful to use hierarchical names, such as
lun0p1for the first partition oflun0. - 5
- Specify the total size in MiB of the partition.
- 6
- Specify the filesystem to use when formatting a partition. Use the partition label to specify the partition.
- 7
- Specify a
systemdunit to mount the partition at boot. Use the partition label to specify the partition. You can create multiple partitions by specifying multiple"partitions"entries in this configuration file. If you specify multiple"partitions"entries, you must specify asystemdunit for each. - 8
- For
Where, specify the value ofstorage.filesystems.path. ForWhat, specify the value ofstorage.filesystems.device.
-
On the immediately preceding line, add a
Extract the disabling template value to a file called
disableTemplating.txtby running the following command:$ oc -n openshift-machine-api get secret <role>-user-data \1 --template='{{index .data.disableTemplating | base64decode}}' | jq > disableTemplating.txt- 1
- Replace
<role>withworker.
Combine the
userData.txtfile anddisableTemplating.txtfile to create a data secret file by running the following command:$ oc -n openshift-machine-api create secret generic <role>-user-data-x5 \1 --from-file=userData=userData.txt \ --from-file=disableTemplating=disableTemplating.txt- 1
- For
<role>-user-data-x5, specify the name of the secret. Replace<role>withworker.
Copy an existing Azure
MachineSetcustom resource (CR) and edit it by running the following command:$ oc edit machineset <machine_set_name>where
<machine_set_name>is the machine set that you want to provision machines with ultra disks.Add the following lines in the positions indicated:
apiVersion: machine.openshift.io/v1beta1 kind: MachineSet spec: template: spec: metadata: labels: disk: ultrassd1 providerSpec: value: ultraSSDCapability: Enabled2 dataDisks:3 - nameSuffix: ultrassd lun: 0 diskSizeGB: 4 deletionPolicy: Delete cachingType: None managedDisk: storageAccountType: UltraSSD_LRS userDataSecret: name: <role>-user-data-x54 Create a machine set using the updated configuration by running the following command:
$ oc create -f <machine_set_name>.yaml
Verification
Validate that the machines are created by running the following command:
$ oc get machinesThe machines should be in the
Runningstate.For a machine that is running and has a node attached, validate the partition by running the following command:
$ oc debug node/<node_name> -- chroot /host lsblkIn this command,
oc debug node/<node_name>starts a debugging shell on the node<node_name>and passes a command with--. The passed commandchroot /hostprovides access to the underlying host OS binaries, andlsblkshows the block devices that are attached to the host OS machine.
Next steps
To use an ultra disk from within a pod, create a workload that uses the mount point. Create a YAML file similar to the following example:
apiVersion: v1 kind: Pod metadata: name: ssd-benchmark1 spec: containers: - name: ssd-benchmark1 image: nginx ports: - containerPort: 80 name: "http-server" volumeMounts: - name: lun0p1 mountPath: "/tmp" volumes: - name: lun0p1 hostPath: path: /var/lib/lun0p1 type: DirectoryOrCreate nodeSelector: disktype: ultrassd
2.3.8.2. Troubleshooting resources for machine sets that enable ultra disks
Use the information in this section to understand and recover from issues you might encounter.
2.3.8.2.1. Incorrect ultra disk configuration
If an incorrect configuration of the ultraSSDCapability parameter is specified in the machine set, the machine provisioning fails.
For example, if the ultraSSDCapability parameter is set to Disabled, but an ultra disk is specified in the dataDisks parameter, the following error message appears:
StorageAccountType UltraSSD_LRS can be used only when additionalCapabilities.ultraSSDEnabled is set.- To resolve this issue, verify that your machine set configuration is correct.
2.3.8.2.2. Unsupported disk parameters
If a region, availability zone, or instance size that is not compatible with ultra disks is specified in the machine set, the machine provisioning fails. Check the logs for the following error message:
failed to create vm <machine_name>: failure sending request for machine <machine_name>: cannot create vm: compute.VirtualMachinesClient#CreateOrUpdate: Failure sending request: StatusCode=400 -- Original Error: Code="BadRequest" Message="Storage Account type 'UltraSSD_LRS' is not supported <more_information_about_why>."- To resolve this issue, verify that you are using this feature in a supported environment and that your machine set configuration is correct.
2.3.8.2.3. Unable to delete disks
If the deletion of ultra disks as data disks is not working as expected, the machines are deleted and the data disks are orphaned. You must delete the orphaned disks manually if desired.
2.3.9. Enabling customer-managed encryption keys for a machine set
You can supply an encryption key to Azure to encrypt data on managed disks at rest. You can enable server-side encryption with customer-managed keys by using the Machine API.
An Azure Key Vault, a disk encryption set, and an encryption key are required to use a customer-managed key. The disk encryption set must be in a resource group where the Cloud Credential Operator (CCO) has granted permissions. If not, an additional reader role is required to be granted on the disk encryption set.
Prerequisites
Procedure
Configure the disk encryption set under the
providerSpecfield in your machine set YAML file. For example:providerSpec: value: osDisk: diskSizeGB: 128 managedDisk: diskEncryptionSet: id: /subscriptions/<subscription_id>/resourceGroups/<resource_group_name>/providers/Microsoft.Compute/diskEncryptionSets/<disk_encryption_set_name> storageAccountType: Premium_LRS
2.3.10. Accelerated Networking for Microsoft Azure VMs
Accelerated Networking uses single root I/O virtualization (SR-IOV) to provide Microsoft Azure VMs with a more direct path to the switch. This enhances network performance. This feature can be enabled during or after installation.
2.3.10.1. Limitations
Consider the following limitations when deciding whether to use Accelerated Networking:
- Accelerated Networking is only supported on clusters where the Machine API is operational.
Although the minimum requirement for an Azure worker node is two vCPUs, Accelerated Networking requires an Azure VM size that includes at least four vCPUs. To satisfy this requirement, you can change the value of
vmSizein your machine set. For information about Azure VM sizes, see Microsoft Azure documentation.
- When this feature is enabled on an existing Azure cluster, only newly provisioned nodes are affected. Currently running nodes are not reconciled. To enable the feature on all nodes, you must replace each existing machine. This can be done for each machine individually, or by scaling the replicas down to zero, and then scaling back up to your desired number of replicas.
2.3.11. Adding a GPU node to an existing OpenShift Container Platform cluster
You can copy and modify a default compute machine set configuration to create a GPU-enabled machine set and machines for the Azure cloud provider.
The following table lists the validated instance types:
| vmSize | NVIDIA GPU accelerator | Maximum number of GPUs | Architecture |
|---|---|---|---|
|
| V100 | 4 | x86 |
|
| T4 | 1 | x86 |
|
| A100 | 8 | x86 |
By default, Azure subscriptions do not have a quota for the Azure instance types with GPU. Customers have to request a quota increase for the Azure instance families listed above.
Procedure
View the machines and machine sets that exist in the
openshift-machine-apinamespace by running the following command. Each compute machine set is associated with a different availability zone within the Azure region. The installer automatically load balances compute machines across availability zones.$ oc get machineset -n openshift-machine-apiExample output
NAME DESIRED CURRENT READY AVAILABLE AGE myclustername-worker-centralus1 1 1 1 1 6h9m myclustername-worker-centralus2 1 1 1 1 6h9m myclustername-worker-centralus3 1 1 1 1 6h9mMake a copy of one of the existing compute
MachineSetdefinitions and output the result to a YAML file by running the following command. This will be the basis for the GPU-enabled compute machine set definition.$ oc get machineset -n openshift-machine-api myclustername-worker-centralus1 -o yaml > machineset-azure.yamlView the content of the machineset:
$ cat machineset-azure.yamlExample
machineset-azure.yamlfileapiVersion: machine.openshift.io/v1beta1 kind: MachineSet metadata: annotations: machine.openshift.io/GPU: "0" machine.openshift.io/memoryMb: "16384" machine.openshift.io/vCPU: "4" creationTimestamp: "2023-02-06T14:08:19Z" generation: 1 labels: machine.openshift.io/cluster-api-cluster: myclustername machine.openshift.io/cluster-api-machine-role: worker machine.openshift.io/cluster-api-machine-type: worker name: myclustername-worker-centralus1 namespace: openshift-machine-api resourceVersion: "23601" uid: acd56e0c-7612-473a-ae37-8704f34b80de spec: replicas: 1 selector: matchLabels: machine.openshift.io/cluster-api-cluster: myclustername machine.openshift.io/cluster-api-machineset: myclustername-worker-centralus1 template: metadata: labels: machine.openshift.io/cluster-api-cluster: myclustername machine.openshift.io/cluster-api-machine-role: worker machine.openshift.io/cluster-api-machine-type: worker machine.openshift.io/cluster-api-machineset: myclustername-worker-centralus1 spec: lifecycleHooks: {} metadata: {} providerSpec: value: acceleratedNetworking: true apiVersion: machine.openshift.io/v1beta1 credentialsSecret: name: azure-cloud-credentials namespace: openshift-machine-api diagnostics: {} image: offer: "" publisher: "" resourceID: /resourceGroups/myclustername-rg/providers/Microsoft.Compute/galleries/gallery_myclustername_n6n4r/images/myclustername-gen2/versions/latest sku: "" version: "" kind: AzureMachineProviderSpec location: centralus managedIdentity: myclustername-identity metadata: creationTimestamp: null networkResourceGroup: myclustername-rg osDisk: diskSettings: {} diskSizeGB: 128 managedDisk: storageAccountType: Premium_LRS osType: Linux publicIP: false publicLoadBalancer: myclustername resourceGroup: myclustername-rg spotVMOptions: {} subnet: myclustername-worker-subnet userDataSecret: name: worker-user-data vmSize: Standard_D4s_v3 vnet: myclustername-vnet zone: "1" status: availableReplicas: 1 fullyLabeledReplicas: 1 observedGeneration: 1 readyReplicas: 1 replicas: 1Make a copy of the
machineset-azure.yamlfile by running the following command:$ cp machineset-azure.yaml machineset-azure-gpu.yamlUpdate the following fields in
machineset-azure-gpu.yaml:-
Change
.metadata.nameto a name containinggpu. -
Change
.spec.selector.matchLabels["machine.openshift.io/cluster-api-machineset"]to match the new .metadata.name. -
Change
.spec.template.metadata.labels["machine.openshift.io/cluster-api-machineset"]to match the new.metadata.name. Change
.spec.template.spec.providerSpec.value.vmSizetoStandard_NC4as_T4_v3.Example
machineset-azure-gpu.yamlfileapiVersion: machine.openshift.io/v1beta1 kind: MachineSet metadata: annotations: machine.openshift.io/GPU: "1" machine.openshift.io/memoryMb: "28672" machine.openshift.io/vCPU: "4" creationTimestamp: "2023-02-06T20:27:12Z" generation: 1 labels: machine.openshift.io/cluster-api-cluster: myclustername machine.openshift.io/cluster-api-machine-role: worker machine.openshift.io/cluster-api-machine-type: worker name: myclustername-nc4ast4-gpu-worker-centralus1 namespace: openshift-machine-api resourceVersion: "166285" uid: 4eedce7f-6a57-4abe-b529-031140f02ffa spec: replicas: 1 selector: matchLabels: machine.openshift.io/cluster-api-cluster: myclustername machine.openshift.io/cluster-api-machineset: myclustername-nc4ast4-gpu-worker-centralus1 template: metadata: labels: machine.openshift.io/cluster-api-cluster: myclustername machine.openshift.io/cluster-api-machine-role: worker machine.openshift.io/cluster-api-machine-type: worker machine.openshift.io/cluster-api-machineset: myclustername-nc4ast4-gpu-worker-centralus1 spec: lifecycleHooks: {} metadata: {} providerSpec: value: acceleratedNetworking: true apiVersion: machine.openshift.io/v1beta1 credentialsSecret: name: azure-cloud-credentials namespace: openshift-machine-api diagnostics: {} image: offer: "" publisher: "" resourceID: /resourceGroups/myclustername-rg/providers/Microsoft.Compute/galleries/gallery_myclustername_n6n4r/images/myclustername-gen2/versions/latest sku: "" version: "" kind: AzureMachineProviderSpec location: centralus managedIdentity: myclustername-identity metadata: creationTimestamp: null networkResourceGroup: myclustername-rg osDisk: diskSettings: {} diskSizeGB: 128 managedDisk: storageAccountType: Premium_LRS osType: Linux publicIP: false publicLoadBalancer: myclustername resourceGroup: myclustername-rg spotVMOptions: {} subnet: myclustername-worker-subnet userDataSecret: name: worker-user-data vmSize: Standard_NC4as_T4_v3 vnet: myclustername-vnet zone: "1" status: availableReplicas: 1 fullyLabeledReplicas: 1 observedGeneration: 1 readyReplicas: 1 replicas: 1
-
Change
To verify your changes, perform a
diffof the original compute definition and the new GPU-enabled node definition by running the following command:$ diff machineset-azure.yaml machineset-azure-gpu.yamlExample output
14c14 < name: myclustername-worker-centralus1 --- > name: myclustername-nc4ast4-gpu-worker-centralus1 23c23 < machine.openshift.io/cluster-api-machineset: myclustername-worker-centralus1 --- > machine.openshift.io/cluster-api-machineset: myclustername-nc4ast4-gpu-worker-centralus1 30c30 < machine.openshift.io/cluster-api-machineset: myclustername-worker-centralus1 --- > machine.openshift.io/cluster-api-machineset: myclustername-nc4ast4-gpu-worker-centralus1 67c67 < vmSize: Standard_D4s_v3 --- > vmSize: Standard_NC4as_T4_v3Create the GPU-enabled compute machine set from the definition file by running the following command:
$ oc create -f machineset-azure-gpu.yamlExample output
machineset.machine.openshift.io/myclustername-nc4ast4-gpu-worker-centralus1 createdView the machines and machine sets that exist in the
openshift-machine-apinamespace by running the following command. Each compute machine set is associated with a different availability zone within the Azure region. The installer automatically load balances compute machines across availability zones.$ oc get machineset -n openshift-machine-apiExample output
NAME DESIRED CURRENT READY AVAILABLE AGE clustername-n6n4r-nc4ast4-gpu-worker-centralus1 1 1 1 1 122m clustername-n6n4r-worker-centralus1 1 1 1 1 8h clustername-n6n4r-worker-centralus2 1 1 1 1 8h clustername-n6n4r-worker-centralus3 1 1 1 1 8hView the machines that exist in the
openshift-machine-apinamespace by running the following command. You can only configure one compute machine per set, although you can scale a compute machine set to add a node in a particular region and zone.$ oc get machines -n openshift-machine-apiExample output
NAME PHASE TYPE REGION ZONE AGE myclustername-master-0 Running Standard_D8s_v3 centralus 2 6h40m myclustername-master-1 Running Standard_D8s_v3 centralus 1 6h40m myclustername-master-2 Running Standard_D8s_v3 centralus 3 6h40m myclustername-nc4ast4-gpu-worker-centralus1-w9bqn Running centralus 1 21m myclustername-worker-centralus1-rbh6b Running Standard_D4s_v3 centralus 1 6h38m myclustername-worker-centralus2-dbz7w Running Standard_D4s_v3 centralus 2 6h38m myclustername-worker-centralus3-p9b8c Running Standard_D4s_v3 centralus 3 6h38mView the existing nodes, machines, and machine sets by running the following command. Note that each node is an instance of a machine definition with a specific Azure region and OpenShift Container Platform role.
$ oc get nodesExample output
NAME STATUS ROLES AGE VERSION myclustername-master-0 Ready control-plane,master 6h39m v1.25.4+a34b9e9 myclustername-master-1 Ready control-plane,master 6h41m v1.25.4+a34b9e9 myclustername-master-2 Ready control-plane,master 6h39m v1.25.4+a34b9e9 myclustername-nc4ast4-gpu-worker-centralus1-w9bqn Ready worker 14m v1.25.4+a34b9e9 myclustername-worker-centralus1-rbh6b Ready worker 6h29m v1.25.4+a34b9e9 myclustername-worker-centralus2-dbz7w Ready worker 6h29m v1.25.4+a34b9e9 myclustername-worker-centralus3-p9b8c Ready worker 6h31m v1.25.4+a34b9e9View the list of compute machine sets:
$ oc get machineset -n openshift-machine-apiExample output
NAME DESIRED CURRENT READY AVAILABLE AGE myclustername-worker-centralus1 1 1 1 1 8h myclustername-worker-centralus2 1 1 1 1 8h myclustername-worker-centralus3 1 1 1 1 8hCreate the GPU-enabled compute machine set from the definition file by running the following command:
$ oc create -f machineset-azure-gpu.yamlView the list of compute machine sets:
oc get machineset -n openshift-machine-apiExample output
NAME DESIRED CURRENT READY AVAILABLE AGE myclustername-nc4ast4-gpu-worker-centralus1 1 1 1 1 121m myclustername-worker-centralus1 1 1 1 1 8h myclustername-worker-centralus2 1 1 1 1 8h myclustername-worker-centralus3 1 1 1 1 8h
Verification
View the machine set you created by running the following command:
$ oc get machineset -n openshift-machine-api | grep gpuThe MachineSet replica count is set to
1so a newMachineobject is created automatically.Example output
myclustername-nc4ast4-gpu-worker-centralus1 1 1 1 1 121mView the
Machineobject that the machine set created by running the following command:$ oc -n openshift-machine-api get machines | grep gpuExample output
myclustername-nc4ast4-gpu-worker-centralus1-w9bqn Running Standard_NC4as_T4_v3 centralus 1 21m
There is no need to specify a namespace for the node. The node definition is cluster scoped.
2.3.12. Deploying the Node Feature Discovery Operator
After the GPU-enabled node is created, you need to discover the GPU-enabled node so it can be scheduled. To do this, install the Node Feature Discovery (NFD) Operator. The NFD Operator identifies hardware device features in nodes. It solves the general problem of identifying and cataloging hardware resources in the infrastructure nodes so they can be made available to OpenShift Container Platform.
Procedure
- Install the Node Feature Discovery Operator from OperatorHub in the OpenShift Container Platform console.
-
After installing the NFD Operator into OperatorHub, select Node Feature Discovery from the installed Operators list and select Create instance. This installs the
nfd-masterandnfd-workerpods, onenfd-workerpod for each compute node, in theopenshift-nfdnamespace. Verify that the Operator is installed and running by running the following command:
$ oc get pods -n openshift-nfdExample output
NAME READY STATUS RESTARTS AGE nfd-controller-manager-8646fcbb65-x5qgk 2/2 Running 7 (8h ago) 1d- Browse to the installed Oerator in the console and select Create Node Feature Discovery.
-
Select Create to build a NFD custom resource. This creates NFD pods in the
openshift-nfdnamespace that poll the OpenShift Container Platform nodes for hardware resources and catalogue them.
Verification
After a successful build, verify that a NFD pod is running on each nodes by running the following command:
$ oc get pods -n openshift-nfdExample output
NAME READY STATUS RESTARTS AGE nfd-controller-manager-8646fcbb65-x5qgk 2/2 Running 7 (8h ago) 12d nfd-master-769656c4cb-w9vrv 1/1 Running 0 12d nfd-worker-qjxb2 1/1 Running 3 (3d14h ago) 12d nfd-worker-xtz9b 1/1 Running 5 (3d14h ago) 12dThe NFD Operator uses vendor PCI IDs to identify hardware in a node. NVIDIA uses the PCI ID
10de.View the NVIDIA GPU discovered by the NFD Operator by running the following command:
$ oc describe node ip-10-0-132-138.us-east-2.compute.internal | egrep 'Roles|pci'Example output
Roles: worker feature.node.kubernetes.io/pci-1013.present=true feature.node.kubernetes.io/pci-10de.present=true feature.node.kubernetes.io/pci-1d0f.present=true10deappears in the node feature list for the GPU-enabled node. This mean the NFD Operator correctly identified the node from the GPU-enabled MachineSet.
2.3.12.1. Enabling Accelerated Networking on an existing Microsoft Azure cluster
You can enable Accelerated Networking on Azure by adding acceleratedNetworking to your machine set YAML file.
Prerequisites
- Have an existing Microsoft Azure cluster where the Machine API is operational.
Procedure
Add the following to the
providerSpecfield:providerSpec: value: acceleratedNetworking: true1 vmSize: <azure-vm-size>2 - 1
- This line enables Accelerated Networking.
- 2
- Specify an Azure VM size that includes at least four vCPUs. For information about VM sizes, see Microsoft Azure documentation.
Next steps
- To enable the feature on currently running nodes, you must replace each existing machine. This can be done for each machine individually, or by scaling the replicas down to zero, and then scaling back up to your desired number of replicas.
Verification
-
On the Microsoft Azure portal, review the Networking settings page for a machine provisioned by the machine set, and verify that the
Accelerated networkingfield is set toEnabled.
2.4. Creating a compute machine set on Azure Stack Hub
You can create a different compute machine set to serve a specific purpose in your OpenShift Container Platform cluster on Microsoft Azure Stack Hub. For example, you might create infrastructure machine sets and related machines so that you can move supporting workloads to the new machines.
You can use the advanced machine management and scaling capabilities only in clusters where the Machine API is operational. Clusters with user-provisioned infrastructure require additional validation and configuration to use the Machine API.
Clusters with the infrastructure platform type none cannot use the Machine API. This limitation applies even if the compute machines that are attached to the cluster are installed on a platform that supports the feature. This parameter cannot be changed after installation.
To view the platform type for your cluster, run the following command:
$ oc get infrastructure cluster -o jsonpath='{.status.platform}'2.4.1. Sample YAML for a compute machine set custom resource on Azure Stack Hub
This sample YAML defines a compute machine set that runs in the 1 Microsoft Azure zone in a region and creates nodes that are labeled with node-role.kubernetes.io/<role>: "".
In this sample, <infrastructure_id> is the infrastructure ID label that is based on the cluster ID that you set when you provisioned the cluster, and <role> is the node label to add.
apiVersion: machine.openshift.io/v1beta1
kind: MachineSet
metadata:
labels:
machine.openshift.io/cluster-api-cluster: <infrastructure_id>
machine.openshift.io/cluster-api-machine-role: <role>
machine.openshift.io/cluster-api-machine-type: <role>
name: <infrastructure_id>-<role>-<region>
namespace: openshift-machine-api
spec:
replicas: 1
selector:
matchLabels:
machine.openshift.io/cluster-api-cluster: <infrastructure_id>
machine.openshift.io/cluster-api-machineset: <infrastructure_id>-<role>-<region>
template:
metadata:
creationTimestamp: null
labels:
machine.openshift.io/cluster-api-cluster: <infrastructure_id>
machine.openshift.io/cluster-api-machine-role: <role>
machine.openshift.io/cluster-api-machine-type: <role>
machine.openshift.io/cluster-api-machineset: <infrastructure_id>-<role>-<region>
spec:
metadata:
creationTimestamp: null
labels:
node-role.kubernetes.io/<role>: ""
providerSpec:
value:
apiVersion: machine.openshift.io/v1beta1
availabilitySet: <availability_set>
credentialsSecret:
name: azure-cloud-credentials
namespace: openshift-machine-api
image:
offer: ""
publisher: ""
resourceID: /resourceGroups/<infrastructure_id>-rg/providers/Microsoft.Compute/images/<infrastructure_id>
sku: ""
version: ""
internalLoadBalancer: ""
kind: AzureMachineProviderSpec
location: <region>
managedIdentity: <infrastructure_id>-identity
metadata:
creationTimestamp: null
natRule: null
networkResourceGroup: ""
osDisk:
diskSizeGB: 128
managedDisk:
storageAccountType: Premium_LRS
osType: Linux
publicIP: false
publicLoadBalancer: ""
resourceGroup: <infrastructure_id>-rg
sshPrivateKey: ""
sshPublicKey: ""
subnet: <infrastructure_id>-<role>-subnet
userDataSecret:
name: worker-user-data
vmSize: Standard_DS4_v2
vnet: <infrastructure_id>-vnet
zone: "1" - 1 5 7 13 15 16 17 20
- Specify the infrastructure ID that is based on the cluster ID that you set when you provisioned the cluster. If you have the OpenShift CLI installed, you can obtain the infrastructure ID by running the following command:
$ oc get -o jsonpath='{.status.infrastructureName}{"\n"}' infrastructure clusterYou can obtain the subnet by running the following command:
$ oc -n openshift-machine-api \ -o jsonpath='{.spec.template.spec.providerSpec.value.subnet}{"\n"}' \ get machineset/<infrastructure_id>-worker-centralus1You can obtain the vnet by running the following command:
$ oc -n openshift-machine-api \ -o jsonpath='{.spec.template.spec.providerSpec.value.vnet}{"\n"}' \ get machineset/<infrastructure_id>-worker-centralus1 - 2 3 8 9 11 18 19
- Specify the node label to add.
- 4 6 10
- Specify the infrastructure ID, node label, and region.
- 14
- Specify the region to place machines on.
- 21
- Specify the zone within your region to place machines on. Be sure that your region supports the zone that you specify.
- 12
- Specify the availability set for the cluster.
2.4.2. Creating a compute machine set
In addition to the compute machine sets created by the installation program, you can create your own to dynamically manage the machine compute resources for specific workloads of your choice.
Prerequisites
- Deploy an OpenShift Container Platform cluster.
-
Install the OpenShift CLI (
oc). -
Log in to
ocas a user withcluster-adminpermission. - Create an availability set in which to deploy Azure Stack Hub compute machines.
Procedure
Create a new YAML file that contains the compute machine set custom resource (CR) sample and is named
<file_name>.yaml.Ensure that you set the
<availabilitySet>,<clusterID>, and<role>parameter values.Optional: If you are not sure which value to set for a specific field, you can check an existing compute machine set from your cluster.
To list the compute machine sets in your cluster, run the following command:
$ oc get machinesets -n openshift-machine-apiExample output
NAME DESIRED CURRENT READY AVAILABLE AGE agl030519-vplxk-worker-us-east-1a 1 1 1 1 55m agl030519-vplxk-worker-us-east-1b 1 1 1 1 55m agl030519-vplxk-worker-us-east-1c 1 1 1 1 55m agl030519-vplxk-worker-us-east-1d 0 0 55m agl030519-vplxk-worker-us-east-1e 0 0 55m agl030519-vplxk-worker-us-east-1f 0 0 55mTo view values of a specific compute machine set custom resource (CR), run the following command:
$ oc get machineset <machineset_name> \ -n openshift-machine-api -o yamlExample output
apiVersion: machine.openshift.io/v1beta1 kind: MachineSet metadata: labels: machine.openshift.io/cluster-api-cluster: <infrastructure_id>1 name: <infrastructure_id>-<role>2 namespace: openshift-machine-api spec: replicas: 1 selector: matchLabels: machine.openshift.io/cluster-api-cluster: <infrastructure_id> machine.openshift.io/cluster-api-machineset: <infrastructure_id>-<role> template: metadata: labels: machine.openshift.io/cluster-api-cluster: <infrastructure_id> machine.openshift.io/cluster-api-machine-role: <role> machine.openshift.io/cluster-api-machine-type: <role> machine.openshift.io/cluster-api-machineset: <infrastructure_id>-<role> spec: providerSpec:3 ...- 1
- The cluster infrastructure ID.
- 2
- A default node label.Note
For clusters that have user-provisioned infrastructure, a compute machine set can only create
workerandinfratype machines. - 3
- The values in the
<providerSpec>section of the compute machine set CR are platform-specific. For more information about<providerSpec>parameters in the CR, see the sample compute machine set CR configuration for your provider.
Create a
MachineSetCR by running the following command:$ oc create -f <file_name>.yaml
Verification
View the list of compute machine sets by running the following command:
$ oc get machineset -n openshift-machine-apiExample output
NAME DESIRED CURRENT READY AVAILABLE AGE agl030519-vplxk-infra-us-east-1a 1 1 1 1 11m agl030519-vplxk-worker-us-east-1a 1 1 1 1 55m agl030519-vplxk-worker-us-east-1b 1 1 1 1 55m agl030519-vplxk-worker-us-east-1c 1 1 1 1 55m agl030519-vplxk-worker-us-east-1d 0 0 55m agl030519-vplxk-worker-us-east-1e 0 0 55m agl030519-vplxk-worker-us-east-1f 0 0 55mWhen the new compute machine set is available, the
DESIREDandCURRENTvalues match. If the compute machine set is not available, wait a few minutes and run the command again.
2.4.3. Labeling GPU machine sets for the cluster autoscaler
You can use a machine set label to indicate which machines the cluster autoscaler can use to deploy GPU-enabled nodes.
Prerequisites
- Your cluster uses a cluster autoscaler.
Procedure
On the machine set that you want to create machines for the cluster autoscaler to use to deploy GPU-enabled nodes, add a
cluster-api/acceleratorlabel:apiVersion: machine.openshift.io/v1beta1 kind: MachineSet metadata: name: machine-set-name spec: template: spec: metadata: labels: cluster-api/accelerator: nvidia-t41 - 1
- Specify a label of your choice that consists of alphanumeric characters,
-,_, or.and starts and ends with an alphanumeric character. For example, you might usenvidia-t4to represent Nvidia T4 GPUs, ornvidia-a10gfor A10G GPUs.NoteYou must specify the value of this label for the
spec.resourceLimits.gpus.typeparameter in yourClusterAutoscalerCR. For more information, see "Cluster autoscaler resource definition".
2.4.4. Enabling Azure boot diagnostics
You can enable boot diagnostics on Azure machines that your machine set creates.
Prerequisites
- Have an existing Microsoft Azure Stack Hub cluster.
Procedure
Add the
diagnosticsconfiguration that is applicable to your storage type to theproviderSpecfield in your machine set YAML file:For an Azure Managed storage account:
providerSpec: diagnostics: boot: storageAccountType: AzureManaged1 - 1
- Specifies an Azure Managed storage account.
For an Azure Unmanaged storage account:
providerSpec: diagnostics: boot: storageAccountType: CustomerManaged1 customerManaged: storageAccountURI: https://<storage-account>.blob.core.windows.net2 NoteOnly the Azure Blob Storage data service is supported.
Verification
- On the Microsoft Azure portal, review the Boot diagnostics page for a machine deployed by the machine set, and verify that you can see the serial logs for the machine.
2.4.5. Enabling customer-managed encryption keys for a machine set
You can supply an encryption key to Azure to encrypt data on managed disks at rest. You can enable server-side encryption with customer-managed keys by using the Machine API.
An Azure Key Vault, a disk encryption set, and an encryption key are required to use a customer-managed key. The disk encryption set must be in a resource group where the Cloud Credential Operator (CCO) has granted permissions. If not, an additional reader role is required to be granted on the disk encryption set.
Prerequisites
Procedure
Configure the disk encryption set under the
providerSpecfield in your machine set YAML file. For example:providerSpec: value: osDisk: diskSizeGB: 128 managedDisk: diskEncryptionSet: id: /subscriptions/<subscription_id>/resourceGroups/<resource_group_name>/providers/Microsoft.Compute/diskEncryptionSets/<disk_encryption_set_name> storageAccountType: Premium_LRS
2.5. Creating a compute machine set on Google Cloud
You can create a different compute machine set to serve a specific purpose in your OpenShift Container Platform cluster on Google Cloud. For example, you might create infrastructure machine sets and related machines so that you can move supporting workloads to the new machines.
You can use the advanced machine management and scaling capabilities only in clusters where the Machine API is operational. Clusters with user-provisioned infrastructure require additional validation and configuration to use the Machine API.
Clusters with the infrastructure platform type none cannot use the Machine API. This limitation applies even if the compute machines that are attached to the cluster are installed on a platform that supports the feature. This parameter cannot be changed after installation.
To view the platform type for your cluster, run the following command:
$ oc get infrastructure cluster -o jsonpath='{.status.platform}'2.5.1. Sample YAML for a compute machine set custom resource on Google Cloud
This sample YAML defines a compute machine set that runs in Google Cloud and creates nodes that are labeled with node-role.kubernetes.io/<role>: "".
In this sample, <infrastructure_id> is the infrastructure ID label that is based on the cluster ID that you set when you provisioned the cluster, and <role> is the node label to add.
apiVersion: machine.openshift.io/v1beta1
kind: MachineSet
metadata:
labels:
machine.openshift.io/cluster-api-cluster: <infrastructure_id>
name: <infrastructure_id>-w-a
namespace: openshift-machine-api
spec:
replicas: 1
selector:
matchLabels:
machine.openshift.io/cluster-api-cluster: <infrastructure_id>
machine.openshift.io/cluster-api-machineset: <infrastructure_id>-w-a
template:
metadata:
creationTimestamp: null
labels:
machine.openshift.io/cluster-api-cluster: <infrastructure_id>
machine.openshift.io/cluster-api-machine-role: <role>
machine.openshift.io/cluster-api-machine-type: <role>
machine.openshift.io/cluster-api-machineset: <infrastructure_id>-w-a
spec:
metadata:
labels:
node-role.kubernetes.io/<role>: ""
providerSpec:
value:
apiVersion: gcpprovider.openshift.io/v1beta1
canIPForward: false
credentialsSecret:
name: gcp-cloud-credentials
deletionProtection: false
disks:
- autoDelete: true
boot: true
image: <path_to_image>
labels: null
sizeGb: 128
type: pd-ssd
gcpMetadata:
- key: <custom_metadata_key>
value: <custom_metadata_value>
kind: GCPMachineProviderSpec
machineType: n1-standard-4
metadata:
creationTimestamp: null
networkInterfaces:
- network: <infrastructure_id>-network
subnetwork: <infrastructure_id>-worker-subnet
projectID: <project_name>
region: us-central1
serviceAccounts:
- email: <infrastructure_id>-w@<project_name>.iam.gserviceaccount.com
scopes:
- https://www.googleapis.com/auth/cloud-platform
tags:
- <infrastructure_id>-worker
userDataSecret:
name: worker-user-data
zone: us-central1-a- 1
- For
<infrastructure_id>, specify the infrastructure ID that is based on the cluster ID that you set when you provisioned the cluster. If you have the OpenShift CLI installed, you can obtain the infrastructure ID by running the following command:$ oc get -o jsonpath='{.status.infrastructureName}{"\n"}' infrastructure cluster - 2
- For
<node>, specify the node label to add. - 3
- Specify the path to the image that is used in current compute machine sets. If you have the OpenShift CLI installed, you can obtain the path to the image by running the following command:
$ oc -n openshift-machine-api \ -o jsonpath='{.spec.template.spec.providerSpec.value.disks[0].image}{"\n"}' \ get machineset/<infrastructure_id>-worker-aTo use a Google Cloud Marketplace image, specify the offer to use:
-
OpenShift Container Platform:
https://www.googleapis.com/compute/v1/projects/redhat-marketplace-public/global/images/redhat-coreos-ocp-48-x86-64-202210040145 -
OpenShift Platform Plus:
https://www.googleapis.com/compute/v1/projects/redhat-marketplace-public/global/images/redhat-coreos-opp-48-x86-64-202206140145 -
OpenShift Kubernetes Engine:
https://www.googleapis.com/compute/v1/projects/redhat-marketplace-public/global/images/redhat-coreos-oke-48-x86-64-202206140145
-
OpenShift Container Platform:
- 4
- Optional: Specify custom metadata in the form of a
key:valuepair. For example use cases, see the Google Cloud documentation for setting custom metadata. - 5
- For
<project_name>, specify the name of the Google Cloud project that you use for your cluster. - 6
- Specifies a single service account. Multiple service accounts are not supported.
2.5.2. Creating a compute machine set
In addition to the compute machine sets created by the installation program, you can create your own to dynamically manage the machine compute resources for specific workloads of your choice.
Prerequisites
- Deploy an OpenShift Container Platform cluster.
-
Install the OpenShift CLI (
oc). -
Log in to
ocas a user withcluster-adminpermission.
Procedure
Create a new YAML file that contains the compute machine set custom resource (CR) sample and is named
<file_name>.yaml.Ensure that you set the
<clusterID>and<role>parameter values.Optional: If you are not sure which value to set for a specific field, you can check an existing compute machine set from your cluster.
To list the compute machine sets in your cluster, run the following command:
$ oc get machinesets -n openshift-machine-apiExample output
NAME DESIRED CURRENT READY AVAILABLE AGE agl030519-vplxk-worker-us-east-1a 1 1 1 1 55m agl030519-vplxk-worker-us-east-1b 1 1 1 1 55m agl030519-vplxk-worker-us-east-1c 1 1 1 1 55m agl030519-vplxk-worker-us-east-1d 0 0 55m agl030519-vplxk-worker-us-east-1e 0 0 55m agl030519-vplxk-worker-us-east-1f 0 0 55mTo view values of a specific compute machine set custom resource (CR), run the following command:
$ oc get machineset <machineset_name> \ -n openshift-machine-api -o yamlExample output
apiVersion: machine.openshift.io/v1beta1 kind: MachineSet metadata: labels: machine.openshift.io/cluster-api-cluster: <infrastructure_id>1 name: <infrastructure_id>-<role>2 namespace: openshift-machine-api spec: replicas: 1 selector: matchLabels: machine.openshift.io/cluster-api-cluster: <infrastructure_id> machine.openshift.io/cluster-api-machineset: <infrastructure_id>-<role> template: metadata: labels: machine.openshift.io/cluster-api-cluster: <infrastructure_id> machine.openshift.io/cluster-api-machine-role: <role> machine.openshift.io/cluster-api-machine-type: <role> machine.openshift.io/cluster-api-machineset: <infrastructure_id>-<role> spec: providerSpec:3 ...- 1
- The cluster infrastructure ID.
- 2
- A default node label.Note
For clusters that have user-provisioned infrastructure, a compute machine set can only create
workerandinfratype machines. - 3
- The values in the
<providerSpec>section of the compute machine set CR are platform-specific. For more information about<providerSpec>parameters in the CR, see the sample compute machine set CR configuration for your provider.
Create a
MachineSetCR by running the following command:$ oc create -f <file_name>.yaml
Verification
View the list of compute machine sets by running the following command:
$ oc get machineset -n openshift-machine-apiExample output
NAME DESIRED CURRENT READY AVAILABLE AGE agl030519-vplxk-infra-us-east-1a 1 1 1 1 11m agl030519-vplxk-worker-us-east-1a 1 1 1 1 55m agl030519-vplxk-worker-us-east-1b 1 1 1 1 55m agl030519-vplxk-worker-us-east-1c 1 1 1 1 55m agl030519-vplxk-worker-us-east-1d 0 0 55m agl030519-vplxk-worker-us-east-1e 0 0 55m agl030519-vplxk-worker-us-east-1f 0 0 55mWhen the new compute machine set is available, the
DESIREDandCURRENTvalues match. If the compute machine set is not available, wait a few minutes and run the command again.
2.5.3. Labeling GPU machine sets for the cluster autoscaler
You can use a machine set label to indicate which machines the cluster autoscaler can use to deploy GPU-enabled nodes.
Prerequisites
- Your cluster uses a cluster autoscaler.
Procedure
On the machine set that you want to create machines for the cluster autoscaler to use to deploy GPU-enabled nodes, add a
cluster-api/acceleratorlabel:apiVersion: machine.openshift.io/v1beta1 kind: MachineSet metadata: name: machine-set-name spec: template: spec: metadata: labels: cluster-api/accelerator: nvidia-t41 - 1
- Specify a label of your choice that consists of alphanumeric characters,
-,_, or.and starts and ends with an alphanumeric character. For example, you might usenvidia-t4to represent Nvidia T4 GPUs, ornvidia-a10gfor A10G GPUs.NoteYou must specify the value of this label for the
spec.resourceLimits.gpus.typeparameter in yourClusterAutoscalerCR. For more information, see "Cluster autoscaler resource definition".
2.5.4. Configuring persistent disk types by using compute machine sets
You can configure the type of persistent disk that a compute machine set deploys machines on by editing the compute machine set YAML file.
For more information about persistent disk types, compatibility, regional availability, and limitations, see the Google Cloud Compute Engine documentation about persistent disks.
Procedure
- In a text editor, open the YAML file for an existing compute machine set or create a new one.
Edit the following line under the
providerSpecfield:providerSpec: value: disks: type: <pd-disk-type>1 - 1
- Specify the disk persistent type. Valid values are
pd-ssd,pd-standard, andpd-balanced. The default value ispd-standard.
Verification
-
On the Google Cloud console, review the details for a machine deployed by the compute machine set and verify that the
Typefield matches the configured disk type.
2.5.5. Machine sets that deploy machines as preemptible VM instances
You can save on costs by creating a compute machine set running on Google Cloud that deploys machines as non-guaranteed preemptible VM instances. Preemptible VM instances utilize excess Compute Engine capacity and are less expensive than normal instances. You can use preemptible VM instances for workloads that can tolerate interruptions, such as batch or stateless, horizontally scalable workloads.
Google Cloud Compute Engine can terminate a preemptible VM instance at any time. Compute Engine sends a preemption notice to the user indicating that an interruption will occur in 30 seconds. OpenShift Container Platform begins to remove the workloads from the affected instances when Compute Engine issues the preemption notice. An ACPI G3 Mechanical Off signal is sent to the operating system after 30 seconds if the instance is not stopped. The preemptible VM instance is then transitioned to a TERMINATED state by Compute Engine.
Interruptions can occur when using preemptible VM instances for the following reasons:
- There is a system or maintenance event
- The supply of preemptible VM instances decreases
- The instance reaches the end of the allotted 24-hour period for preemptible VM instances
When Google Cloud terminates an instance, a termination handler running on the preemptible VM instance node deletes the machine resource. To satisfy the compute machine set replicas quantity, the compute machine set creates a machine that requests a preemptible VM instance.
2.5.5.1. Creating preemptible VM instances by using compute machine sets
You can launch a preemptible VM instance on Google Cloud by adding preemptible to your compute machine set YAML file.
Procedure
Add the following line under the
providerSpecfield:providerSpec: value: preemptible: trueIf
preemptibleis set totrue, the machine is labeled as aninterruptible-instanceafter the instance is launched.
2.5.6. Enabling customer-managed encryption keys for a compute machine set
Google Cloud Platform (GCP) Compute Engine allows users to supply an encryption key to encrypt data on disks at rest. The key is used to encrypt the data encryption key, not to encrypt the customer’s data. By default, Compute Engine encrypts this data by using Compute Engine keys.
You can enable encryption with a customer-managed key by using the Machine API. You must first create a KMS key and assign the correct permissions to a service account. The KMS key name, key ring name, and location are required to allow a service account to use your key.
If you do not want to use a dedicated service account for the KMS encryption, the Compute Engine default service account is used instead. You must grant the default service account permission to access the keys if you do not use a dedicated service account. The Compute Engine default service account name follows the service-<project_number>@compute-system.iam.gserviceaccount.com pattern.
Procedure
Run the following command with your KMS key name, key ring name, and location to allow a specific service account to use your KMS key and to grant the service account the correct IAM role:
gcloud kms keys add-iam-policy-binding <key_name> \ --keyring <key_ring_name> \ --location <key_ring_location> \ --member "serviceAccount:service-<project_number>@compute-system.iam.gserviceaccount.com” \ --role roles/cloudkms.cryptoKeyEncrypterDecrypterConfigure the encryption key under the
providerSpecfield in your compute machine set YAML file. For example:providerSpec: value: # ... disks: - type: # ... encryptionKey: kmsKey: name: machine-encryption-key1 keyRing: openshift-encrpytion-ring2 location: global3 projectID: openshift-gcp-project4 kmsKeyServiceAccount: openshift-service-account@openshift-gcp-project.iam.gserviceaccount.com5 - 1
- The name of the customer-managed encryption key that is used for the disk encryption.
- 2
- The name of the KMS key ring that the KMS key belongs to.
- 3
- The GCP location in which the KMS key ring exists.
- 4
- Optional: The ID of the project in which the KMS key ring exists. If a project ID is not set, the compute machine set
projectIDin which the compute machine set was created is used. - 5
- Optional: The service account that is used for the encryption request for the given KMS key. If a service account is not set, the Compute Engine default service account is used.
After a new machine is created by using the updated
providerSpecobject configuration, the disk encryption key is encrypted with the KMS key.
2.5.7. Enabling GPU support for a compute machine set
Google Cloud Compute Engine enables users to add GPUs to VM instances. Workloads that benefit from access to GPU resources can perform better on compute machines with this feature enabled. OpenShift Container Platform on Google Cloud supports NVIDIA GPU models in the A2 and N1 machine series.
| Model name | GPU type | Machine types [1] |
|---|---|---|
| NVIDIA A100 |
|
|
| NVIDIA K80 |
|
|
| NVIDIA P100 |
| |
| NVIDIA P4 |
| |
| NVIDIA T4 |
| |
| NVIDIA V100 |
|
- For more information about machine types, including specifications, compatibility, regional availability, and limitations, see the Google Cloud Compute Engine documentation about N1 machine series, A2 machine series, and GPU regions and zones availability.
You can define which supported GPU to use for an instance by using the Machine API.
You can configure machines in the N1 machine series to deploy with one of the supported GPU types. Machines in the A2 machine series come with associated GPUs, and cannot use guest accelerators.
GPUs for graphics workloads are not supported.
Procedure
- In a text editor, open the YAML file for an existing compute machine set or create a new one.
Specify a GPU configuration under the
providerSpecfield in your compute machine set YAML file. See the following examples of valid configurations:Example configuration for the A2 machine series:
providerSpec: value: machineType: a2-highgpu-1g1 onHostMaintenance: Terminate2 restartPolicy: Always3 Example configuration for the N1 machine series:
providerSpec: value: gpus: - count: 11 type: nvidia-tesla-p1002 machineType: n1-standard-13 onHostMaintenance: Terminate4 restartPolicy: Always5 - 1
- Specify the number of GPUs to attach to the machine.
- 2
- Specify the type of GPUs to attach to the machine. Ensure that the machine type and GPU type are compatible.
- 3
- Specify the machine type. Ensure that the machine type and GPU type are compatible.
- 4
- When using GPU support, you must set
onHostMaintenancetoTerminate. - 5
- Specify the restart policy for machines deployed by the compute machine set. Allowed values are
AlwaysorNever.
2.5.8. Adding a GPU node to an existing OpenShift Container Platform cluster
You can copy and modify a default compute machine set configuration to create a GPU-enabled machine set and machines for the Google Cloud cloud provider.
The following table lists the validated instance types:
| Instance type | NVIDIA GPU accelerator | Maximum number of GPUs | Architecture |
|---|---|---|---|
|
| A100 | 1 | x86 |
|
| T4 | 1 | x86 |
Procedure
-
Make a copy of an existing
MachineSet. -
In the new copy, change the machine set
nameinmetadata.nameand in both instances ofmachine.openshift.io/cluster-api-machineset. Change the instance type to add the following two lines to the newly copied
MachineSet:machineType: a2-highgpu-1g onHostMaintenance: TerminateExample
a2-highgpu-1g.jsonfile{ "apiVersion": "machine.openshift.io/v1beta1", "kind": "MachineSet", "metadata": { "annotations": { "machine.openshift.io/GPU": "0", "machine.openshift.io/memoryMb": "16384", "machine.openshift.io/vCPU": "4" }, "creationTimestamp": "2023-01-13T17:11:02Z", "generation": 1, "labels": { "machine.openshift.io/cluster-api-cluster": "myclustername-2pt9p" }, "name": "myclustername-2pt9p-worker-gpu-a", "namespace": "openshift-machine-api", "resourceVersion": "20185", "uid": "2daf4712-733e-4399-b4b4-d43cb1ed32bd" }, "spec": { "replicas": 1, "selector": { "matchLabels": { "machine.openshift.io/cluster-api-cluster": "myclustername-2pt9p", "machine.openshift.io/cluster-api-machineset": "myclustername-2pt9p-worker-gpu-a" } }, "template": { "metadata": { "labels": { "machine.openshift.io/cluster-api-cluster": "myclustername-2pt9p", "machine.openshift.io/cluster-api-machine-role": "worker", "machine.openshift.io/cluster-api-machine-type": "worker", "machine.openshift.io/cluster-api-machineset": "myclustername-2pt9p-worker-gpu-a" } }, "spec": { "lifecycleHooks": {}, "metadata": {}, "providerSpec": { "value": { "apiVersion": "machine.openshift.io/v1beta1", "canIPForward": false, "credentialsSecret": { "name": "gcp-cloud-credentials" }, "deletionProtection": false, "disks": [ { "autoDelete": true, "boot": true, "image": "projects/rhcos-cloud/global/images/rhcos-412-86-202212081411-0-gcp-x86-64", "labels": null, "sizeGb": 128, "type": "pd-ssd" } ], "kind": "GCPMachineProviderSpec", "machineType": "a2-highgpu-1g", "onHostMaintenance": "Terminate", "metadata": { "creationTimestamp": null }, "networkInterfaces": [ { "network": "myclustername-2pt9p-network", "subnetwork": "myclustername-2pt9p-worker-subnet" } ], "preemptible": true, "projectID": "myteam", "region": "us-central1", "serviceAccounts": [ { "email": "myclustername-2pt9p-w@myteam.iam.gserviceaccount.com", "scopes": [ "https://www.googleapis.com/auth/cloud-platform" ] } ], "tags": [ "myclustername-2pt9p-worker" ], "userDataSecret": { "name": "worker-user-data" }, "zone": "us-central1-a" } } } } }, "status": { "availableReplicas": 1, "fullyLabeledReplicas": 1, "observedGeneration": 1, "readyReplicas": 1, "replicas": 1 } }View the existing nodes, machines, and machine sets by running the following command. Note that each node is an instance of a machine definition with a specific Google Cloud region and OpenShift Container Platform role.
$ oc get nodesExample output
NAME STATUS ROLES AGE VERSION myclustername-2pt9p-master-0.c.openshift-qe.internal Ready control-plane,master 8h v1.25.4+77bec7a myclustername-2pt9p-master-1.c.openshift-qe.internal Ready control-plane,master 8h v1.25.4+77bec7a myclustername-2pt9p-master-2.c.openshift-qe.internal Ready control-plane,master 8h v1.25.4+77bec7a myclustername-2pt9p-worker-a-mxtnz.c.openshift-qe.internal Ready worker 8h v1.25.4+77bec7a myclustername-2pt9p-worker-b-9pzzn.c.openshift-qe.internal Ready worker 8h v1.25.4+77bec7a myclustername-2pt9p-worker-c-6pbg6.c.openshift-qe.internal Ready worker 8h v1.25.4+77bec7a myclustername-2pt9p-worker-gpu-a-wxcr6.c.openshift-qe.internal Ready worker 4h35m v1.25.4+77bec7aView the machines and machine sets that exist in the
openshift-machine-apinamespace by running the following command. Each compute machine set is associated with a different availability zone within the Google Cloud region. The installer automatically load balances compute machines across availability zones.$ oc get machinesets -n openshift-machine-apiExample output
NAME DESIRED CURRENT READY AVAILABLE AGE myclustername-2pt9p-worker-a 1 1 1 1 8h myclustername-2pt9p-worker-b 1 1 1 1 8h myclustername-2pt9p-worker-c 1 1 8h myclustername-2pt9p-worker-f 0 0 8hView the machines that exist in the
openshift-machine-apinamespace by running the following command. You can only configure one compute machine per set, although you can scale a compute machine set to add a node in a particular region and zone.$ oc get machines -n openshift-machine-api | grep workerExample output
myclustername-2pt9p-worker-a-mxtnz Running n2-standard-4 us-central1 us-central1-a 8h myclustername-2pt9p-worker-b-9pzzn Running n2-standard-4 us-central1 us-central1-b 8h myclustername-2pt9p-worker-c-6pbg6 Running n2-standard-4 us-central1 us-central1-c 8hMake a copy of one of the existing compute
MachineSetdefinitions and output the result to a JSON file by running the following command. This will be the basis for the GPU-enabled compute machine set definition.$ oc get machineset myclustername-2pt9p-worker-a -n openshift-machine-api -o json > <output_file.json>Edit the JSON file to make the following changes to the new
MachineSetdefinition:-
Rename the machine set
nameby inserting the substringgpuinmetadata.nameand in both instances ofmachine.openshift.io/cluster-api-machineset. Change the
machineTypeof the newMachineSetdefinition toa2-highgpu-1g, which includes an NVIDIA A100 GPU.jq .spec.template.spec.providerSpec.value.machineType ocp_4.12_machineset-a2-highgpu-1g.json "a2-highgpu-1g"The
<output_file.json>file is saved asocp_4.12_machineset-a2-highgpu-1g.json.
-
Rename the machine set
Update the following fields in
ocp_4.12_machineset-a2-highgpu-1g.json:-
Change
.metadata.nameto a name containinggpu. -
Change
.spec.selector.matchLabels["machine.openshift.io/cluster-api-machineset"]to match the new.metadata.name. -
Change
.spec.template.metadata.labels["machine.openshift.io/cluster-api-machineset"]to match the new.metadata.name. -
Change
.spec.template.spec.providerSpec.value.MachineTypetoa2-highgpu-1g. Add the following line under
machineType: `"onHostMaintenance": "Terminate". For example:"machineType": "a2-highgpu-1g", "onHostMaintenance": "Terminate",
-
Change
To verify your changes, perform a
diffof the original compute definition and the new GPU-enabled node definition by running the following command:$ oc get machineset/myclustername-2pt9p-worker-a -n openshift-machine-api -o json | diff ocp_4.12_machineset-a2-highgpu-1g.json -Example output
15c15 < "name": "myclustername-2pt9p-worker-gpu-a", --- > "name": "myclustername-2pt9p-worker-a", 25c25 < "machine.openshift.io/cluster-api-machineset": "myclustername-2pt9p-worker-gpu-a" --- > "machine.openshift.io/cluster-api-machineset": "myclustername-2pt9p-worker-a" 34c34 < "machine.openshift.io/cluster-api-machineset": "myclustername-2pt9p-worker-gpu-a" --- > "machine.openshift.io/cluster-api-machineset": "myclustername-2pt9p-worker-a" 59,60c59 < "machineType": "a2-highgpu-1g", < "onHostMaintenance": "Terminate", --- > "machineType": "n2-standard-4",Create the GPU-enabled compute machine set from the definition file by running the following command:
$ oc create -f ocp_4.12_machineset-a2-highgpu-1g.jsonExample output
machineset.machine.openshift.io/myclustername-2pt9p-worker-gpu-a created
Verification
View the machine set you created by running the following command:
$ oc -n openshift-machine-api get machinesets | grep gpuThe MachineSet replica count is set to
1so a newMachineobject is created automatically.Example output
myclustername-2pt9p-worker-gpu-a 1 1 1 1 5h24mView the
Machineobject that the machine set created by running the following command:$ oc -n openshift-machine-api get machines | grep gpuExample output
myclustername-2pt9p-worker-gpu-a-wxcr6 Running a2-highgpu-1g us-central1 us-central1-a 5h25m
Note that there is no need to specify a namespace for the node. The node definition is cluster scoped.
2.5.9. Deploying the Node Feature Discovery Operator
After the GPU-enabled node is created, you need to discover the GPU-enabled node so it can be scheduled. To do this, install the Node Feature Discovery (NFD) Operator. The NFD Operator identifies hardware device features in nodes. It solves the general problem of identifying and cataloging hardware resources in the infrastructure nodes so they can be made available to OpenShift Container Platform.
Procedure
- Install the Node Feature Discovery Operator from OperatorHub in the OpenShift Container Platform console.
-
After installing the NFD Operator into OperatorHub, select Node Feature Discovery from the installed Operators list and select Create instance. This installs the
nfd-masterandnfd-workerpods, onenfd-workerpod for each compute node, in theopenshift-nfdnamespace. Verify that the Operator is installed and running by running the following command:
$ oc get pods -n openshift-nfdExample output
NAME READY STATUS RESTARTS AGE nfd-controller-manager-8646fcbb65-x5qgk 2/2 Running 7 (8h ago) 1d- Browse to the installed Oerator in the console and select Create Node Feature Discovery.
-
Select Create to build a NFD custom resource. This creates NFD pods in the
openshift-nfdnamespace that poll the OpenShift Container Platform nodes for hardware resources and catalogue them.
Verification
After a successful build, verify that a NFD pod is running on each nodes by running the following command:
$ oc get pods -n openshift-nfdExample output
NAME READY STATUS RESTARTS AGE nfd-controller-manager-8646fcbb65-x5qgk 2/2 Running 7 (8h ago) 12d nfd-master-769656c4cb-w9vrv 1/1 Running 0 12d nfd-worker-qjxb2 1/1 Running 3 (3d14h ago) 12d nfd-worker-xtz9b 1/1 Running 5 (3d14h ago) 12dThe NFD Operator uses vendor PCI IDs to identify hardware in a node. NVIDIA uses the PCI ID
10de.View the NVIDIA GPU discovered by the NFD Operator by running the following command:
$ oc describe node ip-10-0-132-138.us-east-2.compute.internal | egrep 'Roles|pci'Example output
Roles: worker feature.node.kubernetes.io/pci-1013.present=true feature.node.kubernetes.io/pci-10de.present=true feature.node.kubernetes.io/pci-1d0f.present=true10deappears in the node feature list for the GPU-enabled node. This mean the NFD Operator correctly identified the node from the GPU-enabled MachineSet.
2.6. Creating a compute machine set on IBM Cloud
You can create a different compute machine set to serve a specific purpose in your OpenShift Container Platform cluster on IBM Cloud. For example, you might create infrastructure machine sets and related machines so that you can move supporting workloads to the new machines.
You can use the advanced machine management and scaling capabilities only in clusters where the Machine API is operational. Clusters with user-provisioned infrastructure require additional validation and configuration to use the Machine API.
Clusters with the infrastructure platform type none cannot use the Machine API. This limitation applies even if the compute machines that are attached to the cluster are installed on a platform that supports the feature. This parameter cannot be changed after installation.
To view the platform type for your cluster, run the following command:
$ oc get infrastructure cluster -o jsonpath='{.status.platform}'2.6.1. Sample YAML for a compute machine set custom resource on IBM Cloud
This sample YAML defines a compute machine set that runs in a specified IBM Cloud zone in a region and creates nodes that are labeled with node-role.kubernetes.io/<role>: "".
In this sample, <infrastructure_id> is the infrastructure ID label that is based on the cluster ID that you set when you provisioned the cluster, and <role> is the node label to add.
apiVersion: machine.openshift.io/v1beta1
kind: MachineSet
metadata:
labels:
machine.openshift.io/cluster-api-cluster: <infrastructure_id>
machine.openshift.io/cluster-api-machine-role: <role>
machine.openshift.io/cluster-api-machine-type: <role>
name: <infrastructure_id>-<role>-<region>
namespace: openshift-machine-api
spec:
replicas: 1
selector:
matchLabels:
machine.openshift.io/cluster-api-cluster: <infrastructure_id>
machine.openshift.io/cluster-api-machineset: <infrastructure_id>-<role>-<region>
template:
metadata:
labels:
machine.openshift.io/cluster-api-cluster: <infrastructure_id>
machine.openshift.io/cluster-api-machine-role: <role>
machine.openshift.io/cluster-api-machine-type: <role>
machine.openshift.io/cluster-api-machineset: <infrastructure_id>-<role>-<region>
spec:
metadata:
labels:
node-role.kubernetes.io/<role>: ""
providerSpec:
value:
apiVersion: ibmcloudproviderconfig.openshift.io/v1beta1
credentialsSecret:
name: ibmcloud-credentials
image: <infrastructure_id>-rhcos
kind: IBMCloudMachineProviderSpec
primaryNetworkInterface:
securityGroups:
- <infrastructure_id>-sg-cluster-wide
- <infrastructure_id>-sg-openshift-net
subnet: <infrastructure_id>-subnet-compute-<zone>
profile: <instance_profile>
region: <region>
resourceGroup: <resource_group>
userDataSecret:
name: <role>-user-data
vpc: <vpc_name>
zone: <zone> - 1 5 7
- The infrastructure ID that is based on the cluster ID that you set when you provisioned the cluster. If you have the OpenShift CLI installed, you can obtain the infrastructure ID by running the following command:
$ oc get -o jsonpath='{.status.infrastructureName}{"\n"}' infrastructure cluster - 2 3 8 9 16
- The node label to add.
- 4 6 10
- The infrastructure ID, node label, and region.
- 11
- The custom Red Hat Enterprise Linux CoreOS (RHCOS) image that was used for cluster installation.
- 12
- The infrastructure ID and zone within your region to place machines on. Be sure that your region supports the zone that you specify.
- 13
- Specify the IBM Cloud instance profile.
- 14
- Specify the region to place machines on.
- 15
- The resource group that machine resources are placed in. This is either an existing resource group specified at installation time, or an installer-created resource group named based on the infrastructure ID.
- 17
- The VPC name.
- 18
- Specify the zone within your region to place machines on. Be sure that your region supports the zone that you specify.
2.6.2. Creating a compute machine set
In addition to the compute machine sets created by the installation program, you can create your own to dynamically manage the machine compute resources for specific workloads of your choice.
Prerequisites
- Deploy an OpenShift Container Platform cluster.
-
Install the OpenShift CLI (
oc). -
Log in to
ocas a user withcluster-adminpermission.
Procedure
Create a new YAML file that contains the compute machine set custom resource (CR) sample and is named
<file_name>.yaml.Ensure that you set the
<clusterID>and<role>parameter values.Optional: If you are not sure which value to set for a specific field, you can check an existing compute machine set from your cluster.
To list the compute machine sets in your cluster, run the following command:
$ oc get machinesets -n openshift-machine-apiExample output
NAME DESIRED CURRENT READY AVAILABLE AGE agl030519-vplxk-worker-us-east-1a 1 1 1 1 55m agl030519-vplxk-worker-us-east-1b 1 1 1 1 55m agl030519-vplxk-worker-us-east-1c 1 1 1 1 55m agl030519-vplxk-worker-us-east-1d 0 0 55m agl030519-vplxk-worker-us-east-1e 0 0 55m agl030519-vplxk-worker-us-east-1f 0 0 55mTo view values of a specific compute machine set custom resource (CR), run the following command:
$ oc get machineset <machineset_name> \ -n openshift-machine-api -o yamlExample output
apiVersion: machine.openshift.io/v1beta1 kind: MachineSet metadata: labels: machine.openshift.io/cluster-api-cluster: <infrastructure_id>1 name: <infrastructure_id>-<role>2 namespace: openshift-machine-api spec: replicas: 1 selector: matchLabels: machine.openshift.io/cluster-api-cluster: <infrastructure_id> machine.openshift.io/cluster-api-machineset: <infrastructure_id>-<role> template: metadata: labels: machine.openshift.io/cluster-api-cluster: <infrastructure_id> machine.openshift.io/cluster-api-machine-role: <role> machine.openshift.io/cluster-api-machine-type: <role> machine.openshift.io/cluster-api-machineset: <infrastructure_id>-<role> spec: providerSpec:3 ...- 1
- The cluster infrastructure ID.
- 2
- A default node label.Note
For clusters that have user-provisioned infrastructure, a compute machine set can only create
workerandinfratype machines. - 3
- The values in the
<providerSpec>section of the compute machine set CR are platform-specific. For more information about<providerSpec>parameters in the CR, see the sample compute machine set CR configuration for your provider.
Create a
MachineSetCR by running the following command:$ oc create -f <file_name>.yaml
Verification
View the list of compute machine sets by running the following command:
$ oc get machineset -n openshift-machine-apiExample output
NAME DESIRED CURRENT READY AVAILABLE AGE agl030519-vplxk-infra-us-east-1a 1 1 1 1 11m agl030519-vplxk-worker-us-east-1a 1 1 1 1 55m agl030519-vplxk-worker-us-east-1b 1 1 1 1 55m agl030519-vplxk-worker-us-east-1c 1 1 1 1 55m agl030519-vplxk-worker-us-east-1d 0 0 55m agl030519-vplxk-worker-us-east-1e 0 0 55m agl030519-vplxk-worker-us-east-1f 0 0 55mWhen the new compute machine set is available, the
DESIREDandCURRENTvalues match. If the compute machine set is not available, wait a few minutes and run the command again.
2.6.3. Labeling GPU machine sets for the cluster autoscaler
You can use a machine set label to indicate which machines the cluster autoscaler can use to deploy GPU-enabled nodes.
Prerequisites
- Your cluster uses a cluster autoscaler.
Procedure
On the machine set that you want to create machines for the cluster autoscaler to use to deploy GPU-enabled nodes, add a
cluster-api/acceleratorlabel:apiVersion: machine.openshift.io/v1beta1 kind: MachineSet metadata: name: machine-set-name spec: template: spec: metadata: labels: cluster-api/accelerator: nvidia-t41 - 1
- Specify a label of your choice that consists of alphanumeric characters,
-,_, or.and starts and ends with an alphanumeric character. For example, you might usenvidia-t4to represent Nvidia T4 GPUs, ornvidia-a10gfor A10G GPUs.NoteYou must specify the value of this label for the
spec.resourceLimits.gpus.typeparameter in yourClusterAutoscalerCR. For more information, see "Cluster autoscaler resource definition".
2.7. Creating a compute machine set on Nutanix
You can create a different compute machine set to serve a specific purpose in your OpenShift Container Platform cluster on Nutanix. For example, you might create infrastructure machine sets and related machines so that you can move supporting workloads to the new machines.
You can use the advanced machine management and scaling capabilities only in clusters where the Machine API is operational. Clusters with user-provisioned infrastructure require additional validation and configuration to use the Machine API.
Clusters with the infrastructure platform type none cannot use the Machine API. This limitation applies even if the compute machines that are attached to the cluster are installed on a platform that supports the feature. This parameter cannot be changed after installation.
To view the platform type for your cluster, run the following command:
$ oc get infrastructure cluster -o jsonpath='{.status.platform}'2.7.1. Sample YAML for a compute machine set custom resource on Nutanix
This sample YAML defines a Nutanix compute machine set that creates nodes that are labeled with node-role.kubernetes.io/<role>: "".
In this sample, <infrastructure_id> is the infrastructure ID label that is based on the cluster ID that you set when you provisioned the cluster, and <role> is the node label to add.
apiVersion: machine.openshift.io/v1beta1
kind: MachineSet
metadata:
labels:
machine.openshift.io/cluster-api-cluster: <infrastructure_id>
machine.openshift.io/cluster-api-machine-role: <role>
machine.openshift.io/cluster-api-machine-type: <role>
name: <infrastructure_id>-<role>-<zone>
namespace: openshift-machine-api
annotations:
machine.openshift.io/memoryMb: "16384"
machine.openshift.io/vCPU: "4"
spec:
replicas: 3
selector:
matchLabels:
machine.openshift.io/cluster-api-cluster: <infrastructure_id>
machine.openshift.io/cluster-api-machineset: <infrastructure_id>-<role>-<zone>
template:
metadata:
labels:
machine.openshift.io/cluster-api-cluster: <infrastructure_id>
machine.openshift.io/cluster-api-machine-role: <role>
machine.openshift.io/cluster-api-machine-type: <role>
machine.openshift.io/cluster-api-machineset: <infrastructure_id>-<role>-<zone>
spec:
metadata:
labels:
node-role.kubernetes.io/<role>: ""
providerSpec:
value:
apiVersion: machine.openshift.io/v1
cluster:
type: uuid
uuid: <cluster_uuid>
credentialsSecret:
name: nutanix-credentials
image:
name: <infrastructure_id>-rhcos
type: name
kind: NutanixMachineProviderConfig
memorySize: 16Gi
subnets:
- type: uuid
uuid: <subnet_uuid>
systemDiskSize: 120Gi
userDataSecret:
name: <user_data_secret>
vcpuSockets: 4
vcpusPerSocket: 1 - 1 6 8
- Specify the infrastructure ID that is based on the cluster ID that you set when you provisioned the cluster. If you have the OpenShift CLI (
oc) installed, you can obtain the infrastructure ID by running the following command:$ oc get -o jsonpath='{.status.infrastructureName}{"\n"}' infrastructure cluster - 2 3 9 10
- Specify the node label to add.
- 4 7 11
- Specify the infrastructure ID, node label, and zone.
- 5
- Annotations for the cluster autoscaler.
- 12
- Specify the image to use. Use an image from an existing default compute machine set for the cluster.
- 13
- Specify the amount of memory for the cluster in Gi.
- 14
- Specify the size of the system disk in Gi.
- 15
- Specify the name of the secret in the user data YAML file that is in the
openshift-machine-apinamespace. Use the value that the installer populates in the default compute machine set. - 16
- Specify the number of vCPU sockets.
- 17
- Specify the number of vCPUs per socket.
2.7.2. Creating a compute machine set
In addition to the compute machine sets created by the installation program, you can create your own to dynamically manage the machine compute resources for specific workloads of your choice.
Prerequisites
- Deploy an OpenShift Container Platform cluster.
-
Install the OpenShift CLI (
oc). -
Log in to
ocas a user withcluster-adminpermission.
Procedure
Create a new YAML file that contains the compute machine set custom resource (CR) sample and is named
<file_name>.yaml.Ensure that you set the
<clusterID>and<role>parameter values.Optional: If you are not sure which value to set for a specific field, you can check an existing compute machine set from your cluster.
To list the compute machine sets in your cluster, run the following command:
$ oc get machinesets -n openshift-machine-apiExample output
NAME DESIRED CURRENT READY AVAILABLE AGE agl030519-vplxk-worker-us-east-1a 1 1 1 1 55m agl030519-vplxk-worker-us-east-1b 1 1 1 1 55m agl030519-vplxk-worker-us-east-1c 1 1 1 1 55m agl030519-vplxk-worker-us-east-1d 0 0 55m agl030519-vplxk-worker-us-east-1e 0 0 55m agl030519-vplxk-worker-us-east-1f 0 0 55mTo view values of a specific compute machine set custom resource (CR), run the following command:
$ oc get machineset <machineset_name> \ -n openshift-machine-api -o yamlExample output
apiVersion: machine.openshift.io/v1beta1 kind: MachineSet metadata: labels: machine.openshift.io/cluster-api-cluster: <infrastructure_id>1 name: <infrastructure_id>-<role>2 namespace: openshift-machine-api spec: replicas: 1 selector: matchLabels: machine.openshift.io/cluster-api-cluster: <infrastructure_id> machine.openshift.io/cluster-api-machineset: <infrastructure_id>-<role> template: metadata: labels: machine.openshift.io/cluster-api-cluster: <infrastructure_id> machine.openshift.io/cluster-api-machine-role: <role> machine.openshift.io/cluster-api-machine-type: <role> machine.openshift.io/cluster-api-machineset: <infrastructure_id>-<role> spec: providerSpec:3 ...- 1
- The cluster infrastructure ID.
- 2
- A default node label.Note
For clusters that have user-provisioned infrastructure, a compute machine set can only create
workerandinfratype machines. - 3
- The values in the
<providerSpec>section of the compute machine set CR are platform-specific. For more information about<providerSpec>parameters in the CR, see the sample compute machine set CR configuration for your provider.
Create a
MachineSetCR by running the following command:$ oc create -f <file_name>.yaml
Verification
View the list of compute machine sets by running the following command:
$ oc get machineset -n openshift-machine-apiExample output
NAME DESIRED CURRENT READY AVAILABLE AGE agl030519-vplxk-infra-us-east-1a 1 1 1 1 11m agl030519-vplxk-worker-us-east-1a 1 1 1 1 55m agl030519-vplxk-worker-us-east-1b 1 1 1 1 55m agl030519-vplxk-worker-us-east-1c 1 1 1 1 55m agl030519-vplxk-worker-us-east-1d 0 0 55m agl030519-vplxk-worker-us-east-1e 0 0 55m agl030519-vplxk-worker-us-east-1f 0 0 55mWhen the new compute machine set is available, the
DESIREDandCURRENTvalues match. If the compute machine set is not available, wait a few minutes and run the command again.
2.7.3. Labeling GPU machine sets for the cluster autoscaler
You can use a machine set label to indicate which machines the cluster autoscaler can use to deploy GPU-enabled nodes.
Prerequisites
- Your cluster uses a cluster autoscaler.
Procedure
On the machine set that you want to create machines for the cluster autoscaler to use to deploy GPU-enabled nodes, add a
cluster-api/acceleratorlabel:apiVersion: machine.openshift.io/v1beta1 kind: MachineSet metadata: name: machine-set-name spec: template: spec: metadata: labels: cluster-api/accelerator: nvidia-t41 - 1
- Specify a label of your choice that consists of alphanumeric characters,
-,_, or.and starts and ends with an alphanumeric character. For example, you might usenvidia-t4to represent Nvidia T4 GPUs, ornvidia-a10gfor A10G GPUs.NoteYou must specify the value of this label for the
spec.resourceLimits.gpus.typeparameter in yourClusterAutoscalerCR. For more information, see "Cluster autoscaler resource definition".
2.8. Creating a compute machine set on OpenStack
You can create a different compute machine set to serve a specific purpose in your OpenShift Container Platform cluster on Red Hat OpenStack Platform (RHOSP). For example, you might create infrastructure machine sets and related machines so that you can move supporting workloads to the new machines.
You can use the advanced machine management and scaling capabilities only in clusters where the Machine API is operational. Clusters with user-provisioned infrastructure require additional validation and configuration to use the Machine API.
Clusters with the infrastructure platform type none cannot use the Machine API. This limitation applies even if the compute machines that are attached to the cluster are installed on a platform that supports the feature. This parameter cannot be changed after installation.
To view the platform type for your cluster, run the following command:
$ oc get infrastructure cluster -o jsonpath='{.status.platform}'2.8.1. Sample YAML for a compute machine set custom resource on RHOSP
This sample YAML defines a compute machine set that runs on Red Hat OpenStack Platform (RHOSP) and creates nodes that are labeled with node-role.kubernetes.io/<role>: "".
In this sample, <infrastructure_id> is the infrastructure ID label that is based on the cluster ID that you set when you provisioned the cluster, and <role> is the node label to add.
apiVersion: machine.openshift.io/v1beta1
kind: MachineSet
metadata:
labels:
machine.openshift.io/cluster-api-cluster: <infrastructure_id>
machine.openshift.io/cluster-api-machine-role: <role>
machine.openshift.io/cluster-api-machine-type: <role>
name: <infrastructure_id>-<role>
namespace: openshift-machine-api
spec:
replicas: <number_of_replicas>
selector:
matchLabels:
machine.openshift.io/cluster-api-cluster: <infrastructure_id>
machine.openshift.io/cluster-api-machineset: <infrastructure_id>-<role>
template:
metadata:
labels:
machine.openshift.io/cluster-api-cluster: <infrastructure_id>
machine.openshift.io/cluster-api-machine-role: <role>
machine.openshift.io/cluster-api-machine-type: <role>
machine.openshift.io/cluster-api-machineset: <infrastructure_id>-<role>
spec:
providerSpec:
value:
apiVersion: openstackproviderconfig.openshift.io/v1alpha1
cloudName: openstack
cloudsSecret:
name: openstack-cloud-credentials
namespace: openshift-machine-api
flavor: <nova_flavor>
image: <glance_image_name_or_location>
serverGroupID: <optional_UUID_of_server_group>
kind: OpenstackProviderSpec
networks:
- filter: {}
subnets:
- filter:
name: <subnet_name>
tags: openshiftClusterID=<infrastructure_id>
primarySubnet: <rhosp_subnet_UUID>
securityGroups:
- filter: {}
name: <infrastructure_id>-worker
serverMetadata:
Name: <infrastructure_id>-worker
openshiftClusterID: <infrastructure_id>
tags:
- openshiftClusterID=<infrastructure_id>
trunk: true
userDataSecret:
name: worker-user-data
availabilityZone: <optional_openstack_availability_zone>- 1 5 7 13 15 16 17 18
- Specify the infrastructure ID that is based on the cluster ID that you set when you provisioned the cluster. If you have the OpenShift CLI installed, you can obtain the infrastructure ID by running the following command:
$ oc get -o jsonpath='{.status.infrastructureName}{"\n"}' infrastructure cluster - 2 3 8 9 19
- Specify the node label to add.
- 4 6 10
- Specify the infrastructure ID and node label.
- 11
- To set a server group policy for the MachineSet, enter the value that is returned from creating a server group. For most deployments,
anti-affinityorsoft-anti-affinitypolicies are recommended. - 12
- Required for deployments to multiple networks. To specify multiple networks, add another entry in the networks array. Also, you must include the network that is used as the
primarySubnetvalue. - 14
- Specify the RHOSP subnet that you want the endpoints of nodes to be published on. Usually, this is the same subnet that is used as the value of
machinesSubnetin theinstall-config.yamlfile.
2.8.2. Sample YAML for a compute machine set custom resource that uses SR-IOV on RHOSP
If you configured your cluster for single-root I/O virtualization (SR-IOV), you can create compute machine sets that use that technology.
This sample YAML defines a compute machine set that uses SR-IOV networks. The nodes that it creates are labeled with node-role.openshift.io/<node_role>: ""
In this sample, infrastructure_id is the infrastructure ID label that is based on the cluster ID that you set when you provisioned the cluster, and node_role is the node label to add.
The sample assumes two SR-IOV networks that are named "radio" and "uplink". The networks are used in port definitions in the spec.template.spec.providerSpec.value.ports list.
Only parameters that are specific to SR-IOV deployments are described in this sample. To review a more general sample, see "Sample YAML for a compute machine set custom resource on RHOSP".
An example compute machine set that uses SR-IOV networks
apiVersion: machine.openshift.io/v1beta1
kind: MachineSet
metadata:
labels:
machine.openshift.io/cluster-api-cluster: <infrastructure_id>
machine.openshift.io/cluster-api-machine-role: <node_role>
machine.openshift.io/cluster-api-machine-type: <node_role>
name: <infrastructure_id>-<node_role>
namespace: openshift-machine-api
spec:
replicas: <number_of_replicas>
selector:
matchLabels:
machine.openshift.io/cluster-api-cluster: <infrastructure_id>
machine.openshift.io/cluster-api-machineset: <infrastructure_id>-<node_role>
template:
metadata:
labels:
machine.openshift.io/cluster-api-cluster: <infrastructure_id>
machine.openshift.io/cluster-api-machine-role: <node_role>
machine.openshift.io/cluster-api-machine-type: <node_role>
machine.openshift.io/cluster-api-machineset: <infrastructure_id>-<node_role>
spec:
metadata:
providerSpec:
value:
apiVersion: openstackproviderconfig.openshift.io/v1alpha1
cloudName: openstack
cloudsSecret:
name: openstack-cloud-credentials
namespace: openshift-machine-api
flavor: <nova_flavor>
image: <glance_image_name_or_location>
serverGroupID: <optional_UUID_of_server_group>
kind: OpenstackProviderSpec
networks:
- subnets:
- UUID: <machines_subnet_UUID>
ports:
- networkID: <radio_network_UUID>
nameSuffix: radio
fixedIPs:
- subnetID: <radio_subnet_UUID>
tags:
- sriov
- radio
vnicType: direct
portSecurity: false
- networkID: <uplink_network_UUID>
nameSuffix: uplink
fixedIPs:
- subnetID: <uplink_subnet_UUID>
tags:
- sriov
- uplink
vnicType: direct
portSecurity: false
primarySubnet: <machines_subnet_UUID>
securityGroups:
- filter: {}
name: <infrastructure_id>-<node_role>
serverMetadata:
Name: <infrastructure_id>-<node_role>
openshiftClusterID: <infrastructure_id>
tags:
- openshiftClusterID=<infrastructure_id>
trunk: true
userDataSecret:
name: <node_role>-user-data
availabilityZone: <optional_openstack_availability_zone>- 1 5
- Enter a network UUID for each port.
- 2 6
- Enter a subnet UUID for each port.
- 3 7
- The value of the
vnicTypeparameter must bedirectfor each port. - 4 8
- The value of the
portSecurityparameter must befalsefor each port.You cannot set security groups and allowed address pairs for ports when port security is disabled. Setting security groups on the instance applies the groups to all ports that are attached to it.
After you deploy compute machines that are SR-IOV-capable, you must label them as such. For example, from a command line, enter:
$ oc label node <NODE_NAME> feature.node.kubernetes.io/network-sriov.capable="true"
Trunking is enabled for ports that are created by entries in the networks and subnets lists. The names of ports that are created from these lists follow the pattern <machine_name>-<nameSuffix>. The nameSuffix field is required in port definitions.
You can enable trunking for each port.
Optionally, you can add tags to ports as part of their tags lists.
2.8.3. Sample YAML for SR-IOV deployments where port security is disabled
To create single-root I/O virtualization (SR-IOV) ports on a network that has port security disabled, define a compute machine set that includes the ports as items in the spec.template.spec.providerSpec.value.ports list. This difference from the standard SR-IOV compute machine set is due to the automatic security group and allowed address pair configuration that occurs for ports that are created by using the network and subnet interfaces.
Ports that you define for machines subnets require:
- Allowed address pairs for the API and ingress virtual IP ports
- The compute security group
- Attachment to the machines network and subnet
Only parameters that are specific to SR-IOV deployments where port security is disabled are described in this sample. To review a more general sample, see Sample YAML for a compute machine set custom resource that uses SR-IOV on RHOSP".
An example compute machine set that uses SR-IOV networks and has port security disabled
apiVersion: machine.openshift.io/v1beta1
kind: MachineSet
metadata:
labels:
machine.openshift.io/cluster-api-cluster: <infrastructure_id>
machine.openshift.io/cluster-api-machine-role: <node_role>
machine.openshift.io/cluster-api-machine-type: <node_role>
name: <infrastructure_id>-<node_role>
namespace: openshift-machine-api
spec:
replicas: <number_of_replicas>
selector:
matchLabels:
machine.openshift.io/cluster-api-cluster: <infrastructure_id>
machine.openshift.io/cluster-api-machineset: <infrastructure_id>-<node_role>
template:
metadata:
labels:
machine.openshift.io/cluster-api-cluster: <infrastructure_id>
machine.openshift.io/cluster-api-machine-role: <node_role>
machine.openshift.io/cluster-api-machine-type: <node_role>
machine.openshift.io/cluster-api-machineset: <infrastructure_id>-<node_role>
spec:
metadata: {}
providerSpec:
value:
apiVersion: openstackproviderconfig.openshift.io/v1alpha1
cloudName: openstack
cloudsSecret:
name: openstack-cloud-credentials
namespace: openshift-machine-api
flavor: <nova_flavor>
image: <glance_image_name_or_location>
kind: OpenstackProviderSpec
ports:
- allowedAddressPairs:
- ipAddress: <API_VIP_port_IP>
- ipAddress: <ingress_VIP_port_IP>
fixedIPs:
- subnetID: <machines_subnet_UUID>
nameSuffix: nodes
networkID: <machines_network_UUID>
securityGroups:
- <compute_security_group_UUID>
- networkID: <SRIOV_network_UUID>
nameSuffix: sriov
fixedIPs:
- subnetID: <SRIOV_subnet_UUID>
tags:
- sriov
vnicType: direct
portSecurity: False
primarySubnet: <machines_subnet_UUID>
serverMetadata:
Name: <infrastructure_ID>-<node_role>
openshiftClusterID: <infrastructure_id>
tags:
- openshiftClusterID=<infrastructure_id>
trunk: false
userDataSecret:
name: worker-user-data
Trunking is enabled for ports that are created by entries in the networks and subnets lists. The names of ports that are created from these lists follow the pattern <machine_name>-<nameSuffix>. The nameSuffix field is required in port definitions.
You can enable trunking for each port.
Optionally, you can add tags to ports as part of their tags lists.
If your cluster uses Kuryr and the RHOSP SR-IOV network has port security disabled, the primary port for compute machines must have:
-
The value of the
spec.template.spec.providerSpec.value.networks.portSecurityEnabledparameter set tofalse. -
For each subnet, the value of the
spec.template.spec.providerSpec.value.networks.subnets.portSecurityEnabledparameter set tofalse. -
The value of
spec.template.spec.providerSpec.value.securityGroupsset to empty:[].
An example section of a compute machine set for a cluster on Kuryr that uses SR-IOV and has port security disabled
...
networks:
- subnets:
- uuid: <machines_subnet_UUID>
portSecurityEnabled: false
portSecurityEnabled: false
securityGroups: []
...In that case, you can apply the compute security group to the primary VM interface after the VM is created. For example, from a command line:
$ openstack port set --enable-port-security --security-group <infrastructure_id>-<node_role> <main_port_ID>After you deploy compute machines that are SR-IOV-capable, you must label them as such. For example, from a command line, enter:
$ oc label node <NODE_NAME> feature.node.kubernetes.io/network-sriov.capable="true"2.8.4. Creating a compute machine set
In addition to the compute machine sets created by the installation program, you can create your own to dynamically manage the machine compute resources for specific workloads of your choice.
Prerequisites
- Deploy an OpenShift Container Platform cluster.
-
Install the OpenShift CLI (
oc). -
Log in to
ocas a user withcluster-adminpermission.
Procedure
Create a new YAML file that contains the compute machine set custom resource (CR) sample and is named
<file_name>.yaml.Ensure that you set the
<clusterID>and<role>parameter values.Optional: If you are not sure which value to set for a specific field, you can check an existing compute machine set from your cluster.
To list the compute machine sets in your cluster, run the following command:
$ oc get machinesets -n openshift-machine-apiExample output
NAME DESIRED CURRENT READY AVAILABLE AGE agl030519-vplxk-worker-us-east-1a 1 1 1 1 55m agl030519-vplxk-worker-us-east-1b 1 1 1 1 55m agl030519-vplxk-worker-us-east-1c 1 1 1 1 55m agl030519-vplxk-worker-us-east-1d 0 0 55m agl030519-vplxk-worker-us-east-1e 0 0 55m agl030519-vplxk-worker-us-east-1f 0 0 55mTo view values of a specific compute machine set custom resource (CR), run the following command:
$ oc get machineset <machineset_name> \ -n openshift-machine-api -o yamlExample output
apiVersion: machine.openshift.io/v1beta1 kind: MachineSet metadata: labels: machine.openshift.io/cluster-api-cluster: <infrastructure_id>1 name: <infrastructure_id>-<role>2 namespace: openshift-machine-api spec: replicas: 1 selector: matchLabels: machine.openshift.io/cluster-api-cluster: <infrastructure_id> machine.openshift.io/cluster-api-machineset: <infrastructure_id>-<role> template: metadata: labels: machine.openshift.io/cluster-api-cluster: <infrastructure_id> machine.openshift.io/cluster-api-machine-role: <role> machine.openshift.io/cluster-api-machine-type: <role> machine.openshift.io/cluster-api-machineset: <infrastructure_id>-<role> spec: providerSpec:3 ...- 1
- The cluster infrastructure ID.
- 2
- A default node label.Note
For clusters that have user-provisioned infrastructure, a compute machine set can only create
workerandinfratype machines. - 3
- The values in the
<providerSpec>section of the compute machine set CR are platform-specific. For more information about<providerSpec>parameters in the CR, see the sample compute machine set CR configuration for your provider.
Create a
MachineSetCR by running the following command:$ oc create -f <file_name>.yaml
Verification
View the list of compute machine sets by running the following command:
$ oc get machineset -n openshift-machine-apiExample output
NAME DESIRED CURRENT READY AVAILABLE AGE agl030519-vplxk-infra-us-east-1a 1 1 1 1 11m agl030519-vplxk-worker-us-east-1a 1 1 1 1 55m agl030519-vplxk-worker-us-east-1b 1 1 1 1 55m agl030519-vplxk-worker-us-east-1c 1 1 1 1 55m agl030519-vplxk-worker-us-east-1d 0 0 55m agl030519-vplxk-worker-us-east-1e 0 0 55m agl030519-vplxk-worker-us-east-1f 0 0 55mWhen the new compute machine set is available, the
DESIREDandCURRENTvalues match. If the compute machine set is not available, wait a few minutes and run the command again.
2.8.5. Labeling GPU machine sets for the cluster autoscaler
You can use a machine set label to indicate which machines the cluster autoscaler can use to deploy GPU-enabled nodes.
Prerequisites
- Your cluster uses a cluster autoscaler.
Procedure
On the machine set that you want to create machines for the cluster autoscaler to use to deploy GPU-enabled nodes, add a
cluster-api/acceleratorlabel:apiVersion: machine.openshift.io/v1beta1 kind: MachineSet metadata: name: machine-set-name spec: template: spec: metadata: labels: cluster-api/accelerator: nvidia-t41 - 1
- Specify a label of your choice that consists of alphanumeric characters,
-,_, or.and starts and ends with an alphanumeric character. For example, you might usenvidia-t4to represent Nvidia T4 GPUs, ornvidia-a10gfor A10G GPUs.NoteYou must specify the value of this label for the
spec.resourceLimits.gpus.typeparameter in yourClusterAutoscalerCR. For more information, see "Cluster autoscaler resource definition".
2.9. Creating a compute machine set on RHV
You can create a different compute machine set to serve a specific purpose in your OpenShift Container Platform cluster on Red Hat Virtualization (RHV). For example, you might create infrastructure machine sets and related machines so that you can move supporting workloads to the new machines.
You can use the advanced machine management and scaling capabilities only in clusters where the Machine API is operational. Clusters with user-provisioned infrastructure require additional validation and configuration to use the Machine API.
Clusters with the infrastructure platform type none cannot use the Machine API. This limitation applies even if the compute machines that are attached to the cluster are installed on a platform that supports the feature. This parameter cannot be changed after installation.
To view the platform type for your cluster, run the following command:
$ oc get infrastructure cluster -o jsonpath='{.status.platform}'2.9.1. Sample YAML for a compute machine set custom resource on RHV
This sample YAML defines a compute machine set that runs on RHV and creates nodes that are labeled with node-role.kubernetes.io/<node_role>: "".
In this sample, <infrastructure_id> is the infrastructure ID label that is based on the cluster ID that you set when you provisioned the cluster, and <role> is the node label to add.
apiVersion: machine.openshift.io/v1beta1
kind: MachineSet
metadata:
labels:
machine.openshift.io/cluster-api-cluster: <infrastructure_id>
machine.openshift.io/cluster-api-machine-role: <role>
machine.openshift.io/cluster-api-machine-type: <role>
name: <infrastructure_id>-<role>
namespace: openshift-machine-api
spec:
replicas: <number_of_replicas>
Selector:
matchLabels:
machine.openshift.io/cluster-api-cluster: <infrastructure_id>
machine.openshift.io/cluster-api-machineset: <infrastructure_id>-<role>
template:
metadata:
labels:
machine.openshift.io/cluster-api-cluster: <infrastructure_id>
machine.openshift.io/cluster-api-machine-role: <role>
machine.openshift.io/cluster-api-machine-type: <role>
machine.openshift.io/cluster-api-machineset: <infrastructure_id>-<role>
spec:
metadata:
labels:
node-role.kubernetes.io/<role>: ""
providerSpec:
value:
apiVersion: ovirtproviderconfig.machine.openshift.io/v1beta1
cluster_id: <ovirt_cluster_id>
template_name: <ovirt_template_name>
sparse: <boolean_value>
format: <raw_or_cow>
cpu:
sockets: <number_of_sockets>
cores: <number_of_cores>
threads: <number_of_threads>
memory_mb: <memory_size>
guaranteed_memory_mb: <memory_size>
os_disk:
size_gb: <disk_size>
storage_domain_id: <storage_domain_UUID>
network_interfaces:
vnic_profile_id: <vnic_profile_id>
credentialsSecret:
name: ovirt-credentials
kind: OvirtMachineProviderSpec
type: <workload_type>
auto_pinning_policy: <auto_pinning_policy>
hugepages: <hugepages>
affinityGroupsNames:
- compute
userDataSecret:
name: worker-user-data- 1 7 9
- Specify the infrastructure ID that is based on the cluster ID that you set when you provisioned the cluster. If you have the OpenShift CLI (
oc) installed, you can obtain the infrastructure ID by running the following command:$ oc get -o jsonpath='{.status.infrastructureName}{"\n"}' infrastructure cluster - 2 3 10 11 13
- Specify the node label to add.
- 4 8 12
- Specify the infrastructure ID and node label. These two strings together cannot be longer than 35 characters.
- 5
- Specify the number of machines to create.
- 6
- Selector for the machines.
- 14
- Specify the UUID for the RHV cluster to which this VM instance belongs.
- 15
- Specify the RHV VM template to use to create the machine.
- 16
- Setting this option to
falseenables preallocation of disks. The default istrue. Settingsparsetotruewithformatset torawis not available for block storage domains. Therawformat writes the entire virtual disk to the underlying physical disk. - 17
- Can be set to
coworraw. The default iscow. Thecowformat is optimized for virtual machines.NotePreallocating disks on file storage domains writes zeroes to the file. This might not actually preallocate disks depending on the underlying storage.
- 18
- Optional: The CPU field contains the CPU configuration, including sockets, cores, and threads.
- 19
- Optional: Specify the number of sockets for a VM.
- 20
- Optional: Specify the number of cores per socket.
- 21
- Optional: Specify the number of threads per core.
- 22
- Optional: Specify the size of a VM’s memory in MiB.
- 23
- Optional: Specify the size of a virtual machine’s guaranteed memory in MiB. This is the amount of memory that is guaranteed not to be drained by the ballooning mechanism. For more information, see Memory Ballooning and Optimization Settings Explained.Note
If you are using a version earlier than RHV 4.4.8, see Guaranteed memory requirements for OpenShift on Red Hat Virtualization clusters.
- 24
- Optional: Root disk of the node.
- 25
- Optional: Specify the size of the bootable disk in GiB.
- 26
- Optional: Specify the UUID of the storage domain for the compute node’s disks. If none is provided, the compute node is created on the same storage domain as the control nodes. (default)
- 27
- Optional: List of the network interfaces of the VM. If you include this parameter, OpenShift Container Platform discards all network interfaces from the template and creates new ones.
- 28
- Optional: Specify the vNIC profile ID.
- 29
- Specify the name of the secret object that holds the RHV credentials.
- 30
- Optional: Specify the workload type for which the instance is optimized. This value affects the
RHV VMparameter. Supported values:desktop,server(default),high_performance.high_performanceimproves performance on the VM. Limitations exist, for example, you cannot access the VM with a graphical console. For more information, see Configuring High Performance Virtual Machines, Templates, and Pools in the Virtual Machine Management Guide. - 31
- Optional: AutoPinningPolicy defines the policy that automatically sets CPU and NUMA settings, including pinning to the host for this instance. Supported values:
none,resize_and_pin. For more information, see Setting NUMA Nodes in the Virtual Machine Management Guide. - 32
- Optional: Hugepages is the size in KiB for defining hugepages in a VM. Supported values:
2048or1048576. For more information, see Configuring Huge Pages in the Virtual Machine Management Guide. - 33
- Optional: A list of affinity group names to be applied to the VMs. The affinity groups must exist in oVirt.
Because RHV uses a template when creating a VM, if you do not specify a value for an optional parameter, RHV uses the value for that parameter that is specified in the template.
2.9.2. Creating a compute machine set
In addition to the compute machine sets created by the installation program, you can create your own to dynamically manage the machine compute resources for specific workloads of your choice.
Prerequisites
- Deploy an OpenShift Container Platform cluster.
-
Install the OpenShift CLI (
oc). -
Log in to
ocas a user withcluster-adminpermission.
Procedure
Create a new YAML file that contains the compute machine set custom resource (CR) sample and is named
<file_name>.yaml.Ensure that you set the
<clusterID>and<role>parameter values.Optional: If you are not sure which value to set for a specific field, you can check an existing compute machine set from your cluster.
To list the compute machine sets in your cluster, run the following command:
$ oc get machinesets -n openshift-machine-apiExample output
NAME DESIRED CURRENT READY AVAILABLE AGE agl030519-vplxk-worker-us-east-1a 1 1 1 1 55m agl030519-vplxk-worker-us-east-1b 1 1 1 1 55m agl030519-vplxk-worker-us-east-1c 1 1 1 1 55m agl030519-vplxk-worker-us-east-1d 0 0 55m agl030519-vplxk-worker-us-east-1e 0 0 55m agl030519-vplxk-worker-us-east-1f 0 0 55mTo view values of a specific compute machine set custom resource (CR), run the following command:
$ oc get machineset <machineset_name> \ -n openshift-machine-api -o yamlExample output
apiVersion: machine.openshift.io/v1beta1 kind: MachineSet metadata: labels: machine.openshift.io/cluster-api-cluster: <infrastructure_id>1 name: <infrastructure_id>-<role>2 namespace: openshift-machine-api spec: replicas: 1 selector: matchLabels: machine.openshift.io/cluster-api-cluster: <infrastructure_id> machine.openshift.io/cluster-api-machineset: <infrastructure_id>-<role> template: metadata: labels: machine.openshift.io/cluster-api-cluster: <infrastructure_id> machine.openshift.io/cluster-api-machine-role: <role> machine.openshift.io/cluster-api-machine-type: <role> machine.openshift.io/cluster-api-machineset: <infrastructure_id>-<role> spec: providerSpec:3 ...- 1
- The cluster infrastructure ID.
- 2
- A default node label.Note
For clusters that have user-provisioned infrastructure, a compute machine set can only create
workerandinfratype machines. - 3
- The values in the
<providerSpec>section of the compute machine set CR are platform-specific. For more information about<providerSpec>parameters in the CR, see the sample compute machine set CR configuration for your provider.
Create a
MachineSetCR by running the following command:$ oc create -f <file_name>.yaml
Verification
View the list of compute machine sets by running the following command:
$ oc get machineset -n openshift-machine-apiExample output
NAME DESIRED CURRENT READY AVAILABLE AGE agl030519-vplxk-infra-us-east-1a 1 1 1 1 11m agl030519-vplxk-worker-us-east-1a 1 1 1 1 55m agl030519-vplxk-worker-us-east-1b 1 1 1 1 55m agl030519-vplxk-worker-us-east-1c 1 1 1 1 55m agl030519-vplxk-worker-us-east-1d 0 0 55m agl030519-vplxk-worker-us-east-1e 0 0 55m agl030519-vplxk-worker-us-east-1f 0 0 55mWhen the new compute machine set is available, the
DESIREDandCURRENTvalues match. If the compute machine set is not available, wait a few minutes and run the command again.
2.10. Creating a compute machine set on vSphere
You can create a different compute machine set to serve a specific purpose in your OpenShift Container Platform cluster on VMware vSphere. For example, you might create infrastructure machine sets and related machines so that you can move supporting workloads to the new machines.
You can use the advanced machine management and scaling capabilities only in clusters where the Machine API is operational. Clusters with user-provisioned infrastructure require additional validation and configuration to use the Machine API.
Clusters with the infrastructure platform type none cannot use the Machine API. This limitation applies even if the compute machines that are attached to the cluster are installed on a platform that supports the feature. This parameter cannot be changed after installation.
To view the platform type for your cluster, run the following command:
$ oc get infrastructure cluster -o jsonpath='{.status.platform}'2.10.1. Sample YAML for a compute machine set custom resource on vSphere
This sample YAML defines a compute machine set that runs on VMware vSphere and creates nodes that are labeled with node-role.kubernetes.io/<role>: "".
In this sample, <infrastructure_id> is the infrastructure ID label that is based on the cluster ID that you set when you provisioned the cluster, and <role> is the node label to add.
apiVersion: machine.openshift.io/v1beta1
kind: MachineSet
metadata:
creationTimestamp: null
labels:
machine.openshift.io/cluster-api-cluster: <infrastructure_id>
name: <infrastructure_id>-<role>
namespace: openshift-machine-api
spec:
replicas: 1
selector:
matchLabels:
machine.openshift.io/cluster-api-cluster: <infrastructure_id>
machine.openshift.io/cluster-api-machineset: <infrastructure_id>-<role>
template:
metadata:
creationTimestamp: null
labels:
machine.openshift.io/cluster-api-cluster: <infrastructure_id>
machine.openshift.io/cluster-api-machine-role: <role>
machine.openshift.io/cluster-api-machine-type: <role>
machine.openshift.io/cluster-api-machineset: <infrastructure_id>-<role>
spec:
metadata:
creationTimestamp: null
labels:
node-role.kubernetes.io/<role>: ""
providerSpec:
value:
apiVersion: vsphereprovider.openshift.io/v1beta1
credentialsSecret:
name: vsphere-cloud-credentials
diskGiB: 120
kind: VSphereMachineProviderSpec
memoryMiB: 8192
metadata:
creationTimestamp: null
network:
devices:
- networkName: "<vm_network_name>"
numCPUs: 4
numCoresPerSocket: 1
snapshot: ""
template: <vm_template_name>
userDataSecret:
name: worker-user-data
workspace:
datacenter: <vcenter_datacenter_name>
datastore: <vcenter_datastore_name>
folder: <vcenter_vm_folder_path>
resourcepool: <vsphere_resource_pool>
server: <vcenter_server_ip> - 1
- Specify the infrastructure ID that is based on the cluster ID that you set when you provisioned the cluster. If you have the OpenShift CLI (
oc) installed, you can obtain the infrastructure ID by running the following command:$ oc get -o jsonpath='{.status.infrastructureName}{"\n"}' infrastructure cluster - 2
- Specify the infrastructure ID and node label.
- 3
- Specify the node label to add.
- 4
- Specify the vSphere VM network to deploy the compute machine set to. This VM network must be where other compute machines reside in the cluster.
- 5
- Specify the vSphere VM template to use, such as
user-5ddjd-rhcos. - 6
- Specify the vCenter Datacenter to deploy the compute machine set on.
- 7
- Specify the vCenter Datastore to deploy the compute machine set on.
- 8
- Specify the path to the vSphere VM folder in vCenter, such as
/dc1/vm/user-inst-5ddjd. - 9
- Specify the vSphere resource pool for your VMs.
- 10
- Specify the vCenter server IP or fully qualified domain name.
2.10.2. Minimum required vCenter privileges for compute machine set management
To manage compute machine sets in an OpenShift Container Platform cluster on vCenter, you must use an account with privileges to read, create, and delete the required resources. Using an account that has global administrative privileges is the simplest way to access all of the necessary permissions.
If you cannot use an account with global administrative privileges, you must create roles to grant the minimum required privileges. The following table lists the minimum vCenter roles and privileges that are required to create, scale, and delete compute machine sets and to delete machines in your OpenShift Container Platform cluster.
Example 2.1. Minimum vCenter roles and privileges required for compute machine set management
| vSphere object for role | When required | Required privileges |
|---|---|---|
| vSphere vCenter | Always |
|
| vSphere vCenter Cluster | Always |
|
| vSphere Datastore | Always |
|
| vSphere Port Group | Always |
|
| Virtual Machine Folder | Always |
|
| vSphere vCenter Datacenter | If the installation program creates the virtual machine folder |
|
|
1 The | ||
The following table details the permissions and propagation settings that are required for compute machine set management.
Example 2.2. Required permissions and propagation settings
| vSphere object | Folder type | Propagate to children | Permissions required |
|---|---|---|---|
| vSphere vCenter | Always | Not required | Listed required privileges |
| vSphere vCenter Datacenter | Existing folder | Not required |
|
| Installation program creates the folder | Required | Listed required privileges | |
| vSphere vCenter Cluster | Always | Required | Listed required privileges |
| vSphere vCenter Datastore | Always | Not required | Listed required privileges |
| vSphere Switch | Always | Not required |
|
| vSphere Port Group | Always | Not required | Listed required privileges |
| vSphere vCenter Virtual Machine Folder | Existing folder | Required | Listed required privileges |
For more information about creating an account with only the required privileges, see vSphere Permissions and User Management Tasks in the vSphere documentation.
2.10.3. Requirements for clusters with user-provisioned infrastructure to use compute machine sets
To use compute machine sets on clusters that have user-provisioned infrastructure, you must ensure that you cluster configuration supports using the Machine API.
Obtaining the infrastructure ID
To create compute machine sets, you must be able to supply the infrastructure ID for your cluster.
Procedure
To obtain the infrastructure ID for your cluster, run the following command:
$ oc get infrastructure cluster -o jsonpath='{.status.infrastructureName}'
Satisfying vSphere credentials requirements
To use compute machine sets, the Machine API must be able to interact with vCenter. Credentials that authorize the Machine API components to interact with vCenter must exist in a secret in the openshift-machine-api namespace.
Procedure
To determine whether the required credentials exist, run the following command:
$ oc get secret \ -n openshift-machine-api vsphere-cloud-credentials \ -o go-template='{{range $k,$v := .data}}{{printf "%s: " $k}}{{if not $v}}{{$v}}{{else}}{{$v | base64decode}}{{end}}{{"\n"}}{{end}}'Sample output
<vcenter-server>.password=<openshift-user-password> <vcenter-server>.username=<openshift-user>where
<vcenter-server>is the IP address or fully qualified domain name (FQDN) of the vCenter server and<openshift-user>and<openshift-user-password>are the OpenShift Container Platform administrator credentials to use.If the secret does not exist, create it by running the following command:
$ oc create secret generic vsphere-cloud-credentials \ -n openshift-machine-api \ --from-literal=<vcenter-server>.username=<openshift-user> --from-literal=<vcenter-server>.password=<openshift-user-password>
Satisfying Ignition configuration requirements
Provisioning virtual machines (VMs) requires a valid Ignition configuration. The Ignition configuration contains the machine-config-server address and a system trust bundle for obtaining further Ignition configurations from the Machine Config Operator.
By default, this configuration is stored in the worker-user-data secret in the machine-api-operator namespace. Compute machine sets reference the secret during the machine creation process.
Procedure
To determine whether the required secret exists, run the following command:
$ oc get secret \ -n openshift-machine-api worker-user-data \ -o go-template='{{range $k,$v := .data}}{{printf "%s: " $k}}{{if not $v}}{{$v}}{{else}}{{$v | base64decode}}{{end}}{{"\n"}}{{end}}'Sample output
disableTemplating: false userData:1 { "ignition": { ... }, ... }- 1
- The full output is omitted here, but should have this format.
If the secret does not exist, create it by running the following command:
$ oc create secret generic worker-user-data \ -n openshift-machine-api \ --from-file=<installation_directory>/worker.ignwhere
<installation_directory>is the directory that was used to store your installation assets during cluster installation.
2.10.4. Creating a compute machine set
In addition to the compute machine sets created by the installation program, you can create your own to dynamically manage the machine compute resources for specific workloads of your choice.
Clusters that are installed with user-provisioned infrastructure have a different networking stack than clusters with infrastructure that is provisioned by the installation program. As a result of this difference, automatic load balancer management is unsupported on clusters that have user-provisioned infrastructure. For these clusters, a compute machine set can only create worker and infra type machines.
Prerequisites
- Deploy an OpenShift Container Platform cluster.
-
Install the OpenShift CLI (
oc). -
Log in to
ocas a user withcluster-adminpermission. - Have the necessary permissions to deploy VMs in your vCenter instance and have the required access to the datastore specified.
- If your cluster uses user-provisioned infrastructure, you have satisfied the specific Machine API requirements for that configuration.
Procedure
Create a new YAML file that contains the compute machine set custom resource (CR) sample and is named
<file_name>.yaml.Ensure that you set the
<clusterID>and<role>parameter values.Optional: If you are not sure which value to set for a specific field, you can check an existing compute machine set from your cluster.
To list the compute machine sets in your cluster, run the following command:
$ oc get machinesets -n openshift-machine-apiExample output
NAME DESIRED CURRENT READY AVAILABLE AGE agl030519-vplxk-worker-us-east-1a 1 1 1 1 55m agl030519-vplxk-worker-us-east-1b 1 1 1 1 55m agl030519-vplxk-worker-us-east-1c 1 1 1 1 55m agl030519-vplxk-worker-us-east-1d 0 0 55m agl030519-vplxk-worker-us-east-1e 0 0 55m agl030519-vplxk-worker-us-east-1f 0 0 55mTo view values of a specific compute machine set custom resource (CR), run the following command:
$ oc get machineset <machineset_name> \ -n openshift-machine-api -o yamlExample output
apiVersion: machine.openshift.io/v1beta1 kind: MachineSet metadata: labels: machine.openshift.io/cluster-api-cluster: <infrastructure_id>1 name: <infrastructure_id>-<role>2 namespace: openshift-machine-api spec: replicas: 1 selector: matchLabels: machine.openshift.io/cluster-api-cluster: <infrastructure_id> machine.openshift.io/cluster-api-machineset: <infrastructure_id>-<role> template: metadata: labels: machine.openshift.io/cluster-api-cluster: <infrastructure_id> machine.openshift.io/cluster-api-machine-role: <role> machine.openshift.io/cluster-api-machine-type: <role> machine.openshift.io/cluster-api-machineset: <infrastructure_id>-<role> spec: providerSpec:3 ...- 1
- The cluster infrastructure ID.
- 2
- A default node label.Note
For clusters that have user-provisioned infrastructure, a compute machine set can only create
workerandinfratype machines. - 3
- The values in the
<providerSpec>section of the compute machine set CR are platform-specific. For more information about<providerSpec>parameters in the CR, see the sample compute machine set CR configuration for your provider.
If you are creating a compute machine set for a cluster that has user-provisioned infrastructure, note the following important values:
Example vSphere
providerSpecvaluesapiVersion: machine.openshift.io/v1beta1 kind: MachineSet ... template: ... spec: providerSpec: value: apiVersion: machine.openshift.io/v1beta1 credentialsSecret: name: vsphere-cloud-credentials1 diskGiB: 120 kind: VSphereMachineProviderSpec memoryMiB: 16384 network: devices: - networkName: "<vm_network_name>" numCPUs: 4 numCoresPerSocket: 4 snapshot: "" template: <vm_template_name>2 userDataSecret: name: worker-user-data3 workspace: datacenter: <vcenter_datacenter_name> datastore: <vcenter_datastore_name> folder: <vcenter_vm_folder_path> resourcepool: <vsphere_resource_pool> server: <vcenter_server_address>4 - 1
- The name of the secret in the
openshift-machine-apinamespace that contains the required vCenter credentials. - 2
- The name of the RHCOS VM template for your cluster that was created during installation.
- 3
- The name of the secret in the
openshift-machine-apinamespace that contains the required Ignition configuration credentials. - 4
- The IP address or fully qualified domain name (FQDN) of the vCenter server.
Create a
MachineSetCR by running the following command:$ oc create -f <file_name>.yaml
Verification
View the list of compute machine sets by running the following command:
$ oc get machineset -n openshift-machine-apiExample output
NAME DESIRED CURRENT READY AVAILABLE AGE agl030519-vplxk-infra-us-east-1a 1 1 1 1 11m agl030519-vplxk-worker-us-east-1a 1 1 1 1 55m agl030519-vplxk-worker-us-east-1b 1 1 1 1 55m agl030519-vplxk-worker-us-east-1c 1 1 1 1 55m agl030519-vplxk-worker-us-east-1d 0 0 55m agl030519-vplxk-worker-us-east-1e 0 0 55m agl030519-vplxk-worker-us-east-1f 0 0 55mWhen the new compute machine set is available, the
DESIREDandCURRENTvalues match. If the compute machine set is not available, wait a few minutes and run the command again.
2.10.5. Labeling GPU machine sets for the cluster autoscaler
You can use a machine set label to indicate which machines the cluster autoscaler can use to deploy GPU-enabled nodes.
Prerequisites
- Your cluster uses a cluster autoscaler.
Procedure
On the machine set that you want to create machines for the cluster autoscaler to use to deploy GPU-enabled nodes, add a
cluster-api/acceleratorlabel:apiVersion: machine.openshift.io/v1beta1 kind: MachineSet metadata: name: machine-set-name spec: template: spec: metadata: labels: cluster-api/accelerator: nvidia-t41 - 1
- Specify a label of your choice that consists of alphanumeric characters,
-,_, or.and starts and ends with an alphanumeric character. For example, you might usenvidia-t4to represent Nvidia T4 GPUs, ornvidia-a10gfor A10G GPUs.NoteYou must specify the value of this label for the
spec.resourceLimits.gpus.typeparameter in yourClusterAutoscalerCR. For more information, see "Cluster autoscaler resource definition".
2.11. Creating a compute machine set on bare metal
You can create a different compute machine set to serve a specific purpose in your OpenShift Container Platform cluster on bare metal. For example, you might create infrastructure machine sets and related machines so that you can move supporting workloads to the new machines.
You can use the advanced machine management and scaling capabilities only in clusters where the Machine API is operational. Clusters with user-provisioned infrastructure require additional validation and configuration to use the Machine API.
Clusters with the infrastructure platform type none cannot use the Machine API. This limitation applies even if the compute machines that are attached to the cluster are installed on a platform that supports the feature. This parameter cannot be changed after installation.
To view the platform type for your cluster, run the following command:
$ oc get infrastructure cluster -o jsonpath='{.status.platform}'2.11.1. Sample YAML for a compute machine set custom resource on bare metal
This sample YAML defines a compute machine set that runs on bare metal and creates nodes that are labeled with node-role.kubernetes.io/<role>: "".
In this sample, <infrastructure_id> is the infrastructure ID label that is based on the cluster ID that you set when you provisioned the cluster, and <role> is the node label to add.
apiVersion: machine.openshift.io/v1beta1
kind: MachineSet
metadata:
creationTimestamp: null
labels:
machine.openshift.io/cluster-api-cluster: <infrastructure_id>
name: <infrastructure_id>-<role>
namespace: openshift-machine-api
spec:
replicas: 1
selector:
matchLabels:
machine.openshift.io/cluster-api-cluster: <infrastructure_id>
machine.openshift.io/cluster-api-machineset: <infrastructure_id>-<role>
template:
metadata:
creationTimestamp: null
labels:
machine.openshift.io/cluster-api-cluster: <infrastructure_id>
machine.openshift.io/cluster-api-machine-role: <role>
machine.openshift.io/cluster-api-machine-type: <role>
machine.openshift.io/cluster-api-machineset: <infrastructure_id>-<role>
spec:
metadata:
creationTimestamp: null
labels:
node-role.kubernetes.io/<role>: ""
providerSpec:
value:
apiVersion: baremetal.cluster.k8s.io/v1alpha1
hostSelector: {}
image:
checksum: http:/172.22.0.3:6181/images/rhcos-<version>.<architecture>.qcow2.<md5sum>
url: http://172.22.0.3:6181/images/rhcos-<version>.<architecture>.qcow2
kind: BareMetalMachineProviderSpec
metadata:
creationTimestamp: null
userData:
name: worker-user-data- 1 3 5
- Specify the infrastructure ID that is based on the cluster ID that you set when you provisioned the cluster. If you have the OpenShift CLI (
oc) installed, you can obtain the infrastructure ID by running the following command:$ oc get -o jsonpath='{.status.infrastructureName}{"\n"}' infrastructure cluster - 2 4 8
- Specify the infrastructure ID and node label.
- 6 7 9
- Specify the node label to add.
- 10
- Edit the
checksumURL to use the API VIP address. - 11
- Edit the
urlURL to use the API VIP address.
2.11.2. Creating a compute machine set
In addition to the compute machine sets created by the installation program, you can create your own to dynamically manage the machine compute resources for specific workloads of your choice.
Prerequisites
- Deploy an OpenShift Container Platform cluster.
-
Install the OpenShift CLI (
oc). -
Log in to
ocas a user withcluster-adminpermission.
Procedure
Create a new YAML file that contains the compute machine set custom resource (CR) sample and is named
<file_name>.yaml.Ensure that you set the
<clusterID>and<role>parameter values.Optional: If you are not sure which value to set for a specific field, you can check an existing compute machine set from your cluster.
To list the compute machine sets in your cluster, run the following command:
$ oc get machinesets -n openshift-machine-apiExample output
NAME DESIRED CURRENT READY AVAILABLE AGE agl030519-vplxk-worker-us-east-1a 1 1 1 1 55m agl030519-vplxk-worker-us-east-1b 1 1 1 1 55m agl030519-vplxk-worker-us-east-1c 1 1 1 1 55m agl030519-vplxk-worker-us-east-1d 0 0 55m agl030519-vplxk-worker-us-east-1e 0 0 55m agl030519-vplxk-worker-us-east-1f 0 0 55mTo view values of a specific compute machine set custom resource (CR), run the following command:
$ oc get machineset <machineset_name> \ -n openshift-machine-api -o yamlExample output
apiVersion: machine.openshift.io/v1beta1 kind: MachineSet metadata: labels: machine.openshift.io/cluster-api-cluster: <infrastructure_id>1 name: <infrastructure_id>-<role>2 namespace: openshift-machine-api spec: replicas: 1 selector: matchLabels: machine.openshift.io/cluster-api-cluster: <infrastructure_id> machine.openshift.io/cluster-api-machineset: <infrastructure_id>-<role> template: metadata: labels: machine.openshift.io/cluster-api-cluster: <infrastructure_id> machine.openshift.io/cluster-api-machine-role: <role> machine.openshift.io/cluster-api-machine-type: <role> machine.openshift.io/cluster-api-machineset: <infrastructure_id>-<role> spec: providerSpec:3 ...- 1
- The cluster infrastructure ID.
- 2
- A default node label.Note
For clusters that have user-provisioned infrastructure, a compute machine set can only create
workerandinfratype machines. - 3
- The values in the
<providerSpec>section of the compute machine set CR are platform-specific. For more information about<providerSpec>parameters in the CR, see the sample compute machine set CR configuration for your provider.
Create a
MachineSetCR by running the following command:$ oc create -f <file_name>.yaml
Verification
View the list of compute machine sets by running the following command:
$ oc get machineset -n openshift-machine-apiExample output
NAME DESIRED CURRENT READY AVAILABLE AGE agl030519-vplxk-infra-us-east-1a 1 1 1 1 11m agl030519-vplxk-worker-us-east-1a 1 1 1 1 55m agl030519-vplxk-worker-us-east-1b 1 1 1 1 55m agl030519-vplxk-worker-us-east-1c 1 1 1 1 55m agl030519-vplxk-worker-us-east-1d 0 0 55m agl030519-vplxk-worker-us-east-1e 0 0 55m agl030519-vplxk-worker-us-east-1f 0 0 55mWhen the new compute machine set is available, the
DESIREDandCURRENTvalues match. If the compute machine set is not available, wait a few minutes and run the command again.
2.11.3. Labeling GPU machine sets for the cluster autoscaler
You can use a machine set label to indicate which machines the cluster autoscaler can use to deploy GPU-enabled nodes.
Prerequisites
- Your cluster uses a cluster autoscaler.
Procedure
On the machine set that you want to create machines for the cluster autoscaler to use to deploy GPU-enabled nodes, add a
cluster-api/acceleratorlabel:apiVersion: machine.openshift.io/v1beta1 kind: MachineSet metadata: name: machine-set-name spec: template: spec: metadata: labels: cluster-api/accelerator: nvidia-t41 - 1
- Specify a label of your choice that consists of alphanumeric characters,
-,_, or.and starts and ends with an alphanumeric character. For example, you might usenvidia-t4to represent Nvidia T4 GPUs, ornvidia-a10gfor A10G GPUs.NoteYou must specify the value of this label for the
spec.resourceLimits.gpus.typeparameter in yourClusterAutoscalerCR. For more information, see "Cluster autoscaler resource definition".
Chapter 3. Manually scaling a compute machine set
You can add or remove an instance of a machine in a compute machine set.
If you need to modify aspects of a compute machine set outside of scaling, see Modifying a compute machine set.
3.1. Prerequisites
-
If you enabled the cluster-wide proxy and scale up compute machines not included in
networking.machineNetwork[].cidrfrom the installation configuration, you must add the compute machines to the Proxy object’snoProxyfield to prevent connection issues.
You can use the advanced machine management and scaling capabilities only in clusters where the Machine API is operational. Clusters with user-provisioned infrastructure require additional validation and configuration to use the Machine API.
Clusters with the infrastructure platform type none cannot use the Machine API. This limitation applies even if the compute machines that are attached to the cluster are installed on a platform that supports the feature. This parameter cannot be changed after installation.
To view the platform type for your cluster, run the following command:
$ oc get infrastructure cluster -o jsonpath='{.status.platform}'3.2. Scaling a compute machine set manually
To add or remove an instance of a machine in a compute machine set, you can manually scale the compute machine set.
This guidance is relevant to fully automated, installer-provisioned infrastructure installations. Customized, user-provisioned infrastructure installations do not have compute machine sets.
Prerequisites
-
Install an OpenShift Container Platform cluster and the
occommand line. -
Log in to
ocas a user withcluster-adminpermission.
Procedure
View the compute machine sets that are in the cluster by running the following command:
$ oc get machinesets -n openshift-machine-apiThe compute machine sets are listed in the form of
<clusterid>-worker-<aws-region-az>.View the compute machines that are in the cluster by running the following command:
$ oc get machine -n openshift-machine-apiSet the annotation on the compute machine that you want to delete by running the following command:
$ oc annotate machine/<machine_name> -n openshift-machine-api machine.openshift.io/delete-machine="true"Scale the compute machine set by running one of the following commands:
$ oc scale --replicas=2 machineset <machineset> -n openshift-machine-apiOr:
$ oc edit machineset <machineset> -n openshift-machine-apiTipYou can alternatively apply the following YAML to scale the compute machine set:
apiVersion: machine.openshift.io/v1beta1 kind: MachineSet metadata: name: <machineset> namespace: openshift-machine-api spec: replicas: 2You can scale the compute machine set up or down. It takes several minutes for the new machines to be available.
ImportantBy default, the machine controller tries to drain the node that is backed by the machine until it succeeds. In some situations, such as with a misconfigured pod disruption budget, the drain operation might not be able to succeed. If the drain operation fails, the machine controller cannot proceed removing the machine.
You can skip draining the node by annotating
machine.openshift.io/exclude-node-drainingin a specific machine.
Verification
Verify the deletion of the intended machine by running the following command:
$ oc get machines
3.3. The compute machine set deletion policy
Random, Newest, and Oldest are the three supported deletion options. The default is Random, meaning that random machines are chosen and deleted when scaling compute machine sets down. The deletion policy can be set according to the use case by modifying the particular compute machine set:
spec:
deletePolicy: <delete_policy>
replicas: <desired_replica_count>
Specific machines can also be prioritized for deletion by adding the annotation machine.openshift.io/delete-machine=true to the machine of interest, regardless of the deletion policy.
By default, the OpenShift Container Platform router pods are deployed on workers. Because the router is required to access some cluster resources, including the web console, do not scale the worker compute machine set to 0 unless you first relocate the router pods.
Custom compute machine sets can be used for use cases requiring that services run on specific nodes and that those services are ignored by the controller when the worker compute machine sets are scaling down. This prevents service disruption.
Chapter 4. Modifying a compute machine set
You can modify a compute machine set, such as adding labels, changing the instance type, or changing block storage.
On Red Hat Virtualization (RHV), you can also change a compute machine set to provision new nodes on a different storage domain.
If you need to scale a compute machine set without making other changes, see Manually scaling a compute machine set.
4.1. Modifying a compute machine set by using the CLI
You can modify the configuration of a compute machine set, and then propagate the changes to the machines in your cluster by using the CLI.
By updating the compute machine set configuration, you can enable features or change the properties of the machines it creates. When you modify a compute machine set, your changes only apply to compute machines that are created after you save the updated MachineSet custom resource (CR). The changes do not affect existing machines.
Changes made in the underlying cloud provider are not reflected in the Machine or MachineSet CRs. To adjust instance configuration in cluster-managed infrastructure, use the cluster-side resources.
You can replace the existing machines with new ones that reflect the updated configuration by scaling the compute machine set to create twice the number of replicas and then scaling it down to the original number of replicas.
If you need to scale a compute machine set without making other changes, you do not need to delete the machines.
By default, the OpenShift Container Platform router pods are deployed on compute machines. Because the router is required to access some cluster resources, including the web console, do not scale the compute machine set to 0 unless you first relocate the router pods.
The output examples in this procedure use the values for an AWS cluster.
Prerequisites
- Your OpenShift Container Platform cluster uses the Machine API.
-
You are logged in to the cluster as an administrator by using the OpenShift CLI (
oc).
Procedure
List the compute machine sets in your cluster by running the following command:
$ oc get machinesets.machine.openshift.io -n openshift-machine-apiExample output
NAME DESIRED CURRENT READY AVAILABLE AGE <compute_machine_set_name_1> 1 1 1 1 55m <compute_machine_set_name_2> 1 1 1 1 55mEdit a compute machine set by running the following command:
$ oc edit machinesets.machine.openshift.io <machine_set_name> \ -n openshift-machine-apiNote the value of the
spec.replicasfield, because you need it when scaling the machine set to apply the changes.apiVersion: machine.openshift.io/v1beta1 kind: MachineSet metadata: name: <machine_set_name> namespace: openshift-machine-api spec: replicas: 21 # ...- 1
- The examples in this procedure show a compute machine set that has a
replicasvalue of2.
- Update the compute machine set CR with the configuration options that you want and save your changes.
List the machines that are managed by the updated compute machine set by running the following command:
$ oc get machines.machine.openshift.io \ -n openshift-machine-api \ -l machine.openshift.io/cluster-api-machineset=<machine_set_name>Example output for an AWS cluster
NAME PHASE TYPE REGION ZONE AGE <machine_name_original_1> Running m6i.xlarge us-west-1 us-west-1a 4h <machine_name_original_2> Running m6i.xlarge us-west-1 us-west-1a 4hFor each machine that is managed by the updated compute machine set, set the
deleteannotation by running the following command:$ oc annotate machine.machine.openshift.io/<machine_name_original_1> \ -n openshift-machine-api \ machine.openshift.io/delete-machine="true"To create replacement machines with the new configuration, scale the compute machine set to twice the number of replicas by running the following command:
$ oc scale --replicas=4 \1 machineset.machine.openshift.io <machine_set_name> \ -n openshift-machine-api- 1
- The original example value of
2is doubled to4.
List the machines that are managed by the updated compute machine set by running the following command:
$ oc get machines.machine.openshift.io \ -n openshift-machine-api \ -l machine.openshift.io/cluster-api-machineset=<machine_set_name>Example output for an AWS cluster
NAME PHASE TYPE REGION ZONE AGE <machine_name_original_1> Running m6i.xlarge us-west-1 us-west-1a 4h <machine_name_original_2> Running m6i.xlarge us-west-1 us-west-1a 4h <machine_name_updated_1> Provisioned m6i.xlarge us-west-1 us-west-1a 55s <machine_name_updated_2> Provisioning m6i.xlarge us-west-1 us-west-1a 55sWhen the new machines are in the
Runningphase, you can scale the compute machine set to the original number of replicas.To remove the machines that were created with the old configuration, scale the compute machine set to the original number of replicas by running the following command:
$ oc scale --replicas=2 \1 machineset.machine.openshift.io <machine_set_name> \ -n openshift-machine-api- 1
- The original example value of
2.
Verification
To verify that a machine created by the updated machine set has the correct configuration, examine the relevant fields in the CR for one of the new machines by running the following command:
$ oc describe machine.machine.openshift.io <machine_name_updated_1> \ -n openshift-machine-apiTo verify that the compute machines without the updated configuration are deleted, list the machines that are managed by the updated compute machine set by running the following command:
$ oc get machines.machine.openshift.io \ -n openshift-machine-api \ -l machine.openshift.io/cluster-api-machineset=<machine_set_name>Example output while deletion is in progress for an AWS cluster
NAME PHASE TYPE REGION ZONE AGE <machine_name_original_1> Deleting m6i.xlarge us-west-1 us-west-1a 4h <machine_name_original_2> Deleting m6i.xlarge us-west-1 us-west-1a 4h <machine_name_updated_1> Running m6i.xlarge us-west-1 us-west-1a 5m41s <machine_name_updated_2> Running m6i.xlarge us-west-1 us-west-1a 5m41sExample output when deletion is complete for an AWS cluster
NAME PHASE TYPE REGION ZONE AGE <machine_name_updated_1> Running m6i.xlarge us-west-1 us-west-1a 6m30s <machine_name_updated_2> Running m6i.xlarge us-west-1 us-west-1a 6m30s
4.2. Migrating nodes to a different storage domain on RHV
You can migrate the OpenShift Container Platform control plane and compute nodes to a different storage domain in a Red Hat Virtualization (RHV) cluster.
4.2.1. Migrating compute nodes to a different storage domain in RHV
Prerequisites
- You are logged in to the Manager.
- You have the name of the target storage domain.
Procedure
Identify the virtual machine template by running the following command:
$ oc get -o jsonpath='{.items[0].spec.template.spec.providerSpec.value.template_name}{"\n"}' machineset -ACreate a new virtual machine in the Manager, based on the template you identified. Leave all other settings unchanged. For details, see Creating a Virtual Machine Based on a Template in the Red Hat Virtualization Virtual Machine Management Guide.
TipYou do not need to start the new virtual machine.
- Create a new template from the new virtual machine. Specify the target storage domain under Target. For details, see Creating a Template in the Red Hat Virtualization Virtual Machine Management Guide.
Add a new compute machine set to the OpenShift Container Platform cluster with the new template.
Get the details of the current compute machine set by running the following command:
$ oc get machineset -o yamlUse these details to create a compute machine set. For more information see Creating a compute machine set.
Enter the new virtual machine template name in the template_name field. Use the same template name you used in the New template dialog in the Manager.
- Note the names of both the old and new compute machine sets. You need to refer to them in subsequent steps.
Migrate the workloads.
Scale up the new compute machine set. For details on manually scaling compute machine sets, see Scaling a compute machine set manually.
OpenShift Container Platform moves the pods to an available worker when the old machine is removed.
- Scale down the old compute machine set.
Remove the old compute machine set by running the following command:
$ oc delete machineset <machineset-name>
4.2.2. Migrating control plane nodes to a different storage domain on RHV
OpenShift Container Platform does not manage control plane nodes, so they are easier to migrate than compute nodes. You can migrate them like any other virtual machine on Red Hat Virtualization (RHV).
Perform this procedure for each node separately.
Prerequisites
- You are logged in to the Manager.
- You have identified the control plane nodes. They are labeled master in the Manager.
Procedure
- Select the virtual machine labeled master.
- Shut down the virtual machine.
- Click the Disks tab.
- Click the virtual machine’s disk.
-
Click More Actions
 and select Move.
- Select the target storage domain and wait for the migration process to complete.
- Start the virtual machine.
Verify that the OpenShift Container Platform cluster is stable:
$ oc get nodesThe output should display the node with the status
Ready.- Repeat this procedure for each control plane node.
Chapter 5. Machine phases and lifecycle
Machines move through a lifecycle that has several defined phases. Understanding the machine lifecycle and its phases can help you verify whether a procedure is complete or troubleshoot undesired behavior. In OpenShift Container Platform, the machine lifecycle is consistent across all supported cloud providers.
5.1. Machine phases
As a machine moves through its lifecycle, it passes through different phases. Each phase is a basic representation of the state of the machine.
Provisioning- There is a request to provision a new machine. The machine does not yet exist and does not have an instance, a provider ID, or an address.
Provisioned-
The machine exists and has a provider ID or an address. The cloud provider has created an instance for the machine. The machine has not yet become a node and the
status.nodeRefsection of the machine object is not yet populated. Running-
The machine exists and has a provider ID or address. Ignition has run successfully and the cluster machine approver has approved a certificate signing request (CSR). The machine has become a node and the
status.nodeRefsection of the machine object contains node details. Deleting-
There is a request to delete the machine. The machine object has a
DeletionTimestampfield that indicates the time of the deletion request. Failed- There is an unrecoverable problem with the machine. This can happen, for example, if the cloud provider deletes the instance for the machine.
5.2. The machine lifecycle
The lifecycle begins with the request to provision a machine and continues until the machine no longer exists.
The machine lifecycle proceeds in the following order. Interruptions due to errors or lifecycle hooks are not included in this overview.
There is a request to provision a new machine for one of the following reasons:
- A cluster administrator scales a machine set such that it requires additional machines.
- An autoscaling policy scales machine set such that it requires additional machines.
- A machine that is managed by a machine set fails or is deleted and the machine set creates a replacement to maintain the required number of machines.
-
The machine enters the
Provisioningphase. - The infrastructure provider creates an instance for the machine.
-
The machine has a provider ID or address and enters the
Provisionedphase. - The Ignition configuration file is processed.
- The kubelet issues a certificate signing request (CSR).
- The cluster machine approver approves the CSR.
-
The machine becomes a node and enters the
Runningphase. An existing machine is slated for deletion for one of the following reasons:
-
A user with
cluster-adminpermissions uses theoc delete machinecommand. -
The machine gets a
machine.openshift.io/delete-machineannotation. - The machine set that manages the machine marks it for deletion to reduce the replica count as part of reconciliation.
- The cluster autoscaler identifies a node that is unnecessary to meet the deployment needs of the cluster.
- A machine health check is configured to replace an unhealthy machine.
-
A user with
-
The machine enters the
Deletingphase, in which it is marked for deletion but is still present in the API. - The machine controller removes the instance from the infrastructure provider.
-
The machine controller deletes the
Nodeobject.
5.3. Determining the phase of a machine
You can find the phase of a machine by using the OpenShift CLI (oc) or by using the web console. You can use this information to verify whether a procedure is complete or to troubleshoot undesired behavior.
5.3.1. Determining the phase of a machine by using the CLI
You can find the phase of a machine by using the OpenShift CLI (oc).
Prerequisites
-
You have access to an OpenShift Container Platform cluster using an account with
cluster-adminpermissions. -
You have installed the
ocCLI.
Procedure
List the machines on the cluster by running the following command:
$ oc get machine -n openshift-machine-apiExample output
NAME PHASE TYPE REGION ZONE AGE mycluster-5kbsp-master-0 Running m6i.xlarge us-west-1 us-west-1a 4h55m mycluster-5kbsp-master-1 Running m6i.xlarge us-west-1 us-west-1b 4h55m mycluster-5kbsp-master-2 Running m6i.xlarge us-west-1 us-west-1a 4h55m mycluster-5kbsp-worker-us-west-1a-fmx8t Running m6i.xlarge us-west-1 us-west-1a 4h51m mycluster-5kbsp-worker-us-west-1a-m889l Running m6i.xlarge us-west-1 us-west-1a 4h51m mycluster-5kbsp-worker-us-west-1b-c8qzm Running m6i.xlarge us-west-1 us-west-1b 4h51mThe
PHASEcolumn of the output contains the phase of each machine.
5.3.2. Determining the phase of a machine by using the web console
You can find the phase of a machine by using the OpenShift Container Platform web console.
Prerequisites
-
You have access to an OpenShift Container Platform cluster using an account with
cluster-adminpermissions.
Procedure
-
Log in to the web console as a user with the
cluster-adminrole. - Navigate to Compute → Machines.
- On the Machines page, select the name of the machine that you want to find the phase of.
- On the Machine details page, select the YAML tab.
In the YAML block, find the value of the
status.phasefield.Example YAML snippet
apiVersion: machine.openshift.io/v1beta1 kind: Machine metadata: name: mycluster-5kbsp-worker-us-west-1a-fmx8t # ... status: phase: Running1 - 1
- In this example, the phase is
Running.
Chapter 6. Deleting a machine
You can delete a specific machine.
6.1. Deleting a specific machine
You can delete a specific machine.
Do not delete a control plane machine unless your cluster uses a control plane machine set.
Prerequisites
- Install an OpenShift Container Platform cluster.
-
Install the OpenShift CLI (
oc). -
Log in to
ocas a user withcluster-adminpermission.
Procedure
View the machines that are in the cluster by running the following command:
$ oc get machine -n openshift-machine-apiThe command output contains a list of machines in the
<clusterid>-<role>-<cloud_region>format.- Identify the machine that you want to delete.
Delete the machine by running the following command:
$ oc delete machine <machine> -n openshift-machine-apiImportantBy default, the machine controller tries to drain the node that is backed by the machine until it succeeds. In some situations, such as with a misconfigured pod disruption budget, the drain operation might not be able to succeed. If the drain operation fails, the machine controller cannot proceed removing the machine.
You can skip draining the node by annotating
machine.openshift.io/exclude-node-drainingin a specific machine.If the machine that you delete belongs to a machine set, a new machine is immediately created to satisfy the specified number of replicas.
6.2. Lifecycle hooks for the machine deletion phase
Machine lifecycle hooks are points in the reconciliation lifecycle of a machine where the normal lifecycle process can be interrupted. In the machine Deleting phase, these interruptions provide the opportunity for components to modify the machine deletion process.
6.2.1. Terminology and definitions
To understand the behavior of lifecycle hooks for the machine deletion phase, you must understand the following concepts:
- Reconciliation
- Reconciliation is the process by which a controller attempts to make the real state of the cluster and the objects that it comprises match the requirements in an object specification.
- Machine controller
The machine controller manages the reconciliation lifecycle for a machine. For machines on cloud platforms, the machine controller is the combination of an OpenShift Container Platform controller and a platform-specific actuator from the cloud provider.
In the context of machine deletion, the machine controller performs the following actions:
- Drain the node that is backed by the machine.
- Delete the machine instance from the cloud provider.
-
Delete the
Nodeobject.
- Lifecycle hook
A lifecycle hook is a defined point in the reconciliation lifecycle of an object where the normal lifecycle process can be interrupted. Components can use a lifecycle hook to inject changes into the process to accomplish a desired outcome.
There are two lifecycle hooks in the machine
Deletingphase:-
preDrainlifecycle hooks must be resolved before the node that is backed by the machine can be drained. -
preTerminatelifecycle hooks must be resolved before the instance can be removed from the infrastructure provider.
-
- Hook-implementing controller
A hook-implementing controller is a controller, other than the machine controller, that can interact with a lifecycle hook. A hook-implementing controller can do one or more of the following actions:
- Add a lifecycle hook.
- Respond to a lifecycle hook.
- Remove a lifecycle hook.
Each lifecycle hook has a single hook-implementing controller, but a hook-implementing controller can manage one or more hooks.
6.2.2. Machine deletion processing order
In OpenShift Container Platform 4.12, there are two lifecycle hooks for the machine deletion phase: preDrain and preTerminate. When all hooks for a given lifecycle point are removed, reconciliation continues as normal.
Figure 6.1. Machine deletion flow
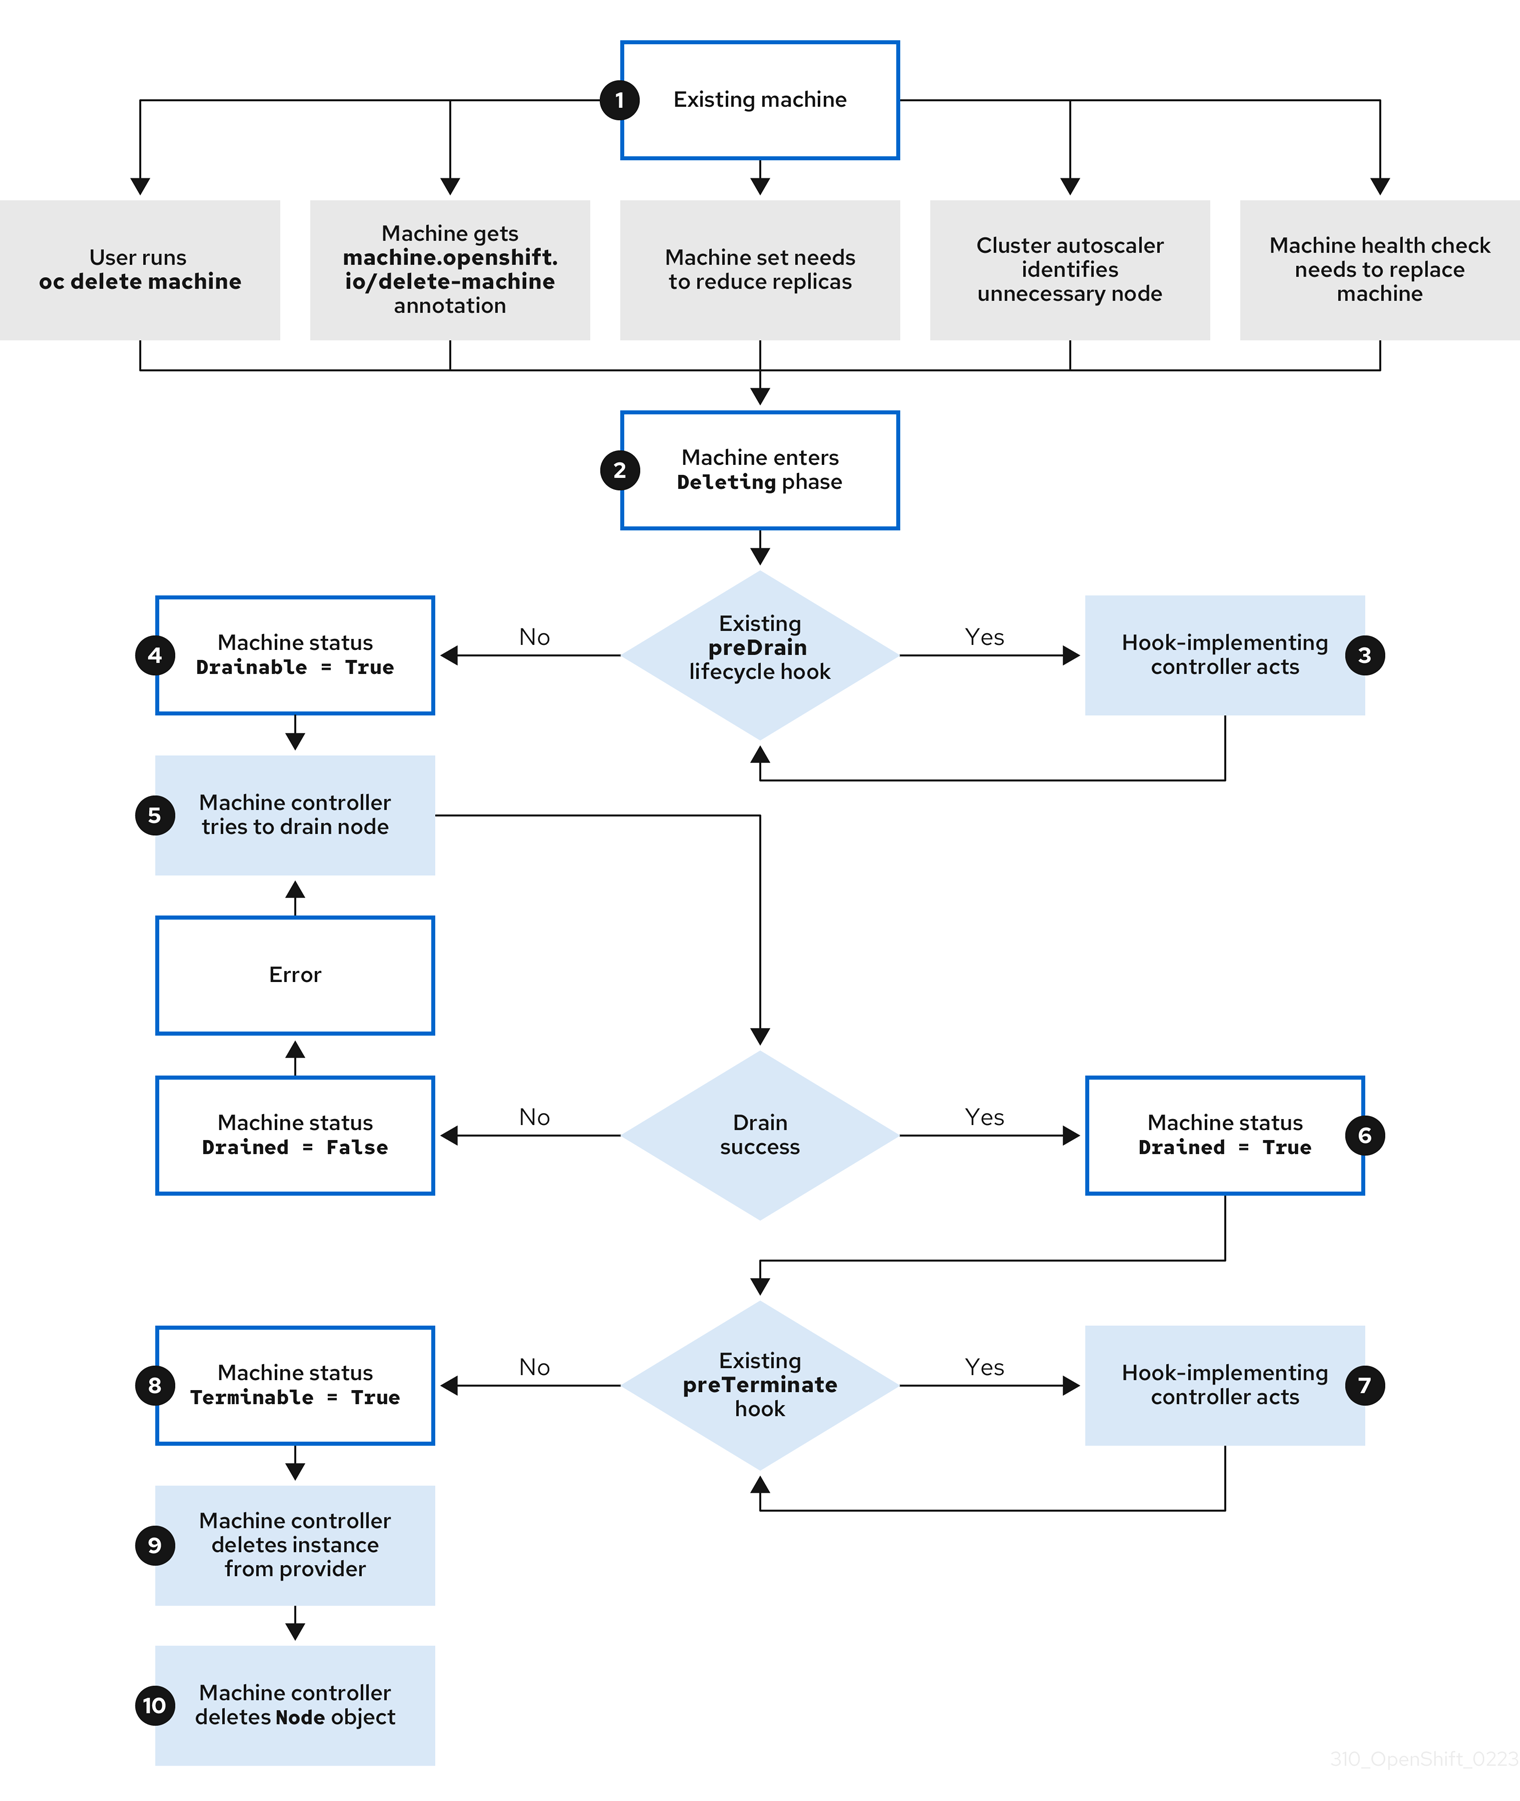
The machine Deleting phase proceeds in the following order:
An existing machine is slated for deletion for one of the following reasons:
-
A user with
cluster-adminpermissions uses theoc delete machinecommand. -
The machine gets a
machine.openshift.io/delete-machineannotation. - The machine set that manages the machine marks it for deletion to reduce the replica count as part of reconciliation.
- The cluster autoscaler identifies a node that is unnecessary to meet the deployment needs of the cluster.
- A machine health check is configured to replace an unhealthy machine.
-
A user with
-
The machine enters the
Deletingphase, in which it is marked for deletion but is still present in the API. If a
preDrainlifecycle hook exists, the hook-implementing controller that manages it does a specified action.Until all
preDrainlifecycle hooks are satisfied, the machine status conditionDrainableis set toFalse.-
There are no unresolved
preDrainlifecycle hooks and the machine status conditionDrainableis set toTrue. The machine controller attempts to drain the node that is backed by the machine.
-
If draining fails,
Drainedis set toFalseand the machine controller attempts to drain the node again. -
If draining succeeds,
Drainedis set toTrue.
-
If draining fails,
-
The machine status condition
Drainedis set toTrue. If a
preTerminatelifecycle hook exists, the hook-implementing controller that manages it does a specified action.Until all
preTerminatelifecycle hooks are satisfied, the machine status conditionTerminableis set toFalse.-
There are no unresolved
preTerminatelifecycle hooks and the machine status conditionTerminableis set toTrue. - The machine controller removes the instance from the infrastructure provider.
-
The machine controller deletes the
Nodeobject.
6.2.3. Deletion lifecycle hook configuration
The following YAML snippets demonstrate the format and placement of deletion lifecycle hook configurations within a machine set:
YAML snippet demonstrating a preDrain lifecycle hook
apiVersion: machine.openshift.io/v1beta1
kind: Machine
metadata:
...
spec:
lifecycleHooks:
preDrain:
- name: <hook_name>
owner: <hook_owner>
...YAML snippet demonstrating a preTerminate lifecycle hook
apiVersion: machine.openshift.io/v1beta1
kind: Machine
metadata:
...
spec:
lifecycleHooks:
preTerminate:
- name: <hook_name>
owner: <hook_owner>
...Example lifecycle hook configuration
The following example demonstrates the implementation of multiple fictional lifecycle hooks that interrupt the machine deletion process:
Example configuration for lifecycle hooks
apiVersion: machine.openshift.io/v1beta1
kind: Machine
metadata:
...
spec:
lifecycleHooks:
preDrain:
- name: MigrateImportantApp
owner: my-app-migration-controller
preTerminate:
- name: BackupFileSystem
owner: my-backup-controller
- name: CloudProviderSpecialCase
owner: my-custom-storage-detach-controller
- name: WaitForStorageDetach
owner: my-custom-storage-detach-controller
...6.2.4. Machine deletion lifecycle hook examples for Operator developers
Operators can use lifecycle hooks for the machine deletion phase to modify the machine deletion process. The following examples demonstrate possible ways that an Operator can use this functionality.
Example use cases for preDrain lifecycle hooks
- Proactively replacing machines
-
An Operator can use a
preDrainlifecycle hook to ensure that a replacement machine is successfully created and joined to the cluster before removing the instance of a deleted machine. This can mitigate the impact of disruptions during machine replacement or of replacement instances that do not initialize promptly. - Implementing custom draining logic
An Operator can use a
preDrainlifecycle hook to replace the machine controller draining logic with a different draining controller. By replacing the draining logic, the Operator would have more flexibility and control over the lifecycle of the workloads on each node.For example, the machine controller drain libraries do not support ordering, but a custom drain provider could provide this functionality. By using a custom drain provider, an Operator could prioritize moving mission-critical applications before draining the node to ensure that service interruptions are minimized in cases where cluster capacity is limited.
Example use cases for preTerminate lifecycle hooks
- Verifying storage detachment
-
An Operator can use a
preTerminatelifecycle hook to ensure that storage that is attached to a machine is detached before the machine is removed from the infrastructure provider. - Improving log reliability
After a node is drained, the log exporter daemon requires some time to synchronize logs to the centralized logging system.
A logging Operator can use a
preTerminatelifecycle hook to add a delay between when the node drains and when the machine is removed from the infrastructure provider. This delay would provide time for the Operator to ensure that the main workloads are removed and no longer adding to the log backlog. When no new data is being added to the log backlog, the log exporter can catch up on the synchronization process, thus ensuring that all application logs are captured.
6.2.5. Quorum protection with machine lifecycle hooks
For OpenShift Container Platform clusters that use the Machine API Operator, the etcd Operator uses lifecycle hooks for the machine deletion phase to implement a quorum protection mechanism.
By using a preDrain lifecycle hook, the etcd Operator can control when the pods on a control plane machine are drained and removed. To protect etcd quorum, the etcd Operator prevents the removal of an etcd member until it migrates that member onto a new node within the cluster.
This mechanism allows the etcd Operator precise control over the members of the etcd quorum and allows the Machine API Operator to safely create and remove control plane machines without specific operational knowledge of the etcd cluster.
6.2.5.1. Control plane deletion with quorum protection processing order
When a control plane machine is replaced on a cluster that uses a control plane machine set, the cluster temporarily has four control plane machines. When the fourth control plane node joins the cluster, the etcd Operator starts a new etcd member on the replacement node. When the etcd Operator observes that the old control plane machine is marked for deletion, it stops the etcd member on the old node and promotes the replacement etcd member to join the quorum of the cluster.
The control plane machine Deleting phase proceeds in the following order:
- A control plane machine is slated for deletion.
-
The control plane machine enters the
Deletingphase. To satisfy the
preDrainlifecycle hook, the etcd Operator takes the following actions:-
The etcd Operator waits until a fourth control plane machine is added to the cluster as an etcd member. This new etcd member has a state of
Runningbut notreadyuntil it receives the full database update from the etcd leader. - When the new etcd member receives the full database update, the etcd Operator promotes the new etcd member to a voting member and removes the old etcd member from the cluster.
After this transition is complete, it is safe for the old etcd pod and its data to be removed, so the
preDrainlifecycle hook is removed.-
The etcd Operator waits until a fourth control plane machine is added to the cluster as an etcd member. This new etcd member has a state of
-
The control plane machine status condition
Drainableis set toTrue. The machine controller attempts to drain the node that is backed by the control plane machine.
-
If draining fails,
Drainedis set toFalseand the machine controller attempts to drain the node again. -
If draining succeeds,
Drainedis set toTrue.
-
If draining fails,
-
The control plane machine status condition
Drainedis set toTrue. -
If no other Operators have added a
preTerminatelifecycle hook, the control plane machine status conditionTerminableis set toTrue. - The machine controller removes the instance from the infrastructure provider.
-
The machine controller deletes the
Nodeobject.
YAML snippet demonstrating the etcd quorum protection preDrain lifecycle hook
apiVersion: machine.openshift.io/v1beta1
kind: Machine
metadata:
...
spec:
lifecycleHooks:
preDrain:
- name: EtcdQuorumOperator
owner: clusteroperator/etcd
...Chapter 7. Applying autoscaling to an OpenShift Container Platform cluster
Applying autoscaling to an OpenShift Container Platform cluster involves deploying a cluster autoscaler and then deploying machine autoscalers for each machine type in your cluster.
You can configure the cluster autoscaler only in clusters where the Machine API Operator is operational.
7.1. About the cluster autoscaler
The cluster autoscaler adjusts the size of an OpenShift Container Platform cluster to meet its current deployment needs. It uses declarative, Kubernetes-style arguments to provide infrastructure management that does not rely on objects of a specific cloud provider. The cluster autoscaler has a cluster scope, and is not associated with a particular namespace.
The cluster autoscaler increases the size of the cluster when there are pods that fail to schedule on any of the current worker nodes due to insufficient resources or when another node is necessary to meet deployment needs. The cluster autoscaler does not increase the cluster resources beyond the limits that you specify.
The cluster autoscaler computes the total memory, CPU, and GPU on all nodes the cluster, even though it does not manage the control plane nodes. These values are not single-machine oriented. They are an aggregation of all the resources in the entire cluster. For example, if you set the maximum memory resource limit, the cluster autoscaler includes all the nodes in the cluster when calculating the current memory usage. That calculation is then used to determine if the cluster autoscaler has the capacity to add more worker resources.
Ensure that the maxNodesTotal value in the ClusterAutoscaler resource definition that you create is large enough to account for the total possible number of machines in your cluster. This value must encompass the number of control plane machines and the possible number of compute machines that you might scale to.
Automatic node removal
Every 10 seconds, the cluster autoscaler checks which nodes are unnecessary in the cluster and removes them. The cluster autoscaler considers a node for removal if the following conditions apply:
-
The node utilization is less than the node utilization level threshold for the cluster. The node utilization level is the sum of the requested resources divided by the allocated resources for the node. If you do not specify a value in the
ClusterAutoscalercustom resource, the cluster autoscaler uses a default value of0.5, which corresponds to 50% utilization. - The cluster autoscaler can move all pods running on the node to the other nodes. The Kubernetes scheduler is responsible for scheduling pods on the nodes.
- The cluster autoscaler does not have scale down disabled annotation.
If the following types of pods are present on a node, the cluster autoscaler will not remove the node:
- Pods with restrictive pod disruption budgets (PDBs).
- Kube-system pods that do not run on the node by default.
- Kube-system pods that do not have a PDB or have a PDB that is too restrictive.
- Pods that are not backed by a controller object such as a deployment, replica set, or stateful set.
- Pods with local storage.
- Pods that cannot be moved elsewhere because of a lack of resources, incompatible node selectors or affinity, matching anti-affinity, and so on.
-
Unless they also have a
"cluster-autoscaler.kubernetes.io/safe-to-evict": "true"annotation, pods that have a"cluster-autoscaler.kubernetes.io/safe-to-evict": "false"annotation.
For example, you set the maximum CPU limit to 64 cores and configure the cluster autoscaler to only create machines that have 8 cores each. If your cluster starts with 30 cores, the cluster autoscaler can add up to 4 more nodes with 32 cores, for a total of 62.
Limitations
If you configure the cluster autoscaler, additional usage restrictions apply:
- Do not modify the nodes that are in autoscaled node groups directly. All nodes within the same node group have the same capacity and labels and run the same system pods.
- Specify requests for your pods.
- If you have to prevent pods from being deleted too quickly, configure appropriate PDBs.
- Confirm that your cloud provider quota is large enough to support the maximum node pools that you configure.
- Do not run additional node group autoscalers, especially the ones offered by your cloud provider.
The cluster autoscaler only adds nodes in autoscaled node groups if doing so would result in a schedulable pod. If the available node types cannot meet the requirements for a pod request, or if the node groups that could meet these requirements are at their maximum size, the cluster autoscaler cannot scale up.
Interaction with other scheduling features
The horizontal pod autoscaler (HPA) and the cluster autoscaler modify cluster resources in different ways. The HPA changes the deployment’s or replica set’s number of replicas based on the current CPU load. If the load increases, the HPA creates new replicas, regardless of the amount of resources available to the cluster. If there are not enough resources, the cluster autoscaler adds resources so that the HPA-created pods can run. If the load decreases, the HPA stops some replicas. If this action causes some nodes to be underutilized or completely empty, the cluster autoscaler deletes the unnecessary nodes.
The cluster autoscaler takes pod priorities into account. The Pod Priority and Preemption feature enables scheduling pods based on priorities if the cluster does not have enough resources, but the cluster autoscaler ensures that the cluster has resources to run all pods. To honor the intention of both features, the cluster autoscaler includes a priority cutoff function. You can use this cutoff to schedule "best-effort" pods, which do not cause the cluster autoscaler to increase resources but instead run only when spare resources are available.
Pods with priority lower than the cutoff value do not cause the cluster to scale up or prevent the cluster from scaling down. No new nodes are added to run the pods, and nodes running these pods might be deleted to free resources.
7.2. Configuring the cluster autoscaler
First, deploy the cluster autoscaler to manage automatic resource scaling in your OpenShift Container Platform cluster.
Because the cluster autoscaler is scoped to the entire cluster, you can make only one cluster autoscaler for the cluster.
7.2.1. Cluster autoscaler resource definition
This ClusterAutoscaler resource definition shows the parameters and sample values for the cluster autoscaler.
When you change the configuration of an existing cluster autoscaler, it restarts.
apiVersion: "autoscaling.openshift.io/v1"
kind: "ClusterAutoscaler"
metadata:
name: "default"
spec:
podPriorityThreshold: -10
resourceLimits:
maxNodesTotal: 24
cores:
min: 8
max: 128
memory:
min: 4
max: 256
gpus:
- type: <gpu_type>
min: 0
max: 16
logVerbosity: 4
scaleDown:
enabled: true
delayAfterAdd: 10m
delayAfterDelete: 5m
delayAfterFailure: 30s
unneededTime: 5m
utilizationThreshold: "0.4" - 1
- Specify the priority that a pod must exceed to cause the cluster autoscaler to deploy additional nodes. Enter a 32-bit integer value. The
podPriorityThresholdvalue is compared to the value of thePriorityClassthat you assign to each pod. - 2
- Specify the maximum number of nodes to deploy. This value is the total number of machines that are deployed in your cluster, not just the ones that the autoscaler controls. Ensure that this value is large enough to account for all of your control plane and compute machines and the total number of replicas that you specify in your
MachineAutoscalerresources. - 3
- Specify the minimum number of cores to deploy in the cluster.
- 4
- Specify the maximum number of cores to deploy in the cluster.
- 5
- Specify the minimum amount of memory, in GiB, in the cluster.
- 6
- Specify the maximum amount of memory, in GiB, in the cluster.
- 7
- Optional: To configure the cluster autoscaler to deploy GPU-enabled nodes, specify a
typevalue. This value must match the value of thespec.template.spec.metadata.labels[cluster-api/accelerator]label in the machine set that manages the GPU-enabled nodes of that type. For example, this value might benvidia-t4to represent Nvidia T4 GPUs, ornvidia-a10gfor A10G GPUs. For more information, see "Labeling GPU machine sets for the cluster autoscaler". - 8
- Specify the minimum number of GPUs of the specified type to deploy in the cluster.
- 9
- Specify the maximum number of GPUs of the specified type to deploy in the cluster.
- 10
- Specify the logging verbosity level between
0and10. The following log level thresholds are provided for guidance:-
1: (Default) Basic information about changes. -
4: Debug-level verbosity for troubleshooting typical issues. -
9: Extensive, protocol-level debugging information.
If you do not specify a value, the default value of
1is used. -
- 11
- In this section, you can specify the period to wait for each action by using any valid ParseDuration interval, including
ns,us,ms,s,m, andh. - 12
- Specify whether the cluster autoscaler can remove unnecessary nodes.
- 13
- Optional: Specify the period to wait before deleting a node after a node has recently been added. If you do not specify a value, the default value of
10mis used. - 14
- Optional: Specify the period to wait before deleting a node after a node has recently been deleted. If you do not specify a value, the default value of
0sis used. - 15
- Optional: Specify the period to wait before deleting a node after a scale down failure occurred. If you do not specify a value, the default value of
3mis used. - 16
- Optional: Specify a period of time before an unnecessary node is eligible for deletion. If you do not specify a value, the default value of
10mis used. - 17
- Optional: Specify the node utilization level. Nodes below this utilization level are eligible for deletion.
The node utilization level is the sum of the requested resources divided by the allocated resources for the node, and must be a value greater than
"0"but less than"1". If you do not specify a value, the cluster autoscaler uses a default value of"0.5", which corresponds to 50% utilization. You must express this value as a string.
When performing a scaling operation, the cluster autoscaler remains within the ranges set in the ClusterAutoscaler resource definition, such as the minimum and maximum number of cores to deploy or the amount of memory in the cluster. However, the cluster autoscaler does not correct the current values in your cluster to be within those ranges.
The minimum and maximum CPUs, memory, and GPU values are determined by calculating those resources on all nodes in the cluster, even if the cluster autoscaler does not manage the nodes. For example, the control plane nodes are considered in the total memory in the cluster, even though the cluster autoscaler does not manage the control plane nodes.
7.2.1.1. Labeling GPU machine sets for the cluster autoscaler
You can use a machine set label to indicate which machines the cluster autoscaler can use to deploy GPU-enabled nodes.
Prerequisites
- Your cluster uses a cluster autoscaler.
Procedure
On the machine set that you want to create machines for the cluster autoscaler to use to deploy GPU-enabled nodes, add a
cluster-api/acceleratorlabel:apiVersion: machine.openshift.io/v1beta1 kind: MachineSet metadata: name: machine-set-name spec: template: spec: metadata: labels: cluster-api/accelerator: nvidia-t41 - 1
- Specify a label of your choice that consists of alphanumeric characters,
-,_, or.and starts and ends with an alphanumeric character. For example, you might usenvidia-t4to represent Nvidia T4 GPUs, ornvidia-a10gfor A10G GPUs.NoteYou must specify the value of this label for the
spec.resourceLimits.gpus.typeparameter in yourClusterAutoscalerCR. For more information, see "Cluster autoscaler resource definition".
7.2.2. Deploying a cluster autoscaler
To deploy a cluster autoscaler, you create an instance of the ClusterAutoscaler resource.
Procedure
-
Create a YAML file for a
ClusterAutoscalerresource that contains the custom resource definition. Create the custom resource in the cluster by running the following command:
$ oc create -f <filename>.yaml1 - 1
<filename>is the name of the custom resource file.
Next steps
- After you configure the cluster autoscaler, you must configure at least one machine autoscaler.
7.3. About the machine autoscaler
The machine autoscaler adjusts the number of Machines in the compute machine sets that you deploy in an OpenShift Container Platform cluster. You can scale both the default worker compute machine set and any other compute machine sets that you create. The machine autoscaler makes more Machines when the cluster runs out of resources to support more deployments. Any changes to the values in MachineAutoscaler resources, such as the minimum or maximum number of instances, are immediately applied to the compute machine set they target.
You must deploy a machine autoscaler for the cluster autoscaler to scale your machines. The cluster autoscaler uses the annotations on compute machine sets that the machine autoscaler sets to determine the resources that it can scale. If you define a cluster autoscaler without also defining machine autoscalers, the cluster autoscaler will never scale your cluster.
7.4. Configuring machine autoscalers
After you deploy the cluster autoscaler, deploy MachineAutoscaler resources that reference the compute machine sets that are used to scale the cluster.
You must deploy at least one MachineAutoscaler resource after you deploy the ClusterAutoscaler resource.
You must configure separate resources for each compute machine set. Remember that compute machine sets are different in each region, so consider whether you want to enable machine scaling in multiple regions. The compute machine set that you scale must have at least one machine in it.
7.4.1. Machine autoscaler resource definition
This MachineAutoscaler resource definition shows the parameters and sample values for the machine autoscaler.
apiVersion: "autoscaling.openshift.io/v1beta1"
kind: "MachineAutoscaler"
metadata:
name: "worker-us-east-1a"
namespace: "openshift-machine-api"
spec:
minReplicas: 1
maxReplicas: 12
scaleTargetRef:
apiVersion: machine.openshift.io/v1beta1
kind: MachineSet
name: worker-us-east-1a - 1
- Specify the machine autoscaler name. To make it easier to identify which compute machine set this machine autoscaler scales, specify or include the name of the compute machine set to scale. The compute machine set name takes the following form:
<clusterid>-<machineset>-<region>. - 2
- Specify the minimum number machines of the specified type that must remain in the specified zone after the cluster autoscaler initiates cluster scaling. If running in AWS, Google Cloud, Azure, RHOSP, or vSphere, this value can be set to
0. For other providers, do not set this value to0.You can save on costs by setting this value to
0for use cases such as running expensive or limited-usage hardware that is used for specialized workloads, or by scaling a compute machine set with extra large machines. The cluster autoscaler scales the compute machine set down to zero if the machines are not in use.ImportantDo not set the
spec.minReplicasvalue to0for the three compute machine sets that are created during the OpenShift Container Platform installation process for an installer provisioned infrastructure. - 3
- Specify the maximum number machines of the specified type that the cluster autoscaler can deploy in the specified zone after it initiates cluster scaling. Ensure that the
maxNodesTotalvalue in theClusterAutoscalerresource definition is large enough to allow the machine autoscaler to deploy this number of machines. - 4
- In this section, provide values that describe the existing compute machine set to scale.
- 5
- The
kindparameter value is alwaysMachineSet. - 6
- The
namevalue must match the name of an existing compute machine set, as shown in themetadata.nameparameter value.
7.4.2. Deploying a machine autoscaler
To deploy a machine autoscaler, you create an instance of the MachineAutoscaler resource.
Procedure
-
Create a YAML file for a
MachineAutoscalerresource that contains the custom resource definition. Create the custom resource in the cluster by running the following command:
$ oc create -f <filename>.yaml1 - 1
<filename>is the name of the custom resource file.
7.5. Disabling autoscaling
You can disable an individual machine autoscaler in your cluster or disable autoscaling on the cluster entirely.
7.5.1. Disabling a machine autoscaler
To disable a machine autoscaler, you delete the corresponding MachineAutoscaler custom resource (CR).
Disabling a machine autoscaler does not disable the cluster autoscaler. To disable the cluster autoscaler, follow the instructions in "Disabling the cluster autoscaler".
Procedure
List the
MachineAutoscalerCRs for the cluster by running the following command:$ oc get MachineAutoscaler -n openshift-machine-apiExample output
NAME REF KIND REF NAME MIN MAX AGE compute-us-east-1a MachineSet compute-us-east-1a 1 12 39m compute-us-west-1a MachineSet compute-us-west-1a 2 4 37mOptional: Create a YAML file backup of the
MachineAutoscalerCR by running the following command:$ oc get MachineAutoscaler/<machine_autoscaler_name> \1 -n openshift-machine-api \ -o yaml> <machine_autoscaler_name_backup>.yaml2 Delete the
MachineAutoscalerCR by running the following command:$ oc delete MachineAutoscaler/<machine_autoscaler_name> -n openshift-machine-apiExample output
machineautoscaler.autoscaling.openshift.io "compute-us-east-1a" deleted
Verification
To verify that the machine autoscaler is disabled, run the following command:
$ oc get MachineAutoscaler -n openshift-machine-apiThe disabled machine autoscaler does not appear in the list of machine autoscalers.
Next steps
-
If you need to re-enable the machine autoscaler, use the
<machine_autoscaler_name_backup>.yamlbackup file and follow the instructions in "Deploying a machine autoscaler".
7.5.2. Disabling the cluster autoscaler
To disable the cluster autoscaler, you delete the corresponding ClusterAutoscaler resource.
Disabling the cluster autoscaler disables autoscaling on the cluster, even if the cluster has existing machine autoscalers.
Procedure
List the
ClusterAutoscalerresource for the cluster by running the following command:$ oc get ClusterAutoscalerExample output
NAME AGE default 42mOptional: Create a YAML file backup of the
ClusterAutoscalerCR by running the following command:$ oc get ClusterAutoscaler/default \1 -o yaml> <cluster_autoscaler_backup_name>.yaml2 Delete the
ClusterAutoscalerCR by running the following command:$ oc delete ClusterAutoscaler/defaultExample output
clusterautoscaler.autoscaling.openshift.io "default" deleted
Verification
To verify that the cluster autoscaler is disabled, run the following command:
$ oc get ClusterAutoscalerExpected output
No resources found
Next steps
-
Disabling the cluster autoscaler by deleting the
ClusterAutoscalerCR prevents the cluster from autoscaling but does not delete any existing machine autoscalers on the cluster. To clean up unneeded machine autoscalers, see "Disabling a machine autoscaler". -
If you need to re-enable the cluster autoscaler, use the
<cluster_autoscaler_name_backup>.yamlbackup file and follow the instructions in "Deploying a cluster autoscaler".
Chapter 8. Creating infrastructure machine sets
You can use the advanced machine management and scaling capabilities only in clusters where the Machine API is operational. Clusters with user-provisioned infrastructure require additional validation and configuration to use the Machine API.
Clusters with the infrastructure platform type none cannot use the Machine API. This limitation applies even if the compute machines that are attached to the cluster are installed on a platform that supports the feature. This parameter cannot be changed after installation.
To view the platform type for your cluster, run the following command:
$ oc get infrastructure cluster -o jsonpath='{.status.platform}'You can use infrastructure machine sets to create machines that host only infrastructure components, such as the default router, the integrated container image registry, and the components for cluster metrics and monitoring. These infrastructure machines are not counted toward the total number of subscriptions that are required to run the environment.
In a production deployment, it is recommended that you deploy at least three machine sets to hold infrastructure components. Red Hat OpenShift Service Mesh deploys Elasticsearch, which requires three instances to be installed on different nodes. Each of these nodes can be deployed to different availability zones for high availability. This configuration requires three different machine sets, one for each availability zone. In global Azure regions that do not have multiple availability zones, you can use availability sets to ensure high availability.
8.1. OpenShift Container Platform infrastructure components
Each self-managed Red Hat OpenShift subscription includes entitlements for OpenShift Container Platform and other OpenShift-related components. These entitlements are included for running OpenShift Container Platform control plane and infrastructure workloads and do not need to be accounted for during sizing.
To qualify as an infrastructure node and use the included entitlement, only components that are supporting the cluster, and not part of an end-user application, can run on those instances. Examples include the following components:
- Kubernetes and OpenShift Container Platform control plane services
- The default router
- The integrated container image registry
- The HAProxy-based Ingress Controller
- The cluster metrics collection, or monitoring service, including components for monitoring user-defined projects
- Cluster aggregated logging
- Red Hat Quay
- Red Hat OpenShift Data Foundation
- Red Hat Advanced Cluster Management for Kubernetes
- Red Hat Advanced Cluster Security for Kubernetes
- Red Hat OpenShift GitOps
- Red Hat OpenShift Pipelines
- Red Hat OpenShift Service Mesh
Any node that runs any other container, pod, or component is a worker node that your subscription must cover.
For information about infrastructure nodes and which components can run on infrastructure nodes, see the "Red Hat OpenShift control plane and infrastructure nodes" section in the OpenShift sizing and subscription guide for enterprise Kubernetes document.
To create an infrastructure node, you can use a machine set, label the node, or use a machine config pool.
8.2. Creating infrastructure machine sets for production environments
In a production deployment, it is recommended that you deploy at least three compute machine sets to hold infrastructure components. Red Hat OpenShift Service Mesh deploys Elasticsearch, which requires three instances to be installed on different nodes. Each of these nodes can be deployed to different availability zones for high availability. A configuration like this requires three different compute machine sets, one for each availability zone. In global Azure regions that do not have multiple availability zones, you can use availability sets to ensure high availability.
8.2.1. Creating infrastructure machine sets for different clouds
Use the sample compute machine set for your cloud.
8.2.1.1. Sample YAML for a compute machine set custom resource on Alibaba Cloud
This sample YAML defines a compute machine set that runs in a specified Alibaba Cloud zone in a region and creates nodes that are labeled with node-role.kubernetes.io/infra: "".
In this sample, <infrastructure_id> is the infrastructure ID label that is based on the cluster ID that you set when you provisioned the cluster, and <infra> is the node label to add.
apiVersion: machine.openshift.io/v1beta1
kind: MachineSet
metadata:
labels:
machine.openshift.io/cluster-api-cluster: <infrastructure_id>
machine.openshift.io/cluster-api-machine-role: <infra>
machine.openshift.io/cluster-api-machine-type: <infra>
name: <infrastructure_id>-<infra>-<zone>
namespace: openshift-machine-api
spec:
replicas: 1
selector:
matchLabels:
machine.openshift.io/cluster-api-cluster: <infrastructure_id>
machine.openshift.io/cluster-api-machineset: <infrastructure_id>-<infra>-<zone>
template:
metadata:
labels:
machine.openshift.io/cluster-api-cluster: <infrastructure_id>
machine.openshift.io/cluster-api-machine-role: <infra>
machine.openshift.io/cluster-api-machine-type: <infra>
machine.openshift.io/cluster-api-machineset: <infrastructure_id>-<infra>-<zone>
spec:
metadata:
labels:
node-role.kubernetes.io/infra: ""
providerSpec:
value:
apiVersion: machine.openshift.io/v1
credentialsSecret:
name: alibabacloud-credentials
imageId: <image_id>
instanceType: <instance_type>
kind: AlibabaCloudMachineProviderConfig
ramRoleName: <infrastructure_id>-role-worker
regionId: <region>
resourceGroup:
id: <resource_group_id>
type: ID
securityGroups:
- tags:
- Key: Name
Value: <infrastructure_id>-sg-<role>
type: Tags
systemDisk:
category: cloud_essd
size: <disk_size>
tag:
- Key: kubernetes.io/cluster/<infrastructure_id>
Value: owned
userDataSecret:
name: <user_data_secret>
vSwitch:
tags:
- Key: Name
Value: <infrastructure_id>-vswitch-<zone>
type: Tags
vpcId: ""
zoneId: <zone>
taints:
- key: node-role.kubernetes.io/infra
effect: NoSchedule- 1 5 7
- Specify the infrastructure ID that is based on the cluster ID that you set when you provisioned the cluster. If you have the OpenShift CLI (
oc) installed, you can obtain the infrastructure ID by running the following command:$ oc get -o jsonpath='{.status.infrastructureName}{"\n"}' infrastructure cluster - 2 3 8 9
- Specify the
<infra>node label. - 4 6 10
- Specify the infrastructure ID,
<infra>node label, and zone. - 11
- Specify the image to use. Use an image from an existing default compute machine set for the cluster.
- 12
- Specify the instance type you want to use for the compute machine set.
- 13
- Specify the name of the RAM role to use for the compute machine set. Use the value that the installer populates in the default compute machine set.
- 14
- Specify the region to place machines on.
- 15
- Specify the resource group and type for the cluster. You can use the value that the installer populates in the default compute machine set, or specify a different one.
- 16 18 20
- Specify the tags to use for the compute machine set. Minimally, you must include the tags shown in this example, with appropriate values for your cluster. You can include additional tags, including the tags that the installer populates in the default compute machine set it creates, as needed.
- 17
- Specify the type and size of the root disk. Use the
categoryvalue that the installer populates in the default compute machine set it creates. If required, specify a different value in gigabytes forsize. - 19
- Specify the name of the secret in the user data YAML file that is in the
openshift-machine-apinamespace. Use the value that the installer populates in the default compute machine set. - 21
- Specify the zone within your region to place machines on. Be sure that your region supports the zone that you specify.
- 22
- Specify a taint to prevent user workloads from being scheduled on infra nodes.Note
After adding the
NoScheduletaint on the infrastructure node, existing DNS pods running on that node are marked asmisscheduled. You must either delete or add toleration onmisscheduledDNS pods.
Machine set parameters for Alibaba Cloud usage statistics
The default compute machine sets that the installer creates for Alibaba Cloud clusters include nonessential tag values that Alibaba Cloud uses internally to track usage statistics. These tags are populated in the securityGroups, tag, and vSwitch parameters of the spec.template.spec.providerSpec.value list.
When creating compute machine sets to deploy additional machines, you must include the required Kubernetes tags. The usage statistics tags are applied by default, even if they are not specified in the compute machine sets you create. You can also include additional tags as needed.
The following YAML snippets indicate which tags in the default compute machine sets are optional and which are required.
Tags in spec.template.spec.providerSpec.value.securityGroups
spec:
template:
spec:
providerSpec:
value:
securityGroups:
- tags:
- Key: kubernetes.io/cluster/<infrastructure_id>
Value: owned
- Key: GISV
Value: ocp
- Key: sigs.k8s.io/cloud-provider-alibaba/origin
Value: ocp
- Key: Name
Value: <infrastructure_id>-sg-<role>
type: TagsTags in spec.template.spec.providerSpec.value.tag
spec:
template:
spec:
providerSpec:
value:
tag:
- Key: kubernetes.io/cluster/<infrastructure_id>
Value: owned
- Key: GISV
Value: ocp
- Key: sigs.k8s.io/cloud-provider-alibaba/origin
Value: ocpTags in spec.template.spec.providerSpec.value.vSwitch
spec:
template:
spec:
providerSpec:
value:
vSwitch:
tags:
- Key: kubernetes.io/cluster/<infrastructure_id>
Value: owned
- Key: GISV
Value: ocp
- Key: sigs.k8s.io/cloud-provider-alibaba/origin
Value: ocp
- Key: Name
Value: <infrastructure_id>-vswitch-<zone>
type: Tags8.2.1.2. Sample YAML for a compute machine set custom resource on AWS
This sample YAML defines a compute machine set that runs in the us-east-1a Amazon Web Services (AWS) zone and creates nodes that are labeled with node-role.kubernetes.io/infra: "".
In this sample, <infrastructure_id> is the infrastructure ID label that is based on the cluster ID that you set when you provisioned the cluster, and <infra> is the node label to add.
apiVersion: machine.openshift.io/v1beta1
kind: MachineSet
metadata:
labels:
machine.openshift.io/cluster-api-cluster: <infrastructure_id>
name: <infrastructure_id>-infra-<zone>
namespace: openshift-machine-api
spec:
replicas: 1
selector:
matchLabels:
machine.openshift.io/cluster-api-cluster: <infrastructure_id>
machine.openshift.io/cluster-api-machineset: <infrastructure_id>-infra-<zone>
template:
metadata:
labels:
machine.openshift.io/cluster-api-cluster: <infrastructure_id>
machine.openshift.io/cluster-api-machine-role: infra
machine.openshift.io/cluster-api-machine-type: infra
machine.openshift.io/cluster-api-machineset: <infrastructure_id>-infra-<zone>
spec:
metadata:
labels:
node-role.kubernetes.io/infra: ""
providerSpec:
value:
ami:
id: ami-046fe691f52a953f9
apiVersion: awsproviderconfig.openshift.io/v1beta1
blockDevices:
- ebs:
iops: 0
volumeSize: 120
volumeType: gp2
credentialsSecret:
name: aws-cloud-credentials
deviceIndex: 0
iamInstanceProfile:
id: <infrastructure_id>-worker-profile
instanceType: m6i.large
kind: AWSMachineProviderConfig
placement:
availabilityZone: <zone>
region: <region>
securityGroups:
- filters:
- name: tag:Name
values:
- <infrastructure_id>-worker-sg
subnet:
filters:
- name: tag:Name
values:
- <infrastructure_id>-private-<zone>
tags:
- name: kubernetes.io/cluster/<infrastructure_id>
value: owned
- name: <custom_tag_name>
value: <custom_tag_value>
userDataSecret:
name: worker-user-data
taints:
- key: node-role.kubernetes.io/infra
effect: NoSchedule- 1 3 5 11 14 16
- Specify the infrastructure ID that is based on the cluster ID that you set when you provisioned the cluster. If you have the OpenShift CLI installed, you can obtain the infrastructure ID by running the following command:
$ oc get -o jsonpath='{.status.infrastructureName}{"\n"}' infrastructure cluster - 2 4 8
- Specify the infrastructure ID,
infrarole node label, and zone. - 6 7 9
- Specify the
infrarole node label. - 10
- Specify a valid Red Hat Enterprise Linux CoreOS (RHCOS) Amazon Machine Image (AMI) for your AWS zone for your OpenShift Container Platform nodes. If you want to use an AWS Marketplace image, you must complete the OpenShift Container Platform subscription from the AWS Marketplace to obtain an AMI ID for your region.
$ oc -n openshift-machine-api \ -o jsonpath='{.spec.template.spec.providerSpec.value.ami.id}{"\n"}' \ get machineset/<infrastructure_id>-<role>-<zone> - 17 18
- Optional: Specify custom tag data for your cluster. For example, you might add an admin contact email address by specifying a
name:valuepair ofEmail:admin-email@example.com.NoteCustom tags can also be specified during installation in the
install-config.ymlfile. If theinstall-config.ymlfile and the machine set include a tag with the samenamedata, the value for the tag from the machine set takes priority over the value for the tag in theinstall-config.ymlfile. - 12
- Specify the zone, for example,
us-east-1a. - 13
- Specify the region, for example,
us-east-1. - 15
- Specify the infrastructure ID and zone.
- 19
- Specify a taint to prevent user workloads from being scheduled on infra nodes.Note
After adding the
NoScheduletaint on the infrastructure node, existing DNS pods running on that node are marked asmisscheduled. You must either delete or add toleration onmisscheduledDNS pods.
Machine sets running on AWS support non-guaranteed Spot Instances. You can save on costs by using Spot Instances at a lower price compared to On-Demand Instances on AWS. Configure Spot Instances by adding spotMarketOptions to the MachineSet YAML file.
8.2.1.3. Sample YAML for a compute machine set custom resource on Azure
This sample YAML defines a compute machine set that runs in the 1 Microsoft Azure zone in a region and creates nodes that are labeled with node-role.kubernetes.io/infra: "".
In this sample, <infrastructure_id> is the infrastructure ID label that is based on the cluster ID that you set when you provisioned the cluster, and infra is the node label to add.
apiVersion: machine.openshift.io/v1beta1
kind: MachineSet
metadata:
labels:
machine.openshift.io/cluster-api-cluster: <infrastructure_id>
machine.openshift.io/cluster-api-machine-role: infra
machine.openshift.io/cluster-api-machine-type: infra
name: <infrastructure_id>-infra-<region>
namespace: openshift-machine-api
spec:
replicas: 1
selector:
matchLabels:
machine.openshift.io/cluster-api-cluster: <infrastructure_id>
machine.openshift.io/cluster-api-machineset: <infrastructure_id>-infra-<region>
template:
metadata:
creationTimestamp: null
labels:
machine.openshift.io/cluster-api-cluster: <infrastructure_id>
machine.openshift.io/cluster-api-machine-role: infra
machine.openshift.io/cluster-api-machine-type: infra
machine.openshift.io/cluster-api-machineset: <infrastructure_id>-infra-<region>
spec:
metadata:
creationTimestamp: null
labels:
machine.openshift.io/cluster-api-machineset: <machineset_name>
node-role.kubernetes.io/infra: ""
providerSpec:
value:
apiVersion: azureproviderconfig.openshift.io/v1beta1
credentialsSecret:
name: azure-cloud-credentials
namespace: openshift-machine-api
image:
offer: ""
publisher: ""
resourceID: /resourceGroups/<infrastructure_id>-rg/providers/Microsoft.Compute/galleries/gallery_<infrastructure_id>/images/<infrastructure_id>-gen2/versions/latest
sku: ""
version: ""
internalLoadBalancer: ""
kind: AzureMachineProviderSpec
location: <region>
managedIdentity: <infrastructure_id>-identity
metadata:
creationTimestamp: null
natRule: null
networkResourceGroup: ""
osDisk:
diskSizeGB: 128
managedDisk:
storageAccountType: Premium_LRS
osType: Linux
publicIP: false
publicLoadBalancer: ""
resourceGroup: <infrastructure_id>-rg
sshPrivateKey: ""
sshPublicKey: ""
tags:
<custom_tag_name_1>: <custom_tag_value_1>
<custom_tag_name_2>: <custom_tag_value_2>
subnet: <infrastructure_id>-<role>-subnet
userDataSecret:
name: worker-user-data
vmSize: Standard_D4s_v3
vnet: <infrastructure_id>-vnet
zone: "1"
taints:
- key: node-role.kubernetes.io/infra
effect: NoSchedule- 1
- Specify the infrastructure ID that is based on the cluster ID that you set when you provisioned the cluster. If you have the OpenShift CLI installed, you can obtain the infrastructure ID by running the following command:
$ oc get -o jsonpath='{.status.infrastructureName}{"\n"}' infrastructure clusterYou can obtain the subnet by running the following command:
$ oc -n openshift-machine-api \ -o jsonpath='{.spec.template.spec.providerSpec.value.subnet}{"\n"}' \ get machineset/<infrastructure_id>-worker-centralus1You can obtain the vnet by running the following command:
$ oc -n openshift-machine-api \ -o jsonpath='{.spec.template.spec.providerSpec.value.vnet}{"\n"}' \ get machineset/<infrastructure_id>-worker-centralus1 - 2
- Specify the
infranode label. - 3
- Specify the infrastructure ID,
infranode label, and region. - 4
- Specify the image details for your compute machine set. If you want to use an Azure Marketplace image, see "Selecting an Azure Marketplace image".
- 5
- Specify an image that is compatible with your instance type. The Hyper-V generation V2 images created by the installation program have a
-gen2suffix, while V1 images have the same name without the suffix. - 6
- Specify the region to place machines on.
- 7
- Optional: Specify custom tags in your machine set. Provide the tag name in
<custom_tag_name>field and the corresponding tag value in<custom_tag_value>field. - 8
- Specify the zone within your region to place machines on. Ensure that your region supports the zone that you specify.Important
If your region supports availability zones, you must specify the zone. Specifying the zone avoids volume node affinity failure when a pod requires a persistent volume attachment. To do this, you can create a compute machine set for each zone in the same region.
- 9
- Specify a taint to prevent user workloads from being scheduled on infra nodes.Note
After adding the
NoScheduletaint on the infrastructure node, existing DNS pods running on that node are marked asmisscheduled. You must either delete or add toleration onmisscheduledDNS pods.
Machine sets running on Azure support non-guaranteed Spot VMs. You can save on costs by using Spot VMs at a lower price compared to standard VMs on Azure. You can configure Spot VMs by adding spotVMOptions to the MachineSet YAML file.
8.2.1.4. Sample YAML for a compute machine set custom resource on Azure Stack Hub
This sample YAML defines a compute machine set that runs in the 1 Microsoft Azure zone in a region and creates nodes that are labeled with node-role.kubernetes.io/infra: "".
In this sample, <infrastructure_id> is the infrastructure ID label that is based on the cluster ID that you set when you provisioned the cluster, and <infra> is the node label to add.
apiVersion: machine.openshift.io/v1beta1
kind: MachineSet
metadata:
labels:
machine.openshift.io/cluster-api-cluster: <infrastructure_id>
machine.openshift.io/cluster-api-machine-role: <infra>
machine.openshift.io/cluster-api-machine-type: <infra>
name: <infrastructure_id>-infra-<region>
namespace: openshift-machine-api
spec:
replicas: 1
selector:
matchLabels:
machine.openshift.io/cluster-api-cluster: <infrastructure_id>
machine.openshift.io/cluster-api-machineset: <infrastructure_id>-infra-<region>
template:
metadata:
creationTimestamp: null
labels:
machine.openshift.io/cluster-api-cluster: <infrastructure_id>
machine.openshift.io/cluster-api-machine-role: <infra>
machine.openshift.io/cluster-api-machine-type: <infra>
machine.openshift.io/cluster-api-machineset: <infrastructure_id>-infra-<region>
spec:
metadata:
creationTimestamp: null
labels:
node-role.kubernetes.io/infra: ""
taints:
- key: node-role.kubernetes.io/infra
effect: NoSchedule
providerSpec:
value:
apiVersion: machine.openshift.io/v1beta1
availabilitySet: <availability_set>
credentialsSecret:
name: azure-cloud-credentials
namespace: openshift-machine-api
image:
offer: ""
publisher: ""
resourceID: /resourceGroups/<infrastructure_id>-rg/providers/Microsoft.Compute/images/<infrastructure_id>
sku: ""
version: ""
internalLoadBalancer: ""
kind: AzureMachineProviderSpec
location: <region>
managedIdentity: <infrastructure_id>-identity
metadata:
creationTimestamp: null
natRule: null
networkResourceGroup: ""
osDisk:
diskSizeGB: 128
managedDisk:
storageAccountType: Premium_LRS
osType: Linux
publicIP: false
publicLoadBalancer: ""
resourceGroup: <infrastructure_id>-rg
sshPrivateKey: ""
sshPublicKey: ""
subnet: <infrastructure_id>-<role>-subnet
userDataSecret:
name: worker-user-data
vmSize: Standard_DS4_v2
vnet: <infrastructure_id>-vnet
zone: "1" - 1 5 7 14 16 17 18 21
- Specify the infrastructure ID that is based on the cluster ID that you set when you provisioned the cluster. If you have the OpenShift CLI installed, you can obtain the infrastructure ID by running the following command:
$ oc get -o jsonpath='{.status.infrastructureName}{"\n"}' infrastructure clusterYou can obtain the subnet by running the following command:
$ oc -n openshift-machine-api \ -o jsonpath='{.spec.template.spec.providerSpec.value.subnet}{"\n"}' \ get machineset/<infrastructure_id>-worker-centralus1You can obtain the vnet by running the following command:
$ oc -n openshift-machine-api \ -o jsonpath='{.spec.template.spec.providerSpec.value.vnet}{"\n"}' \ get machineset/<infrastructure_id>-worker-centralus1 - 2 3 8 9 11 19 20
- Specify the
<infra>node label. - 4 6 10
- Specify the infrastructure ID,
<infra>node label, and region. - 12
- Specify a taint to prevent user workloads from being scheduled on infra nodes.Note
After adding the
NoScheduletaint on the infrastructure node, existing DNS pods running on that node are marked asmisscheduled. You must either delete or add toleration onmisscheduledDNS pods. - 15
- Specify the region to place machines on.
- 13
- Specify the availability set for the cluster.
- 22
- Specify the zone within your region to place machines on. Be sure that your region supports the zone that you specify.
Machine sets running on Azure Stack Hub do not support non-guaranteed Spot VMs.
8.2.1.5. Sample YAML for a compute machine set custom resource on IBM Cloud
This sample YAML defines a compute machine set that runs in a specified IBM Cloud zone in a region and creates nodes that are labeled with node-role.kubernetes.io/infra: "".
In this sample, <infrastructure_id> is the infrastructure ID label that is based on the cluster ID that you set when you provisioned the cluster, and <infra> is the node label to add.
apiVersion: machine.openshift.io/v1beta1
kind: MachineSet
metadata:
labels:
machine.openshift.io/cluster-api-cluster: <infrastructure_id>
machine.openshift.io/cluster-api-machine-role: <infra>
machine.openshift.io/cluster-api-machine-type: <infra>
name: <infrastructure_id>-<infra>-<region>
namespace: openshift-machine-api
spec:
replicas: 1
selector:
matchLabels:
machine.openshift.io/cluster-api-cluster: <infrastructure_id>
machine.openshift.io/cluster-api-machineset: <infrastructure_id>-<infra>-<region>
template:
metadata:
labels:
machine.openshift.io/cluster-api-cluster: <infrastructure_id>
machine.openshift.io/cluster-api-machine-role: <infra>
machine.openshift.io/cluster-api-machine-type: <infra>
machine.openshift.io/cluster-api-machineset: <infrastructure_id>-<infra>-<region>
spec:
metadata:
labels:
node-role.kubernetes.io/infra: ""
providerSpec:
value:
apiVersion: ibmcloudproviderconfig.openshift.io/v1beta1
credentialsSecret:
name: ibmcloud-credentials
image: <infrastructure_id>-rhcos
kind: IBMCloudMachineProviderSpec
primaryNetworkInterface:
securityGroups:
- <infrastructure_id>-sg-cluster-wide
- <infrastructure_id>-sg-openshift-net
subnet: <infrastructure_id>-subnet-compute-<zone>
profile: <instance_profile>
region: <region>
resourceGroup: <resource_group>
userDataSecret:
name: <role>-user-data
vpc: <vpc_name>
zone: <zone>
taints:
- key: node-role.kubernetes.io/infra
effect: NoSchedule- 1 5 7
- The infrastructure ID that is based on the cluster ID that you set when you provisioned the cluster. If you have the OpenShift CLI installed, you can obtain the infrastructure ID by running the following command:
$ oc get -o jsonpath='{.status.infrastructureName}{"\n"}' infrastructure cluster - 2 3 8 9 16
- The
<infra>node label. - 4 6 10
- The infrastructure ID,
<infra>node label, and region. - 11
- The custom Red Hat Enterprise Linux CoreOS (RHCOS) image that was used for cluster installation.
- 12
- The infrastructure ID and zone within your region to place machines on. Be sure that your region supports the zone that you specify.
- 13
- Specify the IBM Cloud instance profile.
- 14
- Specify the region to place machines on.
- 15
- The resource group that machine resources are placed in. This is either an existing resource group specified at installation time, or an installer-created resource group named based on the infrastructure ID.
- 17
- The VPC name.
- 18
- Specify the zone within your region to place machines on. Be sure that your region supports the zone that you specify.
- 19
- The taint to prevent user workloads from being scheduled on infra nodes.Note
After adding the
NoScheduletaint on the infrastructure node, existing DNS pods running on that node are marked asmisscheduled. You must either delete or add toleration onmisscheduledDNS pods.
8.2.1.6. Sample YAML for a compute machine set custom resource on Google Cloud
This sample YAML defines a compute machine set that runs in Google Cloud and creates nodes that are labeled with node-role.kubernetes.io/infra: "".
In this sample, <infrastructure_id> is the infrastructure ID label that is based on the cluster ID that you set when you provisioned the cluster, and <infra> is the node label to add.
apiVersion: machine.openshift.io/v1beta1
kind: MachineSet
metadata:
labels:
machine.openshift.io/cluster-api-cluster: <infrastructure_id>
name: <infrastructure_id>-w-a
namespace: openshift-machine-api
spec:
replicas: 1
selector:
matchLabels:
machine.openshift.io/cluster-api-cluster: <infrastructure_id>
machine.openshift.io/cluster-api-machineset: <infrastructure_id>-w-a
template:
metadata:
creationTimestamp: null
labels:
machine.openshift.io/cluster-api-cluster: <infrastructure_id>
machine.openshift.io/cluster-api-machine-role: <infra>
machine.openshift.io/cluster-api-machine-type: <infra>
machine.openshift.io/cluster-api-machineset: <infrastructure_id>-w-a
spec:
metadata:
labels:
node-role.kubernetes.io/infra: ""
providerSpec:
value:
apiVersion: gcpprovider.openshift.io/v1beta1
canIPForward: false
credentialsSecret:
name: gcp-cloud-credentials
deletionProtection: false
disks:
- autoDelete: true
boot: true
image: <path_to_image>
labels: null
sizeGb: 128
type: pd-ssd
gcpMetadata:
- key: <custom_metadata_key>
value: <custom_metadata_value>
kind: GCPMachineProviderSpec
machineType: n1-standard-4
metadata:
creationTimestamp: null
networkInterfaces:
- network: <infrastructure_id>-network
subnetwork: <infrastructure_id>-worker-subnet
projectID: <project_name>
region: us-central1
serviceAccounts:
- email: <infrastructure_id>-w@<project_name>.iam.gserviceaccount.com
scopes:
- https://www.googleapis.com/auth/cloud-platform
tags:
- <infrastructure_id>-worker
userDataSecret:
name: worker-user-data
zone: us-central1-a
taints:
- key: node-role.kubernetes.io/infra
effect: NoSchedule- 1
- For
<infrastructure_id>, specify the infrastructure ID that is based on the cluster ID that you set when you provisioned the cluster. If you have the OpenShift CLI installed, you can obtain the infrastructure ID by running the following command:$ oc get -o jsonpath='{.status.infrastructureName}{"\n"}' infrastructure cluster - 2
- For
<infra>, specify the<infra>node label. - 3
- Specify the path to the image that is used in current compute machine sets. If you have the OpenShift CLI installed, you can obtain the path to the image by running the following command:
$ oc -n openshift-machine-api \ -o jsonpath='{.spec.template.spec.providerSpec.value.disks[0].image}{"\n"}' \ get machineset/<infrastructure_id>-worker-aTo use a Google Cloud Marketplace image, specify the offer to use:
-
OpenShift Container Platform:
https://www.googleapis.com/compute/v1/projects/redhat-marketplace-public/global/images/redhat-coreos-ocp-48-x86-64-202210040145 -
OpenShift Platform Plus:
https://www.googleapis.com/compute/v1/projects/redhat-marketplace-public/global/images/redhat-coreos-opp-48-x86-64-202206140145 -
OpenShift Kubernetes Engine:
https://www.googleapis.com/compute/v1/projects/redhat-marketplace-public/global/images/redhat-coreos-oke-48-x86-64-202206140145
-
OpenShift Container Platform:
- 4
- Optional: Specify custom metadata in the form of a
key:valuepair. For example use cases, see the Google Cloud documentation for setting custom metadata. - 5
- For
<project_name>, specify the name of the Google Cloud project that you use for your cluster. - 6
- Specifies a single service account. Multiple service accounts are not supported.
- 7
- Specify a taint to prevent user workloads from being scheduled on infra nodes.Note
After adding the
NoScheduletaint on the infrastructure node, existing DNS pods running on that node are marked asmisscheduled. You must either delete or add toleration onmisscheduledDNS pods.
Machine sets running on Google Cloud support non-guaranteed preemptible VM instances. You can save on costs by using preemptible VM instances at a lower price compared to normal instances on Google Cloud. You can configure preemptible VM instances by adding preemptible to the MachineSet YAML file.
8.2.1.7. Sample YAML for a compute machine set custom resource on Nutanix
This sample YAML defines a Nutanix compute machine set that creates nodes that are labeled with node-role.kubernetes.io/infra: "".
In this sample, <infrastructure_id> is the infrastructure ID label that is based on the cluster ID that you set when you provisioned the cluster, and <infra> is the node label to add.
apiVersion: machine.openshift.io/v1beta1
kind: MachineSet
metadata:
labels:
machine.openshift.io/cluster-api-cluster: <infrastructure_id>
machine.openshift.io/cluster-api-machine-role: <infra>
machine.openshift.io/cluster-api-machine-type: <infra>
name: <infrastructure_id>-<infra>-<zone>
namespace: openshift-machine-api
annotations:
machine.openshift.io/memoryMb: "16384"
machine.openshift.io/vCPU: "4"
spec:
replicas: 3
selector:
matchLabels:
machine.openshift.io/cluster-api-cluster: <infrastructure_id>
machine.openshift.io/cluster-api-machineset: <infrastructure_id>-<infra>-<zone>
template:
metadata:
labels:
machine.openshift.io/cluster-api-cluster: <infrastructure_id>
machine.openshift.io/cluster-api-machine-role: <infra>
machine.openshift.io/cluster-api-machine-type: <infra>
machine.openshift.io/cluster-api-machineset: <infrastructure_id>-<infra>-<zone>
spec:
metadata:
labels:
node-role.kubernetes.io/infra: ""
providerSpec:
value:
apiVersion: machine.openshift.io/v1
cluster:
type: uuid
uuid: <cluster_uuid>
credentialsSecret:
name: nutanix-credentials
image:
name: <infrastructure_id>-rhcos
type: name
kind: NutanixMachineProviderConfig
memorySize: 16Gi
subnets:
- type: uuid
uuid: <subnet_uuid>
systemDiskSize: 120Gi
userDataSecret:
name: <user_data_secret>
vcpuSockets: 4
vcpusPerSocket: 1
taints:
- key: node-role.kubernetes.io/infra
effect: NoSchedule- 1 6 8
- Specify the infrastructure ID that is based on the cluster ID that you set when you provisioned the cluster. If you have the OpenShift CLI (
oc) installed, you can obtain the infrastructure ID by running the following command:$ oc get -o jsonpath='{.status.infrastructureName}{"\n"}' infrastructure cluster - 2 3 9 10
- Specify the
<infra>node label. - 4 7 11
- Specify the infrastructure ID,
<infra>node label, and zone. - 5
- Annotations for the cluster autoscaler.
- 12
- Specify the image to use. Use an image from an existing default compute machine set for the cluster.
- 13
- Specify the amount of memory for the cluster in Gi.
- 14
- Specify the size of the system disk in Gi.
- 15
- Specify the name of the secret in the user data YAML file that is in the
openshift-machine-apinamespace. Use the value that the installer populates in the default compute machine set. - 16
- Specify the number of vCPU sockets.
- 17
- Specify the number of vCPUs per socket.
- 18
- Specify a taint to prevent user workloads from being scheduled on infra nodes.Note
After adding the
NoScheduletaint on the infrastructure node, existing DNS pods running on that node are marked asmisscheduled. You must either delete or add toleration onmisscheduledDNS pods.
8.2.1.8. Sample YAML for a compute machine set custom resource on RHOSP
This sample YAML defines a compute machine set that runs on Red Hat OpenStack Platform (RHOSP) and creates nodes that are labeled with node-role.kubernetes.io/infra: "".
In this sample, <infrastructure_id> is the infrastructure ID label that is based on the cluster ID that you set when you provisioned the cluster, and <infra> is the node label to add.
apiVersion: machine.openshift.io/v1beta1
kind: MachineSet
metadata:
labels:
machine.openshift.io/cluster-api-cluster: <infrastructure_id>
machine.openshift.io/cluster-api-machine-role: <infra>
machine.openshift.io/cluster-api-machine-type: <infra>
name: <infrastructure_id>-infra
namespace: openshift-machine-api
spec:
replicas: <number_of_replicas>
selector:
matchLabels:
machine.openshift.io/cluster-api-cluster: <infrastructure_id>
machine.openshift.io/cluster-api-machineset: <infrastructure_id>-infra
template:
metadata:
labels:
machine.openshift.io/cluster-api-cluster: <infrastructure_id>
machine.openshift.io/cluster-api-machine-role: <infra>
machine.openshift.io/cluster-api-machine-type: <infra>
machine.openshift.io/cluster-api-machineset: <infrastructure_id>-infra
spec:
metadata:
creationTimestamp: null
labels:
node-role.kubernetes.io/infra: ""
taints:
- key: node-role.kubernetes.io/infra
effect: NoSchedule
providerSpec:
value:
apiVersion: openstackproviderconfig.openshift.io/v1alpha1
cloudName: openstack
cloudsSecret:
name: openstack-cloud-credentials
namespace: openshift-machine-api
flavor: <nova_flavor>
image: <glance_image_name_or_location>
serverGroupID: <optional_UUID_of_server_group>
kind: OpenstackProviderSpec
networks:
- filter: {}
subnets:
- filter:
name: <subnet_name>
tags: openshiftClusterID=<infrastructure_id>
primarySubnet: <rhosp_subnet_UUID>
securityGroups:
- filter: {}
name: <infrastructure_id>-worker
serverMetadata:
Name: <infrastructure_id>-worker
openshiftClusterID: <infrastructure_id>
tags:
- openshiftClusterID=<infrastructure_id>
trunk: true
userDataSecret:
name: worker-user-data
availabilityZone: <optional_openstack_availability_zone>- 1 5 7 14 16 17 18 19
- Specify the infrastructure ID that is based on the cluster ID that you set when you provisioned the cluster. If you have the OpenShift CLI installed, you can obtain the infrastructure ID by running the following command:
$ oc get -o jsonpath='{.status.infrastructureName}{"\n"}' infrastructure cluster - 2 3 8 9 20
- Specify the
<infra>node label. - 4 6 10
- Specify the infrastructure ID and
<infra>node label. - 11
- Specify a taint to prevent user workloads from being scheduled on infra nodes.Note
After adding the
NoScheduletaint on the infrastructure node, existing DNS pods running on that node are marked asmisscheduled. You must either delete or add toleration onmisscheduledDNS pods. - 12
- To set a server group policy for the MachineSet, enter the value that is returned from creating a server group. For most deployments,
anti-affinityorsoft-anti-affinitypolicies are recommended. - 13
- Required for deployments to multiple networks. If deploying to multiple networks, this list must include the network that is used as the
primarySubnetvalue. - 15
- Specify the RHOSP subnet that you want the endpoints of nodes to be published on. Usually, this is the same subnet that is used as the value of
machinesSubnetin theinstall-config.yamlfile.
8.2.1.9. Sample YAML for a compute machine set custom resource on RHV
This sample YAML defines a compute machine set that runs on RHV and creates nodes that are labeled with node-role.kubernetes.io/<node_role>: "".
In this sample, <infrastructure_id> is the infrastructure ID label that is based on the cluster ID that you set when you provisioned the cluster, and <role> is the node label to add.
apiVersion: machine.openshift.io/v1beta1
kind: MachineSet
metadata:
labels:
machine.openshift.io/cluster-api-cluster: <infrastructure_id>
machine.openshift.io/cluster-api-machine-role: <role>
machine.openshift.io/cluster-api-machine-type: <role>
name: <infrastructure_id>-<role>
namespace: openshift-machine-api
spec:
replicas: <number_of_replicas>
Selector:
matchLabels:
machine.openshift.io/cluster-api-cluster: <infrastructure_id>
machine.openshift.io/cluster-api-machineset: <infrastructure_id>-<role>
template:
metadata:
labels:
machine.openshift.io/cluster-api-cluster: <infrastructure_id>
machine.openshift.io/cluster-api-machine-role: <role>
machine.openshift.io/cluster-api-machine-type: <role>
machine.openshift.io/cluster-api-machineset: <infrastructure_id>-<role>
spec:
metadata:
labels:
node-role.kubernetes.io/<role>: ""
providerSpec:
value:
apiVersion: ovirtproviderconfig.machine.openshift.io/v1beta1
cluster_id: <ovirt_cluster_id>
template_name: <ovirt_template_name>
sparse: <boolean_value>
format: <raw_or_cow>
cpu:
sockets: <number_of_sockets>
cores: <number_of_cores>
threads: <number_of_threads>
memory_mb: <memory_size>
guaranteed_memory_mb: <memory_size>
os_disk:
size_gb: <disk_size>
storage_domain_id: <storage_domain_UUID>
network_interfaces:
vnic_profile_id: <vnic_profile_id>
credentialsSecret:
name: ovirt-credentials
kind: OvirtMachineProviderSpec
type: <workload_type>
auto_pinning_policy: <auto_pinning_policy>
hugepages: <hugepages>
affinityGroupsNames:
- compute
userDataSecret:
name: worker-user-data- 1 7 9
- Specify the infrastructure ID that is based on the cluster ID that you set when you provisioned the cluster. If you have the OpenShift CLI (
oc) installed, you can obtain the infrastructure ID by running the following command:$ oc get -o jsonpath='{.status.infrastructureName}{"\n"}' infrastructure cluster - 2 3 10 11 13
- Specify the node label to add.
- 4 8 12
- Specify the infrastructure ID and node label. These two strings together cannot be longer than 35 characters.
- 5
- Specify the number of machines to create.
- 6
- Selector for the machines.
- 14
- Specify the UUID for the RHV cluster to which this VM instance belongs.
- 15
- Specify the RHV VM template to use to create the machine.
- 16
- Setting this option to
falseenables preallocation of disks. The default istrue. Settingsparsetotruewithformatset torawis not available for block storage domains. Therawformat writes the entire virtual disk to the underlying physical disk. - 17
- Can be set to
coworraw. The default iscow. Thecowformat is optimized for virtual machines.NotePreallocating disks on file storage domains writes zeroes to the file. This might not actually preallocate disks depending on the underlying storage.
- 18
- Optional: The CPU field contains the CPU configuration, including sockets, cores, and threads.
- 19
- Optional: Specify the number of sockets for a VM.
- 20
- Optional: Specify the number of cores per socket.
- 21
- Optional: Specify the number of threads per core.
- 22
- Optional: Specify the size of a VM’s memory in MiB.
- 23
- Optional: Specify the size of a virtual machine’s guaranteed memory in MiB. This is the amount of memory that is guaranteed not to be drained by the ballooning mechanism. For more information, see Memory Ballooning and Optimization Settings Explained.Note
If you are using a version earlier than RHV 4.4.8, see Guaranteed memory requirements for OpenShift on Red Hat Virtualization clusters.
- 24
- Optional: Root disk of the node.
- 25
- Optional: Specify the size of the bootable disk in GiB.
- 26
- Optional: Specify the UUID of the storage domain for the compute node’s disks. If none is provided, the compute node is created on the same storage domain as the control nodes. (default)
- 27
- Optional: List of the network interfaces of the VM. If you include this parameter, OpenShift Container Platform discards all network interfaces from the template and creates new ones.
- 28
- Optional: Specify the vNIC profile ID.
- 29
- Specify the name of the secret object that holds the RHV credentials.
- 30
- Optional: Specify the workload type for which the instance is optimized. This value affects the
RHV VMparameter. Supported values:desktop,server(default),high_performance.high_performanceimproves performance on the VM. Limitations exist, for example, you cannot access the VM with a graphical console. For more information, see Configuring High Performance Virtual Machines, Templates, and Pools in the Virtual Machine Management Guide. - 31
- Optional: AutoPinningPolicy defines the policy that automatically sets CPU and NUMA settings, including pinning to the host for this instance. Supported values:
none,resize_and_pin. For more information, see Setting NUMA Nodes in the Virtual Machine Management Guide. - 32
- Optional: Hugepages is the size in KiB for defining hugepages in a VM. Supported values:
2048or1048576. For more information, see Configuring Huge Pages in the Virtual Machine Management Guide. - 33
- Optional: A list of affinity group names to be applied to the VMs. The affinity groups must exist in oVirt.
Because RHV uses a template when creating a VM, if you do not specify a value for an optional parameter, RHV uses the value for that parameter that is specified in the template.
8.2.1.10. Sample YAML for a compute machine set custom resource on vSphere
This sample YAML defines a compute machine set that runs on VMware vSphere and creates nodes that are labeled with node-role.kubernetes.io/infra: "".
In this sample, <infrastructure_id> is the infrastructure ID label that is based on the cluster ID that you set when you provisioned the cluster, and infra is the node label to add.
apiVersion: machine.openshift.io/v1beta1
kind: MachineSet
metadata:
creationTimestamp: null
labels:
machine.openshift.io/cluster-api-cluster: <infrastructure_id>
name: <infrastructure_id>-infra
namespace: openshift-machine-api
spec:
replicas: 1
selector:
matchLabels:
machine.openshift.io/cluster-api-cluster: <infrastructure_id>
machine.openshift.io/cluster-api-machineset: <infrastructure_id>-infra
template:
metadata:
creationTimestamp: null
labels:
machine.openshift.io/cluster-api-cluster: <infrastructure_id>
machine.openshift.io/cluster-api-machine-role: infra
machine.openshift.io/cluster-api-machine-type: infra
machine.openshift.io/cluster-api-machineset: <infrastructure_id>-infra
spec:
metadata:
creationTimestamp: null
labels:
node-role.kubernetes.io/infra: ""
providerSpec:
value:
apiVersion: vsphereprovider.openshift.io/v1beta1
credentialsSecret:
name: vsphere-cloud-credentials
diskGiB: 120
kind: VSphereMachineProviderSpec
memoryMiB: 8192
metadata:
creationTimestamp: null
network:
devices:
- networkName: "<vm_network_name>"
numCPUs: 4
numCoresPerSocket: 1
snapshot: ""
template: <vm_template_name>
userDataSecret:
name: worker-user-data
workspace:
datacenter: <vcenter_datacenter_name>
datastore: <vcenter_datastore_name>
folder: <vcenter_vm_folder_path>
resourcepool: <vsphere_resource_pool>
server: <vcenter_server_ip>
taints:
- key: node-role.kubernetes.io/infra
effect: NoSchedule- 1
- Specify the infrastructure ID that is based on the cluster ID that you set when you provisioned the cluster. If you have the OpenShift CLI (
oc) installed, you can obtain the infrastructure ID by running the following command:$ oc get -o jsonpath='{.status.infrastructureName}{"\n"}' infrastructure cluster - 2
- Specify the infrastructure ID and
infranode label. - 3
- Specify the
infranode label. - 4
- Specify the vSphere VM network to deploy the compute machine set to. This VM network must be where other compute machines reside in the cluster.
- 5
- Specify the vSphere VM template to use, such as
user-5ddjd-rhcos. - 6
- Specify the vCenter Datacenter to deploy the compute machine set on.
- 7
- Specify the vCenter Datastore to deploy the compute machine set on.
- 8
- Specify the path to the vSphere VM folder in vCenter, such as
/dc1/vm/user-inst-5ddjd. - 9
- Specify the vSphere resource pool for your VMs.
- 10
- Specify the vCenter server IP or fully qualified domain name.
- 11
- Specify a taint to prevent user workloads from being scheduled on infra nodes.Note
After adding the
NoScheduletaint on the infrastructure node, existing DNS pods running on that node are marked asmisscheduled. You must either delete or add toleration onmisscheduledDNS pods.
8.2.2. Creating a compute machine set
In addition to the compute machine sets created by the installation program, you can create your own to dynamically manage the machine compute resources for specific workloads of your choice.
Prerequisites
- Deploy an OpenShift Container Platform cluster.
-
Install the OpenShift CLI (
oc). -
Log in to
ocas a user withcluster-adminpermission.
Procedure
Create a new YAML file that contains the compute machine set custom resource (CR) sample and is named
<file_name>.yaml.Ensure that you set the
<clusterID>and<role>parameter values.Optional: If you are not sure which value to set for a specific field, you can check an existing compute machine set from your cluster.
To list the compute machine sets in your cluster, run the following command:
$ oc get machinesets -n openshift-machine-apiExample output
NAME DESIRED CURRENT READY AVAILABLE AGE agl030519-vplxk-worker-us-east-1a 1 1 1 1 55m agl030519-vplxk-worker-us-east-1b 1 1 1 1 55m agl030519-vplxk-worker-us-east-1c 1 1 1 1 55m agl030519-vplxk-worker-us-east-1d 0 0 55m agl030519-vplxk-worker-us-east-1e 0 0 55m agl030519-vplxk-worker-us-east-1f 0 0 55mTo view values of a specific compute machine set custom resource (CR), run the following command:
$ oc get machineset <machineset_name> \ -n openshift-machine-api -o yamlExample output
apiVersion: machine.openshift.io/v1beta1 kind: MachineSet metadata: labels: machine.openshift.io/cluster-api-cluster: <infrastructure_id>1 name: <infrastructure_id>-<role>2 namespace: openshift-machine-api spec: replicas: 1 selector: matchLabels: machine.openshift.io/cluster-api-cluster: <infrastructure_id> machine.openshift.io/cluster-api-machineset: <infrastructure_id>-<role> template: metadata: labels: machine.openshift.io/cluster-api-cluster: <infrastructure_id> machine.openshift.io/cluster-api-machine-role: <role> machine.openshift.io/cluster-api-machine-type: <role> machine.openshift.io/cluster-api-machineset: <infrastructure_id>-<role> spec: providerSpec:3 ...- 1
- The cluster infrastructure ID.
- 2
- A default node label.Note
For clusters that have user-provisioned infrastructure, a compute machine set can only create
workerandinfratype machines. - 3
- The values in the
<providerSpec>section of the compute machine set CR are platform-specific. For more information about<providerSpec>parameters in the CR, see the sample compute machine set CR configuration for your provider.
Create a
MachineSetCR by running the following command:$ oc create -f <file_name>.yaml
Verification
View the list of compute machine sets by running the following command:
$ oc get machineset -n openshift-machine-apiExample output
NAME DESIRED CURRENT READY AVAILABLE AGE agl030519-vplxk-infra-us-east-1a 1 1 1 1 11m agl030519-vplxk-worker-us-east-1a 1 1 1 1 55m agl030519-vplxk-worker-us-east-1b 1 1 1 1 55m agl030519-vplxk-worker-us-east-1c 1 1 1 1 55m agl030519-vplxk-worker-us-east-1d 0 0 55m agl030519-vplxk-worker-us-east-1e 0 0 55m agl030519-vplxk-worker-us-east-1f 0 0 55mWhen the new compute machine set is available, the
DESIREDandCURRENTvalues match. If the compute machine set is not available, wait a few minutes and run the command again.
8.2.3. Creating an infrastructure node
See Creating infrastructure machine sets for installer-provisioned infrastructure environments or for any cluster where the control plane nodes are managed by the machine API.
Requirements of the cluster dictate that infrastructure (infra) nodes, be provisioned. The installation program provisions only control plane and worker nodes. Worker nodes can be designated as infrastructure nodes through labeling. You can then use taints and tolerations to move appropriate workloads to the infrastructure nodes. For more information, see "Moving resources to infrastructure machine sets".
You can optionally create a default cluster-wide node selector. The default node selector is applied to pods created in all namespaces and creates an intersection with any existing node selectors on a pod, which additionally constrains the pod’s selector.
If the default node selector key conflicts with the key of a pod’s label, then the default node selector is not applied.
However, do not set a default node selector that might cause a pod to become unschedulable. For example, setting the default node selector to a specific node role, such as node-role.kubernetes.io/infra="", when a pod’s label is set to a different node role, such as node-role.kubernetes.io/master="", can cause the pod to become unschedulable. For this reason, use caution when setting the default node selector to specific node roles.
You can alternatively use a project node selector to avoid cluster-wide node selector key conflicts.
Procedure
Add a label to the worker nodes that you want to act as infrastructure nodes:
$ oc label node <node-name> node-role.kubernetes.io/infra=""Check to see if applicable nodes now have the
infrarole:$ oc get nodesOptional: Create a default cluster-wide node selector:
Edit the
Schedulerobject:$ oc edit scheduler clusterAdd the
defaultNodeSelectorfield with the appropriate node selector:apiVersion: config.openshift.io/v1 kind: Scheduler metadata: name: cluster spec: defaultNodeSelector: node-role.kubernetes.io/infra=""1 # ...- 1
- This example node selector deploys pods on infrastructure nodes by default.
- Save the file to apply the changes.
You can now move infrastructure resources to the new infrastructure nodes. Also, remove any workloads that you do not want, or that do not belong, on the new infrastructure node. See the list of workloads supported for use on infrastructure nodes in "OpenShift Container Platform infrastructure components".
8.2.4. Creating a machine config pool for infrastructure machines
If you need infrastructure machines to have dedicated configurations, you must create an infra pool.
Procedure
Add a label to the node you want to assign as the infra node with a specific label:
$ oc label node <node_name> <label>$ oc label node ci-ln-n8mqwr2-f76d1-xscn2-worker-c-6fmtx node-role.kubernetes.io/infra=Create a machine config pool that contains both the worker role and your custom role as machine config selector:
$ cat infra.mcp.yamlExample output
apiVersion: machineconfiguration.openshift.io/v1 kind: MachineConfigPool metadata: name: infra spec: machineConfigSelector: matchExpressions: - {key: machineconfiguration.openshift.io/role, operator: In, values: [worker,infra]}1 nodeSelector: matchLabels: node-role.kubernetes.io/infra: ""2 NoteCustom machine config pools inherit machine configs from the worker pool. Custom pools use any machine config targeted for the worker pool, but add the ability to also deploy changes that are targeted at only the custom pool. Because a custom pool inherits resources from the worker pool, any change to the worker pool also affects the custom pool.
After you have the YAML file, you can create the machine config pool:
$ oc create -f infra.mcp.yamlCheck the machine configs to ensure that the infrastructure configuration rendered successfully:
$ oc get machineconfigExample output
NAME GENERATEDBYCONTROLLER IGNITIONVERSION CREATED 00-master 365c1cfd14de5b0e3b85e0fc815b0060f36ab955 3.2.0 31d 00-worker 365c1cfd14de5b0e3b85e0fc815b0060f36ab955 3.2.0 31d 01-master-container-runtime 365c1cfd14de5b0e3b85e0fc815b0060f36ab955 3.2.0 31d 01-master-kubelet 365c1cfd14de5b0e3b85e0fc815b0060f36ab955 3.2.0 31d 01-worker-container-runtime 365c1cfd14de5b0e3b85e0fc815b0060f36ab955 3.2.0 31d 01-worker-kubelet 365c1cfd14de5b0e3b85e0fc815b0060f36ab955 3.2.0 31d 99-master-1ae2a1e0-a115-11e9-8f14-005056899d54-registries 365c1cfd14de5b0e3b85e0fc815b0060f36ab955 3.2.0 31d 99-master-ssh 3.2.0 31d 99-worker-1ae64748-a115-11e9-8f14-005056899d54-registries 365c1cfd14de5b0e3b85e0fc815b0060f36ab955 3.2.0 31d 99-worker-ssh 3.2.0 31d rendered-infra-4e48906dca84ee702959c71a53ee80e7 365c1cfd14de5b0e3b85e0fc815b0060f36ab955 3.2.0 23m rendered-master-072d4b2da7f88162636902b074e9e28e 5b6fb8349a29735e48446d435962dec4547d3090 3.2.0 31d rendered-master-3e88ec72aed3886dec061df60d16d1af 02c07496ba0417b3e12b78fb32baf6293d314f79 3.2.0 31d rendered-master-419bee7de96134963a15fdf9dd473b25 365c1cfd14de5b0e3b85e0fc815b0060f36ab955 3.2.0 17d rendered-master-53f5c91c7661708adce18739cc0f40fb 365c1cfd14de5b0e3b85e0fc815b0060f36ab955 3.2.0 13d rendered-master-a6a357ec18e5bce7f5ac426fc7c5ffcd 365c1cfd14de5b0e3b85e0fc815b0060f36ab955 3.2.0 7d3h rendered-master-dc7f874ec77fc4b969674204332da037 5b6fb8349a29735e48446d435962dec4547d3090 3.2.0 31d rendered-worker-1a75960c52ad18ff5dfa6674eb7e533d 5b6fb8349a29735e48446d435962dec4547d3090 3.2.0 31d rendered-worker-2640531be11ba43c61d72e82dc634ce6 5b6fb8349a29735e48446d435962dec4547d3090 3.2.0 31d rendered-worker-4e48906dca84ee702959c71a53ee80e7 365c1cfd14de5b0e3b85e0fc815b0060f36ab955 3.2.0 7d3h rendered-worker-4f110718fe88e5f349987854a1147755 365c1cfd14de5b0e3b85e0fc815b0060f36ab955 3.2.0 17d rendered-worker-afc758e194d6188677eb837842d3b379 02c07496ba0417b3e12b78fb32baf6293d314f79 3.2.0 31d rendered-worker-daa08cc1e8f5fcdeba24de60cd955cc3 365c1cfd14de5b0e3b85e0fc815b0060f36ab955 3.2.0 13dYou should see a new machine config, with the
rendered-infra-*prefix.Optional: To deploy changes to a custom pool, create a machine config that uses the custom pool name as the label, such as
infra. Note that this is not required and only shown for instructional purposes. In this manner, you can apply any custom configurations specific to only your infra nodes.NoteAfter you create the new machine config pool, the MCO generates a new rendered config for that pool, and associated nodes of that pool reboot to apply the new configuration.
Create a machine config:
$ cat infra.mc.yamlExample output
apiVersion: machineconfiguration.openshift.io/v1 kind: MachineConfig metadata: name: 51-infra labels: machineconfiguration.openshift.io/role: infra1 spec: config: ignition: version: 3.2.0 storage: files: - path: /etc/infratest mode: 0644 contents: source: data:,infra- 1
- Add the label you added to the node as a
nodeSelector.
Apply the machine config to the infra-labeled nodes:
$ oc create -f infra.mc.yaml
Confirm that your new machine config pool is available:
$ oc get mcpExample output
NAME CONFIG UPDATED UPDATING DEGRADED MACHINECOUNT READYMACHINECOUNT UPDATEDMACHINECOUNT DEGRADEDMACHINECOUNT AGE infra rendered-infra-60e35c2e99f42d976e084fa94da4d0fc True False False 1 1 1 0 4m20s master rendered-master-9360fdb895d4c131c7c4bebbae099c90 True False False 3 3 3 0 91m worker rendered-worker-60e35c2e99f42d976e084fa94da4d0fc True False False 2 2 2 0 91mIn this example, a worker node was changed to an infra node.
8.3. Assigning machine set resources to infrastructure nodes
After creating an infrastructure machine set, the worker and infra roles are applied to new infra nodes. Nodes with the infra role applied are not counted toward the total number of subscriptions that are required to run the environment, even when the worker role is also applied.
However, with an infra node being assigned as a worker, there is a chance user workloads could get inadvertently assigned to an infra node. To avoid this, you can apply a taint to the infra node and tolerations for the pods you want to control.
8.3.1. Binding infrastructure node workloads using taints and tolerations
If you have an infrastructure node that has the infra and worker roles assigned, you must configure the node so that user workloads are not assigned to it.
It is recommended that you preserve the dual infra,worker label that is created for infrastructure nodes and use taints and tolerations to manage nodes that user workloads are scheduled on. If you remove the worker label from the node, you must create a custom pool to manage it. A node with a label other than master or worker is not recognized by the MCO without a custom pool. Maintaining the worker label allows the node to be managed by the default worker machine config pool, if no custom pools that select the custom label exists. The infra label communicates to the cluster that it does not count toward the total number of subscriptions.
Prerequisites
-
Configure additional
MachineSetobjects in your OpenShift Container Platform cluster.
Procedure
Add a taint to the infrastructure node to prevent scheduling user workloads on it:
Determine if the node has the taint:
$ oc describe nodes <node_name>Sample output
oc describe node ci-ln-iyhx092-f76d1-nvdfm-worker-b-wln2l Name: ci-ln-iyhx092-f76d1-nvdfm-worker-b-wln2l Roles: worker ... Taints: node-role.kubernetes.io/infra=reserved:NoSchedule ...This example shows that the node has a taint. You can proceed with adding a toleration to your pod in the next step.
If you have not configured a taint to prevent scheduling user workloads on it:
$ oc adm taint nodes <node_name> <key>=<value>:<effect>For example:
$ oc adm taint nodes node1 node-role.kubernetes.io/infra=reserved:NoScheduleTipYou can alternatively edit the pod specification to add the taint:
apiVersion: v1 kind: Node metadata: name: node1 # ... spec: taints: - key: node-role.kubernetes.io/infra value: reserved effect: NoSchedule # ...These examples place a taint on
node1that has thenode-role.kubernetes.io/infrakey and theNoScheduletaint effect. Nodes with theNoScheduleeffect schedule only pods that tolerate the taint, but allow existing pods to remain scheduled on the node.If you added a
NoScheduletaint to the infrastructure node, any pods that are controlled by a daemon set on that node are marked asmisscheduled. You must either delete the pods or add a toleration to the pods as shown in the Red Hat Knowledgebase solution add toleration onmisscheduledDNS pods. Note that you cannot add a toleration to a daemon set object that is managed by an operator.NoteIf a descheduler is used, pods violating node taints could be evicted from the cluster.
Add tolerations to the pods that you want to schedule on the infrastructure node, such as the router, registry, and monitoring workloads. Referencing the previous examples, add the following tolerations to the
Podobject specification:apiVersion: v1 kind: Pod metadata: annotations: # ... spec: # ... tolerations: - key: node-role.kubernetes.io/infra1 value: reserved2 effect: NoSchedule3 operator: Equal4 This toleration matches the taint created by the
oc adm taintcommand. A pod with this toleration can be scheduled onto the infrastructure node.NoteMoving pods for an Operator installed via OLM to an infrastructure node is not always possible. The capability to move Operator pods depends on the configuration of each Operator.
- Schedule the pod to the infrastructure node by using a scheduler. See the documentation for "Controlling pod placement using the scheduler" for details.
- Remove any workloads that you do not want, or that do not belong, on the new infrastructure node. See the list of workloads supported for use on infrastructure nodes in "OpenShift Container Platform infrastructure components".
8.4. Moving resources to infrastructure machine sets
Some of the infrastructure resources are deployed in your cluster by default. You can move them to the infrastructure machine sets that you created by adding the infrastructure node selector, as shown:
apiVersion: imageregistry.operator.openshift.io/v1
kind: Config
metadata:
name: cluster
# ...
spec:
nodePlacement:
nodeSelector:
matchLabels:
node-role.kubernetes.io/infra: ""
tolerations:
- effect: NoSchedule
key: node-role.kubernetes.io/infra
value: reserved
- effect: NoExecute
key: node-role.kubernetes.io/infra
value: reserved- 1
- Add a
nodeSelectorparameter with the appropriate value to the component you want to move. You can use anodeSelectorin the format shown or use<key>: <value>pairs, based on the value specified for the node. If you added a taint to the infrasructure node, also add a matching toleration.
Applying a specific node selector to all infrastructure components causes OpenShift Container Platform to schedule those workloads on nodes with that label.
8.4.1. Moving the router
You can deploy the router pod to a different compute machine set. By default, the pod is deployed to a worker node.
Prerequisites
- Configure additional compute machine sets in your OpenShift Container Platform cluster.
Procedure
View the
IngressControllercustom resource for the router Operator:$ oc get ingresscontroller default -n openshift-ingress-operator -o yamlThe command output resembles the following text:
apiVersion: operator.openshift.io/v1 kind: IngressController metadata: creationTimestamp: 2019-04-18T12:35:39Z finalizers: - ingresscontroller.operator.openshift.io/finalizer-ingresscontroller generation: 1 name: default namespace: openshift-ingress-operator resourceVersion: "11341" selfLink: /apis/operator.openshift.io/v1/namespaces/openshift-ingress-operator/ingresscontrollers/default uid: 79509e05-61d6-11e9-bc55-02ce4781844a spec: {} status: availableReplicas: 2 conditions: - lastTransitionTime: 2019-04-18T12:36:15Z status: "True" type: Available domain: apps.<cluster>.example.com endpointPublishingStrategy: type: LoadBalancerService selector: ingresscontroller.operator.openshift.io/deployment-ingresscontroller=defaultEdit the
ingresscontrollerresource and change thenodeSelectorto use theinfralabel:$ oc edit ingresscontroller default -n openshift-ingress-operatorapiVersion: operator.openshift.io/v1 kind: IngressController metadata: creationTimestamp: "2025-03-26T21:15:43Z" finalizers: - ingresscontroller.operator.openshift.io/finalizer-ingresscontroller generation: 1 name: default # ... spec: nodePlacement: nodeSelector:1 matchLabels: node-role.kubernetes.io/infra: "" tolerations: - effect: NoSchedule key: node-role.kubernetes.io/infra value: reserved # ...- 1
- Add a
nodeSelectorparameter with the appropriate value to the component you want to move. You can use anodeSelectorparameter in the format shown or use<key>: <value>pairs, based on the value specified for the node. If you added a taint to the infrastructure node, also add a matching toleration.
Confirm that the router pod is running on the
infranode.View the list of router pods and note the node name of the running pod:
$ oc get pod -n openshift-ingress -o wideExample output
NAME READY STATUS RESTARTS AGE IP NODE NOMINATED NODE READINESS GATES router-default-86798b4b5d-bdlvd 1/1 Running 0 28s 10.130.2.4 ip-10-0-217-226.ec2.internal <none> <none> router-default-955d875f4-255g8 0/1 Terminating 0 19h 10.129.2.4 ip-10-0-148-172.ec2.internal <none> <none>In this example, the running pod is on the
ip-10-0-217-226.ec2.internalnode.View the node status of the running pod:
$ oc get node <node_name>1 - 1
- Specify the
<node_name>that you obtained from the pod list.
Example output
NAME STATUS ROLES AGE VERSION ip-10-0-217-226.ec2.internal Ready infra,worker 17h v1.25.0Because the role list includes
infra, the pod is running on the correct node.
8.4.2. Moving the default registry
You configure the registry Operator to deploy its pods to different nodes.
Prerequisites
- Configure additional compute machine sets in your OpenShift Container Platform cluster.
Procedure
View the
config/instanceobject:$ oc get configs.imageregistry.operator.openshift.io/cluster -o yamlExample output
apiVersion: imageregistry.operator.openshift.io/v1 kind: Config metadata: creationTimestamp: 2019-02-05T13:52:05Z finalizers: - imageregistry.operator.openshift.io/finalizer generation: 1 name: cluster resourceVersion: "56174" selfLink: /apis/imageregistry.operator.openshift.io/v1/configs/cluster uid: 36fd3724-294d-11e9-a524-12ffeee2931b spec: httpSecret: d9a012ccd117b1e6616ceccb2c3bb66a5fed1b5e481623 logging: 2 managementState: Managed proxy: {} replicas: 1 requests: read: {} write: {} storage: s3: bucket: image-registry-us-east-1-c92e88cad85b48ec8b312344dff03c82-392c region: us-east-1 status: ...Edit the
config/instanceobject:$ oc edit configs.imageregistry.operator.openshift.io/clusterapiVersion: imageregistry.operator.openshift.io/v1 kind: Config metadata: name: cluster # ... spec: logLevel: Normal managementState: Managed nodeSelector:1 node-role.kubernetes.io/infra: "" tolerations: - effect: NoSchedule key: node-role.kubernetes.io/infra value: reserved- 1
- Add a
nodeSelectorparameter with the appropriate value to the component you want to move. You can use anodeSelectorparameter in the format shown or use<key>: <value>pairs, based on the value specified for the node. If you added a taint to the infrasructure node, also add a matching toleration.
Verify the registry pod has been moved to the infrastructure node.
Run the following command to identify the node where the registry pod is located:
$ oc get pods -o wide -n openshift-image-registryConfirm the node has the label you specified:
$ oc describe node <node_name>Review the command output and confirm that
node-role.kubernetes.io/infrais in theLABELSlist.
8.4.3. Moving the monitoring solution
The monitoring stack includes multiple components, including Prometheus, Thanos Querier, and Alertmanager. The Cluster Monitoring Operator manages this stack. To redeploy the monitoring stack to infrastructure nodes, you can create and apply a custom config map.
Prerequisites
-
You have access to the cluster as a user with the
cluster-admincluster role. -
You have created the
cluster-monitoring-configConfigMapobject. -
You have installed the OpenShift CLI (
oc).
Procedure
Edit the
cluster-monitoring-configconfig map and change thenodeSelectorto use theinfralabel:$ oc edit configmap cluster-monitoring-config -n openshift-monitoringapiVersion: v1 kind: ConfigMap metadata: name: cluster-monitoring-config namespace: openshift-monitoring data: config.yaml: |+ alertmanagerMain: nodeSelector:1 node-role.kubernetes.io/infra: "" tolerations: - key: node-role.kubernetes.io/infra value: reserved effect: NoSchedule prometheusK8s: nodeSelector: node-role.kubernetes.io/infra: "" tolerations: - key: node-role.kubernetes.io/infra value: reserved effect: NoSchedule prometheusOperator: nodeSelector: node-role.kubernetes.io/infra: "" tolerations: - key: node-role.kubernetes.io/infra value: reserved effect: NoSchedule k8sPrometheusAdapter: nodeSelector: node-role.kubernetes.io/infra: "" tolerations: - key: node-role.kubernetes.io/infra value: reserved effect: NoSchedule kubeStateMetrics: nodeSelector: node-role.kubernetes.io/infra: "" tolerations: - key: node-role.kubernetes.io/infra value: reserved effect: NoSchedule telemeterClient: nodeSelector: node-role.kubernetes.io/infra: "" tolerations: - key: node-role.kubernetes.io/infra value: reserved effect: NoSchedule openshiftStateMetrics: nodeSelector: node-role.kubernetes.io/infra: "" tolerations: - key: node-role.kubernetes.io/infra value: reserved effect: NoSchedule thanosQuerier: nodeSelector: node-role.kubernetes.io/infra: "" tolerations: - key: node-role.kubernetes.io/infra value: reserved effect: NoSchedule- 1
- Add a
nodeSelectorparameter with the appropriate value to the component you want to move. You can use anodeSelectorparameter in the format shown or use<key>: <value>pairs, based on the value specified for the node. If you added a taint to the infrastructure node, also add a matching toleration.
Watch the monitoring pods move to the new machines:
$ watch 'oc get pod -n openshift-monitoring -o wide'If a component has not moved to the
infranode, delete the pod with this component:$ oc delete pod -n openshift-monitoring <pod>The component from the deleted pod is re-created on the
infranode.
Chapter 9. Adding RHEL compute machines to an OpenShift Container Platform cluster
In OpenShift Container Platform, you can add Red Hat Enterprise Linux (RHEL) compute machines to a user-provisioned infrastructure cluster or an installation-provisioned infrastructure cluster on the x86_64 architecture. You can use RHEL as the operating system only on compute machines.
9.1. About adding RHEL compute nodes to a cluster
In OpenShift Container Platform 4.12, you have the option of using Red Hat Enterprise Linux (RHEL) machines as compute machines in your cluster if you use a user-provisioned or installer-provisioned infrastructure installation on the x86_64 architecture. You must use Red Hat Enterprise Linux CoreOS (RHCOS) machines for the control plane machines in your cluster.
If you choose to use RHEL compute machines in your cluster, you are responsible for all operating system life cycle management and maintenance. You must perform system updates, apply patches, and complete all other required tasks.
For installer-provisioned infrastructure clusters, you must manually add RHEL compute machines because automatic scaling in installer-provisioned infrastructure clusters adds Red Hat Enterprise Linux CoreOS (RHCOS) compute machines by default.
- Because removing OpenShift Container Platform from a machine in the cluster requires destroying the operating system, you must use dedicated hardware for any RHEL machines that you add to the cluster.
- Swap memory is disabled on all RHEL machines that you add to your OpenShift Container Platform cluster. You cannot enable swap memory on these machines.
9.2. System requirements for RHEL compute nodes
The Red Hat Enterprise Linux (RHEL) compute machine hosts in your OpenShift Container Platform environment must meet the following minimum hardware specifications and system-level requirements:
- You must have an active OpenShift Container Platform subscription on your Red Hat account. If you do not, contact your sales representative for more information.
- Production environments must provide compute machines to support your expected workloads. As a cluster administrator, you must calculate the expected workload and add about 10% for overhead. For production environments, allocate enough resources so that a node host failure does not affect your maximum capacity.
Each system must meet the following hardware requirements:
- Physical or virtual system, or an instance running on a public or private IaaS.
Base OS: RHEL 8.6 and later with "Minimal" installation option.
ImportantAdding RHEL 7 compute machines to an OpenShift Container Platform cluster is not supported.
If you have RHEL 7 compute machines that were previously supported in a past OpenShift Container Platform version, you cannot upgrade them to RHEL 8. You must deploy new RHEL 8 hosts, and the old RHEL 7 hosts should be removed. See the "Deleting nodes" section for more information.
For the most recent list of major functionality that has been deprecated or removed within OpenShift Container Platform, refer to the Deprecated and removed features section of the OpenShift Container Platform release notes.
- If you deployed OpenShift Container Platform in FIPS mode, you must enable FIPS on the RHEL machine before you boot it. See Installing a RHEL 8 system with FIPS mode enabled in the RHEL 8 documentation.
To enable FIPS mode for your cluster, you must run the installation program from a Red Hat Enterprise Linux (RHEL) computer configured to operate in FIPS mode. For more information about configuring FIPS mode on RHEL, see Installing the system in FIPS mode. The use of FIPS validated or Modules In Process cryptographic libraries is only supported on OpenShift Container Platform deployments on the x86_64, ppc64le, and s390x architectures.
- NetworkManager 1.0 or later.
- 1 vCPU.
- Minimum 8 GB RAM.
-
Minimum 15 GB hard disk space for the file system containing
/var/. -
Minimum 1 GB hard disk space for the file system containing
/usr/local/bin/. Minimum 1 GB hard disk space for the file system containing its temporary directory. The temporary system directory is determined according to the rules defined in the tempfile module in the Python standard library.
-
Each system must meet any additional requirements for your system provider. For example, if you installed your cluster on VMware vSphere, your disks must be configured according to its storage guidelines and the
disk.enableUUID=trueattribute must be set. - Each system must be able to access the cluster’s API endpoints by using DNS-resolvable hostnames. Any network security access control that is in place must allow system access to the cluster’s API service endpoints.
-
Each system must meet any additional requirements for your system provider. For example, if you installed your cluster on VMware vSphere, your disks must be configured according to its storage guidelines and the
9.2.1. Certificate signing requests management
Because your cluster has limited access to automatic machine management when you use infrastructure that you provision, you must provide a mechanism for approving cluster certificate signing requests (CSRs) after installation. The kube-controller-manager only approves the kubelet client CSRs. The machine-approver cannot guarantee the validity of a serving certificate that is requested by using kubelet credentials because it cannot confirm that the correct machine issued the request. You must determine and implement a method of verifying the validity of the kubelet serving certificate requests and approving them.
9.3. Preparing an image for your cloud
Amazon Machine Images (AMI) are required because various image formats cannot be used directly by AWS. You may use the AMIs that Red Hat has provided, or you can manually import your own images. The AMI must exist before the EC2 instance can be provisioned. You will need a valid AMI ID so that the correct RHEL version needed for the compute machines is selected.
9.3.1. Listing latest available RHEL images on AWS
AMI IDs correspond to native boot images for AWS. Because an AMI must exist before the EC2 instance is provisioned, you will need to know the AMI ID before configuration. The AWS Command Line Interface (CLI) is used to list the available Red Hat Enterprise Linux (RHEL) image IDs.
Prerequisites
- You have installed the AWS CLI.
Procedure
Use this command to list RHEL 8.4 Amazon Machine Images (AMI):
$ aws ec2 describe-images --owners 309956199498 \1 --query 'sort_by(Images, &CreationDate)[*].[CreationDate,Name,ImageId]' \2 --filters "Name=name,Values=RHEL-8.4*" \3 --region us-east-1 \4 --output table5 - 1
- The
--ownerscommand option shows Red Hat images based on the account ID309956199498.ImportantThis account ID is required to display AMI IDs for images that are provided by Red Hat.
- 2
- The
--querycommand option sets how the images are sorted with the parameters'sort_by(Images, &CreationDate)[*].[CreationDate,Name,ImageId]'. In this case, the images are sorted by the creation date, and the table is structured to show the creation date, the name of the image, and the AMI IDs. - 3
- The
--filtercommand option sets which version of RHEL is shown. In this example, since the filter is set by"Name=name,Values=RHEL-8.4*", then RHEL 8.4 AMIs are shown. - 4
- The
--regioncommand option sets where the region where an AMI is stored. - 5
- The
--outputcommand option sets how the results are displayed.
When creating a RHEL compute machine for AWS, ensure that the AMI is RHEL 8.4 or 8.5.
Example output
------------------------------------------------------------------------------------------------------------
| DescribeImages |
+---------------------------+-----------------------------------------------------+------------------------+
| 2021-03-18T14:23:11.000Z | RHEL-8.4.0_HVM_BETA-20210309-x86_64-1-Hourly2-GP2 | ami-07eeb4db5f7e5a8fb |
| 2021-03-18T14:38:28.000Z | RHEL-8.4.0_HVM_BETA-20210309-arm64-1-Hourly2-GP2 | ami-069d22ec49577d4bf |
| 2021-05-18T19:06:34.000Z | RHEL-8.4.0_HVM-20210504-arm64-2-Hourly2-GP2 | ami-01fc429821bf1f4b4 |
| 2021-05-18T20:09:47.000Z | RHEL-8.4.0_HVM-20210504-x86_64-2-Hourly2-GP2 | ami-0b0af3577fe5e3532 |
+---------------------------+-----------------------------------------------------+------------------------+9.4. Preparing the machine to run the playbook
Before you can add compute machines that use Red Hat Enterprise Linux (RHEL) as the operating system to an OpenShift Container Platform 4.12 cluster, you must prepare a RHEL 8 machine to run an Ansible playbook that adds the new node to the cluster. This machine is not part of the cluster but must be able to access it.
Prerequisites
-
Install the OpenShift CLI (
oc) on the machine that you run the playbook on. -
Log in as a user with
cluster-adminpermission.
Procedure
-
Ensure that the
kubeconfigfile for the cluster and the installation program that you used to install the cluster are on the RHEL 8 machine. One way to accomplish this is to use the same machine that you used to install the cluster. - Configure the machine to access all of the RHEL hosts that you plan to use as compute machines. You can use any method that your company allows, including a bastion with an SSH proxy or a VPN.
Configure a user on the machine that you run the playbook on that has SSH access to all of the RHEL hosts.
ImportantIf you use SSH key-based authentication, you must manage the key with an SSH agent.
If you have not already done so, register the machine with RHSM and attach a pool with an
OpenShiftsubscription to it:Register the machine with RHSM:
# subscription-manager register --username=<user_name> --password=<password>Pull the latest subscription data from RHSM:
# subscription-manager refreshList the available subscriptions:
# subscription-manager list --available --matches '*OpenShift*'In the output for the previous command, find the pool ID for an OpenShift Container Platform subscription and attach it:
# subscription-manager attach --pool=<pool_id>
Enable the repositories required by OpenShift Container Platform 4.12:
# subscription-manager repos \ --enable="rhel-8-for-x86_64-baseos-rpms" \ --enable="rhel-8-for-x86_64-appstream-rpms" \ --enable="rhocp-4.12-for-rhel-8-x86_64-rpms"Install the required packages, including
openshift-ansible:# yum install openshift-ansible openshift-clients jqThe
openshift-ansiblepackage provides installation program utilities and pulls in other packages that you require to add a RHEL compute node to your cluster, such as Ansible, playbooks, and related configuration files. Theopenshift-clientsprovides theocCLI, and thejqpackage improves the display of JSON output on your command line.
9.5. Preparing a RHEL compute node
Before you add a Red Hat Enterprise Linux (RHEL) machine to your OpenShift Container Platform cluster, you must register each host with Red Hat Subscription Manager (RHSM), attach an active OpenShift Container Platform subscription, and enable the required repositories. Ensure NetworkManager is enabled and configured to control all interfaces on the host.
On each host, register with RHSM:
# subscription-manager register --username=<user_name> --password=<password>Pull the latest subscription data from RHSM:
# subscription-manager refreshList the available subscriptions:
# subscription-manager list --available --matches '*OpenShift*'In the output for the previous command, find the pool ID for an OpenShift Container Platform subscription and attach it:
# subscription-manager attach --pool=<pool_id>Disable all yum repositories:
Disable all the enabled RHSM repositories:
# subscription-manager repos --disable="*"List the remaining yum repositories and note their names under
repo id, if any:# yum repolistUse
yum-config-managerto disable the remaining yum repositories:# yum-config-manager --disable <repo_id>Alternatively, disable all repositories:
# yum-config-manager --disable \*Note that this might take a few minutes if you have a large number of available repositories
Enable only the repositories required by OpenShift Container Platform 4.12:
# subscription-manager repos \ --enable="rhel-8-for-x86_64-baseos-rpms" \ --enable="rhel-8-for-x86_64-appstream-rpms" \ --enable="rhocp-4.12-for-rhel-8-x86_64-rpms" \ --enable="fast-datapath-for-rhel-8-x86_64-rpms"Stop and disable firewalld on the host:
# systemctl disable --now firewalld.serviceNoteYou must not enable firewalld later. If you do, you cannot access OpenShift Container Platform logs on the worker.
9.6. Attaching the role permissions to RHEL instance in AWS
Using the Amazon IAM console in your browser, you may select the needed roles and assign them to a worker node.
Procedure
- From the AWS IAM console, create your desired IAM role.
- Attach the IAM role to the desired worker node.
9.7. Tagging a RHEL worker node as owned or shared
A cluster uses the value of the kubernetes.io/cluster/<clusterid>,Value=(owned|shared) tag to determine the lifetime of the resources related to the AWS cluster.
-
The
ownedtag value should be added if the resource should be destroyed as part of destroying the cluster. -
The
sharedtag value should be added if the resource continues to exist after the cluster has been destroyed. This tagging denotes that the cluster uses this resource, but there is a separate owner for the resource.
Procedure
-
With RHEL compute machines, the RHEL worker instance must be tagged with
kubernetes.io/cluster/<clusterid>=ownedorkubernetes.io/cluster/<cluster-id>=shared.
Do not tag all existing security groups with the kubernetes.io/cluster/<name>,Value=<clusterid> tag, or the Elastic Load Balancing (ELB) will not be able to create a load balancer.
9.8. Adding a RHEL compute machine to your cluster
You can add compute machines that use Red Hat Enterprise Linux as the operating system to an OpenShift Container Platform 4.12 cluster.
Prerequisites
- You installed the required packages and performed the necessary configuration on the machine that you run the playbook on.
- You prepared the RHEL hosts for installation.
Procedure
Perform the following steps on the machine that you prepared to run the playbook:
Create an Ansible inventory file that is named
/<path>/inventory/hoststhat defines your compute machine hosts and required variables:[all:vars] ansible_user=root1 #ansible_become=True2 openshift_kubeconfig_path="~/.kube/config"3 [new_workers]4 mycluster-rhel8-0.example.com mycluster-rhel8-1.example.com- 1
- Specify the user name that runs the Ansible tasks on the remote compute machines.
- 2
- If you do not specify
rootfor theansible_user, you must setansible_becometoTrueand assign the user sudo permissions. - 3
- Specify the path and file name of the
kubeconfigfile for your cluster. - 4
- List each RHEL machine to add to your cluster. You must provide the fully-qualified domain name for each host. This name is the hostname that the cluster uses to access the machine, so set the correct public or private name to access the machine.
Navigate to the Ansible playbook directory:
$ cd /usr/share/ansible/openshift-ansibleRun the playbook:
$ ansible-playbook -i /<path>/inventory/hosts playbooks/scaleup.yml1 - 1
- For
<path>, specify the path to the Ansible inventory file that you created.
9.9. Approving the certificate signing requests for your machines
When you add machines to a cluster, two pending certificate signing requests (CSRs) are generated for each machine that you added. You must confirm that these CSRs are approved or, if necessary, approve them yourself. The client requests must be approved first, followed by the server requests.
Prerequisites
- You added machines to your cluster.
Procedure
Confirm that the cluster recognizes the machines:
$ oc get nodesExample output
NAME STATUS ROLES AGE VERSION master-0 Ready master 63m v1.25.0 master-1 Ready master 63m v1.25.0 master-2 Ready master 64m v1.25.0The output lists all of the machines that you created.
NoteThe preceding output might not include the compute nodes, also known as worker nodes, until some CSRs are approved.
Review the pending CSRs and ensure that you see the client requests with the
PendingorApprovedstatus for each machine that you added to the cluster:$ oc get csrExample output
NAME AGE REQUESTOR CONDITION csr-8b2br 15m system:serviceaccount:openshift-machine-config-operator:node-bootstrapper Pending csr-8vnps 15m system:serviceaccount:openshift-machine-config-operator:node-bootstrapper Pending ...In this example, two machines are joining the cluster. You might see more approved CSRs in the list.
If the CSRs were not approved, after all of the pending CSRs for the machines you added are in
Pendingstatus, approve the CSRs for your cluster machines:NoteBecause the CSRs rotate automatically, approve your CSRs within an hour of adding the machines to the cluster. If you do not approve them within an hour, the certificates will rotate, and more than two certificates will be present for each node. You must approve all of these certificates. After the client CSR is approved, the Kubelet creates a secondary CSR for the serving certificate, which requires manual approval. Then, subsequent serving certificate renewal requests are automatically approved by the
machine-approverif the Kubelet requests a new certificate with identical parameters.NoteFor clusters running on platforms that are not machine API enabled, such as bare metal and other user-provisioned infrastructure, you must implement a method of automatically approving the kubelet serving certificate requests (CSRs). If a request is not approved, then the
oc exec,oc rsh, andoc logscommands cannot succeed, because a serving certificate is required when the API server connects to the kubelet. Any operation that contacts the Kubelet endpoint requires this certificate approval to be in place. The method must watch for new CSRs, confirm that the CSR was submitted by thenode-bootstrapperservice account in thesystem:nodeorsystem:admingroups, and confirm the identity of the node.To approve them individually, run the following command for each valid CSR:
$ oc adm certificate approve <csr_name>1 - 1
<csr_name>is the name of a CSR from the list of current CSRs.
To approve all pending CSRs, run the following command:
$ oc get csr -o go-template='{{range .items}}{{if not .status}}{{.metadata.name}}{{"\n"}}{{end}}{{end}}' | xargs --no-run-if-empty oc adm certificate approveNoteSome Operators might not become available until some CSRs are approved.
Now that your client requests are approved, you must review the server requests for each machine that you added to the cluster:
$ oc get csrExample output
NAME AGE REQUESTOR CONDITION csr-bfd72 5m26s system:node:ip-10-0-50-126.us-east-2.compute.internal Pending csr-c57lv 5m26s system:node:ip-10-0-95-157.us-east-2.compute.internal Pending ...If the remaining CSRs are not approved, and are in the
Pendingstatus, approve the CSRs for your cluster machines:To approve them individually, run the following command for each valid CSR:
$ oc adm certificate approve <csr_name>1 - 1
<csr_name>is the name of a CSR from the list of current CSRs.
To approve all pending CSRs, run the following command:
$ oc get csr -o go-template='{{range .items}}{{if not .status}}{{.metadata.name}}{{"\n"}}{{end}}{{end}}' | xargs oc adm certificate approve
After all client and server CSRs have been approved, the machines have the
Readystatus. Verify this by running the following command:$ oc get nodesExample output
NAME STATUS ROLES AGE VERSION master-0 Ready master 73m v1.25.0 master-1 Ready master 73m v1.25.0 master-2 Ready master 74m v1.25.0 worker-0 Ready worker 11m v1.25.0 worker-1 Ready worker 11m v1.25.0NoteIt can take a few minutes after approval of the server CSRs for the machines to transition to the
Readystatus.
Additional information
- For more information on CSRs, see Certificate Signing Requests.
9.10. Required parameters for the Ansible hosts file
You must define the following parameters in the Ansible hosts file before you add Red Hat Enterprise Linux (RHEL) compute machines to your cluster.
| Parameter | Description | Values |
|---|---|---|
|
| The SSH user that allows SSH-based authentication without requiring a password. If you use SSH key-based authentication, then you must manage the key with an SSH agent. |
A user name on the system. The default value is |
|
|
If the values of |
|
|
|
Specifies a path and file name to a local directory that contains the | The path and name of the configuration file. |
9.10.1. Optional: Removing RHCOS compute machines from a cluster
After you add the Red Hat Enterprise Linux (RHEL) compute machines to your cluster, you can optionally remove the Red Hat Enterprise Linux CoreOS (RHCOS) compute machines to free up resources.
Prerequisites
- You have added RHEL compute machines to your cluster.
Procedure
View the list of machines and record the node names of the RHCOS compute machines:
$ oc get nodes -o wideFor each RHCOS compute machine, delete the node:
Mark the node as unschedulable by running the
oc adm cordoncommand:$ oc adm cordon <node_name>1 - 1
- Specify the node name of one of the RHCOS compute machines.
Drain all the pods from the node:
$ oc adm drain <node_name> --force --delete-emptydir-data --ignore-daemonsets1 - 1
- Specify the node name of the RHCOS compute machine that you isolated.
Delete the node:
$ oc delete nodes <node_name>1 - 1
- Specify the node name of the RHCOS compute machine that you drained.
Review the list of compute machines to ensure that only the RHEL nodes remain:
$ oc get nodes -o wide- Remove the RHCOS machines from the load balancer for your cluster’s compute machines. You can delete the virtual machines or reimage the physical hardware for the RHCOS compute machines.
Chapter 10. Adding more RHEL compute machines to an OpenShift Container Platform cluster
If your OpenShift Container Platform cluster already includes Red Hat Enterprise Linux (RHEL) compute machines, which are also known as worker machines, you can add more RHEL compute machines to it.
10.1. About adding RHEL compute nodes to a cluster
In OpenShift Container Platform 4.12, you have the option of using Red Hat Enterprise Linux (RHEL) machines as compute machines in your cluster if you use a user-provisioned or installer-provisioned infrastructure installation on the x86_64 architecture. You must use Red Hat Enterprise Linux CoreOS (RHCOS) machines for the control plane machines in your cluster.
If you choose to use RHEL compute machines in your cluster, you are responsible for all operating system life cycle management and maintenance. You must perform system updates, apply patches, and complete all other required tasks.
For installer-provisioned infrastructure clusters, you must manually add RHEL compute machines because automatic scaling in installer-provisioned infrastructure clusters adds Red Hat Enterprise Linux CoreOS (RHCOS) compute machines by default.
- Because removing OpenShift Container Platform from a machine in the cluster requires destroying the operating system, you must use dedicated hardware for any RHEL machines that you add to the cluster.
- Swap memory is disabled on all RHEL machines that you add to your OpenShift Container Platform cluster. You cannot enable swap memory on these machines.
10.2. System requirements for RHEL compute nodes
The Red Hat Enterprise Linux (RHEL) compute machine hosts in your OpenShift Container Platform environment must meet the following minimum hardware specifications and system-level requirements:
- You must have an active OpenShift Container Platform subscription on your Red Hat account. If you do not, contact your sales representative for more information.
- Production environments must provide compute machines to support your expected workloads. As a cluster administrator, you must calculate the expected workload and add about 10% for overhead. For production environments, allocate enough resources so that a node host failure does not affect your maximum capacity.
Each system must meet the following hardware requirements:
- Physical or virtual system, or an instance running on a public or private IaaS.
Base OS: RHEL 8.6 and later with "Minimal" installation option.
ImportantAdding RHEL 7 compute machines to an OpenShift Container Platform cluster is not supported.
If you have RHEL 7 compute machines that were previously supported in a past OpenShift Container Platform version, you cannot upgrade them to RHEL 8. You must deploy new RHEL 8 hosts, and the old RHEL 7 hosts should be removed. See the "Deleting nodes" section for more information.
For the most recent list of major functionality that has been deprecated or removed within OpenShift Container Platform, refer to the Deprecated and removed features section of the OpenShift Container Platform release notes.
- If you deployed OpenShift Container Platform in FIPS mode, you must enable FIPS on the RHEL machine before you boot it. See Installing a RHEL 8 system with FIPS mode enabled in the RHEL 8 documentation.
To enable FIPS mode for your cluster, you must run the installation program from a Red Hat Enterprise Linux (RHEL) computer configured to operate in FIPS mode. For more information about configuring FIPS mode on RHEL, see Installing the system in FIPS mode. The use of FIPS validated or Modules In Process cryptographic libraries is only supported on OpenShift Container Platform deployments on the x86_64, ppc64le, and s390x architectures.
- NetworkManager 1.0 or later.
- 1 vCPU.
- Minimum 8 GB RAM.
-
Minimum 15 GB hard disk space for the file system containing
/var/. -
Minimum 1 GB hard disk space for the file system containing
/usr/local/bin/. Minimum 1 GB hard disk space for the file system containing its temporary directory. The temporary system directory is determined according to the rules defined in the tempfile module in the Python standard library.
-
Each system must meet any additional requirements for your system provider. For example, if you installed your cluster on VMware vSphere, your disks must be configured according to its storage guidelines and the
disk.enableUUID=trueattribute must be set. - Each system must be able to access the cluster’s API endpoints by using DNS-resolvable hostnames. Any network security access control that is in place must allow system access to the cluster’s API service endpoints.
-
Each system must meet any additional requirements for your system provider. For example, if you installed your cluster on VMware vSphere, your disks must be configured according to its storage guidelines and the
10.2.1. Certificate signing requests management
Because your cluster has limited access to automatic machine management when you use infrastructure that you provision, you must provide a mechanism for approving cluster certificate signing requests (CSRs) after installation. The kube-controller-manager only approves the kubelet client CSRs. The machine-approver cannot guarantee the validity of a serving certificate that is requested by using kubelet credentials because it cannot confirm that the correct machine issued the request. You must determine and implement a method of verifying the validity of the kubelet serving certificate requests and approving them.
10.3. Preparing an image for your cloud
Amazon Machine Images (AMI) are required since various image formats cannot be used directly by AWS. You may use the AMIs that Red Hat has provided, or you can manually import your own images. The AMI must exist before the EC2 instance can be provisioned. You must list the AMI IDs so that the correct RHEL version needed for the compute machines is selected.
10.3.1. Listing latest available RHEL images on AWS
AMI IDs correspond to native boot images for AWS. Because an AMI must exist before the EC2 instance is provisioned, you will need to know the AMI ID before configuration. The AWS Command Line Interface (CLI) is used to list the available Red Hat Enterprise Linux (RHEL) image IDs.
Prerequisites
- You have installed the AWS CLI.
Procedure
Use this command to list RHEL 8.4 Amazon Machine Images (AMI):
$ aws ec2 describe-images --owners 309956199498 \1 --query 'sort_by(Images, &CreationDate)[*].[CreationDate,Name,ImageId]' \2 --filters "Name=name,Values=RHEL-8.4*" \3 --region us-east-1 \4 --output table5 - 1
- The
--ownerscommand option shows Red Hat images based on the account ID309956199498.ImportantThis account ID is required to display AMI IDs for images that are provided by Red Hat.
- 2
- The
--querycommand option sets how the images are sorted with the parameters'sort_by(Images, &CreationDate)[*].[CreationDate,Name,ImageId]'. In this case, the images are sorted by the creation date, and the table is structured to show the creation date, the name of the image, and the AMI IDs. - 3
- The
--filtercommand option sets which version of RHEL is shown. In this example, since the filter is set by"Name=name,Values=RHEL-8.4*", then RHEL 8.4 AMIs are shown. - 4
- The
--regioncommand option sets where the region where an AMI is stored. - 5
- The
--outputcommand option sets how the results are displayed.
When creating a RHEL compute machine for AWS, ensure that the AMI is RHEL 8.4 or 8.5.
Example output
------------------------------------------------------------------------------------------------------------
| DescribeImages |
+---------------------------+-----------------------------------------------------+------------------------+
| 2021-03-18T14:23:11.000Z | RHEL-8.4.0_HVM_BETA-20210309-x86_64-1-Hourly2-GP2 | ami-07eeb4db5f7e5a8fb |
| 2021-03-18T14:38:28.000Z | RHEL-8.4.0_HVM_BETA-20210309-arm64-1-Hourly2-GP2 | ami-069d22ec49577d4bf |
| 2021-05-18T19:06:34.000Z | RHEL-8.4.0_HVM-20210504-arm64-2-Hourly2-GP2 | ami-01fc429821bf1f4b4 |
| 2021-05-18T20:09:47.000Z | RHEL-8.4.0_HVM-20210504-x86_64-2-Hourly2-GP2 | ami-0b0af3577fe5e3532 |
+---------------------------+-----------------------------------------------------+------------------------+10.4. Preparing a RHEL compute node
Before you add a Red Hat Enterprise Linux (RHEL) machine to your OpenShift Container Platform cluster, you must register each host with Red Hat Subscription Manager (RHSM), attach an active OpenShift Container Platform subscription, and enable the required repositories. Ensure NetworkManager is enabled and configured to control all interfaces on the host.
On each host, register with RHSM:
# subscription-manager register --username=<user_name> --password=<password>Pull the latest subscription data from RHSM:
# subscription-manager refreshList the available subscriptions:
# subscription-manager list --available --matches '*OpenShift*'In the output for the previous command, find the pool ID for an OpenShift Container Platform subscription and attach it:
# subscription-manager attach --pool=<pool_id>Disable all yum repositories:
Disable all the enabled RHSM repositories:
# subscription-manager repos --disable="*"List the remaining yum repositories and note their names under
repo id, if any:# yum repolistUse
yum-config-managerto disable the remaining yum repositories:# yum-config-manager --disable <repo_id>Alternatively, disable all repositories:
# yum-config-manager --disable \*Note that this might take a few minutes if you have a large number of available repositories
Enable only the repositories required by OpenShift Container Platform 4.12:
# subscription-manager repos \ --enable="rhel-8-for-x86_64-baseos-rpms" \ --enable="rhel-8-for-x86_64-appstream-rpms" \ --enable="rhocp-4.12-for-rhel-8-x86_64-rpms" \ --enable="fast-datapath-for-rhel-8-x86_64-rpms"Stop and disable firewalld on the host:
# systemctl disable --now firewalld.serviceNoteYou must not enable firewalld later. If you do, you cannot access OpenShift Container Platform logs on the worker.
10.5. Attaching the role permissions to RHEL instance in AWS
Using the Amazon IAM console in your browser, you may select the needed roles and assign them to a worker node.
Procedure
- From the AWS IAM console, create your desired IAM role.
- Attach the IAM role to the desired worker node.
10.6. Tagging a RHEL worker node as owned or shared
A cluster uses the value of the kubernetes.io/cluster/<clusterid>,Value=(owned|shared) tag to determine the lifetime of the resources related to the AWS cluster.
-
The
ownedtag value should be added if the resource should be destroyed as part of destroying the cluster. -
The
sharedtag value should be added if the resource continues to exist after the cluster has been destroyed. This tagging denotes that the cluster uses this resource, but there is a separate owner for the resource.
Procedure
-
With RHEL compute machines, the RHEL worker instance must be tagged with
kubernetes.io/cluster/<clusterid>=ownedorkubernetes.io/cluster/<cluster-id>=shared.
Do not tag all existing security groups with the kubernetes.io/cluster/<name>,Value=<clusterid> tag, or the Elastic Load Balancing (ELB) will not be able to create a load balancer.
10.7. Adding more RHEL compute machines to your cluster
You can add more compute machines that use Red Hat Enterprise Linux (RHEL) as the operating system to an OpenShift Container Platform 4.12 cluster.
Prerequisites
- Your OpenShift Container Platform cluster already contains RHEL compute nodes.
-
The
hostsfile that you used to add the first RHEL compute machines to your cluster is on the machine that you use the run the playbook. - The machine that you run the playbook on must be able to access all of the RHEL hosts. You can use any method that your company allows, including a bastion with an SSH proxy or a VPN.
-
The
kubeconfigfile for the cluster and the installation program that you used to install the cluster are on the machine that you use the run the playbook. - You must prepare the RHEL hosts for installation.
- Configure a user on the machine that you run the playbook on that has SSH access to all of the RHEL hosts.
- If you use SSH key-based authentication, you must manage the key with an SSH agent.
-
Install the OpenShift CLI (
oc) on the machine that you run the playbook on.
Procedure
-
Open the Ansible inventory file at
/<path>/inventory/hoststhat defines your compute machine hosts and required variables. -
Rename the
[new_workers]section of the file to[workers]. Add a
[new_workers]section to the file and define the fully-qualified domain names for each new host. The file resembles the following example:[all:vars] ansible_user=root #ansible_become=True openshift_kubeconfig_path="~/.kube/config" [workers] mycluster-rhel8-0.example.com mycluster-rhel8-1.example.com [new_workers] mycluster-rhel8-2.example.com mycluster-rhel8-3.example.comIn this example, the
mycluster-rhel8-0.example.comandmycluster-rhel8-1.example.commachines are in the cluster and you add themycluster-rhel8-2.example.comandmycluster-rhel8-3.example.commachines.Navigate to the Ansible playbook directory:
$ cd /usr/share/ansible/openshift-ansibleRun the scaleup playbook:
$ ansible-playbook -i /<path>/inventory/hosts playbooks/scaleup.yml1 - 1
- For
<path>, specify the path to the Ansible inventory file that you created.
10.8. Approving the certificate signing requests for your machines
When you add machines to a cluster, two pending certificate signing requests (CSRs) are generated for each machine that you added. You must confirm that these CSRs are approved or, if necessary, approve them yourself. The client requests must be approved first, followed by the server requests.
Prerequisites
- You added machines to your cluster.
Procedure
Confirm that the cluster recognizes the machines:
$ oc get nodesExample output
NAME STATUS ROLES AGE VERSION master-0 Ready master 63m v1.25.0 master-1 Ready master 63m v1.25.0 master-2 Ready master 64m v1.25.0The output lists all of the machines that you created.
NoteThe preceding output might not include the compute nodes, also known as worker nodes, until some CSRs are approved.
Review the pending CSRs and ensure that you see the client requests with the
PendingorApprovedstatus for each machine that you added to the cluster:$ oc get csrExample output
NAME AGE REQUESTOR CONDITION csr-8b2br 15m system:serviceaccount:openshift-machine-config-operator:node-bootstrapper Pending csr-8vnps 15m system:serviceaccount:openshift-machine-config-operator:node-bootstrapper Pending ...In this example, two machines are joining the cluster. You might see more approved CSRs in the list.
If the CSRs were not approved, after all of the pending CSRs for the machines you added are in
Pendingstatus, approve the CSRs for your cluster machines:NoteBecause the CSRs rotate automatically, approve your CSRs within an hour of adding the machines to the cluster. If you do not approve them within an hour, the certificates will rotate, and more than two certificates will be present for each node. You must approve all of these certificates. After the client CSR is approved, the Kubelet creates a secondary CSR for the serving certificate, which requires manual approval. Then, subsequent serving certificate renewal requests are automatically approved by the
machine-approverif the Kubelet requests a new certificate with identical parameters.NoteFor clusters running on platforms that are not machine API enabled, such as bare metal and other user-provisioned infrastructure, you must implement a method of automatically approving the kubelet serving certificate requests (CSRs). If a request is not approved, then the
oc exec,oc rsh, andoc logscommands cannot succeed, because a serving certificate is required when the API server connects to the kubelet. Any operation that contacts the Kubelet endpoint requires this certificate approval to be in place. The method must watch for new CSRs, confirm that the CSR was submitted by thenode-bootstrapperservice account in thesystem:nodeorsystem:admingroups, and confirm the identity of the node.To approve them individually, run the following command for each valid CSR:
$ oc adm certificate approve <csr_name>1 - 1
<csr_name>is the name of a CSR from the list of current CSRs.
To approve all pending CSRs, run the following command:
$ oc get csr -o go-template='{{range .items}}{{if not .status}}{{.metadata.name}}{{"\n"}}{{end}}{{end}}' | xargs --no-run-if-empty oc adm certificate approveNoteSome Operators might not become available until some CSRs are approved.
Now that your client requests are approved, you must review the server requests for each machine that you added to the cluster:
$ oc get csrExample output
NAME AGE REQUESTOR CONDITION csr-bfd72 5m26s system:node:ip-10-0-50-126.us-east-2.compute.internal Pending csr-c57lv 5m26s system:node:ip-10-0-95-157.us-east-2.compute.internal Pending ...If the remaining CSRs are not approved, and are in the
Pendingstatus, approve the CSRs for your cluster machines:To approve them individually, run the following command for each valid CSR:
$ oc adm certificate approve <csr_name>1 - 1
<csr_name>is the name of a CSR from the list of current CSRs.
To approve all pending CSRs, run the following command:
$ oc get csr -o go-template='{{range .items}}{{if not .status}}{{.metadata.name}}{{"\n"}}{{end}}{{end}}' | xargs oc adm certificate approve
After all client and server CSRs have been approved, the machines have the
Readystatus. Verify this by running the following command:$ oc get nodesExample output
NAME STATUS ROLES AGE VERSION master-0 Ready master 73m v1.25.0 master-1 Ready master 73m v1.25.0 master-2 Ready master 74m v1.25.0 worker-0 Ready worker 11m v1.25.0 worker-1 Ready worker 11m v1.25.0NoteIt can take a few minutes after approval of the server CSRs for the machines to transition to the
Readystatus.
Additional information
- For more information on CSRs, see Certificate Signing Requests.
10.9. Required parameters for the Ansible hosts file
You must define the following parameters in the Ansible hosts file before you add Red Hat Enterprise Linux (RHEL) compute machines to your cluster.
| Parameter | Description | Values |
|---|---|---|
|
| The SSH user that allows SSH-based authentication without requiring a password. If you use SSH key-based authentication, then you must manage the key with an SSH agent. |
A user name on the system. The default value is |
|
|
If the values of |
|
|
|
Specifies a path and file name to a local directory that contains the | The path and name of the configuration file. |
Chapter 11. Managing user-provisioned infrastructure manually
11.1. Adding compute machines to clusters with user-provisioned infrastructure manually
You can add compute machines to a cluster on user-provisioned infrastructure either as part of the installation process or after installation. The postinstallation process requires some of the same configuration files and parameters that were used during installation.
11.1.1. Adding compute machines to Amazon Web Services
To add more compute machines to your OpenShift Container Platform cluster on Amazon Web Services (AWS), see Adding compute machines to AWS by using CloudFormation templates.
11.1.2. Adding compute machines to Microsoft Azure
To add more compute machines to your OpenShift Container Platform cluster on Microsoft Azure, see Creating additional worker machines in Azure.
11.1.3. Adding compute machines to Azure Stack Hub
To add more compute machines to your OpenShift Container Platform cluster on Azure Stack Hub, see Creating additional worker machines in Azure Stack Hub.
11.1.4. Adding compute machines to Google Cloud
To add more compute machines to your OpenShift Container Platform cluster on Google Cloud, see Creating additional worker machines in Google Cloud.
11.1.5. Adding compute machines to vSphere
You can use compute machine sets to automate the creation of additional compute machines for your OpenShift Container Platform cluster on vSphere.
To manually add more compute machines to your cluster, see Adding compute machines to vSphere manually.
11.1.6. Adding compute machines to RHV
To add more compute machines to your OpenShift Container Platform cluster on RHV, see Adding compute machines to RHV.
11.1.7. Adding compute machines to bare metal
To add more compute machines to your OpenShift Container Platform cluster on bare metal, see Adding compute machines to bare metal.
11.2. Adding compute machines to AWS by using CloudFormation templates
You can add more compute machines to your OpenShift Container Platform cluster on Amazon Web Services (AWS) that you created by using the sample CloudFormation templates.
11.2.1. Prerequisites
- You installed your cluster on AWS by using the provided AWS CloudFormation templates.
- You have the JSON file and CloudFormation template that you used to create the compute machines during cluster installation. If you do not have these files, you must recreate them by following the instructions in the installation procedure.
11.2.2. Adding more compute machines to your AWS cluster by using CloudFormation templates
You can add more compute machines to your OpenShift Container Platform cluster on Amazon Web Services (AWS) that you created by using the sample CloudFormation templates.
The CloudFormation template creates a stack that represents one compute machine. You must create a stack for each compute machine.
If you do not use the provided CloudFormation template to create your compute nodes, you must review the provided information and manually create the infrastructure. If your cluster does not initialize correctly, you might have to contact Red Hat support with your installation logs.
Prerequisites
- You installed an OpenShift Container Platform cluster by using CloudFormation templates and have access to the JSON file and CloudFormation template that you used to create the compute machines during cluster installation.
- You installed the AWS CLI.
Procedure
Create another compute stack.
Launch the template:
$ aws cloudformation create-stack --stack-name <name> \1 --template-body file://<template>.yaml \2 --parameters file://<parameters>.json3 - 1
<name>is the name for the CloudFormation stack, such ascluster-workers. You must provide the name of this stack if you remove the cluster.- 2
<template>is the relative path to and name of the CloudFormation template YAML file that you saved.- 3
<parameters>is the relative path to and name of the CloudFormation parameters JSON file.
Confirm that the template components exist:
$ aws cloudformation describe-stacks --stack-name <name>
- Continue to create compute stacks until you have created enough compute machines for your cluster.
11.2.3. Approving the certificate signing requests for your machines
When you add machines to a cluster, two pending certificate signing requests (CSRs) are generated for each machine that you added. You must confirm that these CSRs are approved or, if necessary, approve them yourself. The client requests must be approved first, followed by the server requests.
Prerequisites
- You added machines to your cluster.
Procedure
Confirm that the cluster recognizes the machines:
$ oc get nodesExample output
NAME STATUS ROLES AGE VERSION master-0 Ready master 63m v1.25.0 master-1 Ready master 63m v1.25.0 master-2 Ready master 64m v1.25.0The output lists all of the machines that you created.
NoteThe preceding output might not include the compute nodes, also known as worker nodes, until some CSRs are approved.
Review the pending CSRs and ensure that you see the client requests with the
PendingorApprovedstatus for each machine that you added to the cluster:$ oc get csrExample output
NAME AGE REQUESTOR CONDITION csr-8b2br 15m system:serviceaccount:openshift-machine-config-operator:node-bootstrapper Pending csr-8vnps 15m system:serviceaccount:openshift-machine-config-operator:node-bootstrapper Pending ...In this example, two machines are joining the cluster. You might see more approved CSRs in the list.
If the CSRs were not approved, after all of the pending CSRs for the machines you added are in
Pendingstatus, approve the CSRs for your cluster machines:NoteBecause the CSRs rotate automatically, approve your CSRs within an hour of adding the machines to the cluster. If you do not approve them within an hour, the certificates will rotate, and more than two certificates will be present for each node. You must approve all of these certificates. After the client CSR is approved, the Kubelet creates a secondary CSR for the serving certificate, which requires manual approval. Then, subsequent serving certificate renewal requests are automatically approved by the
machine-approverif the Kubelet requests a new certificate with identical parameters.NoteFor clusters running on platforms that are not machine API enabled, such as bare metal and other user-provisioned infrastructure, you must implement a method of automatically approving the kubelet serving certificate requests (CSRs). If a request is not approved, then the
oc exec,oc rsh, andoc logscommands cannot succeed, because a serving certificate is required when the API server connects to the kubelet. Any operation that contacts the Kubelet endpoint requires this certificate approval to be in place. The method must watch for new CSRs, confirm that the CSR was submitted by thenode-bootstrapperservice account in thesystem:nodeorsystem:admingroups, and confirm the identity of the node.To approve them individually, run the following command for each valid CSR:
$ oc adm certificate approve <csr_name>1 - 1
<csr_name>is the name of a CSR from the list of current CSRs.
To approve all pending CSRs, run the following command:
$ oc get csr -o go-template='{{range .items}}{{if not .status}}{{.metadata.name}}{{"\n"}}{{end}}{{end}}' | xargs --no-run-if-empty oc adm certificate approveNoteSome Operators might not become available until some CSRs are approved.
Now that your client requests are approved, you must review the server requests for each machine that you added to the cluster:
$ oc get csrExample output
NAME AGE REQUESTOR CONDITION csr-bfd72 5m26s system:node:ip-10-0-50-126.us-east-2.compute.internal Pending csr-c57lv 5m26s system:node:ip-10-0-95-157.us-east-2.compute.internal Pending ...If the remaining CSRs are not approved, and are in the
Pendingstatus, approve the CSRs for your cluster machines:To approve them individually, run the following command for each valid CSR:
$ oc adm certificate approve <csr_name>1 - 1
<csr_name>is the name of a CSR from the list of current CSRs.
To approve all pending CSRs, run the following command:
$ oc get csr -o go-template='{{range .items}}{{if not .status}}{{.metadata.name}}{{"\n"}}{{end}}{{end}}' | xargs oc adm certificate approve
After all client and server CSRs have been approved, the machines have the
Readystatus. Verify this by running the following command:$ oc get nodesExample output
NAME STATUS ROLES AGE VERSION master-0 Ready master 73m v1.25.0 master-1 Ready master 73m v1.25.0 master-2 Ready master 74m v1.25.0 worker-0 Ready worker 11m v1.25.0 worker-1 Ready worker 11m v1.25.0NoteIt can take a few minutes after approval of the server CSRs for the machines to transition to the
Readystatus.
Additional information
- For more information on CSRs, see Certificate Signing Requests.
11.3. Adding compute machines to vSphere manually
You can add more compute machines to your OpenShift Container Platform cluster on VMware vSphere manually.
You can also use compute machine sets to automate the creation of additional VMware vSphere compute machines for your cluster.
11.3.1. Prerequisites
- You installed a cluster on vSphere.
- You have installation media and Red Hat Enterprise Linux CoreOS (RHCOS) images that you used to create your cluster. If you do not have these files, you must obtain them by following the instructions in the installation procedure.
If you do not have access to the Red Hat Enterprise Linux CoreOS (RHCOS) images that were used to create your cluster, you can add more compute machines to your OpenShift Container Platform cluster with newer versions of Red Hat Enterprise Linux CoreOS (RHCOS) images. For instructions, see Adding new nodes to UPI cluster fails after upgrading to OpenShift 4.6+.
11.3.2. Adding more compute machines to a cluster in vSphere
You can add more compute machines to a user-provisioned OpenShift Container Platform cluster on VMware vSphere.
After your vSphere template deploys in your OpenShift Container Platform cluster, you can deploy a virtual machine (VM) for a machine in that cluster.
Prerequisites
- Obtain the base64-encoded Ignition file for your compute machines.
- You have access to the vSphere template that you created for your cluster.
Procedure
- Right-click the template’s name and click Clone → Clone to Virtual Machine.
On the Select a name and folder tab, specify a name for the VM. You might include the machine type in the name, such as
compute-1.NoteEnsure that all virtual machine names across a vSphere installation are unique.
- On the Select a name and folder tab, select the name of the folder that you created for the cluster.
- On the Select a compute resource tab, select the name of a host in your datacenter.
- On the Select storage tab, select storage for your configuration and disk files.
- On the Select clone options, select Customize this virtual machine’s hardware.
On the Customize hardware tab, click Advanced.
Click Edit Configuration, and on the Configuration Parameters window, click Add Configuration Params. Define the following parameter names and values:
-
guestinfo.ignition.config.data: Paste the contents of the base64-encoded compute Ignition config file for this machine type. -
guestinfo.ignition.config.data.encoding: Specifybase64. -
disk.EnableUUID: SpecifyTRUE.
-
- In the Virtual Hardware panel of the Customize hardware tab, modify the specified values as required. Ensure that the amount of RAM, CPU, and disk storage meets the minimum requirements for the machine type. If many networks exist, select Add New Device > Network Adapter, and then enter your network information in the fields provided by the New Network menu item.
- Complete the remaining configuration steps. On clicking the Finish button, you have completed the cloning operation.
- From the Virtual Machines tab, right-click on your VM and then select Power → Power On.
Next steps
- Continue to create more compute machines for your cluster.
11.3.3. Approving the certificate signing requests for your machines
When you add machines to a cluster, two pending certificate signing requests (CSRs) are generated for each machine that you added. You must confirm that these CSRs are approved or, if necessary, approve them yourself. The client requests must be approved first, followed by the server requests.
Prerequisites
- You added machines to your cluster.
Procedure
Confirm that the cluster recognizes the machines:
$ oc get nodesExample output
NAME STATUS ROLES AGE VERSION master-0 Ready master 63m v1.25.0 master-1 Ready master 63m v1.25.0 master-2 Ready master 64m v1.25.0The output lists all of the machines that you created.
NoteThe preceding output might not include the compute nodes, also known as worker nodes, until some CSRs are approved.
Review the pending CSRs and ensure that you see the client requests with the
PendingorApprovedstatus for each machine that you added to the cluster:$ oc get csrExample output
NAME AGE REQUESTOR CONDITION csr-8b2br 15m system:serviceaccount:openshift-machine-config-operator:node-bootstrapper Pending csr-8vnps 15m system:serviceaccount:openshift-machine-config-operator:node-bootstrapper Pending ...In this example, two machines are joining the cluster. You might see more approved CSRs in the list.
If the CSRs were not approved, after all of the pending CSRs for the machines you added are in
Pendingstatus, approve the CSRs for your cluster machines:NoteBecause the CSRs rotate automatically, approve your CSRs within an hour of adding the machines to the cluster. If you do not approve them within an hour, the certificates will rotate, and more than two certificates will be present for each node. You must approve all of these certificates. After the client CSR is approved, the Kubelet creates a secondary CSR for the serving certificate, which requires manual approval. Then, subsequent serving certificate renewal requests are automatically approved by the
machine-approverif the Kubelet requests a new certificate with identical parameters.NoteFor clusters running on platforms that are not machine API enabled, such as bare metal and other user-provisioned infrastructure, you must implement a method of automatically approving the kubelet serving certificate requests (CSRs). If a request is not approved, then the
oc exec,oc rsh, andoc logscommands cannot succeed, because a serving certificate is required when the API server connects to the kubelet. Any operation that contacts the Kubelet endpoint requires this certificate approval to be in place. The method must watch for new CSRs, confirm that the CSR was submitted by thenode-bootstrapperservice account in thesystem:nodeorsystem:admingroups, and confirm the identity of the node.To approve them individually, run the following command for each valid CSR:
$ oc adm certificate approve <csr_name>1 - 1
<csr_name>is the name of a CSR from the list of current CSRs.
To approve all pending CSRs, run the following command:
$ oc get csr -o go-template='{{range .items}}{{if not .status}}{{.metadata.name}}{{"\n"}}{{end}}{{end}}' | xargs --no-run-if-empty oc adm certificate approveNoteSome Operators might not become available until some CSRs are approved.
Now that your client requests are approved, you must review the server requests for each machine that you added to the cluster:
$ oc get csrExample output
NAME AGE REQUESTOR CONDITION csr-bfd72 5m26s system:node:ip-10-0-50-126.us-east-2.compute.internal Pending csr-c57lv 5m26s system:node:ip-10-0-95-157.us-east-2.compute.internal Pending ...If the remaining CSRs are not approved, and are in the
Pendingstatus, approve the CSRs for your cluster machines:To approve them individually, run the following command for each valid CSR:
$ oc adm certificate approve <csr_name>1 - 1
<csr_name>is the name of a CSR from the list of current CSRs.
To approve all pending CSRs, run the following command:
$ oc get csr -o go-template='{{range .items}}{{if not .status}}{{.metadata.name}}{{"\n"}}{{end}}{{end}}' | xargs oc adm certificate approve
After all client and server CSRs have been approved, the machines have the
Readystatus. Verify this by running the following command:$ oc get nodesExample output
NAME STATUS ROLES AGE VERSION master-0 Ready master 73m v1.25.0 master-1 Ready master 73m v1.25.0 master-2 Ready master 74m v1.25.0 worker-0 Ready worker 11m v1.25.0 worker-1 Ready worker 11m v1.25.0NoteIt can take a few minutes after approval of the server CSRs for the machines to transition to the
Readystatus.
Additional information
- For more information on CSRs, see Certificate Signing Requests.
11.4. Adding compute machines to a cluster on RHV
In OpenShift Container Platform version 4.12, you can add more compute machines to a user-provisioned OpenShift Container Platform cluster on RHV.
Prerequisites
- You installed a cluster on RHV with user-provisioned infrastructure.
11.4.1. Adding more compute machines to a cluster on RHV
Procedure
-
Modify the
inventory.ymlfile to include the new workers. Run the
create-templates-and-vmsAnsible playbook to create the disks and virtual machines:$ ansible-playbook -i inventory.yml create-templates-and-vms.ymlRun the
workers.ymlAnsible playbook to start the virtual machines:$ ansible-playbook -i inventory.yml workers.ymlCSRs for new workers joining the cluster must be approved by the administrator. The following command helps to approve all pending requests:
$ oc get csr -ojson | jq -r '.items[] | select(.status == {} ) | .metadata.name' | xargs oc adm certificate approve
11.5. Adding compute machines to bare metal
You can add more compute machines to your OpenShift Container Platform cluster on bare metal.
11.5.1. Prerequisites
- You installed a cluster on bare metal.
- You have installation media and Red Hat Enterprise Linux CoreOS (RHCOS) images that you used to create your cluster. If you do not have these files, you must obtain them by following the instructions in the installation procedure.
- If a DHCP server is available for your user-provisioned infrastructure, you have added the details for the additional compute machines to your DHCP server configuration. This includes a persistent IP address, DNS server information, and a hostname for each machine.
- You have updated your DNS configuration to include the record name and IP address of each compute machine that you are adding. You have validated that DNS lookup and reverse DNS lookup resolve correctly.
If you do not have access to the Red Hat Enterprise Linux CoreOS (RHCOS) images that were used to create your cluster, you can add more compute machines to your OpenShift Container Platform cluster with newer versions of Red Hat Enterprise Linux CoreOS (RHCOS) images. For instructions, see Adding new nodes to UPI cluster fails after upgrading to OpenShift 4.6+.
11.5.2. Creating Red Hat Enterprise Linux CoreOS (RHCOS) machines
Before you add more compute machines to a cluster that you installed on bare metal infrastructure, you must create RHCOS machines for it to use. You can either use an ISO image or network PXE booting to create the machines.
You must use the same ISO image that you used to install a cluster to deploy all new nodes in a cluster. It is recommended to use the same Ignition config file. The nodes automatically upgrade themselves on the first boot before running the workloads. You can add the nodes before or after the upgrade.
11.5.2.1. Creating more RHCOS machines using an ISO image
You can create more Red Hat Enterprise Linux CoreOS (RHCOS) compute machines for your bare metal cluster by using an ISO image to create the machines.
Prerequisites
- Obtain the URL of the Ignition config file for the compute machines for your cluster. You uploaded this file to your HTTP server during installation.
Procedure
Use the ISO file to install RHCOS on more compute machines. Use the same method that you used when you created machines before you installed the cluster:
- Burn the ISO image to a disk and boot it directly.
- Use ISO redirection with a LOM interface.
Boot the RHCOS ISO image without specifying any options, or interrupting the live boot sequence. Wait for the installer to boot into a shell prompt in the RHCOS live environment.
NoteYou can interrupt the RHCOS installation boot process to add kernel arguments. However, for this ISO procedure you must use the
coreos-installercommand as outlined in the following steps, instead of adding kernel arguments.Run the
coreos-installercommand and specify the options that meet your installation requirements. At a minimum, you must specify the URL that points to the Ignition config file for the node type, and the device that you are installing to:$ sudo coreos-installer install --ignition-url=http://<HTTP_server>/<node_type>.ign <device> --ignition-hash=sha512-<digest>1 2 - 1
- You must run the
coreos-installercommand by usingsudo, because thecoreuser does not have the required root privileges to perform the installation. - 2
- The
--ignition-hashoption is required when the Ignition config file is obtained through an HTTP URL to validate the authenticity of the Ignition config file on the cluster node.<digest>is the Ignition config file SHA512 digest obtained in a preceding step.
NoteIf you want to provide your Ignition config files through an HTTPS server that uses TLS, you can add the internal certificate authority (CA) to the system trust store before running
coreos-installer.The following example initializes a compute node installation to the
/dev/sdadevice. The Ignition config file for the compute node is obtained from an HTTP web server with the IP address 192.168.1.2:$ sudo coreos-installer install --ignition-url=http://192.168.1.2:80/installation_directory/worker.ign /dev/sda --ignition-hash=sha512-a5a2d43879223273c9b60af66b44202a1d1248fc01cf156c46d4a79f552b6bad47bc8cc78ddf0116e80c59d2ea9e32ba53bc807afbca581aa059311def2c3e3bMonitor the progress of the RHCOS installation on the console of the machine.
ImportantEnsure that the installation is successful on each node before commencing with the OpenShift Container Platform installation. Observing the installation process can also help to determine the cause of RHCOS installation issues that might arise.
- Continue to create more compute machines for your cluster.
11.5.2.2. Creating more RHCOS machines by PXE or iPXE booting
You can create more Red Hat Enterprise Linux CoreOS (RHCOS) compute machines for your bare metal cluster by using PXE or iPXE booting.
Prerequisites
- Obtain the URL of the Ignition config file for the compute machines for your cluster. You uploaded this file to your HTTP server during installation.
-
Obtain the URLs of the RHCOS ISO image, compressed metal BIOS,
kernel, andinitramfsfiles that you uploaded to your HTTP server during cluster installation. - You have access to the PXE booting infrastructure that you used to create the machines for your OpenShift Container Platform cluster during installation. The machines must boot from their local disks after RHCOS is installed on them.
-
If you use UEFI, you have access to the
grub.conffile that you modified during OpenShift Container Platform installation.
Procedure
Confirm that your PXE or iPXE installation for the RHCOS images is correct.
For PXE:
DEFAULT pxeboot TIMEOUT 20 PROMPT 0 LABEL pxeboot KERNEL http://<HTTP_server>/rhcos-<version>-live-kernel-<architecture>1 APPEND initrd=http://<HTTP_server>/rhcos-<version>-live-initramfs.<architecture>.img coreos.inst.install_dev=/dev/sda coreos.inst.ignition_url=http://<HTTP_server>/worker.ign coreos.live.rootfs_url=http://<HTTP_server>/rhcos-<version>-live-rootfs.<architecture>.img2 - 1
- Specify the location of the live
kernelfile that you uploaded to your HTTP server. - 2
- Specify locations of the RHCOS files that you uploaded to your HTTP server. The
initrdparameter value is the location of the liveinitramfsfile, thecoreos.inst.ignition_urlparameter value is the location of the worker Ignition config file, and thecoreos.live.rootfs_urlparameter value is the location of the liverootfsfile. Thecoreos.inst.ignition_urlandcoreos.live.rootfs_urlparameters only support HTTP and HTTPS.
This configuration does not enable serial console access on machines with a graphical console. To configure a different console, add one or more console= arguments to the APPEND line. For example, add console=tty0 console=ttyS0 to set the first PC serial port as the primary console and the graphical console as a secondary console. For more information, see How does one set up a serial terminal and/or console in Red Hat Enterprise Linux?.
For iPXE:
kernel http://<HTTP_server>/rhcos-<version>-live-kernel-<architecture> initrd=main coreos.inst.install_dev=/dev/sda coreos.inst.ignition_url=http://<HTTP_server>/worker.ign coreos.live.rootfs_url=http://<HTTP_server>/rhcos-<version>-live-rootfs.<architecture>.img1 initrd --name main http://<HTTP_server>/rhcos-<version>-live-initramfs.<architecture>.img2 - 1
- Specify locations of the RHCOS files that you uploaded to your HTTP server. The
kernelparameter value is the location of thekernelfile, theinitrd=mainargument is needed for booting on UEFI systems, thecoreos.inst.ignition_urlparameter value is the location of the worker Ignition config file, and thecoreos.live.rootfs_urlparameter value is the location of the liverootfsfile. Thecoreos.inst.ignition_urlandcoreos.live.rootfs_urlparameters only support HTTP and HTTPS. - 2
- Specify the location of the
initramfsfile that you uploaded to your HTTP server.
This configuration does not enable serial console access on machines with a graphical console. To configure a different console, add one or more console= arguments to the kernel line. For example, add console=tty0 console=ttyS0 to set the first PC serial port as the primary console and the graphical console as a secondary console. For more information, see How does one set up a serial terminal and/or console in Red Hat Enterprise Linux?.
- Use the PXE or iPXE infrastructure to create the required compute machines for your cluster.
11.5.3. Approving the certificate signing requests for your machines
When you add machines to a cluster, two pending certificate signing requests (CSRs) are generated for each machine that you added. You must confirm that these CSRs are approved or, if necessary, approve them yourself. The client requests must be approved first, followed by the server requests.
Prerequisites
- You added machines to your cluster.
Procedure
Confirm that the cluster recognizes the machines:
$ oc get nodesExample output
NAME STATUS ROLES AGE VERSION master-0 Ready master 63m v1.25.0 master-1 Ready master 63m v1.25.0 master-2 Ready master 64m v1.25.0The output lists all of the machines that you created.
NoteThe preceding output might not include the compute nodes, also known as worker nodes, until some CSRs are approved.
Review the pending CSRs and ensure that you see the client requests with the
PendingorApprovedstatus for each machine that you added to the cluster:$ oc get csrExample output
NAME AGE REQUESTOR CONDITION csr-8b2br 15m system:serviceaccount:openshift-machine-config-operator:node-bootstrapper Pending csr-8vnps 15m system:serviceaccount:openshift-machine-config-operator:node-bootstrapper Pending ...In this example, two machines are joining the cluster. You might see more approved CSRs in the list.
If the CSRs were not approved, after all of the pending CSRs for the machines you added are in
Pendingstatus, approve the CSRs for your cluster machines:NoteBecause the CSRs rotate automatically, approve your CSRs within an hour of adding the machines to the cluster. If you do not approve them within an hour, the certificates will rotate, and more than two certificates will be present for each node. You must approve all of these certificates. After the client CSR is approved, the Kubelet creates a secondary CSR for the serving certificate, which requires manual approval. Then, subsequent serving certificate renewal requests are automatically approved by the
machine-approverif the Kubelet requests a new certificate with identical parameters.NoteFor clusters running on platforms that are not machine API enabled, such as bare metal and other user-provisioned infrastructure, you must implement a method of automatically approving the kubelet serving certificate requests (CSRs). If a request is not approved, then the
oc exec,oc rsh, andoc logscommands cannot succeed, because a serving certificate is required when the API server connects to the kubelet. Any operation that contacts the Kubelet endpoint requires this certificate approval to be in place. The method must watch for new CSRs, confirm that the CSR was submitted by thenode-bootstrapperservice account in thesystem:nodeorsystem:admingroups, and confirm the identity of the node.To approve them individually, run the following command for each valid CSR:
$ oc adm certificate approve <csr_name>1 - 1
<csr_name>is the name of a CSR from the list of current CSRs.
To approve all pending CSRs, run the following command:
$ oc get csr -o go-template='{{range .items}}{{if not .status}}{{.metadata.name}}{{"\n"}}{{end}}{{end}}' | xargs --no-run-if-empty oc adm certificate approveNoteSome Operators might not become available until some CSRs are approved.
Now that your client requests are approved, you must review the server requests for each machine that you added to the cluster:
$ oc get csrExample output
NAME AGE REQUESTOR CONDITION csr-bfd72 5m26s system:node:ip-10-0-50-126.us-east-2.compute.internal Pending csr-c57lv 5m26s system:node:ip-10-0-95-157.us-east-2.compute.internal Pending ...If the remaining CSRs are not approved, and are in the
Pendingstatus, approve the CSRs for your cluster machines:To approve them individually, run the following command for each valid CSR:
$ oc adm certificate approve <csr_name>1 - 1
<csr_name>is the name of a CSR from the list of current CSRs.
To approve all pending CSRs, run the following command:
$ oc get csr -o go-template='{{range .items}}{{if not .status}}{{.metadata.name}}{{"\n"}}{{end}}{{end}}' | xargs oc adm certificate approve
After all client and server CSRs have been approved, the machines have the
Readystatus. Verify this by running the following command:$ oc get nodesExample output
NAME STATUS ROLES AGE VERSION master-0 Ready master 73m v1.25.0 master-1 Ready master 73m v1.25.0 master-2 Ready master 74m v1.25.0 worker-0 Ready worker 11m v1.25.0 worker-1 Ready worker 11m v1.25.0NoteIt can take a few minutes after approval of the server CSRs for the machines to transition to the
Readystatus.
Additional information
- For more information on CSRs, see Certificate Signing Requests.
Chapter 12. Managing control plane machines
12.1. About control plane machine sets
With control plane machine sets, you can automate management of the control plane machine resources within your OpenShift Container Platform cluster.
Control plane machine sets cannot manage compute machines, and compute machine sets cannot manage control plane machines.
Control plane machine sets provide for control plane machines similar management capabilities as compute machine sets provide for compute machines. However, these two types of machine sets are separate custom resources defined within the Machine API and have several fundamental differences in their architecture and functionality.
12.1.1. Control Plane Machine Set Operator overview
The Control Plane Machine Set Operator uses the ControlPlaneMachineSet custom resource (CR) to automate management of the control plane machine resources within your OpenShift Container Platform cluster.
When the state of the cluster control plane machine set is set to Active, the Operator ensures that the cluster has the correct number of control plane machines with the specified configuration. This allows the automated replacement of degraded control plane machines and rollout of changes to the control plane.
A cluster has only one control plane machine set, and the Operator only manages objects in the openshift-machine-api namespace.
12.1.2. Control Plane Machine Set Operator limitations
The Control Plane Machine Set Operator has the following limitations:
- Only Amazon Web Services (AWS), Microsoft Azure, and VMware vSphere clusters are supported.
Clusters that do not have preexisting machines that represent the control plane nodes cannot use a control plane machine set or enable the use of a control plane machine set after installation. Generally, preexisting control plane machines are only present if a cluster was installed using infrastructure provisioned by the installation program.
To determine if a cluster has the required preexisting control plane machines, run the following command as a user with administrator privileges:
$ oc get machine \ -n openshift-machine-api \ -l machine.openshift.io/cluster-api-machine-role=masterExample output showing preexisting control plane machines
NAME PHASE TYPE REGION ZONE AGE <infrastructure_id>-master-0 Running m6i.xlarge us-west-1 us-west-1a 5h19m <infrastructure_id>-master-1 Running m6i.xlarge us-west-1 us-west-1b 5h19m <infrastructure_id>-master-2 Running m6i.xlarge us-west-1 us-west-1a 5h19mExample output missing preexisting control plane machines
No resources found in openshift-machine-api namespace.-
The Operator requires the Machine API Operator to be operational and is therefore not supported on clusters with manually provisioned machines. When installing a OpenShift Container Platform cluster with manually provisioned machines for a platform that creates an active generated
ControlPlaneMachineSetcustom resource (CR), you must remove the Kubernetes manifest files that define the control plane machine set as instructed in the installation process. - Only clusters with three control plane machines are supported.
- Horizontal scaling of the control plane is not supported.
- Deploying Azure control plane machines on Ephemeral OS disks increases risk for data loss and is not supported.
Deploying control plane machines as AWS Spot Instances or Azure Spot VMs is not supported.
ImportantAttempting to deploy control plane machines as AWS Spot Instances or Azure Spot VMs might cause the cluster to lose etcd quorum. A cluster that loses all control plane machines simultaneously is unrecoverable.
- Making changes to the control plane machine set during or prior to installation is not supported. You must make any changes to the control plane machine set only after installation.
12.2. Getting started with control plane machine sets
The process for getting started with control plane machine sets depends on the state of the ControlPlaneMachineSet custom resource (CR) in your cluster.
- Clusters with an active generated CR
- Clusters that have a generated CR with an active state use the control plane machine set by default. No administrator action is required.
- Clusters with an inactive generated CR
- For clusters that include an inactive generated CR, you must review the CR configuration and activate the CR.
- Clusters without a generated CR
- For clusters that do not include a generated CR, you must create and activate a CR with the appropriate configuration for your cluster.
If you are uncertain about the state of the ControlPlaneMachineSet CR in your cluster, you can verify the CR status.
12.2.1. Supported cloud providers
In OpenShift Container Platform 4.12, the control plane machine sets are supported for Amazon Web Services (AWS), Microsoft Azure, and VMware vSphere clusters.
The status of the control plane machine set after installation depends on your cloud provider and the version of OpenShift Container Platform that you installed on your cluster.
| Cloud provider | Active by default | Generated CR | Manual CR required |
|---|---|---|---|
| Amazon Web Services (AWS) | X [1] | X | |
| Microsoft Azure | X | ||
| VMware vSphere | X |
- AWS clusters that are upgraded to version 4.12 from an earlier version require CR activation.
12.2.2. Checking the control plane machine set custom resource state
You can verify the existence and state of the ControlPlaneMachineSet custom resource (CR).
Procedure
Determine the state of the CR by running the following command:
$ oc get controlplanemachineset.machine.openshift.io cluster \ --namespace openshift-machine-api-
A result of
Activeindicates that theControlPlaneMachineSetCR exists and is activated. No administrator action is required. -
A result of
Inactiveindicates that aControlPlaneMachineSetCR exists but is not activated. -
A result of
NotFoundindicates that there is no existingControlPlaneMachineSetCR.
-
A result of
Next steps
To use the control plane machine set, you must ensure that a ControlPlaneMachineSet CR with the correct settings for your cluster exists.
- If your cluster has an existing CR, you must verify that the configuration in the CR is correct for your cluster.
- If your cluster does not have an existing CR, you must create one with the correct configuration for your cluster.
12.2.3. Activating the control plane machine set custom resource
To use the control plane machine set, you must ensure that a ControlPlaneMachineSet custom resource (CR) with the correct settings for your cluster exists. On a cluster with a generated CR, you must verify that the configuration in the CR is correct for your cluster and activate it.
For more information about the parameters in the CR, see "Control plane machine set configuration".
Procedure
View the configuration of the CR by running the following command:
$ oc --namespace openshift-machine-api edit controlplanemachineset.machine.openshift.io cluster- Change the values of any fields that are incorrect for your cluster configuration.
When the configuration is correct, activate the CR by setting the
.spec.statefield toActiveand saving your changes.ImportantTo activate the CR, you must change the
.spec.statefield toActivein the sameoc editsession that you use to update the CR configuration. If the CR is saved with the state left asInactive, the control plane machine set generator resets the CR to its original settings.
12.2.4. Creating a control plane machine set custom resource
To use the control plane machine set, you must ensure that a ControlPlaneMachineSet custom resource (CR) with the correct settings for your cluster exists. On a cluster without a generated CR, you must create the CR manually and activate it.
For more information about the structure and parameters of the CR, see "Control plane machine set configuration".
Procedure
Create a YAML file using the following template:
Control plane machine set CR YAML file template
apiVersion: machine.openshift.io/v1 kind: ControlPlaneMachineSet metadata: name: cluster namespace: openshift-machine-api spec: replicas: 3 selector: matchLabels: machine.openshift.io/cluster-api-cluster: <cluster_id>1 machine.openshift.io/cluster-api-machine-role: master machine.openshift.io/cluster-api-machine-type: master state: Active2 strategy: type: RollingUpdate3 template: machineType: machines_v1beta1_machine_openshift_io machines_v1beta1_machine_openshift_io: failureDomains: platform: <platform>4 <platform_failure_domains>5 metadata: labels: machine.openshift.io/cluster-api-cluster: <cluster_id>6 machine.openshift.io/cluster-api-machine-role: master machine.openshift.io/cluster-api-machine-type: master spec: providerSpec: value: <platform_provider_spec>7 - 1
- Specify the infrastructure ID that is based on the cluster ID that you set when you provisioned the cluster. You must specify this value when you create a
ControlPlaneMachineSetCR. If you have the OpenShift CLI (oc) installed, you can obtain the infrastructure ID by running the following command:$ oc get -o jsonpath='{.status.infrastructureName}{"\n"}' infrastructure cluster - 2
- Specify the state of the Operator. When the state is
Inactive, the Operator is not operational. You can activate the Operator by setting the value toActive.ImportantBefore you activate the CR, you must ensure that its configuration is correct for your cluster requirements.
- 3
- Specify the update strategy for the cluster. The allowed values are
OnDeleteandRollingUpdate. The default value isRollingUpdate. - 4
- Specify your cloud provider platform name. The allowed values are
AWSandAzure. - 5
- Add the
<platform_failure_domains>configuration for the cluster. The format and values of this section are provider-specific. For more information, see the sample failure domain configuration for your cloud provider.NoteVMware vSphere does not support failure domains in the control plane machine set. For vSphere clusters, do not specify a
failureDomainsstanza in themachines_v1beta1_machine_openshift_iosection. - 6
- Specify the infrastructure ID.
- 7
- Add the
<platform_provider_spec>configuration for the cluster. The format and values of this section are provider-specific. For more information, see the sample provider specification for your cloud provider.
- Refer to the sample YAML for a control plane machine set CR and populate your file with values that are appropriate for your cluster configuration.
- Refer to the sample failure domain configuration and sample provider specification for your cloud provider and update those sections of your file with the appropriate values.
-
When the configuration is correct, activate the CR by setting the
.spec.statefield toActiveand saving your changes. Create the CR from your YAML file by running the following command:
$ oc create -f <control_plane_machine_set>.yamlwhere
<control_plane_machine_set>is the name of the YAML file that contains the CR configuration.
12.3. Control plane machine set configuration
These example YAML file and snippets demonstrate the base structure for a control plane machine set custom resource (CR) and platform-specific samples for failure domain and provider specification configurations.
12.3.1. Sample YAML for a control plane machine set custom resource
The base of the ControlPlaneMachineSet CR is structured the same way for all platforms.
Sample ControlPlaneMachineSet CR YAML file
apiVersion: machine.openshift.io/v1
kind: ControlPlaneMachineSet
metadata:
name: cluster
namespace: openshift-machine-api
spec:
replicas: 3
selector:
matchLabels:
machine.openshift.io/cluster-api-cluster: <cluster_id>
machine.openshift.io/cluster-api-machine-role: master
machine.openshift.io/cluster-api-machine-type: master
state: Active
strategy:
type: RollingUpdate
template:
machineType: machines_v1beta1_machine_openshift_io
machines_v1beta1_machine_openshift_io:
failureDomains:
platform: <platform>
<platform_failure_domains>
metadata:
labels:
machine.openshift.io/cluster-api-cluster: <cluster_id>
machine.openshift.io/cluster-api-machine-role: master
machine.openshift.io/cluster-api-machine-type: master
spec:
providerSpec:
value:
<platform_provider_spec> - 1
- Specifies the name of the
ControlPlaneMachineSetCR, which iscluster. Do not change this value. - 2
- Specifies the number of control plane machines. Only clusters with three control plane machines are supported, so the
replicasvalue is3. Horizontal scaling is not supported. Do not change this value. - 3
- Specifies the infrastructure ID that is based on the cluster ID that you set when you provisioned the cluster. You must specify this value when you create a
ControlPlaneMachineSetCR. If you have the OpenShift CLI (oc) installed, you can obtain the infrastructure ID by running the following command:$ oc get -o jsonpath='{.status.infrastructureName}{"\n"}' infrastructure cluster - 4
- Specifies the state of the Operator. When the state is
Inactive, the Operator is not operational. You can activate the Operator by setting the value toActive.ImportantBefore you activate the Operator, you must ensure that the
ControlPlaneMachineSetCR configuration is correct for your cluster requirements. For more information about activating the Control Plane Machine Set Operator, see "Getting started with control plane machine sets". - 5
- Specifies the update strategy for the cluster. The allowed values are
OnDeleteandRollingUpdate. The default value isRollingUpdate. For more information about update strategies, see "Updating the control plane configuration". - 6
- Specifies the cloud provider platform name. Do not change this value.
- 7
- Specifies the
<platform_failure_domains>configuration for the cluster. The format and values of this section are provider-specific. For more information, see the sample failure domain configuration for your cloud provider.NoteVMware vSphere does not support failure domains in the control plane machine set.
- 8
- Specifies the
<platform_provider_spec>configuration for the cluster. The format and values of this section are provider-specific. For more information, see the sample provider specification for your cloud provider.
Provider-specific configuration
The <platform_provider_spec> and <platform_failure_domains> sections of the control plane machine set resources are provider-specific. Refer to the example YAML for your cluster:
12.3.2. Sample YAML for configuring Amazon Web Services clusters
Some sections of the control plane machine set CR are provider-specific. The example YAML in this section show failure domain and provider specification configurations for an Amazon Web Services (AWS) cluster.
12.3.2.1. Sample AWS failure domain configuration
The control plane machine set concept of a failure domain is analogous to existing AWS concept of an Availability Zone (AZ). The ControlPlaneMachineSet CR spreads control plane machines across multiple failure domains when possible.
When configuring AWS failure domains in the control plane machine set, you must specify the availability zone name and the subnet to use.
Sample AWS failure domain values
failureDomains:
aws:
- placement:
availabilityZone: <aws_zone_a>
subnet:
filters:
- name: tag:Name
values:
- <cluster_id>-private-<aws_zone_a>
type: Filters
- placement:
availabilityZone: <aws_zone_b>
subnet:
filters:
- name: tag:Name
values:
- <cluster_id>-private-<aws_zone_b>
type: Filters
platform: AWS - 1
- Specifies an AWS availability zone for the first failure domain.
- 2
- Specifies a subnet configuration. In this example, the subnet type is
Filters, so there is afiltersstanza. - 3
- Specifies the subnet name for the first failure domain, using the infrastructure ID and the AWS availability zone.
- 4
- Specifies the subnet type. The allowed values are:
ARN,FiltersandID. The default value isFilters. - 5
- Specifies the subnet name for an additional failure domain, using the infrastructure ID and the AWS availability zone.
- 6
- Specifies the cluster’s infrastructure ID and the AWS availability zone for the additional failure domain.
- 7
- Specifies the cloud provider platform name. Do not change this value.
12.3.2.2. Sample AWS provider specification
When you create a control plane machine set for an existing cluster, the provider specification must match the providerSpec configuration in the control plane machine custom resource (CR) that the installation program creates. You can omit any field that is set in the failure domain section of the CR.
In the following example, <cluster_id> is the infrastructure ID that is based on the cluster ID that you set when you provisioned the cluster. If you have the OpenShift CLI installed, you can obtain the infrastructure ID by running the following command:
$ oc get -o jsonpath='{.status.infrastructureName}{"\n"}' infrastructure clusterSample AWS providerSpec values
providerSpec:
value:
ami:
id: ami-<ami_id_string>
apiVersion: machine.openshift.io/v1beta1
blockDevices:
- ebs:
encrypted: true
iops: 0
kmsKey:
arn: ""
volumeSize: 120
volumeType: gp3
credentialsSecret:
name: aws-cloud-credentials
deviceIndex: 0
iamInstanceProfile:
id: <cluster_id>-master-profile
instanceType: m6i.xlarge
kind: AWSMachineProviderConfig
loadBalancers:
- name: <cluster_id>-int
type: network
- name: <cluster_id>-ext
type: network
metadata:
creationTimestamp: null
metadataServiceOptions: {}
placement:
region: <region>
securityGroups:
- filters:
- name: tag:Name
values:
- <cluster_id>-master-sg
subnet: {}
userDataSecret:
name: master-user-data - 1
- Specifies the Red Hat Enterprise Linux CoreOS (RHCOS) Amazon Machine Images (AMI) ID for the cluster. The AMI must belong to the same region as the cluster. If you want to use an AWS Marketplace image, you must complete the OpenShift Container Platform subscription from the AWS Marketplace to obtain an AMI ID for your region.
- 2
- Specifies the configuration of an encrypted EBS volume.
- 3
- Specifies the secret name for the cluster. Do not change this value.
- 4
- Specifies the AWS Identity and Access Management (IAM) instance profile. Do not change this value.
- 5
- Specifies the AWS instance type for the control plane.
- 6
- Specifies the cloud provider platform type. Do not change this value.
- 7
- Specifies the internal (
int) and external (ext) load balancers for the cluster.NoteYou can omit the external (
ext) load balancer parameters on private OpenShift Container Platform clusters. - 8
- This parameter is configured in the failure domain, and is shown with an empty value here. If a value specified for this parameter differs from the value in the failure domain, the Operator overwrites it with the value in the failure domain.
- 9
- Specifies the AWS region for the cluster.
- 10
- Specifies the control plane machines security group.
- 11
- This parameter is configured in the failure domain, and is shown with an empty value here. If a value specified for this parameter differs from the value in the failure domain, the Operator overwrites it with the value in the failure domain.
- 12
- Specifies the control plane user data secret. Do not change this value.
12.3.3. Sample YAML for configuring Microsoft Azure clusters
Some sections of the control plane machine set CR are provider-specific. The example YAML in this section show failure domain and provider specification configurations for an Azure cluster.
12.3.3.1. Sample Azure failure domain configuration
The control plane machine set concept of a failure domain is analogous to existing Azure concept of an Azure availability zone. The ControlPlaneMachineSet CR spreads control plane machines across multiple failure domains when possible.
When configuring Azure failure domains in the control plane machine set, you must specify the availability zone name.
Sample Azure failure domain values
failureDomains:
azure:
- zone: "1"
- zone: "2"
- zone: "3"
platform: Azure 12.3.3.2. Sample Azure provider specification
When you create a control plane machine set for an existing cluster, the provider specification must match the providerSpec configuration in the control plane Machine CR that is created by the installation program. You can omit any field that is set in the failure domain section of the CR.
In the following example, <cluster_id> is the infrastructure ID that is based on the cluster ID that you set when you provisioned the cluster. If you have the OpenShift CLI installed, you can obtain the infrastructure ID by running the following command:
$ oc get -o jsonpath='{.status.infrastructureName}{"\n"}' infrastructure clusterSample Azure providerSpec values
providerSpec:
value:
acceleratedNetworking: true
apiVersion: machine.openshift.io/v1beta1
credentialsSecret:
name: azure-cloud-credentials
namespace: openshift-machine-api
diagnostics: {}
image:
offer: ""
publisher: ""
resourceID: /resourceGroups/<cluster_id>-rg/providers/Microsoft.Compute/galleries/gallery_<cluster_id>/images/<cluster_id>-gen2/versions/412.86.20220930
sku: ""
version: ""
internalLoadBalancer: <cluster_id>-internal
kind: AzureMachineProviderSpec
location: <region>
managedIdentity: <cluster_id>-identity
metadata:
creationTimestamp: null
name: <cluster_id>
networkResourceGroup: <cluster_id>-rg
osDisk:
diskSettings: {}
diskSizeGB: 1024
managedDisk:
storageAccountType: Premium_LRS
osType: Linux
publicIP: false
publicLoadBalancer: <cluster_id>
resourceGroup: <cluster_id>-rg
subnet: <cluster_id>-master-subnet
userDataSecret:
name: master-user-data
vmSize: Standard_D8s_v3
vnet: <cluster_id>-vnet
zone: "" - 1
- Specifies the secret name for the cluster. Do not change this value.
- 2
- Specifies the image details for your control plane machine set.
- 3
- Specifies an image that is compatible with your instance type. The Hyper-V generation V2 images created by the installation program have a
-gen2suffix, while V1 images have the same name without the suffix. - 4
- Specifies the internal load balancer for the control plane. This field might not be preconfigured but is required in both the
ControlPlaneMachineSetand control planeMachineCRs. - 5
- Specifies the cloud provider platform type. Do not change this value.
- 6
- Specifies the region to place control plane machines on.
- 7
- Specifies the disk configuration for the control plane.
- 8
- Specifies the public load balancer for the control plane.Note
You can omit the
publicLoadBalancerparameter on private OpenShift Container Platform clusters that have user-defined outbound routing. - 9
- Specifies the subnet for the control plane.
- 10
- Specifies the control plane user data secret. Do not change this value.
- 11
- This parameter is configured in the failure domain, and is shown with an empty value here. If a value specified for this parameter differs from the value in the failure domain, the Operator overwrites it with the value in the failure domain.
12.3.4. Sample YAML for configuring VMware vSphere clusters
Some sections of the control plane machine set CR are provider-specific. The example YAML in this section shows a provider specification configuration for a VMware vSphere cluster.
12.3.4.1. Sample vSphere provider specification
When you create a control plane machine set for an existing cluster, the provider specification must match the providerSpec configuration in the control plane machine custom resource (CR) that the installation program creates.
Sample vSphere providerSpec values
providerSpec:
value:
apiVersion: machine.openshift.io/v1beta1
credentialsSecret:
name: vsphere-cloud-credentials
diskGiB: 120
kind: VSphereMachineProviderSpec
memoryMiB: 16384
metadata:
creationTimestamp: null
network:
devices:
- networkName: <vm_network_name>
numCPUs: 4
numCoresPerSocket: 4
snapshot: ""
template: <vm_template_name>
userDataSecret:
name: master-user-data
workspace:
datacenter: <vcenter_datacenter_name>
datastore: <vcenter_datastore_name>
folder: <path_to_vcenter_vm_folder>
resourcePool: <vsphere_resource_pool>
server: <vcenter_server_ip> - 1
- Specifies the secret name for the cluster. Do not change this value.
- 2
- Specifies the VM disk size for the control plane machines.
- 3
- Specifies the cloud provider platform type. Do not change this value.
- 4
- Specifies the memory allocated for the control plane machines.
- 5
- Specifies the network on which the control plane is deployed.
- 6
- Specifies the number of CPUs allocated for the control plane machines.
- 7
- Specifies the number of cores for each control plane CPU.
- 8
- Specifies the vSphere VM template to use, such as
user-5ddjd-rhcos. - 9
- Specifies the control plane user data secret. Do not change this value.
- 10
- Specifies the vCenter Datacenter for the control plane.
- 11
- Specifies the vCenter Datastore for the control plane.
- 12
- Specifies the path to the vSphere VM folder in vCenter, such as
/dc1/vm/user-inst-5ddjd. - 13
- Specifies the vSphere resource pool for your VMs.
- 14
- Specifies the vCenter server IP or fully qualified domain name.
12.4. Managing control plane machines with control plane machine sets
Control plane machine sets automate several essential aspects of control plane management.
12.4.1. Replacing a control plane machine
To replace a control plane machine in a cluster that has a control plane machine set, you delete the machine manually. The control plane machine set replaces the deleted machine with one using the specification in the control plane machine set custom resource (CR).
Procedure
List the control plane machines in your cluster by running the following command:
$ oc get machines \ -l machine.openshift.io/cluster-api-machine-role==master \ -n openshift-machine-apiDelete a control plane machine by running the following command:
$ oc delete machine \ -n openshift-machine-api \ <control_plane_machine_name>1 - 1
- Specify the name of the control plane machine to delete.
NoteIf you delete multiple control plane machines, the control plane machine set replaces them according to the configured update strategy:
-
For clusters that use the default
RollingUpdateupdate strategy, the Operator replaces one machine at a time until each machine is replaced. -
For clusters that are configured to use the
OnDeleteupdate strategy, the Operator creates all of the required replacement machines simultaneously.
Both strategies maintain etcd health during control plane machine replacement.
12.4.2. Updating the control plane configuration
You can make changes to the configuration of the machines in the control plane by updating the specification in the control plane machine set custom resource (CR).
The Control Plane Machine Set Operator monitors the control plane machines and compares their configuration with the specification in the control plane machine set CR. When there is a discrepancy between the specification in the CR and the configuration of a control plane machine, the Operator marks that control plane machine for replacement.
For more information about the parameters in the CR, see "Control plane machine set configuration".
Prerequisites
- Your cluster has an activated and functioning Control Plane Machine Set Operator.
Procedure
Edit your control plane machine set CR by running the following command:
$ oc edit controlplanemachineset.machine.openshift.io cluster \ -n openshift-machine-api- Change the values of any fields that you want to update in your cluster configuration.
- Save your changes.
Next steps
-
For clusters that use the default
RollingUpdateupdate strategy, the control plane machine set propagates changes to your control plane configuration automatically. -
For clusters that are configured to use the
OnDeleteupdate strategy, you must replace your control plane machines manually.
12.4.2.1. Automatic updates to the control plane configuration
The RollingUpdate update strategy automatically propagates changes to your control plane configuration. This update strategy is the default configuration for the control plane machine set.
For clusters that use the RollingUpdate update strategy, the Operator creates a replacement control plane machine with the configuration that is specified in the CR. When the replacement control plane machine is ready, the Operator deletes the control plane machine that is marked for replacement. The replacement machine then joins the control plane.
If multiple control plane machines are marked for replacement, the Operator protects etcd health during replacement by repeating this replacement process one machine at a time until it has replaced each machine.
12.4.2.2. Manual updates to the control plane configuration
You can use the OnDelete update strategy to propagate changes to your control plane configuration by replacing machines manually. Manually replacing machines allows you to test changes to your configuration on a single machine before applying the changes more broadly.
For clusters that are configured to use the OnDelete update strategy, the Operator creates a replacement control plane machine when you delete an existing machine. When the replacement control plane machine is ready, the etcd Operator allows the existing machine to be deleted. The replacement machine then joins the control plane.
If multiple control plane machines are deleted, the Operator creates all of the required replacement machines simultaneously. The Operator maintains etcd health by preventing more than one machine being removed from the control plane at once.
12.4.3. Enabling Amazon Web Services features for control plane machines
You can enable Amazon Web Services (AWS) features on control plane machines by changing the configuration of your control plane machine set. When you save an update to the control plane machine set, the Control Plane Machine Set Operator updates the control plane machines according to your configured update strategy.
12.4.3.1. Restricting the API server to private
After you deploy a cluster to Amazon Web Services (AWS), you can reconfigure the API server to use only the private zone.
Prerequisites
-
Install the OpenShift CLI (
oc). -
Have access to the web console as a user with
adminprivileges.
Procedure
In the web portal or console for your cloud provider, take the following actions:
Locate and delete the appropriate load balancer component:
- For AWS, delete the external load balancer. The API DNS entry in the private zone already points to the internal load balancer, which uses an identical configuration, so you do not need to modify the internal load balancer.
-
Delete the
api.$clustername.$yourdomainDNS entry in the public zone.
Remove the external load balancers by deleting the following lines in the control plane machine set custom resource:
providerSpec: value: loadBalancers: - name: lk4pj-ext1 type: network2 - name: lk4pj-int type: network
12.4.3.2. Changing the Amazon Web Services instance type by using a control plane machine set
You can change the Amazon Web Services (AWS) instance type that your control plane machines use by updating the specification in the control plane machine set custom resource (CR).
Prerequisites
- Your AWS cluster uses a control plane machine set.
Procedure
Edit the following line under the
providerSpecfield:providerSpec: value: ... instanceType: <compatible_aws_instance_type>1 - 1
- Specify a larger AWS instance type with the same base as the previous selection. For example, you can change
m6i.xlargetom6i.2xlargeorm6i.4xlarge.
- Save your changes.
12.4.3.3. Machine set options for the Amazon EC2 Instance Metadata Service
You can use machine sets to create machines that use a specific version of the Amazon EC2 Instance Metadata Service (IMDS). Machine sets can create machines that allow the use of both IMDSv1 and IMDSv2 or machines that require the use of IMDSv2.
Using IMDSv2 is only supported on AWS clusters that were created with OpenShift Container Platform version 4.7 or later.
Before configuring a machine set to create machines that require IMDSv2, ensure that any workloads that interact with the AWS metadata service support IMDSv2.
12.4.3.3.1. Configuring IMDS by using machine sets
You can specify whether to require the use of IMDSv2 by adding or editing the value of metadataServiceOptions.authentication in the machine set YAML file for your machines.
Prerequisites
- To use IMDSv2, your AWS cluster must have been created with OpenShift Container Platform version 4.7 or later.
Procedure
Add or edit the following lines under the
providerSpecfield:providerSpec: value: metadataServiceOptions: authentication: Required1 - 1
- To require IMDSv2, set the parameter value to
Required. To allow the use of both IMDSv1 and IMDSv2, set the parameter value toOptional. If no value is specified, both IMDSv1 and IMDSv2 are allowed.
12.4.3.4. Machine sets that deploy machines as Dedicated Instances
You can create a machine set running on AWS that deploys machines as Dedicated Instances. Dedicated Instances run in a virtual private cloud (VPC) on hardware that is dedicated to a single customer. These Amazon EC2 instances are physically isolated at the host hardware level. The isolation of Dedicated Instances occurs even if the instances belong to different AWS accounts that are linked to a single payer account. However, other instances that are not dedicated can share hardware with Dedicated Instances if they belong to the same AWS account.
Instances with either public or dedicated tenancy are supported by the Machine API. Instances with public tenancy run on shared hardware. Public tenancy is the default tenancy. Instances with dedicated tenancy run on single-tenant hardware.
12.4.3.4.1. Creating Dedicated Instances by using machine sets
You can run a machine that is backed by a Dedicated Instance by using Machine API integration. Set the tenancy field in your machine set YAML file to launch a Dedicated Instance on AWS.
Procedure
Specify a dedicated tenancy under the
providerSpecfield:providerSpec: placement: tenancy: dedicated
12.4.4. Enabling Microsoft Azure features for control plane machines
You can enable Microsoft Azure features on control plane machines by changing the configuration of your control plane machine set. When you save an update to the control plane machine set, the Control Plane Machine Set Operator updates the control plane machines according to your configured update strategy.
12.4.4.1. Restricting the API server to private
After you deploy a cluster to Microsoft Azure, you can reconfigure the API server to use only the private zone.
Prerequisites
-
Install the OpenShift CLI (
oc). -
Have access to the web console as a user with
adminprivileges.
Procedure
In the web portal or console for your cloud provider, take the following actions:
Locate and delete the appropriate load balancer component:
-
For Azure, delete the
api-internalrule for the load balancer.
-
For Azure, delete the
-
Delete the
api.$clustername.$yourdomainDNS entry in the public zone.
Remove the external load balancers by deleting the following lines in the control plane machine set custom resource:
providerSpec: value: loadBalancers: - name: lk4pj-ext1 type: network2 - name: lk4pj-int type: network
12.4.4.2. Selecting an Azure Marketplace image
You can create a machine set running on Azure that deploys machines that use the Azure Marketplace offering. To use this offering, you must first obtain the Azure Marketplace image. When obtaining your image, consider the following:
-
While the images are the same, the Azure Marketplace publisher is different depending on your region. If you are located in North America, specify
redhatas the publisher. If you are located in EMEA, specifyredhat-limitedas the publisher. -
The offer includes a
rh-ocp-workerSKU and arh-ocp-worker-gen1SKU. Therh-ocp-workerSKU represents a Hyper-V generation version 2 VM image. The default instance types used in OpenShift Container Platform are version 2 compatible. If you plan to use an instance type that is only version 1 compatible, use the image associated with therh-ocp-worker-gen1SKU. Therh-ocp-worker-gen1SKU represents a Hyper-V version 1 VM image.
Installing images with the Azure marketplace is not supported on clusters with 64-bit ARM instances.
You should only modify the RHCOS image for compute machines to use an Azure Marketplace image. Control plane machines and infrastructure nodes do not require an OpenShift Container Platform subscription and use the public RHCOS default image by default, which does not incur subscription costs on your Azure bill. Therefore, you should not modify the cluster default boot image or the control plane boot images. Applying the Azure Marketplace image to them will incur additional licensing costs that cannot be recovered.
Prerequisites
-
You have installed the Azure CLI client
(az). - Your Azure account is entitled for the offer and you have logged into this account with the Azure CLI client.
Procedure
Display all of the available OpenShift Container Platform images by running one of the following commands:
North America:
$ az vm image list --all --offer rh-ocp-worker --publisher redhat -o tableExample output
Offer Publisher Sku Urn Version ------------- -------------- ------------------ -------------------------------------------------------------- -------------- rh-ocp-worker RedHat rh-ocp-worker RedHat:rh-ocp-worker:rh-ocpworker:4.8.2021122100 4.8.2021122100 rh-ocp-worker RedHat rh-ocp-worker-gen1 RedHat:rh-ocp-worker:rh-ocp-worker-gen1:4.8.2021122100 4.8.2021122100EMEA:
$ az vm image list --all --offer rh-ocp-worker --publisher redhat-limited -o tableExample output
Offer Publisher Sku Urn Version ------------- -------------- ------------------ -------------------------------------------------------------- -------------- rh-ocp-worker redhat-limited rh-ocp-worker redhat-limited:rh-ocp-worker:rh-ocp-worker:4.8.2021122100 4.8.2021122100 rh-ocp-worker redhat-limited rh-ocp-worker-gen1 redhat-limited:rh-ocp-worker:rh-ocp-worker-gen1:4.8.2021122100 4.8.2021122100
NoteRegardless of the version of OpenShift Container Platform that you install, the correct version of the Azure Marketplace image to use is 4.8. If required, your VMs are automatically upgraded as part of the installation process.
Inspect the image for your offer by running one of the following commands:
North America:
$ az vm image show --urn redhat:rh-ocp-worker:rh-ocp-worker:<version>EMEA:
$ az vm image show --urn redhat-limited:rh-ocp-worker:rh-ocp-worker:<version>
Review the terms of the offer by running one of the following commands:
North America:
$ az vm image terms show --urn redhat:rh-ocp-worker:rh-ocp-worker:<version>EMEA:
$ az vm image terms show --urn redhat-limited:rh-ocp-worker:rh-ocp-worker:<version>
Accept the terms of the offering by running one of the following commands:
North America:
$ az vm image terms accept --urn redhat:rh-ocp-worker:rh-ocp-worker:<version>EMEA:
$ az vm image terms accept --urn redhat-limited:rh-ocp-worker:rh-ocp-worker:<version>
-
Record the image details of your offer, specifically the values for
publisher,offer,sku, andversion. Add the following parameters to the
providerSpecsection of your machine set YAML file using the image details for your offer:Sample
providerSpecimage values for Azure Marketplace machinesproviderSpec: value: image: offer: rh-ocp-worker publisher: redhat resourceID: "" sku: rh-ocp-worker type: MarketplaceWithPlan version: 4.8.2021122100
12.4.4.3. Enabling Azure boot diagnostics
You can enable boot diagnostics on Azure machines that your machine set creates.
Prerequisites
- Have an existing Microsoft Azure cluster.
Procedure
Add the
diagnosticsconfiguration that is applicable to your storage type to theproviderSpecfield in your machine set YAML file:For an Azure Managed storage account:
providerSpec: diagnostics: boot: storageAccountType: AzureManaged1 - 1
- Specifies an Azure Managed storage account.
For an Azure Unmanaged storage account:
providerSpec: diagnostics: boot: storageAccountType: CustomerManaged1 customerManaged: storageAccountURI: https://<storage-account>.blob.core.windows.net2 NoteOnly the Azure Blob Storage data service is supported.
Verification
- On the Microsoft Azure portal, review the Boot diagnostics page for a machine deployed by the machine set, and verify that you can see the serial logs for the machine.
12.4.4.4. Machine sets that deploy machines with ultra disks as data disks
You can create a machine set running on Azure that deploys machines with ultra disks. Ultra disks are high-performance storage that are intended for use with the most demanding data workloads.
12.4.4.4.1. Creating machines with ultra disks by using machine sets
You can deploy machines with ultra disks on Azure by editing your machine set YAML file.
Prerequisites
- Have an existing Microsoft Azure cluster.
Procedure
Create a custom secret in the
openshift-machine-apinamespace using themasterdata secret by running the following command:$ oc -n openshift-machine-api \ get secret <role>-user-data \1 --template='{{index .data.userData | base64decode}}' | jq > userData.txt2 In a text editor, open the
userData.txtfile and locate the final}character in the file.-
On the immediately preceding line, add a
,. Create a new line after the
,and add the following configuration details:"storage": { "disks": [1 { "device": "/dev/disk/azure/scsi1/lun0",2 "partitions": [3 { "label": "lun0p1",4 "sizeMiB": 1024,5 "startMiB": 0 } ] } ], "filesystems": [6 { "device": "/dev/disk/by-partlabel/lun0p1", "format": "xfs", "path": "/var/lib/lun0p1" } ] }, "systemd": { "units": [7 { "contents": "[Unit]\nBefore=local-fs.target\n[Mount]\nWhere=/var/lib/lun0p1\nWhat=/dev/disk/by-partlabel/lun0p1\nOptions=defaults,pquota\n[Install]\nWantedBy=local-fs.target\n",8 "enabled": true, "name": "var-lib-lun0p1.mount" } ] }- 1
- The configuration details for the disk that you want to attach to a node as an ultra disk.
- 2
- Specify the
lunvalue that is defined in thedataDisksstanza of the machine set you are using. For example, if the machine set containslun: 0, specifylun0. You can initialize multiple data disks by specifying multiple"disks"entries in this configuration file. If you specify multiple"disks"entries, ensure that thelunvalue for each matches the value in the machine set. - 3
- The configuration details for a new partition on the disk.
- 4
- Specify a label for the partition. You might find it helpful to use hierarchical names, such as
lun0p1for the first partition oflun0. - 5
- Specify the total size in MiB of the partition.
- 6
- Specify the filesystem to use when formatting a partition. Use the partition label to specify the partition.
- 7
- Specify a
systemdunit to mount the partition at boot. Use the partition label to specify the partition. You can create multiple partitions by specifying multiple"partitions"entries in this configuration file. If you specify multiple"partitions"entries, you must specify asystemdunit for each. - 8
- For
Where, specify the value ofstorage.filesystems.path. ForWhat, specify the value ofstorage.filesystems.device.
-
On the immediately preceding line, add a
Extract the disabling template value to a file called
disableTemplating.txtby running the following command:$ oc -n openshift-machine-api get secret <role>-user-data \1 --template='{{index .data.disableTemplating | base64decode}}' | jq > disableTemplating.txt- 1
- Replace
<role>withmaster.
Combine the
userData.txtfile anddisableTemplating.txtfile to create a data secret file by running the following command:$ oc -n openshift-machine-api create secret generic <role>-user-data-x5 \1 --from-file=userData=userData.txt \ --from-file=disableTemplating=disableTemplating.txt- 1
- For
<role>-user-data-x5, specify the name of the secret. Replace<role>withmaster.
Edit your control plane machine set CR by running the following command:
$ oc --namespace openshift-machine-api edit controlplanemachineset.machine.openshift.io clusterAdd the following lines in the positions indicated:
apiVersion: machine.openshift.io/v1beta1 kind: ControlPlaneMachineSet spec: template: spec: metadata: labels: disk: ultrassd1 providerSpec: value: ultraSSDCapability: Enabled2 dataDisks:3 - nameSuffix: ultrassd lun: 0 diskSizeGB: 4 deletionPolicy: Delete cachingType: None managedDisk: storageAccountType: UltraSSD_LRS userDataSecret: name: <role>-user-data-x54 Save your changes.
-
For clusters that use the default
RollingUpdateupdate strategy, the Operator automatically propagates the changes to your control plane configuration. -
For clusters that are configured to use the
OnDeleteupdate strategy, you must replace your control plane machines manually.
-
For clusters that use the default
Verification
Validate that the machines are created by running the following command:
$ oc get machinesThe machines should be in the
Runningstate.For a machine that is running and has a node attached, validate the partition by running the following command:
$ oc debug node/<node_name> -- chroot /host lsblkIn this command,
oc debug node/<node_name>starts a debugging shell on the node<node_name>and passes a command with--. The passed commandchroot /hostprovides access to the underlying host OS binaries, andlsblkshows the block devices that are attached to the host OS machine.
Next steps
- To use an ultra disk on the control plane, reconfigure your workload to use the control plane’s ultra disk mount point.
12.4.4.4.2. Troubleshooting resources for machine sets that enable ultra disks
Use the information in this section to understand and recover from issues you might encounter.
12.4.4.4.2.1. Incorrect ultra disk configuration
If an incorrect configuration of the ultraSSDCapability parameter is specified in the machine set, the machine provisioning fails.
For example, if the ultraSSDCapability parameter is set to Disabled, but an ultra disk is specified in the dataDisks parameter, the following error message appears:
StorageAccountType UltraSSD_LRS can be used only when additionalCapabilities.ultraSSDEnabled is set.- To resolve this issue, verify that your machine set configuration is correct.
12.4.4.4.2.2. Unsupported disk parameters
If a region, availability zone, or instance size that is not compatible with ultra disks is specified in the machine set, the machine provisioning fails. Check the logs for the following error message:
failed to create vm <machine_name>: failure sending request for machine <machine_name>: cannot create vm: compute.VirtualMachinesClient#CreateOrUpdate: Failure sending request: StatusCode=400 -- Original Error: Code="BadRequest" Message="Storage Account type 'UltraSSD_LRS' is not supported <more_information_about_why>."- To resolve this issue, verify that you are using this feature in a supported environment and that your machine set configuration is correct.
12.4.4.4.2.3. Unable to delete disks
If the deletion of ultra disks as data disks is not working as expected, the machines are deleted and the data disks are orphaned. You must delete the orphaned disks manually if desired.
12.4.4.5. Enabling customer-managed encryption keys for a machine set
You can supply an encryption key to Azure to encrypt data on managed disks at rest. You can enable server-side encryption with customer-managed keys by using the Machine API.
An Azure Key Vault, a disk encryption set, and an encryption key are required to use a customer-managed key. The disk encryption set must be in a resource group where the Cloud Credential Operator (CCO) has granted permissions. If not, an additional reader role is required to be granted on the disk encryption set.
Prerequisites
Procedure
Configure the disk encryption set under the
providerSpecfield in your machine set YAML file. For example:providerSpec: value: osDisk: diskSizeGB: 128 managedDisk: diskEncryptionSet: id: /subscriptions/<subscription_id>/resourceGroups/<resource_group_name>/providers/Microsoft.Compute/diskEncryptionSets/<disk_encryption_set_name> storageAccountType: Premium_LRS
12.4.4.6. Accelerated Networking for Microsoft Azure VMs
Accelerated Networking uses single root I/O virtualization (SR-IOV) to provide Microsoft Azure VMs with a more direct path to the switch. This enhances network performance. This feature can be enabled after installation.
12.4.4.6.1. Limitations
Consider the following limitations when deciding whether to use Accelerated Networking:
- Accelerated Networking is only supported on clusters where the Machine API is operational.
Accelerated Networking requires an Azure VM size that includes at least four vCPUs. To satisfy this requirement, you can change the value of
vmSizein your machine set. For information about Azure VM sizes, see Microsoft Azure documentation.
12.4.4.6.2. Enabling Accelerated Networking on an existing Microsoft Azure cluster
You can enable Accelerated Networking on Azure by adding acceleratedNetworking to your machine set YAML file.
Prerequisites
- Have an existing Microsoft Azure cluster where the Machine API is operational.
Procedure
Add the following to the
providerSpecfield:providerSpec: value: acceleratedNetworking: true1 vmSize: <azure-vm-size>2 - 1
- This line enables Accelerated Networking.
- 2
- Specify an Azure VM size that includes at least four vCPUs. For information about VM sizes, see Microsoft Azure documentation.
Verification
-
On the Microsoft Azure portal, review the Networking settings page for a machine provisioned by the machine set, and verify that the
Accelerated networkingfield is set toEnabled.
12.5. Control plane resiliency and recovery
You can use the control plane machine set to improve the resiliency of the control plane for your OpenShift Container Platform cluster.
12.5.1. High availability and fault tolerance with failure domains
When possible, the control plane machine set spreads the control plane machines across multiple failure domains. This configuration provides high availability and fault tolerance within the control plane. This strategy can help protect the control plane when issues arise within the infrastructure provider.
12.5.1.1. Failure domain platform support and configuration
The control plane machine set concept of a failure domain is analogous to existing concepts on cloud providers. Not all platforms support the use of failure domains.
| Cloud provider | Support for failure domains | Provider nomenclature |
|---|---|---|
| Amazon Web Services (AWS) | X | |
| Microsoft Azure | X | |
| VMware vSphere | Not applicable |
The failure domain configuration in the control plane machine set custom resource (CR) is platform-specific. For more information about failure domain parameters in the CR, see the sample failure domain configuration for your provider.
12.5.1.2. Balancing control plane machines
The control plane machine set balances control plane machines across the failure domains that are specified in the custom resource (CR).
When possible, the control plane machine set uses each failure domain equally to ensure appropriate fault tolerance. If there are fewer failure domains than control plane machines, failure domains are selected for reuse alphabetically by name. For clusters with no failure domains specified, all control plane machines are placed within a single failure domain.
Some changes to the failure domain configuration cause the control plane machine set to rebalance the control plane machines. For example, if you add failure domains to a cluster with fewer failure domains than control plane machines, the control plane machine set rebalances the machines across all available failure domains.
12.5.2. Recovery of failed control plane machines
The Control Plane Machine Set Operator automates the recovery of control plane machines. When a control plane machine is deleted, the Operator creates a replacement with the configuration that is specified in the ControlPlaneMachineSet custom resource (CR).
For clusters that use control plane machine sets, you can configure a machine health check. The machine health check deletes unhealthy control plane machines so that they are replaced.
If you configure a MachineHealthCheck resource for the control plane, set the value of maxUnhealthy to 1.
This configuration ensures that the machine health check takes no action when multiple control plane machines appear to be unhealthy. Multiple unhealthy control plane machines can indicate that the etcd cluster is degraded or that a scaling operation to replace a failed machine is in progress.
If the etcd cluster is degraded, manual intervention might be required. If a scaling operation is in progress, the machine health check should allow it to finish.
12.5.3. Quorum protection with machine lifecycle hooks
For OpenShift Container Platform clusters that use the Machine API Operator, the etcd Operator uses lifecycle hooks for the machine deletion phase to implement a quorum protection mechanism.
By using a preDrain lifecycle hook, the etcd Operator can control when the pods on a control plane machine are drained and removed. To protect etcd quorum, the etcd Operator prevents the removal of an etcd member until it migrates that member onto a new node within the cluster.
This mechanism allows the etcd Operator precise control over the members of the etcd quorum and allows the Machine API Operator to safely create and remove control plane machines without specific operational knowledge of the etcd cluster.
12.5.3.1. Control plane deletion with quorum protection processing order
When a control plane machine is replaced on a cluster that uses a control plane machine set, the cluster temporarily has four control plane machines. When the fourth control plane node joins the cluster, the etcd Operator starts a new etcd member on the replacement node. When the etcd Operator observes that the old control plane machine is marked for deletion, it stops the etcd member on the old node and promotes the replacement etcd member to join the quorum of the cluster.
The control plane machine Deleting phase proceeds in the following order:
- A control plane machine is slated for deletion.
-
The control plane machine enters the
Deletingphase. To satisfy the
preDrainlifecycle hook, the etcd Operator takes the following actions:-
The etcd Operator waits until a fourth control plane machine is added to the cluster as an etcd member. This new etcd member has a state of
Runningbut notreadyuntil it receives the full database update from the etcd leader. - When the new etcd member receives the full database update, the etcd Operator promotes the new etcd member to a voting member and removes the old etcd member from the cluster.
After this transition is complete, it is safe for the old etcd pod and its data to be removed, so the
preDrainlifecycle hook is removed.-
The etcd Operator waits until a fourth control plane machine is added to the cluster as an etcd member. This new etcd member has a state of
-
The control plane machine status condition
Drainableis set toTrue. The machine controller attempts to drain the node that is backed by the control plane machine.
-
If draining fails,
Drainedis set toFalseand the machine controller attempts to drain the node again. -
If draining succeeds,
Drainedis set toTrue.
-
If draining fails,
-
The control plane machine status condition
Drainedis set toTrue. -
If no other Operators have added a
preTerminatelifecycle hook, the control plane machine status conditionTerminableis set toTrue. - The machine controller removes the instance from the infrastructure provider.
-
The machine controller deletes the
Nodeobject.
YAML snippet demonstrating the etcd quorum protection preDrain lifecycle hook
apiVersion: machine.openshift.io/v1beta1
kind: Machine
metadata:
...
spec:
lifecycleHooks:
preDrain:
- name: EtcdQuorumOperator
owner: clusteroperator/etcd
...12.6. Troubleshooting the control plane machine set
Use the information in this section to understand and recover from issues you might encounter.
12.6.1. Checking the control plane machine set custom resource state
You can verify the existence and state of the ControlPlaneMachineSet custom resource (CR).
Procedure
Determine the state of the CR by running the following command:
$ oc get controlplanemachineset.machine.openshift.io cluster \ --namespace openshift-machine-api-
A result of
Activeindicates that theControlPlaneMachineSetCR exists and is activated. No administrator action is required. -
A result of
Inactiveindicates that aControlPlaneMachineSetCR exists but is not activated. -
A result of
NotFoundindicates that there is no existingControlPlaneMachineSetCR.
-
A result of
Next steps
To use the control plane machine set, you must ensure that a ControlPlaneMachineSet CR with the correct settings for your cluster exists.
- If your cluster has an existing CR, you must verify that the configuration in the CR is correct for your cluster.
- If your cluster does not have an existing CR, you must create one with the correct configuration for your cluster.
12.6.2. Adding a missing Azure internal load balancer
The internalLoadBalancer parameter is required in both the ControlPlaneMachineSet and control plane Machine custom resources (CRs) for Azure. If this parameter is not preconfigured on your cluster, you must add it to both CRs.
For more information about where this parameter is located in the Azure provider specification, see the sample Azure provider specification. The placement in the control plane Machine CR is similar.
Procedure
List the control plane machines in your cluster by running the following command:
$ oc get machines \ -l machine.openshift.io/cluster-api-machine-role==master \ -n openshift-machine-apiFor each control plane machine, edit the CR by running the following command:
$ oc edit machine <control_plane_machine_name>-
Add the
internalLoadBalancerparameter with the correct details for your cluster and save your changes. Edit your control plane machine set CR by running the following command:
$ oc edit controlplanemachineset.machine.openshift.io cluster \ -n openshift-machine-api-
Add the
internalLoadBalancerparameter with the correct details for your cluster and save your changes.
Next steps
-
For clusters that use the default
RollingUpdateupdate strategy, the Operator automatically propagates the changes to your control plane configuration. -
For clusters that are configured to use the
OnDeleteupdate strategy, you must replace your control plane machines manually.
12.6.3. Recovering a degraded etcd Operator
Certain situations can cause the etcd Operator to become degraded.
For example, while performing remediation, the machine health check might delete a control plane machine that is hosting etcd. If the etcd member is not reachable at that time, the etcd Operator becomes degraded.
When the etcd Operator is degraded, manual intervention is required to force the Operator to remove the failed member and restore the cluster state.
Procedure
List the control plane machines in your cluster by running the following command:
$ oc get machines \ -l machine.openshift.io/cluster-api-machine-role==master \ -n openshift-machine-api \ -o wideAny of the following conditions might indicate a failed control plane machine:
-
The
STATEvalue isstopped. -
The
PHASEvalue isFailed. -
The
PHASEvalue isDeletingfor more than ten minutes.
ImportantBefore continuing, ensure that your cluster has two healthy control plane machines. Performing the actions in this procedure on more than one control plane machine risks losing etcd quorum and can cause data loss.
If you have lost the majority of your control plane hosts, leading to etcd quorum loss, then you must follow the disaster recovery procedure "Restoring to a previous cluster state" instead of this procedure.
-
The
Edit the machine CR for the failed control plane machine by running the following command:
$ oc edit machine <control_plane_machine_name>Remove the contents of the
lifecycleHooksparameter from the failed control plane machine and save your changes.The etcd Operator removes the failed machine from the cluster and can then safely add new etcd members.
12.7. Disabling the control plane machine set
The .spec.state field in an activated ControlPlaneMachineSet custom resource (CR) cannot be changed from Active to Inactive. To disable the control plane machine set, you must delete the CR so that it is removed from the cluster.
When you delete the CR, the Control Plane Machine Set Operator performs cleanup operations and disables the control plane machine set. The Operator then removes the CR from the cluster and creates an inactive control plane machine set with default settings.
12.7.1. Deleting the control plane machine set
To stop managing control plane machines with the control plane machine set on your cluster, you must delete the ControlPlaneMachineSet custom resource (CR).
Procedure
Delete the control plane machine set CR by running the following command:
$ oc delete controlplanemachineset.machine.openshift.io cluster \ -n openshift-machine-api
Verification
-
Check the control plane machine set custom resource state. A result of
Inactiveindicates that the removal and replacement process is successful. AControlPlaneMachineSetCR exists but is not activated.
12.7.2. Checking the control plane machine set custom resource state
You can verify the existence and state of the ControlPlaneMachineSet custom resource (CR).
Procedure
Determine the state of the CR by running the following command:
$ oc get controlplanemachineset.machine.openshift.io cluster \ --namespace openshift-machine-api-
A result of
Activeindicates that theControlPlaneMachineSetCR exists and is activated. No administrator action is required. -
A result of
Inactiveindicates that aControlPlaneMachineSetCR exists but is not activated. -
A result of
NotFoundindicates that there is no existingControlPlaneMachineSetCR.
-
A result of
12.7.3. Re-enabling the control plane machine set
To re-enable the control plane machine set, you must ensure that the configuration in the CR is correct for your cluster and activate it.
Chapter 13. Managing machines with the Cluster API
13.1. About the Cluster API
Managing machines with the Cluster API is a Technology Preview feature only. Technology Preview features are not supported with Red Hat production service level agreements (SLAs) and might not be functionally complete. Red Hat does not recommend using them in production. These features provide early access to upcoming product features, enabling customers to test functionality and provide feedback during the development process.
For more information about the support scope of Red Hat Technology Preview features, see Technology Preview Features Support Scope.
The Cluster API is an upstream project that is integrated into OpenShift Container Platform as a Technology Preview for Amazon Web Services (AWS) and Google Cloud Platform (GCP).
13.1.1. Cluster API overview
You can use the Cluster API to create and manage compute machine sets and compute machines in your OpenShift Container Platform cluster. This capability is in addition or an alternative to managing machines with the Machine API.
For OpenShift Container Platform 4.12 clusters, you can use the Cluster API to perform node host provisioning management actions after the cluster installation finishes. This system enables an elastic, dynamic provisioning method on top of public or private cloud infrastructure.
With the Cluster API Technology Preview, you can create compute machines and compute machine sets on OpenShift Container Platform clusters for supported providers. You can also explore the features that are enabled by this implementation that might not be available with the Machine API.
13.1.1.1. Cluster API benefits
By using the Cluster API, OpenShift Container Platform users and developers gain the following advantages:
- The option to use upstream community Cluster API infrastructure providers that might not be supported by the Machine API.
- The opportunity to collaborate with third parties who maintain machine controllers for infrastructure providers.
- The ability to use the same set of Kubernetes tools for infrastructure management in OpenShift Container Platform.
- The ability to create compute machine sets by using the Cluster API that support features that are not available with the Machine API.
13.1.1.2. Cluster API limitations
Using the Cluster API to manage machines is a Technology Preview feature and has the following limitations:
To use this feature, you must enable the
TechPreviewNoUpgradefeature set.ImportantEnabling this feature set cannot be undone and prevents minor version updates.
- Only AWS and Google Cloud clusters can use the Cluster API.
- You must manually create the primary resources that the Cluster API requires. For more information, see "Getting started with the Cluster API".
- You cannot use the Cluster API to manage control plane machines.
- Migration of existing compute machine sets created by the Machine API to Cluster API compute machine sets is not supported.
- Full feature parity with the Machine API is not available.
For clusters that use the Cluster API, OpenShift CLI (
oc) commands prioritize Cluster API objects over Machine API objects. This behavior impacts anyoccommand that acts upon any object that is represented in both the Cluster API and the Machine API.For more information and a workaround for this issue, see "Referencing the intended objects when using the CLI" in the troubleshooting content.
13.1.2. Cluster API architecture
The OpenShift Container Platform integration of the upstream Cluster API is implemented and managed by the Cluster CAPI Operator. The Cluster CAPI Operator and its operands are provisioned in the openshift-cluster-api namespace, in contrast to the Machine API, which uses the openshift-machine-api namespace.
13.1.2.1. The Cluster CAPI Operator
The Cluster CAPI Operator is an OpenShift Container Platform Operator that maintains the lifecycle of Cluster API resources. This Operator is responsible for all administrative tasks related to deploying the Cluster API project within an OpenShift Container Platform cluster.
If a cluster is configured correctly to allow the use of the Cluster API, the Cluster CAPI Operator installs the Cluster API Operator on the cluster.
The Cluster CAPI Operator is distinct from the upstream Cluster API Operator.
For more information, see the entry for the "Cluster CAPI Operator" in the Cluster Operators reference content.
13.1.2.2. Cluster API primary resources
The Cluster API is comprised of the following primary resources. For the Technology Preview of this feature, you must create these resources manually in the openshift-cluster-api namespace.
- Cluster
- A fundamental unit that represents a cluster that is managed by the Cluster API.
- Infrastructure
- A provider-specific resource that defines properties that are shared by all the compute machine sets in the cluster, such as the region and subnets.
- Machine template
- A provider-specific template that defines the properties of the machines that a compute machine set creates.
- Machine set
A group of machines.
Compute machine sets are to machines as replica sets are to pods. To add machines or scale them down, change the
replicasfield on the compute machine set custom resource to meet your compute needs.With the Cluster API, a compute machine set references a
Clusterobject and a provider-specific machine template.- Machine
A fundamental unit that describes the host for a node.
The Cluster API creates machines based on the configuration in the machine template.
13.2. Getting started with the Cluster API
Managing machines with the Cluster API is a Technology Preview feature only. Technology Preview features are not supported with Red Hat production service level agreements (SLAs) and might not be functionally complete. Red Hat does not recommend using them in production. These features provide early access to upcoming product features, enabling customers to test functionality and provide feedback during the development process.
For more information about the support scope of Red Hat Technology Preview features, see Technology Preview Features Support Scope.
For the Cluster API Technology Preview, you must create the primary resources that the Cluster API requires manually.
13.2.1. Creating the Cluster API primary resources
To create the Cluster API primary resources, you must obtain the cluster ID value, which you use for the <cluster_name> parameter in the cluster resource manifest.
13.2.1.1. Obtaining the cluster ID value
You can find the cluster ID value by using the OpenShift CLI (oc).
Prerequisites
- You have deployed an OpenShift Container Platform cluster.
-
You have access to the cluster using an account with
cluster-adminpermissions. -
You have installed the OpenShift CLI (
oc).
Procedure
Obtain the value of the cluster ID by running the following command:
$ oc get infrastructure cluster \ -o jsonpath='{.status.infrastructureName}'
You can create the Cluster API primary resources manually by creating YAML manifest files and applying them with the OpenShift CLI (oc).
13.2.1.2. Creating the Cluster API cluster resource
You can create the cluster resource by creating a YAML manifest file and applying it with the OpenShift CLI (oc).
Prerequisites
- You have deployed an OpenShift Container Platform cluster.
- You have enabled the use of the Cluster API.
-
You have access to the cluster using an account with
cluster-adminpermissions. -
You have installed the OpenShift CLI (
oc). - You have the cluster ID value.
Procedure
Create a YAML file similar to the following. This procedure uses
<cluster_resource_file>.yamlas an example file name.apiVersion: cluster.x-k8s.io/v1beta1 kind: Cluster metadata: name: <cluster_name>1 namespace: openshift-cluster-api spec: infrastructureRef: apiVersion: infrastructure.cluster.x-k8s.io/v1beta1 kind: <infrastructure_kind>2 name: <cluster_name> namespace: openshift-cluster-apiCreate the cluster CR by running the following command:
$ oc create -f <cluster_resource_file>.yaml
Verification
Confirm that the cluster CR exists by running the following command:
$ oc get clusterExample output
NAME PHASE AGE VERSION <cluster_name> Provisioning 4h6mThe cluster resource is ready when the value of
PHASEisProvisioned.
13.2.1.3. Creating a Cluster API infrastructure resource
You can create a provider-specific infrastructure resource by creating a YAML manifest file and applying it with the OpenShift CLI (oc).
Prerequisites
- You have deployed an OpenShift Container Platform cluster.
- You have enabled the use of the Cluster API.
-
You have access to the cluster using an account with
cluster-adminpermissions. -
You have installed the OpenShift CLI (
oc). - You have the cluster ID value.
- You have created and applied the cluster resource.
Procedure
Create a YAML file similar to the following. This procedure uses
<infrastructure_resource_file>.yamlas an example file name.apiVersion: infrastructure.cluster.x-k8s.io/<version>1 kind: <infrastructure_kind>2 metadata: name: <cluster_name>3 namespace: openshift-cluster-api spec:4 - 1
- The
apiVersionvaries by platform. For more information, see the sample Cluster API infrastructure resource YAML for your provider. The following values are valid:-
infrastructure.cluster.x-k8s.io/v1beta1: The version that Google Cloud clusters use. -
infrastructure.cluster.x-k8s.io/v1beta1: The version that Amazon Web Services (AWS) clusters use.
-
- 2
- Specify the infrastructure kind for the cluster. This value must match the value for your platform. The following values are valid:
-
AWSCluster: The cluster is running on AWS. -
GCPCluster: The cluster is running on Google Cloud.
-
- 3
- Specify the name of the cluster.
- 4
- Specify the details for your environment. These parameters are provider specific. For more information, see the sample Cluster API infrastructure resource YAML for your provider.
Create the infrastructure CR by running the following command:
$ oc create -f <infrastructure_resource_file>.yaml
Verification
Confirm that the infrastructure CR is created by running the following command:
$ oc get <infrastructure_kind>where
<infrastructure_kind>is the value that corresponds to your platform.Example output
NAME CLUSTER READY <cluster_name> <cluster_name> trueNoteThis output might contain additional columns that are specific to your cloud provider.
13.2.1.4. Creating a Cluster API machine template
You can create a provider-specific machine template resource by creating a YAML manifest file and applying it with the OpenShift CLI (oc).
Prerequisites
- You have deployed an OpenShift Container Platform cluster.
- You have enabled the use of the Cluster API.
-
You have access to the cluster using an account with
cluster-adminpermissions. -
You have installed the OpenShift CLI (
oc). - You have created and applied the cluster and infrastructure resources.
Procedure
Create a YAML file similar to the following. This procedure uses
<machine_template_resource_file>.yamlas an example file name.apiVersion: infrastructure.cluster.x-k8s.io/v1beta1 kind: <machine_template_kind>1 metadata: name: <template_name>2 namespace: openshift-cluster-api spec: template: spec:3 - 1
- Specify the machine template kind. This value must match the value for your platform. The following values are valid:
-
AWSMachineTemplate: The cluster is running on Amazon Web Services (AWS). -
GCPMachineTemplate: The cluster is running on Google Cloud.
-
- 2
- Specify a name for the machine template.
- 3
- Specify the details for your environment. These parameters are provider specific. For more information, see the sample Cluster API machine template YAML for your provider.
Create the machine template CR by running the following command:
$ oc create -f <machine_template_resource_file>.yaml
Verification
Confirm that the machine template CR is created by running the following command:
$ oc get <machine_template_kind>where
<machine_template_kind>is the value that corresponds to your platform.Example output
NAME AGE <template_name> 77m
13.2.1.5. Creating a Cluster API compute machine set
You can create compute machine sets that use the Cluster API to dynamically manage the machine compute resources for specific workloads of your choice.
Prerequisites
- You have deployed an OpenShift Container Platform cluster.
- You have enabled the use of the Cluster API.
-
You have access to the cluster using an account with
cluster-adminpermissions. -
You have installed the OpenShift CLI (
oc). - You have created the cluster, infrastructure, and machine template resources.
Procedure
Create a YAML file similar to the following. This procedure uses
<machine_set_resource_file>.yamlas an example file name.apiVersion: cluster.x-k8s.io/v1beta1 kind: MachineSet metadata: name: <machine_set_name>1 namespace: openshift-cluster-api spec: clusterName: <cluster_name>2 replicas: 1 selector: matchLabels: test: example template: metadata: labels: test: example spec:3 # ...Create the compute machine set CR by running the following command:
$ oc create -f <machine_set_resource_file>.yamlConfirm that the compute machine set CR is created by running the following command:
$ oc get machineset -n openshift-cluster-api1 - 1
- Specify the
openshift-cluster-apinamespace.
Example output
NAME CLUSTER REPLICAS READY AVAILABLE AGE VERSION <machine_set_name> <cluster_name> 1 1 1 17mWhen the new compute machine set is available, the
REPLICASandAVAILABLEvalues match. If the compute machine set is not available, wait a few minutes and run the command again.
Verification
To verify that the compute machine set is creating machines according to your required configuration, review the lists of machines and nodes in the cluster by running the following commands:
View the list of Cluster API machines:
$ oc get machine -n openshift-cluster-api1 - 1
- Specify the
openshift-cluster-apinamespace.
Example output
NAME CLUSTER NODENAME PROVIDERID PHASE AGE VERSION <machine_set_name>-<string_id> <cluster_name> <ip_address>.<region>.compute.internal <provider_id> Running 8m23sView the list of nodes:
$ oc get nodeExample output
NAME STATUS ROLES AGE VERSION <ip_address_1>.<region>.compute.internal Ready worker 5h14m v1.28.5 <ip_address_2>.<region>.compute.internal Ready master 5h19m v1.28.5 <ip_address_3>.<region>.compute.internal Ready worker 7m v1.28.5
13.3. Managing machines with the Cluster API
Managing machines with the Cluster API is a Technology Preview feature only. Technology Preview features are not supported with Red Hat production service level agreements (SLAs) and might not be functionally complete. Red Hat does not recommend using them in production. These features provide early access to upcoming product features, enabling customers to test functionality and provide feedback during the development process.
For more information about the support scope of Red Hat Technology Preview features, see Technology Preview Features Support Scope.
13.3.1. Modifying a Cluster API machine template
You can update the machine template resource for your cluster by modifying the YAML manifest file and applying it with the OpenShift CLI (oc).
Prerequisites
- You have deployed an OpenShift Container Platform cluster that uses the Cluster API.
-
You have access to the cluster using an account with
cluster-adminpermissions. -
You have installed the OpenShift CLI (
oc).
Procedure
List the machine template resource for your cluster by running the following command:
$ oc get <machine_template_kind>1 - 1
- Specify the value that corresponds to your platform. The following values are valid:
-
AWSMachineTemplate: The cluster is running on Amazon Web Services (AWS). -
GCPMachineTemplate: The cluster is running on Google Cloud.
-
Example output
NAME AGE <template_name> 77mWrite the machine template resource for your cluster to a file that you can edit by running the following command:
$ oc get <machine_template_kind> <template_name> -o yaml > <template_name>.yamlwhere
<template_name>is the name of the machine template resource for your cluster.-
Make a copy of the
<template_name>.yamlfile with a different name. This procedure uses<modified_template_name>.yamlas an example file name. Use a text editor to make changes to the
<modified_template_name>.yamlfile that defines the updated machine template resource for your cluster. When editing the machine template resource, observe the following:-
The parameters in the
specstanza are provider specific. For more information, see the sample Cluster API machine template YAML for your provider. You must use a value for the
metadata.nameparameter that differs from any existing values.ImportantFor any Cluster API compute machine sets that reference this template, you must update the
spec.template.spec.infrastructureRef.nameparameter to match themetadata.namevalue in the new machine template resource.
-
The parameters in the
Apply the machine template CR by running the following command:
$ oc apply -f <modified_template_name>.yaml1 - 1
- Use the edited YAML file with a new name.
Next steps
-
For any Cluster API compute machine sets that reference this template, update the
spec.template.spec.infrastructureRef.nameparameter to match themetadata.namevalue in the new machine template resource. For more information, see "Modifying a compute machine set by using the CLI."
13.3.2. Modifying a compute machine set by using the CLI
You can modify the configuration of a compute machine set, and then propagate the changes to the machines in your cluster by using the CLI.
By updating the compute machine set configuration, you can enable features or change the properties of the machines it creates. When you modify a compute machine set, your changes only apply to compute machines that are created after you save the updated MachineSet custom resource (CR). The changes do not affect existing machines.
Changes made in the underlying cloud provider are not reflected in the Machine or MachineSet CRs. To adjust instance configuration in cluster-managed infrastructure, use the cluster-side resources.
You can replace the existing machines with new ones that reflect the updated configuration by scaling the compute machine set to create twice the number of replicas and then scaling it down to the original number of replicas.
If you need to scale a compute machine set without making other changes, you do not need to delete the machines.
By default, the OpenShift Container Platform router pods are deployed on compute machines. Because the router is required to access some cluster resources, including the web console, do not scale the compute machine set to 0 unless you first relocate the router pods.
The output examples in this procedure use the values for an AWS cluster.
Prerequisites
- Your OpenShift Container Platform cluster uses the Cluster API.
-
You are logged in to the cluster as an administrator by using the OpenShift CLI (
oc).
Procedure
List the compute machine sets in your cluster by running the following command:
$ oc get machinesets.cluster.x-k8s.io -n openshift-cluster-apiExample output
NAME CLUSTER REPLICAS READY AVAILABLE AGE VERSION <compute_machine_set_name_1> <cluster_name> 1 1 1 26m <compute_machine_set_name_2> <cluster_name> 1 1 1 26mEdit a compute machine set by running the following command:
$ oc edit machinesets.cluster.x-k8s.io <machine_set_name> \ -n openshift-cluster-apiNote the value of the
spec.replicasfield, because you need it when scaling the machine set to apply the changes.apiVersion: cluster.x-k8s.io/v1beta1 kind: MachineSet metadata: name: <machine_set_name> namespace: openshift-cluster-api spec: replicas: 21 # ...- 1
- The examples in this procedure show a compute machine set that has a
replicasvalue of2.
- Update the compute machine set CR with the configuration options that you want and save your changes.
List the machines that are managed by the updated compute machine set by running the following command:
$ oc get machines.cluster.x-k8s.io \ -n openshift-cluster-api \ -l cluster.x-k8s.io/set-name=<machine_set_name>Example output for an AWS cluster
NAME CLUSTER NODENAME PROVIDERID PHASE AGE VERSION <machine_name_original_1> <cluster_name> <original_1_ip>.<region>.compute.internal aws:///us-east-2a/i-04e7b2cbd61fd2075 Running 4h <machine_name_original_2> <cluster_name> <original_2_ip>.<region>.compute.internal aws:///us-east-2a/i-04e7b2cbd61fd2075 Running 4hFor each machine that is managed by the updated compute machine set, set the
deleteannotation by running the following command:$ oc annotate machines.cluster.x-k8s.io/<machine_name_original_1> \ -n openshift-cluster-api \ cluster.x-k8s.io/delete-machine="true"To create replacement machines with the new configuration, scale the compute machine set to twice the number of replicas by running the following command:
$ oc scale --replicas=4 \1 machinesets.cluster.x-k8s.io <machine_set_name> \ -n openshift-cluster-api- 1
- The original example value of
2is doubled to4.
List the machines that are managed by the updated compute machine set by running the following command:
$ oc get machines.cluster.x-k8s.io \ -n openshift-cluster-api \ -l cluster.x-k8s.io/set-name=<machine_set_name>Example output for an AWS cluster
NAME CLUSTER NODENAME PROVIDERID PHASE AGE VERSION <machine_name_original_1> <cluster_name> <original_1_ip>.<region>.compute.internal aws:///us-east-2a/i-04e7b2cbd61fd2075 Running 4h <machine_name_original_2> <cluster_name> <original_2_ip>.<region>.compute.internal aws:///us-east-2a/i-04e7b2cbd61fd2075 Running 4h <machine_name_updated_1> <cluster_name> <updated_1_ip>.<region>.compute.internal aws:///us-east-2a/i-04e7b2cbd61fd2075 Provisioned 55s <machine_name_updated_2> <cluster_name> <updated_2_ip>.<region>.compute.internal aws:///us-east-2a/i-04e7b2cbd61fd2075 Provisioning 55sWhen the new machines are in the
Runningphase, you can scale the compute machine set to the original number of replicas.To remove the machines that were created with the old configuration, scale the compute machine set to the original number of replicas by running the following command:
$ oc scale --replicas=2 \1 machinesets.cluster.x-k8s.io <machine_set_name> \ -n openshift-cluster-api- 1
- The original example value of
2.
Verification
To verify that a machine created by the updated machine set has the correct configuration, examine the relevant fields in the CR for one of the new machines by running the following command:
$ oc describe machines.cluster.x-k8s.io <machine_name_updated_1> \ -n openshift-cluster-apiTo verify that the compute machines without the updated configuration are deleted, list the machines that are managed by the updated compute machine set by running the following command:
$ oc get machines.cluster.x-k8s.io \ -n openshift-cluster-api \ cluster.x-k8s.io/set-name=<machine_set_name>Example output while deletion is in progress for an AWS cluster
NAME CLUSTER NODENAME PROVIDERID PHASE AGE VERSION <machine_name_original_1> <cluster_name> <original_1_ip>.<region>.compute.internal aws:///us-east-2a/i-04e7b2cbd61fd2075 Running 18m <machine_name_original_2> <cluster_name> <original_2_ip>.<region>.compute.internal aws:///us-east-2a/i-04e7b2cbd61fd2075 Running 18m <machine_name_updated_1> <cluster_name> <updated_1_ip>.<region>.compute.internal aws:///us-east-2a/i-04e7b2cbd61fd2075 Running 18m <machine_name_updated_2> <cluster_name> <updated_2_ip>.<region>.compute.internal aws:///us-east-2a/i-04e7b2cbd61fd2075 Running 18mExample output when deletion is complete for an AWS cluster
NAME CLUSTER NODENAME PROVIDERID PHASE AGE VERSION <machine_name_updated_1> <cluster_name> <updated_1_ip>.<region>.compute.internal aws:///us-east-2a/i-04e7b2cbd61fd2075 Running 18m <machine_name_updated_2> <cluster_name> <updated_2_ip>.<region>.compute.internal aws:///us-east-2a/i-04e7b2cbd61fd2075 Running 18m
13.4. Cluster API configuration
Managing machines with the Cluster API is a Technology Preview feature only. Technology Preview features are not supported with Red Hat production service level agreements (SLAs) and might not be functionally complete. Red Hat does not recommend using them in production. These features provide early access to upcoming product features, enabling customers to test functionality and provide feedback during the development process.
For more information about the support scope of Red Hat Technology Preview features, see Technology Preview Features Support Scope.
The following example YAML files show how to make the Cluster API primary resources work together and configure settings for the machines that they create that are appropriate for your environment.
13.4.1. Sample YAML for a Cluster API cluster resource
The cluster resource defines the name and infrastructure provider for the cluster and is managed by the Cluster API. This resource has the same structure for all providers.
apiVersion: cluster.x-k8s.io/v1beta1
kind: Cluster
metadata:
name: <cluster_name>
namespace: openshift-cluster-api
spec:
infrastructureRef:
apiVersion: infrastructure.cluster.x-k8s.io/v1beta1
kind: <infrastructure_kind>
name: <cluster_name>
namespace: openshift-cluster-api13.4.2. Provider-specific configuration options
The remaining Cluster API resources are provider-specific. For provider-specific configuration options for your cluster, see the following resources:
13.5. Configuration options for Cluster API machines
13.5.1. Cluster API configuration options for Amazon Web Services
Managing machines with the Cluster API is a Technology Preview feature only. Technology Preview features are not supported with Red Hat production service level agreements (SLAs) and might not be functionally complete. Red Hat does not recommend using them in production. These features provide early access to upcoming product features, enabling customers to test functionality and provide feedback during the development process.
For more information about the support scope of Red Hat Technology Preview features, see Technology Preview Features Support Scope.
You can change the configuration of your Amazon Web Services (AWS) Cluster API machines by updating values in the Cluster API custom resource manifests.
13.5.1.1. Sample YAML for configuring Amazon Web Services clusters
The following example YAML files show configurations for an Amazon Web Services cluster.
13.5.1.1.1. Sample YAML for a Cluster API infrastructure resource on Amazon Web Services
The infrastructure resource is provider-specific and defines properties that are shared by all the compute machine sets in the cluster, such as the region and subnets. The compute machine set references this resource when creating machines.
apiVersion: infrastructure.cluster.x-k8s.io/v1beta1
kind: AWSCluster
metadata:
name: <cluster_name>
namespace: openshift-cluster-api
spec:
controlPlaneEndpoint:
host: <control_plane_endpoint_address>
port: 6443
region: <region> 13.5.1.1.2. Sample YAML for a Cluster API machine template resource on Amazon Web Services
The machine template resource is provider-specific and defines the basic properties of the machines that a compute machine set creates. The compute machine set references this template when creating machines.
apiVersion: infrastructure.cluster.x-k8s.io/v1beta1
kind: AWSMachineTemplate
metadata:
name: <template_name>
namespace: openshift-cluster-api
spec:
template:
spec:
uncompressedUserData: true
iamInstanceProfile: # ...
instanceType: m5.large
cloudInit:
insecureSkipSecretsManager: true
ami:
id: # ...
subnet:
filters:
- name: tag:Name
values:
- # ...
additionalSecurityGroups:
- filters:
- name: tag:Name
values:
- # ...13.5.1.1.3. Sample YAML for a Cluster API compute machine set resource on Amazon Web Services
The compute machine set resource defines additional properties of the machines that it creates. The compute machine set also references the infrastructure resource and machine template when creating machines.
apiVersion: cluster.x-k8s.io/v1beta1
kind: MachineSet
metadata:
name: <machine_set_name>
namespace: openshift-cluster-api
spec:
clusterName: <cluster_name>
replicas: 1
selector:
matchLabels:
test: example
template:
metadata:
labels:
test: example
spec:
bootstrap:
dataSecretName: worker-user-data
clusterName: <cluster_name>
infrastructureRef:
apiVersion: infrastructure.cluster.x-k8s.io/v1beta1
kind: AWSMachineTemplate
name: <template_name> - 1
- Specify a name for the compute machine set.
- 2
- Specify the cluster ID as the name of the cluster.
- 3
- For the Cluster API Technology Preview, the Operator can use the worker user data secret from the
openshift-machine-apinamespace. - 4
- Specify the machine template kind. This value must match the value for your platform.
- 5
- Specify the machine template name.
13.5.2. Cluster API configuration options for Google Cloud
Managing machines with the Cluster API is a Technology Preview feature only. Technology Preview features are not supported with Red Hat production service level agreements (SLAs) and might not be functionally complete. Red Hat does not recommend using them in production. These features provide early access to upcoming product features, enabling customers to test functionality and provide feedback during the development process.
For more information about the support scope of Red Hat Technology Preview features, see Technology Preview Features Support Scope.
You can change the configuration of your Google Cloud Cluster API machines by updating values in the Cluster API custom resource manifests.
13.5.2.1. Sample YAML for configuring Google Cloud clusters
The following example YAML files show configurations for a Google Cloud cluster.
13.5.2.1.1. Sample YAML for a Cluster API infrastructure resource on Google Cloud Platform
The infrastructure resource is provider-specific and defines properties that are shared by all the compute machine sets in the cluster, such as the region and subnets. The compute machine set references this resource when creating machines.
apiVersion: infrastructure.cluster.x-k8s.io/v1beta1
kind: GCPCluster
metadata:
name: <cluster_name>
spec:
controlPlaneEndpoint:
host: <control_plane_endpoint_address>
port: 6443
network:
name: <cluster_name>-network
project: <project>
region: <region> - 1
- Specify the infrastructure kind for the cluster. This value must match the value for your platform.
- 2
- Specify the cluster ID as the name of the cluster.
- 3
- Specify the IP address of the control plane endpoint and the port used to access it.
- 4
- Specify the Google Cloud project name.
- 5
- Specify the Google Cloud region.
13.5.2.1.2. Sample YAML for a Cluster API machine template resource on Google Cloud Platform
The machine template resource is provider-specific and defines the basic properties of the machines that a compute machine set creates. The compute machine set references this template when creating machines.
apiVersion: infrastructure.cluster.x-k8s.io/v1beta1
kind: GCPMachineTemplate
metadata:
name: <template_name>
namespace: openshift-cluster-api
spec:
template:
spec:
rootDeviceType: pd-ssd
rootDeviceSize: 128
instanceType: n1-standard-4
image: projects/rhcos-cloud/global/images/rhcos-411-85-202203181601-0-gcp-x86-64
subnet: <cluster_name>-worker-subnet
serviceAccounts:
email: <service_account_email_address>
scopes:
- https://www.googleapis.com/auth/cloud-platform
additionalLabels:
kubernetes-io-cluster-<cluster_name>: owned
additionalNetworkTags:
- <cluster_name>-worker
ipForwarding: Disabled13.5.2.1.3. Sample YAML for a Cluster API compute machine set resource on Google Cloud Platform
The compute machine set resource defines additional properties of the machines that it creates. The compute machine set also references the infrastructure resource and machine template when creating machines.
apiVersion: cluster.x-k8s.io/v1beta1
kind: MachineSet
metadata:
name: <machine_set_name>
namespace: openshift-cluster-api
spec:
clusterName: <cluster_name>
replicas: 1
selector:
matchLabels:
test: example
template:
metadata:
labels:
test: example
spec:
bootstrap:
dataSecretName: worker-user-data
clusterName: <cluster_name>
infrastructureRef:
apiVersion: infrastructure.cluster.x-k8s.io/v1beta1
kind: GCPMachineTemplate
name: <template_name>
failureDomain: <failure_domain> - 1
- Specify a name for the compute machine set.
- 2
- Specify the cluster ID as the name of the cluster.
- 3
- For the Cluster API Technology Preview, the Operator can use the worker user data secret from the
openshift-machine-apinamespace. - 4
- Specify the machine template kind. This value must match the value for your platform.
- 5
- Specify the machine template name.
- 6
- Specify the failure domain within the Google Cloud region.
13.6. Troubleshooting clusters that use the Cluster API
Managing machines with the Cluster API is a Technology Preview feature only. Technology Preview features are not supported with Red Hat production service level agreements (SLAs) and might not be functionally complete. Red Hat does not recommend using them in production. These features provide early access to upcoming product features, enabling customers to test functionality and provide feedback during the development process.
For more information about the support scope of Red Hat Technology Preview features, see Technology Preview Features Support Scope.
Use the information in this section to understand and recover from issues you might encounter. Generally, troubleshooting steps for problems with the Cluster API are similar to those steps for problems with the Machine API.
The Cluster CAPI Operator and its operands are provisioned in the openshift-cluster-api namespace, whereas the Machine API uses the openshift-machine-api namespace. When using oc commands that reference a namespace, be sure to reference the correct one.
13.6.1. Referencing the intended objects when using the CLI
For clusters that use the Cluster API, OpenShift CLI (oc) commands prioritize Cluster API objects over Machine API objects.
This behavior impacts any oc command that acts upon any object that is represented in both the Cluster API and the Machine API. This explanation uses the oc delete machine command, which deletes a machine, as an example.
- Cause
When you run an
occommand,occommunicates with the Kube API server to determine which objects to act upon. The Kube API server uses the first installed custom resource definition (CRD) it encounters alphabetically when anoccommand is run.CRDs for Cluster API objects are in the
cluster.x-k8s.iogroup, while CRDs for Machine API objects are in themachine.openshift.iogroup. Because the lettercprecedes the lettermalphabetically, the Kube API server matches on the Cluster API object CRD. As a result, theoccommand acts upon Cluster API objects.- Consequence
Due to this behavior, the following unintended outcomes can occur on a cluster that uses the Cluster API:
-
For namespaces that contain both types of objects, commands such as
oc get machinereturn only Cluster API objects. -
For namespaces that contain only Machine API objects, commands such as
oc get machinereturn no results.
-
For namespaces that contain both types of objects, commands such as
- Workaround
-
You can ensure that
occommands act on the type of objects you intend by using the corresponding fully qualified name.
Prerequisites
-
You have access to the cluster using an account with
cluster-adminpermissions. -
You have installed the OpenShift CLI (
oc).
Procedure
To delete a Machine API machine, use the fully qualified name
machine.machine.openshift.iowhen running theoc delete machinecommand:$ oc delete machine.machine.openshift.io <machine_name>To delete a Cluster API machine, use the fully qualified name
machine.cluster.x-k8s.iowhen running theoc delete machinecommand:$ oc delete machine.cluster.x-k8s.io <machine_name>
Chapter 14. Deploying machine health checks
You can configure and deploy a machine health check to automatically repair damaged machines in a machine pool.
You can use the advanced machine management and scaling capabilities only in clusters where the Machine API is operational. Clusters with user-provisioned infrastructure require additional validation and configuration to use the Machine API.
Clusters with the infrastructure platform type none cannot use the Machine API. This limitation applies even if the compute machines that are attached to the cluster are installed on a platform that supports the feature. This parameter cannot be changed after installation.
To view the platform type for your cluster, run the following command:
$ oc get infrastructure cluster -o jsonpath='{.status.platform}'14.1. About machine health checks
You can only apply a machine health check to machines that are managed by compute machine sets or control plane machine sets.
To monitor machine health, create a resource to define the configuration for a controller. Set a condition to check, such as staying in the NotReady status for five minutes or displaying a permanent condition in the node-problem-detector, and a label for the set of machines to monitor.
The controller that observes a MachineHealthCheck resource checks for the defined condition. If a machine fails the health check, the machine is automatically deleted and one is created to take its place. When a machine is deleted, you see a machine deleted event.
To limit disruptive impact of the machine deletion, the controller drains and deletes only one node at a time. If there are more unhealthy machines than the maxUnhealthy threshold allows for in the targeted pool of machines, remediation stops and therefore enables manual intervention.
Consider the timeouts carefully, accounting for workloads and requirements.
- Long timeouts can result in long periods of downtime for the workload on the unhealthy machine.
-
Too short timeouts can result in a remediation loop. For example, the timeout for checking the
NotReadystatus must be long enough to allow the machine to complete the startup process.
To stop the check, remove the resource.
14.1.1. Limitations when deploying machine health checks
There are limitations to consider before deploying a machine health check:
- Only machines owned by a machine set are remediated by a machine health check.
- If the node for a machine is removed from the cluster, a machine health check considers the machine to be unhealthy and remediates it immediately.
-
If the corresponding node for a machine does not join the cluster after the
nodeStartupTimeout, the machine is remediated. -
A machine is remediated immediately if the
Machineresource phase isFailed.
14.2. Sample MachineHealthCheck resource
The MachineHealthCheck resource for all cloud-based installation types, and other than bare metal, resembles the following YAML file:
apiVersion: machine.openshift.io/v1beta1
kind: MachineHealthCheck
metadata:
name: example
namespace: openshift-machine-api
spec:
selector:
matchLabels:
machine.openshift.io/cluster-api-machine-role: <role>
machine.openshift.io/cluster-api-machine-type: <role>
machine.openshift.io/cluster-api-machineset: <cluster_name>-<label>-<zone>
unhealthyConditions:
- type: "Ready"
timeout: "300s"
status: "False"
- type: "Ready"
timeout: "300s"
status: "Unknown"
maxUnhealthy: "40%"
nodeStartupTimeout: "10m" - 1
- Specify the name of the machine health check to deploy.
- 2 3
- Specify a label for the machine pool that you want to check.
- 4
- Specify the machine set to track in
<cluster_name>-<label>-<zone>format. For example,prod-node-us-east-1a. - 5 6
- Specify the timeout duration for a node condition. If a condition is met for the duration of the timeout, the machine will be remediated. Long timeouts can result in long periods of downtime for a workload on an unhealthy machine.
- 7
- Specify the amount of machines allowed to be concurrently remediated in the targeted pool. This can be set as a percentage or an integer. If the number of unhealthy machines exceeds the limit set by
maxUnhealthy, remediation is not performed. - 8
- Specify the timeout duration that a machine health check must wait for a node to join the cluster before a machine is determined to be unhealthy.
The matchLabels are examples only; you must map your machine groups based on your specific needs.
14.2.1. Short-circuiting machine health check remediation
Short-circuiting ensures that machine health checks remediate machines only when the cluster is healthy. Short-circuiting is configured through the maxUnhealthy field in the MachineHealthCheck resource.
If the user defines a value for the maxUnhealthy field, before remediating any machines, the MachineHealthCheck compares the value of maxUnhealthy with the number of machines within its target pool that it has determined to be unhealthy. Remediation is not performed if the number of unhealthy machines exceeds the maxUnhealthy limit.
If maxUnhealthy is not set, the value defaults to 100% and the machines are remediated regardless of the state of the cluster.
The appropriate maxUnhealthy value depends on the scale of the cluster you deploy and how many machines the MachineHealthCheck covers. For example, you can use the maxUnhealthy value to cover multiple compute machine sets across multiple availability zones so that if you lose an entire zone, your maxUnhealthy setting prevents further remediation within the cluster. In global Azure regions that do not have multiple availability zones, you can use availability sets to ensure high availability.
If you configure a MachineHealthCheck resource for the control plane, set the value of maxUnhealthy to 1.
This configuration ensures that the machine health check takes no action when multiple control plane machines appear to be unhealthy. Multiple unhealthy control plane machines can indicate that the etcd cluster is degraded or that a scaling operation to replace a failed machine is in progress.
If the etcd cluster is degraded, manual intervention might be required. If a scaling operation is in progress, the machine health check should allow it to finish.
The maxUnhealthy field can be set as either an integer or percentage. There are different remediation implementations depending on the maxUnhealthy value.
14.2.1.1. Setting maxUnhealthy by using an absolute value
If maxUnhealthy is set to 2:
- Remediation will be performed if 2 or fewer nodes are unhealthy
- Remediation will not be performed if 3 or more nodes are unhealthy
These values are independent of how many machines are being checked by the machine health check.
14.2.1.2. Setting maxUnhealthy by using percentages
If maxUnhealthy is set to 40% and there are 25 machines being checked:
- Remediation will be performed if 10 or fewer nodes are unhealthy
- Remediation will not be performed if 11 or more nodes are unhealthy
If maxUnhealthy is set to 40% and there are 6 machines being checked:
- Remediation will be performed if 2 or fewer nodes are unhealthy
- Remediation will not be performed if 3 or more nodes are unhealthy
The allowed number of machines is rounded down when the percentage of maxUnhealthy machines that are checked is not a whole number.
14.3. Creating a machine health check resource
You can create a MachineHealthCheck resource for machine sets in your cluster.
You can only apply a machine health check to machines that are managed by compute machine sets or control plane machine sets.
Prerequisites
-
Install the
occommand-line interface.
Procedure
-
Create a
healthcheck.ymlfile that contains the definition of your machine health check. Apply the
healthcheck.ymlfile to your cluster:$ oc apply -f healthcheck.yml
You can configure and deploy a machine health check to detect and repair unhealthy bare metal nodes.
14.4. About power-based remediation of bare metal
In a bare metal cluster, remediation of nodes is critical to ensuring the overall health of the cluster. Physically remediating a cluster can be challenging and any delay in putting the machine into a safe or an operational state increases the time the cluster remains in a degraded state, and the risk that subsequent failures might bring the cluster offline. Power-based remediation helps counter such challenges.
Instead of reprovisioning the nodes, power-based remediation uses a power controller to power off an inoperable node. This type of remediation is also called power fencing.
OpenShift Container Platform uses the MachineHealthCheck controller to detect faulty bare metal nodes. Power-based remediation is fast and reboots faulty nodes instead of removing them from the cluster.
Power-based remediation provides the following capabilities:
- Allows the recovery of control plane nodes
- Reduces the risk data loss in hyperconverged environments
- Reduces the downtime associated with recovering physical machines
14.4.1. MachineHealthChecks on bare metal
Machine deletion on bare metal cluster triggers reprovisioning of a bare metal host. Usually bare metal reprovisioning is a lengthy process, during which the cluster is missing compute resources and applications might be interrupted. To change the default remediation process from machine deletion to host power-cycle, annotate the MachineHealthCheck resource with the machine.openshift.io/remediation-strategy: external-baremetal annotation.
After you set the annotation, unhealthy machines are power-cycled by using BMC credentials.
14.4.2. Understanding the remediation process
The remediation process operates as follows:
- The MachineHealthCheck (MHC) controller detects that a node is unhealthy.
- The MHC notifies the bare metal machine controller which requests to power-off the unhealthy node.
- After the power is off, the node is deleted, which allows the cluster to reschedule the affected workload on other nodes.
- The bare metal machine controller requests to power on the node.
- After the node is up, the node re-registers itself with the cluster, resulting in the creation of a new node.
- After the node is recreated, the bare metal machine controller restores the annotations and labels that existed on the unhealthy node before its deletion.
If the power operations did not complete, the bare metal machine controller triggers the reprovisioning of the unhealthy node unless this is a control plane node or a node that was provisioned externally.
14.4.3. Creating a MachineHealthCheck resource for bare metal
Prerequisites
- The OpenShift Container Platform is installed using installer-provisioned infrastructure (IPI).
- Access to Baseboard Management Controller (BMC) credentials (or BMC access to each node)
- Network access to the BMC interface of the unhealthy node.
Procedure
-
Create a
healthcheck.yamlfile that contains the definition of your machine health check. Apply the
healthcheck.yamlfile to your cluster using the following command:$ oc apply -f healthcheck.yaml
Sample MachineHealthCheck resource for bare metal
apiVersion: machine.openshift.io/v1beta1
kind: MachineHealthCheck
metadata:
name: example
namespace: openshift-machine-api
annotations:
machine.openshift.io/remediation-strategy: external-baremetal
spec:
selector:
matchLabels:
machine.openshift.io/cluster-api-machine-role: <role>
machine.openshift.io/cluster-api-machine-type: <role>
machine.openshift.io/cluster-api-machineset: <cluster_name>-<label>-<zone>
unhealthyConditions:
- type: "Ready"
timeout: "300s"
status: "False"
- type: "Ready"
timeout: "300s"
status: "Unknown"
maxUnhealthy: "40%"
nodeStartupTimeout: "10m" - 1
- Specify the name of the machine health check to deploy.
- 2
- For bare metal clusters, you must include the
machine.openshift.io/remediation-strategy: external-baremetalannotation in theannotationssection to enable power-cycle remediation. With this remediation strategy, unhealthy hosts are rebooted instead of removed from the cluster. - 3 4
- Specify a label for the machine pool that you want to check.
- 5
- Specify the compute machine set to track in
<cluster_name>-<label>-<zone>format. For example,prod-node-us-east-1a. - 6 7
- Specify the timeout duration for the node condition. If the condition is met for the duration of the timeout, the machine will be remediated. Long timeouts can result in long periods of downtime for a workload on an unhealthy machine.
- 8
- Specify the amount of machines allowed to be concurrently remediated in the targeted pool. This can be set as a percentage or an integer. If the number of unhealthy machines exceeds the limit set by
maxUnhealthy, remediation is not performed. - 9
- Specify the timeout duration that a machine health check must wait for a node to join the cluster before a machine is determined to be unhealthy.
The matchLabels are examples only; you must map your machine groups based on your specific needs.
14.4.4. Troubleshooting issues with power-based remediation
To troubleshoot an issue with power-based remediation, verify the following:
- You have access to the BMC.
- BMC is connected to the control plane node that is responsible for running the remediation task.
Legal Notice
Copyright © Red Hat
OpenShift documentation is licensed under the Apache License 2.0 (https://www.apache.org/licenses/LICENSE-2.0).
Modified versions must remove all Red Hat trademarks.
Portions adapted from https://github.com/kubernetes-incubator/service-catalog/ with modifications by Red Hat.
Red Hat, Red Hat Enterprise Linux, the Red Hat logo, the Shadowman logo, JBoss, OpenShift, Fedora, the Infinity logo, and RHCE are trademarks of Red Hat, Inc., registered in the United States and other countries.
Linux® is the registered trademark of Linus Torvalds in the United States and other countries.
Java® is a registered trademark of Oracle and/or its affiliates.
XFS® is a trademark of Silicon Graphics International Corp. or its subsidiaries in the United States and/or other countries.
MySQL® is a registered trademark of MySQL AB in the United States, the European Union and other countries.
Node.js® is an official trademark of the OpenJS Foundation.
The OpenStack® Word Mark and OpenStack logo are either registered trademarks/service marks or trademarks/service marks of the OpenStack Foundation, in the United States and other countries and are used with the OpenStack Foundation’s permission. We are not affiliated with, endorsed or sponsored by the OpenStack Foundation, or the OpenStack community.
All other trademarks are the property of their respective owners.