Este contenido no está disponible en el idioma seleccionado.
Installing on OpenStack
Installing OpenShift Container Platform on OpenStack
Abstract
Chapter 1. Preparing to install on OpenStack
You can install OpenShift Container Platform on Red Hat OpenStack Platform (RHOSP).
1.1. Prerequisites
- You reviewed details about the OpenShift Container Platform installation and update processes.
- You read the documentation on selecting a cluster installation method and preparing it for users.
1.2. Choosing a method to install OpenShift Container Platform on OpenStack
You can install OpenShift Container Platform on installer-provisioned or user-provisioned infrastructure. The default installation type uses installer-provisioned infrastructure, where the installation program provisions the underlying infrastructure for the cluster. You can also install OpenShift Container Platform on infrastructure that you provision. If you do not use infrastructure that the installation program provisions, you must manage and maintain the cluster resources yourself.
See Installation process for more information about installer-provisioned and user-provisioned installation processes.
1.2.1. Installing a cluster on installer-provisioned infrastructure
You can install a cluster on Red Hat OpenStack Platform (RHOSP) infrastructure that is provisioned by the OpenShift Container Platform installation program, by using one of the following methods:
- Installing a cluster on OpenStack with customizations: You can install a customized cluster on RHOSP. The installation program allows for some customization to be applied at the installation stage. Many other customization options are available post-installation.
- Installing a cluster on OpenStack with Kuryr: You can install a customized OpenShift Container Platform cluster on RHOSP that uses Kuryr SDN. Kuryr and OpenShift Container Platform integration is primarily designed for OpenShift Container Platform clusters running on RHOSP VMs. Kuryr improves the network performance by plugging OpenShift Container Platform pods into RHOSP SDN. In addition, it provides interconnectivity between pods and RHOSP virtual instances.
- Installing a cluster on OpenStack in a restricted network: You can install OpenShift Container Platform on RHOSP in a restricted or disconnected network by creating an internal mirror of the installation release content. You can use this method to install a cluster that does not require an active internet connection to obtain the software components. You can also use this installation method to ensure that your clusters only use container images that satisfy your organizational controls on external content.
1.2.2. Installing a cluster on user-provisioned infrastructure
You can install a cluster on RHOSP infrastructure that you provision, by using one of the following methods:
- Installing a cluster on OpenStack on your own infrastructure: You can install OpenShift Container Platform on user-provisioned RHOSP infrastructure. By using this installation method, you can integrate your cluster with existing infrastructure and modifications. For installations on user-provisioned infrastructure, you must create all RHOSP resources, like Nova servers, Neutron ports, and security groups. You can use the provided Ansible playbooks to assist with the deployment process.
- Installing a cluster on OpenStack with Kuryr on your own infrastructure: You can install OpenShift Container Platform on user-provisioned RHOSP infrastructure that uses Kuryr SDN.
1.3. Scanning RHOSP endpoints for legacy HTTPS certificates
Beginning with OpenShift Container Platform 4.10, HTTPS certificates must contain subject alternative name (SAN) fields. Run the following script to scan each HTTPS endpoint in a Red Hat OpenStack Platform (RHOSP) catalog for legacy certificates that only contain the CommonName field.
OpenShift Container Platform does not check the underlying RHOSP infrastructure for legacy certificates prior to installation or updates. Use the provided script to check for these certificates yourself. Failing to update legacy certificates prior to installing or updating a cluster will result in cluster dysfunction.
Prerequisites
On the machine where you run the script, have the following software:
- Bash version 4.0 or greater
-
grep - OpenStack client
-
jq - OpenSSL version 1.1.1l or greater
- Populate the machine with RHOSP credentials for the target cloud.
Procedure
Save the following script to your machine:
#!/usr/bin/env bash set -Eeuo pipefail declare catalog san catalog="$(mktemp)" san="$(mktemp)" readonly catalog san declare invalid=0 openstack catalog list --format json --column Name --column Endpoints \ | jq -r '.[] | .Name as $name | .Endpoints[] | select(.interface=="public") | [$name, .interface, .url] | join(" ")' \ | sort \ > "$catalog" while read -r name interface url; do # Ignore HTTP if [[ ${url#"http://"} != "$url" ]]; then continue fi # Remove the schema from the URL noschema=${url#"https://"} # If the schema was not HTTPS, error if [[ "$noschema" == "$url" ]]; then echo "ERROR (unknown schema): $name $interface $url" exit 2 fi # Remove the path and only keep host and port noschema="${noschema%%/*}" host="${noschema%%:*}" port="${noschema##*:}" # Add the port if was implicit if [[ "$port" == "$host" ]]; then port='443' fi # Get the SAN fields openssl s_client -showcerts -servername "$host" -connect "$host:$port" </dev/null 2>/dev/null \ | openssl x509 -noout -ext subjectAltName \ > "$san" # openssl returns the empty string if no SAN is found. # If a SAN is found, openssl is expected to return something like: # # X509v3 Subject Alternative Name: # DNS:standalone, DNS:osp1, IP Address:192.168.2.1, IP Address:10.254.1.2 if [[ "$(grep -c "Subject Alternative Name" "$san" || true)" -gt 0 ]]; then echo "PASS: $name $interface $url" else invalid=$((invalid+1)) echo "INVALID: $name $interface $url" fi done < "$catalog" # clean up temporary files rm "$catalog" "$san" if [[ $invalid -gt 0 ]]; then echo "${invalid} legacy certificates were detected. Update your certificates to include a SAN field." exit 1 else echo "All HTTPS certificates for this cloud are valid." fi- Run the script.
-
Replace any certificates that the script reports as
INVALIDwith certificates that contain SAN fields.
You must replace all legacy HTTPS certificates before you install OpenShift Container Platform 4.10 or update a cluster to that version. Legacy certificates will be rejected with the following message:
x509: certificate relies on legacy Common Name field, use SANs instead1.3.1. Scanning RHOSP endpoints for legacy HTTPS certificates manually
Beginning with OpenShift Container Platform 4.10, HTTPS certificates must contain subject alternative name (SAN) fields. If you do not have access to the prerequisite tools that are listed in "Scanning RHOSP endpoints for legacy HTTPS certificates", perform the following steps to scan each HTTPS endpoint in a Red Hat OpenStack Platform (RHOSP) catalog for legacy certificates that only contain the CommonName field.
OpenShift Container Platform does not check the underlying RHOSP infrastructure for legacy certificates prior to installation or updates. Use the following steps to check for these certificates yourself. Failing to update legacy certificates prior to installing or updating a cluster will result in cluster dysfunction.
Procedure
On a command line, run the following command to view the URL of RHOSP public endpoints:
$ openstack catalog listRecord the URL for each HTTPS endpoint that the command returns.
For each public endpoint, note the host and the port.
TipDetermine the host of an endpoint by removing the scheme, the port, and the path.
For each endpoint, run the following commands to extract the SAN field of the certificate:
Set a
hostvariable:$ host=<host_name>Set a
portvariable:$ port=<port_number>If the URL of the endpoint does not have a port, use the value
443.Retrieve the SAN field of the certificate:
$ openssl s_client -showcerts -servername "$host" -connect "$host:$port" </dev/null 2>/dev/null \ | openssl x509 -noout -ext subjectAltNameExample output
X509v3 Subject Alternative Name: DNS:your.host.example.netFor each endpoint, look for output that resembles the previous example. If there is no output for an endpoint, the certificate of that endpoint is invalid and must be re-issued.
You must replace all legacy HTTPS certificates before you install OpenShift Container Platform 4.10 or update a cluster to that version. Legacy certificates are rejected with the following message:
x509: certificate relies on legacy Common Name field, use SANs insteadChapter 2. Preparing to install a cluster that uses SR-IOV or OVS-DPDK on OpenStack
Before you install a OpenShift Container Platform cluster that uses single-root I/O virtualization (SR-IOV) or Open vSwitch with the Data Plane Development Kit (OVS-DPDK) on Red Hat OpenStack Platform (RHOSP), you must understand the requirements for each technology and then perform preparatory tasks.
2.1. Requirements for clusters on RHOSP that use either SR-IOV or OVS-DPDK
If you use SR-IOV or OVS-DPDK with your deployment, you must meet the following requirements:
- RHOSP compute nodes must use a flavor that supports huge pages.
2.1.1. Requirements for clusters on RHOSP that use SR-IOV
To use single-root I/O virtualization (SR-IOV) with your deployment, you must meet the following requirements:
- Plan your Red Hat OpenStack Platform (RHOSP) SR-IOV deployment.
- OpenShift Container Platform must support the NICs that you use. For a list of supported NICs, see "About Single Root I/O Virtualization (SR-IOV) hardware networks" in the "Hardware networks" subsection of the "Networking" documentation.
For each node that will have an attached SR-IOV NIC, your RHOSP cluster must have:
- One instance from the RHOSP quota
- One port attached to the machines subnet
- One port for each SR-IOV Virtual Function
- A flavor with at least 16 GB memory, 4 vCPUs, and 25 GB storage space
SR-IOV deployments often employ performance optimizations, such as dedicated or isolated CPUs. For maximum performance, configure your underlying RHOSP deployment to use these optimizations, and then run OpenShift Container Platform compute machines on the optimized infrastructure.
- For more information about configuring performant RHOSP compute nodes, see Configuring Compute nodes for performance.
2.1.2. Requirements for clusters on RHOSP that use OVS-DPDK
To use Open vSwitch with the Data Plane Development Kit (OVS-DPDK) with your deployment, you must meet the following requirements:
- Plan your Red Hat OpenStack Platform (RHOSP) OVS-DPDK deployment by referring to Planning your OVS-DPDK deployment in the Network Functions Virtualization Planning and Configuration Guide.
- Configure your RHOSP OVS-DPDK deployment according to Configuring an OVS-DPDK deployment in the Network Functions Virtualization Planning and Configuration Guide.
2.2. Preparing to install a cluster that uses SR-IOV
You must configure RHOSP before you install a cluster that uses SR-IOV on it.
When installing a cluster using SR-IOV, you must deploy clusters using cgroup v1. For more information, Enabling Linux control group version 1 (cgroup v1).
2.2.1. Creating SR-IOV networks for compute machines
If your Red Hat OpenStack Platform (RHOSP) deployment supports single root I/O virtualization (SR-IOV), you can provision SR-IOV networks that compute machines run on.
The following instructions entail creating an external flat network and an external, VLAN-based network that can be attached to a compute machine. Depending on your RHOSP deployment, other network types might be required.
Prerequisites
Your cluster supports SR-IOV.
NoteIf you are unsure about what your cluster supports, review the OpenShift Container Platform SR-IOV hardware networks documentation.
-
You created radio and uplink provider networks as part of your RHOSP deployment. The names
radioanduplinkare used in all example commands to represent these networks.
Procedure
On a command line, create a radio RHOSP network:
$ openstack network create radio --provider-physical-network radio --provider-network-type flat --externalCreate an uplink RHOSP network:
$ openstack network create uplink --provider-physical-network uplink --provider-network-type vlan --externalCreate a subnet for the radio network:
$ openstack subnet create --network radio --subnet-range <radio_network_subnet_range> radioCreate a subnet for the uplink network:
$ openstack subnet create --network uplink --subnet-range <uplink_network_subnet_range> uplink
2.3. Preparing to install a cluster that uses OVS-DPDK
You must configure RHOSP before you install a cluster that uses SR-IOV on it.
- Complete Creating a flavor and deploying an instance for OVS-DPDK before you install a cluster on RHOSP.
After you perform preinstallation tasks, install your cluster by following the most relevant OpenShift Container Platform on RHOSP installation instructions. Then, perform the tasks under "Next steps" on this page.
2.4. Next steps
For either type of deployment:
To complete SR-IOV configuration after you deploy your cluster:
Consult the following references after you deploy your cluster to improve its performance:
Chapter 3. Installing a cluster on OpenStack with customizations
In OpenShift Container Platform version 4.14, you can install a customized cluster on Red Hat OpenStack Platform (RHOSP). To customize the installation, modify parameters in the install-config.yaml before you install the cluster.
3.1. Prerequisites
- You reviewed details about the OpenShift Container Platform installation and update processes.
- You read the documentation on selecting a cluster installation method and preparing it for users.
- You verified that OpenShift Container Platform 4.14 is compatible with your RHOSP version by using the Supported platforms for OpenShift clusters section. You can also compare platform support across different versions by viewing the OpenShift Container Platform on RHOSP support matrix.
- You have a storage service installed in RHOSP, such as block storage (Cinder) or object storage (Swift). Object storage is the recommended storage technology for OpenShift Container Platform registry cluster deployment. For more information, see Optimizing storage.
- You understand performance and scalability practices for cluster scaling, control plane sizing, and etcd. For more information, see Recommended practices for scaling the cluster.
- You have the metadata service enabled in RHOSP.
3.2. Resource guidelines for installing OpenShift Container Platform on RHOSP
To support an OpenShift Container Platform installation, your Red Hat OpenStack Platform (RHOSP) quota must meet the following requirements:
| Resource | Value |
|---|---|
| Floating IP addresses | 3 |
| Ports | 15 |
| Routers | 1 |
| Subnets | 1 |
| RAM | 88 GB |
| vCPUs | 22 |
| Volume storage | 275 GB |
| Instances | 7 |
| Security groups | 3 |
| Security group rules | 60 |
| Server groups | 2 - plus 1 for each additional availability zone in each machine pool |
A cluster might function with fewer than recommended resources, but its performance is not guaranteed.
If RHOSP object storage (Swift) is available and operated by a user account with the swiftoperator role, it is used as the default backend for the OpenShift Container Platform image registry. In this case, the volume storage requirement is 175 GB. Swift space requirements vary depending on the size of the image registry.
By default, your security group and security group rule quotas might be low. If you encounter problems, run openstack quota set --secgroups 3 --secgroup-rules 60 <project> as an administrator to increase them.
An OpenShift Container Platform deployment comprises control plane machines, compute machines, and a bootstrap machine.
3.2.1. Control plane machines
By default, the OpenShift Container Platform installation process creates three control plane machines.
Each machine requires:
- An instance from the RHOSP quota
- A port from the RHOSP quota
- A flavor with at least 16 GB memory and 4 vCPUs
- At least 100 GB storage space from the RHOSP quota
3.2.2. Compute machines
By default, the OpenShift Container Platform installation process creates three compute machines.
Each machine requires:
- An instance from the RHOSP quota
- A port from the RHOSP quota
- A flavor with at least 8 GB memory and 2 vCPUs
- At least 100 GB storage space from the RHOSP quota
Compute machines host the applications that you run on OpenShift Container Platform; aim to run as many as you can.
3.2.3. Bootstrap machine
During installation, a bootstrap machine is temporarily provisioned to stand up the control plane. After the production control plane is ready, the bootstrap machine is deprovisioned.
The bootstrap machine requires:
- An instance from the RHOSP quota
- A port from the RHOSP quota
- A flavor with at least 16 GB memory and 4 vCPUs
- At least 100 GB storage space from the RHOSP quota
3.2.4. Load balancing requirements for user-provisioned infrastructure
Before you install OpenShift Container Platform, you can provision your own API and application ingress load balancing infrastructure to use in place of the default, internal load balancing solution. In production scenarios, you can deploy the API and application Ingress load balancers separately so that you can scale the load balancer infrastructure for each in isolation.
If you want to deploy the API and application Ingress load balancers with a Red Hat Enterprise Linux (RHEL) instance, you must purchase the RHEL subscription separately.
The load balancing infrastructure must meet the following requirements:
API load balancer: Provides a common endpoint for users, both human and machine, to interact with and configure the platform. Configure the following conditions:
- Layer 4 load balancing only. This can be referred to as Raw TCP or SSL Passthrough mode.
- A stateless load balancing algorithm. The options vary based on the load balancer implementation.
ImportantDo not configure session persistence for an API load balancer. Configuring session persistence for a Kubernetes API server might cause performance issues from excess application traffic for your OpenShift Container Platform cluster and the Kubernetes API that runs inside the cluster.
Configure the following ports on both the front and back of the load balancers:
Expand Table 3.2. API load balancer Port Back-end machines (pool members) Internal External Description 6443Bootstrap and control plane. You remove the bootstrap machine from the load balancer after the bootstrap machine initializes the cluster control plane. You must configure the
/readyzendpoint for the API server health check probe.X
X
Kubernetes API server
22623Bootstrap and control plane. You remove the bootstrap machine from the load balancer after the bootstrap machine initializes the cluster control plane.
X
Machine config server
NoteThe load balancer must be configured to take a maximum of 30 seconds from the time the API server turns off the
/readyzendpoint to the removal of the API server instance from the pool. Within the time frame after/readyzreturns an error or becomes healthy, the endpoint must have been removed or added. Probing every 5 or 10 seconds, with two successful requests to become healthy and three to become unhealthy, are well-tested values.Application Ingress load balancer: Provides an ingress point for application traffic flowing in from outside the cluster. A working configuration for the Ingress router is required for an OpenShift Container Platform cluster.
Configure the following conditions:
- Layer 4 load balancing only. This can be referred to as Raw TCP or SSL Passthrough mode.
- A connection-based or session-based persistence is recommended, based on the options available and types of applications that will be hosted on the platform.
TipIf the true IP address of the client can be seen by the application Ingress load balancer, enabling source IP-based session persistence can improve performance for applications that use end-to-end TLS encryption.
Configure the following ports on both the front and back of the load balancers:
Expand Table 3.3. Application Ingress load balancer Port Back-end machines (pool members) Internal External Description 443The machines that run the Ingress Controller pods, compute, or worker, by default.
X
X
HTTPS traffic
80The machines that run the Ingress Controller pods, compute, or worker, by default.
X
X
HTTP traffic
NoteIf you are deploying a three-node cluster with zero compute nodes, the Ingress Controller pods run on the control plane nodes. In three-node cluster deployments, you must configure your application Ingress load balancer to route HTTP and HTTPS traffic to the control plane nodes.
3.2.4.1. Example load balancer configuration for clusters that are deployed with user-managed load balancers
This section provides an example API and application Ingress load balancer configuration that meets the load balancing requirements for clusters that are deployed with user-managed load balancers. The sample is an /etc/haproxy/haproxy.cfg configuration for an HAProxy load balancer. The example is not meant to provide advice for choosing one load balancing solution over another.
In the example, the same load balancer is used for the Kubernetes API and application ingress traffic. In production scenarios, you can deploy the API and application ingress load balancers separately so that you can scale the load balancer infrastructure for each in isolation.
If you are using HAProxy as a load balancer and SELinux is set to enforcing, you must ensure that the HAProxy service can bind to the configured TCP port by running setsebool -P haproxy_connect_any=1.
Example 3.1. Sample API and application Ingress load balancer configuration
global
log 127.0.0.1 local2
pidfile /var/run/haproxy.pid
maxconn 4000
daemon
defaults
mode http
log global
option dontlognull
option http-server-close
option redispatch
retries 3
timeout http-request 10s
timeout queue 1m
timeout connect 10s
timeout client 1m
timeout server 1m
timeout http-keep-alive 10s
timeout check 10s
maxconn 3000
listen api-server-6443
bind *:6443
mode tcp
option httpchk GET /readyz HTTP/1.0
option log-health-checks
balance roundrobin
server bootstrap bootstrap.ocp4.example.com:6443 verify none check check-ssl inter 10s fall 2 rise 3 backup
server master0 master0.ocp4.example.com:6443 weight 1 verify none check check-ssl inter 10s fall 2 rise 3
server master1 master1.ocp4.example.com:6443 weight 1 verify none check check-ssl inter 10s fall 2 rise 3
server master2 master2.ocp4.example.com:6443 weight 1 verify none check check-ssl inter 10s fall 2 rise 3
listen machine-config-server-22623
bind *:22623
mode tcp
server bootstrap bootstrap.ocp4.example.com:22623 check inter 1s backup
server master0 master0.ocp4.example.com:22623 check inter 1s
server master1 master1.ocp4.example.com:22623 check inter 1s
server master2 master2.ocp4.example.com:22623 check inter 1s
listen ingress-router-443
bind *:443
mode tcp
balance source
server worker0 worker0.ocp4.example.com:443 check inter 1s
server worker1 worker1.ocp4.example.com:443 check inter 1s
listen ingress-router-80
bind *:80
mode tcp
balance source
server worker0 worker0.ocp4.example.com:80 check inter 1s
server worker1 worker1.ocp4.example.com:80 check inter 1s- 1
- Port
6443handles the Kubernetes API traffic and points to the control plane machines. - 2 4
- The bootstrap entries must be in place before the OpenShift Container Platform cluster installation and they must be removed after the bootstrap process is complete.
- 3
- Port
22623handles the machine config server traffic and points to the control plane machines. - 5
- Port
443handles the HTTPS traffic and points to the machines that run the Ingress Controller pods. The Ingress Controller pods run on the compute machines by default. - 6
- Port
80handles the HTTP traffic and points to the machines that run the Ingress Controller pods. The Ingress Controller pods run on the compute machines by default.NoteIf you are deploying a three-node cluster with zero compute nodes, the Ingress Controller pods run on the control plane nodes. In three-node cluster deployments, you must configure your application Ingress load balancer to route HTTP and HTTPS traffic to the control plane nodes.
If you are using HAProxy as a load balancer, you can check that the haproxy process is listening on ports 6443, 22623, 443, and 80 by running netstat -nltupe on the HAProxy node.
3.3. Internet access for OpenShift Container Platform
In OpenShift Container Platform 4.14, you require access to the internet to install your cluster.
You must have internet access to:
- Access OpenShift Cluster Manager to download the installation program and perform subscription management. If the cluster has internet access and you do not disable Telemetry, that service automatically entitles your cluster.
- Access Quay.io to obtain the packages that are required to install your cluster.
- Obtain the packages that are required to perform cluster updates.
If your cluster cannot have direct internet access, you can perform a restricted network installation on some types of infrastructure that you provision. During that process, you download the required content and use it to populate a mirror registry with the installation packages. With some installation types, the environment that you install your cluster in will not require internet access. Before you update the cluster, you update the content of the mirror registry.
3.4. Enabling Swift on RHOSP
Swift is operated by a user account with the swiftoperator role. Add the role to an account before you run the installation program.
If the Red Hat OpenStack Platform (RHOSP) object storage service, commonly known as Swift, is available, OpenShift Container Platform uses it as the image registry storage. If it is unavailable, the installation program relies on the RHOSP block storage service, commonly known as Cinder.
If Swift is present and you want to use it, you must enable access to it. If it is not present, or if you do not want to use it, skip this section.
RHOSP 17 sets the rgw_max_attr_size parameter of Ceph RGW to 256 characters. This setting causes issues with uploading container images to the OpenShift Container Platform registry. You must set the value of rgw_max_attr_size to at least 1024 characters.
Before installation, check if your RHOSP deployment is affected by this problem. If it is, reconfigure Ceph RGW.
Prerequisites
- You have a RHOSP administrator account on the target environment.
- The Swift service is installed.
-
On Ceph RGW, the
account in urloption is enabled.
Procedure
To enable Swift on RHOSP:
As an administrator in the RHOSP CLI, add the
swiftoperatorrole to the account that will access Swift:$ openstack role add --user <user> --project <project> swiftoperator
Your RHOSP deployment can now use Swift for the image registry.
3.5. Configuring an image registry with custom storage on clusters that run on RHOSP
After you install a cluster on Red Hat OpenStack Platform (RHOSP), you can use a Cinder volume that is in a specific availability zone for registry storage.
Procedure
Create a YAML file that specifies the storage class and availability zone to use. For example:
apiVersion: storage.k8s.io/v1 kind: StorageClass metadata: name: custom-csi-storageclass provisioner: cinder.csi.openstack.org volumeBindingMode: WaitForFirstConsumer allowVolumeExpansion: true parameters: availability: <availability_zone_name>NoteOpenShift Container Platform does not verify the existence of the availability zone you choose. Verify the name of the availability zone before you apply the configuration.
From a command line, apply the configuration:
$ oc apply -f <storage_class_file_name>Example output
storageclass.storage.k8s.io/custom-csi-storageclass createdCreate a YAML file that specifies a persistent volume claim (PVC) that uses your storage class and the
openshift-image-registrynamespace. For example:apiVersion: v1 kind: PersistentVolumeClaim metadata: name: csi-pvc-imageregistry namespace: openshift-image-registry1 annotations: imageregistry.openshift.io: "true" spec: accessModes: - ReadWriteOnce volumeMode: Filesystem resources: requests: storage: 100Gi2 storageClassName: <your_custom_storage_class>3 From a command line, apply the configuration:
$ oc apply -f <pvc_file_name>Example output
persistentvolumeclaim/csi-pvc-imageregistry createdReplace the original persistent volume claim in the image registry configuration with the new claim:
$ oc patch configs.imageregistry.operator.openshift.io/cluster --type 'json' -p='[{"op": "replace", "path": "/spec/storage/pvc/claim", "value": "csi-pvc-imageregistry"}]'Example output
config.imageregistry.operator.openshift.io/cluster patchedOver the next several minutes, the configuration is updated.
Verification
To confirm that the registry is using the resources that you defined:
Verify that the PVC claim value is identical to the name that you provided in your PVC definition:
$ oc get configs.imageregistry.operator.openshift.io/cluster -o yamlExample output
... status: ... managementState: Managed pvc: claim: csi-pvc-imageregistry ...Verify that the status of the PVC is
Bound:$ oc get pvc -n openshift-image-registry csi-pvc-imageregistryExample output
NAME STATUS VOLUME CAPACITY ACCESS MODES STORAGECLASS AGE csi-pvc-imageregistry Bound pvc-72a8f9c9-f462-11e8-b6b6-fa163e18b7b5 100Gi RWO custom-csi-storageclass 11m
3.6. Verifying external network access
The OpenShift Container Platform installation process requires external network access. You must provide an external network value to it, or deployment fails. Before you begin the process, verify that a network with the external router type exists in Red Hat OpenStack Platform (RHOSP).
Prerequisites
Procedure
Using the RHOSP CLI, verify the name and ID of the 'External' network:
$ openstack network list --long -c ID -c Name -c "Router Type"Example output
+--------------------------------------+----------------+-------------+ | ID | Name | Router Type | +--------------------------------------+----------------+-------------+ | 148a8023-62a7-4672-b018-003462f8d7dc | public_network | External | +--------------------------------------+----------------+-------------+
A network with an external router type appears in the network list. If at least one does not, see Creating a default floating IP network and Creating a default provider network.
If the external network’s CIDR range overlaps one of the default network ranges, you must change the matching network ranges in the install-config.yaml file before you start the installation process.
The default network ranges are:
| Network | Range |
|---|---|
|
| 10.0.0.0/16 |
|
| 172.30.0.0/16 |
|
| 10.128.0.0/14 |
If the installation program finds multiple networks with the same name, it sets one of them at random. To avoid this behavior, create unique names for resources in RHOSP.
If the Neutron trunk service plugin is enabled, a trunk port is created by default. For more information, see Neutron trunk port.
3.7. Defining parameters for the installation program
The OpenShift Container Platform installation program relies on a file that is called clouds.yaml. The file describes Red Hat OpenStack Platform (RHOSP) configuration parameters, including the project name, log in information, and authorization service URLs.
Procedure
Create the
clouds.yamlfile:If your RHOSP distribution includes the Horizon web UI, generate a
clouds.yamlfile in it.ImportantRemember to add a password to the
authfield. You can also keep secrets in a separate file fromclouds.yaml.If your RHOSP distribution does not include the Horizon web UI, or you do not want to use Horizon, create the file yourself. For detailed information about
clouds.yaml, see Config files in the RHOSP documentation.clouds: shiftstack: auth: auth_url: http://10.10.14.42:5000/v3 project_name: shiftstack username: <username> password: <password> user_domain_name: Default project_domain_name: Default dev-env: region_name: RegionOne auth: username: <username> password: <password> project_name: 'devonly' auth_url: 'https://10.10.14.22:5001/v2.0'
If your RHOSP installation uses self-signed certificate authority (CA) certificates for endpoint authentication:
- Copy the certificate authority file to your machine.
Add the
cacertskey to theclouds.yamlfile. The value must be an absolute, non-root-accessible path to the CA certificate:clouds: shiftstack: ... cacert: "/etc/pki/ca-trust/source/anchors/ca.crt.pem"TipAfter you run the installer with a custom CA certificate, you can update the certificate by editing the value of the
ca-cert.pemkey in thecloud-provider-configkeymap. On a command line, run:$ oc edit configmap -n openshift-config cloud-provider-config
Place the
clouds.yamlfile in one of the following locations:-
The value of the
OS_CLIENT_CONFIG_FILEenvironment variable - The current directory
-
A Unix-specific user configuration directory, for example
~/.config/openstack/clouds.yaml A Unix-specific site configuration directory, for example
/etc/openstack/clouds.yamlThe installation program searches for
clouds.yamlin that order.
-
The value of the
3.8. Setting OpenStack Cloud Controller Manager options
Optionally, you can edit the OpenStack Cloud Controller Manager (CCM) configuration for your cluster. This configuration controls how OpenShift Container Platform interacts with Red Hat OpenStack Platform (RHOSP).
For a complete list of configuration parameters, see the "OpenStack Cloud Controller Manager reference guide" page in the "Installing on OpenStack" documentation.
Procedure
If you have not already generated manifest files for your cluster, generate them by running the following command:
$ openshift-install --dir <destination_directory> create manifestsIn a text editor, open the cloud-provider configuration manifest file. For example:
$ vi openshift/manifests/cloud-provider-config.yamlModify the options according to the CCM reference guide.
Configuring Octavia for load balancing is a common case for clusters that do not use Kuryr. For example:
#... [LoadBalancer] lb-provider = "amphora"1 floating-network-id="d3deb660-4190-40a3-91f1-37326fe6ec4a"2 create-monitor = True3 monitor-delay = 10s4 monitor-timeout = 10s5 monitor-max-retries = 16 #...- 1
- This property sets the Octavia provider that your load balancer uses. It accepts
"ovn"or"amphora"as values. If you choose to use OVN, you must also setlb-methodtoSOURCE_IP_PORT. - 2
- This property is required if you want to use multiple external networks with your cluster. The cloud provider creates floating IP addresses on the network that is specified here.
- 3
- This property controls whether the cloud provider creates health monitors for Octavia load balancers. Set the value to
Trueto create health monitors. As of RHOSP 16.2, this feature is only available for the Amphora provider. - 4
- This property sets the frequency with which endpoints are monitored. The value must be in the
time.ParseDuration()format. This property is required if the value of thecreate-monitorproperty isTrue. - 5
- This property sets the time that monitoring requests are open before timing out. The value must be in the
time.ParseDuration()format. This property is required if the value of thecreate-monitorproperty isTrue. - 6
- This property defines how many successful monitoring requests are required before a load balancer is marked as online. The value must be an integer. This property is required if the value of the
create-monitorproperty isTrue.
ImportantPrior to saving your changes, verify that the file is structured correctly. Clusters might fail if properties are not placed in the appropriate section.
ImportantYou must set the value of the
create-monitorproperty toTrueif you use services that have the value of the.spec.externalTrafficPolicyproperty set toLocal. The OVN Octavia provider in RHOSP 16.2 does not support health monitors. Therefore, services that haveETPparameter values set toLocalmight not respond when thelb-providervalue is set to"ovn".ImportantFor installations that use Kuryr, Kuryr handles relevant services. There is no need to configure Octavia load balancing in the cloud provider.
Save the changes to the file and proceed with installation.
TipYou can update your cloud provider configuration after you run the installer. On a command line, run:
$ oc edit configmap -n openshift-config cloud-provider-configAfter you save your changes, your cluster will take some time to reconfigure itself. The process is complete if none of your nodes have a
SchedulingDisabledstatus.
3.9. Obtaining the installation program
Before you install OpenShift Container Platform, download the installation file on the host you are using for installation.
Prerequisites
- You have a computer that runs Linux or macOS, with at least 1.2 GB of local disk space.
Procedure
- Go to the Cluster Type page on the Red Hat Hybrid Cloud Console. If you have a Red Hat account, log in with your credentials. If you do not, create an account.
- Select your infrastructure provider from the Run it yourself section of the page.
- Select your host operating system and architecture from the dropdown menus under OpenShift Installer and click Download Installer.
Place the downloaded file in the directory where you want to store the installation configuration files.
Important- The installation program creates several files on the computer that you use to install your cluster. You must keep the installation program and the files that the installation program creates after you finish installing the cluster. Both of the files are required to delete the cluster.
- Deleting the files created by the installation program does not remove your cluster, even if the cluster failed during installation. To remove your cluster, complete the OpenShift Container Platform uninstallation procedures for your specific cloud provider.
Extract the installation program. For example, on a computer that uses a Linux operating system, run the following command:
$ tar -xvf openshift-install-linux.tar.gz- Download your installation pull secret from Red Hat OpenShift Cluster Manager. This pull secret allows you to authenticate with the services that are provided by the included authorities, including Quay.io, which serves the container images for OpenShift Container Platform components.
Alternatively, you can retrieve the installation program from the Red Hat Customer Portal, where you can specify a version of the installation program to download. However, you must have an active subscription to access this page.
3.10. Creating the installation configuration file
You can customize the OpenShift Container Platform cluster you install on Red Hat OpenStack Platform (RHOSP).
Prerequisites
- You have the OpenShift Container Platform installation program and the pull secret for your cluster.
Procedure
Create the
install-config.yamlfile.Change to the directory that contains the installation program and run the following command:
$ ./openshift-install create install-config --dir <installation_directory>1 - 1
- For
<installation_directory>, specify the directory name to store the files that the installation program creates.
When specifying the directory:
-
Verify that the directory has the
executepermission. This permission is required to run Terraform binaries under the installation directory. Use an empty directory. Some installation assets, such as bootstrap X.509 certificates, have short expiration intervals, therefore you must not reuse an installation directory. If you want to reuse individual files from another cluster installation, you can copy them into your directory. However, the file names for the installation assets might change between releases. Use caution when copying installation files from an earlier OpenShift Container Platform version.
NoteAlways delete the
~/.powervsdirectory to avoid reusing a stale configuration. Run the following command:$ rm -rf ~/.powervs
At the prompts, provide the configuration details for your cloud:
Optional: Select an SSH key to use to access your cluster machines.
NoteFor production OpenShift Container Platform clusters on which you want to perform installation debugging or disaster recovery, specify an SSH key that your
ssh-agentprocess uses.- Select openstack as the platform to target.
- Specify the Red Hat OpenStack Platform (RHOSP) external network name to use for installing the cluster.
- Specify the floating IP address to use for external access to the OpenShift API.
- Specify a RHOSP flavor with at least 16 GB RAM to use for control plane nodes and 8 GB RAM for compute nodes.
- Select the base domain to deploy the cluster to. All DNS records will be sub-domains of this base and will also include the cluster name.
- Enter a name for your cluster. The name must be 14 or fewer characters long.
-
Modify the
install-config.yamlfile. You can find more information about the available parameters in the "Installation configuration parameters" section. Back up the
install-config.yamlfile so that you can use it to install multiple clusters.ImportantThe
install-config.yamlfile is consumed during the installation process. If you want to reuse the file, you must back it up now.
3.10.1. Configuring the cluster-wide proxy during installation
Production environments can deny direct access to the internet and instead have an HTTP or HTTPS proxy available. You can configure a new OpenShift Container Platform cluster to use a proxy by configuring the proxy settings in the install-config.yaml file.
Prerequisites
-
You have an existing
install-config.yamlfile. You reviewed the sites that your cluster requires access to and determined whether any of them need to bypass the proxy. By default, all cluster egress traffic is proxied, including calls to hosting cloud provider APIs. You added sites to the
Proxyobject’sspec.noProxyfield to bypass the proxy if necessary.NoteThe
Proxyobjectstatus.noProxyfield is populated with the values of thenetworking.machineNetwork[].cidr,networking.clusterNetwork[].cidr, andnetworking.serviceNetwork[]fields from your installation configuration.For installations on Amazon Web Services (AWS), Google Cloud, Microsoft Azure, and Red Hat OpenStack Platform (RHOSP), the
Proxyobjectstatus.noProxyfield is also populated with the instance metadata endpoint (169.254.169.254).
Procedure
Edit your
install-config.yamlfile and add the proxy settings. For example:apiVersion: v1 baseDomain: my.domain.com proxy: httpProxy: http://<username>:<pswd>@<ip>:<port>1 httpsProxy: https://<username>:<pswd>@<ip>:<port>2 noProxy: example.com3 additionalTrustBundle: |4 -----BEGIN CERTIFICATE----- <MY_TRUSTED_CA_CERT> -----END CERTIFICATE----- additionalTrustBundlePolicy: <policy_to_add_additionalTrustBundle>5 - 1
- A proxy URL to use for creating HTTP connections outside the cluster. The URL scheme must be
http. - 2
- A proxy URL to use for creating HTTPS connections outside the cluster.
- 3
- A comma-separated list of destination domain names, IP addresses, or other network CIDRs to exclude from proxying. Preface a domain with
.to match subdomains only. For example,.y.commatchesx.y.com, but noty.com. Use*to bypass the proxy for all destinations. - 4
- If provided, the installation program generates a config map that is named
user-ca-bundlein theopenshift-confignamespace that contains one or more additional CA certificates that are required for proxying HTTPS connections. The Cluster Network Operator then creates atrusted-ca-bundleconfig map that merges these contents with the Red Hat Enterprise Linux CoreOS (RHCOS) trust bundle, and this config map is referenced in thetrustedCAfield of theProxyobject. TheadditionalTrustBundlefield is required unless the proxy’s identity certificate is signed by an authority from the RHCOS trust bundle. - 5
- Optional: The policy to determine the configuration of the
Proxyobject to reference theuser-ca-bundleconfig map in thetrustedCAfield. The allowed values areProxyonlyandAlways. UseProxyonlyto reference theuser-ca-bundleconfig map only whenhttp/httpsproxy is configured. UseAlwaysto always reference theuser-ca-bundleconfig map. The default value isProxyonly.
NoteThe installation program does not support the proxy
readinessEndpointsfield.NoteIf the installer times out, restart and then complete the deployment by using the
wait-forcommand of the installer. For example:$ ./openshift-install wait-for install-complete --log-level debug- Save the file and reference it when installing OpenShift Container Platform.
The installation program creates a cluster-wide proxy that is named cluster that uses the proxy settings in the provided install-config.yaml file. If no proxy settings are provided, a cluster Proxy object is still created, but it will have a nil spec.
Only the Proxy object named cluster is supported, and no additional proxies can be created.
3.10.2. Custom subnets in RHOSP deployments
Optionally, you can deploy a cluster on a Red Hat OpenStack Platform (RHOSP) subnet of your choice. The subnet’s GUID is passed as the value of platform.openstack.machinesSubnet in the install-config.yaml file.
This subnet is used as the cluster’s primary subnet. By default, nodes and ports are created on it. You can create nodes and ports on a different RHOSP subnet by setting the value of the platform.openstack.machinesSubnet property to the subnet’s UUID.
Before you run the OpenShift Container Platform installer with a custom subnet, verify that your configuration meets the following requirements:
-
The subnet that is used by
platform.openstack.machinesSubnethas DHCP enabled. -
The CIDR of
platform.openstack.machinesSubnetmatches the CIDR ofnetworking.machineNetwork. - The installation program user has permission to create ports on this network, including ports with fixed IP addresses.
Clusters that use custom subnets have the following limitations:
-
If you plan to install a cluster that uses floating IP addresses, the
platform.openstack.machinesSubnetsubnet must be attached to a router that is connected to theexternalNetworknetwork. -
If the
platform.openstack.machinesSubnetvalue is set in theinstall-config.yamlfile, the installation program does not create a private network or subnet for your RHOSP machines. -
You cannot use the
platform.openstack.externalDNSproperty at the same time as a custom subnet. To add DNS to a cluster that uses a custom subnet, configure DNS on the RHOSP network.
By default, the API VIP takes x.x.x.5 and the Ingress VIP takes x.x.x.7 from your network’s CIDR block. To override these default values, set values for platform.openstack.apiVIPs and platform.openstack.ingressVIPs that are outside of the DHCP allocation pool.
The CIDR ranges for networks are not adjustable after cluster installation. Red Hat does not provide direct guidance on determining the range during cluster installation because it requires careful consideration of the number of created pods per namespace.
3.10.3. Deploying a cluster with bare metal machines
If you want your cluster to use bare metal machines, modify the install-config.yaml file. Your cluster can have compute machines running on bare metal.
Bare-metal compute machines are not supported on clusters that use Kuryr.
Be sure that your install-config.yaml file reflects whether the RHOSP network that you use for bare metal workers supports floating IP addresses or not.
Prerequisites
- The RHOSP Bare Metal service (Ironic) is enabled and accessible via the RHOSP Compute API.
- Bare metal is available as a RHOSP flavor.
- If your cluster runs on an RHOSP version that is more than 16.1.6 and less than 16.2.4, bare metal workers do not function due to a known issue that causes the metadata service to be unavailable for services on OpenShift Container Platform nodes.
- The RHOSP network supports both VM and bare metal server attachment.
- If you want to deploy the machines on a pre-existing network, a RHOSP subnet is provisioned.
- If you want to deploy the machines on an installer-provisioned network, the RHOSP Bare Metal service (Ironic) is able to listen for and interact with Preboot eXecution Environment (PXE) boot machines that run on tenant networks.
-
You created an
install-config.yamlfile as part of the OpenShift Container Platform installation process.
Procedure
In the
install-config.yamlfile, edit the flavors for machines:-
Change the value of
compute.platform.openstack.typeto a bare metal flavor. If you want to deploy your machines on a pre-existing network, change the value of
platform.openstack.machinesSubnetto the RHOSP subnet UUID of the network.An example bare metal
install-config.yamlfilecompute: - architecture: amd64 hyperthreading: Enabled name: worker platform: openstack: type: <bare_metal_compute_flavor>1 replicas: 3 ... platform: openstack: machinesSubnet: <subnet_UUID>2 ...
-
Change the value of
Use the updated install-config.yaml file to complete the installation process. The compute machines that are created during deployment use the flavor that you added to the file.
The installer may time out while waiting for bare metal machines to boot.
If the installer times out, restart and then complete the deployment by using the wait-for command of the installer. For example:
$ ./openshift-install wait-for install-complete --log-level debug3.10.4. Cluster deployment on RHOSP provider networks
You can deploy your OpenShift Container Platform clusters on Red Hat OpenStack Platform (RHOSP) with a primary network interface on a provider network. Provider networks are commonly used to give projects direct access to a public network that can be used to reach the internet. You can also share provider networks among projects as part of the network creation process.
RHOSP provider networks map directly to an existing physical network in the data center. A RHOSP administrator must create them.
In the following example, OpenShift Container Platform workloads are connected to a data center by using a provider network:
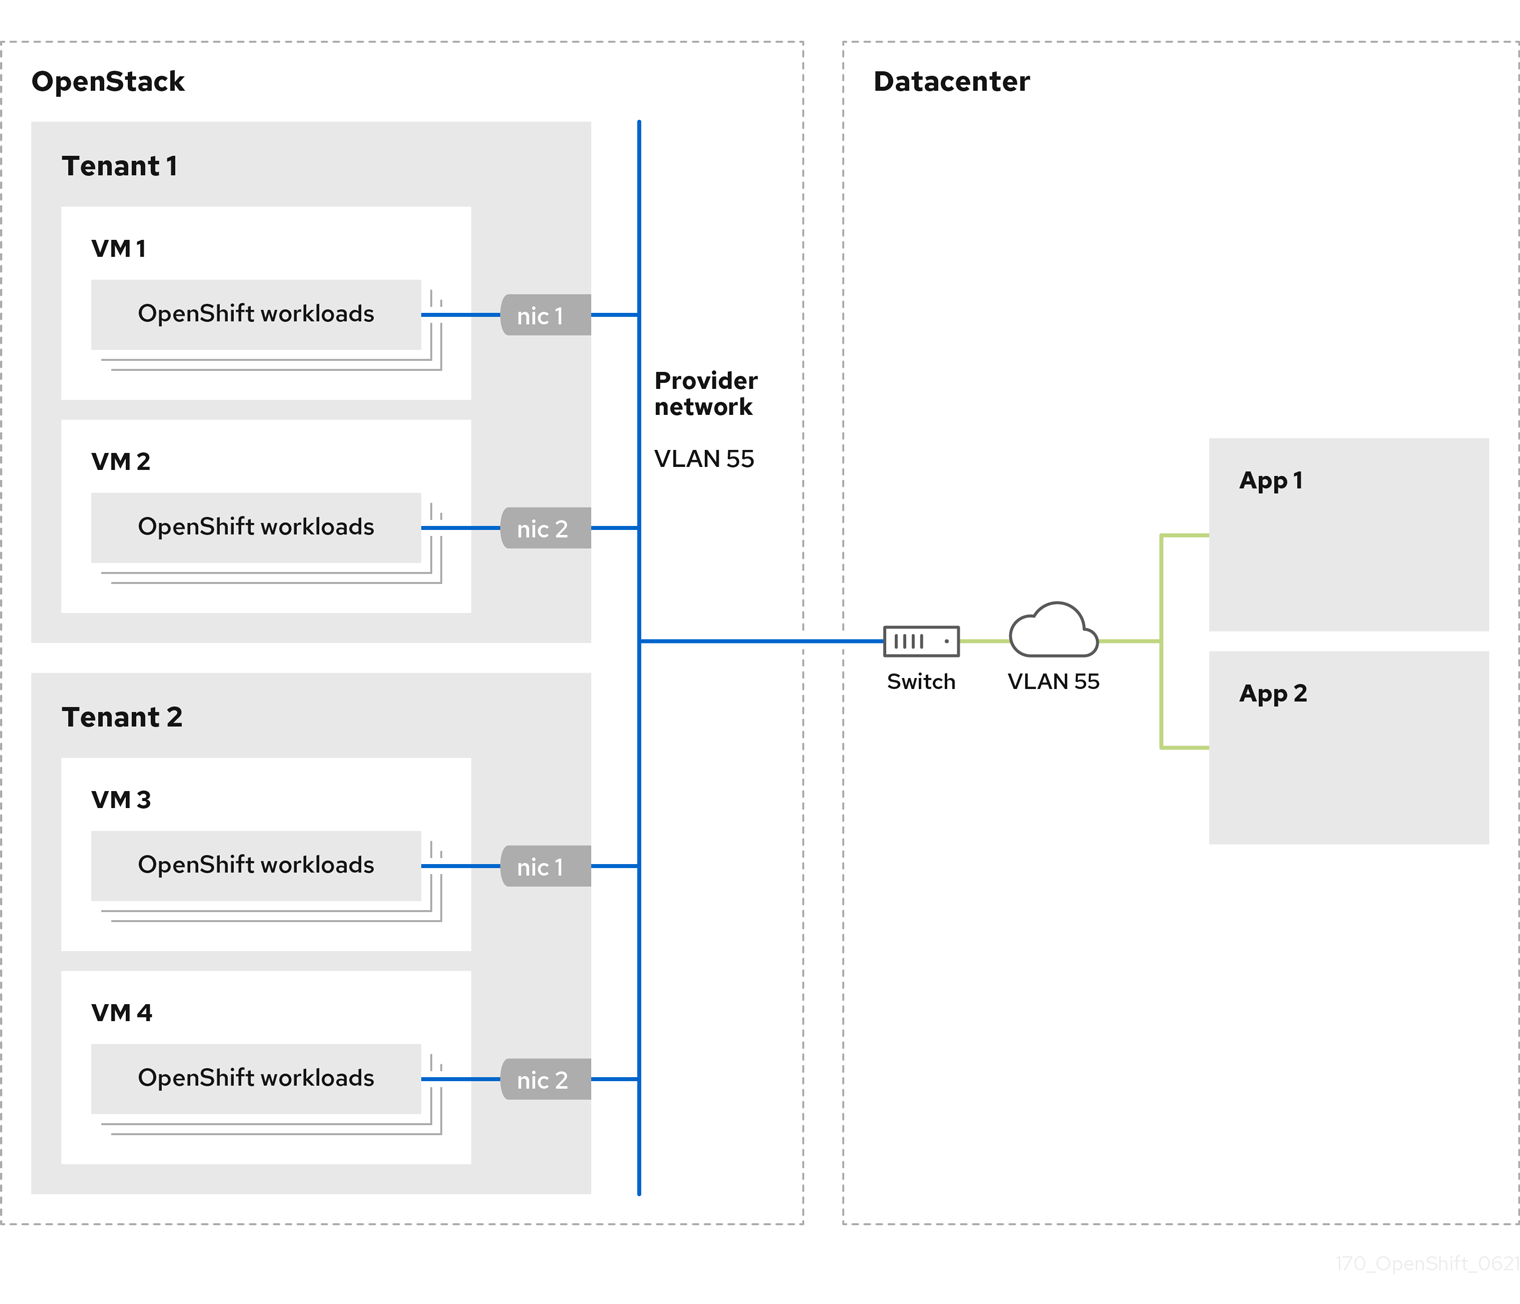
OpenShift Container Platform clusters that are installed on provider networks do not require tenant networks or floating IP addresses. The installer does not create these resources during installation.
Example provider network types include flat (untagged) and VLAN (802.1Q tagged).
A cluster can support as many provider network connections as the network type allows. For example, VLAN networks typically support up to 4096 connections.
You can learn more about provider and tenant networks in the RHOSP documentation.
3.10.4.1. RHOSP provider network requirements for cluster installation
Before you install an OpenShift Container Platform cluster, your Red Hat OpenStack Platform (RHOSP) deployment and provider network must meet a number of conditions:
- The RHOSP networking service (Neutron) is enabled and accessible through the RHOSP networking API.
- The RHOSP networking service has the port security and allowed address pairs extensions enabled.
The provider network can be shared with other tenants.
TipUse the
openstack network createcommand with the--shareflag to create a network that can be shared.The RHOSP project that you use to install the cluster must own the provider network, as well as an appropriate subnet.
Tip- To create a network for a project that is named "openshift," enter the following command
$ openstack network create --project openshift- To create a subnet for a project that is named "openshift," enter the following command
$ openstack subnet create --project openshiftTo learn more about creating networks on RHOSP, read the provider networks documentation.
If the cluster is owned by the
adminuser, you must run the installer as that user to create ports on the network.ImportantProvider networks must be owned by the RHOSP project that is used to create the cluster. If they are not, the RHOSP Compute service (Nova) cannot request a port from that network.
Verify that the provider network can reach the RHOSP metadata service IP address, which is
169.254.169.254by default.Depending on your RHOSP SDN and networking service configuration, you might need to provide the route when you create the subnet. For example:
$ openstack subnet create --dhcp --host-route destination=169.254.169.254/32,gateway=192.0.2.2 ...- Optional: To secure the network, create role-based access control (RBAC) rules that limit network access to a single project.
3.10.4.2. Deploying a cluster that has a primary interface on a provider network
You can deploy an OpenShift Container Platform cluster that has its primary network interface on an Red Hat OpenStack Platform (RHOSP) provider network.
Prerequisites
- Your Red Hat OpenStack Platform (RHOSP) deployment is configured as described by "RHOSP provider network requirements for cluster installation".
Procedure
-
In a text editor, open the
install-config.yamlfile. -
Set the value of the
platform.openstack.apiVIPsproperty to the IP address for the API VIP. -
Set the value of the
platform.openstack.ingressVIPsproperty to the IP address for the Ingress VIP. -
Set the value of the
platform.openstack.machinesSubnetproperty to the UUID of the provider network subnet. -
Set the value of the
networking.machineNetwork.cidrproperty to the CIDR block of the provider network subnet.
The platform.openstack.apiVIPs and platform.openstack.ingressVIPs properties must both be unassigned IP addresses from the networking.machineNetwork.cidr block.
Section of an installation configuration file for a cluster that relies on a RHOSP provider network
...
platform:
openstack:
apiVIPs:
- 192.0.2.13
ingressVIPs:
- 192.0.2.23
machinesSubnet: fa806b2f-ac49-4bce-b9db-124bc64209bf
# ...
networking:
machineNetwork:
- cidr: 192.0.2.0/24
You cannot set the platform.openstack.externalNetwork or platform.openstack.externalDNS parameters while using a provider network for the primary network interface.
When you deploy the cluster, the installer uses the install-config.yaml file to deploy the cluster on the provider network.
You can add additional networks, including provider networks, to the platform.openstack.additionalNetworkIDs list.
After you deploy your cluster, you can attach pods to additional networks. For more information, see Understanding multiple networks.
3.10.5. Sample customized install-config.yaml file for RHOSP
This sample install-config.yaml demonstrates all of the possible Red Hat OpenStack Platform (RHOSP) customization options.
This sample file is provided for reference only. You must obtain your install-config.yaml file by using the installation program.
apiVersion: v1
baseDomain: example.com
controlPlane:
name: master
platform: {}
replicas: 3
compute:
- name: worker
platform:
openstack:
type: ml.large
replicas: 3
metadata:
name: example
networking:
clusterNetwork:
- cidr: 10.128.0.0/14
hostPrefix: 23
machineNetwork:
- cidr: 10.0.0.0/16
serviceNetwork:
- 172.30.0.0/16
networkType: OVNKubernetes
platform:
openstack:
cloud: mycloud
externalNetwork: external
computeFlavor: m1.xlarge
apiFloatingIP: 128.0.0.1
fips: false
pullSecret: '{"auths": ...}'
sshKey: ssh-ed25519 AAAA...3.10.6. Optional: Configuring a cluster with dual-stack networking
Dual-stack configuration for OpenStack is a Technology Preview feature only. Technology Preview features are not supported with Red Hat production service level agreements (SLAs) and might not be functionally complete. Red Hat does not recommend using them in production. These features provide early access to upcoming product features, enabling customers to test functionality and provide feedback during the development process.
For more information about the support scope of Red Hat Technology Preview features, see Technology Preview Features Support Scope.
You can create a dual-stack cluster on RHOSP. However, the dual-stack configuration is enabled only if you are using an RHOSP network with IPv4 and IPv6 subnets.
RHOSP does not support the following configurations:
- Conversion of an IPv4 single-stack cluster to a dual-stack cluster network.
- IPv6 as the primary address family for dual-stack cluster network.
3.10.6.1. Deploying the dual-stack cluster
For dual-stack networking in OpenShift Container Platform clusters, you can configure IPv4 and IPv6 address endpoints for cluster nodes.
Prerequisites
- You enabled Dynamic Host Configuration Protocol (DHCP) on the subnets.
Procedure
Create a network with IPv4 and IPv6 subnets. The available address modes for
ipv6-ra-modeandipv6-address-modefields are:stateful,statelessandslaac.NoteThe dual-stack network MTU must accommodate both the minimum MTU for IPv6, which is
1280, and the OVN-Kubernetes encapsulation overhead, which is100.- Create the API and Ingress VIPs ports.
- Add the IPv6 subnet to the router to enable router advertisements. If you are using a provider network, you can enable router advertisements by adding the network as an external gateway, which also enables external connectivity.
For an IPv4/IPv6 dual-stack cluster where you set IPv4 as the primary endpoint for your cluster nodes, edit the
install-config.yamlfile like the following example:apiVersion: v1 baseDomain: mydomain.test featureSet: TechPreviewNoUpgrade1 compute: - name: worker platform: openstack: type: m1.xlarge replicas: 3 controlPlane: name: master platform: openstack: type: m1.xlarge replicas: 3 metadata: name: mycluster networking: machineNetwork:2 - cidr: "192.168.25.0/24" - cidr: "fd2e:6f44:5dd8:c956::/64" clusterNetwork:3 - cidr: 10.128.0.0/14 hostPrefix: 23 - cidr: fd01::/48 hostPrefix: 64 serviceNetwork:4 - 172.30.0.0/16 - fd02::/112 platform: openstack: ingressVIPs: ['192.168.25.79', 'fd2e:6f44:5dd8:c956:f816:3eff:fef1:1bad']5 apiVIPs: ['192.168.25.199', 'fd2e:6f44:5dd8:c956:f816:3eff:fe78:cf36']6 controlPlanePort:7 fixedIPs:8 - subnet:9 name: subnet-v4 id: subnet-v4-id - subnet:10 name: subnet-v6 id: subnet-v6-id network:11 name: dualstack id: network-id- 1
- Dual-stack clusters are supported only with the
TechPreviewNoUpgradevalue. - 2 3 4
- You must specify an IP address range in the
cidrfield for both IPv4 and IPv6 address families. - 5
- Specify the virtual IP (VIP) address endpoints for the Ingress VIP services to provide an interface to the cluster.
- 6
- Specify the virtual IP (VIP) address endpoints for the API VIP services to provide an interface to the cluster.
- 7
- Specify the dual-stack network details that are used by all the nodes across the cluster.
- 8
- The Classless Inter-Domain Routing (CIDR) of any subnet specified in this field must match the CIDRs listed on
networks.machineNetwork. - 9 10 11
- You can specify a value for
name,id, or both.
The ip=dhcp,dhcp6 kernel argument, which is set on all of the nodes, results in a single Network Manager connection profile that is activated on multiple interfaces simultaneously. Because of this behavior, any additional network has the same connection enforced with an identical UUID. If you need an interface-specific configuration, create a new connection profile for that interface so that the default connection is no longer enforced on it.
3.10.7. Installation configuration for a cluster on OpenStack with a user-managed load balancer
The following example install-config.yaml file demonstrates how to configure a cluster that uses an external, user-managed load balancer rather than the default internal load balancer.
apiVersion: v1
baseDomain: mydomain.test
compute:
- name: worker
platform:
openstack:
type: m1.xlarge
replicas: 3
controlPlane:
name: master
platform:
openstack:
type: m1.xlarge
replicas: 3
metadata:
name: mycluster
networking:
clusterNetwork:
- cidr: 10.128.0.0/14
hostPrefix: 23
machineNetwork:
- cidr: 192.168.10.0/24
platform:
openstack:
cloud: mycloud
machinesSubnet: 8586bf1a-cc3c-4d40-bdf6-c243decc603a
apiVIPs:
- 192.168.10.5
ingressVIPs:
- 192.168.10.7
loadBalancer:
type: UserManaged 3.11. Generating a key pair for cluster node SSH access
During an OpenShift Container Platform installation, you can provide an SSH public key to the installation program. The key is passed to the Red Hat Enterprise Linux CoreOS (RHCOS) nodes through their Ignition config files and is used to authenticate SSH access to the nodes. The key is added to the ~/.ssh/authorized_keys list for the core user on each node, which enables password-less authentication.
After the key is passed to the nodes, you can use the key pair to SSH in to the RHCOS nodes as the user core. To access the nodes through SSH, the private key identity must be managed by SSH for your local user.
If you want to SSH in to your cluster nodes to perform installation debugging or disaster recovery, you must provide the SSH public key during the installation process. The ./openshift-install gather command also requires the SSH public key to be in place on the cluster nodes.
Do not skip this procedure in production environments, where disaster recovery and debugging is required.
Procedure
If you do not have an existing SSH key pair on your local machine to use for authentication onto your cluster nodes, create one. For example, on a computer that uses a Linux operating system, run the following command:
$ ssh-keygen -t ed25519 -N '' -f <path>/<file_name>1 - 1
- Specify the path and file name, such as
~/.ssh/id_ed25519, of the new SSH key. If you have an existing key pair, ensure your public key is in the your~/.sshdirectory.
NoteIf you plan to install an OpenShift Container Platform cluster that uses the RHEL cryptographic libraries that have been submitted to NIST for FIPS 140-2/140-3 Validation on only the
x86_64,ppc64le, ands390xarchitectures, do not create a key that uses theed25519algorithm. Instead, create a key that uses thersaorecdsaalgorithm.View the public SSH key:
$ cat <path>/<file_name>.pubFor example, run the following to view the
~/.ssh/id_ed25519.pubpublic key:$ cat ~/.ssh/id_ed25519.pubAdd the SSH private key identity to the SSH agent for your local user, if it has not already been added. SSH agent management of the key is required for password-less SSH authentication onto your cluster nodes, or if you want to use the
./openshift-install gathercommand.NoteOn some distributions, default SSH private key identities such as
~/.ssh/id_rsaand~/.ssh/id_dsaare managed automatically.If the
ssh-agentprocess is not already running for your local user, start it as a background task:$ eval "$(ssh-agent -s)"Example output
Agent pid 31874NoteIf your cluster is in FIPS mode, only use FIPS-compliant algorithms to generate the SSH key. The key must be either RSA or ECDSA.
Add your SSH private key to the
ssh-agent:$ ssh-add <path>/<file_name>1 - 1
- Specify the path and file name for your SSH private key, such as
~/.ssh/id_ed25519
Example output
Identity added: /home/<you>/<path>/<file_name> (<computer_name>)
Next steps
- When you install OpenShift Container Platform, provide the SSH public key to the installation program.
3.12. Enabling access to the environment
At deployment, all OpenShift Container Platform machines are created in a Red Hat OpenStack Platform (RHOSP)-tenant network. Therefore, they are not accessible directly in most RHOSP deployments.
You can configure OpenShift Container Platform API and application access by using floating IP addresses (FIPs) during installation. You can also complete an installation without configuring FIPs, but the installer will not configure a way to reach the API or applications externally.
3.12.1. Enabling access with floating IP addresses
Create floating IP (FIP) addresses for external access to the OpenShift Container Platform API and cluster applications.
Procedure
Using the Red Hat OpenStack Platform (RHOSP) CLI, create the API FIP:
$ openstack floating ip create --description "API <cluster_name>.<base_domain>" <external_network>Using the Red Hat OpenStack Platform (RHOSP) CLI, create the apps, or Ingress, FIP:
$ openstack floating ip create --description "Ingress <cluster_name>.<base_domain>" <external_network>Add records that follow these patterns to your DNS server for the API and Ingress FIPs:
api.<cluster_name>.<base_domain>. IN A <API_FIP> *.apps.<cluster_name>.<base_domain>. IN A <apps_FIP>NoteIf you do not control the DNS server, you can access the cluster by adding the cluster domain names such as the following to your
/etc/hostsfile:-
<api_floating_ip> api.<cluster_name>.<base_domain> -
<application_floating_ip> grafana-openshift-monitoring.apps.<cluster_name>.<base_domain> -
<application_floating_ip> prometheus-k8s-openshift-monitoring.apps.<cluster_name>.<base_domain> -
<application_floating_ip> oauth-openshift.apps.<cluster_name>.<base_domain> -
<application_floating_ip> console-openshift-console.apps.<cluster_name>.<base_domain> -
application_floating_ip integrated-oauth-server-openshift-authentication.apps.<cluster_name>.<base_domain>
The cluster domain names in the
/etc/hostsfile grant access to the web console and the monitoring interface of your cluster locally. You can also use thekubectloroc. You can access the user applications by using the additional entries pointing to the <application_floating_ip>. This action makes the API and applications accessible to only you, which is not suitable for production deployment, but does allow installation for development and testing.-
Add the FIPs to the
install-config.yamlfile as the values of the following parameters:-
platform.openstack.ingressFloatingIP -
platform.openstack.apiFloatingIP
-
If you use these values, you must also enter an external network as the value of the platform.openstack.externalNetwork parameter in the install-config.yaml file.
You can make OpenShift Container Platform resources available outside of the cluster by assigning a floating IP address and updating your firewall configuration.
3.12.2. Completing installation without floating IP addresses
You can install OpenShift Container Platform on Red Hat OpenStack Platform (RHOSP) without providing floating IP addresses.
In the install-config.yaml file, do not define the following parameters:
-
platform.openstack.ingressFloatingIP -
platform.openstack.apiFloatingIP
If you cannot provide an external network, you can also leave platform.openstack.externalNetwork blank. If you do not provide a value for platform.openstack.externalNetwork, a router is not created for you, and, without additional action, the installer will fail to retrieve an image from Glance. You must configure external connectivity on your own.
If you run the installer from a system that cannot reach the cluster API due to a lack of floating IP addresses or name resolution, installation fails. To prevent installation failure in these cases, you can use a proxy network or run the installer from a system that is on the same network as your machines.
You can enable name resolution by creating DNS records for the API and Ingress ports. For example:
api.<cluster_name>.<base_domain>. IN A <api_port_IP>
*.apps.<cluster_name>.<base_domain>. IN A <ingress_port_IP>
If you do not control the DNS server, you can add the record to your /etc/hosts file. This action makes the API accessible to only you, which is not suitable for production deployment but does allow installation for development and testing.
3.13. Deploying the cluster
You can install OpenShift Container Platform on a compatible cloud platform.
You can run the create cluster command of the installation program only once, during initial installation.
Prerequisites
- You have the OpenShift Container Platform installation program and the pull secret for your cluster.
- You have verified that the cloud provider account on your host has the correct permissions to deploy the cluster. An account with incorrect permissions causes the installation process to fail with an error message that displays the missing permissions.
Procedure
Change to the directory that contains the installation program and initialize the cluster deployment:
$ ./openshift-install create cluster --dir <installation_directory> \1 --log-level=info2
Verification
When the cluster deployment completes successfully:
-
The terminal displays directions for accessing your cluster, including a link to the web console and credentials for the
kubeadminuser. -
Credential information also outputs to
<installation_directory>/.openshift_install.log.
Do not delete the installation program or the files that the installation program creates. Both are required to delete the cluster.
Example output
...
INFO Install complete!
INFO To access the cluster as the system:admin user when using 'oc', run 'export KUBECONFIG=/home/myuser/install_dir/auth/kubeconfig'
INFO Access the OpenShift web-console here: https://console-openshift-console.apps.mycluster.example.com
INFO Login to the console with user: "kubeadmin", and password: "password"
INFO Time elapsed: 36m22s-
The Ignition config files that the installation program generates contain certificates that expire after 24 hours, which are then renewed at that time. If the cluster is shut down before renewing the certificates and the cluster is later restarted after the 24 hours have elapsed, the cluster automatically recovers the expired certificates. The exception is that you must manually approve the pending
node-bootstrappercertificate signing requests (CSRs) to recover kubelet certificates. See the documentation for Recovering from expired control plane certificates for more information. - It is recommended that you use Ignition config files within 12 hours after they are generated because the 24-hour certificate rotates from 16 to 22 hours after the cluster is installed. By using the Ignition config files within 12 hours, you can avoid installation failure if the certificate update runs during installation.
3.14. Verifying cluster status
You can verify your OpenShift Container Platform cluster’s status during or after installation.
Procedure
In the cluster environment, export the administrator’s kubeconfig file:
$ export KUBECONFIG=<installation_directory>/auth/kubeconfig1 - 1
- For
<installation_directory>, specify the path to the directory that you stored the installation files in.
The
kubeconfigfile contains information about the cluster that is used by the CLI to connect a client to the correct cluster and API server.View the control plane and compute machines created after a deployment:
$ oc get nodesView your cluster’s version:
$ oc get clusterversionView your Operators' status:
$ oc get clusteroperatorView all running pods in the cluster:
$ oc get pods -A
3.15. Logging in to the cluster by using the CLI
You can log in to your cluster as a default system user by exporting the cluster kubeconfig file. The kubeconfig file contains information about the cluster that is used by the CLI to connect a client to the correct cluster and API server. The file is specific to a cluster and is created during OpenShift Container Platform installation.
Prerequisites
- You deployed an OpenShift Container Platform cluster.
-
You installed the
ocCLI.
Procedure
Export the
kubeadmincredentials:$ export KUBECONFIG=<installation_directory>/auth/kubeconfig1 - 1
- For
<installation_directory>, specify the path to the directory that you stored the installation files in.
Verify you can run
occommands successfully using the exported configuration:$ oc whoamiExample output
system:admin
3.16. Telemetry access for OpenShift Container Platform
In OpenShift Container Platform 4.14, the Telemetry service, which runs by default to provide metrics about cluster health and the success of updates, requires internet access. If your cluster is connected to the internet, Telemetry runs automatically, and your cluster is registered to OpenShift Cluster Manager.
After you confirm that your OpenShift Cluster Manager inventory is correct, either maintained automatically by Telemetry or manually by using OpenShift Cluster Manager, use subscription watch to track your OpenShift Container Platform subscriptions at the account or multi-cluster level.
3.17. Next steps
Chapter 4. Installing a cluster on OpenStack with Kuryr
Kuryr is a deprecated feature. Deprecated functionality is still included in OpenShift Container Platform and continues to be supported; however, it will be removed in a future release of this product and is not recommended for new deployments.
For the most recent list of major functionality that has been deprecated or removed within OpenShift Container Platform, refer to the Deprecated and removed features section of the OpenShift Container Platform release notes.
In OpenShift Container Platform version 4.14, you can install a customized cluster on Red Hat OpenStack Platform (RHOSP) that uses Kuryr SDN. To customize the installation, modify parameters in the install-config.yaml before you install the cluster.
4.1. Prerequisites
- You reviewed details about the OpenShift Container Platform installation and update processes.
- You read the documentation on selecting a cluster installation method and preparing it for users.
- You verified that OpenShift Container Platform 4.14 is compatible with your RHOSP version by using the Supported platforms for OpenShift clusters section. You can also compare platform support across different versions by viewing the OpenShift Container Platform on RHOSP support matrix.
- You have a storage service installed in RHOSP, such as block storage (Cinder) or object storage (Swift). Object storage is the recommended storage technology for OpenShift Container Platform registry cluster deployment. For more information, see Optimizing storage.
- You understand performance and scalability practices for cluster scaling, control plane sizing, and etcd. For more information, see Recommended practices for scaling the cluster.
4.2. About Kuryr SDN
Kuryr is a deprecated feature. Deprecated functionality is still included in OpenShift Container Platform and continues to be supported; however, it will be removed in a future release of this product and is not recommended for new deployments.
For the most recent list of major functionality that has been deprecated or removed within OpenShift Container Platform, refer to the Deprecated and removed features section of the OpenShift Container Platform release notes.
Kuryr is a container network interface (CNI) plugin solution that uses the Neutron and Octavia Red Hat OpenStack Platform (RHOSP) services to provide networking for pods and Services.
Kuryr and OpenShift Container Platform integration is primarily designed for OpenShift Container Platform clusters running on RHOSP VMs. Kuryr improves the network performance by plugging OpenShift Container Platform pods into RHOSP SDN. In addition, it provides interconnectivity between pods and RHOSP virtual instances.
Kuryr components are installed as pods in OpenShift Container Platform using the openshift-kuryr namespace:
-
kuryr-controller- a single service instance installed on amasternode. This is modeled in OpenShift Container Platform as aDeploymentobject. -
kuryr-cni- a container installing and configuring Kuryr as a CNI driver on each OpenShift Container Platform node. This is modeled in OpenShift Container Platform as aDaemonSetobject.
The Kuryr controller watches the OpenShift Container Platform API server for pod, service, and namespace create, update, and delete events. It maps the OpenShift Container Platform API calls to corresponding objects in Neutron and Octavia. This means that every network solution that implements the Neutron trunk port functionality can be used to back OpenShift Container Platform via Kuryr. This includes open source solutions such as Open vSwitch (OVS) and Open Virtual Network (OVN) as well as Neutron-compatible commercial SDNs.
Kuryr is recommended for OpenShift Container Platform deployments on encapsulated RHOSP tenant networks to avoid double encapsulation, such as running an encapsulated OpenShift Container Platform SDN over an RHOSP network.
If you use provider networks or tenant VLANs, you do not need to use Kuryr to avoid double encapsulation. The performance benefit is negligible. Depending on your configuration, though, using Kuryr to avoid having two overlays might still be beneficial.
Kuryr is not recommended in deployments where all of the following criteria are true:
- The RHOSP version is less than 16.
- The deployment uses UDP services, or a large number of TCP services on few hypervisors.
or
-
The
ovn-octaviaOctavia driver is disabled. - The deployment uses a large number of TCP services on few hypervisors.
4.3. Resource guidelines for installing OpenShift Container Platform on RHOSP with Kuryr
When using Kuryr SDN, the pods, services, namespaces, and network policies are using resources from the RHOSP quota; this increases the minimum requirements. Kuryr also has some additional requirements on top of what a default install requires.
Use the following quota to satisfy a default cluster’s minimum requirements:
| Resource | Value |
|---|---|
| Floating IP addresses | 3 - plus the expected number of Services of LoadBalancer type |
| Ports | 1500 - 1 needed per Pod |
| Routers | 1 |
| Subnets | 250 - 1 needed per Namespace/Project |
| Networks | 250 - 1 needed per Namespace/Project |
| RAM | 112 GB |
| vCPUs | 28 |
| Volume storage | 275 GB |
| Instances | 7 |
| Security groups | 250 - 1 needed per Service and per NetworkPolicy |
| Security group rules | 1000 |
| Server groups | 2 - plus 1 for each additional availability zone in each machine pool |
| Load balancers | 100 - 1 needed per Service |
| Load balancer listeners | 500 - 1 needed per Service-exposed port |
| Load balancer pools | 500 - 1 needed per Service-exposed port |
A cluster might function with fewer than recommended resources, but its performance is not guaranteed.
If RHOSP object storage (Swift) is available and operated by a user account with the swiftoperator role, it is used as the default backend for the OpenShift Container Platform image registry. In this case, the volume storage requirement is 175 GB. Swift space requirements vary depending on the size of the image registry.
If you are using Red Hat OpenStack Platform (RHOSP) version 16 with the Amphora driver rather than the OVN Octavia driver, security groups are associated with service accounts instead of user projects.
Take the following notes into consideration when setting resources:
- The number of ports that are required is larger than the number of pods. Kuryr uses ports pools to have pre-created ports ready to be used by pods and speed up the pods' booting time.
-
Each network policy is mapped into an RHOSP security group, and depending on the
NetworkPolicyspec, one or more rules are added to the security group. Each service is mapped to an RHOSP load balancer. Consider this requirement when estimating the number of security groups required for the quota.
If you are using RHOSP version 15 or earlier, or the
ovn-octavia driver, each load balancer has a security group with the user project.The quota does not account for load balancer resources (such as VM resources), but you must consider these resources when you decide the RHOSP deployment’s size. The default installation will have more than 50 load balancers; the clusters must be able to accommodate them.
If you are using RHOSP version 16 with the OVN Octavia driver enabled, only one load balancer VM is generated; services are load balanced through OVN flows.
An OpenShift Container Platform deployment comprises control plane machines, compute machines, and a bootstrap machine.
To enable Kuryr SDN, your environment must meet the following requirements:
- Run RHOSP 13+.
- Have Overcloud with Octavia.
- Use Neutron Trunk ports extension.
-
Use
openvswitchfirewall driver if ML2/OVS Neutron driver is used instead ofovs-hybrid.
4.3.1. Increasing quota
When using Kuryr SDN, you must increase quotas to satisfy the Red Hat OpenStack Platform (RHOSP) resources used by pods, services, namespaces, and network policies.
Procedure
Increase the quotas for a project by running the following command:
$ sudo openstack quota set --secgroups 250 --secgroup-rules 1000 --ports 1500 --subnets 250 --networks 250 <project>
4.3.2. Configuring Neutron
Kuryr CNI leverages the Neutron Trunks extension to plug containers into the Red Hat OpenStack Platform (RHOSP) SDN, so you must use the trunks extension for Kuryr to properly work.
In addition, if you leverage the default ML2/OVS Neutron driver, the firewall must be set to openvswitch instead of ovs_hybrid so that security groups are enforced on trunk subports and Kuryr can properly handle network policies.
4.3.3. Configuring Octavia
Kuryr SDN uses Red Hat OpenStack Platform (RHOSP)'s Octavia LBaaS to implement OpenShift Container Platform services. Thus, you must install and configure Octavia components in RHOSP to use Kuryr SDN.
To enable Octavia, you must include the Octavia service during the installation of the RHOSP Overcloud, or upgrade the Octavia service if the Overcloud already exists. The following steps for enabling Octavia apply to both a clean install of the Overcloud or an Overcloud update.
The following steps only capture the key pieces required during the deployment of RHOSP when dealing with Octavia. It is also important to note that registry methods vary.
This example uses the local registry method.
Procedure
If you are using the local registry, create a template to upload the images to the registry. For example:
(undercloud) $ openstack overcloud container image prepare \ -e /usr/share/openstack-tripleo-heat-templates/environments/services-docker/octavia.yaml \ --namespace=registry.access.redhat.com/rhosp13 \ --push-destination=<local-ip-from-undercloud.conf>:8787 \ --prefix=openstack- \ --tag-from-label {version}-{product-version} \ --output-env-file=/home/stack/templates/overcloud_images.yaml \ --output-images-file /home/stack/local_registry_images.yamlVerify that the
local_registry_images.yamlfile contains the Octavia images. For example:... - imagename: registry.access.redhat.com/rhosp13/openstack-octavia-api:13.0-43 push_destination: <local-ip-from-undercloud.conf>:8787 - imagename: registry.access.redhat.com/rhosp13/openstack-octavia-health-manager:13.0-45 push_destination: <local-ip-from-undercloud.conf>:8787 - imagename: registry.access.redhat.com/rhosp13/openstack-octavia-housekeeping:13.0-45 push_destination: <local-ip-from-undercloud.conf>:8787 - imagename: registry.access.redhat.com/rhosp13/openstack-octavia-worker:13.0-44 push_destination: <local-ip-from-undercloud.conf>:8787NoteThe Octavia container versions vary depending upon the specific RHOSP release installed.
Pull the container images from
registry.redhat.ioto the Undercloud node:(undercloud) $ sudo openstack overcloud container image upload \ --config-file /home/stack/local_registry_images.yaml \ --verboseThis may take some time depending on the speed of your network and Undercloud disk.
Install or update your Overcloud environment with Octavia:
$ openstack overcloud deploy --templates \ -e /usr/share/openstack-tripleo-heat-templates/environments/services-docker/octavia.yaml \ -e octavia_timeouts.yamlNoteThis command only includes the files associated with Octavia; it varies based on your specific installation of RHOSP. See the RHOSP documentation for further information. For more information on customizing your Octavia installation, see installation of Octavia using Director.
NoteWhen leveraging Kuryr SDN, the Overcloud installation requires the Neutron
trunkextension. This is available by default on director deployments. Use theopenvswitchfirewall instead of the defaultovs-hybridwhen the Neutron backend is ML2/OVS. There is no need for modifications if the backend is ML2/OVN.
4.3.3.1. The Octavia OVN Driver
Octavia supports multiple provider drivers through the Octavia API.
To see all available Octavia provider drivers, on a command line, enter:
$ openstack loadbalancer provider listExample output
+---------+-------------------------------------------------+
| name | description |
+---------+-------------------------------------------------+
| amphora | The Octavia Amphora driver. |
| octavia | Deprecated alias of the Octavia Amphora driver. |
| ovn | Octavia OVN driver. |
+---------+-------------------------------------------------+
Beginning with RHOSP version 16, the Octavia OVN provider driver (ovn) is supported on OpenShift Container Platform on RHOSP deployments.
ovn is an integration driver for the load balancing that Octavia and OVN provide. It supports basic load balancing capabilities, and is based on OpenFlow rules. The driver is automatically enabled in Octavia by Director on deployments that use OVN Neutron ML2.
The Amphora provider driver is the default driver. If ovn is enabled, however, Kuryr uses it.
If Kuryr uses ovn instead of Amphora, it offers the following benefits:
- Decreased resource requirements. Kuryr does not require a load balancer VM for each service.
- Reduced network latency.
- Increased service creation speed by using OpenFlow rules instead of a VM for each service.
- Distributed load balancing actions across all nodes instead of centralized on Amphora VMs.
You can configure your cluster to use the Octavia OVN driver after your RHOSP cloud is upgraded from version 13 to version 16.
4.3.4. Known limitations of installing with Kuryr
Using OpenShift Container Platform with Kuryr SDN has several known limitations.
4.3.4.1. RHOSP general limitations
Using OpenShift Container Platform with Kuryr SDN has several limitations that apply to all versions and environments:
-
Serviceobjects with theNodePorttype are not supported. -
Clusters that use the OVN Octavia provider driver support
Serviceobjects for which the.spec.selectorproperty is unspecified only if the.subsets.addressesproperty of theEndpointsobject includes the subnet of the nodes or pods. -
If the subnet on which machines are created is not connected to a router, or if the subnet is connected, but the router has no external gateway set, Kuryr cannot create floating IPs for
Serviceobjects with typeLoadBalancer. -
Configuring the
sessionAffinity=ClientIPproperty onServiceobjects does not have an effect. Kuryr does not support this setting.
4.3.4.2. RHOSP version limitations
Using OpenShift Container Platform with Kuryr SDN has several limitations that depend on the RHOSP version.
RHOSP versions before 16 use the default Octavia load balancer driver (Amphora). This driver requires that one Amphora load balancer VM is deployed per OpenShift Container Platform service. Creating too many services can cause you to run out of resources.
Deployments of later versions of RHOSP that have the OVN Octavia driver disabled also use the Amphora driver. They are subject to the same resource concerns as earlier versions of RHOSP.
- Kuryr SDN does not support automatic unidling by a service.
4.3.4.3. RHOSP upgrade limitations
As a result of the RHOSP upgrade process, the Octavia API might be changed, and upgrades to the Amphora images that are used for load balancers might be required.
You can address API changes on an individual basis.
If the Amphora image is upgraded, the RHOSP operator can handle existing load balancer VMs in two ways:
- Upgrade each VM by triggering a load balancer failover.
- Leave responsibility for upgrading the VMs to users.
If the operator takes the first option, there might be short downtimes during failovers.
If the operator takes the second option, the existing load balancers will not support upgraded Octavia API features, like UDP listeners. In this case, users must recreate their Services to use these features.
4.3.5. Control plane machines
By default, the OpenShift Container Platform installation process creates three control plane machines.
Each machine requires:
- An instance from the RHOSP quota
- A port from the RHOSP quota
- A flavor with at least 16 GB memory and 4 vCPUs
- At least 100 GB storage space from the RHOSP quota
4.3.6. Compute machines
By default, the OpenShift Container Platform installation process creates three compute machines.
Each machine requires:
- An instance from the RHOSP quota
- A port from the RHOSP quota
- A flavor with at least 8 GB memory and 2 vCPUs
- At least 100 GB storage space from the RHOSP quota
Compute machines host the applications that you run on OpenShift Container Platform; aim to run as many as you can.
4.3.7. Bootstrap machine
During installation, a bootstrap machine is temporarily provisioned to stand up the control plane. After the production control plane is ready, the bootstrap machine is deprovisioned.
The bootstrap machine requires:
- An instance from the RHOSP quota
- A port from the RHOSP quota
- A flavor with at least 16 GB memory and 4 vCPUs
- At least 100 GB storage space from the RHOSP quota
4.3.8. Load balancing requirements for user-provisioned infrastructure
Before you install OpenShift Container Platform, you can provision your own API and application ingress load balancing infrastructure to use in place of the default, internal load balancing solution. In production scenarios, you can deploy the API and application Ingress load balancers separately so that you can scale the load balancer infrastructure for each in isolation.
If you want to deploy the API and application Ingress load balancers with a Red Hat Enterprise Linux (RHEL) instance, you must purchase the RHEL subscription separately.
The load balancing infrastructure must meet the following requirements:
API load balancer: Provides a common endpoint for users, both human and machine, to interact with and configure the platform. Configure the following conditions:
- Layer 4 load balancing only. This can be referred to as Raw TCP or SSL Passthrough mode.
- A stateless load balancing algorithm. The options vary based on the load balancer implementation.
ImportantDo not configure session persistence for an API load balancer. Configuring session persistence for a Kubernetes API server might cause performance issues from excess application traffic for your OpenShift Container Platform cluster and the Kubernetes API that runs inside the cluster.
Configure the following ports on both the front and back of the load balancers:
Expand Table 4.2. API load balancer Port Back-end machines (pool members) Internal External Description 6443Bootstrap and control plane. You remove the bootstrap machine from the load balancer after the bootstrap machine initializes the cluster control plane. You must configure the
/readyzendpoint for the API server health check probe.X
X
Kubernetes API server
22623Bootstrap and control plane. You remove the bootstrap machine from the load balancer after the bootstrap machine initializes the cluster control plane.
X
Machine config server
NoteThe load balancer must be configured to take a maximum of 30 seconds from the time the API server turns off the
/readyzendpoint to the removal of the API server instance from the pool. Within the time frame after/readyzreturns an error or becomes healthy, the endpoint must have been removed or added. Probing every 5 or 10 seconds, with two successful requests to become healthy and three to become unhealthy, are well-tested values.Application Ingress load balancer: Provides an ingress point for application traffic flowing in from outside the cluster. A working configuration for the Ingress router is required for an OpenShift Container Platform cluster.
Configure the following conditions:
- Layer 4 load balancing only. This can be referred to as Raw TCP or SSL Passthrough mode.
- A connection-based or session-based persistence is recommended, based on the options available and types of applications that will be hosted on the platform.
TipIf the true IP address of the client can be seen by the application Ingress load balancer, enabling source IP-based session persistence can improve performance for applications that use end-to-end TLS encryption.
Configure the following ports on both the front and back of the load balancers:
Expand Table 4.3. Application Ingress load balancer Port Back-end machines (pool members) Internal External Description 443The machines that run the Ingress Controller pods, compute, or worker, by default.
X
X
HTTPS traffic
80The machines that run the Ingress Controller pods, compute, or worker, by default.
X
X
HTTP traffic
NoteIf you are deploying a three-node cluster with zero compute nodes, the Ingress Controller pods run on the control plane nodes. In three-node cluster deployments, you must configure your application Ingress load balancer to route HTTP and HTTPS traffic to the control plane nodes.
4.3.8.1. Example load balancer configuration for clusters that are deployed with user-managed load balancers
This section provides an example API and application Ingress load balancer configuration that meets the load balancing requirements for clusters that are deployed with user-managed load balancers. The sample is an /etc/haproxy/haproxy.cfg configuration for an HAProxy load balancer. The example is not meant to provide advice for choosing one load balancing solution over another.
In the example, the same load balancer is used for the Kubernetes API and application ingress traffic. In production scenarios, you can deploy the API and application ingress load balancers separately so that you can scale the load balancer infrastructure for each in isolation.
If you are using HAProxy as a load balancer and SELinux is set to enforcing, you must ensure that the HAProxy service can bind to the configured TCP port by running setsebool -P haproxy_connect_any=1.
Example 4.1. Sample API and application Ingress load balancer configuration
global
log 127.0.0.1 local2
pidfile /var/run/haproxy.pid
maxconn 4000
daemon
defaults
mode http
log global
option dontlognull
option http-server-close
option redispatch
retries 3
timeout http-request 10s
timeout queue 1m
timeout connect 10s
timeout client 1m
timeout server 1m
timeout http-keep-alive 10s
timeout check 10s
maxconn 3000
listen api-server-6443
bind *:6443
mode tcp
option httpchk GET /readyz HTTP/1.0
option log-health-checks
balance roundrobin
server bootstrap bootstrap.ocp4.example.com:6443 verify none check check-ssl inter 10s fall 2 rise 3 backup
server master0 master0.ocp4.example.com:6443 weight 1 verify none check check-ssl inter 10s fall 2 rise 3
server master1 master1.ocp4.example.com:6443 weight 1 verify none check check-ssl inter 10s fall 2 rise 3
server master2 master2.ocp4.example.com:6443 weight 1 verify none check check-ssl inter 10s fall 2 rise 3
listen machine-config-server-22623
bind *:22623
mode tcp
server bootstrap bootstrap.ocp4.example.com:22623 check inter 1s backup
server master0 master0.ocp4.example.com:22623 check inter 1s
server master1 master1.ocp4.example.com:22623 check inter 1s
server master2 master2.ocp4.example.com:22623 check inter 1s
listen ingress-router-443
bind *:443
mode tcp
balance source
server worker0 worker0.ocp4.example.com:443 check inter 1s
server worker1 worker1.ocp4.example.com:443 check inter 1s
listen ingress-router-80
bind *:80
mode tcp
balance source
server worker0 worker0.ocp4.example.com:80 check inter 1s
server worker1 worker1.ocp4.example.com:80 check inter 1s- 1
- Port
6443handles the Kubernetes API traffic and points to the control plane machines. - 2 4
- The bootstrap entries must be in place before the OpenShift Container Platform cluster installation and they must be removed after the bootstrap process is complete.
- 3
- Port
22623handles the machine config server traffic and points to the control plane machines. - 5
- Port
443handles the HTTPS traffic and points to the machines that run the Ingress Controller pods. The Ingress Controller pods run on the compute machines by default. - 6
- Port
80handles the HTTP traffic and points to the machines that run the Ingress Controller pods. The Ingress Controller pods run on the compute machines by default.NoteIf you are deploying a three-node cluster with zero compute nodes, the Ingress Controller pods run on the control plane nodes. In three-node cluster deployments, you must configure your application Ingress load balancer to route HTTP and HTTPS traffic to the control plane nodes.
If you are using HAProxy as a load balancer, you can check that the haproxy process is listening on ports 6443, 22623, 443, and 80 by running netstat -nltupe on the HAProxy node.
4.4. Internet access for OpenShift Container Platform
In OpenShift Container Platform 4.14, you require access to the internet to install your cluster.
You must have internet access to:
- Access OpenShift Cluster Manager to download the installation program and perform subscription management. If the cluster has internet access and you do not disable Telemetry, that service automatically entitles your cluster.
- Access Quay.io to obtain the packages that are required to install your cluster.
- Obtain the packages that are required to perform cluster updates.
If your cluster cannot have direct internet access, you can perform a restricted network installation on some types of infrastructure that you provision. During that process, you download the required content and use it to populate a mirror registry with the installation packages. With some installation types, the environment that you install your cluster in will not require internet access. Before you update the cluster, you update the content of the mirror registry.
4.5. Enabling Swift on RHOSP
Swift is operated by a user account with the swiftoperator role. Add the role to an account before you run the installation program.
If the Red Hat OpenStack Platform (RHOSP) object storage service, commonly known as Swift, is available, OpenShift Container Platform uses it as the image registry storage. If it is unavailable, the installation program relies on the RHOSP block storage service, commonly known as Cinder.
If Swift is present and you want to use it, you must enable access to it. If it is not present, or if you do not want to use it, skip this section.
RHOSP 17 sets the rgw_max_attr_size parameter of Ceph RGW to 256 characters. This setting causes issues with uploading container images to the OpenShift Container Platform registry. You must set the value of rgw_max_attr_size to at least 1024 characters.
Before installation, check if your RHOSP deployment is affected by this problem. If it is, reconfigure Ceph RGW.
Prerequisites
- You have a RHOSP administrator account on the target environment.
- The Swift service is installed.
-
On Ceph RGW, the
account in urloption is enabled.
Procedure
To enable Swift on RHOSP:
As an administrator in the RHOSP CLI, add the
swiftoperatorrole to the account that will access Swift:$ openstack role add --user <user> --project <project> swiftoperator
Your RHOSP deployment can now use Swift for the image registry.
4.6. Verifying external network access
The OpenShift Container Platform installation process requires external network access. You must provide an external network value to it, or deployment fails. Before you begin the process, verify that a network with the external router type exists in Red Hat OpenStack Platform (RHOSP).
Prerequisites
Procedure
Using the RHOSP CLI, verify the name and ID of the 'External' network:
$ openstack network list --long -c ID -c Name -c "Router Type"Example output
+--------------------------------------+----------------+-------------+ | ID | Name | Router Type | +--------------------------------------+----------------+-------------+ | 148a8023-62a7-4672-b018-003462f8d7dc | public_network | External | +--------------------------------------+----------------+-------------+
A network with an external router type appears in the network list. If at least one does not, see Creating a default floating IP network and Creating a default provider network.
If the external network’s CIDR range overlaps one of the default network ranges, you must change the matching network ranges in the install-config.yaml file before you start the installation process.
The default network ranges are:
| Network | Range |
|---|---|
|
| 10.0.0.0/16 |
|
| 172.30.0.0/16 |
|
| 10.128.0.0/14 |
If the installation program finds multiple networks with the same name, it sets one of them at random. To avoid this behavior, create unique names for resources in RHOSP.
If the Neutron trunk service plugin is enabled, a trunk port is created by default. For more information, see Neutron trunk port.
4.7. Defining parameters for the installation program
The OpenShift Container Platform installation program relies on a file that is called clouds.yaml. The file describes Red Hat OpenStack Platform (RHOSP) configuration parameters, including the project name, log in information, and authorization service URLs.
Procedure
Create the
clouds.yamlfile:If your RHOSP distribution includes the Horizon web UI, generate a
clouds.yamlfile in it.ImportantRemember to add a password to the
authfield. You can also keep secrets in a separate file fromclouds.yaml.If your RHOSP distribution does not include the Horizon web UI, or you do not want to use Horizon, create the file yourself. For detailed information about
clouds.yaml, see Config files in the RHOSP documentation.clouds: shiftstack: auth: auth_url: http://10.10.14.42:5000/v3 project_name: shiftstack username: <username> password: <password> user_domain_name: Default project_domain_name: Default dev-env: region_name: RegionOne auth: username: <username> password: <password> project_name: 'devonly' auth_url: 'https://10.10.14.22:5001/v2.0'
If your RHOSP installation uses self-signed certificate authority (CA) certificates for endpoint authentication:
- Copy the certificate authority file to your machine.
Add the
cacertskey to theclouds.yamlfile. The value must be an absolute, non-root-accessible path to the CA certificate:clouds: shiftstack: ... cacert: "/etc/pki/ca-trust/source/anchors/ca.crt.pem"TipAfter you run the installer with a custom CA certificate, you can update the certificate by editing the value of the
ca-cert.pemkey in thecloud-provider-configkeymap. On a command line, run:$ oc edit configmap -n openshift-config cloud-provider-config
Place the
clouds.yamlfile in one of the following locations:-
The value of the
OS_CLIENT_CONFIG_FILEenvironment variable - The current directory
-
A Unix-specific user configuration directory, for example
~/.config/openstack/clouds.yaml A Unix-specific site configuration directory, for example
/etc/openstack/clouds.yamlThe installation program searches for
clouds.yamlin that order.
-
The value of the
4.8. Setting OpenStack Cloud Controller Manager options
Optionally, you can edit the OpenStack Cloud Controller Manager (CCM) configuration for your cluster. This configuration controls how OpenShift Container Platform interacts with Red Hat OpenStack Platform (RHOSP).
For a complete list of configuration parameters, see the "OpenStack Cloud Controller Manager reference guide" page in the "Installing on OpenStack" documentation.
Procedure
If you have not already generated manifest files for your cluster, generate them by running the following command:
$ openshift-install --dir <destination_directory> create manifestsIn a text editor, open the cloud-provider configuration manifest file. For example:
$ vi openshift/manifests/cloud-provider-config.yamlModify the options according to the CCM reference guide.
Configuring Octavia for load balancing is a common case for clusters that do not use Kuryr. For example:
#... [LoadBalancer] lb-provider = "amphora"1 floating-network-id="d3deb660-4190-40a3-91f1-37326fe6ec4a"2 create-monitor = True3 monitor-delay = 10s4 monitor-timeout = 10s5 monitor-max-retries = 16 #...- 1
- This property sets the Octavia provider that your load balancer uses. It accepts
"ovn"or"amphora"as values. If you choose to use OVN, you must also setlb-methodtoSOURCE_IP_PORT. - 2
- This property is required if you want to use multiple external networks with your cluster. The cloud provider creates floating IP addresses on the network that is specified here.
- 3
- This property controls whether the cloud provider creates health monitors for Octavia load balancers. Set the value to
Trueto create health monitors. As of RHOSP 16.2, this feature is only available for the Amphora provider. - 4
- This property sets the frequency with which endpoints are monitored. The value must be in the
time.ParseDuration()format. This property is required if the value of thecreate-monitorproperty isTrue. - 5
- This property sets the time that monitoring requests are open before timing out. The value must be in the
time.ParseDuration()format. This property is required if the value of thecreate-monitorproperty isTrue. - 6
- This property defines how many successful monitoring requests are required before a load balancer is marked as online. The value must be an integer. This property is required if the value of the
create-monitorproperty isTrue.
ImportantPrior to saving your changes, verify that the file is structured correctly. Clusters might fail if properties are not placed in the appropriate section.
ImportantYou must set the value of the
create-monitorproperty toTrueif you use services that have the value of the.spec.externalTrafficPolicyproperty set toLocal. The OVN Octavia provider in RHOSP 16.2 does not support health monitors. Therefore, services that haveETPparameter values set toLocalmight not respond when thelb-providervalue is set to"ovn".ImportantFor installations that use Kuryr, Kuryr handles relevant services. There is no need to configure Octavia load balancing in the cloud provider.
Save the changes to the file and proceed with installation.
TipYou can update your cloud provider configuration after you run the installer. On a command line, run:
$ oc edit configmap -n openshift-config cloud-provider-configAfter you save your changes, your cluster will take some time to reconfigure itself. The process is complete if none of your nodes have a
SchedulingDisabledstatus.
4.9. Obtaining the installation program
Before you install OpenShift Container Platform, download the installation file on the host you are using for installation.
Prerequisites
- You have a computer that runs Linux or macOS, with at least 1.2 GB of local disk space.
Procedure
- Go to the Cluster Type page on the Red Hat Hybrid Cloud Console. If you have a Red Hat account, log in with your credentials. If you do not, create an account.
- Select your infrastructure provider from the Run it yourself section of the page.
- Select your host operating system and architecture from the dropdown menus under OpenShift Installer and click Download Installer.
Place the downloaded file in the directory where you want to store the installation configuration files.
Important- The installation program creates several files on the computer that you use to install your cluster. You must keep the installation program and the files that the installation program creates after you finish installing the cluster. Both of the files are required to delete the cluster.
- Deleting the files created by the installation program does not remove your cluster, even if the cluster failed during installation. To remove your cluster, complete the OpenShift Container Platform uninstallation procedures for your specific cloud provider.
Extract the installation program. For example, on a computer that uses a Linux operating system, run the following command:
$ tar -xvf openshift-install-linux.tar.gz- Download your installation pull secret from Red Hat OpenShift Cluster Manager. This pull secret allows you to authenticate with the services that are provided by the included authorities, including Quay.io, which serves the container images for OpenShift Container Platform components.
Alternatively, you can retrieve the installation program from the Red Hat Customer Portal, where you can specify a version of the installation program to download. However, you must have an active subscription to access this page.
4.10. Creating the installation configuration file
You can customize the OpenShift Container Platform cluster you install on Red Hat OpenStack Platform (RHOSP).
Prerequisites
- You have the OpenShift Container Platform installation program and the pull secret for your cluster.
Procedure
Create the
install-config.yamlfile.Change to the directory that contains the installation program and run the following command:
$ ./openshift-install create install-config --dir <installation_directory>1 - 1
- For
<installation_directory>, specify the directory name to store the files that the installation program creates.
When specifying the directory:
-
Verify that the directory has the
executepermission. This permission is required to run Terraform binaries under the installation directory. Use an empty directory. Some installation assets, such as bootstrap X.509 certificates, have short expiration intervals, therefore you must not reuse an installation directory. If you want to reuse individual files from another cluster installation, you can copy them into your directory. However, the file names for the installation assets might change between releases. Use caution when copying installation files from an earlier OpenShift Container Platform version.
NoteAlways delete the
~/.powervsdirectory to avoid reusing a stale configuration. Run the following command:$ rm -rf ~/.powervs
At the prompts, provide the configuration details for your cloud:
Optional: Select an SSH key to use to access your cluster machines.
NoteFor production OpenShift Container Platform clusters on which you want to perform installation debugging or disaster recovery, specify an SSH key that your
ssh-agentprocess uses.- Select openstack as the platform to target.
- Specify the Red Hat OpenStack Platform (RHOSP) external network name to use for installing the cluster.
- Specify the floating IP address to use for external access to the OpenShift API.
- Specify a RHOSP flavor with at least 16 GB RAM to use for control plane nodes and 8 GB RAM for compute nodes.
- Select the base domain to deploy the cluster to. All DNS records will be sub-domains of this base and will also include the cluster name.
- Enter a name for your cluster. The name must be 14 or fewer characters long.
-
Modify the
install-config.yamlfile. You can find more information about the available parameters in the "Installation configuration parameters" section. Back up the
install-config.yamlfile so that you can use it to install multiple clusters.ImportantThe
install-config.yamlfile is consumed during the installation process. If you want to reuse the file, you must back it up now.
4.10.1. Configuring the cluster-wide proxy during installation
Production environments can deny direct access to the internet and instead have an HTTP or HTTPS proxy available. You can configure a new OpenShift Container Platform cluster to use a proxy by configuring the proxy settings in the install-config.yaml file.
Kuryr installations default to HTTP proxies.
Prerequisites
For Kuryr installations on restricted networks that use the
Proxyobject, the proxy must be able to reply to the router that the cluster uses. To add a static route for the proxy configuration, from a command line as the root user, enter:$ ip route add <cluster_network_cidr> via <installer_subnet_gateway>-
The restricted subnet must have a gateway that is defined and available to be linked to the
Routerresource that Kuryr creates.
Prerequisites
-
You have an existing
install-config.yamlfile. You reviewed the sites that your cluster requires access to and determined whether any of them need to bypass the proxy. By default, all cluster egress traffic is proxied, including calls to hosting cloud provider APIs. You added sites to the
Proxyobject’sspec.noProxyfield to bypass the proxy if necessary.NoteThe
Proxyobjectstatus.noProxyfield is populated with the values of thenetworking.machineNetwork[].cidr,networking.clusterNetwork[].cidr, andnetworking.serviceNetwork[]fields from your installation configuration.For installations on Amazon Web Services (AWS), Google Cloud, Microsoft Azure, and Red Hat OpenStack Platform (RHOSP), the
Proxyobjectstatus.noProxyfield is also populated with the instance metadata endpoint (169.254.169.254).
Procedure
Edit your
install-config.yamlfile and add the proxy settings. For example:apiVersion: v1 baseDomain: my.domain.com proxy: httpProxy: http://<username>:<pswd>@<ip>:<port>1 httpsProxy: https://<username>:<pswd>@<ip>:<port>2 noProxy: example.com3 additionalTrustBundle: |4 -----BEGIN CERTIFICATE----- <MY_TRUSTED_CA_CERT> -----END CERTIFICATE----- additionalTrustBundlePolicy: <policy_to_add_additionalTrustBundle>5 - 1
- A proxy URL to use for creating HTTP connections outside the cluster. The URL scheme must be
http. - 2
- A proxy URL to use for creating HTTPS connections outside the cluster.
- 3
- A comma-separated list of destination domain names, IP addresses, or other network CIDRs to exclude from proxying. Preface a domain with
.to match subdomains only. For example,.y.commatchesx.y.com, but noty.com. Use*to bypass the proxy for all destinations. - 4
- If provided, the installation program generates a config map that is named
user-ca-bundlein theopenshift-confignamespace that contains one or more additional CA certificates that are required for proxying HTTPS connections. The Cluster Network Operator then creates atrusted-ca-bundleconfig map that merges these contents with the Red Hat Enterprise Linux CoreOS (RHCOS) trust bundle, and this config map is referenced in thetrustedCAfield of theProxyobject. TheadditionalTrustBundlefield is required unless the proxy’s identity certificate is signed by an authority from the RHCOS trust bundle. - 5
- Optional: The policy to determine the configuration of the
Proxyobject to reference theuser-ca-bundleconfig map in thetrustedCAfield. The allowed values areProxyonlyandAlways. UseProxyonlyto reference theuser-ca-bundleconfig map only whenhttp/httpsproxy is configured. UseAlwaysto always reference theuser-ca-bundleconfig map. The default value isProxyonly.
NoteThe installation program does not support the proxy
readinessEndpointsfield.NoteIf the installer times out, restart and then complete the deployment by using the
wait-forcommand of the installer. For example:$ ./openshift-install wait-for install-complete --log-level debug- Save the file and reference it when installing OpenShift Container Platform.
The installation program creates a cluster-wide proxy that is named cluster that uses the proxy settings in the provided install-config.yaml file. If no proxy settings are provided, a cluster Proxy object is still created, but it will have a nil spec.
Only the Proxy object named cluster is supported, and no additional proxies can be created.
4.10.2. Custom subnets in RHOSP deployments
Optionally, you can deploy a cluster on a Red Hat OpenStack Platform (RHOSP) subnet of your choice. The subnet’s GUID is passed as the value of platform.openstack.machinesSubnet in the install-config.yaml file.
This subnet is used as the cluster’s primary subnet. By default, nodes and ports are created on it. You can create nodes and ports on a different RHOSP subnet by setting the value of the platform.openstack.machinesSubnet property to the subnet’s UUID.
Before you run the OpenShift Container Platform installer with a custom subnet, verify that your configuration meets the following requirements:
-
The subnet that is used by
platform.openstack.machinesSubnethas DHCP enabled. -
The CIDR of
platform.openstack.machinesSubnetmatches the CIDR ofnetworking.machineNetwork. - The installation program user has permission to create ports on this network, including ports with fixed IP addresses.
Clusters that use custom subnets have the following limitations:
-
If you plan to install a cluster that uses floating IP addresses, the
platform.openstack.machinesSubnetsubnet must be attached to a router that is connected to theexternalNetworknetwork. -
If the
platform.openstack.machinesSubnetvalue is set in theinstall-config.yamlfile, the installation program does not create a private network or subnet for your RHOSP machines. -
You cannot use the
platform.openstack.externalDNSproperty at the same time as a custom subnet. To add DNS to a cluster that uses a custom subnet, configure DNS on the RHOSP network.
By default, the API VIP takes x.x.x.5 and the Ingress VIP takes x.x.x.7 from your network’s CIDR block. To override these default values, set values for platform.openstack.apiVIPs and platform.openstack.ingressVIPs that are outside of the DHCP allocation pool.
The CIDR ranges for networks are not adjustable after cluster installation. Red Hat does not provide direct guidance on determining the range during cluster installation because it requires careful consideration of the number of created pods per namespace.
4.10.3. Sample customized install-config.yaml file for RHOSP with Kuryr
To deploy with Kuryr SDN instead of the default OVN-Kubernetes network plugin, you must modify the install-config.yaml file to include Kuryr as the desired networking.networkType. This sample install-config.yaml demonstrates all of the possible Red Hat OpenStack Platform (RHOSP) customization options.
This sample file is provided for reference only. You must obtain your install-config.yaml file by using the installation program.
apiVersion: v1
baseDomain: example.com
controlPlane:
name: master
platform: {}
replicas: 3
compute:
- name: worker
platform:
openstack:
type: ml.large
replicas: 3
metadata:
name: example
networking:
clusterNetwork:
- cidr: 10.128.0.0/14
hostPrefix: 23
machineNetwork:
- cidr: 10.0.0.0/16
serviceNetwork:
- 172.30.0.0/16
networkType: Kuryr
platform:
openstack:
cloud: mycloud
externalNetwork: external
computeFlavor: m1.xlarge
apiFloatingIP: 128.0.0.1
trunkSupport: true
octaviaSupport: true
pullSecret: '{"auths": ...}'
sshKey: ssh-ed25519 AAAA...- 1
- The Amphora Octavia driver creates two ports per load balancer. As a result, the service subnet that the installer creates is twice the size of the CIDR that is specified as the value of the
serviceNetworkproperty. The larger range is required to prevent IP address conflicts. - 2
- The cluster network plugin to install. The supported values are
Kuryr,OVNKubernetes, andOpenShiftSDN. The default value isOVNKubernetes. - 3 4
- Both
trunkSupportandoctaviaSupportare automatically discovered by the installer, so there is no need to set them. But if your environment does not meet both requirements, Kuryr SDN will not properly work. Trunks are needed to connect the pods to the RHOSP network and Octavia is required to create the OpenShift Container Platform services.
4.10.4. Installation configuration for a cluster on OpenStack with a user-managed load balancer
The following example install-config.yaml file demonstrates how to configure a cluster that uses an external, user-managed load balancer rather than the default internal load balancer.
apiVersion: v1
baseDomain: mydomain.test
compute:
- name: worker
platform:
openstack:
type: m1.xlarge
replicas: 3
controlPlane:
name: master
platform:
openstack:
type: m1.xlarge
replicas: 3
metadata:
name: mycluster
networking:
clusterNetwork:
- cidr: 10.128.0.0/14
hostPrefix: 23
machineNetwork:
- cidr: 192.168.10.0/24
platform:
openstack:
cloud: mycloud
machinesSubnet: 8586bf1a-cc3c-4d40-bdf6-c243decc603a
apiVIPs:
- 192.168.10.5
ingressVIPs:
- 192.168.10.7
loadBalancer:
type: UserManaged 4.10.5. Cluster deployment on RHOSP provider networks
You can deploy your OpenShift Container Platform clusters on Red Hat OpenStack Platform (RHOSP) with a primary network interface on a provider network. Provider networks are commonly used to give projects direct access to a public network that can be used to reach the internet. You can also share provider networks among projects as part of the network creation process.
RHOSP provider networks map directly to an existing physical network in the data center. A RHOSP administrator must create them.
In the following example, OpenShift Container Platform workloads are connected to a data center by using a provider network:
OpenShift Container Platform clusters that are installed on provider networks do not require tenant networks or floating IP addresses. The installer does not create these resources during installation.
Example provider network types include flat (untagged) and VLAN (802.1Q tagged).
A cluster can support as many provider network connections as the network type allows. For example, VLAN networks typically support up to 4096 connections.
You can learn more about provider and tenant networks in the RHOSP documentation.
4.10.5.1. RHOSP provider network requirements for cluster installation
Before you install an OpenShift Container Platform cluster, your Red Hat OpenStack Platform (RHOSP) deployment and provider network must meet a number of conditions:
- The RHOSP networking service (Neutron) is enabled and accessible through the RHOSP networking API.
- The RHOSP networking service has the port security and allowed address pairs extensions enabled.
The provider network can be shared with other tenants.
TipUse the
openstack network createcommand with the--shareflag to create a network that can be shared.The RHOSP project that you use to install the cluster must own the provider network, as well as an appropriate subnet.
Tip- To create a network for a project that is named "openshift," enter the following command
$ openstack network create --project openshift- To create a subnet for a project that is named "openshift," enter the following command
$ openstack subnet create --project openshiftTo learn more about creating networks on RHOSP, read the provider networks documentation.
If the cluster is owned by the
adminuser, you must run the installer as that user to create ports on the network.ImportantProvider networks must be owned by the RHOSP project that is used to create the cluster. If they are not, the RHOSP Compute service (Nova) cannot request a port from that network.
Verify that the provider network can reach the RHOSP metadata service IP address, which is
169.254.169.254by default.Depending on your RHOSP SDN and networking service configuration, you might need to provide the route when you create the subnet. For example:
$ openstack subnet create --dhcp --host-route destination=169.254.169.254/32,gateway=192.0.2.2 ...- Optional: To secure the network, create role-based access control (RBAC) rules that limit network access to a single project.
4.10.5.2. Deploying a cluster that has a primary interface on a provider network
You can deploy an OpenShift Container Platform cluster that has its primary network interface on an Red Hat OpenStack Platform (RHOSP) provider network.
Prerequisites
- Your Red Hat OpenStack Platform (RHOSP) deployment is configured as described by "RHOSP provider network requirements for cluster installation".
Procedure
-
In a text editor, open the
install-config.yamlfile. -
Set the value of the
platform.openstack.apiVIPsproperty to the IP address for the API VIP. -
Set the value of the
platform.openstack.ingressVIPsproperty to the IP address for the Ingress VIP. -
Set the value of the
platform.openstack.machinesSubnetproperty to the UUID of the provider network subnet. -
Set the value of the
networking.machineNetwork.cidrproperty to the CIDR block of the provider network subnet.
The platform.openstack.apiVIPs and platform.openstack.ingressVIPs properties must both be unassigned IP addresses from the networking.machineNetwork.cidr block.
Section of an installation configuration file for a cluster that relies on a RHOSP provider network
...
platform:
openstack:
apiVIPs:
- 192.0.2.13
ingressVIPs:
- 192.0.2.23
machinesSubnet: fa806b2f-ac49-4bce-b9db-124bc64209bf
# ...
networking:
machineNetwork:
- cidr: 192.0.2.0/24
You cannot set the platform.openstack.externalNetwork or platform.openstack.externalDNS parameters while using a provider network for the primary network interface.
When you deploy the cluster, the installer uses the install-config.yaml file to deploy the cluster on the provider network.
You can add additional networks, including provider networks, to the platform.openstack.additionalNetworkIDs list.
After you deploy your cluster, you can attach pods to additional networks. For more information, see Understanding multiple networks.
4.10.6. Kuryr ports pools
A Kuryr ports pool maintains a number of ports on standby for pod creation.
Keeping ports on standby minimizes pod creation time. Without ports pools, Kuryr must explicitly request port creation or deletion whenever a pod is created or deleted.
The Neutron ports that Kuryr uses are created in subnets that are tied to namespaces. These pod ports are also added as subports to the primary port of OpenShift Container Platform cluster nodes.
Because Kuryr keeps each namespace in a separate subnet, a separate ports pool is maintained for each namespace-worker pair.
Prior to installing a cluster, you can set the following parameters in the cluster-network-03-config.yml manifest file to configure ports pool behavior:
-
The
enablePortPoolsPrepopulationparameter controls pool prepopulation, which forces Kuryr to add Neutron ports to the pools when the first pod that is configured to use the dedicated network for pods is created in a namespace. The default value isfalse. -
The
poolMinPortsparameter is the minimum number of free ports that are kept in the pool. The default value is1. The
poolMaxPortsparameter is the maximum number of free ports that are kept in the pool. A value of0disables that upper bound. This is the default setting.If your OpenStack port quota is low, or you have a limited number of IP addresses on the pod network, consider setting this option to ensure that unneeded ports are deleted.
-
The
poolBatchPortsparameter defines the maximum number of Neutron ports that can be created at once. The default value is3.
4.10.7. Adjusting Kuryr ports pools during installation
During installation, you can configure how Kuryr manages Red Hat OpenStack Platform (RHOSP) Neutron ports to control the speed and efficiency of pod creation.
Prerequisites
-
Create and modify the
install-config.yamlfile.
Procedure
From a command line, create the manifest files:
$ ./openshift-install create manifests --dir <installation_directory>1 - 1
- For
<installation_directory>, specify the name of the directory that contains theinstall-config.yamlfile for your cluster.
Create a file that is named
cluster-network-03-config.ymlin the<installation_directory>/manifests/directory:$ touch <installation_directory>/manifests/cluster-network-03-config.yml1 - 1
- For
<installation_directory>, specify the directory name that contains themanifests/directory for your cluster.
After creating the file, several network configuration files are in the
manifests/directory, as shown:$ ls <installation_directory>/manifests/cluster-network-*Example output
cluster-network-01-crd.yml cluster-network-02-config.yml cluster-network-03-config.ymlOpen the
cluster-network-03-config.ymlfile in an editor, and enter a custom resource (CR) that describes the Cluster Network Operator configuration that you want:$ oc edit networks.operator.openshift.io clusterEdit the settings to meet your requirements. The following file is provided as an example:
apiVersion: operator.openshift.io/v1 kind: Network metadata: name: cluster spec: clusterNetwork: - cidr: 10.128.0.0/14 hostPrefix: 23 serviceNetwork: - 172.30.0.0/16 defaultNetwork: type: Kuryr kuryrConfig: enablePortPoolsPrepopulation: false1 poolMinPorts: 12 poolBatchPorts: 33 poolMaxPorts: 54 openstackServiceNetwork: 172.30.0.0/155 - 1
- Set
enablePortPoolsPrepopulationtotrueto make Kuryr create new Neutron ports when the first pod on the network for pods is created in a namespace. This setting raises the Neutron ports quota but can reduce the time that is required to spawn pods. The default value isfalse. - 2
- Kuryr creates new ports for a pool if the number of free ports in that pool is lower than the value of
poolMinPorts. The default value is1. - 3
poolBatchPortscontrols the number of new ports that are created if the number of free ports is lower than the value ofpoolMinPorts. The default value is3.- 4
- If the number of free ports in a pool is higher than the value of
poolMaxPorts, Kuryr deletes them until the number matches that value. Setting this value to0disables this upper bound, preventing pools from shrinking. The default value is0. - 5
- The
openStackServiceNetworkparameter defines the CIDR range of the network from which IP addresses are allocated to RHOSP Octavia’s LoadBalancers.
If this parameter is used with the Amphora driver, Octavia takes two IP addresses from this network for each load balancer: one for OpenShift and the other for VRRP connections. Because these IP addresses are managed by OpenShift Container Platform and Neutron respectively, they must come from different pools. Therefore, the value of
openStackServiceNetworkmust be at least twice the size of the value ofserviceNetwork, and the value ofserviceNetworkmust overlap entirely with the range that is defined byopenStackServiceNetwork.The CNO verifies that VRRP IP addresses that are taken from the range that is defined by this parameter do not overlap with the range that is defined by the
serviceNetworkparameter.If this parameter is not set, the CNO uses an expanded value of
serviceNetworkthat is determined by decrementing the prefix size by 1.-
Save the
cluster-network-03-config.ymlfile, and exit the text editor. -
Optional: Back up the
manifests/cluster-network-03-config.ymlfile. The installation program deletes themanifests/directory while creating the cluster.
4.11. Generating a key pair for cluster node SSH access
During an OpenShift Container Platform installation, you can provide an SSH public key to the installation program. The key is passed to the Red Hat Enterprise Linux CoreOS (RHCOS) nodes through their Ignition config files and is used to authenticate SSH access to the nodes. The key is added to the ~/.ssh/authorized_keys list for the core user on each node, which enables password-less authentication.
After the key is passed to the nodes, you can use the key pair to SSH in to the RHCOS nodes as the user core. To access the nodes through SSH, the private key identity must be managed by SSH for your local user.
If you want to SSH in to your cluster nodes to perform installation debugging or disaster recovery, you must provide the SSH public key during the installation process. The ./openshift-install gather command also requires the SSH public key to be in place on the cluster nodes.
Do not skip this procedure in production environments, where disaster recovery and debugging is required.
Procedure
If you do not have an existing SSH key pair on your local machine to use for authentication onto your cluster nodes, create one. For example, on a computer that uses a Linux operating system, run the following command:
$ ssh-keygen -t ed25519 -N '' -f <path>/<file_name>1 - 1
- Specify the path and file name, such as
~/.ssh/id_ed25519, of the new SSH key. If you have an existing key pair, ensure your public key is in the your~/.sshdirectory.
NoteIf you plan to install an OpenShift Container Platform cluster that uses the RHEL cryptographic libraries that have been submitted to NIST for FIPS 140-2/140-3 Validation on only the
x86_64,ppc64le, ands390xarchitectures, do not create a key that uses theed25519algorithm. Instead, create a key that uses thersaorecdsaalgorithm.View the public SSH key:
$ cat <path>/<file_name>.pubFor example, run the following to view the
~/.ssh/id_ed25519.pubpublic key:$ cat ~/.ssh/id_ed25519.pubAdd the SSH private key identity to the SSH agent for your local user, if it has not already been added. SSH agent management of the key is required for password-less SSH authentication onto your cluster nodes, or if you want to use the
./openshift-install gathercommand.NoteOn some distributions, default SSH private key identities such as
~/.ssh/id_rsaand~/.ssh/id_dsaare managed automatically.If the
ssh-agentprocess is not already running for your local user, start it as a background task:$ eval "$(ssh-agent -s)"Example output
Agent pid 31874NoteIf your cluster is in FIPS mode, only use FIPS-compliant algorithms to generate the SSH key. The key must be either RSA or ECDSA.
Add your SSH private key to the
ssh-agent:$ ssh-add <path>/<file_name>1 - 1
- Specify the path and file name for your SSH private key, such as
~/.ssh/id_ed25519
Example output
Identity added: /home/<you>/<path>/<file_name> (<computer_name>)
Next steps
- When you install OpenShift Container Platform, provide the SSH public key to the installation program.
4.12. Enabling access to the environment
At deployment, all OpenShift Container Platform machines are created in a Red Hat OpenStack Platform (RHOSP)-tenant network. Therefore, they are not accessible directly in most RHOSP deployments.
You can configure OpenShift Container Platform API and application access by using floating IP addresses (FIPs) during installation. You can also complete an installation without configuring FIPs, but the installer will not configure a way to reach the API or applications externally.
4.12.1. Enabling access with floating IP addresses
Create floating IP (FIP) addresses for external access to the OpenShift Container Platform API and cluster applications.
Procedure
Using the Red Hat OpenStack Platform (RHOSP) CLI, create the API FIP:
$ openstack floating ip create --description "API <cluster_name>.<base_domain>" <external_network>Using the Red Hat OpenStack Platform (RHOSP) CLI, create the apps, or Ingress, FIP:
$ openstack floating ip create --description "Ingress <cluster_name>.<base_domain>" <external_network>Add records that follow these patterns to your DNS server for the API and Ingress FIPs:
api.<cluster_name>.<base_domain>. IN A <API_FIP> *.apps.<cluster_name>.<base_domain>. IN A <apps_FIP>NoteIf you do not control the DNS server, you can access the cluster by adding the cluster domain names such as the following to your
/etc/hostsfile:-
<api_floating_ip> api.<cluster_name>.<base_domain> -
<application_floating_ip> grafana-openshift-monitoring.apps.<cluster_name>.<base_domain> -
<application_floating_ip> prometheus-k8s-openshift-monitoring.apps.<cluster_name>.<base_domain> -
<application_floating_ip> oauth-openshift.apps.<cluster_name>.<base_domain> -
<application_floating_ip> console-openshift-console.apps.<cluster_name>.<base_domain> -
application_floating_ip integrated-oauth-server-openshift-authentication.apps.<cluster_name>.<base_domain>
The cluster domain names in the
/etc/hostsfile grant access to the web console and the monitoring interface of your cluster locally. You can also use thekubectloroc. You can access the user applications by using the additional entries pointing to the <application_floating_ip>. This action makes the API and applications accessible to only you, which is not suitable for production deployment, but does allow installation for development and testing.-
Add the FIPs to the
install-config.yamlfile as the values of the following parameters:-
platform.openstack.ingressFloatingIP -
platform.openstack.apiFloatingIP
-
If you use these values, you must also enter an external network as the value of the platform.openstack.externalNetwork parameter in the install-config.yaml file.
You can make OpenShift Container Platform resources available outside of the cluster by assigning a floating IP address and updating your firewall configuration.
4.12.2. Completing installation without floating IP addresses
You can install OpenShift Container Platform on Red Hat OpenStack Platform (RHOSP) without providing floating IP addresses.
In the install-config.yaml file, do not define the following parameters:
-
platform.openstack.ingressFloatingIP -
platform.openstack.apiFloatingIP
If you cannot provide an external network, you can also leave platform.openstack.externalNetwork blank. If you do not provide a value for platform.openstack.externalNetwork, a router is not created for you, and, without additional action, the installer will fail to retrieve an image from Glance. You must configure external connectivity on your own.
If you run the installer from a system that cannot reach the cluster API due to a lack of floating IP addresses or name resolution, installation fails. To prevent installation failure in these cases, you can use a proxy network or run the installer from a system that is on the same network as your machines.
You can enable name resolution by creating DNS records for the API and Ingress ports. For example:
api.<cluster_name>.<base_domain>. IN A <api_port_IP>
*.apps.<cluster_name>.<base_domain>. IN A <ingress_port_IP>
If you do not control the DNS server, you can add the record to your /etc/hosts file. This action makes the API accessible to only you, which is not suitable for production deployment but does allow installation for development and testing.
4.13. Deploying the cluster
You can install OpenShift Container Platform on a compatible cloud platform.
You can run the create cluster command of the installation program only once, during initial installation.
Prerequisites
- You have the OpenShift Container Platform installation program and the pull secret for your cluster.
- You have verified that the cloud provider account on your host has the correct permissions to deploy the cluster. An account with incorrect permissions causes the installation process to fail with an error message that displays the missing permissions.
Procedure
Change to the directory that contains the installation program and initialize the cluster deployment:
$ ./openshift-install create cluster --dir <installation_directory> \1 --log-level=info2
Verification
When the cluster deployment completes successfully:
-
The terminal displays directions for accessing your cluster, including a link to the web console and credentials for the
kubeadminuser. -
Credential information also outputs to
<installation_directory>/.openshift_install.log.
Do not delete the installation program or the files that the installation program creates. Both are required to delete the cluster.
Example output
...
INFO Install complete!
INFO To access the cluster as the system:admin user when using 'oc', run 'export KUBECONFIG=/home/myuser/install_dir/auth/kubeconfig'
INFO Access the OpenShift web-console here: https://console-openshift-console.apps.mycluster.example.com
INFO Login to the console with user: "kubeadmin", and password: "password"
INFO Time elapsed: 36m22s-
The Ignition config files that the installation program generates contain certificates that expire after 24 hours, which are then renewed at that time. If the cluster is shut down before renewing the certificates and the cluster is later restarted after the 24 hours have elapsed, the cluster automatically recovers the expired certificates. The exception is that you must manually approve the pending
node-bootstrappercertificate signing requests (CSRs) to recover kubelet certificates. See the documentation for Recovering from expired control plane certificates for more information. - It is recommended that you use Ignition config files within 12 hours after they are generated because the 24-hour certificate rotates from 16 to 22 hours after the cluster is installed. By using the Ignition config files within 12 hours, you can avoid installation failure if the certificate update runs during installation.
4.14. Verifying cluster status
You can verify your OpenShift Container Platform cluster’s status during or after installation.
Procedure
In the cluster environment, export the administrator’s kubeconfig file:
$ export KUBECONFIG=<installation_directory>/auth/kubeconfig1 - 1
- For
<installation_directory>, specify the path to the directory that you stored the installation files in.
The
kubeconfigfile contains information about the cluster that is used by the CLI to connect a client to the correct cluster and API server.View the control plane and compute machines created after a deployment:
$ oc get nodesView your cluster’s version:
$ oc get clusterversionView your Operators' status:
$ oc get clusteroperatorView all running pods in the cluster:
$ oc get pods -A
4.15. Logging in to the cluster by using the CLI
You can log in to your cluster as a default system user by exporting the cluster kubeconfig file. The kubeconfig file contains information about the cluster that is used by the CLI to connect a client to the correct cluster and API server. The file is specific to a cluster and is created during OpenShift Container Platform installation.
Prerequisites
- You deployed an OpenShift Container Platform cluster.
-
You installed the
ocCLI.
Procedure
Export the
kubeadmincredentials:$ export KUBECONFIG=<installation_directory>/auth/kubeconfig1 - 1
- For
<installation_directory>, specify the path to the directory that you stored the installation files in.
Verify you can run
occommands successfully using the exported configuration:$ oc whoamiExample output
system:admin
4.16. Telemetry access for OpenShift Container Platform
In OpenShift Container Platform 4.14, the Telemetry service, which runs by default to provide metrics about cluster health and the success of updates, requires internet access. If your cluster is connected to the internet, Telemetry runs automatically, and your cluster is registered to OpenShift Cluster Manager.
After you confirm that your OpenShift Cluster Manager inventory is correct, either maintained automatically by Telemetry or manually by using OpenShift Cluster Manager, use subscription watch to track your OpenShift Container Platform subscriptions at the account or multi-cluster level.
4.17. Next steps
Chapter 5. Installing a cluster on OpenStack on your own infrastructure
In OpenShift Container Platform version 4.14, you can install a cluster on Red Hat OpenStack Platform (RHOSP) that runs on user-provisioned infrastructure.
Using your own infrastructure allows you to integrate your cluster with existing infrastructure and modifications. The process requires more labor on your part than installer-provisioned installations, because you must create all RHOSP resources, like Nova servers, Neutron ports, and security groups. However, Red Hat provides Ansible playbooks to help you in the deployment process.
5.1. Prerequisites
- You reviewed details about the OpenShift Container Platform installation and update processes.
- You read the documentation on selecting a cluster installation method and preparing it for users.
- You verified that OpenShift Container Platform 4.14 is compatible with your RHOSP version by using the Supported platforms for OpenShift clusters section. You can also compare platform support across different versions by viewing the OpenShift Container Platform on RHOSP support matrix.
- You have an RHOSP account where you want to install OpenShift Container Platform.
- You understand performance and scalability practices for cluster scaling, control plane sizing, and etcd. For more information, see Recommended practices for scaling the cluster.
On the machine from which you run the installation program, you have:
- A single directory in which you can keep the files you create during the installation process
- Python 3
5.2. Internet access for OpenShift Container Platform
In OpenShift Container Platform 4.14, you require access to the internet to install your cluster.
You must have internet access to:
- Access OpenShift Cluster Manager to download the installation program and perform subscription management. If the cluster has internet access and you do not disable Telemetry, that service automatically entitles your cluster.
- Access Quay.io to obtain the packages that are required to install your cluster.
- Obtain the packages that are required to perform cluster updates.
If your cluster cannot have direct internet access, you can perform a restricted network installation on some types of infrastructure that you provision. During that process, you download the required content and use it to populate a mirror registry with the installation packages. With some installation types, the environment that you install your cluster in will not require internet access. Before you update the cluster, you update the content of the mirror registry.
5.3. Resource guidelines for installing OpenShift Container Platform on RHOSP
To support an OpenShift Container Platform installation, your Red Hat OpenStack Platform (RHOSP) quota must meet the following requirements:
| Resource | Value |
|---|---|
| Floating IP addresses | 3 |
| Ports | 15 |
| Routers | 1 |
| Subnets | 1 |
| RAM | 88 GB |
| vCPUs | 22 |
| Volume storage | 275 GB |
| Instances | 7 |
| Security groups | 3 |
| Security group rules | 60 |
| Server groups | 2 - plus 1 for each additional availability zone in each machine pool |
A cluster might function with fewer than recommended resources, but its performance is not guaranteed.
If RHOSP object storage (Swift) is available and operated by a user account with the swiftoperator role, it is used as the default backend for the OpenShift Container Platform image registry. In this case, the volume storage requirement is 175 GB. Swift space requirements vary depending on the size of the image registry.
By default, your security group and security group rule quotas might be low. If you encounter problems, run openstack quota set --secgroups 3 --secgroup-rules 60 <project> as an administrator to increase them.
An OpenShift Container Platform deployment comprises control plane machines, compute machines, and a bootstrap machine.
5.3.1. Control plane machines
By default, the OpenShift Container Platform installation process creates three control plane machines.
Each machine requires:
- An instance from the RHOSP quota
- A port from the RHOSP quota
- A flavor with at least 16 GB memory and 4 vCPUs
- At least 100 GB storage space from the RHOSP quota
5.3.2. Compute machines
By default, the OpenShift Container Platform installation process creates three compute machines.
Each machine requires:
- An instance from the RHOSP quota
- A port from the RHOSP quota
- A flavor with at least 8 GB memory and 2 vCPUs
- At least 100 GB storage space from the RHOSP quota
Compute machines host the applications that you run on OpenShift Container Platform; aim to run as many as you can.
5.3.3. Bootstrap machine
During installation, a bootstrap machine is temporarily provisioned to stand up the control plane. After the production control plane is ready, the bootstrap machine is deprovisioned.
The bootstrap machine requires:
- An instance from the RHOSP quota
- A port from the RHOSP quota
- A flavor with at least 16 GB memory and 4 vCPUs
- At least 100 GB storage space from the RHOSP quota
5.4. Downloading playbook dependencies
The Ansible playbooks that simplify the installation process on user-provisioned infrastructure require several Python modules. On the machine where you will run the installer, add the modules' repositories and then download them.
These instructions assume that you are using Red Hat Enterprise Linux (RHEL) 8.
Prerequisites
- Python 3 is installed on your machine.
Procedure
On a command line, add the repositories:
Register with Red Hat Subscription Manager:
$ sudo subscription-manager register # If not done alreadyPull the latest subscription data:
$ sudo subscription-manager attach --pool=$YOUR_POOLID # If not done alreadyDisable the current repositories:
$ sudo subscription-manager repos --disable=* # If not done alreadyAdd the required repositories:
$ sudo subscription-manager repos \ --enable=rhel-8-for-x86_64-baseos-rpms \ --enable=openstack-16-tools-for-rhel-8-x86_64-rpms \ --enable=ansible-2.9-for-rhel-8-x86_64-rpms \ --enable=rhel-8-for-x86_64-appstream-rpms
Install the modules:
$ sudo yum install python3-openstackclient ansible python3-openstacksdk python3-netaddr ansible-collections-openstackEnsure that the
pythoncommand points topython3:$ sudo alternatives --set python /usr/bin/python3
5.5. Downloading the installation playbooks
Download Ansible playbooks that you can use to install OpenShift Container Platform on your own Red Hat OpenStack Platform (RHOSP) infrastructure.
Prerequisites
- The curl command-line tool is available on your machine.
Procedure
To download the playbooks to your working directory, run the following script from a command line:
$ xargs -n 1 curl -O <<< ' https://raw.githubusercontent.com/openshift/installer/release-4.14/upi/openstack/bootstrap.yaml https://raw.githubusercontent.com/openshift/installer/release-4.14/upi/openstack/common.yaml https://raw.githubusercontent.com/openshift/installer/release-4.14/upi/openstack/compute-nodes.yaml https://raw.githubusercontent.com/openshift/installer/release-4.14/upi/openstack/control-plane.yaml https://raw.githubusercontent.com/openshift/installer/release-4.14/upi/openstack/inventory.yaml https://raw.githubusercontent.com/openshift/installer/release-4.14/upi/openstack/network.yaml https://raw.githubusercontent.com/openshift/installer/release-4.14/upi/openstack/security-groups.yaml https://raw.githubusercontent.com/openshift/installer/release-4.14/upi/openstack/down-bootstrap.yaml https://raw.githubusercontent.com/openshift/installer/release-4.14/upi/openstack/down-compute-nodes.yaml https://raw.githubusercontent.com/openshift/installer/release-4.14/upi/openstack/down-control-plane.yaml https://raw.githubusercontent.com/openshift/installer/release-4.14/upi/openstack/down-load-balancers.yaml https://raw.githubusercontent.com/openshift/installer/release-4.14/upi/openstack/down-network.yaml https://raw.githubusercontent.com/openshift/installer/release-4.14/upi/openstack/down-security-groups.yaml https://raw.githubusercontent.com/openshift/installer/release-4.14/upi/openstack/down-containers.yaml'
The playbooks are downloaded to your machine.
During the installation process, you can modify the playbooks to configure your deployment.
Retain all playbooks for the life of your cluster. You must have the playbooks to remove your OpenShift Container Platform cluster from RHOSP.
You must match any edits you make in the bootstrap.yaml, compute-nodes.yaml, control-plane.yaml, network.yaml, and security-groups.yaml files to the corresponding playbooks that are prefixed with down-. For example, edits to the bootstrap.yaml file must be reflected in the down-bootstrap.yaml file, too. If you do not edit both files, the supported cluster removal process will fail.
5.6. Obtaining the installation program
Before you install OpenShift Container Platform, download the installation file on the host you are using for installation.
Prerequisites
- You have a computer that runs Linux or macOS, with at least 1.2 GB of local disk space.
Procedure
- Go to the Cluster Type page on the Red Hat Hybrid Cloud Console. If you have a Red Hat account, log in with your credentials. If you do not, create an account.
- Select your infrastructure provider from the Run it yourself section of the page.
- Select your host operating system and architecture from the dropdown menus under OpenShift Installer and click Download Installer.
Place the downloaded file in the directory where you want to store the installation configuration files.
Important- The installation program creates several files on the computer that you use to install your cluster. You must keep the installation program and the files that the installation program creates after you finish installing the cluster. Both of the files are required to delete the cluster.
- Deleting the files created by the installation program does not remove your cluster, even if the cluster failed during installation. To remove your cluster, complete the OpenShift Container Platform uninstallation procedures for your specific cloud provider.
Extract the installation program. For example, on a computer that uses a Linux operating system, run the following command:
$ tar -xvf openshift-install-linux.tar.gz- Download your installation pull secret from Red Hat OpenShift Cluster Manager. This pull secret allows you to authenticate with the services that are provided by the included authorities, including Quay.io, which serves the container images for OpenShift Container Platform components.
Alternatively, you can retrieve the installation program from the Red Hat Customer Portal, where you can specify a version of the installation program to download. However, you must have an active subscription to access this page.
5.7. Generating a key pair for cluster node SSH access
During an OpenShift Container Platform installation, you can provide an SSH public key to the installation program. The key is passed to the Red Hat Enterprise Linux CoreOS (RHCOS) nodes through their Ignition config files and is used to authenticate SSH access to the nodes. The key is added to the ~/.ssh/authorized_keys list for the core user on each node, which enables password-less authentication.
After the key is passed to the nodes, you can use the key pair to SSH in to the RHCOS nodes as the user core. To access the nodes through SSH, the private key identity must be managed by SSH for your local user.
If you want to SSH in to your cluster nodes to perform installation debugging or disaster recovery, you must provide the SSH public key during the installation process. The ./openshift-install gather command also requires the SSH public key to be in place on the cluster nodes.
Do not skip this procedure in production environments, where disaster recovery and debugging is required.
You must use a local key, not one that you configured with platform-specific approaches such as AWS key pairs.
Procedure
If you do not have an existing SSH key pair on your local machine to use for authentication onto your cluster nodes, create one. For example, on a computer that uses a Linux operating system, run the following command:
$ ssh-keygen -t ed25519 -N '' -f <path>/<file_name>1 - 1
- Specify the path and file name, such as
~/.ssh/id_ed25519, of the new SSH key. If you have an existing key pair, ensure your public key is in the your~/.sshdirectory.
NoteIf you plan to install an OpenShift Container Platform cluster that uses the RHEL cryptographic libraries that have been submitted to NIST for FIPS 140-2/140-3 Validation on only the
x86_64,ppc64le, ands390xarchitectures, do not create a key that uses theed25519algorithm. Instead, create a key that uses thersaorecdsaalgorithm.View the public SSH key:
$ cat <path>/<file_name>.pubFor example, run the following to view the
~/.ssh/id_ed25519.pubpublic key:$ cat ~/.ssh/id_ed25519.pubAdd the SSH private key identity to the SSH agent for your local user, if it has not already been added. SSH agent management of the key is required for password-less SSH authentication onto your cluster nodes, or if you want to use the
./openshift-install gathercommand.NoteOn some distributions, default SSH private key identities such as
~/.ssh/id_rsaand~/.ssh/id_dsaare managed automatically.If the
ssh-agentprocess is not already running for your local user, start it as a background task:$ eval "$(ssh-agent -s)"Example output
Agent pid 31874NoteIf your cluster is in FIPS mode, only use FIPS-compliant algorithms to generate the SSH key. The key must be either RSA or ECDSA.
Add your SSH private key to the
ssh-agent:$ ssh-add <path>/<file_name>1 - 1
- Specify the path and file name for your SSH private key, such as
~/.ssh/id_ed25519
Example output
Identity added: /home/<you>/<path>/<file_name> (<computer_name>)
Next steps
- When you install OpenShift Container Platform, provide the SSH public key to the installation program.
5.8. Creating the Red Hat Enterprise Linux CoreOS (RHCOS) image
The OpenShift Container Platform installation program requires that a Red Hat Enterprise Linux CoreOS (RHCOS) image be present in the Red Hat OpenStack Platform (RHOSP) cluster. Retrieve the latest RHCOS image, then upload it using the RHOSP CLI.
Prerequisites
- The RHOSP CLI is installed.
Procedure
- Log in to the Red Hat Customer Portal’s Product Downloads page.
Under Version, select the most recent release of OpenShift Container Platform 4.14 for Red Hat Enterprise Linux (RHEL) 8.
ImportantThe RHCOS images might not change with every release of OpenShift Container Platform. You must download images with the highest version that is less than or equal to the OpenShift Container Platform version that you install. Use the image versions that match your OpenShift Container Platform version if they are available.
- Download the Red Hat Enterprise Linux CoreOS (RHCOS) - OpenStack Image (QCOW).
Decompress the image.
NoteYou must decompress the RHOSP image before the cluster can use it. The name of the downloaded file might not contain a compression extension, like
.gzor.tgz. To find out if or how the file is compressed, in a command line, enter:$ file <name_of_downloaded_file>From the image that you downloaded, create an image that is named
rhcosin your cluster by using the RHOSP CLI:$ openstack image create --container-format=bare --disk-format=qcow2 --file rhcos-${RHCOS_VERSION}-openstack.qcow2 rhcosImportantDepending on your RHOSP environment, you might be able to upload the image in either
.rawor.qcow2formats. If you use Ceph, you must use the.rawformat.WarningIf the installation program finds multiple images with the same name, it chooses one of them at random. To avoid this behavior, create unique names for resources in RHOSP.
After you upload the image to RHOSP, it is usable in the installation process.
5.9. Verifying external network access
The OpenShift Container Platform installation process requires external network access. You must provide an external network value to it, or deployment fails. Before you begin the process, verify that a network with the external router type exists in Red Hat OpenStack Platform (RHOSP).
Prerequisites
Procedure
Using the RHOSP CLI, verify the name and ID of the 'External' network:
$ openstack network list --long -c ID -c Name -c "Router Type"Example output
+--------------------------------------+----------------+-------------+ | ID | Name | Router Type | +--------------------------------------+----------------+-------------+ | 148a8023-62a7-4672-b018-003462f8d7dc | public_network | External | +--------------------------------------+----------------+-------------+
A network with an external router type appears in the network list. If at least one does not, see Creating a default floating IP network and Creating a default provider network.
If the Neutron trunk service plugin is enabled, a trunk port is created by default. For more information, see Neutron trunk port.
5.10. Enabling access to the environment
At deployment, all OpenShift Container Platform machines are created in a Red Hat OpenStack Platform (RHOSP)-tenant network. Therefore, they are not accessible directly in most RHOSP deployments.
You can configure OpenShift Container Platform API and application access by using floating IP addresses (FIPs) during installation. You can also complete an installation without configuring FIPs, but the installer will not configure a way to reach the API or applications externally.
5.10.1. Enabling access with floating IP addresses
Create floating IP (FIP) addresses for external access to the OpenShift Container Platform API, cluster applications, and the bootstrap process.
Procedure
Using the Red Hat OpenStack Platform (RHOSP) CLI, create the API FIP:
$ openstack floating ip create --description "API <cluster_name>.<base_domain>" <external_network>Using the Red Hat OpenStack Platform (RHOSP) CLI, create the apps, or Ingress, FIP:
$ openstack floating ip create --description "Ingress <cluster_name>.<base_domain>" <external_network>By using the Red Hat OpenStack Platform (RHOSP) CLI, create the bootstrap FIP:
$ openstack floating ip create --description "bootstrap machine" <external_network>Add records that follow these patterns to your DNS server for the API and Ingress FIPs:
api.<cluster_name>.<base_domain>. IN A <API_FIP> *.apps.<cluster_name>.<base_domain>. IN A <apps_FIP>NoteIf you do not control the DNS server, you can access the cluster by adding the cluster domain names such as the following to your
/etc/hostsfile:-
<api_floating_ip> api.<cluster_name>.<base_domain> -
<application_floating_ip> grafana-openshift-monitoring.apps.<cluster_name>.<base_domain> -
<application_floating_ip> prometheus-k8s-openshift-monitoring.apps.<cluster_name>.<base_domain> -
<application_floating_ip> oauth-openshift.apps.<cluster_name>.<base_domain> -
<application_floating_ip> console-openshift-console.apps.<cluster_name>.<base_domain> -
application_floating_ip integrated-oauth-server-openshift-authentication.apps.<cluster_name>.<base_domain>
The cluster domain names in the
/etc/hostsfile grant access to the web console and the monitoring interface of your cluster locally. You can also use thekubectloroc. You can access the user applications by using the additional entries pointing to the <application_floating_ip>. This action makes the API and applications accessible to only you, which is not suitable for production deployment, but does allow installation for development and testing.-
Add the FIPs to the
inventory.yamlfile as the values of the following variables:-
os_api_fip -
os_bootstrap_fip -
os_ingress_fip
-
If you use these values, you must also enter an external network as the value of the os_external_network variable in the inventory.yaml file.
You can make OpenShift Container Platform resources available outside of the cluster by assigning a floating IP address and updating your firewall configuration.
5.10.2. Completing installation without floating IP addresses
You can install OpenShift Container Platform on Red Hat OpenStack Platform (RHOSP) without providing floating IP addresses.
In the inventory.yaml file, do not define the following variables:
-
os_api_fip -
os_bootstrap_fip -
os_ingress_fip
If you cannot provide an external network, you can also leave os_external_network blank. If you do not provide a value for os_external_network, a router is not created for you, and, without additional action, the installer will fail to retrieve an image from Glance. Later in the installation process, when you create network resources, you must configure external connectivity on your own.
If you run the installer with the wait-for command from a system that cannot reach the cluster API due to a lack of floating IP addresses or name resolution, installation fails. To prevent installation failure in these cases, you can use a proxy network or run the installer from a system that is on the same network as your machines.
You can enable name resolution by creating DNS records for the API and Ingress ports. For example:
api.<cluster_name>.<base_domain>. IN A <api_port_IP>
*.apps.<cluster_name>.<base_domain>. IN A <ingress_port_IP>
If you do not control the DNS server, you can add the record to your /etc/hosts file. This action makes the API accessible to only you, which is not suitable for production deployment but does allow installation for development and testing.
5.11. Defining parameters for the installation program
The OpenShift Container Platform installation program relies on a file that is called clouds.yaml. The file describes Red Hat OpenStack Platform (RHOSP) configuration parameters, including the project name, log in information, and authorization service URLs.
Procedure
Create the
clouds.yamlfile:If your RHOSP distribution includes the Horizon web UI, generate a
clouds.yamlfile in it.ImportantRemember to add a password to the
authfield. You can also keep secrets in a separate file fromclouds.yaml.If your RHOSP distribution does not include the Horizon web UI, or you do not want to use Horizon, create the file yourself. For detailed information about
clouds.yaml, see Config files in the RHOSP documentation.clouds: shiftstack: auth: auth_url: http://10.10.14.42:5000/v3 project_name: shiftstack username: <username> password: <password> user_domain_name: Default project_domain_name: Default dev-env: region_name: RegionOne auth: username: <username> password: <password> project_name: 'devonly' auth_url: 'https://10.10.14.22:5001/v2.0'
If your RHOSP installation uses self-signed certificate authority (CA) certificates for endpoint authentication:
- Copy the certificate authority file to your machine.
Add the
cacertskey to theclouds.yamlfile. The value must be an absolute, non-root-accessible path to the CA certificate:clouds: shiftstack: ... cacert: "/etc/pki/ca-trust/source/anchors/ca.crt.pem"TipAfter you run the installer with a custom CA certificate, you can update the certificate by editing the value of the
ca-cert.pemkey in thecloud-provider-configkeymap. On a command line, run:$ oc edit configmap -n openshift-config cloud-provider-config
Place the
clouds.yamlfile in one of the following locations:-
The value of the
OS_CLIENT_CONFIG_FILEenvironment variable - The current directory
-
A Unix-specific user configuration directory, for example
~/.config/openstack/clouds.yaml A Unix-specific site configuration directory, for example
/etc/openstack/clouds.yamlThe installation program searches for
clouds.yamlin that order.
-
The value of the
5.12. Creating the installation configuration file
You can customize the OpenShift Container Platform cluster you install on Red Hat OpenStack Platform (RHOSP).
Prerequisites
- You have the OpenShift Container Platform installation program and the pull secret for your cluster.
Procedure
Create the
install-config.yamlfile.Change to the directory that contains the installation program and run the following command:
$ ./openshift-install create install-config --dir <installation_directory>1 - 1
- For
<installation_directory>, specify the directory name to store the files that the installation program creates.
When specifying the directory:
-
Verify that the directory has the
executepermission. This permission is required to run Terraform binaries under the installation directory. Use an empty directory. Some installation assets, such as bootstrap X.509 certificates, have short expiration intervals, therefore you must not reuse an installation directory. If you want to reuse individual files from another cluster installation, you can copy them into your directory. However, the file names for the installation assets might change between releases. Use caution when copying installation files from an earlier OpenShift Container Platform version.
NoteAlways delete the
~/.powervsdirectory to avoid reusing a stale configuration. Run the following command:$ rm -rf ~/.powervs
At the prompts, provide the configuration details for your cloud:
Optional: Select an SSH key to use to access your cluster machines.
NoteFor production OpenShift Container Platform clusters on which you want to perform installation debugging or disaster recovery, specify an SSH key that your
ssh-agentprocess uses.- Select openstack as the platform to target.
- Specify the Red Hat OpenStack Platform (RHOSP) external network name to use for installing the cluster.
- Specify the floating IP address to use for external access to the OpenShift API.
- Specify a RHOSP flavor with at least 16 GB RAM to use for control plane nodes and 8 GB RAM for compute nodes.
- Select the base domain to deploy the cluster to. All DNS records will be sub-domains of this base and will also include the cluster name.
- Enter a name for your cluster. The name must be 14 or fewer characters long.
-
Modify the
install-config.yamlfile. You can find more information about the available parameters in the "Installation configuration parameters" section. Back up the
install-config.yamlfile so that you can use it to install multiple clusters.ImportantThe
install-config.yamlfile is consumed during the installation process. If you want to reuse the file, you must back it up now.
You now have the file install-config.yaml in the directory that you specified.
5.12.1. Custom subnets in RHOSP deployments
Optionally, you can deploy a cluster on a Red Hat OpenStack Platform (RHOSP) subnet of your choice. The subnet’s GUID is passed as the value of platform.openstack.machinesSubnet in the install-config.yaml file.
This subnet is used as the cluster’s primary subnet. By default, nodes and ports are created on it. You can create nodes and ports on a different RHOSP subnet by setting the value of the platform.openstack.machinesSubnet property to the subnet’s UUID.
Before you run the OpenShift Container Platform installer with a custom subnet, verify that your configuration meets the following requirements:
-
The subnet that is used by
platform.openstack.machinesSubnethas DHCP enabled. -
The CIDR of
platform.openstack.machinesSubnetmatches the CIDR ofnetworking.machineNetwork. - The installation program user has permission to create ports on this network, including ports with fixed IP addresses.
Clusters that use custom subnets have the following limitations:
-
If you plan to install a cluster that uses floating IP addresses, the
platform.openstack.machinesSubnetsubnet must be attached to a router that is connected to theexternalNetworknetwork. -
If the
platform.openstack.machinesSubnetvalue is set in theinstall-config.yamlfile, the installation program does not create a private network or subnet for your RHOSP machines. -
You cannot use the
platform.openstack.externalDNSproperty at the same time as a custom subnet. To add DNS to a cluster that uses a custom subnet, configure DNS on the RHOSP network.
By default, the API VIP takes x.x.x.5 and the Ingress VIP takes x.x.x.7 from your network’s CIDR block. To override these default values, set values for platform.openstack.apiVIPs and platform.openstack.ingressVIPs that are outside of the DHCP allocation pool.
The CIDR ranges for networks are not adjustable after cluster installation. Red Hat does not provide direct guidance on determining the range during cluster installation because it requires careful consideration of the number of created pods per namespace.
5.12.2. Sample customized install-config.yaml file for RHOSP
This sample install-config.yaml demonstrates all of the possible Red Hat OpenStack Platform (RHOSP) customization options.
This sample file is provided for reference only. You must obtain your install-config.yaml file by using the installation program.
apiVersion: v1
baseDomain: example.com
controlPlane:
name: master
platform: {}
replicas: 3
compute:
- name: worker
platform:
openstack:
type: ml.large
replicas: 3
metadata:
name: example
networking:
clusterNetwork:
- cidr: 10.128.0.0/14
hostPrefix: 23
machineNetwork:
- cidr: 10.0.0.0/16
serviceNetwork:
- 172.30.0.0/16
networkType: OVNKubernetes
platform:
openstack:
cloud: mycloud
externalNetwork: external
computeFlavor: m1.xlarge
apiFloatingIP: 128.0.0.1
fips: false
pullSecret: '{"auths": ...}'
sshKey: ssh-ed25519 AAAA...5.12.3. Setting a custom subnet for machines
The IP range that the installation program uses by default might not match the Neutron subnet that you create when you install OpenShift Container Platform. If necessary, update the CIDR value for new machines by editing the installation configuration file.
Prerequisites
-
You have the
install-config.yamlfile that was generated by the OpenShift Container Platform installation program.
Procedure
-
On a command line, browse to the directory that contains
install-config.yaml. From that directory, either run a script to edit the
install-config.yamlfile or update the file manually:To set the value by using a script, run:
$ python -c ' import yaml; path = "install-config.yaml"; data = yaml.safe_load(open(path)); data["networking"]["machineNetwork"] = [{"cidr": "192.168.0.0/18"}];1 open(path, "w").write(yaml.dump(data, default_flow_style=False))'- 1
- Insert a value that matches your intended Neutron subnet, e.g.
192.0.2.0/24.
-
To set the value manually, open the file and set the value of
networking.machineCIDRto something that matches your intended Neutron subnet.
5.12.4. Emptying compute machine pools
To proceed with an installation that uses your own infrastructure, set the number of compute machines in the installation configuration file to zero. Later, you create these machines manually.
Prerequisites
-
You have the
install-config.yamlfile that was generated by the OpenShift Container Platform installation program.
Procedure
-
On a command line, browse to the directory that contains
install-config.yaml. From that directory, either run a script to edit the
install-config.yamlfile or update the file manually:To set the value by using a script, run:
$ python -c ' import yaml; path = "install-config.yaml"; data = yaml.safe_load(open(path)); data["compute"][0]["replicas"] = 0; open(path, "w").write(yaml.dump(data, default_flow_style=False))'-
To set the value manually, open the file and set the value of
compute.<first entry>.replicasto0.
5.12.5. Cluster deployment on RHOSP provider networks
You can deploy your OpenShift Container Platform clusters on Red Hat OpenStack Platform (RHOSP) with a primary network interface on a provider network. Provider networks are commonly used to give projects direct access to a public network that can be used to reach the internet. You can also share provider networks among projects as part of the network creation process.
RHOSP provider networks map directly to an existing physical network in the data center. A RHOSP administrator must create them.
In the following example, OpenShift Container Platform workloads are connected to a data center by using a provider network:
OpenShift Container Platform clusters that are installed on provider networks do not require tenant networks or floating IP addresses. The installer does not create these resources during installation.
Example provider network types include flat (untagged) and VLAN (802.1Q tagged).
A cluster can support as many provider network connections as the network type allows. For example, VLAN networks typically support up to 4096 connections.
You can learn more about provider and tenant networks in the RHOSP documentation.
5.12.5.1. RHOSP provider network requirements for cluster installation
Before you install an OpenShift Container Platform cluster, your Red Hat OpenStack Platform (RHOSP) deployment and provider network must meet a number of conditions:
- The RHOSP networking service (Neutron) is enabled and accessible through the RHOSP networking API.
- The RHOSP networking service has the port security and allowed address pairs extensions enabled.
The provider network can be shared with other tenants.
TipUse the
openstack network createcommand with the--shareflag to create a network that can be shared.The RHOSP project that you use to install the cluster must own the provider network, as well as an appropriate subnet.
Tip- To create a network for a project that is named "openshift," enter the following command
$ openstack network create --project openshift- To create a subnet for a project that is named "openshift," enter the following command
$ openstack subnet create --project openshiftTo learn more about creating networks on RHOSP, read the provider networks documentation.
If the cluster is owned by the
adminuser, you must run the installer as that user to create ports on the network.ImportantProvider networks must be owned by the RHOSP project that is used to create the cluster. If they are not, the RHOSP Compute service (Nova) cannot request a port from that network.
Verify that the provider network can reach the RHOSP metadata service IP address, which is
169.254.169.254by default.Depending on your RHOSP SDN and networking service configuration, you might need to provide the route when you create the subnet. For example:
$ openstack subnet create --dhcp --host-route destination=169.254.169.254/32,gateway=192.0.2.2 ...- Optional: To secure the network, create role-based access control (RBAC) rules that limit network access to a single project.
5.12.5.2. Deploying a cluster that has a primary interface on a provider network
You can deploy an OpenShift Container Platform cluster that has its primary network interface on an Red Hat OpenStack Platform (RHOSP) provider network.
Prerequisites
- Your Red Hat OpenStack Platform (RHOSP) deployment is configured as described by "RHOSP provider network requirements for cluster installation".
Procedure
-
In a text editor, open the
install-config.yamlfile. -
Set the value of the
platform.openstack.apiVIPsproperty to the IP address for the API VIP. -
Set the value of the
platform.openstack.ingressVIPsproperty to the IP address for the Ingress VIP. -
Set the value of the
platform.openstack.machinesSubnetproperty to the UUID of the provider network subnet. -
Set the value of the
networking.machineNetwork.cidrproperty to the CIDR block of the provider network subnet.
The platform.openstack.apiVIPs and platform.openstack.ingressVIPs properties must both be unassigned IP addresses from the networking.machineNetwork.cidr block.
Section of an installation configuration file for a cluster that relies on a RHOSP provider network
...
platform:
openstack:
apiVIPs:
- 192.0.2.13
ingressVIPs:
- 192.0.2.23
machinesSubnet: fa806b2f-ac49-4bce-b9db-124bc64209bf
# ...
networking:
machineNetwork:
- cidr: 192.0.2.0/24
You cannot set the platform.openstack.externalNetwork or platform.openstack.externalDNS parameters while using a provider network for the primary network interface.
When you deploy the cluster, the installer uses the install-config.yaml file to deploy the cluster on the provider network.
You can add additional networks, including provider networks, to the platform.openstack.additionalNetworkIDs list.
After you deploy your cluster, you can attach pods to additional networks. For more information, see Understanding multiple networks.
5.13. Creating the Kubernetes manifest and Ignition config files
Because you must modify some cluster definition files and manually start the cluster machines, you must generate the Kubernetes manifest and Ignition config files that the cluster needs to configure the machines.
The installation configuration file transforms into the Kubernetes manifests. The manifests wrap into the Ignition configuration files, which are later used to configure the cluster machines.
-
The Ignition config files that the OpenShift Container Platform installation program generates contain certificates that expire after 24 hours, which are then renewed at that time. If the cluster is shut down before renewing the certificates and the cluster is later restarted after the 24 hours have elapsed, the cluster automatically recovers the expired certificates. The exception is that you must manually approve the pending
node-bootstrappercertificate signing requests (CSRs) to recover kubelet certificates. See the documentation for Recovering from expired control plane certificates for more information. - It is recommended that you use Ignition config files within 12 hours after they are generated because the 24-hour certificate rotates from 16 to 22 hours after the cluster is installed. By using the Ignition config files within 12 hours, you can avoid installation failure if the certificate update runs during installation.
Prerequisites
- You obtained the OpenShift Container Platform installation program.
-
You created the
install-config.yamlinstallation configuration file.
Procedure
Change to the directory that contains the OpenShift Container Platform installation program and generate the Kubernetes manifests for the cluster:
$ ./openshift-install create manifests --dir <installation_directory>1 - 1
- For
<installation_directory>, specify the installation directory that contains theinstall-config.yamlfile you created.
Remove the Kubernetes manifest files that define the control plane machines, compute machine sets, and control plane machine sets:
$ rm -f openshift/99_openshift-cluster-api_master-machines-*.yaml openshift/99_openshift-cluster-api_worker-machineset-*.yaml openshift/99_openshift-machine-api_master-control-plane-machine-set.yamlBecause you create and manage these resources yourself, you do not have to initialize them.
- You can preserve the compute machine set files to create compute machines by using the machine API, but you must update references to them to match your environment.
Check that the
mastersSchedulableparameter in the<installation_directory>/manifests/cluster-scheduler-02-config.ymlKubernetes manifest file is set tofalse. This setting prevents pods from being scheduled on the control plane machines:-
Open the
<installation_directory>/manifests/cluster-scheduler-02-config.ymlfile. -
Locate the
mastersSchedulableparameter and ensure that it is set tofalse. - Save and exit the file.
-
Open the
To create the Ignition configuration files, run the following command from the directory that contains the installation program:
$ ./openshift-install create ignition-configs --dir <installation_directory>1 - 1
- For
<installation_directory>, specify the same installation directory.
Ignition config files are created for the bootstrap, control plane, and compute nodes in the installation directory. The
kubeadmin-passwordandkubeconfigfiles are created in the./<installation_directory>/authdirectory:. ├── auth │ ├── kubeadmin-password │ └── kubeconfig ├── bootstrap.ign ├── master.ign ├── metadata.json └── worker.ignExport the metadata file’s
infraIDkey as an environment variable:$ export INFRA_ID=$(jq -r .infraID metadata.json)
Extract the infraID key from metadata.json and use it as a prefix for all of the RHOSP resources that you create. By doing so, you avoid name conflicts when making multiple deployments in the same project.
5.14. Preparing the bootstrap Ignition files
The OpenShift Container Platform installation process relies on bootstrap machines that are created from a bootstrap Ignition configuration file.
Edit the file and upload it. Then, create a secondary bootstrap Ignition configuration file that Red Hat OpenStack Platform (RHOSP) uses to download the primary file.
Prerequisites
-
You have the bootstrap Ignition file that the installer program generates,
bootstrap.ign. The infrastructure ID from the installer’s metadata file is set as an environment variable (
$INFRA_ID).- If the variable is not set, see Creating the Kubernetes manifest and Ignition config files.
You have an HTTP(S)-accessible way to store the bootstrap Ignition file.
- The documented procedure uses the RHOSP image service (Glance), but you can also use the RHOSP storage service (Swift), Amazon S3, an internal HTTP server, or an ad hoc Nova server.
Procedure
Run the following Python script. The script modifies the bootstrap Ignition file to set the hostname and, if available, CA certificate file when it runs:
import base64 import json import os with open('bootstrap.ign', 'r') as f: ignition = json.load(f) files = ignition['storage'].get('files', []) infra_id = os.environ.get('INFRA_ID', 'openshift').encode() hostname_b64 = base64.standard_b64encode(infra_id + b'-bootstrap\n').decode().strip() files.append( { 'path': '/etc/hostname', 'mode': 420, 'contents': { 'source': 'data:text/plain;charset=utf-8;base64,' + hostname_b64 } }) ca_cert_path = os.environ.get('OS_CACERT', '') if ca_cert_path: with open(ca_cert_path, 'r') as f: ca_cert = f.read().encode() ca_cert_b64 = base64.standard_b64encode(ca_cert).decode().strip() files.append( { 'path': '/opt/openshift/tls/cloud-ca-cert.pem', 'mode': 420, 'contents': { 'source': 'data:text/plain;charset=utf-8;base64,' + ca_cert_b64 } }) ignition['storage']['files'] = files; with open('bootstrap.ign', 'w') as f: json.dump(ignition, f)Using the RHOSP CLI, create an image that uses the bootstrap Ignition file:
$ openstack image create --disk-format=raw --container-format=bare --file bootstrap.ign <image_name>Get the image’s details:
$ openstack image show <image_name>Make a note of the
filevalue; it follows the patternv2/images/<image_ID>/file.NoteVerify that the image you created is active.
Retrieve the image service’s public address:
$ openstack catalog show image-
Combine the public address with the image
filevalue and save the result as the storage location. The location follows the pattern<image_service_public_URL>/v2/images/<image_ID>/file. Generate an auth token and save the token ID:
$ openstack token issue -c id -f valueInsert the following content into a file called
$INFRA_ID-bootstrap-ignition.jsonand edit the placeholders to match your own values:{ "ignition": { "config": { "merge": [{ "source": "<storage_url>",1 "httpHeaders": [{ "name": "X-Auth-Token",2 "value": "<token_ID>"3 }] }] }, "security": { "tls": { "certificateAuthorities": [{ "source": "data:text/plain;charset=utf-8;base64,<base64_encoded_certificate>"4 }] } }, "version": "3.2.0" } }- 1
- Replace the value of
ignition.config.merge.sourcewith the bootstrap Ignition file storage URL. - 2
- Set
nameinhttpHeadersto"X-Auth-Token". - 3
- Set
valueinhttpHeadersto your token’s ID. - 4
- If the bootstrap Ignition file server uses a self-signed certificate, include the base64-encoded certificate.
- Save the secondary Ignition config file.
The bootstrap Ignition data will be passed to RHOSP during installation.
The bootstrap Ignition file contains sensitive information, like clouds.yaml credentials. Ensure that you store it in a secure place, and delete it after you complete the installation process.
5.15. Creating control plane Ignition config files on RHOSP
Installing OpenShift Container Platform on Red Hat OpenStack Platform (RHOSP) on your own infrastructure requires control plane Ignition config files. You must create multiple config files.
As with the bootstrap Ignition configuration, you must explicitly define a hostname for each control plane machine.
Prerequisites
The infrastructure ID from the installation program’s metadata file is set as an environment variable (
$INFRA_ID).- If the variable is not set, see "Creating the Kubernetes manifest and Ignition config files".
Procedure
On a command line, run the following Python script:
$ for index in $(seq 0 2); do MASTER_HOSTNAME="$INFRA_ID-master-$index\n" python -c "import base64, json, sys; ignition = json.load(sys.stdin); storage = ignition.get('storage', {}); files = storage.get('files', []); files.append({'path': '/etc/hostname', 'mode': 420, 'contents': {'source': 'data:text/plain;charset=utf-8;base64,' + base64.standard_b64encode(b'$MASTER_HOSTNAME').decode().strip(), 'verification': {}}, 'filesystem': 'root'}); storage['files'] = files; ignition['storage'] = storage json.dump(ignition, sys.stdout)" <master.ign >"$INFRA_ID-master-$index-ignition.json" doneYou now have three control plane Ignition files:
<INFRA_ID>-master-0-ignition.json,<INFRA_ID>-master-1-ignition.json, and<INFRA_ID>-master-2-ignition.json.
5.16. Creating network resources on RHOSP
Create the network resources that an OpenShift Container Platform on Red Hat OpenStack Platform (RHOSP) installation on your own infrastructure requires. To save time, run supplied Ansible playbooks that generate security groups, networks, subnets, routers, and ports.
Prerequisites
- Python 3 is installed on your machine.
- You downloaded the modules in "Downloading playbook dependencies".
- You downloaded the playbooks in "Downloading the installation playbooks".
Procedure
Optional: Add an external network value to the
inventory.yamlplaybook:Example external network value in the
inventory.yamlAnsible playbook... # The public network providing connectivity to the cluster. If not # provided, the cluster external connectivity must be provided in another # way. # Required for os_api_fip, os_ingress_fip, os_bootstrap_fip. os_external_network: 'external' ...ImportantIf you did not provide a value for
os_external_networkin theinventory.yamlfile, you must ensure that VMs can access Glance and an external connection yourself.Optional: Add external network and floating IP (FIP) address values to the
inventory.yamlplaybook:Example FIP values in the
inventory.yamlAnsible playbook... # OpenShift API floating IP address. If this value is non-empty, the # corresponding floating IP will be attached to the Control Plane to # serve the OpenShift API. os_api_fip: '203.0.113.23' # OpenShift Ingress floating IP address. If this value is non-empty, the # corresponding floating IP will be attached to the worker nodes to serve # the applications. os_ingress_fip: '203.0.113.19' # If this value is non-empty, the corresponding floating IP will be # attached to the bootstrap machine. This is needed for collecting logs # in case of install failure. os_bootstrap_fip: '203.0.113.20'ImportantIf you do not define values for
os_api_fipandos_ingress_fip, you must perform postinstallation network configuration.If you do not define a value for
os_bootstrap_fip, the installer cannot download debugging information from failed installations.See "Enabling access to the environment" for more information.
On a command line, create security groups by running the
security-groups.yamlplaybook:$ ansible-playbook -i inventory.yaml security-groups.yamlOn a command line, create a network, subnet, and router by running the
network.yamlplaybook:$ ansible-playbook -i inventory.yaml network.yamlOptional: If you want to control the default resolvers that Nova servers use, run the RHOSP CLI command:
$ openstack subnet set --dns-nameserver <server_1> --dns-nameserver <server_2> "$INFRA_ID-nodes"
Optionally, you can use the inventory.yaml file that you created to customize your installation. For example, you can deploy a cluster that uses bare metal machines.
5.16.1. Deploying a cluster with bare metal machines
If you want your cluster to use bare metal machines, modify the inventory.yaml file. Your cluster can have compute machines running on bare metal.
Bare-metal compute machines are not supported on clusters that use Kuryr.
Be sure that your install-config.yaml file reflects whether the RHOSP network that you use for bare metal workers supports floating IP addresses or not.
Prerequisites
- The RHOSP Bare Metal service (Ironic) is enabled and accessible via the RHOSP Compute API.
- Bare metal is available as a RHOSP flavor.
- If your cluster runs on an RHOSP version that is more than 16.1.6 and less than 16.2.4, bare metal workers do not function due to a known issue that causes the metadata service to be unavailable for services on OpenShift Container Platform nodes.
- The RHOSP network supports both VM and bare metal server attachment.
- If you want to deploy the machines on a pre-existing network, a RHOSP subnet is provisioned.
- If you want to deploy the machines on an installer-provisioned network, the RHOSP Bare Metal service (Ironic) is able to listen for and interact with Preboot eXecution Environment (PXE) boot machines that run on tenant networks.
-
You created an
inventory.yamlfile as part of the OpenShift Container Platform installation process.
Procedure
In the
inventory.yamlfile, edit the flavors for machines:Change the value of
os_flavor_workerto a bare metal flavor.An example bare metal
inventory.yamlfileall: hosts: localhost: ansible_connection: local ansible_python_interpreter: "{{ansible_playbook_python}}" # User-provided values os_subnet_range: '10.0.0.0/16' os_flavor_master: 'my-vm-flavor' os_flavor_worker: 'my-bare-metal-flavor'1 os_image_rhcos: 'rhcos' os_external_network: 'external' ...- 1
- Change this value to a bare metal flavor to use for compute machines.
Use the updated inventory.yaml file to complete the installation process. Machines that are created during deployment use the flavor that you added to the file.
The installer may time out while waiting for bare metal machines to boot.
If the installer times out, restart and then complete the deployment by using the wait-for command of the installer. For example:
$ ./openshift-install wait-for install-complete --log-level debug5.17. Creating the bootstrap machine on RHOSP
Create a bootstrap machine and give it the network access it needs to run on Red Hat OpenStack Platform (RHOSP). Red Hat provides an Ansible playbook that you run to simplify this process.
Prerequisites
- You downloaded the modules in "Downloading playbook dependencies".
- You downloaded the playbooks in "Downloading the installation playbooks".
-
The
inventory.yaml,common.yaml, andbootstrap.yamlAnsible playbooks are in a common directory. -
The
metadata.jsonfile that the installation program created is in the same directory as the Ansible playbooks.
Procedure
- On a command line, change the working directory to the location of the playbooks.
On a command line, run the
bootstrap.yamlplaybook:$ ansible-playbook -i inventory.yaml bootstrap.yamlAfter the bootstrap server is active, view the logs to verify that the Ignition files were received:
$ openstack console log show "$INFRA_ID-bootstrap"
5.18. Creating the control plane machines on RHOSP
Create three control plane machines by using the Ignition config files that you generated. Red Hat provides an Ansible playbook that you run to simplify this process.
Prerequisites
- You downloaded the modules in "Downloading playbook dependencies".
- You downloaded the playbooks in "Downloading the installation playbooks".
-
The infrastructure ID from the installation program’s metadata file is set as an environment variable (
$INFRA_ID). -
The
inventory.yaml,common.yaml, andcontrol-plane.yamlAnsible playbooks are in a common directory. - You have the three Ignition files that were created in "Creating control plane Ignition config files".
Procedure
- On a command line, change the working directory to the location of the playbooks.
- If the control plane Ignition config files aren’t already in your working directory, copy them into it.
On a command line, run the
control-plane.yamlplaybook:$ ansible-playbook -i inventory.yaml control-plane.yamlRun the following command to monitor the bootstrapping process:
$ openshift-install wait-for bootstrap-completeYou will see messages that confirm that the control plane machines are running and have joined the cluster:
INFO API v1.27.3 up INFO Waiting up to 30m0s for bootstrapping to complete... ... INFO It is now safe to remove the bootstrap resources
5.19. Logging in to the cluster by using the CLI
You can log in to your cluster as a default system user by exporting the cluster kubeconfig file. The kubeconfig file contains information about the cluster that is used by the CLI to connect a client to the correct cluster and API server. The file is specific to a cluster and is created during OpenShift Container Platform installation.
Prerequisites
- You deployed an OpenShift Container Platform cluster.
-
You installed the
ocCLI.
Procedure
Export the
kubeadmincredentials:$ export KUBECONFIG=<installation_directory>/auth/kubeconfig1 - 1
- For
<installation_directory>, specify the path to the directory that you stored the installation files in.
Verify you can run
occommands successfully using the exported configuration:$ oc whoamiExample output
system:admin
5.20. Deleting bootstrap resources from RHOSP
Delete the bootstrap resources that you no longer need.
Prerequisites
- You downloaded the modules in "Downloading playbook dependencies".
- You downloaded the playbooks in "Downloading the installation playbooks".
-
The
inventory.yaml,common.yaml, anddown-bootstrap.yamlAnsible playbooks are in a common directory. The control plane machines are running.
- If you do not know the status of the machines, see "Verifying cluster status".
Procedure
- On a command line, change the working directory to the location of the playbooks.
On a command line, run the
down-bootstrap.yamlplaybook:$ ansible-playbook -i inventory.yaml down-bootstrap.yaml
The bootstrap port, server, and floating IP address are deleted.
If you did not disable the bootstrap Ignition file URL earlier, do so now.
5.21. Creating compute machines on RHOSP
After standing up the control plane, create compute machines. Red Hat provides an Ansible playbook that you run to simplify this process.
Prerequisites
- You downloaded the modules in "Downloading playbook dependencies".
- You downloaded the playbooks in "Downloading the installation playbooks".
-
The
inventory.yaml,common.yaml, andcompute-nodes.yamlAnsible playbooks are in a common directory. -
The
metadata.jsonfile that the installation program created is in the same directory as the Ansible playbooks. - The control plane is active.
Procedure
- On a command line, change the working directory to the location of the playbooks.
On a command line, run the playbook:
$ ansible-playbook -i inventory.yaml compute-nodes.yaml
Next steps
- Approve the certificate signing requests for the machines.
5.22. Approving the certificate signing requests for your machines
When you add machines to a cluster, two pending certificate signing requests (CSRs) are generated for each machine that you added. You must confirm that these CSRs are approved or, if necessary, approve them yourself. The client requests must be approved first, followed by the server requests.
Prerequisites
- You added machines to your cluster.
Procedure
Confirm that the cluster recognizes the machines:
$ oc get nodesExample output
NAME STATUS ROLES AGE VERSION master-0 Ready master 63m v1.27.3 master-1 Ready master 63m v1.27.3 master-2 Ready master 64m v1.27.3The output lists all of the machines that you created.
NoteThe preceding output might not include the compute nodes, also known as worker nodes, until some CSRs are approved.
Review the pending CSRs and ensure that you see the client requests with the
PendingorApprovedstatus for each machine that you added to the cluster:$ oc get csrExample output
NAME AGE REQUESTOR CONDITION csr-8b2br 15m system:serviceaccount:openshift-machine-config-operator:node-bootstrapper Pending csr-8vnps 15m system:serviceaccount:openshift-machine-config-operator:node-bootstrapper Pending ...In this example, two machines are joining the cluster. You might see more approved CSRs in the list.
If the CSRs were not approved, after all of the pending CSRs for the machines you added are in
Pendingstatus, approve the CSRs for your cluster machines:NoteBecause the CSRs rotate automatically, approve your CSRs within an hour of adding the machines to the cluster. If you do not approve them within an hour, the certificates will rotate, and more than two certificates will be present for each node. You must approve all of these certificates. After the client CSR is approved, the Kubelet creates a secondary CSR for the serving certificate, which requires manual approval. Then, subsequent serving certificate renewal requests are automatically approved by the
machine-approverif the Kubelet requests a new certificate with identical parameters.NoteFor clusters running on platforms that are not machine API enabled, such as bare metal and other user-provisioned infrastructure, you must implement a method of automatically approving the kubelet serving certificate requests (CSRs). If a request is not approved, then the
oc exec,oc rsh, andoc logscommands cannot succeed, because a serving certificate is required when the API server connects to the kubelet. Any operation that contacts the Kubelet endpoint requires this certificate approval to be in place. The method must watch for new CSRs, confirm that the CSR was submitted by thenode-bootstrapperservice account in thesystem:nodeorsystem:admingroups, and confirm the identity of the node.To approve them individually, run the following command for each valid CSR:
$ oc adm certificate approve <csr_name>1 - 1
<csr_name>is the name of a CSR from the list of current CSRs.
To approve all pending CSRs, run the following command:
$ oc get csr -o go-template='{{range .items}}{{if not .status}}{{.metadata.name}}{{"\n"}}{{end}}{{end}}' | xargs --no-run-if-empty oc adm certificate approveNoteSome Operators might not become available until some CSRs are approved.
Now that your client requests are approved, you must review the server requests for each machine that you added to the cluster:
$ oc get csrExample output
NAME AGE REQUESTOR CONDITION csr-bfd72 5m26s system:node:ip-10-0-50-126.us-east-2.compute.internal Pending csr-c57lv 5m26s system:node:ip-10-0-95-157.us-east-2.compute.internal Pending ...If the remaining CSRs are not approved, and are in the
Pendingstatus, approve the CSRs for your cluster machines:To approve them individually, run the following command for each valid CSR:
$ oc adm certificate approve <csr_name>1 - 1
<csr_name>is the name of a CSR from the list of current CSRs.
To approve all pending CSRs, run the following command:
$ oc get csr -o go-template='{{range .items}}{{if not .status}}{{.metadata.name}}{{"\n"}}{{end}}{{end}}' | xargs oc adm certificate approve
After all client and server CSRs have been approved, the machines have the
Readystatus. Verify this by running the following command:$ oc get nodesExample output
NAME STATUS ROLES AGE VERSION master-0 Ready master 73m v1.27.3 master-1 Ready master 73m v1.27.3 master-2 Ready master 74m v1.27.3 worker-0 Ready worker 11m v1.27.3 worker-1 Ready worker 11m v1.27.3NoteIt can take a few minutes after approval of the server CSRs for the machines to transition to the
Readystatus.
Additional information
- For more information on CSRs, see Certificate Signing Requests.
5.23. Verifying a successful installation
Verify that the OpenShift Container Platform installation is complete.
Prerequisites
-
You have the installation program (
openshift-install)
Procedure
On a command line, enter:
$ openshift-install --log-level debug wait-for install-complete
The program outputs the console URL, as well as the administrator’s login information.
5.24. Telemetry access for OpenShift Container Platform
In OpenShift Container Platform 4.14, the Telemetry service, which runs by default to provide metrics about cluster health and the success of updates, requires internet access. If your cluster is connected to the internet, Telemetry runs automatically, and your cluster is registered to OpenShift Cluster Manager.
After you confirm that your OpenShift Cluster Manager inventory is correct, either maintained automatically by Telemetry or manually by using OpenShift Cluster Manager, use subscription watch to track your OpenShift Container Platform subscriptions at the account or multi-cluster level.
5.25. Next steps
Chapter 6. Installing a cluster on OpenStack with Kuryr on your own infrastructure
Kuryr is a deprecated feature. Deprecated functionality is still included in OpenShift Container Platform and continues to be supported; however, it will be removed in a future release of this product and is not recommended for new deployments.
For the most recent list of major functionality that has been deprecated or removed within OpenShift Container Platform, refer to the Deprecated and removed features section of the OpenShift Container Platform release notes.
In OpenShift Container Platform version 4.14, you can install a cluster on Red Hat OpenStack Platform (RHOSP) that runs on user-provisioned infrastructure.
Using your own infrastructure allows you to integrate your cluster with existing infrastructure and modifications. The process requires more labor on your part than installer-provisioned installations, because you must create all RHOSP resources, like Nova servers, Neutron ports, and security groups. However, Red Hat provides Ansible playbooks to help you in the deployment process.
6.1. Prerequisites
- You reviewed details about the OpenShift Container Platform installation and update processes.
- You read the documentation on selecting a cluster installation method and preparing it for users.
- You verified that OpenShift Container Platform 4.14 is compatible with your RHOSP version by using the Supported platforms for OpenShift clusters section. You can also compare platform support across different versions by viewing the OpenShift Container Platform on RHOSP support matrix.
- You have an RHOSP account where you want to install OpenShift Container Platform.
- You understand performance and scalability practices for cluster scaling, control plane sizing, and etcd. For more information, see Recommended practices for scaling the cluster.
On the machine from which you run the installation program, you have:
- A single directory in which you can keep the files you create during the installation process
- Python 3
6.2. About Kuryr SDN
Kuryr is a deprecated feature. Deprecated functionality is still included in OpenShift Container Platform and continues to be supported; however, it will be removed in a future release of this product and is not recommended for new deployments.
For the most recent list of major functionality that has been deprecated or removed within OpenShift Container Platform, refer to the Deprecated and removed features section of the OpenShift Container Platform release notes.
Kuryr is a container network interface (CNI) plugin solution that uses the Neutron and Octavia Red Hat OpenStack Platform (RHOSP) services to provide networking for pods and Services.
Kuryr and OpenShift Container Platform integration is primarily designed for OpenShift Container Platform clusters running on RHOSP VMs. Kuryr improves the network performance by plugging OpenShift Container Platform pods into RHOSP SDN. In addition, it provides interconnectivity between pods and RHOSP virtual instances.
Kuryr components are installed as pods in OpenShift Container Platform using the openshift-kuryr namespace:
-
kuryr-controller- a single service instance installed on amasternode. This is modeled in OpenShift Container Platform as aDeploymentobject. -
kuryr-cni- a container installing and configuring Kuryr as a CNI driver on each OpenShift Container Platform node. This is modeled in OpenShift Container Platform as aDaemonSetobject.
The Kuryr controller watches the OpenShift Container Platform API server for pod, service, and namespace create, update, and delete events. It maps the OpenShift Container Platform API calls to corresponding objects in Neutron and Octavia. This means that every network solution that implements the Neutron trunk port functionality can be used to back OpenShift Container Platform via Kuryr. This includes open source solutions such as Open vSwitch (OVS) and Open Virtual Network (OVN) as well as Neutron-compatible commercial SDNs.
Kuryr is recommended for OpenShift Container Platform deployments on encapsulated RHOSP tenant networks to avoid double encapsulation, such as running an encapsulated OpenShift Container Platform SDN over an RHOSP network.
If you use provider networks or tenant VLANs, you do not need to use Kuryr to avoid double encapsulation. The performance benefit is negligible. Depending on your configuration, though, using Kuryr to avoid having two overlays might still be beneficial.
Kuryr is not recommended in deployments where all of the following criteria are true:
- The RHOSP version is less than 16.
- The deployment uses UDP services, or a large number of TCP services on few hypervisors.
or
-
The
ovn-octaviaOctavia driver is disabled. - The deployment uses a large number of TCP services on few hypervisors.
6.3. Resource guidelines for installing OpenShift Container Platform on RHOSP with Kuryr
When using Kuryr SDN, the pods, services, namespaces, and network policies are using resources from the RHOSP quota; this increases the minimum requirements. Kuryr also has some additional requirements on top of what a default install requires.
Use the following quota to satisfy a default cluster’s minimum requirements:
| Resource | Value |
|---|---|
| Floating IP addresses | 3 - plus the expected number of Services of LoadBalancer type |
| Ports | 1500 - 1 needed per Pod |
| Routers | 1 |
| Subnets | 250 - 1 needed per Namespace/Project |
| Networks | 250 - 1 needed per Namespace/Project |
| RAM | 112 GB |
| vCPUs | 28 |
| Volume storage | 275 GB |
| Instances | 7 |
| Security groups | 250 - 1 needed per Service and per NetworkPolicy |
| Security group rules | 1000 |
| Server groups | 2 - plus 1 for each additional availability zone in each machine pool |
| Load balancers | 100 - 1 needed per Service |
| Load balancer listeners | 500 - 1 needed per Service-exposed port |
| Load balancer pools | 500 - 1 needed per Service-exposed port |
A cluster might function with fewer than recommended resources, but its performance is not guaranteed.
If RHOSP object storage (Swift) is available and operated by a user account with the swiftoperator role, it is used as the default backend for the OpenShift Container Platform image registry. In this case, the volume storage requirement is 175 GB. Swift space requirements vary depending on the size of the image registry.
If you are using Red Hat OpenStack Platform (RHOSP) version 16 with the Amphora driver rather than the OVN Octavia driver, security groups are associated with service accounts instead of user projects.
Take the following notes into consideration when setting resources:
- The number of ports that are required is larger than the number of pods. Kuryr uses ports pools to have pre-created ports ready to be used by pods and speed up the pods' booting time.
-
Each network policy is mapped into an RHOSP security group, and depending on the
NetworkPolicyspec, one or more rules are added to the security group. Each service is mapped to an RHOSP load balancer. Consider this requirement when estimating the number of security groups required for the quota.
If you are using RHOSP version 15 or earlier, or the
ovn-octavia driver, each load balancer has a security group with the user project.The quota does not account for load balancer resources (such as VM resources), but you must consider these resources when you decide the RHOSP deployment’s size. The default installation will have more than 50 load balancers; the clusters must be able to accommodate them.
If you are using RHOSP version 16 with the OVN Octavia driver enabled, only one load balancer VM is generated; services are load balanced through OVN flows.
An OpenShift Container Platform deployment comprises control plane machines, compute machines, and a bootstrap machine.
To enable Kuryr SDN, your environment must meet the following requirements:
- Run RHOSP 13+.
- Have Overcloud with Octavia.
- Use Neutron Trunk ports extension.
-
Use
openvswitchfirewall driver if ML2/OVS Neutron driver is used instead ofovs-hybrid.
6.3.1. Increasing quota
When using Kuryr SDN, you must increase quotas to satisfy the Red Hat OpenStack Platform (RHOSP) resources used by pods, services, namespaces, and network policies.
Procedure
Increase the quotas for a project by running the following command:
$ sudo openstack quota set --secgroups 250 --secgroup-rules 1000 --ports 1500 --subnets 250 --networks 250 <project>
6.3.2. Configuring Neutron
Kuryr CNI leverages the Neutron Trunks extension to plug containers into the Red Hat OpenStack Platform (RHOSP) SDN, so you must use the trunks extension for Kuryr to properly work.
In addition, if you leverage the default ML2/OVS Neutron driver, the firewall must be set to openvswitch instead of ovs_hybrid so that security groups are enforced on trunk subports and Kuryr can properly handle network policies.
6.3.3. Configuring Octavia
Kuryr SDN uses Red Hat OpenStack Platform (RHOSP)'s Octavia LBaaS to implement OpenShift Container Platform services. Thus, you must install and configure Octavia components in RHOSP to use Kuryr SDN.
To enable Octavia, you must include the Octavia service during the installation of the RHOSP Overcloud, or upgrade the Octavia service if the Overcloud already exists. The following steps for enabling Octavia apply to both a clean install of the Overcloud or an Overcloud update.
The following steps only capture the key pieces required during the deployment of RHOSP when dealing with Octavia. It is also important to note that registry methods vary.
This example uses the local registry method.
Procedure
If you are using the local registry, create a template to upload the images to the registry. For example:
(undercloud) $ openstack overcloud container image prepare \ -e /usr/share/openstack-tripleo-heat-templates/environments/services-docker/octavia.yaml \ --namespace=registry.access.redhat.com/rhosp13 \ --push-destination=<local-ip-from-undercloud.conf>:8787 \ --prefix=openstack- \ --tag-from-label {version}-{product-version} \ --output-env-file=/home/stack/templates/overcloud_images.yaml \ --output-images-file /home/stack/local_registry_images.yamlVerify that the
local_registry_images.yamlfile contains the Octavia images. For example:... - imagename: registry.access.redhat.com/rhosp13/openstack-octavia-api:13.0-43 push_destination: <local-ip-from-undercloud.conf>:8787 - imagename: registry.access.redhat.com/rhosp13/openstack-octavia-health-manager:13.0-45 push_destination: <local-ip-from-undercloud.conf>:8787 - imagename: registry.access.redhat.com/rhosp13/openstack-octavia-housekeeping:13.0-45 push_destination: <local-ip-from-undercloud.conf>:8787 - imagename: registry.access.redhat.com/rhosp13/openstack-octavia-worker:13.0-44 push_destination: <local-ip-from-undercloud.conf>:8787NoteThe Octavia container versions vary depending upon the specific RHOSP release installed.
Pull the container images from
registry.redhat.ioto the Undercloud node:(undercloud) $ sudo openstack overcloud container image upload \ --config-file /home/stack/local_registry_images.yaml \ --verboseThis may take some time depending on the speed of your network and Undercloud disk.
Install or update your Overcloud environment with Octavia:
$ openstack overcloud deploy --templates \ -e /usr/share/openstack-tripleo-heat-templates/environments/services-docker/octavia.yaml \ -e octavia_timeouts.yamlNoteThis command only includes the files associated with Octavia; it varies based on your specific installation of RHOSP. See the RHOSP documentation for further information. For more information on customizing your Octavia installation, see installation of Octavia using Director.
NoteWhen leveraging Kuryr SDN, the Overcloud installation requires the Neutron
trunkextension. This is available by default on director deployments. Use theopenvswitchfirewall instead of the defaultovs-hybridwhen the Neutron backend is ML2/OVS. There is no need for modifications if the backend is ML2/OVN.
6.3.3.1. The Octavia OVN Driver
Octavia supports multiple provider drivers through the Octavia API.
To see all available Octavia provider drivers, on a command line, enter:
$ openstack loadbalancer provider listExample output
+---------+-------------------------------------------------+
| name | description |
+---------+-------------------------------------------------+
| amphora | The Octavia Amphora driver. |
| octavia | Deprecated alias of the Octavia Amphora driver. |
| ovn | Octavia OVN driver. |
+---------+-------------------------------------------------+
Beginning with RHOSP version 16, the Octavia OVN provider driver (ovn) is supported on OpenShift Container Platform on RHOSP deployments.
ovn is an integration driver for the load balancing that Octavia and OVN provide. It supports basic load balancing capabilities, and is based on OpenFlow rules. The driver is automatically enabled in Octavia by Director on deployments that use OVN Neutron ML2.
The Amphora provider driver is the default driver. If ovn is enabled, however, Kuryr uses it.
If Kuryr uses ovn instead of Amphora, it offers the following benefits:
- Decreased resource requirements. Kuryr does not require a load balancer VM for each service.
- Reduced network latency.
- Increased service creation speed by using OpenFlow rules instead of a VM for each service.
- Distributed load balancing actions across all nodes instead of centralized on Amphora VMs.
6.3.4. Known limitations of installing with Kuryr
Using OpenShift Container Platform with Kuryr SDN has several known limitations.
6.3.4.1. RHOSP general limitations
Using OpenShift Container Platform with Kuryr SDN has several limitations that apply to all versions and environments:
-
Serviceobjects with theNodePorttype are not supported. -
Clusters that use the OVN Octavia provider driver support
Serviceobjects for which the.spec.selectorproperty is unspecified only if the.subsets.addressesproperty of theEndpointsobject includes the subnet of the nodes or pods. -
If the subnet on which machines are created is not connected to a router, or if the subnet is connected, but the router has no external gateway set, Kuryr cannot create floating IPs for
Serviceobjects with typeLoadBalancer. -
Configuring the
sessionAffinity=ClientIPproperty onServiceobjects does not have an effect. Kuryr does not support this setting.
6.3.4.2. RHOSP version limitations
Using OpenShift Container Platform with Kuryr SDN has several limitations that depend on the RHOSP version.
RHOSP versions before 16 use the default Octavia load balancer driver (Amphora). This driver requires that one Amphora load balancer VM is deployed per OpenShift Container Platform service. Creating too many services can cause you to run out of resources.
Deployments of later versions of RHOSP that have the OVN Octavia driver disabled also use the Amphora driver. They are subject to the same resource concerns as earlier versions of RHOSP.
- Kuryr SDN does not support automatic unidling by a service.
6.3.4.3. RHOSP upgrade limitations
As a result of the RHOSP upgrade process, the Octavia API might be changed, and upgrades to the Amphora images that are used for load balancers might be required.
You can address API changes on an individual basis.
If the Amphora image is upgraded, the RHOSP operator can handle existing load balancer VMs in two ways:
- Upgrade each VM by triggering a load balancer failover.
- Leave responsibility for upgrading the VMs to users.
If the operator takes the first option, there might be short downtimes during failovers.
If the operator takes the second option, the existing load balancers will not support upgraded Octavia API features, like UDP listeners. In this case, users must recreate their Services to use these features.
6.3.5. Control plane machines
By default, the OpenShift Container Platform installation process creates three control plane machines.
Each machine requires:
- An instance from the RHOSP quota
- A port from the RHOSP quota
- A flavor with at least 16 GB memory and 4 vCPUs
- At least 100 GB storage space from the RHOSP quota
6.3.6. Compute machines
By default, the OpenShift Container Platform installation process creates three compute machines.
Each machine requires:
- An instance from the RHOSP quota
- A port from the RHOSP quota
- A flavor with at least 8 GB memory and 2 vCPUs
- At least 100 GB storage space from the RHOSP quota
Compute machines host the applications that you run on OpenShift Container Platform; aim to run as many as you can.
6.3.7. Bootstrap machine
During installation, a bootstrap machine is temporarily provisioned to stand up the control plane. After the production control plane is ready, the bootstrap machine is deprovisioned.
The bootstrap machine requires:
- An instance from the RHOSP quota
- A port from the RHOSP quota
- A flavor with at least 16 GB memory and 4 vCPUs
- At least 100 GB storage space from the RHOSP quota
6.4. Internet access for OpenShift Container Platform
In OpenShift Container Platform 4.14, you require access to the internet to install your cluster.
You must have internet access to:
- Access OpenShift Cluster Manager to download the installation program and perform subscription management. If the cluster has internet access and you do not disable Telemetry, that service automatically entitles your cluster.
- Access Quay.io to obtain the packages that are required to install your cluster.
- Obtain the packages that are required to perform cluster updates.
If your cluster cannot have direct internet access, you can perform a restricted network installation on some types of infrastructure that you provision. During that process, you download the required content and use it to populate a mirror registry with the installation packages. With some installation types, the environment that you install your cluster in will not require internet access. Before you update the cluster, you update the content of the mirror registry.
6.5. Downloading playbook dependencies
The Ansible playbooks that simplify the installation process on user-provisioned infrastructure require several Python modules. On the machine where you will run the installer, add the modules' repositories and then download them.
These instructions assume that you are using Red Hat Enterprise Linux (RHEL) 8.
Prerequisites
- Python 3 is installed on your machine.
Procedure
On a command line, add the repositories:
Register with Red Hat Subscription Manager:
$ sudo subscription-manager register # If not done alreadyPull the latest subscription data:
$ sudo subscription-manager attach --pool=$YOUR_POOLID # If not done alreadyDisable the current repositories:
$ sudo subscription-manager repos --disable=* # If not done alreadyAdd the required repositories:
$ sudo subscription-manager repos \ --enable=rhel-8-for-x86_64-baseos-rpms \ --enable=openstack-16-tools-for-rhel-8-x86_64-rpms \ --enable=ansible-2.9-for-rhel-8-x86_64-rpms \ --enable=rhel-8-for-x86_64-appstream-rpms
Install the modules:
$ sudo yum install python3-openstackclient ansible python3-openstacksdk python3-netaddr ansible-collections-openstackEnsure that the
pythoncommand points topython3:$ sudo alternatives --set python /usr/bin/python3
6.6. Downloading the installation playbooks
Download Ansible playbooks that you can use to install OpenShift Container Platform on your own Red Hat OpenStack Platform (RHOSP) infrastructure.
Prerequisites
- The curl command-line tool is available on your machine.
Procedure
To download the playbooks to your working directory, run the following script from a command line:
$ xargs -n 1 curl -O <<< ' https://raw.githubusercontent.com/openshift/installer/release-4.14/upi/openstack/bootstrap.yaml https://raw.githubusercontent.com/openshift/installer/release-4.14/upi/openstack/common.yaml https://raw.githubusercontent.com/openshift/installer/release-4.14/upi/openstack/compute-nodes.yaml https://raw.githubusercontent.com/openshift/installer/release-4.14/upi/openstack/control-plane.yaml https://raw.githubusercontent.com/openshift/installer/release-4.14/upi/openstack/inventory.yaml https://raw.githubusercontent.com/openshift/installer/release-4.14/upi/openstack/network.yaml https://raw.githubusercontent.com/openshift/installer/release-4.14/upi/openstack/security-groups.yaml https://raw.githubusercontent.com/openshift/installer/release-4.14/upi/openstack/down-bootstrap.yaml https://raw.githubusercontent.com/openshift/installer/release-4.14/upi/openstack/down-compute-nodes.yaml https://raw.githubusercontent.com/openshift/installer/release-4.14/upi/openstack/down-control-plane.yaml https://raw.githubusercontent.com/openshift/installer/release-4.14/upi/openstack/down-load-balancers.yaml https://raw.githubusercontent.com/openshift/installer/release-4.14/upi/openstack/down-network.yaml https://raw.githubusercontent.com/openshift/installer/release-4.14/upi/openstack/down-security-groups.yaml https://raw.githubusercontent.com/openshift/installer/release-4.14/upi/openstack/down-containers.yaml'
The playbooks are downloaded to your machine.
During the installation process, you can modify the playbooks to configure your deployment.
Retain all playbooks for the life of your cluster. You must have the playbooks to remove your OpenShift Container Platform cluster from RHOSP.
You must match any edits you make in the bootstrap.yaml, compute-nodes.yaml, control-plane.yaml, network.yaml, and security-groups.yaml files to the corresponding playbooks that are prefixed with down-. For example, edits to the bootstrap.yaml file must be reflected in the down-bootstrap.yaml file, too. If you do not edit both files, the supported cluster removal process will fail.
6.7. Obtaining the installation program
Before you install OpenShift Container Platform, download the installation file on the host you are using for installation.
Prerequisites
- You have a computer that runs Linux or macOS, with at least 1.2 GB of local disk space.
Procedure
- Go to the Cluster Type page on the Red Hat Hybrid Cloud Console. If you have a Red Hat account, log in with your credentials. If you do not, create an account.
- Select your infrastructure provider from the Run it yourself section of the page.
- Select your host operating system and architecture from the dropdown menus under OpenShift Installer and click Download Installer.
Place the downloaded file in the directory where you want to store the installation configuration files.
Important- The installation program creates several files on the computer that you use to install your cluster. You must keep the installation program and the files that the installation program creates after you finish installing the cluster. Both of the files are required to delete the cluster.
- Deleting the files created by the installation program does not remove your cluster, even if the cluster failed during installation. To remove your cluster, complete the OpenShift Container Platform uninstallation procedures for your specific cloud provider.
Extract the installation program. For example, on a computer that uses a Linux operating system, run the following command:
$ tar -xvf openshift-install-linux.tar.gz- Download your installation pull secret from Red Hat OpenShift Cluster Manager. This pull secret allows you to authenticate with the services that are provided by the included authorities, including Quay.io, which serves the container images for OpenShift Container Platform components.
Alternatively, you can retrieve the installation program from the Red Hat Customer Portal, where you can specify a version of the installation program to download. However, you must have an active subscription to access this page.
6.8. Generating a key pair for cluster node SSH access
During an OpenShift Container Platform installation, you can provide an SSH public key to the installation program. The key is passed to the Red Hat Enterprise Linux CoreOS (RHCOS) nodes through their Ignition config files and is used to authenticate SSH access to the nodes. The key is added to the ~/.ssh/authorized_keys list for the core user on each node, which enables password-less authentication.
After the key is passed to the nodes, you can use the key pair to SSH in to the RHCOS nodes as the user core. To access the nodes through SSH, the private key identity must be managed by SSH for your local user.
If you want to SSH in to your cluster nodes to perform installation debugging or disaster recovery, you must provide the SSH public key during the installation process. The ./openshift-install gather command also requires the SSH public key to be in place on the cluster nodes.
Do not skip this procedure in production environments, where disaster recovery and debugging is required.
You must use a local key, not one that you configured with platform-specific approaches such as AWS key pairs.
Procedure
If you do not have an existing SSH key pair on your local machine to use for authentication onto your cluster nodes, create one. For example, on a computer that uses a Linux operating system, run the following command:
$ ssh-keygen -t ed25519 -N '' -f <path>/<file_name>1 - 1
- Specify the path and file name, such as
~/.ssh/id_ed25519, of the new SSH key. If you have an existing key pair, ensure your public key is in the your~/.sshdirectory.
NoteIf you plan to install an OpenShift Container Platform cluster that uses the RHEL cryptographic libraries that have been submitted to NIST for FIPS 140-2/140-3 Validation on only the
x86_64,ppc64le, ands390xarchitectures, do not create a key that uses theed25519algorithm. Instead, create a key that uses thersaorecdsaalgorithm.View the public SSH key:
$ cat <path>/<file_name>.pubFor example, run the following to view the
~/.ssh/id_ed25519.pubpublic key:$ cat ~/.ssh/id_ed25519.pubAdd the SSH private key identity to the SSH agent for your local user, if it has not already been added. SSH agent management of the key is required for password-less SSH authentication onto your cluster nodes, or if you want to use the
./openshift-install gathercommand.NoteOn some distributions, default SSH private key identities such as
~/.ssh/id_rsaand~/.ssh/id_dsaare managed automatically.If the
ssh-agentprocess is not already running for your local user, start it as a background task:$ eval "$(ssh-agent -s)"Example output
Agent pid 31874NoteIf your cluster is in FIPS mode, only use FIPS-compliant algorithms to generate the SSH key. The key must be either RSA or ECDSA.
Add your SSH private key to the
ssh-agent:$ ssh-add <path>/<file_name>1 - 1
- Specify the path and file name for your SSH private key, such as
~/.ssh/id_ed25519
Example output
Identity added: /home/<you>/<path>/<file_name> (<computer_name>)
Next steps
- When you install OpenShift Container Platform, provide the SSH public key to the installation program.
6.9. Creating the Red Hat Enterprise Linux CoreOS (RHCOS) image
The OpenShift Container Platform installation program requires that a Red Hat Enterprise Linux CoreOS (RHCOS) image be present in the Red Hat OpenStack Platform (RHOSP) cluster. Retrieve the latest RHCOS image, then upload it using the RHOSP CLI.
Prerequisites
- The RHOSP CLI is installed.
Procedure
- Log in to the Red Hat Customer Portal’s Product Downloads page.
Under Version, select the most recent release of OpenShift Container Platform 4.14 for Red Hat Enterprise Linux (RHEL) 8.
ImportantThe RHCOS images might not change with every release of OpenShift Container Platform. You must download images with the highest version that is less than or equal to the OpenShift Container Platform version that you install. Use the image versions that match your OpenShift Container Platform version if they are available.
- Download the Red Hat Enterprise Linux CoreOS (RHCOS) - OpenStack Image (QCOW).
Decompress the image.
NoteYou must decompress the RHOSP image before the cluster can use it. The name of the downloaded file might not contain a compression extension, like
.gzor.tgz. To find out if or how the file is compressed, in a command line, enter:$ file <name_of_downloaded_file>From the image that you downloaded, create an image that is named
rhcosin your cluster by using the RHOSP CLI:$ openstack image create --container-format=bare --disk-format=qcow2 --file rhcos-${RHCOS_VERSION}-openstack.qcow2 rhcosImportantDepending on your RHOSP environment, you might be able to upload the image in either
.rawor.qcow2formats. If you use Ceph, you must use the.rawformat.WarningIf the installation program finds multiple images with the same name, it chooses one of them at random. To avoid this behavior, create unique names for resources in RHOSP.
After you upload the image to RHOSP, it is usable in the installation process.
6.10. Verifying external network access
The OpenShift Container Platform installation process requires external network access. You must provide an external network value to it, or deployment fails. Before you begin the process, verify that a network with the external router type exists in Red Hat OpenStack Platform (RHOSP).
Prerequisites
Procedure
Using the RHOSP CLI, verify the name and ID of the 'External' network:
$ openstack network list --long -c ID -c Name -c "Router Type"Example output
+--------------------------------------+----------------+-------------+ | ID | Name | Router Type | +--------------------------------------+----------------+-------------+ | 148a8023-62a7-4672-b018-003462f8d7dc | public_network | External | +--------------------------------------+----------------+-------------+
A network with an external router type appears in the network list. If at least one does not, see Creating a default floating IP network and Creating a default provider network.
If the Neutron trunk service plugin is enabled, a trunk port is created by default. For more information, see Neutron trunk port.
6.11. Enabling access to the environment
At deployment, all OpenShift Container Platform machines are created in a Red Hat OpenStack Platform (RHOSP)-tenant network. Therefore, they are not accessible directly in most RHOSP deployments.
You can configure OpenShift Container Platform API and application access by using floating IP addresses (FIPs) during installation. You can also complete an installation without configuring FIPs, but the installer will not configure a way to reach the API or applications externally.
6.11.1. Enabling access with floating IP addresses
Create floating IP (FIP) addresses for external access to the OpenShift Container Platform API, cluster applications, and the bootstrap process.
Procedure
Using the Red Hat OpenStack Platform (RHOSP) CLI, create the API FIP:
$ openstack floating ip create --description "API <cluster_name>.<base_domain>" <external_network>Using the Red Hat OpenStack Platform (RHOSP) CLI, create the apps, or Ingress, FIP:
$ openstack floating ip create --description "Ingress <cluster_name>.<base_domain>" <external_network>By using the Red Hat OpenStack Platform (RHOSP) CLI, create the bootstrap FIP:
$ openstack floating ip create --description "bootstrap machine" <external_network>Add records that follow these patterns to your DNS server for the API and Ingress FIPs:
api.<cluster_name>.<base_domain>. IN A <API_FIP> *.apps.<cluster_name>.<base_domain>. IN A <apps_FIP>NoteIf you do not control the DNS server, you can access the cluster by adding the cluster domain names such as the following to your
/etc/hostsfile:-
<api_floating_ip> api.<cluster_name>.<base_domain> -
<application_floating_ip> grafana-openshift-monitoring.apps.<cluster_name>.<base_domain> -
<application_floating_ip> prometheus-k8s-openshift-monitoring.apps.<cluster_name>.<base_domain> -
<application_floating_ip> oauth-openshift.apps.<cluster_name>.<base_domain> -
<application_floating_ip> console-openshift-console.apps.<cluster_name>.<base_domain> -
application_floating_ip integrated-oauth-server-openshift-authentication.apps.<cluster_name>.<base_domain>
The cluster domain names in the
/etc/hostsfile grant access to the web console and the monitoring interface of your cluster locally. You can also use thekubectloroc. You can access the user applications by using the additional entries pointing to the <application_floating_ip>. This action makes the API and applications accessible to only you, which is not suitable for production deployment, but does allow installation for development and testing.-
Add the FIPs to the
inventory.yamlfile as the values of the following variables:-
os_api_fip -
os_bootstrap_fip -
os_ingress_fip
-
If you use these values, you must also enter an external network as the value of the os_external_network variable in the inventory.yaml file.
You can make OpenShift Container Platform resources available outside of the cluster by assigning a floating IP address and updating your firewall configuration.
6.11.2. Completing installation without floating IP addresses
You can install OpenShift Container Platform on Red Hat OpenStack Platform (RHOSP) without providing floating IP addresses.
In the inventory.yaml file, do not define the following variables:
-
os_api_fip -
os_bootstrap_fip -
os_ingress_fip
If you cannot provide an external network, you can also leave os_external_network blank. If you do not provide a value for os_external_network, a router is not created for you, and, without additional action, the installer will fail to retrieve an image from Glance. Later in the installation process, when you create network resources, you must configure external connectivity on your own.
If you run the installer with the wait-for command from a system that cannot reach the cluster API due to a lack of floating IP addresses or name resolution, installation fails. To prevent installation failure in these cases, you can use a proxy network or run the installer from a system that is on the same network as your machines.
You can enable name resolution by creating DNS records for the API and Ingress ports. For example:
api.<cluster_name>.<base_domain>. IN A <api_port_IP>
*.apps.<cluster_name>.<base_domain>. IN A <ingress_port_IP>
If you do not control the DNS server, you can add the record to your /etc/hosts file. This action makes the API accessible to only you, which is not suitable for production deployment but does allow installation for development and testing.
6.12. Defining parameters for the installation program
The OpenShift Container Platform installation program relies on a file that is called clouds.yaml. The file describes Red Hat OpenStack Platform (RHOSP) configuration parameters, including the project name, log in information, and authorization service URLs.
Procedure
Create the
clouds.yamlfile:If your RHOSP distribution includes the Horizon web UI, generate a
clouds.yamlfile in it.ImportantRemember to add a password to the
authfield. You can also keep secrets in a separate file fromclouds.yaml.If your RHOSP distribution does not include the Horizon web UI, or you do not want to use Horizon, create the file yourself. For detailed information about
clouds.yaml, see Config files in the RHOSP documentation.clouds: shiftstack: auth: auth_url: http://10.10.14.42:5000/v3 project_name: shiftstack username: <username> password: <password> user_domain_name: Default project_domain_name: Default dev-env: region_name: RegionOne auth: username: <username> password: <password> project_name: 'devonly' auth_url: 'https://10.10.14.22:5001/v2.0'
If your RHOSP installation uses self-signed certificate authority (CA) certificates for endpoint authentication:
- Copy the certificate authority file to your machine.
Add the
cacertskey to theclouds.yamlfile. The value must be an absolute, non-root-accessible path to the CA certificate:clouds: shiftstack: ... cacert: "/etc/pki/ca-trust/source/anchors/ca.crt.pem"TipAfter you run the installer with a custom CA certificate, you can update the certificate by editing the value of the
ca-cert.pemkey in thecloud-provider-configkeymap. On a command line, run:$ oc edit configmap -n openshift-config cloud-provider-config
Place the
clouds.yamlfile in one of the following locations:-
The value of the
OS_CLIENT_CONFIG_FILEenvironment variable - The current directory
-
A Unix-specific user configuration directory, for example
~/.config/openstack/clouds.yaml A Unix-specific site configuration directory, for example
/etc/openstack/clouds.yamlThe installation program searches for
clouds.yamlin that order.
-
The value of the
6.13. Creating the installation configuration file
You can customize the OpenShift Container Platform cluster you install on Red Hat OpenStack Platform (RHOSP).
Prerequisites
- You have the OpenShift Container Platform installation program and the pull secret for your cluster.
Procedure
Create the
install-config.yamlfile.Change to the directory that contains the installation program and run the following command:
$ ./openshift-install create install-config --dir <installation_directory>1 - 1
- For
<installation_directory>, specify the directory name to store the files that the installation program creates.
When specifying the directory:
-
Verify that the directory has the
executepermission. This permission is required to run Terraform binaries under the installation directory. Use an empty directory. Some installation assets, such as bootstrap X.509 certificates, have short expiration intervals, therefore you must not reuse an installation directory. If you want to reuse individual files from another cluster installation, you can copy them into your directory. However, the file names for the installation assets might change between releases. Use caution when copying installation files from an earlier OpenShift Container Platform version.
NoteAlways delete the
~/.powervsdirectory to avoid reusing a stale configuration. Run the following command:$ rm -rf ~/.powervs
At the prompts, provide the configuration details for your cloud:
Optional: Select an SSH key to use to access your cluster machines.
NoteFor production OpenShift Container Platform clusters on which you want to perform installation debugging or disaster recovery, specify an SSH key that your
ssh-agentprocess uses.- Select openstack as the platform to target.
- Specify the Red Hat OpenStack Platform (RHOSP) external network name to use for installing the cluster.
- Specify the floating IP address to use for external access to the OpenShift API.
- Specify a RHOSP flavor with at least 16 GB RAM to use for control plane nodes and 8 GB RAM for compute nodes.
- Select the base domain to deploy the cluster to. All DNS records will be sub-domains of this base and will also include the cluster name.
- Enter a name for your cluster. The name must be 14 or fewer characters long.
-
Modify the
install-config.yamlfile. You can find more information about the available parameters in the "Installation configuration parameters" section. Back up the
install-config.yamlfile so that you can use it to install multiple clusters.ImportantThe
install-config.yamlfile is consumed during the installation process. If you want to reuse the file, you must back it up now.
You now have the file install-config.yaml in the directory that you specified.
6.13.1. Custom subnets in RHOSP deployments
Optionally, you can deploy a cluster on a Red Hat OpenStack Platform (RHOSP) subnet of your choice. The subnet’s GUID is passed as the value of platform.openstack.machinesSubnet in the install-config.yaml file.
This subnet is used as the cluster’s primary subnet. By default, nodes and ports are created on it. You can create nodes and ports on a different RHOSP subnet by setting the value of the platform.openstack.machinesSubnet property to the subnet’s UUID.
Before you run the OpenShift Container Platform installer with a custom subnet, verify that your configuration meets the following requirements:
-
The subnet that is used by
platform.openstack.machinesSubnethas DHCP enabled. -
The CIDR of
platform.openstack.machinesSubnetmatches the CIDR ofnetworking.machineNetwork. - The installation program user has permission to create ports on this network, including ports with fixed IP addresses.
Clusters that use custom subnets have the following limitations:
-
If you plan to install a cluster that uses floating IP addresses, the
platform.openstack.machinesSubnetsubnet must be attached to a router that is connected to theexternalNetworknetwork. -
If the
platform.openstack.machinesSubnetvalue is set in theinstall-config.yamlfile, the installation program does not create a private network or subnet for your RHOSP machines. -
You cannot use the
platform.openstack.externalDNSproperty at the same time as a custom subnet. To add DNS to a cluster that uses a custom subnet, configure DNS on the RHOSP network.
By default, the API VIP takes x.x.x.5 and the Ingress VIP takes x.x.x.7 from your network’s CIDR block. To override these default values, set values for platform.openstack.apiVIPs and platform.openstack.ingressVIPs that are outside of the DHCP allocation pool.
The CIDR ranges for networks are not adjustable after cluster installation. Red Hat does not provide direct guidance on determining the range during cluster installation because it requires careful consideration of the number of created pods per namespace.
6.13.2. Sample customized install-config.yaml file for RHOSP with Kuryr
To deploy with Kuryr SDN instead of the default OVN-Kubernetes network plugin, you must modify the install-config.yaml file to include Kuryr as the desired networking.networkType. This sample install-config.yaml demonstrates all of the possible Red Hat OpenStack Platform (RHOSP) customization options.
This sample file is provided for reference only. You must obtain your install-config.yaml file by using the installation program.
apiVersion: v1
baseDomain: example.com
controlPlane:
name: master
platform: {}
replicas: 3
compute:
- name: worker
platform:
openstack:
type: ml.large
replicas: 3
metadata:
name: example
networking:
clusterNetwork:
- cidr: 10.128.0.0/14
hostPrefix: 23
machineNetwork:
- cidr: 10.0.0.0/16
serviceNetwork:
- 172.30.0.0/16
networkType: Kuryr
platform:
openstack:
cloud: mycloud
externalNetwork: external
computeFlavor: m1.xlarge
apiFloatingIP: 128.0.0.1
trunkSupport: true
octaviaSupport: true
pullSecret: '{"auths": ...}'
sshKey: ssh-ed25519 AAAA...- 1
- The Amphora Octavia driver creates two ports per load balancer. As a result, the service subnet that the installer creates is twice the size of the CIDR that is specified as the value of the
serviceNetworkproperty. The larger range is required to prevent IP address conflicts. - 2
- The cluster network plugin to install. The supported values are
Kuryr,OVNKubernetes, andOpenShiftSDN. The default value isOVNKubernetes. - 3 4
- Both
trunkSupportandoctaviaSupportare automatically discovered by the installer, so there is no need to set them. But if your environment does not meet both requirements, Kuryr SDN will not properly work. Trunks are needed to connect the pods to the RHOSP network and Octavia is required to create the OpenShift Container Platform services.
6.13.3. Cluster deployment on RHOSP provider networks
You can deploy your OpenShift Container Platform clusters on Red Hat OpenStack Platform (RHOSP) with a primary network interface on a provider network. Provider networks are commonly used to give projects direct access to a public network that can be used to reach the internet. You can also share provider networks among projects as part of the network creation process.
RHOSP provider networks map directly to an existing physical network in the data center. A RHOSP administrator must create them.
In the following example, OpenShift Container Platform workloads are connected to a data center by using a provider network:
OpenShift Container Platform clusters that are installed on provider networks do not require tenant networks or floating IP addresses. The installer does not create these resources during installation.
Example provider network types include flat (untagged) and VLAN (802.1Q tagged).
A cluster can support as many provider network connections as the network type allows. For example, VLAN networks typically support up to 4096 connections.
You can learn more about provider and tenant networks in the RHOSP documentation.
6.13.3.1. RHOSP provider network requirements for cluster installation
Before you install an OpenShift Container Platform cluster, your Red Hat OpenStack Platform (RHOSP) deployment and provider network must meet a number of conditions:
- The RHOSP networking service (Neutron) is enabled and accessible through the RHOSP networking API.
- The RHOSP networking service has the port security and allowed address pairs extensions enabled.
The provider network can be shared with other tenants.
TipUse the
openstack network createcommand with the--shareflag to create a network that can be shared.The RHOSP project that you use to install the cluster must own the provider network, as well as an appropriate subnet.
Tip- To create a network for a project that is named "openshift," enter the following command
$ openstack network create --project openshift- To create a subnet for a project that is named "openshift," enter the following command
$ openstack subnet create --project openshiftTo learn more about creating networks on RHOSP, read the provider networks documentation.
If the cluster is owned by the
adminuser, you must run the installer as that user to create ports on the network.ImportantProvider networks must be owned by the RHOSP project that is used to create the cluster. If they are not, the RHOSP Compute service (Nova) cannot request a port from that network.
Verify that the provider network can reach the RHOSP metadata service IP address, which is
169.254.169.254by default.Depending on your RHOSP SDN and networking service configuration, you might need to provide the route when you create the subnet. For example:
$ openstack subnet create --dhcp --host-route destination=169.254.169.254/32,gateway=192.0.2.2 ...- Optional: To secure the network, create role-based access control (RBAC) rules that limit network access to a single project.
6.13.3.2. Deploying a cluster that has a primary interface on a provider network
You can deploy an OpenShift Container Platform cluster that has its primary network interface on an Red Hat OpenStack Platform (RHOSP) provider network.
Prerequisites
- Your Red Hat OpenStack Platform (RHOSP) deployment is configured as described by "RHOSP provider network requirements for cluster installation".
Procedure
-
In a text editor, open the
install-config.yamlfile. -
Set the value of the
platform.openstack.apiVIPsproperty to the IP address for the API VIP. -
Set the value of the
platform.openstack.ingressVIPsproperty to the IP address for the Ingress VIP. -
Set the value of the
platform.openstack.machinesSubnetproperty to the UUID of the provider network subnet. -
Set the value of the
networking.machineNetwork.cidrproperty to the CIDR block of the provider network subnet.
The platform.openstack.apiVIPs and platform.openstack.ingressVIPs properties must both be unassigned IP addresses from the networking.machineNetwork.cidr block.
Section of an installation configuration file for a cluster that relies on a RHOSP provider network
...
platform:
openstack:
apiVIPs:
- 192.0.2.13
ingressVIPs:
- 192.0.2.23
machinesSubnet: fa806b2f-ac49-4bce-b9db-124bc64209bf
# ...
networking:
machineNetwork:
- cidr: 192.0.2.0/24
You cannot set the platform.openstack.externalNetwork or platform.openstack.externalDNS parameters while using a provider network for the primary network interface.
When you deploy the cluster, the installer uses the install-config.yaml file to deploy the cluster on the provider network.
You can add additional networks, including provider networks, to the platform.openstack.additionalNetworkIDs list.
After you deploy your cluster, you can attach pods to additional networks. For more information, see Understanding multiple networks.
6.13.4. Kuryr ports pools
A Kuryr ports pool maintains a number of ports on standby for pod creation.
Keeping ports on standby minimizes pod creation time. Without ports pools, Kuryr must explicitly request port creation or deletion whenever a pod is created or deleted.
The Neutron ports that Kuryr uses are created in subnets that are tied to namespaces. These pod ports are also added as subports to the primary port of OpenShift Container Platform cluster nodes.
Because Kuryr keeps each namespace in a separate subnet, a separate ports pool is maintained for each namespace-worker pair.
Prior to installing a cluster, you can set the following parameters in the cluster-network-03-config.yml manifest file to configure ports pool behavior:
-
The
enablePortPoolsPrepopulationparameter controls pool prepopulation, which forces Kuryr to add Neutron ports to the pools when the first pod that is configured to use the dedicated network for pods is created in a namespace. The default value isfalse. -
The
poolMinPortsparameter is the minimum number of free ports that are kept in the pool. The default value is1. The
poolMaxPortsparameter is the maximum number of free ports that are kept in the pool. A value of0disables that upper bound. This is the default setting.If your OpenStack port quota is low, or you have a limited number of IP addresses on the pod network, consider setting this option to ensure that unneeded ports are deleted.
-
The
poolBatchPortsparameter defines the maximum number of Neutron ports that can be created at once. The default value is3.
6.13.5. Adjusting Kuryr ports pools during installation
During installation, you can configure how Kuryr manages Red Hat OpenStack Platform (RHOSP) Neutron ports to control the speed and efficiency of pod creation.
Prerequisites
-
Create and modify the
install-config.yamlfile.
Procedure
From a command line, create the manifest files:
$ ./openshift-install create manifests --dir <installation_directory>1 - 1
- For
<installation_directory>, specify the name of the directory that contains theinstall-config.yamlfile for your cluster.
Create a file that is named
cluster-network-03-config.ymlin the<installation_directory>/manifests/directory:$ touch <installation_directory>/manifests/cluster-network-03-config.yml1 - 1
- For
<installation_directory>, specify the directory name that contains themanifests/directory for your cluster.
After creating the file, several network configuration files are in the
manifests/directory, as shown:$ ls <installation_directory>/manifests/cluster-network-*Example output
cluster-network-01-crd.yml cluster-network-02-config.yml cluster-network-03-config.ymlOpen the
cluster-network-03-config.ymlfile in an editor, and enter a custom resource (CR) that describes the Cluster Network Operator configuration that you want:$ oc edit networks.operator.openshift.io clusterEdit the settings to meet your requirements. The following file is provided as an example:
apiVersion: operator.openshift.io/v1 kind: Network metadata: name: cluster spec: clusterNetwork: - cidr: 10.128.0.0/14 hostPrefix: 23 serviceNetwork: - 172.30.0.0/16 defaultNetwork: type: Kuryr kuryrConfig: enablePortPoolsPrepopulation: false1 poolMinPorts: 12 poolBatchPorts: 33 poolMaxPorts: 54 openstackServiceNetwork: 172.30.0.0/155 - 1
- Set
enablePortPoolsPrepopulationtotrueto make Kuryr create new Neutron ports when the first pod on the network for pods is created in a namespace. This setting raises the Neutron ports quota but can reduce the time that is required to spawn pods. The default value isfalse. - 2
- Kuryr creates new ports for a pool if the number of free ports in that pool is lower than the value of
poolMinPorts. The default value is1. - 3
poolBatchPortscontrols the number of new ports that are created if the number of free ports is lower than the value ofpoolMinPorts. The default value is3.- 4
- If the number of free ports in a pool is higher than the value of
poolMaxPorts, Kuryr deletes them until the number matches that value. Setting this value to0disables this upper bound, preventing pools from shrinking. The default value is0. - 5
- The
openStackServiceNetworkparameter defines the CIDR range of the network from which IP addresses are allocated to RHOSP Octavia’s LoadBalancers.
If this parameter is used with the Amphora driver, Octavia takes two IP addresses from this network for each load balancer: one for OpenShift and the other for VRRP connections. Because these IP addresses are managed by OpenShift Container Platform and Neutron respectively, they must come from different pools. Therefore, the value of
openStackServiceNetworkmust be at least twice the size of the value ofserviceNetwork, and the value ofserviceNetworkmust overlap entirely with the range that is defined byopenStackServiceNetwork.The CNO verifies that VRRP IP addresses that are taken from the range that is defined by this parameter do not overlap with the range that is defined by the
serviceNetworkparameter.If this parameter is not set, the CNO uses an expanded value of
serviceNetworkthat is determined by decrementing the prefix size by 1.-
Save the
cluster-network-03-config.ymlfile, and exit the text editor. -
Optional: Back up the
manifests/cluster-network-03-config.ymlfile. The installation program deletes themanifests/directory while creating the cluster.
6.13.6. Setting a custom subnet for machines
The IP range that the installation program uses by default might not match the Neutron subnet that you create when you install OpenShift Container Platform. If necessary, update the CIDR value for new machines by editing the installation configuration file.
Prerequisites
-
You have the
install-config.yamlfile that was generated by the OpenShift Container Platform installation program.
Procedure
-
On a command line, browse to the directory that contains
install-config.yaml. From that directory, either run a script to edit the
install-config.yamlfile or update the file manually:To set the value by using a script, run:
$ python -c ' import yaml; path = "install-config.yaml"; data = yaml.safe_load(open(path)); data["networking"]["machineNetwork"] = [{"cidr": "192.168.0.0/18"}];1 open(path, "w").write(yaml.dump(data, default_flow_style=False))'- 1
- Insert a value that matches your intended Neutron subnet, e.g.
192.0.2.0/24.
-
To set the value manually, open the file and set the value of
networking.machineCIDRto something that matches your intended Neutron subnet.
6.13.7. Emptying compute machine pools
To proceed with an installation that uses your own infrastructure, set the number of compute machines in the installation configuration file to zero. Later, you create these machines manually.
Prerequisites
-
You have the
install-config.yamlfile that was generated by the OpenShift Container Platform installation program.
Procedure
-
On a command line, browse to the directory that contains
install-config.yaml. From that directory, either run a script to edit the
install-config.yamlfile or update the file manually:To set the value by using a script, run:
$ python -c ' import yaml; path = "install-config.yaml"; data = yaml.safe_load(open(path)); data["compute"][0]["replicas"] = 0; open(path, "w").write(yaml.dump(data, default_flow_style=False))'-
To set the value manually, open the file and set the value of
compute.<first entry>.replicasto0.
6.13.8. Modifying the network type
By default, the installation program selects the OpenShiftSDN network type. To use Kuryr instead, change the value in the installation configuration file that the program generated.
Prerequisites
-
You have the file
install-config.yamlthat was generated by the OpenShift Container Platform installation program
Procedure
-
In a command prompt, browse to the directory that contains
install-config.yaml. From that directory, either run a script to edit the
install-config.yamlfile or update the file manually:To set the value by using a script, run:
$ python -c ' import yaml; path = "install-config.yaml"; data = yaml.safe_load(open(path)); data["networking"]["networkType"] = "Kuryr"; open(path, "w").write(yaml.dump(data, default_flow_style=False))'-
To set the value manually, open the file and set
networking.networkTypeto"Kuryr".
6.14. Creating the Kubernetes manifest and Ignition config files
Because you must modify some cluster definition files and manually start the cluster machines, you must generate the Kubernetes manifest and Ignition config files that the cluster needs to configure the machines.
The installation configuration file transforms into the Kubernetes manifests. The manifests wrap into the Ignition configuration files, which are later used to configure the cluster machines.
-
The Ignition config files that the OpenShift Container Platform installation program generates contain certificates that expire after 24 hours, which are then renewed at that time. If the cluster is shut down before renewing the certificates and the cluster is later restarted after the 24 hours have elapsed, the cluster automatically recovers the expired certificates. The exception is that you must manually approve the pending
node-bootstrappercertificate signing requests (CSRs) to recover kubelet certificates. See the documentation for Recovering from expired control plane certificates for more information. - It is recommended that you use Ignition config files within 12 hours after they are generated because the 24-hour certificate rotates from 16 to 22 hours after the cluster is installed. By using the Ignition config files within 12 hours, you can avoid installation failure if the certificate update runs during installation.
Prerequisites
- You obtained the OpenShift Container Platform installation program.
-
You created the
install-config.yamlinstallation configuration file.
Procedure
Change to the directory that contains the OpenShift Container Platform installation program and generate the Kubernetes manifests for the cluster:
$ ./openshift-install create manifests --dir <installation_directory>1 - 1
- For
<installation_directory>, specify the installation directory that contains theinstall-config.yamlfile you created.
Remove the Kubernetes manifest files that define the control plane machines, compute machine sets, and control plane machine sets:
$ rm -f openshift/99_openshift-cluster-api_master-machines-*.yaml openshift/99_openshift-cluster-api_worker-machineset-*.yaml openshift/99_openshift-machine-api_master-control-plane-machine-set.yamlBecause you create and manage these resources yourself, you do not have to initialize them.
- You can preserve the compute machine set files to create compute machines by using the machine API, but you must update references to them to match your environment.
Check that the
mastersSchedulableparameter in the<installation_directory>/manifests/cluster-scheduler-02-config.ymlKubernetes manifest file is set tofalse. This setting prevents pods from being scheduled on the control plane machines:-
Open the
<installation_directory>/manifests/cluster-scheduler-02-config.ymlfile. -
Locate the
mastersSchedulableparameter and ensure that it is set tofalse. - Save and exit the file.
-
Open the
To create the Ignition configuration files, run the following command from the directory that contains the installation program:
$ ./openshift-install create ignition-configs --dir <installation_directory>1 - 1
- For
<installation_directory>, specify the same installation directory.
Ignition config files are created for the bootstrap, control plane, and compute nodes in the installation directory. The
kubeadmin-passwordandkubeconfigfiles are created in the./<installation_directory>/authdirectory:. ├── auth │ ├── kubeadmin-password │ └── kubeconfig ├── bootstrap.ign ├── master.ign ├── metadata.json └── worker.ignExport the metadata file’s
infraIDkey as an environment variable:$ export INFRA_ID=$(jq -r .infraID metadata.json)
Extract the infraID key from metadata.json and use it as a prefix for all of the RHOSP resources that you create. By doing so, you avoid name conflicts when making multiple deployments in the same project.
6.15. Preparing the bootstrap Ignition files
The OpenShift Container Platform installation process relies on bootstrap machines that are created from a bootstrap Ignition configuration file.
Edit the file and upload it. Then, create a secondary bootstrap Ignition configuration file that Red Hat OpenStack Platform (RHOSP) uses to download the primary file.
Prerequisites
-
You have the bootstrap Ignition file that the installer program generates,
bootstrap.ign. The infrastructure ID from the installer’s metadata file is set as an environment variable (
$INFRA_ID).- If the variable is not set, see Creating the Kubernetes manifest and Ignition config files.
You have an HTTP(S)-accessible way to store the bootstrap Ignition file.
- The documented procedure uses the RHOSP image service (Glance), but you can also use the RHOSP storage service (Swift), Amazon S3, an internal HTTP server, or an ad hoc Nova server.
Procedure
Run the following Python script. The script modifies the bootstrap Ignition file to set the hostname and, if available, CA certificate file when it runs:
import base64 import json import os with open('bootstrap.ign', 'r') as f: ignition = json.load(f) files = ignition['storage'].get('files', []) infra_id = os.environ.get('INFRA_ID', 'openshift').encode() hostname_b64 = base64.standard_b64encode(infra_id + b'-bootstrap\n').decode().strip() files.append( { 'path': '/etc/hostname', 'mode': 420, 'contents': { 'source': 'data:text/plain;charset=utf-8;base64,' + hostname_b64 } }) ca_cert_path = os.environ.get('OS_CACERT', '') if ca_cert_path: with open(ca_cert_path, 'r') as f: ca_cert = f.read().encode() ca_cert_b64 = base64.standard_b64encode(ca_cert).decode().strip() files.append( { 'path': '/opt/openshift/tls/cloud-ca-cert.pem', 'mode': 420, 'contents': { 'source': 'data:text/plain;charset=utf-8;base64,' + ca_cert_b64 } }) ignition['storage']['files'] = files; with open('bootstrap.ign', 'w') as f: json.dump(ignition, f)Using the RHOSP CLI, create an image that uses the bootstrap Ignition file:
$ openstack image create --disk-format=raw --container-format=bare --file bootstrap.ign <image_name>Get the image’s details:
$ openstack image show <image_name>Make a note of the
filevalue; it follows the patternv2/images/<image_ID>/file.NoteVerify that the image you created is active.
Retrieve the image service’s public address:
$ openstack catalog show image-
Combine the public address with the image
filevalue and save the result as the storage location. The location follows the pattern<image_service_public_URL>/v2/images/<image_ID>/file. Generate an auth token and save the token ID:
$ openstack token issue -c id -f valueInsert the following content into a file called
$INFRA_ID-bootstrap-ignition.jsonand edit the placeholders to match your own values:{ "ignition": { "config": { "merge": [{ "source": "<storage_url>",1 "httpHeaders": [{ "name": "X-Auth-Token",2 "value": "<token_ID>"3 }] }] }, "security": { "tls": { "certificateAuthorities": [{ "source": "data:text/plain;charset=utf-8;base64,<base64_encoded_certificate>"4 }] } }, "version": "3.2.0" } }- 1
- Replace the value of
ignition.config.merge.sourcewith the bootstrap Ignition file storage URL. - 2
- Set
nameinhttpHeadersto"X-Auth-Token". - 3
- Set
valueinhttpHeadersto your token’s ID. - 4
- If the bootstrap Ignition file server uses a self-signed certificate, include the base64-encoded certificate.
- Save the secondary Ignition config file.
The bootstrap Ignition data will be passed to RHOSP during installation.
The bootstrap Ignition file contains sensitive information, like clouds.yaml credentials. Ensure that you store it in a secure place, and delete it after you complete the installation process.
6.16. Creating control plane Ignition config files on RHOSP
Installing OpenShift Container Platform on Red Hat OpenStack Platform (RHOSP) on your own infrastructure requires control plane Ignition config files. You must create multiple config files.
As with the bootstrap Ignition configuration, you must explicitly define a hostname for each control plane machine.
Prerequisites
The infrastructure ID from the installation program’s metadata file is set as an environment variable (
$INFRA_ID).- If the variable is not set, see "Creating the Kubernetes manifest and Ignition config files".
Procedure
On a command line, run the following Python script:
$ for index in $(seq 0 2); do MASTER_HOSTNAME="$INFRA_ID-master-$index\n" python -c "import base64, json, sys; ignition = json.load(sys.stdin); storage = ignition.get('storage', {}); files = storage.get('files', []); files.append({'path': '/etc/hostname', 'mode': 420, 'contents': {'source': 'data:text/plain;charset=utf-8;base64,' + base64.standard_b64encode(b'$MASTER_HOSTNAME').decode().strip(), 'verification': {}}, 'filesystem': 'root'}); storage['files'] = files; ignition['storage'] = storage json.dump(ignition, sys.stdout)" <master.ign >"$INFRA_ID-master-$index-ignition.json" doneYou now have three control plane Ignition files:
<INFRA_ID>-master-0-ignition.json,<INFRA_ID>-master-1-ignition.json, and<INFRA_ID>-master-2-ignition.json.
6.17. Creating network resources on RHOSP
Create the network resources that an OpenShift Container Platform on Red Hat OpenStack Platform (RHOSP) installation on your own infrastructure requires. To save time, run supplied Ansible playbooks that generate security groups, networks, subnets, routers, and ports.
Prerequisites
- Python 3 is installed on your machine.
- You downloaded the modules in "Downloading playbook dependencies".
- You downloaded the playbooks in "Downloading the installation playbooks".
Procedure
Optional: Add an external network value to the
inventory.yamlplaybook:Example external network value in the
inventory.yamlAnsible playbook... # The public network providing connectivity to the cluster. If not # provided, the cluster external connectivity must be provided in another # way. # Required for os_api_fip, os_ingress_fip, os_bootstrap_fip. os_external_network: 'external' ...ImportantIf you did not provide a value for
os_external_networkin theinventory.yamlfile, you must ensure that VMs can access Glance and an external connection yourself.Optional: Add external network and floating IP (FIP) address values to the
inventory.yamlplaybook:Example FIP values in the
inventory.yamlAnsible playbook... # OpenShift API floating IP address. If this value is non-empty, the # corresponding floating IP will be attached to the Control Plane to # serve the OpenShift API. os_api_fip: '203.0.113.23' # OpenShift Ingress floating IP address. If this value is non-empty, the # corresponding floating IP will be attached to the worker nodes to serve # the applications. os_ingress_fip: '203.0.113.19' # If this value is non-empty, the corresponding floating IP will be # attached to the bootstrap machine. This is needed for collecting logs # in case of install failure. os_bootstrap_fip: '203.0.113.20'ImportantIf you do not define values for
os_api_fipandos_ingress_fip, you must perform postinstallation network configuration.If you do not define a value for
os_bootstrap_fip, the installer cannot download debugging information from failed installations.See "Enabling access to the environment" for more information.
On a command line, create security groups by running the
security-groups.yamlplaybook:$ ansible-playbook -i inventory.yaml security-groups.yamlOn a command line, create a network, subnet, and router by running the
network.yamlplaybook:$ ansible-playbook -i inventory.yaml network.yamlOptional: If you want to control the default resolvers that Nova servers use, run the RHOSP CLI command:
$ openstack subnet set --dns-nameserver <server_1> --dns-nameserver <server_2> "$INFRA_ID-nodes"
6.18. Creating the bootstrap machine on RHOSP
Create a bootstrap machine and give it the network access it needs to run on Red Hat OpenStack Platform (RHOSP). Red Hat provides an Ansible playbook that you run to simplify this process.
Prerequisites
- You downloaded the modules in "Downloading playbook dependencies".
- You downloaded the playbooks in "Downloading the installation playbooks".
-
The
inventory.yaml,common.yaml, andbootstrap.yamlAnsible playbooks are in a common directory. -
The
metadata.jsonfile that the installation program created is in the same directory as the Ansible playbooks.
Procedure
- On a command line, change the working directory to the location of the playbooks.
On a command line, run the
bootstrap.yamlplaybook:$ ansible-playbook -i inventory.yaml bootstrap.yamlAfter the bootstrap server is active, view the logs to verify that the Ignition files were received:
$ openstack console log show "$INFRA_ID-bootstrap"
6.19. Creating the control plane machines on RHOSP
Create three control plane machines by using the Ignition config files that you generated. Red Hat provides an Ansible playbook that you run to simplify this process.
Prerequisites
- You downloaded the modules in "Downloading playbook dependencies".
- You downloaded the playbooks in "Downloading the installation playbooks".
-
The infrastructure ID from the installation program’s metadata file is set as an environment variable (
$INFRA_ID). -
The
inventory.yaml,common.yaml, andcontrol-plane.yamlAnsible playbooks are in a common directory. - You have the three Ignition files that were created in "Creating control plane Ignition config files".
Procedure
- On a command line, change the working directory to the location of the playbooks.
- If the control plane Ignition config files aren’t already in your working directory, copy them into it.
On a command line, run the
control-plane.yamlplaybook:$ ansible-playbook -i inventory.yaml control-plane.yamlRun the following command to monitor the bootstrapping process:
$ openshift-install wait-for bootstrap-completeYou will see messages that confirm that the control plane machines are running and have joined the cluster:
INFO API v1.27.3 up INFO Waiting up to 30m0s for bootstrapping to complete... ... INFO It is now safe to remove the bootstrap resources
6.20. Logging in to the cluster by using the CLI
You can log in to your cluster as a default system user by exporting the cluster kubeconfig file. The kubeconfig file contains information about the cluster that is used by the CLI to connect a client to the correct cluster and API server. The file is specific to a cluster and is created during OpenShift Container Platform installation.
Prerequisites
- You deployed an OpenShift Container Platform cluster.
-
You installed the
ocCLI.
Procedure
Export the
kubeadmincredentials:$ export KUBECONFIG=<installation_directory>/auth/kubeconfig1 - 1
- For
<installation_directory>, specify the path to the directory that you stored the installation files in.
Verify you can run
occommands successfully using the exported configuration:$ oc whoamiExample output
system:admin
6.21. Deleting bootstrap resources from RHOSP
Delete the bootstrap resources that you no longer need.
Prerequisites
- You downloaded the modules in "Downloading playbook dependencies".
- You downloaded the playbooks in "Downloading the installation playbooks".
-
The
inventory.yaml,common.yaml, anddown-bootstrap.yamlAnsible playbooks are in a common directory. The control plane machines are running.
- If you do not know the status of the machines, see "Verifying cluster status".
Procedure
- On a command line, change the working directory to the location of the playbooks.
On a command line, run the
down-bootstrap.yamlplaybook:$ ansible-playbook -i inventory.yaml down-bootstrap.yaml
The bootstrap port, server, and floating IP address are deleted.
If you did not disable the bootstrap Ignition file URL earlier, do so now.
6.22. Creating compute machines on RHOSP
After standing up the control plane, create compute machines. Red Hat provides an Ansible playbook that you run to simplify this process.
Prerequisites
- You downloaded the modules in "Downloading playbook dependencies".
- You downloaded the playbooks in "Downloading the installation playbooks".
-
The
inventory.yaml,common.yaml, andcompute-nodes.yamlAnsible playbooks are in a common directory. -
The
metadata.jsonfile that the installation program created is in the same directory as the Ansible playbooks. - The control plane is active.
Procedure
- On a command line, change the working directory to the location of the playbooks.
On a command line, run the playbook:
$ ansible-playbook -i inventory.yaml compute-nodes.yaml
Next steps
- Approve the certificate signing requests for the machines.
6.23. Approving the certificate signing requests for your machines
When you add machines to a cluster, two pending certificate signing requests (CSRs) are generated for each machine that you added. You must confirm that these CSRs are approved or, if necessary, approve them yourself. The client requests must be approved first, followed by the server requests.
Prerequisites
- You added machines to your cluster.
Procedure
Confirm that the cluster recognizes the machines:
$ oc get nodesExample output
NAME STATUS ROLES AGE VERSION master-0 Ready master 63m v1.27.3 master-1 Ready master 63m v1.27.3 master-2 Ready master 64m v1.27.3The output lists all of the machines that you created.
NoteThe preceding output might not include the compute nodes, also known as worker nodes, until some CSRs are approved.
Review the pending CSRs and ensure that you see the client requests with the
PendingorApprovedstatus for each machine that you added to the cluster:$ oc get csrExample output
NAME AGE REQUESTOR CONDITION csr-8b2br 15m system:serviceaccount:openshift-machine-config-operator:node-bootstrapper Pending csr-8vnps 15m system:serviceaccount:openshift-machine-config-operator:node-bootstrapper Pending ...In this example, two machines are joining the cluster. You might see more approved CSRs in the list.
If the CSRs were not approved, after all of the pending CSRs for the machines you added are in
Pendingstatus, approve the CSRs for your cluster machines:NoteBecause the CSRs rotate automatically, approve your CSRs within an hour of adding the machines to the cluster. If you do not approve them within an hour, the certificates will rotate, and more than two certificates will be present for each node. You must approve all of these certificates. After the client CSR is approved, the Kubelet creates a secondary CSR for the serving certificate, which requires manual approval. Then, subsequent serving certificate renewal requests are automatically approved by the
machine-approverif the Kubelet requests a new certificate with identical parameters.NoteFor clusters running on platforms that are not machine API enabled, such as bare metal and other user-provisioned infrastructure, you must implement a method of automatically approving the kubelet serving certificate requests (CSRs). If a request is not approved, then the
oc exec,oc rsh, andoc logscommands cannot succeed, because a serving certificate is required when the API server connects to the kubelet. Any operation that contacts the Kubelet endpoint requires this certificate approval to be in place. The method must watch for new CSRs, confirm that the CSR was submitted by thenode-bootstrapperservice account in thesystem:nodeorsystem:admingroups, and confirm the identity of the node.To approve them individually, run the following command for each valid CSR:
$ oc adm certificate approve <csr_name>1 - 1
<csr_name>is the name of a CSR from the list of current CSRs.
To approve all pending CSRs, run the following command:
$ oc get csr -o go-template='{{range .items}}{{if not .status}}{{.metadata.name}}{{"\n"}}{{end}}{{end}}' | xargs --no-run-if-empty oc adm certificate approveNoteSome Operators might not become available until some CSRs are approved.
Now that your client requests are approved, you must review the server requests for each machine that you added to the cluster:
$ oc get csrExample output
NAME AGE REQUESTOR CONDITION csr-bfd72 5m26s system:node:ip-10-0-50-126.us-east-2.compute.internal Pending csr-c57lv 5m26s system:node:ip-10-0-95-157.us-east-2.compute.internal Pending ...If the remaining CSRs are not approved, and are in the
Pendingstatus, approve the CSRs for your cluster machines:To approve them individually, run the following command for each valid CSR:
$ oc adm certificate approve <csr_name>1 - 1
<csr_name>is the name of a CSR from the list of current CSRs.
To approve all pending CSRs, run the following command:
$ oc get csr -o go-template='{{range .items}}{{if not .status}}{{.metadata.name}}{{"\n"}}{{end}}{{end}}' | xargs oc adm certificate approve
After all client and server CSRs have been approved, the machines have the
Readystatus. Verify this by running the following command:$ oc get nodesExample output
NAME STATUS ROLES AGE VERSION master-0 Ready master 73m v1.27.3 master-1 Ready master 73m v1.27.3 master-2 Ready master 74m v1.27.3 worker-0 Ready worker 11m v1.27.3 worker-1 Ready worker 11m v1.27.3NoteIt can take a few minutes after approval of the server CSRs for the machines to transition to the
Readystatus.
Additional information
- For more information on CSRs, see Certificate Signing Requests.
6.24. Verifying a successful installation
Verify that the OpenShift Container Platform installation is complete.
Prerequisites
-
You have the installation program (
openshift-install)
Procedure
On a command line, enter:
$ openshift-install --log-level debug wait-for install-complete
The program outputs the console URL, as well as the administrator’s login information.
6.25. Telemetry access for OpenShift Container Platform
In OpenShift Container Platform 4.14, the Telemetry service, which runs by default to provide metrics about cluster health and the success of updates, requires internet access. If your cluster is connected to the internet, Telemetry runs automatically, and your cluster is registered to OpenShift Cluster Manager.
After you confirm that your OpenShift Cluster Manager inventory is correct, either maintained automatically by Telemetry or manually by using OpenShift Cluster Manager, use subscription watch to track your OpenShift Container Platform subscriptions at the account or multi-cluster level.
6.26. Next steps
Chapter 7. Installing a cluster on OpenStack in a restricted network
In OpenShift Container Platform 4.14, you can install a cluster on Red Hat OpenStack Platform (RHOSP) in a restricted network by creating an internal mirror of the installation release content.
7.1. Prerequisites
- You reviewed details about the OpenShift Container Platform installation and update processes.
- You read the documentation on selecting a cluster installation method and preparing it for users.
- You verified that OpenShift Container Platform 4.14 is compatible with your RHOSP version by using the Supported platforms for OpenShift clusters section. You can also compare platform support across different versions by viewing the OpenShift Container Platform on RHOSP support matrix.
You created a registry on your mirror host and obtained the
imageContentSourcesdata for your version of OpenShift Container Platform.ImportantBecause the installation media is on the mirror host, you can use that computer to complete all installation steps.
- You understand performance and scalability practices for cluster scaling, control plane sizing, and etcd. For more information, see Recommended practices for scaling the cluster.
- You have the metadata service enabled in RHOSP.
7.2. About installations in restricted networks
In OpenShift Container Platform 4.14, you can perform an installation that does not require an active connection to the internet to obtain software components. Restricted network installations can be completed using installer-provisioned infrastructure or user-provisioned infrastructure, depending on the cloud platform to which you are installing the cluster.
If you choose to perform a restricted network installation on a cloud platform, you still require access to its cloud APIs. Some cloud functions, like Amazon Web Service’s Route 53 DNS and IAM services, require internet access. Depending on your network, you might require less internet access for an installation on bare metal hardware, Nutanix, or on VMware vSphere.
To complete a restricted network installation, you must create a registry that mirrors the contents of the OpenShift image registry and contains the installation media. You can create this registry on a mirror host, which can access both the internet and your closed network, or by using other methods that meet your restrictions.
7.2.1. Additional limits
Clusters in restricted networks have the following additional limitations and restrictions:
-
The
ClusterVersionstatus includes anUnable to retrieve available updateserror. - By default, you cannot use the contents of the Developer Catalog because you cannot access the required image stream tags.
7.3. Resource guidelines for installing OpenShift Container Platform on RHOSP
To support an OpenShift Container Platform installation, your Red Hat OpenStack Platform (RHOSP) quota must meet the following requirements:
| Resource | Value |
|---|---|
| Floating IP addresses | 3 |
| Ports | 15 |
| Routers | 1 |
| Subnets | 1 |
| RAM | 88 GB |
| vCPUs | 22 |
| Volume storage | 275 GB |
| Instances | 7 |
| Security groups | 3 |
| Security group rules | 60 |
| Server groups | 2 - plus 1 for each additional availability zone in each machine pool |
A cluster might function with fewer than recommended resources, but its performance is not guaranteed.
If RHOSP object storage (Swift) is available and operated by a user account with the swiftoperator role, it is used as the default backend for the OpenShift Container Platform image registry. In this case, the volume storage requirement is 175 GB. Swift space requirements vary depending on the size of the image registry.
By default, your security group and security group rule quotas might be low. If you encounter problems, run openstack quota set --secgroups 3 --secgroup-rules 60 <project> as an administrator to increase them.
An OpenShift Container Platform deployment comprises control plane machines, compute machines, and a bootstrap machine.
7.3.1. Control plane machines
By default, the OpenShift Container Platform installation process creates three control plane machines.
Each machine requires:
- An instance from the RHOSP quota
- A port from the RHOSP quota
- A flavor with at least 16 GB memory and 4 vCPUs
- At least 100 GB storage space from the RHOSP quota
7.3.2. Compute machines
By default, the OpenShift Container Platform installation process creates three compute machines.
Each machine requires:
- An instance from the RHOSP quota
- A port from the RHOSP quota
- A flavor with at least 8 GB memory and 2 vCPUs
- At least 100 GB storage space from the RHOSP quota
Compute machines host the applications that you run on OpenShift Container Platform; aim to run as many as you can.
7.3.3. Bootstrap machine
During installation, a bootstrap machine is temporarily provisioned to stand up the control plane. After the production control plane is ready, the bootstrap machine is deprovisioned.
The bootstrap machine requires:
- An instance from the RHOSP quota
- A port from the RHOSP quota
- A flavor with at least 16 GB memory and 4 vCPUs
- At least 100 GB storage space from the RHOSP quota
7.4. Internet access for OpenShift Container Platform
In OpenShift Container Platform 4.14, you require access to the internet to obtain the images that are necessary to install your cluster.
You must have internet access to:
- Access OpenShift Cluster Manager to download the installation program and perform subscription management. If the cluster has internet access and you do not disable Telemetry, that service automatically entitles your cluster.
- Access Quay.io to obtain the packages that are required to install your cluster.
- Obtain the packages that are required to perform cluster updates.
7.5. Enabling Swift on RHOSP
Swift is operated by a user account with the swiftoperator role. Add the role to an account before you run the installation program.
If the Red Hat OpenStack Platform (RHOSP) object storage service, commonly known as Swift, is available, OpenShift Container Platform uses it as the image registry storage. If it is unavailable, the installation program relies on the RHOSP block storage service, commonly known as Cinder.
If Swift is present and you want to use it, you must enable access to it. If it is not present, or if you do not want to use it, skip this section.
RHOSP 17 sets the rgw_max_attr_size parameter of Ceph RGW to 256 characters. This setting causes issues with uploading container images to the OpenShift Container Platform registry. You must set the value of rgw_max_attr_size to at least 1024 characters.
Before installation, check if your RHOSP deployment is affected by this problem. If it is, reconfigure Ceph RGW.
Prerequisites
- You have a RHOSP administrator account on the target environment.
- The Swift service is installed.
-
On Ceph RGW, the
account in urloption is enabled.
Procedure
To enable Swift on RHOSP:
As an administrator in the RHOSP CLI, add the
swiftoperatorrole to the account that will access Swift:$ openstack role add --user <user> --project <project> swiftoperator
Your RHOSP deployment can now use Swift for the image registry.
7.6. Defining parameters for the installation program
The OpenShift Container Platform installation program relies on a file that is called clouds.yaml. The file describes Red Hat OpenStack Platform (RHOSP) configuration parameters, including the project name, log in information, and authorization service URLs.
Procedure
Create the
clouds.yamlfile:If your RHOSP distribution includes the Horizon web UI, generate a
clouds.yamlfile in it.ImportantRemember to add a password to the
authfield. You can also keep secrets in a separate file fromclouds.yaml.If your RHOSP distribution does not include the Horizon web UI, or you do not want to use Horizon, create the file yourself. For detailed information about
clouds.yaml, see Config files in the RHOSP documentation.clouds: shiftstack: auth: auth_url: http://10.10.14.42:5000/v3 project_name: shiftstack username: <username> password: <password> user_domain_name: Default project_domain_name: Default dev-env: region_name: RegionOne auth: username: <username> password: <password> project_name: 'devonly' auth_url: 'https://10.10.14.22:5001/v2.0'
If your RHOSP installation uses self-signed certificate authority (CA) certificates for endpoint authentication:
- Copy the certificate authority file to your machine.
Add the
cacertskey to theclouds.yamlfile. The value must be an absolute, non-root-accessible path to the CA certificate:clouds: shiftstack: ... cacert: "/etc/pki/ca-trust/source/anchors/ca.crt.pem"TipAfter you run the installer with a custom CA certificate, you can update the certificate by editing the value of the
ca-cert.pemkey in thecloud-provider-configkeymap. On a command line, run:$ oc edit configmap -n openshift-config cloud-provider-config
Place the
clouds.yamlfile in one of the following locations:-
The value of the
OS_CLIENT_CONFIG_FILEenvironment variable - The current directory
-
A Unix-specific user configuration directory, for example
~/.config/openstack/clouds.yaml A Unix-specific site configuration directory, for example
/etc/openstack/clouds.yamlThe installation program searches for
clouds.yamlin that order.
-
The value of the
7.7. Setting OpenStack Cloud Controller Manager options
Optionally, you can edit the OpenStack Cloud Controller Manager (CCM) configuration for your cluster. This configuration controls how OpenShift Container Platform interacts with Red Hat OpenStack Platform (RHOSP).
For a complete list of configuration parameters, see the "OpenStack Cloud Controller Manager reference guide" page in the "Installing on OpenStack" documentation.
Procedure
If you have not already generated manifest files for your cluster, generate them by running the following command:
$ openshift-install --dir <destination_directory> create manifestsIn a text editor, open the cloud-provider configuration manifest file. For example:
$ vi openshift/manifests/cloud-provider-config.yamlModify the options according to the CCM reference guide.
Configuring Octavia for load balancing is a common case for clusters that do not use Kuryr. For example:
#... [LoadBalancer] lb-provider = "amphora"1 floating-network-id="d3deb660-4190-40a3-91f1-37326fe6ec4a"2 create-monitor = True3 monitor-delay = 10s4 monitor-timeout = 10s5 monitor-max-retries = 16 #...- 1
- This property sets the Octavia provider that your load balancer uses. It accepts
"ovn"or"amphora"as values. If you choose to use OVN, you must also setlb-methodtoSOURCE_IP_PORT. - 2
- This property is required if you want to use multiple external networks with your cluster. The cloud provider creates floating IP addresses on the network that is specified here.
- 3
- This property controls whether the cloud provider creates health monitors for Octavia load balancers. Set the value to
Trueto create health monitors. As of RHOSP 16.2, this feature is only available for the Amphora provider. - 4
- This property sets the frequency with which endpoints are monitored. The value must be in the
time.ParseDuration()format. This property is required if the value of thecreate-monitorproperty isTrue. - 5
- This property sets the time that monitoring requests are open before timing out. The value must be in the
time.ParseDuration()format. This property is required if the value of thecreate-monitorproperty isTrue. - 6
- This property defines how many successful monitoring requests are required before a load balancer is marked as online. The value must be an integer. This property is required if the value of the
create-monitorproperty isTrue.
ImportantPrior to saving your changes, verify that the file is structured correctly. Clusters might fail if properties are not placed in the appropriate section.
ImportantYou must set the value of the
create-monitorproperty toTrueif you use services that have the value of the.spec.externalTrafficPolicyproperty set toLocal. The OVN Octavia provider in RHOSP 16.2 does not support health monitors. Therefore, services that haveETPparameter values set toLocalmight not respond when thelb-providervalue is set to"ovn".ImportantFor installations that use Kuryr, Kuryr handles relevant services. There is no need to configure Octavia load balancing in the cloud provider.
Save the changes to the file and proceed with installation.
TipYou can update your cloud provider configuration after you run the installer. On a command line, run:
$ oc edit configmap -n openshift-config cloud-provider-configAfter you save your changes, your cluster will take some time to reconfigure itself. The process is complete if none of your nodes have a
SchedulingDisabledstatus.
7.8. Creating the RHCOS image for restricted network installations
Download the Red Hat Enterprise Linux CoreOS (RHCOS) image to install OpenShift Container Platform on a restricted network Red Hat OpenStack Platform (RHOSP) environment.
Prerequisites
- Obtain the OpenShift Container Platform installation program. For a restricted network installation, the program is on your mirror registry host.
Procedure
- Log in to the Red Hat Customer Portal’s Product Downloads page.
Under Version, select the most recent release of OpenShift Container Platform 4.14 for RHEL 8.
ImportantThe RHCOS images might not change with every release of OpenShift Container Platform. You must download images with the highest version that is less than or equal to the OpenShift Container Platform version that you install. Use the image versions that match your OpenShift Container Platform version if they are available.
- Download the Red Hat Enterprise Linux CoreOS (RHCOS) - OpenStack Image (QCOW) image.
Decompress the image.
NoteYou must decompress the image before the cluster can use it. The name of the downloaded file might not contain a compression extension, like
.gzor.tgz. To find out if or how the file is compressed, in a command line, enter:$ file <name_of_downloaded_file>Upload the image that you decompressed to a location that is accessible from the bastion server, like Glance. For example:
$ openstack image create --file rhcos-44.81.202003110027-0-openstack.x86_64.qcow2 --disk-format qcow2 rhcos-${RHCOS_VERSION}ImportantDepending on your RHOSP environment, you might be able to upload the image in either
.rawor.qcow2formats. If you use Ceph, you must use the.rawformat.WarningIf the installation program finds multiple images with the same name, it chooses one of them at random. To avoid this behavior, create unique names for resources in RHOSP.
The image is now available for a restricted installation. Note the image name or location for use in OpenShift Container Platform deployment.
7.9. Creating the installation configuration file
You can customize the OpenShift Container Platform cluster you install on Red Hat OpenStack Platform (RHOSP).
Prerequisites
- You have the OpenShift Container Platform installation program and the pull secret for your cluster. For a restricted network installation, these files are on your mirror host.
-
You have the
imageContentSourcesvalues that were generated during mirror registry creation. - You have obtained the contents of the certificate for your mirror registry.
- You have retrieved a Red Hat Enterprise Linux CoreOS (RHCOS) image and uploaded it to an accessible location.
Procedure
Create the
install-config.yamlfile.Change to the directory that contains the installation program and run the following command:
$ ./openshift-install create install-config --dir <installation_directory>1 - 1
- For
<installation_directory>, specify the directory name to store the files that the installation program creates.
When specifying the directory:
-
Verify that the directory has the
executepermission. This permission is required to run Terraform binaries under the installation directory. Use an empty directory. Some installation assets, such as bootstrap X.509 certificates, have short expiration intervals, therefore you must not reuse an installation directory. If you want to reuse individual files from another cluster installation, you can copy them into your directory. However, the file names for the installation assets might change between releases. Use caution when copying installation files from an earlier OpenShift Container Platform version.
NoteAlways delete the
~/.powervsdirectory to avoid reusing a stale configuration. Run the following command:$ rm -rf ~/.powervs
At the prompts, provide the configuration details for your cloud:
Optional: Select an SSH key to use to access your cluster machines.
NoteFor production OpenShift Container Platform clusters on which you want to perform installation debugging or disaster recovery, specify an SSH key that your
ssh-agentprocess uses.- Select openstack as the platform to target.
- Specify the Red Hat OpenStack Platform (RHOSP) external network name to use for installing the cluster.
- Specify the floating IP address to use for external access to the OpenShift API.
- Specify a RHOSP flavor with at least 16 GB RAM to use for control plane nodes and 8 GB RAM for compute nodes.
- Select the base domain to deploy the cluster to. All DNS records will be sub-domains of this base and will also include the cluster name.
- Enter a name for your cluster. The name must be 14 or fewer characters long.
In the
install-config.yamlfile, set the value ofplatform.openstack.clusterOSImageto the image location or name. For example:platform: openstack: clusterOSImage: http://mirror.example.com/images/rhcos-43.81.201912131630.0-openstack.x86_64.qcow2.gz?sha256=ffebbd68e8a1f2a245ca19522c16c86f67f9ac8e4e0c1f0a812b068b16f7265dEdit the
install-config.yamlfile to give the additional information that is required for an installation in a restricted network.Update the
pullSecretvalue to contain the authentication information for your registry:pullSecret: '{"auths":{"<mirror_host_name>:5000": {"auth": "<credentials>","email": "you@example.com"}}}'For
<mirror_host_name>, specify the registry domain name that you specified in the certificate for your mirror registry, and for<credentials>, specify the base64-encoded user name and password for your mirror registry.Add the
additionalTrustBundleparameter and value.additionalTrustBundle: | -----BEGIN CERTIFICATE----- ZZZZZZZZZZZZZZZZZZZZZZZZZZZZZZZZZZZZZZZZZZZZZZZZZZZZZZZZZZZZZZZZ -----END CERTIFICATE-----The value must be the contents of the certificate file that you used for your mirror registry. The certificate file can be an existing, trusted certificate authority, or the self-signed certificate that you generated for the mirror registry.
Add the image content resources, which resemble the following YAML excerpt:
imageContentSources: - mirrors: - <mirror_host_name>:5000/<repo_name>/release source: quay.io/openshift-release-dev/ocp-release - mirrors: - <mirror_host_name>:5000/<repo_name>/release source: registry.redhat.io/ocp/releaseFor these values, use the
imageContentSourcesthat you recorded during mirror registry creation.Optional: Set the publishing strategy to
Internal:publish: InternalBy setting this option, you create an internal Ingress Controller and a private load balancer.
-
Make any other modifications to the
install-config.yamlfile that you require. You can find more information about the available parameters in the Installation configuration parameters section. Back up the
install-config.yamlfile so that you can use it to install multiple clusters.ImportantThe
install-config.yamlfile is consumed during the installation process. If you want to reuse the file, you must back it up now.
7.9.1. Configuring the cluster-wide proxy during installation
Production environments can deny direct access to the internet and instead have an HTTP or HTTPS proxy available. You can configure a new OpenShift Container Platform cluster to use a proxy by configuring the proxy settings in the install-config.yaml file.
Kuryr installations default to HTTP proxies.
Prerequisites
For Kuryr installations on restricted networks that use the
Proxyobject, the proxy must be able to reply to the router that the cluster uses. To add a static route for the proxy configuration, from a command line as the root user, enter:$ ip route add <cluster_network_cidr> via <installer_subnet_gateway>-
The restricted subnet must have a gateway that is defined and available to be linked to the
Routerresource that Kuryr creates.
Prerequisites
-
You have an existing
install-config.yamlfile. You reviewed the sites that your cluster requires access to and determined whether any of them need to bypass the proxy. By default, all cluster egress traffic is proxied, including calls to hosting cloud provider APIs. You added sites to the
Proxyobject’sspec.noProxyfield to bypass the proxy if necessary.NoteThe
Proxyobjectstatus.noProxyfield is populated with the values of thenetworking.machineNetwork[].cidr,networking.clusterNetwork[].cidr, andnetworking.serviceNetwork[]fields from your installation configuration.For installations on Amazon Web Services (AWS), Google Cloud, Microsoft Azure, and Red Hat OpenStack Platform (RHOSP), the
Proxyobjectstatus.noProxyfield is also populated with the instance metadata endpoint (169.254.169.254).
Procedure
Edit your
install-config.yamlfile and add the proxy settings. For example:apiVersion: v1 baseDomain: my.domain.com proxy: httpProxy: http://<username>:<pswd>@<ip>:<port>1 httpsProxy: https://<username>:<pswd>@<ip>:<port>2 noProxy: example.com3 additionalTrustBundle: |4 -----BEGIN CERTIFICATE----- <MY_TRUSTED_CA_CERT> -----END CERTIFICATE----- additionalTrustBundlePolicy: <policy_to_add_additionalTrustBundle>5 - 1
- A proxy URL to use for creating HTTP connections outside the cluster. The URL scheme must be
http. - 2
- A proxy URL to use for creating HTTPS connections outside the cluster.
- 3
- A comma-separated list of destination domain names, IP addresses, or other network CIDRs to exclude from proxying. Preface a domain with
.to match subdomains only. For example,.y.commatchesx.y.com, but noty.com. Use*to bypass the proxy for all destinations. - 4
- If provided, the installation program generates a config map that is named
user-ca-bundlein theopenshift-confignamespace that contains one or more additional CA certificates that are required for proxying HTTPS connections. The Cluster Network Operator then creates atrusted-ca-bundleconfig map that merges these contents with the Red Hat Enterprise Linux CoreOS (RHCOS) trust bundle, and this config map is referenced in thetrustedCAfield of theProxyobject. TheadditionalTrustBundlefield is required unless the proxy’s identity certificate is signed by an authority from the RHCOS trust bundle. - 5
- Optional: The policy to determine the configuration of the
Proxyobject to reference theuser-ca-bundleconfig map in thetrustedCAfield. The allowed values areProxyonlyandAlways. UseProxyonlyto reference theuser-ca-bundleconfig map only whenhttp/httpsproxy is configured. UseAlwaysto always reference theuser-ca-bundleconfig map. The default value isProxyonly.
NoteThe installation program does not support the proxy
readinessEndpointsfield.NoteIf the installer times out, restart and then complete the deployment by using the
wait-forcommand of the installer. For example:$ ./openshift-install wait-for install-complete --log-level debug- Save the file and reference it when installing OpenShift Container Platform.
The installation program creates a cluster-wide proxy that is named cluster that uses the proxy settings in the provided install-config.yaml file. If no proxy settings are provided, a cluster Proxy object is still created, but it will have a nil spec.
Only the Proxy object named cluster is supported, and no additional proxies can be created.
7.9.2. Sample customized install-config.yaml file for restricted OpenStack installations
This sample install-config.yaml demonstrates all of the possible Red Hat OpenStack Platform (RHOSP) customization options.
This sample file is provided for reference only. You must obtain your install-config.yaml file by using the installation program.
apiVersion: v1
baseDomain: example.com
controlPlane:
name: master
platform: {}
replicas: 3
compute:
- name: worker
platform:
openstack:
type: ml.large
replicas: 3
metadata:
name: example
networking:
clusterNetwork:
- cidr: 10.128.0.0/14
hostPrefix: 23
machineNetwork:
- cidr: 10.0.0.0/16
serviceNetwork:
- 172.30.0.0/16
networkType: OVNKubernetes
platform:
openstack:
region: region1
cloud: mycloud
externalNetwork: external
computeFlavor: m1.xlarge
apiFloatingIP: 128.0.0.1
fips: false
pullSecret: '{"auths": ...}'
sshKey: ssh-ed25519 AAAA...
additionalTrustBundle: |
-----BEGIN CERTIFICATE-----
ZZZZZZZZZZZZZZZZZZZZZZZZZZZZZZZZZZZZZZZZZZZZZZZZZZZZZZZZZZZZZZZZ
-----END CERTIFICATE-----
imageContentSources:
- mirrors:
- <mirror_registry>/<repo_name>/release
source: quay.io/openshift-release-dev/ocp-release
- mirrors:
- <mirror_registry>/<repo_name>/release
source: quay.io/openshift-release-dev/ocp-v4.0-art-dev7.10. Generating a key pair for cluster node SSH access
During an OpenShift Container Platform installation, you can provide an SSH public key to the installation program. The key is passed to the Red Hat Enterprise Linux CoreOS (RHCOS) nodes through their Ignition config files and is used to authenticate SSH access to the nodes. The key is added to the ~/.ssh/authorized_keys list for the core user on each node, which enables password-less authentication.
After the key is passed to the nodes, you can use the key pair to SSH in to the RHCOS nodes as the user core. To access the nodes through SSH, the private key identity must be managed by SSH for your local user.
If you want to SSH in to your cluster nodes to perform installation debugging or disaster recovery, you must provide the SSH public key during the installation process. The ./openshift-install gather command also requires the SSH public key to be in place on the cluster nodes.
Do not skip this procedure in production environments, where disaster recovery and debugging is required.
You must use a local key, not one that you configured with platform-specific approaches such as AWS key pairs.
Procedure
If you do not have an existing SSH key pair on your local machine to use for authentication onto your cluster nodes, create one. For example, on a computer that uses a Linux operating system, run the following command:
$ ssh-keygen -t ed25519 -N '' -f <path>/<file_name>1 - 1
- Specify the path and file name, such as
~/.ssh/id_ed25519, of the new SSH key. If you have an existing key pair, ensure your public key is in the your~/.sshdirectory.
NoteIf you plan to install an OpenShift Container Platform cluster that uses the RHEL cryptographic libraries that have been submitted to NIST for FIPS 140-2/140-3 Validation on only the
x86_64,ppc64le, ands390xarchitectures, do not create a key that uses theed25519algorithm. Instead, create a key that uses thersaorecdsaalgorithm.View the public SSH key:
$ cat <path>/<file_name>.pubFor example, run the following to view the
~/.ssh/id_ed25519.pubpublic key:$ cat ~/.ssh/id_ed25519.pubAdd the SSH private key identity to the SSH agent for your local user, if it has not already been added. SSH agent management of the key is required for password-less SSH authentication onto your cluster nodes, or if you want to use the
./openshift-install gathercommand.NoteOn some distributions, default SSH private key identities such as
~/.ssh/id_rsaand~/.ssh/id_dsaare managed automatically.If the
ssh-agentprocess is not already running for your local user, start it as a background task:$ eval "$(ssh-agent -s)"Example output
Agent pid 31874NoteIf your cluster is in FIPS mode, only use FIPS-compliant algorithms to generate the SSH key. The key must be either RSA or ECDSA.
Add your SSH private key to the
ssh-agent:$ ssh-add <path>/<file_name>1 - 1
- Specify the path and file name for your SSH private key, such as
~/.ssh/id_ed25519
Example output
Identity added: /home/<you>/<path>/<file_name> (<computer_name>)
Next steps
- When you install OpenShift Container Platform, provide the SSH public key to the installation program.
7.11. Enabling access to the environment
At deployment, all OpenShift Container Platform machines are created in a Red Hat OpenStack Platform (RHOSP)-tenant network. Therefore, they are not accessible directly in most RHOSP deployments.
You can configure OpenShift Container Platform API and application access by using floating IP addresses (FIPs) during installation. You can also complete an installation without configuring FIPs, but the installer will not configure a way to reach the API or applications externally.
7.11.1. Enabling access with floating IP addresses
Create floating IP (FIP) addresses for external access to the OpenShift Container Platform API and cluster applications.
Procedure
Using the Red Hat OpenStack Platform (RHOSP) CLI, create the API FIP:
$ openstack floating ip create --description "API <cluster_name>.<base_domain>" <external_network>Using the Red Hat OpenStack Platform (RHOSP) CLI, create the apps, or Ingress, FIP:
$ openstack floating ip create --description "Ingress <cluster_name>.<base_domain>" <external_network>Add records that follow these patterns to your DNS server for the API and Ingress FIPs:
api.<cluster_name>.<base_domain>. IN A <API_FIP> *.apps.<cluster_name>.<base_domain>. IN A <apps_FIP>NoteIf you do not control the DNS server, you can access the cluster by adding the cluster domain names such as the following to your
/etc/hostsfile:-
<api_floating_ip> api.<cluster_name>.<base_domain> -
<application_floating_ip> grafana-openshift-monitoring.apps.<cluster_name>.<base_domain> -
<application_floating_ip> prometheus-k8s-openshift-monitoring.apps.<cluster_name>.<base_domain> -
<application_floating_ip> oauth-openshift.apps.<cluster_name>.<base_domain> -
<application_floating_ip> console-openshift-console.apps.<cluster_name>.<base_domain> -
application_floating_ip integrated-oauth-server-openshift-authentication.apps.<cluster_name>.<base_domain>
The cluster domain names in the
/etc/hostsfile grant access to the web console and the monitoring interface of your cluster locally. You can also use thekubectloroc. You can access the user applications by using the additional entries pointing to the <application_floating_ip>. This action makes the API and applications accessible to only you, which is not suitable for production deployment, but does allow installation for development and testing.-
Add the FIPs to the
install-config.yamlfile as the values of the following parameters:-
platform.openstack.ingressFloatingIP -
platform.openstack.apiFloatingIP
-
If you use these values, you must also enter an external network as the value of the platform.openstack.externalNetwork parameter in the install-config.yaml file.
You can make OpenShift Container Platform resources available outside of the cluster by assigning a floating IP address and updating your firewall configuration.
7.11.2. Completing installation without floating IP addresses
You can install OpenShift Container Platform on Red Hat OpenStack Platform (RHOSP) without providing floating IP addresses.
In the install-config.yaml file, do not define the following parameters:
-
platform.openstack.ingressFloatingIP -
platform.openstack.apiFloatingIP
If you cannot provide an external network, you can also leave platform.openstack.externalNetwork blank. If you do not provide a value for platform.openstack.externalNetwork, a router is not created for you, and, without additional action, the installer will fail to retrieve an image from Glance. You must configure external connectivity on your own.
If you run the installer from a system that cannot reach the cluster API due to a lack of floating IP addresses or name resolution, installation fails. To prevent installation failure in these cases, you can use a proxy network or run the installer from a system that is on the same network as your machines.
You can enable name resolution by creating DNS records for the API and Ingress ports. For example:
api.<cluster_name>.<base_domain>. IN A <api_port_IP>
*.apps.<cluster_name>.<base_domain>. IN A <ingress_port_IP>
If you do not control the DNS server, you can add the record to your /etc/hosts file. This action makes the API accessible to only you, which is not suitable for production deployment but does allow installation for development and testing.
7.12. Deploying the cluster
You can install OpenShift Container Platform on a compatible cloud platform.
You can run the create cluster command of the installation program only once, during initial installation.
Prerequisites
- You have the OpenShift Container Platform installation program and the pull secret for your cluster.
- You have verified that the cloud provider account on your host has the correct permissions to deploy the cluster. An account with incorrect permissions causes the installation process to fail with an error message that displays the missing permissions.
Procedure
Change to the directory that contains the installation program and initialize the cluster deployment:
$ ./openshift-install create cluster --dir <installation_directory> \1 --log-level=info2
Verification
When the cluster deployment completes successfully:
-
The terminal displays directions for accessing your cluster, including a link to the web console and credentials for the
kubeadminuser. -
Credential information also outputs to
<installation_directory>/.openshift_install.log.
Do not delete the installation program or the files that the installation program creates. Both are required to delete the cluster.
Example output
...
INFO Install complete!
INFO To access the cluster as the system:admin user when using 'oc', run 'export KUBECONFIG=/home/myuser/install_dir/auth/kubeconfig'
INFO Access the OpenShift web-console here: https://console-openshift-console.apps.mycluster.example.com
INFO Login to the console with user: "kubeadmin", and password: "password"
INFO Time elapsed: 36m22s-
The Ignition config files that the installation program generates contain certificates that expire after 24 hours, which are then renewed at that time. If the cluster is shut down before renewing the certificates and the cluster is later restarted after the 24 hours have elapsed, the cluster automatically recovers the expired certificates. The exception is that you must manually approve the pending
node-bootstrappercertificate signing requests (CSRs) to recover kubelet certificates. See the documentation for Recovering from expired control plane certificates for more information. - It is recommended that you use Ignition config files within 12 hours after they are generated because the 24-hour certificate rotates from 16 to 22 hours after the cluster is installed. By using the Ignition config files within 12 hours, you can avoid installation failure if the certificate update runs during installation.
7.13. Verifying cluster status
You can verify your OpenShift Container Platform cluster’s status during or after installation.
Procedure
In the cluster environment, export the administrator’s kubeconfig file:
$ export KUBECONFIG=<installation_directory>/auth/kubeconfig1 - 1
- For
<installation_directory>, specify the path to the directory that you stored the installation files in.
The
kubeconfigfile contains information about the cluster that is used by the CLI to connect a client to the correct cluster and API server.View the control plane and compute machines created after a deployment:
$ oc get nodesView your cluster’s version:
$ oc get clusterversionView your Operators' status:
$ oc get clusteroperatorView all running pods in the cluster:
$ oc get pods -A
7.14. Logging in to the cluster by using the CLI
You can log in to your cluster as a default system user by exporting the cluster kubeconfig file. The kubeconfig file contains information about the cluster that is used by the CLI to connect a client to the correct cluster and API server. The file is specific to a cluster and is created during OpenShift Container Platform installation.
Prerequisites
- You deployed an OpenShift Container Platform cluster.
-
You installed the
ocCLI.
Procedure
Export the
kubeadmincredentials:$ export KUBECONFIG=<installation_directory>/auth/kubeconfig1 - 1
- For
<installation_directory>, specify the path to the directory that you stored the installation files in.
Verify you can run
occommands successfully using the exported configuration:$ oc whoamiExample output
system:admin
7.15. Disabling the default OperatorHub catalog sources
Operator catalogs that source content provided by Red Hat and community projects are configured for OperatorHub by default during an OpenShift Container Platform installation. In a restricted network environment, you must disable the default catalogs as a cluster administrator.
Procedure
Disable the sources for the default catalogs by adding
disableAllDefaultSources: trueto theOperatorHubobject:$ oc patch OperatorHub cluster --type json \ -p '[{"op": "add", "path": "/spec/disableAllDefaultSources", "value": true}]'
Alternatively, you can use the web console to manage catalog sources. From the Administration → Cluster Settings → Configuration → OperatorHub page, click the Sources tab, where you can create, update, delete, disable, and enable individual sources.
7.16. Telemetry access for OpenShift Container Platform
In OpenShift Container Platform 4.14, the Telemetry service, which runs by default to provide metrics about cluster health and the success of updates, requires internet access. If your cluster is connected to the internet, Telemetry runs automatically, and your cluster is registered to OpenShift Cluster Manager.
After you confirm that your OpenShift Cluster Manager inventory is correct, either maintained automatically by Telemetry or manually by using OpenShift Cluster Manager, use subscription watch to track your OpenShift Container Platform subscriptions at the account or multi-cluster level.
7.17. Next steps
- Customize your cluster.
- If the mirror registry that you used to install your cluster has a trusted CA, add it to the cluster by configuring additional trust stores.
- If necessary, you can Remote health reporting.
- If necessary, see Registering your disconnected cluster
-
Configure image streams for the Cluster Samples Operator and the
must-gathertool. - Learn how to use Operator Lifecycle Manager (OLM) on restricted networks.
- If you did not configure RHOSP to accept application traffic over floating IP addresses, configure RHOSP access with floating IP addresses.
Chapter 8. Configuring network settings after installing OpenStack
You can configure network settings for an OpenShift Container Platform on Red Hat OpenStack Platform (RHOSP) cluster after installation.
8.1. Configuring application access with floating IP addresses
After you install OpenShift Container Platform, configure Red Hat OpenStack Platform (RHOSP) to allow application network traffic.
You do not need to perform this procedure if you provided values for platform.openstack.apiFloatingIP and platform.openstack.ingressFloatingIP in the install-config.yaml file, or os_api_fip and os_ingress_fip in the inventory.yaml playbook, during installation. The floating IP addresses are already set.
Prerequisites
- OpenShift Container Platform cluster must be installed
- Floating IP addresses are enabled as described in the OpenShift Container Platform on RHOSP installation documentation.
Procedure
After you install the OpenShift Container Platform cluster, attach a floating IP address to the ingress port:
Show the port:
$ openstack port show <cluster_name>-<cluster_ID>-ingress-portAttach the port to the IP address:
$ openstack floating ip set --port <ingress_port_ID> <apps_FIP>Add a wildcard
Arecord for*apps.to your DNS file:*.apps.<cluster_name>.<base_domain> IN A <apps_FIP>
If you do not control the DNS server but want to enable application access for non-production purposes, you can add these hostnames to /etc/hosts:
<apps_FIP> console-openshift-console.apps.<cluster name>.<base domain>
<apps_FIP> integrated-oauth-server-openshift-authentication.apps.<cluster name>.<base domain>
<apps_FIP> oauth-openshift.apps.<cluster name>.<base domain>
<apps_FIP> prometheus-k8s-openshift-monitoring.apps.<cluster name>.<base domain>
<apps_FIP> <app name>.apps.<cluster name>.<base domain>8.2. Enabling OVS hardware offloading
For clusters that run on Red Hat OpenStack Platform (RHOSP), you can enable Open vSwitch (OVS) hardware offloading.
OVS is a multi-layer virtual switch that enables large-scale, multi-server network virtualization.
Prerequisites
- You installed a cluster on RHOSP that is configured for single-root input/output virtualization (SR-IOV).
- You installed the SR-IOV Network Operator on your cluster.
-
You created two
hw-offloadtype virtual function (VF) interfaces on your cluster.
Application layer gateway flows are broken in OpenShift Container Platform version 4.10, 4.11, and 4.12. Also, you cannot offload the application layer gateway flow for OpenShift Container Platform version 4.13.
Procedure
Create an
SriovNetworkNodePolicypolicy for the twohw-offloadtype VF interfaces that are on your cluster:The first virtual function interface
apiVersion: sriovnetwork.openshift.io/v1 kind: SriovNetworkNodePolicy1 metadata: name: "hwoffload9" namespace: openshift-sriov-network-operator spec: deviceType: netdevice isRdma: true nicSelector: pfNames:2 - ens6 nodeSelector: feature.node.kubernetes.io/network-sriov.capable: 'true' numVfs: 1 priority: 99 resourceName: "hwoffload9"The second virtual function interface
apiVersion: sriovnetwork.openshift.io/v1 kind: SriovNetworkNodePolicy1 metadata: name: "hwoffload10" namespace: openshift-sriov-network-operator spec: deviceType: netdevice isRdma: true nicSelector: pfNames:2 - ens5 nodeSelector: feature.node.kubernetes.io/network-sriov.capable: 'true' numVfs: 1 priority: 99 resourceName: "hwoffload10"Create
NetworkAttachmentDefinitionresources for the two interfaces:A
NetworkAttachmentDefinitionresource for the first interfaceapiVersion: k8s.cni.cncf.io/v1 kind: NetworkAttachmentDefinition metadata: annotations: k8s.v1.cni.cncf.io/resourceName: openshift.io/hwoffload9 name: hwoffload9 namespace: default spec: config: '{ "cniVersion":"0.3.1", "name":"hwoffload9","type":"host-device","device":"ens6" }'A
NetworkAttachmentDefinitionresource for the second interfaceapiVersion: k8s.cni.cncf.io/v1 kind: NetworkAttachmentDefinition metadata: annotations: k8s.v1.cni.cncf.io/resourceName: openshift.io/hwoffload10 name: hwoffload10 namespace: default spec: config: '{ "cniVersion":"0.3.1", "name":"hwoffload10","type":"host-device","device":"ens5" }'Use the interfaces that you created with a pod. For example:
A pod that uses the two OVS offload interfaces
apiVersion: v1 kind: Pod metadata: name: dpdk-testpmd namespace: default annotations: irq-load-balancing.crio.io: disable cpu-quota.crio.io: disable k8s.v1.cni.cncf.io/resourceName: openshift.io/hwoffload9 k8s.v1.cni.cncf.io/resourceName: openshift.io/hwoffload10 spec: restartPolicy: Never containers: - name: dpdk-testpmd image: quay.io/krister/centos8_nfv-container-dpdk-testpmd:latest
8.3. Attaching an OVS hardware offloading network
You can attach an Open vSwitch (OVS) hardware offloading network to your cluster.
Prerequisites
- Your cluster is installed and running.
- You provisioned an OVS hardware offloading network on Red Hat OpenStack Platform (RHOSP) to use with your cluster.
Procedure
Create a file named
network.yamlfrom the following template:spec: additionalNetworks: - name: hwoffload1 namespace: cnf rawCNIConfig: '{ "cniVersion": "0.3.1", "name": "hwoffload1", "type": "host-device","pciBusId": "0000:00:05.0", "ipam": {}}'1 type: Rawwhere:
pciBusIdSpecifies the device that is connected to the offloading network. If you do not have it, you can find this value by running the following command:
$ oc describe SriovNetworkNodeState -n openshift-sriov-network-operator
From a command line, enter the following command to patch your cluster with the file:
$ oc apply -f network.yaml
8.4. Enabling IPv6 connectivity to pods on RHOSP
To enable IPv6 connectivity between pods that have additional networks that are on different nodes, disable port security for the IPv6 port of the server. Disabling port security obviates the need to create allowed address pairs for each IPv6 address that is assigned to pods and enables traffic on the security group.
Only the following IPv6 additional network configurations are supported:
- SLAAC and host-device
- SLAAC and MACVLAN
- DHCP stateless and host-device
- DHCP stateless and MACVLAN
Procedure
On a command line, enter the following command:
$ openstack port set --no-security-group --disable-port-security <compute_ipv6_port>1 ImportantThis command removes security groups from the port and disables port security. Traffic restrictions are removed entirely from the port.
8.5. Create pods that have IPv6 connectivity on RHOSP
After you enable IPv6 connectivty for pods and add it to them, create pods that have secondary IPv6 connections.
Procedure
Define pods that use your IPv6 namespace and the annotation
k8s.v1.cni.cncf.io/networks: <additional_network_name>, where<additional_network_nameis the name of the additional network. For example, as part of aDeploymentobject:apiVersion: apps/v1 kind: Deployment metadata: name: hello-openshift namespace: ipv6 spec: affinity: podAntiAffinity: requiredDuringSchedulingIgnoredDuringExecution: - labelSelector: matchExpressions: - key: app operator: In values: - hello-openshift replicas: 2 selector: matchLabels: app: hello-openshift template: metadata: labels: app: hello-openshift annotations: k8s.v1.cni.cncf.io/networks: ipv6 spec: securityContext: runAsNonRoot: true seccompProfile: type: RuntimeDefault containers: - name: hello-openshift securityContext: allowPrivilegeEscalation: false capabilities: drop: - ALL image: quay.io/openshift/origin-hello-openshift ports: - containerPort: 8080Create the pod. For example, on a command line, enter the following command:
$ oc create -f <ipv6_enabled_resource>1 - 1
- Specify the file that contains your resource definition.
8.6. Adding IPv6 connectivity to pods on RHOSP
After you enable IPv6 connectivity in pods, add connectivity to them by using a Container Network Interface (CNI) configuration.
Procedure
To edit the Cluster Network Operator (CNO), enter the following command:
$ oc edit networks.operator.openshift.io clusterSpecify your CNI configuration under the
specfield. For example, the following configuration uses a SLAAC address mode with MACVLAN:... spec: additionalNetworks: - name: ipv6 namespace: ipv61 rawCNIConfig: '{ "cniVersion": "0.3.1", "name": "ipv6", "type": "macvlan", "master": "ens4"}'2 type: RawNoteIf you are using stateful address mode, include the IP Address Management (IPAM) in the CNI configuration.
DHCPv6 is not supported by Multus.
- Save your changes and quit the text editor to commit your changes.
Verification
On a command line, enter the following command:
$ oc get network-attachment-definitions -AExample output
NAMESPACE NAME AGE ipv6 ipv6 21h
You can now create pods that have secondary IPv6 connections.
Chapter 9. OpenStack Cloud Controller Manager reference guide
9.1. The OpenStack Cloud Controller Manager
Beginning with OpenShift Container Platform 4.12, clusters that run on Red Hat OpenStack Platform (RHOSP) were switched from the legacy OpenStack cloud provider to the external OpenStack Cloud Controller Manager (CCM). This change follows the move in Kubernetes from in-tree, legacy cloud providers to external cloud providers that are implemented by using the Cloud Controller Manager.
To preserve user-defined configurations for the legacy cloud provider, existing configurations are mapped to new ones as part of the migration process. It searches for a configuration called cloud-provider-config in the openshift-config namespace.
The config map name cloud-provider-config is not statically configured. It is derived from the spec.cloudConfig.name value in the infrastructure/cluster CRD.
Found configurations are synchronized to the cloud-conf config map in the openshift-cloud-controller-manager namespace.
As part of this synchronization, the OpenStack CCM Operator alters the new config map such that its properties are compatible with the external cloud provider. The file is changed in the following ways:
-
The
[Global] secret-name,[Global] secret-namespace, and[Global] kubeconfig-pathoptions are removed. They do not apply to the external cloud provider. -
The
[Global] use-clouds,[Global] clouds-file, and[Global] cloudoptions are added. -
The entire
[BlockStorage]section is removed. External cloud providers no longer perform storage operations. Block storage configuration is managed by the Cinder CSI driver.
Additionally, the CCM Operator enforces a number of default options. Values for these options are always overriden as follows:
[Global]
use-clouds = true
clouds-file = /etc/openstack/secret/clouds.yaml
cloud = openstack
...
[LoadBalancer]
enabled = true - 1
- If the network is configured to use Kuryr, this value is
false.
The clouds-value value, /etc/openstack/secret/clouds.yaml, is mapped to the openstack-cloud-credentials config in the openshift-cloud-controller-manager namespace. You can modify the RHOSP cloud in this file as you do any other clouds.yaml file.
9.2. The OpenStack Cloud Controller Manager (CCM) config map
An OpenStack CCM config map defines how your cluster interacts with your RHOSP cloud. By default, this configuration is stored under the cloud.conf key in the cloud-conf config map in the openshift-cloud-controller-manager namespace.
The cloud-conf config map is generated from the cloud-provider-config config map in the openshift-config namespace.
To change the settings that are described by the cloud-conf config map, modify the cloud-provider-config config map.
As part of this synchronization, the CCM Operator overrides some options. For more information, see "The RHOSP Cloud Controller Manager".
For example:
An example cloud-conf config map
apiVersion: v1
data:
cloud.conf: |
[Global]
secret-name = openstack-credentials
secret-namespace = kube-system
region = regionOne
[LoadBalancer]
enabled = True
kind: ConfigMap
metadata:
creationTimestamp: "2022-12-20T17:01:08Z"
name: cloud-conf
namespace: openshift-cloud-controller-manager
resourceVersion: "2519"
uid: cbbeedaf-41ed-41c2-9f37-4885732d3677- 1
- Set global options by using a
clouds.yamlfile rather than modifying the config map.
The following options are present in the config map. Except when indicated otherwise, they are mandatory for clusters that run on RHOSP.
9.2.1. Load balancer options
CCM supports several load balancer options for deployments that use Octavia.
Neutron-LBaaS support is deprecated.
| Option | Description |
|---|---|
|
|
Whether or not to enable the |
|
|
Optional. The external network used to create floating IP addresses for load balancer virtual IP addresses (VIPs). If there are multiple external networks in the cloud, this option must be set or the user must specify |
|
|
Optional. The external network subnet used to create floating IP addresses for the load balancer VIP. Can be overridden by the service annotation |
|
|
Optional. A name pattern (glob or regular expression if starting with |
|
|
Optional. Tags for the external network subnet used to create floating IP addresses for the load balancer VIP. Can be overridden by the service annotation
If the RHOSP network is configured with sharing disabled, for example, with the |
|
|
The load balancing algorithm used to create the load balancer pool. For the Amphora provider the value can be
For the OVN provider, only the
For the Amphora provider, if using the |
|
|
Optional. Used to specify the provider of the load balancer, for example, |
|
|
Optional. The load balancer API version. Only |
|
| The ID of the Networking service subnet on which load balancer VIPs are created. For dual stack deployments, leave this option unset. The OpenStack cloud provider automatically selects which subnet to use for a load balancer. |
|
|
The ID of the Networking service network on which load balancer VIPs are created. Unnecessary if |
|
|
Whether or not to create a health monitor for the service load balancer. A health monitor is required for services that declare
This option is unsupported if you use RHOSP earlier than version 17 with the |
|
|
The interval in seconds by which probes are sent to members of the load balancer. The default value is |
|
|
The number of successful checks that are required to change the operating status of a load balancer member to |
|
|
The time in seconds that a monitor waits to connect to the back end before it times out. The default value is |
|
|
Whether or not to create an internal load balancer without floating IP addresses. The default value is |
|
| This is a config section that comprises a set of options:
The behavior of these options is the same as that of the identically named options in the load balancer section of the CCM config file.
You can set the |
|
|
The maximum number of services that can share a load balancer. The default value is |
9.2.2. Options that the Operator overrides
The CCM Operator overrides the following options, which you might recognize from configuring RHOSP. Do not configure them yourself. They are included in this document for informational purposes only.
| Option | Description |
|---|---|
|
|
The RHOSP Identity service URL. For example, |
|
| The type of endpoint to use from the service catalog. |
|
| The Identity service user name. |
|
| The Identity service user password. |
|
| The Identity service user domain ID. |
|
| The Identity service user domain name. |
|
| The Identity service project ID. Leave this option unset if you are using Identity service application credentials.
In version 3 of the Identity API, which changed the identifier |
|
| The Identity service project name. |
|
| The Identity service project domain ID. |
|
| The Identity service project domain name. |
|
| The Identity service user domain ID. |
|
| The Identity service user domain name. |
|
|
Whether or not to fetch authorization credentials from a CCM searches for the file in the following places:
|
|
|
The file path of a |
|
|
The named cloud in the |
Chapter 10. Uninstalling a cluster on OpenStack
You can remove a cluster that you deployed to Red Hat OpenStack Platform (RHOSP).
10.1. Removing a cluster that uses installer-provisioned infrastructure
You can remove a cluster that uses installer-provisioned infrastructure from your cloud.
If you deployed your cluster to the AWS C2S Secret Region, the installation program does not support destroying the cluster; you must manually remove the cluster resources.
After uninstallation, check your cloud provider for any resources not removed properly, especially with User Provisioned Infrastructure (UPI) clusters. There might be resources that the installer did not create or that the installer is unable to access. For example, some Google Cloud resources require IAM permissions in shared VPC host projects, or there might be unused health checks that must be deleted.
Prerequisites
- You have a copy of the installation program that you used to deploy the cluster.
- You have the files that the installation program generated when you created your cluster.
Procedure
From the directory that contains the installation program on the computer that you used to install the cluster, run the following command:
$ ./openshift-install destroy cluster \ --dir <installation_directory> --log-level info1 2 NoteYou must specify the directory that contains the cluster definition files for your cluster. The installation program requires the
metadata.jsonfile in this directory to delete the cluster.-
Optional: Delete the
<installation_directory>directory and the OpenShift Container Platform installation program.
Chapter 11. Uninstalling a cluster on RHOSP from your own infrastructure
You can remove a cluster that you deployed to Red Hat OpenStack Platform (RHOSP) on user-provisioned infrastructure.
11.1. Downloading playbook dependencies
The Ansible playbooks that simplify the removal process on user-provisioned infrastructure require several Python modules. On the machine where you will run the process, add the modules' repositories and then download them.
These instructions assume that you are using Red Hat Enterprise Linux (RHEL) 8.
Prerequisites
- Python 3 is installed on your machine.
Procedure
On a command line, add the repositories:
Register with Red Hat Subscription Manager:
$ sudo subscription-manager register # If not done alreadyPull the latest subscription data:
$ sudo subscription-manager attach --pool=$YOUR_POOLID # If not done alreadyDisable the current repositories:
$ sudo subscription-manager repos --disable=* # If not done alreadyAdd the required repositories:
$ sudo subscription-manager repos \ --enable=rhel-8-for-x86_64-baseos-rpms \ --enable=openstack-16-tools-for-rhel-8-x86_64-rpms \ --enable=ansible-2.9-for-rhel-8-x86_64-rpms \ --enable=rhel-8-for-x86_64-appstream-rpms
Install the modules:
$ sudo yum install python3-openstackclient ansible python3-openstacksdkEnsure that the
pythoncommand points topython3:$ sudo alternatives --set python /usr/bin/python3
11.2. Removing a cluster from RHOSP that uses your own infrastructure
You can remove an OpenShift Container Platform cluster on Red Hat OpenStack Platform (RHOSP) that uses your own infrastructure. To complete the removal process quickly, run several Ansible playbooks.
Prerequisites
- Python 3 is installed on your machine.
- You downloaded the modules in "Downloading playbook dependencies."
- You have the playbooks that you used to install the cluster.
-
You modified the playbooks that are prefixed with
down-to reflect any changes that you made to their corresponding installation playbooks. For example, changes to thebootstrap.yamlfile are reflected in thedown-bootstrap.yamlfile. - All of the playbooks are in a common directory.
Procedure
On a command line, run the playbooks that you downloaded:
$ ansible-playbook -i inventory.yaml \ down-bootstrap.yaml \ down-control-plane.yaml \ down-compute-nodes.yaml \ down-load-balancers.yaml \ down-network.yaml \ down-security-groups.yaml- Remove any DNS record changes you made for the OpenShift Container Platform installation.
OpenShift Container Platform is removed from your infrastructure.
Chapter 12. Installation configuration parameters for OpenStack
Before you deploy an OpenShift Container Platform cluster on Red Hat OpenStack Platform (RHOSP), you provide parameters to customize your cluster and the platform that hosts it. When you create the install-config.yaml file, you provide values for the required parameters through the command line. You can then modify the install-config.yaml file to customize your cluster further.
12.1. Available installation configuration parameters for OpenStack
The following tables specify the required, optional, and OpenStack-specific installation configuration parameters that you can set as part of the installation process.
After installation, you cannot change these parameters in the install-config.yaml file.
12.1.1. Required configuration parameters
Required installation configuration parameters are described in the following table:
| Parameter | Description | Values |
|---|---|---|
|
The API version for the | String |
|
The base domain of your cloud provider. The base domain is used to create routes to your OpenShift Container Platform cluster components. The full DNS name for your cluster is a combination of the |
A fully-qualified domain or subdomain name, such as |
|
Kubernetes resource | Object |
|
The name of the cluster. DNS records for the cluster are all subdomains of |
String of lowercase letters, hyphens ( |
|
The configuration for the specific platform upon which to perform the installation: | Object |
| Get a pull secret from Red Hat OpenShift Cluster Manager to authenticate downloading container images for OpenShift Container Platform components from services such as Quay.io. |
|
12.1.2. Network configuration parameters
You can customize your installation configuration based on the requirements of your existing network infrastructure. For example, you can expand the IP address block for the cluster network or configure different IP address blocks than the defaults.
Only IPv4 addresses are supported.
Globalnet is not supported with Red Hat OpenShift Data Foundation disaster recovery solutions. For regional disaster recovery scenarios, ensure that you use a nonoverlapping range of private IP addresses for the cluster and service networks in each cluster.
| Parameter | Description | Values |
|---|---|---|
| The configuration for the cluster network. | Object Note
You cannot change parameters specified by the |
| The Red Hat OpenShift Networking network plugin to install. |
Either |
| The IP address blocks for pods.
The default value is If you specify multiple IP address blocks, the blocks must not overlap. | An array of objects. For example: |
|
Required if you use An IPv4 network. |
An IP address block in Classless Inter-Domain Routing (CIDR) notation. The prefix length for an IPv4 block is between |
|
The subnet prefix length to assign to each individual node. For example, if | A subnet prefix.
The default value is |
|
The IP address block for services. The default value is The OpenShift SDN and OVN-Kubernetes network plugins support only a single IP address block for the service network. | An array with an IP address block in CIDR format. For example: |
| The IP address blocks for machines. If you specify multiple IP address blocks, the blocks must not overlap. | An array of objects. For example: |
|
Required if you use | An IP network block in CIDR notation.
For example, Note
Set the |
12.1.3. Optional configuration parameters
Optional installation configuration parameters are described in the following table:
| Parameter | Description | Values |
|---|---|---|
| A PEM-encoded X.509 certificate bundle that is added to the nodes' trusted certificate store. This trust bundle might also be used when a proxy is configured. | String |
| Controls the installation of optional core cluster components. You can reduce the footprint of your OpenShift Container Platform cluster by disabling optional components. For more information, see the "Cluster capabilities" page in Installing. | String array |
|
Selects an initial set of optional capabilities to enable. Valid values are | String |
|
Extends the set of optional capabilities beyond what you specify in | String array |
| Enables workload partitioning, which isolates OpenShift Container Platform services, cluster management workloads, and infrastructure pods to run on a reserved set of CPUs. You can only enable workload partitioning during installation. You cannot disable it after installation. While this field enables workload partitioning, it does not configure workloads to use specific CPUs. For more information, see the Workload partitioning page in the Scalability and Performance section. |
|
| The configuration for the machines that comprise the compute nodes. |
Array of |
|
Determines the instruction set architecture of the machines in the pool. Currently, clusters with varied architectures are not supported. All pools must specify the same architecture. Valid values are | String |
|
Whether to enable or disable simultaneous multithreading, or Important If you disable simultaneous multithreading, ensure that your capacity planning accounts for the dramatically decreased machine performance. |
|
|
Required if you use |
|
|
Required if you use |
|
| The number of compute machines, which are also known as worker machines, to provision. |
A positive integer greater than or equal to |
| Enables the cluster for a feature set. A feature set is a collection of OpenShift Container Platform features that are not enabled by default. For more information about enabling a feature set during installation, see "Enabling features using feature gates". |
String. The name of the feature set to enable, such as |
| The configuration for the machines that form the control plane. |
Array of |
|
Determines the instruction set architecture of the machines in the pool. Currently, clusters with varied architectures are not supported. All pools must specify the same architecture. Valid values are | String |
|
Whether to enable or disable simultaneous multithreading, or Important If you disable simultaneous multithreading, ensure that your capacity planning accounts for the dramatically decreased machine performance. |
|
|
Required if you use |
|
|
Required if you use |
|
| The number of control plane machines to provision. |
Supported values are |
| The Cloud Credential Operator (CCO) mode. If no mode is specified, the CCO dynamically tries to determine the capabilities of the provided credentials, with a preference for mint mode on the platforms where multiple modes are supported. |
|
|
Enable or disable FIPS mode. The default is Important To enable FIPS mode for your cluster, you must run the installation program from a Red Hat Enterprise Linux (RHEL) computer configured to operate in FIPS mode. For more information about configuring FIPS mode on RHEL, see Switching RHEL to FIPS mode. When running Red Hat Enterprise Linux (RHEL) or Red Hat Enterprise Linux CoreOS (RHCOS) booted in FIPS mode, OpenShift Container Platform core components use the RHEL cryptographic libraries that have been submitted to NIST for FIPS 140-2/140-3 Validation on only the x86_64, ppc64le, and s390x architectures. If you are using Azure File storage, you cannot enable FIPS mode. |
|
| Sources and repositories for the release-image content. |
Array of objects. Includes a |
|
Required if you use | String |
| Specify one or more repositories that might also contain the same images. | Array of strings |
|
Required to set the NLB load balancer type in AWS. Valid values are |
|
| How to publish or expose the user-facing endpoints of your cluster, such as the Kubernetes API, OpenShift routes. |
|
| The SSH key to authenticate access to your cluster machines. Note
For production OpenShift Container Platform clusters on which you want to perform installation debugging or disaster recovery, specify an SSH key that your |
For example, |
Not all CCO modes are supported for all cloud providers. For more information about CCO modes, see the "Managing cloud provider credentials" entry in the Authentication and authorization content.
NoteIf your AWS account has service control policies (SCP) enabled, you must configure the
credentialsModeparameter toMint,Passthrough, orManual. If you are installing on Google Cloud into a shared virtual private cloud (VPC),credentialsModemust be set toPassthroughorManual.ImportantSetting this parameter to
Manualenables alternatives to storing administrator-level secrets in thekube-systemproject, which require additional configuration steps. For more information, see "Alternatives to storing administrator-level secrets in the kube-system project".
12.1.4. Optional AWS configuration parameters
Optional AWS configuration parameters are described in the following table:
| Parameter | Description | Values |
|---|---|---|
| The AWS AMI used to boot compute machines for the cluster. This is required for regions that require a custom RHCOS AMI. | Any published or custom RHCOS AMI that belongs to the set AWS region. See RHCOS AMIs for AWS infrastructure for available AMI IDs. |
| A pre-existing AWS IAM role applied to the compute machine pool instance profiles. You can use these fields to match naming schemes and include predefined permissions boundaries for your IAM roles. If undefined, the installation program creates a new IAM role. | The name of a valid AWS IAM role. |
| The Input/Output Operations Per Second (IOPS) that is reserved for the root volume. |
Integer, for example |
| The size in GiB of the root volume. |
Integer, for example |
| The type of the root volume. |
Valid AWS EBS volume type, such as |
| The Amazon Resource Name (key ARN) of a KMS key. This is required to encrypt operating system volumes of worker nodes with a specific KMS key. | Valid key ID or the key ARN. |
| The EC2 instance type for the compute machines. |
Valid AWS instance type, such as |
| The availability zones where the installation program creates machines for the compute machine pool. If you provide your own VPC, you must provide a subnet in that availability zone. |
A list of valid AWS availability zones, such as |
| The AWS AMI used to boot control plane machines for the cluster. This is required for regions that require a custom RHCOS AMI. | Any published or custom RHCOS AMI that belongs to the set AWS region. See RHCOS AMIs for AWS infrastructure for available AMI IDs. |
| A pre-existing AWS IAM role applied to the control plane machine pool instance profiles. You can use these fields to match naming schemes and include predefined permissions boundaries for your IAM roles. If undefined, the installation program creates a new IAM role. | The name of a valid AWS IAM role. |
| The Input/Output Operations Per Second (IOPS) that is reserved for the root volume on control plane machines. |
Integer, for example |
| The size in GiB of the root volume for control plane machines. |
Integer, for example |
| The type of the root volume for control plane machines. |
Valid AWS EBS volume type, such as |
| The Amazon Resource Name (key ARN) of a KMS key. This is required to encrypt operating system volumes of control plane nodes with a specific KMS key. | Valid key ID and the key ARN. |
| The EC2 instance type for the control plane machines. |
Valid AWS instance type, such as |
| The availability zones where the installation program creates machines for the control plane machine pool. |
A list of valid AWS availability zones, such as |
| The AWS AMI used to boot all machines for the cluster. If set, the AMI must belong to the same region as the cluster. This is required for regions that require a custom RHCOS AMI. | Any published or custom RHCOS AMI that belongs to the set AWS region. See RHCOS AMIs for AWS infrastructure for available AMI IDs. |
| An existing Route 53 private hosted zone for the cluster. You can only use a pre-existing hosted zone when also supplying your own VPC. The hosted zone must already be associated with the user-provided VPC before installation. Also, the domain of the hosted zone must be the cluster domain or a parent of the cluster domain. If undefined, the installation program creates a new hosted zone. |
String, for example |
| An Amazon Resource Name (ARN) for an existing IAM role in the account containing the specified hosted zone. The installation program and cluster operators assume this role when performing operations on the hosted zone. Use this parameter only when you are installing a cluster into a shared VPC. |
String, for example |
| The AWS region that the installation program creates all cluster resources in. |
Any valid AWS region, such as Important When running on ARM based AWS instances, ensure that you enter a region where AWS Graviton processors are available. See Global availability map in the AWS documentation. Currently, AWS Graviton3 processors are only available in some regions. |
| The AWS service endpoint name and URL. Custom endpoints are only required for cases where alternative AWS endpoints, such as FIPS, must be used. Custom API endpoints can be specified for EC2, S3, IAM, Elastic Load Balancing, Tagging, Route 53, and STS AWS services. | Valid AWS service endpoint name and valid AWS service endpoint URL. |
| A map of keys and values that the installation program adds as tags to all resources that it creates. |
Any valid YAML map, such as key value pairs in the Note You can add up to 25 user-defined tags during installation. The remaining 25 tags are reserved for OpenShift Container Platform. |
| A flag that directs in-cluster Operators to include the specified user tags in the tags of the AWS resources that the Operators create. |
Boolean values, for example |
|
If you provide the VPC instead of allowing the installation program to create the VPC for you, specify the subnet for the cluster to use. The subnet must be part of the same For a standard cluster, specify a public and a private subnet for each availability zone. For a private cluster, specify a private subnet for each availability zone. For clusters that use AWS Local Zones, you must add AWS Local Zone subnets to this list to ensure edge machine pool creation. | Valid subnet IDs. |
| Prevents the S3 bucket from being deleted after completion of bootstrapping. |
|
12.1.5. Additional Red Hat OpenStack Platform (RHOSP) configuration parameters
Additional RHOSP configuration parameters are described in the following table:
| Parameter | Description | Values |
|---|---|---|
| For compute machines, the size in gigabytes of the root volume. If you do not set this value, machines use ephemeral storage. |
Integer, for example |
| For compute machines, the root volume types. |
A list of strings, for example, { |
|
For compute machines, the root volume’s type. This property is deprecated and is replaced by |
String, for example, |
|
For compute machines, the Cinder availability zone to install root volumes on. If you do not set a value for this parameter, the installation program selects the default availability zone. This parameter is mandatory when |
A list of strings, for example |
| For control plane machines, the size in gigabytes of the root volume. If you do not set this value, machines use ephemeral storage. |
Integer, for example |
| For control plane machines, the root volume types. |
A list of strings, for example, { |
|
For control plane machines, the root volume’s type. This property is deprecated and is replaced by |
String, for example, |
|
For control plane machines, the Cinder availability zone to install root volumes on. If you do not set this value, the installation program selects the default availability zone. This parameter is mandatory when |
A list of strings, for example |
|
The name of the RHOSP cloud to use from the list of clouds in the
In the cloud configuration in the |
String, for example |
| The RHOSP external network name to be used for installation. |
String, for example |
| The RHOSP flavor to use for control plane and compute machines.
This property is deprecated. To use a flavor as the default for all machine pools, add it as the value of the |
String, for example |
-
If the machine pool defines
zones, the count of types can either be a single item or match the number of items inzones. For example, the count of types cannot be 2 if there are 3 items inzones. -
If you have any existing reference to this property, the installer populates the corresponding value in the
controlPlane.platform.openstack.rootVolume.typesfield.
12.1.6. Optional RHOSP configuration parameters
Optional RHOSP configuration parameters are described in the following table:
| Parameter | Description | Values |
|---|---|---|
| Additional networks that are associated with compute machines. Allowed address pairs are not created for additional networks. |
A list of one or more UUIDs as strings. For example, |
| Additional security groups that are associated with compute machines. |
A list of one or more UUIDs as strings. For example, |
| RHOSP Compute (Nova) availability zones (AZs) to install machines on. If this parameter is not set, the installation program relies on the default settings for Nova that the RHOSP administrator configured. On clusters that use Kuryr, RHOSP Octavia does not support availability zones. Load balancers and, if you are using the Amphora provider driver, OpenShift Container Platform services that rely on Amphora VMs, are not created according to the value of this property. |
A list of strings. For example, |
|
The server group policy to apply to the group that contains the compute machines in the pool. You cannot change server group policies or affiliations after creation. Supported options include
An
If you use a strict |
A server group policy to apply to the machine pool. For example, |
| Additional networks that are associated with control plane machines. Allowed address pairs are not created for additional networks. Additional networks that are attached to a control plane machine are also attached to the bootstrap node. |
A list of one or more UUIDs as strings. For example, |
| Additional security groups that are associated with control plane machines. |
A list of one or more UUIDs as strings. For example, |
| RHOSP Compute (Nova) availability zones (AZs) to install machines on. If this parameter is not set, the installation program relies on the default settings for Nova that the RHOSP administrator configured. On clusters that use Kuryr, RHOSP Octavia does not support availability zones. Load balancers and, if you are using the Amphora provider driver, OpenShift Container Platform services that rely on Amphora VMs, are not created according to the value of this property. |
A list of strings. For example, |
|
Server group policy to apply to the group that contains the control plane machines in the pool. You cannot change server group policies or affiliations after creation. Supported options include
An
If you use a strict |
A server group policy to apply to the machine pool. For example, |
| The location from which the installation program downloads the RHCOS image. You must set this parameter to perform an installation in a restricted network. | An HTTP or HTTPS URL, optionally with an SHA-256 checksum.
For example, |
|
Properties to add to the installer-uploaded ClusterOSImage in Glance. This property is ignored if
You can use this property to exceed the default persistent volume (PV) limit for RHOSP of 26 PVs per node. To exceed the limit, set the
You can also use this property to enable the QEMU guest agent by including the | A set of string properties. For example: |
| The default machine pool platform configuration. |
|
|
An existing floating IP address to associate with the Ingress port. To use this property, you must also define the |
An IP address, for example |
|
An existing floating IP address to associate with the API load balancer. To use this property, you must also define the |
An IP address, for example |
| IP addresses for external DNS servers that cluster instances use for DNS resolution. |
A list of IP addresses as strings. For example, |
|
Whether or not to use the default, internal load balancer. If the value is set to |
|
| The UUID of a RHOSP subnet that the cluster’s nodes use. Nodes and virtual IP (VIP) ports are created on this subnet.
The first item in If you deploy to a custom subnet, you cannot specify an external DNS server to the OpenShift Container Platform installer. Instead, add DNS to the subnet in RHOSP. |
A UUID as a string. For example, |
12.1.7. Additional Google Cloud configuration parameters
Additional Google Cloud configuration parameters are described in the following table:
| Parameter | Description | Values |
|---|---|---|
| Optional. By default, the installation program downloads and installs the Red Hat Enterprise Linux CoreOS (RHCOS) image that is used to boot control plane machines. You can override the default behavior by specifying the location of a custom RHCOS image that the installation program is to use for control plane machines only. Control plane machines do not contribute to licensing costs when using the default image. But, if you apply a Google Cloud Marketplace image for a control plane machine, usage costs do apply. | String. The name of Google Cloud project where the image is located. |
|
The name of the custom RHCOS image that the installation program is to use to boot control plane machines. If you use | String. The name of the RHCOS image. |
| Optional. By default, the installation program downloads and installs the RHCOS image that is used to boot compute machines. You can override the default behavior by specifying the location of a custom RHCOS image that the installation program is to use for compute machines only. | String. The name of Google Cloud project where the image is located. |
|
The name of the custom RHCOS image that the installation program is to use to boot compute machines. If you use | String. The name of the RHCOS image. |
|
The name of the existing Virtual Private Cloud (VPC) where you want to deploy your cluster. If you want to deploy your cluster into a shared VPC, you must set | String. |
| Optional. The name of the Google Cloud project that contains the shared VPC where you want to deploy your cluster. | String. |
| The name of the Google Cloud project where the installation program installs the cluster. | String. |
| The name of the Google Cloud region that hosts your cluster. |
Any valid region name, such as |
| The name of the existing subnet where you want to deploy your control plane machines. | The subnet name. |
| The name of the existing subnet where you want to deploy your compute machines. | The subnet name. |
| The availability zones where the installation program creates machines. |
A list of valid Google Cloud availability zones, such as Important When running your cluster on Google Cloud 64-bit ARM infrastructures, ensure that you use a zone where Ampere Altra Arm CPU’s are available. You can find which zones are compatible with 64-bit ARM processors in the "Google Cloud availability zones" link. |
| The size of the disk in gigabytes (GB). | Any size between 16 GB and 65536 GB. |
|
The default disk type for all machines. Control plane nodes must use the | |
| Optional. By default, the installation program downloads and installs the RHCOS image that is used to boot control plane and compute machines. You can override the default behavior by specifying the location of a custom RHCOS image that the installation program is to use for both types of machines. | String. The name of Google Cloud project where the image is located. |
|
The name of the custom RHCOS image that the installation program is to use to boot control plane and compute machines. If you use | String. The name of the RHCOS image. |
| Optional. Additional network tags to add to the control plane and compute machines. |
One or more strings, for example |
| The Google Cloud machine type for control plane and compute machines. |
The Google Cloud machine type, for example |
| The name of the customer managed encryption key to be used for machine disk encryption. | The encryption key name. |
| The name of the Key Management Service (KMS) key ring to which the KMS key belongs. | The KMS key ring name. |
| The Google Cloud location in which the KMS key ring exists. | The Google Cloud location. |
|
The ID of the project in which the KMS key ring exists. This value defaults to the value of the | The Google Cloud project ID. |
| The Google Cloud service account used for the encryption request for control plane and compute machines. If absent, the Compute Engine default service account is used. For more information about Google Cloud service accounts, see Google’s documentation on service accounts. |
The Google Cloud service account email, for example |
| Whether to enable Shielded VM secure boot for all machines in the cluster. Shielded VMs have additional security protocols such as secure boot, firmware and integrity monitoring, and rootkit protection. For more information on Shielded VMs, see Google’s documentation on Shielded VMs. |
|
| Whether to use Confidential VMs for all machines in the cluster. Confidential VMs provide encryption for data during processing. For more information on Confidential computing, see Google’s documentation on Confidential computing. |
|
|
Specifies the behavior of all VMs during a host maintenance event, such as a software or hardware update. For Confidential VMs, this parameter must be set to |
|
| The name of the customer managed encryption key to be used for control plane machine disk encryption. | The encryption key name. |
| For control plane machines, the name of the KMS key ring to which the KMS key belongs. | The KMS key ring name. |
| For control plane machines, the Google Cloud location in which the key ring exists. For more information about KMS locations, see Google’s documentation on Cloud KMS locations. | The Google Cloud location for the key ring. |
| For control plane machines, the ID of the project in which the KMS key ring exists. This value defaults to the VM project ID if not set. | The Google Cloud project ID. |
| The Google Cloud service account used for the encryption request for control plane machines. If absent, the Compute Engine default service account is used. For more information about Google Cloud service accounts, see Google’s documentation on service accounts. |
The Google Cloud service account email, for example |
| The size of the disk in gigabytes (GB). This value applies to control plane machines. | Any integer between 16 and 65536. |
| The Google Cloud disk type for control plane machines. |
Control plane machines must use the |
|
Optional. Additional network tags to add to the control plane machines. If set, this parameter overrides the |
One or more strings, for example |
|
The Google Cloud machine type for control plane machines. If set, this parameter overrides the |
The Google Cloud machine type, for example |
| The availability zones where the installation program creates control plane machines. |
A list of valid Google Cloud availability zones, such as Important When running your cluster on Google Cloud 64-bit ARM infrastructures, ensure that you use a zone where Ampere Altra Arm CPU’s are available. You can find which zones are compatible with 64-bit ARM processors in the "Google Cloud availability zones" link. |
| Whether to enable Shielded VM secure boot for control plane machines. Shielded VMs have additional security protocols such as secure boot, firmware and integrity monitoring, and rootkit protection. For more information on Shielded VMs, see Google’s documentation on Shielded VMs. |
|
| Whether to enable Confidential VMs for control plane machines. Confidential VMs provide encryption for data while it is being processed. For more information on Confidential VMs, see Google’s documentation on Confidential Computing. |
|
|
Specifies the behavior of control plane VMs during a host maintenance event, such as a software or hardware update. For Confidential VMs, this parameter must be set to |
|
| The name of the customer managed encryption key to be used for compute machine disk encryption. | The encryption key name. |
| For compute machines, the name of the KMS key ring to which the KMS key belongs. | The KMS key ring name. |
| For compute machines, the Google Cloud location in which the key ring exists. For more information about KMS locations, see Google’s documentation on Cloud KMS locations. | The Google Cloud location for the key ring. |
| For compute machines, the ID of the project in which the KMS key ring exists. This value defaults to the VM project ID if not set. | The Google Cloud project ID. |
| The Google Cloud service account used for the encryption request for compute machines. If this value is not set, the Compute Engine default service account is used. For more information about Google Cloud service accounts, see Google’s documentation on service accounts. |
The Google Cloud service account email, for example |
| The size of the disk in gigabytes (GB). This value applies to compute machines. | Any integer between 16 and 65536. |
| The Google Cloud disk type for compute machines. |
|
|
Optional. Additional network tags to add to the compute machines. If set, this parameter overrides the |
One or more strings, for example |
|
The Google Cloud machine type for compute machines. If set, this parameter overrides the |
The Google Cloud machine type, for example |
| The availability zones where the installation program creates compute machines. |
A list of valid Google Cloud availability zones, such as Important When running your cluster on Google Cloud 64-bit ARM infrastructures, ensure that you use a zone where Ampere Altra Arm CPU’s are available. You can find which zones are compatible with 64-bit ARM processors in the "Google Cloud availability zones" link. |
| Whether to enable Shielded VM secure boot for compute machines. Shielded VMs have additional security protocols such as secure boot, firmware and integrity monitoring, and rootkit protection. For more information on Shielded VMs, see Google’s documentation on Shielded VMs. |
|
| Whether to enable Confidential VMs for compute machines. Confidential VMs provide encryption for data while it is being processed. For more information on Confidential VMs, see Google’s documentation on Confidential Computing. |
|
|
Specifies the behavior of compute VMs during a host maintenance event, such as a software or hardware update. For Confidential VMs, this parameter must be set to |
|
Legal Notice
Copyright © Red Hat
OpenShift documentation is licensed under the Apache License 2.0 (https://www.apache.org/licenses/LICENSE-2.0).
Modified versions must remove all Red Hat trademarks.
Portions adapted from https://github.com/kubernetes-incubator/service-catalog/ with modifications by Red Hat.
Red Hat, Red Hat Enterprise Linux, the Red Hat logo, the Shadowman logo, JBoss, OpenShift, Fedora, the Infinity logo, and RHCE are trademarks of Red Hat, Inc., registered in the United States and other countries.
Linux® is the registered trademark of Linus Torvalds in the United States and other countries.
Java® is a registered trademark of Oracle and/or its affiliates.
XFS® is a trademark of Silicon Graphics International Corp. or its subsidiaries in the United States and/or other countries.
MySQL® is a registered trademark of MySQL AB in the United States, the European Union and other countries.
Node.js® is an official trademark of the OpenJS Foundation.
The OpenStack® Word Mark and OpenStack logo are either registered trademarks/service marks or trademarks/service marks of the OpenStack Foundation, in the United States and other countries and are used with the OpenStack Foundation’s permission. We are not affiliated with, endorsed or sponsored by the OpenStack Foundation, or the OpenStack community.
All other trademarks are the property of their respective owners.