Este contenido no está disponible en el idioma seleccionado.
Chapter 11. Managing wifi connections
If your host contains a wifi adapter, you can connect it to a wifi network.
-
Use the
nmcliutility to configure connections by using the command line. -
Use the
nmtuiapplication to configure connections in a text-based user interface. - Use the GNOME system menu to quickly connect to wifi networks that do not require any configuration.
-
Use the
GNOME Settingsapplication to configure connections by using the GNOME application. -
Use the
nm-connection-editorapplication to configure connections in a graphical user interface. -
Use the
networkRHEL system role to automate the configuration of connections on one or multiple hosts.
11.1. Supported wifi security types
Depending on the security type a wifi network supports, you can transmit data more or less securely.
Do not connect to wifi networks that do not use encryption or which support only the insecure WEP or WPA standards.
RHEL 9 supports the following wifi security types:
-
None: Encryption is disabled, and data is transferred in plain text over the network. -
Enhanced Open: With opportunistic wireless encryption (OWE), devices negotiate unique pairwise master keys (PMK) to encrypt connections in wireless networks without authentication. -
LEAP: The Lightweight Extensible Authentication Protocol, which was developed by Cisco, is a proprietary version of the extensible authentication protocol (EAP). -
WPA & WPA2 Personal: In personal mode, the Wi-Fi Protected Access (WPA) and Wi-Fi Protected Access 2 (WPA2) authentication methods use a pre-shared key. -
WPA & WPA2 Enterprise: In enterprise mode, WPA and WPA2 use the EAP framework and authenticate users to a remote authentication dial-in user service (RADIUS) server. -
WPA3 Personal: Wi-Fi Protected Access 3 (WPA3) Personal uses simultaneous authentication of equals (SAE) instead of pre-shared keys (PSK) to prevent dictionary attacks. WPA3 uses perfect forward secrecy (PFS).
11.2. Connecting to a wifi network by using nmcli
When you first use the nmcli utility to connect to a wifi network, it automatically creates a NetworkManager connection profile. You can then modify this profile to add specific settings, such as a static IP address.
Prerequisites
- A wifi device is installed on the host.
-
The wifi device is enabled. To verify, use the
nmcli radiocommand.
Procedure
If the wifi radio has been disabled in NetworkManager, enable this feature:
nmcli radio wifi on
# nmcli radio wifi onCopy to Clipboard Copied! Toggle word wrap Toggle overflow Optional: Display the available wifi networks:
nmcli device wifi list
# nmcli device wifi list
IN-USE  BSSID              SSID          MODE   CHAN  RATE        SIGNAL  BARS  SECURITY
        00:53:00:2F:3B:08  Office        Infra  44    270 Mbit/s  57      ▂▄▆_  WPA2 WPA3
        00:53:00:15:03:BF  --            Infra  1     130 Mbit/s  48      ▂▄__  WPA2 WPA3
Copy to Clipboard Copied! Toggle word wrap Toggle overflow The service set identifier (
SSID) column contains the names of the networks. If the column shows--, the access point of this network does not broadcast an SSID.Connect to the wifi network:
nmcli device wifi connect Office --ask
# nmcli device wifi connect Office --ask
Password: wifi-password
Copy to Clipboard Copied! Toggle word wrap Toggle overflow If you prefer to set the password in the command instead of entering it interactively, use the
password <wifi_password>option in the command instead of--ask:nmcli device wifi connect Office password <wifi_password>
# nmcli device wifi connect Office password <wifi_password>Copy to Clipboard Copied! Toggle word wrap Toggle overflow Note that, if the network requires static IP addresses, NetworkManager fails to activate the connection at this point. You can configure the IP addresses in later steps.
If the network requires static IP addresses:
Configure the IPv4 address settings, for example:
nmcli connection modify Office ipv4.method manual ipv4.addresses 192.0.2.1/24 ipv4.gateway 192.0.2.254 ipv4.dns 192.0.2.200 ipv4.dns-search example.com
# nmcli connection modify Office ipv4.method manual ipv4.addresses 192.0.2.1/24 ipv4.gateway 192.0.2.254 ipv4.dns 192.0.2.200 ipv4.dns-search example.comCopy to Clipboard Copied! Toggle word wrap Toggle overflow Configure the IPv6 address settings, for example:
nmcli connection modify Office ipv6.method manual ipv6.addresses 2001:db8:1::1/64 ipv6.gateway 2001:db8:1::fffe ipv6.dns 2001:db8:1::ffbb ipv6.dns-search example.com
# nmcli connection modify Office ipv6.method manual ipv6.addresses 2001:db8:1::1/64 ipv6.gateway 2001:db8:1::fffe ipv6.dns 2001:db8:1::ffbb ipv6.dns-search example.comCopy to Clipboard Copied! Toggle word wrap Toggle overflow
Re-activate the connection:
nmcli connection up Office
# nmcli connection up OfficeCopy to Clipboard Copied! Toggle word wrap Toggle overflow
Verification
Display the active connections:
nmcli connection show --active
# nmcli connection show --active
NAME    ID                                    TYPE  DEVICE
Office  2501eb7e-7b16-4dc6-97ef-7cc460139a58  wifi  wlp0s20f3
Copy to Clipboard Copied! Toggle word wrap Toggle overflow If the output lists the wifi connection you have created, the connection is active.
Ping a hostname or IP address:
ping -c 3 example.com
# ping -c 3 example.comCopy to Clipboard Copied! Toggle word wrap Toggle overflow
11.3. Connecting to a wifi network by using the GNOME system menu
You can use the GNOME system menu to connect to a wifi network. When you connect to a network for the first time, GNOME creates a NetworkManager connection profile for it. If you configure the connection profile to not automatically connect, you can also use the GNOME system menu to manually connect to a wifi network with an existing NetworkManager connection profile.
Using the GNOME system menu to establish a connection to a wifi network for the first time has certain limitations. For example, you cannot configure IP address settings. In this case first configure the connections:
Prerequisites
- A wifi device is installed on the host.
-
The wifi device is enabled. To verify, use the
nmcli radiocommand.
Procedure
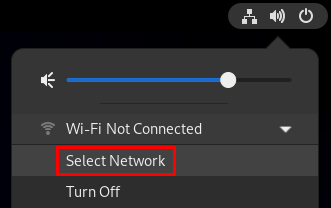
- Open the system menu on the right side of the top bar.
-
Expand the
Wi-Fi Not Connectedentry. Click
Select Network:- Select the wifi network you want to connect to.
-
Click
Connect. -
If this is the first time you connect to this network, enter the password for the network, and click
Connect.
Verification
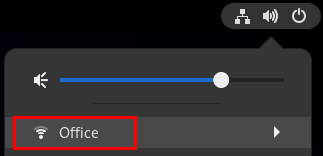
Open the system menu on the right side of the top bar, and verify that the wifi network is connected:
If the network appears in the list, it is connected.
Ping a hostname or IP address:
ping -c 3 example.com
# ping -c 3 example.comCopy to Clipboard Copied! Toggle word wrap Toggle overflow
11.4. Connecting to a wifi network by using GNOME Settings
You can use the GNOME Settings application, also named gnome-control-center, to connect to a wifi network and configure the connection. When you connect to the network for the first time, GNOME creates a NetworkManager connection profile for it.
In GNOME Settings, you can configure wifi connections for all wifi network security types that RHEL supports.
Prerequisites
- A wifi device is installed on the host.
-
The wifi device is enabled. To verify, use the
nmcli radiocommand.
Procedure
-
Press the Super key, type
Wi-Fi, and press Enter. - Click on the name of the wifi network you want to connect to.
-
Enter the password for the network, and click
Connect. If the network requires additional settings, such as static IP addresses or a security type other than WPA2 Personal:
- Click the gear icon next to the network’s name.
Optional: Configure the network profile on the
Detailstab to not automatically connect.If you deactivate this feature, you must always manually connect to the network, for example, by using GNOME Settings or the GNOME system menu.
-
Configure IPv4 settings on the
IPv4tab, and IPv6 settings on theIPv6tab. On the
Securitytab, select the authentication of the network, such asWPA3 Personal, and enter the password.Depending on the selected security, the application shows additional fields. Fill them accordingly. For details, ask the administrator of the wifi network.
-
Click
Apply.
Verification
Open the system menu on the right side of the top bar, and verify that the wifi network is connected:
If the network appears in the list, it is connected.
Ping a hostname or IP address:
ping -c 3 example.com
# ping -c 3 example.comCopy to Clipboard Copied! Toggle word wrap Toggle overflow
11.5. Configuring a wifi connection by using nmtui
The nmtui application provides a text-based user interface for NetworkManager. You can use nmtui to connect to a wifi network.
In nmtui:
- Navigate by using the cursor keys.
- Press a button by selecting it and hitting Enter.
- Select and clear checkboxes by using Space.
- To return to the previous screen, use ESC.
Procedure
Start
nmtui:nmtui
# nmtuiCopy to Clipboard Copied! Toggle word wrap Toggle overflow -
Select
Edit a connection, and press Enter. -
Press the
Addbutton. -
Select
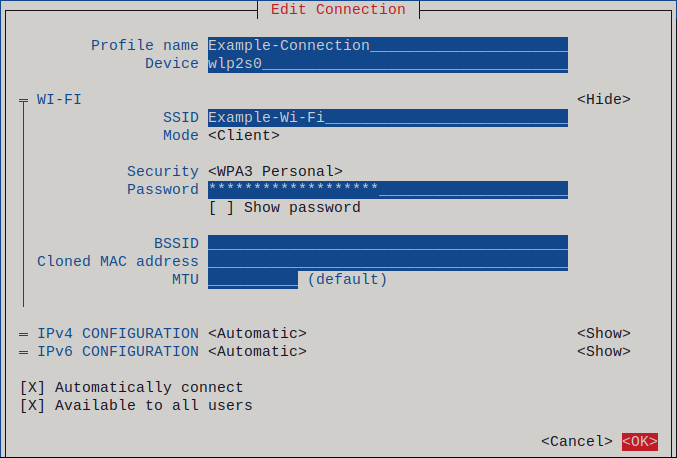
Wi-Fifrom the list of network types, and press Enter. Optional: Enter a name for the NetworkManager profile to be created.
On hosts with multiple profiles, a meaningful name makes it easier to identify the purpose of a profile.
-
Enter the name of the Wi-Fi network, the Service Set Identifier (SSID), into the
SSIDfield. -
Leave the
Modefield set to its default,Client. Select the
Securityfield, press Enter, and set the authentication type of the network from the list.Depending on the authentication type you have selected,
nmtuidisplays different fields.- Fill the authentication type-related fields.
If the Wi-Fi network requires static IP addresses:
-
Press the
Automaticbutton next to the protocol, and selectManualfrom the displayed list. -
Press the
Showbutton next to the protocol you want to configure to display additional fields, and fill them.
-
Press the
Press the
OKbutton to create and automatically activate the new connection.-
Press the
Backbutton to return to the main menu. -
Select
Quit, and press Enter to close thenmtuiapplication.
Verification
Display the active connections:
nmcli connection show --active
# nmcli connection show --active
NAME    ID                                    TYPE  DEVICE
Office  2501eb7e-7b16-4dc6-97ef-7cc460139a58  wifi  wlp0s20f3
Copy to Clipboard Copied! Toggle word wrap Toggle overflow If the output lists the wifi connection you have created, the connection is active.
Ping a hostname or IP address:
ping -c 3 example.com
# ping -c 3 example.comCopy to Clipboard Copied! Toggle word wrap Toggle overflow
11.6. Configuring a wifi connection by using nm-connection-editor
You can use the nm-connection-editor application to create a connection profile for a wireless network. In this application you can configure all wifi network authentication types that RHEL supports.
By default, NetworkManager enables the auto-connect feature for connection profiles and automatically connects to a saved network if it is available.
Prerequisites
- A wifi device is installed on the host.
-
The wifi device is enabled. To verify, use the
nmcli radiocommand.
Procedure
Open a terminal and enter:
nm-connection-editor
# nm-connection-editorCopy to Clipboard Copied! Toggle word wrap Toggle overflow - Click the button to add a new connection.
-
Select the
Wi-Ficonnection type, and click . - Optional: Set a name for the connection profile.
Optional: Configure the network profile on the
Generaltab to not automatically connect.If you deactivate this feature, you must always manually connect to the network, for example, by using GNOME Settings or the GNOME system menu.
-
On the
Wi-Fitab, enter the service set identifier (SSID) in theSSIDfield. On the
Wi-Fi Securitytab, select the authentication type for the network, such asWPA3 Personal, and enter the password.Depending on the selected security, the application shows additional fields. Fill them accordingly. For details, ask the administrator of the wifi network.
-
Configure IPv4 settings on the
IPv4tab, and IPv6 settings on theIPv6tab. -
Click
Save. -
Close the
Network Connectionswindow.
Verification
Open the system menu on the right side of the top bar, and verify that the wifi network is connected:
If the network appears in the list, it is connected.
Ping a hostname or IP address:
ping -c 3 example.com
# ping -c 3 example.comCopy to Clipboard Copied! Toggle word wrap Toggle overflow
11.7. Configuring a wifi connection with 802.1X network authentication in an existing profile by using nmcli
You can use the nmcli utility to configure a client to authenticate itself to a network.
For example, you can configure Protected Extensible Authentication Protocol (PEAP) authentication with Microsoft Challenge-Handshake Authentication Protocol version 2 (MSCHAPv2) in an existing NetworkManager wifi profile.
Prerequisites
- The network must have 802.1X network authentication.
- The wifi connection profile exists in NetworkManager and has a valid IP configuration.
-
If the client is required to verify the certificate of the authenticator, the Certificate Authority (CA) certificate must be stored in the
/etc/pki/ca-trust/source/anchors/directory. -
The
wpa_supplicantpackage is installed.
Procedure
Set the wifi security mode to
wpa-eap, the Extensible Authentication Protocol (EAP) topeap, the inner authentication protocol tomschapv2, and the user name:nmcli connection modify wlp1s0 wireless-security.key-mgmt wpa-eap 802-1x.eap peap 802-1x.phase2-auth mschapv2 802-1x.identity user_name
# nmcli connection modify wlp1s0 wireless-security.key-mgmt wpa-eap 802-1x.eap peap 802-1x.phase2-auth mschapv2 802-1x.identity user_nameCopy to Clipboard Copied! Toggle word wrap Toggle overflow Note that you must set the
wireless-security.key-mgmt,802-1x.eap,802-1x.phase2-auth, and802-1x.identityparameters in a single command.Optional: Store the password in the configuration:
nmcli connection modify wlp1s0 802-1x.password password
# nmcli connection modify wlp1s0 802-1x.password passwordCopy to Clipboard Copied! Toggle word wrap Toggle overflow ImportantBy default, NetworkManager stores the password in plain text in the
/etc/sysconfig/network-scripts/keys-connection_namefile, which is readable only by therootuser. However, plain text passwords in a configuration file can be a security risk.To increase the security, set the
802-1x.password-flagsparameter toagent-owned. With this setting, on servers with the GNOME desktop environment or thenm-appletrunning, NetworkManager retrieves the password from these services, after you unlock the keyring first. In other cases, NetworkManager prompts for the password.If the client needs to verify the certificate of the authenticator, set the
802-1x.ca-certparameter in the connection profile to the path of the CA certificate:nmcli connection modify wlp1s0 802-1x.ca-cert /etc/pki/ca-trust/source/anchors/ca.crt
# nmcli connection modify wlp1s0 802-1x.ca-cert /etc/pki/ca-trust/source/anchors/ca.crtCopy to Clipboard Copied! Toggle word wrap Toggle overflow NoteFor security reasons, clients should validate the certiciate of the authenticator.
Activate the connection profile:
nmcli connection up wlp1s0
# nmcli connection up wlp1s0Copy to Clipboard Copied! Toggle word wrap Toggle overflow
Verification
- Access resources on the network that require network authentication.
11.8. Configuring a wifi connection with 802.1X network authentication by using the network RHEL system role
By using the network RHEL system role, you can automate setting up Network Access Control (NAC) on remote hosts. You can define authentication details for clients in a playbook to ensure only authorized clients can access the network.
You can use an Ansible playbook to copy a private key, a certificate, and the CA certificate to the client, and then use the network RHEL system role to configure a connection profile with 802.1X network authentication.
Prerequisites
- You have prepared the control node and the managed nodes.
- You are logged in to the control node as a user who can run playbooks on the managed nodes.
-
The account you use to connect to the managed nodes has
sudopermissions on them. - The network supports 802.1X network authentication.
-
You installed the
wpa_supplicantpackage on the managed node. - DHCP is available in the network of the managed node.
The following files required for TLS authentication exist on the control node:
-
The client key is stored in the
/srv/data/client.keyfile. -
The client certificate is stored in the
/srv/data/client.crtfile. -
The CA certificate is stored in the
/srv/data/ca.crtfile.
-
The client key is stored in the
Procedure
Store your sensitive variables in an encrypted file:
Create the vault:
ansible-vault create ~/vault.yml
$ ansible-vault create ~/vault.yml
New Vault password: <vault_password>
Confirm New Vault password: <vault_password>
Copy to Clipboard Copied! Toggle word wrap Toggle overflow After the
ansible-vault createcommand opens an editor, enter the sensitive data in the<key>: <value>format:pwd: <password>
pwd: <password>Copy to Clipboard Copied! Toggle word wrap Toggle overflow - Save the changes, and close the editor. Ansible encrypts the data in the vault.
Create a playbook file, for example,
~/playbook.yml, with the following content:Copy to Clipboard Copied! Toggle word wrap Toggle overflow The settings specified in the example playbook include the following:
ieee802_1x- This variable contains the 802.1X-related settings.
eap: tls-
Configures the profile to use the certificate-based
TLSauthentication method for the Extensible Authentication Protocol (EAP).
For details about all variables used in the playbook, see the
/usr/share/ansible/roles/rhel-system-roles.network/README.mdfile on the control node.Validate the playbook syntax:
ansible-playbook --ask-vault-pass --syntax-check ~/playbook.yml
$ ansible-playbook --ask-vault-pass --syntax-check ~/playbook.ymlCopy to Clipboard Copied! Toggle word wrap Toggle overflow Note that this command only validates the syntax and does not protect against a wrong but valid configuration.
Run the playbook:
ansible-playbook --ask-vault-pass ~/playbook.yml
$ ansible-playbook --ask-vault-pass ~/playbook.ymlCopy to Clipboard Copied! Toggle word wrap Toggle overflow