Este contenido no está disponible en el idioma seleccionado.
Chapter 4. Configuring a NIC team
Network interface controller (NIC) teaming is a method to combine or aggregate physical and virtual network interfaces to provide a logical interface with higher throughput or redundancy. NIC teaming uses a small kernel module to implement fast handling of packet flows and a user-space service for other tasks. This way, NIC teaming is an easily extensible and scalable solution for load-balancing and redundancy requirements.
Red Hat Enterprise Linux provides administrators different options to configure team devices. For example:
-
Use
nmclito configure teams connections using the command line. - Use the RHEL web console to configure team connections using a web browser.
-
Use the
nm-connection-editorapplication to configure team connections in a graphical interface.
NIC teaming is deprecated in Red Hat Enterprise Linux 9. Consider using the network bonding driver as an alternative. For details, see Configuring a network bond.
4.1. Migrating a NIC team configuration to network bond
Network interface controller (NIC) teaming is deprecated in Red Hat Enterprise Linux 9. If you already have a working NIC team configured, for example because you upgraded from an earlier RHEL version, you can migrate the configuration to a network bond that is managed by NetworkManager.
The team2bond utility only converts the team configuration to a bond. Afterwards, you must manually configure further settings of the bond, such as IP addresses and DNS configuration.
Prerequisites
-
The
team-team0NetworkManager connection profile is configured and manages theteam0device. -
The
teamdpackage is installed.
Procedure
Optional: Display the IP configuration of the
team-team0NetworkManager connection:Copy to Clipboard Copied! Toggle word wrap Toggle overflow Export the configuration of the
team0device to a JSON file:teamdctl team0 config dump actual > /tmp/team0.json
# teamdctl team0 config dump actual > /tmp/team0.jsonCopy to Clipboard Copied! Toggle word wrap Toggle overflow Remove the NIC team. For example, if you configured the team in NetworkManager, remove the
team-team0connection profile and the profiles of associated ports:nmcli connection delete team-team0 nmcli connection delete team-team0-port1 nmcli connection delete team-team0-port2
# nmcli connection delete team-team0
# nmcli connection delete team-team0-port1
# nmcli connection delete team-team0-port2
Copy to Clipboard Copied! Toggle word wrap Toggle overflow Run the
team2bondutility in dry-run mode to displaynmclicommands that set up a network bond with similar settings as the team device:team2bond --config=/tmp/team0.json --rename=bond0
# team2bond --config=/tmp/team0.json --rename=bond0
nmcli con add type bond ifname bond0 bond.options "mode=active-backup,num_grat_arp=1,num_unsol_na=1,resend_igmp=1,miimon=100,miimon=100"
nmcli con add type ethernet ifname enp7s0 controller bond0
nmcli con add type ethernet ifname enp8s0 controller bond0
Copy to Clipboard Copied! Toggle word wrap Toggle overflow The first command contains two
miimonoptions because the team configuration file contained twolink_watchentries. Note that this does not affect the creation of the bond.If you bound services to the device name of the team and want to avoid updating or breaking these services, omit the
--rename=bond0option. In this case,team2bonduses the same interface name for the bond as for the team.-
Verify that the options for the bond the
team2bondutility suggested are correct. Create the bond. You can execute the suggested
nmclicommands or re-run theteam2bondcommand with the--exec-cmdoption:team2bond --config=/tmp/team0.json --rename=bond0 --exec-cmd
# team2bond --config=/tmp/team0.json --rename=bond0 --exec-cmd
Connection 'bond-bond0' (0241a531-0c72-4202-80df-73eadfc126b5) successfully added.
Connection 'bond-port-enp7s0' (38489729-b624-4606-a784-1ccf01e2f6d6) successfully added.
Connection 'bond-port-enp8s0' (de97ec06-7daa-4298-9a71-9d4c7909daa1) successfully added.
Copy to Clipboard Copied! Toggle word wrap Toggle overflow You require the name of the bond connection profile (
bond-bond0) in the next steps.Set the IPv4 settings that were previously configured on
team-team0to thebond-bond0connection:nmcli connection modify bond-bond0 ipv4.addresses '192.0.2.1/24' nmcli connection modify bond-bond0 ipv4.gateway '192.0.2.254' nmcli connection modify bond-bond0 ipv4.dns '192.0.2.253' nmcli connection modify bond-bond0 ipv4.dns-search 'example.com' nmcli connection modify bond-bond0 ipv4.method manual
# nmcli connection modify bond-bond0 ipv4.addresses '192.0.2.1/24'
# nmcli connection modify bond-bond0 ipv4.gateway '192.0.2.254'
# nmcli connection modify bond-bond0 ipv4.dns '192.0.2.253'
# nmcli connection modify bond-bond0 ipv4.dns-search 'example.com'
# nmcli connection modify bond-bond0 ipv4.method manual
Copy to Clipboard Copied! Toggle word wrap Toggle overflow Set the IPv6 settings that were previously configured on
team-team0to thebond-bond0connection:nmcli connection modify bond-bond0 ipv6.addresses '2001:db8:1::1/64' nmcli connection modify bond-bond0 ipv6.gateway '2001:db8:1::fffe' nmcli connection modify bond-bond0 ipv6.dns '2001:db8:1::fffd' nmcli connection modify bond-bond0 ipv6.dns-search 'example.com' nmcli connection modify bond-bond0 ipv6.method manual
# nmcli connection modify bond-bond0 ipv6.addresses '2001:db8:1::1/64'
# nmcli connection modify bond-bond0 ipv6.gateway '2001:db8:1::fffe'
# nmcli connection modify bond-bond0 ipv6.dns '2001:db8:1::fffd'
# nmcli connection modify bond-bond0 ipv6.dns-search 'example.com'
# nmcli connection modify bond-bond0 ipv6.method manual
Copy to Clipboard Copied! Toggle word wrap Toggle overflow Activate the connection:
nmcli connection up bond-bond0
# nmcli connection up bond-bond0Copy to Clipboard Copied! Toggle word wrap Toggle overflow
Verification
Display the IP configuration of the
bond-bond0NetworkManager connection:Copy to Clipboard Copied! Toggle word wrap Toggle overflow Display the status of the bond:
Copy to Clipboard Copied! Toggle word wrap Toggle overflow In this example, both ports are up.
To verify that bonding failover works:
- Temporarily remove the network cable from the host. Note that there is no method to properly test link failure events using the command line.
Display the status of the bond:
cat /proc/net/bonding/bond0
# cat /proc/net/bonding/bond0Copy to Clipboard Copied! Toggle word wrap Toggle overflow
4.2. Understanding the default behavior of controller and port interfaces
Understanding the default behavior of NetworkManager when managing bond port interfaces helps you to troubleshoot problems more effectively.
Default behavior:
- Starting the controller interface does not automatically start the port interfaces.
- Starting a port interface always starts the controller interface.
- Stopping the controller interface also stops the port interface.
- A controller without ports can start static IP connections.
- A controller without ports waits for ports when starting DHCP connections.
- A controller with a DHCP connection waiting for ports completes when you add a port with a carrier.
- A controller with a DHCP connection waiting for ports continues waiting when you add a port without a carrier.
4.3. Understanding the teamd service, runners, and link-watchers
The team service, teamd, controls one instance of the team driver. This instance of the driver adds instances of a hardware device driver to form a team of network interfaces. The team driver presents a network interface, for example team0, to the kernel.
The teamd service implements the common logic to all methods of teaming. Those functions are unique to the different load sharing and backup methods, such as round-robin, and implemented by separate units of code referred to as runners. Administrators specify runners in JavaScript Object Notation (JSON) format, and the JSON code is compiled into an instance of teamd when the instance is created. Alternatively, when using NetworkManager, you can set the runner in the team.runner parameter, and NetworkManager auto-creates the corresponding JSON code.
The following runners are available:
-
broadcast: Transmits data over all ports. -
roundrobin: Transmits data over all ports in turn. -
activebackup: Transmits data over one port while the others are kept as a backup. -
loadbalance: Transmits data over all ports with active Tx load balancing and Berkeley Packet Filter (BPF)-based Tx port selectors. -
random: Transmits data on a randomly selected port. -
lacp: Implements the 802.3ad Link Aggregation Control Protocol (LACP).
The teamd services uses a link watcher to monitor the state of subordinate devices. The following link-watchers are available:
-
ethtool: Thelibteamlibrary uses theethtoolutility to watch for link state changes. This is the default link-watcher. -
arp_ping: Thelibteamlibrary uses thearp_pingutility to monitor the presence of a far-end hardware address using Address Resolution Protocol (ARP). -
nsna_ping: On IPv6 connections, thelibteamlibrary uses the Neighbor Advertisement and Neighbor Solicitation features from the IPv6 Neighbor Discovery protocol to monitor the presence of a neighbor’s interface.
Each runner can use any link watcher, with the exception of lacp. This runner can only use the ethtool link watcher.
4.4. Configuring a NIC team by using nmcli
To configure a network interface controller (NIC) team on the command line, use the nmcli utility.
NIC teaming is deprecated in Red Hat Enterprise Linux 9. Consider using the network bonding driver as an alternative. For details, see Configuring a network bond.
Prerequisites
-
The
teamdandNetworkManager-teampackages are installed. - Two or more physical or virtual network devices are installed on the server.
- To use Ethernet devices as ports of the team, the physical or virtual Ethernet devices must be installed on the server and connected to a switch.
To use bond, bridge, or VLAN devices as ports of the team, you can either create these devices while you create the team or you can create them in advance as described in:
Procedure
Create a team interface:
nmcli connection add type team con-name team0 ifname team0 team.runner activebackup
# nmcli connection add type team con-name team0 ifname team0 team.runner activebackupCopy to Clipboard Copied! Toggle word wrap Toggle overflow This command creates a NIC team named
team0that uses theactivebackuprunner.Optional: Set a link watcher. For example, to set the
ethtoollink watcher in theteam0connection profile:nmcli connection modify team0 team.link-watchers "name=ethtool"
# nmcli connection modify team0 team.link-watchers "name=ethtool"Copy to Clipboard Copied! Toggle word wrap Toggle overflow Link watchers support different parameters. To set parameters for a link watcher, specify them space-separated in the
nameproperty. Note that the name property must be surrounded by quotation marks. For example, to use theethtoollink watcher and set itsdelay-upparameter to2500milliseconds (2.5 seconds):nmcli connection modify team0 team.link-watchers "name=ethtool delay-up=2500"
# nmcli connection modify team0 team.link-watchers "name=ethtool delay-up=2500"Copy to Clipboard Copied! Toggle word wrap Toggle overflow To set multiple link watchers and each of them with specific parameters, the link watchers must be separated by a comma. The following example sets the
ethtoollink watcher with thedelay-upparameter and thearp_pinglink watcher with thesource-hostandtarget-hostparameter:nmcli connection modify team0 team.link-watchers "name=ethtool delay-up=2, name=arp_ping source-host=192.0.2.1 target-host=192.0.2.2"
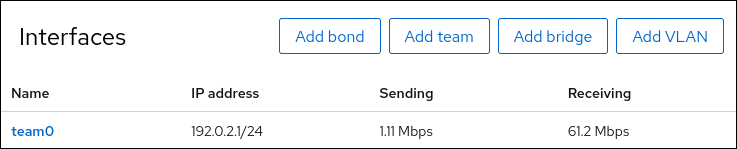
# nmcli connection modify team0 team.link-watchers "name=ethtool delay-up=2, name=arp_ping source-host=192.0.2.1 target-host=192.0.2.2"Copy to Clipboard Copied! Toggle word wrap Toggle overflow Display the network interfaces, and note the names of the interfaces you want to add to the team:
Copy to Clipboard Copied! Toggle word wrap Toggle overflow In this example:
-
enp7s0andenp8s0are not configured. To use these devices as ports, add connection profiles in the next step. Note that you can only use Ethernet interfaces in a team that are not assigned to any connection. -
bond0andbond1have existing connection profiles. To use these devices as ports, modify their profiles in the next step.
-
Assign the port interfaces to the team:
If the interfaces you want to assign to the team are not configured, create new connection profiles for them:
nmcli connection add type ethernet port-type team con-name team0-port1 ifname enp7s0 controller team0
nmcli connection add type ethernet port--type team con-name team0-port2 ifname enp8s0 controller team0
# nmcli connection add type ethernet port-type team con-name team0-port1 ifname enp7s0 controller team0
# nmcli connection add type ethernet port--type team con-name team0-port2 ifname enp8s0 controller team0
Copy to Clipboard Copied! Toggle word wrap Toggle overflow These commands create profiles for
enp7s0andenp8s0, and add them to theteam0connection.To assign an existing connection profile to the team:
Set the
controllerparameter of these connections toteam0:nmcli connection modify bond0 controller team0 nmcli connection modify bond1 controller team0
# nmcli connection modify bond0 controller team0
# nmcli connection modify bond1 controller team0
Copy to Clipboard Copied! Toggle word wrap Toggle overflow These commands assign the existing connection profiles named
bond0andbond1to theteam0connection.Reactivate the connections:
nmcli connection up bond0
nmcli connection up bond1
# nmcli connection up bond0
# nmcli connection up bond1
Copy to Clipboard Copied! Toggle word wrap Toggle overflow
Configure the IPv4 settings:
To set a static IPv4 address, network mask, default gateway, and DNS server to the
team0connection, enter:nmcli connection modify team0 ipv4.addresses '192.0.2.1/24' ipv4.gateway '192.0.2.254' ipv4.dns '192.0.2.253' ipv4.dns-search 'example.com' ipv4.method manual
# nmcli connection modify team0 ipv4.addresses '192.0.2.1/24' ipv4.gateway '192.0.2.254' ipv4.dns '192.0.2.253' ipv4.dns-search 'example.com' ipv4.method manualCopy to Clipboard Copied! Toggle word wrap Toggle overflow - To use DHCP, no action is required.
- If you plan to use this team device as a port of other devices, no action is required.
Configure the IPv6 settings:
To set a static IPv6 address, network mask, default gateway, and DNS server to the
team0connection, enter:nmcli connection modify team0 ipv6.addresses '2001:db8:1::1/64' ipv6.gateway '2001:db8:1::fffe' ipv6.dns '2001:db8:1::fffd' ipv6.dns-search 'example.com' ipv6.method manual
# nmcli connection modify team0 ipv6.addresses '2001:db8:1::1/64' ipv6.gateway '2001:db8:1::fffe' ipv6.dns '2001:db8:1::fffd' ipv6.dns-search 'example.com' ipv6.method manualCopy to Clipboard Copied! Toggle word wrap Toggle overflow - If you plan to use this team device as a port of other devices, no action is required.
- To use stateless address autoconfiguration (SLAAC), no action is required.
Activate the connection:
nmcli connection up team0
# nmcli connection up team0Copy to Clipboard Copied! Toggle word wrap Toggle overflow
Verification
Display the status of the team:
Copy to Clipboard Copied! Toggle word wrap Toggle overflow In this example, both ports are up.
4.5. Configuring a NIC team by using the RHEL web console
Use the RHEL web console to configure a network interface controller (NIC) team if you prefer to manage network settings using a web browser-based interface.
NIC teaming is deprecated in Red Hat Enterprise Linux 9. Consider using the network bonding driver as an alternative. For details, see Configuring a network bond.
Prerequisites
-
The
teamdandNetworkManager-teampackages are installed. - Two or more physical or virtual network devices are installed on the server.
- To use Ethernet devices as ports of the team, the physical or virtual Ethernet devices must be installed on the server and connected to a switch.
To use bond, bridge, or VLAN devices as ports of the team, create them in advance as described in:
- You have installed the RHEL 9 web console.
- You have enabled the cockpit service.
Your user account is allowed to log in to the web console.
For instructions, see Installing and enabling the web console.
Procedure
Log in to the RHEL 9 web console.
For details, see Logging in to the web console.
-
Select the
Networkingtab in the navigation on the left side of the screen. -
Click in the
Interfacessection. - Enter the name of the team device you want to create.
- Select the interfaces that should be ports of the team.
Select the runner of the team.
If you select
Load balancingor802.3ad LACP, the web console shows the additional fieldBalancer.Set the link watcher:
-
If you select
Ethtool, additionally, set a link up and link down delay. -
If you set
ARP pingorNSNA ping, additionally, set a ping interval and ping target.
-
If you select
- Click .
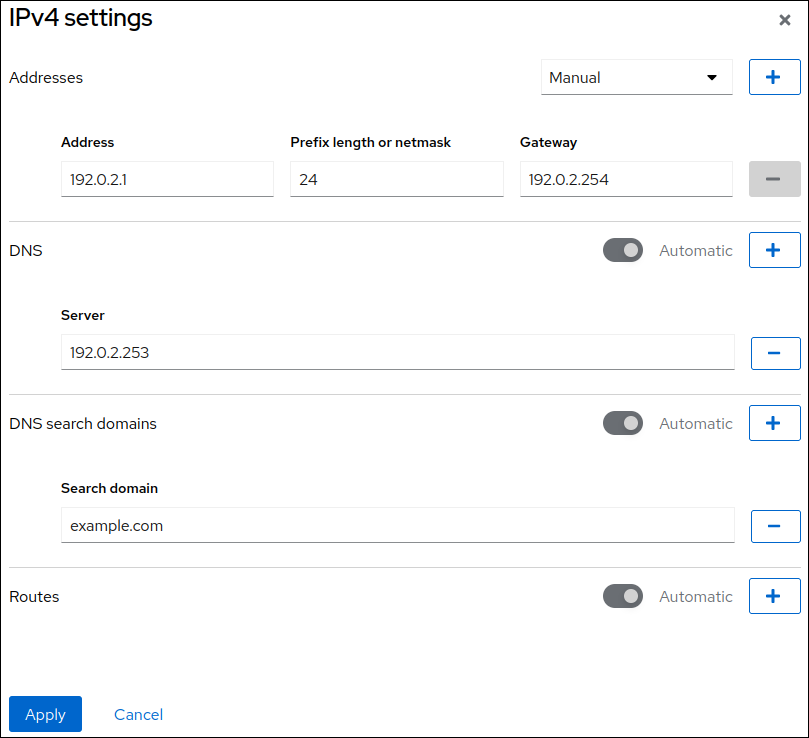
By default, the team uses a dynamic IP address. If you want to set a static IP address:
-
Click the name of the team in the
Interfacessection. -
Click
Editnext to the protocol you want to configure. -
Select
Manualnext toAddresses, and enter the IP address, prefix, and default gateway. -
In the
DNSsection, click the button, and enter the IP address of the DNS server. Repeat this step to set multiple DNS servers. -
In the
DNS search domainssection, click the button, and enter the search domain. If the interface requires static routes, configure them in the
Routessection.- Click
-
Click the name of the team in the

Verification
Select the
Networkingtab in the navigation on the left side of the screen, and check if there is incoming and outgoing traffic on the interface.Display the status of the team:
Copy to Clipboard Copied! Toggle word wrap Toggle overflow In this example, both ports are up.
4.6. Configuring a NIC team by using nm-connection-editor
If you use Red Hat Enterprise Linux with a graphical interface, you can configure network interface controller (NIC) teams using the nm-connection-editor application.
Note that nm-connection-editor can add only new ports to a team. To use an existing connection profile as a port, create the team using the nmcli utility as described in Configuring a NIC team by using nmcli.
NIC teaming is deprecated in Red Hat Enterprise Linux 9. Consider using the network bonding driver as an alternative. For details, see Configuring a network bond.
Prerequisites
-
The
teamdandNetworkManager-teampackages are installed. - Two or more physical or virtual network devices are installed on the server.
- To use Ethernet devices as ports of the team, the physical or virtual Ethernet devices must be installed on the server.
- To use team, bond, or VLAN devices as ports of the team, ensure that these devices are not already configured.
Procedure
Open a terminal, and enter
nm-connection-editor:nm-connection-editor
$ nm-connection-editorCopy to Clipboard Copied! Toggle word wrap Toggle overflow - Click the button to add a new connection.
- Select the Team connection type, and click .
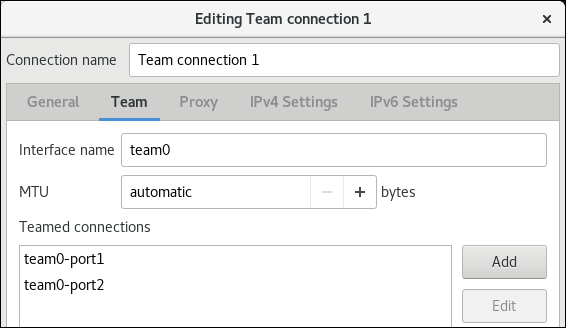
On the Team tab:
- Optional: Set the name of the team interface in the Interface name field.
Click the button to add a new connection profile for a network interface and adding the profile as a port to the team.
- Select the connection type of the interface. For example, select Ethernet for a wired connection.
- Optional: Set a connection name for the port.
- If you create a connection profile for an Ethernet device, open the Ethernet tab, and select in the Device field the network interface you want to add as a port to the team. If you selected a different device type, configure it accordingly. Note that you can only use Ethernet interfaces in a team that are not assigned to any connection.
- Click .
Repeat the previous step for each interface you want to add to the team.
Click the button to set advanced options to the team connection.
- On the Runner tab, select the runner.
- On the Link Watcher tab, set the link watcher and its optional settings.
- Click .
Configure the IP address settings on both the IPv4 Settings and IPv6 Settings tabs:
- If you plan to use this bridge device as a port of other devices, set the Method field to Disabled.
- To use DHCP, leave the Method field at its default, Automatic (DHCP).
To use static IP settings, set the Method field to Manual and fill the fields accordingly:

- Click .
-
Close
nm-connection-editor.
Verification
Display the status of the team:
Copy to Clipboard Copied! Toggle word wrap Toggle overflow