Este contenido no está disponible en el idioma seleccionado.
1.4. Run Your First Application
1.4.1. Download the Quickstart Code Examples
1.4.1.1. Access the Quickstarts
JBoss EAP 6 comes with a series of quickstart examples designed to help users begin writing applications using the Java EE 6 technologies.
Prerequisites
- Maven 3.0.0 or higher. For more information on installing Maven, refer to http://maven.apache.org/download.html.
- The JBoss EAP 6 Maven repository is available online, so it is not necessary to download and install it locally. If you plan to use the online repository, you can skip to the next step. If you prefer to install a local repository, see: Section 2.2.3, “Install the JBoss EAP 6 Maven Repository Locally”.
Procedure 1.4. Download the Quickstarts
- Open a web browser and access this URL: https://access.redhat.com/jbossnetwork/restricted/listSoftware.html?product=appplatform.
- Find "Quickstarts" in the list.
- Click the button to download a Zip archive containing the examples.
- Unzip the archive in a directory of your choosing.
The JBoss EAP Quickstarts have been downloaded and unzipped. Refer to the README.md file in the top-level directory of the Quickstart archive for instructions about deploying each quickstart.
1.4.2. Run the Quickstarts
1.4.2.1. Run the Quickstarts in Red Hat JBoss Developer Studio
Procedure 1.5. Import the quickstarts into Red Hat JBoss Developer Studio
Important
- If you have not yet done so, Section 2.3.2, “Configure the JBoss EAP 6 Maven Repository Using the Maven Settings”.
- Start Red Hat JBoss Developer Studio.
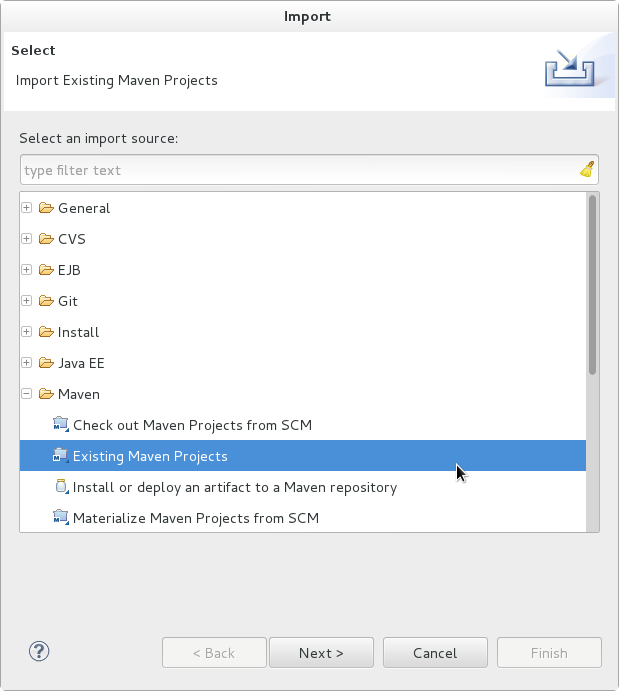
- From the menu, select
. - In the selection list, choose
, then click . Figure 1.7. Import Existing Maven Projects
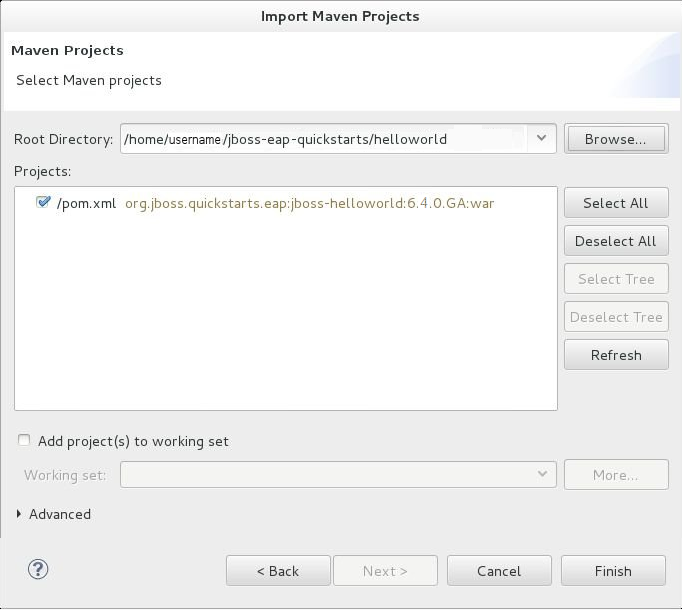
- Browse to the directory of the quickstart you plan to test, for example the
helloworldquickstart, and click . The Projects list box is populated with thepom.xmlfile of the selected quickstart project.Figure 1.8. Select Maven Projects
- Click .
Procedure 1.6. Build and Deploy the helloworld quickstart
helloworld quickstart is one of the simplest quickstarts and is a good way to verify that the JBoss server is configured and running correctly.
- If you do not see a Servers tab or have not yet defined a server, follow the instructions here: Section 1.3.1.5, “Add the JBoss EAP Server Using Define New Server”. If you plan to deploy a quickstart that requires the
fullprofile or additional startup arguments, be sure to create the server runtime environment as noted in the quickstart instructions. - Right-click on the
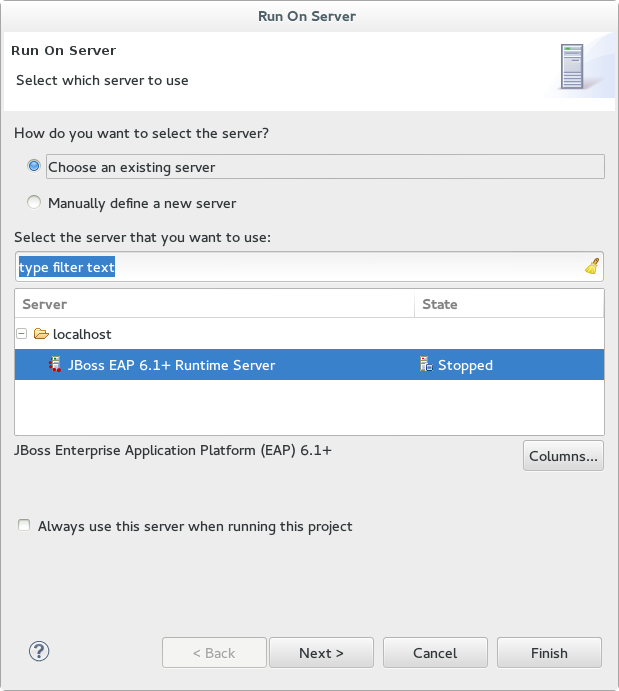
jboss-helloworldproject in the Project Explorer tab and select . You are provided with a list of choices. Select .Figure 1.9. Run As - Run on Server
- Select JBoss EAP 6.1+ Runtime Server from the server list and click .
Figure 1.10. Run on Server
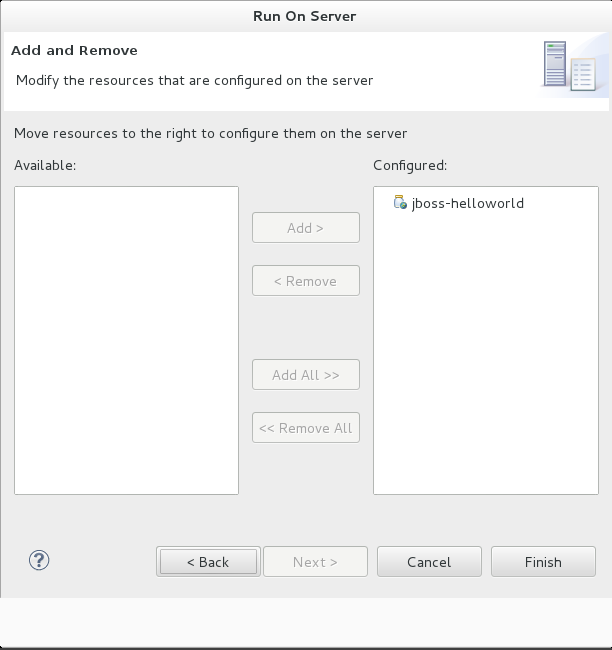
- The next screen displays the resources that are configured on the server. The
jboss-helloworldquickstart is configured for you. Click to deploy the quickstart.Figure 1.11. Modify Resources Configured on the Server
- Review the results.
- In the
Servertab, the JBoss EAP 6.x Runtime Server status changes to[Started, Republish]. - The server Console tab shows messages detailing the JBoss EAP 6.x server start and the helloworld quickstart deployment.
- A helloworld tab appears displaying the URL http://localhost:8080/jboss-helloworld/HelloWorld and the text "Hello World!".
- The following messages in the Console confirm deployment of the
jboss-helloworld.warfile:The registered web context is appended toJBAS018210: Register web context: /jboss-helloworld JBAS018559: Deployed "jboss-helloworld.war" (runtime-name : "jboss-helloworld.war")
JBAS018210: Register web context: /jboss-helloworld JBAS018559: Deployed "jboss-helloworld.war" (runtime-name : "jboss-helloworld.war")Copy to Clipboard Copied! Toggle word wrap Toggle overflow http://localhost:8080to provide the URL used to access the deployed application.
- To verify the
helloworldquickstart deployed successfully to the JBoss server, open a web browser and access the application at this URL: http://localhost:8080/jboss-helloworld

Procedure 1.7. Run the bean-validation quickstart Arquillian tests
bean-validation quickstart is an example of a quickstart that provides Arquillian tests.
- Follow the procedure above to import the
bean-validationquickstart into Red Hat JBoss Developer Studio. - In the Servers tab, right-click on the server and choose to start the JBoss EAP server. If you do not see a Servers tab or have not yet defined a server, follow the instructions here: Section 1.3.1.5, “Add the JBoss EAP Server Using Define New Server”.
- Right-click on the
jboss-bean-validationproject in the Project Explorer tab and select . You are provided with a list of choices. Select . - In the Goals input field of the Edit Configuration dialog, type:
clean test -Parq-jbossas-remoteThen click .Figure 1.12. Edit Configuration
- Review the results.The server Console tab shows messages detailing the JBoss EAP server start and the output of the
bean-validationquickstart Arquillian tests.Copy to Clipboard Copied! Toggle word wrap Toggle overflow

1.4.2.2. Run the Quickstarts Using a Command Line
Procedure 1.8. Build and Deploy the Quickstarts Using a Command Line
- If you have not yet done so, Section 2.3.2, “Configure the JBoss EAP 6 Maven Repository Using the Maven Settings”.
- Review the
README.htmlfile in the root directory of the quickstarts.This file contains general information about system requirements, how to configure Maven, how to add users, and how to run the Quickstarts. Be sure to read through it before you get started.It also contains a table listing the available quickstarts. The table lists each quickstart name and the technologies it demonstrates. It gives a brief description of each quickstart and the level of experience required to set it up. For more detailed information about a quickstart, click on the quickstart name.Some quickstarts are designed to enhance or extend other quickstarts. These are noted in thePrerequisitescolumn. If a quickstart lists prerequisites, you must install them first before working with the quickstart.Some quickstarts require the installation and configuration of optional components. Do not install these components unless the quickstart requires them. - Run the
helloworldquickstart.Thehelloworldquickstart is one of the simplest quickstarts and is a good way to verify that the JBoss server is configured and running correctly. Open theREADME.htmlfile in the root of thehelloworldquickstart. It contains detailed instructions on how to build and deploy the quickstart and access the running application - Run the other quickstarts.Follow the instructions in the
README.htmlfile located in the root folder of each quickstart to run the example.
1.4.3. Review the Quickstart Tutorials
1.4.3.1. Explore the helloworld Quickstart
The helloworld quickstart shows you how to deploy a simple Servlet to JBoss EAP 6. The business logic is encapsulated in a service which is provided as a CDI (Contexts and Dependency Injection) bean and injected into the Servlet. This quickstart is very simple. All it does is print "Hello World" onto a web page. It is a good starting point to be sure you have configured and started your server properly.
helloworld quickstart.
- Install Red Hat JBoss Developer Studio following the procedure here: Section 1.3.1.3, “Install Red Hat JBoss Developer Studio”.
- Configure Maven for use with Red Hat JBoss Developer Studio following the procedure here: Section 2.3.3, “Configure Maven for Use with Red Hat JBoss Developer Studio”.
- Follow the procedures here to import, build, and deploy the
helloworldquickstart in Red Hat JBoss Developer Studio: Section 1.4.2.1, “Run the Quickstarts in Red Hat JBoss Developer Studio” - Verify the
helloworldquickstart was deployed successfully to JBoss EAP by opening a web browser and accessing the application at this URL: http://localhost:8080/jboss-helloworld
Procedure 1.9. Examine the Directory Structure
QUICKSTART_HOME/helloworld directory. The helloworld quickstart is comprised of a Servlet and a CDI bean. It also includes an empty beans.xml file which tells JBoss EAP 6 to look for beans in this application and to activate the CDI.
- The
beans.xmlfile is located in theWEB-INF/folder in thesrc/main/webapp/directory of the quickstart. - The
src/main/webapp/directory also includes anindex.htmlfile which uses a simple meta refresh to redirect the user's browser to the Servlet, which is located at http://localhost:8080/jboss-helloworld/HelloWorld. - All the configuration files for this example are located in
WEB-INF/, which can be found in thesrc/main/webapp/directory of the example. - Notice that the quickstart doesn't even need a
web.xmlfile!
Procedure 1.10. Examine the Code
Review the HelloWorldServlet code
TheHelloWorldServlet.javafile is located in thesrc/main/java/org/jboss/as/quickstarts/helloworld/directory. This Servlet sends the information to the browser.Copy to Clipboard Copied! Toggle word wrap Toggle overflow Expand Table 1.1. HelloWorldServlet Details Line Note 43 Before Java EE 6, an XML file was used to register Servlets. It is now much cleaner. All you need to do is add the @WebServletannotation and provide a mapping to a URL used to access the servlet.46-48 Every web page needs correctly formed HTML. This quickstart uses static Strings to write the minimum header and footer output. 50-51 These lines inject the HelloService CDI bean which generates the actual message. As long as we don't alter the API of HelloService, this approach allows us to alter the implementation of HelloService at a later date without changing the view layer. 58 This line calls into the service to generate the message "Hello World", and write it out to the HTTP request. Review the HelloService code
TheHelloService.javafile is located in thesrc/main/java/org/jboss/as/quickstarts/helloworld/directory. This service is very simple. It returns a message. No XML or annotation registration is required.Copy to Clipboard Copied! Toggle word wrap Toggle overflow
1.4.3.2. Explore the numberguess Quickstart
This quickstart shows you how to create and deploy a simple application to JBoss EAP 6. This application does not persist any information. Information is displayed using a JSF view, and business logic is encapsulated in two CDI (Contexts and Dependency Injection) beans. In the numberguess quickstart, you get 10 attempts to guess a number between 1 and 100. After each attempt, you're told whether your guess was too high or too low.
QUICKSTART_HOME/numberguess directory. The numberguess quickstart is comprised of a number of beans, configuration files and Facelets (JSF) views, packaged as a WAR module.
numberguess quickstart.
- Install Red Hat JBoss Developer Studio following the procedure here: Section 1.3.1.3, “Install Red Hat JBoss Developer Studio”.
- Configure Maven for use with Red Hat JBoss Developer Studio following the procedure here: Section 2.3.3, “Configure Maven for Use with Red Hat JBoss Developer Studio”.
- Follow the procedures here to import, build, and deploy the
numberguessquickstart in Red Hat JBoss Developer Studio: Section 1.4.2.1, “Run the Quickstarts in Red Hat JBoss Developer Studio” - Verify the
numberguessquickstart was deployed successfully to JBoss EAP by opening a web browser and accessing the application at this URL: http://localhost:8080/jboss-numberguess
Procedure 1.11. Examine the Configuration Files
WEB-INF/ directory which can be found in the src/main/webapp/ directory of the quickstart.
- Examine the
faces-config.xmlfile.This quickstart uses the JSF 2.0 version offaces-config.xmlfilename. A standardized version of Facelets is the default view handler in JSF 2.0, so there's really nothing that you have to configure. JBoss EAP 6 goes above and beyond Java EE here. It will automatically configure the JSF for you if you include this configuration file. As a result, the configuration consists of only the root element:Copy to Clipboard Copied! Toggle word wrap Toggle overflow - Examine the
beans.xmlfile.There's also an emptybeans.xmlfile, which tells JBoss EAP 6 to look for beans in this application and to activate the CDI. - There is no
web.xmlfileNotice that the quickstart doesn't even need aweb.xmlfile!
Procedure 1.12. Examine the JSF Code
.xhtml file extension for source files, but serves up the rendered views with the .jsf extension.
- Examine the
home.xhtmlcode.Thehome.xhtmlfile is located in thesrc/main/webapp/directory.Copy to Clipboard Copied! Toggle word wrap Toggle overflow Expand Table 1.2. JSF Details Line Note 36-40 These are the messages which can be sent to the user: "Higher!" and "Lower!" 45-48 As the user guesses, the range of numbers they can guess gets smaller. This sentence changes to make sure they know the number range of a valid guess. 55-58 This input field is bound to a bean property using a value expression. 58 A validator binding is used to make sure the user does not accidentally input a number outside of the range in which they can guess. If the validator was not here, the user might use up a guess on an out of bounds number. 59-61 There must be a way for the user to send their guess to the server. Here we bind to an action method on the bean.
Procedure 1.13. Examine the Class Files
src/main/java/org/jboss/as/quickstarts/numberguess/ directory. The package declaration and imports have been excluded from these listings. The complete listing is available in the quickstart source code.
- Review the
Random.javaqualifier code.A qualifier is used to remove ambiguity between two beans, both of which are eligible for injection based on their type. For more information on qualifiers, refer to Section 11.2.3.3, “Use a Qualifier to Resolve an Ambiguous Injection”The@Randomqualifier is used for injecting a random number.Copy to Clipboard Copied! Toggle word wrap Toggle overflow - Review the
MaxNumber.javaqualifier code.The@MaxNumberqualifieris used for injecting the maximum number allowed.Copy to Clipboard Copied! Toggle word wrap Toggle overflow - Review the
Generator.javacode.TheGeneratorclass is responsible for creating the random number via a producer method. It also exposes the maximum possible number via a producer method. This class is application scoped so you don't get a different random each time.Copy to Clipboard Copied! Toggle word wrap Toggle overflow - Review the
Game.javacode.The session scoped classGameis the primary entry point of the application. It is responsible for setting up or resetting the game, capturing and validating the user's guess, and providing feedback to the user with aFacesMessage. It uses the post-construct lifecycle method to initialize the game by retrieving a random number from the@Random Instance<Integer>bean.Notice the @Named annotation in the class. This annotation is only required when you want to make the bean accessible to a JSF view via Expression Language (EL), in this case#{game}.Copy to Clipboard Copied! Toggle word wrap Toggle overflow
1.4.4. Replace the Default Welcome Web Application
Procedure 1.14. Replace the Default Welcome Web Application With Your Own Web Application
Disable the Welcome application.
Use the Management CLI scriptEAP_HOME/bin/jboss-cli.shto run the following command. You may need to change the profile to modify a different managed domain profile, or remove the/profile=defaultportion of the command for a standalone server./profile=default/subsystem=web/virtual-server=default-host:write-attribute(name=enable-welcome-root,value=false)
/profile=default/subsystem=web/virtual-server=default-host:write-attribute(name=enable-welcome-root,value=false)Copy to Clipboard Copied! Toggle word wrap Toggle overflow Configure your Web application to use the root context.
To configure your web application to use the root context (/) as its URL address, modify itsjboss-web.xml, which is located in theMETA-INF/orWEB-INF/directory. Replace its<context-root>directive with one that looks like the following.<jboss-web> <context-root>/</context-root> </jboss-web><jboss-web> <context-root>/</context-root> </jboss-web>Copy to Clipboard Copied! Toggle word wrap Toggle overflow Deploy your application.
Deploy your application to the server group or server you modified in the first step. The application is now available onhttp://SERVER_URL:PORT/.
1.4.5. Using WS-AtomicTransaction
wsat-simple quickstart demonstrates the deployment of a WS-AT (WS-AtomicTransaction) enabled JAX-WS Web Service bundled in a WAR archive for deployment to Red Hat JBoss Enterprise Application Platform.
- The Service does not implement the required hooks to support recovery in the presence of failures.
- It also does not utilize a transactional back end resource.
- Only one Web service participates in the protocol. As WS-AT is a 2PC coordination protocol, it is best suited to multi-participant scenarios.
org.jboss.as.quickstarts.wsat.simple.ClientTest#testCommit() method, the following steps occur:
- A new Atomic Transaction (AT) is created by the client.
- An operation on a WS-AT enabled Web service is invoked by the client.
- The JaxWSHeaderContextProcessor in the WS Client handler chain inserts the WS-AT context into the outgoing SOAP message.
- When the service receives the SOAP request, the JaxWSHeaderContextProcessor in its handler chain inspects the WS-AT context and associates the request with this AT.
- The Web service operation is invoked.
- A participant is enlisted in this AT. This allows the Web Service logic to respond to protocol events, such as Commit and Rollback.
- The service invokes the business logic. In this case, a booking is made with the restaurant.
- The backend resource is prepared. This ensures that the Backend resource can undo or make permanent the change when told to do so by the coordinator.
- The client can then decide to commit or rollback the AT. If the client decides to commit, the coordinator will begin the 2PC protocol. If the participant decides to rollback, all participants will be told to rollback.