Ce contenu n'est pas disponible dans la langue sélectionnée.
Chapter 1. Red Hat build of Cryostat Operator
You can use the Red Hat build of Cryostat Operator to manage and configure your Cryostat instance. The Red Hat build of Cryostat Operator is available on the OpenShift Container Platform (OCP).
1.1. Overview of the Red Hat build of Cryostat Operator
After you create or update a Cryostat application on the OpenShift Container Platform, the Red Hat build of Cryostat Operator creates and manages the Cryostat application.
Operator level 2 seamless upgrades
From Cryostat 2.2, the Operator Capability Level for the Red Hat build of Cryostat Operator is set to Level 2 Seamless Upgrades on the Operator Lifecycle Manager framework. After you upgrade your Red Hat build of Cryostat Operator, the Red Hat build of Cryostat Operator automatically upgrades Cryostat and its related components. The automatic upgrade operation does not remove any JFR recordings, templates, rules, and other stored components, from your Cryostat instance.
The automatic upgrade operation occurs only for minor releases or patch update releases of Cryostat. For major releases, you might need to re-install the Red Hat build of Cryostat Operator.
Persistent volume claims
You can create persistent volume claims (PVCs) on Red Hat OpenShift with the Red Hat build of Cryostat Operator so that your Cryostat application can store archived recordings on a cloud storage disk.
Operator configuration settings
Additionally, you can make the following changes to the default configuration settings for the Red Hat build of Cryostat Operator:
- Configure the PVC that was created by the Red Hat build of Cryostat Operator, so that your Cryostat application can store archived recordings on a cloud storage disk.
- Configure your Cryostat application to trust TLS certificates from specific applications.
- Deploy Cryostat as a minimal deployment, so that the operator requires less resources to deploy a Cryostat application.
- Disable cert-manager, so that the operator does not need to generate self-signed certificates for Cryostat components.
- Install custom event template files, which are located in ConfigMaps, to your Cryostat instance, so you can use the templates to create recordings when Cryostat starts.
From Cryostat 2.2, the following configuration options for the Red Hat build of Cryostat Operator are included:
-
Resource requirements, which you can use to specify resource requests or limits for the
core,datasource, orgrafanacontainers. - Service customization, so that you can control the services that the Red Hat build of Cryostat Operator creates.
- Sidecar report options, which the Red Hat build of Cryostat Operator can use to provision one or more report generators for your Cryostat application.
Single-namespace or multi-namespace Cryostat instances
The Red Hat build of Cryostat Operator provides both a Cryostat API and a Cluster Cryostat API. You can use the Cryostat API to create Cryostat instances that work in a single namespace. You can use the Cluster Cryostat API to create Cryostat instances that work across multiple namespaces. You can control these Cryostat instances by using a GUI that is accessible from the Red Hat OpenShift web console.
Users who can access the multi-namespace Cryostat instance have access to all target applications in any namespace that is visible to that Cryostat instance. Therefore, when you deploy a multi-namespace Cryostat instance, you must consider which namespaces to select for monitoring, which namespace to install Cryostat into, and which users can have access rights.
Prerequisites for configuring the Red Hat build of Cryostat Operator
Before you configure the Red Hat build of Cryostat Operator, ensure that the following prerequisites are met:
- Installed the Red Hat build of Cryostat Operator in a project on Red Hat OpenShift.
- Created a Cryostat instance by using the Red Hat build of Cryostat Operator.
Additional resources
- See Operator Capability Levels (Operator SDK)
- See Installing Cryostat on Red Hat OpenShift using an operator (Installing Cryostat)
1.2. Excluding supportive containers
You can choose to exclude supportive applications from getting deployed with your Cryostat application. Supportive applications are the supportive containers that are listed with your Cryostat pod. When you exclude supportive containers, fewer system resources are required to deploy your Cryostat application.
By default, Cryostat sets the minimal property in your project’s Red Hat build of Cryostat Operator YAML configuration file to false. With this configuration, the Red Hat build of Cryostat Operator deploys your Cryostat application with all the standard supportive applications, such as jfr-datasource and the Grafana dashboard, which are contained in the same pod as your Cryostat application. These supportive applications can interact with your Cryostat data and provide you with additional capabilities for interacting with this data.
The Red Hat build of Cryostat Operator defaults to the following configurations:
- Deploys a pre-configured Grafana application.
-
Deploys a
jfr-datasourceapplication for converting JDK Flight Recorder (JFR) data to JSON, which is a readable format for Grafana. - Includes a Dashboard JSON file that is pre-configured in Grafana when you deploy Cryostat.
You can set the minimal property to true, so that the Red Hat build of Cryostat Operator automatically restarts your Cryostat instance as a minimal deployment. This means that the operator deploys only those applications that are listed in your Cryostat container and ignores any standard supportive applications, such as jfr-datasource and the Grafana dashboard, that are contained in the same pod as your Cryostat application.
Prerequisites
- Logged in to the OpenShift Container Platform by using the Red Hat OpenShift web console.
Procedure
- On your Red Hat OpenShift web console, click Operators > Installed Operators.
- From the list of available operators, select Red Hat build of Cryostat.
- Click the Details tab.
In the Provided APIs section, the Cryostat and Cluster Cryostat custom resources (CRs) are available. Select one of the following options:
- To create a single-namespace Cryostat instance, select Cryostat, then click Create instance.
- To create a multi-namespace instance of Cryostat, select Cluster Cryostat, then click Create instance.
To configure the
minimalproperty, choose one of the following options:Click the Form view radio button.
Set the Minimal Deployment switch to
true. You must also enter a value in the Name field.Figure 1.1. Toggling the Minimal Deployment switch to true

Click Create. Depending on the type of instance you created, the instance opens under one of the following tabs:
- If you created a single-namespace Cryostat instance, the instance is available under the Cryostat tab on the Operator details page.
- If you created a Cluster Cryostat instance, the instance is available under the Cluster Cryostat tab on the Operator details page.
Click the YAML view radio button.
Change the value for the
minimalproperty totruein thespec:key set.Example of configuring the minimal property
--
apiVersion: operator.cryostat.io/v1beta1
kind: Cryostat
metadata:
  name: cryostat-sample
spec:
  minimal: true
--
- Click Save.
Verification
- From the Red Hat OpenShift web console, select the project where you created your Cryostat instance or the project you chose as the Install Namespace of your Cluster Cryostat instance.
-
Navigate to Workloads
Deployments. - From the list of deployments, select the deployment that matches the name of your Cryostat or Cluster Cryostat instance. A Deployment details page opens on your web console.
- Navigate to the Containers section. A single listed container indicates that the Red Hat build of Cryostat Operator has deployed your Cryostat application as a minimal deployment.
Additional resources
- For more information about the OpenShift CLI, see Getting started with the OpenShift CLI (Red Hat OpenShift documentation)
- See Creating a JDK Flight Recorder (JFR) recording (Creating a JFR recording with Cryostat)
1.3. Disabling cert-manager
You can disable cert-manager functionality by configuring the enableCertManager property of the Red Hat build of Cryostat Operator.
By default, Red Hat build of Cryostat Operator’s enableCertManager property is set to true. This means that the Red Hat build of Cryostat Operator uses the cert-manager CA issuer to generate self-signed certificates for your Cryostat components. The Red Hat build of Cryostat Operator uses these certificates to enable HTTPS communication among Cryostat components operating in a cluster.
You can set the enableCertManager property to false, so that the Red Hat build of Cryostat Operator does not need to generate self-signed certificates for Cryostat components.
If you set the enableCertManager property to false, you could introduce potential security implications from unencrypted internal traffic to the cluster that contains your running Cryostat application.
Prerequisites
- Logged in to the OpenShift Container Platform by using the Red Hat OpenShift web console.
Procedure
- Navigate to Operators > Installed Operators on your OpenShift web console.
- From the list of available operators, select Red Hat build of Cryostat.
- Click the Details tab.
In the Provided APIs section, the Cryostat and Cluster Cryostat custom resources (CRs) are available. Select one of the following options:
- To create a single-namespace Cryostat instance, select Cryostat, then click Create instance.
- To create a multi-namespace instance of Cryostat, select Cluster Cryostat, then click Create instance.
To configure the
enableCertManagerproperty, choose one of the following options:Click the Form view radio button.
Set the Enable cert-manager Integration switch to
false, and then enter a value in the Name field.Figure 1.2. Toggling the Enable cert-manager Integration switch to false

Click Create. Depending on the type of instance you created, the instance opens under one of the following tabs:
- If you created a single-namespace Cryostat instance, the instance is available under the Cryostat tab on the Operator details page.
- If you created a Cluster Cryostat instance, the instance is available under the Cluster Cryostat tab on the Operator details page.
Click the YAML view radio button.
In the
spec:key set of the YAML file, change theenableCertManagerproperty tofalse.Example of configuring the
spec:key set in a YAML file-- apiVersion: operator.cryostat.io/v1beta1 kind: Cryostat metadata: name: cryostat-sample spec: enableCertManager: false --
Click the Save button.
The Red Hat build of Cryostat Operator automatically restarts your Cryostat application, enabling the application to run with the updated
enableCertManagerproperty configuration.
Verification
Select your Cryostat or Cluster Cryostat instance:
- If you created a Cryostat instance, select your Cryostat instance from the Cryostat tab on the Operator details page.
- If you created a Cluster Cryostat instance, select your Cluster Cryostat instance from the Cluster Cryostat tab on the Operator details page.
- Navigate to the Cryostat Conditions table.
Verify that the
TLSSetupCompletecondition is set totrueand that the Reason column for this condition is set toCertManagerDisabled. This indicates that you have set theenableCertManagerproperty tofalse.Figure 1.3. Example showing the TLSSetupComplete condition set to true

Additional resources
- See the cert-manager documentation
- See Creating a JDK Flight Recorder (JFR) recording (Creating a JFR recording with Cryostat)
1.4. Customizing event templates
In Cryostat 2, you can configure the eventTemplates property of the Red Hat build of Cryostat Operator YAML configuration file to include multiple custom templates. An event template outlines the event recording criteria for your JDK Flight Recording (JFR). You can configure a JFR through its associated event template.
By default, Red Hat build of Cryostat Operator includes some pre-configured event templates. These pre-configured event templates might not meet your needs, so you can use Red Hat build of Cryostat Operator to generate custom event templates for your Cryostat instance and store these templates in ConfigMaps for easier retrieval. You can generate a custom event template in the following ways:
- Use the Red Hat OpenShift web console to upload an event template into a custom resource.
- Edit the YAML file for your Cryostat custom resource on the Red Hat OpenShift web console.
After you store a custom event template in a ConfigMap, you can deploy a new Cryostat instance with this custom event template. You can then use your custom event template with JFR to monitor your Java application to meet your needs.
Prerequisites
- Logged in to the OpenShift Container Platform by using the Red Hat OpenShift web console.
- Logged in to your Cryostat web console.
Procedure
To download a default event template, navigate to your Cryostat web console and from the Events menu, click Downloads.
NoteEvent templates are in XML format and have a file name extension of
.jfc.- Optional: If you want a custom event template, edit the downloaded default event template by using a text editor or XML editor to configure the template to meet your needs.
-
Log in to your Red Hat OpenShift web console by entering the
oc logincommand in your CLI. Create a
ConfigMapresource from the event template by entering the following command in your CLI. You must issue the command in the path where you want to deploy your Cryostat application. You can use this resource to store an event template file that is inside the cluster where you run your Cryostat instance.Example of creating a ConfigMap resource by using the CLI
$ oc create configmap <template_name> --from-file=<path_to_custom_event_template>
- On your Red Hat OpenShift web console, click Operators > Installed Operators.
- From the list of available operators, select Red Hat build of Cryostat.
Under the Details tab on the Operator details page, create a Cryostat or Cluster Cryostat instance.
In the Provided APIs section, the Cryostat and Cluster Cryostat custom resources (CRs) are available. Select one of the following options:
- To create a single-namespace Cryostat instance, select Cryostat, then click Create instance.
- To create a multi-namespace instance of Cryostat, select Cluster Cryostat, then click Create instance.
Choose one of the following options to upload an event template in XML format into a resource:
Click the Form view radio button.
- Navigate to the Event Templates section of the Cryostat or Cluster Cryostat instance.
- From the Event Templates menu, click Add Event Template. An Event Templates section opens on your Red Hat OpenShift console.
From the Config Map Name drop-down list, select the ConfigMap resource that contains your event template.
Figure 1.4. Event Templates option for a Cryostat instance
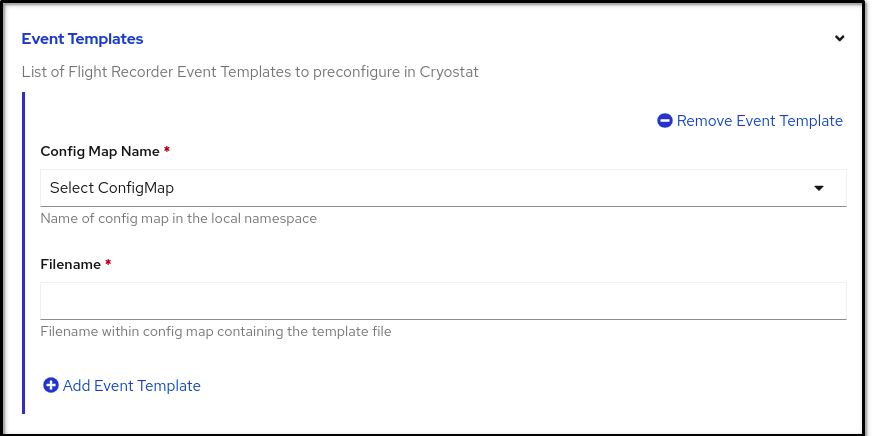
-
In the Filename field, enter the name of the
.jfcfile that is contained within your ConfigMap. - To generate a Cryostat or a Cluster Cryostat instance with your custom event template, click Create.
Click the YAML view radio button.
Specify any custom event templates for the
eventTemplatesproperty. This property points the Red Hat build of Cryostat Operator to your ConfigMap, so that the Red Hat build of Cryostat Operator can read the event template.Example of specifying custom event templates for the
eventTemplatesproperty-- apiVersion: operator.cryostat.io/v1beta1 kind: Cryostat metadata: name: cryostat-sample spec: eventTemplates: - configMapName: custom-template1 filename: my-template1.jfc - configMapName: custom-template2 filename: my-template2.jfc --ImportantYou must select the name of a ConfigMap, which is associated with your Cryostat or Cluster Cryostat instance, from the
configMapNamedrop-down list. Additionally, you must specify a key associated with the ConfigMap in thefilenamefield.The Red Hat build of Cryostat Operator can now provide the custom event template as an XML file to your Cryostat application. Your custom event template opens alongside default event templates in your Cryostat web console.
Verification
- On the Cryostat web console, click Events from the menu. If an Authentication Required window opens on your web console, enter your credentials and click Save.
Under the Event Templates tab, check if your custom event template shows in the list of available event templates.
Figure 1.5. Example of a listed custom event template under the Event Templates tab

Additional resources
- See Installing Cryostat on OpenShift using an operator (Installing Cryostat)
- See Accessing Cryostat by using the web console(Installing Cryostat)
- See Using custom event templates (Using Cryostat to manage a JFR recording)
1.5. Configuring TLS certificates
You can specify the Red Hat build of Cryostat Operator to configure Cryostat to trust TLS certificates from specific applications.
Cryostat attempts to open a JMX connection to a target JVM that uses a TLS certificate. For a successful JMX connection, the Cryostat must pass all its authentication checks on the target JVM certificate.
You can specify multiple TLS secrets in the trustedCertSecrets array of the Red Hat build of Cryostat Operator YAML configuration file. You must specify the secret located in the same namespace as your Cryostat application in the secretName property of the array. The certificateKey property defaults to tls.crt, but you can change the value to an X.509 certificate file name.
Configuring a TLS certificate is required only for applications that have enabled TLS for remote JMX connections by using the com.sun.management.jmxremote.registry.ssl=true attribute.
Prerequisites
- Logged in to the OpenShift Container Platform by using the OpenShift web console.
- Logged in to your Cryostat web console.
Procedure
- On your Red Hat OpenShift web console, click Operators > Installed Operators.
- From the list of available operators, select Red Hat build of Cryostat.
- On the Operator details page, click the Details tab.
In the Provided APIs section, the Cryostat and Cluster Cryostat custom resources (CRs) are available. Select one of the following options:
- To create a single-namespace Cryostat instance, select Cryostat, then click Create instance.
- To create a multi-namespace instance of Cryostat, select Cluster Cryostat, then click Create instance.
To configure a TLS certificate, choose one of the following options:
Click the Form view radio button.
- In the Name field, specify a name for the instance of Cryostat that you want to create.
Expand the Trusted TLS Certificates option, then click Add Trusted TLS Certificate. A list of options displays on your Red Hat OpenShift web console.
Figure 1.6. The Trusted TLS Certificates option

Select a TLS secret from the Secret Name list. The Certificate Key field is optional.
NoteYou can remove a TLS certificate by clicking Remove Trusted TLS Certificate.
Click Create. Depending on the type of instance you created, the instance opens under one of the following tabs:
- If you created a single-namespace Cryostat instance, the instance is available under the Cryostat tab on the Operator details page.
- If you created a Cluster Cryostat instance, the instance is available under the Cluster Cryostat tab on the Operator details page.
Click the YAML view radio button.
Specify your secret, which is located in the same namespace as your Cryostat application, in the
secretNameproperty of thetrustedCertSecretsarray.Example of specifying a secret in the
trustedCertSecretsarray-- apiVersion: operator.cryostat.io/v1beta1 kind: Cryostat metadata: name: cryostat-sample spec: trustedCertSecrets: - secretName: my-tls-secret --
Optional: Change the
certificateKeyproperty value to the application’s X.509 certificate file name. If you do not change the value, thecertificateKeyproperty defaults totls.crt.Example of changing the
certificateKeyproperty’s value-- apiVersion: operator.cryostat.io/v1beta1 kind: Cryostat metadata: name: cryostat-sample spec: trustedCertSecrets: - secretName: my-tls-secret certificateKey: ca.crt --Click Save.
The Red Hat build of Cryostat Operator automatically restarts your Cryostat instance with the configured security settings.
Verification
Determine that all your application pods exist in the same OpenShift cluster namespace as your Cryostat pod by issuing the following command in your CLI:
$ oc get pods
- Log in to the web console of your Cryostat instance.
- On the Dashboard menu for your Cryostat instance, select a target JVM from the Target list.
In the navigation menu on the Cryostat web console, select Recordings. On the Authentication Required dialog window, enter your secret’s credentials and then select Save to provide your credentials to the target JVM.
NoteIf the selected target has password authentication enabled for JMX connections, you must provide the JMX credentials for the target JVM when prompted for a connection.
Cryostat connects to your application through the authenticated JMX connection. You can now use the Recordings and Events functions to monitor your application’s JFR data.
Additional resources
- See Creating a JDK Flight Recorder (JFR) recording (Creating a JFR recording with Cryostat)
- See Installing Cryostat on Red Hat OpenShift using an operator(Installing Cryostat)
- See Accessing Cryostat by using the web console(Installing Cryostat)
1.6. Changing storage volume options
You can use the Red Hat build of Cryostat Operator to configure storage volumes for your Cryostat or Cluster Cryostat instance. Cryostat supports persistent volume claim (PVC) and emptyDir storage volume types.
By default, Red Hat build of Cryostat Operator creates a PVC for your Cryostat or Cluster Cryostat instance that uses the default StorageClass resource with 500 mebibytes (MiB) of allocated storage.
You can create a custom PVC for your Cryostat application on OpenShift Container Platform by choosing one of the following options:
- Navigating to Storage Options > PVC > Spec in the Form view window, and then customizing your PVC by completing the relevant fields.
-
Navigating to the YAML view window, and then editing the
storageOptionsarray in thespec: keyset to meet your needs.
You can learn more about creating a custom PVC by navigating to Changing storage volume options in the Using the Red Hat build of Cryostat Operator to configure Cryostat guide.
You can configure the emptyDir storage volume for your Cryostat application on OpenShift Container Platform by choosing one of the following options:
- Enabling the Empty Dir setting in Storage Options on the Form view window.
-
Setting the
spec.storageOptions.emptyDir.enabledtotruein the YAML view window.
Prerequisites
- Logged in to the OpenShift Container Platform by using the Red Hat OpenShift web console.
Procedure
- On your Red Hat OpenShift web console, click Operators > Installed Operators.
From the list of available operators, select Red Hat build of Cryostat.
- Click the Details tab.
In the Provided APIs section, the Cryostat and Cluster Cryostat custom resources (CRs) are available. Select one of the following options:
- To create a single-namespace Cryostat instance, select Cryostat, then click Create instance.
- To create a multi-namespace instance of Cryostat, select Cluster Cryostat, then click Create instance.
To change storage settings for your Cryostat application, choose one of the following options:
Click the Form view radio button.
- Navigate to the Storage Options section, and enter a value in the Name field.
- Expand Storage Options and click Empty Dir. An expanded selection of options opens on your Red Hat OpenShift web console.
Set the Enabled switch to
true.Figure 1.7. Example showing the Empty Dir switch set to
true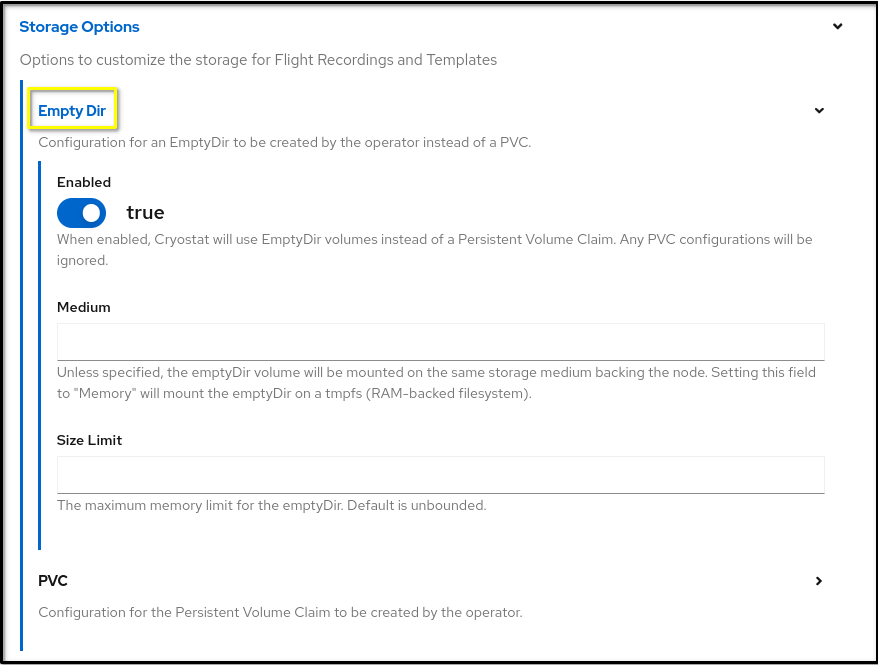
Click Create. Depending on the type of instance you created, the instance opens under one of the following tabs:
- If you created a single-namespace Cryostat instance, the instance is available under the Cryostat tab on the Operator details page.
- If you created a Cluster Cryostat instance, the instance is available under the Cluster Cryostat tab on the Operator details page.
Click the YAML view radio button.
In the
spec:key set of the YAML file, add thestorageOptionsdefinition and set theemptyDirproperty totrue.Example showing the
emptyDirproperty set astrue-- apiVersion: operator.cryostat.io/v1beta1 kind: Cryostat metadata: name: cryostat-sample spec: storageOptions: emptyDir: enabled: true medium: "Memory" sizeLimit: 1Gi ---
Optional: Set values for the
mediumandsizeLimitproperties. -
Click the Save button. The Red Hat build of Cryostat Operator creates an
EmptyDirvolume for storage instead of creating a PVC for your Cryostat instance.
1.7. Scheduling options for Cryostat
From the Red Hat OpenShift web console, you can use the Red Hat build of Cryostat Operator to define policies for scheduling a Cryostat application and its generated reports to nodes.
You can define Node Selector, Affinities, and Tolerations definitions in the YAML configuration file for a Cryostat or Cluster Cryostat custom resource (CR) on Red Hat OpenShift. You must define these definitions under the spec.SchedulingOptions property for the Cryostat application and the spec.ReportOptions.SchedulingOptions property for the report generator sidecar. By specifying the SchedulingOptions property, the Cryostat application and its report generator sidecar pods will be scheduled on nodes that meet the scheduling criteria.
a targeted node application can receive sidecar reports updates from a Cryostat instance.
Example that shows the YAML configuration for a Cryostat CR that defines schedule options
kind: Cryostat
apiVersion: operator.cryostat.io/v1beta1
metadata:
  name: cryostat
spec:
  schedulingOptions:
    nodeSelector:
      node: good
    affinity:
      nodeAffinity:
        requiredDuringSchedulingIgnoredDuringExecution:
          nodeSelectorTerms:
          - matchExpressions:
            - key: node
              operator: In
              values:
              - good
              - better
      podAffinity:
        requiredDuringSchedulingIgnoredDuringExecution:
        - labelSelector:
            matchLabels:
              pod: good
          topologyKey: topology.kubernetes.io/zone
      podAntiAffinity:
        requiredDuringSchedulingIgnoredDuringExecution:
        - labelSelector:
            matchLabels:
              pod: bad
          topologyKey: topology.kubernetes.io/zone
    tolerations:
    - key: node
      operator: Equal
      value: ok
      effect: NoExecute
  reportOptions:
    replicas: 1
    schedulingOptions:
      nodeSelector:
        node: good
      affinity:
        nodeAffinity:
          requiredDuringSchedulingIgnoredDuringExecution:
            nodeSelectorTerms:
            - matchExpressions:
              - key: node
                operator: In
                values:
                - good
                - better
        podAffinity:
          requiredDuringSchedulingIgnoredDuringExecution:
          - labelSelector:
              matchLabels:
                pod: good
            topologyKey: topology.kubernetes.io/zone
        podAntiAffinity:
          requiredDuringSchedulingIgnoredDuringExecution:
          - labelSelector:
              matchLabels:
                pod: bad
            topologyKey: topology.kubernetes.io/zone
      tolerations:
      - key: node
        operator: Equal
        value: ok
        effect: NoExecute
Alternatively, you can open your Red Hat OpenShift web console, create a Cryostat instance, and then define Affinities and Tolerations definitions in the SchedulingOptions and reportOptions.SchedulingOptions options for that Cryostat instance.
Figure 1.8. The Report Options and Scheduling Options panels on the OpenShift web console
