Ce contenu n'est pas disponible dans la langue sélectionnée.
Chapter 9. Integrating identity providers
An Identity Broker is an intermediary service connecting service providers with identity providers. The identity broker creates a relationship with an external identity provider to use the provider’s identities to access the internal services the service provider exposes.
From a user perspective, identity brokers provide a user-centric, centralized way to manage identities for security domains and realms. You can link an account with one or more identities from identity providers or create an account based on the identity information from them.
An identity provider derives from a specific protocol used to authenticate and send authentication and authorization information to users. It can be:
- A social provider such as Facebook, Google, or Twitter.
- A business partner whose users need to access your services.
- A cloud-based identity service you want to integrate.
Typically, Red Hat build of Keycloak bases identity providers on the following protocols:
-
SAML v2.0 -
OpenID Connect v1.0 -
OAuth v2.0
9.1. Brokering overview
When using Red Hat build of Keycloak as an identity broker, Red Hat build of Keycloak does not force users to provide their credentials to authenticate in a specific realm. Red Hat build of Keycloak displays a list of identity providers from which they can authenticate.
If you configure a default identity provider, Red Hat build of Keycloak redirects users to the default provider.
Different protocols may require different authentication flows. All the identity providers supported by Red Hat build of Keycloak use the following flow.
Identity broker flow
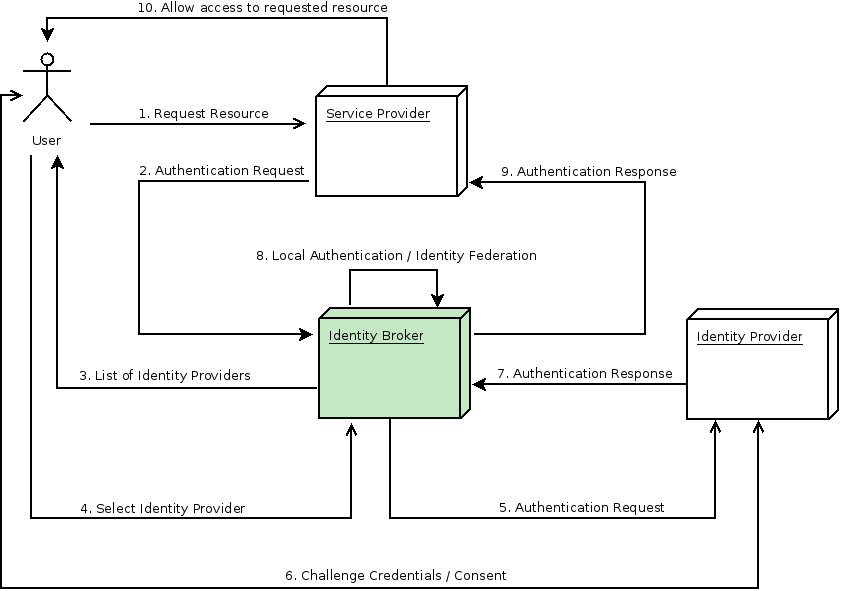
- The unauthenticated user requests a protected resource in a client application.
- The client application redirects the user to Red Hat build of Keycloak to authenticate.
- Red Hat build of Keycloak displays the login page with a list of identity providers configured in a realm.
- The user selects one of the identity providers by clicking its button or link.
- Red Hat build of Keycloak issues an authentication request to the target identity provider requesting authentication and redirects the user to the identity provider’s login page. The administrator has already set the connection properties and other configuration options for the Admin Console’s identity provider.
- The user provides credentials or consents to authenticate with the identity provider.
- Upon successful authentication by the identity provider, the user redirects back to Red Hat build of Keycloak with an authentication response. Usually, the response contains a security token used by Red Hat build of Keycloak to trust the identity provider’s authentication and retrieve user information.
- Red Hat build of Keycloak checks if the response from the identity provider is valid. If valid, Red Hat build of Keycloak imports and creates a user if the user does not already exist. Red Hat build of Keycloak may ask the identity provider for further user information if the token does not contain that information. This behavior is identity federation. If the user already exists, Red Hat build of Keycloak may ask the user to link the identity returned from the identity provider with the existing account. This behavior is account linking. With Red Hat build of Keycloak, you can configure Account linking and specify it in the First Login Flow. At this step, Red Hat build of Keycloak authenticates the user and issues its token to access the requested resource in the service provider.
- When the user authenticates, Red Hat build of Keycloak redirects the user to the service provider by sending the token previously issued during the local authentication.
- The service provider receives the token from Red Hat build of Keycloak and permits access to the protected resource.
Variations of this flow are possible. For example, the client application can request a specific identity provider rather than displaying a list of them, or you can set Red Hat build of Keycloak to force users to provide additional information before federating their identity.
At the end of the authentication process, Red Hat build of Keycloak issues its token to client applications. Client applications are separate from the external identity providers, so they cannot see the client application’s protocol or how they validate the user’s identity. The provider only needs to know about Red Hat build of Keycloak.
9.2. Default Identity Provider
Red Hat build of Keycloak can redirect to an identity provider rather than displaying the login form. To enable this redirection:
Procedure
- Click Authentication in the menu.
- Click the Browser flow.
- Click the gear icon ⚙️ on the Identity Provider Redirector row.
- Set Default Identity Provider to the identity provider you want to redirect users to.
If Red Hat build of Keycloak does not find the configured default identity provider, the login form is displayed.
This authenticator is responsible for processing the kc_idp_hint query parameter. See the client suggested identity provider section for more information.
9.3. General configuration
The foundations of the identity broker configuration are identity providers (IDPs). Red Hat build of Keycloak creates identity providers for each realm and enables them for every application by default. Users from a realm can use any of the registered identity providers when signing in to an application.
Procedure
Click Identity Providers in the menu.
Identity Providers

Select an identity provider. Red Hat build of Keycloak displays the configuration page for the identity provider you selected.
Add Facebook identity Provider
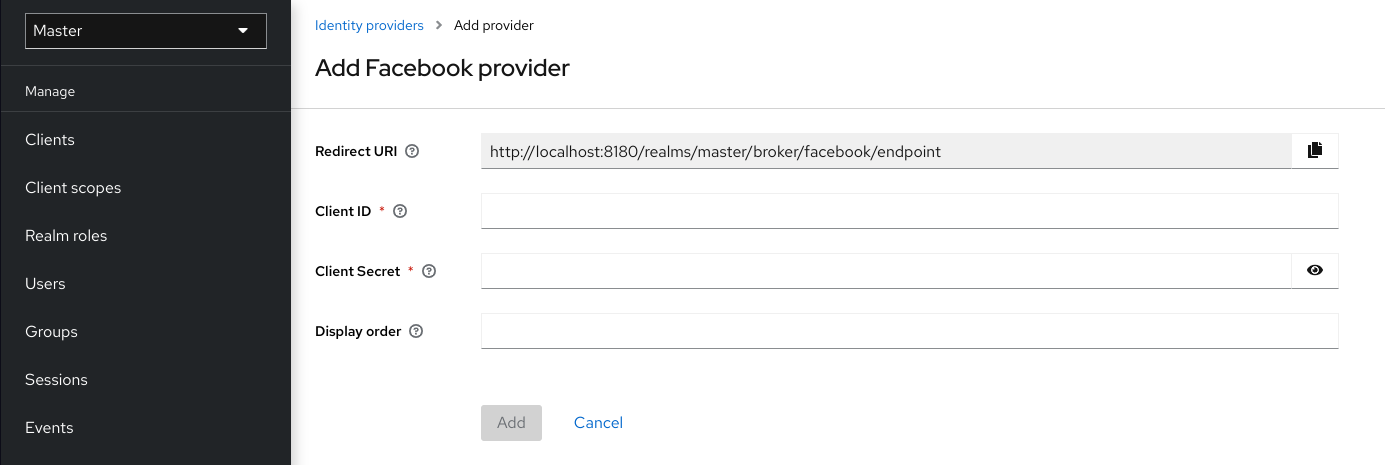
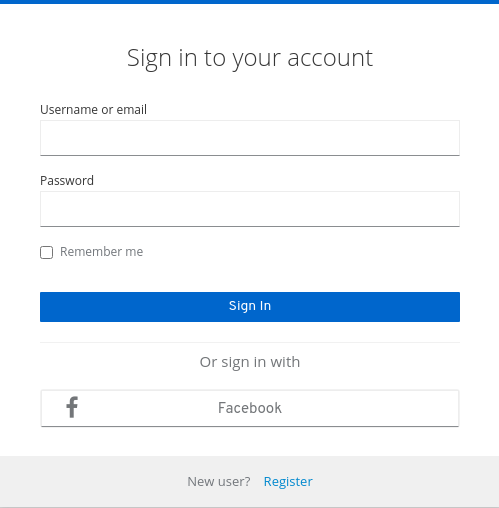
When you configure an identity provider, the identity provider appears on the Red Hat build of Keycloak login page as an option. You can place custom icons on the login screen for each identity provider. See custom icons for more information.
IDP login page
- Social
- Social providers enable social authentication in your realm. With Red Hat build of Keycloak, users can log in to your application using a social network account. Supported providers include Twitter, Facebook, Google, LinkedIn, Instagram, Microsoft, PayPal, Openshift v3, GitHub, GitLab, Bitbucket, and Stack Overflow.
- Protocol-based
- Protocol-based providers rely on specific protocols to authenticate and authorize users. Using these providers, you can connect to any identity provider compliant with a specific protocol. Red Hat build of Keycloak provides support for SAML v2.0 and OpenID Connect v1.0 protocols. You can configure and broker any identity provider based on these open standards.
Although each type of identity provider has its configuration options, all share a common configuration. The following configuration options available:
| Configuration | Description |
|---|---|
| Alias |
The alias is a unique identifier for an identity provider and references an internal identity provider. Red Hat build of Keycloak uses the alias to build redirect URIs for OpenID Connect protocols that require a redirect URI or callback URL to communicate with an identity provider. All identity providers must have an alias. Alias examples include |
| Enabled | Toggles the provider ON or OFF. |
| Hide on Login Page | When ON, Red Hat build of Keycloak does not display this provider as a login option on the login page. Clients can request this provider by using the 'kc_idp_hint' parameter in the URL to request a login. |
| Account Linking Only | When ON, Red Hat build of Keycloak links existing accounts with this provider. This provider cannot log users in, and Red Hat build of Keycloak does not display this provider as an option on the login page. |
| Store Tokens | When ON, Red Hat build of Keycloak stores tokens from the identity provider. |
| Stored Tokens Readable | When ON, users can retrieve the stored identity provider token. This action also applies to the broker client-level role read token. |
| Trust Email | When ON, Red Hat build of Keycloak trusts email addresses from the identity provider. If the realm requires email validation, users that log in from this identity provider do not need to perform the email verification process. |
| GUI Order | The sort order of the available identity providers on the login page. |
| Verify essential claim | When ON, ID tokens issued by the identity provider must have a specific claim, otherwise, the user can not authenticate through this broker |
| Essential claim | When Verify essential claim is ON, the name of the JWT token claim to filter (match is case sensitive) |
| Essential claim value | When Verify essential claim is ON, the value of the JWT token claim to match (supports regular expression format) |
| First Login Flow | The authentication flow Red Hat build of Keycloak triggers when users use this identity provider to log into Red Hat build of Keycloak for the first time. |
| Post Login Flow | The authentication flow Red Hat build of Keycloak triggers when a user finishes logging in with the external identity provider. |
| Sync Mode | Strategy to update user information from the identity provider through mappers. When choosing legacy, Red Hat build of Keycloak used the current behavior. Import does not update user data and force updates user data when possible. See Identity Provider Mappers for more information. |
9.5. OpenID Connect v1.0 identity providers
Red Hat build of Keycloak brokers identity providers based on the OpenID Connect protocol. These identity providers (IDPs) must support the Authorization Code Flow defined in the specification to authenticate users and authorize access.
Procedure
- Click Identity Providers in the menu.
From the
Add providerlist, selectOpenID Connect v1.0.Add identity provider
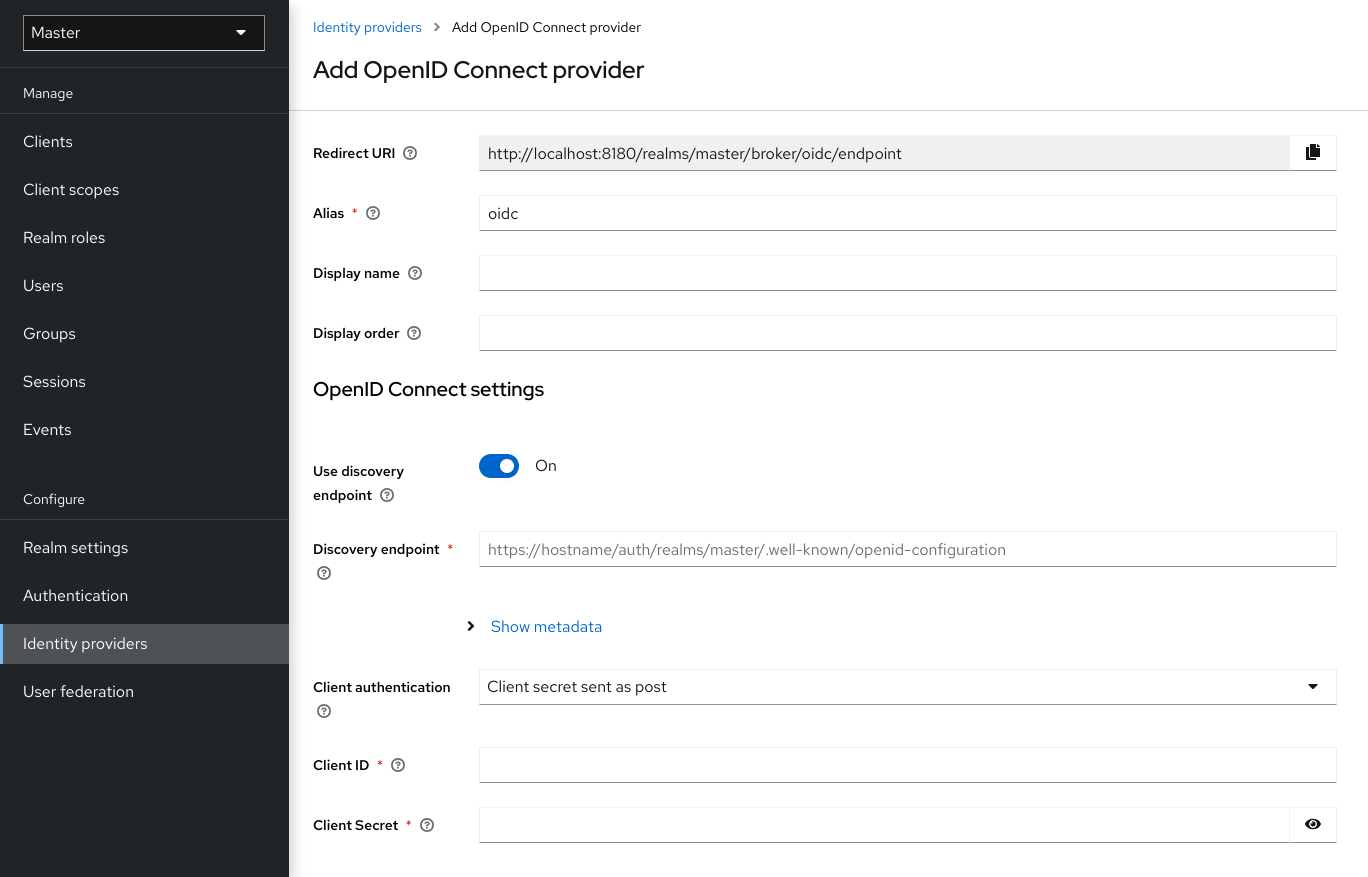
Enter your initial configuration options. See General IDP Configuration for more information about configuration options.
Expand Table 9.2. OpenID connect config Configuration Description Authorization URL
The authorization URL endpoint the OIDC protocol requires.
Token URL
The token URL endpoint the OIDC protocol requires.
Logout URL
The logout URL endpoint in the OIDC protocol. This value is optional.
Backchannel Logout
A background, out-of-band, REST request to the IDP to log out the user. Some IDPs perform logout through browser redirects only, as they may identify sessions using a browser cookie.
User Info URL
An endpoint the OIDC protocol defines. This endpoint points to user profile information.
Client Authentication
Defines the Client Authentication method Red Hat build of Keycloak uses with the Authorization Code Flow. In the case of JWT signed with a private key, Red Hat build of Keycloak uses the realm private key. In the other cases, define a client secret. See the Client Authentication specifications for more information.
Client ID
A realm acting as an OIDC client to the external IDP. The realm must have an OIDC client ID if you use the Authorization Code Flow to interact with the external IDP.
Client Secret
Client secret from an external vault. This secret is necessary if you are using the Authorization Code Flow.
Client Assertion Signature Algorithm
Signature algorithm to create JWT assertion as client authentication. In the case of JWT signed with private key or Client secret as jwt, it is required. If no algorithm is specified, the following algorithm is adapted.
RS256is adapted in the case of JWT signed with private key.HS256is adapted in the case of Client secret as jwt.Client Assertion Audience
The audience to use for the client assertion. The default value is the IDP’s token endpoint URL.
Issuer
Red Hat build of Keycloak validates issuer claims, in responses from the IDP, against this value.
Default Scopes
A list of OIDC scopes Red Hat build of Keycloak sends with the authentication request. The default value is
openid. A space separates each scope.Prompt
The prompt parameter in the OIDC specification. Through this parameter, you can force re-authentication and other options. See the specification for more details.
Accepts prompt=none forward from client
Specifies if the IDP accepts forwarded authentication requests containing the
prompt=nonequery parameter. If a realm receives an auth request withprompt=none, the realm checks if the user is currently authenticated and returns alogin_requirederror if the user has not logged in. When Red Hat build of Keycloak determines a default IDP for the auth request (using thekc_idp_hintquery parameter or having a default IDP for the realm), you can forward the auth request withprompt=noneto the default IDP. The default IDP checks the authentication of the user there. Because not all IDPs support requests withprompt=none, Red Hat build of Keycloak uses this switch to indicate that the default IDP supports the parameter before redirecting the authentication request.If the user is unauthenticated in the IDP, the client still receives a
login_requirederror. If the user is authentic in the IDP, the client can still receive aninteraction_requirederror if Red Hat build of Keycloak must display authentication pages that require user interaction. This authentication includes required actions (for example, password change), consent screens, and screens set to display by thefirst broker loginflow orpost broker loginflow.Validate Signatures
Specifies if Red Hat build of Keycloak verifies signatures on the external ID Token signed by this IDP. If ON, Red Hat build of Keycloak must know the public key of the external OIDC IDP. For performance purposes, Red Hat build of Keycloak caches the public key of the external OIDC identity provider.
Use JWKS URL
This switch is applicable if
Validate Signaturesis ON. If Use JWKS URL is ON, Red Hat build of Keycloak downloads the IDP’s public keys from the JWKS URL. New keys download when the identity provider generates a new keypair. If OFF, Red Hat build of Keycloak uses the public key (or certificate) from its database, so when the IDP keypair changes, import the new key to the Red Hat build of Keycloak database as well.JWKS URL
The URL pointing to the location of the IDP JWK keys. For more information, see the JWK specification. If you use an external Red Hat build of Keycloak as an IDP, you can use a URL such as http://broker-keycloak:8180/realms/test/protocol/openid-connect/certs if your brokered Red Hat build of Keycloak is running on http://broker-keycloak:8180 and its realm is
test.Validating Public Key
The public key in PEM format that Red Hat build of Keycloak uses to verify external IDP signatures. This key applies if
Use JWKS URLis OFF.Validating Public Key Id
This setting applies if Use JWKS URL is OFF. This setting specifies the ID of the public key in PEM format. Because there is no standard way for computing key ID from the key, external identity providers can use different algorithms from what Red Hat build of Keycloak uses. If this field’s value is not specified, Red Hat build of Keycloak uses the validating public key for all requests, regardless of the key ID sent by the external IDP. When ON, this field’s value is the key ID used by Red Hat build of Keycloak for validating signatures from providers and must match the key ID specified by the IDP.
You can import all this configuration data by providing a URL or file that points to OpenID Provider Metadata. If you connect to a Red Hat build of Keycloak external IDP, you can import the IDP settings from <root>/realms/{realm-name}/.well-known/openid-configuration. This link is a JSON document describing metadata about the IDP.
If you want to use Json Web Encryption (JWE) ID Tokens or UserInfo responses in the provider, the IDP needs to know the public key to use with Red Hat build of Keycloak. The provider uses the realm keys defined for the different encryption algorithms to decrypt the tokens. Red Hat build of Keycloak provides a standard JWKS endpoint which the IDP can use for downloading the keys automatically.
9.6. SAML v2.0 Identity Providers
Red Hat build of Keycloak can broker identity providers based on the SAML v2.0 protocol.
Procedure
- Click Identity Providers in the menu.
From the
Add providerlist, selectSAML v2.0.Add identity provider

- Enter your initial configuration options. See General IDP Configuration for more information about configuration options.
| Configuration | Description |
|---|---|
| Service Provider Entity ID |
The SAML Entity ID that the remote Identity Provider uses to identify requests from this Service Provider. By default, this setting is set to the realms base URL |
| Identity Provider Entity ID | The Entity ID used to validate the Issuer for received SAML assertions. If empty, no Issuer validation is performed. |
| Single Sign-On Service URL | The SAML endpoint that starts the authentication process. If your SAML IDP publishes an IDP entity descriptor, the value of this field is specified there. |
| Single Logout Service URL | The SAML logout endpoint. If your SAML IDP publishes an IDP entity descriptor, the value of this field is specified there. |
| Backchannel Logout | Toggle this switch to ON if your SAML IDP supports back channel logout. |
| NameID Policy Format |
The URI reference corresponding to a name identifier format. By default, Red Hat build of Keycloak sets it to |
| Principal Type | Specifies which part of the SAML assertion will be used to identify and track external user identities. Can be either Subject NameID or SAML attribute (either by name or by friendly name). Subject NameID value can not be set together with 'urn:oasis:names:tc:SAML:2.0:nameid-format:transient' NameID Policy Format value. |
| Principal Attribute | If a Principal type is non-blank, this field specifies the name ("Attribute [Name]") or the friendly name ("Attribute [Friendly Name]") of the identifying attribute. |
| Allow create | Allow the external identity provider to create a new identifier to represent the principal. |
| HTTP-POST Binding Response | Controls the SAML binding in response to any SAML requests sent by an external IDP. When OFF, Red Hat build of Keycloak uses Redirect Binding. |
| HTTP-POST Binding for AuthnRequest | Controls the SAML binding when requesting authentication from an external IDP. When OFF, Red Hat build of Keycloak uses Redirect Binding. |
| Want AuthnRequests Signed | When ON, Red Hat build of Keycloak uses the realm’s keypair to sign requests sent to the external SAML IDP. |
| Want Assertions Signed | Indicates whether this service provider expects a signed Assertion. |
| Want Assertions Encrypted | Indicates whether this service provider expects an encrypted Assertion. |
| Signature Algorithm |
If Want AuthnRequests Signed is ON, the signature algorithm to use. Note that |
| Encryption Algorithm | Encryption algorithm, which is used by SAML IDP for encryption of SAML documents, assertions, or IDs. The corresponding decryption key for decrypt SAML document parts will be chosen based on this configured algorithm and should be available in realm keys for the encryption (ENC) usage. If the algorithm is not configured, any supported algorithm is allowed and a decryption key will be chosen based on the algorithm specified in SAML document itself. |
| SAML Signature Key Name |
Signed SAML documents sent using POST binding contain the identification of signing key in |
| Force Authentication | The user must enter their credentials at the external IDP even when the user is already logged in. |
| Validate Signature | When ON, the realm expects SAML requests and responses from the external IDP to be digitally signed. |
| Metadata descriptor URL |
External URL where Identity Provider publishes the |
| Use metadata descriptor URL |
When ON, the certificates to validate signatures are automatically downloaded from the
When the option is OFF, the certificates in |
| Validating X509 Certificates |
The public certificates Red Hat build of Keycloak uses to validate the signatures of SAML requests and responses from the external IDP when |
| Sign Service Provider Metadata | When ON, Red Hat build of Keycloak uses the realm’s key pair to sign the SAML Service Provider Metadata descriptor. |
| Pass subject |
Controls if Red Hat build of Keycloak forwards a |
| Attribute Consuming Service Index | Identifies the attribute set to request to the remote IDP. Red Hat build of Keycloak automatically adds the attributes mapped in the identity provider configuration to the autogenerated SP metadata document. |
| Attribute Consuming Service Name | A descriptive name for the set of attributes that are advertised in the autogenerated SP metadata document. |
You can import all configuration data by providing a URL or a file pointing to the SAML IDP entity descriptor of the external IDP. If you are connecting to a Red Hat build of Keycloak external IDP, you can import the IDP settings from the URL <root>/realms/{realm-name}/protocol/saml/descriptor. This link is an XML document describing metadata about the IDP. You can also import all this configuration data by providing a URL or XML file pointing to the external SAML IDP’s entity descriptor to connect to.
9.6.1. Requesting specific AuthnContexts
Identity Providers facilitate clients specifying constraints on the authentication method verifying the user identity. For example, asking for MFA, Kerberos authentication, or security requirements. These constraints use particular AuthnContext criteria. A client can ask for one or more criteria and specify how the Identity Provider must match the requested AuthnContext, exactly, or by satisfying other equivalents.
You can list the criteria your Service Provider requires by adding ClassRefs or DeclRefs in the Requested AuthnContext Constraints section. Usually, you need to provide either ClassRefs or DeclRefs, so check with your Identity Provider documentation which values are supported. If no ClassRefs or DeclRefs are present, the Identity Provider does not enforce additional constraints.
| Configuration | Description |
|---|---|
| Comparison |
The method the Identity Provider uses to evaluate the context requirements. The available values are |
| AuthnContext ClassRefs | The AuthnContext ClassRefs describing the required criteria. |
| AuthnContext DeclRefs | The AuthnContext DeclRefs describing the required criteria. |
9.6.2. SP Descriptor
When you access the provider’s SAML SP metadata, look for the Endpoints item in the identity provider configuration settings. It contains a SAML 2.0 Service Provider Metadata link which generates the SAML entity descriptor for the Service Provider. You can download the descriptor or copy its URL and then import it into the remote Identity Provider.
This metadata is also available publicly by going to the following URL:
http[s]://{host:port}/realms/{realm-name}/broker/{broker-alias}/endpoint/descriptor
http[s]://{host:port}/realms/{realm-name}/broker/{broker-alias}/endpoint/descriptorEnsure you save any configuration changes before accessing the descriptor.
9.6.3. Send subject in SAML requests
By default, a social button pointing to a SAML Identity Provider redirects the user to the following login URL:
http[s]://{host:port}/realms/${realm-name}/broker/{broker-alias}/login
http[s]://{host:port}/realms/${realm-name}/broker/{broker-alias}/login
Adding a query parameter named login_hint to this URL adds the parameter’s value to SAML request as a Subject attribute. If this query parameter is empty, Red Hat build of Keycloak does not add a subject to the request.
Enable the "Pass subject" option to send the subject in SAML requests.
9.7. Client-suggested Identity Provider
OIDC applications can bypass the Red Hat build of Keycloak login page by hinting at the identity provider they want to use. You can enable this by setting the kc_idp_hint query parameter in the Authorization Code Flow authorization endpoint.
With Red Hat build of Keycloak OIDC client adapters, you can specify this query parameter when you access a secured resource in the application.
For example:
GET /myapplication.com?kc_idp_hint=facebook HTTP/1.1
Host: localhost:8080
GET /myapplication.com?kc_idp_hint=facebook HTTP/1.1
Host: localhost:8080
In this case, your realm must have an identity provider with a facebook alias. If this provider does not exist, the login form is displayed.
If you are using the keycloak.js adapter, you can also achieve the same behavior as follows:
const keycloak = new Keycloak('keycloak.json');

keycloak.createLoginUrl({
	idpHint: 'facebook'
});
const keycloak = new Keycloak('keycloak.json');

keycloak.createLoginUrl({
	idpHint: 'facebook'
});
With the kc_idp_hint query parameter, the client can override the default identity provider if you configure one for the Identity Provider Redirector authenticator. The client can disable the automatic redirecting by setting the kc_idp_hint query parameter to an empty value.
9.8. Mapping claims and assertions
You can import the SAML and OpenID Connect metadata, provided by the external IDP you are authenticating with, into the realm. After importing, you can extract user profile metadata and other information, so you can make it available to your applications.
Each user logging into your realm using an external identity provider has an entry in the local Red Hat build of Keycloak database, based on the metadata from the SAML or OIDC assertions and claims.
Procedure
- Click Identity Providers in the menu.
- Select one of the identity providers in the list.
Click the Mappers tab.
Identity provider mappers
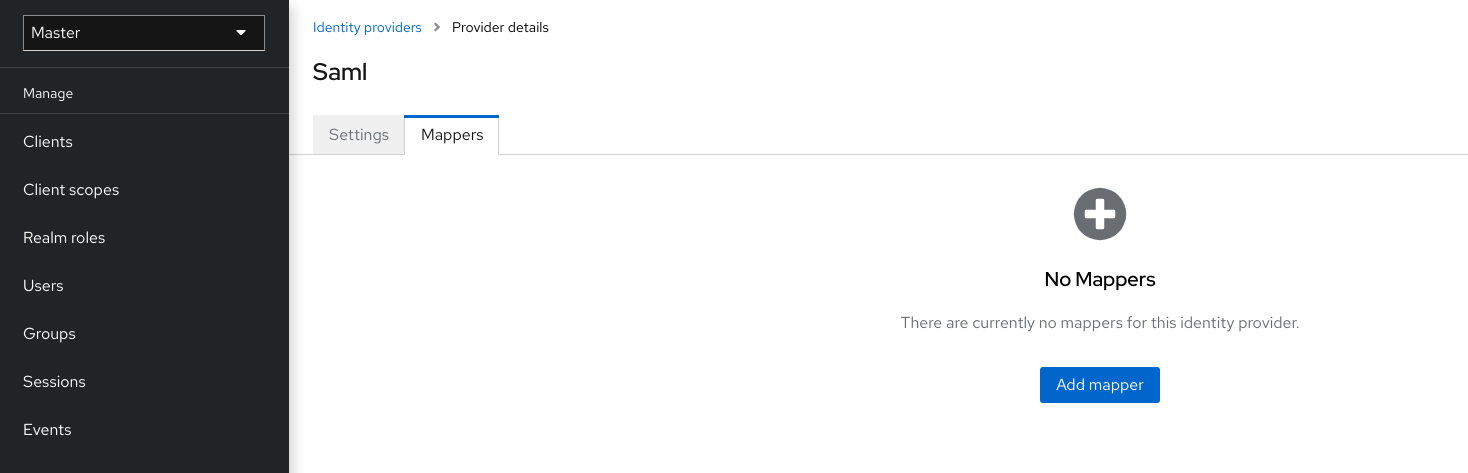
Click Add mapper.
Identity provider mapper
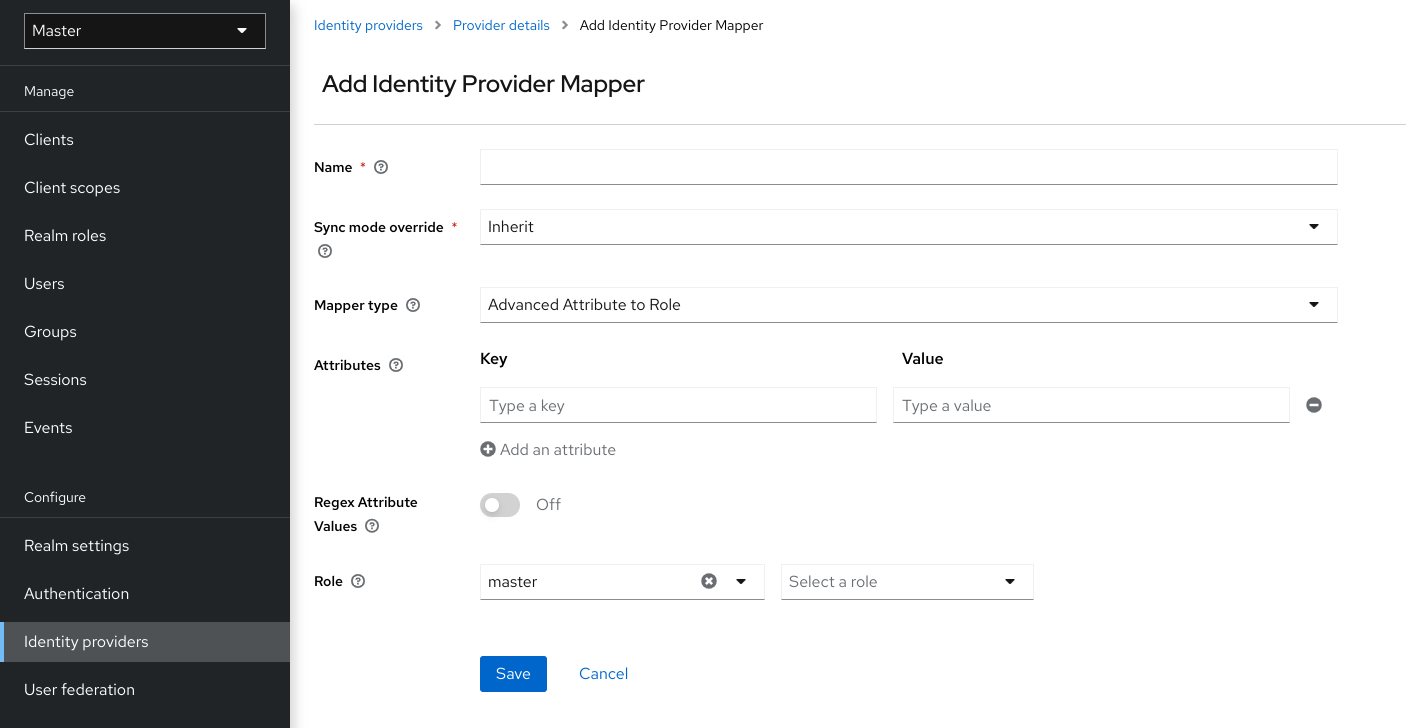
Select a value for Sync Mode Override. The mapper updates user information when users log in repeatedly according to this setting.
- Select legacy to use the behavior of the previous Red Hat build of Keycloak version.
- Select import to import data from when the user was first created in Red Hat build of Keycloak during the first login to Red Hat build of Keycloak with a particular identity provider.
- Select force to update user data at each user login.
- Select inherit to use the sync mode configured in the identity provider. All other options will override this sync mode.
- Select a mapper from the Mapper Type list. Hover over the Mapper Type for a description of the mapper and configuration to enter for the mapper.
- Click Save.
For JSON-based claims, you can use dot notation for nesting and square brackets to access array fields by index. For example, contact.address[0].country.
To investigate the structure of user profile JSON data provided by social providers, you can enable the DEBUG level logger org.keycloak.social.user_profile_dump when starting the server.
9.9. Available user session data
After a user login from an external IDP, Red Hat build of Keycloak stores user session note data that you can access. This data can be propagated to the client requesting log in using the token or SAML assertion passed back to the client using an appropriate client mapper.
- identity_provider
- The IDP alias of the broker used to perform the login.
- identity_provider_identity
-
The IDP username of the currently authenticated user. Often, but not always, the same as the Red Hat build of Keycloak username. For example, Red Hat build of Keycloak can link a user john` to a Facebook user
john123@gmail.com. In that case, the value of the user session note isjohn123@gmail.com.
You can use a Protocol Mapper of type User Session Note to propagate this information to your clients.
9.10. First login flow
When users log in through identity brokering, Red Hat build of Keycloak imports and links aspects of the user within the realm’s local database. When Red Hat build of Keycloak successfully authenticates users through an external identity provider, two situations can exist:
- Red Hat build of Keycloak has already imported and linked a user account with the authenticated identity provider account. In this case, Red Hat build of Keycloak authenticates as the existing user and redirects back to the application.
- No account exists for this user in Red Hat build of Keycloak. Usually, you register and import a new account into the Red Hat build of Keycloak database, but there may be an existing Red Hat build of Keycloak account with the same email address. Automatically linking the existing local account to the external identity provider is a potential security hole. You cannot always trust the information you get from the external identity provider.
Different organizations have different requirements when dealing with some of these situations. With Red Hat build of Keycloak, you can use the First Login Flow option in the IDP settings to choose a workflow for a user logging in from an external IDP for the first time. By default, the First Login Flow option points to the first broker login flow, but you can use your flow or different flows for different identity providers.
The flow is in the Admin Console under the Authentication tab. When you choose the First Broker Login flow, you see the authenticators used by default. You can re-configure the existing flow. For example, you can disable some authenticators, mark some of them as required, or configure some authenticators.
9.10.1. Default first login flow authenticators
- Review Profile
- This authenticator displays the profile information page, so the users can review their profile that Red Hat build of Keycloak retrieves from an identity provider.
-
You can set the
Update Profile On First Loginoption in the Actions menu. - When ON, users are presented with the profile page requesting additional information to federate the user’s identities.
- When missing, users are presented with the profile page if the identity provider does not provide mandatory information, such as email, first name, or last name.
-
When OFF, the profile page does not display unless the user clicks in a later phase on the
Review profile infolink in the page displayed by theConfirm Link Existing Accountauthenticator.
- Create User If Unique
This authenticator checks if there is already an existing Red Hat build of Keycloak account with the same email or username like the account from the identity provider. If it’s not, then the authenticator just creates a new local Red Hat build of Keycloak account and links it with the identity provider and the whole flow is finished. Otherwise it goes to the next
Handle Existing Accountsubflow. If you always want to ensure that there is no duplicated account, you can mark this authenticator asREQUIRED. In this case, the user will see the error page if there is an existing Red Hat build of Keycloak account and the user will need to link the identity provider account through Account management.- This authenticator verifies that there is already a Red Hat build of Keycloak account with the same email or username as the identity provider’s account.
- If an account does not exist, the authenticator creates a local Red Hat build of Keycloak account, links this account with the identity provider, and terminates the flow.
-
If an account exists, the authenticator implements the next
Handle Existing Accountsub-flow. -
To ensure there is no duplicated account, you can mark this authenticator as
REQUIRED. The user sees the error page if a Red Hat build of Keycloak account exists, and users must link their identity provider account through Account management.
- Confirm Link Existing Account
-
On the information page, users see a Red Hat build of Keycloak account with the same email. Users can review their profile again and use a different email or username. The flow restarts and goes back to the
Review Profileauthenticator. - Alternatively, users can confirm that they want to link their identity provider account with their existing Red Hat build of Keycloak account.
- Disable this authenticator if you do not want users to see this confirmation page and go straight to linking identity provider account by email verification or re-authentication.
-
On the information page, users see a Red Hat build of Keycloak account with the same email. Users can review their profile again and use a different email or username. The flow restarts and goes back to the
- Verify Existing Account By Email
-
This authenticator is
ALTERNATIVEby default. Red Hat build of Keycloak uses this authenticator if the realm has an SMTP setup configured. - The authenticator sends an email to users to confirm that they want to link the identity provider with their Red Hat build of Keycloak account.
- Disable this authenticator if you do not want to confirm linking by email, but want users to reauthenticate with their password.
-
This authenticator is
- Verify Existing Account By Re-authentication
- Use this authenticator if the email authenticator is not available. For example, you have not configured SMTP for your realm. This authenticator displays a login screen for users to authenticate to link their Red Hat build of Keycloak account with the Identity Provider.
- Users can also re-authenticate with another identity provider already linked to their Red Hat build of Keycloak account.
- You can force users to use OTP. Otherwise, it is optional and used if you have set OTP for the user account.
9.10.2. Automatically link existing first login flow
The AutoLink authenticator is dangerous in a generic environment where users can register themselves using arbitrary usernames or email addresses. Do not use this authenticator unless you are carefully curating user registration and assigning usernames and email addresses.
To configure a first login flow that links users automatically without prompting, create a new flow with the following two authenticators:
- Create User If Unique
- This authenticator ensures Red Hat build of Keycloak handles unique users. Set the authenticator requirement to Alternative.
- Automatically Set Existing User
- This authenticator sets an existing user to the authentication context without verification. Set the authenticator requirement to "Alternative".
This setup is the simplest setup available, but it is possible to use other authenticators. For example: * You can add the Review Profile authenticator to the beginning of the flow if you want end users to confirm their profile information. * You can add authentication mechanisms to this flow, forcing a user to verify their credentials. Adding authentication mechanisms requires a complex flow. For example, you can set the "Automatically Set Existing User" and "Password Form" as "Required" in an "Alternative" sub-flow.
9.10.3. Disabling automatic user creation
The Default first login flow looks up the Red Hat build of Keycloak account matching the external identity and offers to link them. If no matching Red Hat build of Keycloak account exists, the flow automatically creates one.
This default behavior may be unsuitable for some setups. One example is when you use a read-only LDAP user store, where all users are pre-created. In this case, you must switch off automatic user creation.
To disable user creation:
Procedure
- Click Authentication in the menu.
- Select First Broker Login from the list.
- Set Create User If Unique to DISABLED.
- Set Confirm Link Existing Account to DISABLED.
This configuration also implies that Red Hat build of Keycloak itself won’t be able to determine which internal account would correspond to the external identity. Therefore, the Verify Existing Account By Re-authentication authenticator will ask the user to provide both username and password.
Enabling or disabling user creation by identity provider is completely independent on the realm User Registration switch. You can have enabled user-creation by identity provider and at the same time disabled user self-registration in the realm login settings or vice-versa.
9.10.4. Detect existing user first login flow
In order to configure a first login flow in which:
- only users already registered in this realm can log in,
- users are automatically linked without being prompted,
create a new flow with the following two authenticators:
- Detect Existing Broker User
-
This authenticator ensures that unique users are handled. Set the authenticator requirement to
REQUIRED. - Automatically Set Existing User
-
Automatically sets an existing user to the authentication context without any verification. Set the authenticator requirement to
REQUIRED.
You have to set the First Login Flow of the identity provider configuration to that flow. You could set the also set Sync Mode to force if you want to update the user profile (Last Name, First Name…) with the identity provider attributes.
This flow can be used if you want to delegate the identity to other identity providers (such as GitHub, Facebook …) but you want to manage which users that can log in.
With this configuration, Red Hat build of Keycloak is unable to determine which internal account corresponds to the external identity. The Verify Existing Account By Re-authentication authenticator asks the provider for the username and password.
9.11. Retrieving external IDP tokens
With Red Hat build of Keycloak, you can store tokens and responses from the authentication process with the external IDP using the Store Token configuration option on the IDP’s settings page.
Application code can retrieve these tokens and responses to import extra user information or to request the external IDP securely. For example, an application can use the Google token to use other Google services and REST APIs. To retrieve a token for a particular identity provider, send a request as follows:
GET /realms/{realm}/broker/{provider_alias}/token HTTP/1.1
Host: localhost:8080
Authorization: Bearer <KEYCLOAK ACCESS TOKEN>
GET /realms/{realm}/broker/{provider_alias}/token HTTP/1.1
Host: localhost:8080
Authorization: Bearer <KEYCLOAK ACCESS TOKEN>
An application must authenticate with Red Hat build of Keycloak and receive an access token. This access token must have the broker client-level role read-token set, so the user must have a role mapping for this role, and the client application must have that role within its scope. In this case, since you are accessing a protected service in Red Hat build of Keycloak, send the access token issued by Red Hat build of Keycloak during the user authentication. You can assign this role to newly imported users in the broker configuration page by setting the Stored Tokens Readable switch to ON.
These external tokens can be re-established by logging in again through the provider or using the client-initiated account linking API.
9.12. Identity broker logout
When logging out, Red Hat build of Keycloak sends a request to the external identity provider that is used to log in initially and logs the user out of this identity provider. You can skip this behavior and avoid logging out of the external identity provider. See adapter logout documentation for more information.
9.4. Social Identity ProvidersCopier lienLien copié sur presse-papiers!
A social identity provider can delegate authentication to a trusted, respected social media account. Red Hat build of Keycloak includes support for social networks such as Google, Facebook, Twitter, GitHub, LinkedIn, Microsoft, and Stack Overflow.
9.4.1. BitbucketCopier lienLien copié sur presse-papiers!
To log in with Bitbucket, perform the following procedure.
Procedure
From the Add provider list, select Bitbucket.
Add identity provider
In a separate browser tab, perform the OAuth on Bitbucket Cloud process. When you click Add Consumer:
Keyinto the Client ID field.Secretinto the Client Secret field.9.4.2. FacebookCopier lienLien copié sur presse-papiers!
Procedure
From the Add provider list, select Facebook.
Add identity provider
In a separate browser tab, open the Meta for Developers.
Select Create App.
Add a use case
Select Other.
Select an app type
Select Consumer.
Create an app
Click Create app. Meta then brings you to the dashboard.
Add a product
App IDandApp Secretvalues from your Facebook app into the Client ID and Client Secret fields in Red Hat build of Keycloak.Red Hat build of Keycloak sends profile requests to
graph.facebook.com/me?fields=id,name,email,first_name,last_nameby default. The response contains the id, name, email, first_name, and last_name fields only. To fetch additional fields from the Facebook profile, add a corresponding scope and add the field name in theAdditional user’s profile fieldsconfiguration option field.9.4.3. GitHubCopier lienLien copié sur presse-papiers!
To log in with GitHub, perform the following procedure.
Procedure
From the Add provider list, select Github.
Add identity provider
In a separate browser tab, create an OAUTH app.
Client IDinto the Client ID field.Client secretinto the Client Secret field.9.4.4. GitLabCopier lienLien copié sur presse-papiers!
Procedure
From the Add provider list, select GitLab.
Add identity provider
In a separate browser tab, add a new GitLab application.
Application IDinto the Client ID field.Secretinto the Client Secret field.9.4.5. GoogleCopier lienLien copié sur presse-papiers!
Procedure
From the Add provider list, select Google.
Add identity provider
In the Google dashboard:
Your Client IDinto the Client ID field.Your Client secretinto the Client Secret field.9.4.6. InstagramCopier lienLien copié sur presse-papiers!
Procedure
From the Add provider list, select Instagram.
Add identity provider
In a separate browser tab, open the Meta for Developers.
Select Create App.
Add a use case
Select Other.
Select an app type
Select Consumer.
Create an app
Enter a URL for your site.
Add a product
Click Create New App.
Create a New Instagram App ID
Enter a value into the Display name field.
Set up the app
Instagram App IDinto the Client ID field.Instagram App Secretinto the Client Secret field.9.4.7. LinkedInCopier lienLien copié sur presse-papiers!
Procedure
From the Add provider list, select LinkedIn.
Add identity provider
In a separate browser tab, create an app in the LinkedIn developer portal.
Client IDinto the Client ID field.Client Secretinto the Client Secret field.9.4.8. MicrosoftCopier lienLien copié sur presse-papiers!
Procedure
From the Add provider list, select Microsoft.
Add identity provider
In a separate browser tab, register an app on Microsoft Azure under App registrations.
Application (client) IDinto the Client ID field.Valueof the secret into the Client Secret field.9.4.9. OpenShift 3Copier lienLien copié sur presse-papiers!
Procedure
From the Add provider list, select Openshift v3.
Add identity provider
Register your client using the
occommand-line tool.nameof your OAuth client. Passed asclient_idrequest parameter when making requests to<openshift_master>/oauth/authorizeand<openshift_master>/oauth/token.secretRed Hat build of Keycloak uses for theclient_secretrequest parameter.redirect_uriparameter specified in requests to<openshift_master>/oauth/authorizeand<openshift_master>/oauth/tokenmust be equal to (or prefixed by) one of the URIs inredirectURIs. You can obtain this from the Redirect URI field in the Identity Provider screengrantMethodRed Hat build of Keycloak uses to determine the action when this client requests tokens but has not been granted access by the user.9.4.10. OpenShift 4Copier lienLien copié sur presse-papiers!
Prerequisites
Procedure
Enter the Client ID and Client Secret and in the Base URL field, enter the API URL of your OpenShift 4 instance. Additionally, you can copy the Redirect URI to your clipboard.
Add identity provider
Register your client, either via OpenShift 4 Console (Home
occommand-line tool.nameof your OAuth client. Passed asclient_idrequest parameter when making requests to<openshift_master>/oauth/authorizeand<openshift_master>/oauth/token. Thenameparameter must be the same in theOAuthClientobject and the Red Hat build of Keycloak configuration.secretRed Hat build of Keycloak uses as theclient_secretrequest parameter.redirect_uriparameter specified in requests to<openshift_master>/oauth/authorizeand<openshift_master>/oauth/tokenmust be equal to (or prefixed by) one of the URIs inredirectURIs. The easiest way to configure it correctly is to copy-paste it from Red Hat build of Keycloak OpenShift 4 Identity Provider configuration page (Redirect URIfield).grantMethodRed Hat build of Keycloak uses to determine the action when this client requests tokens but has not been granted access by the user.In the end you should see the OpenShift 4 Identity Provider on the login page of your Red Hat build of Keycloak instance. After clicking on it, you should be redirected to the OpenShift 4 login page.
Result
See official OpenShift documentation for more information.
9.4.11. PayPalCopier lienLien copié sur presse-papiers!
Procedure
From the Add provider list, select PayPal.
Add identity provider
In a separate browser tab, open the PayPal Developer applications area.
localhost. If you want to use Red Hat build of Keycloak locally, replace thelocalhostin the Return URL by127.0.0.1and then access Red Hat build of Keycloak using127.0.0.1in the browser intead oflocalhost.Client IDinto the Client ID field.Secret key 1into the Client Secret field.9.4.12. Stack overflowCopier lienLien copié sur presse-papiers!
Procedure
From the Add provider list, select Stack Overflow.
Add identity provider
In a separate browser tab, log into registering your application on Stack Apps.
Register application
Click Register Your Application.
Settings
Client Idinto the Client ID field.Client Secretinto the Client Secret field.Keyinto the Key field.9.4.13. TwitterCopier lienLien copié sur presse-papiers!
Prerequisites
Procedure
From the Add provider list, select Twitter.
Add identity provider
In a separate browser tab, create an app in Twitter Application Management.
localhost.API Keyinto the Client ID field.API Key Secretinto the Client Secret field.