Ce contenu n'est pas disponible dans la langue sélectionnée.
31.3. Setting up JBoss EAP 6 Instances
31.3.1. Configuring the Agent to Discover EAP 6 Instances
Copier lienLien copié sur presse-papiers!
As covered in Chapter 4, Interactions with System Users for Agents and Resources, the system user as which the agent runs has a direct effect on how the agent can manage certain resource types. For EAP instances, the agent's system user must have the appropriate permissions to be able to manage EAP resources:
- The agent must have read permissions to the
run.jarfile, plus execute and search permissions for every directory in the path to therun.jarfile. - When a JBoss EAP 6 instance is installed from an RPM, the agent user must belong to the same system group which runs the EAP instance. This is
jboss, by default.
31.3.2. Configuration for Servers and Profiles
Copier lienLien copié sur presse-papiers!
31.3.2.1. Differences for Standalone Servers and Domains
Copier lienLien copié sur presse-papiers!
Section 31.1, “The Structure of JBoss EAP 6” goes over some of the differences between standalone servers and domain structures. The crucial difference for configuration is that with a standalone server, all of the configuration is performed directly on the child entries. With a domain, configuration is divided, with almost all configuration centralized in the domain-managed profiles and server groups.
This is reflected in the EAP 6 management console. Almost all configuration is under the Profiles area. The domain profiles define individual subsystem configuration, system properties, global JVM settings, and server group configuration.
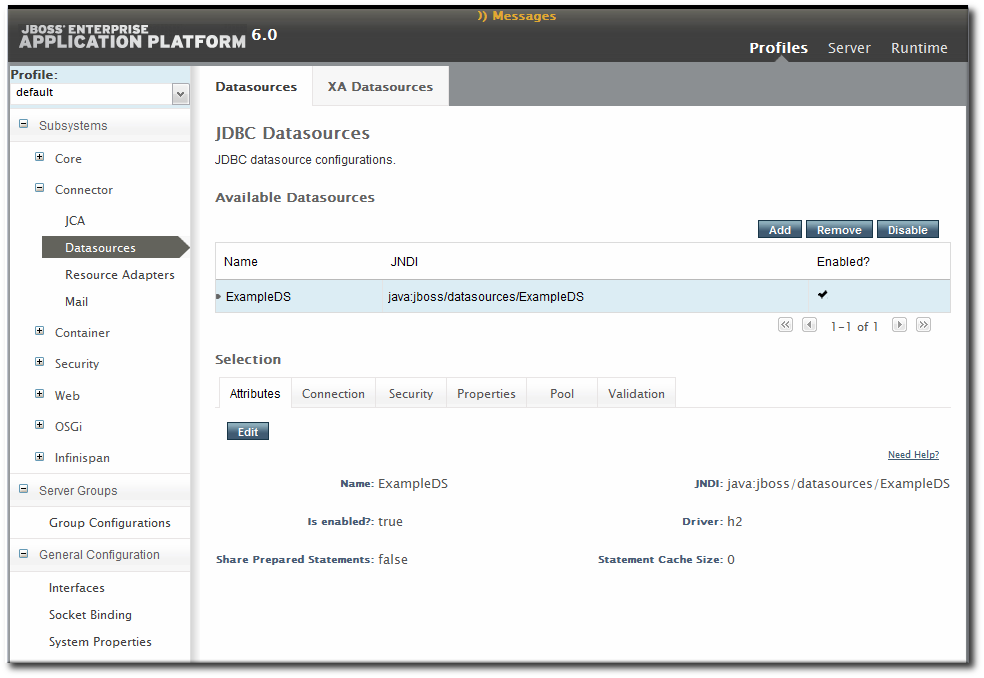
Figure 31.6. Profiles Area in the EAP 6 Console
The Servers area covers the limited amount of configuration that is set on a managed server, mainly a local JVM definition and operations like stopping and starting the server.
In JBoss ON, the major configuration areas for the domain — profiles and their subsystems, socket bindings, server groups — are broken out as separate resource types. This configuration is applied to the managed server (through the server group), much like a template.
Always edit the resource which originates the configuration settings. For most settings, that means editing the related child resource of the domain controller.
- Subsystem configuration is located in the profile resources within the Profiles autogroup for the domain controller.
- JVM definitions are configured under the domain controller (domain-wide defaults), server group (group-wide settings), or the managed server (local settings).
- Network interfaces are configured under the domain controller.
- Socket bindings themselves are configured as part of the domain controller configuration, in the entries under the SocketBindings autogroup for the domain controller. Each server group and managed server has an offset, a number that is added to the socket bindings value, which is used to give the managed servers unique port numbers in the domain; these offsets are set on the server group and managed server connection settings.
- System properties can be set on almost any server resource: the domain controller, host controller, server group, managed server.
Some configuration settings (JVM definitions and system properties) can be defined at different levels: domain, server group, or managed server. In that case, the configuration works in a cascade, with the lowest-level configuration taking precedence. So, server group configuration trumps domain settings, and managed server settings supersede server group settings. For those configuration settings, be sure to set the configuration at the appropriate level in the domain hierarchy. To apply settings to the entire domain, edit the relevant domain entry; to set it at the server group or server level, create or edit the configuration at that entry level.
31.3.2.2. Requried Management Interfaces on EAP 6
Copier lienLien copié sur presse-papiers!
The EAP 6 plug-in in JBoss ON connects to the default HTTP management interface for the EAP 6 domain controller. This management interface is used to manage and monitor the EAP 6 domain instance.
If the HTTP management interface has been removed or disabled, the agent (using the EAP 6 plug-in) will not be able to connect to the EAP 6 domain instance. Therefore, it cannot manage or monitor the EAP 6 domain resource and the resource will appear to be unavbailable, even if it is running.
If necessary, enable the HTTP management interface for the JBoss ON agent to connect to, using the EAP 6 CLI:
/host=instanceName/core-service=management/management-interface=http-interface:add(interface=http,port="\${jboss.management.http.port:9990}",security-realm=ManagementRealm31.3.2.3. Configuration Features in JBoss ON
Copier lienLien copié sur presse-papiers!
JBoss ON tracks all configuration changes that are made to JBoss ON resources (through the JBoss ON UI or CLI). The emphasis on JBoss ON is not only on making configuration changes; it is on managing configuration. As with other management areas in JBoss ON, the configuration maintains its history. This allows administrators to manage configuration in the context of changes and their performance or maintenance implications:
- View the change history, including diffs between versions
- Rollback changes to any previous version, simply by clicking a button
- Track which users made changes, as part of an audit trail
- Use alerting to notify administrators of any configuration changes
- Define drift monitoring to track configuration changes against a defined baseline and to control unexpected configuration changes
For each resource, JBoss ON breaks out two types of configuration: general resource properties (in the Configuration tab) and connection properties that the agent uses to connect to the resource (in the Inventory tab). Both types of configuration have configuration histories, can be reverted to previous versions, and can be used for alerting and monitoring. In reality, editing either type of configuration could end up editing the same configuration file on the resource. These two configuration areas are separated in JBoss ON to help differentiate between the configuration that affects resource behavior and the configuration that affects connections to the resource.
Even in cases when the configuration or connection settings cannot be edited, JBoss ON will still let administrators view what configuration is being applied to that resource. This is particularly useful for managed servers, which use configuration defined in the profile resources.
31.3.3. Creating Management Users
Copier lienLien copié sur presse-papiers!
The JBoss ON agents connect to the EAP 6 server as a management user. This enables JBoss ON to perform tasks like changing the configuration or starting and stopping resources.
Having a management user is a requirement for JBoss ON to be able to manage EAP 6 instances.
There are several different ways to create a management user:
- Using an LDAP directory or external data store. This is the most secure implementation for EAP 6 and is recommended.
- Creating a management user through JBoss ON.
- Creating a local EAP account through the EAP
add-userscript.
Any of these are valid, according to the security implementations and needs of the local EAP 6 instance, as long as a username and password is set in the EAP 6 resource connection properties.
31.3.3.1. Setting the Credentials for a Management User
Copier lienLien copié sur presse-papiers!
JBoss ON requires a username and password to connect to an EAP 6 server. Any EAP 6 user can be used, so long as that user has the appropriate permissions to carry out operations, application deployments, configuration changes, and other maintenance for the resource.
JBoss ON is agnostic about the EAP user configuration; it only sends the credentials to EAP, and then the EAP server processes the authentication request. Therefore, even if EAP is configured to use an LDAP directory as a user store or other security realms, JBoss ON does not need that information. It only needs the username and password.
The management user is defined in the connection properties for the EAP resource.
- Click the Inventory tab in the top menu.
- Select Servers - Top Level Imports in the Resources menu table on the left. Select the JBoss EAP 6 server, either the standalone server or the domain controller.
- In the inventory tree, select the top resource entry for the server.
- Open the Inventory tab.
- Select the Connection Settings subtab.
- Fill in the username and password for the management user that was created in EAP 6.

- Click the button at the top of the page.
31.3.3.2. Creating a Management User Through JBoss ON
Copier lienLien copié sur presse-papiers!
There is a resource operation which creates and configures a local EAP user which the agent can use to connect to the EAP 6 instance. This is a wrapper for the EAP 6
add-user utility, with predefined configuration for the user and additional configuration for JBoss ON.
The operation creates the
rhqadmin user in the ManagementRealm for the EAP 6 server. This is the default security realm; in production environments, it is strongly recommended that you use a different management realm.
The user is created in the secure management realm. If the EAP 6 server is running in unsecure mode, then the install RHQ user operation fails because JBoss ON cannot connect to the management realm. EAP 6 servers are secured by default.
Note
This operation is convenient because it sets the configuration on both EAP 6 and JBoss ON in a single step, but it has some security limitations: It only creates the user in the default management realm (ManagementRealm). If any other security realm is used — which is recommended for production environments — then this operation, like the add-user.sh script, cannot be used.
- Click the Inventory tab in the top menu.
- Select Servers - Top Level Imports in the Resources menu table on the left. Select the JBoss EAP 6 server, either the standalone server or the domain controller.
- In the inventory tree, select the top resource entry for the server.
- Open the Operations tab.
- Click the New button at the bottom of the page.
- Select the Install RHQ User option from the drop-down menu.
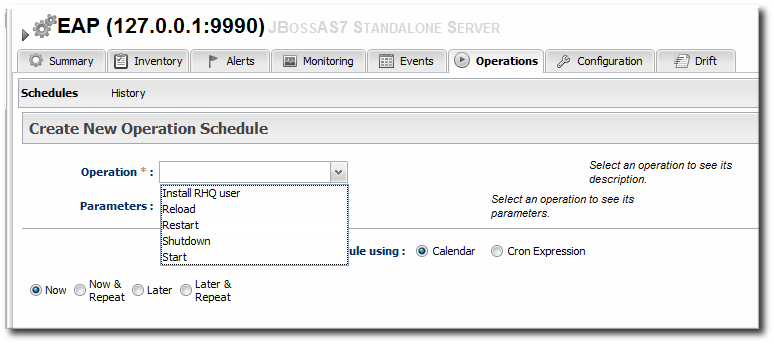
- Click the Schedule button.
31.3.3.3. Creating a Management User in EAP 6
Copier lienLien copié sur presse-papiers!
The EAP 6
add-user.sh utility creates and configures a local EAP user which the agent can use to connect to the EAP 6 instance. After creating the user in EAP, that user's credentials must be supplied to the resource's connection properties configuration in JBoss ON.
Note
Creating a user through the
add-user.sh script has some security limitations: It only creates the user in the default management realm (ManagementRealm). If any other security realm is used — which is recommended for production environments — then this script cannot be used to create a user for the JBoss ON agent.
- Run the
add-userutility to create the user.[root@server ~]# cd /opt/jboss-eap-6.0 [root@server bin]# ./add-user.sh What type of user do you wish to add? a) Management User (mgmt-users.properties) b) Application User (application-users.properties) (a): a Enter the details of the new user to add. Realm (ManagementRealm) : Username : jonadmin Password : Re-enter Password : About to add user 'jonadmin' for realm 'ManagementRealm' Is this correct yes/no? yes - Set that user in the connection settings for the EAP 6 server resource in JBoss ON.
- Click the Inventory tab in the top menu.
- Select Servers - Top Level Imports in the Resources menu table on the left. Select the JBoss EAP 6 server, either the standalone server or the domain controller.
- In the inventory tree, select the top resource entry for the server.
- Open the Inventory tab.
- Select the Connection Settings subtab.
- Fill in the username and password for the management user that was created in EAP 6.
- Click the button at the top of the page.
31.3.4. Creating a Dynamic Group for EAP 6 Resources
Copier lienLien copié sur presse-papiers!
For management, particularly for monitoring or for editing configuration, it can be very convenient to have related resources grouped together in a compatible group. Compatible groups let administrators set alert definitions, change metrics settings, and change configuration for all group members simultaneously.
Dynagroups use search expressions to search for group members and then create groups based on any user-defined criteria. This assures that group membership is always current, since members are added and dropped automatically as the JBoss ON inventory changes.
The dynagroup syntax is described in much more detail in Initial Setup for the Resource Inventory, Groups, and Users. This specific dynagroup expression first searches for resources based on the resource plug-in, category (server), and parent. It then creates groups based on the product type and name.
This creates a separate compatible group for every JBoss product associated with JBoss EAP 6, such as SOA-P, Data Grid (JDG), and host controllers and standalone servers.
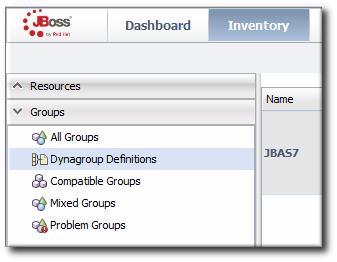
- Click the Inventory tab in the top menu.
- In the Groups area on the left, click the Dynagroup Definitions link.
- Enter the expression to create compatible groups for each EAP 6 server type.
resource.type.plugin = JBossAS7
resource.type.category = SERVER
resource.parent.type.category = PLATFORM
groupby resource.pluginConfiguration[productType]
groupby resource.type.name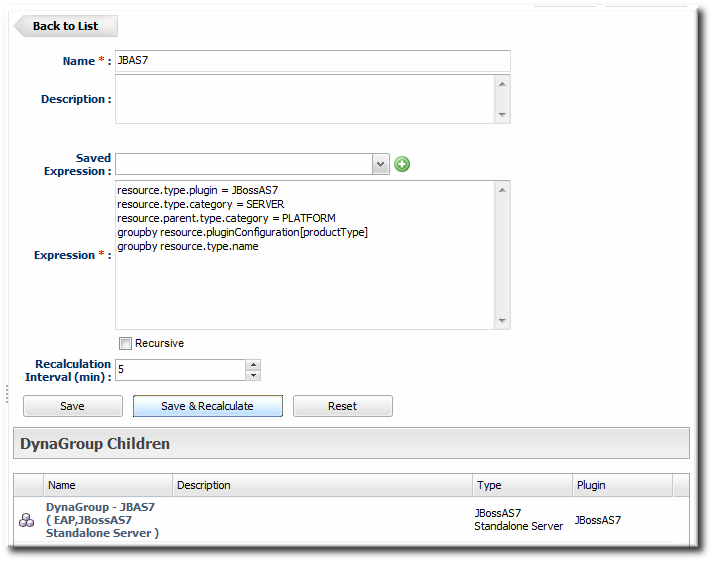
- Click the button in the middle of the page.
31.3.5. Setting Start Script Arguments, Environment Variables, and JAVA_OPTS
Copier lienLien copié sur presse-papiers!
31.3.5.1. Start Script Discovery and Settings
Copier lienLien copié sur presse-papiers!
As part of discovering a JBoss EAP 6 server (domain controller or standalone server), JBoss ON attempts to discover the environment that the server is running in. Specifically, the discovery process attempts to identify and recreate the runtime environment:
- The discovery process identifies, or attempts to identify, the start script used, including custom start scripts.
- Discovery detects a subset of environment variables set in the
run.conffile or parent process that are required for the start script to work.Note
Although the discovery process does detect some environment variables, the discovery scan does not detectJAVA_OPTSvalues.The connection properties for the start script intentionally defer to therun.conffile forJAVA_OPTSvalues. - Discovery attempts to detect any arguments passed with the start script itself.
- Discovery attempts to detect what user the script is running as and assign a prefix command to use with the start script. For example, if the start script is running as the
jbossuser and the JBoss ON agent is running asjonagent, then the discovery script automatically assigns asudocommand,sudo -u jboss -g jboss, to pass with the start script.
The discovered settings are stored in the Start Script Environment Variables and Start Script Arguments connection settings for the EAP 6 resource.
If the discovery scan cannot detect some of the script settings (such as the agent is running as a different user than the EAP 6 server and cannot read the parent process), it fails gracefully. It simply gathers whatever information it can and ignores blank values.
Note
The Start Script Environment Variables and Start Script Arguments connection settings are only discovered once, when the resource is initially discovered. After that, the connection settings can be changed in the connection settings, but any changes made on the local system will not be detected. For example, if the server is discovered with a particular value (like
-XX:PermSize=256M), the argument value will not be updated if the server is restarted later with a different setting value.
The script arguments and environment variables are the only ones used by the agent when it runs the start script. These arguments and environment variables are not added to other configuration settings or the parent process. The start script settings in the EAP 6 connection settings configuration are deterministic.
31.3.5.2. Start Script Arguments and Drift Monitoring
Copier lienLien copié sur presse-papiers!
JBoss ON can monitor directories or specific files to check for configuration drift, which means configuration changes that move away from a designated configuration state. This is described in more detail in Section 31.3.13, “Controlling Configuration Drift” and the drift chapters of "Managing Resource Configuration."
While drift monitoring is critical for administrators to manage important resources, there may be times when it is necessary or beneficial from that configuration in a few settings. The start script arguments can be used to override the defined configuration for an EAP 6 server without triggering a drift alert.
Since the start script options are all connection settings, every change is recorded in a change history and can be easily viewed and reverted, as in Section 31.3.14, “Tracking and Reverting Configuration Changes”. This keeps the system properties and Java settings trackable and remediable.
Example 31.2. System Properties Without Violating the Drift Definition
Tim the IT Guy creates one specific set of configuration that all production EAP 6 servers should use an environment. He then creates a drift definition template for monitoring and associates or pins that blessed configuration to the template.
Every EAP 6 server which uses that drift template must conform to those configuration settings. Tim the IT Guy creates an alert that informs him if any production server drifts away from that specified configuration. This is an important safety measure for Example Co.'s production application servers.
However, a couple of the production servers have slightly different hardware and other applications running on them, so they require different heap sizes to run effectively.
If Tim the TI Guy adds a system property to use a different heap size, he is going to receive constant drift alerts or his edited configuration could be overwritten if he runs an automatic server-side script to remediate drift configuration.
By setting different heap settings through the start script, Tim can apply the right settings for that system without editing a configuration file, so there is no alert-able configuration drift.
31.3.5.3. Changing Start Script Configuration
Copier lienLien copié sur presse-papiers!
- Click the Inventory tab in the top menu.
- Select Servers - Top Level Imports in the Resources menu table on the left. Select the JBoss EAP 6 server.
- In the inventory tree, select the top resource entry for the server.
- Open the Inventory tab, and select the Connection Settings subtab.
- Expand the Operations area.
- Change or add start script settings. These are the scripts and settings that the JBoss ON agent uses when running a start or restart operation on the EAP 6 server.

- To use a custom start script, one other than
domain.shorstandalone.sh, enter the path and script name. - Optionally, enter a prefix to use with the script when running the start script.When the start script is discovered, the agent tries to determine the user the script is running as and assign a prefix command to use with the start script. For example, if the start script is running as the
jbossuser and the JBoss ON agent is running asjonagent, then the discovery script automatically assigns asudocommand,sudo -u jboss -g jboss, to pass with the start script.Additionally, JBoss ON assigns thenohupcommand as a prefix so that if the JBoss Enterprise Application Platform is started by the agent and the agent process dies, the JBoss Enterprise Application Platform process continues running. - Set any environment variables, one per line.
- Set any script arguments, one per line. For regular JAVA_OPTS, these arguments usually are
-X,-D, or-P. Some useful-XXarguments are listed in the JVM options documentation from Sun. Some useful system properties for EAP 6 are listed with the JBoss AS7 project documentation.The EAP 6 default start scripts use arun.sh-style script, so the arguments use that format. A custom script can use different arguments or options.
- Click the Save button at the top of the page.
31.3.6. Changing Port Numbers
Copier lienLien copié sur presse-papiers!
31.3.6.1. Changing Socket Binding Ports
Copier lienLien copié sur presse-papiers!
The socket binding resources defines both what ports are available (such as HTTP, AJP, and HTTPS) and what those port numbers are. The socket binding configuration can also configure multicast port numbers for the sockets.
- Click the Inventory tab in the top menu.
- Select Servers - Top Level Imports in the Resources menu table on the left. Select the JBoss EAP 6 server.
- In the inventory tree, select the SocketBindingsGroup compatible group, and then select the socket binding to edit.
- Open the Configuration tab.
- Click the green pencil icon to edit an existing socket definition or click the green plus sign (+) to create a new one.

- Change the Port number to any available port between 1025 and 65535. On Linux, available port numbers can be determined using
iptables.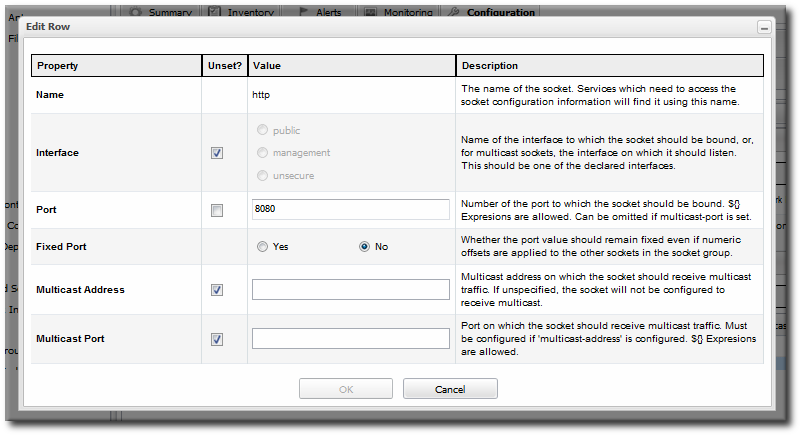 Optionally, configure multicast settings for the socket. If there are multiple instances of JBoss servers on the same system or in the same cluster, then multicast may be configured for cluster communication.
 - Click the Save button at the top of the page.
31.3.6.2. Changing Port Offsets for Server Groups in a Domain
Copier lienLien copié sur presse-papiers!
The port offset is a number added to each port number in a socket binding group to create the actual port numbers used by a server instance. This allows managed servers to have unique port numbers across the domain or for standalone servers within a cluster to have unique ports while using the same socket binding configuration.
For example, if the socket binding HTTP port is 8080, and a managed server has an offset of 110, the actual port used by the managed server is 8190 (8080 + 110). Server groups can also define offsets, and the offsets are additive. So, if a server group has an offset of 15 and the managed server has an offset of 110, the port number used by the server is 8205 (8080 + 15 + 110).
Note
The offset for a managed server is defined in its entry in the
host.xml file. This can be set when the managed server is created in JBoss ON, but it cannot be edited afterward.
It is possible to edit the port offset used by a server group:
- Click the Inventory tab in the top menu.
- Select Servers - Top Level Imports in the Resources menu table on the left. Select the JBoss EAP 6 server.
- In the inventory tree, expand the Server Groups node, and select the server group.
- Open the Configuration tab for the server group.
- In the Port Offset field, enter the new value for the offset.

- Click at the top of the page.
To change the offset for a standalone server, edit its connection settings, as in Section 31.3.10.1, “Changing the General Properties for an EAP 6 Server”.
31.3.7. Editing Network Interfaces
Copier lienLien copié sur presse-papiers!
Network interfaces can be configured to use a specific IP address or a type of IP address when communicating with sockets for that interface.
- Click the Inventory tab in the top menu.
- Select Servers - Top Level Imports in the Resources menu table on the left. Select the JBoss EAP 6 server.
- In the inventory tree, select the Network Interfaces group under the main server entry, and select the interface (management, public, or unsecure).
- Open the Configuration tab.
- Set either the specific IP address for the interface to use or set which type of IP address to use (IPv4, IPv6, or either). Either the IP address or the IP address type must be set.
 Because either a specific IP address or an IP address type can be set, and which property is used is optional, the UI does not enforce that a selection is made. For the network interface to work properly, however, some kind of IP address configuration must be set.
 - Click the Save button at the top of the page.
31.3.8. Setting System Properties
Copier lienLien copié sur presse-papiers!
Servers and particularly subsystems, which are integrated services, can have additional configuration properties added as system properties. The system property is a simple attribute-value pair, and it can be anything. The system properties which are available depend on the resource being edited.
When editing profiles and subsystems, extensions, server groups, and other domain components, system properties are added to the component's entry in the
domain.xml file. When editing a host controller or a managed server, the properties are added to the server's entry in the host.xml file.
Note
System properties, as with other configuration elements in the domain, work in a cascade. If a system property is set on a server group, it applies to all members of the group. If it is set on a managed server, it applies only to that server.
Be sure to edit the entry at the appropriate level in the domain so that the configuration is applied appropriately.
System properties set default configuration; these can be overridden with the start script in the
-D or -P arguments.
Note
If drift monitoring is configured, then adding or editing system properties could trigger a drift alert. See Section 31.3.13, “Controlling Configuration Drift”.
Check the project documentation for information on available system properties:
To add system properties to the configuration:
- Click the Inventory tab in the top menu.
- Select Servers - Top Level Imports in the Resources menu table on the left. Select the JBoss EAP 6 server.
- In the inventory tree, select the top resource entry for the server.
- Open the Configuration tab.
- Expand the Properties section.
- Click the green plus (+) icon at the bottom of the Paths list.
- Fill in the new property information.
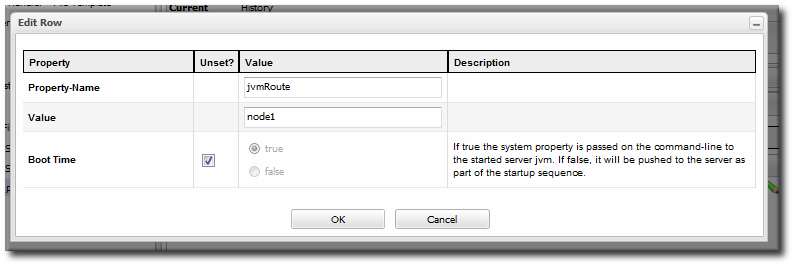
- The system property name.
- The value of the property.
- If the property should be loaded immediately to the running JVM or if it should be loaded when the JVM is started. The default is to load it immediately.
- Click .
31.3.9. Adding System Paths
Copier lienLien copié sur presse-papiers!
Some system paths are already defined for important server directory locations, like the home directory, log directory, and Java home directory. For custom applications, it may be useful or necessary to define other paths, and these can be added to the server configuration.
Note
The default system paths cannot be edited or deleted through the resource configuration. These are defined by the JBoss EAP 6 installation itself. These paths begin with the names
jboss.*, user.*, and java.*.
Some of those default system paths, like the home directory and base directory, can be edited by editing the EAP 6 server connections settings, as in Section 31.3.10, “Editing Connection Settings”.
Edit and delete icons are displayed by these default path entries. Although an edit window comes up and the path can apparently be edited or deleted, those changes are reset immediately.
- Click the Inventory tab in the top menu.
- Select Servers - Top Level Imports in the Resources menu table on the left. Select the JBoss EAP 6 server.
- In the inventory tree, select the top resource entry for the server.
- Open the Configuration tab.
- Expand the Paths section.
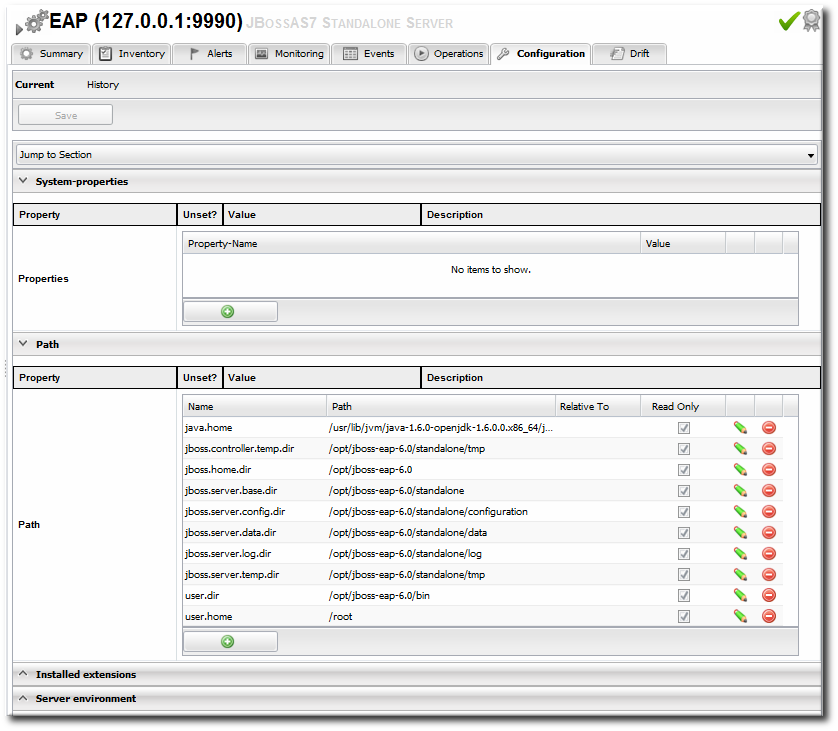
- Click the green plus (+) icon at the bottom of the Paths list.
- Fill in the path information.

- The name of the path to create.
- The path (absolute or relative) to create.
- If a relative path was given as the Path value, then de-select the Unset? checkbox for the Relative field, and enter the name of the system path that it is relative to.For example, if the new path is
devel/, and this is relative to the EAP home directory, then the Relative value is java.home.dir. This results in a final path of/opt/jboss-eap-6.0/devel/. - If the property is read-only. A read-only property cannot be edited after it is created. Read-only paths (aside from the default paths) have to be deleted and recreated if they need to be changed.
- Click .
31.3.10. Editing Connection Settings
Copier lienLien copié sur presse-papiers!
31.3.10.1. Changing the General Properties for an EAP 6 Server
Copier lienLien copié sur presse-papiers!
The connection settings are the properties that the JBoss ON agent uses to connect to a resource; the connection settings to use are identified in the plug-in descriptor for the resource.
Connection settings are only configurable for a domain controller or standalone server; all of the child resource connection properties are derived from the main server configuration.
- Click the Inventory tab in the top menu.
- Select Servers - Top Level Imports in the Resources menu table on the left. Select the JBoss EAP 6 server.
- In the inventory tree, select the top resource entry for the server.
- Open the Inventory tab, and select the Connection Settings subtab.
- The server connection properties are in the General Properties section. Only some of the properties can be edited. Information that is derived from the JBoss EAP 6 installation itself, like the home directory, base directory, and server type (EAP or AS) is displayed, but is inactive.
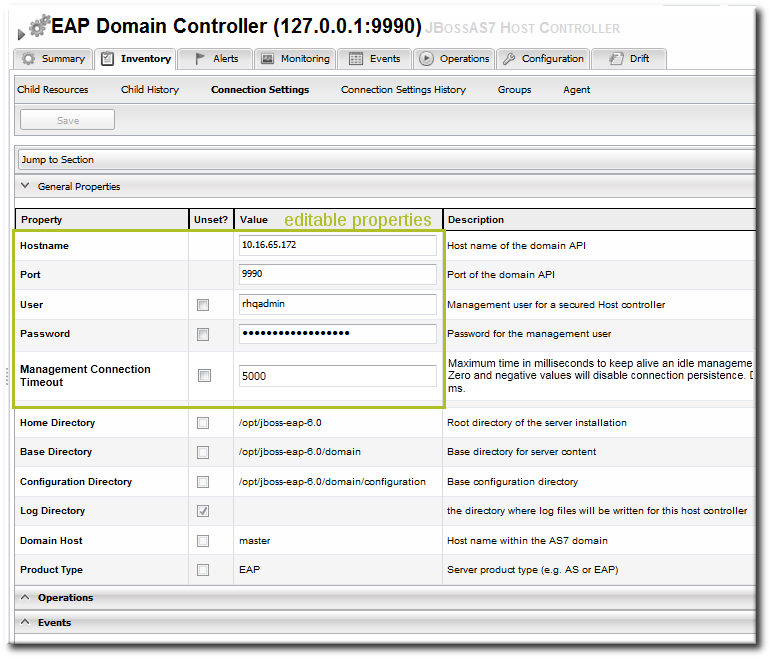
- Hostname gives IP address to use to connect to the server. This is usually 127.0.0.1, but if the management interface configuration has been changed, then the IP address may be a public IP instead of the localhost.
- Port is the port of the management interface.
- Username and Password are the credentials of the JBoss EAP 6 user for the agent to use to log in. If this user was created using the install RHQ user operation, then the user is
rhqadmin. - Domain Controllers Only. With the standalone server, all of the configuration and the server instance definition are in the same file,
standalone.xmlor any other configuration file passed to the start script. For domains, the server configuration is defined in one file (for the domain controller), while the server instances are defined in a separate file (for the host controller). The Domain Configuration and Host Configuration fields give the names of the files within thedomain/configuration/directory to reference for profile configuration and for managed server instances, respectively.
- Click the button at the top of the page.
Note
Along with displaying the information in the Connection Settings area, the settings for a standalone server are also displayed (but not editable) in the Configuration tab, under the Server Environment area.
31.3.10.2. Viewing Installation Paths for EAP 6 Child Resources
Copier lienLien copié sur presse-papiers!
Child resources for EAP 6 server such as managed servers, subsystem services, JVM definitions, and server groups are defined within the EAP 6 server's configuration files.
The "connection setting" for the child resource, then, is the entry in that server's configuration.
The connection setting is viewable in the child resource's Inventory > Connection Settings tab, but it cannot be edited because it is intrinsic to the resource itself. The connection setting for the child is the resource.
For example, the
main-server-group definition is in the domain controller's domain.xml file:
    <server-groups>
        <server-group name="main-server-group" profile="full">
		... 8< ...
In the JBoss ON GUI, the definition is given as the connection setting path, in the form element=name
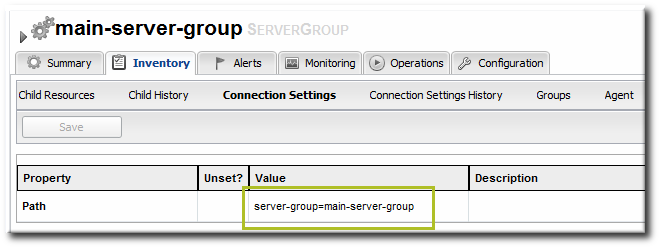
Figure 31.7. Child Resource Connection Settings
31.3.11. Viewing Installed Extensions
Copier lienLien copié sur presse-papiers!
All of the subsystems available to JBoss EAP 6 profiles, both for standalone servers and for domains, are loaded as extensions. These extensions are modules, classes that are defined in the configuration file (
domain.xml or standalone.xml).
    <extensions>
        <extension module="org.jboss.as.clustering.infinispan"/>
        <extension module="org.jboss.as.clustering.jgroups"/>
        <extension module="org.jboss.as.cmp"/>
        <extension module="org.jboss.as.configadmin"/>
        <extension module="org.jboss.as.connector"/>
        <extension module="org.jboss.as.ee"/>
        <extension module="org.jboss.as.ejb3"/>
	... 8< ...
These extensions are not configurable through JBoss ON, but the current extension configuration can be viewed in JBoss ON as part of the standalone server or domain controller configuration.
- Click the Inventory tab in the top menu.
- Select Servers - Top Level Imports in the Resources menu table on the left. Select the JBoss EAP 6 server.
- In the inventory tree, select the top resource entry for the server.
- Open the Configuration tab.
- Expand the Installed extensions section.

Note
An edit icon appears next to module names in the Extensions area of the EAP 6 server configuration. These properties are read-only and cannot, in fact, be edited even though an edit box pops up.
31.3.12. Reloading the Server Configuration
Copier lienLien copié sur presse-papiers!
Some configuration changes require that the EAP 6 server be restarted before they take effect. The server is marked internally as being in a requires-reload state. JBoss ON does not force a reload, but it does inform administrators if changes have been made that require a reload before they can be applied.
Note
Because JBoss ON does not automatically reload configuration every time a configuration change is made, administrators can make multiple changes and then schedule a time for them to be applied by scheduling the reload operation during a maintenance window (through JBoss ON) or by setting up a cron job on the local system.
Clicking any Configuration > Current tab, for any resource within the server tree, brings up a message box that the server must be reloaded.
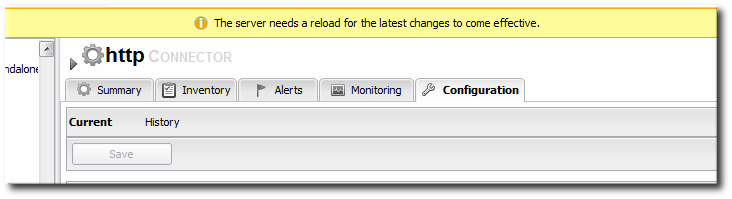
Figure 31.8. Reload Configuration Message
Note
Changes that require the configuration to be reloaded typically involve changing the way that connections are handled, such as resetting port numbers or changing connection protocols for an interface.
Note
If the agent goes offline and a user views a Configuration tab in the UI, the message box is displayed, even if the server has been reloaded. This is because the agent was not able to communicate to the server that the reload state has changed, so the server displays outdated information.
- Click the Inventory tab in the top menu.
- Select Servers - Top Level Imports in the Resources menu table on the left. Select the JBoss EAP 6 server.
- In the inventory tree, select the top resource entry for the server.
- Open the Operations tab.
- Click the New button at the bottom of the page.
- Select the Reload) option from the drop-down menu.
- Click the Schedule button.
31.3.13. Controlling Configuration Drift
Copier lienLien copié sur presse-papiers!
Configuration drift is the accumulation of changes, over time, to the desired or administrator-defined configuration. These changes can be trivial, accidental, or incremental, but it moves the resource outside the intended settings.
Configuration drift and JBoss ON's drift monitoring are covered in detail in the drift chapters of "Managing Resource Configuration."
For EAP 6, plan a drift strategy that covers all of the critical configuration and provides a path to remediation, possibly without requiring administrator intervention, to help preserve production systems:
- Set drift definitions that track the critical configuration directories, such as
domain/configuration/andstandalone/configuration/, but that exclude directories which will have constantly changing data, such as logging, library, and data directories. Even within the configuration directories, create exclude rules for thehost_xml_history/,domain_xml_history/, andstandalone_xml_history/directories, since those are not proper configuration files and should not be tracked. - Once the desired configuration is in place, pin that configuration to the drift definition. This sets the desired configuration as the baseline. All changes will be compared against that baseline.
- Create an archive of the blessed configuration.
- Create a bundle definition that can be automatically deployed to reset the EAP 6 configuration and remediate drift.When creating the he destination should be the platform of the EAP 6 resource. The destination could be the standalone server or the domain controller, but using the platform allows you to deploy the bundle to an expendable directory, like
/tmp/mybundles/holding, and then run a post-install task that copies the configuration files into the configuration directory.Deploying a bundle generally removes whatever existing files are in the target directory and replaces them with the bundle. There are ways to control that behavior, but, generally, it is safest to have the contents of the bundle match exactly what the final deployment will be.Since it may not be feasible to have the entire configuration directory in the bundle, deploying to a separate location on the filesystem preserves the configuration directory, and only the important configuration files are updated (when they are copied by the Ant task).For more on bundles and remedying drift, see the bundles chapter in "Deploying Applications and Content" and the drift-bundle CLI example script in "Writing JBoss ON Command-Line Scripts." - Set up alerts for configuration drift that do two things:
- Send a notification email to administrators.
- Run a CLI script on the platform that automatically deploys the bundle.
Chapter 25, Defining Alerts has information on how to configure alert notifications that launch a JBoss ON server-side script or that run an operation on another resource.
Note
Changing the EAP 6 resource configuration, changing JVM definition settings, adding server groups and managed servers, or changing configuration settings all edit the EAP 6 configuration files,
domain.xml and standalone.xml. That will trigger a drift alert, if alerting is configured.
31.3.14. Tracking and Reverting Configuration Changes
Copier lienLien copié sur presse-papiers!
Every configuration change made through the JBoss ON UI or CLI is recorded in a change history.
- Click the Inventory tab in the top menu.
- Select Servers - Top Level Imports in the Resources menu table on the left. Select the JBoss EAP 6 server.
- In the inventory tree, select the top resource entry for the server.
- Open the Configuration tab, and select the History subtab.
Note
Change history pages are kept for resource configuration (the Configuration tab) and the connection settings (the Inventory > Connection Settings tab). - Clicking the change ID number opens the configuration settings that were in effect for that version.

- Changes can be compared to one another, in a standard diff format, by selecting them from the list and clicking the button.

- The current, live version of the configuration can be reverted to any previous version by selecting the desired previous version in the list and clicking the button.
