Ce contenu n'est pas disponible dans la langue sélectionnée.
Chapter 4. Brokers
4.1. Brokers
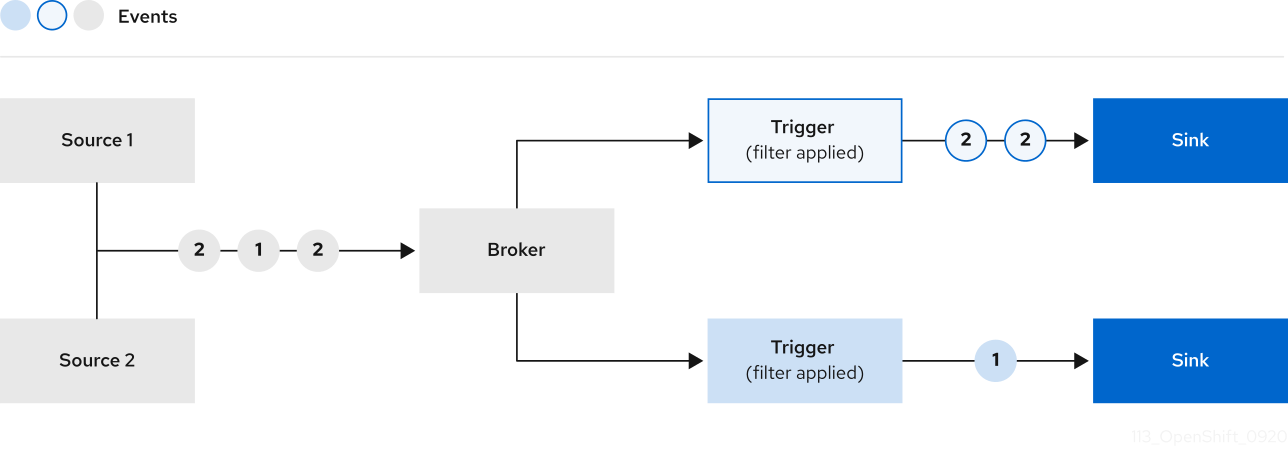
Brokers can be used in combination with triggers to deliver events from an event source to an event sink. Events are sent from an event source to a broker as an HTTP POST request. After events have entered the broker, they can be filtered by CloudEvent attributes using triggers, and sent as an HTTP POST request to an event sink.
4.2. Broker types
Cluster administrators can set the default broker implementation for a cluster. When you create a broker, the default broker implementation is used, unless you provide set configurations in the Broker object.
4.2.1. Default broker implementation for development purposes
Knative provides a default, channel-based broker implementation. This channel-based broker can be used for development and testing purposes, but does not provide adequate event delivery guarantees for production environments. The default broker is backed by the InMemoryChannel channel implementation by default.
If you want to use Apache Kafka to reduce network hops, use the Knative broker implementation for Apache Kafka. Do not configure the channel-based broker to be backed by the KafkaChannel channel implementation.
4.2.2. Production-ready Knative broker implementation for Apache Kafka
For production-ready Knative Eventing deployments, Red Hat recommends using the Knative broker implementation for Apache Kafka. The broker is an Apache Kafka native implementation of the Knative broker, which sends CloudEvents directly to the Kafka instance.
The Knative broker has a native integration with Kafka for storing and routing events. This allows better integration with Kafka for the broker and trigger model over other broker types, and reduces network hops. Other benefits of the Knative broker implementation include:
- At-least-once delivery guarantees
- Ordered delivery of events, based on the CloudEvents partitioning extension
- Control plane high availability
- A horizontally scalable data plane
The Knative broker implementation for Apache Kafka stores incoming CloudEvents as Kafka records, using the binary content mode. This means that all CloudEvent attributes and extensions are mapped as headers on the Kafka record, while the data spec of the CloudEvent corresponds to the value of the Kafka record.
4.3. Creating brokers
Knative provides a default, channel-based broker implementation. This channel-based broker can be used for development and testing purposes, but does not provide adequate event delivery guarantees for production environments.
If a cluster administrator has configured your OpenShift Serverless deployment to use Apache Kafka as the default broker type, creating a broker by using the default settings creates a Knative broker for Apache Kafka.
If your OpenShift Serverless deployment is not configured to use the Knative broker for Apache Kafka as the default broker type, the channel-based broker is created when you use the default settings in the following procedures.
4.3.1. Creating a broker by using the Knative CLI
Brokers can be used in combination with triggers to deliver events from an event source to an event sink. Using the Knative (kn) CLI to create brokers provides a more streamlined and intuitive user interface over modifying YAML files directly. You can use the kn broker create command to create a broker.
Prerequisites
- The OpenShift Serverless Operator and Knative Eventing are installed on your OpenShift Container Platform cluster.
-
You have installed the Knative (
kn) CLI. - You have created a project or have access to a project with the appropriate roles and permissions to create applications and other workloads in OpenShift Container Platform.
Procedure
Create a broker:
$ kn broker create <broker_name>
Verification
Use the
kncommand to list all existing brokers:$ kn broker listExample output
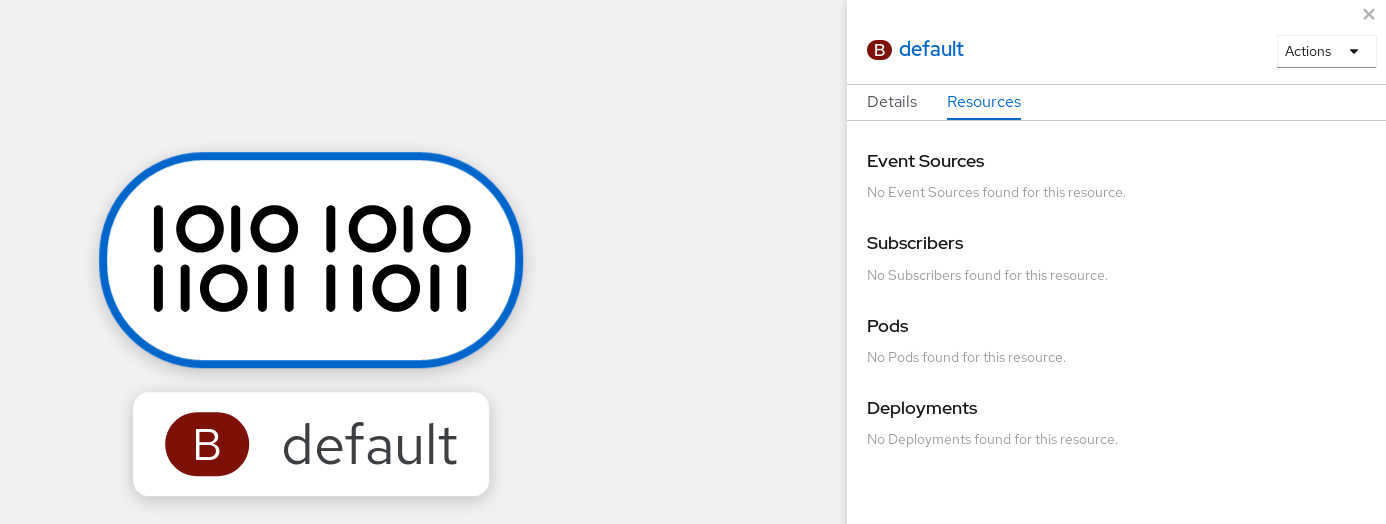
NAME      URL                                                                     AGE   CONDITIONS   READY   REASON
default   http://broker-ingress.knative-eventing.svc.cluster.local/test/default   45s   5 OK / 5     True
Optional: If you are using the OpenShift Container Platform web console, you can navigate to the Topology view in the Developer perspective, and observe that the broker exists:
4.3.2. Creating a broker by annotating a trigger
Brokers can be used in combination with triggers to deliver events from an event source to an event sink. You can create a broker by adding the eventing.knative.dev/injection: enabled annotation to a Trigger object.
If you create a broker by using the eventing.knative.dev/injection: enabled annotation, you cannot delete this broker without cluster administrator permissions. If you delete the broker without having a cluster administrator remove this annotation first, the broker is created again after deletion.
Prerequisites
- The OpenShift Serverless Operator and Knative Eventing are installed on your OpenShift Container Platform cluster.
-
Install the OpenShift CLI (
oc). - You have created a project or have access to a project with the appropriate roles and permissions to create applications and other workloads in OpenShift Container Platform.
Procedure
Create a
Triggerobject as a YAML file that has theeventing.knative.dev/injection: enabledannotation:apiVersion: eventing.knative.dev/v1 kind: Trigger metadata: annotations: eventing.knative.dev/injection: enabled name: <trigger_name> spec: broker: default subscriber:1 ref: apiVersion: serving.knative.dev/v1 kind: Service name: <service_name>- 1
- Specify details about the event sink, or subscriber, that the trigger sends events to.
Apply the
TriggerYAML file:$ oc apply -f <filename>
Verification
You can verify that the broker has been created successfully by using the oc CLI, or by observing it in the Topology view in the web console.
Enter the following
occommand to get the broker:$ oc -n <namespace> get broker defaultExample output
NAME      READY     REASON    URL                                                                     AGE
default   True                http://broker-ingress.knative-eventing.svc.cluster.local/test/default   3m56s
Optional: If you are using the OpenShift Container Platform web console, you can navigate to the Topology view in the Developer perspective, and observe that the broker exists:
4.3.3. Creating a broker by labeling a namespace
Brokers can be used in combination with triggers to deliver events from an event source to an event sink. You can create the default broker automatically by labelling a namespace that you own or have write permissions for.
Brokers created using this method are not removed if you remove the label. You must manually delete them.
Prerequisites
- The OpenShift Serverless Operator and Knative Eventing are installed on your OpenShift Container Platform cluster.
-
Install the OpenShift CLI (
oc). - You have created a project or have access to a project with the appropriate roles and permissions to create applications and other workloads in OpenShift Container Platform.
- You have cluster or dedicated administrator permissions if you are using Red Hat OpenShift Service on AWS or OpenShift Dedicated.
Procedure
Label a namespace with
eventing.knative.dev/injection=enabled:$ oc label namespace <namespace> eventing.knative.dev/injection=enabled
Verification
You can verify that the broker has been created successfully by using the oc CLI, or by observing it in the Topology view in the web console.
Use the
occommand to get the broker:$ oc -n <namespace> get broker <broker_name>Example command
$ oc -n default get broker defaultExample output
NAME      READY     REASON    URL                                                                     AGE
default   True                http://broker-ingress.knative-eventing.svc.cluster.local/test/default   3m56s
Optional: If you are using the OpenShift Container Platform web console, you can navigate to the Topology view in the Developer perspective, and observe that the broker exists:
4.3.4. Deleting a broker that was created by injection
If you create a broker by injection and later want to delete it, you must delete it manually. Brokers created by using a namespace label or trigger annotation are not deleted permanently if you remove the label or annotation.
Prerequisites
-
Install the OpenShift CLI (
oc).
Procedure
Remove the
eventing.knative.dev/injection=enabledlabel from the namespace:$ oc label namespace <namespace> eventing.knative.dev/injection-Removing the annotation prevents Knative from recreating the broker after you delete it.
Delete the broker from the selected namespace:
$ oc -n <namespace> delete broker <broker_name>
Verification
Use the
occommand to get the broker:$ oc -n <namespace> get broker <broker_name>Example command
$ oc -n default get broker defaultExample output
No resources found.
Error from server (NotFound): brokers.eventing.knative.dev "default" not found
4.3.5. Creating a broker by using the web console
After Knative Eventing is installed on your cluster, you can create a broker by using the web console. Using the OpenShift Container Platform web console provides a streamlined and intuitive user interface to create a broker.
Prerequisites
- You have logged in to the OpenShift Container Platform web console.
- The OpenShift Serverless Operator, Knative Serving and Knative Eventing are installed on the cluster.
- You have created a project or have access to a project with the appropriate roles and permissions to create applications and other workloads in OpenShift Container Platform.
Procedure
-
In the Developer perspective, navigate to +Add
Broker. The Broker page is displayed. -
Optional. Update the Name of the broker. If you do not update the name, the generated broker is named
default. - Click Create.
Verification
You can verify that the broker was created by viewing broker components in the Topology page.
- In the Developer perspective, navigate to Topology.
View the
mt-broker-ingress,mt-broker-filter, andmt-broker-controllercomponents.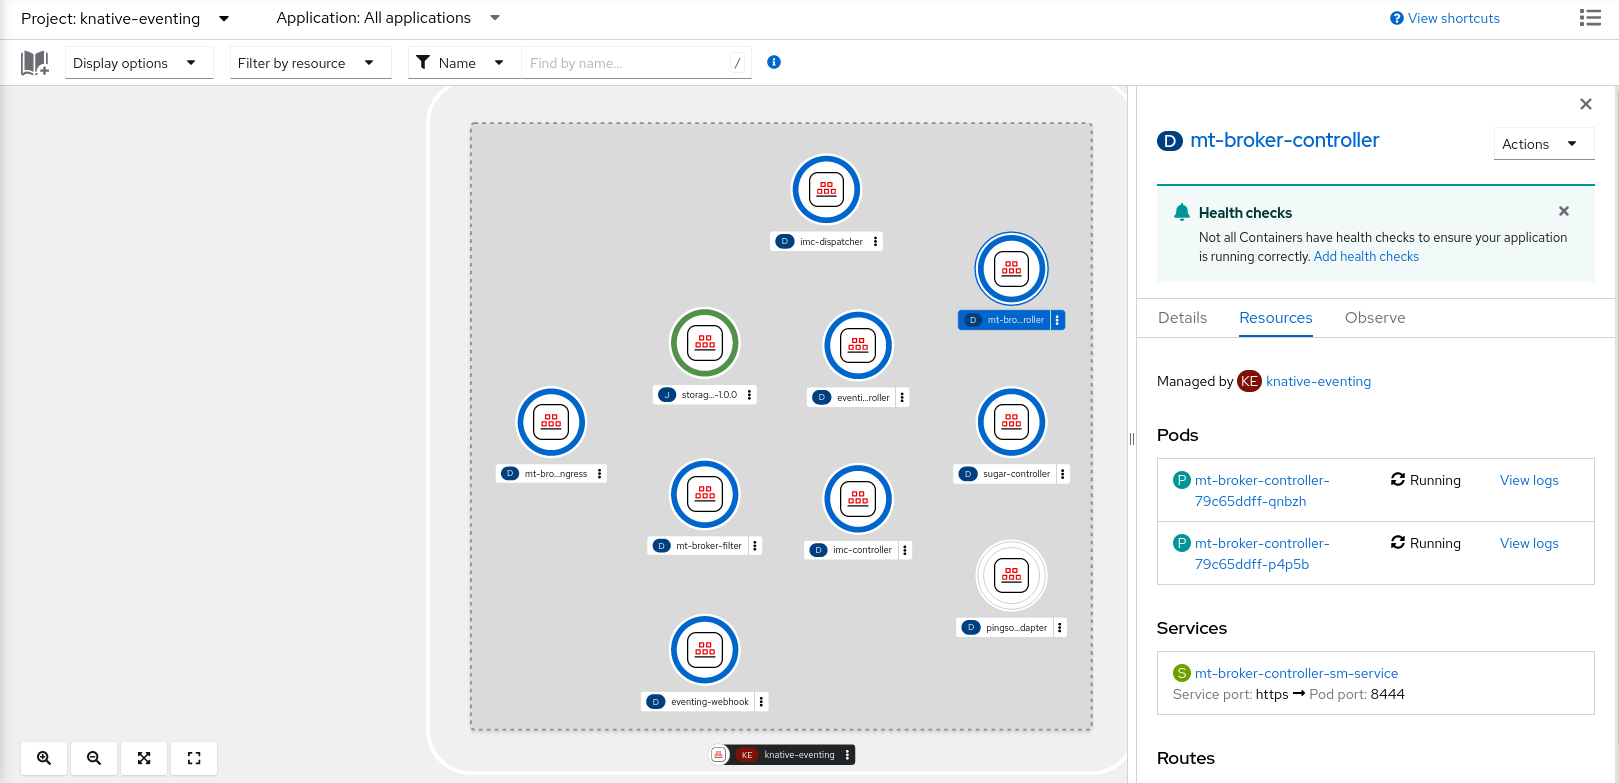
4.3.6. Creating a broker by using the Administrator perspective
Brokers can be used in combination with triggers to deliver events from an event source to an event sink. Events are sent from an event source to a broker as an HTTP POST request. After events have entered the broker, they can be filtered by CloudEvent attributes using triggers, and sent as an HTTP POST request to an event sink.
Prerequisites
- The OpenShift Serverless Operator and Knative Eventing are installed on your OpenShift Container Platform cluster.
- You have logged in to the web console and are in the Administrator perspective.
- You have cluster administrator permissions on OpenShift Container Platform, or you have cluster or dedicated administrator permissions on Red Hat OpenShift Service on AWS or OpenShift Dedicated.
Procedure
-
In the Administrator perspective of the OpenShift Container Platform web console, navigate to Serverless
Eventing. - In the Create list, select Broker. You will be directed to the Create Broker page.
- Optional: Modify the YAML configuration for the broker.
- Click Create.
4.3.7. Next steps
- Configure event delivery parameters that are applied in cases where an event fails to be delivered to an event sink.
4.4. Configuring the default broker backing channel
If you are using a channel-based broker, you can set the default backing channel type for the broker to either InMemoryChannel or KafkaChannel.
Prerequisites
- You have administrator permissions on OpenShift Container Platform.
- You have installed the OpenShift Serverless Operator and Knative Eventing on your cluster.
-
You have installed the OpenShift (
oc) CLI. -
If you want to use Apache Kafka channels as the default backing channel type, you must also install the
KnativeKafkaCR on your cluster.
Procedure
Modify the
KnativeEventingcustom resource (CR) to add configuration details for theconfig-br-default-channelconfig map:apiVersion: operator.knative.dev/v1beta1 kind: KnativeEventing metadata: name: knative-eventing namespace: knative-eventing spec: config:1 config-br-default-channel: channel-template-spec: | apiVersion: messaging.knative.dev/v1beta1 kind: KafkaChannel2 spec: numPartitions: 63 replicationFactor: 34 - 1
- In
spec.config, you can specify the config maps that you want to add modified configurations for. - 2
- The default backing channel type configuration. In this example, the default channel implementation for the cluster is
KafkaChannel. - 3
- The number of partitions for the Kafka channel that backs the broker.
- 4
- The replication factor for the Kafka channel that backs the broker.
Apply the updated
KnativeEventingCR:$ oc apply -f <filename>
4.5. Configuring the default broker class
You can use the config-br-defaults config map to specify default broker class settings for Knative Eventing. You can specify the default broker class for the entire cluster or for one or more namespaces. Currently the MTChannelBasedBroker and Kafka broker types are supported.
Prerequisites
- You have administrator permissions on OpenShift Container Platform.
- You have installed the OpenShift Serverless Operator and Knative Eventing on your cluster.
-
If you want to use the Knative broker for Apache Kafka as the default broker implementation, you must also install the
KnativeKafkaCR on your cluster.
Procedure
Modify the
KnativeEventingcustom resource to add configuration details for theconfig-br-defaultsconfig map:apiVersion: operator.knative.dev/v1beta1 kind: KnativeEventing metadata: name: knative-eventing namespace: knative-eventing spec: defaultBrokerClass: Kafka1 config:2 config-br-defaults:3 default-br-config: | clusterDefault:4 brokerClass: Kafka apiVersion: v1 kind: ConfigMap name: kafka-broker-config5 namespace: knative-eventing6 namespaceDefaults:7 my-namespace: brokerClass: MTChannelBasedBroker apiVersion: v1 kind: ConfigMap name: config-br-default-channel8 namespace: knative-eventing9 ...- 1
- The default broker class for Knative Eventing.
- 2
- In
spec.config, you can specify the config maps that you want to add modified configurations for. - 3
- The
config-br-defaultsconfig map specifies the default settings for any broker that does not specifyspec.configsettings or a broker class. - 4
- The cluster-wide default broker class configuration. In this example, the default broker class implementation for the cluster is
Kafka. - 5
- The
kafka-broker-configconfig map specifies default settings for the Kafka broker. See "Configuring Knative broker for Apache Kafka settings" in the "Additional resources" section. - 6
- The namespace where the
kafka-broker-configconfig map exists. - 7
- The namespace-scoped default broker class configuration. In this example, the default broker class implementation for the
my-namespacenamespace isMTChannelBasedBroker. You can specify default broker class implementations for multiple namespaces. - 8
- The
config-br-default-channelconfig map specifies the default backing channel for the broker. See "Configuring the default broker backing channel" in the "Additional resources" section. - 9
- The namespace where the
config-br-default-channelconfig map exists.
ImportantConfiguring a namespace-specific default overrides any cluster-wide settings.
4.6. Knative broker implementation for Apache Kafka
For production-ready Knative Eventing deployments, Red Hat recommends using the Knative broker implementation for Apache Kafka. The broker is an Apache Kafka native implementation of the Knative broker, which sends CloudEvents directly to the Kafka instance.
The Knative broker has a native integration with Kafka for storing and routing events. This allows better integration with Kafka for the broker and trigger model over other broker types, and reduces network hops. Other benefits of the Knative broker implementation include:
- At-least-once delivery guarantees
- Ordered delivery of events, based on the CloudEvents partitioning extension
- Control plane high availability
- A horizontally scalable data plane
The Knative broker implementation for Apache Kafka stores incoming CloudEvents as Kafka records, using the binary content mode. This means that all CloudEvent attributes and extensions are mapped as headers on the Kafka record, while the data spec of the CloudEvent corresponds to the value of the Kafka record.
4.6.1. Creating an Apache Kafka broker when it is not configured as the default broker type
If your OpenShift Serverless deployment is not configured to use Kafka broker as the default broker type, you can use one of the following procedures to create a Kafka-based broker.
4.6.1.1. Creating an Apache Kafka broker by using YAML
Creating Knative resources by using YAML files uses a declarative API, which enables you to describe applications declaratively and in a reproducible manner. To create a Kafka broker by using YAML, you must create a YAML file that defines a Broker object, then apply it by using the oc apply command.
Prerequisites
-
The OpenShift Serverless Operator, Knative Eventing, and the
KnativeKafkacustom resource are installed on your OpenShift Container Platform cluster. - You have created a project or have access to a project with the appropriate roles and permissions to create applications and other workloads in OpenShift Container Platform.
-
You have installed the OpenShift CLI (
oc).
Procedure
Create a Kafka-based broker as a YAML file:
apiVersion: eventing.knative.dev/v1
kind: Broker
metadata:
  annotations:
    eventing.knative.dev/broker.class: Kafka
1 name: example-kafka-broker spec: config: apiVersion: v1 kind: ConfigMap name: kafka-broker-config2 namespace: knative-eventing- 1
- The broker class. If not specified, brokers use the default class as configured by cluster administrators. To use the Kafka broker, this value must be
Kafka. - 2
- The default config map for Knative brokers for Apache Kafka. This config map is created when the Kafka broker functionality is enabled on the cluster by a cluster administrator.
Apply the Kafka-based broker YAML file:
$ oc apply -f <filename>
4.6.1.2. Creating an Apache Kafka broker that uses an externally managed Kafka topic
If you want to use a Kafka broker without allowing it to create its own internal topic, you can use an externally managed Kafka topic instead. To do this, you must create a Kafka Broker object that uses the kafka.eventing.knative.dev/external.topic annotation.
Prerequisites
-
The OpenShift Serverless Operator, Knative Eventing, and the
KnativeKafkacustom resource are installed on your OpenShift Container Platform cluster. - You have access to a Kafka instance such as Red Hat AMQ Streams, and have created a Kafka topic.
- You have created a project or have access to a project with the appropriate roles and permissions to create applications and other workloads in OpenShift Container Platform.
-
You have installed the OpenShift CLI (
oc).
Procedure
Create a Kafka-based broker as a YAML file:
apiVersion: eventing.knative.dev/v1
kind: Broker
metadata:
  annotations:
    eventing.knative.dev/broker.class: Kafka
1 kafka.eventing.knative.dev/external.topic: <topic_name>2 ...Apply the Kafka-based broker YAML file:
$ oc apply -f <filename>
4.6.1.3. Knative Broker implementation for Apache Kafka with isolated data plane
The Knative Broker implementation for Apache Kafka with isolated data plane is a Technology Preview feature only. Technology Preview features are not supported with Red Hat production service level agreements (SLAs) and might not be functionally complete. Red Hat does not recommend using them in production. These features provide early access to upcoming product features, enabling customers to test functionality and provide feedback during the development process.
For more information about the support scope of Red Hat Technology Preview features, see Technology Preview Features Support Scope.
The Knative Broker implementation for Apache Kafka has 2 planes:
- Control plane
- Consists of controllers that talk to the Kubernetes API, watch for custom objects, and manage the data plane.
- Data plane
-
The collection of components that listen for incoming events, talk to Apache Kafka, and send events to the event sinks. The Knative Broker implementation for Apache Kafka data plane is where events flow. The implementation consists of
kafka-broker-receiverandkafka-broker-dispatcherdeployments.
When you configure a Broker class of Kafka, the Knative Broker implementation for Apache Kafka uses a shared data plane. This means that the kafka-broker-receiver and kafka-broker-dispatcher deployments in the knative-eventing namespace are used for all Apache Kafka Brokers in the cluster.
However, when you configure a Broker class of KafkaNamespaced, the Apache Kafka broker controller creates a new data plane for each namespace where a broker exists. This data plane is used by all KafkaNamespaced brokers in that namespace. This provides isolation between the data planes, so that the kafka-broker-receiver and kafka-broker-dispatcher deployments in the user namespace are only used for the broker in that namespace.
As a consequence of having separate data planes, this security feature creates more deployments and uses more resources. Unless you have such isolation requirements, use a regular Broker with a class of Kafka.
4.6.1.4. Creating a Knative broker for Apache Kafka that uses an isolated data plane
The Knative Broker implementation for Apache Kafka with isolated data plane is a Technology Preview feature only. Technology Preview features are not supported with Red Hat production service level agreements (SLAs) and might not be functionally complete. Red Hat does not recommend using them in production. These features provide early access to upcoming product features, enabling customers to test functionality and provide feedback during the development process.
For more information about the support scope of Red Hat Technology Preview features, see Technology Preview Features Support Scope.
To create a KafkaNamespaced broker, you must set the eventing.knative.dev/broker.class annotation to KafkaNamespaced.
Prerequisites
-
The OpenShift Serverless Operator, Knative Eventing, and the
KnativeKafkacustom resource are installed on your OpenShift Container Platform cluster. - You have access to an Apache Kafka instance, such as Red Hat AMQ Streams, and have created a Kafka topic.
- You have created a project, or have access to a project, with the appropriate roles and permissions to create applications and other workloads in OpenShift Container Platform.
-
You have installed the OpenShift CLI (
oc).
Procedure
Create an Apache Kafka-based broker by using a YAML file:
apiVersion: eventing.knative.dev/v1
kind: Broker
metadata:
  annotations:
    eventing.knative.dev/broker.class: KafkaNamespaced
1 name: default namespace: my-namespace2 spec: config: apiVersion: v1 kind: ConfigMap name: my-config3 ...Apply the Apache Kafka-based broker YAML file:
$ oc apply -f <filename>
The ConfigMap object in spec.config must be in the same namespace as the Broker object:
apiVersion: v1
kind: ConfigMap
metadata:
  name: my-config
  namespace: my-namespace
data:
  ...
After the creation of the first Broker object with the KafkaNamespaced class, the kafka-broker-receiver and kafka-broker-dispatcher deployments are created in the namespace. Subsequently, all brokers with the KafkaNamespaced class in the same namespace will use the same data plane. If no brokers with the KafkaNamespaced class exist in the namespace, the data plane in the namespace is deleted.
4.6.2. Configuring Apache Kafka broker settings
You can configure the replication factor, bootstrap servers, and the number of topic partitions for a Kafka broker, by creating a config map and referencing this config map in the Kafka Broker object.
Prerequisites
- You have cluster or dedicated administrator permissions on OpenShift Container Platform.
-
The OpenShift Serverless Operator, Knative Eventing, and the
KnativeKafkacustom resource (CR) are installed on your OpenShift Container Platform cluster. - You have created a project or have access to a project that has the appropriate roles and permissions to create applications and other workloads in OpenShift Container Platform.
-
You have installed the OpenShift CLI (
oc).
Procedure
Modify the
kafka-broker-configconfig map, or create your own config map that contains the following configuration:apiVersion: v1 kind: ConfigMap metadata: name: <config_map_name>1 namespace: <namespace>2 data: default.topic.partitions: <integer>3 default.topic.replication.factor: <integer>4 bootstrap.servers: <list_of_servers>5 - 1
- The config map name.
- 2
- The namespace where the config map exists.
- 3
- The number of topic partitions for the Kafka broker. This controls how quickly events can be sent to the broker. A higher number of partitions requires greater compute resources.
- 4
- The replication factor of topic messages. This prevents against data loss. A higher replication factor requires greater compute resources and more storage.
- 5
- A comma separated list of bootstrap servers. This can be inside or outside of the OpenShift Container Platform cluster, and is a list of Kafka clusters that the broker receives events from and sends events to.
ImportantThe
default.topic.replication.factorvalue must be less than or equal to the number of Kafka broker instances in your cluster. For example, if you only have one Kafka broker, thedefault.topic.replication.factorvalue should not be more than"1".Example Kafka broker config map
apiVersion: v1
kind: ConfigMap
metadata:
  name: kafka-broker-config
  namespace: knative-eventing
data:
  default.topic.partitions: "10"
  default.topic.replication.factor: "3"
  bootstrap.servers: "my-cluster-kafka-bootstrap.kafka:9092"
Apply the config map:
$ oc apply -f <config_map_filename>Specify the config map for the Kafka
Brokerobject:Example Broker object
apiVersion: eventing.knative.dev/v1
kind: Broker
metadata:
  name: <broker_name>
1 namespace: <namespace>2 annotations: eventing.knative.dev/broker.class: Kafka3 spec: config: apiVersion: v1 kind: ConfigMap name: <config_map_name>4 namespace: <namespace>5 ...Apply the broker:
$ oc apply -f <broker_filename>
4.6.3. Security configuration for the Knative broker implementation for Apache Kafka
Kafka clusters are generally secured by using the TLS or SASL authentication methods. You can configure a Kafka broker or channel to work against a protected Red Hat AMQ Streams cluster by using TLS or SASL.
Red Hat recommends that you enable both SASL and TLS together.
4.6.3.1. Configuring TLS authentication for Apache Kafka brokers
Transport Layer Security (TLS) is used by Apache Kafka clients and servers to encrypt traffic between Knative and Kafka, as well as for authentication. TLS is the only supported method of traffic encryption for the Knative broker implementation for Apache Kafka.
Prerequisites
- You have cluster or dedicated administrator permissions on OpenShift Container Platform.
-
The OpenShift Serverless Operator, Knative Eventing, and the
KnativeKafkaCR are installed on your OpenShift Container Platform cluster. - You have created a project or have access to a project with the appropriate roles and permissions to create applications and other workloads in OpenShift Container Platform.
-
You have a Kafka cluster CA certificate stored as a
.pemfile. -
You have a Kafka cluster client certificate and a key stored as
.pemfiles. -
Install the OpenShift CLI (
oc).
Procedure
Create the certificate files as a secret in the
knative-eventingnamespace:$ oc create secret -n knative-eventing generic <secret_name> \ --from-literal=protocol=SSL \ --from-file=ca.crt=caroot.pem \ --from-file=user.crt=certificate.pem \ --from-file=user.key=key.pemImportantUse the key names
ca.crt,user.crt, anduser.key. Do not change them.Edit the
KnativeKafkaCR and add a reference to your secret in thebrokerspec:apiVersion: operator.serverless.openshift.io/v1alpha1 kind: KnativeKafka metadata: namespace: knative-eventing name: knative-kafka spec: broker: enabled: true defaultConfig: authSecretName: <secret_name> ...
4.6.3.2. Configuring SASL authentication for Apache Kafka brokers
Simple Authentication and Security Layer (SASL) is used by Apache Kafka for authentication. If you use SASL authentication on your cluster, users must provide credentials to Knative for communicating with the Kafka cluster; otherwise events cannot be produced or consumed.
Prerequisites
- You have cluster or dedicated administrator permissions on OpenShift Container Platform.
-
The OpenShift Serverless Operator, Knative Eventing, and the
KnativeKafkaCR are installed on your OpenShift Container Platform cluster. - You have created a project or have access to a project with the appropriate roles and permissions to create applications and other workloads in OpenShift Container Platform.
- You have a username and password for a Kafka cluster.
-
You have chosen the SASL mechanism to use, for example,
PLAIN,SCRAM-SHA-256, orSCRAM-SHA-512. -
If TLS is enabled, you also need the
ca.crtcertificate file for the Kafka cluster. -
Install the OpenShift CLI (
oc).
Procedure
Create the certificate files as a secret in the
knative-eventingnamespace:$ oc create secret -n knative-eventing generic <secret_name> \ --from-literal=protocol=SASL_SSL \ --from-literal=sasl.mechanism=<sasl_mechanism> \ --from-file=ca.crt=caroot.pem \ --from-literal=password="SecretPassword" \ --from-literal=user="my-sasl-user"-
Use the key names
ca.crt,password, andsasl.mechanism. Do not change them. If you want to use SASL with public CA certificates, you must use the
tls.enabled=trueflag, rather than theca.crtargument, when creating the secret. For example:$ oc create secret -n <namespace> generic <kafka_auth_secret> \ --from-literal=tls.enabled=true \ --from-literal=password="SecretPassword" \ --from-literal=saslType="SCRAM-SHA-512" \ --from-literal=user="my-sasl-user"
-
Use the key names
Edit the
KnativeKafkaCR and add a reference to your secret in thebrokerspec:apiVersion: operator.serverless.openshift.io/v1alpha1 kind: KnativeKafka metadata: namespace: knative-eventing name: knative-kafka spec: broker: enabled: true defaultConfig: authSecretName: <secret_name> ...
4.7. Managing brokers
After you have created a broker, you can manage your broker by using Knative (kn) CLI commands, or by modifying it in the OpenShift Container Platform web console.
4.7.1. Managing brokers using the CLI
The Knative (kn) CLI provides commands that can be used to describe and list existing brokers.
4.7.1.1. Listing existing brokers by using the Knative CLI
Using the Knative (kn) CLI to list brokers provides a streamlined and intuitive user interface. You can use the kn broker list command to list existing brokers in your cluster by using the Knative CLI.
Prerequisites
- The OpenShift Serverless Operator and Knative Eventing are installed on your OpenShift Container Platform cluster.
-
You have installed the Knative (
kn) CLI.
Procedure
List all existing brokers:
$ kn broker listExample output
NAME      URL                                                                     AGE   CONDITIONS   READY   REASON
default   http://broker-ingress.knative-eventing.svc.cluster.local/test/default   45s   5 OK / 5     True
4.7.1.2. Describing an existing broker by using the Knative CLI
Using the Knative (kn) CLI to describe brokers provides a streamlined and intuitive user interface. You can use the kn broker describe command to print information about existing brokers in your cluster by using the Knative CLI.
Prerequisites
- The OpenShift Serverless Operator and Knative Eventing are installed on your OpenShift Container Platform cluster.
-
You have installed the Knative (
kn) CLI.
Procedure
Describe an existing broker:
$ kn broker describe <broker_name>Example command using default broker
$ kn broker describe defaultExample output
Name:         default
Namespace:    default
Annotations:  eventing.knative.dev/broker.class=MTChannelBasedBroker, eventing.knative.dev/creato ...
Age:          22s

Address:
  URL:    http://broker-ingress.knative-eventing.svc.cluster.local/default/default

Conditions:
  OK TYPE                   AGE REASON
  ++ Ready                  22s
  ++ Addressable            22s
  ++ FilterReady            22s
  ++ IngressReady           22s
  ++ TriggerChannelReady    22s
4.7.2. Connect a broker to a sink using the Developer perspective
You can connect a broker to an event sink in the OpenShift Container Platform Developer perspective by creating a trigger.
Prerequisites
- The OpenShift Serverless Operator, Knative Serving, and Knative Eventing are installed on your OpenShift Container Platform cluster.
- You have logged in to the web console and are in the Developer perspective.
- You have created a project or have access to a project with the appropriate roles and permissions to create applications and other workloads in OpenShift Container Platform.
- You have created a sink, such as a Knative service or channel.
- You have created a broker.
Procedure
- In the Topology view, point to the broker that you have created. An arrow appears. Drag the arrow to the sink that you want to connect to the broker. This action opens the Add Trigger dialog box.
- In the Add Trigger dialog box, enter a name for the trigger and click Add.
Verification
You can verify that the broker is connected to the sink by viewing the Topology page.
- In the Developer perspective, navigate to Topology.
- Click the line that connects the broker to the sink to see details about the trigger in the Details panel.