Ce contenu n'est pas disponible dans la langue sélectionnée.
Chapter 2. Event sources
2.1. Event sources
A Knative event source can be any Kubernetes object that generates or imports cloud events, and relays those events to another endpoint, known as a sink. Sourcing events is critical to developing a distributed system that reacts to events.
You can create and manage Knative event sources by using the Developer perspective in the OpenShift Container Platform web console, the Knative (kn) CLI, or by applying YAML files.
Currently, OpenShift Serverless supports the following event source types:
- API server source
- Brings Kubernetes API server events into Knative. The API server source sends a new event each time a Kubernetes resource is created, updated or deleted.
- Ping source
- Produces events with a fixed payload on a specified cron schedule.
- Kafka event source
- Connects an Apache Kafka cluster to a sink as an event source.
You can also create a custom event source.
2.2. Event source in the Administrator perspective
Sourcing events is critical to developing a distributed system that reacts to events.
2.2.1. Creating an event source by using the Administrator perspective
A Knative event source can be any Kubernetes object that generates or imports cloud events, and relays those events to another endpoint, known as a sink.
Prerequisites
- The OpenShift Serverless Operator and Knative Eventing are installed on your OpenShift Container Platform cluster.
- You have logged in to the web console and are in the Administrator perspective.
- You have cluster administrator permissions on OpenShift Container Platform, or you have cluster or dedicated administrator permissions on Red Hat OpenShift Service on AWS or OpenShift Dedicated.
Procedure
-
In the Administrator perspective of the OpenShift Container Platform web console, navigate to Serverless
Eventing. - In the Create list, select Event Source. You will be directed to the Event Sources page.
- Select the event source type that you want to create.
2.3. Creating an API server source
The API server source is an event source that can be used to connect an event sink, such as a Knative service, to the Kubernetes API server. The API server source watches for Kubernetes events and forwards them to the Knative Eventing broker.
2.3.1. Creating an API server source by using the web console
After Knative Eventing is installed on your cluster, you can create an API server source by using the web console. Using the OpenShift Container Platform web console provides a streamlined and intuitive user interface to create an event source.
Prerequisites
- You have logged in to the OpenShift Container Platform web console.
- The OpenShift Serverless Operator and Knative Eventing are installed on the cluster.
- You have created a project or have access to a project with the appropriate roles and permissions to create applications and other workloads in OpenShift Container Platform.
-
You have installed the OpenShift CLI (
oc).
If you want to re-use an existing service account, you can modify your existing ServiceAccount resource to include the required permissions instead of creating a new resource.
Create a service account, role, and role binding for the event source as a YAML file:
apiVersion: v1
kind: ServiceAccount
metadata:
  name: events-sa
  namespace: default
1 --- apiVersion: rbac.authorization.k8s.io/v1 kind: Role metadata: name: event-watcher namespace: default2 rules: - apiGroups: - "" resources: - events verbs: - get - list - watch --- apiVersion: rbac.authorization.k8s.io/v1 kind: RoleBinding metadata: name: k8s-ra-event-watcher namespace: default3 roleRef: apiGroup: rbac.authorization.k8s.io kind: Role name: event-watcher subjects: - kind: ServiceAccount name: events-sa namespace: default4 Apply the YAML file:
$ oc apply -f <filename>-
In the Developer perspective, navigate to +Add
Event Source. The Event Sources page is displayed. - Optional: If you have multiple providers for your event sources, select the required provider from the Providers list to filter the available event sources from the provider.
- Select ApiServerSource and then click Create Event Source. The Create Event Source page is displayed.
Configure the ApiServerSource settings by using the Form view or YAML view:
NoteYou can switch between the Form view and YAML view. The data is persisted when switching between the views.
-
Enter
v1as the APIVERSION andEventas the KIND. - Select the Service Account Name for the service account that you created.
In the Target section, select your event sink. This can be either a Resource or a URI:
- Select Resource to use a channel, broker, or service as an event sink for the event source.
- Select URI to specify a Uniform Resource Identifier (URI) where the events are routed to.
-
Enter
- Click Create.
Verification
After you have created the API server source, check that it is connected to the event sink by viewing it in the Topology view.
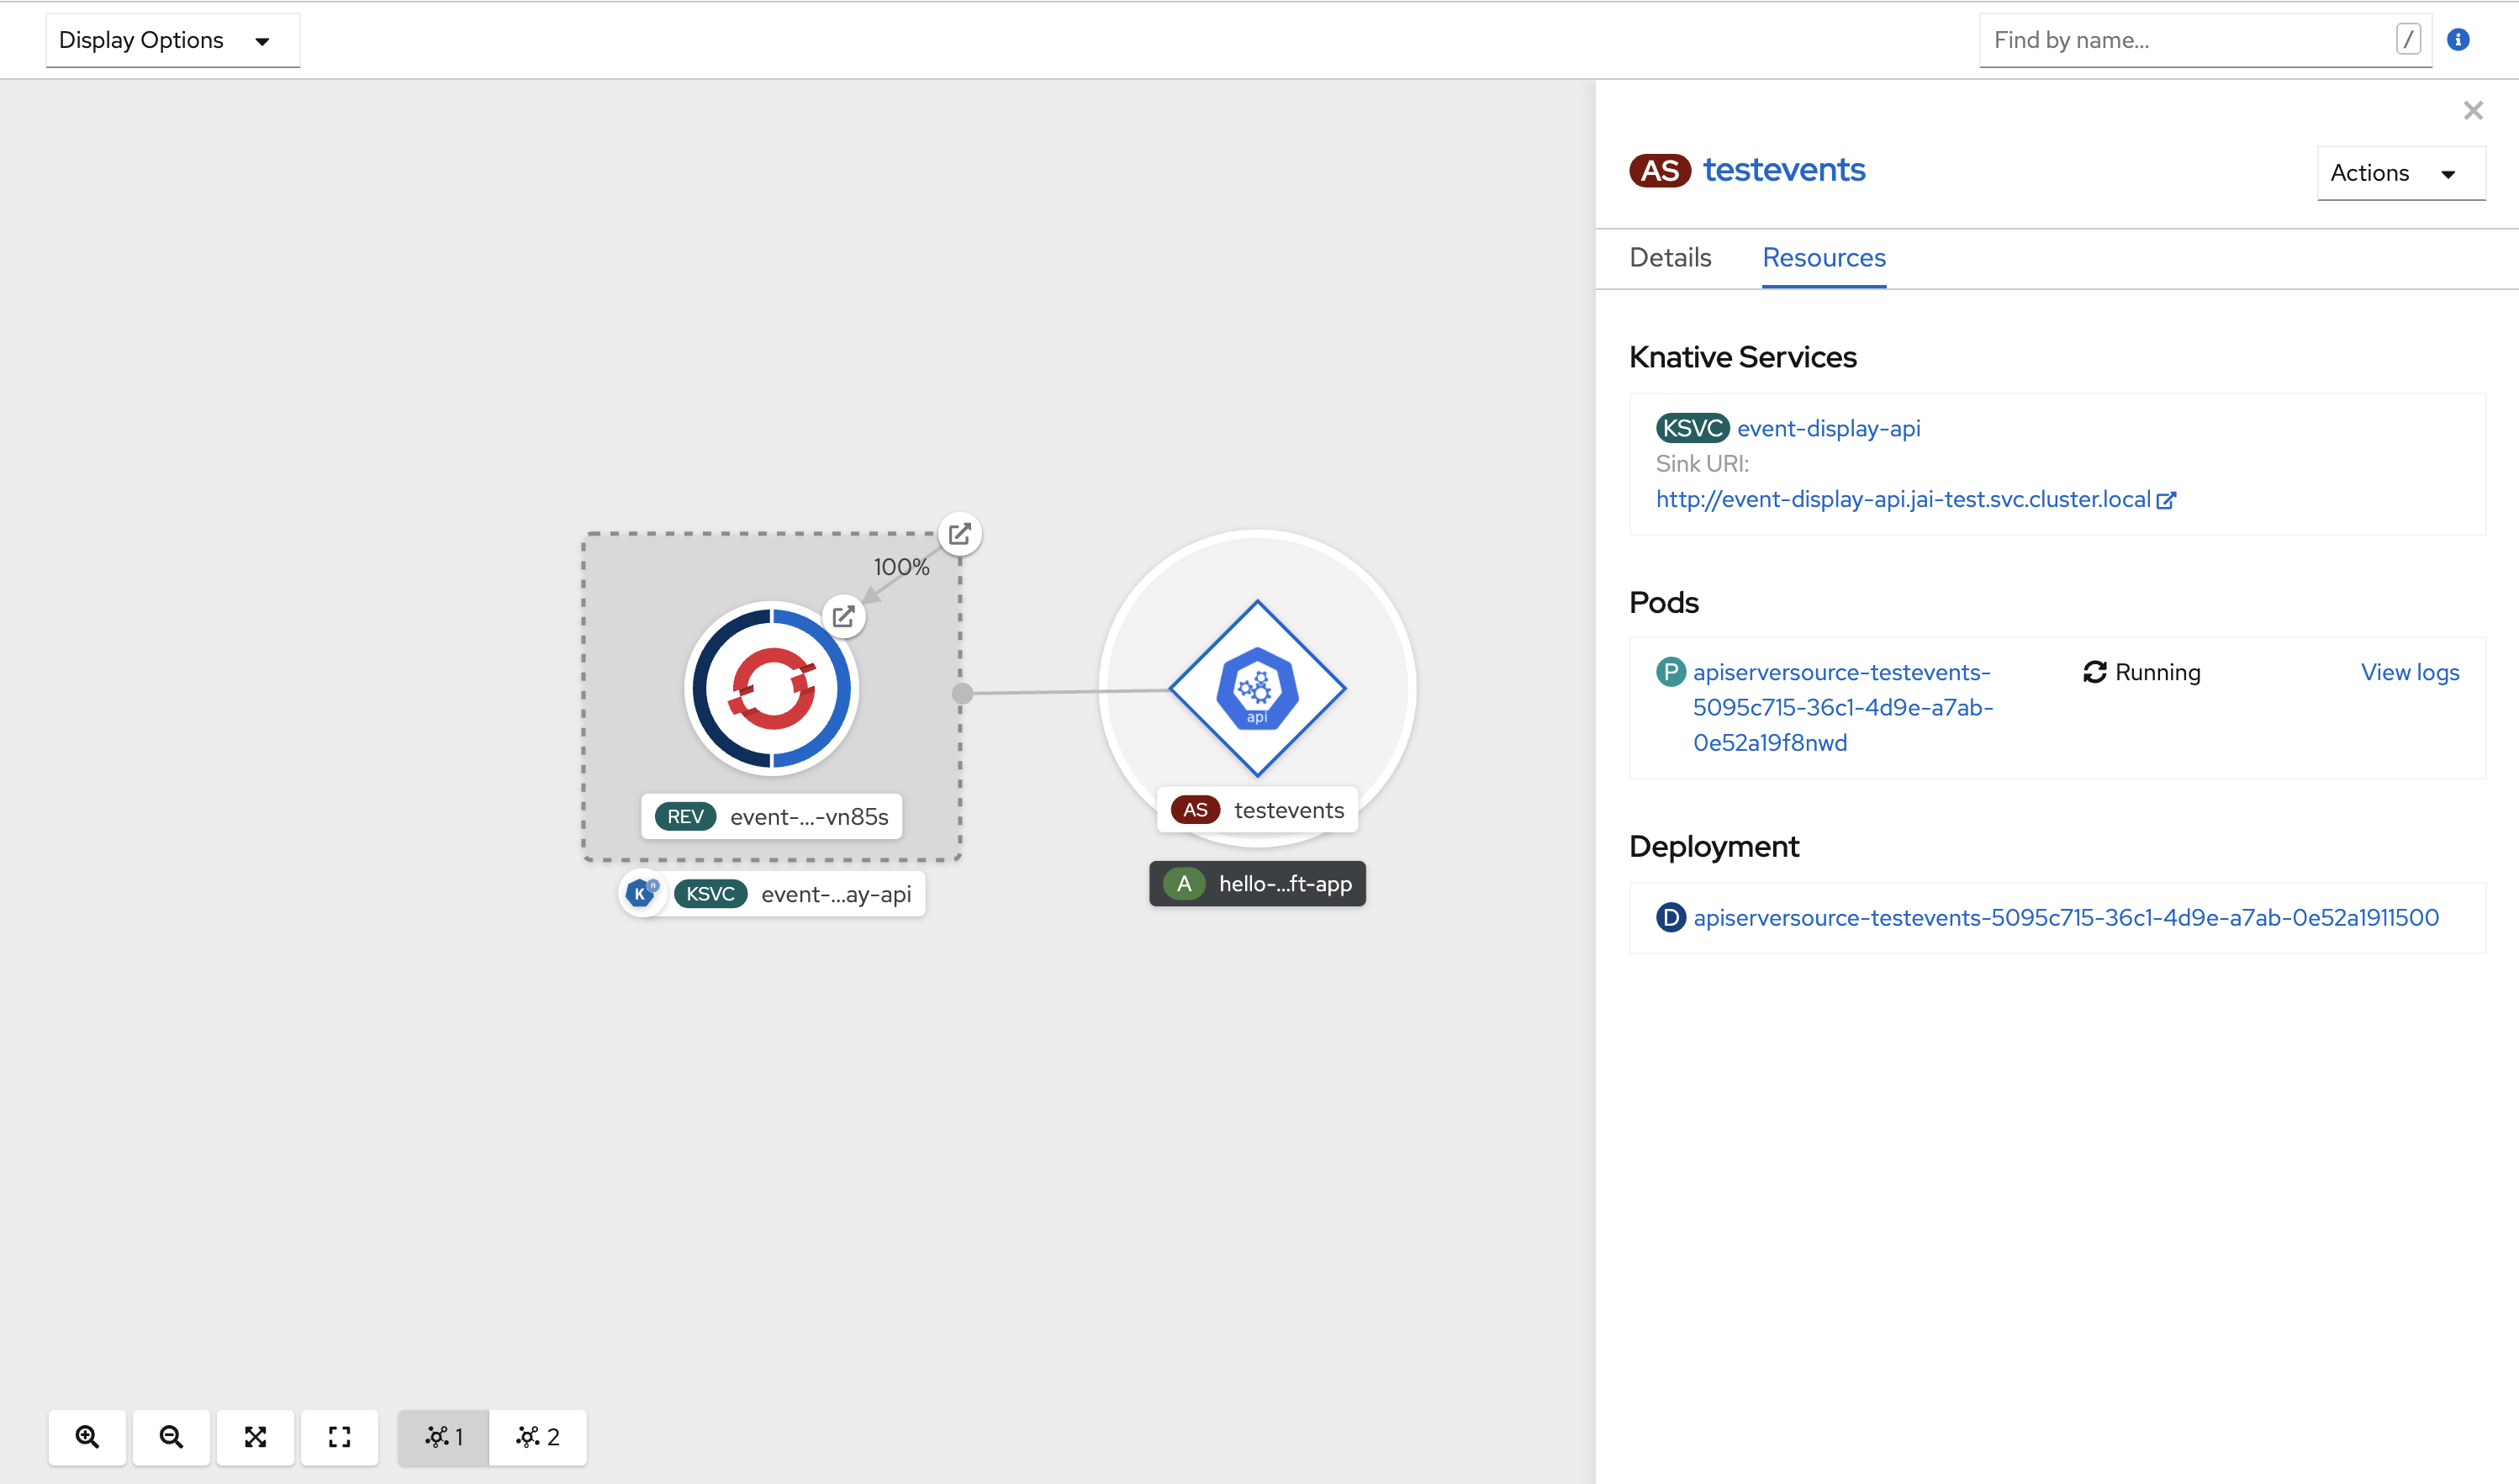
If a URI sink is used, you can modify the URI by right-clicking on URI sink
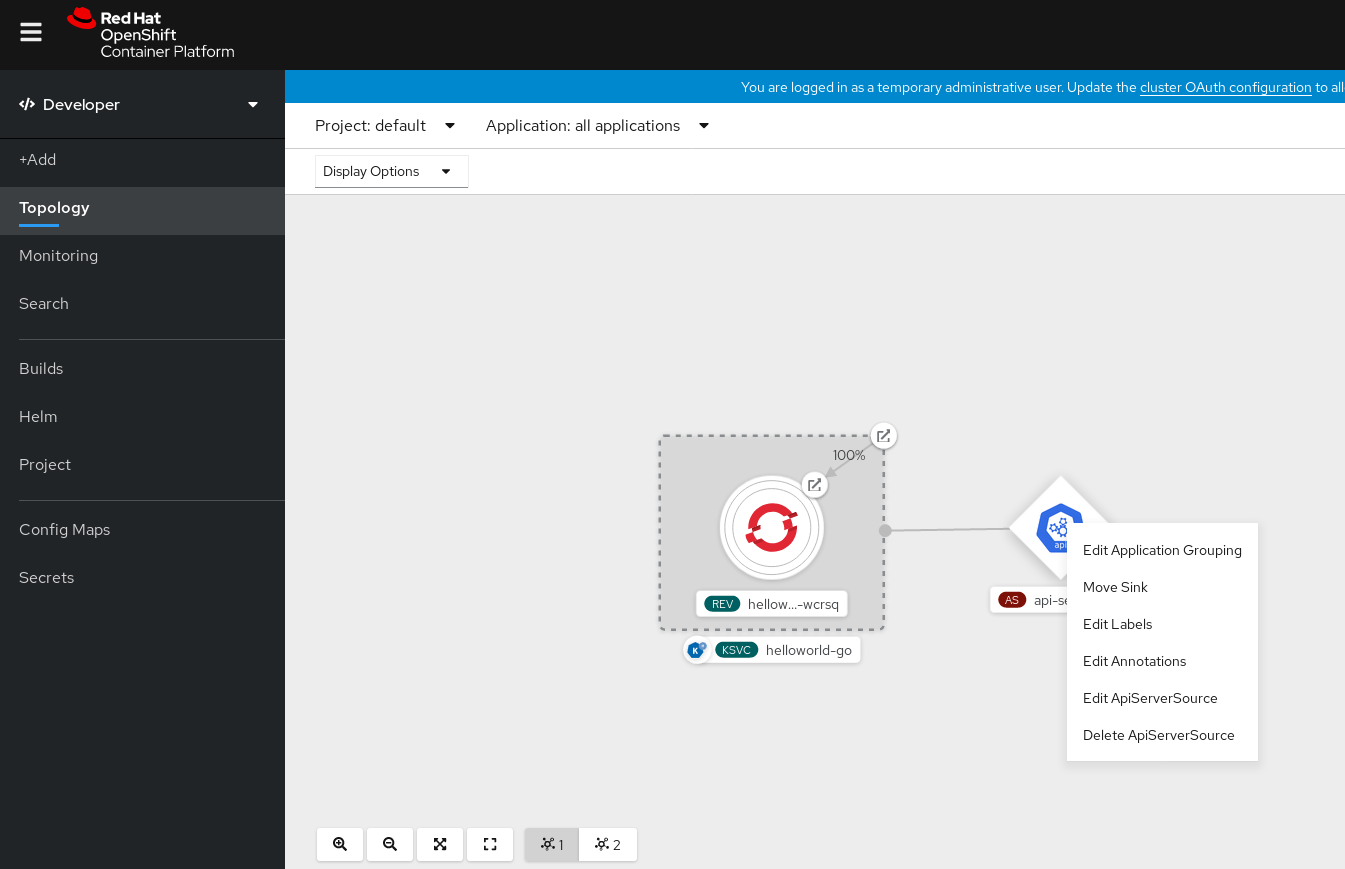
Deleting the API server source
- Navigate to the Topology view.
Right-click the API server source and select Delete ApiServerSource.
2.3.2. Creating an API server source by using the Knative CLI
You can use the kn source apiserver create command to create an API server source by using the kn CLI. Using the kn CLI to create an API server source provides a more streamlined and intuitive user interface than modifying YAML files directly.
Prerequisites
- The OpenShift Serverless Operator and Knative Eventing are installed on the cluster.
- You have created a project or have access to a project with the appropriate roles and permissions to create applications and other workloads in OpenShift Container Platform.
-
You have installed the OpenShift CLI (
oc). -
You have installed the Knative (
kn) CLI.
If you want to re-use an existing service account, you can modify your existing ServiceAccount resource to include the required permissions instead of creating a new resource.
Create a service account, role, and role binding for the event source as a YAML file:
apiVersion: v1
kind: ServiceAccount
metadata:
  name: events-sa
  namespace: default
1 --- apiVersion: rbac.authorization.k8s.io/v1 kind: Role metadata: name: event-watcher namespace: default2 rules: - apiGroups: - "" resources: - events verbs: - get - list - watch --- apiVersion: rbac.authorization.k8s.io/v1 kind: RoleBinding metadata: name: k8s-ra-event-watcher namespace: default3 roleRef: apiGroup: rbac.authorization.k8s.io kind: Role name: event-watcher subjects: - kind: ServiceAccount name: events-sa namespace: default4 Apply the YAML file:
$ oc apply -f <filename>Create an API server source that has an event sink. In the following example, the sink is a broker:
$ kn source apiserver create <event_source_name> --sink broker:<broker_name> --resource "event:v1" --service-account <service_account_name> --mode ResourceTo check that the API server source is set up correctly, create a Knative service that dumps incoming messages to its log:
$ kn service create event-display --image quay.io/openshift-knative/showcaseIf you used a broker as an event sink, create a trigger to filter events from the
defaultbroker to the service:$ kn trigger create <trigger_name> --sink ksvc:event-displayCreate events by launching a pod in the default namespace:
$ oc create deployment event-origin --image quay.io/openshift-knative/showcaseCheck that the controller is mapped correctly by inspecting the output generated by the following command:
$ kn source apiserver describe <source_name>Example output
Name:                mysource
Namespace:           default
Annotations:         sources.knative.dev/creator=developer, sources.knative.dev/lastModifier=developer
Age:                 3m
ServiceAccountName:  events-sa
Mode:                Resource
Sink:
  Name:       default
  Namespace:  default
  Kind:       Broker (eventing.knative.dev/v1)
Resources:
  Kind:        event (v1)
  Controller:  false
Conditions:
  OK TYPE                     AGE REASON
  ++ Ready                     3m
  ++ Deployed                  3m
  ++ SinkProvided              3m
  ++ SufficientPermissions     3m
  ++ EventTypesProvided        3m
Verification
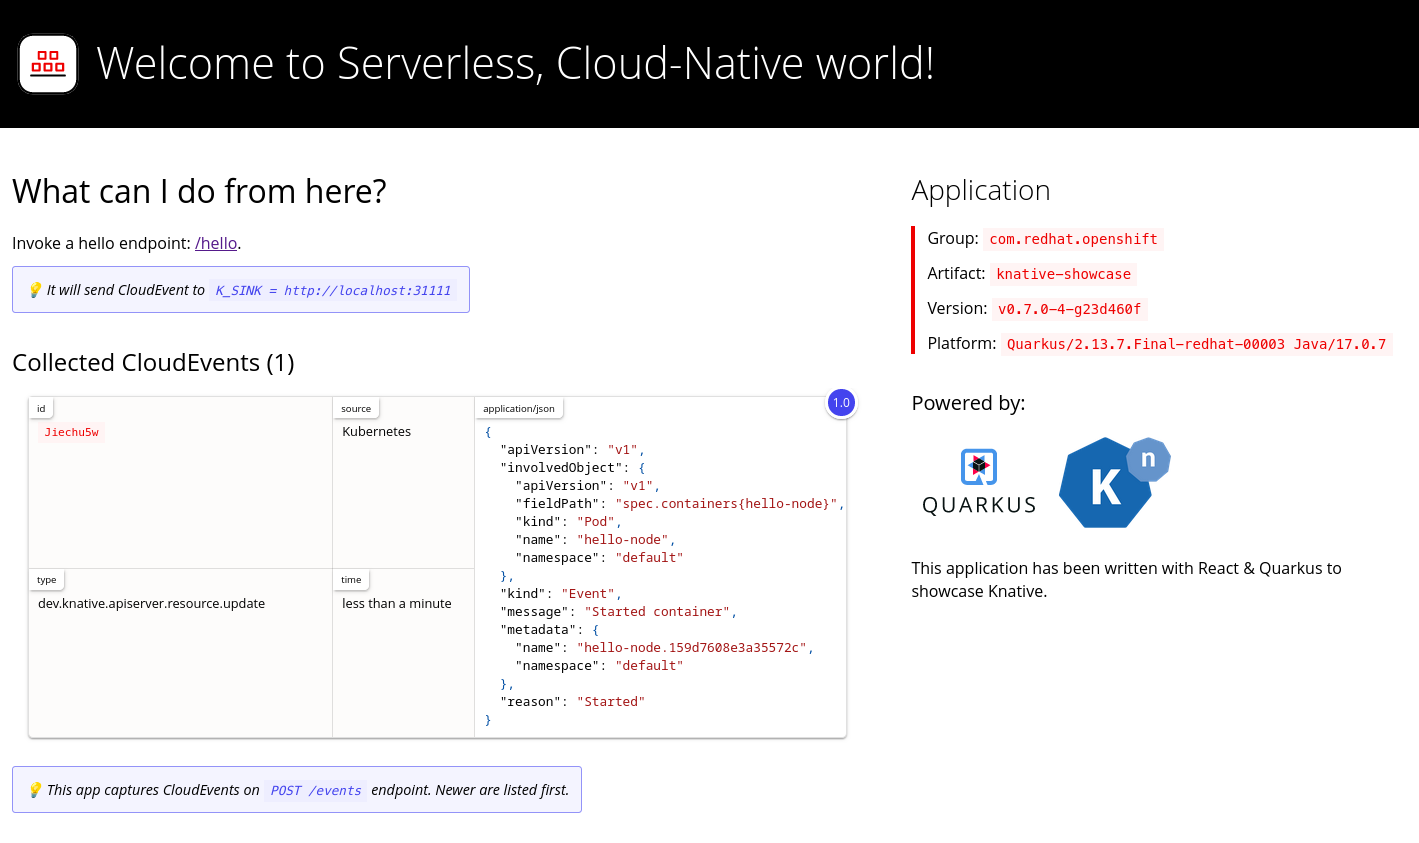
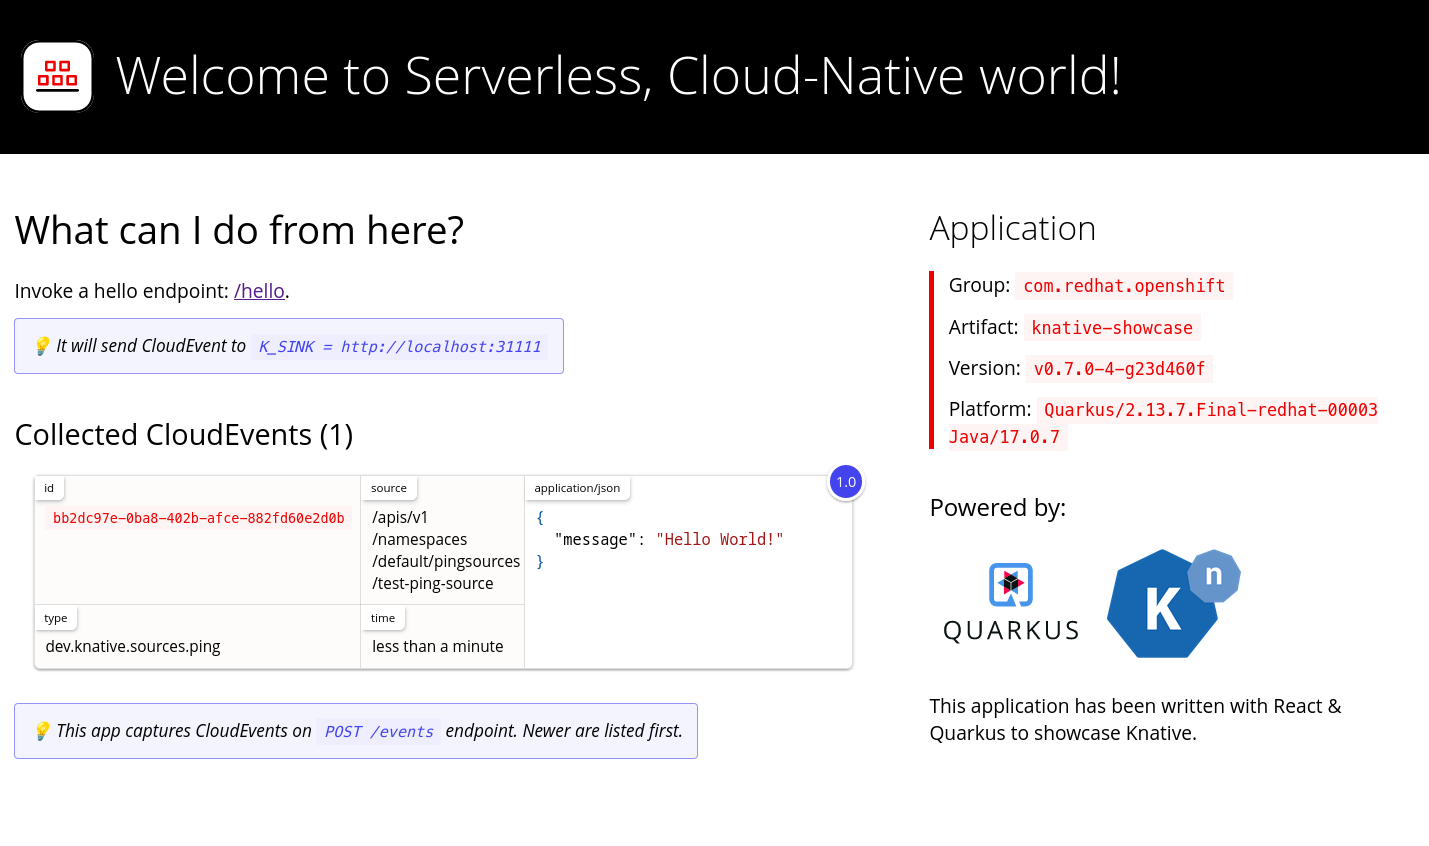
To verify that the Kubernetes events were sent to Knative, look at the event-display logs or use web browser to see the events.
To view the events in a web browser, open the link returned by the following command:
$ kn service describe event-display -o urlFigure 2.1. Example browser page
Alternatively, to see the logs in the terminal, view the event-display logs for the pods by entering the following command:
$ oc logs $(oc get pod -o name | grep event-display) -c user-containerExample output
☁️  cloudevents.Event
Validation: valid
Context Attributes,
  specversion: 1.0
  type: dev.knative.apiserver.resource.update
  datacontenttype: application/json
  ...
Data,
  {
    "apiVersion": "v1",
    "involvedObject": {
      "apiVersion": "v1",
      "fieldPath": "spec.containers{event-origin}",
      "kind": "Pod",
      "name": "event-origin",
      "namespace": "default",
       .....
    },
    "kind": "Event",
    "message": "Started container",
    "metadata": {
      "name": "event-origin.159d7608e3a3572c",
      "namespace": "default",
      ....
    },
    "reason": "Started",
    ...
  }
Deleting the API server source
Delete the trigger:
$ kn trigger delete <trigger_name>Delete the event source:
$ kn source apiserver delete <source_name>Delete the service account, cluster role, and cluster binding:
$ oc delete -f authentication.yaml
2.3.2.1. Knative CLI sink flag
When you create an event source by using the Knative (kn) CLI, you can specify a sink where events are sent to from that resource by using the --sink flag. The sink can be any addressable or callable resource that can receive incoming events from other resources.
The following example creates a sink binding that uses a service, http://event-display.svc.cluster.local, as the sink:
Example command using the sink flag
$ kn source binding create bind-heartbeat \
  --namespace sinkbinding-example \
  --subject "Job:batch/v1:app=heartbeat-cron" \
  --sink http://event-display.svc.cluster.local \
--ce-override "sink=bound"- 1
svcinhttp://event-display.svc.cluster.localdetermines that the sink is a Knative service. Other default sink prefixes includechannel, andbroker.
2.3.3. Creating an API server source by using YAML files
Creating Knative resources by using YAML files uses a declarative API, which enables you to describe event sources declaratively and in a reproducible manner. To create an API server source by using YAML, you must create a YAML file that defines an ApiServerSource object, then apply it by using the oc apply command.
Prerequisites
- The OpenShift Serverless Operator and Knative Eventing are installed on the cluster.
- You have created a project or have access to a project with the appropriate roles and permissions to create applications and other workloads in OpenShift Container Platform.
-
You have created the
defaultbroker in the same namespace as the one defined in the API server source YAML file. -
Install the OpenShift CLI (
oc).
If you want to re-use an existing service account, you can modify your existing ServiceAccount resource to include the required permissions instead of creating a new resource.
Create a service account, role, and role binding for the event source as a YAML file:
apiVersion: v1
kind: ServiceAccount
metadata:
  name: events-sa
  namespace: default
1 --- apiVersion: rbac.authorization.k8s.io/v1 kind: Role metadata: name: event-watcher namespace: default2 rules: - apiGroups: - "" resources: - events verbs: - get - list - watch --- apiVersion: rbac.authorization.k8s.io/v1 kind: RoleBinding metadata: name: k8s-ra-event-watcher namespace: default3 roleRef: apiGroup: rbac.authorization.k8s.io kind: Role name: event-watcher subjects: - kind: ServiceAccount name: events-sa namespace: default4 Apply the YAML file:
$ oc apply -f <filename>Create an API server source as a YAML file:
apiVersion: sources.knative.dev/v1alpha1
kind: ApiServerSource
metadata:
  name: testevents
spec:
  serviceAccountName: events-sa
  mode: Resource
  resources:
    - apiVersion: v1
      kind: Event
  sink:
    ref:
      apiVersion: eventing.knative.dev/v1
      kind: Broker
      name: default
Apply the
ApiServerSourceYAML file:$ oc apply -f <filename>To check that the API server source is set up correctly, create a Knative service as a YAML file that dumps incoming messages to its log:
apiVersion: serving.knative.dev/v1
kind: Service
metadata:
  name: event-display
  namespace: default
spec:
  template:
    spec:
      containers:
        - image: quay.io/openshift-knative/showcase
Apply the
ServiceYAML file:$ oc apply -f <filename>Create a
Triggerobject as a YAML file that filters events from thedefaultbroker to the service created in the previous step:apiVersion: eventing.knative.dev/v1 kind: Trigger metadata: name: event-display-trigger namespace: default spec: broker: default subscriber: ref: apiVersion: serving.knative.dev/v1 kind: Service name: event-displayApply the
TriggerYAML file:$ oc apply -f <filename>Create events by launching a pod in the default namespace:
$ oc create deployment event-origin --image=quay.io/openshift-knative/showcaseCheck that the controller is mapped correctly, by entering the following command and inspecting the output:
$ oc get apiserversource.sources.knative.dev testevents -o yamlExample output
apiVersion: sources.knative.dev/v1alpha1
kind: ApiServerSource
metadata:
  annotations:
  creationTimestamp: "2020-04-07T17:24:54Z"
  generation: 1
  name: testevents
  namespace: default
  resourceVersion: "62868"
  selfLink: /apis/sources.knative.dev/v1alpha1/namespaces/default/apiserversources/testevents2
  uid: 1603d863-bb06-4d1c-b371-f580b4db99fa
spec:
  mode: Resource
  resources:
  - apiVersion: v1
    controller: false
    controllerSelector:
      apiVersion: ""
      kind: ""
      name: ""
      uid: ""
    kind: Event
    labelSelector: {}
  serviceAccountName: events-sa
  sink:
    ref:
      apiVersion: eventing.knative.dev/v1
      kind: Broker
      name: default
Verification
To verify that the Kubernetes events were sent to Knative, you can look at the event-display logs or use web browser to see the events.
To view the events in a web browser, open the link returned by the following command:
$ oc get ksvc event-display -o jsonpath='{.status.url}'Figure 2.2. Example browser page
To see the logs in the terminal, view the event-display logs for the pods by entering the following command:
$ oc logs $(oc get pod -o name | grep event-display) -c user-containerExample output
☁️  cloudevents.Event
Validation: valid
Context Attributes,
  specversion: 1.0
  type: dev.knative.apiserver.resource.update
  datacontenttype: application/json
  ...
Data,
  {
    "apiVersion": "v1",
    "involvedObject": {
      "apiVersion": "v1",
      "fieldPath": "spec.containers{event-origin}",
      "kind": "Pod",
      "name": "event-origin",
      "namespace": "default",
       .....
    },
    "kind": "Event",
    "message": "Started container",
    "metadata": {
      "name": "event-origin.159d7608e3a3572c",
      "namespace": "default",
      ....
    },
    "reason": "Started",
    ...
  }
Deleting the API server source
Delete the trigger:
$ oc delete -f trigger.yamlDelete the event source:
$ oc delete -f k8s-events.yamlDelete the service account, cluster role, and cluster binding:
$ oc delete -f authentication.yaml
2.4. Creating a ping source
A ping source is an event source that can be used to periodically send ping events with a constant payload to an event consumer. A ping source can be used to schedule sending events, similar to a timer.
2.4.1. Creating a ping source by using the web console
After Knative Eventing is installed on your cluster, you can create a ping source by using the web console. Using the OpenShift Container Platform web console provides a streamlined and intuitive user interface to create an event source.
Prerequisites
- You have logged in to the OpenShift Container Platform web console.
- The OpenShift Serverless Operator, Knative Serving and Knative Eventing are installed on the cluster.
- You have created a project or have access to a project with the appropriate roles and permissions to create applications and other workloads in OpenShift Container Platform.
Procedure
To verify that the ping source is working, create a simple Knative service that dumps incoming messages to the logs of the service.
-
In the Developer perspective, navigate to +Add
YAML. Copy the example YAML:
apiVersion: serving.knative.dev/v1 kind: Service metadata: name: event-display spec: template: spec: containers: - image: quay.io/openshift-knative/showcase- Click Create.
-
In the Developer perspective, navigate to +Add
Create a ping source in the same namespace as the service created in the previous step, or any other sink that you want to send events to.
-
In the Developer perspective, navigate to +Add
Event Source. The Event Sources page is displayed. - Optional: If you have multiple providers for your event sources, select the required provider from the Providers list to filter the available event sources from the provider.
Select Ping Source and then click Create Event Source. The Create Event Source page is displayed.
NoteYou can configure the PingSource settings by using the Form view or YAML view and can switch between the views. The data is persisted when switching between the views.
-
Enter a value for Schedule. In this example, the value is
*/2 * * * *, which creates a PingSource that sends a message every two minutes. - Optional: You can enter a value for Data, which is the message payload.
In the Target section, select your event sink. This can be either a Resource or a URI:
-
Select Resource to use a channel, broker, or service as an event sink for the event source. In this example, the
event-displayservice created in the previous step is used as the target Resource. - Select URI to specify a Uniform Resource Identifier (URI) where the events are routed to.
-
Select Resource to use a channel, broker, or service as an event sink for the event source. In this example, the
- Click Create.
-
In the Developer perspective, navigate to +Add
Verification
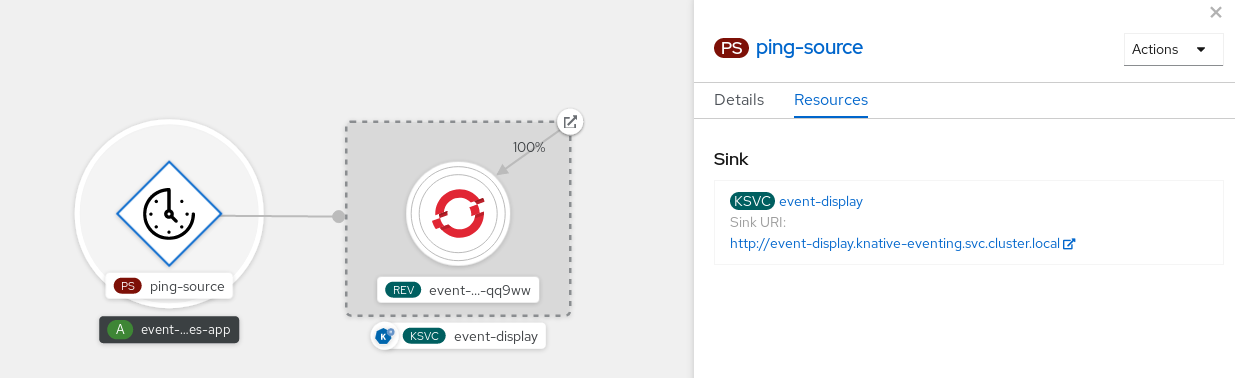
You can verify that the ping source was created and is connected to the sink by viewing the Topology page.
- In the Developer perspective, navigate to Topology.
View the ping source and sink.
View the event-display service in the web browser. You should see the ping source events in the web UI.
Deleting the ping source
- Navigate to the Topology view.
- Right-click the API server source and select Delete Ping Source.
2.4.2. Creating a ping source by using the Knative CLI
You can use the kn source ping create command to create a ping source by using the Knative (kn) CLI. Using the Knative CLI to create event sources provides a more streamlined and intuitive user interface than modifying YAML files directly.
Prerequisites
- The OpenShift Serverless Operator, Knative Serving and Knative Eventing are installed on the cluster.
-
You have installed the Knative (
kn) CLI. - You have created a project or have access to a project with the appropriate roles and permissions to create applications and other workloads in OpenShift Container Platform.
-
Optional: If you want to use the verification steps for this procedure, install the OpenShift CLI (
oc).
Procedure
To verify that the ping source is working, create a simple Knative service that dumps incoming messages to the service logs:
$ kn service create event-display \
    --image quay.io/openshift-knative/showcase
For each set of ping events that you want to request, create a ping source in the same namespace as the event consumer:
$ kn source ping create test-ping-source \
    --schedule "*/2 * * * *" \
    --data '{"message": "Hello world!"}' \
    --sink ksvc:event-display
Check that the controller is mapped correctly by entering the following command and inspecting the output:
$ kn source ping describe test-ping-sourceExample output
Name:         test-ping-source
Namespace:    default
Annotations:  sources.knative.dev/creator=developer, sources.knative.dev/lastModifier=developer
Age:          15s
Schedule:     */2 * * * *
Data:         {"message": "Hello world!"}

Sink:
  Name:       event-display
  Namespace:  default
  Resource:   Service (serving.knative.dev/v1)

Conditions:
  OK TYPE                 AGE REASON
  ++ Ready                 8s
  ++ Deployed              8s
  ++ SinkProvided         15s
  ++ ValidSchedule        15s
  ++ EventTypeProvided    15s
  ++ ResourcesCorrect     15s
Verification
You can verify that the Kubernetes events were sent to the Knative event sink by looking at the logs of the sink pod.
By default, Knative services terminate their pods if no traffic is received within a 60 second period. The example shown in this guide creates a ping source that sends a message every 2 minutes, so each message should be observed in a newly created pod.
Watch for new pods created:
$ watch oc get podsCancel watching the pods using Ctrl+C, then look at the logs of the created pod:
$ oc logs $(oc get pod -o name | grep event-display) -c user-containerExample output
☁️  cloudevents.Event
Validation: valid
Context Attributes,
  specversion: 1.0
  type: dev.knative.sources.ping
  source: /apis/v1/namespaces/default/pingsources/test-ping-source
  id: 99e4f4f6-08ff-4bff-acf1-47f61ded68c9
  time: 2020-04-07T16:16:00.000601161Z
  datacontenttype: application/json
Data,
  {
    "message": "Hello world!"
  }
Deleting the ping source
Delete the ping source:
$ kn delete pingsources.sources.knative.dev <ping_source_name>
2.4.2.1. Knative CLI sink flag
When you create an event source by using the Knative (kn) CLI, you can specify a sink where events are sent to from that resource by using the --sink flag. The sink can be any addressable or callable resource that can receive incoming events from other resources.
The following example creates a sink binding that uses a service, http://event-display.svc.cluster.local, as the sink:
Example command using the sink flag
$ kn source binding create bind-heartbeat \
  --namespace sinkbinding-example \
  --subject "Job:batch/v1:app=heartbeat-cron" \
  --sink http://event-display.svc.cluster.local \
--ce-override "sink=bound"- 1
svcinhttp://event-display.svc.cluster.localdetermines that the sink is a Knative service. Other default sink prefixes includechannel, andbroker.
2.4.3. Creating a ping source by using YAML
Creating Knative resources by using YAML files uses a declarative API, which enables you to describe event sources declaratively and in a reproducible manner. To create a serverless ping source by using YAML, you must create a YAML file that defines a PingSource object, then apply it by using oc apply.
Example PingSource object
apiVersion: sources.knative.dev/v1
kind: PingSource
metadata:
  name: test-ping-source
spec:
  schedule: "*/2 * * * *"
data: '{"message": "Hello world!"}'
sink:
    ref:
      apiVersion: serving.knative.dev/v1
      kind: Service
name: event-display- 1
- The schedule of the event specified using CRON expression.
- 2
- The event message body expressed as a JSON encoded data string.
- 3
- These are the details of the event consumer. In this example, we are using a Knative service named
event-display.
Prerequisites
- The OpenShift Serverless Operator, Knative Serving and Knative Eventing are installed on the cluster.
-
Install the OpenShift CLI (
oc). - You have created a project or have access to a project with the appropriate roles and permissions to create applications and other workloads in OpenShift Container Platform.
Procedure
To verify that the ping source is working, create a simple Knative service that dumps incoming messages to the service’s logs.
Create a service YAML file:
apiVersion: serving.knative.dev/v1
kind: Service
metadata:
  name: event-display
spec:
  template:
    spec:
      containers:
        - image: quay.io/openshift-knative/showcase
Create the service:
$ oc apply -f <filename>
For each set of ping events that you want to request, create a ping source in the same namespace as the event consumer.
Create a YAML file for the ping source:
apiVersion: sources.knative.dev/v1
kind: PingSource
metadata:
  name: test-ping-source
spec:
  schedule: "*/2 * * * *"
  data: '{"message": "Hello world!"}'
  sink:
    ref:
      apiVersion: serving.knative.dev/v1
      kind: Service
      name: event-display
Create the ping source:
$ oc apply -f <filename>
Check that the controller is mapped correctly by entering the following command:
$ oc get pingsource.sources.knative.dev <ping_source_name> -oyamlExample output
apiVersion: sources.knative.dev/v1
kind: PingSource
metadata:
  annotations:
    sources.knative.dev/creator: developer
    sources.knative.dev/lastModifier: developer
  creationTimestamp: "2020-04-07T16:11:14Z"
  generation: 1
  name: test-ping-source
  namespace: default
  resourceVersion: "55257"
  selfLink: /apis/sources.knative.dev/v1/namespaces/default/pingsources/test-ping-source
  uid: 3d80d50b-f8c7-4c1b-99f7-3ec00e0a8164
spec:
  data: '{ value: "hello" }'
  schedule: '*/2 * * * *'
  sink:
    ref:
      apiVersion: serving.knative.dev/v1
      kind: Service
      name: event-display
      namespace: default
Verification
You can verify that the Kubernetes events were sent to the Knative event sink by looking at the sink pod’s logs.
By default, Knative services terminate their pods if no traffic is received within a 60 second period. The example shown in this guide creates a PingSource that sends a message every 2 minutes, so each message should be observed in a newly created pod.
Watch for new pods created:
$ watch oc get podsCancel watching the pods using Ctrl+C, then look at the logs of the created pod:
$ oc logs $(oc get pod -o name | grep event-display) -c user-containerExample output
☁️  cloudevents.Event
Validation: valid
Context Attributes,
  specversion: 1.0
  type: dev.knative.sources.ping
  source: /apis/v1/namespaces/default/pingsources/test-ping-source
  id: 042ff529-240e-45ee-b40c-3a908129853e
  time: 2020-04-07T16:22:00.000791674Z
  datacontenttype: application/json
Data,
  {
    "message": "Hello world!"
  }
Deleting the ping source
Delete the ping source:
$ oc delete -f <filename>Example command
$ oc delete -f ping-source.yaml
2.5. Source for Apache Kafka
You can create an Apache Kafka source that reads events from an Apache Kafka cluster and passes these events to a sink. You can create a Kafka source by using the OpenShift Container Platform web console, the Knative (kn) CLI, or by creating a KafkaSource object directly as a YAML file and using the OpenShift CLI (oc) to apply it.
See the documentation for Installing Knative broker for Apache Kafka.
2.5.1. Creating an Apache Kafka event source by using the web console
After the Knative broker implementation for Apache Kafka is installed on your cluster, you can create an Apache Kafka source by using the web console. Using the OpenShift Container Platform web console provides a streamlined and intuitive user interface to create a Kafka source.
Prerequisites
-
The OpenShift Serverless Operator, Knative Eventing, and the
KnativeKafkacustom resource are installed on your cluster. - You have logged in to the web console.
- You have access to a Red Hat AMQ Streams (Kafka) cluster that produces the Kafka messages you want to import.
- You have created a project or have access to a project with the appropriate roles and permissions to create applications and other workloads in OpenShift Container Platform.
Procedure
- In the Developer perspective, navigate to the +Add page and select Event Source.
- In the Event Sources page, select Kafka Source in the Type section.
Configure the Kafka Source settings:
- Add a comma-separated list of Bootstrap Servers.
- Add a comma-separated list of Topics.
- Add a Consumer Group.
- Select the Service Account Name for the service account that you created.
In the Target section, select your event sink. This can be either a Resource or a URI:
- Select Resource to use a channel, broker, or service as an event sink for the event source.
- Select URI to specify a Uniform Resource Identifier (URI) where the events are routed to.
- Enter a Name for the Kafka event source.
- Click Create.
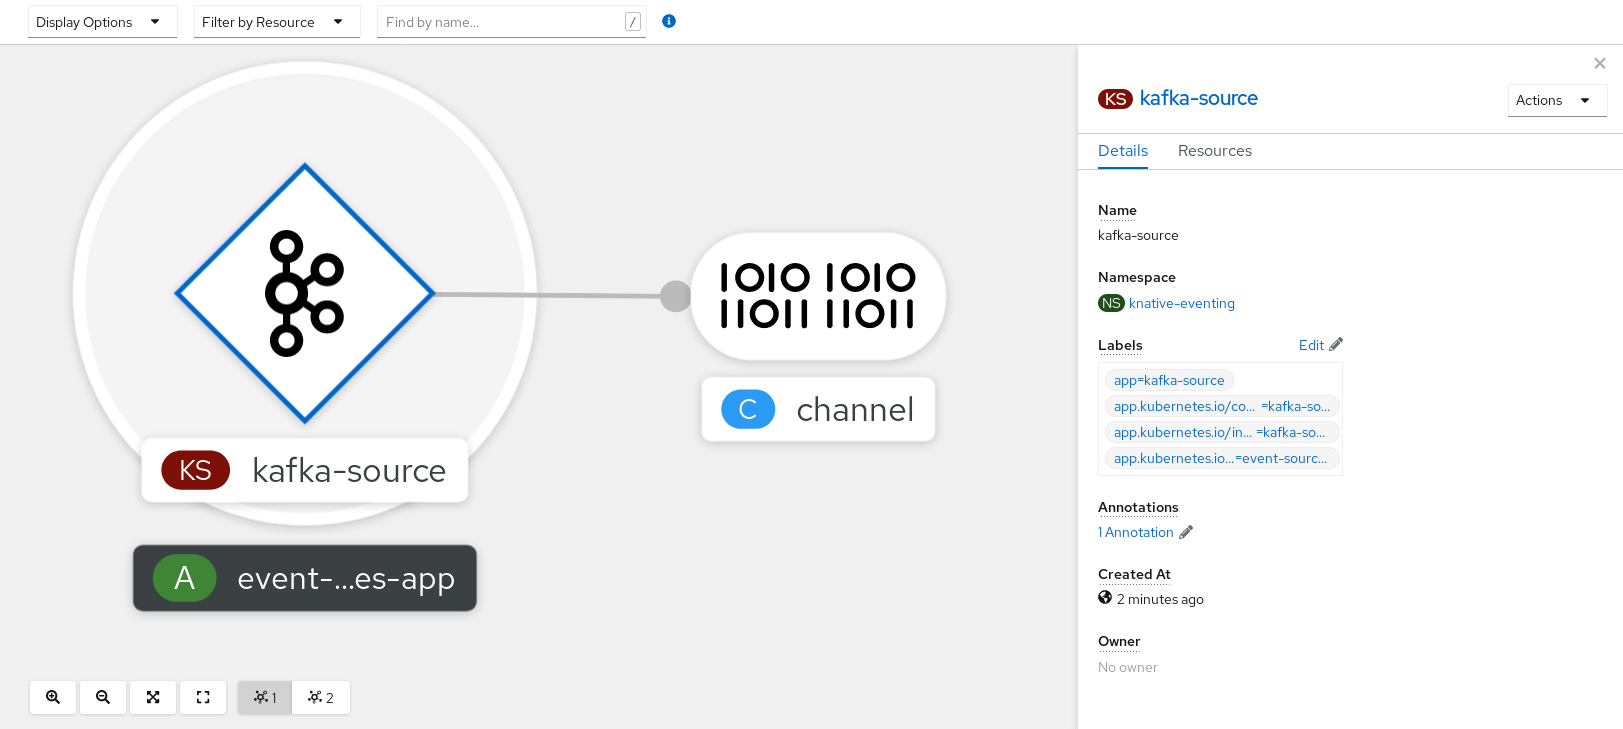
Verification
You can verify that the Kafka event source was created and is connected to the sink by viewing the Topology page.
- In the Developer perspective, navigate to Topology.
View the Kafka event source and sink.
2.5.2. Creating an Apache Kafka event source by using the Knative CLI
You can use the kn source kafka create command to create a Kafka source by using the Knative (kn) CLI. Using the Knative CLI to create event sources provides a more streamlined and intuitive user interface than modifying YAML files directly.
Prerequisites
-
The OpenShift Serverless Operator, Knative Eventing, Knative Serving, and the
KnativeKafkacustom resource (CR) are installed on your cluster. - You have created a project or have access to a project with the appropriate roles and permissions to create applications and other workloads in OpenShift Container Platform.
- You have access to a Red Hat AMQ Streams (Kafka) cluster that produces the Kafka messages you want to import.
-
You have installed the Knative (
kn) CLI. -
Optional: You have installed the OpenShift CLI (
oc) if you want to use the verification steps in this procedure.
Procedure
To verify that the Kafka event source is working, create a Knative service that dumps incoming events into the service logs:
$ kn service create event-display \
    --image quay.io/openshift-knative/showcase
Create a
KafkaSourceCR:$ kn source kafka create <kafka_source_name> \ --servers <cluster_kafka_bootstrap>.kafka.svc:9092 \ --topics <topic_name> --consumergroup my-consumer-group \ --sink event-displayNoteReplace the placeholder values in this command with values for your source name, bootstrap servers, and topics.
The
--servers,--topics, and--consumergroupoptions specify the connection parameters to the Kafka cluster. The--consumergroupoption is optional.Optional: View details about the
KafkaSourceCR you created:$ kn source kafka describe <kafka_source_name>Example output
Name:              example-kafka-source
Namespace:         kafka
Age:               1h
BootstrapServers:  example-cluster-kafka-bootstrap.kafka.svc:9092
Topics:            example-topic
ConsumerGroup:     example-consumer-group

Sink:
  Name:       event-display
  Namespace:  default
  Resource:   Service (serving.knative.dev/v1)

Conditions:
  OK TYPE            AGE REASON
  ++ Ready            1h
  ++ Deployed         1h
  ++ SinkProvided     1h
Verification steps
Trigger the Kafka instance to send a message to the topic:
$ oc -n kafka run kafka-producer \
    -ti --image=quay.io/strimzi/kafka:latest-kafka-2.7.0 --rm=true \
    --restart=Never -- bin/kafka-console-producer.sh \
    --broker-list <cluster_kafka_bootstrap>:9092 --topic my-topic
Enter the message in the prompt. This command assumes that:
-
The Kafka cluster is installed in the
kafkanamespace. -
The
KafkaSourceobject has been configured to use themy-topictopic.
-
The Kafka cluster is installed in the
Verify that the message arrived by viewing the logs:
$ oc logs $(oc get pod -o name | grep event-display) -c user-containerExample output
☁️  cloudevents.Event
Validation: valid
Context Attributes,
  specversion: 1.0
  type: dev.knative.kafka.event
  source: /apis/v1/namespaces/default/kafkasources/example-kafka-source#example-topic
  subject: partition:46#0
  id: partition:46/offset:0
  time: 2021-03-10T11:21:49.4Z
Extensions,
  traceparent: 00-161ff3815727d8755848ec01c866d1cd-7ff3916c44334678-00
Data,
  Hello!
2.5.2.1. Knative CLI sink flag
When you create an event source by using the Knative (kn) CLI, you can specify a sink where events are sent to from that resource by using the --sink flag. The sink can be any addressable or callable resource that can receive incoming events from other resources.
The following example creates a sink binding that uses a service, http://event-display.svc.cluster.local, as the sink:
Example command using the sink flag
$ kn source binding create bind-heartbeat \
  --namespace sinkbinding-example \
  --subject "Job:batch/v1:app=heartbeat-cron" \
  --sink http://event-display.svc.cluster.local \
--ce-override "sink=bound"- 1
svcinhttp://event-display.svc.cluster.localdetermines that the sink is a Knative service. Other default sink prefixes includechannel, andbroker.
2.5.3. Creating an Apache Kafka event source by using YAML
Creating Knative resources by using YAML files uses a declarative API, which enables you to describe applications declaratively and in a reproducible manner. To create a Kafka source by using YAML, you must create a YAML file that defines a KafkaSource object, then apply it by using the oc apply command.
Prerequisites
-
The OpenShift Serverless Operator, Knative Eventing, and the
KnativeKafkacustom resource are installed on your cluster. - You have created a project or have access to a project with the appropriate roles and permissions to create applications and other workloads in OpenShift Container Platform.
- You have access to a Red Hat AMQ Streams (Kafka) cluster that produces the Kafka messages you want to import.
-
Install the OpenShift CLI (
oc).
Procedure
Create a
KafkaSourceobject as a YAML file:apiVersion: sources.knative.dev/v1beta1 kind: KafkaSource metadata: name: <source_name> spec: consumerGroup: <group_name>1 bootstrapServers: - <list_of_bootstrap_servers> topics: - <list_of_topics>2 sink: - <list_of_sinks>3 ImportantOnly the
v1beta1version of the API forKafkaSourceobjects on OpenShift Serverless is supported. Do not use thev1alpha1version of this API, as this version is now deprecated.Example
KafkaSourceobjectapiVersion: sources.knative.dev/v1beta1 kind: KafkaSource metadata: name: kafka-source spec: consumerGroup: knative-group bootstrapServers: - my-cluster-kafka-bootstrap.kafka:9092 topics: - knative-demo-topic sink: ref: apiVersion: serving.knative.dev/v1 kind: Service name: event-displayApply the
KafkaSourceYAML file:$ oc apply -f <filename>
Verification
Verify that the Kafka event source was created by entering the following command:
$ oc get podsExample output
NAME                                    READY     STATUS    RESTARTS   AGE
kafkasource-kafka-source-5ca0248f-...   1/1       Running   0          13m
2.5.4. Configuring SASL authentication for Apache Kafka sources
Simple Authentication and Security Layer (SASL) is used by Apache Kafka for authentication. If you use SASL authentication on your cluster, users must provide credentials to Knative for communicating with the Kafka cluster; otherwise events cannot be produced or consumed.
Prerequisites
- You have cluster or dedicated administrator permissions on OpenShift Container Platform.
-
The OpenShift Serverless Operator, Knative Eventing, and the
KnativeKafkaCR are installed on your OpenShift Container Platform cluster. - You have created a project or have access to a project with the appropriate roles and permissions to create applications and other workloads in OpenShift Container Platform.
- You have a username and password for a Kafka cluster.
-
You have chosen the SASL mechanism to use, for example,
PLAIN,SCRAM-SHA-256, orSCRAM-SHA-512. -
If TLS is enabled, you also need the
ca.crtcertificate file for the Kafka cluster. -
You have installed the OpenShift (
oc) CLI.
Procedure
Create the certificate files as secrets in your chosen namespace:
$ oc create secret -n <namespace> generic <kafka_auth_secret> \
  --from-file=ca.crt=caroot.pem \
  --from-literal=password="SecretPassword" \
  --from-literal=saslType="SCRAM-SHA-512" \
1 --from-literal=user="my-sasl-user"- 1
- The SASL type can be
PLAIN,SCRAM-SHA-256, orSCRAM-SHA-512.
Create or modify your Kafka source so that it contains the following
specconfiguration:apiVersion: sources.knative.dev/v1beta1 kind: KafkaSource metadata: name: example-source spec: ... net: sasl: enable: true user: secretKeyRef: name: <kafka_auth_secret> key: user password: secretKeyRef: name: <kafka_auth_secret> key: password type: secretKeyRef: name: <kafka_auth_secret> key: saslType tls: enable: true caCert:1 secretKeyRef: name: <kafka_auth_secret> key: ca.crt ...- 1
- The
caCertspec is not required if you are using a public cloud Kafka service.
2.5.5. Configuring KEDA autoscaling for KafkaSource
You can configure Knative Eventing sources for Apache Kafka (KafkaSource) to be autoscaled using the Custom Metrics Autoscaler Operator, which is based on the Kubernetes Event Driven Autoscaler (KEDA).
Configuring KEDA autoscaling for KafkaSource is a Technology Preview feature only. Technology Preview features are not supported with Red Hat production service level agreements (SLAs) and might not be functionally complete. Red Hat does not recommend using them in production. These features provide early access to upcoming product features, enabling customers to test functionality and provide feedback during the development process.
For more information about the support scope of Red Hat Technology Preview features, see Technology Preview Features Support Scope.
Prerequisites
-
The OpenShift Serverless Operator, Knative Eventing, and the
KnativeKafkacustom resource are installed on your cluster.
Procedure
In the
KnativeKafkacustom resource, enable KEDA scaling:Example YAML
apiVersion: operator.serverless.openshift.io/v1alpha1
kind: KnativeKafka
metadata:
  name: knative-kafka
  namespace: knative-eventing
spec:
  config:
    kafka-features:
      controller-autoscaler-keda: enabled
Apply the
KnativeKafkaYAML file:$ oc apply -f <filename>
2.6. Custom event sources
If you need to ingress events from an event producer that is not included in Knative, or from a producer that emits events which are not in the CloudEvent format, you can do this by creating a custom event source. You can create a custom event source by using one of the following methods:
-
Use a
PodSpecableobject as an event source, by creating a sink binding. - Use a container as an event source, by creating a container source.
2.6.1. Sink binding
The SinkBinding object supports decoupling event production from delivery addressing. Sink binding is used to connect event producers to an event consumer, or sink. An event producer is a Kubernetes resource that embeds a PodSpec template and produces events. A sink is an addressable Kubernetes object that can receive events.
The SinkBinding object injects environment variables into the PodTemplateSpec of the sink, which means that the application code does not need to interact directly with the Kubernetes API to locate the event destination. These environment variables are as follows:
K_SINK- The URL of the resolved sink.
K_CE_OVERRIDES- A JSON object that specifies overrides to the outbound event.
The SinkBinding object currently does not support custom revision names for services.
2.6.1.1. Creating a sink binding by using YAML
Creating Knative resources by using YAML files uses a declarative API, which enables you to describe event sources declaratively and in a reproducible manner. To create a sink binding by using YAML, you must create a YAML file that defines an SinkBinding object, then apply it by using the oc apply command.
Prerequisites
- The OpenShift Serverless Operator, Knative Serving and Knative Eventing are installed on the cluster.
-
Install the OpenShift CLI (
oc). - You have created a project or have access to a project with the appropriate roles and permissions to create applications and other workloads in OpenShift Container Platform.
Procedure
To check that sink binding is set up correctly, create a Knative event display service, or event sink, that dumps incoming messages to its log.
Create a service YAML file:
Example service YAML file
apiVersion: serving.knative.dev/v1
kind: Service
metadata:
  name: event-display
spec:
  template:
    spec:
      containers:
        - image: quay.io/openshift-knative/showcase
Create the service:
$ oc apply -f <filename>
Create a sink binding instance that directs events to the service.
Create a sink binding YAML file:
Example service YAML file
apiVersion: sources.knative.dev/v1alpha1
kind: SinkBinding
metadata:
  name: bind-heartbeat
spec:
  subject:
    apiVersion: batch/v1
    kind: Job
1 selector: matchLabels: app: heartbeat-cron sink: ref: apiVersion: serving.knative.dev/v1 kind: Service name: event-display- 1
- In this example, any Job with the label
app: heartbeat-cronwill be bound to the event sink.
Create the sink binding:
$ oc apply -f <filename>
Create a
CronJobobject.Create a cron job YAML file:
Example cron job YAML file
apiVersion: batch/v1 kind: CronJob metadata: name: heartbeat-cron spec: # Run every minute schedule: "* * * * *" jobTemplate: metadata: labels: app: heartbeat-cron bindings.knative.dev/include: "true" spec: template: spec: restartPolicy: Never containers: - name: single-heartbeat image: quay.io/openshift-knative/heartbeats:latest args: - --period=1 env: - name: ONE_SHOT value: "true" - name: POD_NAME valueFrom: fieldRef: fieldPath: metadata.name - name: POD_NAMESPACE valueFrom: fieldRef: fieldPath: metadata.namespaceImportantTo use sink binding, you must manually add a
bindings.knative.dev/include=truelabel to your Knative resources.For example, to add this label to a
CronJobresource, add the following lines to theJobresource YAML definition:jobTemplate: metadata: labels: app: heartbeat-cron bindings.knative.dev/include: "true"Create the cron job:
$ oc apply -f <filename>
Check that the controller is mapped correctly by entering the following command and inspecting the output:
$ oc get sinkbindings.sources.knative.dev bind-heartbeat -oyamlExample output
spec:
  sink:
    ref:
      apiVersion: serving.knative.dev/v1
      kind: Service
      name: event-display
      namespace: default
  subject:
    apiVersion: batch/v1
    kind: Job
    namespace: default
    selector:
      matchLabels:
        app: heartbeat-cron
Verification
You can verify that the Kubernetes events were sent to the Knative event sink by looking at the message dumper function logs.
Enter the command:
$ oc get podsEnter the command:
$ oc logs $(oc get pod -o name | grep event-display) -c user-containerExample output
☁️  cloudevents.Event
Validation: valid
Context Attributes,
  specversion: 1.0
  type: dev.knative.eventing.samples.heartbeat
  source: https://knative.dev/eventing-contrib/cmd/heartbeats/#event-test/mypod
  id: 2b72d7bf-c38f-4a98-a433-608fbcdd2596
  time: 2019-10-18T15:23:20.809775386Z
  contenttype: application/json
Extensions,
  beats: true
  heart: yes
  the: 42
Data,
  {
    "id": 1,
    "label": ""
  }
2.6.1.2. Creating a sink binding by using the Knative CLI
You can use the kn source binding create command to create a sink binding by using the Knative (kn) CLI. Using the Knative CLI to create event sources provides a more streamlined and intuitive user interface than modifying YAML files directly.
Prerequisites
- The OpenShift Serverless Operator, Knative Serving and Knative Eventing are installed on the cluster.
- You have created a project or have access to a project with the appropriate roles and permissions to create applications and other workloads in OpenShift Container Platform.
-
Install the Knative (
kn) CLI. -
Install the OpenShift CLI (
oc).
The following procedure requires you to create YAML files.
If you change the names of the YAML files from those used in the examples, you must ensure that you also update the corresponding CLI commands.
Procedure
To check that sink binding is set up correctly, create a Knative event display service, or event sink, that dumps incoming messages to its log:
$ kn service create event-display --image quay.io/openshift-knative/showcaseCreate a sink binding instance that directs events to the service:
$ kn source binding create bind-heartbeat --subject Job:batch/v1:app=heartbeat-cron --sink ksvc:event-displayCreate a
CronJobobject.Create a cron job YAML file:
Example cron job YAML file
apiVersion: batch/v1 kind: CronJob metadata: name: heartbeat-cron spec: # Run every minute schedule: "* * * * *" jobTemplate: metadata: labels: app: heartbeat-cron bindings.knative.dev/include: "true" spec: template: spec: restartPolicy: Never containers: - name: single-heartbeat image: quay.io/openshift-knative/heartbeats:latest args: - --period=1 env: - name: ONE_SHOT value: "true" - name: POD_NAME valueFrom: fieldRef: fieldPath: metadata.name - name: POD_NAMESPACE valueFrom: fieldRef: fieldPath: metadata.namespaceImportantTo use sink binding, you must manually add a
bindings.knative.dev/include=truelabel to your Knative CRs.For example, to add this label to a
CronJobCR, add the following lines to theJobCR YAML definition:jobTemplate: metadata: labels: app: heartbeat-cron bindings.knative.dev/include: "true"Create the cron job:
$ oc apply -f <filename>
Check that the controller is mapped correctly by entering the following command and inspecting the output:
$ kn source binding describe bind-heartbeatExample output
Name:         bind-heartbeat
Namespace:    demo-2
Annotations:  sources.knative.dev/creator=minikube-user, sources.knative.dev/lastModifier=minikub ...
Age:          2m
Subject:
  Resource:   job (batch/v1)
  Selector:
    app:      heartbeat-cron
Sink:
  Name:       event-display
  Resource:   Service (serving.knative.dev/v1)

Conditions:
  OK TYPE     AGE REASON
  ++ Ready     2m
Verification
You can verify that the Kubernetes events were sent to the Knative event sink by looking at the message dumper function logs.
View the message dumper function logs by entering the following commands:
$ oc get pods$ oc logs $(oc get pod -o name | grep event-display) -c user-containerExample output
☁️  cloudevents.Event
Validation: valid
Context Attributes,
  specversion: 1.0
  type: dev.knative.eventing.samples.heartbeat
  source: https://knative.dev/eventing-contrib/cmd/heartbeats/#event-test/mypod
  id: 2b72d7bf-c38f-4a98-a433-608fbcdd2596
  time: 2019-10-18T15:23:20.809775386Z
  contenttype: application/json
Extensions,
  beats: true
  heart: yes
  the: 42
Data,
  {
    "id": 1,
    "label": ""
  }
2.6.1.2.1. Knative CLI sink flag
When you create an event source by using the Knative (kn) CLI, you can specify a sink where events are sent to from that resource by using the --sink flag. The sink can be any addressable or callable resource that can receive incoming events from other resources.
The following example creates a sink binding that uses a service, http://event-display.svc.cluster.local, as the sink:
Example command using the sink flag
$ kn source binding create bind-heartbeat \
  --namespace sinkbinding-example \
  --subject "Job:batch/v1:app=heartbeat-cron" \
  --sink http://event-display.svc.cluster.local \
--ce-override "sink=bound"- 1
svcinhttp://event-display.svc.cluster.localdetermines that the sink is a Knative service. Other default sink prefixes includechannel, andbroker.
2.6.1.3. Creating a sink binding by using the web console
After Knative Eventing is installed on your cluster, you can create a sink binding by using the web console. Using the OpenShift Container Platform web console provides a streamlined and intuitive user interface to create an event source.
Prerequisites
- You have logged in to the OpenShift Container Platform web console.
- The OpenShift Serverless Operator, Knative Serving, and Knative Eventing are installed on your OpenShift Container Platform cluster.
- You have created a project or have access to a project with the appropriate roles and permissions to create applications and other workloads in OpenShift Container Platform.
Procedure
Create a Knative service to use as a sink:
-
In the Developer perspective, navigate to +Add
YAML. Copy the example YAML:
apiVersion: serving.knative.dev/v1 kind: Service metadata: name: event-display spec: template: spec: containers: - image: quay.io/openshift-knative/showcase- Click Create.
-
In the Developer perspective, navigate to +Add
Create a
CronJobresource that is used as an event source and sends an event every minute.-
In the Developer perspective, navigate to +Add
YAML. Copy the example YAML:
apiVersion: batch/v1
kind: CronJob
metadata:
  name: heartbeat-cron
spec:
  # Run every minute
  schedule: "*/1 * * * *"
  jobTemplate:
    metadata:
      labels:
        app: heartbeat-cron
        bindings.knative.dev/include: true
1 spec: template: spec: restartPolicy: Never containers: - name: single-heartbeat image: quay.io/openshift-knative/heartbeats args: - --period=1 env: - name: ONE_SHOT value: "true" - name: POD_NAME valueFrom: fieldRef: fieldPath: metadata.name - name: POD_NAMESPACE valueFrom: fieldRef: fieldPath: metadata.namespace- 1
- Ensure that you include the
bindings.knative.dev/include: truelabel. The default namespace selection behavior of OpenShift Serverless uses inclusion mode.
- Click Create.
-
In the Developer perspective, navigate to +Add
Create a sink binding in the same namespace as the service created in the previous step, or any other sink that you want to send events to.
-
In the Developer perspective, navigate to +Add
Event Source. The Event Sources page is displayed. - Optional: If you have multiple providers for your event sources, select the required provider from the Providers list to filter the available event sources from the provider.
Select Sink Binding and then click Create Event Source. The Create Event Source page is displayed.
NoteYou can configure the Sink Binding settings by using the Form view or YAML view and can switch between the views. The data is persisted when switching between the views.
-
In the apiVersion field enter
batch/v1. In the Kind field enter
Job.NoteThe
CronJobkind is not supported directly by OpenShift Serverless sink binding, so the Kind field must target theJobobjects created by the cron job, rather than the cron job object itself.In the Target section, select your event sink. This can be either a Resource or a URI:
-
Select Resource to use a channel, broker, or service as an event sink for the event source. In this example, the
event-displayservice created in the previous step is used as the target Resource. - Select URI to specify a Uniform Resource Identifier (URI) where the events are routed to.
-
Select Resource to use a channel, broker, or service as an event sink for the event source. In this example, the
In the Match labels section:
-
Enter
appin the Name field. Enter
heartbeat-cronin the Value field.NoteThe label selector is required when using cron jobs with sink binding, rather than the resource name. This is because jobs created by a cron job do not have a predictable name, and contain a randomly generated string in their name. For example,
hearthbeat-cron-1cc23f.
-
Enter
- Click Create.
-
In the Developer perspective, navigate to +Add
Verification
You can verify that the sink binding, sink, and cron job have been created and are working correctly by viewing the Topology page and pod logs.
- In the Developer perspective, navigate to Topology.
View the sink binding, sink, and heartbeats cron job.
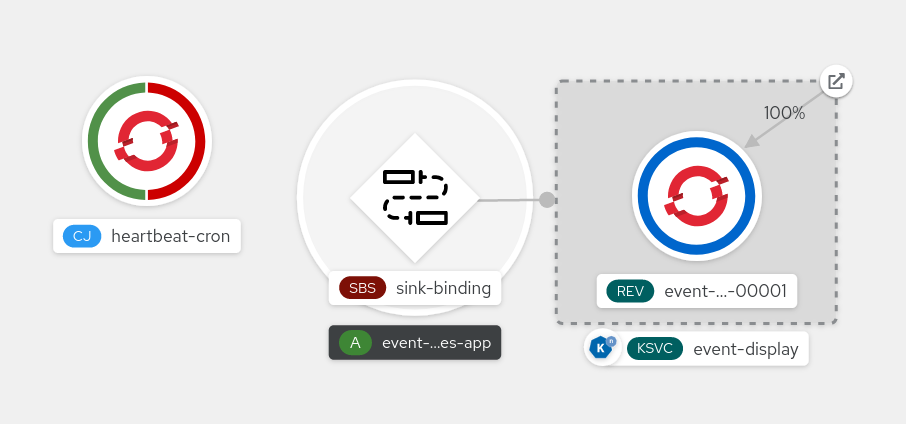
- Observe that successful jobs are being registered by the cron job once the sink binding is added. This means that the sink binding is successfully reconfiguring the jobs created by the cron job.
Browse the
event-displayservice to see events produced by the heartbeats cron job.
2.6.1.4. Sink binding reference
You can use a PodSpecable object as an event source by creating a sink binding. You can configure multiple parameters when creating a SinkBinding object.
SinkBinding objects support the following parameters:
| Field | Description | Required or optional |
|---|---|---|
|
|
Specifies the API version, for example | Required |
|
|
Identifies this resource object as a | Required |
|
|
Specifies metadata that uniquely identifies the | Required |
|
|
Specifies the configuration information for this | Required |
|
| A reference to an object that resolves to a URI to use as the sink. | Required |
|
| References the resources for which the runtime contract is augmented by binding implementations. | Required |
|
| Defines overrides to control the output format and modifications to the event sent to the sink. | Optional |
2.6.1.4.1. Subject parameter
The Subject parameter references the resources for which the runtime contract is augmented by binding implementations. You can configure multiple fields for a Subject definition.
The Subject definition supports the following fields:
| Field | Description | Required or optional |
|---|---|---|
|
| API version of the referent. | Required |
|
| Kind of the referent. | Required |
|
| Namespace of the referent. If omitted, this defaults to the namespace of the object. | Optional |
|
| Name of the referent. |
Do not use if you configure |
|
| Selector of the referents. |
Do not use if you configure |
|
| A list of label selector requirements. |
Only use one of either |
|
| The label key that the selector applies to. |
Required if using |
|
|
Represents a key’s relationship to a set of values. Valid operators are |
Required if using |
|
|
An array of string values. If the |
Required if using |
|
|
A map of key-value pairs. Each key-value pair in the |
Only use one of either |
Subject parameter examples
Given the following YAML, the Deployment object named mysubject in the default namespace is selected:
apiVersion: sources.knative.dev/v1
kind: SinkBinding
metadata:
  name: bind-heartbeat
spec:
  subject:
    apiVersion: apps/v1
    kind: Deployment
    namespace: default
    name: mysubject
  ...
Given the following YAML, any Job object with the label working=example in the default namespace is selected:
apiVersion: sources.knative.dev/v1
kind: SinkBinding
metadata:
  name: bind-heartbeat
spec:
  subject:
    apiVersion: batch/v1
    kind: Job
    namespace: default
    selector:
      matchLabels:
        working: example
  ...
Given the following YAML, any Pod object with the label working=example or working=sample in the default namespace is selected:
apiVersion: sources.knative.dev/v1
kind: SinkBinding
metadata:
  name: bind-heartbeat
spec:
  subject:
    apiVersion: v1
    kind: Pod
    namespace: default
    selector:
      - matchExpression:
        key: working
        operator: In
        values:
          - example
          - sample
  ...
2.6.1.4.2. CloudEvent overrides
A ceOverrides definition provides overrides that control the CloudEvent’s output format and modifications sent to the sink. You can configure multiple fields for the ceOverrides definition.
A ceOverrides definition supports the following fields:
| Field | Description | Required or optional |
|---|---|---|
|
|
Specifies which attributes are added or overridden on the outbound event. Each | Optional |
Only valid CloudEvent attribute names are allowed as extensions. You cannot set the spec defined attributes from the extensions override configuration. For example, you can not modify the type attribute.
CloudEvent Overrides example
apiVersion: sources.knative.dev/v1
kind: SinkBinding
metadata:
  name: bind-heartbeat
spec:
  ...
  ceOverrides:
    extensions:
      extra: this is an extra attribute
      additional: 42
This sets the K_CE_OVERRIDES environment variable on the subject:
Example output
{ "extensions": { "extra": "this is an extra attribute", "additional": "42" } }2.6.1.4.3. The include label
To use a sink binding, you need to do assign the bindings.knative.dev/include: "true" label to either the resource or the namespace that the resource is included in. If the resource definition does not include the label, a cluster administrator can attach it to the namespace by running:
$ oc label namespace <namespace> bindings.knative.dev/include=true2.6.1.5. Integrating Service Mesh with a sink binding
Prerequisites
- You have integrated Service Mesh with OpenShift Serverless.
Procedure
Create a
Servicein a namespace that is a member of theServiceMeshMemberRoll.apiVersion: serving.knative.dev/v1 kind: Service metadata: name: event-display namespace: <namespace>1 spec: template: metadata: annotations: sidecar.istio.io/inject: "true"2 sidecar.istio.io/rewriteAppHTTPProbers: "true" spec: containers: - image: quay.io/openshift-knative/showcaseApply the
Serviceresource.$ oc apply -f <filename>Create a
SinkBindingresource.apiVersion: sources.knative.dev/v1 kind: SinkBinding metadata: name: bind-heartbeat namespace: <namespace>1 spec: subject: apiVersion: batch/v1 kind: Job2 selector: matchLabels: app: heartbeat-cron sink: ref: apiVersion: serving.knative.dev/v1 kind: Service name: event-displayApply the
SinkBindingresource.$ oc apply -f <filename>Create a
CronJob:apiVersion: batch/v1 kind: CronJob metadata: name: heartbeat-cron namespace: <namespace>1 spec: # Run every minute schedule: "* * * * *" jobTemplate: metadata: labels: app: heartbeat-cron bindings.knative.dev/include: "true" spec: template: metadata: annotations: sidecar.istio.io/inject: "true"2 sidecar.istio.io/rewriteAppHTTPProbers: "true" spec: restartPolicy: Never containers: - name: single-heartbeat image: quay.io/openshift-knative/heartbeats:latest args: - --period=1 env: - name: ONE_SHOT value: "true" - name: POD_NAME valueFrom: fieldRef: fieldPath: metadata.name - name: POD_NAMESPACE valueFrom: fieldRef: fieldPath: metadata.namespaceApply the
CronJobresource.$ oc apply -f <filename>
Verification
To verify that the events were sent to the Knative event sink, look at the message dumper function logs.
Enter the following command:
$ oc get podsEnter the following command:
$ oc logs $(oc get pod -o name | grep event-display) -c user-containerExample output
☁️  cloudevents.Event
Validation: valid
Context Attributes,
  specversion: 1.0
  type: dev.knative.eventing.samples.heartbeat
  source: https://knative.dev/eventing/test/heartbeats/#event-test/mypod
  id: 2b72d7bf-c38f-4a98-a433-608fbcdd2596
  time: 2019-10-18T15:23:20.809775386Z
  contenttype: application/json
Extensions,
  beats: true
  heart: yes
  the: 42
Data,
  {
    "id": 1,
    "label": ""
  }
Additional resources
2.6.2. Container source
Container sources create a container image that generates events and sends events to a sink. You can use a container source to create a custom event source, by creating a container image and a ContainerSource object that uses your image URI.
2.6.2.1. Guidelines for creating a container image
Two environment variables are injected by the container source controller: K_SINK and K_CE_OVERRIDES. These variables are resolved from the sink and ceOverrides spec, respectively. Events are sent to the sink URI specified in the K_SINK environment variable. The message must be sent as a POST using the CloudEvent HTTP format.
Example container images
The following is an example of a heartbeats container image:
package main

import (
	"context"
	"encoding/json"
	"flag"
	"fmt"
	"log"
	"os"
	"strconv"
	"time"

	duckv1 "knative.dev/pkg/apis/duck/v1"

	cloudevents "github.com/cloudevents/sdk-go/v2"
	"github.com/kelseyhightower/envconfig"
)

type Heartbeat struct {
	Sequence int    `json:"id"`
	Label    string `json:"label"`
}

var (
	eventSource string
	eventType   string
	sink        string
	label       string
	periodStr   string
)

func init() {
	flag.StringVar(&eventSource, "eventSource", "", "the event-source (CloudEvents)")
	flag.StringVar(&eventType, "eventType", "dev.knative.eventing.samples.heartbeat", "the event-type (CloudEvents)")
	flag.StringVar(&sink, "sink", "", "the host url to heartbeat to")
	flag.StringVar(&label, "label", "", "a special label")
	flag.StringVar(&periodStr, "period", "5", "the number of seconds between heartbeats")
}

type envConfig struct {
	// Sink URL where to send heartbeat cloud events
	Sink string `envconfig:"K_SINK"`

	// CEOverrides are the CloudEvents overrides to be applied to the outbound event.
	CEOverrides string `envconfig:"K_CE_OVERRIDES"`

	// Name of this pod.
	Name string `envconfig:"POD_NAME" required:"true"`

	// Namespace this pod exists in.
	Namespace string `envconfig:"POD_NAMESPACE" required:"true"`

	// Whether to run continuously or exit.
	OneShot bool `envconfig:"ONE_SHOT" default:"false"`
}

func main() {
	flag.Parse()

	var env envConfig
	if err := envconfig.Process("", &env); err != nil {
		log.Printf("[ERROR] Failed to process env var: %s", err)
		os.Exit(1)
	}

	if env.Sink != "" {
		sink = env.Sink
	}

	var ceOverrides *duckv1.CloudEventOverrides
	if len(env.CEOverrides) > 0 {
		overrides := duckv1.CloudEventOverrides{}
		err := json.Unmarshal([]byte(env.CEOverrides), &overrides)
		if err != nil {
			log.Printf("[ERROR] Unparseable CloudEvents overrides %s: %v", env.CEOverrides, err)
			os.Exit(1)
		}
		ceOverrides = &overrides
	}

	p, err := cloudevents.NewHTTP(cloudevents.WithTarget(sink))
	if err != nil {
		log.Fatalf("failed to create http protocol: %s", err.Error())
	}

	c, err := cloudevents.NewClient(p, cloudevents.WithUUIDs(), cloudevents.WithTimeNow())
	if err != nil {
		log.Fatalf("failed to create client: %s", err.Error())
	}

	var period time.Duration
	if p, err := strconv.Atoi(periodStr); err != nil {
		period = time.Duration(5) * time.Second
	} else {
		period = time.Duration(p) * time.Second
	}

	if eventSource == "" {
		eventSource = fmt.Sprintf("https://knative.dev/eventing-contrib/cmd/heartbeats/#%s/%s", env.Namespace, env.Name)
		log.Printf("Heartbeats Source: %s", eventSource)
	}

	if len(label) > 0 && label[0] == '"' {
		label, _ = strconv.Unquote(label)
	}
	hb := &Heartbeat{
		Sequence: 0,
		Label:    label,
	}
	ticker := time.NewTicker(period)
	for {
		hb.Sequence++

		event := cloudevents.NewEvent("1.0")
		event.SetType(eventType)
		event.SetSource(eventSource)
		event.SetExtension("the", 42)
		event.SetExtension("heart", "yes")
		event.SetExtension("beats", true)

		if ceOverrides != nil && ceOverrides.Extensions != nil {
			for n, v := range ceOverrides.Extensions {
				event.SetExtension(n, v)
			}
		}

		if err := event.SetData(cloudevents.ApplicationJSON, hb); err != nil {
			log.Printf("failed to set cloudevents data: %s", err.Error())
		}

		log.Printf("sending cloudevent to %s", sink)
		if res := c.Send(context.Background(), event); !cloudevents.IsACK(res) {
			log.Printf("failed to send cloudevent: %v", res)
		}

		if env.OneShot {
			return
		}

		// Wait for next tick
		<-ticker.C
	}
}
The following is an example of a container source that references the previous heartbeats container image:
apiVersion: sources.knative.dev/v1
kind: ContainerSource
metadata:
  name: test-heartbeats
spec:
  template:
    spec:
      containers:
        # This corresponds to a heartbeats image URI that you have built and published
        - image: gcr.io/knative-releases/knative.dev/eventing/cmd/heartbeats
          name: heartbeats
          args:
            - --period=1
          env:
            - name: POD_NAME
              value: "example-pod"
            - name: POD_NAMESPACE
              value: "event-test"
  sink:
    ref:
      apiVersion: serving.knative.dev/v1
      kind: Service
      name: showcase
...
2.6.2.2. Creating and managing container sources by using the Knative CLI
You can use the kn source container commands to create and manage container sources by using the Knative (kn) CLI. Using the Knative CLI to create event sources provides a more streamlined and intuitive user interface than modifying YAML files directly.
Create a container source
$ kn source container create <container_source_name> --image <image_uri> --sink <sink>Delete a container source
$ kn source container delete <container_source_name>Describe a container source
$ kn source container describe <container_source_name>List existing container sources
$ kn source container listList existing container sources in YAML format
$ kn source container list -o yamlUpdate a container source
This command updates the image URI for an existing container source:
$ kn source container update <container_source_name> --image <image_uri>2.6.2.3. Creating a container source by using the web console
After Knative Eventing is installed on your cluster, you can create a container source by using the web console. Using the OpenShift Container Platform web console provides a streamlined and intuitive user interface to create an event source.
Prerequisites
- You have logged in to the OpenShift Container Platform web console.
- The OpenShift Serverless Operator, Knative Serving, and Knative Eventing are installed on your OpenShift Container Platform cluster.
- You have created a project or have access to a project with the appropriate roles and permissions to create applications and other workloads in OpenShift Container Platform.
Procedure
-
In the Developer perspective, navigate to +Add
Event Source. The Event Sources page is displayed. - Select Container Source and then click Create Event Source. The Create Event Source page is displayed.
Configure the Container Source settings by using the Form view or YAML view:
NoteYou can switch between the Form view and YAML view. The data is persisted when switching between the views.
- In the Image field, enter the URI of the image that you want to run in the container created by the container source.
- In the Name field, enter the name of the image.
- Optional: In the Arguments field, enter any arguments to be passed to the container.
- Optional: In the Environment variables field, add any environment variables to set in the container.
In the Target section, select your event sink. This can be either a Resource or a URI:
- Select Resource to use a channel, broker, or service as an event sink for the event source.
- Select URI to specify a Uniform Resource Identifier (URI) where the events are routed to.
- After you have finished configuring the container source, click Create.
2.6.2.4. Container source reference
You can use a container as an event source, by creating a ContainerSource object. You can configure multiple parameters when creating a ContainerSource object.
ContainerSource objects support the following fields:
| Field | Description | Required or optional |
|---|---|---|
|
|
Specifies the API version, for example | Required |
|
|
Identifies this resource object as a | Required |
|
|
Specifies metadata that uniquely identifies the | Required |
|
|
Specifies the configuration information for this | Required |
|
| A reference to an object that resolves to a URI to use as the sink. | Required |
|
|
A | Required |
|
| Defines overrides to control the output format and modifications to the event sent to the sink. | Optional |
Template parameter example
apiVersion: sources.knative.dev/v1
kind: ContainerSource
metadata:
  name: test-heartbeats
spec:
  template:
    spec:
      containers:
        - image: quay.io/openshift-knative/heartbeats:latest
          name: heartbeats
          args:
            - --period=1
          env:
            - name: POD_NAME
              value: "mypod"
            - name: POD_NAMESPACE
              value: "event-test"
  ...
2.6.2.4.1. CloudEvent overrides
A ceOverrides definition provides overrides that control the CloudEvent’s output format and modifications sent to the sink. You can configure multiple fields for the ceOverrides definition.
A ceOverrides definition supports the following fields:
| Field | Description | Required or optional |
|---|---|---|
|
|
Specifies which attributes are added or overridden on the outbound event. Each | Optional |
Only valid CloudEvent attribute names are allowed as extensions. You cannot set the spec defined attributes from the extensions override configuration. For example, you can not modify the type attribute.
CloudEvent Overrides example
apiVersion: sources.knative.dev/v1
kind: ContainerSource
metadata:
  name: test-heartbeats
spec:
  ...
  ceOverrides:
    extensions:
      extra: this is an extra attribute
      additional: 42
This sets the K_CE_OVERRIDES environment variable on the subject:
Example output
{ "extensions": { "extra": "this is an extra attribute", "additional": "42" } }2.6.2.5. Integrating Service Mesh with ContainerSource
Prerequisites
- You have integrated Service Mesh with OpenShift Serverless.
Procedure
Create a
Servicein a namespace that is a member of theServiceMeshMemberRoll.apiVersion: serving.knative.dev/v1 kind: Service metadata: name: event-display namespace: <namespace>1 spec: template: metadata: annotations: sidecar.istio.io/inject: "true"2 sidecar.istio.io/rewriteAppHTTPProbers: "true" spec: containers: - image: quay.io/openshift-knative/showcaseApply the
Serviceresource.$ oc apply -f <filename>Create a
ContainerSourceobject in a namespace that is a member of theServiceMeshMemberRolland sink set to theevent-display.apiVersion: sources.knative.dev/v1 kind: ContainerSource metadata: name: test-heartbeats namespace: <namespace>1 spec: template: metadata:2 annotations: sidecar.istio.io/inject: "true" sidecar.istio.io/rewriteAppHTTPProbers: "true" spec: containers: - image: quay.io/openshift-knative/heartbeats:latest name: heartbeats args: - --period=1s env: - name: POD_NAME value: "example-pod" - name: POD_NAMESPACE value: "event-test" sink: ref: apiVersion: serving.knative.dev/v1 kind: Service name: event-displayApply the
ContainerSourceresource.$ oc apply -f <filename>
Verification
To verify that the events were sent to the Knative event sink, look at the message dumper function logs.
Enter the following command:
$ oc get podsEnter the following command:
$ oc logs $(oc get pod -o name | grep event-display) -c user-containerExample output
☁️  cloudevents.Event
Validation: valid
Context Attributes,
  specversion: 1.0
  type: dev.knative.eventing.samples.heartbeat
  source: https://knative.dev/eventing/test/heartbeats/#event-test/mypod
  id: 2b72d7bf-c38f-4a98-a433-608fbcdd2596
  time: 2019-10-18T15:23:20.809775386Z
  contenttype: application/json
Extensions,
  beats: true
  heart: yes
  the: 42
Data,
  {
    "id": 1,
    "label": ""
  }
Additional resources
2.7. Connecting an event source to an event sink by using the Developer perspective
When you create an event source by using the OpenShift Container Platform web console, you can specify a target event sink that events are sent to from that source. The event sink can be any addressable or callable resource that can receive incoming events from other resources.
2.7.1. Connect an event source to an event sink by using the Developer perspective
Prerequisites
- The OpenShift Serverless Operator, Knative Serving, and Knative Eventing are installed on your OpenShift Container Platform cluster.
- You have logged in to the web console and are in the Developer perspective.
- You have created a project or have access to a project with the appropriate roles and permissions to create applications and other workloads in OpenShift Container Platform.
- You have created an event sink, such as a Knative service, channel or broker.
Procedure
-
Create an event source of any type, by navigating to +Add
Event Source and selecting the event source type that you want to create. In the Target section of the Create Event Source form view, select your event sink. This can be either a Resource or a URI:
- Select Resource to use a channel, broker, or service as an event sink for the event source.
- Select URI to specify a Uniform Resource Identifier (URI) where the events are routed to.
- Click Create.
Verification
You can verify that the event source was created and is connected to the sink by viewing the Topology page.
- In the Developer perspective, navigate to Topology.
- View the event source and click the connected event sink to see the sink details in the right panel.