Ce contenu n'est pas disponible dans la langue sélectionnée.
Chapter 16. Geo-replication
Currently, the geo-replication feature is not supported on IBM Power.
Geo-replication allows multiple, geographically distributed Red Hat Quay deployments to work as a single registry from the perspective of a client or user. It significantly improves push and pull performance in a globally-distributed Red Hat Quay setup. Image data is asynchronously replicated in the background with transparent failover and redirect for clients.
Deployments of Red Hat Quay with geo-replication is supported on standalone and Operator deployments.
16.1. Geo-replication features
- When geo-replication is configured, container image pushes will be written to the preferred storage engine for that Red Hat Quay instance. This is typically the nearest storage backend within the region.
- After the initial push, image data will be replicated in the background to other storage engines.
- The list of replication locations is configurable and those can be different storage backends.
- An image pull will always use the closest available storage engine, to maximize pull performance.
- If replication has not been completed yet, the pull will use the source storage backend instead.
16.2. Geo-replication requirements and constraints
- In geo-replicated setups, Red Hat Quay requires that all regions are able to read and write to all other region’s object storage. Object storage must be geographically accessible by all other regions.
- In case of an object storage system failure of one geo-replicating site, that site’s Red Hat Quay deployment must be shut down so that clients are redirected to the remaining site with intact storage systems by a global load balancer. Otherwise, clients will experience pull and push failures.
- Red Hat Quay has no internal awareness of the health or availability of the connected object storage system. Users must configure a global load balancer (LB) to monitor the health of your distributed system and to route traffic to different sites based on their storage status.
-
To check the status of your geo-replication deployment, you must use the
/health/endtoendcheckpoint, which is used for global health monitoring. You must configure the redirect manually using the/health/endtoendendpoint. The/health/instanceend point only checks local instance health. - If the object storage system of one site becomes unavailable, there will be no automatic redirect to the remaining storage system, or systems, of the remaining site, or sites.
- Geo-replication is asynchronous. The permanent loss of a site incurs the loss of the data that has been saved in that sites' object storage system but has not yet been replicated to the remaining sites at the time of failure.
A single database, and therefore all metadata and Red Hat Quay configuration, is shared across all regions.
Geo-replication does not replicate the database. In the event of an outage, Red Hat Quay with geo-replication enabled will not failover to another database.
- A single Redis cache is shared across the entire Red Hat Quay setup and needs to be accessible by all Red Hat Quay pods.
-
The exact same configuration should be used across all regions, with exception of the storage backend, which can be configured explicitly using the
QUAY_DISTRIBUTED_STORAGE_PREFERENCEenvironment variable. - Geo-replication requires object storage in each region. It does not work with local storage.
- Each region must be able to access every storage engine in each region, which requires a network path.
- Alternatively, the storage proxy option can be used.
- The entire storage backend, for example, all blobs, is replicated. Repository mirroring, by contrast, can be limited to a repository, or an image.
- All Red Hat Quay instances must share the same entrypoint, typically through a load balancer.
- All Red Hat Quay instances must have the same set of superusers, as they are defined inside the common configuration file.
In geo-replication environments, your Clair configuration can be set to
unmanaged. An unmanaged Clair database allows the Red Hat Quay Operator to work in a geo-replicated environment where multiple instances of the Operator must communicate with the same database. For more information, see Advanced Clair configuration.If you keep your Clair configuration
managed, you must retrieve the configuration file for the deployed Clair instance that is deployed by the Operator. For more information, see Retrieving and decoding the Clair configuration secret for Clair deployments on OpenShift Container Platform.- Geo-Replication requires SSL/TLS certificates and keys. For more information, see * Geo-Replication requires SSL/TLS certificates and keys. For more information, see Proof of concept deployment using SSL/TLS certificates. .
If the above requirements cannot be met, you should instead use two or more distinct Red Hat Quay deployments and take advantage of repository mirroring functions.
16.2.1. Enabling storage replication for standalone Red Hat Quay
Use the following procedure to enable storage replication on Red Hat Quay.
Procedure
Update your
config.yamlfile to include the storage engines to which data will be replicated. You must list all storage engines to be used:# ... FEATURE_STORAGE_REPLICATION: true # ... DISTRIBUTED_STORAGE_CONFIG: usstorage: - RHOCSStorage - access_key: <access_key> bucket_name: <example_bucket> hostname: my.noobaa.hostname is_secure: false port: "443" secret_key: <secret_key> storage_path: /datastorage/registry eustorage: - S3Storage - host: s3.amazon.com port: "443" s3_access_key: <access_key> s3_bucket: <example bucket> s3_secret_key: <secret_key> storage_path: /datastorage/registry DISTRIBUTED_STORAGE_DEFAULT_LOCATIONS: [] DISTRIBUTED_STORAGE_PREFERENCE: - usstorage - eustorage # ...Optional. If complete replication of all images to all storage engines is required, you can replicate images to the storage engine by manually setting the
DISTRIBUTED_STORAGE_DEFAULT_LOCATIONSfield. This ensures that all images are replicated to that storage engine. For example:# ... DISTRIBUTED_STORAGE_DEFAULT_LOCATIONS: - usstorage - eustorage # ...NoteTo enable per-namespace replication, contact Red Hat Quay support.
After adding storage and enabling Replicate to storage engine by default for geo-replication, you must sync existing image data across all storage. To do this, you must execute into the container by running the following command:
$ podman exec -it <container_id>To sync the content after adding new storage, enter the following commands:
# scl enable python27 bash# python -m util.backfillreplicationNoteThis is a one time operation to sync content after adding new storage.
16.2.2. Run Red Hat Quay with storage preferences
- Copy the config.yaml to all machines running Red Hat Quay
For each machine in each region, add a
QUAY_DISTRIBUTED_STORAGE_PREFERENCEenvironment variable with the preferred storage engine for the region in which the machine is running.For example, for a machine running in Europe with the config directory on the host available from
$QUAY/config:$ sudo podman run -d --rm -p 80:8080 -p 443:8443 \ --name=quay \ -v $QUAY/config:/conf/stack:Z \ -e QUAY_DISTRIBUTED_STORAGE_PREFERENCE=europestorage \ registry.redhat.io/quay/quay-rhel8:v3.12.15NoteThe value of the environment variable specified must match the name of a Location ID as defined in the config panel.
- Restart all Red Hat Quay containers
16.2.3. Removing a geo-replicated site from your standalone Red Hat Quay deployment
By using the following procedure, Red Hat Quay administrators can remove sites in a geo-replicated setup.
Prerequisites
-
You have configured Red Hat Quay geo-replication with at least two sites, for example,
usstorageandeustorage. - Each site has its own Organization, Repository, and image tags.
Procedure
Sync the blobs between all of your defined sites by running the following command:
$ python -m util.backfillreplicationWarningPrior to removing storage engines from your Red Hat Quay
config.yamlfile, you must ensure that all blobs are synced between all defined sites. Complete this step before proceeding.-
In your Red Hat Quay
config.yamlfile for siteusstorage, remove theDISTRIBUTED_STORAGE_CONFIGentry for theeustoragesite. Enter the following command to obtain a list of running containers:
$ podman psExample output
CONTAINER ID  IMAGE                                                                     COMMAND         CREATED         STATUS             PORTS                                        NAMES
92c5321cde38  registry.redhat.io/rhel8/redis-5:1                                        run-redis       11 days ago     Up 11 days ago     0.0.0.0:6379->6379/tcp                       redis
4e6d1ecd3811  registry.redhat.io/rhel8/postgresql-13:1-109                              run-postgresql  33 seconds ago  Up 34 seconds ago  0.0.0.0:5432->5432/tcp                       postgresql-quay
d2eadac74fda  registry-proxy.engineering.redhat.com/rh-osbs/quay-quay-rhel8:v3.9.0-131  registry        4 seconds ago   Up 4 seconds ago   0.0.0.0:80->8080/tcp, 0.0.0.0:443->8443/tcp  quay
Enter the following command to execute a shell inside of the PostgreSQL container:
$ podman exec -it postgresql-quay -- /bin/bashEnter psql by running the following command:
bash-4.4$ psqlEnter the following command to reveal a list of sites in your geo-replicated deployment:
quay=# select * from imagestoragelocation;Example output
 id |       name
----+-------------------
  1 | usstorage
  2 | eustorage
Enter the following command to exit the postgres CLI to re-enter bash-4.4:
\qEnter the following command to permanently remove the
eustoragesite:ImportantThe following action cannot be undone. Use with caution.
bash-4.4$ python -m util.removelocation eustorageExample output
WARNING: This is a destructive operation. Are you sure you want to remove eustorage from your storage locations? [y/n] y
Deleted placement 30
Deleted placement 31
Deleted placement 32
Deleted placement 33
Deleted location eustorage
16.2.4. Setting up geo-replication on OpenShift Container Platform
Use the following procedure to set up geo-replication on OpenShift Container Platform.
Procedure
- Deploy a postgres instance for Red Hat Quay.
Login to the database by entering the following command:
psql -U <username> -h <hostname> -p <port> -d <database_name>Create a database for Red Hat Quay named
quay. For example:CREATE DATABASE quay;Enable pg_trm extension inside the database
\c quay;
CREATE EXTENSION IF NOT EXISTS pg_trgm;
Deploy a Redis instance:
Note- Deploying a Redis instance might be unnecessary if your cloud provider has its own service.
- Deploying a Redis instance is required if you are leveraging Builders.
- Deploy a VM for Redis
- Verify that it is accessible from the clusters where Red Hat Quay is running
- Port 6379/TCP must be open
Run Redis inside the instance
sudo dnf install -y podman
podman run -d --name redis -p 6379:6379 redis
- Create two object storage backends, one for each cluster. Ideally, one object storage bucket will be close to the first, or primary, cluster, and the other will run closer to the second, or secondary, cluster.
- Deploy the clusters with the same config bundle, using environment variable overrides to select the appropriate storage backend for an individual cluster.
- Configure a load balancer to provide a single entry point to the clusters.
16.2.4.1. Configuring geo-replication for the Red Hat Quay on OpenShift Container Platform
Use the following procedure to configure geo-replication for the Red Hat Quay on OpenShift Container Platform.
Procedure
Create a
config.yamlfile that is shared between clusters. Thisconfig.yamlfile contains the details for the common PostgreSQL, Redis and storage backends:Geo-replication
config.yamlfileSERVER_HOSTNAME: <georep.quayteam.org or any other name>1 DB_CONNECTION_ARGS: autorollback: true threadlocals: true DB_URI: postgresql://postgres:password@10.19.0.1:5432/quay BUILDLOGS_REDIS: host: 10.19.0.2 port: 6379 USER_EVENTS_REDIS: host: 10.19.0.2 port: 6379 DATABASE_SECRET_KEY: 0ce4f796-c295-415b-bf9d-b315114704b8 DISTRIBUTED_STORAGE_CONFIG: usstorage: - GoogleCloudStorage - access_key: GOOGQGPGVMASAAMQABCDEFG bucket_name: georep-test-bucket-0 secret_key: AYWfEaxX/u84XRA2vUX5C987654321 storage_path: /quaygcp eustorage: - GoogleCloudStorage - access_key: GOOGQGPGVMASAAMQWERTYUIOP bucket_name: georep-test-bucket-1 secret_key: AYWfEaxX/u84XRA2vUX5Cuj12345678 storage_path: /quaygcp DISTRIBUTED_STORAGE_DEFAULT_LOCATIONS: - usstorage - eustorage DISTRIBUTED_STORAGE_PREFERENCE: - usstorage - eustorage FEATURE_STORAGE_REPLICATION: true- 1
- A proper
SERVER_HOSTNAMEmust be used for the route and must match the hostname of the global load balancer. <<<<<<< HEAD - To retrieve the configuration file for a Clair instance deployed using the OpenShift Container Platform Operator, see Retrieving the Clair config.
>>>>>>> 97f5827d (Updates a few broken links)
Create the
configBundleSecretby entering the following command:$ oc create secret generic --from-file config.yaml=./config.yaml georep-config-bundleIn each of the clusters, set the
configBundleSecretand use theQUAY_DISTRIBUTED_STORAGE_PREFERENCEenvironmental variable override to configure the appropriate storage for that cluster. For example:NoteThe
config.yamlfile between both deployments must match. If making a change to one cluster, it must also be changed in the other.US cluster
QuayRegistryexampleapiVersion: quay.redhat.com/v1 kind: QuayRegistry metadata: name: example-registry namespace: quay-enterprise spec: configBundleSecret: georep-config-bundle components: - kind: objectstorage managed: false - kind: route managed: true - kind: tls managed: false - kind: postgres managed: false - kind: clairpostgres managed: false - kind: redis managed: false - kind: quay managed: true overrides: env: - name: QUAY_DISTRIBUTED_STORAGE_PREFERENCE value: usstorage - kind: mirror managed: true overrides: env: - name: QUAY_DISTRIBUTED_STORAGE_PREFERENCE value: usstorageNote<<<<<<< HEAD Because SSL/TLS is unmanaged, and the route is managed, you must supply the certificates directly in the config bundle. For more information, see Configuring TLS and routes.
Because SSL/TLS is unmanaged, and the route is managed, you must supply the certificates directly in the config bundle. For more information, see Configuring SSL/TLS and Routes. >>>>>>> 97f5827d (Updates a few broken links)
+
European cluster
apiVersion: quay.redhat.com/v1
kind: QuayRegistry
metadata:
  name: example-registry
  namespace: quay-enterprise
spec:
  configBundleSecret: georep-config-bundle
  components:
    - kind: objectstorage
      managed: false
    - kind: route
      managed: true
    - kind: tls
      managed: false
    - kind: postgres
      managed: false
    - kind: clairpostgres
      managed: false
    - kind: redis
      managed: false
    - kind: quay
      managed: true
      overrides:
        env:
        - name: QUAY_DISTRIBUTED_STORAGE_PREFERENCE
          value: eustorage
    - kind: mirror
      managed: true
      overrides:
        env:
        - name: QUAY_DISTRIBUTED_STORAGE_PREFERENCE
          value: eustorage
+
Because SSL/TLS is unmanaged, and the route is managed, you must supply the certificates directly in the config bundle. For more information, see Configuring SSL/TLS and Routes.
= Removing a geo-replicated site from your Red Hat Quay on OpenShift Container Platform deployment
By using the following procedure, Red Hat Quay administrators can remove sites in a geo-replicated setup.
Prerequisites
- You are logged into OpenShift Container Platform.
-
You have configured Red Hat Quay geo-replication with at least two sites, for example,
usstorageandeustorage. - Each site has its own Organization, Repository, and image tags.
Procedure
Sync the blobs between all of your defined sites by running the following command:
$ python -m util.backfillreplication
Prior to removing storage engines from your Red Hat Quay config.yaml file, you must ensure that all blobs are synced between all defined sites.
When running this command, replication jobs are created which are picked up by the replication worker. If there are blobs that need replicated, the script returns UUIDs of blobs that will be replicated. If you run this command multiple times, and the output from the return script is empty, it does not mean that the replication process is done; it means that there are no more blobs to be queued for replication. Customers should use appropriate judgement before proceeding, as the allotted time replication takes depends on the number of blobs detected.
Alternatively, you could use a third party cloud tool, such as Microsoft Azure, to check the synchronization status.
This step must be completed before proceeding.
-
In your Red Hat Quay
config.yamlfile for siteusstorage, remove theDISTRIBUTED_STORAGE_CONFIGentry for theeustoragesite. Enter the following command to identify your
Quayapplication pods:$ oc get pod -n <quay_namespace>Example output
quay390usstorage-quay-app-5779ddc886-2drh2
quay390eustorage-quay-app-66969cd859-n2ssm
Enter the following command to open an interactive shell session in the
usstoragepod:$ oc rsh quay390usstorage-quay-app-5779ddc886-2drh2-
Enter the following command to permanently remove the
eustoragesite:
The following action cannot be undone. Use with caution.
+
sh-4.4$ python -m util.removelocation eustorage+ .Example output
+
WARNING: This is a destructive operation. Are you sure you want to remove eustorage from your storage locations? [y/n] y
Deleted placement 30
Deleted placement 31
Deleted placement 32
Deleted placement 33
Deleted location eustorage
= Mixed storage for geo-replication
Red Hat Quay geo-replication supports the use of different and multiple replication targets, for example, using AWS S3 storage on public cloud and using Ceph storage on premise. This complicates the key requirement of granting access to all storage backends from all Red Hat Quay pods and cluster nodes. As a result, it is recommended that you use the following:
- A VPN to prevent visibility of the internal storage, or
- A token pair that only allows access to the specified bucket used by Red Hat Quay
This results in the public cloud instance of Red Hat Quay having access to on-premise storage, but the network will be encrypted, protected, and will use ACLs, thereby meeting security requirements.
If you cannot implement these security measures, it might be preferable to deploy two distinct Red Hat Quay registries and to use repository mirroring as an alternative to geo-replication.
= Backing up and restoring Red Hat Quay on a standalone deployment
Use the content within this section to back up and restore Red Hat Quay in standalone deployments.
= Optional: Enabling read-only mode for Red Hat Quay
Enabling read-only mode for your Red Hat Quay deployment allows you to manage the registry’s operations. Red Hat Quay administrators can enable read-only mode to restrict write access to the registry, which helps ensure data integrity, mitigate risks during maintenance windows, and provide a safeguard against unintended modifications to registry data. It also helps to ensure that your Red Hat Quay registry remains online and available to serve images to users.
Prerequisites
If you are using Red Hat Enterprise Linux (RHEL) 7.x:
- You have enabled the Red Hat Software Collections List (RHSCL).
- You have installed Python 3.6.
-
You have downloaded the
virtualenvpackage. -
You have installed the
gitCLI.
If you are using Red Hat Enterprise Linux (RHEL) 8:
- You have installed Python 3 on your machine.
-
You have downloaded the
python3-virtualenvpackage. -
You have installed the
gitCLI.
-
You have cloned the
https://github.com/quay/quay.gitrepository.
== Creating service keys for standalone Red Hat Quay
Red Hat Quay uses service keys to communicate with various components. These keys are used to sign completed requests, such as requesting to scan images, login, storage access, and so on.
Procedure
If your Red Hat Quay registry is readily available, you can generate service keys inside of the
Quayregistry container.Enter the following command to generate a key pair inside of the
Quaycontainer:$ podman exec quay python3 tools/generatekeypair.py quay-readonly
If your Red Hat Quay is not readily available, you must generate your service keys inside of a virtual environment.
Change into the directory of your Red Hat Quay deployment and create a virtual environment inside of that directory:
$ cd <$QUAY>/quay && virtualenv -v venvActivate the virtual environment by entering the following command:
$ source venv/bin/activateOptional. Install the
pipCLI tool if you do not have it installed:$ venv/bin/pip install --upgrade pipIn your Red Hat Quay directory, create a
requirements-generatekeys.txtfile with the following content:$ cat << EOF > requirements-generatekeys.txt cryptography==3.4.7 pycparser==2.19 pycryptodome==3.9.4 pycryptodomex==3.9.4 pyjwkest==1.4.2 PyJWT==1.7.1 Authlib==1.0.0a2 EOFEnter the following command to install the Python dependencies defined in the
requirements-generatekeys.txtfile:$ venv/bin/pip install -r requirements-generatekeys.txtEnter the following command to create the necessary service keys:
$ PYTHONPATH=. venv/bin/python /<path_to_cloned_repo>/tools/generatekeypair.py quay-readonlyExample output
Writing public key to quay-readonly.jwk
Writing key ID to quay-readonly.kid
Writing private key to quay-readonly.pem
Enter the following command to deactivate the virtual environment:
$ deactivate
== Adding keys to the PostgreSQL database
Use the following procedure to add your service keys to the PostgreSQL database.
Prerequistes
- You have created the service keys.
Procedure
Enter the following command to enter your Red Hat Quay database environment:
$ podman exec -it postgresql-quay psql -U postgres -d quayDisplay the approval types and associated notes of the
servicekeyapprovalby entering the following command:quay=# select * from servicekeyapproval;Example output
 id | approver_id |          approval_type           |       approved_date        | notes
----+-------------+----------------------------------+----------------------------+-------
  1 |             | ServiceKeyApprovalType.AUTOMATIC | 2024-05-07 03:47:48.181347 |
  2 |             | ServiceKeyApprovalType.AUTOMATIC | 2024-05-07 03:47:55.808087 |
  3 |             | ServiceKeyApprovalType.AUTOMATIC | 2024-05-07 03:49:04.27095  |
  4 |             | ServiceKeyApprovalType.AUTOMATIC | 2024-05-07 03:49:05.46235  |
  5 |           1 | ServiceKeyApprovalType.SUPERUSER | 2024-05-07 04:05:10.296796 |
...
Add the service key to your Red Hat Quay database by entering the following query:
quay=# INSERT INTO servicekey
  (name, service, metadata, kid, jwk, created_date, expiration_date)
  VALUES ('quay-readonly',
           'quay',
           '{}',
           '{<contents_of_.kid_file>}',
           '{<contents_of_.jwk_file>}',
           '{<created_date_of_read-only>}',
           '{<expiration_date_of_read-only>}');
Example output
INSERT 0 1Next, add the key approval with the following query:
quay=# INSERT INTO servicekeyapproval ('approval_type', 'approved_date', 'notes')
  VALUES ("ServiceKeyApprovalType.SUPERUSER", "CURRENT_DATE",
           {include_notes_here_on_why_this_is_being_added});
Example output
INSERT 0 1Set the
approval_idfield on the created service key row to theidfield from the created service key approval. You can use the followingSELECTstatements to get the necessary IDs:UPDATE servicekey SET approval_id = (SELECT id FROM servicekeyapproval WHERE approval_type = 'ServiceKeyApprovalType.SUPERUSER') WHERE name = 'quay-readonly';UPDATE 1
== Configuring read-only mode for standalone Red Hat Quay
After the service keys have been created and added to your PostgreSQL database, you must restart the Quay container on your standalone deployment.
Prerequisites
- You have created the service keys and added them to your PostgreSQL database.
Procedure
Shutdown all Red Hat Quay instances on all virtual machines. For example:
$ podman stop <quay_container_name_on_virtual_machine_a>$ podman stop <quay_container_name_on_virtual_machine_b>Enter the following command to copy the contents of the
quay-readonly.kidfile and thequay-readonly.pemfile to the directory that holds your Red Hat Quay configuration bundle:$ cp quay-readonly.kid quay-readonly.pem $Quay/configEnter the following command to set file permissions on all files in your configuration bundle folder:
$ setfacl -m user:1001:rw $Quay/config/*Modify your Red Hat Quay
config.yamlfile and add the following information:# ... REGISTRY_STATE: readonly INSTANCE_SERVICE_KEY_KID_LOCATION: 'conf/stack/quay-readonly.kid' INSTANCE_SERVICE_KEY_LOCATION: 'conf/stack/quay-readonly.pem' # ...- Distribute the new configuration bundle to all Red Hat Quay instances.
Start Red Hat Quay by entering the following command:
$ podman run -d --rm -p 80:8080 -p 443:8443  \
   --name=quay-main-app \
   -v $QUAY/config:/conf/stack:Z \
   -v $QUAY/storage:/datastorage:Z \
   {productrepo}/{quayimage}:{productminv}
After starting Red Hat Quay, a banner inside in your instance informs users that Red Hat Quay is running in read-only mode. Pushes should be rejected and a 405 error should be logged. You can test this by running the following command:
$ podman push <quay-server.example.com>/quayadmin/busybox:testExample output
613be09ab3c0: Preparing
denied: System is currently read-only. Pulls will succeed but all write operations are currently suspended.
With your Red Hat Quay deployment on read-only mode, you can safely manage your registry’s operations and perform such actions as backup and restore.
Optional. After you are finished with read-only mode, you can return to normal operations by removing the following information from your
config.yamlfile. Then, restart your Red Hat Quay deployment:# ... REGISTRY_STATE: readonly INSTANCE_SERVICE_KEY_KID_LOCATION: 'conf/stack/quay-readonly.kid' INSTANCE_SERVICE_KEY_LOCATION: 'conf/stack/quay-readonly.pem' # ...$ podman restart <container_id>
== Updating read-only expiration time
The Red Hat Quay read-only key has an expiration date, and when that date passes the key is deactivated. Before the key expires, its expiration time can be updated in the database. To update the key, connect your Red Hat Quay production database using the methods described earlier and issue the following query:
quay=# UPDATE servicekey SET expiration_date = 'new-date' WHERE id = servicekey_id;The list of service key IDs can be obtained by running the following query:
SELECT id, name, expiration_date FROM servicekey;= Backing up Red Hat Quay on standalone deployments
This procedure describes how to create a backup of Red Hat Quay on standalone deployments.
Procedure
Create a temporary backup directory, for example,
quay-backup:$ mkdir /tmp/quay-backupThe following example command denotes the local directory that the Red Hat Quay was started in, for example,
/opt/quay-install:$ podman run --name quay-app \ -v /opt/quay-install/config:/conf/stack:Z \ -v /opt/quay-install/storage:/datastorage:Z \ registry.redhat.io/quay/quay-rhel8:v3.12.15Change into the directory that bind-mounts to
/conf/stackinside of the container, for example,/opt/quay-install, by running the following command:$ cd /opt/quay-installCompress the contents of your Red Hat Quay deployment into an archive in the
quay-backupdirectory by entering the following command:$ tar cvf /tmp/quay-backup/quay-backup.tar.gz *Example output:
config.yaml
config.yaml.bak
extra_ca_certs/
extra_ca_certs/ca.crt
ssl.cert
ssl.key
Back up the Quay container service by entering the following command:
$ podman inspect quay-app | jq -r '.[0].Config.CreateCommand | .[]' | paste -s -d ' ' -

  /usr/bin/podman run --name quay-app \
  -v /opt/quay-install/config:/conf/stack:Z \
  -v /opt/quay-install/storage:/datastorage:Z \
  registry.redhat.io/quay/quay-rhel8:v3.12.15
Redirect the contents of your
conf/stack/config.yamlfile to your temporaryquay-config.yamlfile by entering the following command:$ podman exec -it quay cat /conf/stack/config.yaml > /tmp/quay-backup/quay-config.yamlObtain the
DB_URIlocated in your temporaryquay-config.yamlby entering the following command:$ grep DB_URI /tmp/quay-backup/quay-config.yamlExample output:
$ postgresql://<username>:test123@172.24.10.50/quayExtract the PostgreSQL contents to your temporary backup directory in a backup .sql file by entering the following command:
$ pg_dump -h 172.24.10.50 -p 5432 -d quay -U <username> -W -O > /tmp/quay-backup/quay-backup.sqlPrint the contents of your
DISTRIBUTED_STORAGE_CONFIGby entering the following command:DISTRIBUTED_STORAGE_CONFIG: default: - S3Storage - s3_bucket: <bucket_name> storage_path: /registry s3_access_key: <s3_access_key> s3_secret_key: <s3_secret_key> host: <host_name> s3_region: <region>Export the
AWS_ACCESS_KEY_IDby using theaccess_keycredential obtained in Step 7:$ export AWS_ACCESS_KEY_ID=<access_key>Export the
AWS_SECRET_ACCESS_KEYby using thesecret_keyobtained in Step 7:$ export AWS_SECRET_ACCESS_KEY=<secret_key>Sync the
quaybucket to the/tmp/quay-backup/blob-backup/directory from thehostnameof yourDISTRIBUTED_STORAGE_CONFIG:$ aws s3 sync s3://<bucket_name> /tmp/quay-backup/blob-backup/ --source-region us-east-2Example output:
download: s3://<user_name>/registry/sha256/9c/9c3181779a868e09698b567a3c42f3744584ddb1398efe2c4ba569a99b823f7a to registry/sha256/9c/9c3181779a868e09698b567a3c42f3744584ddb1398efe2c4ba569a99b823f7a
download: s3://<user_name>/registry/sha256/e9/e9c5463f15f0fd62df3898b36ace8d15386a6813ffb470f332698ecb34af5b0d to registry/sha256/e9/e9c5463f15f0fd62df3898b36ace8d15386a6813ffb470f332698ecb34af5b0d
It is recommended that you delete the quay-config.yaml file after syncing the quay bucket because it contains sensitive information. The quay-config.yaml file will not be lost because it is backed up in the quay-backup.tar.gz file.
= Restoring Red Hat Quay on standalone deployments
This procedure describes how to restore Red Hat Quay on standalone deployments.
Prerequisites
- You have backed up your Red Hat Quay deployment.
Procedure
Create a new directory that will bind-mount to
/conf/stackinside of the Red Hat Quay container:$ mkdir /opt/new-quay-installCopy the contents of your temporary backup directory created in Backing up Red Hat Quay on standalone deployments to the
new-quay-install1directory created in Step 1:$ cp /tmp/quay-backup/quay-backup.tar.gz /opt/new-quay-install/Change into the
new-quay-installdirectory by entering the following command:$ cd /opt/new-quay-install/Extract the contents of your Red Hat Quay directory:
$ tar xvf /tmp/quay-backup/quay-backup.tar.gz *Example output:
config.yaml
config.yaml.bak
extra_ca_certs/
extra_ca_certs/ca.crt
ssl.cert
ssl.key
Recall the
DB_URIfrom your backed-upconfig.yamlfile by entering the following command:$ grep DB_URI config.yamlExample output:
postgresql://<username>:test123@172.24.10.50/quayRun the following command to enter the PostgreSQL database server:
$ sudo postgresEnter psql and create a new database in 172.24.10.50 to restore the quay databases, for example,
example_restore_registry_quay_database, by entering the following command:$ psql "host=172.24.10.50 port=5432 dbname=postgres user=<username> password=test123" postgres=> CREATE DATABASE example_restore_registry_quay_database;Example output:
CREATE DATABASEConnect to the database by running the following command:
postgres=# \c "example-restore-registry-quay-database";Example output:
You are now connected to database "example-restore-registry-quay-database" as user "postgres".Create a
pg_trmgextension of your Quay database by running the following command:example_restore_registry_quay_database=> CREATE EXTENSION IF NOT EXISTS pg_trgm;Example output:
CREATE EXTENSIONExit the postgres CLI by entering the following command:
\qImport the database backup to your new database by running the following command:
$ psql "host=172.24.10.50 port=5432 dbname=example_restore_registry_quay_database user=<username> password=test123" -W < /tmp/quay-backup/quay-backup.sqlExample output:
SET
SET
SET
SET
SET
Update the value of
DB_URIin yourconfig.yamlfrompostgresql://<username>:test123@172.24.10.50/quaytopostgresql://<username>:test123@172.24.10.50/example-restore-registry-quay-databasebefore restarting the Red Hat Quay deployment.
The DB_URI format is DB_URI postgresql://<login_user_name>:<login_user_password>@<postgresql_host>/<quay_database>. If you are moving from one PostgreSQL server to another PostgreSQL server, update the value of <login_user_name>, <login_user_password> and <postgresql_host> at the same time.
In the
/opt/new-quay-installdirectory, print the contents of yourDISTRIBUTED_STORAGE_CONFIGbundle:$ cat config.yaml | grep DISTRIBUTED_STORAGE_CONFIG -A10Example output:
DISTRIBUTED_STORAGE_CONFIG:
   default:
DISTRIBUTED_STORAGE_CONFIG:
   default:
    - S3Storage
    - s3_bucket: <bucket_name>
      storage_path: /registry
      s3_access_key: <s3_access_key>
      s3_region: <region>
      s3_secret_key: <s3_secret_key>
      host: <host_name>
Your DISTRIBUTED_STORAGE_CONFIG in /opt/new-quay-install must be updated before restarting your Red Hat Quay deployment.
Export the
AWS_ACCESS_KEY_IDby using theaccess_keycredential obtained in Step 13:$ export AWS_ACCESS_KEY_ID=<access_key>Export the
AWS_SECRET_ACCESS_KEYby using thesecret_keyobtained in Step 13:$ export AWS_SECRET_ACCESS_KEY=<secret_key>Create a new s3 bucket by entering the following command:
$ aws s3 mb s3://<new_bucket_name> --region us-east-2Example output:
$ make_bucket: quayUpload all blobs to the new s3 bucket by entering the following command:
$ aws s3 sync --no-verify-ssl \
--endpoint-url <example_endpoint_url>
1 /tmp/quay-backup/blob-backup/. s3://quay/- 1
- The Red Hat Quay registry endpoint must be the same before backup and after restore.
Example output:
upload: ../../tmp/quay-backup/blob-backup/datastorage/registry/sha256/50/505edb46ea5d32b5cbe275eb766d960842a52ee77ac225e4dc8abb12f409a30d to s3://quay/datastorage/registry/sha256/50/505edb46ea5d32b5cbe275eb766d960842a52ee77ac225e4dc8abb12f409a30d
upload: ../../tmp/quay-backup/blob-backup/datastorage/registry/sha256/27/27930dc06c2ee27ac6f543ba0e93640dd21eea458eac47355e8e5989dea087d0 to s3://quay/datastorage/registry/sha256/27/27930dc06c2ee27ac6f543ba0e93640dd21eea458eac47355e8e5989dea087d0
upload: ../../tmp/quay-backup/blob-backup/datastorage/registry/sha256/8c/8c7daf5e20eee45ffe4b36761c4bb6729fb3ee60d4f588f712989939323110ec to s3://quay/datastorage/registry/sha256/8c/8c7daf5e20eee45ffe4b36761c4bb6729fb3ee60d4f588f712989939323110ec
...
Before restarting your Red Hat Quay deployment, update the storage settings in your config.yaml:
DISTRIBUTED_STORAGE_CONFIG:
   default:
DISTRIBUTED_STORAGE_CONFIG:
   default:
    - S3Storage
    - s3_bucket: <new_bucket_name>
      storage_path: /registry
      s3_access_key: <s3_access_key>
      s3_secret_key: <s3_secret_key>
      s3_region: <region>
      host: <host_name>
= Migrating a standalone Red Hat Quay deployment to a Red Hat Quay Operator deployment
The following procedures allow you to back up a standalone Red Hat Quay deployment and migrate it to the Red Hat Quay Operator on OpenShift Container Platform.
== Backing up a standalone deployment of Red Hat Quay
Procedure
Back up the
config.yamlof your standalone Red Hat Quay deployment:$ mkdir /tmp/quay-backup $ cp /path/to/Quay/config/directory/config.yaml /tmp/quay-backupCreate a backup of the database that your standalone Red Hat Quay deployment is using:
$ pg_dump -h DB_HOST -p 5432 -d QUAY_DATABASE_NAME -U QUAY_DATABASE_USER -W -O > /tmp/quay-backup/quay-database-backup.sql- Install the AWS CLI if you do not have it already.
Create an
~/.aws/directory:$ mkdir ~/.aws/Obtain the
access_keyandsecret_keyfrom theconfig.yamlof your standalone deployment:$ grep -i DISTRIBUTED_STORAGE_CONFIG -A10 /tmp/quay-backup/config.yamlExample output:
DISTRIBUTED_STORAGE_CONFIG:
    minio-1:
        - RadosGWStorage
        - access_key: ##########
          bucket_name: quay
          hostname: 172.24.10.50
          is_secure: false
          port: "9000"
          secret_key: ##########
          storage_path: /datastorage/registry
Store the
access_keyandsecret_keyfrom theconfig.yamlfile in your~/.awsdirectory:$ touch ~/.aws/credentialsOptional: Check that your
access_keyandsecret_keyare stored:$ cat > ~/.aws/credentials << EOF [default] aws_access_key_id = ACCESS_KEY_FROM_QUAY_CONFIG aws_secret_access_key = SECRET_KEY_FROM_QUAY_CONFIG EOFExample output:
aws_access_key_id = ACCESS_KEY_FROM_QUAY_CONFIG
aws_secret_access_key = SECRET_KEY_FROM_QUAY_CONFIG
If the aws cli does not automatically collect the access_key and secret_key from the `~/.aws/credentials file, you can, you can configure these by running aws configure and manually inputting the credentials.
In your
quay-backupdirectory, create abucket_backupdirectory:$ mkdir /tmp/quay-backup/bucket-backupBackup all blobs from the S3 storage:
$ aws s3 sync --no-verify-ssl --endpoint-url https://PUBLIC_S3_ENDPOINT:PORT s3://QUAY_BUCKET/ /tmp/quay-backup/bucket-backup/
The PUBLIC_S3_ENDPOINT can be read from the Red Hat Quay config.yaml file under hostname in the DISTRIBUTED_STORAGE_CONFIG. If the endpoint is insecure, use http instead of https in the endpoint URL.
Up to this point, you should have a complete backup of all Red Hat Quay data, blobs, the database, and the config.yaml file stored locally. In the following section, you will migrate the standalone deployment backup to Red Hat Quay on OpenShift Container Platform.
== Using backed up standalone content to migrate to OpenShift Container Platform.
Prerequisites
-
Your standalone Red Hat Quay data, blobs, database, and
config.yamlhave been backed up. - Red Hat Quay is deployed on OpenShift Container Platform using the Red Hat Quay Operator.
-
A
QuayRegistrywith all components set tomanaged.
The procedure in this documents uses the following namespace: quay-enterprise.
Scale down the Red Hat Quay Operator:
$ oc scale --replicas=0 deployment quay-operator.v3.6.2 -n openshift-operatorsScale down the application and mirror deployments:
$ oc scale --replicas=0 deployment QUAY_MAIN_APP_DEPLOYMENT QUAY_MIRROR_DEPLOYMENTCopy the database SQL backup to the
QuayPostgreSQL database instance:$ oc cp /tmp/user/quay-backup/quay-database-backup.sql quay-enterprise/quayregistry-quay-database-54956cdd54-p7b2w:/var/lib/pgsql/data/userdataObtain the database password from the Operator-created
config.yamlfile:$ oc get deployment quay-quay-app -o json | jq '.spec.template.spec.volumes[].projected.sources' | grep -i config-secretExample output:
"name": "QUAY_CONFIG_SECRET_NAME"$ oc get secret quay-quay-config-secret-9t77hb84tb -o json | jq '.data."config.yaml"' | cut -d '"' -f2 | base64 -d -w0 > /tmp/quay-backup/operator-quay-config-yaml-backup.yamlcat /tmp/quay-backup/operator-quay-config-yaml-backup.yaml | grep -i DB_URIExample output:
postgresql://QUAY_DATABASE_OWNER:PASSWORD@DATABASE_HOST/QUAY_DATABASE_NAMEExecute a shell inside of the database pod:
# oc exec -it quay-postgresql-database-pod -- /bin/bashEnter psql:
bash-4.4$ psqlDrop the database:
postgres=# DROP DATABASE "example-restore-registry-quay-database";Example output:
DROP DATABASECreate a new database and set the owner as the same name:
postgres=# CREATE DATABASE "example-restore-registry-quay-database" OWNER "example-restore-registry-quay-database";Example output:
CREATE DATABASEConnect to the database:
postgres=# \c "example-restore-registry-quay-database";Example output:
You are now connected to database "example-restore-registry-quay-database" as user "postgres".Create a
pg_trmgextension of yourQuaydatabase:example-restore-registry-quay-database=# create extension pg_trgm ;Example output:
CREATE EXTENSIONExit the postgres CLI to re-enter bash-4.4:
\qSet the password for your PostgreSQL deployment:
bash-4.4$ psql -h localhost -d "QUAY_DATABASE_NAME" -U QUAY_DATABASE_OWNER -W < /var/lib/pgsql/data/userdata/quay-database-backup.sqlExample output:
SET
SET
SET
SET
SET
Exit bash mode:
bash-4.4$ exitCreate a new configuration bundle for the Red Hat Quay Operator.
$ touch config-bundle.yamlIn your new
config-bundle.yaml, include all of the information that the registry requires, such as LDAP configuration, keys, and other modifications that your old registry had. Run the following command to move thesecret_keyto yourconfig-bundle.yaml:$ cat /tmp/quay-backup/config.yaml | grep SECRET_KEY > /tmp/quay-backup/config-bundle.yaml
You must manually copy all the LDAP, OIDC and other information and add it to the /tmp/quay-backup/config-bundle.yaml file.
Create a configuration bundle secret inside of your OpenShift cluster:
$ oc create secret generic new-custom-config-bundle --from-file=config.yaml=/tmp/quay-backup/config-bundle.yamlScale up the
Quaypods:$ oc scale --replicas=1 deployment quayregistry-quay-app deployment.apps/quayregistry-quay-app scaledScale up the mirror pods:
$ oc scale --replicas=1  deployment quayregistry-quay-mirror
deployment.apps/quayregistry-quay-mirror scaled
Patch the
QuayRegistryCRD so that it contains the reference to the new custom configuration bundle:$ oc patch quayregistry QUAY_REGISTRY_NAME --type=merge -p '{"spec":{"configBundleSecret":"new-custom-config-bundle"}}'
If Red Hat Quay returns a 500 internal server error, you might have to update the location of your DISTRIBUTED_STORAGE_CONFIG to default.
Create a new AWS
credentials.yamlin your/.aws/directory and include theaccess_keyandsecret_keyfrom the Operator-createdconfig.yamlfile:$ touch credentials.yaml$ grep -i DISTRIBUTED_STORAGE_CONFIG -A10 /tmp/quay-backup/operator-quay-config-yaml-backup.yaml$ cat > ~/.aws/credentials << EOF [default] aws_access_key_id = ACCESS_KEY_FROM_QUAY_CONFIG aws_secret_access_key = SECRET_KEY_FROM_QUAY_CONFIG EOF
If the aws cli does not automatically collect the access_key and secret_key from the `~/.aws/credentials file, you can configure these by running aws configure and manually inputting the credentials.
Record the NooBaa’s publicly available endpoint:
$ oc get route s3 -n openshift-storage -o yaml -o jsonpath="{.spec.host}{'\n'}"Sync the backup data to the NooBaa backend storage:
$ aws s3 sync --no-verify-ssl --endpoint-url https://NOOBAA_PUBLIC_S3_ROUTE /tmp/quay-backup/bucket-backup/* s3://QUAY_DATASTORE_BUCKET_NAMEScale the Operator back up to 1 pod:
$ oc scale –replicas=1 deployment quay-operator.v3.6.4 -n openshift-operators
The Operator uses the custom configuration bundle provided and reconciles all secrets and deployments. Your new Red Hat Quay deployment on OpenShift Container Platform should contain all of the information that the old deployment had. You should be able to pull all images.
= Configuring artifact types
As a Red Hat Quay administrator, you can configure Open Container Initiative (OCI) artifact types and other experimental artifact types through the FEATURE_GENERAL_OCI_SUPPORT, ALLOWED_OCI_ARTIFACT_TYPES, and IGNORE_UNKNOWN_MEDIATYPES configuration fields.
The following Open Container Initiative (OCI) artifact types are built into Red Hat Quay by default and are enabled through the FEATURE_GENERAL_OCI_SUPPORT configuration field:
| Field | Media Type | Supported content types |
|---|---|---|
| Helm |
|
|
| Cosign |
|
|
| SPDX |
|
|
| Syft |
|
|
| CycloneDX |
|
|
| In-toto |
|
|
| Unknown |
|
|
Additionally, Red Hat Quay uses the ZStandard, or zstd, to reduce the size of container images or other related artifacts. Zstd helps optimize storage and improve transfer speeds when working with container images.
Use the following procedures to configure support for the default and experimental OCI media types.
== Configuring OCI artifact types
Use the following procedure to configure artifact types that are embedded in Red Hat Quay by default.
Prerequisites
- You have Red Hat Quay administrator privileges.
Procedure
In your Red Hat Quay
config.yamlfile, enable support for general OCI support by setting theFEATURE_GENERAL_OCI_SUPPORTfield toTrue. For example:FEATURE_GENERAL_OCI_SUPPORT: trueWith
FEATURE_GENERAL_OCI_SUPPORTset to true, Red Hat Quay users can now push and pull charts of the default artifact types to their Red Hat Quay deployment.
== Configuring additional artifact types
Use the following procedure to configure additional, and specific, artifact types for your Red Hat Quay deployment.
Using the ALLOWED_OCI_ARTIFACT_TYPES configuration field, you can restrict which artifact types are accepted by your Red Hat Quay registry. If you want your Red Hat Quay deployment to accept all artifact types, see "Configuring unknown media types".
Prerequistes
- You have Red Hat Quay administrator privileges.
Procedure
Add the
ALLOWED_OCI_ARTIFACT_TYPESconfiguration field, along with the configuration and layer types:FEATURE_GENERAL_OCI_SUPPORT: true ALLOWED_OCI_ARTIFACT_TYPES: <oci config type 1>: - <oci layer type 1> - <oci layer type 2> <oci config type 2>: - <oci layer type 3> - <oci layer type 4>For example, you can add Singularity Image Format (SIF) support by adding the following to your
config.yamlfile:ALLOWED_OCI_ARTIFACT_TYPES: application/vnd.oci.image.config.v1+json: - application/vnd.dev.cosign.simplesigning.v1+json application/vnd.cncf.helm.config.v1+json: - application/tar+gzip application/vnd.sylabs.sif.config.v1+json: - application/vnd.sylabs.sif.layer.v1+tar
When adding OCI artifact types that are not configured by default, Red Hat Quay administrators will also need to manually add support for Cosign and Helm if desired.
+ Now, users can tag SIF images for their Red Hat Quay registry.
== Configuring unknown media types
Use the following procedure to enable all artifact types for your Red Hat Quay deployment.
With this field enabled, your Red Hat Quay deployment accepts all artifact types.
Prerequistes
- You have Red Hat Quay administrator privileges.
Procedure
Add the
IGNORE_UNKNOWN_MEDIATYPESconfiguration field to your Red Hat Quayconfig.yamlfile:IGNORE_UNKNOWN_MEDIATYPES: trueWith this field enabled, your Red Hat Quay deployment accepts unknown and unrecognized artifact types.
= Red Hat Quay garbage collection
Red Hat Quay includes automatic and continuous image garbage collection. Garbage collection ensures efficient use of resources for active objects by removing objects that occupy sizeable amounts of disk space, such as dangling or untagged images, repositories, and blobs, including layers and manifests. Garbage collection performed by Red Hat Quay can reduce downtime in your organization’s environment.
== Red Hat Quay garbage collection in practice
Currently, all garbage collection happens discreetly, and there are no commands to manually run garbage collection. Red Hat Quay provides metrics that track the status of the different garbage collection workers.
For namespace and repository garbage collection, the progress is tracked based on the size of their respective queues. Namespace and repository garbage collection workers require a global lock to work. As a result, and for performance reasons, only one worker runs at a time.
Red Hat Quay shares blobs between namespaces and repositories in order to conserve disk space. For example, if the same image is pushed 10 times, only one copy of that image will be stored.
It is possible that tags can share their layers with different images already stored somewhere in Red Hat Quay. In that case, blobs will stay in storage, because deleting shared blobs would make other images unusable.
Blob expiration is independent of the time machine. If you push a tag to Red Hat Quay and the time machine is set to 0 seconds, and then you delete a tag immediately, garbage collection deletes the tag and everything related to that tag, but will not delete the blob storage until the blob expiration time is reached.
Garbage collecting tagged images works differently than garbage collection on namespaces or repositories. Rather than having a queue of items to work with, the garbage collection workers for tagged images actively search for a repository with inactive or expired tags to clean up. Each instance of garbage collection workers will grab a repository lock, which results in one worker per repository.
- In Red Hat Quay, inactive or expired tags are manifests without tags because the last tag was deleted or it expired. The manifest stores information about how the image is composed and stored in the database for each individual tag. When a tag is deleted and the allotted time from Time Machine has been met, Red Hat Quay garbage collects the blobs that are not connected to any other manifests in the registry. If a particular blob is connected to a manifest, then it is preserved in storage and only its connection to the manifest that is being deleted is removed.
- Expired images will disappear after the allotted time, but are still stored in Red Hat Quay. The time in which an image is completely deleted, or collected, depends on the Time Machine setting of your organization. The default time for garbage collection is 14 days unless otherwise specified. Until that time, tags can be pointed to an expired or deleted images.
For each type of garbage collection, Red Hat Quay provides metrics for the number of rows per table deleted by each garbage collection worker. The following image shows an example of how Red Hat Quay monitors garbage collection with the same metrics:
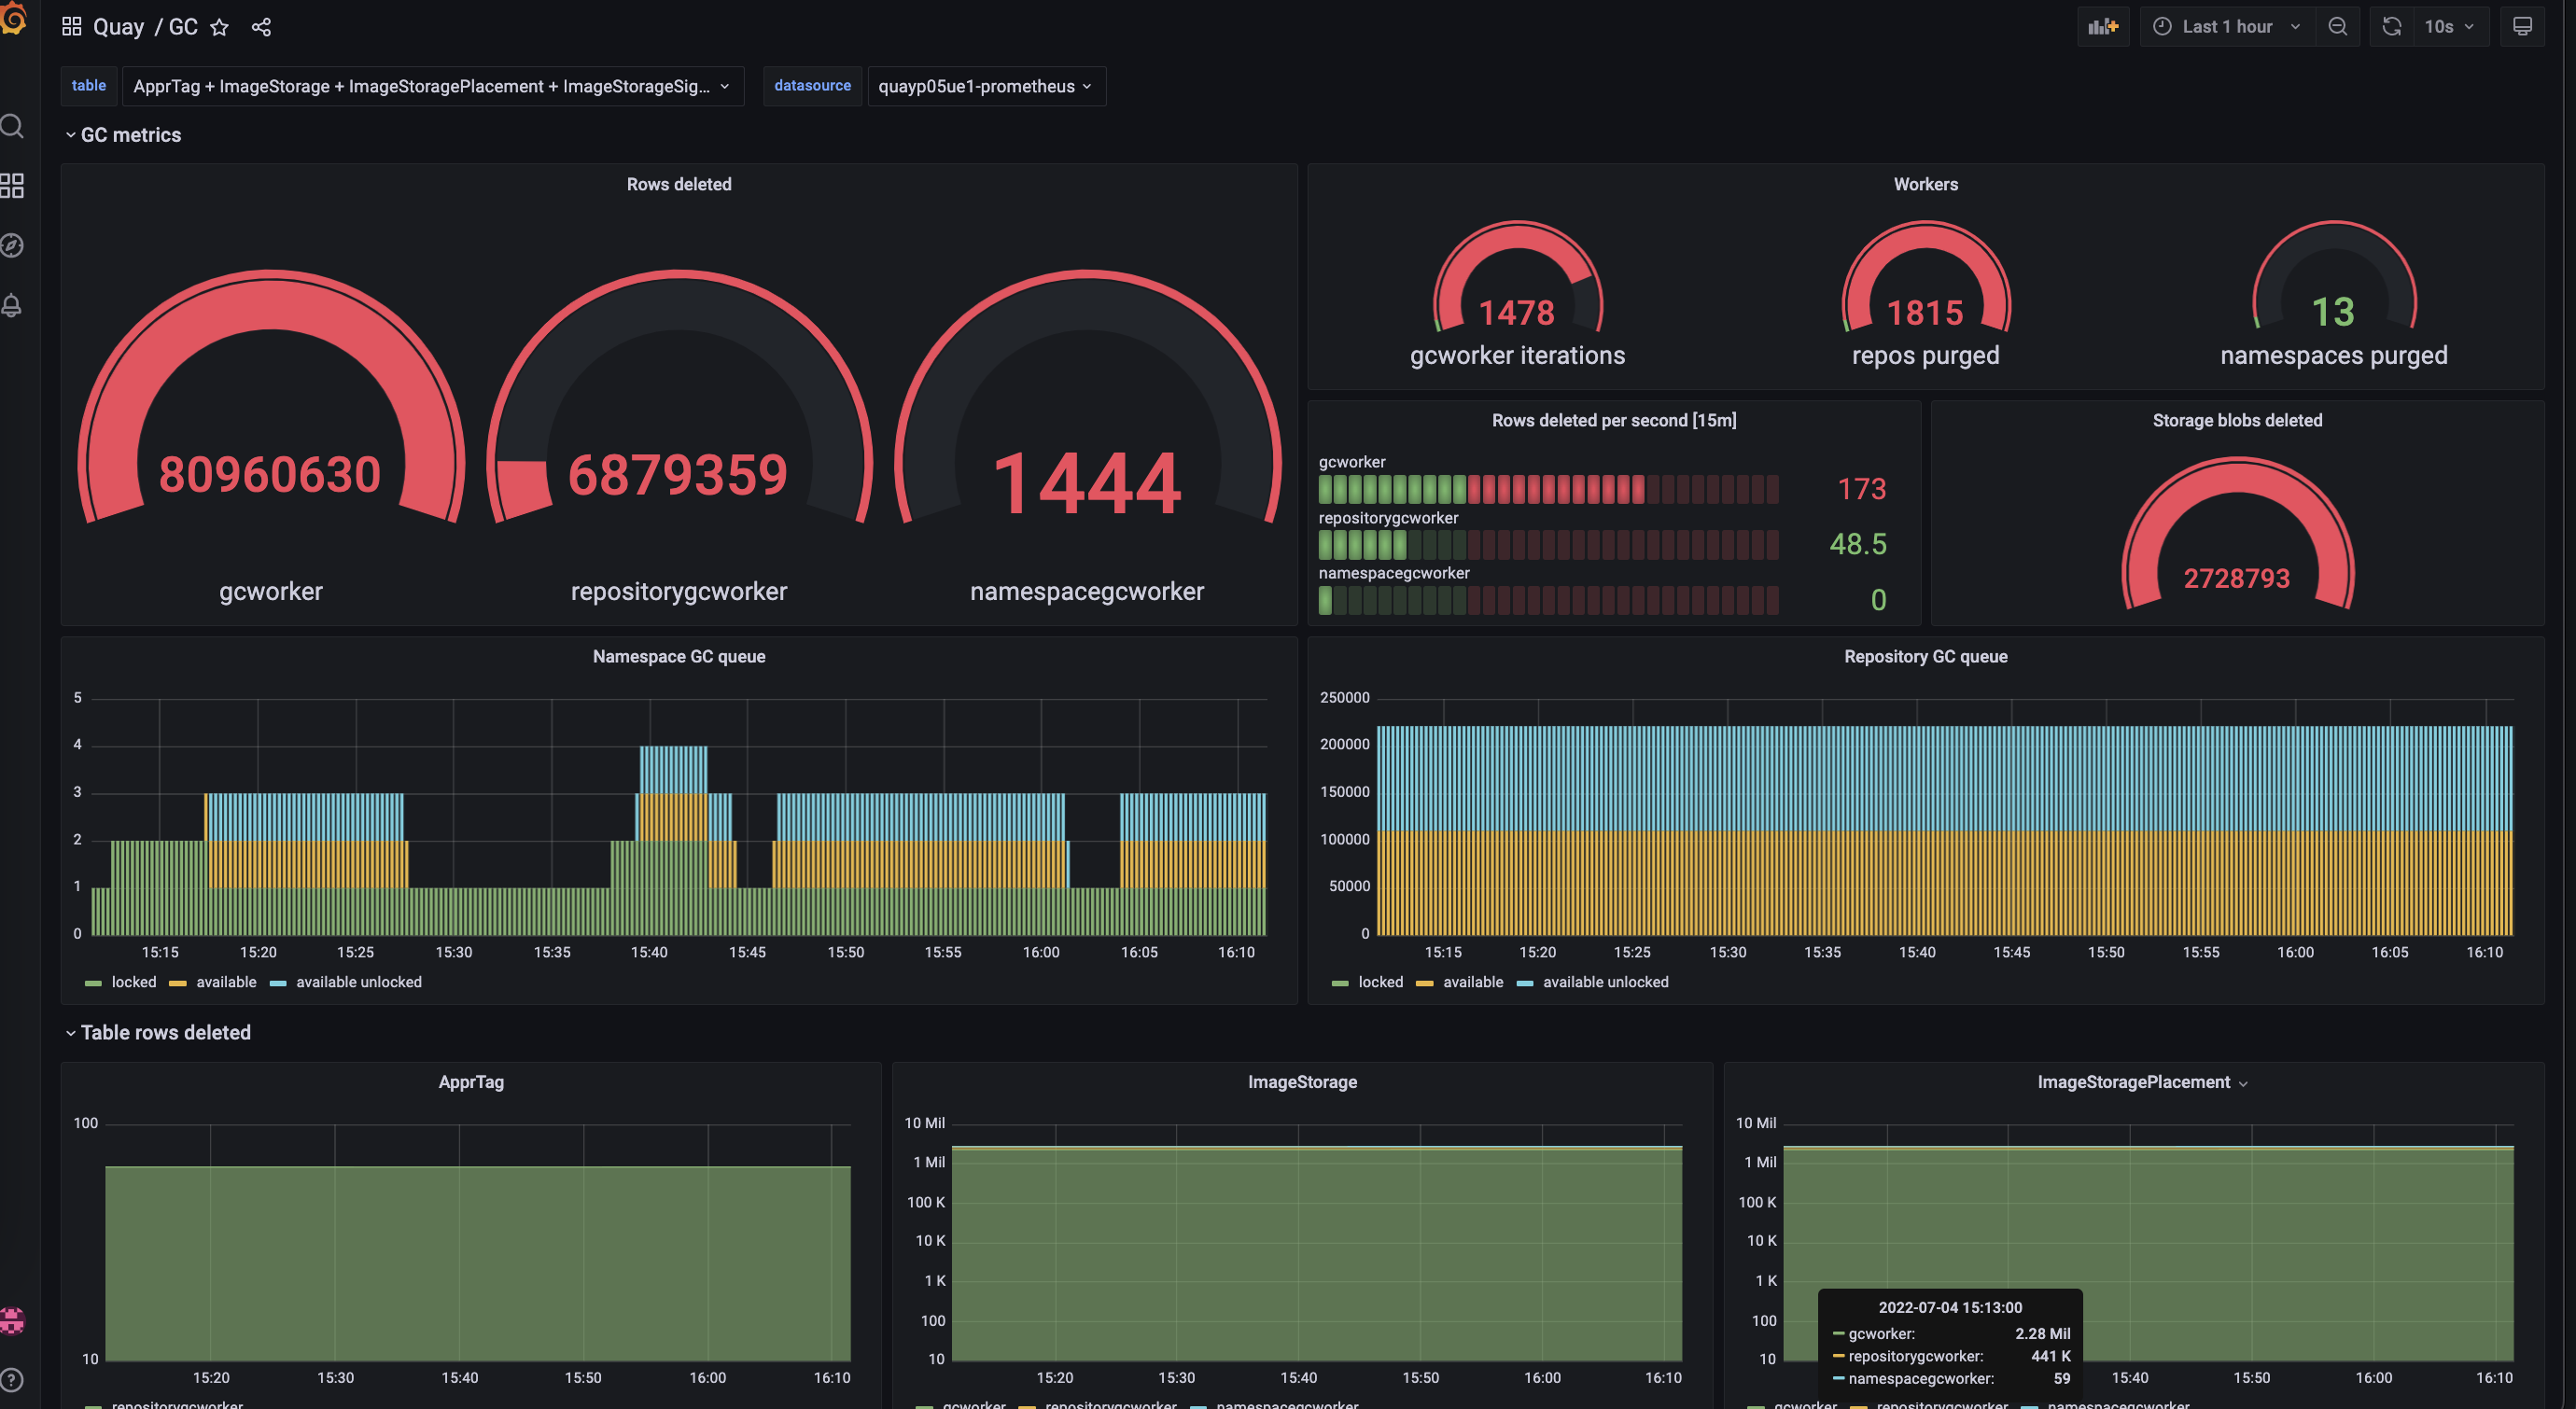
=== Measuring storage reclamation
Red Hat Quay does not have a way to track how much space is freed up by garbage collection. Currently, the best indicator of this is by checking how many blobs have been deleted in the provided metrics.
The UploadedBlob table in the Red Hat Quay metrics tracks the various blobs that are associated with a repository. When a blob is uploaded, it will not be garbage collected before the time designated by the PUSH_TEMP_TAG_EXPIRATION_SEC parameter. This is to avoid prematurely deleting blobs that are part of an ongoing push. For example, if garbage collection is set to run often, and a tag is deleted in the span of less than one hour, then it is possible that the associated blobs will not get cleaned up immediately. Instead, and assuming that the time designated by the PUSH_TEMP_TAG_EXPIRATION_SEC parameter has passed, the associated blobs will be removed the next time garbage collection is triggered to run by another expired tag on the same repository.
== Garbage collection configuration fields
The following configuration fields are available to customize what is garbage collected, and the frequency at which garbage collection occurs:
| Name | Description | Schema |
|---|---|---|
| FEATURE_GARBAGE_COLLECTION |
Whether garbage collection is enabled for image tags. Defaults to | Boolean |
| FEATURE_NAMESPACE_GARBAGE_COLLECTION |
Whether garbage collection is enabled for namespaces. Defaults to | Boolean |
| FEATURE_REPOSITORY_GARBAGE_COLLECTION |
Whether garbage collection is enabled for repositories. Defaults to | Boolean |
| GARBAGE_COLLECTION_FREQUENCY | The frequency, in seconds, at which the garbage collection worker runs. Affects only garbage collection workers. Defaults to 30 seconds. | String |
| PUSH_TEMP_TAG_EXPIRATION_SEC | The number of seconds that blobs will not be garbage collected after being uploaded. This feature prevents garbage collection from cleaning up blobs that are not referenced yet, but still used as part of an ongoing push. | String |
| TAG_EXPIRATION_OPTIONS | List of valid tag expiration values. | String |
| DEFAULT_TAG_EXPIRATION | Tag expiration time for time machine. | String |
| CLEAN_BLOB_UPLOAD_FOLDER | Automatically cleans stale blobs left over from an S3 multipart upload. By default, blob files older than two days are cleaned up every hour. | Boolean
+ Default: |
== Disabling garbage collection
The garbage collection features for image tags, namespaces, and repositories are stored in the config.yaml file. These features default to True.
In rare cases, you might want to disable garbage collection, for example, to control when garbage collection is performed. You can disable garbage collection by setting the GARBAGE_COLLECTION features to False. When disabled, dangling or untagged images, repositories, namespaces, layers, and manifests are not removed. This might increase the downtime of your environment.
There is no command to manually run garbage collection. Instead, you would disable, and then re-enable, the garbage collection feature.
== Garbage collection and quota management
Red Hat Quay introduced quota management in 3.7. With quota management, users have the ability to report storage consumption and to contain registry growth by establishing configured storage quota limits.
As of Red Hat Quay 3.7, garbage collection reclaims memory that was allocated to images, repositories, and blobs after deletion. Because the garbage collection feature reclaims memory after deletion, there is a discrepancy between what is stored in an environment’s disk space and what quota management is reporting as the total consumption. There is currently no workaround for this issue.
== Garbage collection in practice
Use the following procedure to check your Red Hat Quay logs to ensure that garbage collection is working.
Procedure
Enter the following command to ensure that garbage collection is properly working:
$ sudo podman logs <container_id>Example output:
gcworker stdout | 2022-11-14 18:46:52,458 [63] [INFO] [apscheduler.executors.default] Job "GarbageCollectionWorker._garbage_collection_repos (trigger: interval[0:00:30], next run at: 2022-11-14 18:47:22 UTC)" executed successfully- Delete an image tag.
Enter the following command to ensure that the tag was deleted:
$ podman logs quay-appExample output:
gunicorn-web stdout | 2022-11-14 19:23:44,574 [233] [INFO] [gunicorn.access] 192.168.0.38 - - [14/Nov/2022:19:23:44 +0000] "DELETE /api/v1/repository/quayadmin/busybox/tag/test HTTP/1.0" 204 0 "http://quay-server.example.com/repository/quayadmin/busybox?tab=tags" "Mozilla/5.0 (X11; Linux x86_64; rv:102.0) Gecko/20100101 Firefox/102.0"
== Red Hat Quay garbage collection metrics
The following metrics show how many resources have been removed by garbage collection. These metrics show how many times the garbage collection workers have run and how many namespaces, repositories, and blobs were removed.
| Metric name | Description |
|---|---|
| quay_gc_iterations_total | Number of iterations by the GCWorker |
| quay_gc_namespaces_purged_total | Number of namespaces purged by the NamespaceGCWorker |
| quay_gc_repos_purged_total | Number of repositories purged by the RepositoryGCWorker or NamespaceGCWorker |
| quay_gc_storage_blobs_deleted_total | Number of storage blobs deleted |
Sample metrics output
# TYPE quay_gc_iterations_created gauge
quay_gc_iterations_created{host="example-registry-quay-app-6df87f7b66-9tfn6",instance="",job="quay",pid="208",process_name="secscan:application"} 1.6317823190189714e+09
...

# HELP quay_gc_iterations_total number of iterations by the GCWorker
# TYPE quay_gc_iterations_total counter
quay_gc_iterations_total{host="example-registry-quay-app-6df87f7b66-9tfn6",instance="",job="quay",pid="208",process_name="secscan:application"} 0
...

# TYPE quay_gc_namespaces_purged_created gauge
quay_gc_namespaces_purged_created{host="example-registry-quay-app-6df87f7b66-9tfn6",instance="",job="quay",pid="208",process_name="secscan:application"} 1.6317823190189433e+09
...

# HELP quay_gc_namespaces_purged_total number of namespaces purged by the NamespaceGCWorker
# TYPE quay_gc_namespaces_purged_total counter
quay_gc_namespaces_purged_total{host="example-registry-quay-app-6df87f7b66-9tfn6",instance="",job="quay",pid="208",process_name="secscan:application"} 0
....

# TYPE quay_gc_repos_purged_created gauge
quay_gc_repos_purged_created{host="example-registry-quay-app-6df87f7b66-9tfn6",instance="",job="quay",pid="208",process_name="secscan:application"} 1.631782319018925e+09
...

# HELP quay_gc_repos_purged_total number of repositories purged by the RepositoryGCWorker or NamespaceGCWorker
# TYPE quay_gc_repos_purged_total counter
quay_gc_repos_purged_total{host="example-registry-quay-app-6df87f7b66-9tfn6",instance="",job="quay",pid="208",process_name="secscan:application"} 0
...

# TYPE quay_gc_storage_blobs_deleted_created gauge
quay_gc_storage_blobs_deleted_created{host="example-registry-quay-app-6df87f7b66-9tfn6",instance="",job="quay",pid="208",process_name="secscan:application"} 1.6317823190189059e+09
...

# HELP quay_gc_storage_blobs_deleted_total number of storage blobs deleted
# TYPE quay_gc_storage_blobs_deleted_total counter
quay_gc_storage_blobs_deleted_total{host="example-registry-quay-app-6df87f7b66-9tfn6",instance="",job="quay",pid="208",process_name="secscan:application"} 0
...
= Using the v2 UI
== v2 user interface configuration
- This UI is currently in beta and subject to change. In its current state, users can only create, view, and delete organizations, repositories, and image tags.
- When using the old UI, timed-out sessions would require that the user input their password again in the pop-up window. With the new UI, users are returned to the main page and required to input their username and password credentials. This is a known issue and will be fixed in a future version of the new UI.
- There is a discrepancy in how image manifest sizes are reported between the legacy UI and the new UI. In the legacy UI, image manifests were reported in mebibytes. The v2 UI uses the standard definition of megabyte (MB) to report image manifest sizes.
Procedure
- Log in to your deployment.
In the navigation pane of your deployment, you are given the option to toggle between Current UI and New UI. Click the toggle button to set it to new UI, and then click Use Beta Environment, for example:

=== Creating a new organization using the v2 UI
Prerequisites
- You have toggled your deployment to use the v2 UI.
Use the following procedure to create an organization using the v2 UI.
Procedure
- Click Organization in the navigation pane.
- Click Create Organization.
-
Enter an Organization Name, for example,
testorg. - Click Create.
Now, your example organization should populate under the Organizations page.
=== Deleting an organization using the v2 UI
Use the following procedure to delete an organization using the v2 UI.
Procedure
-
On the Organizations page, select the name of the organization you want to delete, for example,
testorg. - Click the More Actions drop down menu.
- Click Delete.
On the Delete page, there is a Search input box. With this box, users can search for specific organizations to ensure that they are properly scheduled for deletion. For example, if a user is deleting 10 organizations and they want to ensure that a specific organization was deleted, they can use the Search input box to confirm said organization is marked for deletion.
- Confirm that you want to permanently delete the organization by typing confirm in the box.
Click Delete.
After deletion, you are returned to the Organizations page.
You can delete more than one organization at a time by selecting multiple organizations, and then clicking More Actions
=== Creating a new repository using the v2 UI
Use the following procedure to create a repository using the v2 UI.
Procedure
- Click Repositories on the navigation pane.
- Click Create Repository.
-
Select a namespace, for example, quayadmin, and then enter a Repository name, for example,
testrepo.
Do not use the following words in your repository name: * build * trigger * tag
When these words are used for repository names, users are unable access the repository, and are unable to permanently delete the repository. Attempting to delete these repositories returns the following error: Failed to delete repository <repository_name>, HTTP404 - Not Found.
Click Create.
Now, your example repository should populate under the Repositories page.
=== Deleting a repository using the v2 UI
Prerequisites
- You have created a repository.
Procedure
-
On the Repositories page of the v2 UI, click the name of the image you want to delete, for example,
quay/admin/busybox. - Click the More Actions drop-down menu.
- Click Delete.
If desired, you could click Make Public or Make Private.
- Type confirm in the box, and then click Delete.
- After deletion, you are returned to the Repositories page.
=== Pushing an image to the v2 UI
Use the following procedure to push an image to the v2 UI.
Procedure
Pull a sample image from an external registry:
$ podman pull busyboxTag the image:
$ podman tag docker.io/library/busybox quay-server.example.com/quayadmin/busybox:testPush the image to your registry:
$ podman push quay-server.example.com/quayadmin/busybox:test- Navigate to the Repositories page on the v2 UI and ensure that your image has been properly pushed.
- You can check the security details by selecting your image tag, and then navigating to the Security Report page.
=== Deleting an image using the v2 UI
Use the following procedure to delete an image using the v2 UI.
Prerequisites
- You have pushed an image to your registry.
Procedure
-
On the Repositories page of the v2 UI, click the name of the image you want to delete, for example,
quay/admin/busybox. - Click the More Actions drop-down menu.
- Click Delete.
If desired, you could click Make Public or Make Private.
- Type confirm in the box, and then click Delete.
- After deletion, you are returned to the Repositories page.
=== Creating a new team using the Red Hat Quay v2 UI
Use the following procedure to create a new team using the Red Hat Quay v2 UI.
Prerequisites
- You have created an organization with a repository.
Procedure
- On the Red Hat Quay v2 UI, click the name of an organization.
- On your organization’s page, click Teams and membership.
- Click the Create new team box.
- In the Create team popup window, provide a name for your new team.
- Optional. Provide a description for your new team.
- Click Proceed. A new popup window appears.
- Optional. Add this team to a repository, and set the permissions to one of Read, Write, Admin, or None.
- Optional. Add a team member or robot account. To add a team member, enter the name of their Red Hat Quay account.
Review and finish the information, then click Review and Finish. The new team appears under the Teams and membership page. From here, you can click the kebab menu, and select one of the following options:
- Manage Team Members. On this page, you can view all members, team members, robot accounts, or users who have been invited. You can also add a new team member by clicking Add new member.
- Set repository permissions. On this page, you can set the repository permissions to one of Read, Write, Admin, or None.
- Delete. This popup windows allows you to delete the team by clicking Delete.
Optional. You can click the one of the following options to reveal more information about teams, members, and collaborators:
- Team View. This menu shows all team names, the number of members, the number of repositories, and the role for each team.
- Members View. This menu shows all usernames of team members, the teams that they are part of, the repository permissions of the user.
- Collaborators View. This menu shows repository collaborators. Collaborators are users that do not belong to any team in the organization, but who have direct permissions on one or more repositories belonging to the organization.
=== Creating a robot account using the v2 UI
Use the following procedure to create a robot account using the v2 UI.
Procedure
- On the v2 UI, click Organizations.
-
Click the name of the organization that you will create the robot account for, for example,
test-org. -
Click the Robot accounts tab
Create robot account. -
In the Provide a name for your robot account box, enter a name, for example,
robot1. Optional. The following options are available if desired:
- Add the robot to a team.
- Add the robot to a repository.
- Adjust the robot’s permissions.
On the Review and finish page, review the information you have provided, then click Review and finish. The following alert appears: Successfully created robot account with robot name: <organization_name> + <robot_name>.
Alternatively, if you tried to create a robot account with the same name as another robot account, you might receive the following error message: Error creating robot account.
- Optional. You can click Expand or Collapse to reveal descriptive information about the robot account.
-
Optional. You can change permissions of the robot account by clicking the kebab menu
Set repository permissions. The following message appears: Successfully updated repository permission. -
Optional. To delete your robot account, check the box of the robot account and click the trash can icon. A popup box appears. Type confirm in the text box, then, click Delete. Alternatively, you can click the kebab menu
Delete. The following message appears: Successfully deleted robot account.
==== Bulk managing robot account repository access using the Red Hat Quay v2 UI
Use the following procedure to manage, in bulk, robot account repository access using the Red Hat Quay v2 UI.
Prerequisites
- You have created a robot account.
- You have created multiple repositories under a single organization.
Procedure
- On the Red Hat Quay v2 UI landing page, click Organizations in the navigation pane.
- On the Organizations page, select the name of the organization that has multiple repositories. The number of repositories under a single organization can be found under the Repo Count column.
- On your organization’s page, click Robot accounts.
-
For the robot account that will be added to multiple repositories, click the kebab icon
Set repository permissions. On the Set repository permissions page, check the boxes of the repositories that the robot account will be added to. For example:
- Set the permissions for the robot account, for example, None, Read, Write, Admin.
- Click save. An alert that says Success alert: Successfully updated repository permission appears on the Set repository permissions page, confirming the changes.
-
Return to the Organizations
Robot accounts page. Now, the Repositories column of your robot account shows the number of repositories that the robot account has been added to.
=== Creating default permissions using the Red Hat Quay v2 UI
Default permissions defines permissions that should be granted automatically to a repository when it is created, in addition to the default of the repository’s creator. Permissions are assigned based on the user who created the repository.
Use the following procedure to create default permissions using the Red Hat Quay v2 UI.
Procedure
- Click the name of an organization.
- Click Default permissions.
- Click create default permissions. A toggle drawer appears.
Select either Anyone or Specific user to create a default permission when a repository is created.
If selecting Anyone, the following information must be provided:
- Applied to. Search, invite, or add a user/robot/team.
- Permission. Set the permission to one of Read, Write, or Admin.
If selecting Specific user, the following information must be provided:
- Repository creator. Provide either a user or robot account.
- Applied to. Provide a username, robot account, or team name.
- Permission. Set the permission to one of Read, Write, or Admin.
- Click Create default permission. A confirmation box appears, returning the following alert: Successfully created default permission for creator.
=== Organization settings for the v2 UI
Use the following procedure to alter your organization settings using the v2 UI.
Procedure
- On the v2 UI, click Organizations.
-
Click the name of the organization that you will create the robot account for, for example,
test-org. - Click the Settings tab.
- Optional. Enter the email address associated with the organization.
Optional. Set the allotted time for the Time Machine feature to one of the following:
- 1 week
- 1 month
- 1 year
- Never
- Click Save.
=== Viewing image tag information using the v2 UI
Use the following procedure to view image tag information using the v2 UI.
Procedure
- On the v2 UI, click Repositories.
-
Click the name of a repository, for example,
quayadmin/busybox. Click the name of the tag, for example,
test. You are taken to the Details page of the tag. The page reveals the following information:- Name
- Repository
- Digest
- Vulnerabilities
- Creation
- Modified
- Size
- Labels
- How to fetch the image tag
- Optional. Click Security Report to view the tag’s vulnerabilities. You can expand an advisory column to open up CVE data.
- Optional. Click Packages to view the tag’s packages.
-
Click the name of the repository, for example,
busybox, to return to the Tags page. - Optional. Hover over the Pull icon to reveal the ways to fetch the tag.
- Check the box of the tag, or multiple tags, click the Actions drop down menu, and then Delete to delete the tag. Confirm deletion by clicking Delete in the popup box.
=== Adjusting repository settings using the v2 UI
Use the following procedure to adjust various settings for a repository using the v2 UI.
Procedure
- On the v2 UI, click Repositories.
-
Click the name of a repository, for example,
quayadmin/busybox. - Click the Settings tab.
- Optional. Click User and robot permissions. You can adjust the settings for a user or robot account by clicking the dropdown menu option under Permissions. You can change the settings to Read, Write, or Admin.
Optional. Click Events and notifications. You can create an event and notification by clicking Create Notification. The following event options are available:
- Push to Repository
- Package Vulnerability Found
- Image build failed
- Image build queued
- Image build started
- Image build success
Image build cancelled
Then, issue a notification. The following options are available:
- Email Notification
- Flowdock Team Notification
- HipChat Room Notification
- Slack Notification
Webhook POST
After selecting an event option and the method of notification, include a Room ID #, a Room Notification Token, then, click Submit.
- Optional. Click Repository visibility. You can make the repository private, or public, by clicking Make Public.
- Optional. Click Delete repository. You can delete the repository by clicking Delete Repository.
== Viewing Red Hat Quay tag history
Use the following procedure to view tag history on the Red Hat Quay v2 UI.
Procedure
- On the Red Hat Quay v2 UI dashboard, click Repositories in the navigation pane.
- Click the name of a repository that has image tags.
Click Tag History. On this page, you can perform the following actions:
- Search by tag name
- Select a date range
- View tag changes
- View tag modification dates and the time at which they were changed
== Adding and managing labels on the Red Hat Quay v2 UI
Red Hat Quay administrators can add and manage labels for tags by using the following procedure.
Procedure
- On the Red Hat Quay v2 UI dashboard, click Repositories in the navigation pane.
- Click the name of a repository that has image tags.
- Click the menu kebab for an image and select Edit labels.
- In the Edit labels window, click Add new label.
-
Enter a label for the image tag using the
key=valueformat, for example,com.example.release-date=2023-11-14.
The following error is returned when failing to use the key=value format: Invalid label format, must be key value separated by =.
- Click the whitespace of the box to add the label.
- Optional. Add a second label.
-
Click Save labels to save the label to the image tag. The following notification is returned:
Created labels successfully. -
Optional. Click the same image tag’s menu kebab
Edit labels X on the label to remove it; alternatively, you can edit the text. Click Save labels. The label is now removed or edited.
== Setting tag expirations on the Red Hat Quay v2 UI
Red Hat Quay administrators can set expiration dates for certain tags in a repository. This helps automate the cleanup of older or unused tags, helping to reduce storage space.
Procedure
- On the Red Hat Quay v2 UI dashboard, click Repositories in the navigation pane.
- Click the name of a repository that has image tags.
- Click the menu kebab for an image and select Change expiration.
-
Optional. Alternatively, you can bulk add expiration dates by clicking the box of multiple tags, and then select Actions
Set expiration. -
In the Change Tags Expiration window, set an expiration date, specifying the day of the week, month, day of the month, and year. For example,
Wednesday, November 15, 2023. Alternatively, you can click the calendar button and manually select the date. -
Set the time, for example,
2:30 PM. -
Click Change Expiration to confirm the date and time. The following notification is returned:
Successfully set expiration for tag test to Nov 15, 2023, 2:26 PM. On the Red Hat Quay v2 UI Tags page, you can see when the tag is set to expire. For example:

== Selecting color theme preference on the Red Hat Quay v2 UI
Users can switch between light and dark modes when using the v2 UI. This feature also includes an automatic mode selection, which chooses between light or dark modes depending on the user’s browser preference.
Use the following procedure to switch between automatic, light, and dark modes.
Procedure
- Log in to your Red Hat Quay repository.
- In the navigation pane, click your username, for example, quayadmin.
- Under Appearance, select between Light theme, Dark theme, and Device-based theme. Device based theme sets the mode depending on your browser’s color preference.
== Viewing usage logs on the Red Hat Quay v2 UI
Red Hat Quay logs can provide valuable information about the way that your Red Hat Quay registry is being used. Logs can be viewed by Organization, repository, or namespace on the v2 UI by using the following procedure.
Procedure
- Log in to your Red Hat Quay registry.
- Navigate to an Organization, repository, or namespace for which you are an administrator of.
Click Logs.
- Optional. Set the date range for viewing log entries by adding dates to the From and To boxes.
-
Optional. Export the logs by clicking Export. You must enter an email address or a valid callback URL that starts with
http://orhttps://. This process can take an hour depending on how many logs there are.
== Enabling the legacy UI
In the navigation pane, you are given the option to toggle between Current UI and New UI. Click the toggle button to set it to Current UI.
= Performing health checks on Red Hat Quay deployments
Health check mechanisms are designed to assess the health and functionality of a system, service, or component. Health checks help ensure that everything is working correctly, and can be used to identify potential issues before they become critical problems. By monitoring the health of a system, Red Hat Quay administrators can address abnormalities or potential failures for things like geo-replication deployments, Operator deployments, standalone Red Hat Quay deployments, object storage issues, and so on. Performing health checks can also help reduce the likelihood of encountering troubleshooting scenarios.
Health check mechanisms can play a role in diagnosing issues by providing valuable information about the system’s current state. By comparing health check results with expected benchmarks or predefined thresholds, deviations or anomalies can be identified quicker.
== Red Hat Quay health check endpoints
Links contained herein to any external website(s) are provided for convenience only. Red Hat has not reviewed the links and is not responsible for the content or its availability. The inclusion of any link to an external website does not imply endorsement by Red Hat of the website or its entities, products, or services. You agree that Red Hat is not responsible or liable for any loss or expenses that may result due to your use of (or reliance on) the external site or content.
Red Hat Quay has several health check endpoints. The following table shows you the health check, a description, an endpoint, and an example output.
| Health check | Description | Endpoint | Example output |
|---|---|---|---|
|
|
The |
|
|
|
|
The |
| |
|
|
The |
|
== Navigating to a Red Hat Quay health check endpoint
Use the following procedure to navigate to the instance endpoint. This procedure can be repeated for endtoend and warning endpoints.
Procedure
-
On your web browser, navigate to
https://{quay-ip-endpoint}/health/instance. You are taken to the health instance page, which returns information like the following:
{"data":{"services":{"auth":true,"database":true,"disk_space":true,"registry_gunicorn":true,"service_key":true,"web_gunicorn":true}},"status_code":200}For Red Hat Quay,
"status_code": 200means that the instance is health. Conversely, if you receive"status_code": 503, there is an issue with your deployment.
= Branding a Red Hat Quay deployment on the legacy UI
You can brand the UI of your Red Hat Quay deployment by changing the registry title, logo, footer image, and by directing users to a website embedded in the footer image.
Procedure
Update your Red Hat Quay
config.yamlfile to add the following parameters:BRANDING: logo:1 footer_img:2 footer_url:3 --- REGISTRY_TITLE:4 REGISTRY_TITLE_SHORT:5 - 1
- The URL of the image that will appear at the top of your Red Hat Quay deployment.
- 2
- The URL of the image that will appear at the bottom of your Red Hat Quay deployment.
- 3
- The URL of the website that users will be directed to when clicking the footer image.
- 4
- The long-form title for the registry. This is displayed in frontend of your Red Hat Quay deployment, for example, at the sign in page of your organization.
- 5
- The short-form title for the registry. The title is displayed on various pages of your organization, for example, as the title of the tutorial on your organization’s Tutorial page.
- Restart your Red Hat Quay deployment. After restarting, your Red Hat Quay deployment is updated with a new logo, footer image, and footer image URL.
= Schema for Red Hat Quay configuration
Most Red Hat Quay configuration information is stored in the config.yaml file. All configuration options are described in the Red Hat Quay Configuration Guide.