Questo contenuto non è disponibile nella lingua selezionata.

4.5. State Manager API


JSF has an advanced navigation mechanism that lets you define navigation from view to view. In a web application, navigation occurs when a user changes from one page to another by clicking on a button, a hyperlink, or another command component. There is no switch mechanism between some logical states of the same view. For example, in Login/Register dialog, an existing user signs in with his user name and password, but if a new user attempts to register, an additional field (Confirm) is displayed, and button labels and methods are changed when the user clicks the To register link:

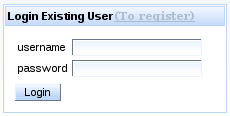
Figure 4.7.  Login Dialog

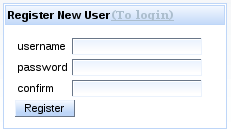
Figure 4.8.  Register Dialog

RichFaces State API lets you easily define a set of states for pages, and properties for these states.
The States class interfaces with a map, where the keySet defines the State name and the entrySet is a State map. The State map defines the properties, method bindings, or constant state variables of a key or object, where these values may change depending on the active State.

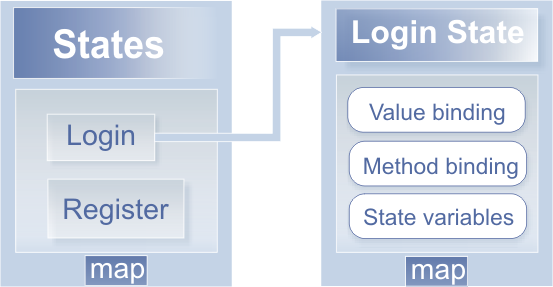
Figure 4.9.  RichFaces State API

One of the most convenient features of the RichFaces State API is the ability to navigate between States. The API implements changes in State through standard JSF navigation. When the action component returns an outcome, the JSF navigation handler (extended through the RichFaces State API) checks whether the outcome is registered as a State change outcome. If true, the corresponding State is activated. If false, standard navigation handling is called.
Implement the RichFaces State API like so:
  • Register the State Navigation Handler and the EL Resolver in your faces-config.xml file:
    ...
    <application>
    	<navigation-handler>org.richfaces.ui.application.StateNavigationHandler</navigation-handler>
    	<el-resolver>org.richfaces.el.StateELResolver</el-resolver>
    </application>
    ...
    Copy to Clipboard Toggle word wrap
  • Register an additional application factory in the faces-config.xml:
    ...
    <factory>
    	<application-factory>org.richfaces.ui.application.StateApplicationFactory</application-factory>
    </factory>
    ...
    Copy to Clipboard Toggle word wrap
  • Register two managed beans in the faces-config.xml:
    ...
    <managed-bean>
    	<managed-bean-name>state</managed-bean-name>
    	<managed-bean-class>org.richfaces.ui.model.States</managed-bean-class>
    	<managed-bean-scope>request</managed-bean-scope>
    	<managed-property>
    		<property-name>states</property-name>
    		<property-class>org.richfaces.ui.model.States</property-class>
    		<value>#{config.states}</value>
    	</managed-property>
    </managed-bean>
    <managed-bean>
    	<managed-bean-name>config</managed-bean-name>
    	<managed-bean-class>org.richfaces.demo.stateApi.Config</managed-bean-class>
    	<managed-bean-scope>none</managed-bean-scope>
    </managed-bean>
    ...
    Copy to Clipboard Toggle word wrap
    One bean (config) defines and stores State as seen in the following example:
    ...
    public class Config {
    
    	/**
    	 * @return States
    	 */
    	public States getStates() {
    		FacesContext facesContext = FacesContext.getCurrentInstance();
    		States states = new States();
    
    		// Registering new User State definition
    		states.setCurrentState("register"); // Name of the new state
    
    		// Text labels, properties and Labels for controls in "register" state
    		states.put("showConfirm", Boolean.TRUE); // confirm field rendering
    		states.put("link", "(To login)"); // Switch State link label
    		states.put("okBtn", "Register"); // Login/Register button label
    		states.put("stateTitle", "Register New User"); // Panel title
    
    		ExpressionFactory expressionFactory = facesContext.getApplication()
    				.getExpressionFactory();
    
    		// Define "registerbean" available under "bean" EL binding on the page
    		ValueExpression beanExpression = expressionFactory
    				.createValueExpression(facesContext.getELContext(),
    						"#{registerbean}", Bean.class);
    		states.put("bean", beanExpression);
    
    		// Define "registeraction" available under "action" EL binding on the
    		// page
    		beanExpression = expressionFactory.createValueExpression(facesContext
    				.getELContext(), "#{registeraction}", RegisterAction.class);
    		states.put("action", beanExpression);
    
    		// Define method expression inside registeraction binding for this state
    		MethodExpression methodExpression = expressionFactory.createMethodExpression(
    				facesContext.getELContext(), "#{registeraction.ok}",
    				String.class, new Class[] {});
    		states.put("ok", methodExpression);
    
    		// Outcome for switching to login state definition
    		states.setNavigation("switch", "login");
    
    		// Login Existent User State analogous definition
    		states.setCurrentState("login");
    		states.put("showConfirm", Boolean.FALSE);
    		states.put("link", "(To register)");
    		states.put("okBtn", "Login");
    		states.put("stateTitle", "Login Existing User");
    
    		beanExpression = expressionFactory.createValueExpression(facesContext
    				.getELContext(), "#{loginbean}", Bean.class);
    		states.put("bean", beanExpression);
    
    		beanExpression = expressionFactory.createValueExpression(facesContext
    				.getELContext(), "#{loginaction}", LoginAction.class);
    		states.put("action", beanExpression);
    
    		methodExpression = expressionFactory.createMethodExpression(
    				facesContext.getELContext(), "#{loginaction.ok}",
    				String.class, new Class[] {});
    		states.put("ok", methodExpression);
    
    		states.setNavigation("switch", "register");
    
    		return states;
    	}
    }
    ...
    Copy to Clipboard Toggle word wrap
    The second bean, with the org.richfaces.ui.model.States type (state), contains the managed property states, which is bound to the first config bean.
  • Next, use state bindings on the page, as in the following example:
    ...
    <h:panelGrid columns="3">
    	<h:outputText value="username" />
    	<h:inputText value="#{state.bean.name}" id="name" required="true" />
    	<h:outputText value="password" />
    	<h:inputSecret value="#{state.bean.password}" id="password" required="true" />
    	<h:outputText value="confirm" rendered="#{state.showConfirm}" />
    	<h:inputSecret value="#{state.bean.confirmPassword}" rendered="#{state.showConfirm}" id="confirm" required="true" />
    </h:panelGrid>
    <a4j:commandButton actionListener="#{state.action.listener}" action="#{state.ok}" value="#{state.okBtn}" id="action"/>
    ...
    Copy to Clipboard Toggle word wrap
To see complete example of the Login/Register dialog, see the RichFaces Live Demo.
Torna in cima
Red Hat logoGithubredditYoutubeTwitter

Formazione

Prova, acquista e vendi

Community

Informazioni sulla documentazione di Red Hat

Aiutiamo gli utenti Red Hat a innovarsi e raggiungere i propri obiettivi con i nostri prodotti e servizi grazie a contenuti di cui possono fidarsi. Esplora i nostri ultimi aggiornamenti.

Rendiamo l’open source più inclusivo

Red Hat si impegna a sostituire il linguaggio problematico nel codice, nella documentazione e nelle proprietà web. Per maggiori dettagli, visita il Blog di Red Hat.

Informazioni su Red Hat

Forniamo soluzioni consolidate che rendono più semplice per le aziende lavorare su piattaforme e ambienti diversi, dal datacenter centrale all'edge della rete.

Theme

© 2025 Red Hat