Questo contenuto non è disponibile nella lingua selezionata.
Chapter 2. OpenShift CLI (oc)
2.1. Getting started with the OpenShift CLI
2.1.1. About the OpenShift CLI
With the OpenShift command-line interface (CLI), the oc command, you can create applications and manage OpenShift Container Platform projects from a terminal. The OpenShift CLI is ideal in the following situations:
- Working directly with project source code
- Scripting OpenShift Container Platform operations
- Managing projects while restricted by bandwidth resources and the web console is unavailable
2.1.2. Installing the OpenShift CLI
You can install the OpenShift CLI (oc) either by downloading the binary or by using an RPM.
2.1.2.1. Installing the OpenShift CLI by downloading the binary
You can install the OpenShift CLI (oc) in order to interact with OpenShift Container Platform from a command-line interface. You can install oc on Linux, Windows, or macOS.
If you installed an earlier version of oc, you cannot use it to complete all of the commands in OpenShift Container Platform 4.6. Download and install the new version of oc.
2.1.2.1.1. Installing the OpenShift CLI on Linux
You can install the OpenShift CLI (oc) binary on Linux by using the following procedure.
Procedure
- Navigate to the OpenShift Container Platform downloads page on the Red Hat Customer Portal.
- Select the appropriate version in the Version drop-down menu.
- Click Download Now next to the OpenShift v4.6 Linux Client entry and save the file.
Unpack the archive:
$ tar xvzf <file>Place the
ocbinary in a directory that is on yourPATH.To check your
PATH, execute the following command:$ echo $PATH
After you install the OpenShift CLI, it is available using the oc command:
$ oc <command>2.1.2.1.2. Installing the OpenShift CLI on Windows
You can install the OpenShift CLI (oc) binary on Windows by using the following procedure.
Procedure
- Navigate to the OpenShift Container Platform downloads page on the Red Hat Customer Portal.
- Select the appropriate version in the Version drop-down menu.
- Click Download Now next to the OpenShift v4.6 Windows Client entry and save the file.
- Unzip the archive with a ZIP program.
Move the
ocbinary to a directory that is on yourPATH.To check your
PATH, open the command prompt and execute the following command:C:\> path
After you install the OpenShift CLI, it is available using the oc command:
C:\> oc <command>2.1.2.1.3. Installing the OpenShift CLI on macOS
You can install the OpenShift CLI (oc) binary on macOS by using the following procedure.
Procedure
- Navigate to the OpenShift Container Platform downloads page on the Red Hat Customer Portal.
- Select the appropriate version in the Version drop-down menu.
- Click Download Now next to the OpenShift v4.6 MacOSX Client entry and save the file.
- Unpack and unzip the archive.
Move the
ocbinary to a directory on your PATH.To check your
PATH, open a terminal and execute the following command:$ echo $PATH
After you install the OpenShift CLI, it is available using the oc command:
$ oc <command>2.1.2.2. Installing the OpenShift CLI by using the web console
You can install the OpenShift CLI (oc) to interact with OpenShift Container Platform from a web console. You can install oc on Linux, Windows, or macOS.
If you installed an earlier version of oc, you cannot use it to complete all of the commands in OpenShift Container Platform 4.6. Download and install the new version of oc.
2.1.2.2.1. Installing the OpenShift CLI on Linux using the web console
You can install the OpenShift CLI (oc) binary on Linux by using the following procedure.
Procedure
From the web console, click ?.
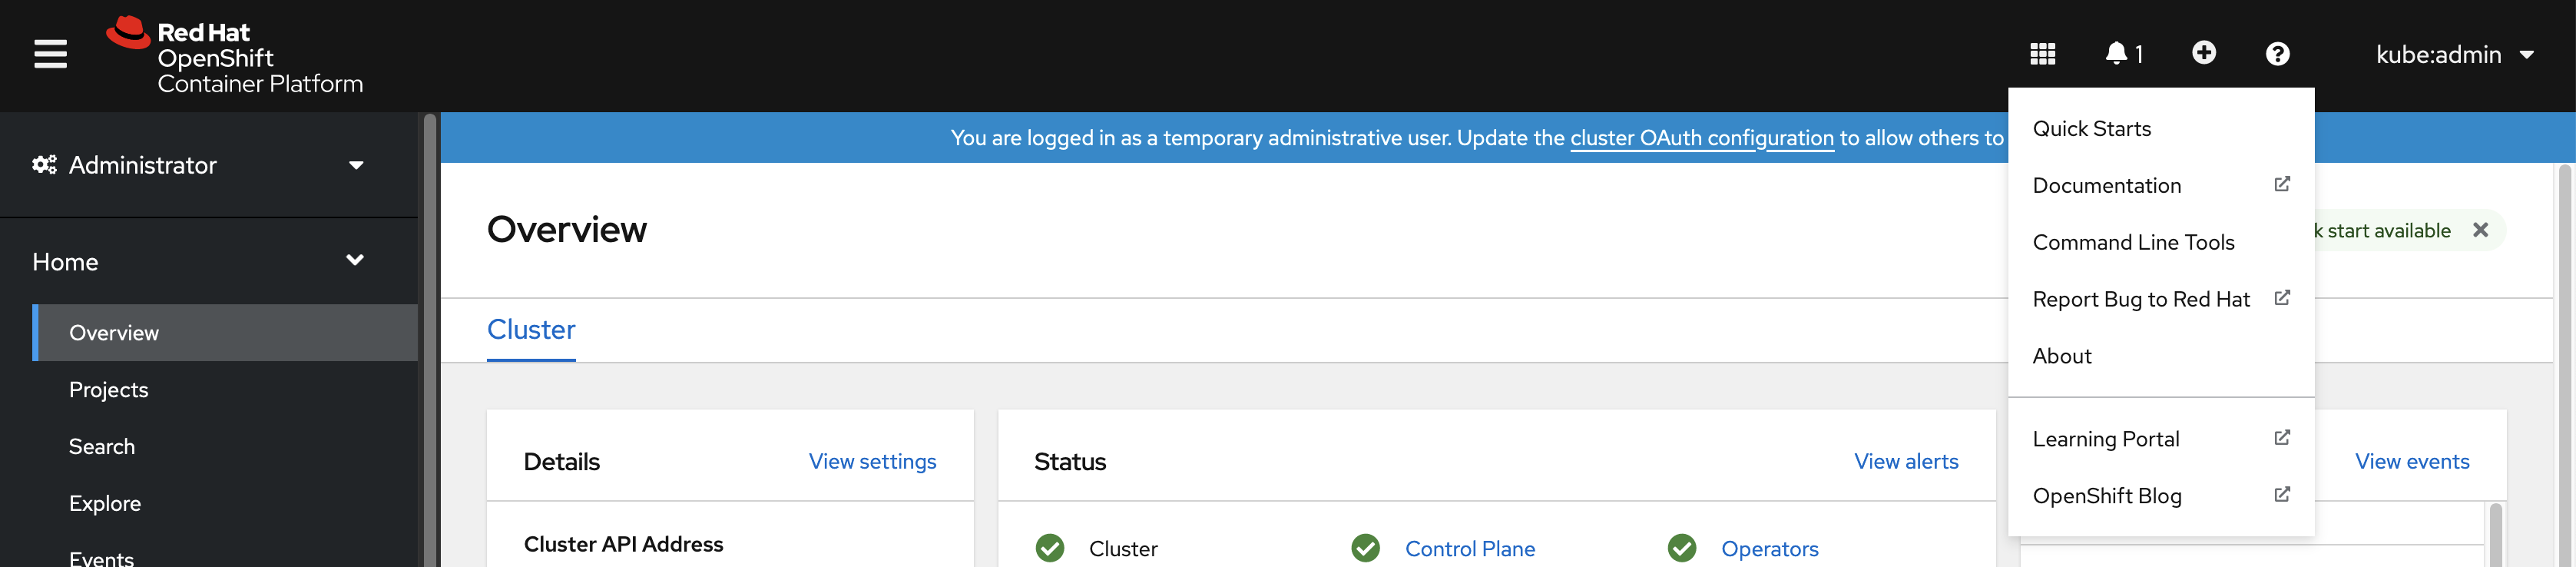
Click Command Line Tools.

-
Select appropriate
ocbinary for your Linux platform, and then click Download oc for Linux. - Save the file.
Unpack the archive.
$ tar xvzf <file>Move the
ocbinary to a directory that is on yourPATH.To check your
PATH, execute the following command:$ echo $PATH
After you install the OpenShift CLI, it is available using the oc command:
$ oc <command>2.1.2.2.2. Installing the OpenShift CLI on Windows using the web console
You can install the OpenShift CLI (oc) binary on Winndows by using the following procedure.
Procedure
From the web console, click ?.
Click Command Line Tools.
-
Select the
ocbinary for Windows platform, and then click Download oc for Windows for x86_64. - Save the file.
- Unzip the archive with a ZIP program.
Move the
ocbinary to a directory that is on yourPATH.To check your
PATH, open the command prompt and execute the following command:C:\> path
After you install the OpenShift CLI, it is available using the oc command:
C:\> oc <command>2.1.2.2.3. Installing the OpenShift CLI on macOS using the web console
You can install the OpenShift CLI (oc) binary on macOS by using the following procedure.
Procedure
From the web console, click ?.
Click Command Line Tools.
-
Select the
ocbinary for macOS platform, and then click Download oc for Mac for x86_64. - Save the file.
- Unpack and unzip the archive.
Move the
ocbinary to a directory on your PATH.To check your
PATH, open a terminal and execute the following command:$ echo $PATH
After you install the OpenShift CLI, it is available using the oc command:
$ oc <command>2.1.2.3. Installing the OpenShift CLI by using an RPM
For Red Hat Enterprise Linux (RHEL), you can install the OpenShift CLI (oc) as an RPM if you have an active OpenShift Container Platform subscription on your Red Hat account.
Prerequisites
- Must have root or sudo privileges.
Procedure
Register with Red Hat Subscription Manager:
# subscription-manager registerPull the latest subscription data:
# subscription-manager refreshList the available subscriptions:
# subscription-manager list --available --matches '*OpenShift*'In the output for the previous command, find the pool ID for an OpenShift Container Platform subscription and attach the subscription to the registered system:
# subscription-manager attach --pool=<pool_id>Enable the repositories required by OpenShift Container Platform 4.6.
For Red Hat Enterprise Linux 8:
# subscription-manager repos --enable="rhocp-4.6-for-rhel-8-x86_64-rpms"For Red Hat Enterprise Linux 7:
# subscription-manager repos --enable="rhel-7-server-ose-4.6-rpms"
Install the
openshift-clientspackage:# yum install openshift-clients
After you install the CLI, it is available using the oc command:
$ oc <command>2.1.2.4. Installing the OpenShift CLI by using Homebrew
For macOS, you can install the OpenShift CLI (oc) by using the Homebrew package manager.
Prerequisites
-
You must have Homebrew (
brew) installed.
Procedure
Run the following command to install the openshift-cli package:
$ brew install openshift-cli
2.1.3. Logging in to the OpenShift CLI
You can log in to the oc CLI to access and manage your cluster.
Prerequisites
- You must have access to an OpenShift Container Platform cluster.
- You must have installed the CLI.
To access a cluster that is accessible only over an HTTP proxy server, you can set the HTTP_PROXY, HTTPS_PROXY and NO_PROXY variables. These environment variables are respected by the oc CLI so that all communication with the cluster goes through the HTTP proxy.
Authentication headers are sent only when using HTTPS transport.
Procedure
Log in to the CLI using the
oc logincommand and enter the required information when prompted.$ oc loginExample output
Server [https://localhost:8443]: https://openshift.example.com:64431 The server uses a certificate signed by an unknown authority. You can bypass the certificate check, but any data you send to the server could be intercepted by others. Use insecure connections? (y/n): y2 Authentication required for https://openshift.example.com:6443 (openshift) Username: user13 Password:4 Login successful. You don't have any projects. You can try to create a new project, by running oc new-project <projectname> Welcome! See 'oc help' to get started.
If you are logged in to the web console, you can generate an oc login command that includes your token and server information. You can use the command to log in to the OpenShift Container Platform CLI without the interactive prompts. To generate the command, select Copy login command from the username drop-down menu at the top right of the web console.
You can now create a project or issue other commands for managing your cluster.
2.1.4. Using the OpenShift CLI
Review the following sections to learn how to complete common tasks using the CLI.
2.1.4.1. Creating a project
Use the oc new-project command to create a new project.
$ oc new-project my-projectExample output
Now using project "my-project" on server "https://openshift.example.com:6443".2.1.4.2. Creating a new app
Use the oc new-app command to create a new application.
$ oc new-app https://github.com/sclorg/cakephp-exExample output
--> Found image 40de956 (9 days old) in imagestream "openshift/php" under tag "7.2" for "php"

...

    Run 'oc status' to view your app.
2.1.4.3. Viewing pods
Use the oc get pods command to view the pods for the current project.
When you run oc inside a pod and do not specify a namespace, the namespace of the pod is used by default.
$ oc get pods -o wideExample output
NAME                  READY   STATUS      RESTARTS   AGE     IP            NODE                           NOMINATED NODE
cakephp-ex-1-build    0/1     Completed   0          5m45s   10.131.0.10   ip-10-0-141-74.ec2.internal    <none>
cakephp-ex-1-deploy   0/1     Completed   0          3m44s   10.129.2.9    ip-10-0-147-65.ec2.internal    <none>
cakephp-ex-1-ktz97    1/1     Running     0          3m33s   10.128.2.11   ip-10-0-168-105.ec2.internal   <none>
2.1.4.4. Viewing pod logs
Use the oc logs command to view logs for a particular pod.
$ oc logs cakephp-ex-1-deployExample output
--> Scaling cakephp-ex-1 to 1
--> Success
2.1.4.5. Viewing the current project
Use the oc project command to view the current project.
$ oc projectExample output
Using project "my-project" on server "https://openshift.example.com:6443".2.1.4.6. Viewing the status for the current project
Use the oc status command to view information about the current project, such as services, deployments, and build configs.
$ oc statusExample output
In project my-project on server https://openshift.example.com:6443

svc/cakephp-ex - 172.30.236.80 ports 8080, 8443
  dc/cakephp-ex deploys istag/cakephp-ex:latest <-
    bc/cakephp-ex source builds https://github.com/sclorg/cakephp-ex on openshift/php:7.2
    deployment #1 deployed 2 minutes ago - 1 pod

3 infos identified, use 'oc status --suggest' to see details.
2.1.4.7. Listing supported API resources
Use the oc api-resources command to view the list of supported API resources on the server.
$ oc api-resourcesExample output
NAME                                  SHORTNAMES       APIGROUP                              NAMESPACED   KIND
bindings                                                                                     true         Binding
componentstatuses                     cs                                                     false        ComponentStatus
configmaps                            cm                                                     true         ConfigMap
...
2.1.5. Getting help
You can get help with CLI commands and OpenShift Container Platform resources in the following ways.
Use
oc helpto get a list and description of all available CLI commands:Example: Get general help for the CLI
$ oc helpExample output
OpenShift Client

This client helps you develop, build, deploy, and run your applications on any OpenShift or Kubernetes compatible
platform. It also includes the administrative commands for managing a cluster under the 'adm' subcommand.

Usage:
  oc [flags]

Basic Commands:
  login           Log in to a server
  new-project     Request a new project
  new-app         Create a new application

...
Use the
--helpflag to get help about a specific CLI command:Example: Get help for the
oc createcommand$ oc create --helpExample output
Create a resource by filename or stdin

JSON and YAML formats are accepted.

Usage:
  oc create -f FILENAME [flags]

...
Use the
oc explaincommand to view the description and fields for a particular resource:Example: View documentation for the
Podresource$ oc explain podsExample output
KIND:     Pod
VERSION:  v1

DESCRIPTION:
     Pod is a collection of containers that can run on a host. This resource is
     created by clients and scheduled onto hosts.

FIELDS:
   apiVersion	<string>
     APIVersion defines the versioned schema of this representation of an
     object. Servers should convert recognized schemas to the latest internal
     value, and may reject unrecognized values. More info:
     https://git.k8s.io/community/contributors/devel/api-conventions.md#resources

...
2.1.6. Logging out of the OpenShift CLI
You can log out the OpenShift CLI to end your current session.
Use the
oc logoutcommand.$ oc logoutExample output
Logged "user1" out on "https://openshift.example.com"
This deletes the saved authentication token from the server and removes it from your configuration file.
2.2. Configuring the OpenShift CLI
2.2.1. Enabling tab completion
You can enable tab completion for the Bash or Zsh shells.
2.2.1.1. Enabling tab completion for Bash
After you install the OpenShift CLI (oc), you can enable tab completion to automatically complete oc commands or suggest options when you press Tab. The following procedure enables tab completion for the Bash shell.
Prerequisites
-
You must have the OpenShift CLI (
oc) installed. -
You must have the package
bash-completioninstalled.
Procedure
Save the Bash completion code to a file:
$ oc completion bash > oc_bash_completionCopy the file to
/etc/bash_completion.d/:$ sudo cp oc_bash_completion /etc/bash_completion.d/You can also save the file to a local directory and source it from your
.bashrcfile instead.
Tab completion is enabled when you open a new terminal.
2.2.1.2. Enabling tab completion for Zsh
After you install the OpenShift CLI (oc), you can enable tab completion to automatically complete oc commands or suggest options when you press Tab. The following procedure enables tab completion for the Zsh shell.
Prerequisites
-
You must have the OpenShift CLI (
oc) installed.
Procedure
To add tab completion for
octo your.zshrcfile, run the following command:$ cat >>~/.zshrc<<EOF if [ $commands[oc] ]; then source <(oc completion zsh) compdef _oc oc fi EOF
Tab completion is enabled when you open a new terminal.
2.3. Managing CLI profiles
A CLI configuration file allows you to configure different profiles, or contexts, for use with the CLI tools overview. A context consists of user authentication and OpenShift Container Platform server information associated with a nickname.
2.3.1. About switches between CLI profiles
Contexts allow you to easily switch between multiple users across multiple OpenShift Container Platform servers, or clusters, when using CLI operations. Nicknames make managing CLI configurations easier by providing short-hand references to contexts, user credentials, and cluster details. After logging in with the CLI for the first time, OpenShift Container Platform creates a ~/.kube/config file if one does not already exist. As more authentication and connection details are provided to the CLI, either automatically during an oc login operation or by manually configuring CLI profiles, the updated information is stored in the configuration file:
CLI config file
apiVersion: v1
clusters:
- cluster:
    insecure-skip-tls-verify: true
    server: https://openshift1.example.com:8443
  name: openshift1.example.com:8443
- cluster:
    insecure-skip-tls-verify: true
    server: https://openshift2.example.com:8443
  name: openshift2.example.com:8443
contexts:
- context:
    cluster: openshift1.example.com:8443
    namespace: alice-project
    user: alice/openshift1.example.com:8443
  name: alice-project/openshift1.example.com:8443/alice
- context:
    cluster: openshift1.example.com:8443
    namespace: joe-project
    user: alice/openshift1.example.com:8443
  name: joe-project/openshift1/alice
current-context: joe-project/openshift1.example.com:8443/alice
kind: Config
preferences: {}
users:
- name: alice/openshift1.example.com:8443
  user:
token: xZHd2piv5_9vQrg-SKXRJ2Dsl9SceNJdhNTljEKTb8k- 1
- The
clusterssection defines connection details for OpenShift Container Platform clusters, including the address for their master server. In this example, one cluster is nicknamedopenshift1.example.com:8443and another is nicknamedopenshift2.example.com:8443. - 2
- This
contextssection defines two contexts: one nicknamedalice-project/openshift1.example.com:8443/alice, using thealice-projectproject,openshift1.example.com:8443cluster, andaliceuser, and another nicknamedjoe-project/openshift1.example.com:8443/alice, using thejoe-projectproject,openshift1.example.com:8443cluster andaliceuser. - 3
- The
current-contextparameter shows that thejoe-project/openshift1.example.com:8443/alicecontext is currently in use, allowing thealiceuser to work in thejoe-projectproject on theopenshift1.example.com:8443cluster. - 4
- The
userssection defines user credentials. In this example, the user nicknamealice/openshift1.example.com:8443uses an access token.
The CLI can support multiple configuration files which are loaded at runtime and merged together along with any override options specified from the command line. After you are logged in, you can use the oc status or oc project command to verify your current working environment:
Verify the current working environment
$ oc statusExample output
oc status
In project Joe's Project (joe-project)

service database (172.30.43.12:5434 -> 3306)
  database deploys docker.io/openshift/mysql-55-centos7:latest
    #1 deployed 25 minutes ago - 1 pod

service frontend (172.30.159.137:5432 -> 8080)
  frontend deploys origin-ruby-sample:latest <-
    builds https://github.com/openshift/ruby-hello-world with joe-project/ruby-20-centos7:latest
    #1 deployed 22 minutes ago - 2 pods

To see more information about a service or deployment, use 'oc describe service <name>' or 'oc describe dc <name>'.
You can use 'oc get all' to see lists of each of the types described in this example.
List the current project
$ oc projectExample output
Using project "joe-project" from context named "joe-project/openshift1.example.com:8443/alice" on server "https://openshift1.example.com:8443".
You can run the oc login command again and supply the required information during the interactive process, to log in using any other combination of user credentials and cluster details. A context is constructed based on the supplied information if one does not already exist. If you are already logged in and want to switch to another project the current user already has access to, use the oc project command and enter the name of the project:
$ oc project alice-projectExample output
Now using project "alice-project" on server "https://openshift1.example.com:8443".
At any time, you can use the oc config view command to view your current CLI configuration, as seen in the output. Additional CLI configuration commands are also available for more advanced usage.
If you have access to administrator credentials but are no longer logged in as the default system user system:admin, you can log back in as this user at any time as long as the credentials are still present in your CLI config file. The following command logs in and switches to the default project:
$ oc login -u system:admin -n default2.3.2. Manual configuration of CLI profiles
This section covers more advanced usage of CLI configurations. In most situations, you can use the oc login and oc project commands to log in and switch between contexts and projects.
If you want to manually configure your CLI config files, you can use the oc config command instead of directly modifying the files. The oc config command includes a number of helpful sub-commands for this purpose:
| Subcommand | Usage |
|---|---|
|
| Sets a cluster entry in the CLI config file. If the referenced cluster nickname already exists, the specified information is merged in. |
|
| Sets a context entry in the CLI config file. If the referenced context nickname already exists, the specified information is merged in. |
|
| Sets the current context using the specified context nickname. |
|
| Sets an individual value in the CLI config file.
The |
|
| Unsets individual values in the CLI config file.
The |
|
| Displays the merged CLI configuration currently in use. Displays the result of the specified CLI config file. |
Example usage
-
Log in as a user that uses an access token. This token is used by the
aliceuser:
$ oc login https://openshift1.example.com --token=ns7yVhuRNpDM9cgzfhhxQ7bM5s7N2ZVrkZepSRf4LC0- View the cluster entry automatically created:
$ oc config viewExample output
apiVersion: v1
clusters:
- cluster:
    insecure-skip-tls-verify: true
    server: https://openshift1.example.com
  name: openshift1-example-com
contexts:
- context:
    cluster: openshift1-example-com
    namespace: default
    user: alice/openshift1-example-com
  name: default/openshift1-example-com/alice
current-context: default/openshift1-example-com/alice
kind: Config
preferences: {}
users:
- name: alice/openshift1.example.com
  user:
token: ns7yVhuRNpDM9cgzfhhxQ7bM5s7N2ZVrkZepSRf4LC0- Update the current context to have users log in to the desired namespace:
$ oc config set-context `oc config current-context` --namespace=<project_name>- Examine the current context, to confirm that the changes are implemented:
$ oc whoami -cAll subsequent CLI operations uses the new context, unless otherwise specified by overriding CLI options or until the context is switched.
2.3.3. Load and merge rules
You can follow these rules, when issuing CLI operations for the loading and merging order for the CLI configuration:
CLI config files are retrieved from your workstation, using the following hierarchy and merge rules:
-
If the
--configoption is set, then only that file is loaded. The flag is set once and no merging takes place. -
If the
$KUBECONFIGenvironment variable is set, then it is used. The variable can be a list of paths, and if so the paths are merged together. When a value is modified, it is modified in the file that defines the stanza. When a value is created, it is created in the first file that exists. If no files in the chain exist, then it creates the last file in the list. -
Otherwise, the
~/.kube/configfile is used and no merging takes place.
-
If the
The context to use is determined based on the first match in the following flow:
-
The value of the
--contextoption. -
The
current-contextvalue from the CLI config file. - An empty value is allowed at this stage.
-
The value of the
The user and cluster to use is determined. At this point, you may or may not have a context; they are built based on the first match in the following flow, which is run once for the user and once for the cluster:
-
The value of the
--userfor user name and--clusteroption for cluster name. -
If the
--contextoption is present, then use the context’s value. - An empty value is allowed at this stage.
-
The value of the
The actual cluster information to use is determined. At this point, you may or may not have cluster information. Each piece of the cluster information is built based on the first match in the following flow:
The values of any of the following command line options:
-
--server, -
--api-version -
--certificate-authority -
--insecure-skip-tls-verify
-
- If cluster information and a value for the attribute is present, then use it.
- If you do not have a server location, then there is an error.
The actual user information to use is determined. Users are built using the same rules as clusters, except that you can only have one authentication technique per user; conflicting techniques cause the operation to fail. Command line options take precedence over config file values. Valid command line options are:
-
--auth-path -
--client-certificate -
--client-key -
--token
-
- For any information that is still missing, default values are used and prompts are given for additional information.
2.4. Extending the OpenShift CLI with plug-ins
You can write and install plug-ins to build on the default oc commands, allowing you to perform new and more complex tasks with the OpenShift Container Platform CLI.
2.4.1. Writing CLI plug-ins
You can write a plug-in for the OpenShift Container Platform CLI in any programming language or script that allows you to write command-line commands. Note that you can not use a plug-in to overwrite an existing oc command.
OpenShift CLI plug-ins are currently a Technology Preview feature. Technology Preview features are not supported with Red Hat production service level agreements (SLAs), might not be functionally complete, and Red Hat does not recommend to use them for production. These features provide early access to upcoming product features, enabling customers to test functionality and provide feedback during the development process.
See the Red Hat Technology Preview features support scope for more information.
Procedure
This procedure creates a simple Bash plug-in that prints a message to the terminal when the oc foo command is issued.
Create a file called
oc-foo.When naming your plug-in file, keep the following in mind:
-
The file must begin with
oc-orkubectl-in order to be recognized as a plug-in. -
The file name determines the command that invokes the plug-in. For example, a plug-in with the file name
oc-foo-barcan be invoked by a command ofoc foo bar. You can also use underscores if you want the command to contain dashes. For example, a plug-in with the file nameoc-foo_barcan be invoked by a command ofoc foo-bar.
-
The file must begin with
Add the following contents to the file.
#!/bin/bash

# optional argument handling
if [[ "$1" == "version" ]]
then
    echo "1.0.0"
    exit 0
fi

# optional argument handling
if [[ "$1" == "config" ]]
then
    echo $KUBECONFIG
    exit 0
fi

echo "I am a plugin named kubectl-foo"
After you install this plug-in for the OpenShift Container Platform CLI, it can be invoked using the oc foo command.
2.4.2. Installing and using CLI plug-ins
After you write a custom plug-in for the OpenShift Container Platform CLI, you must install it to use the functionality that it provides.
OpenShift CLI plug-ins are currently a Technology Preview feature. Technology Preview features are not supported with Red Hat production service level agreements (SLAs), might not be functionally complete, and Red Hat does not recommend to use them for production. These features provide early access to upcoming product features, enabling customers to test functionality and provide feedback during the development process.
See the Red Hat Technology Preview features support scope for more information.
Prerequisites
-
You must have the
ocCLI tool installed. -
You must have a CLI plug-in file that begins with
oc-orkubectl-.
Procedure
If necessary, update the plug-in file to be executable.
$ chmod +x <plugin_file>Place the file anywhere in your
PATH, such as/usr/local/bin/.$ sudo mv <plugin_file> /usr/local/bin/.Run
oc plugin listto make sure that the plug-in is listed.$ oc plugin listExample output
The following compatible plugins are available:

/usr/local/bin/<plugin_file>
If your plug-in is not listed here, verify that the file begins with
oc-orkubectl-, is executable, and is on yourPATH.Invoke the new command or option introduced by the plug-in.
For example, if you built and installed the
kubectl-nsplug-in from the Sample plug-in repository, you can use the following command to view the current namespace.$ oc nsNote that the command to invoke the plug-in depends on the plug-in file name. For example, a plug-in with the file name of
oc-foo-baris invoked by theoc foo barcommand.
2.5. OpenShift CLI developer commands
2.5.1. Basic CLI commands
2.5.1.1. explain
Display documentation for a certain resource.
Example: Display documentation for pods
$ oc explain pods2.5.1.2. login
Log in to the OpenShift Container Platform server and save login information for subsequent use.
Example: Interactive login
$ oc loginExample: Log in specifying a user name
$ oc login -u user12.5.1.3. new-app
Create a new application by specifying source code, a template, or an image.
Example: Create a new application from a local Git repository
$ oc new-app .Example: Create a new application from a remote Git repository
$ oc new-app https://github.com/sclorg/cakephp-exExample: Create a new application from a private remote repository
$ oc new-app https://github.com/youruser/yourprivaterepo --source-secret=yoursecret2.5.1.4. new-project
Create a new project and switch to it as the default project in your configuration.
Example: Create a new project
$ oc new-project myproject2.5.1.5. project
Switch to another project and make it the default in your configuration.
Example: Switch to a different project
$ oc project test-project2.5.1.6. projects
Display information about the current active project and existing projects on the server.
Example: List all projects
$ oc projects2.5.1.7. status
Show a high-level overview of the current project.
Example: Show the status of the current project
$ oc status2.5.2. Build and Deploy CLI commands
2.5.2.1. cancel-build
Cancel a running, pending, or new build.
Example: Cancel a build
$ oc cancel-build python-1Example: Cancel all pending builds from the python build config
$ oc cancel-build buildconfig/python --state=pending2.5.2.2. import-image
Import the latest tag and image information from an image repository.
Example: Import the latest image information
$ oc import-image my-ruby2.5.2.3. new-build
Create a new build config from source code.
Example: Create a build config from a local Git repository
$ oc new-build .Example: Create a build config from a remote Git repository
$ oc new-build https://github.com/sclorg/cakephp-ex2.5.2.4. rollback
Revert an application back to a previous deployment.
Example: Roll back to the last successful deployment
$ oc rollback phpExample: Roll back to a specific version
$ oc rollback php --to-version=32.5.2.5. rollout
Start a new rollout, view its status or history, or roll back to a previous revision of your application.
Example: Roll back to the last successful deployment
$ oc rollout undo deploymentconfig/phpExample: Start a new rollout for a deployment with its latest state
$ oc rollout latest deploymentconfig/php2.5.2.6. start-build
Start a build from a build config or copy an existing build.
Example: Start a build from the specified build config
$ oc start-build pythonExample: Start a build from a previous build
$ oc start-build --from-build=python-1Example: Set an environment variable to use for the current build
$ oc start-build python --env=mykey=myvalue2.5.2.7. tag
Tag existing images into image streams.
Example: Configure the ruby image’s latest tag to refer to the image for the 2.0 tag
$ oc tag ruby:latest ruby:2.02.5.3. Application management CLI commands
2.5.3.1. annotate
Update the annotations on one or more resources.
Example: Add an annotation to a route
$ oc annotate route/test-route haproxy.router.openshift.io/ip_whitelist="192.168.1.10"Example: Remove the annotation from the route
$ oc annotate route/test-route haproxy.router.openshift.io/ip_whitelist-2.5.3.2. apply
Apply a configuration to a resource by file name or standard in (stdin) in JSON or YAML format.
Example: Apply the configuration in pod.json to a pod
$ oc apply -f pod.json2.5.3.3. autoscale
Autoscale a deployment or replication controller.
Example: Autoscale to a minimum of two and maximum of five pods
$ oc autoscale deploymentconfig/parksmap-katacoda --min=2 --max=52.5.3.4. create
Create a resource by file name or standard in (stdin) in JSON or YAML format.
Example: Create a pod using the content in pod.json
$ oc create -f pod.json2.5.3.5. delete
Delete a resource.
Example: Delete a pod named parksmap-katacoda-1-qfqz4
$ oc delete pod/parksmap-katacoda-1-qfqz4Example: Delete all pods with the app=parksmap-katacoda label
$ oc delete pods -l app=parksmap-katacoda2.5.3.6. describe
Return detailed information about a specific object.
Example: Describe a deployment named example
$ oc describe deployment/exampleExample: Describe all pods
$ oc describe pods2.5.3.7. edit
Edit a resource.
Example: Edit a deployment using the default editor
$ oc edit deploymentconfig/parksmap-katacodaExample: Edit a deployment using a different editor
$ OC_EDITOR="nano" oc edit deploymentconfig/parksmap-katacodaExample: Edit a deployment in JSON format
$ oc edit deploymentconfig/parksmap-katacoda -o json2.5.3.8. expose
Expose a service externally as a route.
Example: Expose a service
$ oc expose service/parksmap-katacodaExample: Expose a service and specify the host name
$ oc expose service/parksmap-katacoda --hostname=www.my-host.com2.5.3.9. get
Display one or more resources.
Example: List pods in the default namespace
$ oc get pods -n defaultExample: Get details about the python deployment in JSON format
$ oc get deploymentconfig/python -o json2.5.3.10. label
Update the labels on one or more resources.
Example: Update the python-1-mz2rf pod with the label status set to unhealthy
$ oc label pod/python-1-mz2rf status=unhealthy2.5.3.11. scale
Set the desired number of replicas for a replication controller or a deployment.
Example: Scale the ruby-app deployment to three pods
$ oc scale deploymentconfig/ruby-app --replicas=32.5.3.12. secrets
Manage secrets in your project.
Example: Allow my-pull-secret to be used as an image pull secret by the default service account
$ oc secrets link default my-pull-secret --for=pull2.5.3.13. serviceaccounts
Get a token assigned to a service account or create a new token or kubeconfig file for a service account.
Example: Get the token assigned to the default service account
$ oc serviceaccounts get-token default2.5.3.14. set
Configure existing application resources.
Example: Set the name of a secret on a build config
$ oc set build-secret --source buildconfig/mybc mysecret2.5.4. Troubleshooting and debugging CLI commands
2.5.4.1. attach
Attach the shell to a running container.
Example: Get output from the python container from pod python-1-mz2rf
$ oc attach python-1-mz2rf -c python2.5.4.2. cp
Copy files and directories to and from containers.
Example: Copy a file from the python-1-mz2rf pod to the local file system
$ oc cp default/python-1-mz2rf:/opt/app-root/src/README.md ~/mydirectory/.2.5.4.3. debug
Launch a command shell to debug a running application.
Example: Debug the python deployment
$ oc debug deploymentconfig/python2.5.4.4. exec
Execute a command in a container.
Example: Execute the ls command in the python container from pod python-1-mz2rf
$ oc exec python-1-mz2rf -c python ls2.5.4.5. logs
Retrieve the log output for a specific build, build config, deployment, or pod.
Example: Stream the latest logs from the python deployment
$ oc logs -f deploymentconfig/python2.5.4.6. port-forward
Forward one or more local ports to a pod.
Example: Listen on port 8888 locally and forward to port 5000 in the pod
$ oc port-forward python-1-mz2rf 8888:50002.5.4.7. proxy
Run a proxy to the Kubernetes API server.
Example: Run a proxy to the API server on port 8011 serving static content from ./local/www/
$ oc proxy --port=8011 --www=./local/www/2.5.4.8. rsh
Open a remote shell session to a container.
Example: Open a shell session on the first container in the python-1-mz2rf pod
$ oc rsh python-1-mz2rf2.5.4.9. rsync
Copy contents of a directory to or from a running pod container. Only changed files are copied using the rsync command from your operating system.
Example: Synchronize files from a local directory with a pod directory
$ oc rsync ~/mydirectory/ python-1-mz2rf:/opt/app-root/src/2.5.4.10. run
Create a pod running a particular image.
Example: Start a pod running the perl image
$ oc run my-test --image=perl2.5.4.11. wait
Wait for a specific condition on one or more resources.
This command is experimental and might change without notice.
Example: Wait for the python-1-mz2rf pod to be deleted
$ oc wait --for=delete pod/python-1-mz2rf2.5.5. Advanced developer CLI commands
2.5.5.1. api-resources
Display the full list of API resources that the server supports.
Example: List the supported API resources
$ oc api-resources2.5.5.2. api-versions
Display the full list of API versions that the server supports.
Example: List the supported API versions
$ oc api-versions2.5.5.3. auth
Inspect permissions and reconcile RBAC roles.
Example: Check whether the current user can read pod logs
$ oc auth can-i get pods --subresource=logExample: Reconcile RBAC roles and permissions from a file
$ oc auth reconcile -f policy.json2.5.5.4. cluster-info
Display the address of the master and cluster services.
Example: Display cluster information
$ oc cluster-info2.5.5.5. convert
Convert a YAML or JSON configuration file to a different API version and print to standard output (stdout).
Example: Convert pod.yaml to the latest version
$ oc convert -f pod.yaml2.5.5.6. extract
Extract the contents of a config map or secret. Each key in the config map or secret is created as a separate file with the name of the key.
Example: Download the contents of the ruby-1-ca config map to the current directory
$ oc extract configmap/ruby-1-caExample: Print the contents of the ruby-1-ca config map to stdout
$ oc extract configmap/ruby-1-ca --to=-2.5.5.7. idle
Idle scalable resources. An idled service will automatically become unidled when it receives traffic or it can be manually unidled using the oc scale command.
Example: Idle the ruby-app service
$ oc idle ruby-app2.5.5.8. image
Manage images in your OpenShift Container Platform cluster.
Example: Copy an image to another tag
$ oc image mirror myregistry.com/myimage:latest myregistry.com/myimage:stable2.5.5.9. observe
Observe changes to resources and take action on them.
Example: Observe changes to services
$ oc observe services2.5.5.10. patch
Updates one or more fields of an object using strategic merge patch in JSON or YAML format.
Example: Update the spec.unschedulable field for node node1 to true
$ oc patch node/node1 -p '{"spec":{"unschedulable":true}}'
If you must patch a custom resource definition, you must include the --type merge or --type json option in the command.
2.5.5.11. policy
Manage authorization policies.
Example: Add the edit role to user1 for the current project
$ oc policy add-role-to-user edit user12.5.5.12. process
Process a template into a list of resources.
Example: Convert template.json to a resource list and pass to oc create
$ oc process -f template.json | oc create -f -2.5.5.13. registry
Manage the integrated registry on OpenShift Container Platform.
Example: Display information about the integrated registry
$ oc registry info2.5.5.14. replace
Modify an existing object based on the contents of the specified configuration file.
Example: Update a pod using the content in pod.json
$ oc replace -f pod.json2.5.6. Settings CLI commands
2.5.6.1. completion
Output shell completion code for the specified shell.
Example: Display completion code for Bash
$ oc completion bash2.5.6.2. config
Manage the client configuration files.
Example: Display the current configuration
$ oc config viewExample: Switch to a different context
$ oc config use-context test-context2.5.6.3. logout
Log out of the current session.
Example: End the current session
$ oc logout2.5.6.4. whoami
Display information about the current session.
Example: Display the currently authenticated user
$ oc whoami2.5.7. Other developer CLI commands
2.5.7.1. help
Display general help information for the CLI and a list of available commands.
Example: Display available commands
$ oc helpExample: Display the help for the new-project command
$ oc help new-project2.5.7.2. plugin
List the available plug-ins on the user’s PATH.
Example: List available plug-ins
$ oc plugin list2.5.7.3. version
Display the oc client and server versions.
Example: Display version information
$ oc versionFor cluster administrators, the OpenShift Container Platform server version is also displayed.
2.6. OpenShift CLI administrator commands
You must have cluster-admin or equivalent permissions to use these administrator commands.
2.6.1. Cluster management CLI commands
2.6.1.1. inspect
Gather debugging information for a particular resource.
This command is experimental and might change without notice.
Example: Collect debugging data for the OpenShift API server cluster Operator
$ oc adm inspect clusteroperator/openshift-apiserver2.6.1.2. must-gather
Bulk collect data about the current state of your cluster to debug issues.
This command is experimental and might change without notice.
Example: Gather debugging information
$ oc adm must-gather2.6.1.3. top
Show usage statistics of resources on the server.
Example: Show CPU and memory usage for pods
$ oc adm top podsExample: Show usage statistics for images
$ oc adm top images2.6.2. Node management CLI commands
2.6.2.1. cordon
Mark a node as unschedulable. Manually marking a node as unschedulable blocks any new pods from being scheduled on the node, but does not affect existing pods on the node.
Example: Mark node1 as unschedulable
$ oc adm cordon node12.6.2.2. drain
Drain a node in preparation for maintenance.
Example: Drain node1
$ oc adm drain node12.6.2.3. node-logs
Display and filter node logs.
Example: Get logs for NetworkManager
$ oc adm node-logs --role master -u NetworkManager.service2.6.2.4. taint
Update the taints on one or more nodes.
Example: Add a taint to dedicate a node for a set of users
$ oc adm taint nodes node1 dedicated=groupName:NoScheduleExample: Remove the taints with key dedicated from node node1
$ oc adm taint nodes node1 dedicated-2.6.2.5. uncordon
Mark a node as schedulable.
Example: Mark node1 as schedulable
$ oc adm uncordon node12.6.3. Security and policy CLI commands
2.6.3.1. certificate
Approve or reject certificate signing requests (CSRs).
Example: Approve a CSR
$ oc adm certificate approve csr-sqgzp2.6.3.2. groups
Manage groups in your cluster.
Example: Create a new group
$ oc adm groups new my-group2.6.3.3. new-project
Create a new project and specify administrative options.
Example: Create a new project using a node selector
$ oc adm new-project myproject --node-selector='type=user-node,region=east'2.6.3.4. pod-network
Manage pod networks in the cluster.
Example: Isolate project1 and project2 from other non-global projects
$ oc adm pod-network isolate-projects project1 project22.6.3.5. policy
Manage roles and policies on the cluster.
Example: Add the edit role to user1 for all projects
$ oc adm policy add-cluster-role-to-user edit user1Example: Add the privileged security context constraint to a service account
$ oc adm policy add-scc-to-user privileged -z myserviceaccount2.6.4. Maintenance CLI commands
2.6.4.1. migrate
Migrate resources on the cluster to a new version or format depending on the subcommand used.
Example: Perform an update of all stored objects
$ oc adm migrate storageExample: Perform an update of only pods
$ oc adm migrate storage --include=pods2.6.4.2. prune
Remove older versions of resources from the server.
Example: Prune older builds including those whose build configs no longer exist
$ oc adm prune builds --orphans2.6.5. Configuration CLI commands
2.6.5.1. create-bootstrap-project-template
Create a bootstrap project template.
Example: Output a bootstrap project template in YAML format to stdout
$ oc adm create-bootstrap-project-template -o yaml2.6.5.2. create-error-template
Create a template for customizing the error page.
Example: Output a template for the error page to stdout
$ oc adm create-error-template2.6.5.3. create-kubeconfig
Creates a basic .kubeconfig file from client certificates.
Example: Create a .kubeconfig file with the provided client certificates
$ oc adm create-kubeconfig \
  --client-certificate=/path/to/client.crt \
  --client-key=/path/to/client.key \
  --certificate-authority=/path/to/ca.crt
2.6.5.4. create-login-template
Create a template for customizing the login page.
Example: Output a template for the login page to stdout
$ oc adm create-login-template2.6.5.5. create-provider-selection-template
Create a template for customizing the provider selection page.
Example: Output a template for the provider selection page to stdout
$ oc adm create-provider-selection-template2.6.6. Other Administrator CLI commands
2.6.6.1. build-chain
Output the inputs and dependencies of any builds.
Example: Output dependencies for the perl imagestream
$ oc adm build-chain perl2.6.6.2. completion
Output shell completion code for the oc adm commands for the specified shell.
Example: Display oc adm completion code for Bash
$ oc adm completion bash2.6.6.3. config
Manage the client configuration files. This command has the same behavior as the oc config command.
Example: Display the current configuration
$ oc adm config viewExample: Switch to a different context
$ oc adm config use-context test-context2.6.6.4. release
Manage various aspects of the OpenShift Container Platform release process, such as viewing information about a release or inspecting the contents of a release.
Example: Generate a changelog between two releases and save to changelog.md
$ oc adm release info --changelog=/tmp/git \
    quay.io/openshift-release-dev/ocp-release:4.6.0-rc.7-x86_64 \
    quay.io/openshift-release-dev/ocp-release:4.6.4-x86_64 \
    > changelog.md
2.6.6.5. verify-image-signature
Verify the image signature of an image imported to the internal registry using the local public GPG key.
Example: Verify the nodejs image signature
$ oc adm verify-image-signature \
    sha256:2bba968aedb7dd2aafe5fa8c7453f5ac36a0b9639f1bf5b03f95de325238b288 \
    --expected-identity 172.30.1.1:5000/openshift/nodejs:latest \
    --public-key /etc/pki/rpm-gpg/RPM-GPG-KEY-redhat-release \
    --save
2.7. Usage of oc and kubectl commands
The Kubernetes command-line interface (CLI), kubectl, can be used to run commands against a Kubernetes cluster. Because OpenShift Container Platform is a certified Kubernetes distribution, you can use the supported kubectl binaries that ship with OpenShift Container Platform, or you can gain extended functionality by using the oc binary.
2.7.1. The oc binary
The oc binary offers the same capabilities as the kubectl binary, but it extends to natively support additional OpenShift Container Platform features, including:
Full support for OpenShift Container Platform resources
Resources such as
DeploymentConfig,BuildConfig,Route,ImageStream, andImageStreamTagobjects are specific to OpenShift Container Platform distributions, and build upon standard Kubernetes primitives.Authentication
The
ocbinary offers a built-inlogincommand that allows authentication and enables you to work with OpenShift Container Platform projects, which map Kubernetes namespaces to authenticated users. See Understanding authentication for more information.Additional commands
The additional command
oc new-app, for example, makes it easier to get new applications started using existing source code or pre-built images. Similarly, the additional commandoc new-projectmakes it easier to start a project that you can switch to as your default.
If you installed an earlier version of the oc binary, you cannot use it to complete all of the commands in OpenShift Container Platform 4.6. If you want the latest features, you must download and install the latest version of the oc binary corresponding to your OpenShift Container Platform server version.
Non-security API changes will involve, at minimum, two minor releases (4.1 to 4.2 to 4.3, for example) to allow older oc binaries to update. Using new capabilities might require newer oc binaries. A 4.3 server might have additional capabilities that a 4.2 oc binary cannot use and a 4.3 oc binary might have additional capabilities that are unsupported by a 4.2 server.
|
X.Y ( |
X.Y+N footnote:versionpolicyn[Where N is a number greater than or equal to 1.] ( | |
| X.Y (Server) |
|
|
| X.Y+N footnote:versionpolicyn[] (Server) |
|
|
 Fully compatible.

oc client might be unable to access server features.

oc client might provide options and features that might not be compatible with the accessed server.
2.7.2. The kubectl binary
The kubectl binary is provided as a means to support existing workflows and scripts for new OpenShift Container Platform users coming from a standard Kubernetes environment, or for those who prefer to use the kubectl CLI. Existing users of kubectl can continue to use the binary to interact with Kubernetes primitives, with no changes required to the OpenShift Container Platform cluster.
You can install the supported kubectl binary by following the steps to Install the OpenShift CLI. The kubectl binary is included in the archive if you download the binary, or is installed when you install the CLI by using an RPM.
For more information, see the kubectl documentation.