Questo contenuto non è disponibile nella lingua selezionata.
Chapter 4. Configuring directory databases in Directory Server
You can configure databases, suffixes, chaining policy, database link, and referrals. Organize entries in custom groupings or hierarchies by using virtual directory trees.
4.1. Storing suffixes in separate databases
You can design distributed data storage logic in Directory Server by dividing data in an instance into several databases. You can use suffixes of directory trees as the method of data division.
You can create several directory trees and store them in separate databases by root suffixes. You can also divide a single directory tree into branches and store the branches in separate databases by sub-suffixes.
4.1.1. Role of a suffix in the data structure
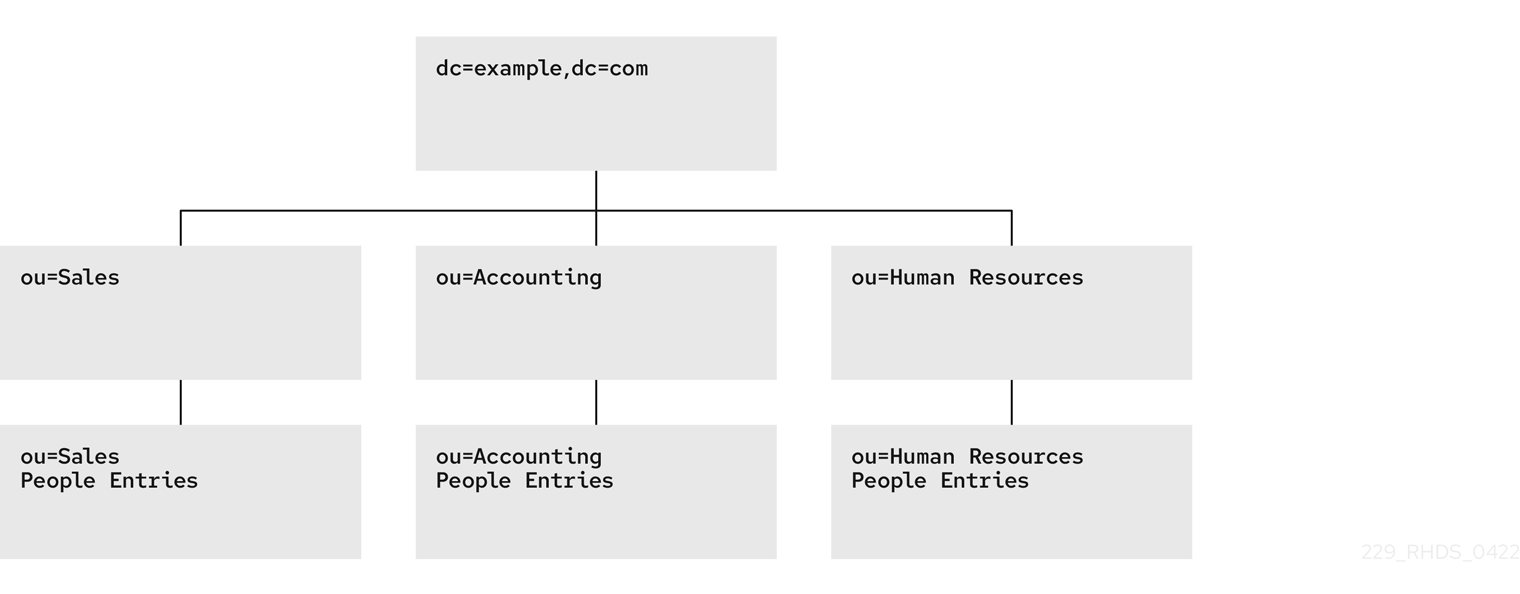
Directory Server presents data in hierarchical structures called directory trees (DIT). The following is a simple directory tree:
Figure 4.1. Simple directory tree with a single root suffix

Each directory tree has a single root entry which defines the naming context of that directory tree, such as dc=example,dc=com.
You can store various pieces of a directory tree in different databases, and then distribute these databases across multiple servers.
You can use suffixes to define the distribution logic of your data storage. A suffix associates a branch (subtree) of the directory tree with a particular database.
This way you can have multiple databases in a single instance of the server. You are not confined to a single database.
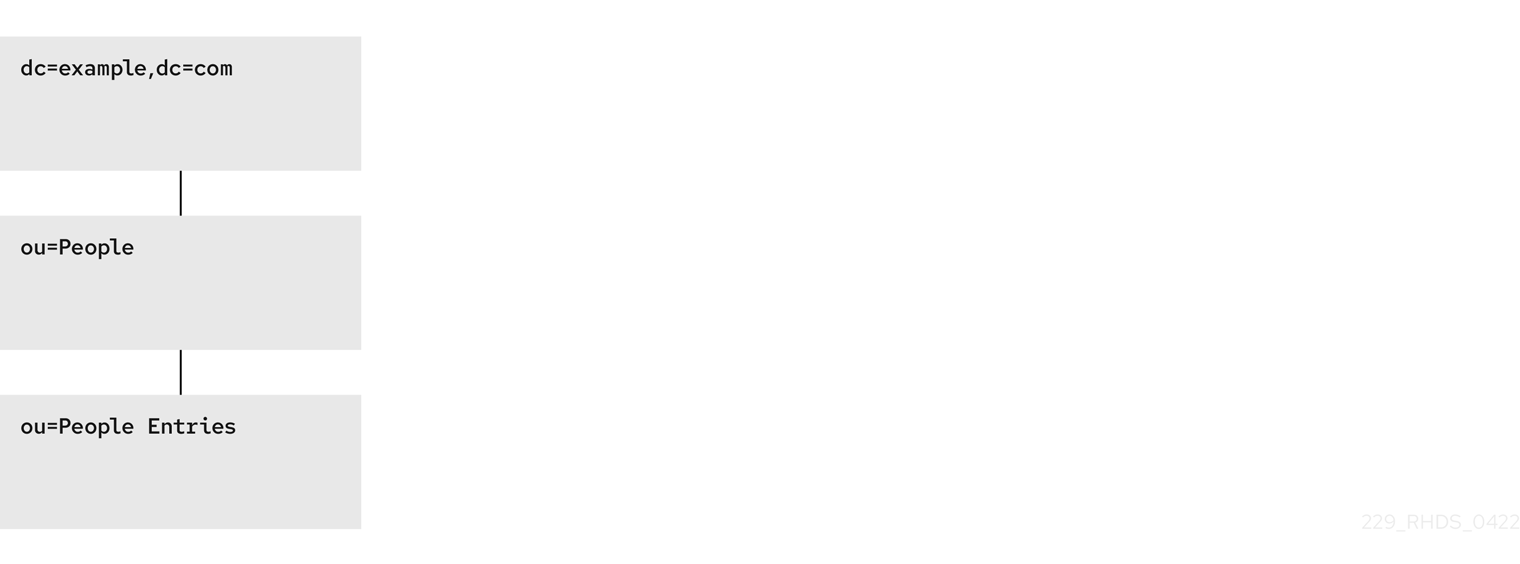
4.1.2. Root suffix vs. sub-suffixes
A root suffix associates an entire directory tree (DIT) with a database. The root suffix does not have a parent suffix.
When you want to store a branch of a directory tree in a separate database, you create a sub-suffix, which associates the branch of the tree with a different database than ancestors of the branch. A sub-suffix must be attached to a parent suffix. The parent suffix can be the root suffix or a sub-suffix, which means that a branch of any subtree can be stored in a separate database.
Figure 4.2. Directory tree with a sub-suffix in a separate database

In this example, the ou=people,dc=example,dc=com sub-suffix is stored in one database and the rest of the directory tree under the root suffix is stored in a different database.
Advantages of using sub-suffixes:
- You can perform database maintenance (import/export/indexing) at a granular level.
- You can store sub-suffixes on separate disks, which resolves disk space concerns.
Disadvantages of using sub-suffixes:
- You need more management actions during setup time.
- Replication needs a separate configuration and replication agreement for each sub-suffix.
4.1.3. Several root suffixes
You can also have several directory trees (DIT) with different root suffixes in a single instance. For example, when you want to separate some portions of data from the user root.
Figure 4.3. Several directory trees defined by root suffixes

When clients search the dc=example,dc=com tree, the search does not return entries from the other trees, because they are off limits to the searching algorithm.
You can then choose which directory tree and naming context is default for your instance.
4.1.4. Creating a root suffix using the command line
This procedure instructs you how to create the root suffix of a directory tree on the command line.
Procedure
Optional: List the suffixes and back-end databases that are already in use:
dsconf <instance_name> backend suffix list
# dsconf <instance_name> backend suffix list
dc=example,dc=com (userroot)
Copy to Clipboard Copied! Toggle word wrap Toggle overflow The name in parentheses is the back-end database that stores the data of the corresponding suffix. You cannot use an existing database name when you create the root suffix in the next step.
Specify the DN of the root suffix in the
--suffixargument and associate it with a new database using the--be-nameargument:dsconf <instance_name> backend create --suffix="dc=example,dc=net" --be-name="example"
# dsconf <instance_name> backend create --suffix="dc=example,dc=net" --be-name="example"Copy to Clipboard Copied! Toggle word wrap Toggle overflow
Verification
- List the suffixes and databases using the command from the first step of this procedure.
4.1.5. Creating a root suffix using the web console
This procedure instructs you how to create the root suffix of a directory tree in a browser.
Prerequisites
- You are logged in to the instance in the web console.
Procedure
- Under Database, click the button below the configuration tree.
- Fill in the Suffix DN and Database Name.
- Select Create The Top Suffix Entry and click .
Verification
- The new suffix should appear in the tree of suffixes.
4.1.6. Changing the default naming context
A naming context is an attribute of a directory tree (DIT) that defines the root namespace for entries in that DIT. When you structure data in your instance with multiple root suffixes, your instance has several DITs, each with a different naming context.
This procedure instructs you how to change the default naming context on the command line when you work with multiple root suffixes in your instance.
Clients that access your instance, may not know which naming context they need to use. The Directory Server signals to clients what the default naming context is, if they have no other configuration of a naming context known to them.
You set the default naming context in the nsslapd-defaultnamingcontext attribute in cn=config. Directory Server propagates this value over to the Directory Server Agent Service Entry (root DSE) and clients can query it anonymously.
Prerequisites
- You have created the root suffix that defines the default naming context of your instance.
Procedure
Optional: View the current default naming context:
dsconf <instance_name> config get nsslapd-defaultnamingcontext
# dsconf <instance_name> config get nsslapd-defaultnamingcontext
nsslapd-defaultnamingcontext: dc=example,dc=com
Copy to Clipboard Copied! Toggle word wrap Toggle overflow Replace the value of the
nsslapd-defaultnamingcontextparameter with the required naming context:dsconf <instance_name> config replace nsslapd-defaultnamingcontext=dc=example,dc=net
# dsconf <instance_name> config replace nsslapd-defaultnamingcontext=dc=example,dc=netCopy to Clipboard Copied! Toggle word wrap Toggle overflow
Verification
- View the current default naming context. The value should be updated.
4.1.7. Creating a sub-suffix using the command line
You can create a sub-suffix of a directory tree using the command line.
Prerequisites
- You created the parent suffix for the sub-suffix.
Procedure
Optional: List the suffixes and back-end databases that are already in use:
dsconf <instance_name> backend suffix list
# dsconf <instance_name> backend suffix list
dc=example,dc=com (userroot)
Copy to Clipboard Copied! Toggle word wrap Toggle overflow The name in parentheses is the back-end database that stores the data of the corresponding suffix. You cannot use an existing database name when you create the sub-suffix in the next step.
Specify the full DN of the sub-suffix in the
--suffixargument, associate it with a new database using the--be-nameargument, and specify the parent suffix in the--parent-suffixargument:dsconf <instance_name> backend create --suffix="ou=People,dc=example,dc=com" --be-name="example" --parent-suffix="dc=example,dc=com" --create-suffix
# dsconf <instance_name> backend create --suffix="ou=People,dc=example,dc=com" --be-name="example" --parent-suffix="dc=example,dc=com" --create-suffixCopy to Clipboard Copied! Toggle word wrap Toggle overflow With
--create-suffixargument, the command creates the configuration entry for the sub-suffix and the sub-suffix entryou=People,dc=example,dc=com.The
--create-suffixargument supports the creation of suffixes with the following RDN attribute types:c,cn,dc,o, andou. If you want to create a suffix with RDN such asl, you can use thedsconf backend createcommand without the--create-suffixoption and then add the suffix entry by using an LDAP add operation or importing the entry from an LDIF file.
Verification
- List the suffixes and databases using the command from the first step of this procedure.
4.1.8. Creating a sub-suffix using the web console
This procedure instructs you how to create a sub-suffix of a directory tree in a browser.
Prerequisites
- You are logged in to the instance in the web console.
- You created the parent suffix for the sub-suffix.
Procedure
- Under Database, select a suffix from the configuration tree that is the parent of the sub-suffix.
- Click the and select .
-
Fill in the Sub-Suffix DN, such as
ou=People, andDatabase Name. -
Select
Create The Top Suffix Entryand click .
Verification
- The new sub-suffix should appear among suffixes in the configuration tree.
4.2. Using views to create a virtual directory hierarchy
You can create virtual directory-tree (DIT) views to organize entries in custom groupings or hierarchies and thus navigate the standard DIT from various perspectives. This way you can save costs on management of your directory, and make navigation through entries more intuitive to the users of your service.
4.2.1. About views
Virtual directory-tree views, or views, are an optional layer of structure in addition to your standard directory tree (DIT) to categorize and search entries in your DIT.
Using views, you can create virtual directory hierarchies, so it is easy to navigate entries, regardless of their placement in the standard DIT. A view uses attributes of entries to include them in the virtual hierarchy, similarly to members of a filtered role or a dynamic group. To client applications, views appear as ordinary container hierarchies.
This way, you can initially place entries in a flat DIT and use views to categorize the entries in complex hierarchies without the need to move the entries. Additionally, entries can appear in multiple views, which you cannot achieve with a standard DIT.
You can think of views as named filters. Each view is an entry of the nsView object class and may have the nsViewFilter attribute, which says what entries are visible in that view. It may be desirable to restrict the type of entries to be returned by specifying an object class in the filter.
You can use a view as a container of other views and thus create the virtual hierarchy. A nested view inherits filters from its ancestors and restricts the view by combining its filter and ancestor filters with an AND, such as (&(container filter)(view filter)).
When a search is performed with a view as the base, entries that match the filter are returned from this virtual search space. The entries only appear to be nested under the view virtually, but they can actually be stored at any position in the DIT.
You can create a testing instance and explore how views work on data imported from the example file located in /usr/share/dirsrv/data/Example-views.ldif.
4.2.2. Directory design considerations
When you design a directory tree (DIT), you naturally tend to categorize entries with hierarchies to reflect hierarchies in your organization. A standard DIT without views ties the position of an entry in the DIT to the distinguished name (DN) of the entry and therefore it is more suitable for use with fixed hierarchies.
Figure 4.4. Standard hierarchy DIT based on functional units
However, the nature of hierarchies in an organization is dynamic. Moving an entry in a standard DIT is time-consuming, because with every change of the position of the entry, the entry and all its descendants must also be renamed. This leads to service disruptions and additional expenses, especially in changes of top-level subtrees.
It is a good idea to design a flat hierarchy with categorization of resources by characteristics that do not change, such as the resource type (people, equipment, etc.), and capture this hierarchy in a standard flat DIT.
Figure 4.5. Standard flat DIT based on resource types
However, a flat DIT is not convenient for navigating the resources. Different users need to navigate the resources from different perspectives, such as an association with a functional unit or a geographical location, which would require additional tools or complex search queries in case of a flat DIT.
The solution to overcome the limitations of a flat DIT is provided by virtual hierarchies of views. Views allow creation of flexible hierarchies by separating the name of an entry from the position of the entry in the hierarchy. The virtual hierarchies are based on attributes instead.
Figure 4.6. DIT With Virtual Hierarchies of Views

4.2.3. Benefits of using views
Using virtual directory-tree views has the benefits of custom flexible hierarchies that are more intuitive for users to navigate and for administrators more efficient to maintain than a deeply-nested standard directory tree (DIT).
- Flat and flexible naming
Views facilitate the use of a flat namespace for entries, because virtual DIT views provide navigational and managerial support similar to those provided by traditional hierarchies.
Whenever there is a change to the DIT, the entries never need to be moved; only the virtual DIT view hierarchies change. Because these hierarchies do not contain actual entries, they are simple and quick to modify.
- Reduction of costs in case of design errors
- Oversights during deployment planning are less catastrophic with virtual DIT views. If the hierarchy is not developed correctly in the first instance, it can be changed easily and quickly without disrupting the service.
- Fast and cheap maintenance
View hierarchies can be completely revised in minutes and the results instantly realized, significantly reducing the cost of directory maintenance.
Changes to a virtual DIT hierarchy are instantly realized. When an organizational change occurs, a new virtual DIT view can be created quickly. The new virtual DIT view can exist at the same time as the old view, thereby facilitating a more gradual changeover for the entries themselves and for the applications that use them. Because an organizational change in the directory is not an all-or-nothing operation, it can be performed over a period of time and without service disruption.
- Enhanced overall flexibility
Using multiple virtual DIT views for navigation and management allows for more flexible use of the directory service.
With the functionality provided by virtual DIT views, an organization can use both the old and new methods to organize directory data without any requirement to place entries at certain positions in the DIT.
- Intuitive user navigation
Views promote flexibility in working practices and reduce the requirement that directory users create complex search filters, using attribute names and values that they would otherwise have no need to know.
The flexibility of having more than one way to view and query directory information allows end users and applications to find what they need intuitively through hierarchical navigation.
- Shortcut to frequent search queries
- Virtual DIT view hierarchies can be created as a kind of ready-made queries to facilitate the retrieval of frequently-required information.
4.2.4. Compatibility of views with other features
When working with views, the search space is limited to entries under a single suffix. Users must base their search queries on a view to get results from a virtual hierarchy. You must take a slightly different approach to access control. You can use entry grouping with roles and classes of service in views.
- Multiple back ends
Virtual DIT views are not entirely compatible with multiple back ends.
The search is limited to a single back end, which means that the entries to be returned by the views must reside under the same suffix.
- Search space
The virtual search space is separate from the standard search space. The virtual search space is accessible only when a search is based on a view node with a filter. Otherwise it is a conventional search over the standard directory tree (DIT) that does not return entries contained under virtual DIT hierarchies.
For example, a search based on
dc=example,dc=comdoes not return any entries from the virtual search space of views; in fact, no virtual-search-space search is performed. Views processing occurs if the search base is such asou=Cupertino,ou=Location Views,dc=example,dc=com.This way, Directory Server ensures that the search does not result in entries from both places.
- Access control
- The use of views requires a slightly different approach to access control. Because there is currently no explicit support for access control lists (ACL) in views, create role-based ACL at the view parent and add the roles to the appropriate parts of the view hierarchy. In this way, take advantage of the organizational property of the hierarchy.
- Entries grouping
- Both class of service and roles in Directory Server support views. When adding a class of service or a role under a view hierarchy, the entries that are both logically and actually contained in the view are considered within scope. This means that roles and class of service can be applied using a virtual DIT view, but the effects of that application can be seen even when querying the flat namespace.
4.2.5. Compatibility of views with client applications
Virtual directory tree (DIT) views are designed to mimic standard DITs to a high degree. The existence of views should be transparent to most applications; there should be no indication that they are working with views. Except for a few specialized cases, there is no need for directory users to know that views are being used in a Directory Server instance; views appear and behave like standard DITs.
Certain types of applications may have problems working with a views-enabled directory service. For example:
Applications that use the distinguished name (DN) of a target entry to navigate up the DIT.
This type of application would find that it is navigating up the hierarchy in which the entry physically exists instead of the view hierarchy in which the entry was found. The reason for this is that views make no attempt to disguise the true location of an entry by changing the DN of the entry to conform to the view’s hierarchy.
This is by design - many applications would not function if the true location of an entry were disguised, such as those applications that rely on the DN to identify a unique entry. This upward navigation by deconstructing a DN is an unusual technique for a client application, but, nonetheless, those clients that do this may not function as intended.
Applications that use the
numSubordinatesoperational attribute to determine how many entries exist beneath a node.For the nodes in a view, this is currently a count of only those entries that exist in the standard search space, ignoring the virtual search space. Consequently, applications may not evaluate the view in a search.
4.2.6. Creating a view
This procedure instructs you how to create a virtual directory-tree view on the command line.
Procedure
Add a view entry with the
ldapaddutility.Specify the
nsViewobject class and define a view filter in thensViewFilterattribute:Copy to Clipboard Copied! Toggle word wrap Toggle overflow
Verification
Perform a search with the view as the search base:
ldapsearch -D "cn=Directory Manager" -W -H ldap://server.example.com -x -b ou=PeopleInRoom0466,dc=example,dc=com
# ldapsearch -D "cn=Directory Manager" -W -H ldap://server.example.com -x -b ou=PeopleInRoom0466,dc=example,dc=comldapsearch -D "cn=Directory Manager" -W -H ldap://server.example.com -x -b ou=PeopleInRoom0466,dc=example,dc=comldapsearch -D "cn=Directory Manager" -W -H ldap://server.example.com -x -b ou=PeopleInRoom0466,dc=example,dc=comCopy to Clipboard Copied! Toggle word wrap Toggle overflow
4.2.7. Creating indexes to improve the performance of views using the command line
Views are derived from search results based on a given filter. Part of the filter are the attributes given explicitly in the nsViewFilter; the rest of the filter is based on the entry hierarchy, looking for the entryid and parentid operational attributes of the actual entries included in the view.
(|(parentid=search_base_id)(entryid=search_base_id)
(|(parentid=search_base_id)(entryid=search_base_id)
If any of the searched attributes — entryid, parentid, or the attributes in the nsViewFilter — are not indexed, then the search becomes partially unindexed and Directory Server searches the entire directory tree for matching entries.
To improve views performance, create the indexes as follows:
-
Create equality index (
eq) forentryid. Theparentidattribute is indexed in the system index by default. -
If a filter in
nsViewFiltertests presence (attribute=*), then create presence index (pres) for the attribute being tested. You should use this index type only with attributes that appear in a minority of directory entries. -
If a filter in
nsViewFiltertests equality (attribute=value), create equality index (eq) for the attribute being tested. -
If a filter in
nsViewFiltertests a substring (attribute=value*), create substring index (sub) for the attribute being tested. -
If a filter in
nsViewFiltertests approximation (attribute~=value), create approximate index (approximate) for the attribute being tested.
For example, when you use the following view filter:
nsViewFilter: (&(objectClass=inetOrgPerson)(roomNumber=*66))
nsViewFilter: (&(objectClass=inetOrgPerson)(roomNumber=*66))
you should index objectClass with the equality index, which is done by default, and roomNumber with the substring index.
Prerequisites
- You are aware of the attributes that you use in a view filter.
Procedure
Optional: List the back ends to determine the database to index:
dsconf <instance_name> backend suffix list
# dsconf <instance_name> backend suffix list
dc=example,dc=com (userroot)
Copy to Clipboard Copied! Toggle word wrap Toggle overflow Note the selected database name (in parentheses).
Create index configuration with the
dsconfigutility for the selected back-end database.Specify the attribute name, index type, and, optionally, matching rules to set collation order (OID), especially in case of an internationalized instance.
dsconf <instance_name> backend index add --attr roomNumber --index-type sub userroot
# dsconf <instance_name> backend index add --attr roomNumber --index-type sub userrootCopy to Clipboard Copied! Toggle word wrap Toggle overflow Repeat this step for each attribute used in the view filter.
Reindex the database to apply the new indexes:
dsconf <instance_name> backend index reindex userroot
# dsconf <instance_name> backend index reindex userrootCopy to Clipboard Copied! Toggle word wrap Toggle overflow
Verification
Perform a search that is based on the standard directory tree with the same filter that you use in the view:
ldapsearch -D "cn=Directory Manager" -W -H ldap://server.example.com -x -b dc=example,dc=com (&(objectClass=inetOrgPerson)(roomNumber=*66))
ldapsearch -D "cn=Directory Manager" -W -H ldap://server.example.com -x -b dc=example,dc=com "(&(objectClass=inetOrgPerson)(roomNumber=*66))"
# ldapsearch -D "cn=Directory Manager" -W -H ldap://server.example.com -x -b dc=example,dc=com (&(objectClass=inetOrgPerson)(roomNumber=*66))ldapsearch -D "cn=Directory Manager" -W -H ldap://server.example.com -x -b dc=example,dc=com (&(objectClass=inetOrgPerson)(roomNumber=*66))ldapsearch -D "cn=Directory Manager" -W -H ldap://server.example.com -x -b dc=example,dc=com (&(objectClass=inetOrgPerson)(roomNumber=*66))ldapsearch -D "cn=Directory Manager" -W -H ldap://server.example.com -x -b dc=example,dc=com (&(objectClass=inetOrgPerson)(roomNumber=*66))ldapsearch -D "cn=Directory Manager" -W -H ldap://server.example.com -x -b dc=example,dc=com (&(objectClass=inetOrgPerson)(roomNumber=*66))ldapsearch -D "cn=Directory Manager" -W -H ldap://server.example.com -x -b dc=example,dc=com (&(objectClass=inetOrgPerson)(roomNumber=*66))
# ldapsearch -D "cn=Directory Manager" -W -H ldap://server.example.com -x -b dc=example,dc=com "(&(objectClass=inetOrgPerson)(roomNumber=*66))"ldapsearch -D "cn=Directory Manager" -W -H ldap://server.example.com -x -b dc=example,dc=com "(&(objectClass=inetOrgPerson)(roomNumber=*66))"ldapsearch -D "cn=Directory Manager" -W -H ldap://server.example.com -x -b dc=example,dc=com "(&(objectClass=inetOrgPerson)(roomNumber=*66))"ldapsearch -D "cn=Directory Manager" -W -H ldap://server.example.com -x -b dc=example,dc=com "(&(objectClass=inetOrgPerson)(roomNumber=*66))"ldapsearch -D "cn=Directory Manager" -W -H ldap://server.example.com -x -b dc=example,dc=com "(&(objectClass=inetOrgPerson)(roomNumber=*66))"ldapsearch -D "cn=Directory Manager" -W -H ldap://server.example.com -x -b dc=example,dc=com "(&(objectClass=inetOrgPerson)(roomNumber=*66))"ldapsearch -D "cn=Directory Manager" -W -H ldap://server.example.com -x -b dc=example,dc=com "(&(objectClass=inetOrgPerson)(roomNumber=*66))"
Copy to Clipboard Copied! Toggle word wrap Toggle overflow View the access log in
/var/log/dirsrv/slapd-<instance_name>/access.The
RESULTof your search should not containnote=UorPartially Unindexed Filterin the details.
4.2.8. Creating indexes to improve the performance of views using the web console
Views are derived from search results based on a given filter. Part of the filter are the attributes given explicitly in the nsViewFilter; the rest of the filter is based on the entry hierarchy, looking for the entryid and parentid operational attributes of the actual entries included in the view.
(|(parentid=search_base_id)(entryid=search_base_id)
(|(parentid=search_base_id)(entryid=search_base_id)
If any of the searched attributes — entryid, parentid, or the attributes in the nsViewFilter — are not indexed, then the search becomes partially unindexed and Directory Server searches the entire directory tree for matching entries.
To improve views performance, create the indexes as follows:
-
Create equality index (
eq) forentryid. Theparentidattribute is indexed in the system index by default. -
If a filter in
nsViewFiltertests presence (attribute=*), then create presence index (pres) for the attribute being tested. You should use this index type only with attributes that appear in a minority of directory entries. -
If a filter in
nsViewFiltertests equality (attribute=value), create equality index (eq) for the attribute being tested. -
If a filter in
nsViewFiltertests a substring (attribute=value*), create substring index (sub) for the attribute being tested. -
If a filter in
nsViewFiltertests approximation (attribute~=value), create approximate index (approximate) for the attribute being tested.
For example, when you use the following view filter:
nsViewFilter: (&(objectClass=inetOrgPerson)(roomNumber=*66))
nsViewFilter: (&(objectClass=inetOrgPerson)(roomNumber=*66))
you should index objectClass with the equality index, which is done by default, and roomNumber with the substring index.
Prerequisites
- You are logged in to the instance in the web console.
- You are aware of the attributes that you use in a view filter.
Procedure
- Under Database, select a suffix from the configuration tree for which you want to create an index.
- Navigate to Indexes and Database Indexes.
- Click the button.
- Type the name of the attribute and select the attribute.
- Select the Index Types that should be created for this attribute.
- Optionally, add Matching Rules to specify collation order (OID), especially in case of an internationalized instance.
- Select Index attribute after creation to rebuild the index afterwards.
- Click .
- Repeat the steps for each attribute to be indexed.
Verification
- Filter Indexes by typing the name of the added attribute.
- The newly indexed attribute should appear in the results.
4.3. Switching a database to read-only mode
Databases of Directory Server run in read-write mode by default, in which users can both retrieve and store data.
When you need a faithful image of a database at a given time, for example before a backup or before a manual initialization of a consumer, you may switch a database to read-only mode that prevents users from creating, modifying, or deleting entries.
4.3.1. Prerequisites
- The database is in read-write mode.
- The database is not used in replication, since enabling read-only mode disables replication.
4.3.2. Switching a database to read-only mode using the command line
This procedure instructs you how to switch a Directory Server database to read-only mode on the command line.
Procedure
List the suffixes and their corresponding databases:
dsconf <instance_name> backend suffix list
# dsconf <instance_name> backend suffix list
dc=example,dc=com (userroot)
o=test (test_database)
Copy to Clipboard Copied! Toggle word wrap Toggle overflow Note the name or suffix of the database that you want to switch.
Enable read-only mode with the
--enable-readonlyparameter and specify the database either by name or suffix:dsconf <instance_name> backend suffix set --enable-readonly "test_database"
# dsconf <instance_name> backend suffix set --enable-readonly "test_database"Copy to Clipboard Copied! Toggle word wrap Toggle overflow
Verification
Attempt a write operation to the directory, such as:
ldapmodify -D "cn=Directory Manager" -W -H ldap://server.example.com -x
# ldapmodify -D "cn=Directory Manager" -W -H ldap://server.example.com -x
dn: dc=example,dc=com
changetype: modify
add: description
description: foo
Copy to Clipboard Copied! Toggle word wrap Toggle overflow The server should refuse to perform.
modifying entry "dc=example,dc=com"
ldap_modify: Server is unwilling to perform (53)
	additional info: Server is read-only
modifying entry "dc=example,dc=com"
ldap_modify: Server is unwilling to perform (53)
	additional info: Server is read-only
Copy to Clipboard Copied! Toggle word wrap Toggle overflow
4.3.3. Switching a database to read-only mode using the web console
This procedure instructs you how to switch a Directory Server database to read-only mode in a browser.
Prerequisites
- You are logged in to the instance in the web console.
Procedure
-
Under
Database, select the suffix in the configuration tree. -
Check the
Database Read-Only Modeoption. - Click .
Verification
Attempt a write operation to the directory, such as:
ldapmodify -D "cn=Directory Manager" -W -H ldap://server.example.com -x
# ldapmodify -D "cn=Directory Manager" -W -H ldap://server.example.com -x
dn: dc=example,dc=com
changetype: modify
add: description
description: foo
Copy to Clipboard Copied! Toggle word wrap Toggle overflow The server should refuse to perform.
modifying entry "dc=example,dc=com"
ldap_modify: Server is unwilling to perform (53)
	additional info: Server is read-only
modifying entry "dc=example,dc=com"
ldap_modify: Server is unwilling to perform (53)
	additional info: Server is read-only
Copy to Clipboard Copied! Toggle word wrap Toggle overflow
4.4. Switching an instance to read-only mode
By default, instances run in read-write mode, in which users can both retrieve and store data. In emergency cases, such as when you want to prevent replication or disable modification of data during reindexing, but keep the directory available, you can temporarily switch the instance to read-only mode.
If Directory Server maintains more than one database and all databases need to be switched to read-only, you can do this in a single operation, on the command line or in the web console.
In read-only mode, you cannot restart the instance, but you may still modify the configuration.
If you stop an instance in read-only mode, you cannot start it again until you manually disable read-only mode.
To disable read-only mode manually, open the /etc/dirsrv/slapd-instance_name/dse.ldif file, navigate to the cn=config section, and set the nsslapd-readonly parameter to off.
4.4.1. Prerequisites
- The instance is in read-write mode.
- The instance is not used in replication, since enabling read-only mode disables replication.
4.4.2. Switching an instance to read-only mode using the command line
This procedure instructs you how to switch a Directory Server instance to read-only mode on the command line.
Procedure
Set the
nsslapd-readonlyparameter toon:dsconf <instance_name> config replace nsslapd-readonly=on
# dsconf <instance_name> config replace nsslapd-readonly=onCopy to Clipboard Copied! Toggle word wrap Toggle overflow
Verification
Attempt a write operation to the directory, such as:
ldapmodify -D "cn=Directory Manager" -W -H ldap://server.example.com -x
# ldapmodify -D "cn=Directory Manager" -W -H ldap://server.example.com -x
dn: dc=example,dc=com
changetype: modify
add: description
description: foo
Copy to Clipboard Copied! Toggle word wrap Toggle overflow The server should refuse to perform.
modifying entry "dc=example,dc=com"
ldap_modify: Server is unwilling to perform (53)
	additional info: Server is read-only
modifying entry "dc=example,dc=com"
ldap_modify: Server is unwilling to perform (53)
	additional info: Server is read-only
Copy to Clipboard Copied! Toggle word wrap Toggle overflow
4.4.3. Switching an instance to read-only mode using the web console
This procedure instructs you how to switch a Directory Server instance to read-only mode in a browser.
Prerequisites
- You are logged in to the instance in the web console.
Procedure
- Under Server, select the Advanced Settings tab.
- Check the Server Read-Only option.
- Click .
Verification
Attempt a write operation to the directory, such as:
ldapmodify -D "cn=Directory Manager" -W -H ldap://server.example.com -x
# ldapmodify -D "cn=Directory Manager" -W -H ldap://server.example.com -x
dn: dc=example,dc=com
changetype: modify
add: description
description: foo
Copy to Clipboard Copied! Toggle word wrap Toggle overflow The server should refuse to perform.
modifying entry "dc=example,dc=com"
ldap_modify: Server is unwilling to perform (53)
	additional info: Server is read-only
modifying entry "dc=example,dc=com"
ldap_modify: Server is unwilling to perform (53)
	additional info: Server is read-only
Copy to Clipboard Copied! Toggle word wrap Toggle overflow
4.5. Deleting a database of a suffix that is no longer needed
When you need to reclaim disk space on your Directory Server host, you can delete databases of suffixes that are not in use anymore.
4.5.1. Deleting a database using the command line
This procedure instructs you how to delete a Directory Server database on the command line.
Procedure
List suffixes and their corresponding databases:
dsconf <instance_name> backend suffix list
# dsconf <instance_name> backend suffix list
dc=example,dc=com (userroot)
o=test (test_database)
Copy to Clipboard Copied! Toggle word wrap Toggle overflow Note the name of the database that you want to delete.
Enter the
dsconf backend deletecommand and specify the name of the database:dsconf <instance_name> backend delete "test_database"
# dsconf <instance_name> backend delete "test_database"dsconf <instance_name> backend delete "test_database"dsconf <instance_name> backend delete "test_database"dsconf <instance_name> backend delete "test_database"dsconf <instance_name> backend delete "test_database"Copy to Clipboard Copied! Toggle word wrap Toggle overflow Confirm the deletion by typing "Yes I am sure" in the prompt:
Deleting Backend cn=test_database,cn=ldbm database,cn=plugins,cn=config :
Type 'Yes I am sure' to continue: Yes I am sure
Deleting Backend cn=test_database,cn=ldbm database,cn=plugins,cn=config :
Type 'Yes I am sure' to continue: Yes I am sure
Copy to Clipboard Copied! Toggle word wrap Toggle overflow
Verification
List the suffixes/databases:
dsconf <instance_name> backend suffix list
# dsconf <instance_name> backend suffix listdsconf <instance_name> backend suffix listdsconf <instance_name> backend suffix list
dc=example,dc=com (userroot)
Copy to Clipboard Copied! Toggle word wrap Toggle overflow
4.5.2. Deleting a database using the web console
This procedure instructs you how to delete a Directory Server database in a browser.
Prerequisites
- You are logged in to the instance in the web console.
Procedure
- Under Database, select the suffix that you want to delete.
-
Navigate to
. - Select Yes, I am sure..
- Click .
Verification
- Under Database, review the list of suffixes in the configuration tree.
4.6. Performing a database integrity check
The Directory Server database integrity check can detect problems, such as corrupt metadata pages and the sorting of duplicate keys. In case of problems, you can re-index the database or restore a backup.
Use the dsctl dbverify command to verify the integrity of back-end databases.
Procedure
Optional: List the back-end databases of the instance:
dsconf <instance_name> backend suffix list
# dsconf <instance_name> backend suffix list
dc=example,dc=com (userRoot)
Copy to Clipboard Copied! Toggle word wrap Toggle overflow Stop the instance:
dsctl <instance_name> stop
# dsctl <instance_name> stopCopy to Clipboard Copied! Toggle word wrap Toggle overflow Verify the database. For example, to verify the
userRootdatabase, enter:Copy to Clipboard Copied! Toggle word wrap Toggle overflow - If the verification process reported any problems, fix them manually or restore a backup.
Start the instance:
dsctl <instance_name> start
# dsctl <instance_name> startCopy to Clipboard Copied! Toggle word wrap Toggle overflow
4.7. Managing attribute encryption
Directory Server offers a number of mechanisms to secure access to sensitive data in the directory. However, by default, the server stores data unencrypted in the database. For highly sensitive information, the potential risk that an attacker could gain access to the database, can be a significant risk.
The attribute encryption feature enables administrators to store specific attributes with sensitive data, such as government identification numbers, encrypted in the database. When enabled for a suffix, every instance of these attributes, even the index data, is encrypted for every entry stored in this attribute in the database. Note that you can enable attribute encryption for suffixes. To enable this feature for the whole server, you must enable attribute encryption for each suffix on the server. Attribute encryption is fully compatible with eq and pres indexing.
Any attribute you use within the entry distinguished name (DN) cannot be efficiently encrypted. For example, if you have configured to encrypt the uid attribute, the value is encrypted in the entry, but not in the DN:
dn: uid=demo_user,ou=People,dc=example,dc=com
...
uid::Sf04P9nJWGU1qiW9JJCGRg==
dn: uid=demo_user,ou=People,dc=example,dc=com
...
uid::Sf04P9nJWGU1qiW9JJCGRg==4.7.1. Keys Directory Server uses for attribute encryption
To use attribute encryption, you must configure encrypted connections using TLS. Directory Server uses the server’s TLS encryption key and the same PIN input methods for attribute encryption.
The server uses randomly generated symmetric cipher keys to encrypt and decrypt attribute data. The server wraps these keys using the public key from the server’s TLS certificate. As a consequence, the effective strength of the attribute encryption cannot be higher than the strength of the server’s TLS key.
Without access to the server’s private key, it is not possible to recover the symmetric keys from the wrapped copies. Therefore, back up the server’s certificate database regularly. If you lose the key, you will no longer be able to decrypt and encrypt data stored in the database.
4.7.2. Enabling attribute encryption using the command line
This procedure demonstrates how to enable attribute encryption for the telephoneNumber attribute in the userRoot database using the command line. After you perform the procedure, the server stores existing and new values of this attribute AES-encrypted.
Prerequisites
- You have enabled TLS encryption in Directory Server.
Procedure
Export the
userRootdatabase:dsconf <instance_name> backend export -E userRoot
# dsconf <instance_name> backend export -E userRootCopy to Clipboard Copied! Toggle word wrap Toggle overflow The server stores the export in an LDIF file in the
/var/lib/dirsrv/slapd-instance_name/ldif/directory. The-Eoption decrypts attributes that are already encrypted during the export.Enable AES encryption for the
telephoneNumberattribute:dsconf <instance_name> backend attr-encrypt --add-attr telephoneNumber dc=example,dc=com
# dsconf <instance_name> backend attr-encrypt --add-attr telephoneNumber dc=example,dc=comCopy to Clipboard Copied! Toggle word wrap Toggle overflow Stop the instance:
dsctl <instance_name> stop
# dsctl <instance_name> stopCopy to Clipboard Copied! Toggle word wrap Toggle overflow Import the LDIF file:
dsctl <instance_name> ldif2db --encrypted userRoot /var/lib/dirsrv/slapd-instance_name/ldif/None-userroot-2022_01_24_10_28_27.ldif
# dsctl <instance_name> ldif2db --encrypted userRoot /var/lib/dirsrv/slapd-instance_name/ldif/None-userroot-2022_01_24_10_28_27.ldifCopy to Clipboard Copied! Toggle word wrap Toggle overflow The
--encryptedparameter enables the script to encrypt attributes configured for encryption during the import.Start the instance:
dsctl <instance_name> start
# dsctl <instance_name> startCopy to Clipboard Copied! Toggle word wrap Toggle overflow
4.7.3. Enabling attribute encryption using the web console
This procedure demonstrates how to enable attribute encryption for the telephoneNumber attribute in the userRoot database using the web console. After you perform the procedure, the server stores existing and new values of this attribute AES-encrypted.
Note that the export and import features in the web console do not support encrypted attributes. Therefore, you must perform these steps on the command line.
Prerequisites
- You have enabled TLS encryption in Directory Server.
- You are logged in to the instance in the web console.
Procedure
Export the
userRootdatabase:dsconf <instance_name> backend export -E userRoot
# dsconf <instance_name> backend export -E userRootCopy to Clipboard Copied! Toggle word wrap Toggle overflow The server stores the export in an LDIF file in the
/var/lib/dirsrv/slapd-instance_name/ldif/directory. The-Eoption decrypts attributes that are already encrypted during the export.-
In the web console, navigate to
. - Enter the attribute to encrypt, and click .
- In the menu, select Stop Instance.
On the command line, import the LDIF file:
dsctl <instance_name> ldif2db --encrypted userRoot /var/lib/dirsrv/slapd-instance_name/ldif/None-userroot-2022_01_24_10_28_27.ldif
# dsctl <instance_name> ldif2db --encrypted userRoot /var/lib/dirsrv/slapd-instance_name/ldif/None-userroot-2022_01_24_10_28_27.ldifCopy to Clipboard Copied! Toggle word wrap Toggle overflow The
--encryptedparameter enables the script to encrypt attributes configured for encryption during the import.-
In the web console, open the menu, and select
Start Instance.
4.7.4. General considerations after enabling attribute encryption
Consider the following points after you have enabled encryption for data that is already in the database:
Unencrypted data can persist in the server’s database page pool backing file. To remove this data:
Stop the instance:
dsctl <instance_name> stop
# dsctl <instance_name> stopCopy to Clipboard Copied! Toggle word wrap Toggle overflow Remove the
/var/lib/dirsrv/slapd-<instance_name>/db/guardianfile:rm /var/lib/dirsrv/slapd-<instance_name>/db/guardian
# rm /var/lib/dirsrv/slapd-<instance_name>/db/guardianCopy to Clipboard Copied! Toggle word wrap Toggle overflow Start the instance:
dsctl <instance_name> start
# dsctl <instance_name> startCopy to Clipboard Copied! Toggle word wrap Toggle overflow
- After you enabled have encryption and successfully imported the data, delete the LDIF file with the unencrypted data.
- Directory Server does not encrypt the replication log file. To protect this data, store the replication log on an encrypted disk.
- Data in the server’s memory (RAM) is unencrypted and can be temporarily stored in swap partitions. To protect this data, configure encrypted swap space.
Even if you delete files that contain unencrypted data, this data can be restored under certain circumstances.
4.7.5. Updating the TLS certificates used for attribute encryption
Attribute encryption is based on the TLS certificate of the server. Follow this procedure to prevent that attribute encryption fails after renewing or replacing the TLS certificate.
Prerequisites
- You configured attribute encryption.
- The TLS certificate will expire in the near future.
Procedure
Export the
userRootdatabase:dsconf <instance_name> backend export -E userRoot
# dsconf <instance_name> backend export -E userRootCopy to Clipboard Copied! Toggle word wrap Toggle overflow The server stores the export in an LDIF file in the
/var/lib/dirsrv/slapd-instance_name/ldif/directory. The-Eoption decrypts attributes that are already encrypted during the export.Create a private key and a certificate signing request (CSR). Skip this step if you want to create them using an external utility.
If your host is reachable only by one name, enter:
dsctl <instance_name> tls generate-server-cert-csr -s "CN=server.example.com,O=example_organization"
# dsctl <instance_name> tls generate-server-cert-csr -s "CN=server.example.com,O=example_organization"Copy to Clipboard Copied! Toggle word wrap Toggle overflow If your host is reachable by multiple names:
dsctl <instance_name> tls generate-server-cert-csr -s "CN=server.example.com,O=example_organization" server.example.com server.example.net
# dsctl <instance_name> tls generate-server-cert-csr -s "CN=server.example.com,O=example_organization" server.example.com server.example.netCopy to Clipboard Copied! Toggle word wrap Toggle overflow If you specify the host names as the last parameter, the command adds the Subject Alternative Name (SAN) extension with the
DNS:server.example.com, DNS:server.example.netentries to the CSR.
The string specified in the
-s subjectparameter must be a valid subject name according to RFC 1485. TheCNfield in the subject is required, and you must set it to one of the fully-qualified domain names (FQDN) of the server. The command stores the CSR in the/etc/dirsrv/slapd-<instance_name>/Server-Cert.csrfile.- Submit the CSR to the certificate authority (CA) to get a certificate issued. For further details, see your CA’s documentation.
Import the server certificate issued by the CA to the NSS database:
If you created the private key using the
dsctl tls generate-server-cert-csrcommand, enter:dsconf <instance_name> security certificate add --file /root/instance_name.crt --name "server-cert" --primary-cert
# dsconf <instance_name> security certificate add --file /root/instance_name.crt --name "server-cert" --primary-certCopy to Clipboard Copied! Toggle word wrap Toggle overflow Remember the name of the certificate you set in the
--name _certificate_nicknameparameter. You require it in a later step.If you created the private key using an external utility, import the server certificate and the private key:
dsctl <instance_name> tls import-server-key-cert /root/server.crt /root/server.key
# dsctl <instance_name> tls import-server-key-cert /root/server.crt /root/server.keyCopy to Clipboard Copied! Toggle word wrap Toggle overflow Note that the command requires you to specify the path to the server certificate first and then the path to the private key. This method always sets the nickname of the certificate to
Server-Cert.
Import the CA certificate to the NSS database:
dsconf <instance_name> security ca-certificate add --file /root/ca.crt --name "Example CA"
# dsconf <instance_name> security ca-certificate add --file /root/ca.crt --name "Example CA"Copy to Clipboard Copied! Toggle word wrap Toggle overflow Set the trust flags of the CA certificate:
dsconf <instance_name> security ca-certificate set-trust-flags "Example CA" --flags "CT,,"
# dsconf <instance_name> security ca-certificate set-trust-flags "Example CA" --flags "CT,,"Copy to Clipboard Copied! Toggle word wrap Toggle overflow This configures Directory Server to trust the CA for TLS encryption and certificate-based authentication.
Stop the instance:
dsctl <instance_name> stop
# dsctl <instance_name> stopCopy to Clipboard Copied! Toggle word wrap Toggle overflow Edit the
/etc/dirsrv/slapd-<instance_name>/dse.ldiffile, and remove the following entries including their attributes:-
cn=AES,cn=encrypted attribute keys,cn=database_name,cn=ldbm database,cn=plugins,cn=config -
cn=3DES,cn=encrypted attribute keys,cn=database_name,cn=ldbm database,cn=plugins,cn=config
ImportantRemove the entries for all databases. If any entry that contains the
nsSymmetricKeyattribute is left in the `/etc/dirsrv/slapd-<instance_name>/dse.ldif file, Directory Server will fail to start.-
Import the LDIF file:
dsctl <instance_name> ldif2db --encrypted userRoot /var/lib/dirsrv/slapd-instance_name/ldif/None-userroot-2022_01_24_10_28_27.ldif
# dsctl <instance_name> ldif2db --encrypted userRoot /var/lib/dirsrv/slapd-instance_name/ldif/None-userroot-2022_01_24_10_28_27.ldifCopy to Clipboard Copied! Toggle word wrap Toggle overflow The
--encryptedparameter enables the script to encrypt attributes configured for encryption during the import.Start the instance:
dsctl <instance_name> start
# dsctl <instance_name> startCopy to Clipboard Copied! Toggle word wrap Toggle overflow
4.8. Creating and maintaining database links
When a client application requests data from a database link, it retrieves the data from the remote database and returns it to the client. Chaining means that a server contacts other servers on behalf of a client application and then returns the combined results. This chaining process is implemented through a database link.
4.8.1. Creating a new database link
Basic database link configuration requires the following information:
Suffix informationThe suffix information must correspond to the suffix on the remote server that contains the data. You can create suffix in the directory tree managed by the database link.
Bind credentialsWhen the database link binds to a remote server, it impersonates a user, and this specifies the
DNand the credentials for each database link to use to bind with remote servers.LDAP URLThe
LDAP URLinformation provides theLDAP URLof the remote server to which the database link connects. URL consists of the protocol (LDAPorLADPS), the host name or IP address (IPv4orIPv6) for the server, and the port.List of failover serversThe list of failover servers is a list of alternative servers for the database link to contact in the case of a failure and is optional.
If secure binds are required for simple password authentication, using a secure connection (TLS and STARTTLS connections or the SASL authentication) is recommended when any chaining operations are performed .
4.8.2. Creating a New Database Link Using the Command Line
You can create a new database link by using the dsconf chaining link-create command.
Prerequisites
- You have opened the Directory Server user interface in the web console and selected the instance.
Procedure
Create a new database link :
dsconf <instance_name> chaining link-create --suffix="ou=Customers,dc=example,dc=com" --server-url="ldap://remote_server.example.com:389" --bind-mech=SIMPLE --bind-dn="cn=proxy_user,cn=config" --bind-pw="password" "example_chain_name"
# dsconf <instance_name> chaining link-create --suffix="ou=Customers,dc=example,dc=com" --server-url="ldap://remote_server.example.com:389" --bind-mech=SIMPLE --bind-dn="cn=proxy_user,cn=config" --bind-pw="password" "example_chain_name"Copy to Clipboard Copied! Toggle word wrap Toggle overflow
By using this command, you create the database link named example_chain_name for ou=Customers,dc=example,dc=com which refers to the ldap://remote_server.example.com:389 server and uses the specified bind DN and password to authenticate. You must set bind-mech to SIMPLE (EXTERNAL for certificate based authentication) or GSSAPI for kerberos authentication.
- Display additional settings that you can set when you create the database link:
dsconf <instance_name> chaining link-create --help
# dsconf <instance_name> chaining link-create --help
To grant the proxy_user the rights to access data, you must create the proxy ACI entry in the dc=example,dc=com suffix on remote server.
Verification
Display the new database link:
dsconf <instance_name> chaining link-get <example_chain_name>
# dsconf <instance_name> chaining link-get <example_chain_name>Copy to Clipboard Copied! Toggle word wrap Toggle overflow
4.8.3. Creating a New Database Link Using the Web Console
You can create a new database link by using the web console.
Prerequisites
- You have opened the Directory Server user interface in the web console and selected the instance.
Procedure
- Open the Database menu.
Create a new suffix:
- Click button.
-
Enter the
DNsuffix and back end name. - Select Create The Top Suffix Entry and click .
- Select the suffix, click button on the right side, and select Create Database Link.
- Fill the fields with the details about the connection to the remote server.
- Click .
Verification
- Open the Database menu and ensure that the new database link appears in this menu.
4.8.4. Managing the default configuration for new database links
You can manage the default configuration of database links by using the dsconf chaining command.
Procedure
Display the current default values of the database link:
dsconf <instance_name> chaining config-get-def
# dsconf <instance_name> chaining config-get-defCopy to Clipboard Copied! Toggle word wrap Toggle overflow Use the
dsconf chaining config-set-defcommand to change the new database links configuration. For example, to set theresponse-delayparameter to30, run:dsconf <instance_name> chaining config-set-def --response-delay 30
# dsconf <instance_name> chaining config-set-def --response-delay 30Copy to Clipboard Copied! Toggle word wrap Toggle overflow The example command sets the default response timeout for all chaining connections. You can overwrite the response timeout for a specific chaining link by using the
dsconf instance chaining link-setcommand.To see the list of all parameters you can set, run:
dsconf <instance_name> chaining config-set-def --help
# dsconf <instance_name> chaining config-set-def --helpCopy to Clipboard Copied! Toggle word wrap Toggle overflow
4.9. Settings required for creating a database link
When creating a database link, you must configure the suffix, bind credentials, bind mechanisms and LDAP URL settings.
4.9.1. Bind credentials
You can chain request from a client application to remote server by using specific bind credentials. The chained suffix on the remote server must have an ACI that allows proxy authorization to the user. Without bind credentials, a database link binds to the remote server as anonymous.
When you enable chaining, carefully examine access controls to avoid providing access to restricted areas of a directory. For example, a user that connects by using the database link can see all entries below the branch. To restrict access to the subtree when not all subtrees must be visible to the user, create an additional ACI to avoid any security issues.
When a client application creates or modifies entries by using database links, the creatorsName and modifiersName attributes do not reflect the real creator or modifier of the entries. These attributes contain the name of the administrative user granted proxied authorization rights on the remote data server.
Providing bind credentials involves the following steps on the remote server:
-
Creating an administrative user, such as
cn=proxy_user,cn=config, for the database link. - Providing proxy access rights for the administrative user created in the previous step on the target subtree chained by using the database link.
For example, the following ACI grants read-only access to the cn=proxy_admin,cn=config user to access data contained on the remote server only within the subtree where the ACI is set.
aci: (targetattr = "*")(version 3.0; acl "Proxied authorization
     for database links"; allow (proxy) userdn = "ldap:///cn=proxy_admin
     ,cn=config";)
aci: (targetattr = "*")(version 3.0; acl "Proxied authorization
     for database links"; allow (proxy) userdn = "ldap:///cn=proxy_admin
,cn=config";)When a user binds to a database link, the user’s identity is sent to the remote server. Access controls are always evaluated on the remote server. To allow the user to modify or write the data to the remote server, set up the correct access controls on the remote server.
4.9.2. LDAP url
You can identify the remote server that the database link connects with by using LDAP URL on a server containing the database link. The URL of the remote server does not specify a suffix and is in the ldap://host_name:port form.
The remote server uses the LDAPS protocol instead of LDAP in the URL and points to the secure port of the server, when you connect the database link to the remote server by using LDAP over TLS, for example:
ldaps://africa.example.com:636/
ldaps://africa.example.com:636/
You must enable TLS on the local Directory Server and the remote Directory Server to be chained over. When the database link and the remote server communicate by using TLS, the client application that creates operation request can bind by using the normal port and not necessarily use TLS for communication.
4.9.3. Bind mechanisms
You can connect a local server to a remote server either of the following ways:
-
By using a standard
LDAPport. -
By using a dedicated
LDAPSport. -
By using the
STARTTLSconnection, which is more secure connection than a standard port.
If secure binds are required for simple password authentication, using a secure connection (TLS and STARTTLS connections or SASL authentication) is recommended when you perform any chaining operation.
The local server can use following methods to authenticate to the remote server:
EMPTYWhen using the
EMPTYmethod, the local server performs simple authentication and requires a bind DN and a password if bind mechanism is not set.EXTERNALWhen using the
EXTERNALmethod, the local server applies the TLS certificate to authenticate the local server to the remote server. Note that you must either set the local server URL to the secure URL (ldaps) or thensUseStartTLSattribute toon. Additionally, you must configure the remote server to map the local server’s certificate to its bind identity.DIGEST-MD5When using the
DIGEST-MD5method, the local server applies theSASLauthentication with theDIGEST-MD5encryption. Similarly to simple authentication, this type of authentication requires thensMultiplexorBindDNandnsMultiplexorCredentialsattributes to give the bind information.GSSAPIWhen using the
GSSAPImethod, the local server applies theKerberos-basedauthentication over theSASLauthentication.You can configure the local server with a
Kerberoskeytab, and the remote server must configure a definedSASLmapping for the local server’s bind identity.
SASL connections can establish over standard connections or TLS connections. You can configure local server to chain the SASL and password policy components when SASL is used.
4.10. Configuring the chaining policy
You can configure Directory Server to chain requests from client applications to Directory Server containing database links. Chaining policy applies to all database links created on Directory Server.
4.10.1. Chaining component operations
A component is any functional unit in the server that uses internal operations, for example, a plug-in or function in the front end.
Some components send internal LDAP requests to the server, expecting to access local data only. For such components, you must control the chaining policy so that the components can complete there operations successfully. For example, the certificate verification function. You can chain the LDAP request made by the function to check certificates that implies the remote server is trusted. If the remote server is not trusted, then there is a security problem.
By default, you cannot chain all the internal operations and any component, but the default can be overridden.
Additionally, you must create an ACI on the remote server to enable the specified plug-in to perform its operation on the remote server. The ACI must exist in the suffix assigned to database link.
The following are component names, their potential side-effects of when you allow these components to chain internal operations, and the permissions the components need in the ACI on the remote server:
The
ACI plug-incomponentThe
ACI plug-incomponent implements access control. You cannot chain operations used to retrieve and updateACIattributes because it not safe to mix the local and the remote attributes. However, you can chain requests used to retrieve user entries by setting the following chaining components attribute:nsActiveChainingComponents: cn=ACI Plugin,cn=plugins,cn=config
nsActiveChainingComponents: cn=ACI Plugin,cn=plugins,cn=configCopy to Clipboard Copied! Toggle word wrap Toggle overflow Permissions: Read, search, and compare.
The
resource limitcomponentThe
resource limitscomponent sets server limits depending on the user bind DN. If you chain the resource limitation component, you can apply resource limits on the remote users. To chain resource limit component operations, add the following chaining component attribute:nsActiveChainingComponents: cn=resource limits,cn=components,cn=config
nsActiveChainingComponents: cn=resource limits,cn=components,cn=configCopy to Clipboard Copied! Toggle word wrap Toggle overflow Permissions: Read, search, and compare.
The
certificate-based authenticationcomponentYou can use the
certificate-based authenticationcomponent during the external bind method.This component retrieves user certificates from the database on the remote server. When you allow this component to chain, it enables certificate-based authentication to work with the database link. To chain this component’s operations, add the following chaining component attribute:nsActiveChainingComponents: cn=certificate-based authentication,cn=components,cn=config
nsActiveChainingComponents: cn=certificate-based authentication,cn=components,cn=configCopy to Clipboard Copied! Toggle word wrap Toggle overflow Permissions: Read, search, and compare.
The
password policycomponentThe
password policycomponent addsSASLbinds to the remote server. Authenticating with a user name and password is essential for some forms of SASL authentication. When you enable the password policy, it allows the server to verify and implement the specific authentication method requested and to apply the appropriate password policies. To chain this component’s operations, add the chaining component attribute:nsActiveChainingComponents: cn=password policy,cn=components,cn=config
nsActiveChainingComponents: cn=password policy,cn=components,cn=configCopy to Clipboard Copied! Toggle word wrap Toggle overflow Permissions: Read, search, and compare.
The
SASLcomponentThe
SASLcomponent allows SASL to bind to the remote server. To chain this component’s operations, add the chaining component attribute:nsActiveChainingComponents: cn=password policy,cn=components,cn=config
nsActiveChainingComponents: cn=password policy,cn=components,cn=configCopy to Clipboard Copied! Toggle word wrap Toggle overflow Permissions: Read, search, and compare.
The
referential integrity postoperationcomponentThe
referential integrity postoperationcomponent propagates updates made to attributes containing DNs to the entries that contain pointers to the attributes. For example, you can automatically remove an entry from a group when group is deleted. By using thereferential integrity postoperationplug-in together with the chaining simplifies the management of static group when the group members are remote to the static group definition.nsActiveChainingComponents: cn=referential integrity postoperation,cn=plugins,cn=config
nsActiveChainingComponents: cn=referential integrity postoperation,cn=plugins,cn=configCopy to Clipboard Copied! Toggle word wrap Toggle overflow Permissions: Read, search, and compare.
The
attribute UniquenesscomponentThe
attribute Uniquenesscomponent validates that all the values for a specified attribute are unique. When you chain the plug-in, it confirms that attribute values are unique even when attributes are changed through a database link. To chain this component’s operations, add the chaining component attribute:nsActiveChainingComponents: cn=attribute uniqueness,cn=plugins,cn=config
nsActiveChainingComponents: cn=attribute uniqueness,cn=plugins,cn=configCopy to Clipboard Copied! Toggle word wrap Toggle overflow Permissions: Read, search, and compare.
The
rolescomponentThe
rolescomponent chains the roles and roles assignments for the entries in a database. When you chain this component, it maintains the roles even on chained databases. To chain this component’s operations, addthe chaining component attribute:nsActiveChainingComponents: cn=roles,cn=components,cn=config
nsActiveChainingComponents: cn=roles,cn=components,cn=configCopy to Clipboard Copied! Toggle word wrap Toggle overflow Permissions: Read, search, and compare.
You cannot chain Roles plug-in, Password policy component, Replication plug-in, and Referential Integrity plug-in components. When you enable the Referential Integrity plug-in on servers that issue chaining requests, ensure that you analyzed the performance, resource, time, and integrity needs. Not that integrity checks can be time-consuming and draining on memory and CPU.
4.10.2. Chaining component operations using the command line
You can add a component allowed to chain by using the command line:
Procedure
Specify the components to include in chaining:
dsconf <instance_name> chaining config-set \ --add-comp="cn=referential integrity postoperation,cn=components,cn=config"
# dsconf <instance_name> chaining config-set \ --add-comp="cn=referential integrity postoperation,cn=components,cn=config"Copy to Clipboard Copied! Toggle word wrap Toggle overflow Restart the instance:
dsctl <instance_name> restart
# dsctl <instance_name> restartCopy to Clipboard Copied! Toggle word wrap Toggle overflow Create an ACI in the suffix on the remote server to which the operation will be chained:
Copy to Clipboard Copied! Toggle word wrap Toggle overflow
Verification
Display the components allowed to chain:
dsconf <instance_name> chaining config-set \ --add-comp="cn=referential integrity postoperation,cn=components,cn=config"
# dsconf <instance_name> chaining config-set \ --add-comp="cn=referential integrity postoperation,cn=components,cn=config"Copy to Clipboard Copied! Toggle word wrap Toggle overflow
4.10.3. Chaining component operations using the web console
You can add a component allowed to chain by using the web console:
Prerequisites
- You have opened the Directory Server user interface in the web console and selected the instance.
Procedure
- Open the Database menu.
- In the navigation on the left, select the Chaining Configuration entry.
- Click the button below the components to Chain field.
- Select the component that you want to chain, and click .
Create ACI in the suffix on the remote server to which the operation will be chained:
Copy to Clipboard Copied! Toggle word wrap Toggle overflow
Verification
- Selected component should be chained .
4.11. Chaining LDAP controls
LDAP operations can contains some data (named control and specified in the ldap protocol) that change their behavior. You can specify which LDAP controls to forward to the remote server.
4.11.1. About chaining LDAP controls
The database link forwards requests containing the following controls to the remote server for chaining LDAP controls:
-
The
Virtual List View (VLV)control provides lists of certain entries. -
The
Server-side sortingcontrol categorizes entries according to their attribute values, usually by using a specific matching rule. -
The
Dereferencingcontrol pulls specified attribute information from the referenced entry and returns this information with the rest of the search results. -
The
Managed DSAcontrols returns smart referrals as entries, rather than following these referrals. Therefore, a smart referral itself can be changed or deleted. -
The
Loop detectioncontrol tracks how many times a server chains with another server. When the count reaches the configured number,Loop detectiondetects a loop and notifies the client application.
Database links cannot support Server-side sorting and VLV controls when a client application makes a request to multiple databases.
The following are some of the LDAP controls that are allowed to chain and their object identifiers (OID):
| Control Name | OID |
|---|---|
| Virtual list view (VLV) | 2.16.840.1.113730.3.4.9 |
| Server-side sorting | 1.2.840.113556.1.4.473 |
| Managed DSA | 2.16.840.1.113730.3.4.2 |
| Loop detection | 1.3.6.1.4.1.1466.29539.12 |
| Dereferencing searches | 1.3.6.1.4.1.4203.666.5.16 |
4.11.2. Chaining LDAP controls using the command line
You can chain LDAP controls by using dsconf chaining config-set --add-control in the command line.
Procedure
Chain
LDAPcontrols:dsconf <instance_name> chaining \ config-set --add-control="2.16.840.1.113730.3.4.9"
# dsconf <instance_name> chaining \ config-set --add-control="2.16.840.1.113730.3.4.9"Copy to Clipboard Copied! Toggle word wrap Toggle overflow Add the object identifier (OID) of the custom control if clients of Directory Server create their own controls and chain there operations to remote servers.
4.11.3. Chaining LDAP controls using the web console
You can chain LDAP controls by using the web console.
Prerequisites
- You have opened the Directory Server user interface in the web console and selected the instance.
Procedure
- Open the Database menu.
- Select the Chaining Configuration entry.
- Click button below the Forwarded LDAP Controls field.
Select the LDAP control and click button.
Add the object identifier (OID) of the custom control if clients of Directory Server create their own controls and chain there operations to remote servers.
- Click button.
Verification
- Click the Database menu and ensure that the selected LDAP control is chained.
4.12. Database links and access control evaluation
When a user binds to a server containing a database link, the database link sends the user’s identity to the remote server. You can evaluate access control on the remote server.
You can evaluate the LDAP operation on the remote server by using the original identity of the client application passed by using the proxied authorization control.
You must have the correct access controls on the subtree present on the remote server for the operations to succeed on the remote server.
You can add usual access controls to the remote server with the following restrictions:
- You cannot use all types of access control. For example, role-based or filter-based ACIs need access to the user entry, because the data is accessed through database links.
- Remote server views the client application in the same IP address and DNS domain as the database link. Because the original domain of the client is lost during chaining, all access controls based on the IP address or DNS domain of the client cannot work.
Directory Server supports both IPv4 and IPv6 IP addresses.
The following restrictions apply to the ACIs used with database links:
- You must locate ACIs with any groups they use. For the dynamic groups, all users in the group are located with the ACI and the group. For the static group, user links to remote server.
- You must locate ACIs with any role definitions they use and with any users who intend to use these roles.
- ACIs that link to values of a user’s entry must work when the user is remote.
Though evaluation of access controls is always done on the remote server, access controls can also be evaluated on both the server containing the database link and the remote server. This poses the following several limitations:
- When you evaluate the access control, for example, on the server containing the database link and when the entry is located on a remote server, the contents of user entries are not necessarily available.
For performance reasons, clients cannot perform remote inquiries and evaluate access controls.
- When you perform modify operation, the database link does not have access to the full entry stored on the remote server and necessarily does not have access to the entries being modified by the client application.
-
When you perform delete operation, the database link is only aware of the entry’s
DN. If an access control specifies a particular attribute, then delete operation must fail when conducted through a database link.
By default, evaluation of access controls on the server containing the database link is not allowed. You can override this default setting by using the nsCheckLocalACI attribute in the cn=database_link, cn=chaining database, cn=plugins, and cn=config entry. However, evaluating access controls on the server containing the database link is not recommended except for cascading chaining.