Chapter 1. Enabling TLS-encrypted connections to Directory Server
By default, Red Hat Directory Server provides the LDAP service without encryption. To improve the security, you can configure TLS in Directory Server to enable your clients or other hosts in a replication environment to use encrypted connections. They can then use the STARTTLS command on port 389 or the LDAPS protocol on port 636 for secure connections.
You can use TLS with simple authentication using a bind Distinguished Name (DN) and password, or using certificate-based authentication.
Directory Server’s cryptographic services are provided by Mozilla network security services (NSS), a library of TLS and base cryptographic functions. NSS includes a software-based cryptographic token which is Federal Information Processing Standard (FIPS) 140-2 certified.
1.1. The different options for encrypted connections to Directory Server
To connect to Directory Server with an encrypted connection, you can use the following protocols and framework:
- LDAPS
-
When you use the LDAPS protocol, the connection starts using encryption and either succeeds or fails. However, no unencrypted data is ever sent over the network. For this reason, prefer LDAPS instead of using
STARTTLSover unencrypted LDAP. - STARTTLS over LDAP
Clients establish an unencrypted connection over the LDAP protocol and then send the
STARTTLScommand. If the command succeeds, all further communication is encrypted.WarningIf the
STARTTLScommand fails and the client does not cancel the connection, all further data, including authentication information, is sent unencrypted over the network.- SASL
- The Simple Authentication and Security Layer (SASL) framework enables you to authenticate a user using external authentication methods, such as Kerberos.
1.2. How Directory Server unlocks the NSS database
Directory Server stores certificate signing requests (CSR), private keys, and certificates in a network security services (NSS) database. When you install a new instance, the installer automatically creates the NSS database and protects it with a random password. The installer stores this password in the following files:
-
/etc/dirsrv/slapd-instance_name/pwdfile.txt: Thedsconf tlscommand uses this file to access the NSS database. /etc/dirsrv/slapd-instance_name/pin.txt: This file contains the token and password to automatically unlock the NSS database when Directory Server starts.- If you want Directory Server to prompt for the NSS database password each time you start the instance, remove this file.
- If you want the instance to start automatically without prompting for the password, keep this file and update it when you change the NSS database password.
If the /etc/dirsrv/slapd-instance_name/pin.txt file does not exist, you start Directory Server with encryption enabled and set a password on the NSS database, the the behavior is as follows:
If the
systemctlordsctlutilities start thens-slapdDirectory Server process, thesystemdservice prompts for the password and automatically passes the input to thesystemd-tty-ask-password-agentutility:# dsctl instance_name start Enter PIN for Internal (Software) Token: (press TAB for no echo)In rare cases, when the
ns-slapdDirectory Server process is not started by thesystemctlordsctlutilities, and the process is detached from the terminal,ns-slapdsends a message to all terminals using thewallcommand:Broadcast message from root@server (Fri 2021-01-01 06:00:00 CET): Password entry required for 'Enter PIN for Internal (Software) Token:' (PID 1234). Please enter password with the systemd-tty-ask-password-agent tool!To enter the password:
# systemd-tty-ask-password-agent
Enter PIN for Internal (Software) Token:
1.3. Enabling TLS-encrypted connections to Directory Server using the command line
To use TLS encryption or certificate-based authentication, you must manage the certificates in a network security services (NSS) database. When you created the instance, the dscreate utility automatically created this database in the /etc/dirsrv/slapd-instance_name/ directory and protected it with a strong password.
Procedure
Create a private key and a certificate signing request (CSR). Skip this step if you want to create them using an external utility.
If your host is reachable only by one name, enter:
# dsctl instance_name tls generate-server-cert-csr -s "CN=server.example.com,O=example_organization"If your host is reachable by multiple names:
# dsctl instance_name tls generate-server-cert-csr -s "CN=server.example.com,O=example_organization" server.example.com server.example.netIf you specify the host names as the last parameter, the command adds the Subject Alternative Name (SAN) extension with the
DNS:server.example.com, DNS:server.example.netentries to the CSR.
The string specified in the
-s subjectparameter must be a valid subject name according to RFC 1485. TheCNfield in the subject is required, and you must set it to one of the fully-qualified domain names (FQDN) of the server. The command stores the CSR in the/etc/dirsrv/slapd-instance_name/Server-Cert.csrfile.- Submit the CSR to the certificate authority (CA) to get a certificate issued. For further details, see your CA’s documentation.
Import the server certificate issued by the CA to the NSS database:
If you created the private key using the
dsctl tls generate-server-cert-csrcommand, enter:# dsconf -D "cn=Directory Manager" ldap://server.example.com security certificate add --file /root/instance_name.crt --name "server-cert" --primary-certRemember the name of the certificate you set in the
--name _certificate_nicknameparameter. You require it in a later step.If you created the private key using an external utility, import the server certificate and the private key:
# dsctl instance_name tls import-server-key-cert /root/server.crt /root/server.keyNote that the command requires you to specify the path to the server certificate first and then the path to the private key. This method always sets the nickname of the certificate to
Server-Cert.
Import the CA certificate to the NSS database:
# dsconf -D "cn=Directory Manager" ldap://server.example.com security ca-certificate add --file /root/ca.crt --name "Example CA"Set the trust flags of the CA certificate:
# dsconf -D "cn=Directory Manager" ldap://server.example.com security ca-certificate set-trust-flags "Example CA" --flags "CT,,"This configures Directory Server to trust the CA for TLS encryption and certificate-based authentication.
Enable TLS and set the LDAPS port:
# dsconf -D "cn=Directory Manager" ldap://server.example.com config replace nsslapd-securePort=636 nsslapd-security=onOpen the LDAPS port in the
firewalldservice:# firewall-cmd --permanent --add-port=636/tcp # firewall-cmd --reloadEnable the RSA cipher family, set the NSS database security device, and the server certificate name:
# dsconf -D "cn=Directory Manager" ldap://server.example.com security rsa set --tls-allow-rsa-certificates on --nss-token "internal (software)" --nss-cert-name Server-CertBy default, the name of the security device in the NSS database is
internal (software).Optional: Disable the plain text LDAP port:
# dsconf inst security disable_plain_portRestart the instance
# dsctl instance_name restart
Verification
Establish a connection to Directory Server using the LDAPS protocol. For example, run a query:
# ldapsearch -H ldaps://server.example.com:636 -D "cn=Directory Manager" -W -b "dc=example,dc=com" -x -s baseIf the command fails, with an
ldap_sasl_bind(SIMPLE): Can’t contact LDAP server (-1)error, re-run the command with debug level 1:# ldapsearch -H ldaps://server.example.com:636 -D "cn=Directory Manager" -W -b "dc=example,dc=com" -x -s base -d 1
1.4. Enabling TLS-encrypted connections to Directory Server using the web console
You can configure TLS encryption using the web console.
Prerequisites
- You are logged in to the instance in the web console.
Procedure
-
Navigate to
, and click . Set a name for certificate signing request (CSR), common name (CN), and organization (O):
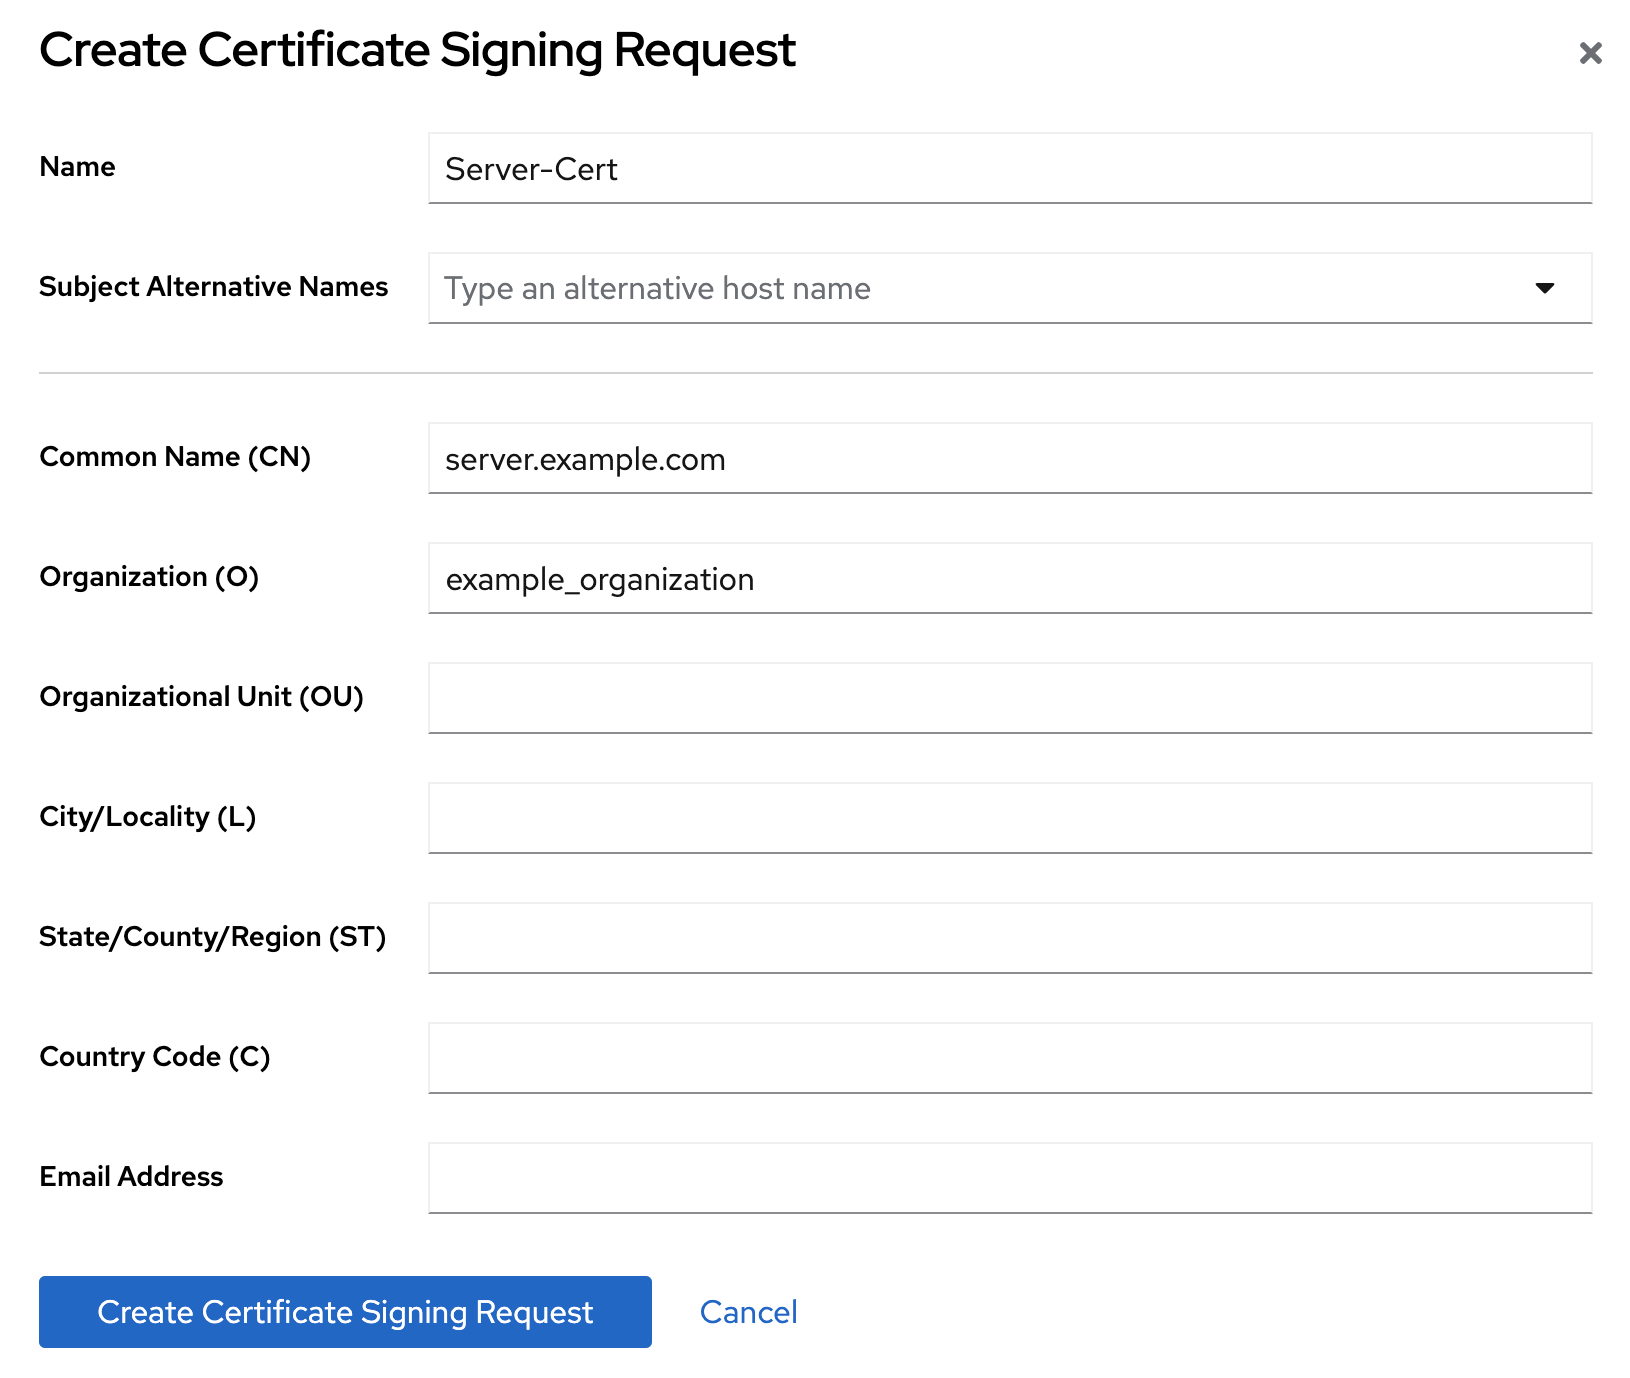
If your host is reachable by multiple names, set the alternative names in the Subject Alternative Names filed.
- Click .
View the CSR text and copy it:
- Click Node options icon for the CSR you want to view and select View CSR.
- Copy the CSR content.
- Submit the CSR file to the certificate authority (CA) to get a certificate issued. For further details, see your CA’s documentation.
-
When you get the certificate from your CA, navigate to
, and click . Set a unique nickname for the server certificate, upload the issued certificate, and click .
Remember the certificate nickname, because a later step requires it.
-
Navigate to
, and click . - Set a unique nickname for the CA certificate, upload the CA certificate file, and click .
Optional: If you did not enable TLS encryption during the Directory Server instance installation, enable it:
-
Navigate to
, and enable the security switch. - On the pop-up window, click .
- Click on the Security Setting page.
-
Navigate to
Configure the Server Certificate Name on the Security Configuration page:
-
Navigate to
. - Select the server certificate nickname in the Server Certificate Name drop-down list, and click .
- Optional: If you do not see the certificate nickname in the drop-down list, refresh the Security Settings page and perform the previous step again.
-
Navigate to
-
Optional: If you want to use an LDAPS port other than
636, navigate to the, set the LDAPS port, and click . Open the LDAPS port in the
firewalldservice:# firewall-cmd --permanent --add-port=636/tcp # firewall-cmd --reloadOptional: Navigate to
, check Require Secure Connections checkbox, and click . Directory Server disables the plain text LDAP port.
- Click in the top right corner, and select Restart Instance.
1.5. Managing how Directory Server behaves if the certificate has expired
By default, if encryption is enabled and the certificate has expired, Directory Server logs a warning and the service starts. To change this behavior, set the nsslapd-validate-cert parameter. You can set it to the following values:
-
warn: Directory Server starts and logs a warning about the expired certificate into the/var/log/dirsrv/slapd-instance_name/errorlog file. This is the default setting. -
on: Directory Server validates the certificate. If the certificate has expired, the instance fails to start. -
off: Directory Server does not validate the certificate expiration date. The instance starts and no warning will be logged.
Prerequisites
- You configured TLS encryption.
Procedure
Use the following command to change the
nsslapd-validate-certparameter:# dsconf -D "cn=Directory Manager" ldap://server.example.com config replace nsslapd-validate-cert=<value>
1.6. Changing the password of the NSS database
You can change the password of the network security services (NSS) database. For example, change it when the password becomes known to unauthorized persons.
Prerequisites
You know the current NSS database password.
If you use a password file to automatically unlock the database when Directory Server starts, the password is stored non-encrypted in plain text in the
/etc/dirsrv/slapd-instance_name/pin.txtfile.
Procedure
Use the following command to change the NSS database password:
# certutil -d /etc/dirsrv/slapd-instance_name/ -W
Enter Password or Pin for "NSS Certificate DB":
Enter a password which will be used to encrypt your keys.
The password should be at least 8 characters long,
and should contain at least one non-alphabetic character.

Enter new password:
Re-enter password:
Password changed successfully.
If you use a password file to start Directory Server automatically without prompting for the NSS database password, replace the old password with the new one in the
/etc/dirsrv/slapd-instance_name/pin.txt:If you use the NSS software cryptography module, which is the default:
Internal (Software) Token:passwordIf you use a Hardware Security Module (HSM):
name_of_the_token:password
Verification
Perform an operation on the NSS database that requires entering the password. For example, list the private keys of your instance:
# certutil -d /etc/dirsrv/slapd-instance_name/ -K
certutil: Checking token "NSS Certificate DB" in slot "NSS User Private Key and Certificate Services"
Enter Password or Pin for "NSS Certificate DB":
< 0> rsa      72cb03f87381abfbb6b9e78234e2e4502ad1bfc0   NSS Certificate DB:Server-Cert
If the command displays the expected output after you entered the new password, changing the password was successful.
1.7. Creating a password file to start an instance without being prompted for the NSS database password
When you create a new instance, the installer automatically creates the /etc/dirsrv/slapd-instance_name/pin.txt file to enable Directory Server to start without prompting for the network security services (NSS) password. However, if you remove this file, you can recreate it.
The password is stored in plain text. Do not use a password file if the server is running in an unsecured environment.
Prerequisites
- You know the NSS database password.
Procedure
Create the
/etc/dirsrv/slapd-instance_name/pin.txtfile with the following content:If you use the NSS software cryptography module, which is the default:
Internal (Software) Token:passwordIf you use a Hardware Security Module (HSM):
name_of_the_token:password
Set the file permissions:
# chown dirsrv:root /etc/dirsrv/slapd-instance_name/pin.txt
# chmod 400 /etc/dirsrv/slapd-instance_name/pin.txt
Verification
Restart the instance:
# dsctl instance_name restartIf the system does not prompt for the NSS database password, Directory Server uses the password file.
1.8. Adding the CA certificate used by Directory Server to the trust store of Red Hat Enterprise Linux
When you enable TLS encryption in Directory Server, you configure the instance to use a certificate issued by a CA. If a client now establishes a connection to the server using the LDAPS protocol or the STARTTLS command over LDAP, Directory Server uses this certificate to encrypt the connection. Client utilities use the CA certificate to verify if the server’s certificate is valid. By default, these utilities cancel the connection if they do not trust the certificate of the server.
Example 1.1. Possible connection errors if client utilities do not use the CA certificate
dsconf# dsconf -D "cn=Directory Manager" ldaps://server.example.com:636 config get Error: {'desc': "Can't contact LDAP server", 'info': 'error:1416F086:SSL routines:tls_process_server_certificate:certificate verify failed (self signed certificate in certificate chain)'}ldapsearch# ldapsearch -H ldaps://server.example.com:636 -D "cn=Directory Manager" -W -b "dc=example,dc=com" -x Enter LDAP Password: ldap_sasl_bind(SIMPLE): Can't contact LDAP server (-1)
To enable client utilities on Red Hat Enterprise Linux to verify the certificate Directory Server uses, add the CA certificate to the trust store of the operating system.
Prerequisites
You know the password of the network security services (NSS) database.
If you still use the password that was generated during the installation of the Directory Server instance, you find this password in plain text in the
/etc/dirsrv/slapd-instance_name/pwdfile.txtfile.
Procedure
If you do not have a local copy of the CA certificate used by Directory Server:
List the certificates in the server’s network security services (NSS) database:
# certutil -d /etc/dirsrv/slapd-instance_name/ -L

Certificate Nickname                       Trust Attributes
                                           SSL,S/MIME,JAR/XPI

Example CA                                 C,,
Server-Cert                                u,u,u
Use the nickname of the CA certificate in the NSS database to export the CA certificate:
# certutil -d /etc/dirsrv/slapd-instance_name/ -L -n "Example CA" -a > /tmp/ds-ca.crt
Copy the CA certificate to the
/etc/pki/ca-trust/source/anchors/directory:# cp /tmp/ds-ca.crt /etc/pki/ca-trust/source/anchors/Rebuild the CA trust database:
# update-ca-trust
Verification
Establish a connection to Directory Server using the LDAPS protocol. For example, run a query:
# ldapsearch -H ldaps://server.example.com:636 -D "cn=Directory Manager" -W -b "dc=example,dc=com" -x -s base