Questo contenuto non è disponibile nella lingua selezionata.
Chapter 11. Configuring authentication with a certificate stored on the desktop of an IdM client
By configuring Identity Management (IdM), IdM system administrators can enable users to authenticate to the IdM web UI and command-line interface (CLI) using a certificate that a Certificate Authority (CA) has issued to the users. The certificate is stored on the desktop of an IdM client.
The web browser can run on a system that is not part of the IdM domain.
Note the following while configuring authentication with a certificate:
- you can skip Requesting a new user certificate and exporting it to the client if the user you want to authenticate using a certificate already has a certificate;
- you can skip Making sure the certificate and user are linked together if the user’s certificate has been issued by the IdM CA.
Only Identity Management users can log into the web UI using a certificate. Active Directory users can log in with their user name and password.
11.1. Configuring the Identity Management Server for Certificate Authentication in the Web UI
As an Identity Management (IdM) administrator, you can allow users to use certificates to authenticate to your IdM environment.
Procedure
As the Identity Management administrator:
On an Identity Management server, obtain administrator privileges and create a shell script to configure the server.
Run the
ipa-advise config-server-for-smart-card-authcommand, and save its output to a file, for exampleserver_certificate_script.sh:kinit admin ipa-advise config-server-for-smart-card-auth > server_certificate_script.sh
# kinit admin
# ipa-advise config-server-for-smart-card-auth > server_certificate_script.sh
Copy to Clipboard Copied! Toggle word wrap Toggle overflow Add execute permissions to the file using the
chmodutility:chmod +x server_certificate_script.sh
# chmod +x server_certificate_script.shCopy to Clipboard Copied! Toggle word wrap Toggle overflow
On all the servers in the Identity Management domain, run the
server_certificate_script.shscriptwith the path of the IdM Certificate Authority certificate,
/etc/ipa/ca.crt, as input if the IdM CA is the only certificate authority that has issued the certificates of the users you want to enable certificate authentication for:./server_certificate_script.sh /etc/ipa/ca.crt
# ./server_certificate_script.sh /etc/ipa/ca.crtCopy to Clipboard Copied! Toggle word wrap Toggle overflow with the paths leading to the relevant CA certificates as input if different external CAs signed the certificates of the users who you want to enable certificate authentication for:
./server_certificate_script.sh /tmp/ca1.pem /tmp/ca2.pem
# ./server_certificate_script.sh /tmp/ca1.pem /tmp/ca2.pemCopy to Clipboard Copied! Toggle word wrap Toggle overflow
Do not forget to run the script on each new replica that you add to the system in the future if you want to have certificate authentication for users enabled in the whole topology.
11.2. Requesting a new user certificate and exporting it to the client
As an Identity Management (IdM) administrator, you can create certificates for users in your IdM environment and export them to the IdM clients on which you want to enable certificate authentication for users.
You do not need to follow this procedure if the user you want to authenticate using a certificate already has a certificate.
Procedure
Optional: Create a new directory, for example
~/certdb/, and make it a temporary certificate database. When asked, create an NSS Certificate DB password to encrypt the keys to the certificate to be generated in a subsequent step:Copy to Clipboard Copied! Toggle word wrap Toggle overflow Create the certificate signing request (CSR) and redirect the output to a file. For example, to create a CSR with the name
certificate_request.csrfor a4096bit certificate for theidm_useruser in theIDM.EXAMPLE.COMrealm, setting the nickname of the certificate private keys toidm_userfor easy findability, and setting the subject toCN=idm_user,O=IDM.EXAMPLE.COM:certutil -R -d ~/certdb/ -a -g 4096 -n idm_user -s "CN=idm_user,O=IDM.EXAMPLE.COM" > certificate_request.csr
# certutil -R -d ~/certdb/ -a -g 4096 -n idm_user -s "CN=idm_user,O=IDM.EXAMPLE.COM" > certificate_request.csrCopy to Clipboard Copied! Toggle word wrap Toggle overflow When prompted, enter the same password that you entered when using
certutilto create the temporary database. Then continue typing randomly until told to stop:Copy to Clipboard Copied! Toggle word wrap Toggle overflow Submit the certificate request file to the server. Specify the Kerberos principal to associate with the newly-issued certificate, the output file to store the certificate, and optionally the certificate profile. For example, to obtain a certificate of the
IECUserRolesprofile, a profile with added user roles extension, for theidm_user@IDM.EXAMPLE.COMprincipal, and save it in the~/idm_user.pemfile:ipa cert-request certificate_request.csr --principal=idm_user@IDM.EXAMPLE.COM --profile-id=IECUserRoles --certificate-out=~/idm_user.pem
# ipa cert-request certificate_request.csr --principal=idm_user@IDM.EXAMPLE.COM --profile-id=IECUserRoles --certificate-out=~/idm_user.pemCopy to Clipboard Copied! Toggle word wrap Toggle overflow Add the certificate to the NSS database. Use the
-noption to set the same nickname that you used when creating the CSR previously so that the certificate matches the private key in the NSS database. The-toption sets the trust level. For details, see the certutil(1) man page. The-ioption specifies the input certificate file. For example, to add to the NSS database a certificate with theidm_usernickname that is stored in the~/idm_user.pemfile in the~/certdb/database:certutil -A -d ~/certdb/ -n idm_user -t "P,," -i ~/idm_user.pem
# certutil -A -d ~/certdb/ -n idm_user -t "P,," -i ~/idm_user.pemCopy to Clipboard Copied! Toggle word wrap Toggle overflow Verify that the key in the NSS database does not show
(orphan)as its nickname. For example, to verify that the certificate stored in the~/certdb/database is not orphaned:certutil -K -d ~/certdb/ < 0> rsa 5ad14d41463b87a095b1896cf0068ccc467df395 NSS Certificate DB:idm_user
# certutil -K -d ~/certdb/
< 0> rsa      5ad14d41463b87a095b1896cf0068ccc467df395   NSS Certificate DB:idm_user
Copy to Clipboard Copied! Toggle word wrap Toggle overflow Use the
pk12utilcommand to export the certificate from the NSS database to the PKCS12 format. For example, to export the certificate with theidm_usernickname from the/root/certdbNSS database into the~/idm_user.p12file:pk12util -d ~/certdb -o ~/idm_user.p12 -n idm_user Enter Password or Pin for "NSS Certificate DB": Enter password for PKCS12 file: Re-enter password: pk12util: PKCS12 EXPORT SUCCESSFUL
# pk12util -d ~/certdb -o ~/idm_user.p12 -n idm_user
Enter Password or Pin for "NSS Certificate DB":
Enter password for PKCS12 file:
Re-enter password:
pk12util: PKCS12 EXPORT SUCCESSFUL
Copy to Clipboard Copied! Toggle word wrap Toggle overflow Transfer the certificate to the host on which you want the certificate authentication for
idm_userto be enabled:scp ~/idm_user.p12 idm_user@client.idm.example.com:/home/idm_user/
# scp ~/idm_user.p12 idm_user@client.idm.example.com:/home/idm_user/Copy to Clipboard Copied! Toggle word wrap Toggle overflow On the host to which the certificate has been transferred, make the directory in which the .pkcs12 file is stored inaccessible to the 'other' group for security reasons:
chmod o-rwx /home/idm_user/
# chmod o-rwx /home/idm_user/Copy to Clipboard Copied! Toggle word wrap Toggle overflow For security reasons, remove the temporary NSS database and the .pkcs12 file from the server:
rm ~/certdb/
rm ~/idm_user.p12
# rm ~/certdb/
# rm ~/idm_user.p12
Copy to Clipboard Copied! Toggle word wrap Toggle overflow
11.3. Making sure the certificate and user are linked together
You do not need to follow this procedure if the user’s certificate has been issued by the IdM CA.
For certificate authentication to work, you need to make sure that the certificate is linked to the user that will use it to authenticate to Identity Management (IdM).
- If the certificate is provided by a Certificate Authority that is not part of your Identity Management environment, link the user and the certificate following the procedure described in Linking User Accounts to Certificates.
- If the certificate is provided by Identity Management CA, the certificate is already automatically added in the user entry and you do not have to link the certificate to the user account. For details on creating a new certificate in IdM, see Requesting a new user certificate and exporting it to the client.
11.4. Configuring a browser to enable certificate authentication
To be able to authenticate with a certificate when using the WebUI to log into Identity Management (IdM), you need to import the user and the relevant certificate authority (CA) certificates into the Mozilla Firefox or Google Chrome browser. The host itself on which the browser is running does not have to be part of the IdM domain.
IdM supports the following browsers for connecting to the WebUI:
- Mozilla Firefox 38 and later
- Google Chrome 46 and later
The following procedure shows how to configure the Mozilla Firefox 57.0.1 browser.
Prerequisites
- You have the user certificate that you want to import to the browser at your disposal in the PKCS#12 format.
Procedure
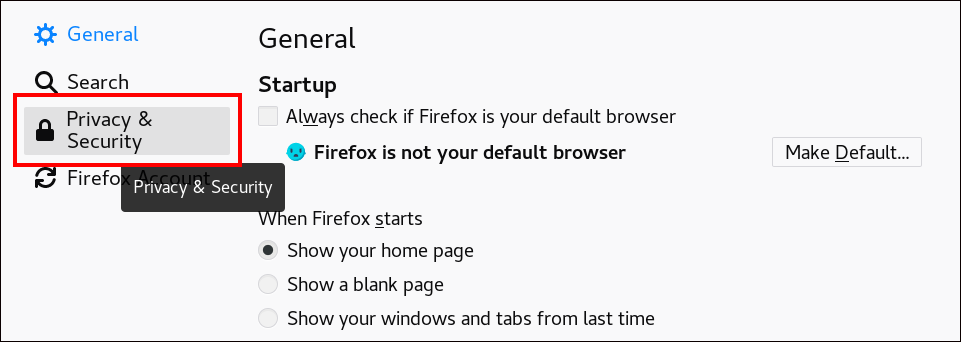
Open Firefox, then navigate to
PreferencesPrivacy & Security.Figure 11.1. Privacy and Security section in Preferences
Click .
Figure 11.2. View Certificates in Privacy and Security
-
In the
Your Certificatestab, click . Locate and open the certificate of the user in the PKCS12 format, then click and . Make sure that the Identity Management Certificate Authority is recognized by Firefox as a trusted authority:
Save the IdM CA certificate locally:
Navigate to the IdM web UI by writing the name of your IdM server in the Firefox address bar. Click
Advancedon the Insecure Connection warning page.Figure 11.3. Insecure Connection
Add Exception. ClickView.Figure 11.4. View the Details of a Certificate
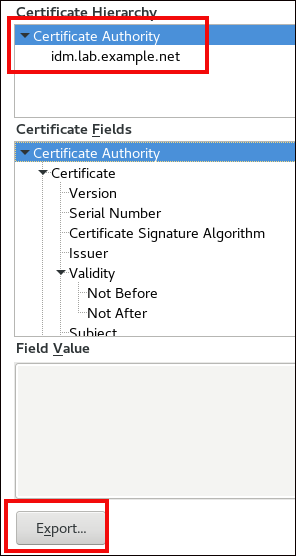
In the
Detailstab, highlight theCertificate Authorityfields.Figure 11.5. Exporting the CA Certificate
-
Click . Save the CA certificate, for example as the
CertificateAuthority.crtfile, then click , and .
Import the IdM CA certificate to Firefox as a trusted certificate authority certificate:
Open Firefox, navigate to Preferences and click .
Figure 11.6. Privacy and Security section in Preferences
Click .
Figure 11.7. View Certificates in Privacy and Security
-
In the
Authoritiestab, click . Locate and open the CA certificate that you saved in the previous step in theCertificateAuthority.crtfile. Trust the certificate to identify websites, then click and .
- Continue to Authenticating to the Identity Management Web UI with a Certificate as an Identity Management User.
11.5. Authenticating to the Identity Management Web UI with a Certificate as an Identity Management User
Follow this procedure to authenticate as a user to the Identity Management (IdM) web UI using a certificate stored on the desktop of an Identity Management client.
Procedure
-
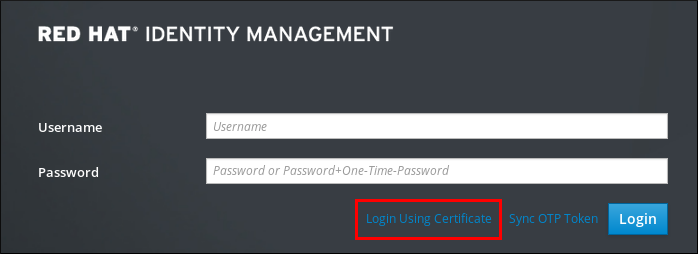
In the browser, navigate to the Identity Management web UI at, for example,
https://server.idm.example.com/ipa/ui. Click .
Figure 11.8. in the Identity Management web UI
- The user’s certificate should already be selected. Uncheck , then click .
You are now authenticated as the user who corresponds to the certificate.
11.6. Configuring an IdM client to enable authenticating to the CLI using a certificate
To make certificate authentication work for an IdM user in the Command Line Interface (CLI) of your IdM client, import the IdM user’s certificate and the private key to the IdM client. For details on creating and transferring the user certificate, see Requesting a new user certificate and exporting it to the client.
Procedure
Log into the IdM client and have the .p12 file containing the user’s certificate and the private key ready. To obtain and cache the Kerberos ticket granting ticket (TGT), run the
kinitcommand with the user’s principal, using the-Xoption with theX509_username:/path/to/file.p12attribute to specify where to find the user’s X509 identity information. For example, to obtain the TGT foridm_userusing the user’s identity information stored in the~/idm_user.p12file:kinit -X X509_idm_user='PKCS12:~/idm_user.p12' idm_user
$ kinit -X X509_idm_user='PKCS12:~/idm_user.p12' idm_userCopy to Clipboard Copied! Toggle word wrap Toggle overflow NoteThe command also supports the .pem file format: kinit -X X509_username='FILE:/path/to/cert.pem,/path/to/key' user_principal


